basket tote - bearcreekquiltingcompany.com · basket tote body piece cut 1 on fold (as marked) for...
TRANSCRIPT

QTfabrics.com | ©QT Fabrics | All rights reserved Pg 1
APPROXIMATE SIZE: 16" wide at the top x 11" tall (not including handles)
Desig
ned
by: C
arol
ine
Fairb
anks
-Crit
chfie
ldBasket ToteFEATURING SWEET CAROLINE
Be on-trend for spring with a beautiful flower-covered basket tote!
This spacious bag has two interior pockets and a magnetic snap. The center panel is quilted and features piping details. Don't leave off the piping... It adds a professional touch and hides any mistakes!
Visit www.sewcanshe.com/blog/2017 /2 /16/basket-tote-free-sewing-pattern to see lots of step-by-step photos.

Pg 2QTfabrics.com | ©QT Fabrics | All rights reserved
Basket ToteDe
signe
d by
: Car
olin
e Fa
irban
ks-C
ritch
field
Approxmiate Finished Size: 16” wide at the top x 11” tall (not including handles)
26989 B Bag Lining
1 / 2 YA R D1 B O LT
Numbers within gray box = Number of Bolts needed to make 12 Kits
26987 Q Main Exterior
1 / 2 YA R D1 B O LT
26994 Q Piping
1 / 2 YA R D1 B O LT
26992 K Coordinating Exterior
1 / 2 YA R D1 B O LT
26994 C Handles and Binding
1 / 2 YA R D1 B O LT S
FABRIC REQUIREMENTS
• 1 magnetic snap closure• 1/2 to 1 yard flexible foam stabilizer such as ByAnnies (1/2 yard if 60" wide, 1 yard if only 20" wide)
• 2 yards 3/16" cording for the piping• fabric marking pen • Wonderclips
A D D I T I O N A L M AT E R I A L S N E E D E D

Pg 3QTfabrics.com | ©QT Fabrics | All rights reserved
Desig
ned
by: C
arol
ine
Fairb
anks
-Crit
chfie
ldBasket Tote
We recommend that you carefully read through all instructions before getting started on your project.
CUTTINGPrint and assemble the pattern pieces found at the end of this document. Make sure to print at 100% scale.
Fabric A (main exterior)• 1 on the fold from the Basket Tote Body pattern
piece (as marked)
Fabric B (coordinating exterior)• 2 from the Basket Tote Side pattern piece
Fabric C (piping)• Enough 1½" bias strips to piece together 2 pieces
1½" x 28" for making the piping (cut on the bias)
Fabric D (handles and binding)• 4 strips 2½" x 23" long for the handles• Enough 2½" bias strips to make a 2½" x 40" binding
piece (cut on the bias—see the diagram below)
Note: The piping and binding strips must be cut on the bias because of the curves on this bag.
Fabric E (bag lining)• 2 from the Basket Tote Body pattern piece
(as marked)• 1 rectangle 9½" x 13"• 2 from the Basket Tote Side pattern piece
Flexible Foam Stabilizer• 1 on the fold from the Basket Tote Body pattern
piece (as marked)• 2 from the Basket Tote Side pattern piece• 2 strips 2½" x 23" long for the handles
MAKE THE HANDLES1. Place two 2½" x 23" handle strips right side together. Stack on top of a 2½" x 23" strip of flexible foam stabilizer. Pin together.
2. Sew all the way around the handle with a ¼" seam allowance. Leave about 4" open for turning. The opening should be at least 4" away from one end.
3. Clip the corners. Turn the handle right side out through the opening. Press gently. Press the raw edges at the opening to the inside.
4. Pinch the handle to fold it in half down the middle, tucking any loose fabric inside. Clip the strap together, starting 3" from one end and placing clips along the whole strap to mark 3" from both ends.
5. Starting at the clip that is 3" from one end, sew the handle together about ⅛" from the edge. Finish sewing at the clip that marks 3" from the other end. Make sure to backstitch at the start and finish.
6. Repeat to make one more handle with the remaining strips.
MAKE THE QUILTED EXTERIOR PANEL1. Pin and sew the exterior fabric pieces to the matching pieces of stabilizer. Baste them together around all sides, about ⅛"-¼" from the edge.
2. After attaching the stabilizer, quilt the exterior body piece as desired.

Pg 4QTfabrics.com | ©QT Fabrics | All rights reserved
3. Make and attach the piping to the side pieces:
Wrap a 1½" bias cut strip around the piping cord and baste close to the cord using your sewing machine’s zipper foot. Then attach a piece of piping around the sides and bottom of each side piece, sewing right on top of the previous basting (still using the zipper foot).
As you attach the piping, you should be sewing about ⅜" from the edge. Make clips into the piping seam allowance to help it curve nicely around the corners.
Repeat to sew piping on the other curved side piece.
4. Trim the piping even with the top of the side pieces. Then use your fingers or tweezers to pull some of the cording out and trim away ½". Smooth the piping out again so that the end of the cording is about ½" lower than the top edge. Repeat this at both ends, and again on the other side piece. This will help you to have less bulk to sew over when attaching the binding in the very last step.
ASSEMBLE THE TOTE EXTERIOR1. Fold the main body piece in half to find the center. Use the fabric marking pen to mark the center on both sides. This will be the bottom of the bag.
2. Fold the side pieces in half lengthwise and mark the center at the bottom of each.
3. Match the center of one side with the center of the tote body piece, right sides together. Starting at the bottom center marks, use Wonderclips to attach the bag side and body together. Cut small clips into the bag body piece to help it curve around the side piece.
4. Sew the body and side together with the side piece on the bottom and sewing on the previous basting line that attached the piping to the side piece.
Tip: Use your zipper foot again so you can sew close to the piping. After sewing these two together, if you can see the piping basting stitches from the right side, it’s okay to sew the seam again, trying to get even closer to the cording.
Repeat steps 3-4 to attach the other side to the bag. Press the seams open as much as you can.
5. Pin a handle to one side of the bag with the ends of the handle about 3" below the top edge. Place the handles about ¾" inside the piping.
6. Sew the handle to the tote bag by topstitching around the bottom of the handle. Make sure that your stitching begins and ends at least 1" away from the top edge of the bag. This is so the handle will fold away from the top edge when you attach the binding.
Repeat to sew the other handle to the other side of the bag.

Pg 5QTfabrics.com | ©QT Fabrics | All rights reserved
ASSEMBLE THE LINING1. Sew the lining pieces with a curved edge and the 9½" x 13" rectangle together with the rectangle in the middle to make a long strip with curved ends. Use a ⅜" seam allowance. Press the seams open.
2. Fold the lining piece (wrong sides together) along one of the seams–either one, it doesn’t matter which. Press. Topstitch ⅛" from the folded edge.
This will be the top edge of the pocket.
3. Place the topstitched edge of the pocket about 1¼" below the curved edge that it is closest to. This makes a pleat that is about 6" deep. Pin the sides of the pleat.
The actual depth of the pocket may vary a little bit. Check to make sure it is correct by folding the piece in half with the curved edges together. Adjust the pocket until both sides are the same height, with the remaining seam at the bottom.
4. Baste the sides of the pleat together about ¼" from the edge.
5. Divide the big pocket into two by marking a vertical line down the center with a ruler and fabric marking pen. Then stitch along the line from the topstitched edge down to the bottom of the pocket (make sure to backstitch at the start and end).
6. Mark the bottom center of the lining side pieces. Pin and stitch the sides of the lining to the pocket piece the same way as the exterior, using a ⅜" seam allowance. The marking at the bottom center of the side should match the seam at the bottom of the pocket piece.
For this step, I like to use pins placed right along the seam line (not perpendicular to it). This helps to make it fit. Don't forget to cut clips into the straight edge of the pocket piece as you pin it around the corners.
Press the seams open.
7. Attach the snap pieces to the lining now, centered on either side of the lining pocket panel, 1¼" below the top edge. See how I attach magnetic snap pieces (including how to use interfacing to make them sturdy) in this tutorial: https://www.sewcanshe.com/blog/2017/2/6/sew-a-tote-bag-and-hostess-apron-from-1-yard-of-fabric-one-yard-magic-pattern-from-lecien
FINISH SEWING THE BASKET TOTE1. Place the lining inside the exterior, wrong sides together. Match up the seams and pin around the top. Baste the lining to the exterior, sewing ¼" from the top edge all the way around.
2. Fold the 2½" x 40" bias strip in half lengthwise and press.
3. Pin or clip the raw edges of the bias strip against the top inside edge of the bag. Leave about 6" open with long ends of binding free at either end.
Stitch the binding to the bag with a scant ⅜" seam allowance.

Pg 6QTfabrics.com | ©QT Fabrics | All rights reserved
After sewing most of the binding on, pin or clip the free ends until they meet. Place a pin at the point where they should be sewn together. Unclip the binding and seam the ends together where you marked them with a pin. Trim away the extra binding, finger press the seam open, and then pin and sew it in place.
4. Wrap the binding around to the outside of the bag. Pin or clip it in place about every 2" all the way around.
Tip: Pin the sides through all layers about 2" below the edge to prevent the lining from creeping up.
5. Topstitch the binding down close to the folded edge.
All done! I would love to see your bags so please tag me on Instagram @SewCanShe!
Please note: All rights to this pattern and instructions belong to Caroline Fairbanks-Critchfield. But I do grant you permission to sew and sell as many totes as you want (provided that you made them yourself). Thank you!
While all possible care has been taken to ensure the accuracy of this pattern, we are not responsible for printing errors or the way in which individual work varies.
Bask
et T
ote
Side
Pie
ce
Cut
2 fo
r ext
erio
r and
2 fo
r lin
ing
Plac
e th
is li
ne o
n th
e fo
ld fo
r the
ext
erio
r bod
y pi
ece
Cut
her
e fo
r 2 li
ning
bod
y pi
eces
Bask
et T
ote
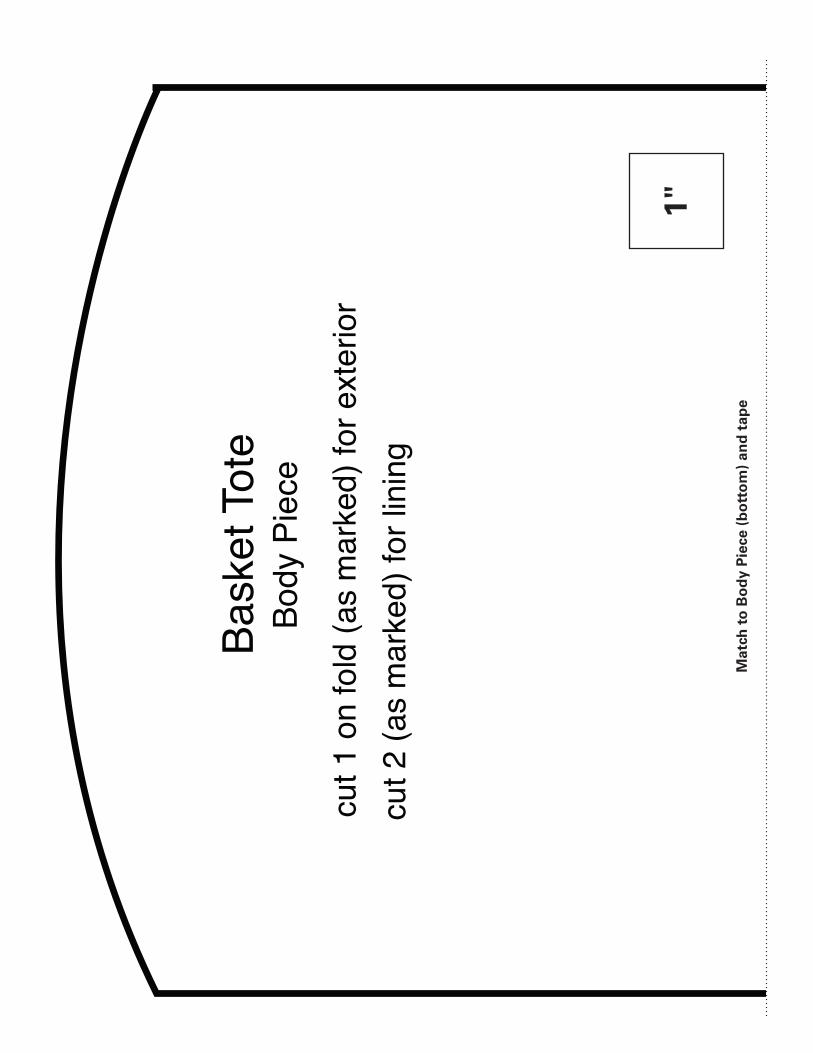
Body
Pie
cecu
t 1 o
n fo
ld (a
s m
arke
d) fo
r ext
erio
rcu
t 2 (a
s m
arke
d) fo
r lin
ing
Mat
ch t
o B
od
y P
iece
(b
ott
om
) an
d t
ape
1"

Bask
et T
ote
Side
Pie
ce
Cut
2 fo
r ext
erio
r and
2 fo
r lin
ing
Plac
e th
is li
ne o
n th
e fo
ld fo
r the
ext
erio
r bod
y pi
ece
Cut
her
e fo
r 2 li
ning
bod
y pi
eces
Bask
et T
ote
Body
Pie
cecu
t 1 o
n fo
ld (a
s m
arke
d) fo
r ext
erio
rcu
t 2 (a
s m
arke
d) fo
r lin
ing
Mat
ch t
o B
od
y P
iece
(to
p)
and
tap
e
1"

Bask
et T
ote
Side
Pie
ce
Cut
2 fo
r ext
erio
r and
2 fo
r lin
ing
Plac
e th
is li
ne o
n th
e fo
ld fo
r the
ext
erio
r bod
y pi
ece
Cut
her
e fo
r 2 li
ning
bod
y pi
eces
Bask
et T
ote
Body
Pie
cecu
t 1 o
n fo
ld (a
s m
arke
d) fo
r ext
erio
rcu
t 2 (a
s m
arke
d) fo
r lin
ing
Mat
ch t
o S
ide
Pie
ce (
bo
tto
m)
and
tap
e
1"

Bask
et T
ote
Side
Pie
ce
Cut
2 fo
r ext
erio
r and
2 fo
r lin
ing
Plac
e th
is li
ne o
n th
e fo
ld fo
r the
ext
erio
r bod
y pi
ece
Cut
her
e fo
r 2 li
ning
bod
y pi
eces
Bask
et T
ote
Body
Pie
cecu
t 1 o
n fo
ld (a
s m
arke
d) fo
r ext
erio
rcu
t 2 (a
s m
arke
d) fo
r lin
ing
Mat
ch t
o S
ide
Pie
ce (
top
) an
d t
ape
1"