basemaps guide - vasab.org
TRANSCRIPT

BASEMAPS GUIDEDETAILED INSTRUCTIONS ON HOW TO USE BASEMAPSS
Version 3 – April 2020

2|
Table of Contents 3What is BASEMAPS?
MSP input
MSP output
Admin panel
Admin panel MSP input
Frequently Asked Questions
719
374958
Contact info and credits
29
Admin panel MSP output
59Since BASEMAPS is still under development, some content of this guide might be slightly different on basemaps.helcom.fi( February 2020)

3|
What is BASEMAPS? BASEMAPS is a map service to access Baltic Sea maritime spatial planning (MSP) data and plans.
The story of BASEMAPS (BAltic SEa MAP Service) dates back to 2012 when a project called BaltSeaPlanrecommended building a tool to access Baltic Sea decentralized MSP data based on Marine Spatial Data Infrastructure (MSDI).
Back then, planners realized there was a need to work with transboundary and up-to-date data that was reliable to make their own national MSP plans.
Working with regional centralized databases was (and still probably is) the best option to get harmonized data from data providers.
However, these centralized databases do not guarantee that the data is up to date. Planners needed a solution to get
data published and maintained by the original official source.
That solution is called BASEMAPS. It was developed by HELCOM under the Interreg funded Baltic LINes project (2016-2019).
BASEMAPS allows users to view and download data/metadata published by national data providers through OGCopen geospatial standards—WMS and WFS. It is also possible to access downloadable services and ArcGIS REST Map layers.
During the project PanBalticScope(2017-2019) it was developed further to view harmonized MSP plans—MSP output data.
It is aimed for planners, data providers and authorities dealing with maritime spatial planning in the Baltic Sea.
https://basemaps.helcom.fi/

4|
BASEMAPS is organized in four parts:
1. The banner
2. The input / output data buttons
3. The layer list
4. The map viewer
BASEMAPS structure

5|
The banner
• Admin: Password protected administration panel where data providers can add and edit services. The administration rights are given by HELCOM.
• About: links to the manual
• BASEMAPS: link to the map service (basemaps.helcom.fi). It is used to refresh the window if needed. The HELCOM logo links to the HELCOM webpage.
• Logos: the funding programmes. BASEMAPS was developed during the Interreg funded project BaklticLINes. The output data part was made under PanBaltcScope.

6|
Input and output dataInput and output data are the terms used to differentiate between data to create plans and the plans.
MSP input data opens by default and includes various thematic data layers which have been considered relevant for MSP purposes.
It contains both national data harvested from national data providers (when available) as well as centralized dataset provided by HELCOM or other international organizations.
MSP planners can use input data if they want to access transboundary data.
MSP output data, on the other hand, contains national MSP plans harmonized according to HELCOM‐VASAB guidelines on transboundary MSP output data structure.
These plans were created based on various input data. MSP planners can use output data to check what other countries in the Baltic Sea have already planned.

MSP input

8|
Layer list
All services are stored in the layer list. The layer list is divided in thematic categories that are relevant for MSP. There are a couple of buttons to help users navigate through all categories:
Collapse layer list: it closes all the opened categories. This is useful if users have opened a lot of them and want to return to the original state.
Hide all layers: it hides all the layers that users have activated. It is useful if they have activated many layers and want to see an empty map.

9|
Categories
A tree is opened by clicking on the cross button .
Most root categories, the ones users see when BASEMAPS is opened, contain subcategories as in the case of Administrative borders.
When users open those subcategories they see the countries or organizations that have provided data to BASEMAPS.
HELCOM data contains links to services from its centralized and harmonized database. It is useful in case there are gaps in the data.
10|
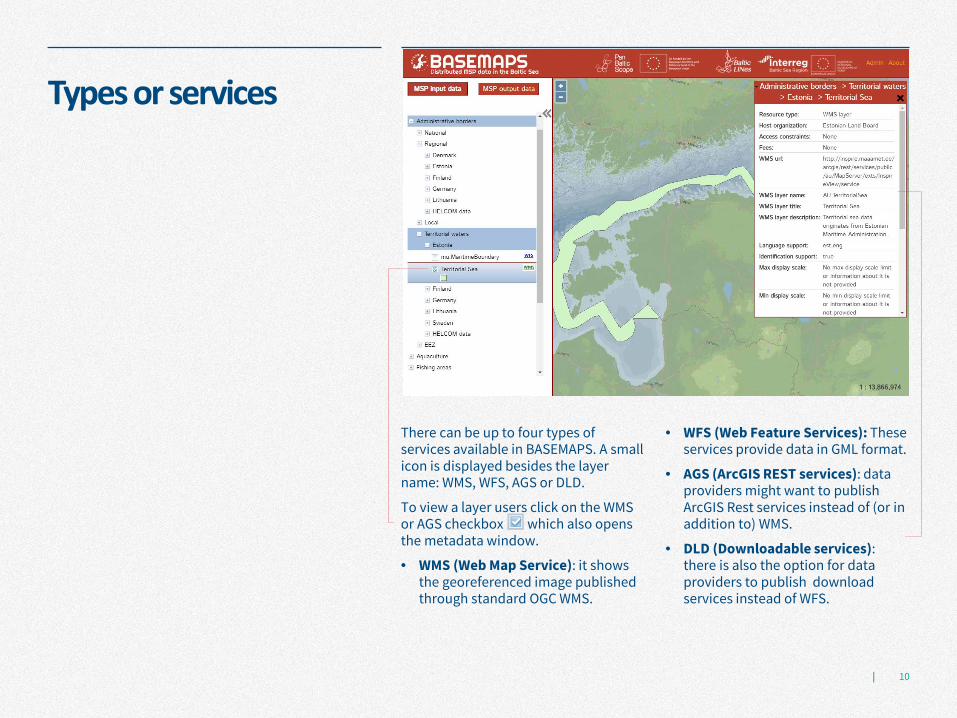
Types or services
There can be up to four types of services available in BASEMAPS. A small icon is displayed besides the layer name: WMS, WFS, AGS or DLD.
To view a layer users click on the WMS or AGS checkbox which also opens the metadata window.
• WMS (Web Map Service): it shows the georeferenced image published through standard OGC WMS.
• WFS (Web Feature Services): These services provide data in GML format.
• AGS (ArcGIS REST services): data providers might want to publish ArcGIS Rest services instead of (or in addition to) WMS.
• DLD (Downloadable services): there is also the option for data providers to publish download services instead of WFS.

11|
Metadata Metadata information comes from WMS/WFS GetCapabilities and contains the following information:
Type of service (WMS, WFS, AGS or DLD)Data providerAny kind of rights restrictionsPossible fees to access dataLink to the layer’s link. To view GetCapabilities in browser users must paste the URL and add this string at the end: ?request=GetCapabilities&service=WMS
Name of layer as the data provider has published it in BASEMAPSTitle of layer
A short description of layer
All languages supported by the service
(Only for WMS) If true users can click on the map and get information(Only for WMS) Above this scale the layer will not be displayed
(Only for WMS) Below this scale the layer will not be displayed
Link to metadata. It may come from GetCapabilities or be provided by data provider

12|
Tag translation
Some data providers publish data in their original language which makes it difficult to understand for users from other countries.
Therefore, some tags in the metadata are automatically translated by BASEMAPS. They are displayed in underlined blue text:
• Access constraints
• Fees
• WMS layer name
• WMS layer description
When the user hovers over the translated tag a small window shows the original text.
Translation provided by Microsoft Bing translator services

13|
Legend (only for WMS and AGS)
The legend of the layer is available only for WMS and AGS and it is below the layer name. It comes from the provided GetCapabilities.

14|
Identification (only for WMS)
Users can click on the displayed layer to see its attributes.
A pop-up window will display all features’ attributes. When the list of attributes is long users can scroll it down using the scroll bar.
The pop-up window can be closed either by clicking on the cross on the top-right corner or clicking somewhere else on the screen.
The displayed information may be in national language.

15|
WFS
To get the data from WFS services users click on the checkbox corresponding to that service.
No layer is displayed. Instead, users get data by clicking on the link in the metadata window “Get features of WFS feature type”
The metadata is similar to WMS. Only the fields about identification and scale are missing.
Downloading can be time-consuming depending on the size of the layer and the speed of internet connection.

16|
ArcGIS REST services
BASEMAPS allows users to view ArcGIS REST mapserver layers. Data providers might want to publish this type of services if WMS services are not available.
The metadata contains:
• Resource type: to check that it is a REST service.
• ArcGIS MapServer url: link to the REST url.
• Metadata format: the format can be HTML or XLM.
• URL: link to metadata.

17|
Download services
Data providers might want to publish download services in addition to (or instead of) WFS. Download services contain a link to the layer usually as zip file.
BASEMAPS does not display the layer when clicking on the checkbox. Instead, a link is provided to download the file.
The metadata contains:
• Resource type: to check that it is a REST service.
• Downloadable resource url: link to the REST URL.
• Metadata format: the format can be HTML or XLM.
• URL: link to metadata.

18|
Map viewer
The map viewer shows a map in Lambert projection where all layers are displayed.
There are three elements to help users view data:
• Collapse tree to close the tree categories and make the map bigger.
• Zoom buttons to zoom in and out. Also the wheel mouse is supported.
• Scale: some layers have scale restrictions so users can check here and in the layer’s metadata in case they are not displayed.
The maximum scale is almost 1:450.000.000 and the minimum 1:2.

MSP output

20|
Users click on MSP output data to access the MSP plans.
Note that BASEMAPS uses copies of the data. The official datasets are available in services in each country.
MSP output data is divided in three categories:
• Plan area: status of each MSP plan per country.
• View Planned Sea Uses: Detail of each area by its sea use and type (for example, to check if an area is prioritized for military or forbidden for fishing).
• With Query Planned Sea Uses: users can check the detail of each sea use and type.

21|
Plan Area
In Plan Area users can see the status of each MSP plan per country.
There are four different categories:
• In force: The plan is already adopted and legally binding or active.
• Elaboration phase: The decision of starting the plan has been taken and officially announced.
• Preparation for elaboration: There is no official decision to elaborate the plan yet, but the legislation is in place and/or preparatory work for MSP has been launched.
• Obsolete: The plan has been substituted by another plan, or is not any longer in force.

22|
The details of each plan can be found when clicking on the area.
Information like the title of the plan in its native language, the responsible authority and the regulation nature are shown in the pop-up window.

23|
Planned Sea Uses
The detail of each MSP is shown in View Planned Sea Uses. It shows which countries have areas with these sea uses types:
• Priority: planned sea use with a certain priority.
• Reserved: sea use which is to be given specific weight in relation to others.
• Allowed: planned sea use which is allowed.
• Restricted: planned sea use with some kind of restriction.
• Forbidden: planned sea use which is forbidden.
Users can switch on and off each sea use type to have an overview of that particular use in all MSP plans.
Then, users can view which sea uses are associated to those planned sea uses types.

24|
Query Planned Sea Use
Query Planned Sea Uses allows users to ask more complex questions to the data. For example: How many MSP areas are prioritized as nature conservation? Or, are there any forbidden areas for diving?
The queries are done by each sea use type (priority, reserved, allowed, restricted and forbidden). There is also the possibility to query all sea use types at the same time clicking on All Sea Use Types.

25|
Query Planned Sea Uses has useful tools to view the data:
• Expand all: It opens all the sub categories under sea uses.
• Collapse all: It closes all sub categories.
• Hide all: If there are many datasets displayed, this tool hides them all.
• Zoom to: It zooms to the selected area.

26|
Query Planned Sea Use—All Sea use Types
This panel allows users to query all sea uses regardless its type.
For example, users can view all nature and fishing areas. The border colour of each area means the use type type(priority, reserved, allowed, restricted and forbidden).

27|
By clicking on the layers, users can view the information of overlapped areas. The info of those areas is displayed by clicking on Next or Previous.

28|
Query Planned Sea Use—use types
All data can be queried by each sea use type which allows users to ask questions such as what priority areas are assigned to nature and installations?

Admin panel

30|
Administration panel All data and users rights are managed in the password protected admin panel
The admin panel was designed to allow users with specific rights to add, edit and delete layers in BASEMAPS.
Users can have admin or provider rights.
Users with admin rights have full control to add or delete all layers. They can also add users with providers rights.
Users with provider rights have permission over the categories they administer. Usually, providers add data from their own countries or institutions.

31|
The administration panel allows data providers to add and edit layers to BASEMAPS.
Users can access the administration panel through the Admin button.

32|
To access the administration panel an account must be created by HELCOM. If users need one they should contact: [email protected]
Login details will be submitted by request.

33|
Admin panel structure
The admin panel is divided in four parts:
• Management of users, input and output data
• Basic operations (only for input data)
• Layer list
• Edit panel

34|
Users rights—only for administrators
The Users button allows administrators to add, view, update and delete accounts.
There are two kinds of accounts:
• Admin: These accounts have full control over all layers. They can add and delete accounts. They can also add, update and delete layers in all categories.
• Provider: These accounts have rights to add and update layers only in the categories assigned by the administrators.

35|
Users with admin rights can:
• Add new users
• Change password of all users
• Update information of all users
• Delete accounts

36|
Administrators can give rights to certain categories by using the Add user button . This allows data providers to edit, add or delete datasets only in their own countries.
When clicking on the Add user button the information about users with rights is shown on the right.
To add a new provider administrator click on Add new and select it from the list. Providers accounts are previously added in the Users button (see previous page).
Administrators can also delete the permissions to access a category.
1
2

Admin panel MSP input

38|
Basic operations
Admin and data providers can do basic operations:
• Add root category: This is done in case a new main category needs to be added (only with admin rights).
• Refresh layer list: Users can refresh the layer list after adding or deleting one category to see the changes.
• View services summary : a report is created with a summary of all available services in BASEMAPS divided in categories (only with admin rights).
• Validate service: It validates all services in all categories (only with admin rights).

39|
In Add root category administrators can add a new main category by adding:
• Label: the name of the category, for example, Installations.
• HELCOM id: added only by HELCOM.
• Metadata URL: to be added if there is metadata for that category.
• Metadata format: it can be HTML, XML or plain text.

40|
Layer list
In the layer list users see four buttons when hovering over a category:
• View or edit: to view or edit the category.
• Add user: give a user right to edit the category (only with admin rights)..
• Move the category up.
• Move the category down.

41|
Add subcategory
To add a subcategory users click on the button and then on Add new under Subcategories.
Users add the label and the rest of required parameters as in Add root category in page 39.

42|
Add service
To add a service users select first the category where they want to add it and click on View or edit .
The next step is to click on Add new under WMS layers, WFS feature types, Downloadable resources or ArcGIS MapServers layers

43|
Enter the service link without the request=GetCapabilities (string before the interrogation mark)
1
2
3
Click on Validate. A message “WMS is valid” will appear. If users get “WMS not valid” the service did not pass validation. Providers should contact their IT department for support.
If the service passed validation, a new input field shows up with the layer names as in the GetCapabilities file (only for WMS and WFS services).
Type the name of the layer as it appears in GetCapabilities or other appropriate name.
The field HELCOM id is filled in only by HELCOM if necessary.
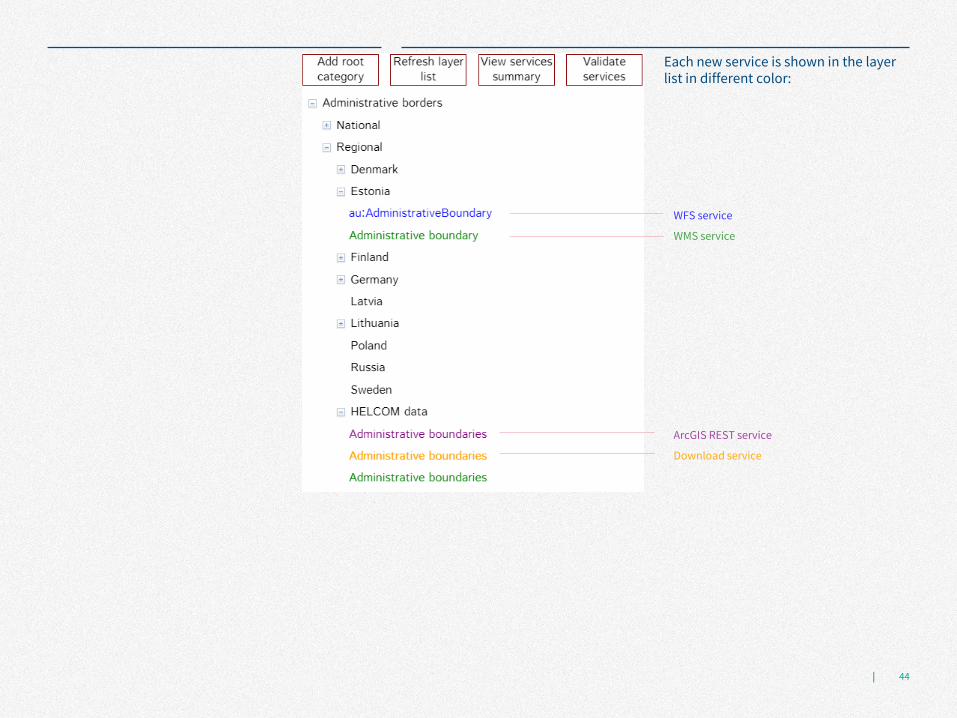
44|
Each new service is shown in the layer list in different color:
WFS service
WMS service
ArcGIS REST service
Download service

45|
Edit service
To edit a WMS service click on Add or edit .
The edit panel on the right will show info about the service and the metadata. The WMS GetCapabilitiesinfo shows all info from the service.
Editing a service allows to:
• Edit the label that users see in the layer list (see next page).
• Edit or add HELCOM id. Used only by HELCOM.
• Add new or delete the existing metadata.
To replace the WMS service with a new one users will need to delete it and create another (see pages 42 and 43).

46|
Click on the edit button in the edit panel.
Change or correct the label and then click on Save. To undo, click cancel.
1
2

47|
Delete service
To delete a service click on
Click then on Delete this WMS.

48|
Alternatively, the service can be deleted by clicking on the edit buttons of each category .
An edit and delete button is available for each service.

Admin panel MSP output

50|
MSP outputHow to validate and upload data—summary
Click on
Before uploading, follow the rules to validate data (next page)
Shapefile WFS
Click on
Click on
If there are errors in file correct them and validate again
Click on
If there are errors in service correct them and validate again
Select Select
Paste link
If there are no errors click on If there are no errors click on

51|
MSP output - validation rules For shapefiles and WFS. Users must be sure data is valid before uploading
Shapefile: Data in ZIP file.WFS: Data should be in valid WFS.
Shapefile: ZIP contains shapefile. These file extensions are allowed: shp, shx, dbf, sbn, sbx, fbn, fbx, ain, aih, atx, ixs, mxs, prj, xml, cpg.WFS: WFS feature types should be valid.
Spatial reference should be defined.
Dataset should be with polygon geometry.
priority, reserved, allowed, restricted, forbidden, useDsc, PlanIDfields should be present in the dataset.
Empty geometries should not be included.
At least 1 of 5 fields (priority, reserved, allowed, restricted, forbidden) should have a value.
priority, reserved, allowed, restricted, forbidden fields should have value(s) according to SeaUse code list: multiple comma separated values are allowed.
If forbidden field has a value, then priority, reserved, allowed, restricted fields should not have that value.
If restricted field has a value, then priority, reserved, allowed, forbidden fields should not have that value.
PlanID field should have a value.
1 2
3 4 5
6 7 8 9 10 11
File validation
Datasetvalidation
Featurevalidation
ZIP

52|
MSP outputHow to validate and upload data—detailed process
The MSP output button allows users with appropriate rights to upload MSP plans data to BASEMAPS.
Users can upload shapefiles or data through OGC WFS services
Before uploading, users must be sure that the data is in the right format following the commonly agreed validation rules.

53|
MSP output—validatingand uploadingshapefiles
Once the users click on I will validate archive with Shapefile(s), they click on Choose file to browse and select the dataset.
12

54|
The shapefiles contained in the zip files are displayed and then the user clicks on Validate. This process checks if the shapefiles meets all the rules.

55|
After a few moments, the validation process ends and a detail report is displayed. If the ZIP file contains several shapefiles, the report shows which ones passed validation and which ones failed.
The user must then correct the errors in the file and start the validation again.
If the shapefile does not contain any errors then it is ready to be displayed in BASEMAPS.
Users can click on New Validation to validate and upload another dataset

56|
MSP output—validatingand uploadingWFS
To upload data via WFS services users add the URL and click on Validate WFS.
1
2

57|
After a few moments, the validation process ends and a detail report is displayed. If the service contains several layers, the report shows which ones passed validation and which ones failed.
The user must then correct the errors in the datasets and start the validation again.
If the WFS service does not contain any errors then it is ready to be displayed in BASEMAPS by clicking on Upload.
Users can click on New Validation to validate and upload another dataset.

58|
Frequently Asked Questions
Why are there empty categories?
Some categories are empty because no country has provided data.
Why is the layer not showing?
Check that you have ticked the WMS or ArcGIS REST services checkbox as they are the only services that are displayed. Also, be sure that the layer does not have any maximum or minimum display scale (check Max and Min display scale in metadata). If so, zoom in or out accordingly with the help of the scale at the bottom-right map corner.
Some tags are weirdly translated, why?
BASEMAPS uses a translator service that can occasionally output a not so accurate translation.
Why is the layer name not in English?
All services in BASEMAPS come from national data providers who may want to publish data in their language. BASEMAPS only translates some tags in the metadata (see page 12)
Why don’t I see in the map the changes I made in the admin panel?
To see the changes you will need to refresh the browser by using the browser’s refresh button.
What kind of services are available in BASEMAPS?
BASEMAPS can display WMS and ArcGIS REST services. Datasets can be downloaded thorough WFS and download services.
59|
For support about BASEMAPS functionality and getting users rights: [email protected]
For support about national data contact the national provider whose contact information can be found in the host organization tag in the metadata.
BASEMAPS has been developed by HELCOM during the Interreg funded Baltic LINes project (2016-2019).
The MSP output part was developed during the PanBalticScope project.
The code is open source and is available in GitHub.
This document was created using an adapted Slidedoc from Duarte Inc
Contact informationand credits