base software for control systemsproject documentation document tn-0088 rev k (canary 10) base...
TRANSCRIPT

Project Documentation Document TN-0088 Rev K (Canary 10)
Base Software for Control Systems
Stephen Guzzo, John Hubbard, Bret Goodrich, Andy Ferayorni
Software
October 2016

Base Software for Control Systems
TN-0088, Rev K (Canary 10) Page i
REVISION SUMMARY:
1. Date: 25 July 2007 – 22 September 2009 Revision: DRAFTS 1-3 Name: Bret Goodrich; John Hubbard Changes: Created. Change the document from a template about Base into a completed tech note. Added section on interlocks.
2. Date: 29 June 2011 Revision: A Name: John Hubbard Changes: Brought in line with Canary 2 CSF/BASE release
3. Date: 19 March 2011 Revision: A1 Name: John Hubbard Changes: Minor typo fix found while reviewing for Canary 3 release
4. Date: 19 December 2011 Revision: B Name: John Hubbard Changes: Brought in line with Canary 3 release.
5. Date: May 2012 Revision: C Name: John Hubbard Changes: Brought in line with Canary 4 release.
6. Date: October/November 2012 Revision: D Name: John Hubbard Changes: Major reordering and added lots of new information in preparation for the Canary 5 release
7. Date: June 2013 Revision: E Name: John Hubbard Changes: Added Time Base Controller information (Section 6)
8. Date: October 2013 Revision: E1 Name: John Hubbard Changes: Added DIO Controller information (Section 7) (content provided by Erik J.)
9. Date: February 2014 Revision: E2 Name: John Hubbard Changes: Change in mgmt ctrl property names, added trajectory and Inst Prog DB sections. Updated DIO Controller information.

Base Software for Control Systems
TN-0088, Rev K (Canary 10) Page ii
10. Date: March 2014 Revision: F (Canary 7) Name: Andy Ferayorni, Keith Cummings Changes: Added section on simulated time connection and time status screen. Canary 7 release.
11. Date: October 2014 Revision: G (Canary 8) Name: John Hubbard, Andy Ferayorni, Stephen Guzzo Changes: Mention TSync firmware update in install instructions, add TcsWatch reference. Added details on base Power Control tools, including os config steps to support RXTX.
12. Date: October 2014 Revision: G1 Name: Stephen Guzzo, Andy Ferayorni Changes: Fixed ConverterTAB formulas in section 9.1.4.1. Added details on the new MotionController indexProgAddr and updated AdvancedMotionController section.
13. Date: February 2015 Revision: H Name: Stephen Guzzo, John Hubbard, Bret Goodrich Changes: Updated Overview
14. Date: March 2015 Revision: I (Canary 9) Name: John Hubbard / Andy Ferayorni Changes: Posting TABs, WCI Stuffs, Rendezvous Service, Updates on DIO DT Connections, addition of information about DT Motion Connection-specific properties, addition of information about new Motion Controller ‘auto’ mode. Added section on Power Switching Controller, and updated Power Supply Controller section with status GUI details.
15. Date: May 2016 Revision: J (Canary 9) Name: John Hubbard Changes: Motion Controller event information, Header section re-write
16. Date: June 2016 Revision: J1 Name: Stephen Guzzo Changes: Updates to the Header Section including information about HeaderTAB, Base Toolbox, Header Service Tools, and Header persistent store.
17. Date: October 2016 Revision: K Name: John Hubbard, Stephen Guzzo Changes: Canary 10 Changes, updated installation instructions, Oregano connection updates.

Base Software for Control Systems
TN-0088, Rev K (Canary 10) Page iii
Table of Contents
1. Overview ........................................................................................... 1
1.1 DOCUMENTS ....................................................................................................... 1
1.2 INSTALLATION .................................................................................................... 2
2. Base ................................................................................................... 3
2.1 HEADER SERVICE............................................................................................... 3 2.1.1 BASIC THEORY OF OPERATION ................................................................................ 3 2.1.2 JAVA SUPPORT ...................................................................................................... 5 2.1.3 C++ SUPPORT ........................................................................................................ 8 2.1.4 THE HEADER PERSISTENT STORE ............................................................................ 8
2.2 INTERLOCKS ....................................................................................................... 9
2.2.1 IMPLEMENTATION .................................................................................................... 9
2.2.2 INTERLOCK PROPERTIES/ATTRIBUTES .................................................................... 10 2.3 LOOKUP TABLES (LUT) ................................................................................... 10
2.3.1 LUT IMPLEMENTATION .......................................................................................... 11 2.4 INSTRUMENT PROGRAM DATABASE ............................................................ 12
2.4.1 RENDEZVOUS SERVICE.......................................................................................... 12
3. Base Controller ............................................................................... 15
3.1 PROPERTIES ..................................................................................................... 15
4. High level controllers ..................................................................... 16
4.1 LIFECYCLE MANAGEMENT CONTROLLERS ................................................. 16
4.1.1 PROPERTIES ......................................................................................................... 16
4.2 ACTION MANAGEMENT CONTROLLERS ....................................................... 17 4.2.1 PROPERTIES ......................................................................................................... 17 4.2.2 ACTION BEHAVIOR ................................................................................................ 17
4.2.3 SEQUENCING ........................................................................................................ 19 4.2.4 PRAC SUPPORT .................................................................................................. 19 4.3 SCRIPT INTERPRETING CONTROLLER .......................................................... 20
4.3.1 PROPERTIES ......................................................................................................... 20 4.3.2 METHODS ............................................................................................................. 20
5. Low-Level Controllers (Hardware Controllers) ............................. 22
5.1 HARDWARE CONNECTIONS ............................................................................ 22 5.2 HARDWARE CONTROLLERS ........................................................................... 22
5.2.1 PROPERTIES ......................................................................................................... 23
5.2.2 METHODS ............................................................................................................. 23 5.2.3 LIFECYCLE ........................................................................................................... 23
6. Time Base ....................................................................................... 25
6.1 TIME BASE CONTROLLER ............................................................................... 25 6.1.1 PROPERTIES ......................................................................................................... 25
6.1.2 USAGE ................................................................................................................. 25

Base Software for Control Systems
TN-0088, Rev K (Canary 10) Page iv
6.1.3 ATTRIBUTES ......................................................................................................... 25 6.2 TIME BASE CONNECTIONS ............................................................................. 25 6.2.1 TSYNC CONNECTION............................................................................................. 26
6.2.2 SIMULATED CONNECTION ...................................................................................... 26 6.3 TIME BASE JES SCREENS ............................................................................... 27 6.3.1 STATUS SCREEN................................................................................................... 27 6.3.1.1 USAGE ........................................................................................................... 27 6.3.1.2 STATUS TAB ................................................................................................... 27
6.3.1.3 INPUTS TAB ..................................................................................................... 28 6.3.1.4 OUTPUTS TAB ................................................................................................. 28 6.3.1.5 HARDWARE TAB .............................................................................................. 28 6.3.1.6 INTERRUPTS ................................................................................................... 29 6.3.2 CONTROL SCREEN ................................................................................................ 29
7. Digital IO ......................................................................................... 30
7.1 DIGITAL IO CONTROLLER ............................................................................... 30 7.1.1 USAGE ................................................................................................................. 30
7.1.2 ATTRIBUTES ......................................................................................................... 31 7.2 DIGITAL IO CONNECTIONS .............................................................................. 32 7.2.1 DELTA TAU POWER PMAC CONNECTION ............................................................... 32
7.2.2 SIMULATED CONNECTION ...................................................................................... 32 7.3 DIGITAL IO JES SCREENS ............................................................................... 32
8. Power Control ................................................................................. 33
8.1 POWER SUPPLY CONTROLLER ...................................................................... 33 8.1.1 USAGE ................................................................................................................. 34
8.1.2 ATTRIBUTES ......................................................................................................... 35
8.1.3 STATUS EVENT ..................................................................................................... 35 8.1.4 CONNECTIONS ...................................................................................................... 35 8.1.4.1 TDK LAMBDA GENESYS CONNECTION .............................................................. 35
8.1.4.2 SIMULATED CONNECTION ................................................................................ 36 8.1.5 JES SCREENS ...................................................................................................... 36
8.1.5.1 STATUS SCREEN ............................................................................................. 36 8.1.5.1.1 USAGE ........................................................................................................ 36
8.2 POWER SWITCHING CONTROLLER ................................................................ 36 8.2.1 USAGE ................................................................................................................. 38 8.2.2 ATTRIBUTES ......................................................................................................... 39 8.2.3 STATUS EVENT ..................................................................................................... 39
8.2.4 CONNECTIONS ...................................................................................................... 40 8.2.4.1 EATON PULLIZI CONNECTION ........................................................................... 40 8.2.4.2 SIMULATED CONNECTION ................................................................................ 40
8.2.5 JES SCREENS ...................................................................................................... 40 8.2.5.1 STATUS SCREEN ............................................................................................. 40 8.2.5.1.1 USAGE ........................................................................................................ 41 8.2.5.2 CONTROL SCREEN ........................................................................................... 41 8.2.5.2.1 USAGE ........................................................................................................ 41

Base Software for Control Systems
TN-0088, Rev K (Canary 10) Page v
9. Motion Control ................................................................................ 43
9.1 MOTION CONTROLLER .................................................................................... 43 9.1.1 USAGE ................................................................................................................. 43 9.1.2 STATE DIAGRAM ................................................................................................... 45 9.1.3 ATTRIBUTES/PROPERTIES ..................................................................................... 45
9.1.4 EVENTS ................................................................................................................ 47 9.1.5 UNIT SPACE CONVERSIONS ................................................................................... 47 9.1.6 DELTA TAU POWER PMAC CONNECTION ............................................................... 48 9.2 ADVANCED MOTION CONTROLLER ............................................................... 48 9.2.1 ATTRIBUTES/PROPERTIES ..................................................................................... 49
9.2.2 WAIT FOR SIGNAL ................................................................................................. 49 9.3 MOTION CONNECTIONS ................................................................................... 49
9.3.1 DELTA TAU POWER PMAC CONNECTION ............................................................... 50
9.3.2 SIMULATED MOTION CONNECTIONS ....................................................................... 51
10. Other useful bits ............................................................................. 52
10.1 TABS ................................................................................................................... 52
10.1.1 POSTING TABS .................................................................................................... 52 10.1.2 UPDATE TAB ....................................................................................................... 54 10.2 OTHER-OTHER USEFUL BITS .......................................................................... 54
10.2.1 MATRIX ................................................................................................................ 54 10.2.2 INTERPOLATION POLYNOMIAL ................................................................................ 55
10.2.3 BASE EVENT CALLBACK ....................................................................................... 55 10.2.4 BASE THREAD ...................................................................................................... 55 10.2.5 REMOTE ACTIONS ................................................................................................. 55
10.2.6 MISC .................................................................................................................... 56
10.2.7 TRAJECTORIES ..................................................................................................... 56 10.2.8 WORLD COORDINATE SYSTEMS ............................................................................. 56
Appendix: Motion Controller State diagram ......................................... 58

Base Software for Control Systems
TN-0088, Rev K (Canary 10) Page 1 of 45
1. OVERVIEW
This document provides details about the DKIST Base software. DKIST provides a set of software
components, controllers, and other tools for use by application developers. This software is often referred
to as the DKIST Base, The Base or just Base. It is the foundation software for all implemented
applications. An application is the software that runs some piece of the facility or that an end user will use
to interact with the facility. These applications include the Telescope Control System (TCS), its
numerous control subsystems, the Instrument Control System, and its associated instruments and their
control systems. The applications that use these software components are able to be fully integrated into
the DKIST control structure and make use of the features and services provided by DKIST through its
common services framework.
Base software is distributed and maintained by DKIST for use by application developers. It is released in
coordination with a CSF release and is always in agreement with the current state and configuration of
CSF. From an application developer’s point of view, there is no difference between CSF and Base.
Developers are urged to consider Base for use in their systems in order to promote code reuse and ease
future maintenance. In addition to the existing modules developers are urged to submit their general
purpose modules for inclusion in Base. DKIST will assume the responsibility for maintaining and
distributing all accepted modules in step with the regular CSF releases. This maintenance includes
updating the classes in step with CSF updates (e.g. CSF-API changes), and basic bug fixes. Some of the
Base classes rely on hardware which the Base developers do not have access to. For those classes users
are urged to submit patches for problems and/or new features as needed. While bugs will be fixed, there
are limited resources for improvements and new features. As such users are urged to submit patches for
improvements and new features.
Previous versions of this document included a quick summary of CSF. In that last revision that was
removed to avoid double dimensioning. You still need a basic understanding of CSF to be able to make
sense of Base. For that understanding you should see SPEC-0022-1 CSF User’s Manual.
Throughout this document source code (classes and methods) will be talked about. When a class,
package or method is given it is presented in a different font; e.g. a class would appear as myClass and
method would appear as myMethod(). When dealing with methods the fact that the parentheses are empty
does not always mean that the method takes no arguments. There are many methods that are overloaded
and it is just easier to not include a methods arguments. If the arguments are relevant they are usually
mentioned in the surrounding text. See the API documentation for more details on the methods listed
here.
1.1 DOCUMENTS
The following documents are referenced herein.
1. SPEC-0022, Common Services Software Design Document.
2. DKIST Base API (Javadoc/C++ doxygen)
3. TN-0154 Motion Control Performance

Base Software for Control Systems
TN-0088, Rev K (Canary 10) Page 2 of 45
1.2 INSTALLATION
DKIST Base can only be installed if there is an existing CSF installation. With the exception of the
Symetricom TSync driver, all of Base’s dependencies are met with a CSF installation, or tools tar balls
distributed with base. If you have not installed CSF you should see the CSF Reference Guide SPEC-
0022-2 for installation instructions. Assuming that you have CSF installed, have all of the CSF services
running somewhere (a remote machines is fine), and have defined the DKIST environmental variable you
can obtain a copy of base by doing:
cd $ATST/..
export CVSROOT=":pserver:<user>@maunder.tuc.noao.edu:/home/atst/src/base"
# Talk to you ATST contact for your CVS username/password
cvs login
cvs co –P –r Canary_10 atst
# edit $ATST/admin/site.config to make sure “ATST_PACKAGE_LIST” includes “base”
./admin/createDevel -–make-all
cp $ATST/admin/base/baseSite.config.template $ATST/admin/base/baseSite.config
# edit $ATST/admin/base/baseSite.config
./admin/pkgDevel --init-data --init-bin base
make build_all docs
./admin/pkgDevel --load-db –init-resources base
This will check out the Canary 10 branch of Base into your existing development tree. The source files
will be found in $ATST/src/[java|c++]/atst/base. The createDevel command will (among other things)
cause the contents of $ATST/tools/base to be installed into the appropriate places. The make command
will build the entire Java and C++ source, generate the Java JavaDoc and C++ doxygen (and place them
in $ATST/doc/api-docs) and find all *.prop files and read them into the CSF property database.
If you have an Oregano Syn1588 PCI-E card that you will be using via the Base Time Base Controller
you will also need to install the syndrv rpm (available at maunder.tuc.noao.edu/~atst). If you install the
RPM prior to installing and configuration base then everything will be ready and no additional steps are
necessary. If you install the RPM after configuring base then you will need to re run the init-data portion
of pkgDevel and rerun the Java and JNI builds.
cd $ATST/..
# edit $ATST/admin/base/baseSite.config
# ensure that use oregano is either yes or auto
./admin/pkgDevel --init-data base
make java jni

Base Software for Control Systems
TN-0088, Rev K (Canary 10) Page 3 of 45
2. BASE
CSF provides many tools for applications. Base was created in an effort to provide a somewhat more
uniform solution to many of the most common problems that application developers will encounter. In
addition to solutions to common problems, Base also provides the framework necessary for header
collection. The controllers and components discussed in this section are all part of the Base package.
They all have the mechanisms for header collection built in and in many cases need only property
definitions or minor tweaking to provide header data.
2.1 HEADER SERVICE
CSF Components and Controllers need to be able to provide data which will eventually become FITS
Header data. To support generation of such data Base provides a framework which allows an entity to
request collection of a certain ‘level’ of header data. Base additionally provides tools which allow
components to respond to such requests and provide Header Data. Finally Base provides a persistent
store for Header Data. The only identified consumer of Header Data is the DHS and as such Base
provides no tools for accessing stored Header Data.
2.1.1 Basic Theory of Operation
In DKIST collection of Header Data is a joint effort undertaken by one or more initiators and one or more
collectors. An initiator is an entity that posts header start/stop events indicating that collection of data
should begin and end. A Collector is a Component, Controller or other CSF entity which then
independently passes its Header Data Items to the Header DB for persistent store. A Header Data item
consists of a name, a value, and a timestamp. Header Data items are stored in the database under Header
Keys. A Header Key consists of an Experiment ID, Observing Program ID, Instrument Program ID, and
Frame ID (although some of those IDs may be blank/empty).
The Header collection system supports multiple initiators: one for the start/stop of an Observing Program
and one for the start/stop of each instrument’s Instrument Program. It is assumed that the OCS will be
responsible for posting the OP start/stop events but the implementation imposes no requirement on what
entity is the OP initiator. It is assumed that some internal part of the instrument will be responsible for
the IP start/stop event; within an IP script or an instrument’s Instrument are two obvious possibilities.
The header implementation imposes no requirements and leaves it up to instruments and/or the SIF.
Header Data Suppliers are generally Components/Controllers however the system does not impose such a
limit; in theory a GUI could be a supplier. Suppliers are responsible for collecting header data and
inserting it into the Header DB (via the Header DB access helper). The system supports suppliers which
respond to multiple initiators, e.g. responds to both instrument X’s and instrument Y’s IP start/stop
events.
There are two approaches for generating header data. The first approach is to utilize the Header TAB
present in all Base Components and Controllers. The Header TAB will query its controller using get()
and place the resultant information into the DB. The TAB is configured by a few properties: the list of
attributes to collect at receipt of header start event; the list of attributes to collect at receipt of header stop
event, the list of attributes to collect periodically between receipt of a start event and the receipt of a stop
even; the period; and the initiators to respond to. The CSF get() method works on Attributes not Header
Data Items. This means that the fetched data has no associated time stamps. The Header TAB assumes
that the data was valid at the time of query and thus attaches the current time to the attributes to turn them
from an Attribute into a Header Data Item. This approach is sufficient for many systems.

Base Software for Control Systems
TN-0088, Rev K (Canary 10) Page 4 of 45
The above approach only works when assuming the current time is sufficient, and when data collection
start/stop may be tied to the start/stop events. The above approach would not work if for example there
was a lag (say 5 seconds) between when a value was valid, and when it became ‘available’ to the CSF
entity. In such a case there would be two problems: the auto-generated time stamp would be wrong; and
the last 5 seconds of data would be lost because collection would stop before the data was ‘available’. In
order to support the header collection of such systems it is possible to use the ‘raw’ pieces from the
Header Service Access Helper.
The Base Header support is primarily concerned with the collection and storage of header data. The DHS
is responsible for accessing stored header data, associating it with science data, and producing a FITS
formatted data object for export. The storage and persistence of such data is provided by a Relational
Database. Users are insulated from the actual database implementation which relies on PostgreSQL.
Fundamentally the Database stores Header Keys and Header Data items. Base provides the IHeaderKey
interface to define the keys used and the IHeaderData interface to define the fundamental data items and
the IHeaderDataTable interface to define collections of the fundamental data items. The DHS is
expected to directly query the Header Database to retrieve the information that it needs.
Header Data and Tables
Base defines the IHeaderData interface and the HeaderData class for representing Header Data Items.
Both the interface and concrete class are immutable. The class accepts as constructor arguments the three
items making up a piece of Header Data (a name, a value, and a timestamp). There are constructors
provided for IAttributes, Strings, doubles, and integers. Base also defines the IHeaderDataTable
interface and the HeaderDataTable class for storing tables of Header Data items. Both the interface and
concrete class provide methods for inserting items into the table but no mechanism for removing items
from the table.
Header Key
A Header Key associates a data item with a piece of science data. There are different levels of header
keys corresponding to the different levels of abstractions in the DKIST Experiment Model. An
Experiment (Exp) level Header Key contains only an Experiment ID String; it fell out of the
implementation but it is unclear if such a key is of much use. An Observing Program (OP) level Header
Key contains an Exp ID and an OP ID strings. Header Data related to the state of the TCS and its sub-
systems will likely be associated with OP-level keys. An Instrument Program (IP) level Header Key
contains an Exp ID, OP ID and an IP ID. Header Data related to the state of an instrument will likely be
associated with IP-level keys. Thus valid header keys may look like:
{“ExpId.12”} (Exp Key)
{“ExpId.12”, “OpId.34”} (OP Key)
{“ExpId.12”, “OpId.34”, “IpId.56”} (IP Key)
{“ExpId.12”,”OpId.34”, “IpId.56”, “FrameId.78”} (Frame Key)
Header Keys are modeled after of the DKIST data model.

Base Software for Control Systems
TN-0088, Rev K (Canary 10) Page 5 of 45
2.1.2 Java Support
As mentioned in the Basic Theory of Operation section Base Component and Controller both have a
Header TAB which handles the subscription to the header initiation events, the tracking of active key(s)
and the auto-polling (via get()) of header information. This section goes into more details on the
underlying tools.
HeaderTAB
The HeaderTAB that all Base Components and Controllers utilize can be configured via a number of
properties to govern the automatic collection of Header Data and insertion of this data into the Header
DB. Based on its configuration the HeaderTAB will automatically respond to any or all Experiment
start/stop events, Observing Program start/stop events, and Instrument Program start/stop events. In the
case of Instrument Program events, the instrument(s) of interest must be specified via a property. The
specific types of events to respond to is configured with the header:type property.
When the HeaderTAB is signaled to begin collection with a start event, the Header Key associated with
the start event is stored by the HeaderTAB. This same key is then used with all subsequent Header Data
insertion until a corresponding stop event is received. Upon receipt of a collection start event, the
HeaderTAB will collect an initial set of attributes from the parent component via a get() call, and then
insert these attributes into the HeaderDB using the stored key. The attributes to collect and insert upon
the receipt of a start event can be specified using the header:start property.
After a header collection start event has been received, the HeaderTAB will periodically issue a get() call
to the parent component to collect another set of attributes for insertion using the stored key. This set of
attributes may be different than the set collected on receipt of a start event. As such the periodic
collection attributes are specified using a different property, the header:periodic property. Another
property, header:freq, is used to set the frequency in Hz that these attributes are collected and inserted
into the Header DB. Using these two properties, the HeaderTAB collects a set of attributes at the given
frequency and inserts them into the Header DB until a corresponding stop event is received.
When the HeaderTAB receives a stop event that corresponds to the type and key of the collection that is
currently underway, periodic collection and insertion of Header Data will cease. In addition to this, the
HeaderTAB will collect a final set of attributes from the parent component using the get() interface and
insert them into the Header DB. The set of attributes to collect and insert at the receipt of a collection
stop event can be specified using the header:stop property.
The HeaderTAB constructs HeaderData items for each attribute it collects prior to inserting into the
Header DB. Each HeaderData item contains a Timestamp corresponding to the time at which the
insertion takes place.
In this fashion it is possible to use a Base Component or Controller and govern the automatic collection
and insertion of Header Data by configuring a total of five properties. A summary of the properties and
how they can be configured follows:
Property Description Possible Values
header:type Type of events to
collect Header Data
for (Experiment,
Observing Program,
Comma separated list of any of the following:
exp – Experiment level keys
op – Observing Program level keys

Base Software for Control Systems
TN-0088, Rev K (Canary 10) Page 6 of 45
Instrument Program) <inst_name> - Any value other than “exp” or “op” is
interpreted as an instrument name. This will collect
and insert IP level data. <inst_name> must match the
instrument name provided in the corresponding call to Header.postIpStartEvent(IHeaderKey key,
String inst)
header:freq Frequency in Hz to
collect and insert
Header Data after a
start event is
received.
Floating point number representing a value in Hz
header:start Attributes to collect
and insert when a
start event is
received.
Comma separated list of attributes to collect from the parent
component using get().
header:periodic Attributes to collect
and insert
periodically after a
start event is
received.
Discontinue periodic
collection when a
stop event is
received.
Comma separated list of attributes to collect from the parent
component using get().
header:stop Attributes to collect
and insert when a
stop event is
received.
Comma separated list of attributes to collect from the parent
component using get().
Consider the following example properties for a controller that wishes to automatically insert Header Data
during execution of Observing Programs and Instrument Programs associated with two instruments: inst1
and inst2. A list of attributes to collect is given for start and stop events, as well as periodic collection.
Periodic collection is set to occur at 0.5 Hz:
Property Value
header:type op,inst1,inst2
header:freq 0.5
header:start pos:x,pos:y
header:periodic temp,pos:x,pos:y,angle
header:stop pos:x,pos:y
Service Access Helper
The static class atst.base.services.Header provides the access methods to the Header service. For a full
detail of the methods present see the Java Doc. This section only attempts to highlight some of the key
methods.
public static void insert(IHeaderKey key, IHeaderDataTable values);
public static HeaderEventHelper postOpStartEvent(IHeaderKey key);

Base Software for Control Systems
TN-0088, Rev K (Canary 10) Page 7 of 45
public static HeaderEventHelper postIpStartEvent(IHeaderKey key, String inst);
public static AutoCloseable registerForOpEvents(Consumer<IHeaderKey> doStart,
Consumer<IHeaderKey> doStop);
public static AutoCloseable registerForIpEvents(String inst, Consumer<IHeaderKey>
doStart, Consumer<IHeaderKey> doStop);
The methods are all pretty self-explanatory. The insert method inserts header data items into the
persistent store associated with the provided key. The postXxxStartEvent methods post the IP and OP
start events. The returned HeaderEventHelper is a no-throw auto-closeable; calling close on it will post
the corresponding stop event. The registerForXxxEvents take as arguments the consumer of start/stop
events. The returned auto-closeable will unsubscribe from the start/stop events.
Toolbox Support
The Base Toolbox atst.base.services.BaseToolBox contains methods that can be used to access and set
the Header Service tool:
public void setHeaderService(IHeaderServiceTool tool);
public IHeaderServiceTool getHeaderService();
When an instance of the Base Toolbox is obtained using the static getToolBox() method for the first
time, the toolbox automatically handles loading and chaining of the Header Service Tools using the Base
Toolbox Loader atst.base.services.BaseToolBoxLoader. An instance of the Base Toolbox is obtained
and passed to the HeaderHelper class atst.base.services.header.HeaderHelper in the static initializer of
the Service Access Helper. Because of this, Header Service Tools are available for use whenever they are
needed.
The Service Access Helper interfaces with the Header Service Tools by way of the HeaderHelper. The
HeaderHelper contains the following method that can be used to insert Header Data:
public void insert(IHeaderKey key, IHeaderDataTable values);
Calling the insert() method in the HeaderHelper passes the IHeaderKey and IHeaderDataTable to the
loaded Header Service Tool.
Service Tools
The Header Service Tools provide the low-level interface to the Header DB. The following Header
Service Tools are provided in Base:
atst.base.services.header.HeaderServiceTool – This tool is the basic Header Service Tool that
issues an insert to the Header DB for each HeaderData item it is requested to store.
atst.base.services.header.BufferedHeaderServiceTool – This tool functions similarly to the
basic HeaderServiceTool with the exception that HeaderData items are buffered and inserted to
the Header DB in batches. Performance increases for large numbers of HeaderData items.
atst.base.services.header.PrintHeaderServiceTool – This tool simply prints HeaderData items
rather than store them in the Header DB. This is useful for debugging purposes.

Base Software for Control Systems
TN-0088, Rev K (Canary 10) Page 8 of 45
By default the BaseToolBoxLoader only loads the BufferedHeaderServiceTool.
All Header Service Tools subclass atst.base.services.header.AbstractHeaderServiceTool and in turn
implement the atst.base.services.header.IHeaderServiceTool interface. This requires all Header
Service Tools to implement the following method:
public void storeHeader(IBaseToolBox tb, String source, IHeaderKey key,
IHeaderDataTable headerData)
2.1.3 C++ Support
There is currently no support for the Header Service in C++. All use of the Header Service must be done
in java.
2.1.4 The Header Persistent Store
The persistent store that Header Data is stored in is built on top of a PostgreSQL database. In order to use
the Header Service, the Header DB must first exist. If the Header DB does not exist it can be created by
using the pkgDevel script with the base package as follows:
$ATST/admin/pkgDevel base –init-db
The Header DB uses the following columns to store Header Data:
expid – The Experiment ID portion of the Header Key
obsid – The Observing Program ID portion of the Header Key
ipid – The Instrument Program ID portion of the Header Key
frameid – The Frame ID portion of the Header Key
name – The name portion of the Header Data
value – The value associated with the Header Data
source – A string representing the name of the component that inserted the data
time – A timestamp representing the time the Header Data was valid
Access to the Header DB persistent store is provided by the java class
atst.base.services.header.HeaderDBServer. This class provides two methods that can be used to insert
into the database. All Header Service Tools utilize one or both of these methods to insert Header Data
into the Header DB:
public boolean insert(IHeaderKey key, String source, IHeaderData headerItem);
public boolean insertBatch(String msgs[]);
The first method is used to insert a single Header Data item while the second is used to insert a batch of
items.

Base Software for Control Systems
TN-0088, Rev K (Canary 10) Page 9 of 45
2.2 INTERLOCKS
Interlocks are a standard safety mechanism with the DKIST telescope. An independent mechanical and
electrical network monitors the status of telescope systems that have been identified as potential personnel
or equipment hazards. The Global Interlock System (GIS) then determines the appropriate actions needed
to prevent harm or injury. For most risk areas this involves removing power from motors and closing light
feed covers. The GIS can also limit the response to a detected hazard to the affected systems, thus leaving
other system free to continue without interruption.
The safety system is not dependent upon the DKIST high-level software systems to perform its activities.
From the control software point-of-view an interlocked motor is identical to a broken or faulty motor; it
does not move nor respond to other commands. Because the proper response to this situation is dependent
upon the root cause, the lack of determinacy requires that the control systems are notified that their
underlying hardware has been interlocked. Because the software systems are not part of the safety chain
they are not required to implement a fully redundant safety mechanism.
Software systems are responsible for recovering after an interlock has been released. In most cases, an
interlock occurs during a complex operation, a movement of a motor or an ongoing camera observation.
The software system cannot return to its prior state since that state might have been transient or otherwise
unrecoverable. Instead, the software system must return to its most minimally operational level. For most
mechanism controllers this means the technical state is running while the functional state is parked. Other
controllers, especially high-level management controllers, need to assure that they and their underlying
workers are all in the same state. Management controllers may be responsible for handling errors from
workers with interlocked hardware and canceling/aborting workers that were not interlocked and
continued to function.
The DKIST software interlock system works in coordination with the GIS to deliver appropriate interlock
events to software controllers. The controllers are required to handle an interlock event by stopping all
ongoing actions, bringing the controller and any workers to the lowest functional level defined by the
controller, and refusing to initiate further actions while the interlock is set. Upon the release of an
interlock, the controllers are required to ensure that it and all workers are initialized and ready for input
commands. The major concern for the release of an interlock is that there are no non-commanded motions
or actions that are the result of the prior operation when the interlock was set. All controllers also have
the ability to override an interlock.
CSF provides many of these functions in a generic way. CSF understands the concept of interlocks and
when a controller is interlocked, canRun() will return false and any scheduled/running actions will be
automatically aborted. While CSF understands the general concept of interlocks it does not know where
they come from in DKIST applications. As such it is the responsibility of base to tie the raising and
lowering of the CSF component-specific interlock flag to the DKIST GIS system’s status.
2.2.1 Implementation
GIS hardware interlocks are detected by a component in the OCS and propagated through the event
system to all subscribed controllers. The event is composed of an attribute table of specific interlock
attribute names. For instance, the MCS controller (and all subcomponents) could register for the
atst.gis.interlock event and filter for the tmaInterlock=true attribute. The interlock event is sent once
per second while any interlock attribute is true and once when all interlocks are false. The interlock
controller in the OCS also supports the get() command to return a polled version of the current state.

Base Software for Control Systems
TN-0088, Rev K (Canary 10) Page 10 of 45
The code to support raising and lowering interlocks is all implemented in the InterlockTAB found in the
atst.base.tabs.util package. The BaseController load the tab and as a result all subclasses of
BaseController will have the following described interlock behavior:
At the moment base controllers do not register for an interlock event. Eventual we expect that all base
controllers will automatically register for the interlock event (atst.gis.interlock). In either case, the default
subscription can be overridden by providing an interlock:event property. All controllers must specify
the interlock:attributes property. This should be a vector of strings containing a list of all of the
attributes that indicate that the controller should be interlocked. The list of relevant attributes, and the
event can be changed at any time after the (or controller has been initialized during init) by passing an
attribute with the name interlock:event or interlock:attributes to the controller.
A controller’s interlocked status can be overridden by performing a set(). The attribute table must
contain a boolean-attribute named interlock:override. This override can only be set when a controller is
interlocked and the override is cleared when the interlock is cleared.
A controller’s interlocked status or interlock override status can be queried with a get(), but only when
the controller is running. The attribute table should contain an attribute named interlock or
interlock:override and the returned table will have the current interlock or interlock override status of
the controller.
If a controller needs to do anything other the cancel existing actions and reject new actions, then the
doRaiseInterlock() method needs to be overridden. The method will only be called when the interlock
is first raised and will not be called again until after the doLowerInterlock() method has been called,
unless the controller is shutdown before the interlock is lowered.
The interlock tab is also capable of contributing to the overall health status of a component. The
interlock:warn property/attribute allows the TAB to automatically transitions the component’s health to
ill if more than interlock:warn ms have passed since the last event was received. If the interval is 0, the
controller will never be transitioned.
2.2.2 Interlock Properties/Attributes
Name Type Description
interlock:event String The name of the interlock event to subscribe to. (set/property)
interlock:attributes String[] The attributes that, when present and true, indicate that the
controller’s interlock flag has been raised. (set/property)
interlock:override Boolean The attribute that instructs a controller to lower its interlock (set)
interlock:warn Long The number of milliseconds to allow to pass before transitioning a
controller’s ‘interlock’ category health to ill.
2.3 LOOKUP TABLES (LUT)
Base provides support for lookup tables. That support consists of a service access helper, and a few
default lookup table implementations. The support for lookup tables may be found in a few different
packages within base. The interface atst.base.interfaces.ILUT provides the base interface for all
LUTs. The package atst.base.data.lut provides a number of basic LUT implementations. The
access helper is atst.base.services.LookupTable. Finally not really part of using LUTs, but an
example of how a LUT would be fetched and used may be found in atst.base.examples.LutExample.

Base Software for Control Systems
TN-0088, Rev K (Canary 10) Page 11 of 45
All lookup tables must implement the ILUT interface which defines a few methods; the most significant
method is the one which actually performs the lookup. The lookup method’s signature is: public
double[] lookup(double key). A single double is passed in and a double array of some length is
returned. The length of the returned array will vary from LUT to LUT based on the need of the
application using it. For example a LUT to convert for an angle in elevation to a Zernike map used to fix
a mirror’s image might return an array of 24 values. However if the control system instead preferred to
track actuator force offsets, it might return an array of 118 actuator force offsets.
Lookup tables are constructed in the component’s namespace so it should be possible to cast to the direct
class should that be necessary. The expected usage is that a LUT will be fetched from an access helper at
init or startup, and that object will then be used for the duration of the component’s life, or an explicit
request is made of the component to re-fetch the LUT.
2.3.1 LUT implementation
The LUT service access helpers are implemented on top of the parameter set database. The assumption is
that a lookup table can be constructed from a Parameter Set (PS). When a request is made to get a LUT
the access helper, requests a parameter set from the Parameter Set DB access helper. If a PS is returned,
the access helper looks for an attribute named “__lut.class” which is then used to construct an object of
the proper type. The service will first attempt to create the LUT based on a constructor:
SomeLUT(IParamSet ps). If no constructor matching the signature is found a generic constructor will be
used instead. To implement custom LUTs one most provide methods to construct a lookup table from a
PS or using a constructor that takes no arguments. The former is preferred.
The four fields contained in parameter sets (and used for looking them up) are mapped to the following
fields when accessing a lookup table.
PS Field LUT Field
category “LookUpTable”
name app name
id lookup table name
version version
The PS name and PS version fields are not readily accessible after the LUT is constructed. The
assumption is that they are not needed after the initial lookup. Performing a lookup with the “LUT”
debug category set to 1 or higher will result in a log message with the version that was fetched from the
database.
Linear Interpolation Lookup Table (LIT)
The linear interpolation table (LIT) is one of the LUTS provided in the atst.base.data.lut package. It
consists of a two dimensional array of doubles. It has a minimum key value, a maximum key value, and a
key step size. The number of rows in the data array must be:
1 + 𝑀𝑎𝑡ℎ. 𝑟𝑜𝑢𝑛𝑑 ((𝑘𝑒𝑦𝑀𝑎𝑥 – 𝑘𝑒𝑦𝑀𝑖𝑛)
𝑘𝑒𝑦𝑆𝑡𝑒𝑝)
A lookup (assuming that the input is in range) is accomplished by taking:
𝑙𝑜𝑤𝑒𝑟 = 𝑀𝑎𝑡ℎ. 𝑓𝑙𝑜𝑜𝑟 ((𝑘𝑒𝑦 – 𝑘𝑒𝑦𝑀𝑖𝑛)
𝑘𝑒𝑦𝑆𝑡𝑒𝑝) and 𝑢𝑝𝑝𝑒𝑟 = 𝑀𝑎𝑡ℎ. 𝑐𝑒𝑖𝑙𝑖𝑛𝑔 (
(𝑘𝑒𝑦 – 𝑘𝑒𝑦𝑀𝑖𝑛)
𝑘𝑒𝑦𝑆𝑡𝑒𝑝)

Base Software for Control Systems
TN-0088, Rev K (Canary 10) Page 12 of 45
and using lower and upper to identify the rows which will then be interpolated between. The result will
be the value of the lower row, plus a fraction of the difference between the rows. The equation for
calculation the result is:
𝑟𝑒𝑠𝑢𝑙𝑡[] = 𝑙𝑢𝑡[𝑙𝑜𝑤𝑒𝑟] +𝑘𝑒𝑦 % 𝑠𝑡𝑒𝑝
𝑠𝑡𝑒𝑝∗ (𝑙𝑢𝑡[𝑢𝑝𝑝𝑒𝑟] − 𝑙𝑢𝑡[𝑙𝑜𝑤𝑒𝑟])
Where lut is the two dimensional input array (e.g. double[][]).
If the input value is out of range, the LIT will return either lut[0] or lut[lut.size -1].
The Parameter set representation of the LIT consists of “key:step”, “key:min” and “key:max” attributes
which are each a single double. There is one double[] “row:#” for each data row. All attributes are
qualified with “__lut.” in order to avoid dealing with fully-qualified attribute names. While it is
possible to manually create the PS needed for a LIT it is recommended that the LITBuilder class (found
in the same package) be used to construct a LIT or its parameter set. The LIT class is immutable, while
the LITBuilder class is not. For more details see the javadoc associated with the two classes.
2.4 INSTRUMENT PROGRAM DATABASE
The Instrument Program (IP) Database is the summit storage system IPs as defined in the DKIST Data
Model. Base provides a data structure for representing IPs along with a services access helper for
storing/fetching IPs from the Database. Under the hood the IP DB relies on the CSF Parameter Set DB
for the actual storage of IPs. The IP DB Access Helper has two responsibilities 1) converting between IPs
and Parameter Sets and 2) mapping the Parameter Set DB storage keys to IP DB storage keys.
See the Javadoc for atst.base.data.InstProg for details on the data structure representing Instrument
Programs.
See the Javadoc for atst.base.services.InstProgDB for details on the service access helper.
2.4.1 Rendezvous Service
The Rendezvous Service allows two or more remote entities to agree on a common time after all entities
acknowledge readiness. The service was nominally designed so that different instruments could start an
observation when both were ready, but it is not limited to that use case. The service allows for a timeout
so that entities do not wait forever. It also understands CSF actions and will wake up if the supplied CSF
action is canceled or aborted.
The service access helper class Rendezvous in the atst.base.services package has a single key method
rendezvous. When called that method will block until a timeout occurs, the current action is canceled or
aborted, or all entities are ‘ready’. See the JavaDoc of the Rendezvous service access helper for details.
The service is organized around an access helper which creates a callback (RendezvousAdapter) which
listens for the ready event, and a Component that listens for events coming out of the Access Helper and
manages nodes (RendezvousNode) that track groups of entities that are trying to rendezvous with each
other. The nodes are stored and fetched based on a list of entities wishing to rendezvous. This means that
can distinctly track A and B rendezvousing with each other at the same time as C and D attempt to
rendezvous with each other.
The Rendezvous Component is generally owned by one of the Primary (OCS/TCS/ICS/DHS) DKIST
Systems. If that system is not running, the Rendezvous Service will not work. Attempts to rendezvous
will fail quickly (~250ms) when the Component fails to send an ACK back to the Access Helper. If you

Base Software for Control Systems
TN-0088, Rev K (Canary 10) Page 13 of 45
need to run the Rendezvous Service in a development environment contact the BASE maintainers for
details about the best approaches.
The rough sequence of events in a typical two entity rendezvous is:
1. Entity A calls Rendezvous.rendeavous(“a”)
a. The access helper creates a RendezvousAdapter which subscribes to the event “a.rendezvous”
b. The access helper posts an event to “services.rendezvous” which contains a list of “a”
and “b”.
c. A thread is spawned to ensure that an ACK is received in 500ms.
d. The call blocks
2. The Rendezvous Managing Component receives the event
a. It sends an ACK on the event topic “a.rendezvous”
b. It checks for the existence of an ”a” & “b” node and fails to find one
c. It creates a new “a” & “b” node
d. It marks the node such that A is known to be ready
e. It checks and finds that not all entities are done
3. Sometime later Entity B calls Rendezvous.rendeavous(“a”)
a. The access helper creates a RendezvousAdapter which subscribes to the event “b.rendezvous”
b. The access helper posts an event to “services.rendezvous” which contains a list of “a”
and “b”.
c. A thread is spawned to ensure that an ACK is received in 500ms.
d. The call blocks
4. The Rendezvous Managing Component receives the event
a. It sends an ACK on the event topic “b.rendezvous”
b. It checks for the existence of an ”a” & “b” node and finds one
c. It marks the node such that B is known to be ready
d. It checks and find that all entities are done
e. Because all entities are ready,

Base Software for Control Systems
TN-0088, Rev K (Canary 10) Page 14 of 45
i. it generates a time stamp (call it T0)
ii. and posts T0 to “a.rendezvous”
iii. and posts T0 to “b.rendezvous”
5. Both Entity A and Entity B’s RendezvousAdapter’s receive their events
a. Both calls to Rendezvous.rendezvous() return T0
For more details on the rendezvous implementation see the Rendezvous class diagram
$ATST/doc/uml/base/Rendezvous.png.

Base Software for Control Systems
TN-0088, Rev K (Canary 10) Page 15 of 45
3. BASE CONTROLLER
The BaseController class in the atst.base.core package was written with the specific goal of
providing easy to implement header collection, and the ability to support interlocks. It is then extended
by all other Controllers in the atst.base package. This section will only cover what to do to add header
collection to a Controller. See the CSF User’s Manual for generic information on writing a Controller.
Assuming that properties are properly defined the base controller automatically generates header data
using calls to get(). Since the CSF code in get() checks for attributes in the cache, the preferred
method for developers to provide header information is to put any relevant information into the cache and
allow CSF and the base controller to automatically handle the collection, and storing of the information.
This means that storing data in the Cache is likely all that needs to be done to enable a controller to
provide header data.
3.1 PROPERTIES
Name Type Description
header:scope String[] TBD
header:sync String[] A list of all attributes to collect at header start and stop.
header:async String[] A list of all attributes to collect at regular interval during an ongoing
header collection
header:freq Real The frequency at which to collect asynchronous header data during
ongoing header collection.
interlock:event String The name of the interlock event to subscribe to.
interlock:attributes String[] The attributes that, when present and true, indicate that the
controller’s interlock flag has been raised.

Base Software for Control Systems
TN-0088, Rev K (Canary 10) Page 16 of 45
4. HIGH LEVEL CONTROLLERS
The high level controllers are those controllers whose job is to manage and coordinate other controllers.
The term manager/management is used to refer to the head controller while the term worker is used to
refer to one of the controllers or components which the manager is responsible for. This can include
managing the lifecycle of worker controllers and components, managing the actions of worker controllers,
or any other aspects of a worker. Because of the communications framework provided by CSF, the
worker controllers do not need to be written in the same language as their manager. This allows low level
controllers to be written in a language that is good for hardware communication (C++) while the high
level controllers can be written in a language that is easier and more abstract (JAVA).
4.1 LIFECYCLE MANAGEMENT CONTROLLERS
The Lifecycle Management Controller is a controller whose only responsibility is the management of the
lifecycle states of its workers. Applications will usually be made up of a group of components and
controllers. It is useful if the commands to bring those components and controllers through their
lifecycles do not have to be delivered to every worker individually by the user. The Lifecycle
Management Controller brings its ‘workers’ through their lifecycle stages so that the workers’ lifecycle
matches the Lifecycle Management Controller’s own lifecycle state.
When a Lifecycle Management Controller is initialized it performs a lookup in the property database and
identifies the name of each component that it is responsible for. If any of the information is missing the
Lifecycle Management Controller logs a warning.
In addition to lifecycle management, the Lifecycle Management Controller’s get() and set() methods
are tied into its worker’s get() and set() methods. When an attribute comes into the Lifecycle
Management Controller that is meant for one of its worker (remember attributes use fully qualified
names) the Lifecycle Management Controller sends that attribute to the appropriate worker so that the
attribute can be either gotten or set.
The Lifecycle Management Controller does not actually exist. The described behavior is implemented in
the java class LifecycleManagementComponent in the atst.base.management.lifecycle package.
Because the definition of the Lifecycle Management Controller’s behavior does not mention actions it can
be implemented as a component. All of the lifecycle management functionality is implemented in the
LifeManTAB class found in the atst.base.management.lifecycle package. If you which to implement
your own controller that performs lifecycle management simply add a LifeManTAB to any extension of
Base Controller. In most cases you should probably be using the ManagementController (described in
section 4.2) which already adds the LifeManTAB for you.
4.1.1 Properties
The following properties are all used by the LifeManTAB and as such any class using a LifeManTAB will
need to include them.
Name Type Description
manage:lifecycles String[] The name of all of the components and Controllers who lifecycle
this manager is responsible for.
manage:lifecycles:timeout Integer The number of seconds to wait before logging an error that the
worker failed to transition into its new lifecycle state. If not
present this defaults to 10 seconds.

Base Software for Control Systems
TN-0088, Rev K (Canary 10) Page 17 of 45
Not listed here are all of the properties inherited from parent classes.
4.2 ACTION MANAGEMENT CONTROLLERS
The Action Management Controller is an extension of the Lifecycle Management Controller. In addition
to carrying workers though their lifecycle states an Action Management Controller can turn a
configuration (call it a main-configuration) that it receives into a set of configurations (call them worker-
configurations) for some or all of its workers. The Action Management Controller ‘completes’ its action
when all of its workers complete their actions. If one of the workers cannot run (i.e. submit does not
return OK) or fails to complete (an unexpected abort) the Action Management Controller can cancel all of
the other workers who are working on a configuration based on the same main configuration.
The Action Management Controller can be configured, based on properties, to either support one action at
a time or (more likely) to support multiple simultaneous actions. Regardless of whether the Action
Management Controller is running in single or multi-threaded mode, it keeps track of which main-
configurations led to which worker, worker-configuration pairs. This allows the Action Management
Controller to pause, resume, and cancel the actions of its workers when that Action Management
Controller’s action is paused, resumed, or canceled. It is possible to customize the
pause/resume/abort/cancel behavior on a configuration-by-configuration basis, or to simply define a
different default.
The Action Management Controller behavior is implemented by the Java class ManagementController
from the atst.base.management.action package. The Management Controller contains all of the
doXxx() methods defined by the CSF Controller. All of these methods (with the exception of
doSerialAction(), and doAction()) may be overridden by developers to add their own custom
behavior. There should be no need to override serialDoAction() or doAction() because the existing
finalized behavior has enough hooks for custom behavior. For details on how actions behave see section
4.2.2 below. Because a Java Management Controller can manage both Java and C++ workers there is no
plan to implement a C++ version of this controller.
4.2.1 Properties
Name Type Description
manage:lifecycles String[] The name of all of the components and Controllers who
lifecycle this manager is responsible for.
manage:lifecycles:timeout Integer The number of seconds to wait before logging an error that
the worker failed to transition into its new lifecycle state. If
not present this defaults to 10 seconds.
manage:actions String[] The name of all of the Controllers whose actions this
manager is responsible for.
manage:actions:finishOnFail Boolean The property determines whether a manager will keep trying
to finish an action if one of its workers fails to complete their
action. If not present this defaults to false.
Not listed here are all of the properties inherited from parent classes.
4.2.2 Action Behavior
When a configuration is submitted to a Management Controller there are some parts of the process that
are done automatically by CSF some parts done automatically by the management controller. Some of
the Management Controller parts are final and cannot be modified but other parts can be modified. The

Base Software for Control Systems
TN-0088, Rev K (Canary 10) Page 18 of 45
following attempts to clearly define an action from start to finish. It would be useful to review the
Javadoc (as it contains more details and better descriptions of individual methods) as you are walking
though the behavior below.
Submit Thread: After a controller’s submit method is called there are a few things that happen in the
submit thread:
1. CSF code checks to make sure that the controller is running.
2. CSF code checks to make sure that all of the attributes in the configuration are valid.
3. The controller’s doSubmit() method is called for any further configuration validate. Users may
add code here to do additional configuration validation. Default behavior is no-op.
4. CSF code makes sure that the configuration is not already running.
5. CSF code places the action on the Action Manager’s Queue.
Action Manager Thread: After the configuration has been placed on the queue the Action Manager:
1. CSF Code in AM waits for start time, and an available action threads
2. CSF Code in AM calls controller doCanRun() to make sure that the configuration can run. Users
may add code here to make sure that a given configuration (i.e. state transition) is allowed.
Default behavior is no-op
3. CSF Code in AM calls doSerialAction() which is a final method and cannot be overridden.
4. doSerialAction() calls the localDoAction() method. Users may override this method and
modify the configuration and set interval values (e.g. demand state). Default action is no-op)
5. doSerialAction() calls getFinishOnFail() to decide if it should the manager should press on
given a failed worker. Users may override the default behavior to decide whether or not to press
on.
6. doSerialAction() calls the controller’s makeAllConfigs() method do construct all workers
configurations. Users may override the default behavior to create configurations with multiple
configurations for a single worker. If only one configuration per worker is needed this method
should probably not be overridden. The default behavior is to call makeCCPair() for each
worker in the list of managed workers.
7. makeAllConfigs() (unless overridden) calls the controller’s makeCCPair() method to make A
Configuration Controller pair for later submission. Users may override the default behavior to
create CCPairs with different ‘PRACable’ behavior. Unless managers need to customize on an
action by action basis worker PRAC behavior this method should probably not be overridden.
The default behavior is to call makeConfig().
8. makeCCPair() (unless overridden) calls the controller’s makeConfig() method to construct a
configuration to send to the target worker. The default behavior for makeConfig() is to call
config.selectOnPrefix() and returns the new configuration if non-empty, or null if it was
empty. Users should probably override this method. This is generally where worker
configurations are constructed. Consider calling super.makeConfig() for a first pass at a
worker configuration.
9. doSerialAction() iterates over the list of returned CCPairs and submits the given configuration
(along with a callback) to the given worker.
10. doSerialAction() returns ACTION_OK.
Action Thread: After the serial action has been finished the remainder of the actions happens in the
action thread’s time.
1. CSF Code in the Action calls doAction(). While doAction() is generally left for users to
implement in the management controller it is final.
2. Code in doAction() obtains the list of remote actions and waits for all of them to complete.
Concurrently with awaiting completion the Callback Thread (see below) is being triggered

Base Software for Control Systems
TN-0088, Rev K (Canary 10) Page 19 of 45
3. Code in doAction() builds an action response of OK if all workers finished successfully or
WORKER_PROBLEM if one or more workers encountered problems.
4. Code in doAction() calls getRespose() to generate an action response.
5. Code in doAction() calls the hasNextPhase() method to see if there should be another action
phases.
6. hasNextPhase() (unless overridden) returns false. Users wanting multiple action phases should
override this method. This might be a good time to increment a phase attribute in the
configuration.
7. If there are more phases (i.e. hasNextPhase() returned true), doAction() will call
doSerialAction() followed by doAction(). The recursive call to doAction() allows an
unlimited number of phases.
8. If there are no more phases, the response generated by getReponse() is returned and the action is
complete.
Callback Thread: The callback thread is triggered by receiving configuration state events. The callback
thread is being triggered concurrently with the serial and regular action methods.
a) CSF code calls doDone() when a worker finishes. The callback then performs some bookkeeping
and notes which worker and configuration have finished.
b) CSF code calls doAbort() when a worker fails. The callback then performs some book keeping
and notes which worker and configuration have finished. If finishOnFail() returned false, all
still-running workers are aborted. By default it returns true.
1) Whether a worker finished because of done, or aborted, the controller’s oneDone() method is
called. User code here may decide to cancel or abort other workers if some set of key workers
are completed. The default behavior is a no-op.
c) CSF code calls doReport() when a worker posts a report. The callback then calls the controller’s
handleWorkerReport() method. Users may add code here to handle worker reports in a custom
way. The default behavior is to propagate the report up the chain.
4.2.3 Sequencing
As mentioned above the Management Controller is also capable of sequencing its worker’s actions.
There is a single method hasNextPhase(IConfiguration config, ActionResponse ar) which by
default returns false. Overriding this method to return true some of the time, will cause the controller to
again attempt to make configurations for its workers, submit those configurations, and await their
completion. This would, for example, allow a management controller that manages motion controllers to
perform collision avoidance (moving one stage, or one set of stages before another). Developers
overriding the Management Controller may use whatever approach they wish for tracking which phase of
action the controller is carrying out. The Management Controller has two methods which can be used to
track phase. The first is getPhase(IConfiguration config), and the second is
incramentPhase(IConfiguration config). See the Javadoc for details on these methods but in short,
get returns the values of the mgr:phase attribute in the configuration (assuming 0 if one is not found),
while the increment method adds one to the current phase and inserts an attribute named mgr:phase into
the configuration. This phase can be consulted in makeConfiguration() to skip building configurations
for some workers during certain phases. See atst.base.examples.ExampleSequenceController for an
example sequencer.
4.2.4 PRAC Support
The Management Controller attempts to automatically propagate pause, resume, abort, and cancel request
from the manager down to all workers carrying out actions based on the PRACed main-configuration.

Base Software for Control Systems
TN-0088, Rev K (Canary 10) Page 20 of 45
The makeCCPair() as mentioned in section 4.2.2 allows subclasses to construct a CCPair object with a
worker-controller specific PRAC behavior. If the same PRAC behavior is desired for all, the default may
be set using the static setDefaultPRAC() method of the CCPair class found in the
atst.base.management.action.util package. One could for example set the default behavior to
propagate all aborts, but not propagate cancels. The default method may be obtained with
getDefaultPRAC() and if it is never set it defaults to fully PRACable (i.e. manager pause, resume, abort,
and cancel worker pause, resume, abort, and cancel.
4.3 SCRIPT INTERPRETING CONTROLLER
The script interpreting controller is an abstract controller for executing scripts. It is a generic class whose
type is the interpreter being used. This is to allow for custom interpreters that provide methods beyond
those defined by the IInterpreter interface. The assumption is that someone extending this class will
be able to define based on some configuration, where to get the script that needs to be run, and after
fetching the script, what interpreter will be used to run the script. All of the code in this class focuses on
protecting against null pointers (scripts, interpreters …) exception catching, and properly cleaning up.
This leaves the developer free to focus on:
1) where the script comes from (e.g. a file, some database, embedded in the code,
dynamically generated)
2) what interpreter to use for the script, and where that interpreter comes from (e.g. are
interpreters created on the fly or are they pooled)
3) reading back responses from the interpreter (e.g. what variable within the interpreter
will be used to store the return value and how does that variable map to an action
response)
4) cleaning up a completed interpreter (e.g. should additional garbage collection be
triggered, can the interpreter be wiped and placed back into a pool)
The class is likely just as useful of an example of how a controller that interprets a script might look as it
is a base class for an interpreter. If it does not suit your needs consider using the class as a template.
4.3.1 Properties
The Script Interpreting Controller requires no properties beyond those needed by the standard CSF
controller and the base controller.
4.3.2 Methods
The Script Interpreting Controller is an abstract class and there are a few methods that must be
implemented by subclasses.
IScript getScript(IConfiguration) – get the script to interpret
IInterpreter getInterpreter(IConfiguration, IScript) – get the interpreter to interpret
the script.
IActionResponse getResponse(IInterpreter, IConfiguration) – get the action response
from the completed interpreter.

Base Software for Control Systems
TN-0088, Rev K (Canary 10) Page 21 of 45
void cleanUpInterpreter(IInterpreter) – carry out what ever actions are necessary with
the now unneeded interpreter.
For more details on the methods, see the Java Doc documentation. Additional methods that do not need
to be overridden will also be listed there.
Base Software for Control Systems
TN-0088, Rev K (Canary 10) Page 22 of 45
5. LOW-LEVEL CONTROLLERS (HARDWARE CONTROLLERS)
DKIST Base provides some low level controllers that are designed to communicate directly with
hardware. The hardware controller class provided in Base manages the communication. The hardware
controller, during its lifecycle progression, manages a hardware connection object. The hardware
connection object is different from the connection used for inter-component communications. The
hardware connection object allows the controller to talk to the underlying hardware.
5.1 HARDWARE CONNECTIONS
The basic principal behind Base’s support for hardware devices is the hardware connection. Hardware
connections take a number of different shapes. All that the hardware controller needs is for the hardware
connection to support a few basic methods: connect(), disconnect() and isSimulated(). As long as
those methods are implemented the hardware controller is able to do its job. That does not provide much
utility to the subclasses of hardware controller though. Generally the hardware connection will
implement a hardware specific interface that the controller uses to abstract the hardware. In this way the
same controller class can be used to talk to two different types of hardware just by changing the
underlying connection.
The connection interface and the hardware-type-specific interface that the hardware connection
implements are its contract with the outside world but internally it actually needs to be able to
communicate with the device in question. This is generally accomplished using channels. Channels may
be unidirectional (write channel or read channel) or bidirectional (write and read channel). A hardware
connection may construct as many channels as it needs to talk to the hardware. These channels are used
internally and the hardware controller or its subclass should not impose any restrictions on these.
The best way to understand a connection is to look at a concrete example. Let’s look at what a motion
controller’s connection would need. The hardware controller needs the IConnection interface to be
implemented so that it can connect and disconnect from the hardware at the startup/shutdown lifecycle
transitions. The extension of hardware controller (motion controller) needs the connection to present an
abstracted representation of the hardware. In the case of the motion controller this abstraction is the
IMotion interface. So for a motion controller, the connection object must implement the IConnection
and IMotion interfaces. In the case of the Delta Tau hardware multiple bidirectional channels are needed.
There is one channel to send commands and receive responses, there is another channel used to read
limit/fault information, and there is a third channel used to publish motor status information and motor
completion.
The goal with the hardware connection is to be the piece that gets changed out when/if the underlying
hardware is changed, or a simulator is used instead. The extension of the hardware controller would
remain but it would simply instantiate a connection that talked to a different kind of hardware, or
simulated the hardware all together.
For a class diagram of a Connection see $ATST/doc/uml/base/FooConnection.png.
For an example Controller/Connection see $ATST/src/java/atst/base/examples/connection.
5.2 HARDWARE CONTROLLERS
A hardware controller is a controller which controls a piece of hardware or another entity that does not
speak common services. This will allow common services to speak to a Delta Tau motion controller, a

Base Software for Control Systems
TN-0088, Rev K (Canary 10) Page 23 of 45
Spectracom TSync timing card, or any one of a number of other devices. The hardware controller
manages the connection between itself and the hardware device.
The hardware controller also provides a few useful utilities. Many controllers and most hardware
controllers will need to post status events at a regular interval. The hardware controller creates a timer
that, at a definable interval, requests an event table. That table is then posted to the event stream.
5.2.1 Properties
Name Type Description
connection:class String The class name of the collection to instantiate. This should be a
fully qualified class name.
connection:address String[] The address or addresses that the connection needs to connect to the
hardware. This will be passed to the connection during connect.
connection:interfaces String[] A list of interfaces that the connection should implement. This
allows the connection to be checked at construction rather than
waiting for a cast to fail after the controller has started.
post:eventName String The name of the event to post with the controllers status. Defaults to
‘controllerName.state’.
post:interval Real The time (in seconds) between event posts. Defaults to 1 second.
post:enable Boolean Whether or not to post a regular status event. The defaults to true.
Not listed here are all of the properties inherited from the controller and base controller classes.
5.2.2 Methods
The Hardware Controller is an abstract class and there are a few abstract methods that must be
implemented by subclasses.
hardwareStartup() – Instruct the hardware to perform any actions necessary for startup.
hardwareShutdown() – Instruct the hardware to perform any action necessary for shutdown.
registerInterrupts() – Instruct the controller to register for any interrupts with the hardware.
Some controllers will do nothing here.
doSetConnection(IConnection c) – The hardware controller calls this method after it has
opened the connection to the hardware (with the connection object), and (with null) imediately
before it closes the connection.
registerInterrupts() – Register for any interrupts that will come from the hardware.
getEventTable() – This event table is used if the controller needs to post regular events. Event
posting can be turned off by setting post:enable to false. Its frequency can be changed with
post:interval. The name of the event can be changed with post:eventName.
5.2.3 Lifecycle
As the Hardware controller is brought though its lifecycle it takes care of instantiating and opening the
connection to the hardware. It provides hooks for developers to add their own behavior. The following
attempts to walk through the lifecycle transitions of the Hardware Controller
Loaded Initialized
After the CSF Controller code takes care of loading all properties, and initializing the Action Manager, it
begins to iterate over a Controller’s TABs. For Hardware Controllers one of those TABs is the Hardware

Base Software for Control Systems
TN-0088, Rev K (Canary 10) Page 24 of 45
TAB. The Hardware TAB checks for the presence of the class and address properties, and refuses to
transition if they are not present. Assuming that they are, it then proceeds to instantiate a connection of
the proper class. If the interfaces property is present that connection is tested to make sure that it satisfies
any additional interfaces (e.g. IMotion). CSF then proceeds to call doInit() where custom initialization
code may be added. After doInit() returns the controller sets its state to initialized.
Initialized Running
After the CSF Controller code takes care of starting the Action Manager, it begins iterating through its
tabs and starting them. Of interest, again, is the Hardware TAB. The Hardware TAB instructions its
connection object to connect. If it is unsuccessful, a LifeCycleChange exception is generated, and the
controller will not transition. If successful, the TAB will check to see if the connection is simulated, and
if so will mark the controller as simulated. The connection is than passed to the controller via the
doSetConnection() method. Next the component’s registerInterrupts() method is called for
developers to register any hardware interrupts. Finally the component’s hardwareStartup() method is
called. After the TAB completes, the CSF Controller calls doStartup() and marks itself as running.
Running Initialized Loaded
Walking backwards though the lifecycle is simply the reverse of the steps laid out above. doShutdown()
is called first, followed by hardwareShutdown() and so forth.
Historical Context
The Hardware Component/Controller and its associated TAB need to be looked at in a historic context to
fully understand some of the reasons behind the various methods. The original versions of the Hardware
Component/Controller were written before TABs. Because of this, the original implementation finalized
the doLifecycle() methods and where the need for addition functionality was anticipated (e.g. startup,
registering interrupts) method stubs were provided. When the hardware component/controller were retro-
fitted with a TAB to perform the doLifecycle() behavior, the need for hardwareStartup(),
hardwareShutdown(), and other method became less clear. However simply doing away with them
would have broken backwards compatibility. Were the Hardware Component/Controller to be re-written
from scratch today, it would likely not bother with any method other than doSetConnection() (and
maybe not even that). However to avoid breaking existing code, the methods are present and used by
some sub-classes.

Base Software for Control Systems
TN-0088, Rev K (Canary 10) Page 25 of 45
6. TIME BASE
The Time Base Controller and connection are used by DKIST to connect to the distributed Time Protocol
(Precision Time Protocol or PTP). As an alternative to running hardware synchronization lines across the
telescope, using the PTP standard, DKIST is able accurately distribute the current time to all subsystems,
and those subsystems can then schedule activities according to the ‘absolute wall clock time’.
6.1 TIME BASE CONTROLLER
The TimeBaseController is a Java Controller in the package atst.base.hardware.time. The Time
Base Controller provides a means of interacting with a time base device. The baseline hardware for the
controller to interface with is the Spectracom TSync-PCIe-PTP card. The controller is trying to be
generic, and hardware independent, but it is unclear how well it accomplishes this goal.
6.1.1 Properties
A property table named ‘atst.base.hardware.time.TimeBaseController’ is provided in the
atst/base/hardware/time/timebase.prop file. This property table include the default connection: and post:
name space properties. This property table will be automatically loaded as part of the “createDevel –init-
db” setup step. Applications that include a TimeBaseController should define their own property table
for the controller under its CSF name, and inherit (using “&inherits”) the
‘atst.base.hardware.time.TimeBaseController’ property table. The inherited properties can then be
overridden as needed.
6.1.2 Usage
The controller supports enabling/disabling GPIO pins, setting match times and configuring square wave
outputs. Additionally it supports getting timestamps, and getting the values of IO pins. All gets are
performed with the Controller.get() method, and all sets are performed with the
Controller.submit() method. While it is possible to perform a get() on a non-running, controller
doing so will result in an un-modified attribute table being returned.
6.1.3 Attributes
For a complete list of Attributes that can be passed to the Time Base Controller see the Javadoc for the
TimeBaseAttribute Enumeration in the atst.base.hardware.time package. The Javadoc lists the
simple names for all attributes that may be passed to the Time Base Controller, whether they may be read,
written, or both, and an explanation of what arguments are supported. Attributes are processed by the
Time Base Controller in a non-deterministic order.
6.2 TIME BASE CONNECTIONS
All Time Base Controller instantiations will use a connection that implements the ITimeBase interface to
communicate with the hardware. Ideally the Time Base Controller’s connection would be completely
generic. In reality the functionality of the controller and more importantly the methods exposed by
ITimeBase very closely match the functionality present in the reference TSync card. After reading the
TSync manual, and understanding what functionalities it provides, you should have a clear sense of what
functionality the methods in the connections expose. If you do need to write you own Time Base
Connection to a different kind of hardware, please consult with the project to determine the best path
forward.

Base Software for Control Systems
TN-0088, Rev K (Canary 10) Page 26 of 45
6.2.1 TSync Connection
The TSync Connection requires that the TSync Linux Kernel Driver be installed to work properly.
Consult Spectracom’s website for details on how to install the kernel driver and update the devices
firmware.1 After installing the driver you will need to configure CSF/Base to build the JNI interface layer
to the driver. This is done by adding ‘tsync’ to the ATST_JNI_PACKAGES list found in site.config.
After updating site.config run the following commands so that make knows it needs to build the Tsync
JNI package:
cd $ATST
./admin/site.config –init-data
make jni
Once these steps are complete, proceed with the build.
6.2.2 Oregano Connection
The Oregano Syn1588 Connection requires that the Oregano Linux Kernel Driver be installed to work
properly. See the installation notes for details on how to install the driver and enable it. After installing
and enabling it the set your controller’s connection:class to
‘atst.base.hardware.time.connections.oregano.Syn1588Connection’. The connection:address
field is used to pass the desired of the IOMatrix configuration to the connection.
The TimeBaseController was designed with the TSync driver/connection in mind. In that model the
GPI/GPO pin arguments that are passed to the controller mapped to physical pins on the card. This does
not map well to the Oregano card. The Oregano card has resources (triggers, events, and periods) that
may be mapped to any physical output (via the IOMatrix). The card’s internal resources are the closest
things to pins and as such those resources are mapped to the pins. GPO pin 0 and 1 map to trigger
resources 0 and 1 respectively. GPO pin 2 and 3 map to period resources 0 and 1 respectively. GPI pin 0
and 1 map to event resources 0 and 1 respectively. GPI pins 2 and 3 are unsupported by the Oregano
connection. See also the constants defined in the Syn1588 Connection class.
6.2.3 Simulated Connection
A simulated time base connection is provided through the atst.base.util.sim.SimTimeConnection class.
Use of this simulated connection requires the connection:class property of the application’s Time Base
Controller to be set to “atst.base.util.sim.SimTimeConnection”. All other properties can be inherited from
the TimeBaseController property table (see timebase.prop)
The simulated time base connection supports most of the ITimeBase interface methods. However it
behaves as a slave clock and always uses AtstDate.getCurrent() as the time. Therefore, the following
interface methods are currently not supported (no-op):
setReference(TimeReference reference) // Fixed at EXT_1PPS
setTimeStandard(TimeStandard standard) // Fixed at UTC
setTime(IAtstDate time) // Time always AtstDate.getCurrent()
1 It should be noted that the TSync Card/Driver appear to still be under development. In the past problems have
been encountered when updating CentOS kernels. Additionally firmware updates have been necessary to ensure
that the card functions properly on some systems.

Base Software for Control Systems
TN-0088, Rev K (Canary 10) Page 27 of 45
setOffset(TimeStandard standard, int offset) // Fixed at 0
setYear(int year) // Time always AtstDate.getCurrent()
setTimeSecNano(long nSeconds, long nNanos) // Time always AtstDate.getCurrent()
waitForInterrupt(InterruptType interrupt, int gpioPin) // TODO
It should also be mentioned that the status information reported by calling the getStatusTable() method of
the simulated time connection return more information than the TSync connection used for real hardware.
It can also be called at a faster rate than that for the TSync connection. This is due to a known issue we
are investigating that limits the rate and amount of status data that can be queried from the TSync
hardware.
6.3 TIME BASE JES SCREENS
6.3.1 Status Screen
A JES template screen for displaying the status of the TimeBaseController is available in
$ATST/resources/screens/base/templates/status/Time.xml This screen subscribes
to the status event of the TimeBaseController and displays the information in an organized manner using
JES widgets.
6.3.1.1 Usage
The screen dimensions are 622x322, which allows them to be embedded nicely in another JES screen
using a JES nested screen widget with dimensions of 625x325.
The Time.xml screen template requires the macro ‘tbc’ to be defined. For example, if the CSF name of
the TimeBaseController is: myapp.tbc then the $ATST/bin/JESexpand tool should be used to generate a
screen file from this template as follows:
$ATST/bin/JESexpand –macros=”tbc=myapp.tbc”
6.3.1.2 Status Tab
The status tab provides all the high level status information about the time card including time settings,
alarm status, and uptime.
Figure 1: Status tab of Time Base Controller JES status screen

Base Software for Control Systems
TN-0088, Rev K (Canary 10) Page 28 of 45
6.3.1.3 Inputs tab
The inputs tab provides status information about the general purpose input pins of the timing card. The
‘value’ column provides the pin name and uses green and red coloring to indicate whether the pin is
enabled or not respectively.
Figure 2: Inputs tab of Time Base Controller JES status screen
6.3.1.4 Outputs tab
The outputs tab provide status information about the general purpose output pins of the timing card. The
mode field identifies the mode of the GPO pin, but also uses green and red coloring to indicate whether
the pin is enabled or disabled respectively. When the mode is square wave the offset, period, and pulse
width will become visible.
Figure 3: Outputs tab of Time Base Controller JES status screen
6.3.1.5 Hardware tab
The hardware tab provides the status of the time card internal hardware time stamping.

Base Software for Control Systems
TN-0088, Rev K (Canary 10) Page 29 of 45
Figure 4: Hardware tab of Time Base Controller JES status screen
6.3.1.6 Interrupts
The interrupts tab provides status on all of the time card interrupts. The interrupt names are given along
with the count of interrupt that have occurred. Green and red coloring are used around the interrupt
names to indicate whether the interrupt is enabled (not masked) or not (masked).
Figure 5: Interrupts tab of Time Base Controller JES status screen
6.3.2 Control Screen
There is currently no JES control screen available for the Time Base Controller. Developers are
encouraged to create a control screen that meets their needs.

Base Software for Control Systems
TN-0088, Rev K (Canary 10) Page 30 of 45
7. DIGITAL IO
The DigitalIOController provides a CSF controller for controlling digital IO hardware. The controller
supports a generic digital IO capability as defined by the IDigitalIO interface and includes the following
features:
Setting/getting the number of IO pins (bits)
Latched or unlatched data reads with latch control for individual bits
Polarity control for individual bits
Reading/writing individual bits or entire words
While the DigitalIOController has been tested, it has not been used extensively. It is up to the user to
test it thoroughly, or to use it as an example for implementing a custom digital IO controller.
7.1 DIGITAL IO CONTROLLER
The DigitalIOController is a Java Controller in the package atst.base.hardware.io. It provides a
full control interface for a generic digital IO hardware device. It uses the standard CSF connection and
channel approach to connect with and control hardware. There is no baseline hardware selected for the
controller, but it has been successfully tested with the Delta Tau ACC-14E digital IO board. The Delta
Tau example uses the DeltaTauConnection.java class in atst.base.hardware.io and the
DeltaTauChannel.java class from atst.base.hardware.motion.deltatau. Please refer to the
connection class as an example of how to write a connection class for new digital IO hardware. The
DeltaTauChannel class is a bit unique in that it supports the concept of a single master DeltaTau
interface that is used by multiple channels, so it may not be the best example for a single channel to
communicate with hardware. The user is also directed to look at the DTConnectionTester.java class in
atst.base.hardware.io as an example of test code for the connection class. The user should also see the
JavaDoc information in the IDigitalIO interface for specific details on how the connection class
methods are used.
7.1.1 Usage
The controller supports the reading and writing of digital data either as a word (Java long) or as individual
bits specified by an array of bit positions within the word. Data reads may be latched or unlatched. Only a
single hardware latch signal is assumed and is not accessible through the software (i.e., the latch is an
external input signal to the hardware board). The control of which bits are latched is supported down to
the individual bit level. The latching configuration is specified using a data word or individual bits,
similar to that described previously for reading and writing data. Moreover, a mask word may be used to
avoid having to perform a read-modify-write when updating the latch word. The controller supports
polarity control (inversion) of both the inputs and outputs as well. The configuration of polarity control is
performed in a manner similar to the configuration of latching.
Data writes are performed using the CSF submit() interface, while data reads are performed using the
CSF get() interface. Both inputs and outputs may be read, so a direction indicator is used when reading.

Base Software for Control Systems
TN-0088, Rev K (Canary 10) Page 31 of 45
7.1.2 Attributes
The attributes are detailed in the IDigitalIOConstants.java interface in the package
atst.hardware.io.interfaces with a brief description provided here. See the dio.prop file (in the
same directory) for an inheritable set of Digital IO properties.
Attribute name Values Description
mode dataAccess | latchControl |
polarityControl
Determines which functions are being
accessed by reads and writes
dataWord long Contains the data to be read or written
maskWord long A mask used when setting particular
latch or polarity control bits to avoid
having to read an entire word, modify a
few bits and then write the modified
word back to the controller
dataBits int[] An array of individual data bits to be
read or written
bitIndices int[] The bit indices of the bits to be read or
written
latchWord long A word representing the bits to be
latched when reading data
latchBits int[] An array of individual latch bits to be
read or written to the latch control
register. The bitIndices attribute is used
in conjunction with this attribute.
inputPolarityWord long A word representing the polarity to be
applied to bits that are read. A 1 means
active high and a 0 means active low.
outputPolarityWord long A word representing the polarity to be
applied to bits that are written. A 1
means active high and a 0 means active
low.
inputPolarityBits int[] An individual bit specification for input
polarity. This is used in conjunction with
the bitIndices attribute.
outputPolarityBits int[] An individual bit specification for output
polarity. This is used in conjunction with
the bitIndices attribute.
direction string A string indicating the direction (input
or output) to be used when accessing
latch or polarity words. If direction is set
to input, then the input latch or polarity
word or bits are read or written.

Base Software for Control Systems
TN-0088, Rev K (Canary 10) Page 32 of 45
7.2 DIGITAL IO CONNECTIONS
See the DeltaTauConnection.java class in atst.base.hardware.io for an example of how to write a
connection class for the DigitalIOController.
7.2.1 Delta Tau Power PMAC Connection
Base provides two different connections for communicating with two different Delta Tau PMAC DIO
expansions cards. Both classes may be found in the atst.base.hardware.io package and may be used
without any modifications. The DeltaTauAcc14EConnection class should be used by DIO controllers
trying to communicate with the ACC 14 E expansion card, and the DeltaTauACC65EConnection class
should be used by DIO controllers trying to communicate with the ACC 65 E expansions card. The
appropriate class name should be stored in the saved/default value of your Controller’s
connection:class property (e.g. for ACC 14 E the connection:class property should be
atst.base.hardware.io.DeltaTauAcc14EConnection).
If you have a different Delta Tau DIO expansion card, then you will have to write your own connection
for it. Using the DeltaTauGateIoConnection class (which both of the previously mentioned connections
extend) as your connection’s parent class should reduce the amount of work necessary.
7.2.2 Simulated Connection
Base provides no simulated digital IO connection classes at this time.
7.3 DIGITAL IO JES SCREENS
There are currently no JES screens available for digitial I/O status or control. Developers are encouraged
to create their own screens that meet their needs.

Base Software for Control Systems
TN-0088, Rev K (Canary 10) Page 33 of 45
8. POWER CONTROL
8.1 POWER SUPPLY CONTROLLER
The PowerSupplyController provides a CSF controller for remotely controlling power supply hardware.
The controller supports a generic power supply control and monitoring capability as defined by the
IPoweredSupply interface and includes the following features:
Setting the output power state to on or off
Getting the hardware status for output power state and current/demand voltage and current
Getting the fault state
While the PowerSupplyController has been tested, it has not been used extensively. It is up to the user
to test it thoroughly, or to use it as an example for implementing a custom power supply controller. It is
expected that a more advanced power supply controller will be developed in the near future that supports
reporting more status information.
The PowerSupplyController is a Java Controller in the package atst.base.hardware.power. It
provides a full control interface for a generic single output power hardware device. It uses the standard
CSF connection and channel approach to connect with and control hardware. There is no baseline
hardware selected for the controller, but it has been successfully tested with the TDK Lambda Genesys
30-25 USB power supply. The Genesys example uses the GenesysConnection.java class in
atst.base.hardware.power.genesys and the SerialChannel.java class from
atst.base.hardware.connections.channels. Please refer to the connection class as an example of
how to write a connection class for power supplies requiring other communications protocols (i.e. telnet).
The user should see the JavaDoc information in the IPowerSupply interface for specific details on how
the connection class methods are used.

Base Software for Control Systems
TN-0088, Rev K (Canary 10) Page 34 of 45
Figure 6: Class diagram for PowerSupplyController
8.1.1 Usage
The controller supports setting the output power state to on or off and reporting status via an event.
Changing the power state is performed using the CSF submit() interface. The submit interface will
accept a configuration which must include the .mode attribute. If the .mode attribute has a value “off” the
output power is turned off. If the .mode attribute has a value of “active” the output power is turned on.
The controller outputs a status event named .status which includes information about the current mode
(.mode), output power state (.power) and current/demand voltage (cVoltage, dVoltage in Volts) and
current (cCurrent, dCurrent in Amps).
The SerialChannel class requires the RXTX library for serial communications. The RXTX package is
included with the Base tools, and will be installed automatically in the ASDT during the createDevel init-
tools step. In order for the linux accout running your application to access the serial ports, the following
additional steps must be performed:
1) The linux account that will run your application must be added to the uucp group. The following
command should be run as root, and is an example of how linux account someuser can be added
to the uucp group:
usermod –a –G uucp someuser

Base Software for Control Systems
TN-0088, Rev K (Canary 10) Page 35 of 45
2) The linux account that will run your application must be added to the dialout group. The
following command should be run as root, and is an example of how linux account someuser can
be added to the dialout group:
usermod –a –G dialout someuser
8.1.2 Attributes
The attributes are detailed in the PowerSupplyConstants.java class in the package
atst.base.hardware.power with a brief description provided here. See the power.prop file (in the
same directory) for an inheritable set of power supply controller properties.
Attribute name Values Description
mode off | active Determines the output power state of the
hardware
8.1.3 Status event
The PowerSupplyController generates a status event with the name “<controller fq name>.status”. For
example if the controller name was “atst.inst.foo” the event name is “atst.inst.foo.status”. The following
table lists the elements of this status event. These element names are static members of the
PowerSupplyConstants.java class in the package atst.base.hardware.power
Attribute name Units Type Description
mode off | active String Mode of the controller
power on | off String State of output power
cVoltage Volts Float Current reading for voltage
cCurrent Amps Float Current reading for current
dVoltage Volts Float Demand voltage
dCurrent Amps Float Demand current
powerY Watts Power for Y phase
voltageZ Volts Voltage for Z phase
8.1.4 Connections
See the GenesysConnection.java class in atst.base.hardware.power.genesys for an example of how to
write a connection class for the PowerSupplyController.
8.1.4.1 TDK Lambda Genesys Connection
The GenesysPowerConnection class provides an implementation of the IPowerSupply interface for
control of a TDK Lambda Genesys power supply. Currently the interface and the implementation only
support setting the output power state on or off through the setPower method. Interrupt handlers for
reporting status and fault information are also supported.

Base Software for Control Systems
TN-0088, Rev K (Canary 10) Page 36 of 45
8.1.4.2 Simulated Connection
The SimPowerSupplyConnection class located in package atst.base.util.sim provides a simulated
connection that implements IPowerSupply. This simulated connection can be used with the
PowerSupplyController class when no power supply hardware is present, or the user wishes to run their
system without connecting to actual hardware.
8.1.5 JES Screens
8.1.5.1 Status screen
A JES template screen for displaying the status of the PowerSupplyController is available in
$ATST/resources/screens/base/templates/status/Power_Supply.xml This
screen subscribes to the status event of the PowerSupplyController and displays the information in an
organized manner using JES widgets.
Figure 7: Power Supply Controller JES status screen
8.1.5.1.1 Usage
The screen dimensions are 622x122, which allows them to be embedded nicely in another JES screen
using a JES nested screen widget with dimensions of 625x125.
The Power_Supply.xml screen template requires the macro ‘power’ to be defined. For example, if the
CSF name of the PowerSupplyController is: myapp.ps1 then the $ATST/bin/JESexpand tool should be
used to generate a screen file from this template as follows:
$ATST/bin/JESexpand –macros=”power=myapp.ps1”
8.2 POWER SWITCHING CONTROLLER
The PowerSwitchingController provides a CSF controller for controlling a remotely switchable power
distribution unit (PDU). The controller supports a generic power switching control and monitoring
capability as defined by the IPoweredSwitching interface and includes the following features:
Setting the output power state for individual outlets by outlet name or number
Setting the output power state for groups of outlets by group name or number
Setting the output power state for all outlets immediately

Base Software for Control Systems
TN-0088, Rev K (Canary 10) Page 37 of 45
Setting the output power state for all outlets based on predefined sequence
Soft reboot of the hardware
Getting all outlet and group names
Getting the current hardware status which generally includes the output power state of each outlet
Getting the fault state
While the PowerSwitchingController has been tested, it has not been used extensively. It is up to the
user to test it thoroughly, or to use it as an example for implementing a custom power supply controller. .
The PowerSwitchingController is a Java Controller in the package atst.base.hardware.power. It
provides a full control interface for a generic multiple outlet switched PDU device. It uses the standard
CSF connection and channel approach to connect with and control hardware. There is no baseline
hardware selected for the controller, but it has been successfully tested with the Eaton Pullizi ePDU
IPV70K1_EP1_09L_3730A_ME. The Eaton Pullizi example uses the EatonPulliziConnection.java
class in atst.base.hardware.power.eaton and the SocketChannel.java class from
atst.base.hardware.connections.channels. Please refer to the connection class as an example of
how to write a connection class for power supplies requiring other communications protocols (i.e. serial
port). The user should see the JavaDoc information in the IPowerSwitching interface for specific details
on how the connection class methods are used.

Base Software for Control Systems
TN-0088, Rev K (Canary 10) Page 38 of 45
Figure 8: Class diagram for PowerSwitchingController
8.2.1 Usage
The controller supports setting the output power state of outlets and reporting status via an event.
Changing the power state is performed using the CSF submit() interface. The submit interface will
accept a configuration which must include the .command attribute. The .command attribute specified
which type of control is being requested. The options and associated use examples are as follows:
Outlet based control:
.command = “controloutlet”
.outletName = “device foo” (or use .outletNum to specify by number)
.powerState = “on”
Group based control:
.command = “controlgroup”
.groupName = “power supplies” (or use .groupNum to specify by number)
.powerState = “off”
Global control:
.command = “controlglobal”
.globalAction = “immediate” (or use “sequenced” to execute predefined sequence)
.powerState = “on”

Base Software for Control Systems
TN-0088, Rev K (Canary 10) Page 39 of 45
Soft reboot:
.command = “softreboot”
The controller outputs a status event named .status which includes information about the current output
power state of each outlet (.outletStates) and current voltage, current, and power of each input phase
(voltageX, currentX, powerX, etc.).
The SocketChannel class uses the java.net and java.io libraries which are included with the standard
JVM. Therefore no additional third party packages are required for its use.
8.2.2 Attributes
The attributes are detailed in the PowerSwitchingConstants.java class in the package
atst.base.hardware.power with a brief description provided here. See the powerswitch.prop file (in
the same directory) for an inheritable set of power switching controller properties.
Attribute name Used with
command(s)
Values Description
command n/a controloutlet |
controlgroup |
controlglobal | softreboot
The type of command being
requested
outletName controloutlet varies The outlet name
outletNum controloutlet varies The outlet number
groupName controlgroup varies The group name
groupNum controlgroup varies The group number
globalAction controlglobal immediate | sequence The global action
powerState controloutlet,
controlgroup,
controlglobal
on | off The demand power state
8.2.3 Status event
The PowerSwitchingController generates a status event with the name “<controller fq name>.status”. For
example if the controller name was “atst.inst.foo” the event name is “atst.inst.foo.status”. The following
table lists the elements of this status event. These element names are static members of the
PowerSwitchingConstants.java class in the package atst.base.hardware.power
Attribute name Units Description
voltageX Volts Voltage for X phase
currentX Amps Current for X phase
powerX Watts Power for X phase
voltageY Volts Voltage for Y phase
currentY Amps Current for Y phase
powerY Watts Power for Y phase
voltageZ Volts Voltage for Z phase
currentZ Amps Current for Z phase
powerZ Watts Power for Z phase
temp1 Degrees F Temperature at sensor 1
temp2 Degrees F Temperature at sensor 2
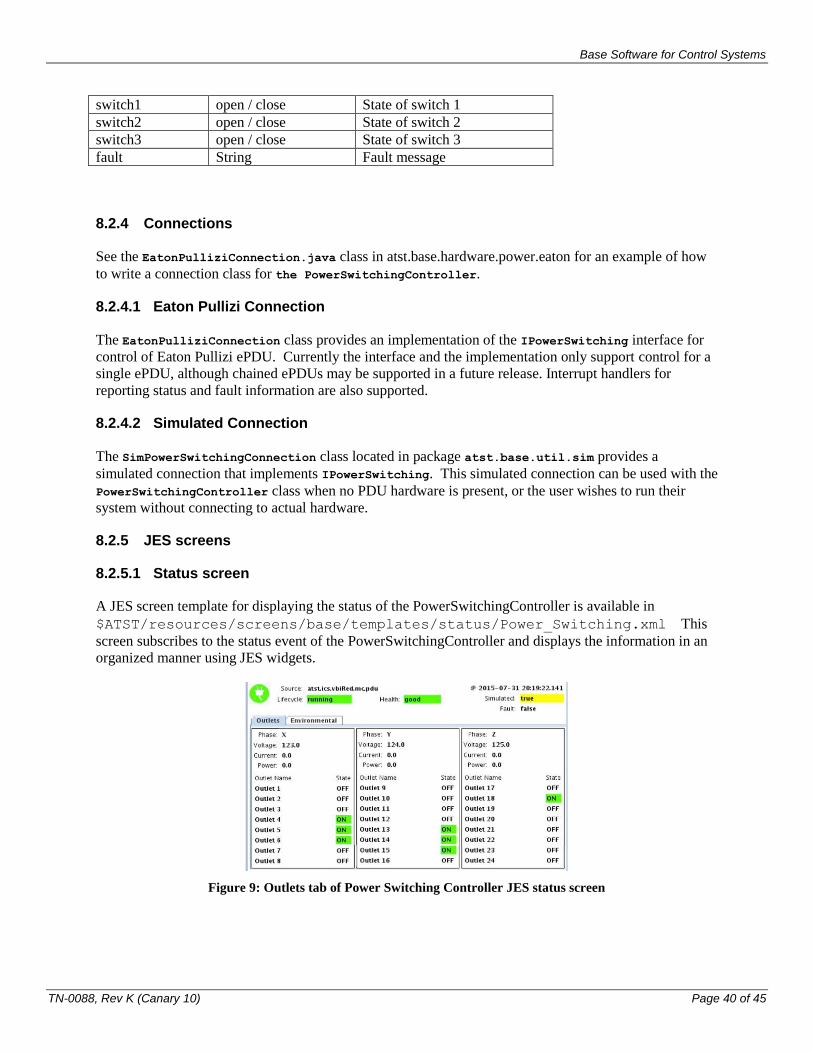
Base Software for Control Systems
TN-0088, Rev K (Canary 10) Page 40 of 45
switch1 open / close State of switch 1
switch2 open / close State of switch 2
switch3 open / close State of switch 3
fault String Fault message
8.2.4 Connections
See the EatonPulliziConnection.java class in atst.base.hardware.power.eaton for an example of how
to write a connection class for the PowerSwitchingController.
8.2.4.1 Eaton Pullizi Connection
The EatonPulliziConnection class provides an implementation of the IPowerSwitching interface for
control of Eaton Pullizi ePDU. Currently the interface and the implementation only support control for a
single ePDU, although chained ePDUs may be supported in a future release. Interrupt handlers for
reporting status and fault information are also supported.
8.2.4.2 Simulated Connection
The SimPowerSwitchingConnection class located in package atst.base.util.sim provides a
simulated connection that implements IPowerSwitching. This simulated connection can be used with the
PowerSwitchingController class when no PDU hardware is present, or the user wishes to run their
system without connecting to actual hardware.
8.2.5 JES screens
8.2.5.1 Status screen
A JES screen template for displaying the status of the PowerSwitchingController is available in
$ATST/resources/screens/base/templates/status/Power_Switching.xml This
screen subscribes to the status event of the PowerSwitchingController and displays the information in an
organized manner using JES widgets.
Figure 9: Outlets tab of Power Switching Controller JES status screen

Base Software for Control Systems
TN-0088, Rev K (Canary 10) Page 41 of 45
Figure 10: Environmental tab of Power Switching Controller JES status screen
8.2.5.1.1 Usage
The screen dimensions are 622x397, which allows them to be embedded nicely in another JES screen
using a JES nested screen widget with dimensions of 625x400.
The Power_Switching.xml screen requires the macro ‘pdu’ to be defined. . For example, if the CSF
name of the PowerSwitchingController is: myapp.pdu1 then the $ATST/bin/JESexpand tool should be
used to generate a screen file from this template as follows:
$ATST/bin/JESexpand –macros=”pdu=myapp.pdu1”
8.2.5.2 Control screen
A JES screen template for control of the PowerSwitchingController is available in
$ATST/resources/screens/base/templates/control/Power_Switching.xml This
screen uses JES widgets and the CSF submit type connection to send control commands to the
PowerSwitchingController.
Figure 11: Power Switching Controller JES control screen
8.2.5.2.1 Usage
The screen dimensions are 987x869, which allows them to be embedded nicely in another JES screen
using a JES nested screen widget with dimensions of 990x872.

Base Software for Control Systems
TN-0088, Rev K (Canary 10) Page 42 of 45
The Power_Switching.xml control screen requires the macro ‘pdu’ to be defined. . For example, if the
CSF name of the PowerSwitchingController is: myapp.pdu1 then the $ATST/bin/JESexpand tool should
be used to generate a screen file from this template as follows:
$ATST/bin/JESexpand –macros=”pdu=myapp.pdu1”

Base Software for Control Systems
TN-0088, Rev K (Canary 10) Page 43 of 45
9. MOTION CONTROL
9.1 MOTION CONTROLLER
The motion controller was created to provide a uniform interface for most motion devices. It is the
preferred controller for managing a single axis motion device. If it (or its extension) is not used, whatever
class is used should make all possible attempts to match this interface so that all motion devices can be
controlled the same way. In most cases however a developer should be able to use an existing connection
or write a custom connection that implements the IMotion interface and use that connection with this
controller. Through database properties the conversion between ‘raw’ and ‘user’ units can be defined and
the conversion between the two can be carried out by the controller. The controller currently supports
conversions for linear stages and rotary stages.
The default motion controller can work on a variety of motion devices through customizing the database
properties. A motion controller can be turned into a discrete-only motion controller by excluding the
‘pos’ (position) and the ‘opos’ (offset position) attributes (property permission of ---, not readable,
writable, or submittable). Doing this means that the only way to give the controller a position is to use
the ‘namedPos’ (named position) attribute. The ‘namedPos’ attribute will then be mapped to a numerical
position if the appropriate properties are present or will be handed directly to the IMotion device. The
inverse is also true. That is, defining ‘namedPos’ to always be invalid will ensure that the motion device
will only be able to move to an absolute position.
9.1.1 Usage
The motion controller has three modes of operation:
off: the motion device’s servo loop is open. If a position is present the device will attempt to
move to that position. If the device has not been indexed, and a position is present the device will
attempt to index itself prior to moving to the position.
active: the motion device’s servo loop is closed. If a position is present the device will attempt to
move to that position. If the device has not been indexed, and a position is present the device will
attempt to index itself prior to moving to the position.
tracking: the device is tracking an outside trajectory.
The modes are all stateless and it is possible to transition from any mode to any other mode. The
controller will take all of the necessary steps to carry out the transition. This includes closing/opening the
servo loop, enabling/disabling the brakes, or indexing the motion device. This means that a mode=park
with a pos can cause the device to power on and move in the opposite direction from what is
expected (in order to index) before turning around, and finally power off at the target position.
In addition to the three real modes the Motion Controller optionally supports an automatic mode. The
auto mode allows the person setting up the system to decide whether the stage should generally enter the
active or off mode after a move completes. To support the auto mode the Motion Controller’s mode
property must have a default value of either off or active. Then when a configuration is submitted with
mode=auto, the controller will substitute the default value and use that as if it had been submitted instead.
This allows someone writing a high level control script, or using a high level GUI to not need to know
whether off or active makes more sense for the motor. This does not prevent a user who does care about
the final state to submit that mode to the controller instead.

Base Software for Control Systems
TN-0088, Rev K (Canary 10) Page 44 of 45
As a supplement to the modes it is also possible to issue a command to the controller
park: the motion device’s servo loop is open and is using its brakes (if present) to hold its current
position.
sip (servo in place): the motion device’s servo loop is closed and it is using that to stay at its
current position.
move: the motion device is trying to move to a given position.
jog: the motion device is trying to move at a constant rate.
index: the motion device is carrying out an indexing routine.
follow: the motion device is trying to follow a trajectory stream. The controller is listening to a
trajectory stream event and is passing those trajectory events to the underlying device.
Commands are stateful. It is not possible to move, until the device has been indexed. It is not possible to
index the system until the servo loop has been closed. See the Appendix for the state machine used by the
Motion Controller.
The motion controller reports it status (position, rate, …) in an event posted at a regular interval. A
change in its power, brake, fault and limit status, causes an event to come out as soon as the change is
detected. After this event the controller’s next event will come after the regular interval of time.
The motion controller uses a connection with a single motion channel that implements the IMotion
interface. The interface provides methods to:
Get: perform a query of
o current brake status: whether the brakes are on or off
o current power status: whether the power is on or off
o current position: where the device is
Subscribe Interrupt:
o current brake status: notifies the subscribe when the brakes status changes
o current power status: notifies the subscriber when the power status changes
o current status: regularly informs the subscriber about the position and velocity. When
possible this should also include the current position error, torque and any other interest
that might be of use.
o fault: notify the subscriber when a fault is encountered/cleared
o limit: notify the subscriber when a limit is encountered/cleared
Command:

Base Software for Control Systems
TN-0088, Rev K (Canary 10) Page 45 of 45
o Brake: enable/disable brakes
o Power: enable/disable power
o Servo loop: open/close the servo loop
o Stop: maximum deceleration and then remain at which ever position was reached with a
closed servo loop
o Move: move to a target position at some preferred rate
o Move indefinitely: move indefinitely at some specified rate
o Index: carry out any indexing routine
o Start follow: indication that a stream of trajectory events will soon begin arriving
o Follow: update the trajectory with a new element.
See the interface atst.base.hardware.motion.interfaces.IMotion for complete details on the
methods including their arguments and return types.
9.1.2 State Diagram
See the Appendix for the state machine used by the Motion Controller.
9.1.3 Attributes/Properties
Name Type Limits Description Permission
mode String off, active, tracking,
auto
The mode attribute is passed to
tell the controller what action
to carry out. The limits should
be set so that the validity of a
configuration can be checked.
Submit, get
command String park, sip, move, jog,
index, follow
The command attribute is
passed to tell the controller
which command to execute
Submit
pos Real controller specific
(should reflect the
limits of the
underlying motor)
Passing a “pos” attribute in
with a configuration specifies
which position to move to,
passing “pos” with a get
returns the current position.
Submit, get
opos Real controller specific
(should reflect the
limits of the
underlying motor)
The offset position attribute is
passed to tell the controller
where to move.
Submit
rpos Real controller specific
(should reflect the
limits of the
underlying motor)
The raw position to move to.
This will not be converted
before being passed to the
underlying motion device
Submit
ropos Real controller specific
(should reflect the
The raw offset position to
move. This will not be
Submit

Base Software for Control Systems
TN-0088, Rev K (Canary 10) Page 46 of 45
limits of the
underlying motor)
converted before being passed
to the underlying motion
device.
namedPos String controller specific
(should reflect the
defined named
positons)
The named position attribute is
passed to tell the controller
where to move. The limits
should be set so that the
validity of a configuration can
be checked. For each named
position, there should be
another property that defines
that position. (see next entry)
Submit
namedPos:somePos Real controller specific
(should reflect the
limits of the
underlying motor)
This is the property that defines
a single named position. The
value should be the numerical
position (in user units) that the
given named position
represents.
Set
index Boolean True This attribute instructs the
controller to perform an index
routine in association with a
mode-based configuration even
if the controller is already
indexed.
Submit
vel Real controller specific
(should reflect the
limits of the
underlying motor)
may be negative
The velocity attribute is passed
to tell the controller how fast to
jog.
Submit
rvel Real controller specific
(should reflect the
limits of the
underlying motor)
may be negative
The raw velocity is passed to
tell the controller how fast to
jog.
Submit
rate Real controller specific
(should reflect the
limits of the
underlying motor)
must be positive
The maximum/target rate at
which to move to a new
position. The controller or
underlying motion device will
determine sign
Submit
rrate Real controller specific
(should reflect the
limits of the
underlying motor)
must be positive
The maximum/target raw rate
at which to move to a new
position. The controller or
underlying motion device will
determine sign
Submit
brake Boolean Set/Query the status of the
brakes
Submit, get
Not mentioned here are all of the properties required by the classes motion controller is extended from.

Base Software for Control Systems
TN-0088, Rev K (Canary 10) Page 47 of 45
Building Configurations with the correct combination of attributes can be tricky. Look at the
MotionConfigFactory class in the atst.base.hardware.motion package for an extensive (although
possibly incomplete) set of methods to generate Configurations which can be submitted to Motion
Controllers to perform common tasks.
9.1.4 Events
The Motion Controller (as an extension of the Hardware Controller) posts a regular status event. The
name and frequency of which are configured via properties. The contents of the events are common
across all motion controllers. The attributes present are:
Name Type Description
state String The current state of the Motion Controller. Value will be one of:
unknown, parked, sip, moving, jogging, indexing, hunting, following,
special or interlocked
mode String The current mode of the Motion Controller. Value will be one of:
unknown, off, active, tracking, special, or interlocked
pos Double The current position of the motion stage in user units.
rawPos Double The current position of the motion stage if raw or motor units.
vel Double The current velocity of the motion stage in user units.
rawVel Double The current velocity of the motion stage in raw or motor units.
fault String The current fault state of the motion stage or “none” if there is no
active fault.
limit String The current limit state of the motion stage or “none” if there is no
encountered limit.
brake Boolean The current state of the motion stage’s brakes.
inPos Boolean True if the motion stage’s current position matches its demand
position.
err Double The difference, in user units, between the demand position and the
current position.
rawErr Double The difference in, raw or motor units, between the demand position
and the current position.
indexed Boolean True if the motion stage has been indexed.
cLimit String Same as limt.
cPos String Same as pos.
cVel String Same as vel.
9.1.5 Unit Space Conversions
The Motion Controller uses an IConverter to convert from engineering units (user input) to motor units
(hardware output). In short the IConverter provides method convert2Raw(), and convert2User() to
perform the conversions. See the Javadoc for the IConverter Java interface in the
atst.base.hardware.motion.interfaces package for details on the interface. For an example
implementation see the ConverterTAB Java class of the atst.base.hardware.motion.util package.
The MotionController, unless extended, uses a ConverterTAB for all of its conversions. To override the
default converter the motion controller should be extended and the getConverter() method should be
overridden, to return a custom converter. The default converter (discussed below) should satisfy many
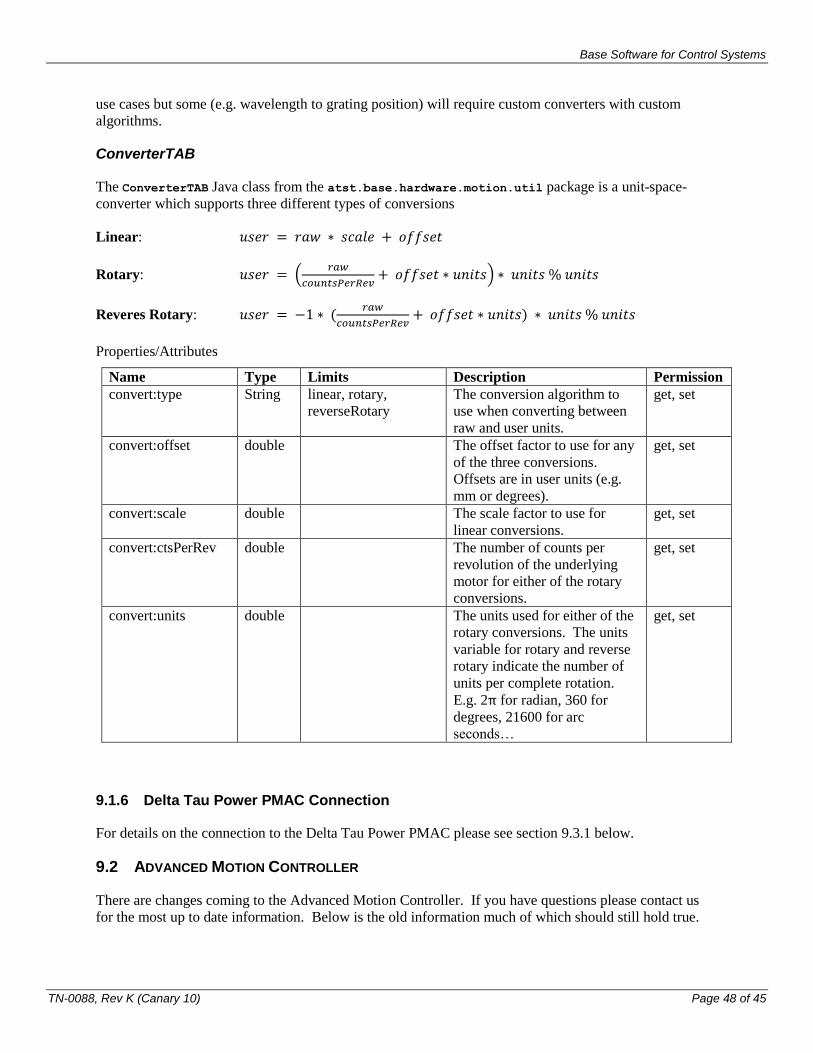
Base Software for Control Systems
TN-0088, Rev K (Canary 10) Page 48 of 45
use cases but some (e.g. wavelength to grating position) will require custom converters with custom
algorithms.
ConverterTAB
The ConverterTAB Java class from the atst.base.hardware.motion.util package is a unit-space-
converter which supports three different types of conversions
Linear: 𝑢𝑠𝑒𝑟 = 𝑟𝑎𝑤 ∗ 𝑠𝑐𝑎𝑙𝑒 + 𝑜𝑓𝑓𝑠𝑒𝑡
Rotary: 𝑢𝑠𝑒𝑟 = (𝑟𝑎𝑤
𝑐𝑜𝑢𝑛𝑡𝑠𝑃𝑒𝑟𝑅𝑒𝑣+ 𝑜𝑓𝑓𝑠𝑒𝑡 ∗ 𝑢𝑛𝑖𝑡𝑠) ∗ 𝑢𝑛𝑖𝑡𝑠 % 𝑢𝑛𝑖𝑡𝑠
Reveres Rotary: 𝑢𝑠𝑒𝑟 = −1 ∗ (𝑟𝑎𝑤
𝑐𝑜𝑢𝑛𝑡𝑠𝑃𝑒𝑟𝑅𝑒𝑣+ 𝑜𝑓𝑓𝑠𝑒𝑡 ∗ 𝑢𝑛𝑖𝑡𝑠) ∗ 𝑢𝑛𝑖𝑡𝑠 % 𝑢𝑛𝑖𝑡𝑠
Properties/Attributes
Name Type Limits Description Permission
convert:type String linear, rotary,
reverseRotary
The conversion algorithm to
use when converting between
raw and user units.
get, set
convert:offset double The offset factor to use for any
of the three conversions.
Offsets are in user units (e.g.
mm or degrees).
get, set
convert:scale double The scale factor to use for
linear conversions.
get, set
convert:ctsPerRev double The number of counts per
revolution of the underlying
motor for either of the rotary
conversions.
get, set
convert:units double The units used for either of the
rotary conversions. The units
variable for rotary and reverse
rotary indicate the number of
units per complete rotation.
E.g. 2π for radian, 360 for
degrees, 21600 for arc
seconds…
get, set
9.1.6 Delta Tau Power PMAC Connection
For details on the connection to the Delta Tau Power PMAC please see section 9.3.1 below.
9.2 ADVANCED MOTION CONTROLLER
There are changes coming to the Advanced Motion Controller. If you have questions please contact us
for the most up to date information. Below is the old information much of which should still hold true.
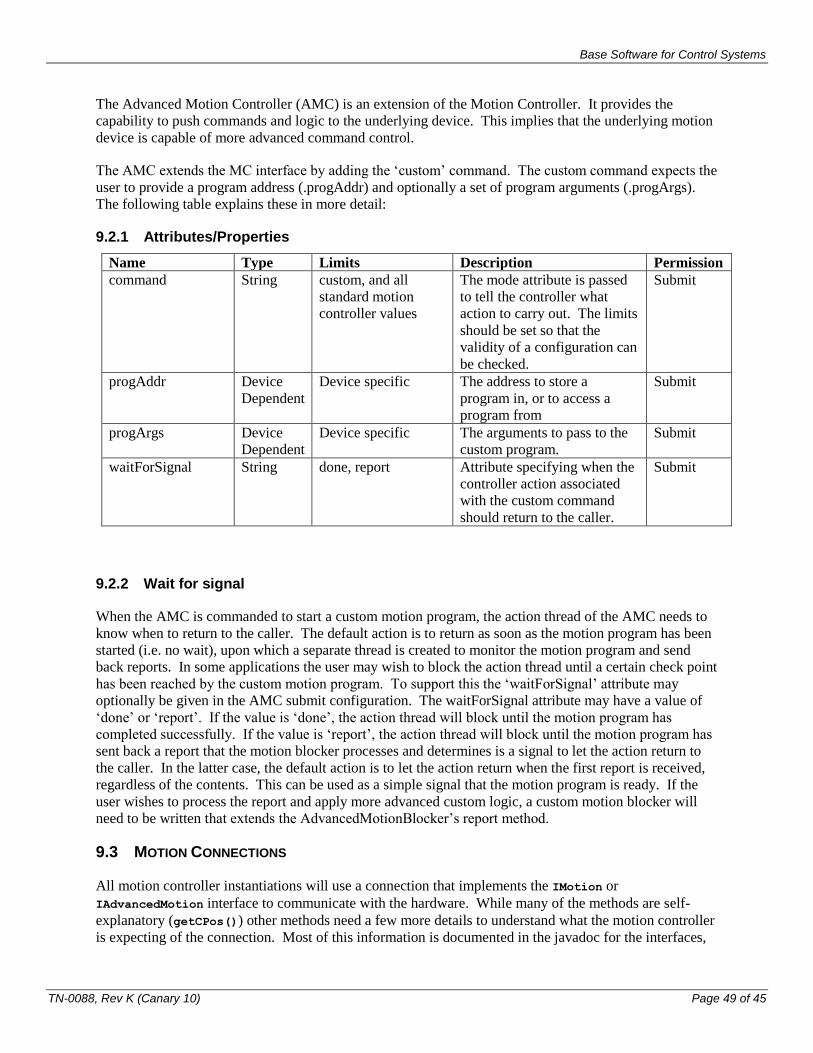
Base Software for Control Systems
TN-0088, Rev K (Canary 10) Page 49 of 45
The Advanced Motion Controller (AMC) is an extension of the Motion Controller. It provides the
capability to push commands and logic to the underlying device. This implies that the underlying motion
device is capable of more advanced command control.
The AMC extends the MC interface by adding the ‘custom’ command. The custom command expects the
user to provide a program address (.progAddr) and optionally a set of program arguments (.progArgs).
The following table explains these in more detail:
9.2.1 Attributes/Properties
Name Type Limits Description Permission
command String custom, and all
standard motion
controller values
The mode attribute is passed
to tell the controller what
action to carry out. The limits
should be set so that the
validity of a configuration can
be checked.
Submit
progAddr Device
Dependent
Device specific The address to store a
program in, or to access a
program from
Submit
progArgs Device
Dependent
Device specific The arguments to pass to the
custom program.
Submit
waitForSignal String done, report Attribute specifying when the
controller action associated
with the custom command
should return to the caller.
Submit
9.2.2 Wait for signal
When the AMC is commanded to start a custom motion program, the action thread of the AMC needs to
know when to return to the caller. The default action is to return as soon as the motion program has been
started (i.e. no wait), upon which a separate thread is created to monitor the motion program and send
back reports. In some applications the user may wish to block the action thread until a certain check point
has been reached by the custom motion program. To support this the ‘waitForSignal’ attribute may
optionally be given in the AMC submit configuration. The waitForSignal attribute may have a value of
‘done’ or ‘report’. If the value is ‘done’, the action thread will block until the motion program has
completed successfully. If the value is ‘report’, the action thread will block until the motion program has
sent back a report that the motion blocker processes and determines is a signal to let the action return to
the caller. In the latter case, the default action is to let the action return when the first report is received,
regardless of the contents. This can be used as a simple signal that the motion program is ready. If the
user wishes to process the report and apply more advanced custom logic, a custom motion blocker will
need to be written that extends the AdvancedMotionBlocker’s report method.
9.3 MOTION CONNECTIONS
All motion controller instantiations will use a connection that implements the IMotion or
IAdvancedMotion interface to communicate with the hardware. While many of the methods are self-
explanatory (getCPos()) other methods need a few more details to understand what the motion controller
is expecting of the connection. Most of this information is documented in the javadoc for the interfaces,

Base Software for Control Systems
TN-0088, Rev K (Canary 10) Page 50 of 45
and if something is found to be in contradiction, use a healthy amount of skepticism but assume that the
javadoc is correct.
The openLoop() and closeLoop() methods are effectively used to disable the hardware. A motor with
an open loop should not be attempting to maintain any position; whereas a motor with a closed loop
should attempt to maintain its current position. Both methods should not return until the loop has been
opened/closed. (Opening/closing the loop is not anticipated to take long.)
The move(), index(), and startFollow() methods should instruct the motor to move to a position,
perform its indexing or homing routine, or begin following an outside trajectory stream. All three of
these methods should return after they have told the hardware to begin carrying out the action, but all
methods take a callback which should be notified when the action has completed. The motion controller
will make the request to move, and will then wait for the motion to complete by pending on the callback.
While waiting it is possible (particularly with long moves or complicated homing mechanisms) that a
request will be made to cancel the move. In this case the controller will call the stop() method (which
should block until the device reaches a zero velocity). After the stop has completed the controller will
cease waiting on the callbacks, and effectively abandon them. A single channel connection will never
need to know about more than one callback at a time.
The follow() method is a request by the controller to updated the demand position/velocity trajectory.
Until this event has been received, the callback submitted during the startFollow() method should NOT
be triggered.
9.3.1 Delta Tau Power PMAC Connection
The Delta Tau Power PMAC connection object may be used as a Motion Controller’s connection, or an
Advanced Motion Controller’s connection. The following describes the properties that a controller using
the connection should define.
Required Properties:
Property Name Expected
connection:class atst.base.hardware.motion.deltatau.DeltaTauConnection
Optional Properties:
Property Name Value
dt:indexProgAddr The Delta Tau address of the program to use for indexing. This
allows for a custom motion program to be used to index a stage. If
this is not used then the standard Delta Tau Connection index
algorithm will be used. (See the Java IMotionProgram class for
details on the standard index program.)
dt:moveProgAddr The Delta Tau address of the program to use for moving. This
allows for a custom motion program to be used to move a stage. If
this is not used then the standard Delta Tau Connection move
algorithm will be used. (See the Java IMotionProgram class for
details on the standard move program.)

Base Software for Control Systems
TN-0088, Rev K (Canary 10) Page 51 of 45
9.3.2 Simulated Motion Connections
Base provides a simulator that can be used in place of a real connection to motion hardware. Most of the
class and interfaces described here are a part of the atst.base.util.sim package. The
SimMotionConnection implements the IAdvancedMotion interface, and extends a class called
SimConnection. This allows it to be instantiated in place of a motion controller’s motion connection.
Instead of using one or more channels to talk to real hardware, the simulator uses an object implementing
the ISimServo interface to perform a servo loop, and optionally an object implementing IFollowLogic.
Base also provides four simulated servos: SimLinearServo, SimLinearPositionServo,
SimRotaryServo, and SimRotaryPositionServo. The two rotary servos, will loop back around on
themselves (i.e. a rotary stage), whereas the linear servos will not loop back around on themselves. If you
have a stage that can spin around an unlimited number of times, you should probably use a rotary servo.
If you have a linear stage, or a rotary stage that has a finite number of allowable wraps you should use the
linear servo. The position servos only do ‘position’ moves, meaning that they cannot be used in rate
mode. This makes them unable to jog at a fixed rate, or unable to track a trajectory position/velocity
stream. Their logic does a much better job of handling very quick accelerating motors. The ‘standard’
servos support rate mode, meaning that you can give them no demand position, and a demand velocity
and they will attempt to move at the indicated rate. Additionally they will support tracking a
position/velocity trajectory stream. They have limitations and do not work well with motors with large
acceleration/deceleration values. They are known to work well for simulating things like the enclosure,
TMA and coudé.
The Follow Logic object used to supply demand positions/velocities when the simulated hardware is
tracking or running in following mode. When the simulator is tracking, it will call the getPosAndVel()
method at 40Hz. Only motors that need to be able to support tracking will need to worry about follow
logic. The logic implemented should do whatever is done down in the real hardware plus what the
connection would do. For example a simulated MCS drive, would take the attribute table passed in to the
connection, and convert the current time and the polynomial coefficients into a position and velocity
demand. The connection/servo would then use these values to update the demand position and velocity.

Base Software for Control Systems
TN-0088, Rev K (Canary 10) Page 52 of 45
10. OTHER USEFUL BITS
In addition to the controllers, and other pieces mentioned above Base also provides other pieces which
you might find useful within your controllers.
10.1 TABS
Technical Architecture Blocks use composition to provide chunks of self-contained behavior that can be
shared by different controllers. All of the logic related to TABs is handled in the CSF Controller and CSF
Component. The best way of thinking about TABs as code that is chained into a Controller. An
IParamTAB for example, will have its get() and set() methods called every time that the controller’s get
and set methods are called. If there are two or three TABs all in use each will have its get and set
methods called. This means that a controller’s get and set methods can be used to query or modify the
behavior of the TAB. ILifecycleTAB allows TABs to insert similar behavior during lifecycle transitions.
The biggest reason for using TABs is that they can prevent code duplication. Code used by both a
component and a controller can be placed inside of one TAB and the only code duplication becomes the
addTAB() call in the constructor.
10.1.1 Posting TABs
The Posting TABs are a collection of TABs which post events at regular interval. They differ in how they
can be configured, and where they get the event contents.
Posting TAB
The PostingTAB found in the atst.base.tabs.util package is responsible for posting an event at
regular interval. The TAB itself is just a mechanism for posting the event, and allowing the modification
of the event rate, and the event name. On construction, the posting tab takes a reference to an IPoster
and optionally a name. IPoster is an interface that defines a single getEventTable() method. If your
component only has a single event stream, your component could use the constructor with no name, and
pass itself in. Then all it would need to do is implement the getEventTable() method, and define a few
properties and it would post a regular event containing whatever attributes were returned by
getEventTable(). If your component needs multiple regular event streams at least one of your posters
would need to use the constructor that takes a name. The name is used by the Posting TAB when looking
up the properties which define its behavior. All properties/attributes used by the posting tab are of the
form “post:name:attribute” if a name was provided or “post:attribute” if no name was provided.
Attributes/Properties
Name Type Limits Description Permission
post[:name]:interval Real 0 ∞ The time in seconds between
postings. 1.0 means one event every
second. 2.0 means one event every 2
seconds. 0.5 means 2 events per
second. 0 means do not post
get/set
post[:name]:enabled Boolean N/A Allows for posting to be enabled or
disabled
get/set
post[:name]:eventName String N/A The name of the outing event. If this
is a simple name (e.g. ‘cStatus’) the
TAB will auto-qualify it with the
component’s name
get/set

Base Software for Control Systems
TN-0088, Rev K (Canary 10) Page 53 of 45
The values for all attributes are queried from the Cache (which falls back to the Property DB) at
TAB/Component) startup. Attributes passed to a component via set may be used to change the behavior
of the poster after it has started running.
See the Java Doc for the Posting TAB for more information. All hardware components load Posting
TABs by default.
Cache Posting TAB
The CachePostingTAB found in the atst.base.tabs.util package is similar to the PostingTAB but
instead of accepting at construction time an object that will return the Attribute Table that should go out
in the event it reads a property-defined list of attributes from the Cache and posts them. Similar to the
PostingTAB the CachePostingTAB may take an optional name. If your component needs multiple regular
event streams at least one of your posters would need to use the constructor that takes a name. The name
is used by the CachePostingTAB when looking up the properties which define its behavior. All
properties/attributes used by the posting tab are of the form “post:name:attribute” if a name was
provided or “post:attribute” if no name was provided.
Attributes/Properties
Name Type Limits Description Permission
post[:name]:interval Real 0 ∞ The time in seconds between
postings. 1.0 means one event
every second. 2.0 means one
event every 2 seconds. 0.5
means 2 events per second. 0
means do not post
get/set
post[:name]:enabled Boolean N/A Allows for posting to be enabled
or disabled get/set
post[:name]:eventName String N/A The name of the outing event. If
this is a simple name (e.g.
‘cStatus’) the TAB will auto-
qualify it with the component’s
name
get/set
post[:name]:attrs String[] N/A The list of attributes to retrieve
from the Cache and post.
Defaults to empty if not
provided.
get/set
post[:name]:postOnMissing Boolean N/A If true the TAB should post an
event even if some of the
attributes referenced are not
present. False will cause any
attribute missing from the cache
to cause the event-posting to be
skipped for one interval.
Defaults to false if not provided.
get/set
The values for all attributes are queried from the Cache (which falls back to the Property DB) at
TAB/Component) startup. Attributes passed to a component via set may be used to change the behavior
of the poster after it has started running.

Base Software for Control Systems
TN-0088, Rev K (Canary 10) Page 54 of 45
WCI Posting TAB
The WciPostingTAB java class in the atst.base.util package is a specialized type of Posting TAB
which posts once per second the attributes the WciWatch needed to generate World Coordinate System
Information. The TAB reads the list of needed attributes from the ALL constant of the WciConstants
class (same package), and then fetches them from the Cache, and posts them. Because the attributes are
read from the Cache any static values may be defined as properties with saved/default values. Any
dynamic values must be placed into the Cache by the component as soon as they are known, and on
change. If any of the WciConstants.REQUIRED attributes are not present, then the poster will log one
warning and post those attributes that are present. Subsequent post attempts will occur normally with the
warning NOT being repeated. See the WciPostingTAB Javadoc for more details.
10.1.2 Update TAB
The UpdateTAB also found in the atst.base.tabs.util is very similar to the Posting TAB (described
above), but instead of posting events, it simply calls an update() method of its reference to an IUpdater.
This TAB could be used to allow a component that talks to dumb hardware to initiate a hardware query at
some modifiable interval. Alternatively it could be used to cause the controller to perform some check
(maybe health) at a configurable interval. At the moment the Update TAB does not support a name in the
same way that the Posting TAB does so you can only have one per controller, but if anyone needs more,
they are free to request an enhancement.
Attributes/Properties
Name Type Limits Description Permission
update:interval Real 0 ∞ The time in seconds between update
calls. 1.0 means one call every
second. 2.0 means one call every 2
seconds. 0.5 means 2 calls per
second. 0 means do not call
get/set
update:enabled Boolean N/A Allows for posting to be enabled or
disabled
get/set
The values for all attributes are queried from the Cache (which falls back to the Property DB) at
TAB/Component) startup. Attributes passed to a component via set may be used to change the behavior
of the poster after it has started running.
See the Java Doc for the Update TAB for more information.
10.2 OTHER-OTHER USEFUL BITS
In addition to TABs there are a number of other useful bits that Base makes available to developers. Most
of these bits are used internally by other classes in base, but they are generic enough, that they should be
useful for other users as well. Brief descriptions are provided below, but the JavaDoc should be consulted
for more details.
10.2.1 Matrix
The package atst.base.util.matrix was obtained from the JAMA (Java Matrix) project at
http://math.nist.gov/javanumerics/jama/. It is included so that systems needing basic linear algebra

Base Software for Control Systems
TN-0088, Rev K (Canary 10) Page 55 of 45
functions do not have to implement their own. The package includes classes to do different kinds of
matrix decomposition as well as general matrix arithmetic.
10.2.2 Interpolation Polynomial
The InterpolationPolynomial java class in the atst.base.util package makes available the
algorithm that the TCS uses for generating the trajectory coefficients. It is likely only of use to the TCS,
MCS, and ECS systems. It has been placed here to removed inter-system dependencies, and because it
might be generally useful outside of the mentioned sub systems.
10.2.3 Base Event Callback
The BaseEventCallbackAdapter Java and C++ class in the atst.base.util.event package is an
extension of and an alternative to the CSF event callback class. The CSF callback must be passed to the
Event Service Helper along with the name of the event channel to subscribe to. The Base Callback stores
a reference to what it should be subscribed to and when it is told to subscribe, it makes the call to the
Event Service Helper. Additionally if an attempt is made to change the subscription of the Base Callback
while subscribed, it will unsubscribe from the old event, and re-subscribe to the new event. In the same
package there is also a callback set. The set allows a collection of callbacks to be managed together. This
means that potentially a component could create callbacks and populate the set during init, and then call a
single method in startup to subscribe all callbacks, and a similar method in uninit to unsubscribe all
callbacks.
10.2.4 Base Thread
The BaseThread Java class in the atst.base.util package is an alternative to the Java timer task. It
provides an easily extended class that can carry out a recurring task. At the time that the Base Thread was
written the Java timer task had some resolution limitations, and additionally it did not work well with the
CSF model of init, start, shutdown, uninit (e.g. a canceled timer could not be restarted). The Base Thread
was designed to better work within CSF. Specifically it can be started, stopped and restarted. It ensures
that if it has been told to start before it had completed stopping, there will only be one running instance.
Its rate may be reconfigured while running, it and it can run at either a fixed frequency, or a fixed delay
between successive executions. The assumption is that the thread will be created at init, started at startup,
stopped at shutdown, and dereferenced at uninit.
There is a single abstract method (doRun()) that must be implemented to carry out the repetitive task.
Optionally there is a doPreRun() and a doPostRun() method that may be used to carry out any setup or
teardown needed. The Base Thread was created because of a need for in within other parts of Base. It is
used by both the Posting TAB and by the Update TAB and in many of the simulated hardware
connection.
10.2.5 Remote Actions
The RemoteAction Java class in the atst.base.util package allows the complete encapsulation of an
action being carried out in a remote controller. When a remote action is constructed, it takes, at
minimum, the action reference of the enclosing controller (parent-action), the handle of the remote
controller to submit the configuration to, and the configuration to submit. As part of construction the
remote action submits the configuration to the remote controller. After constructing the remote action,
the state of the remote action can be queried, it can be PRACed, or the caller can request to block until the
remote action has finished.

Base Software for Control Systems
TN-0088, Rev K (Canary 10) Page 56 of 45
Remote actions are used internally by the ManagementController, and there are a few methods in the
atst.base.Misc class for generating them, or waiting on sets of them to complete. They are available
from within Jython scripts. One might use remote actions to perform something like:
Action a = getAction(config.getId());
RemoteAction ra1 = Misc.submit(a, controller1, config1);
RemoteAction ra2 = Misc.submit(a, controller2, config2);
Misc.waitForRemoteActions(ra1, ra2);
if (ra1.finishedOK()) {
RemoteAction ra3 = Misc.submit(a, controller2, config3);
ra3.waitForFinish();
return ra3.getActionResponse();
} else {
return ra1.getActionResponse();
}
The big things that remote actions take care of for people is the generation of a callback, and threads
necessary to monitor the parent action for state changes (PRAC) and the propagation of those changes
down to the remote action. All of this functionality is encapsulation in a single object that can be easily
passed around. See the RemoteAction Javadoc for details about additional constructors and methods.
10.2.6 Misc
Just like CSF provides a Misc class, Base also provides a Misc class which is located in the
atst.base.util package. Just like the CSF version the base class contains only static methods, and may
not be instantiated. The majority of the methods are related to submitting actions to remote controllers.
All of the methods are backed by the RemteAction class mentioned above. Please see the Javadoc for
details on the methods that are present.
10.2.7 Trajectories
Base provides a utility for posting TCS-like trajectory events. The services can be used to generate a
simulated trajectory stream that matches the TCS trajectory format, or to take an existing TCS-formatted
trajectory stream and time-shift it. For details about the Trajectory Utilities see that Javadoc for the
atst.base.util.trajectory package and the various classes within.
10.2.8 World Coordinate Systems
Base provides a few tools that in conjunction can be used to generate real time World Coordinate Systems
(WCS) information. These classes include a TCS Event Watcher which subscribes to TCS Status events
and identifies where the telescope is; a WCI Event Watcher which subscribes to a WCI Status event and
in conjunction with a TCS Event Watcher provides WCS information that may be attached to an image;
and a WCI Event Poster which posts the needed by the WCI Watcher.
TcsWatch
The class atst.base.util.TcsWatch can be used to collect information required for constructing World
Coordinate System information. This information can be embedded in BDT metadata to allow displays to
operate on the image using a variety of coordinate systems, or posted as an event for other purposes. The
TcsWatch class monitors and caches information delivered by the TCS. When queried using the
getImageInfo method, TcsWatch produces an AttributeTable containing the requisite information.
This table can have additional custom attributes added before merging into the BDT metadata and/or
posted. Detailed information on the full capabilities and use of TcsWatch is found in the API
documentation for atst.base.util.TcsWatch. A brief outline of some features is presented here.

Base Software for Control Systems
TN-0088, Rev K (Canary 10) Page 57 of 45
The following methods are available for creating AttributeTables holding WCS information:
IAttributeTable getImageInfo(AtstDate time, Point2D cntr, Point2D scale,
double iAngle) –produces an attribute table containing all of the information necessary to
perform coordinate system transformations on points in the image and includes all of the
necessary TCS information to locate those points on the Sun. This information is sufficient to
fully produce the WCS linear transformations as well as any effects of differential rotation. It
does not include sufficient information to handle other non-linear effects such as image pin-
cushion effects. The result is a composite of the results of the next two methods.
IAttributeTable getLocalImageInfo(Point2D cntr, Point2D scale, double iAngle) –
produces an attribute table containing the local coordinate system information (image center
offset from sun-center in arcseconds, plate scale in arcseconds, and image angle rotation in
degrees relative to Coude floor surface normal. The attributes included in the attribute table are: o .wci:xyCenter – offset of image center from sun center in arcseconds. o .wci:xyScale – (x,y) plate scale, in arcminutes
o .wci:iP – image rotation angle relative to Coudé surface normal, in degrees.
IAttributeTable getTcsInfo(AtstDate time) – produces the TCS-specific information
directly from the TCS event streams (and so is only meaningful when the TCS is available and
running). The time is the time at which the image was produced. This is usually the current time.
The attributes included in the attribute table are: o .wci:timestamp – image creation time o .wci:tcsDmdPos –demanded TCS position in Thompson heliocentric-cartesian coordinates
o .wci:coudeDmdAngle –demanded Coudé rotator angle in degrees
o .wci:tcsInPosition – Boolean flag indicated whether TCS considers itself "in position"
o .wci:tcsCurPos – current TCS position in Thompson heliocentric-cartesian coordinates
o .wci:coudeCurAngle – current Coudé rotator angle in degrees
o .wci:offsets – all currently applied offsets to the TCS position (degrees)
WCI Watch
The WciWatch Java class of the atst.base.util package has-a TCS Watcher, and subscribes to a WCI
Stream in order to generate the metadata necessary to convert pixels on an image into the World
Coordinate System. The watcher implements the ILifecycleTAB interface meaning that it can be
registered with a component as a TAB and the Technical Architecture will take care of managing the
necessary event subscriptions as the surrounding component undergoes its lifecycle transitions. The
watcher then provides two methods for querying the WCI Data: getImageInfo() and
getImageInfoString(). The first method returns an attribute table containing the WCI information.
The second method returns a stringified version of that attribute table (as a convenience for places where
a single string value is easier to work with). The String returned by getImageInfoString() can be
converted back into an Attribute Table using the static method stringInfoToAttributeTable(). For
details on the attributes that are present in the returned tables, see the WciWatch JavaDoc.
WCI Posting TAB
The WciPostingTAB allows posting of information used by the WCIWatch class. See section 10.1.1 for
details on the WCIPostingTAB.
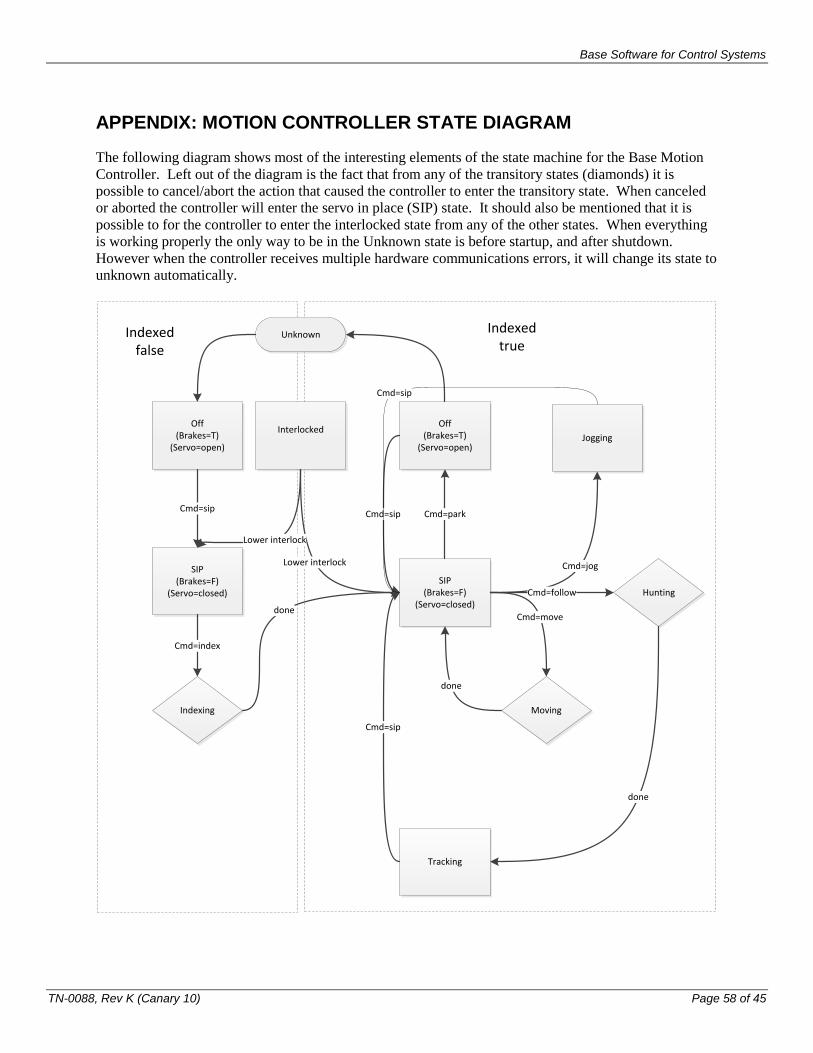
Base Software for Control Systems
TN-0088, Rev K (Canary 10) Page 58 of 45
APPENDIX: MOTION CONTROLLER STATE DIAGRAM
The following diagram shows most of the interesting elements of the state machine for the Base Motion
Controller. Left out of the diagram is the fact that from any of the transitory states (diamonds) it is
possible to cancel/abort the action that caused the controller to enter the transitory state. When canceled
or aborted the controller will enter the servo in place (SIP) state. It should also be mentioned that it is
possible to for the controller to enter the interlocked state from any of the other states. When everything
is working properly the only way to be in the Unknown state is before startup, and after shutdown.
However when the controller receives multiple hardware communications errors, it will change its state to
unknown automatically.
Unknown
Off(Brakes=T)
(Servo=open)
SIP(Brakes=F)
(Servo=closed)
Jogging
Tracking
Hunting
Moving
Cmd=move
Cmd=jog
done
Cmd=follow
done
Cmd=sip
SIP(Brakes=F)
(Servo=closed)
Indexing
Cmd=index
done
Off(Brakes=T)
(Servo=open)
Cmd=sipCmd=sip Cmd=park
Interlocked
Lower interlock
Lower interlock
Cmd=sip
Indexed false
Indexed true