barbara jill vitale's ati 2015 scholarship report
TRANSCRIPT

aTi South 2015
DRAWING FROM NATURE
OR
DRAWN FROM NATURE
By Barbara-Jill Vitale

With Teaching Artist
Cathy LaCleire
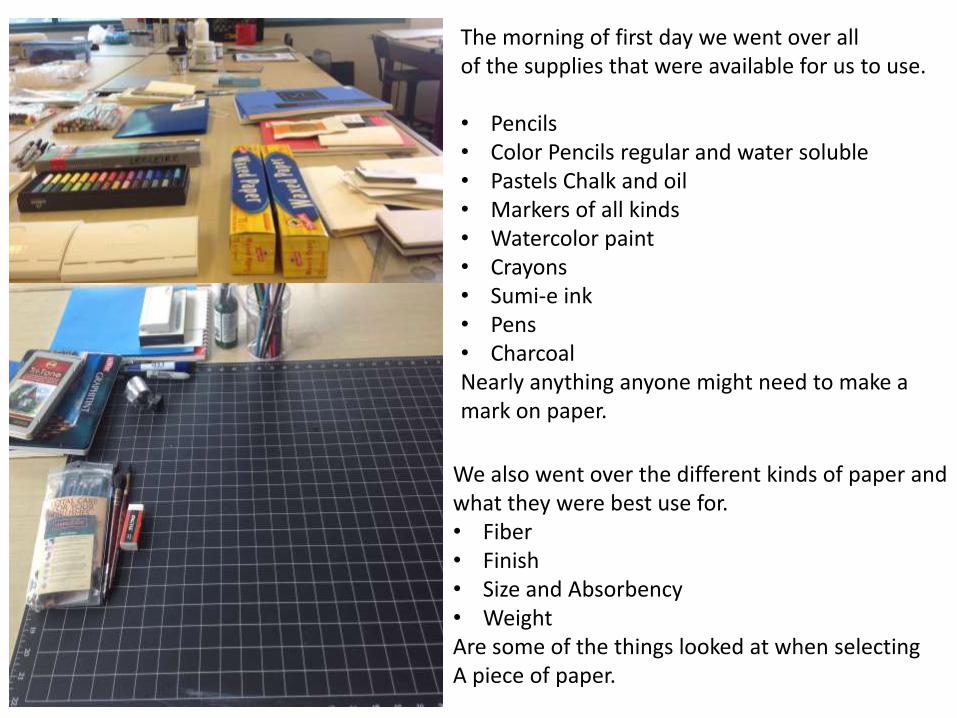
The morning of first day we went over all of the supplies that were available for us to use.
• Pencils• Color Pencils regular and water soluble• Pastels Chalk and oil• Markers of all kinds• Watercolor paint• Crayons • Sumi-e ink• Pens• CharcoalNearly anything anyone might need to make a mark on paper.
We also went over the different kinds of paper and what they were best use for.• Fiber• Finish• Size and Absorbency• WeightAre some of the things looked at when selecting A piece of paper.

We learn about different types of pencils H9-B9 and the different marks each ones makes.
HBHH2H3H4H5H6H7H8H9 B B2 B3 B4 B5 B6 B7 B8 B9
The H pencils make a hard fine light line.The higher the number the harder and lighter the mark made.
The B pencils make a soft thick line.The higher the number the darker and softerthe mark made.
Drawing made with a 2B ,B4 , and a 2H

We tested different types of Mediums that could be used to Change the surface of the paper.
• Fine Pumice: white, light, sandy• Black Lava: black, rough, grains• Clear Gesso: fine, clear, any color could
be added to it. • Micaceous Iron Oxide: med., grit, blackish
gray with sliver flecks,• Black Gesso: fine, jet black • White Gesso: fine, white• Ground for Pastels:
I really like the micaceous iron oxide it had asandy texture and a slight shimmery sliver glow.

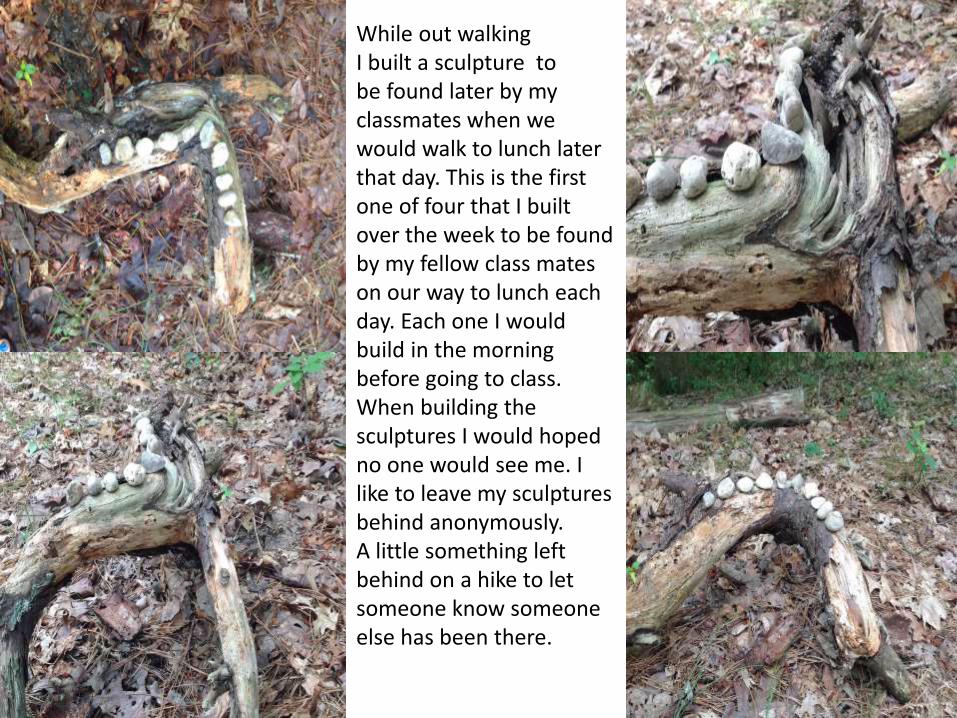
While out walkingI built a sculpture to be found later by my classmates when we would walk to lunch later that day. This is the first one of four that I built over the week to be found by my fellow class mates on our way to lunch each day. Each one I would build in the morning before going to class. When building the sculptures I would hoped no one would see me. I like to leave my sculptures behind anonymously.A little something left behind on a hike to let someone know someone else has been there.


For My first drawing I decided to draw my sculpture of bark, moss and a rock. I used ink and a paint brush to draw the outlines.I then decided to use water soluble color pencils to add color to the drawing.It had been a while since I sat down and concentrated on drawing. It took sometime to get into the swing of things. This made me realize how hard it must be for my student to enter my classroom sit down start a project and in thirty-seven min stoponly to continue one week later.

DAY 1 DAY 2 DAY 3
DAY4 DAY 5 DAY 6

For the drawing of the grass stalks I chose sumi-e ink and brush, which is a Japanese form of painting, to capture the delicateness of the Grass stalks.I like the simplicity of the drawing using brush and ink.

Drawing completed on the first day.
While looking at the finished drawings from our class, for the day, what struck me was how different everyone's choices were. We were all given the topic of nature but we chose different mediums and materials to draw our chosen object of nature. That got me think of incorpating some kind of choice based art into my classroom.

Day 2In the morning we watched the movie about Andy Goldsworthy RIVERS AND TIDES. He is one of the artist that has inspired my own work, I was thrilled to see the movie again and get re-inspired. Andy Goldsworthy is an artist that builds sculptures in nature out if all natural materials found in the environment in which he is working in. He is a British sculpture and photographer and environmentalist, he produces sight specific sculptures and art. I was extremely inspires after class, that the weekend after I had returned home, I went to visit Strom King, which is a sculpture park which is also home to one of his famous sculpture 5 MEN, SEVENTEEN DAYS, FIFTEEN BOULDERS, ONE WALL, 2010, Fieldstone.


Micro Drawing:
Today I decided to do a micro study of some gooses feathers I had found. I like the intense force it took to draw the feathers it was very meditational and relaxing.


This Painting was done with the home made egg tempera that we made early. This painting was inspired by our trip to the marshes we had taken early in the week. I love the intensity of the egg tempera and the glossy sheen it gives to the painting. Egg tempera is created by mixing the egg yolk with concentrated paint, which gives it its glossy sheen. What I found interesting about egg tempera is that you have to use equal amounts of the egg yolk and pure concentrated pigments or else you’re left with either a chalky painting or sticky looking painting.

Next Cathy shows us how to make homemade watercolors using gum arabic, concentrate pigments, and water. What a fun way to show students how to mix colors, and to be able to make their own paints.

I painted this panoramic ocean scape, using the homemade water colors. I love the intensity I was able to achieve by using these water colors.

A Collage made by drawing of a piece of bark with color pencils on black paper, Chinese Joss paper, on black paper.


A drawing inspired by leaf photo I had taken outside of the studio. Done using watercolor paints and color pencils. The spider was added by using a stamp that I carved out of a white eraser.


We next learned how to make several simple books. Accordion books for panoramic drawings, pocket books good for inserting information cards, and flip books good for combining visual images, and text. The cover of this panoramic book was created using sliver leaf. A process by which a fine thin piece of gold, silver, or bronze is glued to a surface. This technique will be great to use with when I teach Illumination and gothic lettering to my sixth grade students.

The covers to these two books were created using natural materials.
The top book was made by using a plant, color pencils, and PVA glue.
Flip Book
Pocket Book
The bottom book was made out of tree bark adhere to the cover using PVA glue. Using the PVA glue made the bark flexible so it would not turn brittle and brake of.

This drawing was made by using a fine piece of sliver wire on paper prepare with a white ground. This processes is called silver point. You can also use a piece of gold or bronze wire to draw with. The drawing is of a pine branch.

In the end the class could not have been as successful as it was if it had not been for our dedicated teacher Cathy LeCleire whose commitment, enthusiasm and knowledge, inspired us to explore our creative. We were all eager to try new things, learn from one another, and experiment with what it means to draw from nature. We thought outside the box and learned many new things to bring back to our class rooms and students.