banner general event management - bridgewater state … · 6 banner general 9.0 february 2012 event...
TRANSCRIPT

Banner General Event ManagementInstallation Guide
Release 9.0February 2012

Banner®, Colleague®, PowerCAMPUS®, Luminis® and Datatel® are trademarks of Ellucian or its affiliates and are registered in the U.S. and other countries. Ellucian, Advance, DegreeWorks, fsaATLAS, Course Signals, SmartCall, Recruiter, MOX, ILP, and WCMS are trademarks of Ellucian or its affiliates. Other names may be trademarks of their respective owners.
©2011-2012 Ellucian. All rights reserved. The unauthorized possession, use, reproduction, distribution, display or disclosure of this material or the information contained herein is prohibited.
Contains confidential and proprietary information of Ellucian and its subsidiaries. Use of these materials is limited to Ellucian licensees, and is subject to the terms and conditions of one or more written license agreements between Ellucian and the licensee in question.
In preparing and providing this publication, Ellucian is not rendering legal, accounting, or other similar professional services. Ellucian makes no claims that an institution's use of this publication or the software for which it is provided will insure compliance with applicable federal or state laws, rules, or regulations. Each organization should seek legal, accounting and other similar professional services from competent providers of the organization’s own choosing.
Prepared by: Ellucian4375 Fair Lakes CourtFairfax, Virginia 22033United States of America
Revision History
Publication Date Summary
February 2011 New version that supports Banner General Event Management 9.0 software.

Contents
Banner General 9.0Event Management Installation Guide
Section 1 Introduction. . . . . . . . . . . . . . . . . . . . . . . . . . . . . . . . . . . . . . . . . . . . . . . . . . . . . . . . . . 5
Hardware and Software Requirements . . . . . . . . . . . . . . . . . . . . . . . . . 5
Hardware requirements . . . . . . . . . . . . . . . . . . . . . . . . . . . . . . . . 5
Software requirements . . . . . . . . . . . . . . . . . . . . . . . . . . . . . . . . . 5
Oracle dependencies . . . . . . . . . . . . . . . . . . . . . . . . . . . . . . . . . . 6
Java dependencies . . . . . . . . . . . . . . . . . . . . . . . . . . . . . . . . . . . 6
F5 Load Balancing Configuration . . . . . . . . . . . . . . . . . . . . . . . . . . . . 6
Section 2 Event Management Admin Application Installation. . . . . . . . . . . . . . . 7
Upgrade the Database . . . . . . . . . . . . . . . . . . . . . . . . . . . . . . . . . . 7
Verify the banproxy database accounts . . . . . . . . . . . . . . . . . . . . . . . 7
Verify Oracle user accounts to connect through banproxy . . . . . . . . . . . . . 7
Data masking conversion . . . . . . . . . . . . . . . . . . . . . . . . . . . . . . . 8
Customize the Banner Event Management Admin WAR file. . . . . . . . . . . . . 8
Prepare the installer . . . . . . . . . . . . . . . . . . . . . . . . . . . . . . . . . . 9
Product home directory structure . . . . . . . . . . . . . . . . . . . . . . . . . . . 10
Install into product home directory . . . . . . . . . . . . . . . . . . . . . . . . . . 11
Shared configuration . . . . . . . . . . . . . . . . . . . . . . . . . . . . . . . . . . 12
Application specific configuration . . . . . . . . . . . . . . . . . . . . . . . . . . . 12
JMX Bean names . . . . . . . . . . . . . . . . . . . . . . . . . . . . . . . . . . . . 13
Logging configuration. . . . . . . . . . . . . . . . . . . . . . . . . . . . . . . . . . 13
Central Authentication Service SSO . . . . . . . . . . . . . . . . . . . . . . . . . 14
Regenerate War file. . . . . . . . . . . . . . . . . . . . . . . . . . . . . . . . . . . 16
Configure and Deploy the WAR file to Web Application Server . . . . . . . . . . . 17
Tomcat . . . . . . . . . . . . . . . . . . . . . . . . . . . . . . . . . . . . . . . . . . 17
WebLogic . . . . . . . . . . . . . . . . . . . . . . . . . . . . . . . . . . . . . . . . 24
MEP for Banner General Event Management Admin Application . . . . . . . . . . 29
Configure Supplemental Data Engine . . . . . . . . . . . . . . . . . . . . . . . . . 31
Manage Session Timeouts. . . . . . . . . . . . . . . . . . . . . . . . . . . . . . . . 32
For Tomcat . . . . . . . . . . . . . . . . . . . . . . . . . . . . . . . . . . . . . . . . 32
For WebLogic . . . . . . . . . . . . . . . . . . . . . . . . . . . . . . . . . . . . . . 32
February 2012 Banner General 9.0 3Event Management Installation Guide
Contents

Section 3 Event Management Self-Service Application Installation . . . . . . . . 33
Upgrade the Database . . . . . . . . . . . . . . . . . . . . . . . . . . . . . . . . . . 33
Verify the ban_ss_user database account . . . . . . . . . . . . . . . . . . . . . . 33
Customize the Banner Event Management Self-Service WAR file . . . . . . . . . 33
Prepare the installer . . . . . . . . . . . . . . . . . . . . . . . . . . . . . . . . . . 34
Product home directory structure . . . . . . . . . . . . . . . . . . . . . . . . . . . 35
Install into product home directory . . . . . . . . . . . . . . . . . . . . . . . . . . 36
Shared configuration . . . . . . . . . . . . . . . . . . . . . . . . . . . . . . . . . . 37
Application specific configuration . . . . . . . . . . . . . . . . . . . . . . . . . . . 38
Link to Banner 8 . . . . . . . . . . . . . . . . . . . . . . . . . . . . . . . . . . . . . 39
JMX Bean names . . . . . . . . . . . . . . . . . . . . . . . . . . . . . . . . . . . . 40
Logging configuration. . . . . . . . . . . . . . . . . . . . . . . . . . . . . . . . . . 41
Central Authentication Service SSO . . . . . . . . . . . . . . . . . . . . . . . . . 42
CSS Customization . . . . . . . . . . . . . . . . . . . . . . . . . . . . . . . . . . . 43
Customize Institution name . . . . . . . . . . . . . . . . . . . . . . . . . . . . . . 44
Provide custom JavaScript. . . . . . . . . . . . . . . . . . . . . . . . . . . . . . . 45
Configure Session Timeouts . . . . . . . . . . . . . . . . . . . . . . . . . . . . . . 45
Configure Date Format . . . . . . . . . . . . . . . . . . . . . . . . . . . . . . . . . 45
Regenerate War file. . . . . . . . . . . . . . . . . . . . . . . . . . . . . . . . . . . 47
Configure and Deploy the WAR file to Web Application Server . . . . . . . . . . . 48
Tomcat . . . . . . . . . . . . . . . . . . . . . . . . . . . . . . . . . . . . . . . . . . 49
WebLogic . . . . . . . . . . . . . . . . . . . . . . . . . . . . . . . . . . . . . . . . 52
MEP for Banner General Event Management Self-Service Application . . . . . . 58
4 Banner General 9.0 February 2012Event Management Installation GuideContents

Februar
1 Introduction
This document details the steps required to install Banner General Event Management application that includes installation steps for both Banner General Event Management Admin and Banner General Event Management Self-Service.
Before you install any components of the system, you should review this chapter thoroughly so that you have a better understanding of what you are installing and where you will install it.
Hardware and Software Requirements
Banner General Event Management Admin and Self-Service applications requires the following hardware and software:
Hardware requirements
• Minimum Requirement: Dual core CPU - 2 GB of memory for the application server
• Recommended: Quad core CPU - 4-8GB of memory for the application server
Software requirements
The following are the application server systems that are supported:
• Application Server: Tomcat 6 or Oracle Fusion Middleware 11.1.1.4 using WebLogic 10.3.4
• Application Server Operating Systems: Redhat 5.3 and 5.6 or Solaris 10 or Window Server 2008 or AIX 6.3 (JDK 1.6.0 SR10 or higher) or HP-UX 11.31
• BEIS 8.1.5 SSOManager is required to support deep linking to a Banner 8 SSB URL
NoteOnly 64-bit versions of the operating systems are supported.
y 2012 Banner General 9.0 5Event Management Installation Guide
Introduction

6
Oracle dependencies
The following table indicates the minimum version of Oracle components that must be installed before Banner General Event Management Admin and Self-Service installation.
Java dependencies
You must have Java 6 JDK installed on the application server platform. Make sure the Java 6 bin directory is included in the path.
NoteDo not install the Java 6 JRE. The application does not support Java 6 JRE.
The following table indicates the version of Java components that must be installed before installing Banner General Event Management Admin and Self-Service.
NoteVerify you defined the JDK bin directory in the PATH system property.
F5 Load Balancing Configuration
The solution has been tested using an F5 load balancer configured with the following settings
Load Balancing type = Round Robin
Persistence = Cookie
NoteOther configurations may be supported depending on Network Load Balancing (NLB).
Oracle Database 11.1.0.7 or 11.2.0.2
Java 6 JDK Java 1.6.x (64-bit version)
Banner General 9.0 February 2012Event Management Installation GuideIntroduction

Februar
2 Event Management Admin Application Installation
The following sections details the installation steps for Banner General Event Management Admin Application:
• “Upgrade the Database” on page 7
• “Customize the Banner Event Management Admin WAR file” on page 8
• “Configure and Deploy the WAR file to Web Application Server” on page 17
Upgrade the Database
For information on Database upgrade process, refer to the Banner Event Management Upgrade Guide.
Verify the banproxy database accounts
The banproxy account is used for Banner 9 database connections. The database upgrade process will issue the necessary grants for these accounts. You should not revoke any grants made to these accounts. Specifically, the BAN_DEFAULT_M role is granted to banproxy. If this role is revoked, the application will not successfully start.
Verify Oracle user accounts to connect through banproxy
All Internet Native Banner (INB) or Oracle user accounts must have connect through banproxy privilege.
Use the following procedure to verify Oracle user accounts to connect through banproxy:
1. Access GSASECR form.
2. To modify, enter a valid username.
3. Click Alter.
y 2012 Banner General 9.0 7Event Management Installation Guide
Event Management Admin Application Installation

8
4. Select the Authorize banproxy check box.
5. Click Save.
Data masking conversion
If you change the data masking rules on GORDMSK form for any of the Event Management pages, you will need to run the gupdgordmsk.sql script found in the general or plus subdirectory of your production source tree. This script should be run as the user GENERAL.
Customize the Banner Event Management Admin WAR file
NoteIt is required to have JDK 1.6 installed in your system. See “Java dependencies” on page 6.
The release package is contained in the Banner Home Directory\general\java subdirectory. The name of the release package is release-BannerGeneralEventManagement-9.0.zip. This file is moved to this location during database upgrade.
Once you locate the release package zip file, it must be copied to your application server environment. Transfer this file in binary mode using File Transfer Protocol (FTP).
NoteTo copy the release package, you must have a valid application server account.
Use the following procedure to copy the release package into a temporary directory:
1. Login into the application server platform.
NoteYou must have a valid account to login and permissions to deploy into the application server container (Tomcat or WebLogic).
2. Create a temporary directory mkdir $HOME/ban9temp.
3. Download (FTP) the release package file into the following directory:
\ $HOME/ban9temp
Banner General 9.0 February 2012Event Management Installation GuideEvent Management Admin Application Installation

Februar
4. Unzip the release package release-BannerGeneralEventManagement-9.0.zip into a temporary directory.
Prepare the installer
Use the following procedure to prepare the installer:
1. Change the directory to installer directory cd installer.
2. Run the ant command, which will build the installation tool.
NoteFor Unix, make sure the ant file is executable. For example, chmod +x ant.
For example,
ban9temp $ cd installer
ban9temp/installer $ ant
You will receive a message Build successful in the output, which is the confirmation for a successful build.
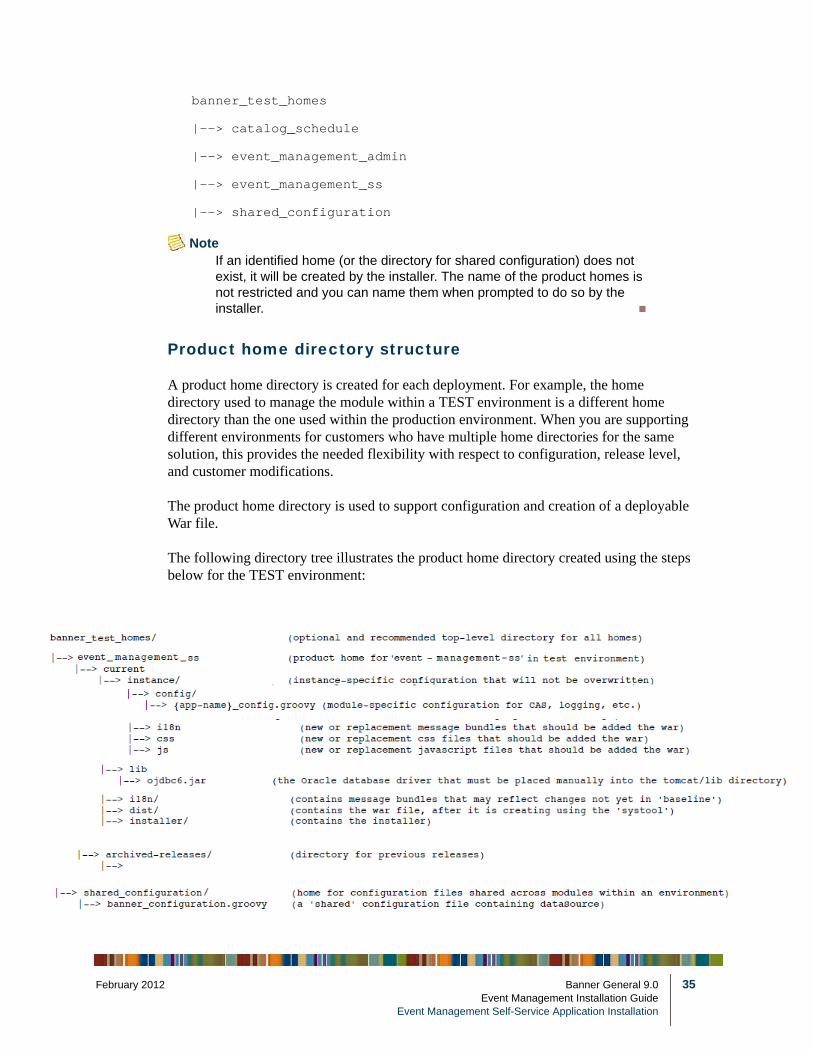
NoteIf you have already installed ant on your machine, run the following command: ./antBanner 9 web applications are modular and are installed independently from each other, though they share common configuration. The package provides a common structure for releases as well as a common installer. The product home directory structures subsequently created are consistent across all Banner 9 modules. It is recommended that the product homes for Banner 9 modules within a particular environment be placed in sibling directories. For example, the following directory structure Illustrates two product homes and a shared_configuration directory that all support a common TEST environment.
banner_test_homes
|--> catalog_schedule
|--> event_management_admin
|--> shared_configuration
NoteIf an identified home (or the directory for shared configuration) does not exist, it will be created by the installer. The name of the product homes is not restricted and you can name them when prompted to do so by the installer.
y 2012 Banner General 9.0 9Event Management Installation Guide
Event Management Admin Application Installation

10
Product home directory structure
A product home directory is created for each deployment. For example, the home directory used to manage the module within a TEST environment is a different home directory than the one used within the production environment. When you are supporting different environments for customers who have multiple home directories for the same solution, this provides the needed flexibility with respect to configuration, release level, and customer modifications.
The product home directory is used to support configuration and creation of a deployable Web application ARchive (WAR) file.
The following directory tree illustrates the product home directory created using the steps below for the TEST environment:
In addition to the module's product home directory, there is a separate shared_configuration home directory that contains cross-module configuration for the TEST environment. Currently, this directory holds a single file banner_configuration.groovy that contains the shared JNDI DataSource configuration.
Banner General 9.0 February 2012Event Management Installation GuideEvent Management Admin Application Installation
Februar
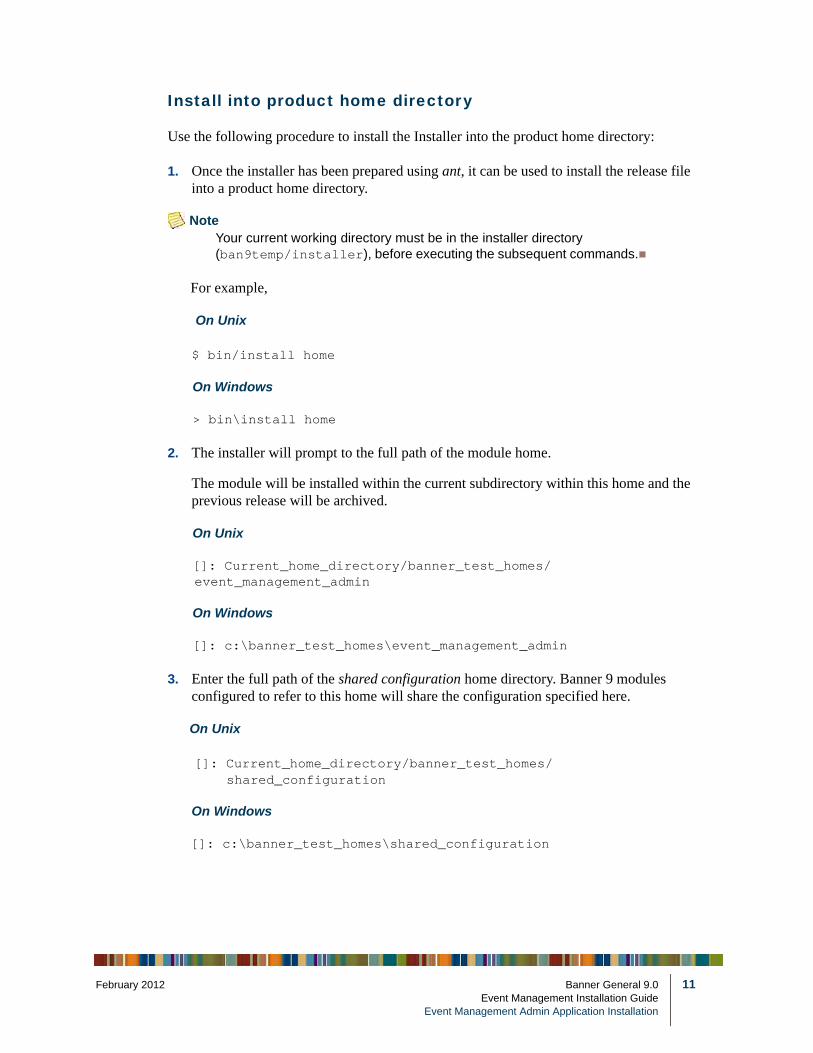
Install into product home directory
Use the following procedure to install the Installer into the product home directory:
1. Once the installer has been prepared using ant, it can be used to install the release file into a product home directory.
NoteYour current working directory must be in the installer directory (ban9temp/installer), before executing the subsequent commands.
For example,
On Unix
$ bin/install home
On Windows
> bin\install home
2. The installer will prompt to the full path of the module home.
The module will be installed within the current subdirectory within this home and the previous release will be archived.
On Unix
[]: Current_home_directory/banner_test_homes/event_management_admin
On Windows
[]: c:\banner_test_homes\event_management_admin
3. Enter the full path of the shared configuration home directory. Banner 9 modules configured to refer to this home will share the configuration specified here.
On Unix
[]: Current_home_directory/banner_test_homes/shared_configuration
On Windows
[]: c:\banner_test_homes\shared_configuration
y 2012 Banner General 9.0 11Event Management Installation Guide
Event Management Admin Application Installation

12
Shared configuration
The shared configuration directory contains a single cross-module configuration file called banner_configuration.groovy. You can optionally change the DataSource name in the configuration file to point to the JNDI DataSource configured in your application server.
For example,
jndiName = "jdbc/bannerDataSource" is the default configuration. You can change this to match the JNDI DataSource name in your environment.
For more information on JNDI DataSource configuration, see “Configure Tomcat server” on page 17.
onLineHelp.url
NoteIn the shared configuration folder, banner_configuration.groovy file, if you do not see the onLineHelp.url field, you must append it to the file and continue with the installation.
The URL pointing to the online help docs for the Event Management application.
//replace with the URL pointing to deployed online help web app
onLineHelp.url= '<scheme>://<server hosting online help>:<port>/<help app context root>/'
For example, onLineHelp.url = "http://localhost:8180/banner9OH", this is the new Online Help URL for the Event Management application.
NoteThe instructions on how to deploy the Banner General Event Management 9.0 Online help is available in the howtoinstallinterimOH.txt file.This file is part of the Banner General Event Management 9.0 release documentation trz (general-events-90000d.trz), which you can download from the Customer Support Center via the Documentation and Download Center.
Application specific configuration
The application configuration directory PRODUCT_HOME\current\instance\config contains an application specific file called BannerGeneralEventManagement_configuration.groovy. This configuration file contains a number of elements you can customize for your specific environment. This directory also contains an instance.properties file that references the shared configuration location.
Banner General 9.0 February 2012Event Management Installation GuideEvent Management Admin Application Installation

Februar
JMX Bean names
The names used to register Mbeans must be unique for all applications deployed into the JVM. This configuration should be updated for each instance of each application to ensure uniqueness.
jmx {
exported {
log4j = "banner_general_event_management-log4j"
} }
Logging configuration
Log4J is the common logging framework used with applications that run on the Java Virtual Machine. For more information, refer to the Log4J documentation.
The configuration file includes documentation on various elements that can be modified depending on your environment.
Output logging file location
For example,
loggingFileDir = "System.properties['logFileDir'] ?
"${System.properties['logFileDir']}" : "target/logs"
logAppName = "bannergeneraleventmanagementapp"
loggingFileName = "${loggingFileDir}/${logAppName}.log".toString()
Following is an example for overriding log file directory properties:
export JAVA_OPTS = "-DlogFileDir=/PRODUCT_HOME /"
The output logging file location is sensitive to the application server you are deploying. See “Configure Tomcat server” on page 17.
y 2012 Banner General 9.0 13Event Management Installation Guide
Event Management Admin Application Installation

14
Log level customization
The root logger level is pre-configured to log at the ERROR level. There are multiple class or package level configurations that are set to off status by default. You may set a different logging level for any of these packages or classes. However, it will require a restart of the running application.
For example,
case 'production':
root {
error 'appLog' //change the log level here with the
appropriate log level value.
additivity = true
}
NoteChanging the log level to debug or info will produce very large log files.
Changes to BannerGeneralEventManagement_configuration.groovy file will require a restart of the application in order to take effect. Alternatively, you can use JMX to modify logging levels for any of the specified packages or classes, or even at the root level.
When you modify the logging levels using JMX, the logging level changes will only affect the running application. If you restart, any changes you made using JMX will be lost. For more information on JMX configuration, see “Configure Java Management Extensions” on page 21.
Central Authentication Service SSO
******
// +++ CAS CONFIGURATION +++
******************************************************************************
banner {
Banner General 9.0 February 2012Event Management Installation GuideEvent Management Admin Application Installation

Februar
sso {
authenticationProvider = 'default'
authenticationAssertionAttribute = 'UDC_IDENTIFIER'
}
}
grails {
plugins {
springsecurity {
cas {
serverUrlPrefix = 'http://CAS_HOST:PORT/cas'
serviceUrl = 'http://BANNER9_HOST:PORT/APP_NAME/j_spring_cas_security_check'
serverName = 'http://BANNER9_HOST:PORT'
proxyCallbackUrl = 'http://BANNER9_HOST:PORT/APP_NAME/secure/receptor'
loginUri = '/login'
sendRenew = false
proxyReceptorUrl = '/secure/receptor'
useSingleSignout = true
key = 'grails-spring-security-cas'
artifactParameter = 'ticket'
serviceParameter = 'service'
filterProcessesUrl = '/j_spring_cas_security_check'
}
}
}
}
y 2012 Banner General 9.0 15Event Management Installation Guide
Event Management Admin Application Installation

16
Regenerate War file
Once the shared and application specific configurations are complete, the application War file can be regenerated with these customization, such as customize logging, application specific settings, and so on and then deployed into your specific application server.
Prepare systool installation tool
The systool is used to create a War file.
Use the following procedure to create a War file:
1. You must change your current working directory to the product home directory PRODUCT_HOME\current\installer.
2. Run the ant command.
This will build the systool module.
NoteIf you have already installed ant on your machine, run the following command: ./ant.For Unix, make sure the ant file is executable. For example, chmod +x ant.
For example,
$ cd PRODUCT_HOME/current/installer
PRODUCT_HOME/current/installer $ ant
3. Use the systool module to create the war file.
Your current working directory must be in the PRODUCT_HOME\current\installer directory before you execute the following command.
On Unix
$ bin/systool war
On Windows
> bin\systool war
The war file is created in the "PRODUCT_HOME\current\dist".You can use externalized configuration files by setting appropriate system properties, although the configuration files have been included within the War file (making the War file self sufficient). For information on external configuration, see the sections “Tomcat” on page 17 or “WebLogic” on page 24.
Banner General 9.0 February 2012Event Management Installation GuideEvent Management Admin Application Installation
Februar
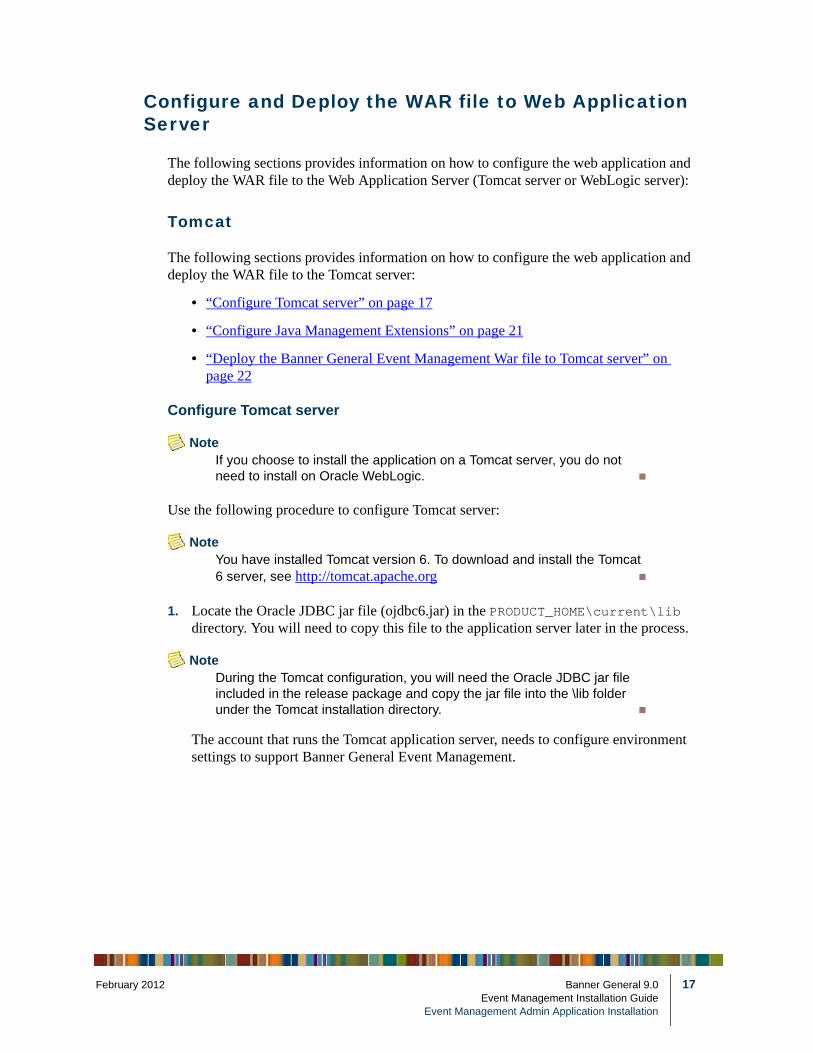
Configure and Deploy the WAR file to Web Application Server
The following sections provides information on how to configure the web application and deploy the WAR file to the Web Application Server (Tomcat server or WebLogic server):
Tomcat
The following sections provides information on how to configure the web application and deploy the WAR file to the Tomcat server:
• “Configure Tomcat server” on page 17
• “Configure Java Management Extensions” on page 21
• “Deploy the Banner General Event Management War file to Tomcat server” on page 22
Configure Tomcat server
NoteIf you choose to install the application on a Tomcat server, you do not need to install on Oracle WebLogic.
Use the following procedure to configure Tomcat server:
NoteYou have installed Tomcat version 6. To download and install the Tomcat 6 server, see http://tomcat.apache.org
1. Locate the Oracle JDBC jar file (ojdbc6.jar) in the PRODUCT_HOME\current\lib directory. You will need to copy this file to the application server later in the process.
NoteDuring the Tomcat configuration, you will need the Oracle JDBC jar file included in the release package and copy the jar file into the \lib folder under the Tomcat installation directory.
The account that runs the Tomcat application server, needs to configure environment settings to support Banner General Event Management.
y 2012 Banner General 9.0 17Event Management Installation Guide
Event Management Admin Application Installation

18
2. Ensure CATALINA_HOME is defined to reference your Tomcat software installation location. For example, CATALINA_HOME=/opt/apache-tomcat-6.0.xx where xx indicates the point version of Tomcat you installed.
NoteYou must not perform the above step for Windows platform.
3. Define CATALINA_OPTS to configure JVM settings. It is recommended that you have the following settings:
CATALINA_OPTS=-server -Xms2048m -Xmx4g -XX:MaxPermSize=512m
This variable can be defined in the account's profile startup script or you can add this definition in $CATALINA_HOME/bin/catalina.sh for Linux or catalina.bat for Windows.
4. (Optional) If you install Tomcat as a Windows service, you must specify the JVM arguments. To specify the JVM arguments, proceed as follows:
4.1. Select Configure Tomcat application from the Windows Start menu.
4.2. Select the Java tab.
4.3. In Java Options field, add the following:
-XX:MaxPermSize=384m
4.4. Set the Initial memory pool = 2048.
4.5. Set the Maximum memory pool = 4096.
4.6. Save the settings.
4.7. Restart the Tomcat Windows service.
5. (Optional) To setup Tomcat server to enable remote JMX connections, perform the steps in section “Configure Java Management Extensions” on page 21. This is useful for debugging and logging.
6. Define Banner Event Management JNDI DataSource resource name.
6.1. Edit $CATALINA_HOME/conf/context.xml.
Banner General 9.0 February 2012Event Management Installation GuideEvent Management Admin Application Installation
Februar
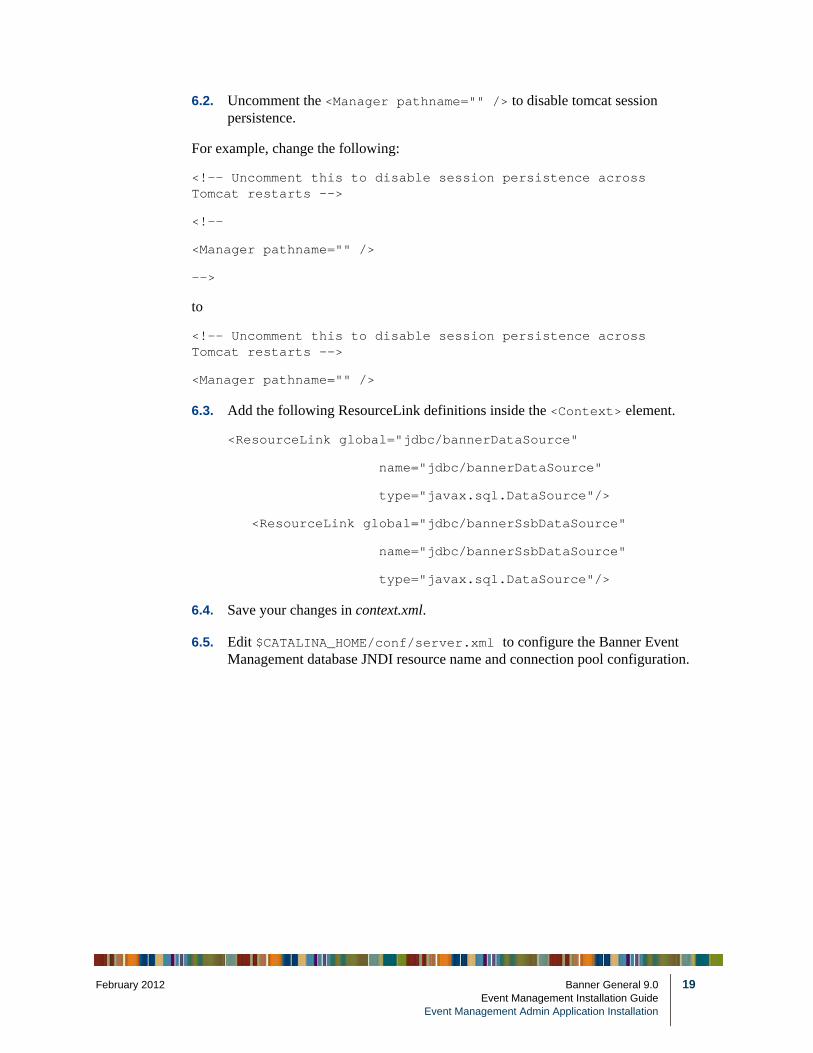
6.2. Uncomment the <Manager pathname="" /> to disable tomcat session persistence.
For example, change the following:
<!-- Uncomment this to disable session persistence across Tomcat restarts -->
<!--
<Manager pathname="" />
-->
to
<!-- Uncomment this to disable session persistence across Tomcat restarts -->
<Manager pathname="" />
6.3. Add the following ResourceLink definitions inside the <Context> element.
<ResourceLink global="jdbc/bannerDataSource"
name="jdbc/bannerDataSource"
type="javax.sql.DataSource"/>
<ResourceLink global="jdbc/bannerSsbDataSource"
name="jdbc/bannerSsbDataSource"
type="javax.sql.DataSource"/>
6.4. Save your changes in context.xml.
6.5. Edit $CATALINA_HOME/conf/server.xml to configure the Banner Event Management database JNDI resource name and connection pool configuration.
y 2012 Banner General 9.0 19Event Management Installation Guide
Event Management Admin Application Installation

20
6.6. Add the Resource definitions inside the <GlobalNamingResources> element.
<Resource name="jdbc/bannerDataSource" auth="Container"
type="javax.sql.DataSource"
driverClassName="oracle.jdbc.OracleDriver"
url="jdbc:oracle:thin:@//hostname:port/service_name"
username="banproxy" password="the_banproxy_password"
initialSize="5" maxActive="100" maxIdle="-1" maxWait="30"
validationQuery="select 1 from dual"
testOnBorrow="true"/>
<Resource name="jdbc/bannerSsbDataSource" auth="Container"
type="javax.sql.DataSource" driverClassName="oracle.jdbc.OracleDriver"
url="jdbc:oracle:thin:@//hostname:port/service_name"
username="ban_ss_user" password="ban_ss_user_pasword"
initialSize="5" maxActive="100" maxIdle="-1" maxWait="30"
validationQuery="select 1 from dual"
testOnBorrow="true"/>
For example if your database server name is myserver.university.edu and the Oracle TNS Listener is accepting connections on port 1521 and your database service name is SEED then the URL will be jdbc:oracle:thin:@//myserver.university.edu:1521/SEED
6.7. Save your changes in server.xml.
6.8. Copy the Oracle JDBC jar file (ojdbc6.jar) located in the PRODUCT_HOME/current/lib directory to the $CATALINA_HOME/lib directory.
Banner General 9.0 February 2012Event Management Installation GuideEvent Management Admin Application Installation

Februar
6.9. Validate the configuration of Tomcat server by starting the application server. To accomplish this, perform the following steps:
6.9.1. Run $CATALINA_HOME/bin/startup.
For Linux
cd $CATALINA_HOME
$ bin/startup.sh
For Windows
cd %CATALINA_HOME%
> bin\startup.bat
6.9.2. Browse http://server:8080.
NoteTo override the configuration that was added into the War file, you may set system properties to point to external configuration files. For example, to point to a configuration file residing in the PRODUCT_HOME directory, export JAVA_OPTS="-DBANNER_APP_CONFIG=/PRODUCT_HOME/shared_configuration/banner_configuration.groovy -DBANNER_GENERAL_EVENT_MANAGEMENT_CONFIG=/PRODUCT_HOME/event_management_admin/current/instance/config/ BannerGeneralEventManagement_configuration.groovy"
Configure Java Management Extensions
This is an optional step and only needed if you wish to monitor or debug the application. Java Management Extensions (JMX) is a Java technology that supplies tools for managing and monitoring applications, system objects, devices and service oriented networks.
Enabling JMX connections allows remote monitoring and debugging of the application server.
y 2012 Banner General 9.0 21Event Management Installation Guide
Event Management Admin Application Installation

22
Use the following procedure to configure the JMX:
1. Add the following options to the catalina.sh or .bat file and then restart the Tomcat server:
set CATALINA_OPTS=-Dcom.sun.management.jmxremote -
Dcom.sun.management.jmxremote.port=8999
-Dcom.sun.management.jmxremote.ssl=false -
Dcom.sun.management.jmxremote.authenticate=false
-Djava.rmi.server.hostname=your.hostname.com
2. Change the java.rmi.server.hostname value to the hostname or IP address of this machine where Tomcat is installed. For example,
-Djava.rmi.server.hostname=prod.appserver1.com or
-Djava.rmi.server.hostname=149.24.3.178
3. Change com.sun.management.jmxremote.port=8999 if needed.
WarningJMX does not define a default port number to use.It is recommended to connect remotely to the Tomcat server using JMX. Also, the jmxremote.authenticate parameter is set to false, which does not require connections to be authenticated. Do not leave this enabled in a production environment as it represents a security threat, or modify the parameters to enforce authentication. For more information on Tomcat Remote JMX documentation, see http://tomcat.apache.org/tomcat-6.0-doc/monitoring.html#Enabling_JMX_Remote
Deploy the Banner General Event Management War file to Tomcat server
The systool that is used to create the War file can also be used to deploy the War file to a Tomcat container. The systool does not provide the capability to undeploy or redeploy an application. If you are redeploying the application, you must use the Tomcat Manager web application to undeploy the existing Event Management Admin application.
Environments vary significantly from each other with respect to user privileges, clustering approach, web container version, operating system, and so on. This target may or may not be suitable for your use. The target provides support for deploying the dist/ War file using the Tomcat manager application. The War file deployment to Tomcat server can also be accomplished by copying the War file to the Tomcat webapps/ directory and hence use of this target is not critical.
Banner General 9.0 February 2012Event Management Installation GuideEvent Management Admin Application Installation

Februar
To use the target, you will be required to answer the following:
• The URL of the manager application in tomcat server. For example, http://localhost:8080/manager
• The Tomcat server user who has privileges to deploy. For Tomcat 6.x, you must configure at least one username/password combination in your Tomcat user database <TOMCAT_HOME>\conf\tomcat-users.xml, which includes the manager role. For example, <user username="tomcat" password="tomcat" roles="manager-gui, manager"/>
• The password of the Tomcat server user
NoteThe roles in Tomcat server have changed between point releases in version 6.x. Refer to Tomcat documentation, specific to your point release on enabling access to provide the appropriate role to a user account for deployment.
Use the following procedure to deploy the BannerGeneralEventManagement-9.0.war file to Tomcat server:
1. You must be in the PRODUCT_HOME\current\installer directory before you enter any command.
For example,
On Unix
$ bin/systool deploy-tomcat
On Windows
> bin\systool deploy-tomcat
2. Enter the following URL to the Tomcat Manager:
[]: http://localhost:8080/manager
This URL will be accessed in order to deploy the War file into the container.
3. Enter a valid Tomcat username to deploy a War. You must have the manager-gui role.
[]: tomcat
4. Enter the Tomcat password for the user. This password will not be persisted.
[]: password
y 2012 Banner General 9.0 23Event Management Installation Guide
Event Management Admin Application Installation

24
5. Access the Event Management Admin web application. http://servername:<port>/BannerGeneralEventManagement/banner.zul?page=mainPage
For more information on user accounts and privileges, refer to “Verify Oracle user accounts to connect through banproxy” on page 7
WebLogic
Configure WebLogic server
The following sections provides information on how to configure the web application and deploy the WAR file to the WebLogic server:
NoteIf you choose to install the application on a WebLogic server, you do not need to install on Tomcat.
The following are the prerequisites before you configure WebLogic server:
• It is assumed that you have WebLogic already installed. If not, see the Oracle website to download and install WebLogic
• The minimum requirements are OFM 11.1.14 using WebLogic 10.3.4
• Both WebLogic node manager and admin server must be started
• To access the admin server, use the following URL http://server:7001/console
Use the following procedure to configure WebLogic server:
1. Create WebLogic machine. See “Create WebLogic machine” on page 24
2. Create WebLogic server. See “Create a WebLogic server” on page 25
3. Create DataSource and Connection Pool. See “Create DataSource and connection pool” on page 26
Create WebLogic machine
NoteIf you have previously created a WebLogic machine definition you may skip this section.
Use the following procedure to create a WebLogic machine:
1. Click Lock & Edit to allow configuration changes in the Change Center frame.
2. In the Domain Structure frame, click (+) to expand and view the list of environments.
Banner General 9.0 February 2012Event Management Installation GuideEvent Management Admin Application Installation

Februar
3. Select the Machines link item.
4. Click New.
5. Enter a machine name and click Next.
6. Accept the defaults and click Finish.
7. Click Activate Changes in the Change Center frame.
Create a WebLogic server
Use the following procedure to create a WebLogic server:
1. Click Lock & Edit to allow configuration changes in the Change Center frame.
2. In the Domain Structure frame, click (+) to expand and view the list of environments.
3. Select the Servers link item.
4. Click New.
5. Enter a Server name and Server Listen Port. For example, you can have Server name as Banner9 and Server Listen Port as 8080.
6. Click Finish.
7. Select the newly created server link.
8. Under the General tab, assign the machine to this server and then click Save.
9. Select the Server Start tab.
10. Add the following to the Arguments text area:
If you are using Sun JVM, use the following parameters:-server -Xms2048m -Xmx4g -XX:MaxPermSize=512m
If you are using JRockit JVM, use the following parameters:
-Xms2048m -Xmx4g
y 2012 Banner General 9.0 25Event Management Installation Guide
Event Management Admin Application Installation

26
NoteTo override the configuration that was added into the War file, you may set system properties to point to external configuration files. Append the following to the Arguments text area:-DBANNER_APP_CONFIG=<full file path to banner_configuration.groovy> -DBANNER_GENERAL_EVENT_MANAGEMENT_CONFIG==<full file path to BannerGeneralEventManagement_configuration.groovy>
11. Click Save.
12. Click Activate Changes.
13. Select Servers link in Domain Structure frame.
14. Select the Control tab.
15. Select the check box next to your new server definition and then click Start.
Create DataSource and connection pool
Use the following procedure to Create a DataSource and connection pool:
1. Click Lock & Edit to allow configuration changes in the Change Center frame.
2. In the Domain Structure frame, click (+) to expand Services and then select Data Sources.
3. Click New.
4. Select Generic DataSource.
5. Specify a name. For example, Banner9DS.
6. Specify the following JNDI name. For example, jdbc/bannerDataSource
7. Specify Oracle for Database Type and then click Next.
8. Select Oracle Driver (Thin) for Service Connections and then click Next.
9. On the Transaction Options page, clear the Supports Global Transactions check box and then click Next.
Banner General 9.0 February 2012Event Management Installation GuideEvent Management Admin Application Installation

Februar
10. Enter the Database Name, Host Name, Port, Username, Password, Confirm password, and then click Next. For example,
Database name: BAN9
Host Name: yourhostname.yourdomain.com
Port: 1521
UserName: banproxy
Password: your_password
11. Click Test Configuration.
12. Click Next for the connection test to be successful.
13. Select the server you have previously created, Banner9 to allow the jdbc DataSource to be deployed and used by this server.
14. Click Finish.
15. Select the DataSource link that you created.
16. Select the Connection Pool tab.
16.1. Set the Initial Capacity parameter to specify the minimum number of database connections to create when the server starts up. For example, Initial Capacity = 5.
16.2. Set the Maximum Capacity parameter to specify the maximum number of database connections that can be created. For example, Maximum Capacity = 100.
17. Change Statement Cache Type = Fixed.
18. Change Statement Cache Size = 0.
19. Click Save.
20. Click Activate Changes in the Change Center frame.
y 2012 Banner General 9.0 27Event Management Installation Guide
Event Management Admin Application Installation

28
Deploy and Start the Event Management Admin web application in WebLogic server
Use the following procedure to deploy and start the EventManagementAdmin web application in WebLogic server:
NoteYou need to access the WebLogic server before you start to deploy the application.
1. To access the admin server, use the following URL http://server:7001/console.
2. Select the Deployments link in the Domain Structure frame.
3. Select Lock & Edit in the Change Center.
4. Click Install.
5. The War file is located in the PRODUCT_HOME/current/dist/BannerGeneralEventManagement-9.0.war.
NoteThe War file name should be changed to remove the version number. For example, BannerGeneralEventManagement.war.
6. Click Next.
7. Select Install this deployment as an application.
8. Click Next.
9. Select the target server to deploy this application (for example, Banner9).
10. Click Next.
11. Click Finish.
12. Click Activate Changes in the Change Center frame.
13. Select the deployed application and then click Start.
14. Select Servicing all request.
Banner General 9.0 February 2012Event Management Installation GuideEvent Management Admin Application Installation

Februar
15. Access the Event Management Admin application:
15.1. Use a valid ID.
15.2. Use valid password credentials.
For more information on user accounts and privileges, refer to “Verify Oracle user accounts to connect through banproxy” on page 7
15.3. Use the following URL format: http://servername:<port>/BannerGeneralEventManagement/banner.zul?page=mainPage
For example: http://localhost:8080/BannerGeneralEventManagement/banner.zul?page=mainPage
MEP for Banner General Event Management Admin Application
Multi-Entity Processing (MEP) is available with Banner General Event Management Admin Release 9.0.
Here is an example of how this works.
Option 1: User A is assigned to multiple institutions
1. User A has access to both of these universities. When the user logs in, he/she sees a Multi Entity Processing window where the institution can be selected.
y 2012 Banner General 9.0 29Event Management Installation Guide
Event Management Admin Application Installation

30
2. For multi-institutional logins, the user can select one of these institutions, click Ok, and continue to the Main Page.
3. Or the user can choose to not select an institution and will be logged into the default institution after clicking Ok.
4. If the user clicks Cancel, he/she will also be logged into the default institution.
The Default indicator is used to indicate that the institution is the default for the user. A user can only have one default institution.
Option 2: User B is assigned to only one institution
1. User B is automatically logged into the institution to which he/she is assigned.
2. The header reads Alternate University. User B is assigned to only the Alternate University.
The institution you are logged into will always be displayed in this location.
Option 3: User C is not assigned any institutions
1. The login process is the same as Option 2, except User C is automatically logged into the default institution.
2. To know what institutions exist and what institution users are assigned to you, access the Oracle/Banner VPD Security Maintenance Form (GSAVPDI) in Banner 8.X.
The Institution Codes tab on GSAVPDI shows the institution codes that have been defined. This list is unique for each institution. The System Default indicator is checked for the record that is the system default. This is the institution that User C, who does have an institution assigned to him/her, will be logged into.
The User Assignment tab shows the user assignment records. The records show all the users, their institution assignments, and their default or home institution. User B, who is assigned only one institution, can only log into Alternate University.
To change institutions, please refer to the instructions for “How to Switch Between Institution Codes” in the Multi-Entity Processing Handbook, in Chapter 3, “Multi-Entity Processing in Banner”.
Banner General 9.0 February 2012Event Management Installation GuideEvent Management Admin Application Installation

Februar
In Banner 9.0, the (Change) link is located in the header in the top right corner of the page.
Configure Supplemental Data Engine
NoteYou must perform this step only if you want to enable or have already enabled (in 8x) Supplemental Data Engine (SDE) for GERATTD or GERFGST tables.
SDE provides a simple way to extend Banner pages to capture and store additional data. In this release, the Primary Key for GERATTD and GERFGST have changed to use the new SURROGATE_ID column. When configuring SDE for the these two tables, the GTVSDTB Form will automatically pick the SURROGATE_ID column as the Primary Key. But this needs to be changed for SDE functionality to work properly. Use the below table for the new values to be used for GERATTD and GERFGST tables.
If these tables are already configured in Banner 8.x version then you must change the configuration now, as shown in the table below.
y 2012 Banner General 9.0 31Event Management Installation Guide
Event Management Admin Application Installation

32
For more information on SDE, refer to the Banner General 9.0 Banner Getting Started Guide.
Manage Session Timeouts
Due to changes in the Banner 9 architecture, session timeouts work in a different way. Individual user sessions are managed at the application container level in Banner 9, which controls the resources and access to connections to the Banner database. Since connections in Banner 9 are only open for the duration of work performed by the user, the individual profile rules in INB do not apply to these connections. You can control the amount of time individual sessions are retained in Banner 9 by specific configuration elements available in the application container.
For Tomcat
Configure the HTTP session timeout by modifying the session-timeout value in the web.xml file located in the \apache-tomcat-6.0.xx\conf directory. You will need to restart the application for changes to be applied.
For WebLogic
Use the following procedure to configure the HTTP session:
1. To access the admin server, use the following URL http://server:7001/console
2. Select the Deployments link in the Domain Structure frame.
3. Select the deployed application.
4. In the settings frame, select the Configuration tab.
5. Modify the Session Timeout value and click Save.
Table Name
Primary Key value (current value Primary Key value (new value)
GERATTD to_char(TABLE_NAME_SURROGATE_ID)
GERATTD_EVNT_CRN||CHR(1)||GERATTD_PIDM||CHR(1)||GERATTD_GIDM||CHR(1)||GERATTD_FUNC_CODE
GERFGST to_char(TABLE_NAME_SURROGATE_ID)
GERFGST_EVNT_CRN||CHR(1)||GERFGST_PIDM||CHR(1)||GERFGST_GIDM||CHR(1)||GERFGST_FUNC_CODE||CHR(1)|| GERFGST_GUEST_GIDM||CHR(1)||GERFGST_GUEST_PIDM
Banner General 9.0 February 2012Event Management Installation GuideEvent Management Admin Application Installation

Februar
3 Event Management Self-Service Application Installation
The following sections details the installation steps for Banner General Event Management Self-Service Application:
• “Upgrade the Database” on page 33
• “Customize the Banner Event Management Self-Service WAR file” on page 33
• “Configure and Deploy the WAR file to Web Application Server” on page 48
Upgrade the Database
For information on Database upgrade process, refer to the Banner Event Management Upgrade Guide.
Verify the ban_ss_user database account
The ban_ss_user account is used for Banner 9 database connections. The database upgrade process will issue the necessary grants for this account. You should not revoke any grants made to this account. Specifically, the BAN_DEFAULT_M role is granted to ban_ss_user. If this role is revoked, the application will not successfully start.
Customize the Banner Event Management Self-Service WAR file
It is required to have JDK 1.6 installed in your system. See “Java dependencies” on page 6.
The release package is contained in the Banner_Home\general\java subdirectory. The name of the release package is release-SelfServiceBannerGeneralEventManagement-9.0.zip. This file is moved to this location during database upgrade.
Once you locate the release package zip file, it must be copied to your application server environment. Transfer this file in binary mode using File Transfer Protocol (FTP).
NoteTo copy the release package, you must have a valid application server account.
y 2012 Banner General 9.0 33Event Management Installation Guide
Event Management Self-Service Application Installation

34
Use the following procedure to copy the release package into a temporary directory:
1. Login into the application server platform.
NoteYou must have a valid account to login and permissions to deploy into the application server container (Tomcat or WebLogic).
2. Create a temporary directory mkdir $HOME/ban9temp.
3. Download (FTP) the release package file into the following directory:
\ $HOME/ban9temp
4. Unzip the release package release-SelfServiceBannerGeneralEventManagement-9.0.zip into a temporary directory.
Prepare the installer
Use the following procedure to prepare the installer:
1. Change the directory to installer directory cd installer.
2. Run the ant command, which will build the installation tool.
NoteFor Unix, make sure the ant file is executable. For example, chmod +x ant.
For example,
ban9temp $ cd installer
ban9temp/installer $ ant
You will receive a message Build successful in the output, which is the confirmation for a successful build.
NoteIf you have already installed ant on your machine, run the following command: ./antBanner 9 web applications are modular and are installed independently from each other, though they share common configuration. The package provides a common structure for releases as well as a common installer. The product home directory structures subsequently created are consistent across all Banner 9 modules. It is recommended that product homes for Banner 9 modules within a particular environment be placed in sibling directories. For example, the following directory structure Illustrates three product homes and a shared_configuration directory that all support a common TEST environment.
Banner General 9.0 February 2012Event Management Installation GuideEvent Management Self-Service Application Installation
Februar
banner_test_homes
|--> catalog_schedule
|--> event_management_admin
|--> event_management_ss
|--> shared_configuration
NoteIf an identified home (or the directory for shared configuration) does not exist, it will be created by the installer. The name of the product homes is not restricted and you can name them when prompted to do so by the installer.
Product home directory structure
A product home directory is created for each deployment. For example, the home directory used to manage the module within a TEST environment is a different home directory than the one used within the production environment. When you are supporting different environments for customers who have multiple home directories for the same solution, this provides the needed flexibility with respect to configuration, release level, and customer modifications.
The product home directory is used to support configuration and creation of a deployable War file.
The following directory tree illustrates the product home directory created using the steps below for the TEST environment:
y 2012 Banner General 9.0 35Event Management Installation Guide
Event Management Self-Service Application Installation

36
In addition to the module's product home directory, there is a separate shared_configuration home directory that contains cross-module configuration for the TEST environment. Currently, this directory holds a single file banner_configuration.groovy that contains the shared JNDI DataSource configuration.
Install into product home directory
Use the following procedure to install the Installer into the product home directory:
1. Once the installer has been prepared using ant, it can be used to install the release file into a product home directory.
NoteYour current working directory must be in the installer directory (ban9temp/installer), before executing the subsequent commands.
For example,
On Unix
$ bin/install home
On Windows
> bin\install home
2. The installer will prompt to the full path of the module home.
The module will be installed within the current subdirectory within this home and the previous release will be archived.
On Unix
[]: Current_home_directory/banner_test_homes/event_management_ss
On Windows
[]: c:\banner_test_homes\event_management_ss
Banner General 9.0 February 2012Event Management Installation GuideEvent Management Self-Service Application Installation

Februar
3. Enter the full path of the shared configuration home directory. Banner 9 modules configured to refer to this home will share the configuration specified here.
On Unix
[]: Current_home_directory/banner_test_homes/shared_configuration
On Windows
[]: c:\banner_test_homes\shared_configuration
Shared configuration
The shared configuration directory contains a single cross-module configuration file called banner_configuration.groovy. You can optionally change the DataSource name in the configuration file to point to the JNDI DataSource configured in your application server.
For example,
jndiName = "jdbc/bannerSsbDataSource" is the default configuration. You can change this to match the JNDI DataSource name in your environment.
For more information on JNDI DataSource configuration, see “Configure Tomcat server” on page 17.
banner8.SS.url
In order to display existing Self-Service Banner 8.x menus and breadcrumbs in the Event Self-Service application the following configuration need to be changed with the URL to an existing Self-Service Banner application.
//replace with the URL pointing to a Self-Service Banner 8.x instance
banner8.SS.url = '<scheme>://<server hosting Self-Service Banner 8.x>:<port>/<context root>/'
For example, 'banner8.SS.url = 'http://localhost:8002/ssb8x', this is the URL for the existing Self-Service Banner 8x application.
NoteIn the shared configuration folder, banner_configuration.groovy file, if you do not see the banner8.SS.url field, you must append it to the file and continue with the installation.
For more information on link to Banner 8, see “Link to Banner 8” on page 39.
y 2012 Banner General 9.0 37Event Management Installation Guide
Event Management Self-Service Application Installation

38
Application specific configuration
The application configuration directory PRODUCT_HOME\current\instance\config contains an application specific file called SelfServiceBannerGeneralEventManagement_configuration.groovy. This configuration file contains a number of elements you can customize for your specific environment. This directory also contains an instance.properties file that references the shared configuration location.
Enable non-SPRIDEN user access
To enable the non-SPRIDEN users access to the application make sure you have the following setting:
guestAuthenticationEnabled=true.
Configuration for Atom Feed absolute links
Every Atom entry requires an absolute hyperlink that points to its article. For more information on Atom Feed, refer to the Banner General 9.0 Event Management Handbook.
Make sure you link the "banner.eventsFeed.base.url" property to Banner General Event Management Self-Service application URL.
For example, banner.eventsFeed.base.url='<scheme>://<hostname or ip address>:<port>/<context root>' where banner.eventsFeed.base.url is the property that points to the base url of the Banner General Event Management Self-Service application, which will be used to create the absolute link to the event details from the feed entry.
Example:
If the Banner General Event Management Self-Service application is deployed in the localhost with port 8080 and content root is SelfServiceBannerGeneralEventManagement then the setting will be banner.eventsFeed.base.url='http://localhost:8080/SelfServiceBannerGeneralEventManagement'
For example, for Event A0001 the following absolute URL gets generated from the feed controller:
http://localhost:8080/SelfServiceBannerGeneralEventManagement/ssb/events/details/A0001
Banner General 9.0 February 2012Event Management Installation GuideEvent Management Self-Service Application Installation

Februar
Configure Forgot pin
To enable the Forgot pin functionality for a SPRIDEN user, set ssbPassword.reset.enabled=true
To enable the Forgot pin functionality for a non SPRIDEN user, set ssbPassword.guest.reset.enabled=true
To enable the reset pin email notification for non SPRIDEN user, set the following URL to the Self-Service application:
banner.events.resetpassword.guest.url='<scheme>://<hostname or ip address>:<port>'
For example, if the Banner General Event Management Self-Service application is deployed in the localhost with port 8080 then the setting will be banner.events.resetpassword.guest.url='http://localhost:8080'
For more information on Forgot Pin functionality, refer to Banner General 9.0 Event Management Handbook.
Link to Banner 8
Banner General Event Management Self-Service menus can be used to also access the 8.x applications.
NoteFor SPRIDEN users, if you do not reference banner8.SS.url with a valid URL then the menus including the bread crumbs do not appear in the Banner General Event Management Self-Service application.
BEIS 8.1.5 is available for download from the Customer Support Center via the Documentation and Download Center under Banner-General\BANNER ENTERPRISE IDENTITY SERVICES\8.1.5.
To allow linking from Self-Service 9.0 to Self-Service 8.0, you need to the add the following URL for configuring BEIS SSO Manager in banner_configuration.groovy file:
Login with BEIS
banner8.SS.url='http://beissmpl.university.com:7777/ssomanager/c/SSB?pkg='
The banner8.SS.url will reference the BEIS 8.1.5 SSO manager URL ('http://beissmpl.university.com:7777/ssomanager/c/SSB’) and append the ‘?pkg=’ suffix to support deep linking to a specific SSB page.
y 2012 Banner General 9.0 39Event Management Installation Guide
Event Management Self-Service Application Installation

40
The following is an example of Banner 8.0 SSO URL through BEIS:
http://beissmpl.greatvalleyu.com:7777/ssomanager/c/SSB?pgk=bwgkogad.P_SelectAtypView
NoteBEIS is optional. If you have a valid BannerSS8 user name and password you can access BannerSS8 from BannerSS9 without having BEIS.
Login without BEIS
The following is an example of Banner 8.0 SSO URL without BEIS:
banner8.SS.url=' https://ssbserver.institution.edu:9500/smpl/'
The BannerSS9 menus are as shown below:
JMX Bean names
The names used to register Mbeans must be unique for all applications deployed into the JVM. This configuration should be updated for each instance of each application to ensure uniqueness.
jmx {
exported {
log4j = "self-service-banner_general_event_management-log4j"
} }
Banner General 9.0 February 2012Event Management Installation GuideEvent Management Self-Service Application Installation
Februar
Logging configuration
Log4J is the common logging framework used with applications that run on the Java Virtual Machine. For more information, refer to the Log4J documentation.
The configuration file includes documentation on various elements that can be modified depending on your environment.
String loggingFileDir = "target/logs"
String logAppName = "selfservicebannergeneraleventmanagementapp"
String loggingFileName = "${loggingFileDir}/${logAppName}.log".toString()
Output logging file location
For example,
loggingFileDir = "System.properties['logFileDir'] ?
"${System.properties['logFileDir']}" : "target/logs"
logAppName = "SelfServiceBannerGeneralEventManagement"
loggingFileName = "${loggingFileDir}/${logAppName}.log".toString()
Following is an example for overriding log file directory properties:
export JAVA_OPTS = "-DlogFileDir=/PRODUCT_HOME /"
The output logging file location is sensitive to the application server you are deploying. See “Configure Tomcat server” on page 17.
Log level customization
The root logger level is pre-configured to log at the ERROR level. There are multiple class or package level configurations that are set to off status by default. You may set a different logging level for any of these packages or classes. However, it will require a restart of the running application.
For example,
case 'production':
root {
error 'appLog' //change the log level here with the
appropriate log level value.
y 2012 Banner General 9.0 41Event Management Installation Guide
Event Management Self-Service Application Installation

42
additivity = true
}
NoteChanging the log level to debug or info will produce very large log files.
Changes to SelfServiceBannerGeneralEventManagement_configuration.groovy file will require a restart of the application in order to take effect. Alternatively, you can use JMX to modify logging levels for any of the specified packages or classes, or even at the root level.
When you modify the logging levels using JMX, the logging level changes will only affect the running application. If you restart, any changes you made using JMX will be lost. For more information on JMX configuration, see “Configure Java Management Extensions” on page 21.
Central Authentication Service SSO
******
// +++ CAS CONFIGURATION +++
******************************************************************************
banner {
sso {
authenticationProvider = 'default'
authenticationAssertionAttribute = 'UDC_IDENTIFIER'
}
}
grails {
plugins {
springsecurity {
cas {
serverUrlPrefix = 'http://CAS_HOST:PORT/cas'
serviceUrl = 'http://BANNER9_HOST:PORT/APP_NAME/j_spring_cas_security_check'
Banner General 9.0 February 2012Event Management Installation GuideEvent Management Self-Service Application Installation

Februar
serverName = 'http://BANNER9_HOST:PORT'
proxyCallbackUrl = 'http://BANNER9_HOST:PORT/APP_NAME/secure/receptor'
loginUri = '/login'
sendRenew = false
proxyReceptorUrl = '/secure/receptor'
useSingleSignout = true
key = 'grails-spring-security-cas'
artifactParameter = 'ticket'
serviceParameter = 'service'
filterProcessesUrl = '/j_spring_cas_security_check'
}
}
}
}
The following sections describes the CSS customization of appearance and the customization of System/University name:
• “CSS Customization” on page 43
• “Customize Institution name” on page 44
CSS Customization
To customize the appearance of the Banner General Event Management application, you can provide custom CSS and image files.
Create a CSS file APPLICATION_HOME/current/instance/css/bannerSelfService-custom.css containing the custom CSS directives.
If you want to provide custom images, save them in the APPLICATION_HOME/current/instance/css/images directory, and in the CSS, specify their paths as url (../images/filename.png).
y 2012 Banner General 9.0 43Event Management Installation Guide
Event Management Self-Service Application Installation

44
NoteIf you do not have the above directory structure, make sure you create one.
For example, to customize the university name/logo in the upper left, create a CSS file APPLICATION_HOME/current/instance/css/bannerSelfService-custom.css containing the following:
.institutionalBranding { background-image: url("../images/institutionLogo.png"); }
Save the desired logo image in the following location: APPLICATION_HOME/current/instance/css/images/institutionLogo.png
Then rebuild and redeploy the war file. See “Regenerate War file” on page 47.
Customize Institution name
The Banner General Event Management application default layout includes an institutional branding area for display of an institution name or logo.
To customize the System/University name, you must provide a replacement logo image and a custom CSS file to override the default styling for the institutional branding area.
The default layout styles the institutional branding area as follows:
.institutionalBranding {position: relative; float: left; left: 10px; top: 15px; height: 22px; width: 173px; background: url("../images/sgu-logo.png") no-repeat;}
The institution can override just the image displayed by creating a CSS file APPLICATION_HOME/current/instance/css/bannerSelfService-custom.css containing the following:
.institutionalBranding {background-image: url("../images/institutionLogo.png");}
The logo image is saved in the following directory:
APPLICATION_HOME/current/instance/css/images/institutionLogo.png
Then rebuild and redeploy the war file. See “Regenerate War file” on page 47.
Banner General 9.0 February 2012Event Management Installation GuideEvent Management Self-Service Application Installation

Februar
Provide custom JavaScript
You have an option to add custom JavaScript file. You need to create a custom JavaScript file to add a custom JavaScript file to the Banner General Event Management application.
Use the following steps to create a Custom JavaScript file:
1. Create a JavaScript file APPLICATION_HOME/current/instance/js/ bannerSelfService-custom.js.
2. You must have the required custom JavaScript code in the custom.js file.
Configure Session Timeouts
There are two timeouts used in Banner General Event Management Self-Service application:
• The overall session inactivity timer
• The much shorter you-haven't-saved-changes-and-haven’t-done-anything-in-awhile timer
Overall session inactivity time
• Configurable in multiple locations.
• banner_configuration.groovy with the configuration property: defaultWebSessionTimeout
• Integer value of the seconds to wait before prompting the user about the session timing out
• If the configuration is not specified a default value of 1500 seconds is used
• Web session timeouts are also configurable in the WebTailor TWTVROLE
• Select twtvrole_code, twtvrole_time_out from twtvrole
• TWTVROLE_CODE corresponds to the ROLE the logged in user has
The service will then use the longest of all the session timeout values it finds. So if TWTVROLE is set to 1000 seconds for the authentication user but the default is 1500 seconds. 1500 seconds is used.
Configure Date Format
The date format follows the MM/DD/YY format, which can be customized in the messages_<ISO_language_code>_<ISO_country_code>.properties file.
y 2012 Banner General 9.0 45Event Management Installation Guide
Event Management Self-Service Application Installation

46
The following are few attributes that can be customized in the messages_<ISO_language_code>_<ISO_country_code>.properties file:
• js.datepicker.closeText
• js.datepicker.prevText
• js.datepicker.nextText
• js.datepicker.currentText
• js.datepicker.dayNamesMin
• js.datepicker.weekHeader
• js.datepicker.dateFormat
• js.datepicker.firstDay
• js.datepicker.showMonthAfterYear
• js.datepicker.yearSuffix
For example, if you wish to modify the MM/DD/YY format to a different format you must use the js.datepicker.dateFormat attribute.
To change date formats in the message.properties file currently requires updating two properties in the message.properties file. These two properties are in different formats, but they must specify the same date format (for example, they must both specify month-day-year or both specify year-day-month).
default.date.format
Determines the date format for display and data entry in the UI and import process. It must match the Java SimpleDateFormat specification:
http://download.oracle.com/javase/6/docs/api/java/text/SimpleDateFormat.html
Example:
MM/dd/yyyy - 05/31/2011
dd/MM/yyyy - 31/05/2011
js.datepicker.dateFormat
Determines the date format for the interactive date selection control. It must match the jQuery datepicker format specification:
http://docs.jquery.com/UI/Datepicker/%24.datepicker.formatDate
Banner General 9.0 February 2012Event Management Installation GuideEvent Management Self-Service Application Installation

Februar
Example:
mm/dd/yy - 05/31/2011
dd/mm/yy - 31/05/2011
Regenerate War file
Once the shared and application specific configurations are complete, the application War file can be regenerated with these customization, such as customize logging, application specific settings, and so on and then deployed into your specific application server.
Prepare systool installation tool
The systool is used to create a War file.
Use the following procedure to create a War file:
1. You must change your current working directory to the product home directory PRODUCT_HOME\current\installer.
y 2012 Banner General 9.0 47Event Management Installation Guide
Event Management Self-Service Application Installation

48
2. Run the ant command.
This will build the systool module.
For example,
$ cd PRODUCT_HOME/current/installer
PRODUCT_HOME/current/installer $ ant
NoteIf you have already installed ant on your machine, run the following command: ./ant.For Unix, make sure the ant file is executable. For example, chmod +x ant.
3. Use the systool module to create the War file.
Your current working directory must be in the PRODUCT_HOME\current\installer directory before you execute the following command.
On Unix
$ bin/systool war
On Windows
> bin\systool war
The war file is created in the PRODUCT_HOME\current\dist.You can use externalized configuration files by setting appropriate system properties, although the configuration files have been included within the War file (making the War file self sufficient). For information on external configuration, see the sections “Tomcat” on page 49 and “WebLogic” on page 52.
Configure and Deploy the WAR file to Web Application Server
The following sections provides information on how to configure the web application and deploy the WAR file to the Web Application Server (Tomcat server or WebLogic server):
• “Tomcat” on page 49
• “WebLogic” on page 52
Banner General 9.0 February 2012Event Management Installation GuideEvent Management Self-Service Application Installation

Februar
Tomcat
The following sections provides information on how to configure the web application and deploy the WAR file to the Tomcat server:
Configure Tomcat server
To configure Tomcat server, see “Configure Tomcat server” on page 17.
NoteIn Banner General Event Management Self-Service, to override the configuration that was added into the War file, you may set system properties to point to external configuration files. For example, to point to a configuration file residing in the PRODUCT_HOME directory, export JAVA_OPTS="-DBANNER_APP_CONFIG=/PRODUCT_HOME/shared_configuration/banner_configuration.groovy -DSELF_SERVICE_BANNER_GENERAL_EVENT_MANAGEMENT_CONFIG=/PRODUCT_HOME/event_management_ss/current/instance/config SelfServiceBannerGeneralEventManagement_configuration.groovy"
Configure Java Management Extensions
This is an optional step and only needed if you wish to monitor or debug the application. Java Management Extensions (JMX) is a Java technology that supplies tools for managing and monitoring applications, system objects, devices and service oriented networks.
Enabling JMX connections allows remote monitoring and debugging of the application server.
Use the following procedure to configure the JMX:
1. Add the following options to the catalina.sh or .bat file and then restart the Tomcat server:
set CATALINA_OPTS=-Dcom.sun.management.jmxremote -
Dcom.sun.management.jmxremote.port=8999
-Dcom.sun.management.jmxremote.ssl=false -
Dcom.sun.management.jmxremote.authenticate=false
-Djava.rmi.server.hostname=your.hostname.com
y 2012 Banner General 9.0 49Event Management Installation Guide
Event Management Self-Service Application Installation

50
2. Change the java.rmi.server.hostname value to the hostname or IP address of this machine where Tomcat is installed. For example,
-Djava.rmi.server.hostname=prod.appserver1.com or
-Djava.rmi.server.hostname=149.24.3.178
3. Change com.sun.management.jmxremote.port=8999 if needed.
WarningJMX does not define a default port number to use.It is recommended to connect remotely to the Tomcat server using JMX. Also, the jmxremote.authenticate parameter is set to false, which does not require connections to be authenticated. Do not leave this enabled in a production environment as it represents a security threat, or modify the parameters to enforce authentication. For more information on Tomcat Remote JMX documentation, see http://tomcat.apache.org/tomcat-6.0-doc/monitoring.html#Enabling_JMX_Remote
Deploy the Event Management Self-Service War file to Tomcat server
The systool that is used to create the War file can also be used to deploy the War file to a Tomcat container. The systool does not provide the capability to undeploy or redeploy an application. If you are redeploying the application, you must use the Tomcat Manager web application to undeploy the existing Event Management Self-Service application.
Environments vary significantly from each other with respect to user privileges, clustering approach, web container version, operating system, and so on. This target may or may not be suitable for your use. The target provides support for deploying the dist/ War file using the Tomcat manager application. The War file deployment to Tomcat server can also be accomplished by copying the War file to the Tomcat webapps/ directory and hence use of this target is not critical. To use the target, you will be required to answer the following:
• The URL of the manager application in tomcat server. For example, http://localhost:8080/manager
• The Tomcat server user who has privileges to deploy. For Tomcat 6.x, you must configure at least one username/password combination in your Tomcat user database <TOMCAT_HOME>\conf\tomcat-users.xml, which includes the manager role. For example, <user username="tomcat" password="tomcat" (your password) roles="manager-gui, manager"/>
• The password of the Tomcat server user
NoteThe roles in Tomcat server have changed between point releases in version 6.x. Refer to Tomcat documentation, specific to your point release on enabling access to provide the appropriate role to a user account for deployment.
Banner General 9.0 February 2012Event Management Installation GuideEvent Management Self-Service Application Installation

Februar
Use the following procedure to deploy the Event Management Self-Service War file to Tomcat server:
1. You must be in the PRODUCT_HOME\current\installer directory before you enter any command.
For example,
On Unix
$ bin/systool deploy-tomcat
On Windows
> bin\systool deploy-tomcat
2. Enter the following URL to the Tomcat Manager:
[]: http://localhost:8080/manager
This URL will be accessed in order to deploy the War file into the container.
3. Enter a valid Tomcat username to deploy a War. You must have the manager-gui role.
[]: tomcat
4. Enter the Tomcat password for the user. This password will not be persisted.
[]: password
5. Access the Event Management Self-Service web application. http://servername:<port>/SelfServiceBannerGeneralEventManagement/ssb/events
NoteYou can access the Event Management Self-Service web application with out login credentials.
To register to an event, you can either login using an existing banner account or newly created Non-Banner account.
Banner account
Use the following procedure to setup a Person in Banner:
1. Set up the Person using person creation forms, such as SPAIDEN, APAIDEN and so on.
2. Assign a PIN on the GOATPAD Form.
y 2012 Banner General 9.0 51Event Management Installation Guide
Event Management Self-Service Application Installation

52
Non-Banner account
To create an account, use the "Create Account" option, which you can access when registering to an existing event. See the below illustration.
WebLogic
Configure WebLogic server
If you choose to install the application on a WebLogic server, you do not need to install on Tomcat.
The following are the prerequisites before you configure WebLogic server:
• It is assumed that you have WebLogic already installed. If not, see the Oracle website to download and install WebLogic
• The minimum requirements are OFM 11.1.14 using WebLogic 10.3.4
• Both WebLogic node manager and admin server must be started
• To access the admin server, use the following URL http://server:7001/console
Use the following procedure to configure WebLogic server:
1. Create WebLogic machine. See “Create WebLogic machine” on page 52
2. Create WebLogic server. See “Create a WebLogic server” on page 53
3. Create DataSource and Connection Pool. See “Create DataSource and connection pool” on page 54
Create WebLogic machine
NoteIf you have previously created a WebLogic machine definition you may skip this section.
Banner General 9.0 February 2012Event Management Installation GuideEvent Management Self-Service Application Installation

Februar
Use the following procedure to create a WebLogic machine:
1. Click Lock & Edit to allow configuration changes in the Change Center frame.
2. In the Domain Structure frame, click (+) to expand and view the list of environments.
3. Select the Machines link item.
4. Click New.
5. Enter a machine name and click Next.
6. Accept the defaults and click Finish.
7. Click Activate Changes in the Change Center frame.
Create a WebLogic server
Use the following procedure to create a WebLogic server:
NoteIf you have previously created a WebLogic server for the Banner General Event Admin application, you can use the same server.
1. Click Lock & Edit to allow configuration changes in the Change Center frame.
2. In the Domain Structure frame, click (+) to expand and view the list of environments.
3. Select the Servers link item.
4. Click New.
5. Enter a Server name and Server Listen Port. For example, you can have Server name as Banner9-SS and Server Listen Port as 8181.
6. Click Finish.
7. Select the newly created server link.
8. Under the General tab, assign the machine to this server and then click Save.
9. Select the Server Start tab.
y 2012 Banner General 9.0 53Event Management Installation Guide
Event Management Self-Service Application Installation

54
10. Add the following to the Arguments text area:
If you are using Sun JVM, use the following parameters:-server -Xms2048m -Xmx4g -XX:MaxPermSize=512m
If you are using JRockit JVM, use the following parameters:
-Xms2048m -Xmx4g
NoteTo override the configuration that was added into the War file, you may set system properties to point to external configuration files. Append the following to the Arguments text area:-DBANNER_APP_CONFIG=<full file path to banner_configuration.groovy> -DSELF_SERVICE_BANNER_GENERAL_EVENT_MANAGEMENT_CONFIG==<full file path to SelfServiceBannerGeneralEventManagement_configuration .groovy".
11. Click Save.
12. Click Activate Changes.
13. Select Servers link in Domain Structure frame.
14. Select the Control tab.
15. Select the check box next to your new server definition and then click Start.
Create DataSource and connection pool
Use the following procedure to Create a DataSource and connection pool:
1. Click Lock & Edit to allow configuration changes in the Change Center frame.
2. In the Domain Structure frame, click (+) to expand Services and then select Data Sources.
3. Click New.
4. Select Generic DataSource.
5. Specify a name. For example, Banner9SS-DS.
6. Specify the following JNDI name. For example, jdbc/bannerSsbDataSource
7. Specify Oracle for Database Type and then click Next.
Banner General 9.0 February 2012Event Management Installation GuideEvent Management Self-Service Application Installation

Februar
8. Select Oracle Driver (Thin) for Service Connections and then click Next.
9. On the Transaction Options page, clear the Supports Global Transactions check box and then click Next.
10. Enter the Database Name, Host Name, Port, Username, Password, Confirm password, and then click Next. For example,
Database name: BAN9
Host Name: yourhostname.yourdomain.com
Port: 1521
UserName: ban_ss_user
Password: ban_ss_user_pasword
11. Click Test Configuration.
12. Click Next for the connection test to be successful.
13. Select the server to allow the jdbc DataSource to be deployed and used by this server.
14. Click Finish.
15. Select the DataSource link that you created.
16. Select the Connection Pool tab.
16.1. Set the Initial Capacity parameter to specify the minimum number of database connections to create when the server starts up. For example, Initial Capacity = 5.
16.2. Set the Maximum Capacity parameter to specify the maximum number of database connections that can be created. For example, Maximum Capacity = 100.
17. Change Statement Cache Type = Fixed.
18. Change Statement Cache Size = 0.
19. Click Save.
20. Click Activate Changes in the Change Center frame.
y 2012 Banner General 9.0 55Event Management Installation Guide
Event Management Self-Service Application Installation
56
NoteIf you are using different servers for the Admin and Self-Service applications, proceed with the steps below.
21. Click Lock & Edit to allow configuration changes in the Change Center frame.
22. In the Domain Structure frame, click (+) to expand Services and then select DataSources.
23. Select the DataSource you have already created for the Event Management Admin application, Banner9DS.
24. Select the Targets Tab.
25. Select the check box for the Banner General Event Self-Service server (for example, Banner9-SS) you have previously created.
26. Click Save.
27. Click Activate Changes in the Change Center frame.
Deploy and Start the Event Management Self-Service web application in WebLogic server
Use the following procedure to deploy and start the EventManagement Self-Service web application in WebLogic server:
NoteYou need to access the WebLogic server before you start to deploy the application.
1. To access the admin server, use the following URL http://server:7001/console.
2. Select the Deployments link in the Domain Structure frame.
3. Select Lock and Edit in the Change Center.
4. Click Install.
5. The War file is located in the PRODUCT_HOME/current/dist/SelfServiceBannerGeneralEventManagement-9.0.war.
NoteThe War file name should be changed to remove the version number. For example, SelfServiceBannerGeneralEventManagement.war.
6. Click Next.
Banner General 9.0 February 2012Event Management Installation GuideEvent Management Self-Service Application Installation

Februar
7. Select Install this deployment as an application.
8. Click Next.
9. Select the target server to deploy this application (for example, Banner9-SS).
10. Click Next.
11. Click Finish.
12. Click Activate Changes in the Change Center frame.
13. Select the deployed application and then click Start.
14. Select Servicing all request.
15. Access the Event Management Self-Service web application. http://servername:<port>/SelfServiceBannerGeneralEventManagement/ssb/events
NoteYou can access the Event Management Self-Service web application with out login credentials.
To register to an event, you can either login using an existing banner account or newly created Non-Banner account.
Banner account
Use the following procedure to setup a Person in Banner:
1. Set up the Person using person creation forms, such as SPAIDEN, APAIDEN and so on.
2. Assign a PIN on the GOATPAD Form.
Non-Banner account
To create an account, use the "Create Account" option, which you can access when registering to an existing event. See the below illustration.
y 2012 Banner General 9.0 57Event Management Installation Guide
Event Management Self-Service Application Installation
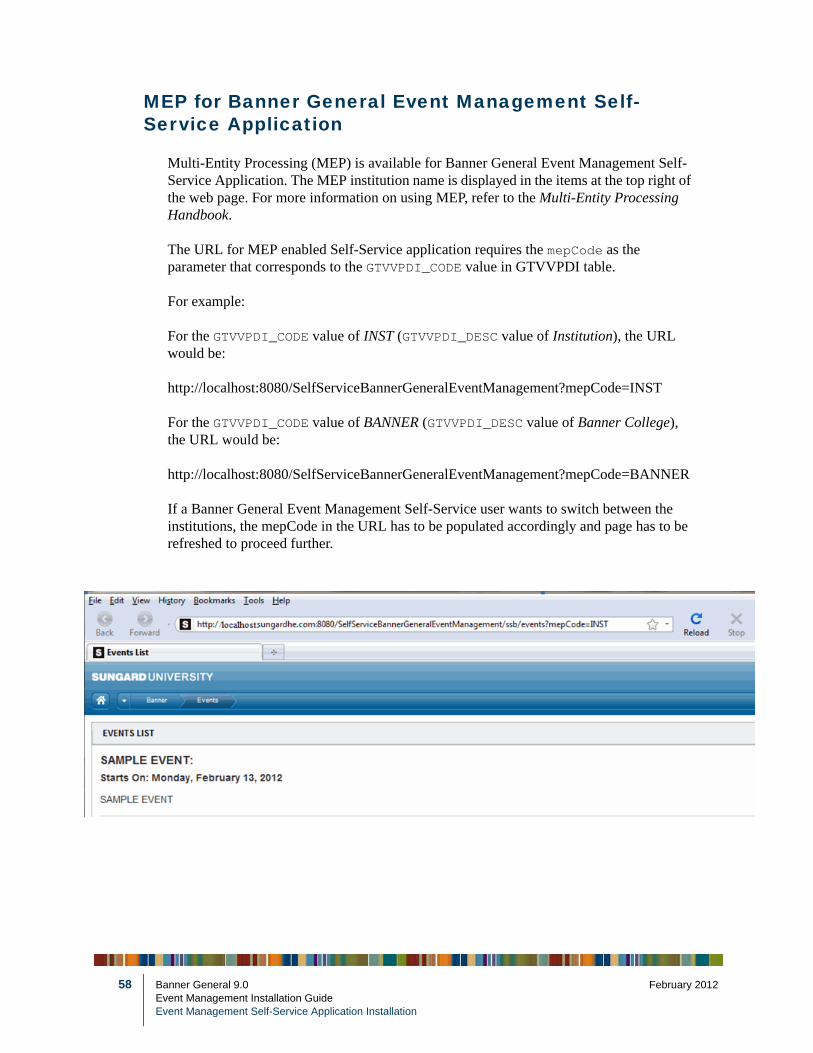
58
MEP for Banner General Event Management Self-Service Application
Multi-Entity Processing (MEP) is available for Banner General Event Management Self-Service Application. The MEP institution name is displayed in the items at the top right of the web page. For more information on using MEP, refer to the Multi-Entity Processing Handbook.
The URL for MEP enabled Self-Service application requires the mepCode as the parameter that corresponds to the GTVVPDI_CODE value in GTVVPDI table.
For example:
For the GTVVPDI_CODE value of INST (GTVVPDI_DESC value of Institution), the URL would be:
http://localhost:8080/SelfServiceBannerGeneralEventManagement?mepCode=INST
For the GTVVPDI_CODE value of BANNER (GTVVPDI_DESC value of Banner College), the URL would be:
http://localhost:8080/SelfServiceBannerGeneralEventManagement?mepCode=BANNER
If a Banner General Event Management Self-Service user wants to switch between the institutions, the mepCode in the URL has to be populated accordingly and page has to be refreshed to proceed further.
Banner General 9.0 February 2012Event Management Installation GuideEvent Management Self-Service Application Installation