band sawing versatility - shopsmith · 2019-08-20 · band sawing versatility the bandsaw gets its...
TRANSCRIPT

Band Sawing Versatility
The bandsaw gets its name from the continuous loop or "band" formed by the flexible steel blade. Thisblade cuts with a downward motion, toward the table. Because it cuts continuously, you'll find thebandsaw is one of the fastest cutting tools in your shop.
The bandsaw will perform a wide variety of workshop operations. The two most common uses arecutting curves or irregular shapes in wood and resawing (slicing thin boards from thick ones). But youcan also make crosscuts, rips, bevels, miters, compound curves, duplicate parts, and many other specialcuts.
You can also cut materials other than wood. With the proper blade installed, the bandsaw will cut plastic,plastic laminates, particle board, and even soft, nonferrous metals such as copper, brass, and aluminum.
BANDSAW-SETUP AND FEATURESTo set up your bandsaw, follow the instructions in the Owners Manual that came with your bandsaw.As you work with the bandsaw, you'll find that it has several special features:
• The bandsaw can be mounted on the Mark V or a Shopsmith Power Stand (Figure 14-1).• The cutoff capacity is 10-1/2"-the distance across the machine's throat. However, with the blade
offset 30° right, you can cut off (freehand) any length of stock up to 3-7/8" wide. The bandsawwill cut stock up to 6" thick.
• The bandsaw accepts continuous-loop blades 72" long and 1/16" to 5/8" wide.Bandsaw blades are mounted on two wheels, 11" in diameter. Both wheels are covered withrubber tires to protect the teeth of the blades and provide traction. The idler (upper) wheel re-
Figure 14-2. The bandsaw/discsander is a logical dual-purposesetup, but the speeds used must bethat of the bandsaw, not the discsander.
Figure 14-1. The Bandsaw can bemounted on (A) the Mark V or (B) ona Shopsmith Power Stand.
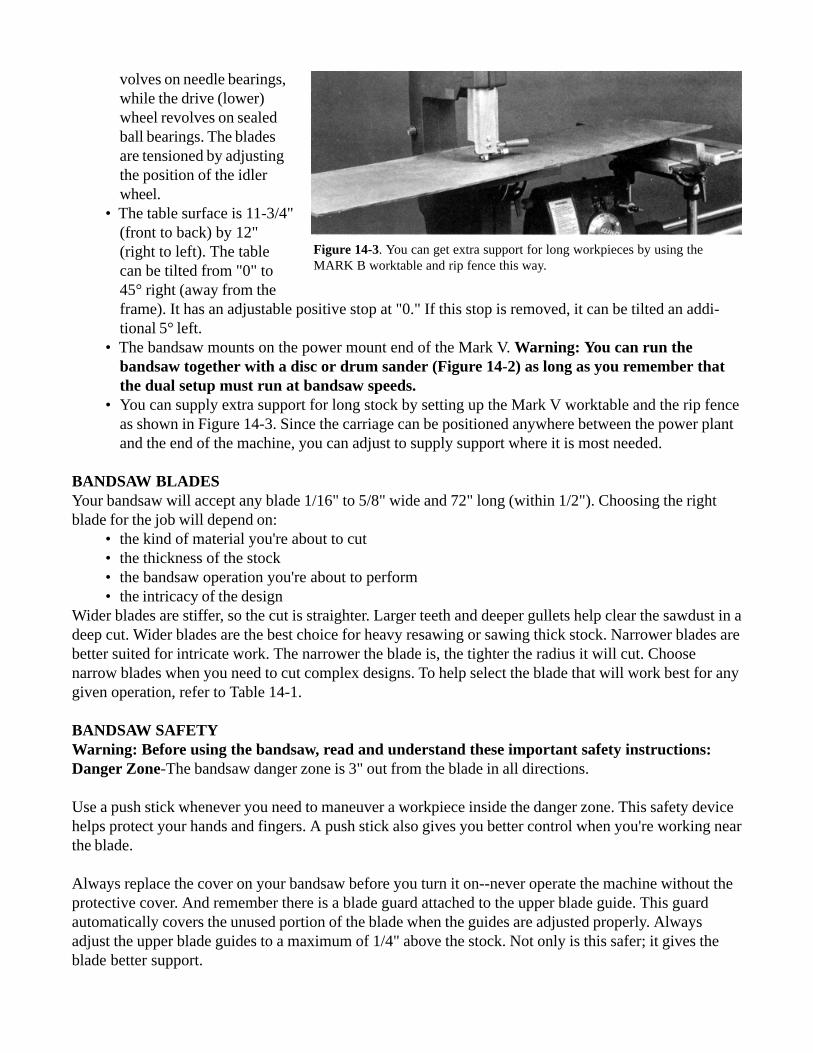
volves on needle bearings,while the drive (lower)wheel revolves on sealedball bearings. The bladesare tensioned by adjustingthe position of the idlerwheel.
• The table surface is 11-3/4"(front to back) by 12"(right to left). The tablecan be tilted from "0" to45° right (away from theframe). It has an adjustable positive stop at "0." If this stop is removed, it can be tilted an addi-tional 5° left.
• The bandsaw mounts on the power mount end of the Mark V. Warning: You can run thebandsaw together with a disc or drum sander (Figure 14-2) as long as you remember thatthe dual setup must run at bandsaw speeds.
• You can supply extra support for long stock by setting up the Mark V worktable and the rip fenceas shown in Figure 14-3. Since the carriage can be positioned anywhere between the power plantand the end of the machine, you can adjust to supply support where it is most needed.
BANDSAW BLADESYour bandsaw will accept any blade 1/16" to 5/8" wide and 72" long (within 1/2"). Choosing the rightblade for the job will depend on:
• the kind of material you're about to cut• the thickness of the stock• the bandsaw operation you're about to perform• the intricacy of the design
Wider blades are stiffer, so the cut is straighter. Larger teeth and deeper gullets help clear the sawdust in adeep cut. Wider blades are the best choice for heavy resawing or sawing thick stock. Narrower blades arebetter suited for intricate work. The narrower the blade is, the tighter the radius it will cut. Choosenarrow blades when you need to cut complex designs. To help select the blade that will work best for anygiven operation, refer to Table 14-1.
BANDSAW SAFETYWarning: Before using the bandsaw, read and understand these important safety instructions:Danger Zone-The bandsaw danger zone is 3" out from the blade in all directions.
Use a push stick whenever you need to maneuver a workpiece inside the danger zone. This safety devicehelps protect your hands and fingers. A push stick also gives you better control when you're working nearthe blade.
Always replace the cover on your bandsaw before you turn it on--never operate the machine without theprotective cover. And remember there is a blade guard attached to the upper blade guide. This guardautomatically covers the unused portion of the blade when the guides are adjusted properly. Alwaysadjust the upper blade guides to a maximum of 1/4" above the stock. Not only is this safer; it gives theblade better support.
Figure 14-3. You can get extra support for long workpieces by using theMARK B worktable and rip fence this way.

• Wear proper eye and ear protection and a dust mask.• Do not remove stock or scraps until the blade has stopped.• Maintain proper adjustment of blade tension, blade guides
and bearings.• Keep the upper guide adjusted to a maximum of 1/4"
above the stock.• Never reach close to the blade or under the table while the
machine is running.• Hold stock firmly against the table.• Never attempt a turn tighter than the blade will allow.
Otherwise, the blade might break or jam.• Use a push stick to finish a resawing or ripping cut.
Figure 14-4. Adjust the upper bladeguide so that it’s a maximum of 1/4”above the workpiece.
Table 14-1: Bandsaw Blades and Speeds
Characteristics Recommended Use Recommended Speed**
1/16” WoodcuttingBlade* - 24 teeth per inch,1/32” minimum turningradius.
1/8” Woodcutting Blade -7.5 teeth per inch, 1/4”minimum turning radius.
1/4” Combination Blade -6 teeth per inch, 3/4”minimum turning radius.
1/2” Combination Blade -4 teeth per inch, 2”minimum turning radius.
5/8” Woodcutting Blade -3 teeth per inch.
For extremely fine detail work only. Use forwood and plywood up to 3” thick. Not forheavy-duty cuts or resawing. Note: Set thetension scale at 1/8” setting.
For very fine detail work only. Use for woodand plywood up to 3” thick. Not for heavy-duty cuts or resawing.
A good general purpose blade for wood,plywood, plastics, particle board, and soft,non-ferrous metals. Limit resawing to stock 4”thick, metalwork to stock 1/4” thick. This isthe blade that comes with your bandsaw.
For heavy-duty cutting of wood, plywood,plastics, particle board, and soft, non-ferrousmetals. Suitable for resawing stock up to 6”thick, and metalwork in stock up to 1/2” thick.
For heavy-duty resawing. Efficiently handleswood up to 6” thick. Straight cuts only. Note:Set the tension scale at the 1/2” setting.
A (750 RPM, 2160 FPM) forhardwood. B (850 RPM,2450 FPM) for softwood.
C (950 RPM, 2750 FPM) forhardwood. D (1050 RPM,3000 FPM) for softwood.
B (850 RPM, 2450 FPM) forhardwood. C (950 RPM,2750 FPM) for softwood.Slow (700 RPM, 2000 FPM)for other materials.
Slow (700 RPM, 2000 FPM)for hardwood, softwood, andother materials.
Slow (700 RPM, 2000 FPM)for hardwood and softwood.
Several balad emanufacturers make bansaw blade stock for a variety of special purposes - intricatescrollwork, cutting iron pipe, etc. If you need a special blade, you can have it made at a well-equippedcommercial saw shop. Use only high-quality blade stock 1/16” - 1/2” wide. Be sure that the finished bladeis 72” long, plus or minus 1/2”, and that the weld is ground perfectly smooth.*Caution: Do not use 1/16” blade without special guide blocks. Failure to use special guide blocks willruith the blade and damage the standard guide blocks. **Note: These speeds are for 60 hz. operations.

• Support long stock with a roller stand.• Hold round stock in a V-block.• Never cut extremely small stock. Cut small components from larger stock.• If the blade breaks, turn off the machine and stand away until it stops.• Whenever you mount and operate the bandsaw on the Mark V, secure the accessory mount
lock, power plant lock and the bandsaw mounting tubes.• Never turn on the machine with stock pressed against the blade.• If you hear a ticking sound or unusual noise, stop the bandsaw immediately. A ticking
sound often means a damaged blade.• If you're using a Shopsmith Power Stand, be sure you're using the proper pulley and belt
combination and that the pulley and belt are properly guarded.
BANDSAW SPEEDSBefore you begin any bandsaw operation, turn on the Mark V, set the speed according to Table 14-1, andlet the bandsaw come up to speed. The speed of a bandsaw is measured by how fast the blade travels, or"Feet Per Minute (FPM)."
The speed is determined by the blade and the material. Generally, slow speeds are used with wide bladesto cut hard, thick woods and dense materials. High speeds are used with narrow blades in soft materials.
BASIC BANDSAWINGAdjust the height of the upperblade guide so that it's no morethan 1/4" above the work (Figure14-4). Then think through the cutbefore you turn on the machine.Know where you'll put your handsas you feed the stock into theblade; make sure the stock won'tbe blocked by the bandsaw frame(Figure 14-5). When you'resatisfied that you can make the cutsafely and without interference,turn on the power, set the speeddial to the proper speed and waituntil the machine comes up tospeed.
Take a comfortable stance in frontand slightly to the left of theblade, and start your cut. As youwork, you may shift more towardthe center. Warning: Stand on theleft side of the blade. If the bladebreaks it may fly to the right.
Figure 14-5. (A) Visualize the cut before you begin and you can avoid thekind of throat interference that is occurring here. (B) Started this way, the cutcan be made in one continuous pass.

Slowly feed the stock into the blade. Use both hands to guide the stock and keep it pressed firmly downagainst the table.As you work, watch out for several problems that may cause the bandsaw to bog down or produce aninaccurate cut:
• feeding the stock too fast• side pressure (against the flat of the blade)• trying to turn a radius too small for the blade• excessive blade "lead"• worn or dull blades.
Don't force the work, but you can feed fairly rapidly since the machine cuts quickly. It's alright to pause inthe cut for a moment, but try not to remain stationary for too long. The blade will heat up in the kerf,burning both the stock and the blade. Feed the stock directly against the teeth, even when cutting curves.To determine if the blade is the right size for the curve, refer to Table 14-1.
If the blade continually wanders off the pattern, there are several possible causes: The blade guides maybe improperly adjusted. Or you could be pressing against the side of the blade. You may also be trying tocut a curve that's too tight for the blade. If the blade wanders or "leads" just to one side or the other, theteeth are improperly set. To correct the set of the teeth, refer to the Bandsaw Owners Manual.
If the machine bogs down, stop a moment to let the bandsaw catch up. Check to see if the blade is twist-ing in the guides. If it is, you may be pressing against the side of the blade or trying to turn a corner tootight for the blade. If the guides, you're probably feeding the stock too fast. Once the bandsaw is back upto running speed, feed the stock a little slower. If the problem persists, check the blade to see if it's worn.Replace dull or worn blades immediately.
Figure 14-6. Break complicated cuts up into simple curves and lines.
Figure 14-7. You may have tobacktrack with the blade in order tocut some patterns. Plan ahead andavoid backing out of cuts.

If the blade jams on a scrap, turn off the machine and unplug thepower before you attempt to clear the scrap. If the blade breaks,move around to the left side of the machine and turn off the power.Wait until the wheels come to a complete stop before removing thecover and the broken blade.
Basic TechniquesGetting a smooth, accurate cut begins by guiding the stock care-fully with both hands, feeding the stock forward against the teeth atthe proper rate, and not turning corners too tight for the blade.Here are a few additional suggestions to help you get the bestresults:
Cutting Outside the Pattern Line-For precision work, cutslightly outside the line--in the waste stock--then sand to the finaldimension with a disc sander, belt sander, strip sander or drumsander. Not only does this technique make it easier to be accurate,the finished edge is smoother. The mill marks left by the bandsaw are removed when you sand up to theline.
Breaking Up a Cut-Break complicated cuts up into simple curves and lines. Study your pat-tern to seehow you might cut it in several easy passes. Don't be afraid to cut into the waste stock and loop around inorder to reposition the blade at a better angle to the pattern line (Figure 14-6).
Backtracking-In order to break up intricate patterns into simple cuts, you may have to cut in to a point,then back the blade out and cut from another angle (Figure 14-7). This is a safe technique if done care-fully, but there is always a danger that you may bind the blade, pull it out of the guides and off the wheels.Sawdust can also build up behind the blade, preventing you from backing it out. To backtrack out of a cutlonger than 1", turn off the machine and let it come to a complete stop before backtracking. If you can,avoid backtracking in long cuts altogether.
Drilling Relief Openings-A few well-placed relief openings will give you sufficient turning room tomake tight cuts. Square-cornered relief openings can be formed with mortising bits and chisels; roundholes, made with drill bits, can be used when the blade can't turn the radius required. Sometimes, cornerholes are used just to make bandsaw cutting easier; the radius of the corner is exactly right because of thebit size that is used. In all cases, be sure the layout for the corners, square or round, is accurately done toconform to the design (Figure 14-8).
Figure 14-8. Round or square relief openings can facilitate making internalcuts. When possible, plan the openings as part of the design.
Figure 14-9. Relief openings giveyou turning room to cut tightinternal corners.

Keep in mind that making relief holes is one of the handiest tech-niques for cutting intricate scrollwork (Figure 14-9). Drill these holesslightly inside the pattern line in the waste stock.
Making Relief Cuts-Radial or tangential relief cuts make it possiblefor you to cut a curve smaller than the blade can normally turn.
Make radial cuts toward the pat-tern line and backtrack out (Figure14-10). Then cut the desired curve. As the blade meets up with eachradial cut, a little piece of waste stock will fall away. This, in turn,provides more room for the blade to turn.
Make tangential cuts by cutting on the pattern line until the bladestarts to bind slightly, then run off at a tangent to the curve. Cutcompletely through the waste stock to the edge of the workpiece,removing a small amount of stock. Start cutting the pattern line againwhere you ran off at a tangent (Figure 14-11). Repeat this processuntil you've cut the desired curve.
Remember that radial cuts are useful when cutting both internal andexternal curves. Tangential cuts can only be used on external curves.
"NibbIing"-There are times when you'll need to cut a detail in a patternthat's too small to use any of the techniques described previously. Forthese extra-fine jobs, feed the stock very, lightly against the blade and letthe teeth "nibble" it away (Figure 14-12). This is handy when you needto cut tiny corners and curves.
Layout-Many of the methods described in connection with scroll sawingand jigsawing can be used to minimize layout and waste when
Figure 14-10. To cut tightextrernal curves, make severalradial cuts vefore you cut thepattern line.
Figure 14-12. To cut corners and curves in tight spots, feed the workpiecevery lightly against the blade and let the teeth nibble away.
Figure 14-11. You can also cuttight external curves by making aseries of tangential cuts as shown.
Figure 14-13. Wise planning of thelayout can often make it possible to joinpieces to form a particular shape. It isalso a way to economize with material.

bandsawing. A specific application, which is typical, is the forming of acurved rail (Figure 14-13). Twopieces that result from a single cut are joined to form the arch shape.
CROSSCUTTINGAs mentioned earlier, the table slots allow you to use the miter gauge with safety grip for many bandsawoperations. By mounting the miter gauge in the slot that's parallel to the flat of the blade, you can makecrosscuts and miter cuts similar to the cuts made on a table saw (Figure 14-14). Your cut-off capacity,however, is limited to 10-1/2 ". Any longer than that and the stock will strike the bandsaw frame.
To increase the cutoff capacity when crosscutting, you can offset the blade. When the blade is off-set, youcan cut off any length of stock that you can safely handle,as long as the stock is not more than 3-7/8" wide. However, when the blade is offset, you must crosscutwithout the miter gauge.
RIPPINGBy locking the miter gauge in thetable slot that runs perpendicularto the flat of the blade, you canuse the miter gauge as a rip fence(Figure 14-15). Secure the mitergauge in the slot by turning theAllen screw in the center of themiter gauge bar clockwise. Thispresses the sides of the bar outagainst the sides of the slot. Wealso suggest you put a singlethickness of paper in the table slotnear the miter bar locking screw,as an extra precaution to keep themiter gauge from shifting duringripping operations.
If you need more support for theworkpiece, attach a miter gaugeextension to the miter gauge. Thestandard extension, mounted onthe miter gauge (Figure 14-16A),is suitable for normal rippingoperations. A longer extension(Figure 14-16B) provides neededsupport when handling longstock, while a higher extension(Figure 14-16C) will help youwork more accurately whendoing resawing. The sizes of allthree extensions and the mount-
Figure 14-14. By mounting the miter gauge in the table slot that runsparallel to the flat of the blade, you can crosscut the miter.
Figure 14-15. Lock the miter gauge with an extension attached in the tableslot that runs perpendicular to the flat of the blade, and use it as a rip fencefor ripping operations.

ing holes they need are detailed in Figure 14-17. You may also want touse a roller stand or the Mark V table and rip fence to help support theworkpiece on either the infeed or outfeed side of the bandsaw.
When you're using the miter gauge as a rip fence, pay particularattention to blade lead-the tendency of the blade to drift off the cuttingline in one direction. To correct blade lead, first try readjusting theblade guides or angling the miter gauge slightly. If this doesn't work,refer to the Bandsaw Owners Manual to correct blade lead. If aftertrying both of these remedies blade lead remains a problem, slow downthe feed and give the blade more time to make the cut and staystraight.
When ripping, feed the stock very slowly and be sure to maintain theextension-to-work contact throughout the pass. You can use yourhands as shown in Figure 14-18; or, if there is enough room betweenthe extension and the blade, use your left hand on the extension muchas if you were doing a rip cut on the table saw. But, in any case, besure to keep a push stick handy during ripping operations and use it tofeed the stock during the last few inches. Also, if you force the cut, itis likely that the stock will move away fromthe fence or the blade will wander off the cutline. Extension-guidedripping won't work if the blade has lead. You must eliminate the lead,change to another blade, or make the cut freehand.
On a few operations, such as sawing or ripping thick stock with a thinblade, it may be necessary to increase the blade tension slightly beyondthe normal setting. However, this increased tension will shorten the life
Figure 14-16. (A) A stnadard mitergauge extension makes a useful fencefor average ripping operations. Thelocking miter gauge is what makesthis and similar setups possible. (B)A longer extension provides moresupport when ripping extra-longworkpieces. (C) A higher extensionprovides needed support for resawingoperations.
Figure 14-17. Construction details ofthree miter gauge extensions.
of your blade. Always remember to reset the tension screw when you no longer need the extra tension.
If accuracy is not critical or the blade is showing excessive lead, you can also make rip cuts freehand. Justremember not to work with pieces so small that they bring your fingers inside the danger zone. Use apush stick instead.
RESAWINGResawing thick stock into thin boards is one of the bandsaw's most useful functions. This operationcannot be performed efficiently on any other home workshop power tool.
To get a good resaw, first joint the bottom edge of the stock. Also make sure the surface that will restagainst the extension is as smooth and flat as possible. If the board is cupped, the cup should face theextension. Check the squareness of the table to the blade and adjust it, if necessary- just 1° to 2° out ofsquare will make the resawn board noticeably uneven.
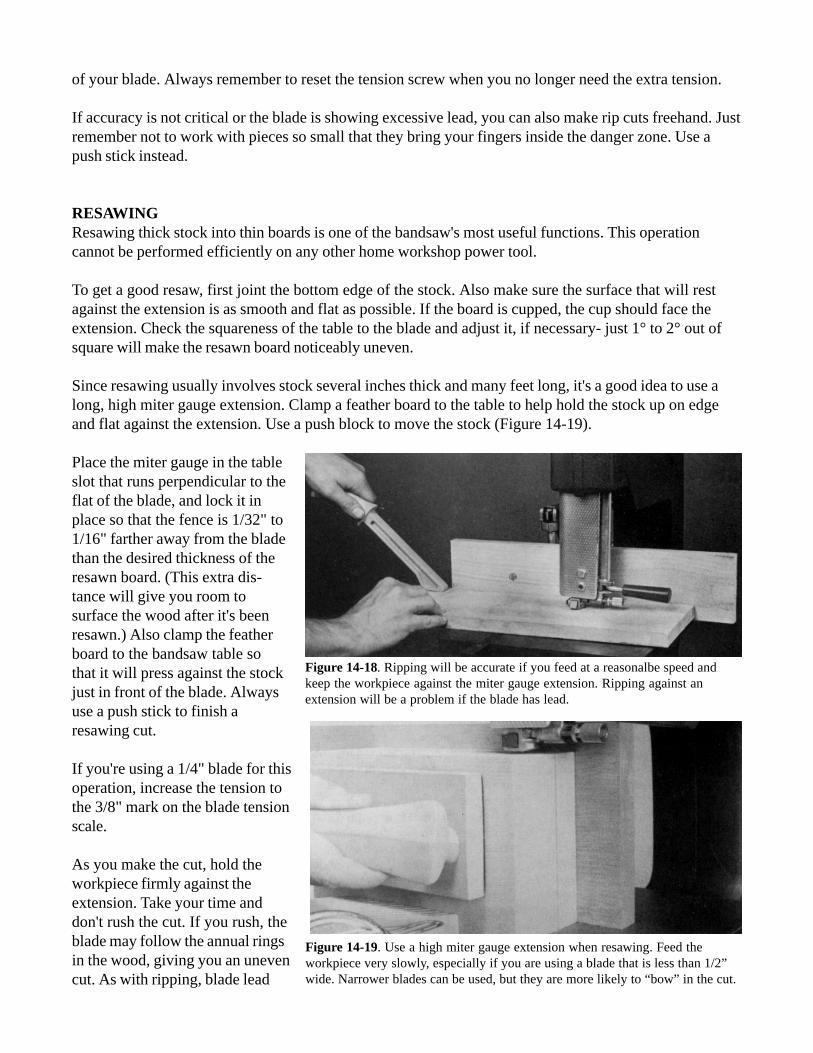
Since resawing usually involves stock several inches thick and many feet long, it's a good idea to use along, high miter gauge extension. Clamp a feather board to the table to help hold the stock up on edgeand flat against the extension. Use a push block to move the stock (Figure 14-19).
Place the miter gauge in the tableslot that runs perpendicular to theflat of the blade, and lock it inplace so that the fence is 1/32" to1/16" farther away from the bladethan the desired thickness of theresawn board. (This extra dis-tance will give you room tosurface the wood after it's beenresawn.) Also clamp the featherboard to the bandsaw table sothat it will press against the stockjust in front of the blade. Alwaysuse a push stick to finish aresawing cut.
If you're using a 1/4" blade for thisoperation, increase the tension tothe 3/8" mark on the blade tensionscale.
As you make the cut, hold theworkpiece firmly against theextension. Take your time anddon't rush the cut. If you rush, theblade may follow the annual ringsin the wood, giving you an unevencut. As with ripping, blade lead
Figure 14-18. Ripping will be accurate if you feed at a reasonalbe speed andkeep the workpiece against the miter gauge extension. Ripping against anextension will be a problem if the blade has lead.
Figure 14-19. Use a high miter gauge extension when resawing. Feed theworkpiece very slowly, especially if you are using a blade that is less than 1/2”wide. Narrower blades can be used, but they are more likely to “bow” in the cut.

can also ruin your cut. If the blade tends to wander, even when youfeed the stock slowly, readjust the blade guides or the angles of themiter gauge. If this doesn't work, refer to the Bandsaw OwnersManual to correct blade lead. If none of these remedies correct theproblem, use another blade for resawing.
Many woodworkers prepare stock for resawing by first kerfing thematerial on the table saw as shown in Figure 14-20. The kerfs dodouble-duty; they act as a guide for the bandsaw blade and theyreduce the amount of material through which the blade must cut.
It isn't resawing, in the strict sense, but the bandsaw's ability to cutthrough thick stock can be utilized to cut square stock round orprepare material for lathe turning (Figure 14-21). Cutting stockthis way considerably reduces the amount of waste that must becut away with lathe chisels.
Thinning Out-Thinning out is a type of resawingprocedure that is used to reduce the thickness ofstock in particular areas so the material will beeasy to bend. Mark the section to be thinned onone edge of the stock. The section should be 1" orso longer than the bend you plan. Make the twoend cuts first. Then, starting from any pointbetween them, make an oblique approach to thestraight line and continue the pass until it meetsthe first cut. Turn the stock end-for-end andcomplete the cut (Figure 14-22). Figure 14-23shows an example of the kind of bending that canbe done by using the thinning-out method. Thethickness of the material that will be left after thecutting will depend on how sharp the bend mustbe. Bends made this way should,be reinforced with glue blocks.
BEVEL CUTSTo make bevel cuts, simply tilt thetable to the desired angle andsecure the tilt lock. If the accuracyof the cutting angle is critical,check the tilt with a protractor ordrafting triangle.
You can make bevel cuts freehand,or you can use the miter gauge toguide and support the stock. After
Figure 14-20. You can prepare aworkpiece for resawing by makingtable saw cuts. THe kerfs haelp toguide the blade and they reduce theamount of material on which theblade must work.
Figure 14-21. The bandsaw’s impressive depth of cut canbe utilized to cut square stock round or prepare stock forlathe turning. Small circles require a narrow blade, so feed
Figure 14-22. Thinning out stock soit can be bent is a type of resawing.How much of the stock’s thicknessyou leave depends on how sharp abend you must make.
Figure 14-23. An example of howstock can be bent after it is thinnedout. The thinning sections will beweak and should be reinforced withglue blocks.

the table is adjusted to the proper tilt, lock the miter gauge in the tableslot that runs perpendicular to the flat of the blade, so that the mitergauge is on the right or downhill side of the blade facing up. This willkeep the stock from sliding down the table while mak-ing the cut(Figure 14-24).
Adjust the upper blade guide so that it's as close to the stock as pos-sible. The left or uphill side of the stock should barely clear the leftguide block.
As you cut, hold the stock firmly on the table and against the mitergauge. If you're making this cut freehand, be careful not to let thestock slip downhill. This will put side pressure on the blade, making ithard for you to follow the pattern line and possibly bogging down thebandsaw.
Use the same setup for cutting triangular glue blocks or for formingchamfers (Figure 14-25). The angle of the chamfer is determined byhow much you tilt the table.
ROUND STOCKCutting round stock requires extra caution because its shape makes theworkpiece difficult to hold. Warning: The teeth of the blade cancatch the stock, spinning it out of your hands, or worse, draggingyour hands into the blade. For this reason, round stock shouldalways be supported and guided with the miter gauge or a V-block.
If you're ripping a round piece, such as a lathe turning, use the miter
Figure 14-24. The miter gauge canbe used to guide and suppor the stockwhen making bevel cuts.
Figure 14-25. This is how to use theV-block arrangement to cut cham-fers. The table tilt will determine theangle of the chamfer. THe mitergauge with an extension supports thestock.
Figure 14-26. A tilted table and amiter gauge with an extension crate aperfect V-block. Always place themiter gauge so it is on the down sideof the table.
Figure 14-27. Use the miter gauge to crosscut round stock. By attaching a stopblock to the left side of the table, you can accurately cut duplicate lengths.
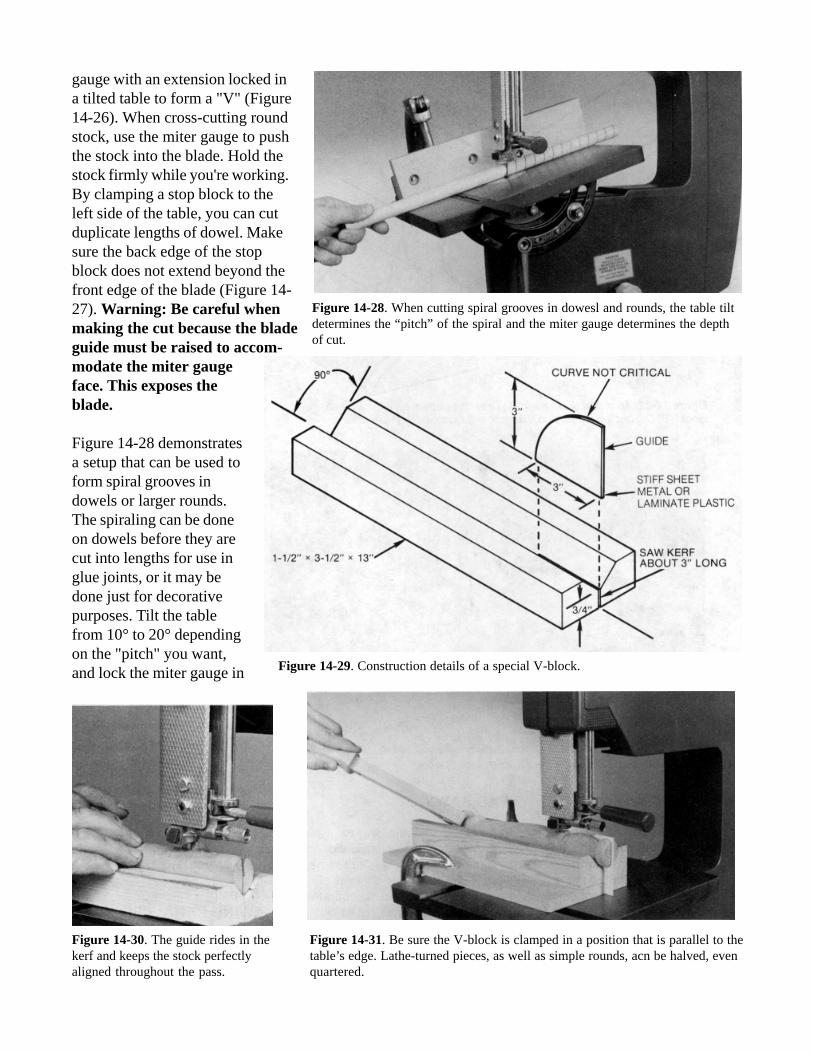
gauge with an extension locked ina tilted table to form a "V" (Figure14-26). When cross-cutting roundstock, use the miter gauge to pushthe stock into the blade. Hold thestock firmly while you're working.By clamping a stop block to theleft side of the table, you can cutduplicate lengths of dowel. Makesure the back edge of the stopblock does not extend beyond thefront edge of the blade (Figure 14-27). Warning: Be careful whenmaking the cut because the bladeguide must be raised to accom-modate the miter gaugeface. This exposes theblade.
Figure 14-28 demonstratesa setup that can be used toform spiral grooves indowels or larger rounds.The spiraling can be doneon dowels before they arecut into lengths for use inglue joints, or it may bedone just for decorativepurposes. Tilt the tablefrom 10° to 20° dependingon the "pitch" you want,and lock the miter gauge in Figure 14-29. Construction details of a special V-block.
Figure 14-30. The guide rides in thekerf and keeps the stock perfectlyaligned throughout the pass.
Figure 14-28. When cutting spiral grooves in dowesl and rounds, the table tiltdetermines the “pitch” of the spiral and the miter gauge determines the depthof cut.
Figure 14-31. Be sure the V-block is clamped in a position that is parallel to thetable’s edge. Lathe-turned pieces, as well as simple rounds, acn be halved, evenquartered.

position to control the depth of cut. Slowlyrotate the dowel to make the cut. This is agood way to mark stock for spirals that youhandshape on the lathe.
Special V-Block-If you make a special V-block, you can use the bandsaw to accuratelyform half-round or quarter-round moldingsfrom dowel, rounds, or from pieces that youhave shaped on the lathe. Figure 14-29 showshow to make the V-block. The V-block guidethat rides in the kerf keeps the stock alignedthroughout the pass (Figure 14-30). Be sure tosaw the kerf exactly on the centerline of the V.Position the V-block by moving it past the
blade and then installing the guide. If the guide isn't a tight fit, use a C-clamp at the base of the block toclose the kerf about the guide. Make certain to clamp the V-block so it is parallel to the edge of the table(Figure 14-31).
RESAWING DUPLICATE PARTSBecause the bandsaw cuts easily through thick stock, it's possible to preshape a block of wood and thenresaw it into separate pieces that will be duplicates of the original design.
The shape of the piece that is needed is drawn on one surface of the thick stock. The shape is then cut outon the bansaw. The shaped piece is then resawn (Figure 14-32). Follow the procedures for "Resawing"earlier in this chapter. It's generally a good idea to leave enough extra stock so that you can sand theresawn pieces smooth.
Figure 14-32. To resaw duplicates: (A) Draw the pattern on a thick pieceof stock. (B) Cut out the shape and then resaw it to make the duplicates.
Figure 14-33. Pad sawing isanother way to producte manysimilar pieces. The pad of indi-vidual pieces is held together withnails or with tape.
Figure 14-34. The pad is cut as if it were a solid block of wood.

PAD SAWINGPad sawing is another way to quickly and accurately produce multiple pieces that have the same shape.The technique consists of holding together a pad of separate pieces, either by driving nails in waste areasor by using enough double-sided tape to do the job. The pattern of the part you need is drawn on the oppiece of stock (Figure 14-33). The pad is then cut as if it were a solid block of wood (Figure 14-34).After cutting, the parts separate into individual pieces, all of them exactly alike.
PATTERN SAWINGPattern sawing is a method of working so that a pattern, shaped like the part that is needed, can be usedas a guide to cut duplicate pieces. This eliminates the need to do layout on individual pieces and assuresexact duplication.
The technique is detailed in Figure 14-35. The guide block, clamped to the table, is undercut at one endto permit passage of the material being cut and is notched to accommodate the blade's width and thick-ness. The workpiece, cut to rough size and shape, is held to the underside of the pattern with short bradsthat protrude from the pattern just enough to catch the workpiece.
Sawing is done by guiding the pattern along the edge of the guide block. Since the blade is positioned bythe notch in the guide block, the work is automatically cut to the shape of the pattern.
SAWING PARALLEL CONVEX CURVESSome duplicate curve cutting can be accomplished by using the miter gauge extension setup as a guide.The workpiece is cut out on the bandsaw. Then, after the edge has been sanded, the workpiece is fed pastthe blade (Figure 14-36). The most important rules are:
Figure 14-35. This is the setup to use for doingpattern sawing. The front edge of the guide blockcan be straight or round depending on the shape ofthe workpiece you will be cutting.
Figure 14-36. A miter gauge extension arrangementcan be the guide when cutting parallel, uniformcurves. The critical factor is keeping the arc of theworkpiece tangent to the guide throughout the pass.

Feed the workpiece slowly andkeep the arc of the workpiecetangent to the extension allthrough the pass. If you don'tmaintain the correct contactbetween workpiece and exten-sion, the blade will surely moveoff the line of cut. Be sure theblade is sharp and has no lead.
You can't work with an exten-sion if the workpiece has anirregular or reverse curve. Forsuch work you need the ar-rangement that is shown inFigure 14-37. The guide block,with one end smoothly sandedto a point, is clamped to thetable so the point is directlyopposite the blade's teeth. Thedistance between the block andthe blade will control the widthof the cut. It is essential to keepturning the workpiece socontact between the workpieceand the guide's edge will beconstant throughout the pass.
Figure 14-37. Irregular parallel curve cutting can be accomplished this way. Besure the first cut that you do freehand is sanded smooth.
Figure 14-38. Construction details of a pivot sawing fixture.
Figure 14-39. Using the pivot sawing fixture to cut a circle. Take it very easywhen you start the pass to give the blade a chance to get into the cut.
Figure 14-40. The classic cabriolelet is shaped by doing compoundcutting, a technique that belongsalmost exclusively to the bandsaw.
It is almost impossible to make the cut oversize, but it can be narrower than you want if you allow theworkpiece to move away from the guide. You can use these techniques successfully if you handle thework carefully and don't try to hurry the cutting.
PIVOT SAWINGYou can cut circles on the bandsaw the same way you would cut any curved line; but if you wish toautomatically gauge the cut or need many similar pieces, a pivot fixture can be used. One that you canmake is detailed in Figure 14-38. It is important that the fixture be situated so the pivot point is directlyon line with the tips of the blade's teeth and that the blade be sharp and free of lead. The best way towork is to first cut the piece or pieces square with a side-length to match the diameter of the circle youneed. Hold the workpiece against the blade as you press it down on the pivot point. When you start theblade turning, it will crowd the workpiece a bit, so you must be careful to allow the blade to work intothe stock. After that it's just a question of rotating the workpiece to complete the pass (Figure 14-39).
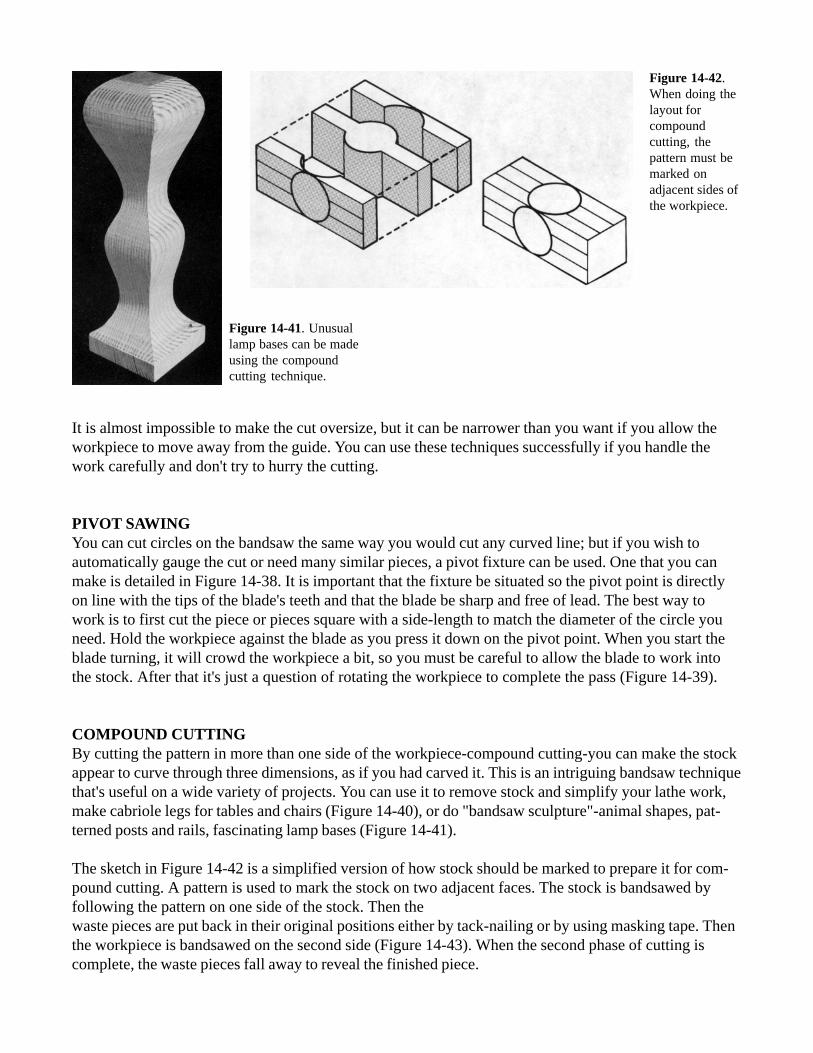
COMPOUND CUTTINGBy cutting the pattern in more than one side of the workpiece-compound cutting-you can make the stockappear to curve through three dimensions, as if you had carved it. This is an intriguing bandsaw techniquethat's useful on a wide variety of projects. You can use it to remove stock and simplify your lathe work,make cabriole legs for tables and chairs (Figure 14-40), or do "bandsaw sculpture"-animal shapes, pat-terned posts and rails, fascinating lamp bases (Figure 14-41).
The sketch in Figure 14-42 is a simplified version of how stock should be marked to prepare it for com-pound cutting. A pattern is used to mark the stock on two adjacent faces. The stock is bandsawed byfollowing the pattern on one side of the stock. Then thewaste pieces are put back in their original positions either by tack-nailing or by using masking tape. Thenthe workpiece is bandsawed on the second side (Figure 14-43). When the second phase of cutting iscomplete, the waste pieces fall away to reveal the finished piece.
Figure 14-42.When doing thelayout forcompoundcutting, thepattern must bemarked onadjacent sides ofthe workpiece.
Figure 14-41. Unusuallamp bases can be madeusing the compoundcutting technique.

Figure 14-43. The waste pieces that fall away afterone side of the stock is cut are replaced either bynailing or taping. Then the second side of theworkpiece is cut.
Don't be too quick to discard the waste pieces. Some ofthem, as shown in Figure 14-44, end up themselves asinteresting pieces that can be utilized on other projects.
CUTTING PARTICLE BOARD, PLASTICS, ANDMETALSAs mentioned earlier, your bandsaw will also cut materialsother than solid wood and plywood. These include particleboard, plastic, plastic laminates, and soft, nonferrousmetals such as brass, copper, and aluminum. Warning:Before cutting metals, clean sawdust out of thebandsaw because hot pieces of metal could ignitesawdust. Also remember that particle board releasestoxic formaldehyde gas when cut. When cutting par-ticle board, always work in a well-ventilated room.
Caution: When cutting materials other than wood, alwaysuse a combination blade. You can ruin a woodworkingblade immediately if you attempt to use iton tough materi-als like these. Even a combination blade will dull rapidly ifyou use it constantly for cutting these materials. Also,work at 'Slow' speed.
Feed the stock very slowly-give the blade plenty of time tocut. When cutting nonferrous metal, put a drop or two ofoil on the pattern line every inch or so to help keep theblade from overheating (Figure 14-45). Warning: Ifyou're cutting round stock, such as pipe, hold it se-curely with a miter gauge or V-block to help preventthe teeth from catching it and spinning It out of yourhands.
Caution: When you're finished cutting particle board,plastics, or metals, remove the bandsaw cover and cleanthe tires thoroughly with a stiff bristle brush. If you don't,the filings and chips will become imbedded in the tires anddamage them. Also clean the blade.
Figure 14-44. Don’t be too hasty in discarding thewaste pieces that result from compound cutting.They might come in handy on some future project.
Figure 14-45. When cutting metal, applyoil to the cutting line to help keep theblade from overheating.