axiom iii™ release notes
TRANSCRIPT

3 October, 2014
RBH Access Technologies Inc. 1 of 39 TB60_Integra32WebClient
RBH Technical Bulletin 2 Automatic Road, Suite 108
Brampton, Ontario Canada L6S 6K8
Integra 32™
Number: 60 Integra 32™ Web Client
Integra32™ Web Client web application
Integra32TM Web Client is a web application developed on Visual Studio 2008 that will run on Microsoft IIS web server built in to Windows OS
Pre-requisites and considerations
Supported Operating Systems
Windows 7 Professional or Ultimate1 (IIS 7.5)
Windows 8/8.1
Windows Server 2008 (IIS 7)
Windows Server 2012
Integra32™ must be updated to at least Service Pack 4C (Version 3.7.23+) for the Web Client to work properly.
Integra32™ must be registered with an appropriate license file to enable Web services:
1 Home Editions are not supported

3 October, 2014
RBH Access Technologies Inc. 2 of 39 TB60_Integra32WebClient
Share the Integra32 folder:

3 October, 2014
RBH Access Technologies Inc. 3 of 39 TB60_Integra32WebClient
NET Framework 3.5 is required. If it is not detected by the Web Client setup it will be installed automatically.
Internet Information Services (IIS) is also required. If it is not detected the user will be notified.

3 October, 2014
RBH Access Technologies Inc. 4 of 39 TB60_Integra32WebClient
Enable/Install IIS
Windows 7
Go to Control Panel and Launch Programs and Features.
Select ‘Turn Windows features on or off’.
Then make the selection under IIS (Internet Information Services) as shown in the screen below:

3 October, 2014
RBH Access Technologies Inc. 5 of 39 TB60_Integra32WebClient

3 October, 2014
RBH Access Technologies Inc. 6 of 39 TB60_Integra32WebClient
Windows 8/8.1
IIS setup in Windows 8/8.1 is similar to the IIS setup in Windows 7 - Through Programs and Features in Windows Control Panel.

3 October, 2014
RBH Access Technologies Inc. 7 of 39 TB60_Integra32WebClient
Integra 32TM R4.3 is based on .NET Framework 4.5, and therefore, the DefaultAppPool would be .NET 4.0 for IIS where Integra 4.3 is installed. Since Integra Web Client is based on .NET Framework 3.5, after the installation of the Integra Web client application, the DefaultAppPool settings need to be changed.
Click on Advanced Settings…for Default AppPool

3 October, 2014
RBH Access Technologies Inc. 8 of 39 TB60_Integra32WebClient
From the drop down menu, select V2.0 for .Net CLR version

3 October, 2014
RBH Access Technologies Inc. 9 of 39 TB60_Integra32WebClient
Restart the DefaultAppPool and browse to the Integra Web Client. You may see a Log in screen without any site name (especially if using a 64 bit OS)

3 October, 2014
RBH Access Technologies Inc. 10 of 39 TB60_Integra32WebClient
\
If your login screen does not show anything in the “Sites” field, you will need to change the setting for 32 bit application to “True” on the DefaultAppPool

3 October, 2014
RBH Access Technologies Inc. 11 of 39 TB60_Integra32WebClient
Browse to the Integra Client 1.0 application again after restarting the DefaultAppPool

3 October, 2014
RBH Access Technologies Inc. 12 of 39 TB60_Integra32WebClient
Log in to the Integra Web application

3 October, 2014
RBH Access Technologies Inc. 13 of 39 TB60_Integra32WebClient
Windows Server 2008/ Windows Server 2008 R2
Before You Begin
Ensure that you have administrative user rights on the computer on which you plan to install IIS7.
Note that by default, you do not have administrative user rights if you are
logged on as a user other than the built-in administrator, even if you were
added to the local Administrators group on the computer (this is a new
security feature in Windows Server 2008 called Local User Administrator).
Log on either to the built-in administrator account, or explicitly invoke
applications as the built-in administrator by using the ‘run as’ on the right
click menu for the application.
If you are logged on to an account other than the built-in local administrator account, you may see the following security alert dialog box.

3 October, 2014
RBH Access Technologies Inc. 14 of 39 TB60_Integra32WebClient
IIS is one of the Windows Server’s server roles. IIS 7 can be installed through the graphical user interface (GUI) by using the new Server Manager interface after the Windows Server operating system is installed.
Server Manager provides a single dashboard to install or uninstall server roles and features. Server Manager also gives an overview of all currently installed roles and features. When IIS 7 is chosen from the Server Manager, the basic components and services needed for IIS are automatically selected.
Click Start -> All Programs -> Administrative Tools -> Server Manager

3 October, 2014
RBH Access Technologies Inc. 15 of 39 TB60_Integra32WebClient
In the Server Manager window, scroll down to Roles Summary, and then click Add Roles.
The Add Roles Wizard will start with a Before You Begin page. The wizard asks for verification of the following:
The administrator account has a strong password.
The network settings, such as IP addresses, are configured.
The latest security updates from Windows Update are installed.
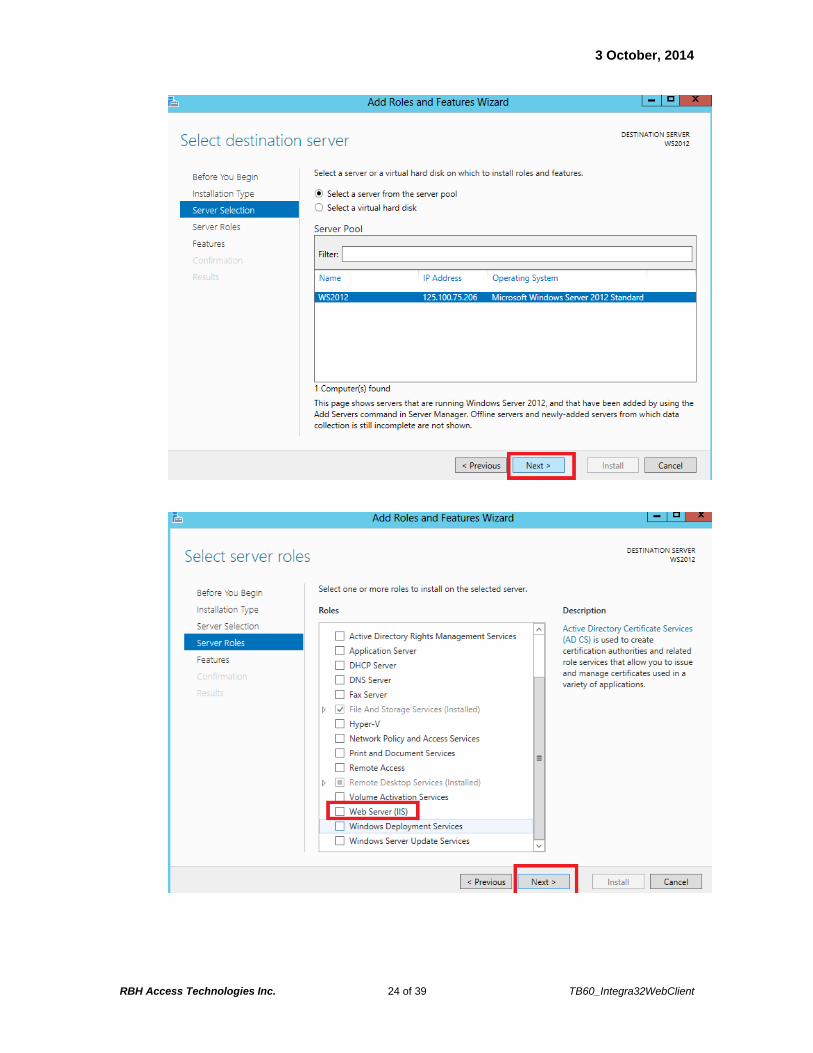
Select Web Server (IIS) on the Select Server Roles page.
An introductory page will open with links for further information.
When you use the Add Roles Wizard to install IIS, you get the default
installation, which has a minimum set of role services. If you need
additional IIS role services, such as Application Development or Health and
Diagnostics, make sure to select the check boxes associated with those
features in the Select Role Services page of the wizard.

3 October, 2014
RBH Access Technologies Inc. 16 of 39 TB60_Integra32WebClient
Select the IIS services to be installed on the Select Role Services page. Add only the modules necessary. In this case, ASP.NET is selected, and a description of ASP.NET appears in the right pane. Once desired modules are added (as shown in the screen below), click Next.

3 October, 2014
RBH Access Technologies Inc. 17 of 39 TB60_Integra32WebClient
And

3 October, 2014
RBH Access Technologies Inc. 18 of 39 TB60_Integra32WebClient
Add any required role services.
Click Install to install the Role selected

3 October, 2014
RBH Access Technologies Inc. 19 of 39 TB60_Integra32WebClient
3 October, 2014
RBH Access Technologies Inc. 20 of 39 TB60_Integra32WebClient
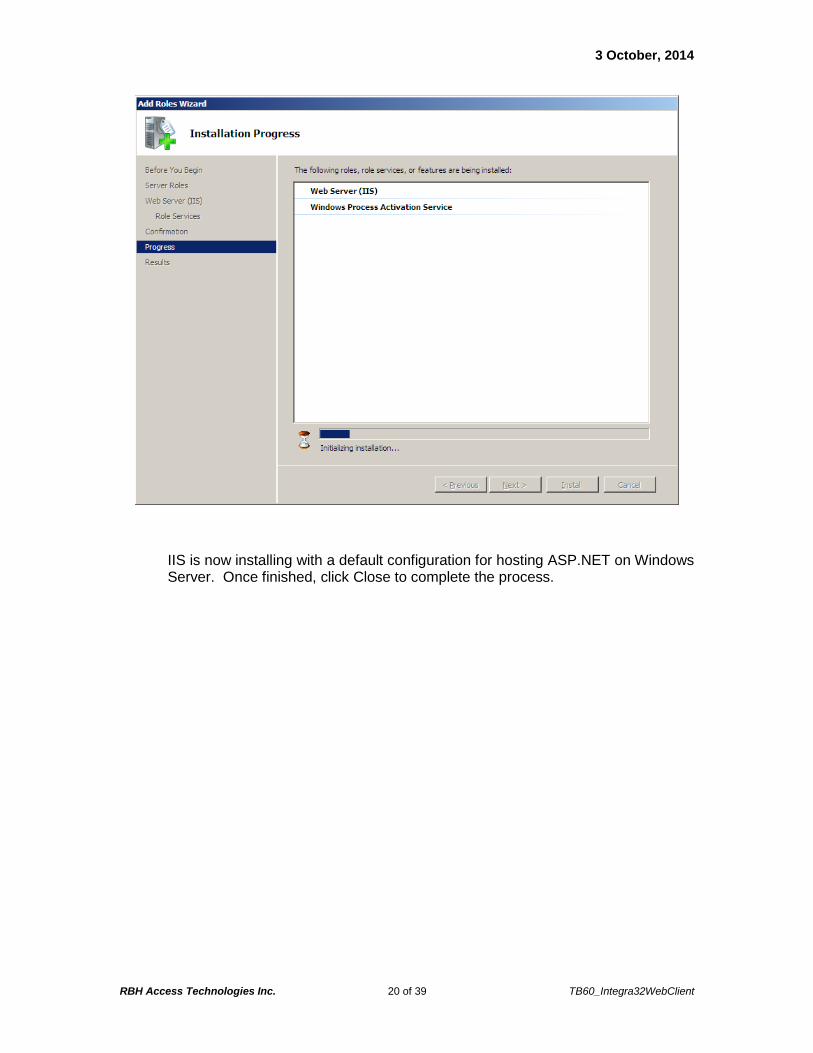
IIS is now installing with a default configuration for hosting ASP.NET on Windows Server. Once finished, click Close to complete the process.

3 October, 2014
RBH Access Technologies Inc. 21 of 39 TB60_Integra32WebClient
Confirm that the Web Server works by using http://localhost.

3 October, 2014
RBH Access Technologies Inc. 22 of 39 TB60_Integra32WebClient
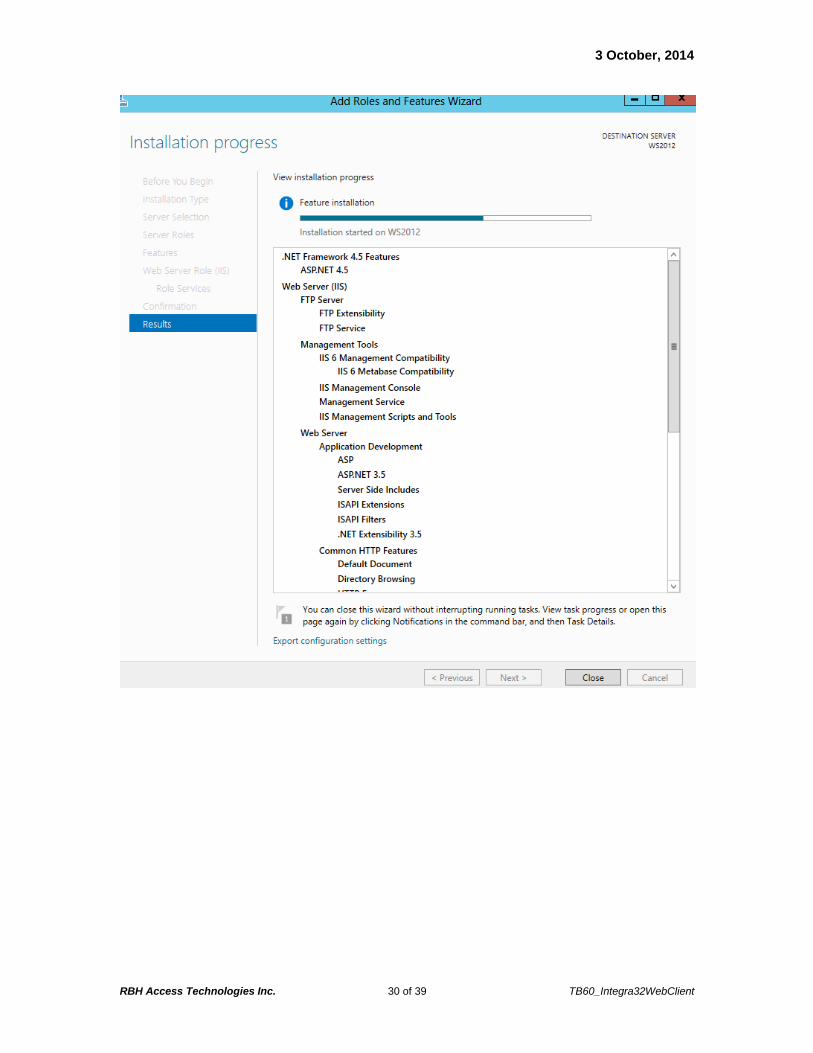
Windows Server 2012
IIS setup for Windows Server 2012 is very similar to the IIS setup for Windows Server 2008. Following screenshots for Windows Server 2012 are self explanatory.

3 October, 2014
RBH Access Technologies Inc. 23 of 39 TB60_Integra32WebClient
3 October, 2014
RBH Access Technologies Inc. 24 of 39 TB60_Integra32WebClient

3 October, 2014
RBH Access Technologies Inc. 25 of 39 TB60_Integra32WebClient

3 October, 2014
RBH Access Technologies Inc. 26 of 39 TB60_Integra32WebClient

3 October, 2014
RBH Access Technologies Inc. 27 of 39 TB60_Integra32WebClient

3 October, 2014
RBH Access Technologies Inc. 28 of 39 TB60_Integra32WebClient

3 October, 2014
RBH Access Technologies Inc. 29 of 39 TB60_Integra32WebClient
3 October, 2014
RBH Access Technologies Inc. 30 of 39 TB60_Integra32WebClient

3 October, 2014
RBH Access Technologies Inc. 31 of 39 TB60_Integra32WebClient

3 October, 2014
RBH Access Technologies Inc. 32 of 39 TB60_Integra32WebClient
Installation Package for Integra32TM Web Client
After IIS is installed go to the folder that contains the installation package for Integra Client.
Double click on the setup file.

3 October, 2014
RBH Access Technologies Inc. 33 of 39 TB60_Integra32WebClient
Click ‘Next’ to continue with installation.

3 October, 2014
RBH Access Technologies Inc. 34 of 39 TB60_Integra32WebClient
“Virtual Directory” is the name of the website you are creating
Set the installation location and click ‘Next’ to continue.

3 October, 2014
RBH Access Technologies Inc. 35 of 39 TB60_Integra32WebClient
Click ‘Next’ to continue with installation.

3 October, 2014
RBH Access Technologies Inc. 36 of 39 TB60_Integra32WebClient
Click ‘Close’ to complete the installation.

3 October, 2014
RBH Access Technologies Inc. 37 of 39 TB60_Integra32WebClient
Login via Web Client
Open Microsoft Internet Explorer and enter the address of the local server to login. Click ‘Go’.
http://localhost/IntegraClient1.0/default.aspx
Substitute an IP address or the server machine’s name for “localhost” to connect to a server across a network (including the Internet).
http://IP/IntegraClient1.0/default.aspx
http://server machine’s name/IntegraClient1.0/default.aspx
For local testing you can use “localhost” or 127.0.0.1

3 October, 2014
RBH Access Technologies Inc. 38 of 39 TB60_Integra32WebClient
Select a language for the user to operate with (the default is English). Enter the user’s name and password, and then click ‘Login’.

3 October, 2014
RBH Access Technologies Inc. 39 of 39 TB60_Integra32WebClient
Important notes:
Verify that IIS web services and Integra Client and Server applications are not blocked by a firewall.