aws elemental medialive - docs.aws.amazon.com · in this case, the frame rate portion of the...
TRANSCRIPT

AWS Elemental MediaLiveUser Guide

AWS Elemental MediaLive User Guide
AWS Elemental MediaLive: User GuideCopyright © 2018 Amazon Web Services, Inc. and/or its affiliates. All rights reserved.
Amazon's trademarks and trade dress may not be used in connection with any product or service that is not Amazon's, in any mannerthat is likely to cause confusion among customers, or in any manner that disparages or discredits Amazon. All other trademarks notowned by Amazon are the property of their respective owners, who may or may not be affiliated with, connected to, or sponsored byAmazon.

AWS Elemental MediaLive User Guide
Table of ContentsWhat Is AWS Elemental MediaLive? .... . . . . . . . . . . . . . . . . . . . . . . . . . . . . . . . . . . . . . . . . . . . . . . . . . . . . . . . . . . . . . . . . . . . . . . . . . . . . . . . . . . . . . . . . . . . . . . . . . . 1
Related Services .... . . . . . . . . . . . . . . . . . . . . . . . . . . . . . . . . . . . . . . . . . . . . . . . . . . . . . . . . . . . . . . . . . . . . . . . . . . . . . . . . . . . . . . . . . . . . . . . . . . . . . . . . . . . . . . . . . . . . . 1Pricing .... . . . . . . . . . . . . . . . . . . . . . . . . . . . . . . . . . . . . . . . . . . . . . . . . . . . . . . . . . . . . . . . . . . . . . . . . . . . . . . . . . . . . . . . . . . . . . . . . . . . . . . . . . . . . . . . . . . . . . . . . . . . . . . . . . . 1
Setting Up AWS Elemental MediaLive .... . . . . . . . . . . . . . . . . . . . . . . . . . . . . . . . . . . . . . . . . . . . . . . . . . . . . . . . . . . . . . . . . . . . . . . . . . . . . . . . . . . . . . . . . . . . . . . . 3Required Permissions in AWS Elemental MediaLive .... . . . . . . . . . . . . . . . . . . . . . . . . . . . . . . . . . . . . . . . . . . . . . . . . . . . . . . . . . . . . . . . . . . . . . 3Sign Up for AWS Elemental MediaLive .... . . . . . . . . . . . . . . . . . . . . . . . . . . . . . . . . . . . . . . . . . . . . . . . . . . . . . . . . . . . . . . . . . . . . . . . . . . . . . . . . . . . . . . 4Create an IAM User .... . . . . . . . . . . . . . . . . . . . . . . . . . . . . . . . . . . . . . . . . . . . . . . . . . . . . . . . . . . . . . . . . . . . . . . . . . . . . . . . . . . . . . . . . . . . . . . . . . . . . . . . . . . . . . . . . 4Access to Amazon EC2 Systems Manager Parameter Store .... . . . . . . . . . . . . . . . . . . . . . . . . . . . . . . . . . . . . . . . . . . . . . . . . . . . . . . . . . . . 4Access to Amazon S3 .... . . . . . . . . . . . . . . . . . . . . . . . . . . . . . . . . . . . . . . . . . . . . . . . . . . . . . . . . . . . . . . . . . . . . . . . . . . . . . . . . . . . . . . . . . . . . . . . . . . . . . . . . . . . . . . 5Access to AWS Elemental MediaStore .... . . . . . . . . . . . . . . . . . . . . . . . . . . . . . . . . . . . . . . . . . . . . . . . . . . . . . . . . . . . . . . . . . . . . . . . . . . . . . . . . . . . . . . . 5Setting Up a Trusted Entity ... . . . . . . . . . . . . . . . . . . . . . . . . . . . . . . . . . . . . . . . . . . . . . . . . . . . . . . . . . . . . . . . . . . . . . . . . . . . . . . . . . . . . . . . . . . . . . . . . . . . . . . 6Setting Up Permissions for AWS Elemental MediaLive .... . . . . . . . . . . . . . . . . . . . . . . . . . . . . . . . . . . . . . . . . . . . . . . . . . . . . . . . . . . . . . . . . . 6
Step 1: Create a Policy .... . . . . . . . . . . . . . . . . . . . . . . . . . . . . . . . . . . . . . . . . . . . . . . . . . . . . . . . . . . . . . . . . . . . . . . . . . . . . . . . . . . . . . . . . . . . . . . . . . . . 7Step 2: Create a Role for the Service .... . . . . . . . . . . . . . . . . . . . . . . . . . . . . . . . . . . . . . . . . . . . . . . . . . . . . . . . . . . . . . . . . . . . . . . . . . . . . . . . . 7Step 3: Revise the Trust Relationship .... . . . . . . . . . . . . . . . . . . . . . . . . . . . . . . . . . . . . . . . . . . . . . . . . . . . . . . . . . . . . . . . . . . . . . . . . . . . . . . . . 8
Data Retention .... . . . . . . . . . . . . . . . . . . . . . . . . . . . . . . . . . . . . . . . . . . . . . . . . . . . . . . . . . . . . . . . . . . . . . . . . . . . . . . . . . . . . . . . . . . . . . . . . . . . . . . . . . . . . . . . . . . . . . . 9Deleting Data in AWS Elemental MediaLive .... . . . . . . . . . . . . . . . . . . . . . . . . . . . . . . . . . . . . . . . . . . . . . . . . . . . . . . . . . . . . . . . . . . . . . . . 9
Getting Started .... . . . . . . . . . . . . . . . . . . . . . . . . . . . . . . . . . . . . . . . . . . . . . . . . . . . . . . . . . . . . . . . . . . . . . . . . . . . . . . . . . . . . . . . . . . . . . . . . . . . . . . . . . . . . . . . . . . . . . . . . . . . . 10Prerequisites ... . . . . . . . . . . . . . . . . . . . . . . . . . . . . . . . . . . . . . . . . . . . . . . . . . . . . . . . . . . . . . . . . . . . . . . . . . . . . . . . . . . . . . . . . . . . . . . . . . . . . . . . . . . . . . . . . . . . . . . . . . 10Step 1: Set up the Upstream System ..... . . . . . . . . . . . . . . . . . . . . . . . . . . . . . . . . . . . . . . . . . . . . . . . . . . . . . . . . . . . . . . . . . . . . . . . . . . . . . . . . . . . . . 10Step 2: Set up the Downstream System ..... . . . . . . . . . . . . . . . . . . . . . . . . . . . . . . . . . . . . . . . . . . . . . . . . . . . . . . . . . . . . . . . . . . . . . . . . . . . . . . . . . 10Step 3: Create an Input .... . . . . . . . . . . . . . . . . . . . . . . . . . . . . . . . . . . . . . . . . . . . . . . . . . . . . . . . . . . . . . . . . . . . . . . . . . . . . . . . . . . . . . . . . . . . . . . . . . . . . . . . . . 11Step 4: Attach the Input .... . . . . . . . . . . . . . . . . . . . . . . . . . . . . . . . . . . . . . . . . . . . . . . . . . . . . . . . . . . . . . . . . . . . . . . . . . . . . . . . . . . . . . . . . . . . . . . . . . . . . . . . 12Step 5: Create an HLS Output Group .... . . . . . . . . . . . . . . . . . . . . . . . . . . . . . . . . . . . . . . . . . . . . . . . . . . . . . . . . . . . . . . . . . . . . . . . . . . . . . . . . . . . . . . 12Step 6: Set up the Output and Encodes .... . . . . . . . . . . . . . . . . . . . . . . . . . . . . . . . . . . . . . . . . . . . . . . . . . . . . . . . . . . . . . . . . . . . . . . . . . . . . . . . . . . 13Step 7: Save .... . . . . . . . . . . . . . . . . . . . . . . . . . . . . . . . . . . . . . . . . . . . . . . . . . . . . . . . . . . . . . . . . . . . . . . . . . . . . . . . . . . . . . . . . . . . . . . . . . . . . . . . . . . . . . . . . . . . . . . . . 13Step 8: Start the Upstream System and the Channel ... . . . . . . . . . . . . . . . . . . . . . . . . . . . . . . . . . . . . . . . . . . . . . . . . . . . . . . . . . . . . . . . . . . 13Step 9: Clean up .... . . . . . . . . . . . . . . . . . . . . . . . . . . . . . . . . . . . . . . . . . . . . . . . . . . . . . . . . . . . . . . . . . . . . . . . . . . . . . . . . . . . . . . . . . . . . . . . . . . . . . . . . . . . . . . . . . . 14
Components of AWS Elemental MediaLive .... . . . . . . . . . . . . . . . . . . . . . . . . . . . . . . . . . . . . . . . . . . . . . . . . . . . . . . . . . . . . . . . . . . . . . . . . . . . . . . . . . . . . . . . 15Inputs .... . . . . . . . . . . . . . . . . . . . . . . . . . . . . . . . . . . . . . . . . . . . . . . . . . . . . . . . . . . . . . . . . . . . . . . . . . . . . . . . . . . . . . . . . . . . . . . . . . . . . . . . . . . . . . . . . . . . . . . . . . . . . . . . . . 15Channels ... . . . . . . . . . . . . . . . . . . . . . . . . . . . . . . . . . . . . . . . . . . . . . . . . . . . . . . . . . . . . . . . . . . . . . . . . . . . . . . . . . . . . . . . . . . . . . . . . . . . . . . . . . . . . . . . . . . . . . . . . . . . . . . 15
Encodes .... . . . . . . . . . . . . . . . . . . . . . . . . . . . . . . . . . . . . . . . . . . . . . . . . . . . . . . . . . . . . . . . . . . . . . . . . . . . . . . . . . . . . . . . . . . . . . . . . . . . . . . . . . . . . . . . . . . . . . . 15Outputs .... . . . . . . . . . . . . . . . . . . . . . . . . . . . . . . . . . . . . . . . . . . . . . . . . . . . . . . . . . . . . . . . . . . . . . . . . . . . . . . . . . . . . . . . . . . . . . . . . . . . . . . . . . . . . . . . . . . . . . . . 16Output Groups .... . . . . . . . . . . . . . . . . . . . . . . . . . . . . . . . . . . . . . . . . . . . . . . . . . . . . . . . . . . . . . . . . . . . . . . . . . . . . . . . . . . . . . . . . . . . . . . . . . . . . . . . . . . . . . 16
Input Security Groups .... . . . . . . . . . . . . . . . . . . . . . . . . . . . . . . . . . . . . . . . . . . . . . . . . . . . . . . . . . . . . . . . . . . . . . . . . . . . . . . . . . . . . . . . . . . . . . . . . . . . . . . . . . . . 16How Components Are Associated .... . . . . . . . . . . . . . . . . . . . . . . . . . . . . . . . . . . . . . . . . . . . . . . . . . . . . . . . . . . . . . . . . . . . . . . . . . . . . . . . . . . . . . . . . . . . 16
Planning Your Workflow for AWS Elemental MediaLive .... . . . . . . . . . . . . . . . . . . . . . . . . . . . . . . . . . . . . . . . . . . . . . . . . . . . . . . . . . . . . . . . . . . . . . 17Assessing the Video Source .... . . . . . . . . . . . . . . . . . . . . . . . . . . . . . . . . . . . . . . . . . . . . . . . . . . . . . . . . . . . . . . . . . . . . . . . . . . . . . . . . . . . . . . . . . . . . . . . . . . . 17Setting Up the Upstream System ..... . . . . . . . . . . . . . . . . . . . . . . . . . . . . . . . . . . . . . . . . . . . . . . . . . . . . . . . . . . . . . . . . . . . . . . . . . . . . . . . . . . . . . . . . . . 18
RTP Push .... . . . . . . . . . . . . . . . . . . . . . . . . . . . . . . . . . . . . . . . . . . . . . . . . . . . . . . . . . . . . . . . . . . . . . . . . . . . . . . . . . . . . . . . . . . . . . . . . . . . . . . . . . . . . . . . . . . . . . 18RTMP Push .... . . . . . . . . . . . . . . . . . . . . . . . . . . . . . . . . . . . . . . . . . . . . . . . . . . . . . . . . . . . . . . . . . . . . . . . . . . . . . . . . . . . . . . . . . . . . . . . . . . . . . . . . . . . . . . . . . . 18RTMP Pull ... . . . . . . . . . . . . . . . . . . . . . . . . . . . . . . . . . . . . . . . . . . . . . . . . . . . . . . . . . . . . . . . . . . . . . . . . . . . . . . . . . . . . . . . . . . . . . . . . . . . . . . . . . . . . . . . . . . . . 19HLS Pull ... . . . . . . . . . . . . . . . . . . . . . . . . . . . . . . . . . . . . . . . . . . . . . . . . . . . . . . . . . . . . . . . . . . . . . . . . . . . . . . . . . . . . . . . . . . . . . . . . . . . . . . . . . . . . . . . . . . . . . . . 19
Planning the Input .... . . . . . . . . . . . . . . . . . . . . . . . . . . . . . . . . . . . . . . . . . . . . . . . . . . . . . . . . . . . . . . . . . . . . . . . . . . . . . . . . . . . . . . . . . . . . . . . . . . . . . . . . . . . . . . . 19Planning the Channel ... . . . . . . . . . . . . . . . . . . . . . . . . . . . . . . . . . . . . . . . . . . . . . . . . . . . . . . . . . . . . . . . . . . . . . . . . . . . . . . . . . . . . . . . . . . . . . . . . . . . . . . . . . . . . 19
Rules for Encodes in an Output .... . . . . . . . . . . . . . . . . . . . . . . . . . . . . . . . . . . . . . . . . . . . . . . . . . . . . . . . . . . . . . . . . . . . . . . . . . . . . . . . . . . . . . 20Examples of Channel Designs .... . . . . . . . . . . . . . . . . . . . . . . . . . . . . . . . . . . . . . . . . . . . . . . . . . . . . . . . . . . . . . . . . . . . . . . . . . . . . . . . . . . . . . . . . . . . . . . . . 21
Non-ABR Asset with Captions Embedded in the Video .... . . . . . . . . . . . . . . . . . . . . . . . . . . . . . . . . . . . . . . . . . . . . . . . . . . . . . . . 21Non-ABR Segmented Asset with Captions as Separate Objects ... . . . . . . . . . . . . . . . . . . . . . . . . . . . . . . . . . . . . . . . . . . . . 21Non-ABR Segmented Asset with Captions as Sidecars ... . . . . . . . . . . . . . . . . . . . . . . . . . . . . . . . . . . . . . . . . . . . . . . . . . . . . . . . . 22ABR Asset with Captions Embedded in the Video .... . . . . . . . . . . . . . . . . . . . . . . . . . . . . . . . . . . . . . . . . . . . . . . . . . . . . . . . . . . . . . 22ABR Asset with Captions in Sidecars ... . . . . . . . . . . . . . . . . . . . . . . . . . . . . . . . . . . . . . . . . . . . . . . . . . . . . . . . . . . . . . . . . . . . . . . . . . . . . . . . . 22
Setting Up the Downstream System ..... . . . . . . . . . . . . . . . . . . . . . . . . . . . . . . . . . . . . . . . . . . . . . . . . . . . . . . . . . . . . . . . . . . . . . . . . . . . . . . . . . . . . . . 23Working with Input Security Groups .... . . . . . . . . . . . . . . . . . . . . . . . . . . . . . . . . . . . . . . . . . . . . . . . . . . . . . . . . . . . . . . . . . . . . . . . . . . . . . . . . . . . . . . . . . . . . . . . 25
iii

AWS Elemental MediaLive User Guide
Purpose of an Input Security Group .... . . . . . . . . . . . . . . . . . . . . . . . . . . . . . . . . . . . . . . . . . . . . . . . . . . . . . . . . . . . . . . . . . . . . . . . . . . . . . . . . . . . . . . . . 25Creating an Input Security Group .... . . . . . . . . . . . . . . . . . . . . . . . . . . . . . . . . . . . . . . . . . . . . . . . . . . . . . . . . . . . . . . . . . . . . . . . . . . . . . . . . . . . . . . . . . . . 25Editing an Input Security Group .... . . . . . . . . . . . . . . . . . . . . . . . . . . . . . . . . . . . . . . . . . . . . . . . . . . . . . . . . . . . . . . . . . . . . . . . . . . . . . . . . . . . . . . . . . . . . . 25Deleting an Input Security Group .... . . . . . . . . . . . . . . . . . . . . . . . . . . . . . . . . . . . . . . . . . . . . . . . . . . . . . . . . . . . . . . . . . . . . . . . . . . . . . . . . . . . . . . . . . . . 26
Working with Inputs .... . . . . . . . . . . . . . . . . . . . . . . . . . . . . . . . . . . . . . . . . . . . . . . . . . . . . . . . . . . . . . . . . . . . . . . . . . . . . . . . . . . . . . . . . . . . . . . . . . . . . . . . . . . . . . . . . . . . . . 27Inputs, Input Security Groups, and Channels ... . . . . . . . . . . . . . . . . . . . . . . . . . . . . . . . . . . . . . . . . . . . . . . . . . . . . . . . . . . . . . . . . . . . . . . . . . . . . . 27Creating an Input .... . . . . . . . . . . . . . . . . . . . . . . . . . . . . . . . . . . . . . . . . . . . . . . . . . . . . . . . . . . . . . . . . . . . . . . . . . . . . . . . . . . . . . . . . . . . . . . . . . . . . . . . . . . . . . . . . . 27
Creating an RTP Push Input .... . . . . . . . . . . . . . . . . . . . . . . . . . . . . . . . . . . . . . . . . . . . . . . . . . . . . . . . . . . . . . . . . . . . . . . . . . . . . . . . . . . . . . . . . . . . 27Creating an RTMP Push Input .... . . . . . . . . . . . . . . . . . . . . . . . . . . . . . . . . . . . . . . . . . . . . . . . . . . . . . . . . . . . . . . . . . . . . . . . . . . . . . . . . . . . . . . . . 28Creating an RTMP Pull Input .... . . . . . . . . . . . . . . . . . . . . . . . . . . . . . . . . . . . . . . . . . . . . . . . . . . . . . . . . . . . . . . . . . . . . . . . . . . . . . . . . . . . . . . . . . . 28Creating an HLS Pull Input .... . . . . . . . . . . . . . . . . . . . . . . . . . . . . . . . . . . . . . . . . . . . . . . . . . . . . . . . . . . . . . . . . . . . . . . . . . . . . . . . . . . . . . . . . . . . . 29
Editing an Input .... . . . . . . . . . . . . . . . . . . . . . . . . . . . . . . . . . . . . . . . . . . . . . . . . . . . . . . . . . . . . . . . . . . . . . . . . . . . . . . . . . . . . . . . . . . . . . . . . . . . . . . . . . . . . . . . . . . . 30Deleting an Input .... . . . . . . . . . . . . . . . . . . . . . . . . . . . . . . . . . . . . . . . . . . . . . . . . . . . . . . . . . . . . . . . . . . . . . . . . . . . . . . . . . . . . . . . . . . . . . . . . . . . . . . . . . . . . . . . . . 30
Creating a Channel from Scratch .... . . . . . . . . . . . . . . . . . . . . . . . . . . . . . . . . . . . . . . . . . . . . . . . . . . . . . . . . . . . . . . . . . . . . . . . . . . . . . . . . . . . . . . . . . . . . . . . . . . . . 32Step 1: Complete the Channel and Input Details ... . . . . . . . . . . . . . . . . . . . . . . . . . . . . . . . . . . . . . . . . . . . . . . . . . . . . . . . . . . . . . . . . . . . . . . . 32
IAM Role and Remember ARN .... . . . . . . . . . . . . . . . . . . . . . . . . . . . . . . . . . . . . . . . . . . . . . . . . . . . . . . . . . . . . . . . . . . . . . . . . . . . . . . . . . . . . . . . . 33Channel Input – RTP Push Input .... . . . . . . . . . . . . . . . . . . . . . . . . . . . . . . . . . . . . . . . . . . . . . . . . . . . . . . . . . . . . . . . . . . . . . . . . . . . . . . . . . . . . . 34Channel Input – RTMP Push Input .... . . . . . . . . . . . . . . . . . . . . . . . . . . . . . . . . . . . . . . . . . . . . . . . . . . . . . . . . . . . . . . . . . . . . . . . . . . . . . . . . . . 34Channel Input – RTMP Pull Input .... . . . . . . . . . . . . . . . . . . . . . . . . . . . . . . . . . . . . . . . . . . . . . . . . . . . . . . . . . . . . . . . . . . . . . . . . . . . . . . . . . . . 34Channel Input – HLS Pull Input .... . . . . . . . . . . . . . . . . . . . . . . . . . . . . . . . . . . . . . . . . . . . . . . . . . . . . . . . . . . . . . . . . . . . . . . . . . . . . . . . . . . . . . . 35Input Specification Settings .... . . . . . . . . . . . . . . . . . . . . . . . . . . . . . . . . . . . . . . . . . . . . . . . . . . . . . . . . . . . . . . . . . . . . . . . . . . . . . . . . . . . . . . . . . . . 35
Step 2: Complete the Input Settings .... . . . . . . . . . . . . . . . . . . . . . . . . . . . . . . . . . . . . . . . . . . . . . . . . . . . . . . . . . . . . . . . . . . . . . . . . . . . . . . . . . . . . . . . 35Input Settings – Network Input Settings .... . . . . . . . . . . . . . . . . . . . . . . . . . . . . . . . . . . . . . . . . . . . . . . . . . . . . . . . . . . . . . . . . . . . . . . . . . . 36Input Settings – Other Settings .... . . . . . . . . . . . . . . . . . . . . . . . . . . . . . . . . . . . . . . . . . . . . . . . . . . . . . . . . . . . . . . . . . . . . . . . . . . . . . . . . . . . . . . 36Input Settings – Video Selector ... . . . . . . . . . . . . . . . . . . . . . . . . . . . . . . . . . . . . . . . . . . . . . . . . . . . . . . . . . . . . . . . . . . . . . . . . . . . . . . . . . . . . . . . 36Input Settings – Audio Selectors ... . . . . . . . . . . . . . . . . . . . . . . . . . . . . . . . . . . . . . . . . . . . . . . . . . . . . . . . . . . . . . . . . . . . . . . . . . . . . . . . . . . . . . 36Input Settings – Caption Selectors ... . . . . . . . . . . . . . . . . . . . . . . . . . . . . . . . . . . . . . . . . . . . . . . . . . . . . . . . . . . . . . . . . . . . . . . . . . . . . . . . . . . . 36
Step 3: Complete the General Settings .... . . . . . . . . . . . . . . . . . . . . . . . . . . . . . . . . . . . . . . . . . . . . . . . . . . . . . . . . . . . . . . . . . . . . . . . . . . . . . . . . . . . 37Avail Blanking .... . . . . . . . . . . . . . . . . . . . . . . . . . . . . . . . . . . . . . . . . . . . . . . . . . . . . . . . . . . . . . . . . . . . . . . . . . . . . . . . . . . . . . . . . . . . . . . . . . . . . . . . . . . . . . . 37Avail Configuration .... . . . . . . . . . . . . . . . . . . . . . . . . . . . . . . . . . . . . . . . . . . . . . . . . . . . . . . . . . . . . . . . . . . . . . . . . . . . . . . . . . . . . . . . . . . . . . . . . . . . . . . . 37Blackout Slate .... . . . . . . . . . . . . . . . . . . . . . . . . . . . . . . . . . . . . . . . . . . . . . . . . . . . . . . . . . . . . . . . . . . . . . . . . . . . . . . . . . . . . . . . . . . . . . . . . . . . . . . . . . . . . . . 37Global Configuration .... . . . . . . . . . . . . . . . . . . . . . . . . . . . . . . . . . . . . . . . . . . . . . . . . . . . . . . . . . . . . . . . . . . . . . . . . . . . . . . . . . . . . . . . . . . . . . . . . . . . . . 37Global Configuration - Input Loss Behavior ... . . . . . . . . . . . . . . . . . . . . . . . . . . . . . . . . . . . . . . . . . . . . . . . . . . . . . . . . . . . . . . . . . . . . . . . 37Timecode Configuration .... . . . . . . . . . . . . . . . . . . . . . . . . . . . . . . . . . . . . . . . . . . . . . . . . . . . . . . . . . . . . . . . . . . . . . . . . . . . . . . . . . . . . . . . . . . . . . . . . 37Logging .... . . . . . . . . . . . . . . . . . . . . . . . . . . . . . . . . . . . . . . . . . . . . . . . . . . . . . . . . . . . . . . . . . . . . . . . . . . . . . . . . . . . . . . . . . . . . . . . . . . . . . . . . . . . . . . . . . . . . . . . 38
Step 4: Create Output Groups .... . . . . . . . . . . . . . . . . . . . . . . . . . . . . . . . . . . . . . . . . . . . . . . . . . . . . . . . . . . . . . . . . . . . . . . . . . . . . . . . . . . . . . . . . . . . . . . . . 38Creating an Archive Output Group .... . . . . . . . . . . . . . . . . . . . . . . . . . . . . . . . . . . . . . . . . . . . . . . . . . . . . . . . . . . . . . . . . . . . . . . . . . . . . . . . . . . 38Creating an HLS Output Group .... . . . . . . . . . . . . . . . . . . . . . . . . . . . . . . . . . . . . . . . . . . . . . . . . . . . . . . . . . . . . . . . . . . . . . . . . . . . . . . . . . . . . . . 41Creating an RTMP Output Group .... . . . . . . . . . . . . . . . . . . . . . . . . . . . . . . . . . . . . . . . . . . . . . . . . . . . . . . . . . . . . . . . . . . . . . . . . . . . . . . . . . . . . 46Creating a Microsoft Smooth Output Group .... . . . . . . . . . . . . . . . . . . . . . . . . . . . . . . . . . . . . . . . . . . . . . . . . . . . . . . . . . . . . . . . . . . . . . 46Creating a UDP Output Group .... . . . . . . . . . . . . . . . . . . . . . . . . . . . . . . . . . . . . . . . . . . . . . . . . . . . . . . . . . . . . . . . . . . . . . . . . . . . . . . . . . . . . . . . 48
Step 5: Create Outputs .... . . . . . . . . . . . . . . . . . . . . . . . . . . . . . . . . . . . . . . . . . . . . . . . . . . . . . . . . . . . . . . . . . . . . . . . . . . . . . . . . . . . . . . . . . . . . . . . . . . . . . . . . . 49Settings for an Archive Output .... . . . . . . . . . . . . . . . . . . . . . . . . . . . . . . . . . . . . . . . . . . . . . . . . . . . . . . . . . . . . . . . . . . . . . . . . . . . . . . . . . . . . . . 50Settings for an HLS Output .... . . . . . . . . . . . . . . . . . . . . . . . . . . . . . . . . . . . . . . . . . . . . . . . . . . . . . . . . . . . . . . . . . . . . . . . . . . . . . . . . . . . . . . . . . . . 51Settings for an RTMP Output .... . . . . . . . . . . . . . . . . . . . . . . . . . . . . . . . . . . . . . . . . . . . . . . . . . . . . . . . . . . . . . . . . . . . . . . . . . . . . . . . . . . . . . . . . 51Settings for a Microsoft Smooth Output .... . . . . . . . . . . . . . . . . . . . . . . . . . . . . . . . . . . . . . . . . . . . . . . . . . . . . . . . . . . . . . . . . . . . . . . . . . 53Settings for a UDP Output .... . . . . . . . . . . . . . . . . . . . . . . . . . . . . . . . . . . . . . . . . . . . . . . . . . . . . . . . . . . . . . . . . . . . . . . . . . . . . . . . . . . . . . . . . . . . . 53
Step 6: Set Up the Video Encode .... . . . . . . . . . . . . . . . . . . . . . . . . . . . . . . . . . . . . . . . . . . . . . . . . . . . . . . . . . . . . . . . . . . . . . . . . . . . . . . . . . . . . . . . . . . . 54Step 7: Set Up the Audio Encodes .... . . . . . . . . . . . . . . . . . . . . . . . . . . . . . . . . . . . . . . . . . . . . . . . . . . . . . . . . . . . . . . . . . . . . . . . . . . . . . . . . . . . . . . . . . . 54Step 8: Set up the Captions Encodes .... . . . . . . . . . . . . . . . . . . . . . . . . . . . . . . . . . . . . . . . . . . . . . . . . . . . . . . . . . . . . . . . . . . . . . . . . . . . . . . . . . . . . . . 55Step 9: Save the Channel ... . . . . . . . . . . . . . . . . . . . . . . . . . . . . . . . . . . . . . . . . . . . . . . . . . . . . . . . . . . . . . . . . . . . . . . . . . . . . . . . . . . . . . . . . . . . . . . . . . . . . . . . 55
Creating a Channel from a Template or by Cloning .... . . . . . . . . . . . . . . . . . . . . . . . . . . . . . . . . . . . . . . . . . . . . . . . . . . . . . . . . . . . . . . . . . . . . . . . . . . . 56About Templates .... . . . . . . . . . . . . . . . . . . . . . . . . . . . . . . . . . . . . . . . . . . . . . . . . . . . . . . . . . . . . . . . . . . . . . . . . . . . . . . . . . . . . . . . . . . . . . . . . . . . . . . . . . . . . . . . . . . 56
Using Built-in Templates .... . . . . . . . . . . . . . . . . . . . . . . . . . . . . . . . . . . . . . . . . . . . . . . . . . . . . . . . . . . . . . . . . . . . . . . . . . . . . . . . . . . . . . . . . . . . . . . . 56Using Custom Templates .... . . . . . . . . . . . . . . . . . . . . . . . . . . . . . . . . . . . . . . . . . . . . . . . . . . . . . . . . . . . . . . . . . . . . . . . . . . . . . . . . . . . . . . . . . . . . . . . 57
About Cloning .... . . . . . . . . . . . . . . . . . . . . . . . . . . . . . . . . . . . . . . . . . . . . . . . . . . . . . . . . . . . . . . . . . . . . . . . . . . . . . . . . . . . . . . . . . . . . . . . . . . . . . . . . . . . . . . . . . . . . . . 57Creating a Channel from a Template .... . . . . . . . . . . . . . . . . . . . . . . . . . . . . . . . . . . . . . . . . . . . . . . . . . . . . . . . . . . . . . . . . . . . . . . . . . . . . . . . . . . . . . . 57
iv

AWS Elemental MediaLive User Guide
Creating a Channel by Cloning .... . . . . . . . . . . . . . . . . . . . . . . . . . . . . . . . . . . . . . . . . . . . . . . . . . . . . . . . . . . . . . . . . . . . . . . . . . . . . . . . . . . . . . . . . . . . . . . . 58Creating a Custom Template .... . . . . . . . . . . . . . . . . . . . . . . . . . . . . . . . . . . . . . . . . . . . . . . . . . . . . . . . . . . . . . . . . . . . . . . . . . . . . . . . . . . . . . . . . . . . . . . . . . . 58
Viewing and Monitoring Channels ... . . . . . . . . . . . . . . . . . . . . . . . . . . . . . . . . . . . . . . . . . . . . . . . . . . . . . . . . . . . . . . . . . . . . . . . . . . . . . . . . . . . . . . . . . . . . . . . . . . . 59Viewing a Channel Configuration .... . . . . . . . . . . . . . . . . . . . . . . . . . . . . . . . . . . . . . . . . . . . . . . . . . . . . . . . . . . . . . . . . . . . . . . . . . . . . . . . . . . . . . . . . . . . 59Monitoring a Channel Using the AWS Elemental MediaLive Console .... . . . . . . . . . . . . . . . . . . . . . . . . . . . . . . . . . . . . . . . . . . . . 59
Viewing Status Information .... . . . . . . . . . . . . . . . . . . . . . . . . . . . . . . . . . . . . . . . . . . . . . . . . . . . . . . . . . . . . . . . . . . . . . . . . . . . . . . . . . . . . . . . . . . . 60Viewing Alerts ... . . . . . . . . . . . . . . . . . . . . . . . . . . . . . . . . . . . . . . . . . . . . . . . . . . . . . . . . . . . . . . . . . . . . . . . . . . . . . . . . . . . . . . . . . . . . . . . . . . . . . . . . . . . . . . 60Handling Alerts ... . . . . . . . . . . . . . . . . . . . . . . . . . . . . . . . . . . . . . . . . . . . . . . . . . . . . . . . . . . . . . . . . . . . . . . . . . . . . . . . . . . . . . . . . . . . . . . . . . . . . . . . . . . . . . 60
Monitoring a Channel Using Amazon CloudWatch Events .... . . . . . . . . . . . . . . . . . . . . . . . . . . . . . . . . . . . . . . . . . . . . . . . . . . . . . . . . . . 60Option 1: Send all AWS Elemental MediaLive Events to an Email Address .... . . . . . . . . . . . . . . . . . . . . . . . . . . . . . 61Option 2: Send Events for Specific Channels to an Email Address .... . . . . . . . . . . . . . . . . . . . . . . . . . . . . . . . . . . . . . . . . 62
Monitoring Using Amazon CloudWatch Logs .... . . . . . . . . . . . . . . . . . . . . . . . . . . . . . . . . . . . . . . . . . . . . . . . . . . . . . . . . . . . . . . . . . . . . . . . . . . . . 63Enabling Channel Logs .... . . . . . . . . . . . . . . . . . . . . . . . . . . . . . . . . . . . . . . . . . . . . . . . . . . . . . . . . . . . . . . . . . . . . . . . . . . . . . . . . . . . . . . . . . . . . . . . . . . 63Working with Logs .... . . . . . . . . . . . . . . . . . . . . . . . . . . . . . . . . . . . . . . . . . . . . . . . . . . . . . . . . . . . . . . . . . . . . . . . . . . . . . . . . . . . . . . . . . . . . . . . . . . . . . . . 64
Editing and Deleting a Channel ... . . . . . . . . . . . . . . . . . . . . . . . . . . . . . . . . . . . . . . . . . . . . . . . . . . . . . . . . . . . . . . . . . . . . . . . . . . . . . . . . . . . . . . . . . . . . . . . . . . . . . . . 66Editing a Channel ... . . . . . . . . . . . . . . . . . . . . . . . . . . . . . . . . . . . . . . . . . . . . . . . . . . . . . . . . . . . . . . . . . . . . . . . . . . . . . . . . . . . . . . . . . . . . . . . . . . . . . . . . . . . . . . . . . . 66Deleting a Channel ... . . . . . . . . . . . . . . . . . . . . . . . . . . . . . . . . . . . . . . . . . . . . . . . . . . . . . . . . . . . . . . . . . . . . . . . . . . . . . . . . . . . . . . . . . . . . . . . . . . . . . . . . . . . . . . . . 66
Working with Captions .... . . . . . . . . . . . . . . . . . . . . . . . . . . . . . . . . . . . . . . . . . . . . . . . . . . . . . . . . . . . . . . . . . . . . . . . . . . . . . . . . . . . . . . . . . . . . . . . . . . . . . . . . . . . . . . . . . . 67Supported Features .... . . . . . . . . . . . . . . . . . . . . . . . . . . . . . . . . . . . . . . . . . . . . . . . . . . . . . . . . . . . . . . . . . . . . . . . . . . . . . . . . . . . . . . . . . . . . . . . . . . . . . . . . . . . . . . 67
Supported Formats .... . . . . . . . . . . . . . . . . . . . . . . . . . . . . . . . . . . . . . . . . . . . . . . . . . . . . . . . . . . . . . . . . . . . . . . . . . . . . . . . . . . . . . . . . . . . . . . . . . . . . . . . 67Format Support by Output Container ... . . . . . . . . . . . . . . . . . . . . . . . . . . . . . . . . . . . . . . . . . . . . . . . . . . . . . . . . . . . . . . . . . . . . . . . . . . . . . . 67Supported Captions Categories ... . . . . . . . . . . . . . . . . . . . . . . . . . . . . . . . . . . . . . . . . . . . . . . . . . . . . . . . . . . . . . . . . . . . . . . . . . . . . . . . . . . . . . . . 67Support for Languages .... . . . . . . . . . . . . . . . . . . . . . . . . . . . . . . . . . . . . . . . . . . . . . . . . . . . . . . . . . . . . . . . . . . . . . . . . . . . . . . . . . . . . . . . . . . . . . . . . . 68Support for Font Styles in Output Captions .... . . . . . . . . . . . . . . . . . . . . . . . . . . . . . . . . . . . . . . . . . . . . . . . . . . . . . . . . . . . . . . . . . . . . . 68
Typical Scenarios .... . . . . . . . . . . . . . . . . . . . . . . . . . . . . . . . . . . . . . . . . . . . . . . . . . . . . . . . . . . . . . . . . . . . . . . . . . . . . . . . . . . . . . . . . . . . . . . . . . . . . . . . . . . . . . . . . . . 69Use Case: One Input Format to One Output and Not Converted .... . . . . . . . . . . . . . . . . . . . . . . . . . . . . . . . . . . . . . . . . . 69Use Case: One Input Format Converted to One Different Format in One Output .... . . . . . . . . . . . . . . . . . . . . 70Use Case: One Input Format Converted to Different Formats, One Format for Each Output .... . . . . . 70Use Case: One Captions Output Shared by Multiple Video Encodes .... . . . . . . . . . . . . . . . . . . . . . . . . . . . . . . . . . . . . . 70
Setting Up for Captions .... . . . . . . . . . . . . . . . . . . . . . . . . . . . . . . . . . . . . . . . . . . . . . . . . . . . . . . . . . . . . . . . . . . . . . . . . . . . . . . . . . . . . . . . . . . . . . . . . . . . . . . . . 71Step 1: Create Caption Selectors in the Input .... . . . . . . . . . . . . . . . . . . . . . . . . . . . . . . . . . . . . . . . . . . . . . . . . . . . . . . . . . . . . . . . . . . . 71Step 2: Plan Captions for the Outputs .... . . . . . . . . . . . . . . . . . . . . . . . . . . . . . . . . . . . . . . . . . . . . . . . . . . . . . . . . . . . . . . . . . . . . . . . . . . . . 75Step 3: Match Formats to Categories ... . . . . . . . . . . . . . . . . . . . . . . . . . . . . . . . . . . . . . . . . . . . . . . . . . . . . . . . . . . . . . . . . . . . . . . . . . . . . . . 76Step 4: Create Captions Encodes .... . . . . . . . . . . . . . . . . . . . . . . . . . . . . . . . . . . . . . . . . . . . . . . . . . . . . . . . . . . . . . . . . . . . . . . . . . . . . . . . . . . . . 77
Examples .... . . . . . . . . . . . . . . . . . . . . . . . . . . . . . . . . . . . . . . . . . . . . . . . . . . . . . . . . . . . . . . . . . . . . . . . . . . . . . . . . . . . . . . . . . . . . . . . . . . . . . . . . . . . . . . . . . . . . . . . . . . . . . 80Use Case: One Input Format to One Output .... . . . . . . . . . . . . . . . . . . . . . . . . . . . . . . . . . . . . . . . . . . . . . . . . . . . . . . . . . . . . . . . . . . . . 80Use Case: One Input Format Converted to One Different Output Format .... . . . . . . . . . . . . . . . . . . . . . . . . . . . . . 81Use Case: One Input Format Converted to Different Formats, One Format for Each Output .... . . . . . 82Use Case: One Captions Output Shared by Multiple Video Encodes .... . . . . . . . . . . . . . . . . . . . . . . . . . . . . . . . . . . . . . 83
SCTE-35 Message Processing .... . . . . . . . . . . . . . . . . . . . . . . . . . . . . . . . . . . . . . . . . . . . . . . . . . . . . . . . . . . . . . . . . . . . . . . . . . . . . . . . . . . . . . . . . . . . . . . . . . . . . . . . . . 87About Message Processing .... . . . . . . . . . . . . . . . . . . . . . . . . . . . . . . . . . . . . . . . . . . . . . . . . . . . . . . . . . . . . . . . . . . . . . . . . . . . . . . . . . . . . . . . . . . . . . . . . . . . . . 87
Supported Features by Input Type .... . . . . . . . . . . . . . . . . . . . . . . . . . . . . . . . . . . . . . . . . . . . . . . . . . . . . . . . . . . . . . . . . . . . . . . . . . . . . . . . . . . 88Supported Output Features .... . . . . . . . . . . . . . . . . . . . . . . . . . . . . . . . . . . . . . . . . . . . . . . . . . . . . . . . . . . . . . . . . . . . . . . . . . . . . . . . . . . . . . . . . . . . 88Processing Features – Default Behavior ... . . . . . . . . . . . . . . . . . . . . . . . . . . . . . . . . . . . . . . . . . . . . . . . . . . . . . . . . . . . . . . . . . . . . . . . . . . . . 89Scope of Processing by Feature .... . . . . . . . . . . . . . . . . . . . . . . . . . . . . . . . . . . . . . . . . . . . . . . . . . . . . . . . . . . . . . . . . . . . . . . . . . . . . . . . . . . . . . . 89Supported Features by Output Type .... . . . . . . . . . . . . . . . . . . . . . . . . . . . . . . . . . . . . . . . . . . . . . . . . . . . . . . . . . . . . . . . . . . . . . . . . . . . . . . . 90
Getting Ready: Set the Ad Avail Mode .... . . . . . . . . . . . . . . . . . . . . . . . . . . . . . . . . . . . . . . . . . . . . . . . . . . . . . . . . . . . . . . . . . . . . . . . . . . . . . . . . . . . . 93Enabling Manifest Decoration .... . . . . . . . . . . . . . . . . . . . . . . . . . . . . . . . . . . . . . . . . . . . . . . . . . . . . . . . . . . . . . . . . . . . . . . . . . . . . . . . . . . . . . . . . . . . . . . . . 93
Enabling Decoration – HLS .... . . . . . . . . . . . . . . . . . . . . . . . . . . . . . . . . . . . . . . . . . . . . . . . . . . . . . . . . . . . . . . . . . . . . . . . . . . . . . . . . . . . . . . . . . . . . 94Enabling Decoration – Microsoft Smooth .... . . . . . . . . . . . . . . . . . . . . . . . . . . . . . . . . . . . . . . . . . . . . . . . . . . . . . . . . . . . . . . . . . . . . . . . . . 94How SCTE-35 Events Are Handled in Manifests and Sparse Tracks .... . . . . . . . . . . . . . . . . . . . . . . . . . . . . . . . . . . . . . . . 94
Enabling Ad Avail Blanking .... . . . . . . . . . . . . . . . . . . . . . . . . . . . . . . . . . . . . . . . . . . . . . . . . . . . . . . . . . . . . . . . . . . . . . . . . . . . . . . . . . . . . . . . . . . . . . . . . . . . . 96.... . . . . . . . . . . . . . . . . . . . . . . . . . . . . . . . . . . . . . . . . . . . . . . . . . . . . . . . . . . . . . . . . . . . . . . . . . . . . . . . . . . . . . . . . . . . . . . . . . . . . . . . . . . . . . . . . . . . . . . . . . . . . . . . . . . 97
The Procedure to Enable Blanking .... . . . . . . . . . . . . . . . . . . . . . . . . . . . . . . . . . . . . . . . . . . . . . . . . . . . . . . . . . . . . . . . . . . . . . . . . . . . . . . . . . . 97Triggers for Ad Avail Blanking .... . . . . . . . . . . . . . . . . . . . . . . . . . . . . . . . . . . . . . . . . . . . . . . . . . . . . . . . . . . . . . . . . . . . . . . . . . . . . . . . . . . . . . . . . 97Ad Avail Blanking Restriction Flags .... . . . . . . . . . . . . . . . . . . . . . . . . . . . . . . . . . . . . . . . . . . . . . . . . . . . . . . . . . . . . . . . . . . . . . . . . . . . . . . . . . 99
Enabling Blackout .... . . . . . . . . . . . . . . . . . . . . . . . . . . . . . . . . . . . . . . . . . . . . . . . . . . . . . . . . . . . . . . . . . . . . . . . . . . . . . . . . . . . . . . . . . . . . . . . . . . . . . . . . . . . . . . . 100
v

AWS Elemental MediaLive User Guide
The Procedure to Black out .... . . . . . . . . . . . . . . . . . . . . . . . . . . . . . . . . . . . . . . . . . . . . . . . . . . . . . . . . . . . . . . . . . . . . . . . . . . . . . . . . . . . . . . . . . 101Triggers for Blackout .... . . . . . . . . . . . . . . . . . . . . . . . . . . . . . . . . . . . . . . . . . . . . . . . . . . . . . . . . . . . . . . . . . . . . . . . . . . . . . . . . . . . . . . . . . . . . . . . . . . . 102Blackout Restriction Flags .... . . . . . . . . . . . . . . . . . . . . . . . . . . . . . . . . . . . . . . . . . . . . . . . . . . . . . . . . . . . . . . . . . . . . . . . . . . . . . . . . . . . . . . . . . . . . 103
Enabling SCTE-35 Passthrough or Removal ... . . . . . . . . . . . . . . . . . . . . . . . . . . . . . . . . . . . . . . . . . . . . . . . . . . . . . . . . . . . . . . . . . . . . . . . . . . . . . 104The Procedure for Archive .... . . . . . . . . . . . . . . . . . . . . . . . . . . . . . . . . . . . . . . . . . . . . . . . . . . . . . . . . . . . . . . . . . . . . . . . . . . . . . . . . . . . . . . . . . . . 104The Procedure for HLS .... . . . . . . . . . . . . . . . . . . . . . . . . . . . . . . . . . . . . . . . . . . . . . . . . . . . . . . . . . . . . . . . . . . . . . . . . . . . . . . . . . . . . . . . . . . . . . . . . 105The Procedure for UDP .... . . . . . . . . . . . . . . . . . . . . . . . . . . . . . . . . . . . . . . . . . . . . . . . . . . . . . . . . . . . . . . . . . . . . . . . . . . . . . . . . . . . . . . . . . . . . . . . 105
Sample Manifests - HLS .... . . . . . . . . . . . . . . . . . . . . . . . . . . . . . . . . . . . . . . . . . . . . . . . . . . . . . . . . . . . . . . . . . . . . . . . . . . . . . . . . . . . . . . . . . . . . . . . . . . . . . . 105Ad Marker: Adobe .... . . . . . . . . . . . . . . . . . . . . . . . . . . . . . . . . . . . . . . . . . . . . . . . . . . . . . . . . . . . . . . . . . . . . . . . . . . . . . . . . . . . . . . . . . . . . . . . . . . . . . . . 105Ad Marker: Elemental ... . . . . . . . . . . . . . . . . . . . . . . . . . . . . . . . . . . . . . . . . . . . . . . . . . . . . . . . . . . . . . . . . . . . . . . . . . . . . . . . . . . . . . . . . . . . . . . . . . . . 106Ad Marker: SCTE-35 Enhanced .... . . . . . . . . . . . . . . . . . . . . . . . . . . . . . . . . . . . . . . . . . . . . . . . . . . . . . . . . . . . . . . . . . . . . . . . . . . . . . . . . . . . . . 107
Starting and Stopping a Channel ... . . . . . . . . . . . . . . . . . . . . . . . . . . . . . . . . . . . . . . . . . . . . . . . . . . . . . . . . . . . . . . . . . . . . . . . . . . . . . . . . . . . . . . . . . . . . . . . . . . . 108Starting a Channel ... . . . . . . . . . . . . . . . . . . . . . . . . . . . . . . . . . . . . . . . . . . . . . . . . . . . . . . . . . . . . . . . . . . . . . . . . . . . . . . . . . . . . . . . . . . . . . . . . . . . . . . . . . . . . . . . 108Stopping a Channel ... . . . . . . . . . . . . . . . . . . . . . . . . . . . . . . . . . . . . . . . . . . . . . . . . . . . . . . . . . . . . . . . . . . . . . . . . . . . . . . . . . . . . . . . . . . . . . . . . . . . . . . . . . . . . . 108
Reference: Supported Captions .... . . . . . . . . . . . . . . . . . . . . . . . . . . . . . . . . . . . . . . . . . . . . . . . . . . . . . . . . . . . . . . . . . . . . . . . . . . . . . . . . . . . . . . . . . . . . . . . . . . . . 109How to Read the Supported Captions Information .... . . . . . . . . . . . . . . . . . . . . . . . . . . . . . . . . . . . . . . . . . . . . . . . . . . . . . . . . . . . . . . . . . . 109General Information on Supported Formats .... . . . . . . . . . . . . . . . . . . . . . . . . . . . . . . . . . . . . . . . . . . . . . . . . . . . . . . . . . . . . . . . . . . . . . . . . . . . 109Formats Supported in an HLS Output .... . . . . . . . . . . . . . . . . . . . . . . . . . . . . . . . . . . . . . . . . . . . . . . . . . . . . . . . . . . . . . . . . . . . . . . . . . . . . . . . . . . . 111Formats Supported in an RTMP Output .... . . . . . . . . . . . . . . . . . . . . . . . . . . . . . . . . . . . . . . . . . . . . . . . . . . . . . . . . . . . . . . . . . . . . . . . . . . . . . . . . . 112Formats Supported in an MPEG2-TS File Output or MPEG2-UDP Streaming Output .... . . . . . . . . . . . . . . . . . . . . . 113Formats Supported in a Microsoft Smooth Output .... . . . . . . . . . . . . . . . . . . . . . . . . . . . . . . . . . . . . . . . . . . . . . . . . . . . . . . . . . . . . . . . . . . 114
Reference: Supported Containers and Codecs .... . . . . . . . . . . . . . . . . . . . . . . . . . . . . . . . . . . . . . . . . . . . . . . . . . . . . . . . . . . . . . . . . . . . . . . . . . . . . . . . . . 116Supported Input Types .... . . . . . . . . . . . . . . . . . . . . . . . . . . . . . . . . . . . . . . . . . . . . . . . . . . . . . . . . . . . . . . . . . . . . . . . . . . . . . . . . . . . . . . . . . . . . . . . . . . . . . . . . 116
Ways of Ingesting: Push and Pull ... . . . . . . . . . . . . . . . . . . . . . . . . . . . . . . . . . . . . . . . . . . . . . . . . . . . . . . . . . . . . . . . . . . . . . . . . . . . . . . . . . . . 117Supported Codecs for Inputs .... . . . . . . . . . . . . . . . . . . . . . . . . . . . . . . . . . . . . . . . . . . . . . . . . . . . . . . . . . . . . . . . . . . . . . . . . . . . . . . . . . . . . . . . . . . . . . . . 118Supported Codecs for Outputs .... . . . . . . . . . . . . . . . . . . . . . . . . . . . . . . . . . . . . . . . . . . . . . . . . . . . . . . . . . . . . . . . . . . . . . . . . . . . . . . . . . . . . . . . . . . . . . 118
Supported Codecs for File Outputs .... . . . . . . . . . . . . . . . . . . . . . . . . . . . . . . . . . . . . . . . . . . . . . . . . . . . . . . . . . . . . . . . . . . . . . . . . . . . . . . . 118Supported Codecs for Streaming Outputs .... . . . . . . . . . . . . . . . . . . . . . . . . . . . . . . . . . . . . . . . . . . . . . . . . . . . . . . . . . . . . . . . . . . . . . . 118
Reference: Identifiers for Variable Data .... . . . . . . . . . . . . . . . . . . . . . . . . . . . . . . . . . . . . . . . . . . . . . . . . . . . . . . . . . . . . . . . . . . . . . . . . . . . . . . . . . . . . . . . . . 120Working with Reservations .... . . . . . . . . . . . . . . . . . . . . . . . . . . . . . . . . . . . . . . . . . . . . . . . . . . . . . . . . . . . . . . . . . . . . . . . . . . . . . . . . . . . . . . . . . . . . . . . . . . . . . . . . . . 122
Input and Output Reservations .... . . . . . . . . . . . . . . . . . . . . . . . . . . . . . . . . . . . . . . . . . . . . . . . . . . . . . . . . . . . . . . . . . . . . . . . . . . . . . . . . . . . . . . . . . . . . 122Input Reservation Attributes and Matching .... . . . . . . . . . . . . . . . . . . . . . . . . . . . . . . . . . . . . . . . . . . . . . . . . . . . . . . . . . . . . . . . . . . . . 122Output Reservation Attributes and Matching .... . . . . . . . . . . . . . . . . . . . . . . . . . . . . . . . . . . . . . . . . . . . . . . . . . . . . . . . . . . . . . . . . . 122How an Input or Output Reservation Is Applied .... . . . . . . . . . . . . . . . . . . . . . . . . . . . . . . . . . . . . . . . . . . . . . . . . . . . . . . . . . . . . . . 123
Add-on Reservations .... . . . . . . . . . . . . . . . . . . . . . . . . . . . . . . . . . . . . . . . . . . . . . . . . . . . . . . . . . . . . . . . . . . . . . . . . . . . . . . . . . . . . . . . . . . . . . . . . . . . . . . . . . . . 124Reservation Attributes .... . . . . . . . . . . . . . . . . . . . . . . . . . . . . . . . . . . . . . . . . . . . . . . . . . . . . . . . . . . . . . . . . . . . . . . . . . . . . . . . . . . . . . . . . . . . . . . . . . 124How an Add-on Reservation Is Applied .... . . . . . . . . . . . . . . . . . . . . . . . . . . . . . . . . . . . . . . . . . . . . . . . . . . . . . . . . . . . . . . . . . . . . . . . . . . 124
Purchasing a Reservation .... . . . . . . . . . . . . . . . . . . . . . . . . . . . . . . . . . . . . . . . . . . . . . . . . . . . . . . . . . . . . . . . . . . . . . . . . . . . . . . . . . . . . . . . . . . . . . . . . . . . . . 126Filtering on the Offerings Page .... . . . . . . . . . . . . . . . . . . . . . . . . . . . . . . . . . . . . . . . . . . . . . . . . . . . . . . . . . . . . . . . . . . . . . . . . . . . . . . . . . . . . 126
Viewing Purchased Reservations .... . . . . . . . . . . . . . . . . . . . . . . . . . . . . . . . . . . . . . . . . . . . . . . . . . . . . . . . . . . . . . . . . . . . . . . . . . . . . . . . . . . . . . . . . . . . 126Deleting a Reservation .... . . . . . . . . . . . . . . . . . . . . . . . . . . . . . . . . . . . . . . . . . . . . . . . . . . . . . . . . . . . . . . . . . . . . . . . . . . . . . . . . . . . . . . . . . . . . . . . . . . . . . . . . 127
Limits ... . . . . . . . . . . . . . . . . . . . . . . . . . . . . . . . . . . . . . . . . . . . . . . . . . . . . . . . . . . . . . . . . . . . . . . . . . . . . . . . . . . . . . . . . . . . . . . . . . . . . . . . . . . . . . . . . . . . . . . . . . . . . . . . . . . . . . . . . . 128Document History .... . . . . . . . . . . . . . . . . . . . . . . . . . . . . . . . . . . . . . . . . . . . . . . . . . . . . . . . . . . . . . . . . . . . . . . . . . . . . . . . . . . . . . . . . . . . . . . . . . . . . . . . . . . . . . . . . . . . . . . 129AWS Glossary .... . . . . . . . . . . . . . . . . . . . . . . . . . . . . . . . . . . . . . . . . . . . . . . . . . . . . . . . . . . . . . . . . . . . . . . . . . . . . . . . . . . . . . . . . . . . . . . . . . . . . . . . . . . . . . . . . . . . . . . . . . . . . . 132
vi

AWS Elemental MediaLive User GuideRelated Services
What Is AWS Elemental MediaLive?AWS Elemental MediaLive is a real-time video service that lets you easily create live outputs forbroadcast and streaming delivery.
Topics• Related Services (p. 1)• Pricing (p. 1)
Related ServicesAWS Identity and Access Management (IAM) is a web service that helps you securely control access toAWS resources for your users. Use IAM to control who can use your AWS resources (authentication) andwhat resources users can use in which ways (authorization). For more information, see Setting Up AWSElemental MediaLive (p. 3)
Amazon S3 is storage for the internet. Use Amazon S3 to store assets that AWS Elemental MediaLiveretrieves and uses when transcoding, and as a destination for output from AWS Elemental MediaLive.
Amazon CloudWatch is a monitoring service for AWS Cloud resources and the applications that yourun on AWS. Use CloudWatch to track AWS Elemental MediaLive events about the progress of runningchannels and about metrics such as ingress and egress request count.
AWS Elemental MediaPackage is a just-in-time video packaging and origination service that runs inthe AWS Cloud. Use AWS Elemental MediaPackage to package content that has been encoded by AWSElemental MediaLive.
AWS Elemental MediaStore is a video origination and storage service that offers the high performanceand immediate consistency required for live and on-demand media. Use AWS Elemental MediaStore tostore assets that AWS Elemental MediaLive retrieves and uses when transcoding, and as a destination foroutput from AWS Elemental MediaLive.
PricingAs with other AWS products, there are no contracts or minimum commitments for using AWS ElementalMediaLive.
There are two components to pricing: pricing based on the input of the channel that is being processed,and pricing based on the outputs of the channel.
• The input pricing is based on a combination of the input codec, the bit rate of the input, andthe resolution of the input. You specify these three characteristics in the input specificationwhen you create the channel. For more information, see the section called “Input SpecificationSettings” (p. 35).
• The output pricing is based on a combination of the output codec, the output frame rate, and theoutput resolution. You specify these values in the codec, frame rate, width, and height fields in thevideo settings of each output in the channel. For more information, see the section called “Step 6: SetUp the Video Encode” (p. 54). Note that it is possible to set up the output frame rate to match theframe rate of the input. In this case, the frame rate portion of the pricing calculation will use the ratefor "30-60fps" framerate; it will not use the actual input frame rate.
1

AWS Elemental MediaLive User GuidePricing
For more information about pricing, see https://aws.amazon.com/medialive/pricing/.
2
AWS Elemental MediaLive User GuideRequired Permissions in AWS Elemental MediaLive
Setting Up AWS ElementalMediaLive
This chapter provides basic procedures for setting up identities and providing access to AWS ElementalMediaLive. It describes how to create IAM users as administrators for the service, how to create IAM usersto access the AWS Elemental MediaLive console, and how to set up AWS Elemental MediaLive itself as anIAM trusted service.
If you are new to AWS or if you have been using AWS for only a few weeks, we recommend that you readthis entire chapter.
If you have more experience using AWS services, you could skip the sections on setting up users. But youshould read the section on setting up AWS Elemental MediaLive as a trusted service.
This chapter provides steps for a basic setup. For detailed information about the many features of IAMthat might be appropriate and useful to your deployment, see the AWS IAM User Guide.
Topics
• Required Permissions in AWS Elemental MediaLive (p. 3)
• Sign Up for AWS Elemental MediaLive (p. 4)
• Create an IAM User (p. 4)
• Access to Amazon EC2 Systems Manager Parameter Store (p. 4)
• Access to Amazon S3 (p. 5)
• Access to AWS Elemental MediaStore (p. 5)
• Setting Up a Trusted Entity (p. 6)
• Setting Up Permissions for AWS Elemental MediaLive (p. 6)
• Data Retention and Personally Identifiable Information (p. 9)
Required Permissions in AWS Elemental MediaLiveThere are several identities that must have permissions to work with AWS Elemental MediaLive:
• Any person who uses the console, the AWS CLI, or the REST API (through a REST client application)must have the appropriate permissions to perform operations in AWS Elemental MediaLive. To grantaccess for yourself and others, you create identities known as IAM users.
• Any software application that is using the REST API or an SDK must have the appropriate permissionsto perform operations in AWS Elemental MediaLive. To grant access, you create IAM users for thesoftware applications.
• AWS Elemental MediaLive itself must be an IAM trusted entity to make calls to the APIs of AmazonEC2 Systems Manager Parameter Store, Amazon S3 (if you plan to store or retrieve assets using thisservice) and AWS Elemental MediaStore (if you plan to store or retrieve assets using this service). It'shighly likely that AWS Elemental MediaLive will need to be set up in this way.
• The person who sets up AWS Elemental MediaLive as a trusted entity needs read and write access withAWS IAM. See the section called “Setting Up Permissions for AWS Elemental MediaLive ” (p. 6).
3

AWS Elemental MediaLive User GuideSign Up for AWS Elemental MediaLive
Sign Up for AWS Elemental MediaLiveIf you do not have an AWS account, use the following procedure to create one.
To sign up for AWS
1. Open https://aws.amazon.com/ and choose Create an AWS Account.
2. Follow the online instructions.
Create an IAM UserTo create an IAM user for yourself and add the user to an Administrators group
1. Use your AWS account email address and password to sign in as the AWS account root user to theIAM console at https://console.aws.amazon.com/iam/.
NoteWe strongly recommend that you adhere to the best practice of using the AdministratorIAM user below and securely lock away the root user credentials. Sign in as the root useronly to perform a few account and service management tasks.
2. In the navigation pane of the console, choose Users, and then choose Add user.
3. For User name, type Administrator.
4. Select the check box next to AWS Management Console access, select Custom password, and thentype the new user's password in the text box. You can optionally select Require password reset toforce the user to create a new password the next time the user signs in.
5. Choose Next: Permissions.
6. On the Set permissions for user page, choose Add user to group.
7. Choose Create group.
8. In the Create group dialog box, type Administrators.
9. For Filter, choose Job function.
10. In the policy list, select the check box for AdministratorAccess. Then choose Create group.
11. Back in the list of groups, select the check box for your new group. Choose Refresh if necessary tosee the group in the list.
12. Choose Next: Review to see the list of group memberships to be added to the new user. When youare ready to proceed, choose Create user.
You can use this same process to create more groups and users, and to give your users access to yourAWS account resources. To learn about using policies to restrict users' permissions to specific AWSresources, go to Access Management and Example Policies.
Access to Amazon EC2 Systems ManagerParameter Store
The Amazon EC2 Systems Manager Parameter Store is used extensively in AWS Elemental MediaLive. It'slikely that you will use this store. The store holds passwords that AWS Elemental MediaLive needs so thatit can retrieve and store files externally.
4

AWS Elemental MediaLive User GuideAccess to Amazon S3
Some of the features that store passwords in this way are the following:
• An input of type RTMP Pull or type HLS Pull. The connection to the source is secure.• Fields in the channel that contain the URL to an external file, if the connection is secure. Examples of
this type of field are the Avail blanking image and a source captions file that is an external file.• The destination in an HLS output group or a Microsoft Smooth output group, if the connection is
secure.
In all these cases, if the connection is secure (typically HTTPS), then AWS Elemental MediaLive needs theuser name and password (stored in a parameter).
How It Works
The password parameter feature ensures that you are not storing passwords in plaintext onthe console. Instead, you create a password parameter in Amazon EC2 Systems ManagerParameter Store. The parameter is a name-value pair where the name is something likecorporateStorageImagesPassword and the value is the actual password. When you create achannel or input in AWS Elemental MediaLive, you specify the password parameter name instead of thepassword. When AWS Elemental MediaLive needs the password (to either read or write to the externallocation), it sends the password parameter name to the Amazon EC2 Systems Manager Parameter Storeand gets back the actual password in response.
Wherever a password field appears on the console, AWS Elemental MediaLive lets you do the following:
• Specify a password parameter that has already been created in Amazon EC2 Systems ManagerParameter.
• Create a password parameter "on the spot." You type in a name and the actual password.
Required Permissions
For any user to create a password parameter "on the spot,"AWS Elemental MediaLive must have a trustedentity role that includes Amazon EC2 Systems Manager Parameter. See the section called “Setting Up aTrusted Entity” (p. 6).
Access to Amazon S3Your deployment might include using files in an Amazon S3 bucket. For example, you might use an S3bucket for the following:
• Source for an HLS input• Destination for an Archive output group• Destination for an HLS output group
In all these cases, regardless of whether the connection is secure or not, AWS Elemental MediaLivemust have a trusted entity role that includes Amazon S3. See the section called “Setting Up a TrustedEntity” (p. 6).
Access to AWS Elemental MediaStoreYour deployment might include using files in an AWS Elemental MediaStore container. For example, youmight use the container for the following:
5

AWS Elemental MediaLive User GuideSetting Up a Trusted Entity
• Source for an HLS input
• Destination for an HLS output group
In all these cases, AWS Elemental MediaLive must have a trusted entity role that includes AWS ElementalMediaStore. See the section called “Setting Up a Trusted Entity” (p. 6).
Setting Up a Trusted EntityThis permission needs to be assigned only once for all users of the console, AWS CLI, and REST API. Thereare options for assigning this permission:
• Using the IAM role fields that appear in the General info pane when the first user starts creating thefirst channel.
This option is convenient, but it requires that the console user have read and write access for AWSIAM, because that user will be sending a request to AWS IAM to set up AWS Elemental MediaLive asa trusted entity with Amazon EC2 Systems Manager Parameter (and most likely with Amazon S3 andAWS Elemental MediaStore, which are two other services that AWS Elemental MediaLive probablyneeds to access on your behalf).
To set up in this way, see the section called “Step 2: Complete the Input Settings” (p. 35).Remember that only one user needs to perform this setup. Subsequent users can choose the existingrole.
• By opening the IAM console and setting up AWS Elemental MediaLive as a trusted entity.
This option also requires access to AWS IAM, but typically an administrator who has this accessperforms this setup on behalf of all users, before the users start using the console.
To set up in this way, see the section called “Setting Up Permissions for AWS Elemental MediaLive” (p. 6).
Both these options result in the creation of a role and a role ARN that is shared by all users (in the AWSaccount) of the console, AWS CLI, and REST API. The role is called MediaLiveAccessRole, and the ARNbelongs to that role.
Setting Up Permissions for AWS ElementalMediaLive
Typically, AWS Elemental MediaLive needs permission to make calls to the APIs of the following services,although you might determine that some of these services don't apply to your deployment:
• Amazon EC2 Parameter Store
• Amazon S3 (if you plan to store or retrieve assets on this service)
• AWS Elemental MediaStore (if you plan to store or retrieve assets on this service)
• CloudWatch Logs (if you plan to allow users to enable channel logging).
Topics
• Step 1: Create a Policy (p. 7)
6

AWS Elemental MediaLive User GuideStep 1: Create a Policy
• Step 2: Create a Role for the Service (p. 7)
• Step 3: Revise the Trust Relationship (p. 8)
Step 1: Create a PolicyOn the IAM console, use the IAM visual editor (policy generator) to create custom policies as applicable.This generator lets you choose the service from a list, and then choose actions from a list. As a bestpractice, give the policy a name that starts with the service name.
For detailed instructions on creating a policy using the visual editor, see the IAM User Guide.
Create policies for the services that you identified as relevant to your deployment. For each identifiedservice, create a policy as follows:
• Amazon EC2 Parameter Store: You can probably use the existing managed policy calledAmazonSSMReadOnlyAccess. ("SSM" refers to the parameter store.)
• Amazon S3: Create a policy that gives access to these operations:
• s3:ListBucket
• s3:PutObject
• s3:GetObject
• s3:DeleteObject
• AWS Elemental MediaStore: Create a policy that gives access to these operations:
• • mediastore:ListContainers
• mediastore:DescribeObject
• mediastore:PutObject
• mediastore:GetObject
• mediastore:DeleteObject
• CloudWatch Logs: Create a policy that gives access to these operations:
• logs:CreateLogGroup
• logs:CreateLogStream
• logs:PutLogEvents
• logs:PutMetricFilter
• logs:PutRetentionPolicy
• logs:DescribeLogStreams
• logs:DescribeLogGroups
The policy must also give access to these resources:
• arn:aws:logs:*
• arn:aws:log-group:*
Step 2: Create a Role for the ServiceYou must create a role for AWS Elemental MediaLive. The role sets up a trusted relationship betweenyour AWS account and AWS Elemental MediaLive. The role is also associated with the policies that youidentified and created in the section called “Step 1: Create a Policy” (p. 7).
To create a role and attach policies to it
1. Open the IAM console.
7

AWS Elemental MediaLive User GuideStep 3: Revise the Trust Relationship
2. In the navigation pane, choose Roles.
3. On the Role page, choose Create role.
4. On the Create role page, for Select type of trusted entity, choose AWS service (the default).
5. For Choose the service that will use this role, choose EC2.
You choose EC2 because AWS Elemental MediaLive is not currently included in this list. ChoosingEC2 lets you create a role; in a later step, you will change this role to mention AWS ElementalMediaLive instead of EC2.
6. Choose Next: Permissions.
7. For Attach permissions policies, choose all the policies that you identified or created in the sectioncalled “Step 1: Create a Policy” (p. 7).
8. Choose Next: Review.
9. In Role name, type a name. We highly recommend that you don't use the nameMediaLiveAccessRole because it is reserved. Instead, use a name that includes medialive anddescribes this role's purpose.
10. Look at the trusted entity: Amazon EC2 is the trusted entity, but you will modify that line in thenext step.
11. Choose Create role.
Step 3: Revise the Trust RelationshipWhen you created the role and established the trusted relationship, you chose EC2 as the service. Youmust now modify the role so that the trusted relationship is between your AWS account and AWSElemental MediaLive.
To change the trust relationship to AWS Elemental MediaLive
1. On the Summary page for the role (which should still be displayed), choose Trust relationships.
2. Choose Edit Trust Relationship.
3. For Edit Trust Relationship, for Policy Document, change ec2.amazonaws.com tomedialive.amazonaws.com.
The policy document should now look like this:
{ "Version": "2012-10-17", "Statement": [ { "Effect": "Allow", "Principal": { "Service": "medialive.amazonaws.com" }, "Action": "sts:AssumeRole" } ] }
4. Choose Update Trust Policy.
5. On the Summary page, make a note of the value for Role ARN. It looks like this:
arn:aws:iam::111122223333:role/MediaLiveAccessRole
where 111122223333 is your AWS account number.
8

AWS Elemental MediaLive User GuideData Retention
Data Retention and Personally IdentifiableInformation
AWS Elemental MediaLive does not require that you supply any customer data. There are no fields inchannels, inputs, or input security groups where there is an expectation that you will provide customerdata.
Do not put sensitive identifying information such as customer account numbers into free-form fieldssuch as a Name field. This includes when you work with AWS Elemental MediaLive using the console,REST API, AWS CLI, or AWS SDKs. Any given piece of data that you enter into AWS Elemental MediaLivemight get picked up for inclusion in diagnostic logs.
When you provide a URL to an external server, do not include credentials information in the URL tovalidate your request to that server. AWS Elemental MediaLive includes features such as the Amazon EC2Systems Manager Parameter Store that provide you with a secure way to handle sensitive information.You should always use these features to pass a password; you should not circumvent them by including apassword in a URL.
Deleting Data in AWS Elemental MediaLiveYou can delete data from AWS Elemental MediaLive by deleting the object, for example, the channel orinput. You can delete data using the console, REST API, AWS CLI, or AWS SDKs. The data will be deleted;no further steps are required after you delete data by completing a delete action.
To delete data using the console, follow these instructions.
Data to Delete Action
Channel See the section called “Deleting aChannel” (p. 66)
Input See the section called “Deleting anInput” (p. 30)
Input security group See the section called “Deleting an Input SecurityGroup” (p. 26)
Amazon EC2 password parameter On the navigation pane of the Amazon EC2Systems Manager console, choose ParameterStore.
On the list on the Parameter Store page, selectthe parameter or parameters, and then chooseDelete.
9

AWS Elemental MediaLive User GuidePrerequisites
Getting Started with AWS ElementalMediaLive
This tutorial describes how to ingest a video source from an RTP source and generate one HLS outputthat contains one H.264 video encode and one audio encode. AWS Elemental MediaLive will send theoutput to AWS Elemental MediaPackage. The output will consist of the following:
• One master manifest: channel.m3u8• One rendition manifest called channel_1.m3u8.• TS files for each output: channel_1.00001.ts, channel_1.00002.ts, channel_1.00003.ts, and so on.
This tutorial uses the default values for most configuration fields in the channel.
NoteAll the text marked as an example in this tutorial is just that – a sample that shows what a pieceof information typically looks like. You must replace each example with the information that isvalid for your situation.
PrerequisitesBefore you can use AWS Elemental MediaLive, you need an AWS account and the appropriatepermissions to access, create and view AWS Elemental MediaLive components. Complete the steps inSetting Up AWS Elemental MediaLive (p. 3) and then return to this tutorial. You will not be able to useAWS Elemental MediaLive, even as an administrator with full access, until you have performed thosesteps.
Step 1: Set up the Upstream SystemThe upstream system is the system that is streaming the video to AWS Elemental MediaLive. Acontribution encode "on the ground" is a typical upstream system. You must perform some setup of yourupstream system before you start working in AWS Elemental MediaLive. For the purposes of this tutorial,the upstream system must be capable of sending a video stream via RTP.
1. Set up your upstream system to perform an RTP push from a specific IP address.
In a typical deployment of AWS Elemental MediaLive, you provide two sources of the video asset youwant to encode. But for this tutorial, you have only one source that you will duplicate within AWSElemental MediaLive. This setup is absolutely not recommended for production usage.
2. Make a note of the IP address. For example, 192.0.2.0.3. Keep in mind that the input will need to be ready when you start the associated channel.
Step 2: Set up the Downstream SystemIn this tutorial, the downstream system (the destination for the output from AWS Elemental MediaLive)is AWS Elemental MediaPackage.
10

AWS Elemental MediaLive User GuideStep 3: Create an Input
You must set up a channel in this service and you must set it up now because you need the input URLsthat AWS Elemental MediaPackage will generate; you enter these input URLs into AWS ElementalMediaLive. You must create two channels in AWS Elemental MediaPackage because you will create twodestinations in AWS Elemental MediaLive.
1. Go to the AWS Elemental MediaPackage console.
2. In a new web browser tab or window, display the Getting Started for AWS Elemental MediaPackageand follow steps 1 to 3 to create one channel and its endpoint.
3. Make a note of the input URL, name, and password that AWS Elemental MediaPackage generates. Forexample:
• https://39fuo4.mediapackage.us-east-1.amazonaws.com/in/v1/88dpie/channel
• ue739wuty
• due484u
Your channel may be in a different region from the example.
4. Follow steps 1 to 3 again to create the second channel and its endpoint.
5. Make a note of the input URL, name, and password. For example:
• https://mgu654.mediapackage.us-east-1.amazonaws.com/in/v1/xmm9s/channel
• 883hdux
• 634hjik
6. Do not close this web browser yet.
Step 3: Create an InputYou must create an input; this input describes how the source video asset will be provided to AWSElemental MediaLive. In this tutorial, you will create an RTP input.
You must also create an input security group for the input. This input security group applies the rule"only this specific IP address (an IP address that you own) can push to this input on AWS ElementalMediaLive". Without the protection of this rule, any third party could push content to an AWS ElementalMediaLive input if they knew the IP address and port of the input.
1. Using your IAM credentials, sign in to the AWS Elemental MediaLive console at https://console.aws.amazon.com/medialive?region="region".
2. In the navigation pane, choose Inputs.
3. On the Inputs page, choose Create input.
4. In the Input details section, for Input name, type "My RTP push".
5. For Input type, choose RTP.
6. In Input security group, choose Create new.
7. In New security group, type or paste the IP address that you noted in step 1. Enter the address as aCIDR. For example, 192.0.2.0/32.
8. Choose Create input security group.
9. Choose Create to create the input.
AWS Elemental MediaLive adds the input to the list of inputs and automatically creates twodestinations (one primary and one redundant). These destinations include the port 5000. For example,rtp://198.51.100.0:5000 and rtp://198.51.100.44:5000. These are the two locations where theupstream system must push the source.
10.Make a note of these two addresses: you will need them in step 8.
11

AWS Elemental MediaLive User GuideStep 4: Attach the Input
Step 4: Attach the InputNow you start creating a channel. The first step in creating a channel is to identify the input . Thechannel contains the details that instruct AWS Elemental MediaLive how to transcode (decode andencode) and package that input into specific outputs.
1. On the console, choose Channels in the navigation pane.
2. In the content pane, choose Create channel.3. In the Channel and input details pane, in General info, in Channel Name, type "Test channel".
4. In Role ARN, type the ARN of the role you created when you set up permissions for your AWS account.For example,
arn:aws:iam::736754895224:role/AllowMediaLiveAccessRole.
5. Select Remember Role.
6. In the Attach input section, in Input, choose "My RTP push" (the input you created). More fieldsappear.
7. In Audio selectors, choose Add audio selectors.
8. In Audio selector name, type "My audio source".
There is no need to complete any other fields on this panel. Specifically:
• There is no need to create a video selector: when the channel starts, AWS Elemental MediaLive willautomatically select the video (or the first video) in the input.
• In the audio selector, there is no need to specify the PID or language: when the channel starts, AWSElemental MediaLive will automatically select the first audio, which is acceptable for this tutorial.
• There is no need to create a captions selector. Typically you will include captions in the channelconfiguration, but in this tutorial we are omitting them.
Step 5: Create an HLS Output Group1. In the navigation bar, move down to Output groups and choose Add.
2. Choose HLS and choose Confirm.
3. In Name, type "MyHLS".
4. In CDN settings, choose Hls webdav. This is the connection that AWS Elemental MediaPackage (thedownstream system for the channel output) uses.
Leave the defaults for all the other CDN fields.
5. In HLS group destination A, in URL, type or paste the first input URL that AWS ElementalMediaPackage created for you in step 2. For example, https://39fuo4.mediapackage.us-east-1.amazonaws.com/in/v1/88dpie/channel.
6. In Credentials, in Username, type or paste the username that corresponds to this URL. For example,ue739wuty.
7. In Password, choose Create new parameter.
8. In Name, type "DestinationA_MyHLS".
9. In Password, type or paste the password that corresponds to the URL. For example, due484u.
10.Click Create new parameter.
You have created a parameter that holds the password. The parameter is stored in the Amazon EC2Systems Manager Parameter Store. For more information, see the section called “Access to AmazonEC2 Systems Manager Parameter Store” (p. 4).
12

AWS Elemental MediaLive User GuideStep 6: Set up the Output and Encodes
11.In HLS group destination B, in URL, type or paste the second input URL that AWS ElementalMediaPackage created for you in step 2. For example, https://mgu654.mediapackage.us-east-1.amazonaws.com/in/v1/xmm9s/channel.
12.In Credentials, in Username, type or paste the username that corresponds to this URL. For example,883hdux.
13.In Password, choose Create new parameter.14.In Name, type "DestinationB_MyHLS".15.In Password, type or paste the password that corresponds to the URL. For example, 634hjik.16.Click Create new parameter.
You have created a parameter that holds this second password. This parameter is also stored in theAmazon EC2 Systems Manager Parameter Store.
17.Leave the default values in all other fields on this pane.
Step 6: Set up the Output and Encodes1. In the navigation pane, choose Output 1. This output was automatically added when you created
the output group. In addition, the output was automatically set up with one video and one audio, asshown in Stream settings.
2. In Stream settings choose Video.3. In Video description name, change the default name to "H264 video".
Leave the remaining fields with the default values. Specifically, leave Width and Height empty in orderto use the same width as the input.
4. In Stream settings choose Audio.5. In Audio description name, change the default name to "AAC audio".6. In Audio selector name, type the audio selector you created in step 4, that is "My audio source"
Leave the remaining fields with the default values. Specifically, leave Codec settings as AAC.
Step 7: Save1. At the bottom of the navigation pane, choose Create channel.
The channel section reappears and shows the newly created channel, named "MyHLS". The Statechanges to Creating, then Ready.
2. Stay on this pane for now.
Step 8: Start the Upstream System and theChannel
1. In your upstream system, start streaming the video sources that you set up in step 1. Set them upto push to the two destinations you noted in step 3. For example, rtp://198.51.100.0:5000 andrtp://198.51.100.44:5000.
2. On the channels list, select the channel.3. Choose Start. The channel State changes to Starting, then to Running.4. Switch to the web browser tab or window where the AWS Elemental MediaPackage is displayed.
13

AWS Elemental MediaLive User GuideStep 9: Clean up
5. Choose the channel link (not the radio button). On the details page, under Endpoints, choose Play. Apreview window appears. Start the video. The output from AWS Elemental MediaLive starts playing.
Step 9: Clean upTo avoid extraneous charges, delete this channel and input when you have finished working with it.
1. On the Channels page, select the channel.2. If needed, choose Stop.3. Choose Delete.4. On the Inputs page, select the input.5. Choose Delete.
14

AWS Elemental MediaLive User GuideInputs
Components of AWS ElementalMediaLive
The key building blocks of AWS Elemental MediaLive are inputs, channels, and input security groups.A channel in turn consists of output groups, which contain outputs, which contain video, audio, andcaptions "encodes."
When a channel is started (run), AWS Elemental MediaLive ingests the input. It then transcodes thatvideo (and the related audio, captions, and metadata) and creates output assets. The information abouthow to transcode a given input is contained in a channel.
An input security group (p. 25) is a mechanism to prevent unauthorized users or third parties frompushing content into a channel that is associated with a "push" input.
InputsAn input is a video asset that is to be transcoded and packaged. It may be associated with an inputsecurity group, which provides protection to the input, and with a channel, which provides details aboutthe transcoding and packaging to perform.
AWS Elemental MediaLive supports different types of stream and file inputs (for example, RTP and HLS).The service also provides two ways to ingest the inputs, either through a push model or a pull model. Formore information, see Reference: Supported Containers and Codecs (p. 116).
ChannelsIn AWS Elemental MediaLive, a channel is attached to an input (source). A channel contains the detailsthat instruct AWS Elemental MediaLive how to transcode (decode and encode) and package that inputinto specific outputs. The key components of a channel are an encode, an output, and an output group.
EncodesAn encode is the smallest component on the output side of a channel. Each encode contains theinstructions for one video asset, one audio asset, or one captions asset that will be created by thetranscoding process. Different encodes have different characteristics. For example, one video encodeproduced from the input might be high resolution while another is low resolution. Or one audio encodemight use the AAC audio codec while another uses the Dolby Digital audio codec.
A channel can contain multiple video, audio, and captions encodes.
In the following illustration, the red circle represents a video output, the blue circle represents an audiooutput, and the green circle represents a captions output.
15

AWS Elemental MediaLive User GuideOutputs
OutputsAn output contains the encodes that belong together. For example, one output will contain thecombination of video, audio, and captions encodes that make sense for one purpose, while anotheroutput will contain a different combination.
The output holds packaging instructions that apply to all the encodes in that output. For example, thepackaging instructions for a UDP output are different from those for an Archive output. The encodesinside the outputs might be the same or different. But the packaging instructions are different.
Output GroupsAn output group contains related outputs. An output group might contain only one output or it mightcontain several outputs. The output group holds details about the destination for all the outputs in thatgroup.
Input Security GroupsAn input security group is a group that you create and associate with specific input types, to preventunauthorized users or third parties from pushing content into a channel. For more information, seeWorking with Input Security Groups (p. 25).
How Components Are AssociatedThe association between an input and a channel is defined in the channel. In other words, to associate achannel with an input, you set up the channel to point to a specific input.
After you create this association, you can do the following:
• View the channel details to identify the associated input.• View the input details to identify the associated channel.
The association between an input and an input security group is defined in the input. In other words, toassociate an input with an input security group (or with several groups), you set up the input to point toa specific input security group (or groups).
After you create this association, you can do the following:
• View the channel details to identify the associated input.• View the input details to identify the associated channel.
16

AWS Elemental MediaLive User GuideAssessing the Video Source
Planning Your Workflow for AWSElemental MediaLive
To use AWS Elemental MediaLive to transcode a video asset, you follow this basic workflow:
1. You assess the video source.2. You set up the upstream system.3. You create an input for your video asset.4. Optionally, you associate the input with an input security group (required only for certain types of
inputs).5. You create a channel in which you identify the input to transcode and specify how AWS Elemental
MediaLive should ingest and encode that input.6. You start (run) your channel, and AWS Elemental MediaLive ingests the input.7. AWS Elemental MediaLive encodes the input (and any associated audio, captions, and metadata), and
then creates the output.8. You send the output to a packaging and origination service such as AWS Elemental MediaPackage.
Topics• Assessing the Video Source (p. 17)• Setting Up the Upstream System (p. 18)• Planning the Input (p. 19)• Planning the Channel (p. 19)• Examples of Channel Designs (p. 21)• Setting Up the Downstream System (p. 23)
Assessing the Video SourceThe upstream system is the system that streams the video to AWS Elemental MediaLive. Examplesof an upstream system are a streaming camera or appliance directly connected to the internet, or acontribution encoder located in the stadium at a sports event. Assess the video source to ensure that itdelivers what you expect:
• Make sure the upstream system is capable of streaming using one of the supported protocols forinput. See the section called “Supported Input Types” (p. 116).
• Determine if your chosen protocol uses a "push" or a "pull." With a push protocol, the upstream systempushes to AWS Elemental MediaLive. With a pull protocol, AWS Elemental MediaLive pulls from theupstream system. See the section called “Supported Input Types” (p. 116).
• Find out how the input—the video codecs, audio codecs, and captions formats—is encoded.
Make sure AWS Elemental MediaLive supports the input video codecs and the input audio codecs. Seethe section called “Supported Input Types” (p. 116).
Make sure that AWS Elemental MediaLive supports the input captions formats. Additionally, makesure that AWS Elemental MediaLive supports conversion of that input captions format to the
17

AWS Elemental MediaLive User GuideSetting Up the Upstream System
output captions format that you want in your specific output types. See Reference: SupportedCaptions (p. 109).
Setting Up the Upstream SystemYou must set up your upstream system before you start working in AWS Elemental MediaLive.
Topics
• RTP Push (p. 18)
• RTMP Push (p. 18)
• RTMP Pull (p. 19)
• HLS Pull (p. 19)
RTP Push• Make sure that the source is a streaming source, not a file source. A push input works only with a
streaming source.
• Make sure that the upstream system is set up to send over RTP, not UDP. The UDP protocol is notsupported as an input into AWS Elemental MediaLive.
• AWS Elemental MediaLive requires redundant sources, so the upstream system must provide twovideo streams. For optimized redundancy, AWS Elemental MediaLive runs each source on differentencoders in different Availability Zones. You don't have to set up these Availability Zones because AWSElemental MediaLive does it for you.
• Make sure that the two streams are identical in terms of resolution and bit rate.
• Keep in mind that the upstream system must be pushing the video source to the input when you startthe channel. The upstream system does not need to be pushing before then.
• From the upstream system, obtain the IP addresses that the two streams will push from and make anote of them. You will need this information to set up the required input security groups for the AWSElemental MediaLive inputs that you will create.
RTMP Push• Make sure that the source is a streaming source, not a file source. A push input works only with a
streaming source.
• AWS Elemental MediaLive requires redundant sources, so you must provide two video streams. Foroptimized redundancy, AWS Elemental MediaLive runs each source on different encoders in differentAvailability Zones. You don't have to set up these Availability Zones because AWS Elemental MediaLivedoes it for you.
• Make sure that the two streams are identical in terms of resolution and bit rate.
• Determine the application name and application instance for this video source.
The upstream system might have already assigned these names. These names might be provided toyou separately (for example, the application name is livestream and the application instance iscurling) or as a path (livestream/curling). Make a note of these names.
If the upstream system has not assigned names, you could request names that work for you.We recommend that you use live as the application name and a name of your choosing as theapplication instance. Make sure that you and the upstream system agree on these names.
18

AWS Elemental MediaLive User GuideRTMP Pull
• Keep in mind that the upstream system must be pushing the video source to the input when you startthe channel. The upstream system does not need to be pushing before then.
• From the upstream system, obtain the IP addresses the two streams will push from and make a noteof them. You will need this information to set up the required input security groups for the AWSElemental MediaLive inputs that you will create.
RTMP Pull• AWS Elemental MediaLive requires redundant sources, so you must provide two video streams. For
optimized redundancy, AWS Elemental MediaLive runs each source on different encoders in differentAvailability Zones. You don't have to set up these Availability Zones because AWS Elemental MediaLivedoes it for you.
• Make sure that the two streams are identical in terms of resolution and bit rate.
• Keep in mind that the video source must be ready to be pulled at the moment that you create theassociated channel. It must be ready at this point because AWS Elemental MediaLive verifies that theinput can be accessed.
HLS Pull• AWS Elemental MediaLive requires redundant sources, so you must provide two video streams. For
optimized redundancy, AWS Elemental MediaLive runs each source on different encoders in differentAvailability Zones. You don't have to set up these Availability Zones because AWS Elemental MediaLivedoes it for you.
• Make sure that the two streams are identical in terms of resolution and bit rate.
• For a pull input, keep in mind that the video source must be ready to be pulled at the moment thatyou create the associated channel. It must be ready at this point because AWS Elemental MediaLiveverifies that the input can be accessed.
Planning the InputTo plan your input, identify which individual video, audio, and captions assets that you want to extractfrom the input and which ones that you want to omit. For example, you must extract one video file, butyou can choose to omit some captions languages.
The rules for extracting input are the following:
• You must extract one and only one video file.
• You can extract zero or more audio files. Typically, you extract multiple audio files so that you caninclude multiple languages in the output. But you can also extract multiple audio files to extractdifferent audio formats, for example, AAC and Dolby Digital.
• You can extract zero or more captions files. Typically, you extract multiple captions files so that youcan include multiple languages in the output. But you can also extract multiple captions to extractdifferent captions formats, for example, DVB-Sub and an external file format such as SRT.
Planning the ChannelTo plan your channel, follow these guidelines:
19

AWS Elemental MediaLive User GuideRules for Encodes in an Output
1. For the specified input, identify the output protocols (for streaming outputs) or the number ofdifferent output file types (for archive outputs).
For example, you could create a streaming ABR HLS output asset, a streaming non-ABR HLS outputasset, and an archive version of the HLS output asset (containing the highest bit rate video). You couldalso create a streaming ABR Smooth output asset.
2. For the first output asset, identify the number of video encodes that you need:• Some output assets consist of one video encode (one set of encoding settings). In this case, you will
plan to create an output group that contains one video output.• An ABR output asset will have more than one video encode, for example, one high-bit rate video,
one medium-bit rate video, and one low-bit rate video. The encoding instructions are identical (forexample, they all use H.264) except for the bit rate. In this case, you will plan to create an outputgroup with more than one video output.
3. For the first output asset, identify the audio encodes that you need.
Typically, you need one encode for each language (English, French, and so on).4. For the first output asset, identify the captions your need.
Typically, you need one encode for each captions language (English, French, and so on).5. Group these encodes into outputs, as described in the section called “Examples of Channel
Designs” (p. 21). Make sure that the groupings follow the rules for encodes in outputs (p. 20).6. Group the outputs into one output group. For example, group the outputs for the ABR HLS outputs
into one HLS output group.7. Repeat the design of encodes, outputs, and output group for each output asset.
Here's the result of running a channel that follows this design:
• Each output that you create in the channel becomes one media asset.• If a media asset includes manifests, one master manifest is created for each output group and one
variant manifest is created for each output.
Rules for Encodes in an OutputThe following rules apply to the organization of encodes into outputs:
• Video – Each video encode goes in its own output. One output cannot contain two videos.• Audio – In a non-ABR asset, each audio encode goes in its own output. In an ABR asset, the audio
encodes do not go in their own output; they are contained in the same output as the video encode.• Captions – Embedded-type captions encodes always go in the same output as the video encode, inside
(embedded) in the video encode. Object-style captions encodes go in their own object in the sameoutput as the video encode. Sidecar captions encodes always go in their own output.
These rules mean that one output can contain the following:
• A video encode• A video encode and one or more audio encodes• A video encode and one embedded-type captions• A video encode and one or more object-type captions• A video encode, one or more audio encodes, and one embedded-type captions• A video encode, one or more audio encodes, and one or more object-type captions• An audio encode
20

AWS Elemental MediaLive User GuideExamples of Channel Designs
• A sidecar-type captions
Examples of Channel DesignsThe following sections show examples of channel designs. The designs progress from simple designs thatcontain only one video offering to more complex designs for adaptive bit rate streaming (ABR) assetsthat contain several video offerings.
Topics
• Non-ABR Asset with Captions Embedded in the Video (p. 21)
• Non-ABR Segmented Asset with Captions as Separate Objects (p. 21)
• Non-ABR Segmented Asset with Captions as Sidecars (p. 22)
• ABR Asset with Captions Embedded in the Video (p. 22)
• ABR Asset with Captions in Sidecars (p. 22)
Non-ABR Asset with Captions Embedded in the VideoFor a non-ABR asset, you create the following outputs and encodes in the channel: one output thatcontains one video asset, as many audio assets as you require, and as many captions assets as yourequire.
The following illustration shows one output in one output group. The output contains one video asset,one captions asset, and two audio assets.
Running this channel produces one segmented media file that contains the video, captions, and audioencodes.
In outputs that have manifests, it also produces one manifest file and one variant manifest file.
Non-ABR Segmented Asset with Captions as SeparateObjectsIn this example, captions are separate objects, but within the media asset (they are not sidecar files).Captions such as DVB-Sub are set up as separate objects.
21

AWS Elemental MediaLive User GuideNon-ABR Segmented Asset with Captions as Sidecars
Running this channel produces one segmented media file that contains the video, audio, and captionsencodes.
Non-ABR Segmented Asset with Captions as Sidecars•
The following illustration shows a non-ABR asset with one video asset and two audio assets in oneoutput group, and two captions assets, each in their own output.
Running this channel produces one media file that contains video and audio, and one media file for eachcaptions asset.
ABR Asset with Captions Embedded in the VideoFor an ABR asset, you create the following outputs and encodes:
• Several video outputs, each containing one video encode (for example, one high-bit rate video, onemedium-bit rate video, and one low-bit rate video) and the same embedded captions encode.
• One or more audio encodes (for example, one for each language).
The following illustration shows an example configuration.
Running this channel produces five sets of segmented media files, one set for each video output andeach audio output.
In outputs that have manifests, it also produces one master manifest and five variant manifests.
ABR Asset with Captions in SidecarsIn this example, each captions asset (one for each language) is in its own output.
22

AWS Elemental MediaLive User GuideSetting Up the Downstream System
Running this channel produces seven sets of segmented media files.
In outputs that have manifests, it also produces one manifest file and seven variant manifests.
Setting Up the Downstream SystemYou must set up the device or application that will be downstream of AWS Elemental MediaLive. Thedownstream system is different for different outputs.
Output Protocol Typical Downstream Systems
Archive An Amazon S3 bucket for the output file.
HLS • A CDN that uses HTTP (or HTTPS) PUT.• A CDN that uses HTTP or HTTPS WebDAV.• An Akamai CDN (this always uses HTTP or
HTTPS).• AWS Elemental MediaPackage, serving as
an origin server that a CDN such as AmazonCloudFront can pull from.
• An AWS Elemental MediaStore container,serving as an origin server that a CDN such asAmazon CloudFront can pull from.
• An Amazon S3 bucket, serving as an originserver that a CDN such as Amazon CloudFrontcan pull from.
Microsoft Smooth A CDN that uses HTTP (or HTTPS) PUT. Typically,the downstream system is a Microsoft IIS server.
RTMP A server that uses RTMP or RTMPS. The servermay be a CDN.
UDP An address that can communicate over UDP orRTP.
The output from AWS Elemental MediaLive is considered input to this downstream system. You must setup this downstream “input” now, because when you create the AWS Elemental MediaLive channel youneed the location of that input.
AWS Elemental MediaLive always works in redundant mode: it always encodes the input to twodestinations (which are inputs from the downstream system's point of view).
23

AWS Elemental MediaLive User GuideSetting Up the Downstream System
1. In your downstream system, set up two inputs:• If the downstream system is AWS Elemental MediaPackage, create two AWS Elemental
MediaPackage channels; see Creating a Channel in the AWS Elemental MediaPackage User Guide.Then view the details of the AWS Elemental MediaPackage channels; see Viewing Channel Details inthe AWS Elemental MediaPackage User Guide. For each channel, make a note of the input URL, theinput user name, and the input password.
• If the downstream system is an Amazon S3 bucket, create two buckets. Make a note of the full pathof the buckets.
• If the downstream system is an AWS Elemental MediaStore container, create two containers. Make anote of the full path of the container and the data plane value of the container.
• If the downstream system is an HTTP CDN, set up so that the CDN expects output at both of itsinputs. Make a note of the input addresses, and of the input user name and input password, ifapplicable.
• If the downstream system is an RTMP server, set up so that the server expects output at both itsinputs.
Perform the necessary setup on the RTMP server to obtain the following information for each input:• The URL for the output to send to.• The port number.• The application name. (The application name may be identical for both inputs.)• The stream name.
The URL might include a path portion in the format <string>/<string>. In this case, the first string isthe application name and the second string is the stream name. In addition, the RTMP server mightrefer to the stream name as the application instance or the stream key.
2. Put in place some mechanism for ensuring that the output from AWS Elemental MediaLive is arrivingsuccessfully:• If the output is an archive file, some system downstream of AWS Elemental MediaLive must make
sure that at least one of the buckets contains the complete file output.• If the output is a stream to Amazon S3, some system downstream of AWS Elemental MediaLive
must make sure that one of the buckets is continually receiving the streaming output. The systemdownstream of Amazon S3 should access only complete content.
• If the output is a stream to AWS Elemental MediaStore, some system downstream of AWSElemental MediaLive must make sure that one of the containers is continually receiving thestreaming output. The system downstream of AWS Elemental MediaStore should access onlycomplete content.
• If the downstream system is a CDN or RTMP server, make sure that it has logic for detecting a loss ofinput and for switching from one location on the CDN to the other when that loss is detected.
24

AWS Elemental MediaLive User GuidePurpose of an Input Security Group
Working with Input Security GroupsAn input security group is a set of one or more whitelist rules. Each rule is a range of IP addresses. TheseIP addresses are allowed to push traffic to the input destinations of a channel (to push traffic to thechannel’s input).
Purpose of an Input Security GroupAn input security group restricts access to an input and prevents unauthorized third parties from pushingcontent into a channel that is associated with a "push" input. Input security groups are required with RTPand RTMP “push” inputs; they do not apply to "pull" inputs such as HLS. Without the protection of thisfeature, any third party could push content to an AWS Elemental MediaLive input if they know the IPaddress and port. Note that setting permissions on the account that owns the channel does not preventthis third-party push; only an input security group prevents it.
You can attach an input security group to more than one input; one input security group can "serve"several inputs.
Creating an Input Security GroupYou create an input security group and then attach it to a "push" input when you create or edit thatinput.
To create an input security group
1. Open the AWS Elemental MediaLive console at https://console.aws.amazon.com/medialive/.2. In the navigation pane, choose Input security groups.3. On the Input security groups page, choose Create input security group.4. For New security group, type one or more IPv4 CIDR blocks. Each CIDR block must include a subnet
mask. Separate the entries with commas, or type each entry on a separate line.
Each item in the list represents one whitelist rule, even if it encompasses several individualaddresses. For example, each of the following examples counts as one rule:
192.0.2.0/24
192.0.2.111/325. Choose Create.
Editing an Input Security GroupYou can edit any of the fields in an input security group. You can perform these edits at any time, even ifthe input security group is attached to an input that is attached to a channel that is running.
To edit an input security group
1. Open the AWS Elemental MediaLive console at https://console.aws.amazon.com/medialive?region="region".
25

AWS Elemental MediaLive User GuideDeleting an Input Security Group
2. In the navigation pane, choose Input Security Groups.3. On the Input security groups page, choose the input security group, and then choose Edit.4. Change any fields as appropriate., and then choose Update.
Wait for the input security State to return to In use or Idle before performing another action withthis input security group.
Deleting an Input Security GroupYou can delete an input security group so long as it is not attached to any inputs.
To delete an input security group
1. Open the AWS Elemental MediaLive console at https://console.aws.amazon.com/medialive?region="region".
2. In the navigation pane, choose Input security groups.3. On the Input security groups page, look at the State for the group to delete:
• If the State is Idle, choose the group, and then choose Delete.• If the State is In use, continue with this procedure.
4. Make a note of the ID of the input security group. For example, 1234567.5. Choose the group, and then choose Edit.6. On the Edit input security group page, look at the Inputs on the right side and count how many
inputs are attached to this input security group.7. Choose the first input. Then on the page for that input, choose Edit. On the Edit page, in the Input
security group, either create a new input security group for this input or choose another group(make sure you don't rechoose the same group; check the ID that you noted earlier). Choose Updateso that this input is no longer attached to the input security group that you want to delete.
8. If there are still more inputs associated with this input group, then in the navigation pane, chooseInput security groups, and repeat these steps to detach this input security group from all the inputs.
9. After detaching the last input from this input security group, wait for the State of the input securitygroup to specify Idle. Then choose the group, and choose Delete.
26

AWS Elemental MediaLive User GuideInputs, Input Security Groups, and Channels
Working with InputsAn input is a video asset that is to be transcoded and packaged. The source of the video asset is theupstream system (p. 17)—the system in your end-to-end workflow whose activities occur before those ofAWS Elemental MediaLive.
AWS Elemental MediaLive supports specific input types. For more information about the types, see thesection called “Supported Input Types” (p. 116).
Inputs, Input Security Groups, and ChannelsThe input is one of the components of a workflow. The others are the input security group (p. 16) andthe channel (p. 15). These three components are linked together. An input security group is attached toan input (if the input requires an input security group; not all inputs have this requirement). An input isattached to a channel.
The following rules apply to the linking to an input:
• The association between an input and an input security group is defined in the input side. You set upthe association when you create or edit the input.
• The association between an input and a channel is defined on the channel side. You set up theassociation when you create or edit the channel.
• An input can have only one input security group attached to it. But that input security group can bealready attached to another input; one input security group can "serve" several inputs.
• An input can be attached to only one channel; several channels cannot be attached to the same input.
Creating an InputTo provide information about the source of the video asset, you must create an AWS ElementalMediaLive input.
Topics• Creating an RTP Push Input (p. 27)• Creating an RTMP Push Input (p. 28)• Creating an RTMP Pull Input (p. 28)• Creating an HLS Pull Input (p. 29)
Creating an RTP Push InputCreate your input before you create the channel that ingests the input.
To create an RTP push input
1. Open the AWS Elemental MediaLive console at https://console.aws.amazon.com/medialive/.2. In the navigation pane, choose Inputs.3. On the Inputs page, choose Create input.4. In the Input details section, for Input name, type a name.5. For Input type, choose RTP.
27

AWS Elemental MediaLive User GuideCreating an RTMP Push Input
6. In the Input security group section, specify a group to attach to this "push" input. You can choosean existing group, or you can create a group. For more information about security groups, seeWorking with Input Security Groups (p. 25).
7. Choose Create.
AWS Elemental MediaLive adds the input to the list of inputs and automatically creates twodestinations (one primary and one redundant). These destinations include the port 5000. Forexample, rtp://198.51.100.0:5000 and rtp://198.51.100.44:5000. These are the twolocations where the upstream system must push the source.
8. Provide the upstream system with these path locations. The upstream system must push the videostreams to these locations.
Creating an RTMP Push InputCreate your input before you create the channel that ingests the input.
To create an RTMP push input
1. Obtain the ID of the input security group (p. 25) that you will use with this input. (Or if you willcreate an input security group at the same time as you create this input, obtain the IP addressesfor the input security group.) Obtain the application name and application instance (p. 18) that youidentified when planning the workflow.
2. Open the AWS Elemental MediaLive console at https://console.aws.amazon.com/medialive/.3. In the navigation pane, choose Inputs.4. On the Inputs page, choose Create input.5. In the Input details section, for Input name, type a name.6. For Input type, choose RTMP (push).7. In the Input security group section, specify the group to attach to this push input. You can choose
an existing group, or you can create a group. For more information about security groups, seeWorking with Input Security Groups (p. 25).
8. In the Input destinations section, for Destination A, type the application name and applicationinstance for one of the sources (remember that you have redundant sources). For example, live andcurling. The names that you type must match the names that the upstream system assigned tothe source. If they do not, AWS Elemental MediaLive might detect the source but does not process it.
9. In the Input destinations section, for Destination B, type the application name and applicationinstance for the other source.
10. Choose Create.
AWS Elemental MediaLive adds the input to the list of inputs and automatically creates twodestinations in AWS Elemental MediaLive. The destinations include the application name, theapplication instance, and the port 1935. For example, rtmp://198.51.100.0:1935/live/curling and rtmp://198.51.100.66:1935/live/curling2.
11. Provide the upstream system with these path locations. The upstream system must push the videostreams to these locations.
Creating an RTMP Pull InputCreate your input before you create the channel that ingests the input.
To create an RTMP pull input
1. Open the AWS Elemental MediaLive console at https://console.aws.amazon.com/medialive/.
28

AWS Elemental MediaLive User GuideCreating an HLS Pull Input
2. In the navigation pane, choose Inputs.
3. On the Inputs page, choose Create input.
4. In the Input details section, for Input name, type a name.
5. For Input type, choose RTMP (pull).
6. In the Input sources section, type the full URI of the two locations where AWS Elemental MediaLivewill pull the source from. Obtain these locations from the upstream system. For example,rtmp://203.0.113.0:1935/movies/classic and rtmp://203.0.113.254:1935/movies/classic.
Also, type the user name and Amazon EC2 password key for accessing the RTMP location. Thesecredentials are stored on the Amazon EC2 Systems Manager Parameter Store. For more information,see the section called “Access to Amazon EC2 Systems Manager Parameter Store” (p. 4).
7. Choose Create.
AWS Elemental MediaLive adds the input to the list of inputs. The sources don't appear in the list,but if you choose the Name link, the details page shows these sources.
Creating an HLS Pull InputCreate your input before you create the channel that ingests the input.
To create an HLS pull input
1. Open the AWS Elemental MediaLive console at https://console.aws.amazon.com/medialive/.
2. In the navigation pane, choose Inputs.
3. On the Inputs page, choose Create input.
4. In the Input details section, for Input name, type a name.
5. For Input type, choose HLS.
6. In the Input sources section, type the full URI of the two locations where AWS Elemental MediaLivewill pull the M3U8 manifest source from. Obtain these locations from the upstream system. Type thelocation of the M3U8 manifest in one of these formats:
• For a location that supports HTTP or HTTPS, type an HTTP or HTTPS URI. For example,https://203.0.113.0/newschannel/anytownusa.m3u8 and https://203.0.113.254/newschannel/anytownusa.m3u8.
• For a manifest that is stored on AWS Elemental MediaStore, the URI must include the dataendpoint for the container. For example, the M3U8 file is called mlaw.m3u8, and it is stored inthe container "movies" in the folder path premium/canada. The URL for the container mightbe eri39n.data.mediastore.us-west-2.amazonaws.com. The value that you type in thisfield would be mediastoressl://eri39n.data.mediastore.us-west-2.amazonaws.com/premium/canada/mlaw.m3u8.
• For a manifest that is stored on Amazon S3, type the protocol as s3 or s3ssl, and then type thebucket name and object for the manifest. For example, s3://movies/mlaw.m3u8 and s3://movies/redundant/mlaw.m3u8.
7. If you use a secure connection (s3ssl), you must also type the user name and Amazon EC2 passwordkey for accessing the location. These credentials are stored on the Amazon EC2 Systems ManagerParameter Store. For more information, see the section called “Access to Amazon EC2 SystemsManager Parameter Store” (p. 4).
8. Choose Create.
AWS Elemental MediaLive adds the input to the list of inputs. The sources don't appear in the list,but if you choose the Name link, the details page shows these sources.
29

AWS Elemental MediaLive User GuideEditing an Input
Editing an InputThe rules for editing an input are as follows:
• You can attach a different input security group.
• You can edit the fields in the input destination or endpoint (for a "push" input) or the fields in an inputsource (for a "pull" input).
• You cannot change the type of an input. For example, if you set up an input as an RTMP push but it isactually an HLS input, delete the input and create it again.
There are constraints on performing these edits, as follows:
• If an input is attached to a channel, you can edit the input only if the channel is idle.
• If an input is attached to a channel and an input security group, you can edit the input only if thechannel is idle.
• If an input is not attached to a channel, you can edit it at any time, even if it is attached to an inputsecurity group.
To edit an input
1. Open the AWS Elemental MediaLive console at https://console.aws.amazon.com/medialive/.
2. In the navigation pane, choose Inputs.
3. Choose the name of the input, and then choose Edit.
4. On the Inputs page, make the following changes as appropriate:
• You can change the Name.
• You cannot change the Input type. If the input has the wrong type, delete it and create it overagain.
• You can change the Source section (applies to "pull" inputs only).
• You can change the Endpoint section (applies to "push" inputs only).
• You can change the Input security groups section (applies to "push" inputs only).
5. Choose Update.
Wait for the input State to return to In use or Idle before performing another action with this input.
Deleting an InputIf an input is not attached to a channel, you can delete it, even if it is attached to an input security group.
NoteIf the input is attached to a channel, you cannot delete the input. This rule exists to ensure thatyou do not remove an input from a channel and therefore make the channel unusable.
When you delete an input, the attached input security group (if any) is not deleted.
To delete an input
1. Open the AWS Elemental MediaLive console at https://console.aws.amazon.com/medialive/.
2. In the navigation pane, choose Inputs.
3. On the Inputs page, find the input that you want to delete, and then look at the State column.
30

AWS Elemental MediaLive User GuideDeleting an Input
4. If the state is Detached, then choose Delete. If the state is Attached and you want to delete boththe input and its channel, then delete the channel first. For more information, see the section called“Deleting a Channel” (p. 66).
31

AWS Elemental MediaLive User GuideStep 1: Complete the Channel and Input Details
Creating a Channel from ScratchA channel contains the details that instruct AWS Elemental MediaLive how to transcode (decode andencode) and package your input into specific outputs.
Before you start the process of creating a channel, you should plan your channel (p. 17) to identify thefollowing elements:
• Inputs that the channel will use• Output groups for the channel• Outputs (within each output group)• Video, audio, and caption encodes (in each output) that the channel will produce
There are three ways to create a channel:
• Create from scratch. See the topics (steps 1-9) in this chapter.• Use a built-in or custom template. See Creating a Channel from a Template or by Cloning (p. 56).• Clone an existing channel. See Creating a Channel from a Template or by Cloning (p. 56).
Topics• Step 1: Complete the Channel and Input Details (p. 32)• Step 2: Complete the Input Settings (p. 35)• Step 3: Complete the General Settings (p. 37)• Step 4: Create Output Groups (p. 38)• Step 5: Create Outputs (p. 49)• Step 6: Set Up the Video Encode (p. 54)• Step 7: Set Up the Audio Encodes (p. 54)• Step 8: Set up the Captions Encodes (p. 55)• Step 9: Save the Channel (p. 55)
Step 1: Complete the Channel and Input DetailsThe first step to creating a channel from scratch is to choose the IAM role that AWS Elemental MediaLivewill use to access the channel when the channel is running (started), choose the input to attach to thechannel, and specify key characteristics of the input.
To provide channel and input details
1. Open the AWS Elemental MediaLive console at https://console.aws.amazon.com/medialive/.2. Before creating a channel, make sure that you have created the input (p. 27) that you will attach to
the channel.3. On the AWS Elemental MediaLive home page, choose Create channel, and in the navigation pane,
choose Channels.
(If you've created a channel before, you won't see the home page. In that case, in the AWS ElementalMediaLive navigation pane, choose Channels, and then choose Create channel.
4. On the Create channel page, choose Channel and input details.5. In the General info section:
32

AWS Elemental MediaLive User GuideIAM Role and Remember ARN
• For Channel name, type a name for your channel.• Complete IAM role. See the section called “IAM Role and Remember ARN” (p. 33).
6. In the Channel input section:
• For Input, choose an existing input. More fields appear. Complete the fields that apply to yourinput. See the section called “Channel Input – RTP Push Input” (p. 34), the section called“Channel Input – RTMP Push Input” (p. 34), the section called “Channel Input – RTMP PullInput” (p. 34), or the section called “Channel Input – HLS Pull Input” (p. 35).
• For Input specification, complete the fields to match your input. See the section called “InputSpecification Settings” (p. 35).
7. In the Input settings section, complete the fields as required. For details about a field, choose theInfo link next to the field.
• For most fields, the default values are sufficient.• However, if you want to include audio and captions in the outputs, you must complete the Audio
selectors and Caption selectors sections; the defaults do not specify enough information.8. For information about the Channel template section, see Creating a Channel from a Template or by
Cloning (p. 56).9. When ready, go to the next step (p. 35).
IAM Role and Remember ARNThis section describes how to complete the IAM role section on the General info section of the Channeland input details pane.
You must choose a role for AWS Elemental MediaLive to assume when it works with this channel. If youdon't choose a role, you won't be able to create the channel. There are two general scenarios, dependingon whether your organization has a designated administrator.
Your Organization Has a Designated AdministratorYour organization might have an administrator who manages this service. That administrator has likelyset up one or more roles:
• Ask the administrator or your manager which role to use. Or if only one rule is listed in Use existingrole, choose that role.
• If the only rule that is listed is MediaLiveAccessRole, choose that role. In addition, if the Updatebutton is displayed beside this role name, choose the button. (The button doesn't always appear, butwhenever it does appear, choose it to refresh the role.)
• If you want the selected ARN to appear first in the list the next time you create a channel, selectRemember ARN.
Your Organization Has No AdministratorYour organization might not have a designated service administrator. In this case, if none of yourcolleagues have set up a suitable role, you might have to create one yourself and then choose it.
• You can create the default role, called MediaLiveAccessRole. To first check if someone else has alreadycreated this role (only one person needs to create it for all users in your AWS account), look at Createrole from template:• If this option is grayed out, this task has been done. In that case, choose Use existing role, and then
choose MediaLiveAccessRole from the list.
33

AWS Elemental MediaLive User GuideChannel Input – RTP Push Input
• If this option is not grayed out, choose Create role from template, and then choose Create IAMrole. Next, choose that role from the list. If AWS Elemental MediaLive doesn't let you create the role,speak to an AWS IAM administrator about your permissions.
• If the MediaLiveAccessRole has already been created and the Update button is displayed beside it,choose the button. (The button doesn't always appear, but whenever it does appear, choose it torefresh the role.)
• If you want the selected ARN to appear first in the list the next time you create a channel, selectRemember ARN.
Channel Input – RTP Push Input• Look at the Input destinations section. It shows the two locations on AWS Elemental MediaLive
that the upstream system will push the source to when the channel is running. These locations wereautomatically generated when you created the input.
For example, rtp://198.51.100.0:5000 and rtp://198.51.100.44:5000.
• Choose Input security group. More information appears. Make sure that an input security group islisted.
If a group is specified, you can continue.
If no group is specified, you can't use this input because it has no input security group attached.Typically, this situation occurs if, for example, you have input A attached to input security group Band then you delete B. Input A is no longer useable. You must recreate the input and attach an inputsecurity group to it before you can associate it with a channel that you are creating.
Channel Input – RTMP Push Input• Look at the Input destinations section. It shows the two locations on AWS Elemental MediaLive
that the upstream system will push the source to when the channel is running. These locations wereautomatically generated when you created the input. Each location consists of an address portion thatwas automatically generated, appended by a folder that you specified when you created the input.
For example, rtmp://198.51.100.0:1935/movies/classic andrtmp://198.51.100.45:1935/movies/classic.
• Choose Input security group. More information appears. Make sure that an input security group islisted.
If a group is specified, you can continue.
If no group is specified, you cannot use this input because it has no input security group attached.Typically, this situation occurs if, for example, you have input A attached to input security group B,and then you delete B. Input A is no longer useable. You must recreate the input and attach an inputsecurity group to it before you can associate it with a channel that you are creating.
Channel Input – RTMP Pull InputLook at the Input destinations section. It shows the locations of the source video. You specified theselocations when you created the input.
For example, rtmp://203.0.113.0:1935/movies/classic and rtmp://203.0.113.254:1935/movies/classic.
34

AWS Elemental MediaLive User GuideChannel Input – HLS Pull Input
Channel Input – HLS Pull InputLook at the Input sources section. It shows the locations of the source video. You specified theselocations when you created the input.
For example, https://203.0.113.0/newschannel/anytownusa.m3u8 andhttps://203.0.113.254/newschannel/anytownusa.m3u8 (for an HTTPS pull).
Or mediastoressl://eri39n.data.mediastore.us-west-2.amazonaws.com/premium/canada/mlaw.m3u8 and mediastoressl://eri39n.data.mediastore.us-west-2.amazonaws.com/redundant/premium/canada/mlaw.m3u8 (for an AWS ElementalMediaStore pull).
Input Specification SettingsThe Input Specifications settings include three fields that characterize the video in the input that youintend to use with this channel. The values in these fields are used to calculate the charges that youwill incur on the input side. The values also ensure that AWS Elemental MediaLive allocates sufficientprocessing resources when you run this channel. The fields are the following:
• Input codec
• Input resolution
• Maximum input bit rate
All the fields provide options that cover ranges, with the lowest range shown first and the highest shownlast. Lower ranges imply lower processing requirements, and higher ranges imply higher requirements.
For each field, choose an option that meets or exceeds the requirements of your input. If you do not,AWS Elemental MediaLive might not allocate sufficient processing resources. If you aren't sure about theprocessing requirements of your input, choose a higher option. For example, if you aren't sure of the bitrate and you are trying to choose between 10 MBPS and 20 MBPS, then choose 20 MBPS, to be on thesafe side. Even with codecs, this advice applies. For example, if you aren't sure if your input is AVC (H.264)or HEVC (H.265), then choose HEVC.
AWS Elemental MediaLive uses these values for billing and resource allocation purposes: you pay for theoption that you specify. For example, if you specify HD but the input is actually SD, you will be chargedfor HD.
AWS Elemental MediaLive doesn't use these values for determining what is actually in the video fordecoding purposes. At ingest time, it still inspects the video to detect the source codec, resolution, andbit rate.
Step 2: Complete the Input SettingsThis step describes how to complete the fields that specify how to ingest the input.
To complete the input settings
1. On the Create channel page, choose Input settings.
2. Complete the fields as required. See the topics at the end of this procedure. For details about a field,choose the Info link next to the field.
• For most fields, the default values are sufficient.
35

AWS Elemental MediaLive User GuideInput Settings – Network Input Settings
• However, if you want to include audio and captions in the outputs, you must complete the Audioselectors and Caption selectors sections; the defaults do not specify enough information.
3. When ready, go to the next step (p. 37).
Input Settings – Network Input SettingsComplete this section only if the input is HLS.
Input Settings – Other SettingsThe fields that are not within the Network input settings section apply to all inputs.
Input Settings – Video SelectorThis section lets you identify the video to extract from the input, and lets you enable the optional colorspace feature.
• In Video selector, choose Video selector. More fields appear.• Selector settings: This field lets you identify the video to ingest.
With RTP input, this field is optional but highly recommended because the input might contain morethan one video. If you don't identify the video, AWS Elemental MediaLive selects the first video it finds,which might result in undesired content, especially in a live streaming context. If you want to explicitlyidentify the video but you don't know its program ID or PID, speak to the content provider.
With all other input types, this field is optional because the input only ever contains one video.
You can specify the video by specifying a program ID (which typically exists in an MPTS input) or byspecifying a PID (which exists in both MPTS and SPTS inputs).
Keep in mind that there is no button to add more video selectors because you can extract only onevideo asset from the input.
• Color space and Color space usage: These fields let you configure the optional color space feature.
Input Settings – Audio SelectorsIf you want to extract audio from the input, this section is required. You create one or more audioselectors to identify the audio to extract. Typically, you identify different languages from the input, butyou could also extract different audio codecs (such as AAC and Dolby).
For each audio that you want to extract, choose Add audio selector. Complete the fields that appear toidentify the location of the audio and to specify optional handling of the audio.
Input Settings – Caption SelectorsIf you want to extract captions from the input or to specify an external file as the source of the captions,this section is required. You create one or more captions selectors to identify the captions to extract.Typically, you identify different languages in each selector, but you could also identify different captionsformats.
For each captions item that you want to extract or include, choose the Add captions selector. Fordetailed information about setting up input for captions, see Working with Captions (p. 67),specifically the section called “Step 1: Create Caption Selectors in the Input” (p. 71).
36

AWS Elemental MediaLive User GuideStep 3: Complete the General Settings
Step 3: Complete the General SettingsAWS Elemental MediaLive has several settings that apply globally to all outputs. AWS ElementalMediaLive also has features that are optional but that apply globally to all outputs if they are enabled.
These settings and features apply to all outputs. Therefore, they appear on the General settings page,rather than in individual output groups and outputs.
To complete the general settings
1. On the Create channel page, in the Channel section, choose General settings.2. In the General channel settings section, set the global settings and optional features as needed. For
information about each setting or feature, see the topics at the end of this procedure.3. When you have finished working with these fields, go to the next step (p. 38).
Avail BlankingOptional feature. You can set this to blank out the output video during ad avails. For more information,see SCTE-35 Message Processing (p. 87).
Avail ConfigurationOptional feature. You can modify the way that AWS Elemental MediaLive handles SCTE-35ad availmessages, or you can keep the default behavior. For information about the default behavior and how tomodify that behavior, see SCTE-35 Message Processing (p. 87) .
Blackout SlateOptional feature. You can black out the output video as specified by program metadata, if that metadatais present in the input. For more information, see SCTE-35 Message Processing (p. 87) .
Global ConfigurationGlobal configuration settings. In this section, complete the first three fields as appropriate. For detailsabout each field, choose the Info link next to the field.
Global Configuration - Input Loss BehaviorGlobal configuration settings. The Input Loss Behavior fields change how AWS Elemental MediaLivehandles input loss. When AWS Elemental MediaLive detects that the input has not arrived within theexpected time, it repeats the previous frame for a configurable number of milliseconds (from zero toforever). When that time expires, it displays a black frame for a configurable number of milliseconds(from zero to forever). When that time expires, it switches to a specified slate or to a specified color.When input resumes, the normal ingest continues.
You can change this behavior: for Input loss behavior, choose Input Loss Behavior. The default valuesare shown in the fields that appear. Change the fields as needed. If you want to later switch back to thedefault behavior, simply set Input Loss Behavior to Disabled.
Timecode ConfigurationGlobal configuration settings. This section lets you specify the timecode for the output. This timecodedoes not have to be the same as the timecode that you specified for the input . The input timecodefields are used to notify AWS Elemental MediaLive what timecode is present in the input, so that AWS
37

AWS Elemental MediaLive User GuideLogging
Elemental MediaLive can find it, and read it or apply it correctly. The output timecode fields are used tospecify the timecode format that AWS Elemental MediaLive must apply to the output.
LoggingOptional feature. You can enable logging of activity on this individual channel. For detailed informationabout this feature, see the section called “Monitoring Using Amazon CloudWatch Logs” (p. 63).
To enable logging, choose a log level other than DISABLED. The levels are listed from least to mostverbose.
To disable logging, choose DISABLED.
Step 4: Create Output GroupsIn this step, you create the output groups that you identified when you planned the channel (p. 17).AWS Elemental MediaLive supports different output types. For more information, see the section called“Supported Codecs for Outputs” (p. 118).
Topics• Creating an Archive Output Group (p. 38)• Creating an HLS Output Group (p. 41)• Creating an RTMP Output Group (p. 46)• Creating a Microsoft Smooth Output Group (p. 46)• Creating a UDP Output Group (p. 48)
Creating an Archive Output GroupFollow these steps if, when you were planning the channel (p. 17), you determined that you want toinclude an Archive output group.
To create an Archive output group
1. On the Create channel page, under Output groups, choose Add. The Add output group sectionappears.
2. Choose Archive, and then choose Confirm. More sections appear.3. Complete the fields as described in the section called “Fields for the Archive Group” (p. 38).4. After you enter all the information for one output group, you can create another output group if
your plan requires it. Otherwise, go to the next step (p. 49).
Fields for the Archive GroupYou must provide information about the destination for each Archive output group. This destinationinformation applies to all the outputs in the individual Archive output group.
Archive Destinations
You must specify both Archive group destination A and Archive group destination B for this output.You must specify two destinations because AWS Elemental MediaLive works in redundant mode foroutputs: it requires two destinations. The URL is one piece of the information that is used for the locationand file names of the output file. For more information, see the section called “About Archive Locationsand File Names” (p. 39).
38

AWS Elemental MediaLive User GuideCreating an Archive Output Group
Each destination is a bucket and object in an Amazon S3 account. You must set up so that AWSElemental MediaLive can access your Amazon S3 account. For more information, see the section called“Access to Amazon S3” (p. 5). .
Archive Settings
• For Name, type a name for the output group. For example, Sports Game 10122017 ABR ortvchannel59.
• For Additional settings, optionally complete the Rollover Interval field. This value is one piece of theinformation that is used for the location and file names (p. 39) of the media files.
Archive Outputs
This section contains fields that relate to the encoding of the video, audio, and captions in the output,and that relate to the packaging and delivery of the output.
• If you want more than one output in this output group, choose Add output. An Output line is addedfor each output. Setup of the individual outputs is described in the section called “Step 5: CreateOutputs” (p. 49).
• For Name modifier for each output, type a modifier, if appropriate. For uses for this field, see thesection called “About Archive Locations and File Names” (p. 39).
About Archive Locations and File NamesThe location of archive output files is controlled by several fields in the Archive output group and theindividual outputs:
• The two URL fields in the Archive group destinations section. The URL consists of a protocol portion, apath portion and a base filename portion.
For example, assume that the URL is s3ssl://interviews/3series/Delivery/3633_WangXiuLan.
s3ssl:// is the protocol. The protocol is always s3ssl://, to indicate that the destination is anAmazon S3 bucket.
interviews/3series/Delivery/ is the path. The path is required and consists of a bucket andfolders, terminated by a slash.
3633_WangXiuLan is the base file name. The base file name is optional. If you omit it, AWS ElementalMediaLive uses the name of the input as the base file name.
• The Name modifier field in the Archive outputs section. Required. The string forms part of the filename.
• The Extension field in the Archive outputs section. The extension for the file name. Required only ifyou don't want to use the default (.ts).
• The Rollover interval field in the Archive settings section. Required. For example, 600 divides theoutput into separate files, each 600 seconds (10 minutes) long. Each file name includes a six-digitsequential counter, such as 000000, 000001, and so on.
Each time the rollover expires, AWS Elemental MediaLive closes the current file on Amazon S3 andstarts a new file. The current file is visible on Amazon S3 only after it has closed.
The values from these fields are put together to form the location:
protocol path base_filename name_modifier sequential_counter extension
39

AWS Elemental MediaLive User GuideCreating an Archive Output Group
For more information, see the examples (p. 40).
Archive ExamplesThese examples show how to set up the fields that relate to locations. They don't show how to set upother fields such as fields in the individual outputs.
Example 1
You want to create an archive of the streaming output from TV channel 59. You want to store the outputin the S3 bucket named "channel59", and you want to break up the stream into 10-minute chunks.
Field Value
Rollover interval field in Archive settings section 600
URL in Archive group destination A section s3ssl://channel59/delivery/program
URL in Archive group destination B section s3ssl://channel59/backup/program
Using "delivery" and "backup" as folder names isonly an example.
Name modifier in Archive outputs section _$dt$
For information about identifiers for variabledata (such as $dt$), see Reference: Identifiers forVariable Data (p. 120)
Extension in Archive outputs section Leave blank to use the default (.ts).
Result: the output will be broken into files of 10 minutes (600 seconds) each. Each file will have a filename of program, plus the time that the channel started plus a counter (000000, 000001, and so on),plus the file name extension. For example:
• The first file will be program_20171012T033162.000000.ts.• The second file will be program_20171012T033162.000001.ts.
Each file will be stored in both s3ssl://channel59/delivery and s3ssl://channel59/backup.
A given file is not visible in Amazon S3 while it is being written. As soon as the rollover happens (or if theuser stops the channel), AWS Elemental MediaLive closes the current file. At that point, the file becomesvisible.
Example 2
You want to create an archive of highlights from the curling game that are also being streamed (in aseparate HLS output group). You want to create three outputs: one that has audio languages for Europe,one for audio languages for Asia, and one for audio languages for Africa. You want to store the outputsin the Amazon S3 bucket named "sports/highlights/curling". You want to break up the stream into five-minute chunks.
Field Value
Rollover interval field in Archive settings section 300
40

AWS Elemental MediaLive User GuideCreating an HLS Output Group
Field Value
URL in Archive group destination A section s3ssl://sports/delivery/highlights/curling/10312017
In this example, the 10312017 folder is set tomatch today's date.
URL in Archive group destination B section s3ssl://sports/backup/highlights/curling/10312017
Using "delivery" and "backup" as folder names isonly an example.
Name modifier in Archive outputs section Choose Add output twice: two more Output linesare added to this section, for a total of three lines.In each line, type a modifier: _audiogroup1,_audiogroup2, and _audiogroup3.
Extension in Archive outputs section Leave blank to use the default (.ts).
Result: three separate sets of files are created for each output. Each file has a file name of 10312017,plus the modifier, plus the sequence counter, plus the file name extension. For example:
• 10312017_audiogroup1.000000.ts, 10312017_audiogroup2.000000.ts, and10312017_audiogroup3.000000.ts.
• 10312017_audiogroup1.000001.ts, 10312017_audiogroup2.000001.ts, and10312017_audiogroup3.000001.ts.
Each file will be stored in both s3ssl://sports/delivery/highlights/curling and s3ssl://sports/backup/highlights/curling.
A given file is not visible in Amazon S3 while it is being written. As soon as the rollover happens (or if theuser stops the channel), AWS Elemental MediaLive closes the current file. At that point, the file becomesvisible.
Creating an HLS Output GroupFollow these steps if, when you were planning the channel (p. 17), you determined that you want toinclude an HLS output group.
To create an HLS output group
1. On the Create channel page, in the Output groups section, choose Add. The content pane changesto show the Add output group section.
2. Choose HLS, and then choose Confirm. More sections appear.3. Complete the fields as described in the section called “Fields for the HLS Group” (p. 42).4. After you enter all the information for one output group, you can optionally create another output
group. Otherwise, go to the next step (p. 49).
Topics• Fields for the HLS Group (p. 42)• About HLS Group Destinations and File Names (p. 43)• HLS Example (p. 44)
41

AWS Elemental MediaLive User GuideCreating an HLS Output Group
Fields for the HLS GroupYou must provide information about the destination and the structure and contents of the manifestfor each HLS output group. This destination and manifest information applies to all the outputs in theindividual HLS output group.
HLS Group Destinations
You must specify the destination URLs for this output. You must specify two destination URLs (A and B)because AWS Elemental MediaLive works in redundant mode for outputs: it requires two destinations.
The URL is one piece of the information that is used for the destination and file names (p. 43) of themanifest and media files.
HLS Settings
• For Name, type a name for the output group. For example, Sports Game 10122017 ABR ortvchannel59.
• For CDN settings, set the value to specify the type of connection that is being used to write to thedestination URLs (specified in the section called “HLS Group Destinations” (p. 42)). The options arethe following:• Hls basic put: To send to a content delivery network (CDN) that uses HTTP or HTTPS PUT. Or to send
to an Amazon S3 bucket (s3:// or s3ssl://).• Hls media store: To send to an AWS Elemental MediaStore container (mediastoressl://).• Hls akamai: To send to an Akamai CDN (this always uses HTTP or HTTPS).• Hls webdav: To send to AWS Elemental MediaPackage. Or to send to a downstream system that uses
HTTP WebDAV or HTTPS WebDAV.
When you select the CDN type, more fields appear, appropriate to the type of connection. For detailsabout a field, choose the Info link next to the field.
The CDN is one piece of the information that is used for the destination and file names (p. 43) ofthe manifest and media files.
• Optionally change the value of Input loss action.• Complete the Caption language mappings fields only if your plan is to include at least one embedded
captions asset in the output in this output group. See the section called “Set up the HLS Manifest(Embedded Captions)” (p. 80)
HLS Outputs
This section contains fields that are related to the encoding of the video, audio, and captions in theoutput, and that are related to the packaging and delivery of the output.
If you want more than one output in this output group, choose Add output. An Output line is addedfor each output. Setup of the individual outputs is described in the section called “Step 5: CreateOutputs” (p. 49).
For the Name modifier field for each output, type a modifier, if appropriate. For uses for this field, seethe section called “About HLS Group Destinations and File Names” (p. 43).
Location
Complete this section to specify the location and organization of the manifest and asset files atthe publishing point. The fields in this section provide some of the information that is used for thedestination and file names (p. 43) of the manifest and media files.
42

AWS Elemental MediaLive User GuideCreating an HLS Output Group
Manifests and Segments
Complete this section to change the default setup of the HLS manifest and the segmentation of outputs.
DRM
Complete this section only if you are setting up for DRM using a static key to encrypt the output. In Keyprovider settings, choose Static key, and then complete all the other fields as appropriate. For detailsabout a field, choose the Info link next to the field.
In a static key setup, you type an encryption key in this section (along with other configuration data) andthen give that key to the other party (for example, by sending it in an email). A static key is not really aDRM solution and is not highly secure.
AWS Elemental MediaLive supports only a static key as an encryption option. To use a DRM solutionwith a key provider, you must deliver the output to AWS Elemental MediaPackage (in other words, set upAWS Elemental MediaPackage as the destination for the output) and then encrypt the video using AWSElemental MediaPackage. For more information, see the AWS Elemental MediaPackage User Guide.
Ad Markers
Complete this section if you want to include SCTE-35 ad messages in the output. See SCTE-35 MessageProcessing (p. 87) and specifically the section called “Enabling Decoration – HLS” (p. 94).
Captions
If your plan is to include at least one embedded captions asset in the output in this output group, thenyou can optionally set up the HLS manifest to include information about the caption languages. See thesection called “Set up the HLS Manifest (Embedded Captions)” (p. 80).
ID3
Complete this section if applicable.
About HLS Group Destinations and File NamesHLS output consists of a manifest, one rendition manifest for each output in the output group, andmedia files: one set of .ts files for each output, and optionally one or more captions files for eachoutput.
For example, one manifest file called curling.m3u8, one rendition manifest calledcurling_high.m3u8, and many .ts files that contain the video and audio (each file contains onesegment of a specified number of seconds) and three .vtt files for English, French, and SpanishWebVTT captions.
Several fields in the HLS group section and the individual outputs control the location of these files:
• The CDN settings fields in the HLS settings section.
The main field specifies the type of connection to the content delivery network (CDN), which is thedownstream system that is the destination for the HLS output. For example, if the destination is AWSElemental MediaPackage, the CDN is of type hls webdav. The other fields in this section provideconnection details.
• The two URL fields in the HLS group destinations section.
The URL consists of a protocol portion, a path portion, and a base filename portion.
For example, assume that the URL is https://sports/curling.
43

AWS Elemental MediaLive User GuideCreating an HLS Output Group
The protocol portion is https://. The protocol is required and must be correct for the CDN thatyou specify. For example, https:// is correct if the CDN type is Hls basic put or Hls akamai or Hlswebdav:
• http:// or https:// if you select Hls basic put in the CDN field and you are sending to a CDNthat uses HTTP or HTTPS PUT
• s3:// or s3ssl:// if you select Hls basic put in the CDN field and you are sending to an AmazonS3 bucket
• mediastoressl:// if you select Hls media store in the CDN field
• http:// or https:// if you select Hls akamai in the CDN field
• http:// or https:// if you select Hls webdav in the CDN field and you are sending to a serverusing WebDAV or you are sending to AWS Elemental MediaPackage
The path portion is sports/. The path is required and consists of the folders, terminated by a slash. Itidentifies the location of the manifest and media files.
The base file name is curling. It is used in the manifest file names and media file names. The basefile name is optional. If you omit it, AWS Elemental MediaLive uses the name of the input as the basefile name.
• The Name modifier field in the HLS outputs section.
Required only in output groups with more than one output. For example, _high. Used in the renditionmanifest file names and in media file names.
Following from our example, the manifest file would be curling, and the renditionmanifest files would be curling_high and curling_low. The media video files wouldbe curling_high.00001.ts, curling_high.00002.ts, and so on for output 1, andcurling_medium.00001.ts, curling_medium.00002.ts, and so on for output 2.
• The Segment modifier field in the Output settings section of each individual output.
Always optional. For example, _high. Used only in the media file names. Typically used instead ofName modifier, when you have only one output in the output group and you want a modifier in themedia but not in the manifest.
Following from our example, the manifest file would be curling, the rendition manifestfile would be curling, and the media video files would be curling_high.00001.ts andcurling_high.00002.ts.
• The Base URL manifest field and Base URL field in the Location section.
Optional. These fields are typically used only for non-standard manifests.
• The Directory structure field in the Location section.
Optional. Used only to create subdirectories for the media files. Creates one subdirectory for eachoutput, and then creates sub-subdirectories according to the Segments per subdirectory field.
For example, the high-resolution media files will go in subdirectories with the same name as eachrendition manifest: curling_high and curling_low. Inside each subdirectory there will be a sub-subdirectory named 00001 (for the first set of media files), 00002 (for the next set of media files), andso on.
HLS Example
This example shows how to set up the fields that relate to destinations. They don't show how to set upother fields such as fields in the individual outputs.
44

AWS Elemental MediaLive User GuideCreating an HLS Output Group
You want to stream the curling game to AWS Elemental MediaPackage. You want to create threeoutputs: high, medium, and low bit rate.
Field Value
CDN settings in HLS settings section hls webdav
This is the type of connection that AWS ElementalMediaPackage uses. Change the other CDN fieldsthat appear, or keep the defaults.
Fields in Location section Keep the defaults in all the fields; these fields arenot used in this example.
URL in HLS group destination A section For example,https://62e3c93793c034c.mediapackage.us-west-2.amazonaws.com/in/v1/9378dje8/channel.
The URLs are the Input URLs from the channelin AWS Elemental MediaPackage. As discussed inthe section called “Setting Up the DownstreamSystem” (p. 23), the input in AWS ElementalMediaPackage is identical to the output from AWSElemental MediaLive. This input URL must alreadyexist in AWS Elemental MediaPackage.
Note that in AWS Elemental MediaPackage, URLsalways end in "channel", so the base file name inAWS Elemental MediaLive must be "channel".
Credentials in HLS group destination A section AWS Elemental MediaPackage accepts onlyauthenticated requests, so you must type a username and a password that is known to AWSElemental MediaPackage. For the password,type the EC2 Parameter Store name value (notthe actual password). For more information,see Access to Amazon EC2 Systems ManagerParameter Store.
URL in HLS group destination B section For example,https://60dei849783734c.mediapackage.us-west-2.amazonaws.com/in/v1/6da5ba717b357a/channel.
Credentials in HLS group destination B section Type a user name and password as for the URL fordestination A. The credentials are probably thesame for both URLs, but they might not be.
Name modifier in HLS outputs section Choose Add output twice: two more Output linesare added to this section, for a total of three lines.In each line, type a modifier: _high, _medium,and _low.
As a result, files are created with the following names:
• One master manifest: channel.m3u8
45

AWS Elemental MediaLive User GuideCreating an RTMP Output Group
• One rendition manifest for each output: channel_high.m3u8, channel_medium.m3u8,channel_low.m3u8
• TS files for each output:
• channel_high.00001.ts, channel_high.00002.ts, channel_high.00003.ts, and so on
• channel_medium.00001.ts, channel_medium.00002.ts, channel_medium.00003.ts, andso on
• channel_low.00001.ts, channel_low.00002.ts, channel_low.00003.ts, and so on
The files will be published to both URL inputs on AWS Elemental MediaPackage .
Creating an RTMP Output GroupFollow these steps if, when you were planning the channel (p. 17), you determined that you want toinclude an RTMP output group.
To create an RTMP output group
1. On the Create channel page, under Output groups, choose Add. The Add output group sectionappears.
2. Choose RTMP, and then choose Confirm. More sections appear.
3. Complete the fields as described in the section called “Fields for the RTMP Group” (p. 46).
4. After you enter all the information for one output group, you can create another output group ifyour plan requires it. Otherwise, go to the next step (p. 49).
Fields for the RTMP GroupYou must provide information that applies to all the outputs in the individual RTMP output group.
• For Name, type a name for the output group. For example, My Video Podcast.
• If you want to connect to the destination over RTMPS, for Authentication Scheme, specify the typeof scheme. Typically, choose Common. Choose Akamai only if instructed to do so by the peopleresponsible for the downstream system. If you connect over RTMP, the value in this field is ignored.
• In Additional Settings, optionally change the Cache length, Restart delay, and Cache full behavior.These fields relate to reconnecting to the RTMP server. For more information, see the section called“Reconnection Settings” (p. 52).
• In Additional settings, for Caption Data, complete this field only if at least one of your outputsincludes captions with embedded as the source captions format and RTMP CaptionInfo as the outputformat. If there are no captions in any output, the value in this field is ignored. For details about afield, choose the Info link next to the field. For detailed information about setting up for captions, seeWorking with Captions (p. 67).
• The RTMP outputs section contains fields that are different for each output. Setup of the individualoutputs is described in the section called “Step 5: Create Outputs” (p. 49).
If you want more than one output in this output group, choose Add output. An Output line is addedfor each output.
Creating a Microsoft Smooth Output GroupFollow these steps if, when you were planning the channel (p. 17), you determined that you want toinclude a Microsoft Smooth output group.
46

AWS Elemental MediaLive User GuideCreating a Microsoft Smooth Output Group
To create a Microsoft Smooth output group
1. On the Create channel page, in the Output groups section, choose Add. The Add output groupsection appears.
2. Choose Microsoft Smooth, and then choose Confirm. More sections appear.
3. Complete the fields as described in the section called “Fields for the Microsoft SmoothGroup” (p. 47).
4. After you enter all the information for one output group, you can optionally create another outputgroup. Otherwise, go to the next step (p. 49).
Fields for the Microsoft Smooth GroupYou must provide information about the destination for all the outputs in each Microsoft Smooth outputgroup.
You also must provide information about the destination for each Microsoft Smooth output group. Thisdestination information applies to all the outputs in the individual Microsoft Smooth output group.
Microsoft Smooth Settings
• For Name, type a name for the output group. For example, Sports Game 10122017 ABR ortvchannel59.
• If you want to change the default setup of the Microsoft Smooth manifest and fragments, chooseGeneral configuration. For details about a field, choose the Info link next to the field.
• If you want to change the configuration of the event information that is sent to the Microsoft IISserver, choose Event configuration. For details about a field, choose the Info link next to the field.
• If you want to change the default setup of the timecode and time stamp that are used in all theoutputs in this output group, choose Timecode configuration. For details about a field, choose theInfo link next to the field.
• If you want all the outputs in this output group to include the SCTE-35 messages that are alreadypresent in the input, choose Sparse track. The messages will be included in a sparse track. For detailsabout a field, choose the Info link next to the field. For more information, see SCTE-35 MessageProcessing (p. 87).
Microsoft Smooth Group Destinations
Specify the URLs for two destinations (A and B). You must specify two destinations because AWSElemental MediaLive works in redundant mode for outputs: it requires two destinations. The URLs mustuse the HTTP or HTTPS protocol. Do not include the port.
Specify the path portion of the destination as /folders/basefilename. The basefilename will beused as the first part of the file name of all the files for all outputs in this output group. Or specify it as /folders/. In this case, the name of the input will be used for the file names.
Microsoft Smooth Outputs
The Microsoft Smooth Outputs section on the console contains fields that relate to the encoding of thevideo, audio, and captions in the output. The section also includes fields that relate to the packaging anddelivery of the output:
• If you want more than one output in this output group, choose Add output. An Output line is addedfor each output. Setup of the individual outputs is described in the section called “Step 5: CreateOutputs” (p. 49).
47

AWS Elemental MediaLive User GuideCreating a UDP Output Group
• For the Name modifier field for each output, type a modifier, if appropriate. For uses for this field, seethe examples (p. 48).
Microsoft Smooth ExampleThe following examples show how to set up the fields that relate to destination. They do not show howto set up other fields such as fields in the individual outputs.
You want to stream the curling game to an origin server that supports Microsoft Smooth. You want tocreate three outputs: high, medium, and low bit rate.
Field Value
URL in the Microsoft Smooth group destinationA section
For example, https://192.0.2.0/sports/curling/$d$.
For information about identifiers for variable data(such as $d$), see Reference: Identifiers for VariableData (p. 120).
Credentials in the Microsoft Smooth groupdestination A section
The Microsoft origin server accepts onlyauthenticated requests, so you must type a username and a password that is known to that server.For the password, type the EC2 Parameter Storename value (not the actual password). For moreinformation, see Access to Amazon EC2 SystemsManager Parameter Store.
URL in the Microsoft Smooth group destinationB section
For example, https://192.0.2.230/sports/curling/$d$.
Credentials in the Microsoft Smooth groupdestination Bsection
Type a user name and password, as for the URLfor destination A. The credentials are probably thesame for both URLs, but they might not be.
Name modifier in the Microsoft Smooth outputssection
Leave blank; in this example, a name modifier isnot used.
Result: If the channel is run on November 30, 2017, files are created with the following names:
• One master manifest: 20171130.isml• A set of video, audio, and captions for output 1: 20171130_high.ismv, 20171130_high.isma,20171130_high.ismt
• A set of video, audio, and captions for output 2: 20171130_medium.ismv, 20171130_medium.isma,20171130_medium.ismt
• A set of video, audio, and captions for output 3: 20171130_low.ismv, 20171130_low.isma,20171130_low.ismt
The files will be published to both destinations: https://192.0.2.0/sports/curling/$d$ andhttps://192.0.2.230/sports/curling/$d$.
Creating a UDP Output GroupFollow these steps if, when you were planning the channel (p. 17), you determined that you want toinclude a UDP output group.
48

AWS Elemental MediaLive User GuideStep 5: Create Outputs
To create a UDP output group
1. On the Create channel page, in the Output groups section, choose Add. The Add output groupsection appears.
2. Choose UDP, and then choose Confirm. More sections appear.
3. Complete the fields in each section (p. 49).
4. After you enter all the information for one output group, you can optionally create another outputgroup. Otherwise, go to the next step (p. 49).
UDP Settings• Type a name for the output group. For example, Sports Game 10122017 ABR or tvchannel59.
• Optionally change the value of Input loss action.
• Complete the ID3 fields if applicable.
UDP DestinationsSpecify the URLs for two destinations (A and B). You must specify two destinations because AWSElemental MediaLive works in redundant mode for outputs: it requires two destinations. The URLs mustuse the RTP or UDP protocol and must include a port number.
If FEC is enabled (this field is in the Output pane, not the Output group pane), then leave space betweenthe port numbers for the two destinations. For example, if one destination is rtp://192.0.2.0:5000,assume that FEC also uses port 5002 and 5004. So the lowest possible port number for the otherdestination is 5005: rtp://192.0.2.230:5005.
UDP OutputsThis section contains fields that relate to the encoding of the video, audio, and captions in the output,and that relate to the packaging and delivery of the output.
If you want more than one output in this output group, choose Add output. An Output line is addedfor each output. Setup of the individual outputs is described in the section called “Step 5: CreateOutputs” (p. 49).
Step 5: Create OutputsEvery output group contains one or more outputs. Each output contains the individual video, audio,and captions encodes and configuration information for the type of output. For example, it containsconfiguration information that is specific to an HLS output.
This section describes how to create and configure the outputs and assumes that you have created theoutput group (p. 38).
To create an output in any output group
1. On the Create channel page, in the Output groups section, the Output section by default has oneoutput. If you need to create more outputs (as determined when you planned the channel (p. 19)),then choose Add Output as many times as required. A new output line is added.
2. Choose the Settings link beside the first output line. The content pane shows the fields for thatoutput.
49

AWS Elemental MediaLive User GuideSettings for an Archive Output
The pane for all output types shows two sections: Output settings and Stream settings. The fieldsin Output settings are different for each output type. The fields in Stream settings are the same forall output types.
3. Complete both the Output settings and Stream settings for the output type: the sectioncalled “Settings for an Archive Output” (p. 50), the section called “Settings for an HLSOutput” (p. 51), the section called “Settings for a Microsoft Smooth Output” (p. 53), or thesection called “Settings for a UDP Output” (p. 53).
4. When you have finished with the fields for this output, go to the next output in this output group.After you set up all the outputs in the output group, go to the outputs in the next output group.
After you set up all outputs, go to the next step (p. 54).
Topics
• Settings for an Archive Output (p. 50)
• Settings for an HLS Output (p. 51)
• Settings for an RTMP Output (p. 51)
• Settings for a Microsoft Smooth Output (p. 53)
• Settings for a UDP Output (p. 53)
Settings for an Archive OutputOn the Output page for an Archive output group, you provide information about the container for thisoutput, and the video, audio, and captions encodes to create in that container.
Output Settings Section• For Name modifier, type a name as described in the section called “Archive Destinations” (p. 38).
• Leave Extension blank; it is always set to m2ts.
• In the fields under Container Settings, optionally change any values. For details about a field, choosethe Info link next to the field.
• In the fields under PID settings, optionally change any values. For details about a field, choose theInfo link next to the field.
Streams Section
In Stream settings, decide if you need to create more encodes for this output, based on the workflowthat you planned (p. 19). By default, each output is set up with one video encode and one audio encode.Choose the appropriate Add button or Delete button to set up the output with the encodes—video,audio, and captions—that you planned for this output.
For example, in one output you might want one video asset and two audio assets, in another outputyou might want one captions asset for French captions, and in a third output you might want onecaptions asset for Spanish captions. For information about why you would set up like this (for example,with an output that contains only one captions asset), see the section called “Examples of ChannelDesigns” (p. 21).
For information about the fields in each type of encode, see the section called “Step 6: Set Up the VideoEncode” (p. 54), the section called “Step 7: Set Up the Audio Encodes” (p. 54), and the sectioncalled “Step 8: Set up the Captions Encodes” (p. 55).
50

AWS Elemental MediaLive User GuideSettings for an HLS Output
Settings for an HLS OutputIn the Output page for an HLS output group, you provide information about the transport for thisoutput and the video, audio, and captions encodes to create in the output.
Output Settings Section• For the Name modifier and Segment modifier, complete the fields as described in the section called
“HLS Group Destinations” (p. 42).• Set the HLS Settings field as appropriate:
• If this output is a regular output with video and audio encodes, choose Standard HLS. More fieldsappear. Keep the default for Audio rendition sets (the value is ignored), and complete the fieldsunder M3U8 as needed or keep the default value, which often is a good choice. For details about afield, choose the Info link next to the field.
• If this output is an output that contains only a video encode and the output is part of an outputgroup that includes an audio rendition group, choose Standard HLS. More fields appear. CompleteAudio rendition sets as required. Complete the fields under M3U8 as needed or keep the defaultvalue, which often is a good choice. For details about a field, choose the Info link next to the field.
• If this output is an output that contains only an audio encode and the output is part of an outputgroup that includes an audio rendition group or is part of an output group that has only audioencodes (no video at all), choose Audio only HLS. A special set of fields appears for configuring theaudio. For details about a field, choose the Info link next to the field.
Streams SectionIn Stream settings, decide if you need to create more encodes for this output, based on the workflowthat you planned (p. 19). By default, each output is set up with one video encode and one audio encode.Choose the appropriate Add button or Delete button to set up the output with the encodes—video,audio, and captions—that you planned for this output.
For example, in one output you might want one video asset and two audio assets, in another outputyou might want one captions asset for French captions, and in a third output you might want onecaptions asset for Spanish captions. For information on why you would set up like this (for example,with an output that contains only one captions asset), see the section called “Examples of ChannelDesigns” (p. 21).
For information about the fields in each type of encode, see the section called “Step 6: Set Up the VideoEncode” (p. 54), the section called “Step 7: Set Up the Audio Encodes” (p. 54), and the sectioncalled “Step 8: Set up the Captions Encodes” (p. 55).
Settings for an RTMP OutputIn each Output page for an RTMP output group, you provide information about the packaging anddelivery of the output, and about the video, audio, and captions encodes to create in the output.
RTMP Destination SectionYou must specify both RTMP destination A and RTMP destination B for this output. You must specifytwo destinations because AWS Elemental MediaLive works in redundant mode for outputs: it requirestwo destinations.
Complete each destination section as follows:
• For URL, type some of the information that you obtained when you set up the downstreamsystem (p. 23). Enter the URL in this format:
51

AWS Elemental MediaLive User GuideSettings for an RTMP Output
<protocol>://<IP address or domain>:<port>/<application name>
For example:
rtmp://192.0.2.0:1935/live
• For Stream, type the stream name (also known as the application instance or stream key). For example,MyStream or 03a38f838e0a.
• If the server requires that you authenticate with a user name and password, complete the Credentialssection. Make sure that you have obtained the user name and password from the RTMP server andthat you have already set up the user name and password in the EC2 Parameter Store. For moreinformation, see Access to Amazon EC2 Systems Manager Parameter Store.
Note that these credentials relate to user authentication, not to the protocol. User authentication isabout whether the RTMP server will accept your request. The protocol is about whether the request issent over a secure connection.
Output Settings Section• For Connection retry interval and Num retries, see the section called “Reconnection
Settings” (p. 52).• If you want to connect to the destination over RTMPS, then for Certificate Mode, choose the option
that is required by the RTMP server (the downstream system). If you connect over RTMP, the value inthis field is ignored.
Reconnection Settings
There are several fields that control how AWS Elemental MediaLive behaves if the connection to theRTMP server seems to drop:
Cache length (on the output group page) specifies how long to hold the output in memory, waiting forthe RTMP server to respond.
When that time expires, Cache full behavior (on the output group page) specifies whether to disconnectimmediately or wait 5 minutes.
If AWS Elemental MediaLive disconnects, then Restart delay (on the output group page) specifies howlong to wait before trying to reconnect.
When AWS Elemental MediaLive tries to reconnect, Connection retry interval (on the output page)specifies how often to retry. Num retries (on the output page) specifies how many times to retry. Whenthe retries expire, this output stops. The channel stops running only if all outputs lose their connections.
Stream Settings SectionIn the Stream settings section, decide if you need to create more encodes for this output, based onthe workflow that you planned (p. 19). By default, each output is set up with one video encode andone audio encode. Choose the appropriate Add button or Delete button to set up the output with theencodes—video, audio, and captions—that you planned for this output.
Typically, RTMP outputs contain one video asset, one or more audio assets, and zero or one captionsassets.
For information about the fields in each type of encode, see the section called “Step 6: Set Up the VideoEncode” (p. 54), the section called “Step 7: Set Up the Audio Encodes” (p. 54), and the sectioncalled “Step 8: Set up the Captions Encodes” (p. 55).
52

AWS Elemental MediaLive User GuideSettings for a Microsoft Smooth Output
Settings for a Microsoft Smooth OutputOn the Output page for a Microsoft Smooth output group, you provide information about the video,audio, and captions encodes to create in the output.
Output Settings Section
For Name modifier, complete the field as described in the section called “Microsoft Smooth GroupDestinations” (p. 47).
Streams Section
In the Stream settings section, decide if you need to create more encodes for this output, based onthe workflow that you planned (p. 19). By default, each output is set up with one video encode andone audio encode. Choose the appropriate Add button or Delete button to set up the output with theencodes—video, audio, and captions—that you planned for this output.
For example, in one output you might want one video asset and two audio assets, in another outputyou might want one captions asset for French captions, and in a third output you might want onecaptions asset for Spanish captions. For information about why you would set up like this (for example,with an output that contains only one captions asset), see the section called “Examples of ChannelDesigns” (p. 21).
For information about the fields in each type of encode, see the section called “Step 6: Set Up the VideoEncode” (p. 54), the section called “Step 7: Set Up the Audio Encodes” (p. 54), and the sectioncalled “Step 8: Set up the Captions Encodes” (p. 55).
Settings for a UDP OutputOn the Output page for a UDP output group, you provide information about the individual outputcontainer and the video, audio, and captions encodes to create in that container.
Output Settings Section• For FEC output settings, choose a value.
• In the fields under Network settings, change any values as needed. For details about a field, choosethe Info link next to the field.
• In the fields under PID settings, change any values as appropriate. For details about a field, choose theInfo link next to the field.
Streams Section• In Stream settings, decide if you need to create more encodes for this output, based on the workflow
that you planned (p. 19). By default, each output is set up with one video encode and one audioencode.
• Choose the appropriate Add button or Delete button to set up the output with the encodes—video,audio, and captions—that you planned for this output.
For example, in one output you might want one video and two audio assets, in another output you mightwant one captions asset for French captions, and in a third output you might want one captions asset forSpanish captions.
53

AWS Elemental MediaLive User GuideStep 6: Set Up the Video Encode
For information about the fields in each type of encode, see the section called “Step 6: Set Up the VideoEncode” (p. 54), the section called “Step 7: Set Up the Audio Encodes” (p. 54), and the sectioncalled “Step 8: Set up the Captions Encodes” (p. 55).
Step 6: Set Up the Video EncodeThe output section for every type of output group (Archive, HLS, Microsoft Smooth, and UDP) contains aStream settings section. In this section, you create encodes (p. 15) for the video, audio, and captions inthe output and specify the details of how you want these assets encoded.
The following procedure describes how to set up a video encode and assumes that you have created theoutput (p. 49) that will hold the video. The fields for a video encode are identical for all output grouptypes. For example, the fields for video for an HLS group are identical to those for a UDP group.
To set up the video encodes in the outputs
1. On the Create channel page, find the output group that you created (p. 38).
2. Under that output group, find the output (or the first output) where you want to set up a videoencode.
3. Choose the link for the video encode.
4. For Codec settings, choose the codec to use for this output. More fields appear.
5. Complete each field as appropriate. For details about a field, choose the Info link next to the field.
6. Continue setting up the audio encodes (p. 54), video encodes, and captions encodes (p. 55) forall outputs in all output groups. When you have finished with the encodes for all outputs, go to savethe channel (p. 55).
Step 7: Set Up the Audio EncodesThe output section for every type of output group (Archive, HLS, Microsoft Smooth, and UDP) contains aStream settings section. In this section, you create encodes (p. 15) for the video, audio, and captions inthe output and specify the details of how you want these assets encoded.
The following procedure describes how to set up an audio encode and assumes that you have created theoutput (p. 49) that will hold the audio. The configuration options for an audio encode are identicalfor all output group types.
To set up the audio encodes in the outputs
1. On the Create channel page, find the output group that you created (p. 38).
2. Under that output group, find the output (or the first output) where you want to set up the audioencode.
3. Choose the link for one of the audio encodes. (You might have created more than one encode.)
4. For Codec settings, choose the codec to use to encode this audio asset. The remaining fields changeto match this codec.
5. Complete each field as appropriate. For details about a field, choose the Info link next to the field.
6. Optionally complete the fields in the Remix settings section, or keep the defaults (to omit remixing).
7. Optionally complete the fields in the Audio normalization settings section, or keep the defaults (toomit normalization).
8. Repeat for each audio encode in this output, if any.
54

AWS Elemental MediaLive User GuideStep 8: Set up the Captions Encodes
9. Continue setting up the audio encodes, video encodes (p. 54), and captions encodes (p. 55) forall outputs in all output groups. When you have finished with the encodes for all outputs go to savethe channel (p. 55).
Step 8: Set up the Captions EncodesThe output section for every type of output group (Archive, HLS, Microsoft Smooth, and UDP) contains aStream settings section. In this section, you create encodes (p. 15) for the video, audio, and captions inthe output and specify the details of how you want these assets encoded.
Before setting up captions, see Reference: Supported Captions (p. 109). There are rules about thefollowing:
• What caption formats can be generated, depending on the format of the input captions and container.For example, ARIB can be generated only from ARIB input captions, which can appear only in a TSinput.
• What caption type (embedded, object, sidecar) applies to which caption format. For example, DVB-Subis an object type of format.
• Which format can be included in which type of output asset. For example, HLS can take WebVTT (asidecar type), 608 (embedded), and burn-in.
To set up the caption encodes in the outputs
1. For detailed information about setting up captions, see Working with Captions (p. 67).2. After you set up the captions for one output, continue setting up the audio encodes (p. 54),
video encodes (p. 54), and captions encodes for all outputs in all output groups. When you havefinished with the encodes for all outputs, go to save the channel (p. 55).
Step 9: Save the ChannelTo save (create) the channel, choose Create channel in the navigation pane.
You can save the channel only after you have configured and created everything that you require. Assoon as you save the channel, AWS Elemental MediaLive validates the configuration of the channel anddisplays messages for any errors. You can't save a draft of the channel, and you can't save a channel thatcontains error messages.
To find your newly created channel, in the navigation pane, choose Channel. (The navigation pane mightbe collapsed. To open it, choose the menu icon in the upper-left corner of the console).
The Channel pane appears and shows the newly created channel in the list of channels. The statechanges to Creating, and then to Ready.
55

AWS Elemental MediaLive User GuideAbout Templates
Creating a Channel from a Templateor by Cloning
A channel contains the details that instruct AWS Elemental MediaLive how to transcode (decode andencode) and package your input into specific outputs.
To create a channel, you provide details about inputs, about one or more output groups and theirdestinations, about the outputs in each output group, and about the video, audio, and caption encodes ineach output.
There are three ways to create a channel:
• From scratch. The Create form on the AWS Elemental MediaLive console contains some fields thatdisplay system defaults and other fields that are empty. You can create a channel from scratch bymodifying the system defaults and by completing the appropriate empty fields. For more information,see Creating a Channel from Scratch (p. 32).
• Using a built-in template or custom template. You can use a template to create a channel, andreuse the template to create more channels. For more information, see the section called “Creating aChannel from a Template” (p. 57).
• By cloning an existing channel. You can clone an existing channel, and then edit the settings forthe new (cloned) channel. For more information, see the section called “Creating a Channel byCloning” (p. 58).
The procedures in the following topics show how to create a channel by using a template or by cloning.Before you use the procedures, you should understand how to create a channel from scratch. For moreinformation, see Creating a Channel from Scratch (p. 32).
Topics• About Templates (p. 56)• About Cloning (p. 57)• Creating a Channel from a Template (p. 57)• Creating a Channel by Cloning (p. 58)• Creating a Custom Template (p. 58)
About TemplatesUsing Built-in TemplatesAWS Elemental MediaLive includes built-in templates that you can access on the console. Each templateincludes data for output groups and outputs, and most importantly, data for encoding video to meetspecific use cases (as specified in the template description).
When you use a built-in template, all sections of the Create channel page are populated with dataexcept for the inputs and output destinations sections.
Even though the templates are built-in, you can choose to edit the existing fields and complete theempty fields.
56

AWS Elemental MediaLive User GuideUsing Custom Templates
Using Custom TemplatesYou or another person in your organization may have created custom templates. A custom templatemight contain nearly all the data that is required to create a complete channel, or it might containonly portions of the data. To create a custom template, see the section called “Creating a CustomTemplate” (p. 58).
Typically, templates are created in order to be shared among different users.
If your organization uses templates, you must obtain the templates you will use from the person whocreated the templates. You must store them in a folder on the computer where you are working on theAWS Elemental MediaLive console. This folder is the "custom template location." You perform this task inyour computer's filesystem, outside of AWS Elemental MediaLive.
When you use a custom template, AWS Elemental MediaLive populates all sections of the Createchannel page are populated with data from the template, except for the input data. Even if the templateincludes input data, that data will not be pulled into the Create channel page.
You can edit the existing fields and complete the empty fields as needed.
About CloningCloning lets you use an existing channel as the basis for a new channel.
When you clone an existing channel, all sections of the Create channel page are populated with the datafrom the cloned channel, except for the input data. Input data is always left blank.
You can edit the existing fields and complete the empty fields as needed.
Creating a Channel from a TemplateYou can create a channel by using a custom template or by using one of the built-in templates that AWSElemental MediaLive provides.
To create a channel from a template (console)
1. If you plan to use a custom template, make sure you have set up to use them. See the section called“Using Custom Templates” (p. 57).
2. Open the AWS Elemental MediaLive console at https://console.aws.amazon.com/medialive/.
3. In the navigation pane, choose Channels.
4. On the Channels page, choose Create channel.
5. On the Create channel page, in the Channel and input details section, in the Channel templatesection, do one of the following:
• To use a built-in template: For Template, from the Channel templates section of the drop-downlist, choose a template. (The Existing channels section does not list templates.)
• To use a custom template: Choose Select custom template. Navigate to the "custom template"folder and choose the template. For information on the custom template location, see the sectioncalled “Using Custom Templates” (p. 57).
6. Complete the fields, such as the input fields, that must always be completed. You can also edit otherfields as needed.
57

AWS Elemental MediaLive User GuideCreating a Channel by Cloning
Creating a Channel by CloningYou can clone a channel that is in the Channels list. (You can also clone a channel after choosing Createchannel; for more information, see the section called “Creating a Channel from a Template” (p. 57).)
To create a channel by cloning (console)
1. Open the AWS Elemental MediaLive console at https://console.aws.amazon.com/medialive/.2. In the navigation pane, choose Channels.3. On the Channels page, choose the radio button next to the channel name.4. Choose Clone.
The Create channel page appears. It replicates all the data from the base channel except for theinput sections, which are always empty.
5. Give the channel a new name and complete the input sections. Change other fields as needed.
Creating a Custom TemplateYou create a custom template by exporting the data from an existing (and therefore validated) channel.AWS Elemental MediaLive exports the data to a JSON file that you can use on the console .
To create a custom template (console)
1. Open the AWS Elemental MediaLive console at https://console.aws.amazon.com/medialive/.2. In the navigation pane, choose Channels.3. On the Channels page, choose the channel name (not the radio button).4. On the details page, choose Create custom template. Follow the prompts to save the channel as a
template. The template is a JSON file with the same name as the channel.5. (Optional) Open the file in a suitable editor and make changes. For example, you can change field
values, add fields, and remove fields. Be careful to maintain valid JSON.6. Make the custom template available to the users who will need them. Each user must store the
template in a folder that is accessible from the computer where the user will work on the AWSElemental MediaLive console. This task is performed outside of AWS Elemental MediaLive.
Users of AWS Elemental MediaLive can use the template file on the console.
58

AWS Elemental MediaLive User GuideViewing a Channel Configuration
Viewing and Monitoring ChannelsYou can view the configuration of an idle or running channel at any time.
You can monitor activity on channels from the AWS Elemental MediaLive console, from AmazonCloudWatch Events, or from Amazon CloudWatch Logs.
Topics
• Viewing a Channel Configuration (p. 59)
• Monitoring a Channel Using the AWS Elemental MediaLive Console (p. 59)
• Monitoring a Channel Using Amazon CloudWatch Events (p. 60)
• Monitoring Using Amazon CloudWatch Logs (p. 63)
Viewing a Channel ConfigurationYou can view information about the configuration of a channel on the Channel details page on the AWSElemental MediaLive console. This page is useful for viewing information when the channel is running.(When a channel is running, you can't view details by choosing Edit).
To view configuration information (AWS Elemental MediaLive console)
1. Open the AWS Elemental MediaLive console at https://console.aws.amazon.com/medialive/.
2. In the navigation pane, choose Channels. (For information about the buttons on this page, see thesection called “Editing a Channel” (p. 66), Starting and Stopping a Channel (p. 108), and thesection called “Creating a Channel by Cloning” (p. 58).)
3. To view more details about a channel, choose the name of that channel. The Channel details pageappears.
4. View configuration information in one of these places:
• For information about the input specification for the channel, choose the Details tab and look atthe Input specifications pane.
• For a one-click view of the destination for the channel (on the downstream system), choose theDestinations tab.
• For basic information about the configuration of the channel, choose the Details tab.
• For a read-only view of the complete configuration of the channel (which you specified when youcreated or edited the channel), choose the Settings tab.
• For a view of the raw JSON code for the channel configuration, choose the Details tab, and thenchoose Advanced details. You can copy this JSON code to your clipboard.
Monitoring a Channel Using the AWS ElementalMediaLive Console
You can view the activity of your channel and its current state.
59

AWS Elemental MediaLive User GuideViewing Status Information
To monitor activity on a channel (AWS Elemental MediaLive console)
1. Open the AWS Elemental MediaLive console at https://console.aws.amazon.com/medialive/.
2. In the navigation pane, choose Channels. (For information about the buttons on the page, see thesection called “Editing a Channel” (p. 66), Starting and Stopping a Channel (p. 108), and thesection called “Creating a Channel by Cloning” (p. 58).)
3. The Channels page shows a list of your channels. Each line in the list provides basic informationabout the channel, including its state (idle or running).
4. To view more details about a channel, choose the name of that channel. The Channel details pageappears.
Viewing Status InformationFor basic status information, look at the Status pane.
For detailed information about the status, choose the Health tab. This tab provides information forboth pipelines in the channel: pipeline A (numbered 0) and pipeline B (numbered 1). You can specify theperiod of time for the health information.
Viewing AlertsAWS Elemental MediaLive generates alerts for a channel when an issue or potential issue occurs in eitherpipeline in a channel. These alerts are displayed in two ways:
• On the right side of the Status pane, there is a count of active alerts for each pipeline.
• On the Alerts tab, details about each alert are displayed.
If the alert is still active, the Cleared column is blank. If the alert has cleared, the column shows thetime stamp for when it cleared.
Handling AlertsWhen an alert occurs, look at the Alerts tab to determine possible causes of the issue. Take steps toresolve the issue.
After you resolve the issue, AWS Elemental MediaLive automatically clears the alert.
If you stop a channel, alerts always automatically clear.
Monitoring a Channel Using Amazon CloudWatchEvents
AWS Elemental MediaLive automatically turns alert information into events in CloudWatch Events. Youcan use Amazon CloudWatch Events to manage these events. For example, you can create event rulesand deliver the events in emails or SMS messages. You can deliver events to a number of destinations.This chapter describes how to deliver them through Amazon Simple Notification Service (SNS).
For complete information about the options for managing events using Amazon CloudWatch Events, seethe Cloudwatch Events User Guide.
60

AWS Elemental MediaLive User GuideOption 1: Send all AWS Elemental
MediaLive Events to an Email Address
For complete information about using Amazon SNS, see the SNS Developer Guide.
Topics
• Option 1: Send all AWS Elemental MediaLive Events to an Email Address (p. 61)
• Option 2: Send Events for Specific Channels to an Email Address (p. 62)
Option 1: Send all AWS Elemental MediaLive Eventsto an Email AddressThis option shows how to set up to send all events to a single email address. The drawback of this setupis that the email account will receive a large volume of emails. Therefore, we recommend that you don'tuse this setup in a production environment.
You must perform the following procedure in each region where channels are running.
Step 1: Create a SubscriptionCreate a subscription to set up a specific email address so that it automatically receives emailnotifications when any event occurs in AWS Elemental MediaLive. You must identify an email recipientfor the emails.
In the following procedure, we use the example of "MediaLive_alert" as the subject line and "MediaLive"as the sender of the email. We create the subscription using the Amazon Simple Notification Service(Amazon SNS) console.
To create a subscription for email notifications (Amazon SNS console)
1. Sign in to the AWS Management Console and open the Amazon SNS console at https://console.aws.amazon.com/sns/v2/home.
2. In the navigation pane, choose Topics, and then choose Create new topic.
3. In the Create new topic dialog box, for Topic name, type the name that you want for the subjectline of the email, such as MediaLive_alert.
4. For Display name, type the name that you want for the sender of the email, such as MediaLive.
5. Choose Create topic.
6. Amazon SNS creates the topic and displays the ARN in the list of topics. For example,arn:aws:sns:us-west-2:111122223333:MediaLive, where 111122223333 is your AWSaccount.
7. Copy this ARN to your clipboard.
8. In the navigation pane, choose Subscriptions, and then choose Create subscription.
9. On the Subscriptions page, choose Create subscription.
10. In the Create subscriptions dialog box, for Topic ARN, type or paste the ARN.
11. For Protocol, choose Email.
12. For Endpoint, type the email address of the recipient. You must be able to log on to this emailaccount because Amazon SNS sends a confirmation email to this address.
13. Choose Create subscription.
Amazon SNS sends a confirmation email to the address that you specified.
14. Log on to that email account, and display the email. Choose the "Confirm subscription" link in theemail to enable the subscription. A confirmation window appears in a web browser. You can closethis window.
61

AWS Elemental MediaLive User GuideOption 2: Send Events for Specific
Channels to an Email Address
Step 2: Create a RuleYou now create a rule in Amazon CloudWatch that says, "When CloudWatch receives any event fromaws.medialive, invoke the specified SNS topic." In other words, you create a rule that sends an email tothe subscribed email address.
To create a rule (Amazon CloudWatch console)
1. Sign in to the AWS Management Console and open the CloudWatch console at https://console.aws.amazon.com/cloudwatch/.
2. In the navigation pane, choose Events.3. On the Welcome to CloudWatch Events page, choose Create rule.4. On the Step 1 page, in Event Source, choose Event Pattern.5. Change Build event pattern to match to Custom event pattern.6. In the box, type the following:
{ "source": [ "aws.medialive" ]}
7. On the pane on the right, choose Add target.8. Choose SNS topic.9. For Topic, choose the topic that you created, for example, MediaLive_alert.10. In Configure input, choose Matched event.11. Choose Configure details.12. Type a name and optional description, and then choose Create rule.
Now, whenever an alert occurs in AWS Elemental MediaLive, an event will be sent to AmazonCloudWatch. This event will trigger the rule that instructs CloudWatch to send an email to the emailaddress that you specified in the SNS subscription.
Option 2: Send Events for Specific Channels to anEmail AddressYou can set up a rule to send all events for a specific channel (or channels) to one email address. Youmust perform this setup in each region where channels are running.
Create as many subscriptions and rules combinations as you need. Follow the steps for option1 (p. ), with these differences:
• When creating the SNS subscription, you might want to add more detail to the topic, for example,MediaLive_notifications_channel_1234567.
• When creating the CloudWatch rule, you create an event pattern that identifies aws.medialive asthe event source and the ARN for the specific channel as the resource within that event source, asfollows:
{ "source": [ "aws.medialive" ],
62

AWS Elemental MediaLive User GuideMonitoring Using Amazon CloudWatch Logs
"resources": [ "arn:aws:medialive:us-west-2:111122223333:channel:1234567" ] }
The resource is the ARN for the channel. You can obtain this ARN from the channels list on the AWSElemental MediaLive console.
This rule says, "When CloudWatch receives any event from aws.medialive for channel 1234567,invoke the specified SNS topic." In other words, the rule triggers an email that is sent to the subscribedemail address.
You can choose to include more than one channel in the resources section, as shown in the followingexample:
"resources": [ "arn:aws:medialive:us-west-2:111122223333:channel:1234567", "arn:aws:medialive:us-west-2:111122223333:channel:2223334" ]
Monitoring Using Amazon CloudWatch LogsAWS Elemental MediaLive produces channel logs that contain detailed information about activity ina channel. The logs provide a sequential description of activity that occurs in the channel. These logscan be useful when the information in alerts (the section called “Monitoring a Channel Using AmazonCloudWatch Events” (p. 60)) does not provide enough information to resolve an issue on the channel.
Channel logs are sent to Amazon CloudWatch Logs. You can use the standard features of CloudWatchLogs to view and manage the logs. For more information, see Amazon CloudWatch Logs User Guide.
You should not automate any processing based on the wording in logs because that wording is subjectto change. (By comparison, you can automate based on the wording in alerts, which are accessed usingCloudWatch Events, because the wording of alerts does not change.)
There is a cost for channel logging. Logging of AWS Elemental MediaLive channel activity forms part ofyour charges for Amazon CloudWatch Logs. See Amazon CloudWatch Pricing.
Topics• Enabling Channel Logs (p. 63)• Working with Logs (p. 64)
Enabling Channel LogsYou enable the capture of logging information for an individual channel on the AWS ElementalMediaLive console. You enable logging and set the logging level (error, warning, info, or debug) on a perchannel basis. The channel must be idle in order to enable or disable logging.
To enable a channel log (AWS Elemental MediaLive console)
1. If you are a returning user of AWS Elemental MediaLive, check with your administrator that yourdeployment has been set up in AWS IAM to support channel logs.
2. Your administrator might instruct you to update the MediaLiveAccessRole permission in one ofthe channels. If you are given this instruction, you must edit a channel (p. 66) (choose any idle
63

AWS Elemental MediaLive User GuideWorking with Logs
channel), display the Channel and input details page (p. 33), and choose the Update button. Whenthe role is updated in one channel, the chaneg applies to all channels.
3. To enable logging in a new channel, set up logging during creation (p. 32). To enable logging inan existing channel, edit the channel (p. 66); this channel must be idle. In both cases, on theGeneral settings page, in the Channel logging section, choose Logging. Choose a level other thanDISABLED. For more information, see the section called “Logging” (p. 38).
4. You or an administrator can also go into CloudWatch Logs and set an expiry date for the logs.
Disabling Channel LogsYou disable the capture of logging information for an individual channel on the AWS ElementalMediaLive console. Edit the channel, and on the General settings page, on the Channel logging section,choose Logging. Set the level to DISABLED.
Working with LogsYou view AWS Elemental MediaLive logs on the CloudWatch Logs console, in the same way that you viewlogs for any service.
You don't have to set up the logs, logging groups, or log streams on the CloudWatch Logs consolebecause AWS Elemental MediaLive automatically sets them up for you.
The log group is always the following: ElementalMediaLive.
The log stream is named after the ARN/pipeline. For example, arn_aws_medialive_us-west-2_111122223333_channel_5106412_0, where 5106412 is the channel ID and 0 is pipeline A.
Content of EML LogsThe AWS Elemental MediaLive logs are in JSON format:
{ "encoder_pipeline": 1, "severity": "I", "timestamp": "2018-05-21T16:36:41.650318", "channel_arn": "arn:aws:medialive:us-west-2:111122223333:channel:5106412", "logger_name": "", "message": "Probing input media..." }, ...]
The data is the following:
• encoder_pipeline: 0 (for pipeline A) or 1 (for pipeline B).• severity: A letter. The logging level (which you set when you enable logging) controls which
severities could appear in logs. For more information, see Log Levels and Verbosities (p. ).• timestamp: The time in ISO 8601 format: yyyy - mm - dd T hh : mm : ss : decimal fraction of second.• channel_arn: The ARN plus the channel ID. In the preceding example, the channel has ID 5106412.• logger_name: This might be blank or might specify a name that ties a series of related messages
together.• message: The message. Remember that the wording is subject to change, so you should not automate
against it.
64

AWS Elemental MediaLive User GuideWorking with Logs
Log Levels and VerbositiesTo use this table, find a level in the first column then read across to identify the message severities thatwill appear in the logs with this logging level.
Level DebugMessages
Info Messages WarningMessages
CriticalMessages
FatalMessages
DEBUG Yes Yes Yes Yes Yes
INFO Yes Yes Yes Yes
WARNING Yes Yes Yes
ERROR Yes Yes
Managing Log StorageWhen you delete a channel, the associated logs remain in CloudWatch Logs. You will continue to becharged for their storage until you delete them. To delete logs, change the log data retention. All thedata that is older than the retention setting that you specify will be deleted. For more information, seeAmazon CloudWatch Logs User Guide. The Log group for the logs is ElementalMediaLive.
65

AWS Elemental MediaLive User GuideEditing a Channel
Editing and Deleting a Channel
Editing a ChannelYou can edit any existing (saved) channel by editing, adding, or deleting output groups and outputs. Youcan also edit, add, or delete the channel's video, audio, and caption encodes.
NoteYou cannot use the edit feature to change the input asgsociated with an existing channel.Instead, clone (p. 58)the channel and associate a different input.
1. On the Channels page, choose the radio button beside the channel.2. Choose Actions then Edit. The Edit channel page appears. The details on this page are identical to
those in Create channel. For information on working with this page, see Creating a Channel fromScratch (p. 32).
3. When done, choose Update channel.
Wait for the channel State to return to Idle before performing another action with this channel.
Deleting a ChannelYou can delete a non-running channel from the Channels list or the details view.
To delete a channel
1. On the Channels page, choose the radio button by the channel name.2. If the channel is running, choose Stop.3. Choose Delete.
66

AWS Elemental MediaLive User GuideSupported Features
Working with Captions
You can set up AWS Elemental MediaLive to include captions when it ingests the source (either captionspresent inside the video source or captions from an external file) and include those captions in theoutput in either the same or a different format. You can include several captions in the output. Forexample, you can include captions for several languages. You can take a source captions asset andconvert it to one format in one output and another format in a different output.
You perform the setup for captions in your AWS Elemental MediaLive channel.
By default, AWS Elemental MediaLive does not ingest any captions (not even captions that areembedded in the video). You must explicitly identify the captions to ingest and the captions to output.
NoteThe information in this captions section assumes that you are familiar with the general steps forcreating a channel, as described in Creating a Channel from Scratch (p. 32). It also assumes thatyou have started creating a channel, including associating an input with the channel.
Supported Features
Supported FormatsAWS Elemental MediaLive supports specific formats in inputs and specific formats in outputs. See thesection called “General Information on Supported Formats ” (p. 109) for a table that lists the supportedcaptions formats, with a reference to the standard that defines that format. This table specifies whetherthe format is supported as input or output or both.
Format Support by Output Container• The type of input container. A given input container can contain captions in some formats and not in
others.
• The format of the input captions. A given format of captions can be converted to some formats andnot to others.
• The type of output containers. A given output container supports some caption formats and notothers.
For more information, see Reference: Supported Captions (p. 109).
Supported Captions CategoriesDifferent formats are grouped into the same category. For example, TTML and WebVTT are grouped inthe "sidecar" category. AWS Elemental MediaLive supports several categories of captions. The main onesare the following:
• Embedded. The captions are carried inside the video encode.
67

AWS Elemental MediaLive User GuideSupport for Languages
• Captions Object. The captions are in their own "captions encode." They are not part of the videoencode. But they are in the same output as their corresponding video and audio encodes.
• Sidecar. The captions are each in their own output, separate from the output that contains the videoand audio. There can be several "captions-only" outputs, for example, one for each language that youwant.
You need to be aware of captions categories when you set up captions in the output. For moreinformation about all categories and which category each captions format belongs to, see the sectioncalled “ Step 3: Match Formats to Categories” (p. 76).
Support for LanguagesIf the source includes captions in multiple languages, you can include multiple languages in the outputas follows:
• Embedded-to-Embedded. For any of the embedded source formats, if you are doing “embeddedin, embedded out” (also known as embedded-to-embedded), all languages that are in the input areincluded in the output. You can't remove any of the languages.
• Embedded In, Other Out. For any of the embedded source formats, if you are doing “embedded in,other out,” you can specify which languages to extract and include in an output.
• Teletext-to-Teletext. For teletext source, if you are doing “teletext in, teletext out” (also knownas teletext-to-teletext), all languages (pages) are included in the output. You can't strip out anylanguages. In fact, the entire teletext content is included in the output; you can't strip out any of thepages. Furthermore, teletext-to-teletext is supported only in TS outputs.
• Teletext In, Other Out. For teletext source, if you are doing “teletext in, other out,” you can specifywhich languages to extract and which languages to include in an output.
• Any Other Combination. For all other sources, you always specify the language to extract from theinput and the language to include in an output, regardless of the source format and output format.
Support for Font Styles in Output CaptionsDepending on the scenario, you can specify the style for fonts, including color, outline, and backgroundcolor.
Font Style Options
Source Caption Output Caption Options for Font Style
ARIB ARIB None. The font styles in theinput are automatically passedthrough in the output.
SCTE-27 SCTE-27 None. The font styles in theinput are automatically passedthrough in the output.
DVB-Sub DVB-Sub None. The font styles in theinput are automatically passedthrough in the output.
Teletext Teletext None. The font styles in theinput are automatically passedthrough in the output.
68

AWS Elemental MediaLive User GuideTypical Scenarios
Source Caption Output Caption Options for Font Style
Any Supported Caption Burn-in You can specify font styles inthe output. If you don’t specifystyles, the AWS ElementalMediaLive defaults are used.
Any Supported Caption DVB-Sub You can specify font styles inthe output. If you don’t specifystyles, the AWS ElementalMediaLive defaults are used.
An Embedded Combination(Embedded, Embedded+SCTE-20, SCTE-20+Embedded)
TTML The font information in thesource can be copied to theoutput, or you can let thedownstream player determinethe font style.
Teletext TTML The font information in thesource can be copied to theoutput, or you can let thedownstream player determinethe font style.
Any Other Any Other No control: the font style isalways determined by thedownstream player.
Typical ScenariosTopics
• Use Case: One Input Format to One Output and Not Converted (p. 69)• Use Case: One Input Format Converted to One Different Format in One Output (p. 70)• Use Case: One Input Format Converted to Different Formats, One Format for Each Output (p. 70)• Use Case: One Captions Output Shared by Multiple Video Encodes (p. 70)
Use Case: One Input Format to One Output and NotConvertedThe input is set up with one format of captions and two or more languages. You want to maintain theformat in the output. You want to produce only one type of output and include all the languages in thatoutput.
For example, the input has embedded captions in English and French. You want to produce HLS outputthat includes embedded captions in both English and French.
69

AWS Elemental MediaLive User GuideUse Case: One Input Format Convertedto One Different Format in One Output
Use Case: One Input Format Converted to OneDifferent Format in One OutputThe input is set up with one format of captions and two or more languages. You want to convert thecaptions to a different format in the output. You want to produce only one type of output and include allthe languages in that output.
For example, the input has embedded captions in German and French. You want to convert the captionsto DVB-Sub and include these captions in both languages in a UDP output.
Use Case: One Input Format Converted to DifferentFormats, One Format for Each OutputThe input is set up with one format of captions and two or more languages. You want to produce severaldifferent types of output. In each output, you want to convert the captions to a different format butinclude all the languages.
For example, the input has teletext captions in Czech and Polish. You want to produce a MicrosoftSmooth output and an HLS output. In the Microsoft Smooth output, you want to convert both captionsto TTML. In the HLS output, you want to convert both captions to WebVTT.
Use Case: One Captions Output Shared by MultipleVideo EncodesThis use case deals with captions in an ABR workflow.
70

AWS Elemental MediaLive User GuideSetting Up for Captions
For example, there are three video/audio media combinations: one for low-resolution video, one formedium, and one for high. There is one output captions asset (English and Spanish embedded) that willbe associated with all three video/audio media combinations.
Setting Up for CaptionsWhen you create a channel, you must specify the format of the input captions, then specify the desiredformat of the captions for every output. When you save the channel, your choices are validated accordingto the supported combinations of input container, source caption, and output container.
Topics
• Step 1: Create Caption Selectors in the Input (p. 71)
• Step 2: Plan Captions for the Outputs (p. 75)
• Step 3: Match Formats to Categories (p. 76)
• Step 4: Create Captions Encodes (p. 77)
Step 1: Create Caption Selectors in the InputYou must identify the captions that you want to use and assign each to a caption selector. If you don'tcreate any caption selectors, you will not be able to include captions in the output. All the captions willbe removed from the media.
Identify the Captions You Want
1. Identify which captions are in the input (the provider of the input should provide you with thisinformation) and identify which captions are available to you as external files. Identify the captionformats and, for each format, the languages.
2. Identify which of those formats and languages that you want to use.
3. Determine how many caption selectors to create in the input in the channel, using the followingguidance:
• For embedded-to-embedded, create a single caption selector for all languages. All languagesare passed through; there is no other option. For details, see the section called “Information forEmbedded ” (p. 73).
71

AWS Elemental MediaLive User GuideStep 1: Create Caption Selectors in the Input
• For teletext-to-teletext, create a single caption selector for all languages (in fact, one captionselector for the entire content). All languages are passed through; there is no other option. Fordetails, see the section called “Information for Teletext” (p. 74).
• In all other cases, create one caption selector for each language and format combination.
You end up with a list of caption selectors to create. For example:
• Caption Selector 1: Teletext captions in Czech
• Caption Selector 2: Teletext captions in Polish
Create Caption Selectors
In AWS Elemental MediaLive, extract the desired captions by adding a caption selector in the channel.Each extracted caption is contained in one caption selector.
1. In the channel that you are creating, in the navigation pane, choose Channel and input details.
2. For Input settings, choose Add caption selectors.
3. For Caption selector name, type a suitable name. For example, TTML Czech.
4. For Selector settings, choose the format of the source captions.
5. For most formats, more fields appear. For details about a field, choose the Info link next to the field.In addition, see extra information on DVB-Sub or SCTE-27 (p. 72), on Embedded (p. 73), or onTeletext (p. 74).
6. Create more caption selectors, as required.
Information for DVB-Sub or SCTE-27
DVB-Sub and SCTE-27 formats are supported only in TS inputs. You must specify the location of thecaptions by completing the PID and/or Language code fields in one of these ways.
PID Language Code Result
Specified Blank Extracts captions from thespecified PID.
Blank Specified Extracts the specified language,whichever PID that happens tobe in.
Specified Specified Extracts captions from that PID;the language is informational.
Blank Blank Valid only if the source is DVB-Sub and the output is DVB-Sub.With this combination of PIDand Language, all input DVB-Sub PIDs will be included in theoutput.
Not valid for SCTE-27.
72

AWS Elemental MediaLive User GuideStep 1: Create Caption Selectors in the Input
Information for Embedded
Read this section if the input captions are any of the following: embedded (EIA-608 or CEA-708),embedded+SCTE-20, SCTE-20+embedded, or SCTE-20.
How Many Caption Selectors?
• If you are doing embedded-to-embedded, create only one caption selector, even if you want to includemultiple languages in the output. With this scenario, all languages are automatically extracted and areautomatically included in the output.
• If you are doing embedded-to-other, create one caption selector for each language that you want toinclude in the output, to a maximum of four selectors.
• If you are doing embedded-to-embedded in some outputs and embedded-to-other in other outputs,create one caption selector for the embedded-to-embedded, then create up to four more selectors forthe embedded-to-other, one for each desired language.
Caption Selector Fields
• Selector settings:
• Choose embedded if the source captions are embedded (EIA-608 or CEA-708), embedded+SCTE-20,or SCTE-20+embedded.
• Choose SCTE-20 if the source captions are SCTE-20 alone.
• EIA-608 track number: This field specifies the language to extract. Complete as follows:
• If you are doing embedded-to-embedded captions (you are creating only one caption selector forthe input embedded captions), this field is ignored, so keep the default.
• If you are converting embedded to another format, (you are creating several caption selectors, onefor each language), specify the number of the CC instance (from the input) that holds the desiredlanguage.
• Convert 608 to 708: The embedded source captions can be EIA-608 captions, CEA-708 captions, orboth EIA-608 and CEA-708. You can specify how you want these captions to be handled when AWSElemental MediaLive is ingesting content. The following table describes the behavior for variousscenarios.
EIA-608 in Source CEA-708 in Source Convert Field Result
Yes No Upconvert CEA-708 data iscreated based on theEIA-608 data andEIA-608 data is addedas 608-compatibilitybits in the CEA-708data.
Yes No Disabled Original EIA-608 ispreserved.
No Yes Upconvert Original CEA-708 ispreserved.
No Yes Disabled Original CEA-708 ispreserved.
73

AWS Elemental MediaLive User GuideStep 1: Create Caption Selectors in the Input
EIA-608 in Source CEA-708 in Source Convert Field Result
Yes Yes Upconvert CEA-708 data isdiscarded. NewCEA-708 data iscreated based on theEIA-608 data, andEIA-608 data is addedas 608-compatibilitybits in the CEA-708data.
The new CEA-708 datawill not include anyCEA-708 formattingfeatures.
Not recommended.
Yes Yes Disabled Original EIA-608 ispreserved and originalCEA-708 is preserved.
• SCTE-20 detection: If the source captions combine embedded (EIA-608 or CEA-708) and SCTE-20, youmight want to set this field to Auto. AWS Elemental MediaLive will give preference to the 608/708embedded captions but will switch to use the SCTE-20 captions when necessary. If you set this field toOff, AWS Elemental MediaLive will never use the SCTE-20 captions.
Information for Teletext
Teletext is a form of data that can contain several types of information, not just captions. Teletext canbe present in TS input, in which case it might be referred to as “DVB Teletext.” Teletext can be handled inone of the following ways:
• If you want to include the entire teletext input, you must do teletext-to-teletext. The entire teletextcan never be converted to another format. Teletext-to-teletext is supported only in a TS output.
• Individual captions pages (the captions in a specific language) can be extracted and converted toanother captions format.
• Individual captions pages (the captions in a specific language) cannot be extracted and kept in teletext.If you want to extract individual captions pages, you must convert them to another format.
How Many Caption Selectors?
• If you are doing teletext-to-teletext captions, create only one caption selector, even if you want toinclude multiple languages in the output. With this scenario, all languages are automatically extractedand are automatically included in the output.
• If you are doing teletext-to-other, create one caption selector for each language that you want toinclude in the output. For example, one selector to extract English teletext, and one selector to extractSwedish teletext.
• If you are doing teletext-to-teletext in some outputs and teletext-to-other in other outputs, create onecaption selector for the teletext-to-teletext, and then create individual selectors for the teletext-to-other, one for each language being converted.
Caption Selector Fields
74

AWS Elemental MediaLive User GuideStep 2: Plan Captions for the Outputs
• Selector settings: Choose Teletext.
• Page number: This field specifies the page of the desired language. Complete as follows:
• If you are doing teletext-to-teletext captions (you are creating only one caption selector for theinput captions), leave blank: the value is ignored.
• If you are converting teletext to another format (you are creating several caption selectors, one foreach language), specify the page for the desired language. If you leave this field blank, you will get avalidation error when you save the channel.
Step 2: Plan Captions for the OutputsIf you followed the instructions in the section called “Step 1: Create Caption Selectors in theInput” (p. 71), you should have a list of the caption formats and languages that will be available forinclusion in the outputs.
You must now plan the caption information for the outputs:
1. Identify the types of output media that you plan to create in the channel. For example, MicrosoftSmooth and HLS.
2. Identify the combinations of video and audio that you plan to create for each output media.
3. For each output media, identify which input captions will be converted to which output formats. Forexample, you will convert teletext captions to TTML for the Microsoft Smooth output media, andthose same teletext captions to WebVTT for the HLS output media.
The output formats that are possible depend on the input formats and the type of output media. SeeReference: Supported Captions (p. 109) to determine which output captions are possible given theinput format.
4. Identify the languages for each output format:
• In general, count each language separately.
• Exception: For embedded-to-embedded, count all languages as one.
• Exception: For teletext-to-teletext, count all languages as one.
The Result
You end up with a list of outputs, and the captions formats and languages for each output. For example:
• Microsoft Smooth output with TTML captions in Czech
• Microsoft Smooth output with TTML captions in Polish
• HLS output with WebVTT captions in Czech
• HLS output with WebVTT captions in Polish
Outputting Multiple FormatsYou can include captions from two or more different formats in an output. For example, you can includeboth embedded captions and WebVTT captions in an HLS output, to give the downstream system morechoices about which captions to use. The only rules for multiple formats are the following:
• The output container must support all the formats. See Reference: Supported Captions (p. 109).
• The font styles in all the captions that are associated with an output must match. This means that theend result must be identical, not that you must use the same option to get that result. For example,all captions that are associated with the output must be white for the first language and blue for thesecond language.
75

AWS Elemental MediaLive User GuideStep 3: Match Formats to Categories
Managing this style matching can be a little tricky. For information about the font style options, seeSupport for Font Styles in Output Captions (p. 68).
Step 3: Match Formats to CategoriesThere are different procedures to follow to create caption encodes in the output. The correct proceduredepends on the "category" that the output captions belong to. There are five categories of captions,described in the following table.
On the list of outputs that you have created, make a note of the category that each captions optionbelongs to.
Captions Format Category of This Format
ARIB Object
Burn-in Burn-in
DVB-Sub Object
Embedded Embedded
Embedded+SCTE-20 Embedded
RTMP CaptionInfo Object
SCTE-20+Embedded Embedded
SCTE-27 Object
SMPTE-TT Stream in Microsoft Smooth
Teletext Object
TTML Sidecar
WebVTT Sidecar
For example, your list of outputs might now look like this:
• Microsoft Smooth output with TTML captions (sidecar) in Czech.• Microsoft Smooth output with TTML captions (sidecar) in Polish.• HLS output with WebVTT captions (sidecar) in Czech.• HLS output with WebVTT captions (sidecar) in Polish.
Embedded in VideoThe captions are carried inside the video encode, which is itself in an output in the output group. Thereis only ever one captions asset within that video encode, although that asset might contain captions forseveral languages.
Captions ObjectThe captions are in their own "captions encode" in an output in the output group. They are not part ofthe video encode. However, they are in the same output as their corresponding video and audio encodes.There might be several captions encodes in the output, for example, for different languages.
76

AWS Elemental MediaLive User GuideStep 4: Create Captions Encodes
SidecarThe captions are each in their own output in the output group, separate from the output that containsthe video and audio. Each captions output contains only one captions asset (file). The output groupmight contain several "captions-only" outputs, for example, one for each language in the output group.
SMPTE-TT in Microsoft SmoothThe captions are handled as a separate stream in Microsoft Smooth.
Burn-inThe captions are converted into text and then overlaid on the picture directly in the videoencode. Strictly speaking, once the overlay occurs, these are not really captions because they areindistinguishable from the video.
Step 4: Create Captions EncodesGo through the list of outputs you created and set up the captions in each output group, one by one.
Follow the procedure that applies to the format category of the captions output:
• the section called “All Captions except Sidecar or SMPTE-TT in Microsoft Smooth” (p. 77).• the section called “Sidecar Captions” (p. 78).• the section called “SMPTE-TT Captions in Microsoft Smooth” (p. 78).
All Captions except Sidecar or SMPTE-TT in Microsoft SmoothFollow this procedure if the format of the captions asset that you want to add belongs to the category ofembedded, burn-in, or object.
1. In the channel that you are creating, in the navigation pane, find the output group (which you havealready created). For example, find the HLS output group.
2. Find the output where you want to add the captions, or create a new output. This output mightalready be set up with video and audio, or you could set up the video and audio after setting up thecaptions.
3. Choose the output.4. For Stream settings, choose Add caption.5. For Caption description name, type a name for this captions asset that is unique in the channel. For
example, Embedded. Or accept the default (which is autogenerated).6. For Caption selector name, type the name of the caption selector that you created in step
1 (p. 71). Specify the selector that identifies the captions asset that is the source for the captions inthis output.
7. For Caption settings, choose the captions format for the output captions.8. Complete the fields that appear for the selected format. For details about a field, choose the Info link
beside the field. For tips about font styles in DVB-Sub or burn-in, see Font Styles for Burn-in or DVB-Sub Output (p. 79).
9. If the output format is embedded and the output group is HLS, you can include caption languageinformation in the manifest. You perform this setup in the output settings (separate from the captionsencode). See HLS manifest (p. 80).
10.If the output format is ARIB or DVB-Sub or SCTE-27, you must perform some extra setup in the outputsettings (separate from the captions encode). See PIDS for ARIB output (p. 79) or PIDs for DVB-Suboutput (p. 79) or PIDs for SCTE-27 (p. 79) or PIDs for Teletext output (p. 79).
77

AWS Elemental MediaLive User GuideStep 4: Create Captions Encodes
11.Repeat these steps to create captions in more outputs and output groups, as applicable.
Sidecar CaptionsFollow this procedure if the format of the captions asset that you want to add is a sidecar, as identified inthe section called “ Step 3: Match Formats to Categories” (p. 76).
1. In the channel that you are creating, in the navigation pane, find the output group (which you havealready created). For example, find the HLS output group.
2. Find the output where you want to add the captions, or create a new output. This output mightalready be set up with video and audio, or you could set up the video and audio after setting up thecaptions.
3. Choose the output.
4. For Stream settings, remove the video and audio encodes from this output by choosing the encodeand selecting Remove video or Remove audio.
5. Choose Add caption. This output should now contain one caption section and no video or audiosections.
6. For Caption description name, type a name for this captions asset that is unique in the channel. Forexample, webvtt Czech. Or accept the default (which is autogenerated).
7. For Caption selector name, type the name of the caption selector that you created in step1 (p. 71). Specify the selector that identifies the captions asset that is the source for the captions inthis output.
8. For Caption settings, choose the sidecar format for the output captions.
9. Complete the fields that appear for the selected format. For details about a field, choose the Info linkbeside the field.
10.Repeat these steps to create sidecar captions in this or another output group, as applicable.
SMPTE-TT Captions in Microsoft SmoothFollow this procedure to add output captions in the SMPTE-TT format (only possible in a MicrosoftSmooth output group).
1. In the channel that you are creating, in the navigation pane, find the Microsoft Smooth output group(which you have already created).
2. Find the output where you want to add the captions, or create a new output. This output mightalready be set up with video and audio, or you could set up the video and audio after setting up thecaptions.
3. Choose the output.
4. For Stream settings, remove the video and audio encodes from this output by choosing the encodeand selecting Remove video or Remove audio.
5. Choose Add caption. This output should now contain one caption section and no video or audiosections.
6. For Caption description name, type a name for this captions asset that is unique in the channel. Forexample, SmpteTT Czech. Or accept the default (which is autogenerated).
7. For Caption selector name, type the name of the caption selector that you created in step1 (p. 71). Specify the selector that identifies the captions asset that is the source for the captions inthis output.
8. For Caption settings, choose SMPTE-TT.
9. Complete the fields that appear for the selected format. For details about a field, choose the Info linkbeside the field.
78

AWS Elemental MediaLive User GuideStep 4: Create Captions Encodes
10.Repeat these steps to create more SMPTE-TT captions in the Microsoft Smooth output group, asapplicable.
Font Styles for Burn-in or DVB-SubYou can specify the look of the captions if the output captions are Burn-in or DVB-Sub.
If you are using the same caption source in several outputs and both those outputs use the same format,then you must set up the font style information identically in each output. If you do not, you will get anerror when you save the channel.
For example, output A might use Caption Selector 1 with the Destination Type set to Burn-in. Andoutput B might also use Caption Selector 1 with the Destination Type set to Burn-in. You set the fontinformation once in output 1 and again in output 2. But you must make sure to set up all the fontinformation identically in both outputs.
Complete the PIDs for ARIBComplete this step if the output group is UDP/TS and the output caption is ARIB.
1. In the relevant UDP output group, choose the output that has the ARIB captions.2. For PID settings, complete ARIB captions PID control and ARIB captions PID as follows:3.
ARIB Captions PID Control ARIB Captions PID Result
Auto Ignore A PID will automatically beassigned during encoding; thisvalue could be any number.
Use Configured Type a decimal or hexadecimal. This PID will be used for thecaptions.
Complete the PIDs for DVB-SubComplete this step if the output group is UDP and the output caption is DVB-Sub.
1. In the relevant UDP output group, choose the output that has the DVB-Sub captions.2. For PID settings, in DVB-Sub PIDs, type the PID for the DVB-Sub caption in this output. Or keep the
default.
Complete the PIDs for SCTE-27Complete this step if the output group is UDP and the output caption is SCTE-27.
1. In the relevant UDP output group, choose the output that has the SCTE-27 captions.2. For PID settings, in SCTE-27 PIDs, type the PID for the SCTE-27 caption in this output. Or keep the
default.
Complete the PIDs for TeletextComplete this step if the output group is UDP and the output caption is Teletext.
1. In the relevant UDP output group, choose the output that has the Teletext captions.
79

AWS Elemental MediaLive User GuideExamples
2. For PID settings, in DVB teletext PID, type the PID for the Teletext captions in this output. Or keepthe default.
Set up the HLS Manifest (Embedded Captions)If the captions are embedded captions and the output is HLS, you can choose to include captionlanguage information in the manifest.
1. In the HLS output group in Output groups, for Captions, in Caption language setting, choose Insert.Choosing this option inserts lines in the manifest for each embedded captions language. It inserts asmany lines as the mappings that you will add in the next step.
2. Still in the HLS output group, for HLS settings, in Caption language mappings, choose Add captionlanguage mappings.
3. Choose Add caption language mappings again to add more mapping groups, one for each embeddedcaptions asset, to a maximum of four groups. For example, if the output embedded languages containEnglish, French, and Spanish, you need three mapping groups.
4. Complete each mapping group to identify the CC (caption channel) number and its language. Forexample, if caption channel 1 is French, then set up the three fields with "1", "FRE", and "French".
The order in which you enter the languages must match the order of the captions in the source. Forexample, if the captions are in the order French, then English, then Spanish, then Portuguese, thenset up CC1 as French, CC2 as English, and so on. If you do not order them correctly, the captions in themanifest will be tagged with the wrong languages.
ExamplesThe following examples describe how to implement the use cases from the section called “TypicalScenarios” (p. 69).
Use Case: One Input Format to One OutputThis example shows how to implement the first use case (p. 69) from the typical scenarios. The inputis set up with one format of captions and two or more languages. You want to maintain the format in theoutput. You want to produce only one type of output and include all the languages in that output.
For example, the input has embedded captions in English and French. You want to produce an HLSoutput that includes embedded captions in both English and French, plus one video and one audio.
This example illustrates two important features of an embedded-to-embedded workflow. First, youdo not create separate caption selectors; all of the languages are all automatically included. Second, ifyou are outputting to HLS, there is an opportunity to specify the languages and the order in which theyappear.
80

AWS Elemental MediaLive User GuideUse Case: One Input Format Converted
to One Different Output Format
Setup1. In the channel that you are creating, in the navigation pane, choose Channel and input details.2. For Input settings, choose Add caption selector to create one caption selector. Set Selector settings
to Embedded source.3. Create an HLS output group.4. Create one output and set up the video and audio.5. In that same output, create one captions asset with the following:
• Caption selector name: Caption selector 1.• Caption settings: One of the Embedded formats.• Language code and Language description: Leave blank; with embedded captions, all the languages
are included.6. In the HLS output group, in Captions, in Caption language setting, choose Insert.7. For HLS settings, in Caption language mappings, choose Add caption language mappings twice
(once for each language).8. Complete the first group of mapping fields with "1," "ENG," and "English" and the second group with
"2," "FRE," and "French."9. Finish setting up the channel and save it.
Use Case: One Input Format Converted to OneDifferent Output FormatThis example shows how to implement the second use case (p. 69) (p. 70) from the typicalscenarios. The input includes two captions languages, and the single output will convert those captions.For example, the input has embedded captions in German and French. You want to produce a UDPoutput with both captions converted to DVB-Sub, plus one video and one audio.
Setup1. In the channel that you are creating, in the navigation pane, choose Channel and input details.2. Choose Add caption selector twice, to create Caption selector 1 (for German) and Caption selector 2
(for French). In both cases, set Selector settings to Embedded source.3. Create a UDP output group.4. Create one output and set up the video and audio.5. In this output, choose Add caption to create a caption encode.
• Caption selector name: Caption selector 1.• Caption settings: DVB-Sub.
81
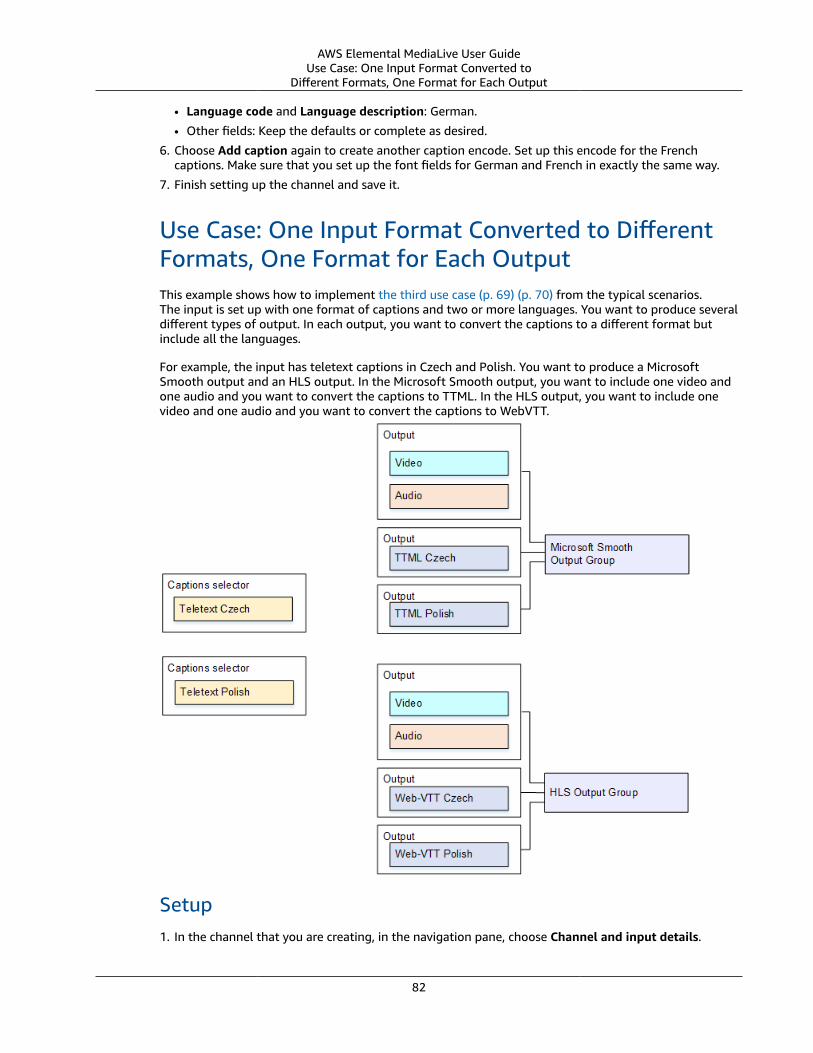
AWS Elemental MediaLive User GuideUse Case: One Input Format Converted to
Different Formats, One Format for Each Output
• Language code and Language description: German.
• Other fields: Keep the defaults or complete as desired.
6. Choose Add caption again to create another caption encode. Set up this encode for the Frenchcaptions. Make sure that you set up the font fields for German and French in exactly the same way.
7. Finish setting up the channel and save it.
Use Case: One Input Format Converted to DifferentFormats, One Format for Each OutputThis example shows how to implement the third use case (p. 69) (p. 70) from the typical scenarios.The input is set up with one format of captions and two or more languages. You want to produce severaldifferent types of output. In each output, you want to convert the captions to a different format butinclude all the languages.
For example, the input has teletext captions in Czech and Polish. You want to produce a MicrosoftSmooth output and an HLS output. In the Microsoft Smooth output, you want to include one video andone audio and you want to convert the captions to TTML. In the HLS output, you want to include onevideo and one audio and you want to convert the captions to WebVTT.
Setup1. In the channel that you are creating, in the navigation pane, choose Channel and input details.
82

AWS Elemental MediaLive User GuideUse Case: One Captions Output
Shared by Multiple Video Encodes
2. Choose Add caption selector twice to create the following caption selectors:
• Caption selector 1 for Teletext Czech. Specify the page that holds the Czech captions.
• Caption selector 2 for Teletext Polish. Specify the page that holds the Polish captions.
Although you are including the captions in two different outputs (Microsoft Smooth and HLS), youneed to extract them from the input only once, so you need to create only one caption selector foreach language.
3. Create a Microsoft Smooth output group and configure it as follows:
a. Create one output and set up the video and audio.
b. Create a second output that contains one captions encode and no video or audio encodes, and withthe following settings:
• Caption selector name: Caption Selector 1.
• Captions settings: TTML.
• Language code and Language description: Czech.
• Style control: Set as desired.
c. Create a third output that contains one captions encode and no video or audio encodes, with thefollowing settings:
• Caption selector name: Caption Selector 2.
• Captions settings: TTML.
• Language code and Language description: Polish.
• Other fields: same as the second output (the Czech captions).
4. Create an HLS output group and configure it as follows:
a. Create one output and set up the video and audio.
b. Create a second output that contains one captions encode and no video or audio encodes, and withthe following settings:
• Caption selector name: Caption Selector 1.
• Captions settings: WebVTT.
• Language code and Language description: Czech.
• Other fields: Set as desired.
c. Create a third caption output that contains one captions encode and no video or audio encodes,and with the following settings:
• Caption selector name: Caption Selector 2.
• Captions settings: WebVTT
• Language code and Language description: Polish.
• Other fields: same as the second output (the Czech captions).
5. Finish setting up the channel and save it.
Use Case: One Captions Output Shared by MultipleVideo EncodesThis example shows how to set up captions in an ABR workflow. The first setup shows how to set up anABR workflow when the captions are in the same output as the video, meaning that the captions areeither embedded or captions style.
The second setup shows how to set up an ABR workflow when the captions belong to the sidecarcategory, in which case each captions is in its own output.
83

AWS Elemental MediaLive User GuideUse Case: One Captions Output
Shared by Multiple Video Encodes
Setup with Embedded or Object-style CaptionsThis example shows how to implement the fourth use case (p. 69) (p. 70) from the typicalscenarios. For example, you want to produce an HLS output with three video encodes (one for low-resolution video, one for medium, one for high) and one audio. You also want to include embeddedcaptions (in English and Spanish) and associate them with all three video encodes.
1. In the channel that you are creating, in the navigation pane, choose Channel and input details.
2. Choose Add caption selector to create one caption selector. Set Selector settings to Embeddedsource.
3. Create an HLS output group.
4. Create one output and set up the video and audio for low-resolution video.
5. In that same output, create one captions asset with the following:
• Caption selector name: Caption selector 1.
• Caption settings: One of the Embedded formats.
• Language code and Language description: Leave blank; with embedded-to-embedded captions, allthe languages are included.
6. Create a second output and set up the video and audio for medium-resolution video.
7. In that same output, create one captions asset with the following:
• Caption selector name: Caption selector 1.
• Caption settings: One of the Embedded formats.
• Language code and Language description: Leave blank; with embedded captions, all the languagesare included.
84

AWS Elemental MediaLive User GuideUse Case: One Captions Output
Shared by Multiple Video Encodes
8. Create a third output and set up the video and audio for high-resolution video.
9. In that same output, create one captions asset with the following:
• Caption selector name: Caption selector 1.
• Caption settings: One of the Embedded formats.
• Language code and Language description: Leave blank; with embedded captions, all the languagesare included.
10.Finish setting up the channel and save it.
Setup with Sidecar Captions
This example shows an ABR workflow where the captions are in sidecars. For example, you want toproduce a Microsoft Smooth output with three video encodes (one for low-resolution video, one formedium, one for high) and one audio. These encodes are in a Microsoft Smooth output. You want toingest embedded captions (in English and Spanish) and convert them to TTML captions, one for Englishand one for Spanish.
1. In the channel that you are creating, in the navigation pane, choose Channel and input details.
2. Choose Add caption selector twice to create the following caption selectors:
• Caption selector 1: for Embedded English.
• Caption Selector 2: for Embedded Spanish.
3. Create a Microsoft Smooth output group.
85

AWS Elemental MediaLive User GuideUse Case: One Captions Output
Shared by Multiple Video Encodes
4. Create one output that contains one video encode and set it up for low-resolution video.5. Create a second output that contains one video encode and set it up for medium-resolution video.6. Create a third output that contains one video encode and set it up for high-resolution video.7. Create a fourth output that contains one audio encode and no video encode.8. Create a fifth output that contains one captions encode and no video or audio encodes, and with the
following settings for the captions encode:• Caption selector name: Caption selector 1.• Caption settings: TTML.• Language code and Language description: English.
9. Create a sixth output that contains one captions encode and no video or audio encodes, and with thefollowing settings for the captions encode:• Caption selector name: Caption selector 2.• Caption settings: TTML.• Language code and Language description: Spanish.
10.Finish setting up the channel and save it.
86

AWS Elemental MediaLive User GuideAbout Message Processing
SCTE-35 Message ProcessingSCTE-35 messages are messages that accompany the video input in an MPEG-2 transport stream (TS).These messages provide information about advertisement availability, also known as ad avail events, andother non-ad avail events.
On the input side, SCTE-35 messages can appear only in MPEG-2 transport stream (TS) inputs, whichmeans that in AWS Elemental MediaLive they can appear only in RTP or HLS inputs.
You can set up a channel so that if an input includes these messages, the messages are either processedduring ingest (passed through) or else completely ignored.
AWS Elemental MediaLive does not support processing of ad avail decorations in input manifests. The adavail decorations in input manifests are always ignored.
On the output side, if you set up to pass through the input (rather than ignore it), then you can set upeach output so that the SCTE-35 messages from the input are turned into cueing information that isappropriate for that output type. This cueing information may be in the form of:
• SCTE-35 messages in a TS output• Or manifest (or sparse track) decoration• Or both.
You set up each output separately, so you can set up some outputs to include cueing information andsome to exclude it.
As an adjunct to the ad avail information, you can also set up the outputs to blank out the video, audio,and captions within the cueing information.
NoteTo use the ad avail features of AWS Elemental MediaLive, you should be familiar with theSCTE-35 standard and optionally with the SCTE-67 standard. You should also be familiar withhow the input that you are encoding implements those standards.The information in this SCTE-35 section assumes that you are familiar with the general steps forcreating a channel, as described in Creating a Channel from Scratch (p. 32). It also assumes thatyou have started creating a channel, including associating an input with the channel.
Topics• About Message Processing (p. 87)• Getting Ready: Set the Ad Avail Mode (p. 93)• Enabling Manifest Decoration in the Output (p. 93)• Enabling Ad Avail Blanking in the Output (p. 96)• Enabling Blackout in the Output (p. 100)• Enabling SCTE-35 Passthrough or Removal in the Output (p. 104)• Sample Manifests - HLS (p. 105)
About Message ProcessingAWS Elemental MediaLive works with the SCTE-35 messages in MPEG-2 transport stream (TS) inputs.These messages might or might not include segmentation descriptors.
Topics
87

AWS Elemental MediaLive User GuideSupported Features by Input Type
• Supported Features by Input Type (p. 88)• Supported Output Features (p. 88)• Processing Features – Default Behavior (p. 89)• Scope of Processing by Feature (p. 89)• Supported Features by Output Type (p. 90)
Supported Features by Input TypeThe table below specifies which inputs might include ad avail information and how AWS ElementalMediaLive handles that information.
Input Interpret S-35messages
Interpret ad availdecoration
HLS Yes No
RTMP No Not applicable
RTP Yes Not applicable
Supported Output Features
Blanking and BlackoutThe “cue out” and “cue in” instructions in SCTE-35 messages in TS inputs line up with specific content inthe video, audio, and captions streams. You can set up so that this content is blanked out in the output:
• The content for ad avails is blanked out using the ad avail blanking feature.• The content for other messages is blanked out using the blackout feature.
The behavior you want must be set up in the channel.
For more information, see the section called “Enabling Ad Avail Blanking” (p. 96) and the sectioncalled “Enabling Blackout” (p. 100).
Manifest DecorationManifest decoration is supported only in HLS and Microsoft Smooth outputs:
• You can set up HLS outputs so that their manifests include instructions that correspond to the originalSCTE-35 message content from the TS input. Decorate the HLS manifest with one or more of thefollowing types of ad markers:• Adobe• Elemental• SCTE-35 enhanced
• You can set up Microsoft Smooth outputs so that the sparse track includes instructions thatcorrespond to the original SCTE-35 message content.
The desired behavior must be set up in the channel. For more information, see the section called“Enabling Manifest Decoration” (p. 93).
88

AWS Elemental MediaLive User GuideProcessing Features – Default Behavior
SCTE-35 Passthrough
You can set up TS outputs so that all the SCTE-35 messages from the input are passed through to theoutput. Or you can set up to remove these messages from the output.
The desired behavior must be set up in the channel. For more information, see the section called“Enabling SCTE-35 Passthrough or Removal” (p. 104).
Processing Features – Default BehaviorThe default handling of SCTE-35 by AWS Elemental MediaLive is the following:
• No passthrough – Remove SCTE-35 messages in any data stream outputs.
• No blanking or blackout – Do not blank out video content for any events. Leave the content as is.
• No manifest decoration – Do not convert any SCTE-35 messages to event information in any outputmanifests or data streams.
If this is the desired behavior, you do not need to read any further in this SCTE-35 section.
Scope of Processing by FeatureThe SCTE-35 features have different scopes in terms of the output groups and outputs that they affect:
Blackout or Ad avail blanking
Blackout applies at the global output level. All the relevant content in every output in every output groupare blanked.
Ad avail blanking applies at the global output level. All the ad avails in every output in every outputgroup are blanked.
Decoration
Manifest decoration applies at the output group level. All the outputs in that output group have theirmanifests decorated.
89

AWS Elemental MediaLive User GuideSupported Features by Output Type
SCTE-35 Passthrough or Removal
SCTE-35 passthrough or removal applies at the output level. The messages are passed through orremoved only in a specific output.
Supported Features by Output TypeThe table below summarizes which features apply to the various types of output.
Output Passthrough in TSOutputs
ManifestDecoration
Blanking See
Archive Applicable Not applicable. Applicable the section called“Archive Outputwith MPEG-2Container” (p. 91)
HLS (TS) Applicable Applicable Applicable the sectioncalled “HLSOutput” (p. 91)
Microsoft Smooth Not applicable Applicable Applicable the section called“Microsoft SmoothOutput” (p. 92)
UDP (TS) Applicable Not applicable Applicable the sectioncalled “UDPOutput” (p. 92)
90

AWS Elemental MediaLive User GuideSupported Features by Output Type
Archive Output with MPEG-2 ContainerA transport stream in an MPEG-2 container supports passthrough of the SCTE-35 messages, but it doesnot support creation of a manifest. Therefore, the processing options that are valid are shown in thefollowing table.
SCTE-35 Passthrough Manifest Decoration Blanking and Blackout Effect
Enabled Not applicable Yes or No Turns on passthroughof SCTE-35 messages.You could alsoimplement blankingand blackout.
Disabled Not applicable No Turns off passthroughin order to removeSCTE-35 messages fromthe video stream. Donot implement blankingor blackout.
Choose this option onlyif, in a downstreamsystem, you do notwant to replace videothat was originallymarked by cues.
HLS OutputHLS output supports both passthrough of the SCTE-35 messages and manifest decoration. In fact, withHLS outputs, passthrough and manifest decoration are either both enabled or both disabled.
Therefore, the processing options that make sense are shown in the following table.
SCTE-35 Passthrough Manifest Decoration Blanking and Blackout Effect
Enabled Enabled Yes or No Turns on passthroughof SCTE-35 messagesand manifestdecoration. Youcould also implementblanking and blackout.
Disabled Disabled No Turns off passthroughin order to removeSCTE-35 messages fromthe video stream. Turnsoff manifest decoration.Do not implementblanking or blackout.
Choose this option onlyif, in a downstreamsystem, you do not
91

AWS Elemental MediaLive User GuideSupported Features by Output Type
SCTE-35 Passthrough Manifest Decoration Blanking and Blackout Effect
want to replace videothat was originallymarked by cues.
Note that with HLS you must either enable passthrough and decoration in all outputs in the same outputgroup, or disable them in all outputs in the same output group.
Microsoft Smooth OutputMicrosoft Smooth output does not support passthrough of the SCTE-35 messages, but does supportinstructions in the sparse track. Therefore, the processing options that make sense are:
SCTE-35 Passthrough Manifest Decoration Blanking and Blackout Effect
Not applicable(SCTE-35 messagesare never included inoutput)
Enabled Yes or No SCTE-35 messages areremoved from the videostream. But instructionsare included in thesparse track. Youcould also implementblanking and blackout.
Not applicable Disabled No SCTE-35 messagesare removed from theoutput. The sparsetrack doesn't includeinstructions. Don'timplement blankingor blackout becausewithout SCTE-35messages in thevideo stream andwithout data in thesparse track, it will beimpossible to find theseblanks and blackoutsprogrammatically in theoutput.
UDP OutputUDP output supports passthrough of the SCTE-35 messages, but it does not support creation of amanifest. Therefore, the processing options that make sense are shown in the following table.
SCTE-35 Passthrough Manifest Decoration Blanking and Blackout Effect
Enabled Not applicable Yes or No Turns on passthroughof SCTE-35 messages.You could alsoimplement blankingand blackout.
92
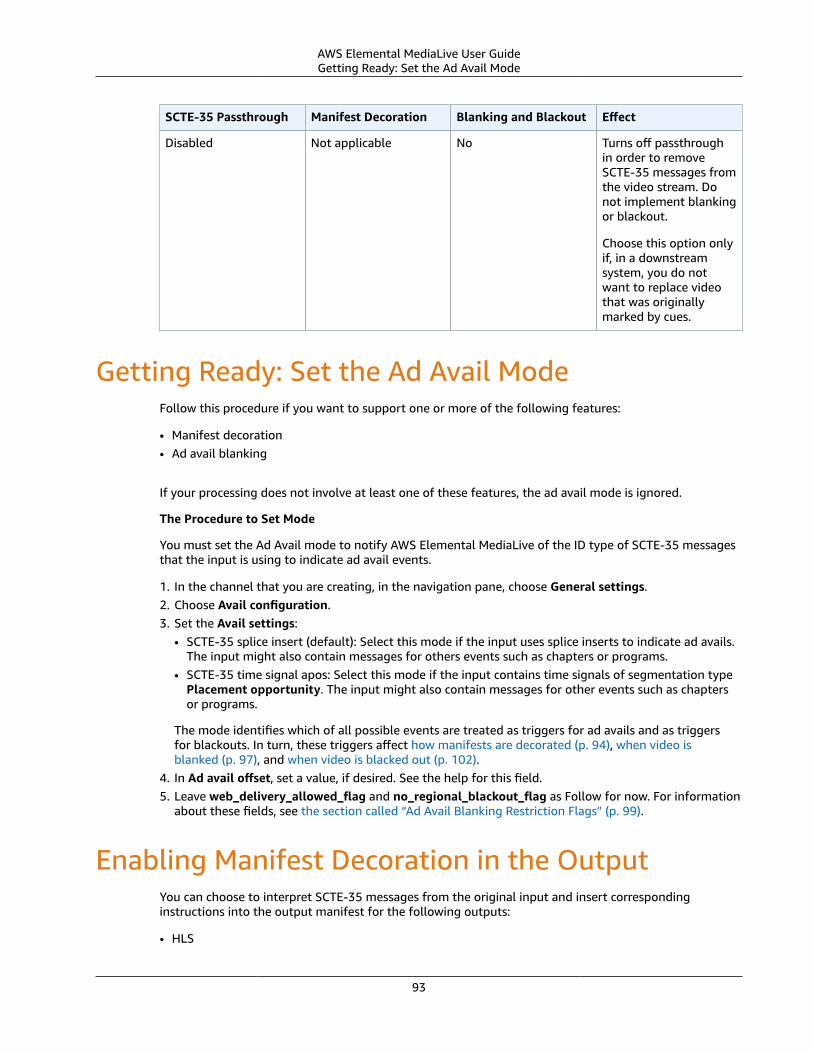
AWS Elemental MediaLive User GuideGetting Ready: Set the Ad Avail Mode
SCTE-35 Passthrough Manifest Decoration Blanking and Blackout Effect
Disabled Not applicable No Turns off passthroughin order to removeSCTE-35 messages fromthe video stream. Donot implement blankingor blackout.
Choose this option onlyif, in a downstreamsystem, you do notwant to replace videothat was originallymarked by cues.
Getting Ready: Set the Ad Avail ModeFollow this procedure if you want to support one or more of the following features:
• Manifest decoration• Ad avail blanking
If your processing does not involve at least one of these features, the ad avail mode is ignored.
The Procedure to Set Mode
You must set the Ad Avail mode to notify AWS Elemental MediaLive of the ID type of SCTE-35 messagesthat the input is using to indicate ad avail events.
1. In the channel that you are creating, in the navigation pane, choose General settings.2. Choose Avail configuration.3. Set the Avail settings:
• SCTE-35 splice insert (default): Select this mode if the input uses splice inserts to indicate ad avails.The input might also contain messages for others events such as chapters or programs.
• SCTE-35 time signal apos: Select this mode if the input contains time signals of segmentation typePlacement opportunity. The input might also contain messages for other events such as chaptersor programs.
The mode identifies which of all possible events are treated as triggers for ad avails and as triggersfor blackouts. In turn, these triggers affect how manifests are decorated (p. 94), when video isblanked (p. 97), and when video is blacked out (p. 102).
4. In Ad avail offset, set a value, if desired. See the help for this field.5. Leave web_delivery_allowed_flag and no_regional_blackout_flag as Follow for now. For information
about these fields, see the section called “Ad Avail Blanking Restriction Flags” (p. 99).
Enabling Manifest Decoration in the OutputYou can choose to interpret SCTE-35 messages from the original input and insert correspondinginstructions into the output manifest for the following outputs:
• HLS
93

AWS Elemental MediaLive User GuideEnabling Decoration – HLS
• Microsoft Smooth (the instructions are inserted in the sparse track).
Manifest decoration is enabled at the output group level. If you enable the feature in a given outputgroup, all the outputs in that group have their manifests decorated.
To include manifest decoration in some outputs and not others, you must create two output groups ofthe specified type, for example, two HLS output groups.
Topics• Enabling Decoration – HLS (p. 94)• Enabling Decoration – Microsoft Smooth (p. 94)• How SCTE-35 Events Are Handled in Manifests and Sparse Tracks (p. 94)
Enabling Decoration – HLSManifest decoration is enabled at the output group level, which means that the manifests for all outputsin that group include instructions based on the SCTE-35 content.
1. In the channel that you are creating, make sure that you have set the ad avail mode. See the sectioncalled “Getting Ready: Set the Ad Avail Mode” (p. 93).
2. In the navigation pane, find the desired HLS output group.3. In Ad Marker, choose Add ad markers.4. For HLS ad markers, select the type of ad marker. For information about the different types of
markers, see Sample Manifests - HLS (p. 105).5. Repeat to add more types of markers, as desired.
The manifest for each output will include a separate set of tags for each type that you select.
Enabling Decoration – Microsoft SmoothWith Microsoft Smooth, if you enable manifest decoration, instructions are inserted in the sparse track.
Manifest decoration is enabled at the output group level, which means that the sparse tracks for alloutputs in that group will include instructions based on the SCTE-35 content.
The Procedure to Enable Decoration
1. In the channel that you are creating, make sure that you have set the ad avail mode. See the sectioncalled “Getting Ready: Set the Ad Avail Mode” (p. 93).
2. In the navigation pane, find the desired Microsoft Smooth output group.3. For Sparse track, for Sparse track type, choose SCTE_35.4. Complete Acquisition point ID, only if encryption is enabled on the output. Enter the address of the
certificate.
How SCTE-35 Events Are Handled in Manifests andSparse TracksWhen manifest decoration or sparse track is enabled, AWS Elemental MediaLive inserts up to three typesof information. The triggers for inserting this information depend on the mode.
94

AWS Elemental MediaLive User GuideHow SCTE-35 Events Are Handled
in Manifests and Sparse Tracks
Types of Information
Type of Instruction When Inserted
Base64 Information about all SCTE-35 messages in theoutput is incorporated into the manifest; theentire SCTE-35 message is added in base64format.
Cue-out, Cue-in SCTE-35 messages that are ad avails result in theinsertion of cue-out, cue-in instructions.
Blackout Only applies to the SCTE-35 Enhanced ad markerstyle (for HLS output; see the section called“Enabling Decoration – HLS” (p. 94)).
SCTE-35 messages that are not ad avails result inthe insertion of blackout start/end instructions,assuming that blackout is enabled. If blackout isnot enabled, these instructions are not inserted.
Splice Insert Mode
Message Type ID: Splice Insert
Segmentation Type ID Base64 Cue-out, Cue-in Blackout
No segmentationdescriptor present
Yes Yes
Provider advertisement Yes Yes
Distributoradvertisement
Yes Yes
Placement opportunity Yes Yes
Other: Programs,Chapters, Network,Unscheduled
Yes Yes
Message Type ID: Time Signal
Segmentation Type ID Base64 Cue-out, Cue-in Blackout
Provider advertisement Yes Yes
Distributoradvertisement
Yes Yes
Placement opportunity Yes Yes
Other: Programs,Chapters, Network,Unscheduled
Yes Yes
95

AWS Elemental MediaLive User GuideEnabling Ad Avail Blanking
For example, read the first line in the first table as follows: When a splice insert (with no segmentationdescriptor) is encountered, the base64 and cue-out, cue-in information will be inserted in the manifest;blackout information will not be inserted.
Timesignal APOS Mode
Message Type ID: Splice Insert
Segmentation Type ID Base64 Cue-out, Cue-in Blackout
No segmentationdescriptor present
Yes
Provider advertisement Yes
Distributoradvertisement
Yes
Placement opportunity Yes
Other: Programs,Chapters, Network,Unscheduled
Yes
Message Type ID: Time Signal
Segmentation Type ID Base64 Cue-out, Cue-in Blackout
Provider advertisement Yes
Distributoradvertisement
Yes
Placement opportunity Yes Yes
Other: Programs,Chapters, Network,Unscheduled
Yes Yes
For example, read the first line in the first table as follows: When a splice insert (with no segmentationdescriptor) is encountered, the base64 information will be inserted in the manifest, and cue-out, cue-ininformation and blackout information will not be inserted.
Enabling Ad Avail Blanking in the OutputYou can enable ad avail blanking to blank out the content for an SCTE-35 message that is considered anad avail (as defined by the ad avail mode in Getting Ready: Set the Ad Avail Mode (p. 93)).
A similar feature is blackout (p. 100).
Blanking involves the following processing:
• Replace the video content associated with this event with an image that you specify or is with a blackimage.
96

AWS Elemental MediaLive User GuideThe Procedure to Enable Blanking
• Remove the audio that is associated with this event.• Remove the captions that are associated with this event.
Comparison to Manifest Decoration and Passthrough
Ad avail blanking applies to all outputs. You cannot choose to blank out for some outputs (for example,the HLS output) and not blank out for others (for example, the Microsoft Smooth output). It is an all-or-nothing decision.
Manifest decoration and passthrough have a smaller scope: they apply only to outputs that supportthese features.
Take note of this fact, because if you do not do passthrough and do not do manifest decoration in agiven output (because they are not supported or because you choose not to) but you do implementblanking, there will be no markers for where the blanked content occurs. The only way to identify wherethis blanking is occurring will be to look for the IDR i-frames that identify where the SCTE-35 messageused to be.
The Procedure to Enable Blanking1. In the channel that you are creating, in the navigation pane, choose General settings.2. In Avail configuration, set Avail settings, if you have not already done so:
• SCTE-35 splice insert (default): Select this mode if the input uses splice inserts to indicate ad avails.The input might also contain messages for others events such as chapters or programs.
• SCTE-35 time signal APOS: Select this mode if the input contains time signals of segmentation typePlacement opportunity. The input might also contain messages for other events such as chaptersor programs.
The mode identifies which of all possible events are treated as triggers for ad avails and as triggersfor blackouts. In turn, these triggers affect how manifests are decorated (p. 94), when video isblanked (p. 97), and when video is blacked out (p. 102).
3. For Ad avail offset, set a value, if desired. See the help for this field.4. In web_delivery_allowed_flag and no_regional_blackout_flag, choose appropriate values. For
information about these fields, see the section called “Triggers for Ad Avail Blanking” (p. 97).• Follow (default): Observe the restriction and blank the content for the ad avail event.• Ignore: Ignore the restriction and do not blank the content for the ad avail event.
WarningNever set both fields to Ignore.
In Avail blanking, in State, choose Enabled.5. In Avail blanking image, choose the appropriate value:
• Disable: To use a plain black image for blanking.• Avail blanking image: To use a special image for blanking. In the URI field, type the path to a file in
an S3 bucket. The file must be of type .bmp or .png. Also enter the user name and EC2 passwordkey for accessing the S3 bucket. See the section called “Access to Amazon EC2 Systems ManagerParameter Store” (p. 4).
Triggers for Ad Avail BlankingFor ad avail blanking, the ad avail mode that you set controls which SCTE-35 events result in theblanking of the content.
97

AWS Elemental MediaLive User GuideTriggers for Ad Avail Blanking
Triggers in Splice Insert Mode
This section describes which message type and segmentation type combination is blanked by ad availblanking when the Ad Avail mode is Splice Insert mode.
Message Type ID: Splice Insert
Segmentation Type ID Blanked
No segmentationdescriptor present
Yes
Provider advertisement Yes
Distributoradvertisement
Yes
Placement opportunity Yes
Other: Programs,Chapters, Network,Unscheduled
No
Message Type ID: Time Signal
Segmentation Type ID Blanked
Provider advertisement Yes
Distributoradvertisement
Yes
Placement opportunity Yes
Other: Programs,Chapters, Network,Unscheduled
No
Triggers in Timesignal APOS Mode
This section describes which message type/segmentation type combination is blanked by ad availblanking when the Ad Avail mode is Timesignal with APOS mode.
Message Type ID: Splice Insert
Segmentation Type ID Blanked
No segmentationdescriptor present
No
Provider advertisement No
Distributoradvertisement
No
Placement opportunity No
98

AWS Elemental MediaLive User GuideAd Avail Blanking Restriction Flags
Segmentation Type ID Blanked
Other: Programs,Chapters, Network,Unscheduled
No
Message Type ID: Time Signal
Segmentation Type ID Blanked
Provider advertisement No
Distributoradvertisement
No
Placement opportunity Yes
Other: Programs,Chapters, Network,Unscheduled
No
Ad Avail Blanking Restriction FlagsRestrictions in the Input
SCTE-35 messages of type time_signal always contain segmentation descriptors.
SCTE-35 messages of type splice_insert might or might not include segmentation descriptors.
If the input has SCTE-35 messages that do include segmentation descriptors, these segmentationdescriptors always include two types of flags. Each flag has a value of "true" or "false" and providesadditional information as guidance for blanking in specific situations:
• web_delivery_allowed_flag
• True means that there is no restriction on including the ad avail event’s content in a stream thatis intended for web delivery: there is no need to blank out content in streams intended for webdelivery.
• False means there is a restriction: the content should be blanked out.
• no_regional_blackout_flag
(The wording of this flag is confusing. Think of it as the "regional_delivery_allowed_flag".)
• True means that there is no restriction on including the ad avail event’s video in a stream thatis intended for regional markets: there is no need to blank out content in streams intended forregional markets.
• False means there is a restriction: the content should be blanked out.
If neither flag is present (usually the case with splice_inserts), then both are considered to be false.Blanking should occur.
If both flags are present (which is usually the case; it is unusual to have only one flag present), then a“false” for one flag takes precedence over a “true” for the other flag. Blanking should occur.
Typically, in any given message in the input only one of these flags is ever set to false, so only onerestriction is ever in place. There would typically never be both a regional delivery restriction and a web
99

AWS Elemental MediaLive User GuideEnabling Blackout
delivery restriction. This is because if content is considered restricted for regional delivery, then it wouldnot also be considered restricted for web delivery (where the concept of a region makes no sense).
To summarize, this is the blanking logic that applies to each ad avail event that is encountered.
Blanking Logic for Ad Avail Events
Content ofcorrespondingSCTE-35 message:Web deliveryallowed?
Content ofcorrespondingSCTE-35 message:Regional deliveryallowed?
Result Comment
S1 Flag is not present Flag is not present Blanking occurs This combinationcan only occurin a messagetype splice_insert(where thesegmentationdescriptor isoptional).
S2 Flag is set to "true" Flag is set to "true" Blanking doesn'toccur
S3 Flag is set to "true" Flag is set to"false"
Blanking occurs
S4 Flag is set to"false"
Flag is set to "true" Blanking occurs
AWS Elemental MediaLive Handling of Restrictions
You can modify this default blanking behavior by instructing AWS Elemental MediaLive to ignore arestriction flag that is set to false, so that blanking not occur for this ad avail event. In other words, touse this logic, "Even if the message indicates to blank content because a regional blackout is in place, donot follow this instruction. Ignore the fact that a regional blackout is in place and do not blank content".
You modify the behavior by setting fields in the channel. See the section called “The Procedure to EnableBlanking” (p. 97).
Restriction Flags with "Splice Insert"
If you select Splice Insert as the Ad Avail mode, then there is an assumption that the SCTE-35 ad availmessage does not include the two restriction flags that are described earlier in this section. There is anassumption that every SCTE-35 ad avail message should result in an ad avail.
Therefore, if you know that the input contains splice inserts (not time signals), you should leave bothrestriction fields unchecked.
Enabling Blackout in the OutputYou can enable blackout to blank out the content for an SCTE-35 message that is of type “otherevent” (as defined by the mode in Getting Ready: Set the Ad Avail Mode (p. 93)). For example,chapters and programs.
(A similar feature is described in the section called “Enabling Ad Avail Blanking” (p. 96).)
100

AWS Elemental MediaLive User GuideThe Procedure to Black out
Blackout involves the following processing:
• Replace the video content associated with the event with an image that you specify or is with a blackimage.
• Remove the audio that is associated with the event.• Remove the captions that are associated with the event.
Comparison to Manifest Decoration and Passthrough
Blackout applies to all outputs. You cannot choose to black out for some outputs (for example, the HLSoutput) and not black out for others (for example, the Microsoft Smooth output). It is an all-or-nothingdecision.
Manifest decoration and passthrough have a smaller scope: they apply only to outputs that supportthese features.
Take important note of this fact, because if you do not do passthrough and do not do manifestdecoration in a given output (because they are not supported or because you choose not to) but you doimplement blanking, there will be no “markers” for where the blanked content occurs. The only way ofidentifying where this blanking is occurring will be to look for the IDR i-frames that identify where theSCTE-35 message used to be.
Topics• The Procedure to Black out (p. 101)• Triggers for Blackout (p. 102)• Blackout Restriction Flags (p. 103)
The Procedure to Black out1. In the channel that you are creating, in the navigation pane, choose General settings.2. For Avail configuration, set Avail settings, if you have not already done so:
• SCTE-35 splice insert (default): Select this mode if the input uses splice inserts to indicate ad avails.The input might also contain messages for others events such as chapters or programs.
• SCTE-35 time signal APOS: Select this mode if the input contains time signals of segmentation typePlacement opportunity. The input might also contain messages for other events such as chaptersor programs.
The mode identifies which of all possible events are treated as triggers for “ad avails” and astriggers for “blackouts.” In turn, these triggers affect how manifests are decorated (p. 94), whenvideo is blanked (p. 97), and when video is blacked out (p. 102).
3. For Ad avail offset, set a value, if desired. See the help for this field.4. For web_delivery_allowed_flag and no_regional_blackout_flag, choose appropriate values. For
information about these fields, see the section called “Triggers for Blackout” (p. 102).• Follow (default): Observe the restriction and blank the content for the ad avail event.• Ignore: Ignore the restriction and do not blank the content for the ad avail event.
WarningNever set both fields to Ignore.
5. In Blackout slate, in State, choose Enabled.6. For Blackout slate image, choose the appropriate value:
• Disable: To use a plain black image for blackout.• Avail blanking image: To use a special image for blackout. In the URI field, enter the path to a file
in an Amazon S3 bucket. The file must be of type .bmp or .png. Also enter the user name and EC2
101

AWS Elemental MediaLive User GuideTriggers for Blackout
password key for accessing the S3 bucket. For information on this key, see the section called “Accessto Amazon EC2 Systems Manager Parameter Store” (p. 4).
7. If you want to enable network end blackout (in other words, black out content when networktransmission has ended and remove blackout only when network transmission resumes), continuereading. If you don't want to enable it, you have now finished setting up.
8. For Network end blackout, choose Enabled.9. For Network end blackout image, choose the appropriate value:
• Disable: To use a plain black image for blackout.• Network end blackout image: To use a special image for network end blackout. In the URI field,
enter the path to a file in an Amazon S3 bucket. The file must be of type .bmp or .png. Also enterthe user name and EC2 password key for accessing the S3 bucket. See the section called “Access toAmazon EC2 Systems Manager Parameter Store” (p. 4).
10.For Additional settings, in Network ID, type the EIDR ID of the network in the format 10.nnnn/xxxx-xxxx- xxxx- xxxx-xxxx-c (case insensitive). Only network end events with this ID will trigger blackout.
Triggers for BlackoutThe blackout feature is triggered only by time_signal messages of segmentation type Other. It is nottriggered by splice_insert messages of any segmentation type, and is not triggered by time_signalmessages of any type except Other.
SCTE-35 messages of type ID "splice insert" and messages of type ID "time signal" can both include"Other" time_signal messages. Therefore, when enabling blackout, the ad avail mode (p. 93) is notrelevant. Blackout works the same with either mode.
The segmentation ID triggers blackout based on “events,” as shown in the following table.
SCTE-35 Segmentation Type Blacked out
Chapter Start Start blacking out
Chapter End End blacking out
Network Start End blacking out
Network End Start blacking out
Program Start Start blacking out
Program End End blacking out
Unscheduled Event Start Start blacking out
Unscheduled Event End End blacking out
For example, if the blackout feature is enabled, then blanking always occurs when a Program Startmessage is encountered and always ends when a Program End message is encountered.
Note that the triggers for blackout on a Network event are different from the other events:
• With Network, blanking starts when the Network End instruction is encountered.• With other events, blanking starts when the "Event Start" instruction is encountered.
End Event Trigger Hierarchy
102

AWS Elemental MediaLive User GuideBlackout Restriction Flags
Events have the following "strength hierarchy."
SCTE-35 Segmentation Type Strength
Network 1 (Strongest)
Unscheduled Event 2
Program 3
Chapter 4 (Weakest)
A blackout can be ended only by an event of equal or greater strength than the event that started it.
For example, if the blackout is started by a Program Start, it can be ended by a Network Start, anUnscheduled Event End or a Program End. It cannot be ended by a Chapter End. AWS ElementalMediaLive ignores the “end blackout” instruction implied by the Chapter End.
Blackout Restriction FlagsRestrictions in the Input
The segmentation descriptors in messages that are blackout triggers always include two types of flags.These flags provide additional information as guidance for blackout in specific situations:
• web_delivery_allowed_flag
• True means that there is no restriction on including the event’s content in a stream that is intendedfor web delivery. There is no need to black out content in streams intended for web delivery.
• False means that there is a restriction. The content should be blacked out.
• no_regional_blackout_flag
• True means that there is no restriction on including the event’s video in a stream intended forregional markets. There is no need to black out content in streams intended for regional markets.
• False means that there is a restriction. The content should be blacked out.
If both flags are present (which is usually the case; it is unusual to have only one flag present), then a“false” for one flag takes precedence over a “true” for the other flag. Blackout should occur.
Typically, in any given message in the input only one of these flags is ever set to false, so only onerestriction is ever in place. There would typically never be both a regional delivery restriction and a webdelivery restriction. This is because if content is considered restricted for regional delivery, then it wouldnot also be considered restricted for web delivery (where the concept of a region makes no sense).
To summarize, this is the blackout logic that applies to each event that is encountered.
Content ofcorrespondingSCTE-35 message:Web deliveryallowed?
Content ofcorrespondingSCTE-35 message:Regional deliveryallowed?
Result Comment
S1 Flag is not present Flag is not present Blackout occurs Never occurs inmessages that areblackout triggers
103

AWS Elemental MediaLive User GuideEnabling SCTE-35 Passthrough or Removal
Content ofcorrespondingSCTE-35 message:Web deliveryallowed?
Content ofcorrespondingSCTE-35 message:Regional deliveryallowed?
Result Comment
S2 Flag is set to "true" Flag is set to "true" Blackout doesn'toccur
S3 Flag is set to "true" Flag is set to"false"
Blackout occurs
S4 Flag is set to"false"
Flag is set to "true" Blackout occurs
AWS Elemental MediaLive Handling of Restrictions
You can modify this default blackout behavior by instructing AWS Elemental MediaLive to ignore arestriction flag that is set to false, so that blackout will not occur for this event. In other words, to usethis logic, "“Even if the message indicates to black out content because a regional blackout is in place,do not follow this instruction. Ignore the fact that a regional blackout is in place and do not black outcontent".
You modify the behavior by setting fields in the channel.
Enabling SCTE-35 Passthrough or Removal in theOutput
You can set up the AWS Elemental MediaLive channel so that SCTE-35 messages from the input is passedthrough (included) in the data stream for the following outputs:
• Outputs in an Archive output group.• Outputs in an HLS output group.• Outputs in a UDP output group.
Alignment with Video
The PTS of the SCTE-35 message is adjusted to match the PTS of the corresponding video frame.
Passthrough Is at the Output Level
SCTE-35 passthrough or removal applies at the output level. The messages are passed through orremoved only in a specific output. The default behavior (if you do not change the configuration fields) isto remove the messages.
The Procedure for Archive1. In the channel that you are creating, find the Archive output group that contains the output that you
want to set up.2. Choose that output.3. In PID settings, complete the following fields:
• SCTE-35 control: Set to Passthrough.
104

AWS Elemental MediaLive User GuideThe Procedure for HLS
• SCTE-35 PID: Leave the default PID or enter the PID where you want the SCTE-35 messages to go.4. If appropriate, repeat for other outputs in this or other Archive output groups.
All SCTE-35 messages from the input are included in the data stream of the outputs that you have setup.
The Procedure for HLS1. In the channel that you are creating, find the HLS output group that contains the output that you
want to set up.2. Choose that output.3. In PID settings, complete the following fields:
• SCTE-35 behavior: Set to Passthrough.• SCTE-35 PID: Leave the default PID or enter the PID where you want the SCTE-35 messages to go.
4. If appropriate, repeat for other outputs in this or other HLS output groups.
All SCTE-35 messages from the input will be included in the data stream of the outputs that you have setup.
The Procedure for UDP1. In the channel that you are creating, find the UDP output group that contains the output that you
want to set up.2. Choose that output.3. In PID settings, complete the following fields:
• SCTE-35 control: Set to Passthrough.• SCTE-35 PID: Leave the default PID or enter the PID where you want the SCTE-35 messages to go.
4. If appropriate, repeat for other outputs in this or other UDP output groups.
All SCTE-35 messages from the input will be included in the data stream of the outputs that you have setup.
Sample Manifests - HLSAWS Elemental MediaLive supports the following HLS manifest styles:
• Adobe• Elemental• SCTE-35 Enhanced
This section describes the ad marker tagging for each style.
Ad Marker: AdobeInserts a CUE: DURATION for each ad avail. Does not insert any CUE-OUT CONT (continuation tags) toindicate to a player joining midbreak that there is a current avail. This does not insert a CUE-IN tag at theend of the avail.
105

AWS Elemental MediaLive User GuideAd Marker: Elemental
Structure
Segment Tag Tag Count
Segment in which the ad availstarts.
1 CUE: DURATION tag 1
Tag Contents• CUE:DURATION contains the following:
• duration – Duration in fractional seconds• id – An identifier, unique among all ad avails CUE tags• type – SpliceOut• time – The PTS time for the ad avail, in fractional seconds
Example
This is the tag for an ad avail lasting 414.171 PTS:
#EXT-X-CUE:DURATION="201.467",ID="0",TYPE="SpliceOut",TIME="414.171"
Ad Marker: ElementalStructure
Segment Tag Tag Count
Each succeeding segment. CUE-OUT 1
Segment in which the ad availstarts.
CUE-OUT-CONT 0-n
Segment in which ad availends.
CUE-IN 1
Tag Contents• CUE-OUT contains DURATION• CUE-OUT-CONT contains Elapsed time and Duration• CUE-IN has no content
Example
#EXT-X-CUE-OUT:30.000 ...# EXT-X-CUE-OUT-CONT: 8.308/30 ...# EXT-X-CUE-OUT-CONT: 20.391/30...
106

AWS Elemental MediaLive User GuideAd Marker: SCTE-35 Enhanced
# EXT-X-CUE-IN
Ad Marker: SCTE-35 EnhancedStructure
Segment Tag Tag Count
Segment in which the ad availstarts.
OATCLS-SCTE35 1
Segment in which the ad availstarts.
ASSET 1
Segment in which the ad availstarts.
CUE-OUT 1
Each succeeding segment. CUE-OUT-CONT 0-n
Segment in which ad availends.
CUE-IN 1
Tag Contents• OATCLS-SCTE35 containing the base64 encoded raw bytes of the original SCTE-35 ad avail
message.• ASSET containing the CAID or UPID as specified in the original SCTE35 message.• 1 CUE-OUT per ad avail.• CUE-OUT-CONT containing the following:
• The elapsed time of the avail.• The duration declared in the original SCTE35 message.• SCTE35 containing the base64 encoded raw bytes of the original SCTE-35 ad avail message.
These lines repeat until the ad avail ends.• CUE-IN to indicate the end of the avail.
Example
#EXT-OATCLS-SCTE35:/DA0AAAAAAAAAAAABQb+ADAQ6QAeAhxDVUVJQAAAO3/PAAEUrEoICAAAAAAg+2UBNAAANvrtoQ== #EXT-X-ASSET:CAID=0x0000000020FB6501 #EXT-X-CUE-OUT:201.467...#EXT-X-CUE-OUT-CONT:ElapsedTime=5.939,Duration=201.467,SCTE35=/DA0AAAA+…AAg+2UBNAAANvrtoQ==...#EXT-X-CUE-IN
107

AWS Elemental MediaLive User GuideStarting a Channel
Starting and Stopping a ChannelTopics
• Starting a Channel (p. 108)• Stopping a Channel (p. 108)
Starting a Channel1. Open the AWS Elemental MediaLive console at https://console.aws.amazon.com/medialive?
region="region".2. In the navigation pane, choose Channels.3. On the Channels page, choose the channel that you want to start.4. Choose Start. The channel state changes to one of the following:
• Starting• Recovering (indicates that encoding has started on one of the destinations but not the other)• Running (encoding on both destinations)
5. Choose the channel name. The details for the channel appear. The content pane shows these sections:
Stopping a ChannelYou can stop a channel that is running.
1. Choose the channel.2. Choose Stop.
108

AWS Elemental MediaLive User GuideHow to Read the Supported Captions Information
Reference: Supported CaptionsThis section contains tables that specify the caption formats that are supported in inputs and the captionformats that are supported in outputs.
There are several factors that control your ability to output captions in a given format:
• The type of input container. A given input container can contain captions in some formats and not inothers.
• The format of the input captions. A given format of captions can be converted to some formats andnot to others.
• The type of output containers. A given output container supports some caption formats and notothers.
Topics• How to Read the Supported Captions Information (p. 109)• General Information on Supported Formats (p. 109)• Formats Supported in an HLS Output (p. 111)• Formats Supported in an RTMP Output (p. 112)• Formats Supported in an MPEG2-TS File Output or MPEG2-UDP Streaming Output (p. 113)• Formats Supported in a Microsoft Smooth Output (p. 114)
How to Read the Supported Captions InformationTo determine if the input container and input captions that you have received are capable of producingthe desired output captions, consult the tables in the following sections and follow these steps:
1. Find the table for your output container.2. In that table, find the container type of the input you have been provided with and then find the input
captions that are in that container.3. In the third column, look for the output caption format you require.
If the format is listed, then your input is suitable.
If the format is not listed, you must ask the provider of that input to provide an input container thatincludes input captions that can be converted to the required output format.
General Information on Supported FormatsThe following table shows the supported formats, specifies whether they are supported in inputs oroutputs, and specifies the standard that defines each format.
Caption Supported in Input Supported in Output Description
Ancillary data Yes From MXF input, datathat is compliant with“SMPTE 291M: AncillaryData Package and
109

AWS Elemental MediaLive User GuideGeneral Information on Supported Formats
Caption Supported in Input Supported in Output Description
Space Formatting” andthat is contained inancillary data.
ARIB Yes Yes Captions that arecompliant with ARIBSTD-B37 Version 2.4.
Burn-in N/A Yes From input: It istechnically impossiblefor the encoder toread burn-in captions.Therefore, from aninput viewpoint, theycannot be considered tobe captions.
For output: Burn-incaptions are captionsthat are converted intotext and then overlaidon top of the picturedirectly in the videostream.
DVB-Sub Yes Yes Captions that arecompliant with ETSI EN300 743.
Embedded Yes Yes Captions that arecompliant with theEIA-608 standard (alsoknown as CEA-608 orSMPTE-259M or “line21 captions”) or theCEA-708 standard (alsoknown as EIA-708).
Embedded+SCTE-20 Yes Yes Captions that haveboth embedded andSCTE-20 in the video.The embedded captionsare inserted before theSCTE-20 captions.
RTMP CaptionInfo Yes Captions that arecompliant with theAdobe onCaptionInfoformat.
RTMP CuePoint Yes Captions that are in thecuePoint format.
110

AWS Elemental MediaLive User GuideFormats Supported in an HLS Output
Caption Supported in Input Supported in Output Description
SCTE-20 Yes Captions that arecompliant with thestandard “SCTE 202012 Methods forCarriage of CEA-608Closed Captions andNon-Real Time SampledVideo.”
SCTE-20+Embedded Yes Captions that arecompliant withSCTE-43. The SCTE-20captions are insertedin the video before theembedded captions.
SCTE-27 Yes Yes Captions that arecompliant with thestandard “SCTE-27(2011), SubtitlingMethods for BroadcastCable.”
Teletext Yes Yes From TS input: Captionsin the EBU Teletextformat.
TTML Yes Yes Captions files thatare compliant withthe standard “TimedText Markup Language1 (TTML1) (SecondEdition).”
WebVTT Yes Captions that arecompliant with “webvtt:The Web Video TextTracks Format” (http://dev.w3.org/html5/webvtt/).
Formats Supported in an HLS OutputIn this table, look up your input container and captions type. Then read across to find the captionformats that are supported for an HLS output, when you have this input container and captions type.
Source Caption Container Source Caption Input Supported Output Captions
HLS Container Embedded Burn-in
Embedded
WebVTT
111

AWS Elemental MediaLive User GuideFormats Supported in an RTMP Output
Source Caption Container Source Caption Input Supported Output Captions
SCTE-20 Burn-in
Embedded
WebVTT
RTMP Container Embedded Burn-in
Embedded
WebVTT
MPEG2-TS Container Embedded Burn-in
Embedded
WebVTT
SCTE-20 Burn-in
Embedded
WebVTT
Teletext Burn-in
WebVTT
ARIB None
DVB-Sub Burn-in
SCTE-27 Burn-in
Formats Supported in an RTMP OutputIn this table, look up your input container and captions type. Then read across to find the captionformats that are supported for an RTMP output, when you have this input container and captions type.
Source Caption Container Source Caption Input Supported Output Captions
HLS Container Embedded Burn-in
RTMP CaptionInfo
SCTE-20 None
RTMP Container Embedded Burn-in
RTMP CaptionInfo
MPEG2-TS Container Embedded Burn-in
RTMP CaptionInfo
SCTE-20 None
112

AWS Elemental MediaLive User GuideFormats Supported in an MPEG2-TS File
Output or MPEG2-UDP Streaming Output
Source Caption Container Source Caption Input Supported Output Captions
ARIB None
DVB-Sub Burn-in
SCTE-27 Burn-in
Formats Supported in an MPEG2-TS File Output orMPEG2-UDP Streaming Output
In this table, look up your input container and captions type. Then read across to find the captionformats that are supported for an MPEG2-TS or MPEG2-UDP output, when you have this input containerand captions type.
Source Caption Container Source Caption Input Supported Output Captions
HLS Container Embedded Burn-in
DVB-Sub
Embedded
Embedded+SCTE-20
SCTE-20+Embedded
SCTE-20 Burn-in
DVB-Sub
Embedded
Embedded+SCTE-20
SCTE-20+Embedded
RTMP Container Embedded Burn-in
DVB-Sub
Embedded
Embedded+SCTE-20
SCTE-20+Embedded
MPEG2-TS Container Embedded Burn-in
DVB-Sub
Embedded
Embedded+SCTE-20
SCTE-20+Embedded
113

AWS Elemental MediaLive User GuideFormats Supported in a Microsoft Smooth Output
Source Caption Container Source Caption Input Supported Output Captions
SCTE-20 Burn-in
DVB-Sub
Embedded
Embedded+SCTE-20
SCTE-20+Embedded
Teletext Burn-in
DVB-Sub
Teletext
ARIB ARIB
DVB-Sub Burn-in
DVB-Sub
SCTE-27 Burn-in
DVB-Sub
SCTE-27
Formats Supported in a Microsoft Smooth OutputIn this table, look up your input container and captions type. Then read across to find the captionformats that are supported for a Microsoft Smooth output, when you have this input container andcaptions type.
Source Caption Container Source Caption Input Supported Output Captions
HLS Container Embedded Burn-in
TTML
SCTE-20 Burn-in
TTML
RTMP Container Embedded Burn-in
TTML
MPEG2-TS Container Embedded Burn-in
TTML
SCTE-20 Burn-in
TTML
Teletext Burn-in
114

AWS Elemental MediaLive User GuideFormats Supported in a Microsoft Smooth Output
Source Caption Container Source Caption Input Supported Output Captions
TTML
ARIB None
DVB-Sub
SCTE-27
115

AWS Elemental MediaLive User GuideSupported Input Types
Reference: Supported Containersand Codecs
Topics• Supported Input Types (p. 116)• Supported Codecs for Inputs (p. 118)• Supported Codecs for Outputs (p. 118)
Supported Input TypesAWS Elemental MediaLive supports the following input sources.
AWSElementalMediaLiveOption (on theCreate Inputpage)
Use Case Protocol URI Format Stream InputSupported
File InputSupported
RTP Push a streamto a fixedendpoint onAWS ElementalMediaLive,using the RTPprotocol.
RTP rtp://<hostname>:5000/
Yes
RTMP Pull Pull a streamfrom anexternalendpoint usingthe RTMPprotocol.
RTMP Pull rtmp://<hostname>:1935/
Yes
RTMP Push Push a streamto a fixedendpoint onAWS ElementalMediaLive,using theRTMP protocol.For theapplicationname, only“live” issupported.
RTMP Push <applicationname>/<streamname>
Yes
HLS Pull an HLSstream orfile from
HTTP The path tothe M3U8manifest:
Yes Yes
116

AWS Elemental MediaLive User GuideWays of Ingesting: Push and Pull
AWSElementalMediaLiveOption (on theCreate Inputpage)
Use Case Protocol URI Format Stream InputSupported
File InputSupported
an externalendpoint usingthe HTTPprotocol.
http://<webserver>[:port]/path/file.m3u8
HLS Pull an HLSstream orfile froman externalendpoint usingthe HTTPSprotocol.
HTTPS The path tothe M3U8manifest:
https://<webserver>/path/file.m3u8
Yes Yes
HLS Pull an HLSstream orfile from anAmazon S3bucket.
Amazon S3 The path tothe M3U8manifest:
s3://<webserver>/path/file.m3u8
Yes Yes
HLS Pull an HLSstream orfile froman AmazonS3 bucket,using a secureconnection.
HTTPS The path tothe M3U8manifest:
s3ssl://<webserver>/path/file.m3u8
Yes Yes
HLS Pull an HLSstream or filefrom an AWSElementalMediaStorecontainer,using a secureconnection.
HTTPS The path tothe M3U8manifest:
mediastoressl://eri39n.data.mediastore.us-west-2.amazonaws.com/premium/canada/mlaw.m3u8
Yes Yes
Ways of Ingesting: Push and Pull• A push input works as follows: the source attempts to deliver to an endpoint that is specified in the
AWS Elemental MediaLive input. In the case of RTP protocols, the source is unaware of whether thecontent is being ingested by the AWS Elemental MediaLive channel. In the case of RTMP, there mustbe a handshake between the source and the AWS Elemental MediaLive channel so that the source willhave knowledge of the status of the input.
When the channel (that is connected to this input) is started, AWS Elemental MediaLive reacts to thesource (RTP) or responds to the handshake message (RTMP) and ingests it. When the channel is not
117

AWS Elemental MediaLive User GuideSupported Codecs for Inputs
running, AWS Elemental MediaLive does not react; the source continues to publish to the endpoint(RTP) or goes into a paused state (RTMP), but AWS Elemental MediaLive does not pay attention.
A push input works only with a streaming source.• A pull input works as follows: the source continually publishes to an endpoint that is outside of AWS
Elemental MediaLive. When the channel (that is connected to the input) is running, AWS ElementalMediaLive connects to the input and ingests the content.
When the channel is not running, AWS Elemental MediaLive does not connect to the input. (Theremight be other applications that do connect.)
A pull input works with a streaming input (where the source is continually being published) or a fileinput (where the source is put on the endpoint and then does not change until the next time it is put).
Supported Codecs for Inputs
Container Video Codecs Audio Codecs
RTP (MPEG TS) H.264 (AVC), HEVC (H.265),MPEG-2
AAC, Dolby Digital, Dolby DigitalPlus, MPEG Audio, PCM
HLS H.264 (AVC) AAC, Dolby Digital, Dolby DigitalPlus
RTMP H.264 (AVC) AAC
Supported Codecs for OutputsSupported Codecs for File Outputs
Container Video Codecs Audio Codecs
MPEG-2 TS H.264 (AVC) AAC, Dolby Digital, Dolby DigitalPlus, MPEG-1 Layer II
HLS H.264 (AVC) AAC, Dolby Digital, Dolby DigitalPlus
Microsoft Smooth H.264 (AVC) AAC, Dolby Digital, Dolby DigitalPlus
Supported Codecs for Streaming Outputs
Container Video Codecs Audio Codecs
UDP H.264 (AVC) AAC, Dolby Digital, Dolby DigitalPlus
HLS H.264 (AVC) AAC, Dolby Digital, Dolby DigitalPlus
118

AWS Elemental MediaLive User GuideSupported Codecs for Streaming Outputs
Container Video Codecs Audio Codecs
Microsoft Smooth H.264 (AVC) AAC, Dolby Digital, Dolby DigitalPlus
RTMP or RTMPS H.264 (AVC) AAC, Dolby Digital, Dolby DigitalPlus
119

AWS Elemental MediaLive User Guide
Reference: Identifiers for VariableData
Identifiers for variable data are $ codes that you can include in a field value to represent variable data.Typically, the variable data (for example, $d$ for the date) is resolved when you run the channel. You caninclude them in any of the fields that make up part of the output destination:
• Destination in Output group
• Name modifier in Output
• Segment modifier in Output
At runtime, the identifier is resolved to the appropriate data. For example, $dt$ resolves to a date andtime.
When you use these identifiers, make sure that the channel doesn't end up with two (or more) outputswith identical destinations. If that happens, the channel passes validation upon creation, but fails onstart.
Identifier Format Description
$dt$ YYYYMMDDTHHMMSS UTC date and time of the starttime of the channel (for alloutputs except HLS) or the dateand time of each segment (forHLS outputs).
$d$ YYYYMMDD UTC date of the start time of thechannel (for all outputs exceptHLS) or the date and time ofeach segment (for HLS outputs).
$t$ HHMMSS Start time of the channel (forall outputs except HLS) or thetime of each segment (for HLSoutputs).
$rv$ Kb Video bit rate.
$ra$ Kb Total of all audio bit rates in theoutput.
$rc$ Kb Container bit rate for the output,or the sum of video and allaudio bit rates for the output,if the container bit rate is notspecified.
$w$ Pixels Horizontal resolution.
$h$ Pixels Vertical resolution.
120

AWS Elemental MediaLive User Guide
Identifier Format Description
$f$ Integer FPS Framerate without decimalplaces. For example, “23.976”appears as “23”.
$$ $ Escaped $.
%0n Padding modifier Modifier for any data identifier.The modifier pads the resolvedvalue with leading zeros. Theformat is%0n, where n is anumber.
For example, to ensure theresolved value in the $h$identifier is 5 characters long,specify the identifier as $h%05$.
If the vertical resolution is “720”,then the resolved, padded valueis “00720”.
The rules for which identifiers can be used in a specified destination field depend on the output type.
Field Applicable Output Types Acceptable Identifiers
Destination in Output group Archive, HLS, Microsoft Smooth $dt$, $d$, $t$
Name modifier in Output Archive, Microsoft Smooth All except $ra$ and $rc$
Name modifier in Output HLS All
Segment modifier in Output Archive, Microsoft Smooth All except $ra$ and $rc$
Segment modifier in Output HLS All
121

AWS Elemental MediaLive User GuideInput and Output Reservations
Working with Reservations in AWSElemental MediaLive
You can purchase a reservation for the processing of resources that you are billed for: input processing,output processing, and add-ons such as codec licenses. Each reservation gives you a reduced rate for theprocessing of the relevant resources.
A reservation is a one-year commitment to a particular input or output configuration. The reservation isallocated and billed on a monthly basis through that year.
You pay an hourly rate (which is lower than the per-minute rate) for a pool of minutes that your channelsconsume for a month.
For information on charges for reservations, see the AWS Elemental MediaLive price list.
Topics• Input and Output Reservations (p. 122)• Add-on Reservations (p. 124)• Purchasing a Reservation (p. 126)• Viewing Purchased Reservations (p. 126)• Deleting a Reservation (p. 127)
Input and Output ReservationsReservation offerings are available for inputs and for outputs.
Input Reservation Attributes and MatchingAn input reservation has these attributes:
• Codec• Resolution (a range)• Bit rate (a range)• Region that the input runs in
An input reservation applies to the cost of processing input. For a reservation to apply to an input, theattributes of the input reservation must match the fields in the channel's Input specification, and thechannel must run in the region that is specified in the reservation. For example, suppose that your inputspecification for a channel is AVC, HD, and Max 20 Mbps. A reservation that matches those attributescould apply to the input in that channel.
Output Reservation Attributes and MatchingAn output reservation has these attributes:
• Codec• Resolution (a range)• Bit rate (a range)
122

AWS Elemental MediaLive User GuideHow an Input or Output Reservation Is Applied
• Framerate (a range)• Region that the input runs in
An output reservation applies to the cost of processing output. For a reservation to apply to an input, theattributes of the output reservation must match the corresponding fields in the channel configuration,and the channel must run in the region that is specified in the reservation. You can find the fields on theAWS Elemental MediaLive console:
• For a regular video and audio output, the fields are in the Video output section of the channelconfiguration. To make most of the fields appear, you must choose a codec on the page.
• For an audio-only output, the fields are in the Audio output section of the channel configuration.
There is a match if the value of a field in the channel is equal to or falls within the range of thecorresponding attribute. For example, a bit rate of 29.97 fps in the channel configuration falls withinthe range of a bit rate attribute of <=30fps in the reservation.
If just one of the fields does not match its corresponding reservation attribute, then there is no matchbetween the output and reservation.
How an Input or Output Reservation Is AppliedAt the start of each monthly billing cycle, AWS replenishes each reservation with the pool of minutes forthe month.
At the end of the cycle, AWS applies the minutes from a given reservation to reduce the cost for theprocessed items (inputs or outputs) whose attributes match this reservation. For each minute in themonth, AWS determines if one or more matching items was running. It accumulates these "runningminutes" within the hour, up to a maximum of 60 minutes in the hour.
After the reservation minutes are used up for the hour, AWS charges the regular rate-per-minute for theremainder of the items in that hour.
Running Minutes Can Be Allocated Over Items
The running minutes could come from more than one item. For example, you start Channel A with aninput that matches a given reservation. You have purchased only one instance of this reservation. After45 minutes you start Channel B that also has an input that matches a given reservation. After 15 moreminutes you stop Channel A. The running minutes are accumulated as shown by the green shading in thefollowing illustration.
Here is another example of how different items can consume the running minutes. Suppose that in onehour you run only outputs that match a given reservation. You have purchased only one instance of thisreservation. You run these four matching outputs simultaneously for 15 minutes each. During that hour,you don't run any other matching outputs. Those four outputs would all contribute to the 60 minutes.
123

AWS Elemental MediaLive User GuideAdd-on Reservations
Processing Bursts Are Not Supported
The 60-minute rule means that reservations can't be used for processing "bursts."
For example, in one hour you run four outputs that match a given reservation. You have purchased onlyone instance of this reservation. You run these four matching outputs simultaneously for 60 minuteseach. Only one of these outputs is eligible for the reservation because one output is enough to use upthe 60 running minutes per hour.
Unused Minutes
If some of the minutes in the reservation are not used, those minutes are lost; the minutes are nottransferred to the next month.
Running Minutes Can Be Allocated Over Items
There are no restrictions regarding channels:
• For example, the reservation could be consumed based on the processing of one input from onechannel and another input from a different channel.
• There is no requirement for all the inputs or outputs in a given channel to be covered by a reservation.
Add-on ReservationsReservations are available for those items in the AWS Elemental MediaLive price list, such as codeclicenses, that are considered to be add-ons.
An add-on reservation applies to the cost of the add-on for the entire channel. The reservation reducesthe cost of the add-on regardless of how many times the add-on applies to the channel. For example, ifthree outputs in the same channel both use an advanced audio codec, you need only one reservation toreduce the cost of the add-on. You don't need three reservations for this channel.
Reservation AttributesThe add-on reservations have these attributes:
• Add-on (Advanced Audio, or Audio Normalization)• Region in which the channel is running
How an Add-on Reservation Is AppliedAt the start of each monthly billing cycle, AWS replenishes each add-on reservation with the pool ofminutes for the month.
At the end of the cycle, AWS applies the minutes from a given reservation to reduce the cost for channelsthat use the add-on. For each minute in the month, it determines if one or more matching channels wasrunning. A channel matches the reservation if the add-on feature is enabled.
124
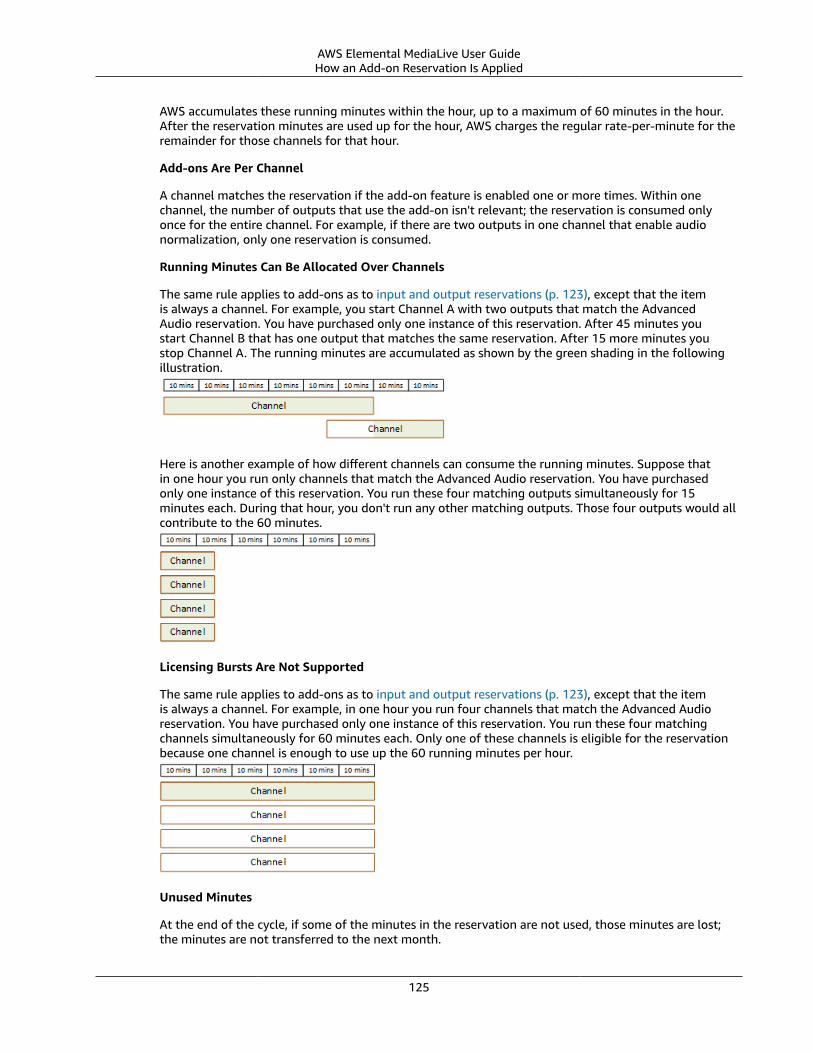
AWS Elemental MediaLive User GuideHow an Add-on Reservation Is Applied
AWS accumulates these running minutes within the hour, up to a maximum of 60 minutes in the hour.After the reservation minutes are used up for the hour, AWS charges the regular rate-per-minute for theremainder for those channels for that hour.
Add-ons Are Per Channel
A channel matches the reservation if the add-on feature is enabled one or more times. Within onechannel, the number of outputs that use the add-on isn't relevant; the reservation is consumed onlyonce for the entire channel. For example, if there are two outputs in one channel that enable audionormalization, only one reservation is consumed.
Running Minutes Can Be Allocated Over Channels
The same rule applies to add-ons as to input and output reservations (p. 123), except that the itemis always a channel. For example, you start Channel A with two outputs that match the AdvancedAudio reservation. You have purchased only one instance of this reservation. After 45 minutes youstart Channel B that has one output that matches the same reservation. After 15 more minutes youstop Channel A. The running minutes are accumulated as shown by the green shading in the followingillustration.
Here is another example of how different channels can consume the running minutes. Suppose thatin one hour you run only channels that match the Advanced Audio reservation. You have purchasedonly one instance of this reservation. You run these four matching outputs simultaneously for 15minutes each. During that hour, you don't run any other matching outputs. Those four outputs would allcontribute to the 60 minutes.
Licensing Bursts Are Not Supported
The same rule applies to add-ons as to input and output reservations (p. 123), except that the itemis always a channel. For example, in one hour you run four channels that match the Advanced Audioreservation. You have purchased only one instance of this reservation. You run these four matchingchannels simultaneously for 60 minutes each. Only one of these channels is eligible for the reservationbecause one channel is enough to use up the 60 running minutes per hour.
Unused Minutes
At the end of the cycle, if some of the minutes in the reservation are not used, those minutes are lost;the minutes are not transferred to the next month.
125

AWS Elemental MediaLive User GuidePurchasing a Reservation
Purchasing a ReservationOn the console, use the Reservations tab to purchase one or more reservations.
To purchase a reservation (console)
1. Open the AWS Elemental MediaLive console at https://console.aws.amazon.com/medialive/.2. In the navigation pane, choose Reservations, and then choose Reserve offerings.3. On the Offerings page, complete the Filter offerings section to filter for specific offerings. For more
information, see Filtering on the Offering Page (p. 126).4. Choose an offering, and then choose Add to cart. The Cart tab title in the upper-left pane
increments to show the total offerings currently in the cart. (To remove an offering that you addedto the cart, switch to the Cart tab.)
5. To view the cart contents, choose the Cart tab.6. To purchase all the offerings that are displayed on the Cart tab, choose Purchase.
Filtering on the Offerings PageThe Offerings page shows the different reservations that you can purchase:
• Input and output offerings, which are described as follows:
Resolution – Codec – Input/output – Bitrate – Framerate (for outputs only) – Region
For example: UHD AVC input at 10-20 mbps in US West (Oregon)• Channel (add-ons) offerings, which are described as follows:
Add-on – Region
For example: Advanced Audio reserved outputs in US West (Oregon)
You can filter the offerings using the filters in the left pane:
• You can filter for the reservation type: input, output, or channel (for add-ons).• You can filter the offerings based on attributes, such as resolution or bit rate.• Match existing channel filters the offerings to show only those offerings that match the inputs and
outputs in the chosen channel.• Special feature filters the offerings to show only add-on offerings.
Filtering does not affect the items in the cart.
Viewing Purchased ReservationsOn the console, you can view the reservations that you have purchased.
To view your purchased reservations (console)
1. Open the AWS Elemental MediaLive console at https://console.aws.amazon.com/medialive/.2. In the navigation pane, choose Reservations.
The information displayed for each reservation includes its expiry date in the End column.
126

AWS Elemental MediaLive User GuideDeleting a Reservation
Deleting a ReservationWhen a reservation has expired, you can delete the reservation from the list.
To delete an expired reservation (console)
1. Open the AWS Elemental MediaLive console at https://console.aws.amazon.com/medialive/.2. In the navigation pane, choose Reservations.3. Choose the item or items, and then choose Delete.
127

AWS Elemental MediaLive User Guide
Limits in AWS Elemental MediaLiveThe following table describes limits in AWS Elemental MediaLive. For information about limits that canbe changed, see AWS Service Limits.
Resource Default Limit
Maximum inputs 5 (can request more)
Maximum input security groups 5 (can request more)
Maximum channels 5 (can request more)
128
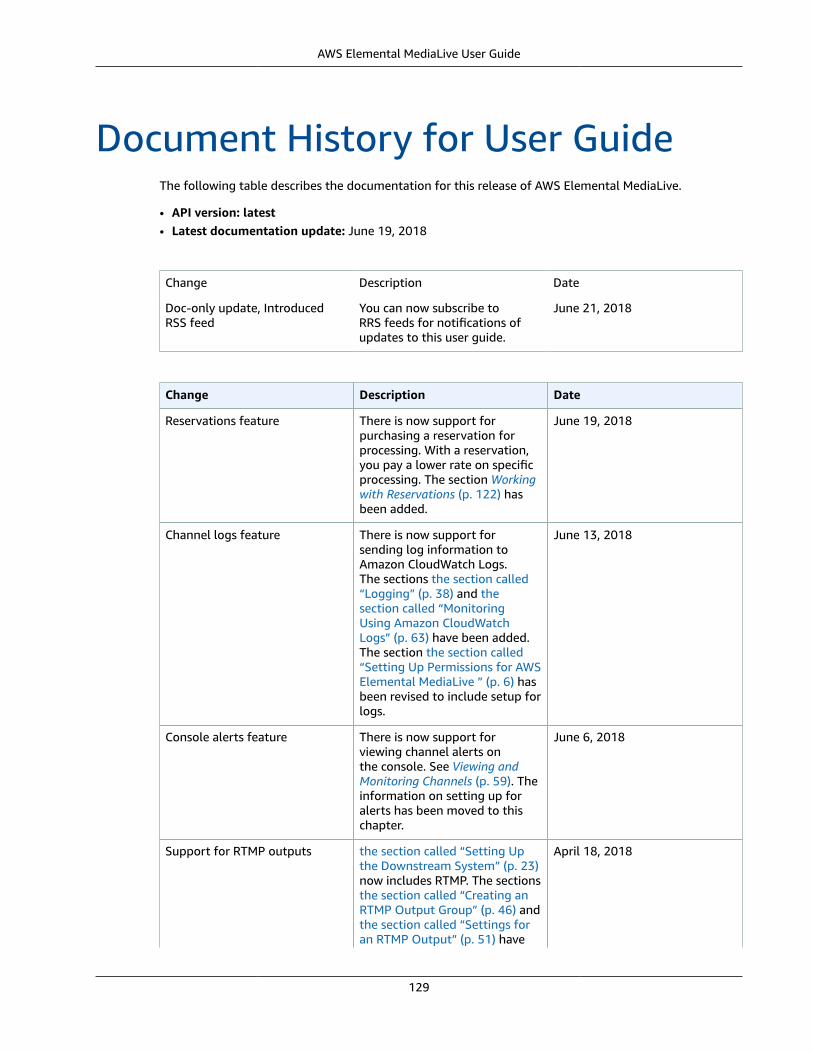
AWS Elemental MediaLive User Guide
Document History for User GuideThe following table describes the documentation for this release of AWS Elemental MediaLive.
• API version: latest• Latest documentation update: June 19, 2018
Change Description Date
Doc-only update, IntroducedRSS feed
You can now subscribe toRRS feeds for notifications ofupdates to this user guide.
June 21, 2018
Change Description Date
Reservations feature There is now support forpurchasing a reservation forprocessing. With a reservation,you pay a lower rate on specificprocessing. The section Workingwith Reservations (p. 122) hasbeen added.
June 19, 2018
Channel logs feature There is now support forsending log information toAmazon CloudWatch Logs.The sections the section called“Logging” (p. 38) and thesection called “MonitoringUsing Amazon CloudWatchLogs” (p. 63) have been added.The section the section called“Setting Up Permissions for AWSElemental MediaLive ” (p. 6) hasbeen revised to include setup forlogs.
June 13, 2018
Console alerts feature There is now support forviewing channel alerts onthe console. See Viewing andMonitoring Channels (p. 59). Theinformation on setting up foralerts has been moved to thischapter.
June 6, 2018
Support for RTMP outputs the section called “Setting Upthe Downstream System” (p. 23)now includes RTMP. The sectionsthe section called “Creating anRTMP Output Group” (p. 46) andthe section called “Settings foran RTMP Output” (p. 51) have
April 18, 2018
129

AWS Elemental MediaLive User Guide
Change Description Date
been added. the section called“ Step 3: Match Formats toCategories” (p. 76) now includesRTMP CaptionInfo. the sectioncalled “Formats Supported in anRTMP Output” (p. 112) has beenadded.
Input edit feature, Input securitygroup edit feature
Editing of an existing inputand an editing of an existinginput security group are nowsupported. See the sectioncalled “Editing an Input” (p. 30)the section called “Editing anInput Security Group” (p. 25)
March 23,2018
Input delete feature, Inputsecurity group delete feature
Deleting an input and deletingan input security group arenow supported. See the sectioncalled “Editing an Input” (p. 30)the section called “Editing anInput Security Group” (p. 25)
March 23, 2018
Creating a channel Creating a Channel fromScratch (p. 32) has beenextensively revised, particularlywith more information andexamples on setting updestinations for output groups.
March 23, 2018
Input specification feature Input specification fields ensurethat the service allocatessufficient processing resourcesand correctly calculatesprocessing charges. See thesection called “Step 2: Completethe Input Settings” (p. 35).
February 15, 2018
Channel edit feature Editing of the fields in anexisting (saved) channelis now supported. See thesection called “Editing aChannel” (p. 66).
February 15, 2018
Custom template feature Users can create customtemplates from existingchannels, and can import thosetemplates into new channels.See Creating a Channel from aTemplate or by Cloning (p. 56).
February 15, 2018
New service and guide This is the initial release of AWSElemental MediaLive User Guide.
November 27, 2017
130

AWS Elemental MediaLive User Guide
Note
• The AWS Media Services are not designed or intended for use with applications or insituations requiring fail‐safe performance, such as life safety operations, navigationor communication systems, air traffic control, or life support machines in which theunavailability, interruption or failure of the services could lead to death, personal injury,property damage or environmental damage.
• A component of AWS Elemental MediaLive is licensed under the AVC patent portfolio licensefor the personal and non-commercial use of a consumer to (i) encode video in compliancewith the AVC standard ("AVC video") and/or (ii) decode AVC video that was encoded by aconsumer engaged in a personal and non-commercial activity and/or was obtained from avideo provider licensed to provide AVC video. No license is granted or shall be implied for anyother use. A component of AWS Elemental MediaLive is licensed under the mpeg-4 patentportfolio license for the personal and non-commercial use of a consumer for (i) encodingvideo in compliance with the mpeg-4 visual standard (“mpeg-4 video”) and/or (ii) decodingmpeg-4 video that was encoded by a consumer engaged in a personal and non-commercialactivity and/or was obtained from a video provider licensed to provide AVC video. No licenseis granted or shall be implied for any other use. Additional information may be obtained fromMPEG-LA, LLC. See http://www.mpegla.com.
• AWS Elemental MediaLive may contain Dolby Digital and Dolby Digital Plus, which areprotected under international and U.S. copyright laws as unpublished works. Dolby Digital andDolby Digital Plus are confidential and proprietary to Dolby Laboratories. Their reproductionor disclosure, in whole or in part, or the production of derivative works therefrom withoutthe express permission of Dolby Laboratories is prohibited. © Copyright 2003-2015 DolbyLaboratories. All rights reserved.
131

AWS Elemental MediaLive User Guide
AWS GlossaryFor the latest AWS terminology, see the AWS Glossary in the AWS General Reference.
132