aws cloud9 - user guide · pdf filetutorial ... 209 panels ... st ep 6: run h aw dk cod
TRANSCRIPT

AWS Cloud9User Guide
AWS Cloud9: User GuideCopyright © 2018 Amazon Web Services, Inc. and/or its affiliates. All rights reserved.

AWS Cloud9 User Guide
Amazon's trademarks and trade dress may not be used in connection with any product or service that is not Amazon's, in any mannerthat is likely to cause confusion among customers, or in any manner that disparages or discredits Amazon. All other trademarks notowned by Amazon are the property of their respective owners, who may or may not be affiliated with, connected to, or sponsored byAmazon.

AWS Cloud9 User Guide
Table of ContentsWhat Is AWS Cloud9? .... . . . . . . . . . . . . . . . . . . . . . . . . . . . . . . . . . . . . . . . . . . . . . . . . . . . . . . . . . . . . . . . . . . . . . . . . . . . . . . . . . . . . . . . . . . . . . . . . . . . . . . . . . . . . . . . . . . . . . 1
What Can I Do with AWS Cloud9? .... . . . . . . . . . . . . . . . . . . . . . . . . . . . . . . . . . . . . . . . . . . . . . . . . . . . . . . . . . . . . . . . . . . . . . . . . . . . . . . . . . . . . . . . . . . . . 1Topics in This Guide .... . . . . . . . . . . . . . . . . . . . . . . . . . . . . . . . . . . . . . . . . . . . . . . . . . . . . . . . . . . . . . . . . . . . . . . . . . . . . . . . . . . . . . . . . . . . . . . . . . . . . . . . 1Related Videos .... . . . . . . . . . . . . . . . . . . . . . . . . . . . . . . . . . . . . . . . . . . . . . . . . . . . . . . . . . . . . . . . . . . . . . . . . . . . . . . . . . . . . . . . . . . . . . . . . . . . . . . . . . . . . . . . 2
How Does AWS Cloud9 Work? .... . . . . . . . . . . . . . . . . . . . . . . . . . . . . . . . . . . . . . . . . . . . . . . . . . . . . . . . . . . . . . . . . . . . . . . . . . . . . . . . . . . . . . . . . . . . . . . . . . 2Pricing .... . . . . . . . . . . . . . . . . . . . . . . . . . . . . . . . . . . . . . . . . . . . . . . . . . . . . . . . . . . . . . . . . . . . . . . . . . . . . . . . . . . . . . . . . . . . . . . . . . . . . . . . . . . . . . . . . . . . . . . . . . . . . . . . . . . 3How Do I Get Started? .... . . . . . . . . . . . . . . . . . . . . . . . . . . . . . . . . . . . . . . . . . . . . . . . . . . . . . . . . . . . . . . . . . . . . . . . . . . . . . . . . . . . . . . . . . . . . . . . . . . . . . . . . . . . . 3About Cloud9 Versions .... . . . . . . . . . . . . . . . . . . . . . . . . . . . . . . . . . . . . . . . . . . . . . . . . . . . . . . . . . . . . . . . . . . . . . . . . . . . . . . . . . . . . . . . . . . . . . . . . . . . . . . . . . . . 4I Have Additional Questions or Need Help .... . . . . . . . . . . . . . . . . . . . . . . . . . . . . . . . . . . . . . . . . . . . . . . . . . . . . . . . . . . . . . . . . . . . . . . . . . . . . . . . . . 4
Getting Started .... . . . . . . . . . . . . . . . . . . . . . . . . . . . . . . . . . . . . . . . . . . . . . . . . . . . . . . . . . . . . . . . . . . . . . . . . . . . . . . . . . . . . . . . . . . . . . . . . . . . . . . . . . . . . . . . . . . . . . . . . . . . . . . 5Express Setup .... . . . . . . . . . . . . . . . . . . . . . . . . . . . . . . . . . . . . . . . . . . . . . . . . . . . . . . . . . . . . . . . . . . . . . . . . . . . . . . . . . . . . . . . . . . . . . . . . . . . . . . . . . . . . . . . . . . . . . . . . 5
Step 1: Create an AWS Account .... . . . . . . . . . . . . . . . . . . . . . . . . . . . . . . . . . . . . . . . . . . . . . . . . . . . . . . . . . . . . . . . . . . . . . . . . . . . . . . . . . . . . . . . 6Step 2: Sign in to the AWS Cloud9 Console with an AWS Account Root User ... . . . . . . . . . . . . . . . . . . . . . . . . . . . . 6
Team Setup .... . . . . . . . . . . . . . . . . . . . . . . . . . . . . . . . . . . . . . . . . . . . . . . . . . . . . . . . . . . . . . . . . . . . . . . . . . . . . . . . . . . . . . . . . . . . . . . . . . . . . . . . . . . . . . . . . . . . . . . . . . . . 7Step 1: Create an AWS Account .... . . . . . . . . . . . . . . . . . . . . . . . . . . . . . . . . . . . . . . . . . . . . . . . . . . . . . . . . . . . . . . . . . . . . . . . . . . . . . . . . . . . . . . . 7Step 2: Create an IAM Group and User, and Add the User to the Group .... . . . . . . . . . . . . . . . . . . . . . . . . . . . . . . . . . . 8Step 3: Add AWS Cloud9 Access Permissions to the Group .... . . . . . . . . . . . . . . . . . . . . . . . . . . . . . . . . . . . . . . . . . . . . . . . . . 11Step 4: Sign in to the AWS Cloud9 Console .... . . . . . . . . . . . . . . . . . . . . . . . . . . . . . . . . . . . . . . . . . . . . . . . . . . . . . . . . . . . . . . . . . . . . . 13
Advanced Team Setup .... . . . . . . . . . . . . . . . . . . . . . . . . . . . . . . . . . . . . . . . . . . . . . . . . . . . . . . . . . . . . . . . . . . . . . . . . . . . . . . . . . . . . . . . . . . . . . . . . . . . . . . . . . . 13Step 1: Create a Customer-Managed Policy .... . . . . . . . . . . . . . . . . . . . . . . . . . . . . . . . . . . . . . . . . . . . . . . . . . . . . . . . . . . . . . . . . . . . . . . 14Step 2: Add Customer-Managed Policies to a Group .... . . . . . . . . . . . . . . . . . . . . . . . . . . . . . . . . . . . . . . . . . . . . . . . . . . . . . . . . . . 15Customer-Managed Policy Examples for Teams Using AWS Cloud9 .... . . . . . . . . . . . . . . . . . . . . . . . . . . . . . . . . . . . . . 15
IDE Tutorial ... . . . . . . . . . . . . . . . . . . . . . . . . . . . . . . . . . . . . . . . . . . . . . . . . . . . . . . . . . . . . . . . . . . . . . . . . . . . . . . . . . . . . . . . . . . . . . . . . . . . . . . . . . . . . . . . . . . . . . . . . . . 19Step 1: Create an EC2 Environment .... . . . . . . . . . . . . . . . . . . . . . . . . . . . . . . . . . . . . . . . . . . . . . . . . . . . . . . . . . . . . . . . . . . . . . . . . . . . . . . . . 19Step 2: Tour the IDE .... . . . . . . . . . . . . . . . . . . . . . . . . . . . . . . . . . . . . . . . . . . . . . . . . . . . . . . . . . . . . . . . . . . . . . . . . . . . . . . . . . . . . . . . . . . . . . . . . . . . . . 24Step 3: Clean Up .... . . . . . . . . . . . . . . . . . . . . . . . . . . . . . . . . . . . . . . . . . . . . . . . . . . . . . . . . . . . . . . . . . . . . . . . . . . . . . . . . . . . . . . . . . . . . . . . . . . . . . . . . . . 44Next Steps .... . . . . . . . . . . . . . . . . . . . . . . . . . . . . . . . . . . . . . . . . . . . . . . . . . . . . . . . . . . . . . . . . . . . . . . . . . . . . . . . . . . . . . . . . . . . . . . . . . . . . . . . . . . . . . . . . . . . 45
AWS Lambda Tutorial ... . . . . . . . . . . . . . . . . . . . . . . . . . . . . . . . . . . . . . . . . . . . . . . . . . . . . . . . . . . . . . . . . . . . . . . . . . . . . . . . . . . . . . . . . . . . . . . . . . . . . . . . . . . . . 45Prerequisites ... . . . . . . . . . . . . . . . . . . . . . . . . . . . . . . . . . . . . . . . . . . . . . . . . . . . . . . . . . . . . . . . . . . . . . . . . . . . . . . . . . . . . . . . . . . . . . . . . . . . . . . . . . . . . . . . . . 46Step 1: Create and Open the AWS Cloud9 Development Environment .... . . . . . . . . . . . . . . . . . . . . . . . . . . . . . . . . . 46Step 2: Create the Lambda Function and API ... . . . . . . . . . . . . . . . . . . . . . . . . . . . . . . . . . . . . . . . . . . . . . . . . . . . . . . . . . . . . . . . . . . . . 48Step 3: Add Code to the Function .... . . . . . . . . . . . . . . . . . . . . . . . . . . . . . . . . . . . . . . . . . . . . . . . . . . . . . . . . . . . . . . . . . . . . . . . . . . . . . . . . . . 50Step 4: Run the Function Locally ... . . . . . . . . . . . . . . . . . . . . . . . . . . . . . . . . . . . . . . . . . . . . . . . . . . . . . . . . . . . . . . . . . . . . . . . . . . . . . . . . . . . . . 52Step 5: Debug the Function Locally ... . . . . . . . . . . . . . . . . . . . . . . . . . . . . . . . . . . . . . . . . . . . . . . . . . . . . . . . . . . . . . . . . . . . . . . . . . . . . . . . . . 54Step 6: Run the API Locally ... . . . . . . . . . . . . . . . . . . . . . . . . . . . . . . . . . . . . . . . . . . . . . . . . . . . . . . . . . . . . . . . . . . . . . . . . . . . . . . . . . . . . . . . . . . . . 55Step 7: Debug the API Locally ... . . . . . . . . . . . . . . . . . . . . . . . . . . . . . . . . . . . . . . . . . . . . . . . . . . . . . . . . . . . . . . . . . . . . . . . . . . . . . . . . . . . . . . . . 56Step 8: Run the Function in Production .... . . . . . . . . . . . . . . . . . . . . . . . . . . . . . . . . . . . . . . . . . . . . . . . . . . . . . . . . . . . . . . . . . . . . . . . . . . . 57Step 9: Run the API in Production .... . . . . . . . . . . . . . . . . . . . . . . . . . . . . . . . . . . . . . . . . . . . . . . . . . . . . . . . . . . . . . . . . . . . . . . . . . . . . . . . . . . 57Step 10: Change the Function Locally ... . . . . . . . . . . . . . . . . . . . . . . . . . . . . . . . . . . . . . . . . . . . . . . . . . . . . . . . . . . . . . . . . . . . . . . . . . . . . . . 58Step 11: Deploy the Changed Function into Production .... . . . . . . . . . . . . . . . . . . . . . . . . . . . . . . . . . . . . . . . . . . . . . . . . . . . . . 58Step 12: Clean Up .... . . . . . . . . . . . . . . . . . . . . . . . . . . . . . . . . . . . . . . . . . . . . . . . . . . . . . . . . . . . . . . . . . . . . . . . . . . . . . . . . . . . . . . . . . . . . . . . . . . . . . . . . 59Next Steps .... . . . . . . . . . . . . . . . . . . . . . . . . . . . . . . . . . . . . . . . . . . . . . . . . . . . . . . . . . . . . . . . . . . . . . . . . . . . . . . . . . . . . . . . . . . . . . . . . . . . . . . . . . . . . . . . . . . . 60
Advanced AWS Lambda Tutorial ... . . . . . . . . . . . . . . . . . . . . . . . . . . . . . . . . . . . . . . . . . . . . . . . . . . . . . . . . . . . . . . . . . . . . . . . . . . . . . . . . . . . . . . . . . . . . . . 60Prerequisites ... . . . . . . . . . . . . . . . . . . . . . . . . . . . . . . . . . . . . . . . . . . . . . . . . . . . . . . . . . . . . . . . . . . . . . . . . . . . . . . . . . . . . . . . . . . . . . . . . . . . . . . . . . . . . . . . . . 61Step 1: Create the Lambda Function and API ... . . . . . . . . . . . . . . . . . . . . . . . . . . . . . . . . . . . . . . . . . . . . . . . . . . . . . . . . . . . . . . . . . . . . 61Step 2: Set up Amazon SNS .... . . . . . . . . . . . . . . . . . . . . . . . . . . . . . . . . . . . . . . . . . . . . . . . . . . . . . . . . . . . . . . . . . . . . . . . . . . . . . . . . . . . . . . . . . . 63Step 3: Run the Function Locally ... . . . . . . . . . . . . . . . . . . . . . . . . . . . . . . . . . . . . . . . . . . . . . . . . . . . . . . . . . . . . . . . . . . . . . . . . . . . . . . . . . . . . . 64Step 4: Debug the Function Locally ... . . . . . . . . . . . . . . . . . . . . . . . . . . . . . . . . . . . . . . . . . . . . . . . . . . . . . . . . . . . . . . . . . . . . . . . . . . . . . . . . . 65Step 5: Run the API Locally ... . . . . . . . . . . . . . . . . . . . . . . . . . . . . . . . . . . . . . . . . . . . . . . . . . . . . . . . . . . . . . . . . . . . . . . . . . . . . . . . . . . . . . . . . . . . . 66Step 6: Debug the API Locally ... . . . . . . . . . . . . . . . . . . . . . . . . . . . . . . . . . . . . . . . . . . . . . . . . . . . . . . . . . . . . . . . . . . . . . . . . . . . . . . . . . . . . . . . . 67Step 7: Deploy and Run the Changed Function in Production .... . . . . . . . . . . . . . . . . . . . . . . . . . . . . . . . . . . . . . . . . . . . . . 67Step 8: Clean Up .... . . . . . . . . . . . . . . . . . . . . . . . . . . . . . . . . . . . . . . . . . . . . . . . . . . . . . . . . . . . . . . . . . . . . . . . . . . . . . . . . . . . . . . . . . . . . . . . . . . . . . . . . . . 68Next Steps .... . . . . . . . . . . . . . . . . . . . . . . . . . . . . . . . . . . . . . . . . . . . . . . . . . . . . . . . . . . . . . . . . . . . . . . . . . . . . . . . . . . . . . . . . . . . . . . . . . . . . . . . . . . . . . . . . . . . 70
Working with Environments .... . . . . . . . . . . . . . . . . . . . . . . . . . . . . . . . . . . . . . . . . . . . . . . . . . . . . . . . . . . . . . . . . . . . . . . . . . . . . . . . . . . . . . . . . . . . . . . . . . . . . . . . . . . . 71
iii
AWS Cloud9 User Guide
Creating an Environment .... . . . . . . . . . . . . . . . . . . . . . . . . . . . . . . . . . . . . . . . . . . . . . . . . . . . . . . . . . . . . . . . . . . . . . . . . . . . . . . . . . . . . . . . . . . . . . . . . . . . . . . 72Creating an Environment with the Console .... . . . . . . . . . . . . . . . . . . . . . . . . . . . . . . . . . . . . . . . . . . . . . . . . . . . . . . . . . . . . . . . . . . . . . . 73Creating an Environment with Code .... . . . . . . . . . . . . . . . . . . . . . . . . . . . . . . . . . . . . . . . . . . . . . . . . . . . . . . . . . . . . . . . . . . . . . . . . . . . . . . . 77
Opening an Environment .... . . . . . . . . . . . . . . . . . . . . . . . . . . . . . . . . . . . . . . . . . . . . . . . . . . . . . . . . . . . . . . . . . . . . . . . . . . . . . . . . . . . . . . . . . . . . . . . . . . . . . 77Call AWS Services from an Environment .... . . . . . . . . . . . . . . . . . . . . . . . . . . . . . . . . . . . . . . . . . . . . . . . . . . . . . . . . . . . . . . . . . . . . . . . . . . . . . . . . . 80
Create and Use an Instance Profile to Manage Temporary Credentials ... . . . . . . . . . . . . . . . . . . . . . . . . . . . . . . . . . . . 81Create and Store Permanent Access Credentials in an Environment .... . . . . . . . . . . . . . . . . . . . . . . . . . . . . . . . . . . . . . 84
Changing Environment Settings .... . . . . . . . . . . . . . . . . . . . . . . . . . . . . . . . . . . . . . . . . . . . . . . . . . . . . . . . . . . . . . . . . . . . . . . . . . . . . . . . . . . . . . . . . . . . . 86Change Environment Preferences .... . . . . . . . . . . . . . . . . . . . . . . . . . . . . . . . . . . . . . . . . . . . . . . . . . . . . . . . . . . . . . . . . . . . . . . . . . . . . . . . . . . . 86Change Environment Settings with the Console .... . . . . . . . . . . . . . . . . . . . . . . . . . . . . . . . . . . . . . . . . . . . . . . . . . . . . . . . . . . . . . . . 86Change Environment Settings with Code .... . . . . . . . . . . . . . . . . . . . . . . . . . . . . . . . . . . . . . . . . . . . . . . . . . . . . . . . . . . . . . . . . . . . . . . . . . 89
Working with Shared Environments .... . . . . . . . . . . . . . . . . . . . . . . . . . . . . . . . . . . . . . . . . . . . . . . . . . . . . . . . . . . . . . . . . . . . . . . . . . . . . . . . . . . . . . . . 90About Environment Member Access Roles .... . . . . . . . . . . . . . . . . . . . . . . . . . . . . . . . . . . . . . . . . . . . . . . . . . . . . . . . . . . . . . . . . . . . . . . . 91Invite an IAM User in Your Account to Your Environment .... . . . . . . . . . . . . . . . . . . . . . . . . . . . . . . . . . . . . . . . . . . . . . . . . . . . 92Invite an IAM User in Another Account to Your Environment .... . . . . . . . . . . . . . . . . . . . . . . . . . . . . . . . . . . . . . . . . . . . . . . 95Open a Shared Environment .... . . . . . . . . . . . . . . . . . . . . . . . . . . . . . . . . . . . . . . . . . . . . . . . . . . . . . . . . . . . . . . . . . . . . . . . . . . . . . . . . . . . . . . . . . . 97See a List of Environment Members .... . . . . . . . . . . . . . . . . . . . . . . . . . . . . . . . . . . . . . . . . . . . . . . . . . . . . . . . . . . . . . . . . . . . . . . . . . . . . . . . 98Open the Active File of an Environment Member .... . . . . . . . . . . . . . . . . . . . . . . . . . . . . . . . . . . . . . . . . . . . . . . . . . . . . . . . . . . . . . . 99Open the Open File of an Environment Member .... . . . . . . . . . . . . . . . . . . . . . . . . . . . . . . . . . . . . . . . . . . . . . . . . . . . . . . . . . . . . . . 99Go to the Active Cursor of an Environment Member .... . . . . . . . . . . . . . . . . . . . . . . . . . . . . . . . . . . . . . . . . . . . . . . . . . . . . . . . . . 99Chat with Other Environment Members .... . . . . . . . . . . . . . . . . . . . . . . . . . . . . . . . . . . . . . . . . . . . . . . . . . . . . . . . . . . . . . . . . . . . . . . . . . 100View Chat Messages in a Shared Environment .... . . . . . . . . . . . . . . . . . . . . . . . . . . . . . . . . . . . . . . . . . . . . . . . . . . . . . . . . . . . . . . . . 100Delete a Chat Message from a Shared Environment .... . . . . . . . . . . . . . . . . . . . . . . . . . . . . . . . . . . . . . . . . . . . . . . . . . . . . . . . . 100Delete All Chat Messages from a Shared Environment .... . . . . . . . . . . . . . . . . . . . . . . . . . . . . . . . . . . . . . . . . . . . . . . . . . . . . . 100Change the Access Role of an Environment Member .... . . . . . . . . . . . . . . . . . . . . . . . . . . . . . . . . . . . . . . . . . . . . . . . . . . . . . . . 100Remove Your User From a Shared Environment .... . . . . . . . . . . . . . . . . . . . . . . . . . . . . . . . . . . . . . . . . . . . . . . . . . . . . . . . . . . . . . . 101Remove Another Environment Member .... . . . . . . . . . . . . . . . . . . . . . . . . . . . . . . . . . . . . . . . . . . . . . . . . . . . . . . . . . . . . . . . . . . . . . . . . . 102Environment Sharing Best Practices .... . . . . . . . . . . . . . . . . . . . . . . . . . . . . . . . . . . . . . . . . . . . . . . . . . . . . . . . . . . . . . . . . . . . . . . . . . . . . . . 103
Moving or Resizing an Environment .... . . . . . . . . . . . . . . . . . . . . . . . . . . . . . . . . . . . . . . . . . . . . . . . . . . . . . . . . . . . . . . . . . . . . . . . . . . . . . . . . . . . . . 103To move or resize an environment .... . . . . . . . . . . . . . . . . . . . . . . . . . . . . . . . . . . . . . . . . . . . . . . . . . . . . . . . . . . . . . . . . . . . . . . . . . . . . . . . . 104
Deleting an Environment .... . . . . . . . . . . . . . . . . . . . . . . . . . . . . . . . . . . . . . . . . . . . . . . . . . . . . . . . . . . . . . . . . . . . . . . . . . . . . . . . . . . . . . . . . . . . . . . . . . . . . 104Deleting an Environment with the Console .... . . . . . . . . . . . . . . . . . . . . . . . . . . . . . . . . . . . . . . . . . . . . . . . . . . . . . . . . . . . . . . . . . . . . 104Deleting an Environment with Code .... . . . . . . . . . . . . . . . . . . . . . . . . . . . . . . . . . . . . . . . . . . . . . . . . . . . . . . . . . . . . . . . . . . . . . . . . . . . . . . 106
Working with the IDE .... . . . . . . . . . . . . . . . . . . . . . . . . . . . . . . . . . . . . . . . . . . . . . . . . . . . . . . . . . . . . . . . . . . . . . . . . . . . . . . . . . . . . . . . . . . . . . . . . . . . . . . . . . . . . . . . . . . 108Language Support ... . . . . . . . . . . . . . . . . . . . . . . . . . . . . . . . . . . . . . . . . . . . . . . . . . . . . . . . . . . . . . . . . . . . . . . . . . . . . . . . . . . . . . . . . . . . . . . . . . . . . . . . . . . . . . . . 109Menu Commands Reference .... . . . . . . . . . . . . . . . . . . . . . . . . . . . . . . . . . . . . . . . . . . . . . . . . . . . . . . . . . . . . . . . . . . . . . . . . . . . . . . . . . . . . . . . . . . . . . . . . . 110
AWS Cloud9 Menu .... . . . . . . . . . . . . . . . . . . . . . . . . . . . . . . . . . . . . . . . . . . . . . . . . . . . . . . . . . . . . . . . . . . . . . . . . . . . . . . . . . . . . . . . . . . . . . . . . . . . . . . 110File Menu .... . . . . . . . . . . . . . . . . . . . . . . . . . . . . . . . . . . . . . . . . . . . . . . . . . . . . . . . . . . . . . . . . . . . . . . . . . . . . . . . . . . . . . . . . . . . . . . . . . . . . . . . . . . . . . . . . . . 111Edit Menu .... . . . . . . . . . . . . . . . . . . . . . . . . . . . . . . . . . . . . . . . . . . . . . . . . . . . . . . . . . . . . . . . . . . . . . . . . . . . . . . . . . . . . . . . . . . . . . . . . . . . . . . . . . . . . . . . . . . 112Find Menu .... . . . . . . . . . . . . . . . . . . . . . . . . . . . . . . . . . . . . . . . . . . . . . . . . . . . . . . . . . . . . . . . . . . . . . . . . . . . . . . . . . . . . . . . . . . . . . . . . . . . . . . . . . . . . . . . . . 114View Menu .... . . . . . . . . . . . . . . . . . . . . . . . . . . . . . . . . . . . . . . . . . . . . . . . . . . . . . . . . . . . . . . . . . . . . . . . . . . . . . . . . . . . . . . . . . . . . . . . . . . . . . . . . . . . . . . . . 115Goto Menu .... . . . . . . . . . . . . . . . . . . . . . . . . . . . . . . . . . . . . . . . . . . . . . . . . . . . . . . . . . . . . . . . . . . . . . . . . . . . . . . . . . . . . . . . . . . . . . . . . . . . . . . . . . . . . . . . . 115Run Menu .... . . . . . . . . . . . . . . . . . . . . . . . . . . . . . . . . . . . . . . . . . . . . . . . . . . . . . . . . . . . . . . . . . . . . . . . . . . . . . . . . . . . . . . . . . . . . . . . . . . . . . . . . . . . . . . . . . . 116Tools Menu .... . . . . . . . . . . . . . . . . . . . . . . . . . . . . . . . . . . . . . . . . . . . . . . . . . . . . . . . . . . . . . . . . . . . . . . . . . . . . . . . . . . . . . . . . . . . . . . . . . . . . . . . . . . . . . . . . 117Window Menu .... . . . . . . . . . . . . . . . . . . . . . . . . . . . . . . . . . . . . . . . . . . . . . . . . . . . . . . . . . . . . . . . . . . . . . . . . . . . . . . . . . . . . . . . . . . . . . . . . . . . . . . . . . . . . 117Support Menu .... . . . . . . . . . . . . . . . . . . . . . . . . . . . . . . . . . . . . . . . . . . . . . . . . . . . . . . . . . . . . . . . . . . . . . . . . . . . . . . . . . . . . . . . . . . . . . . . . . . . . . . . . . . . . 119Preview Menu .... . . . . . . . . . . . . . . . . . . . . . . . . . . . . . . . . . . . . . . . . . . . . . . . . . . . . . . . . . . . . . . . . . . . . . . . . . . . . . . . . . . . . . . . . . . . . . . . . . . . . . . . . . . . . 119Other Menu Bar Commands .... . . . . . . . . . . . . . . . . . . . . . . . . . . . . . . . . . . . . . . . . . . . . . . . . . . . . . . . . . . . . . . . . . . . . . . . . . . . . . . . . . . . . . . . . . 119
Finding and Replacing Text ... . . . . . . . . . . . . . . . . . . . . . . . . . . . . . . . . . . . . . . . . . . . . . . . . . . . . . . . . . . . . . . . . . . . . . . . . . . . . . . . . . . . . . . . . . . . . . . . . . . . 120Find Text in a Single File ... . . . . . . . . . . . . . . . . . . . . . . . . . . . . . . . . . . . . . . . . . . . . . . . . . . . . . . . . . . . . . . . . . . . . . . . . . . . . . . . . . . . . . . . . . . . . . . 120Replace Text in a Single File ... . . . . . . . . . . . . . . . . . . . . . . . . . . . . . . . . . . . . . . . . . . . . . . . . . . . . . . . . . . . . . . . . . . . . . . . . . . . . . . . . . . . . . . . . . 120Find Text in Multiple Files ... . . . . . . . . . . . . . . . . . . . . . . . . . . . . . . . . . . . . . . . . . . . . . . . . . . . . . . . . . . . . . . . . . . . . . . . . . . . . . . . . . . . . . . . . . . . . . 120Replace Text in Multiple Files ... . . . . . . . . . . . . . . . . . . . . . . . . . . . . . . . . . . . . . . . . . . . . . . . . . . . . . . . . . . . . . . . . . . . . . . . . . . . . . . . . . . . . . . . . 121Find and Replace Options .... . . . . . . . . . . . . . . . . . . . . . . . . . . . . . . . . . . . . . . . . . . . . . . . . . . . . . . . . . . . . . . . . . . . . . . . . . . . . . . . . . . . . . . . . . . . . 122
Previewing Files ... . . . . . . . . . . . . . . . . . . . . . . . . . . . . . . . . . . . . . . . . . . . . . . . . . . . . . . . . . . . . . . . . . . . . . . . . . . . . . . . . . . . . . . . . . . . . . . . . . . . . . . . . . . . . . . . . . . 123Open a File for Preview .... . . . . . . . . . . . . . . . . . . . . . . . . . . . . . . . . . . . . . . . . . . . . . . . . . . . . . . . . . . . . . . . . . . . . . . . . . . . . . . . . . . . . . . . . . . . . . . . 123Reload a File Preview .... . . . . . . . . . . . . . . . . . . . . . . . . . . . . . . . . . . . . . . . . . . . . . . . . . . . . . . . . . . . . . . . . . . . . . . . . . . . . . . . . . . . . . . . . . . . . . . . . . . 124
iv

AWS Cloud9 User Guide
Change the File Preview Type .... . . . . . . . . . . . . . . . . . . . . . . . . . . . . . . . . . . . . . . . . . . . . . . . . . . . . . . . . . . . . . . . . . . . . . . . . . . . . . . . . . . . . . . 124Open a File Preview in a Separate Web Browser Tab .... . . . . . . . . . . . . . . . . . . . . . . . . . . . . . . . . . . . . . . . . . . . . . . . . . . . . . . . 124Switch to a Different File Preview .... . . . . . . . . . . . . . . . . . . . . . . . . . . . . . . . . . . . . . . . . . . . . . . . . . . . . . . . . . . . . . . . . . . . . . . . . . . . . . . . . . 124
Previewing Running Applications .... . . . . . . . . . . . . . . . . . . . . . . . . . . . . . . . . . . . . . . . . . . . . . . . . . . . . . . . . . . . . . . . . . . . . . . . . . . . . . . . . . . . . . . . . . . 124Run an Application .... . . . . . . . . . . . . . . . . . . . . . . . . . . . . . . . . . . . . . . . . . . . . . . . . . . . . . . . . . . . . . . . . . . . . . . . . . . . . . . . . . . . . . . . . . . . . . . . . . . . . . 125Preview a Running Application .... . . . . . . . . . . . . . . . . . . . . . . . . . . . . . . . . . . . . . . . . . . . . . . . . . . . . . . . . . . . . . . . . . . . . . . . . . . . . . . . . . . . . . 126Reload an Application Preview .... . . . . . . . . . . . . . . . . . . . . . . . . . . . . . . . . . . . . . . . . . . . . . . . . . . . . . . . . . . . . . . . . . . . . . . . . . . . . . . . . . . . . . 126Change the Application Preview Type .... . . . . . . . . . . . . . . . . . . . . . . . . . . . . . . . . . . . . . . . . . . . . . . . . . . . . . . . . . . . . . . . . . . . . . . . . . . . 127Open an Application Preview in a Separate Web Browser Tab .... . . . . . . . . . . . . . . . . . . . . . . . . . . . . . . . . . . . . . . . . . . . 127Switch to a Different Preview URL .... . . . . . . . . . . . . . . . . . . . . . . . . . . . . . . . . . . . . . . . . . . . . . . . . . . . . . . . . . . . . . . . . . . . . . . . . . . . . . . . . 127Share a Running Application over the Internet .... . . . . . . . . . . . . . . . . . . . . . . . . . . . . . . . . . . . . . . . . . . . . . . . . . . . . . . . . . . . . . . . 127
Working with File Revisions .... . . . . . . . . . . . . . . . . . . . . . . . . . . . . . . . . . . . . . . . . . . . . . . . . . . . . . . . . . . . . . . . . . . . . . . . . . . . . . . . . . . . . . . . . . . . . . . . . . 131Working with Image Files ... . . . . . . . . . . . . . . . . . . . . . . . . . . . . . . . . . . . . . . . . . . . . . . . . . . . . . . . . . . . . . . . . . . . . . . . . . . . . . . . . . . . . . . . . . . . . . . . . . . . . . 132
View or Edit an Image .... . . . . . . . . . . . . . . . . . . . . . . . . . . . . . . . . . . . . . . . . . . . . . . . . . . . . . . . . . . . . . . . . . . . . . . . . . . . . . . . . . . . . . . . . . . . . . . . . . 132Resize an Image .... . . . . . . . . . . . . . . . . . . . . . . . . . . . . . . . . . . . . . . . . . . . . . . . . . . . . . . . . . . . . . . . . . . . . . . . . . . . . . . . . . . . . . . . . . . . . . . . . . . . . . . . . . 132Crop an Image .... . . . . . . . . . . . . . . . . . . . . . . . . . . . . . . . . . . . . . . . . . . . . . . . . . . . . . . . . . . . . . . . . . . . . . . . . . . . . . . . . . . . . . . . . . . . . . . . . . . . . . . . . . . . 133Rotate an Image .... . . . . . . . . . . . . . . . . . . . . . . . . . . . . . . . . . . . . . . . . . . . . . . . . . . . . . . . . . . . . . . . . . . . . . . . . . . . . . . . . . . . . . . . . . . . . . . . . . . . . . . . . . 133Flip an Image .... . . . . . . . . . . . . . . . . . . . . . . . . . . . . . . . . . . . . . . . . . . . . . . . . . . . . . . . . . . . . . . . . . . . . . . . . . . . . . . . . . . . . . . . . . . . . . . . . . . . . . . . . . . . . . 133Zoom an Image .... . . . . . . . . . . . . . . . . . . . . . . . . . . . . . . . . . . . . . . . . . . . . . . . . . . . . . . . . . . . . . . . . . . . . . . . . . . . . . . . . . . . . . . . . . . . . . . . . . . . . . . . . . . 133Smooth an Image .... . . . . . . . . . . . . . . . . . . . . . . . . . . . . . . . . . . . . . . . . . . . . . . . . . . . . . . . . . . . . . . . . . . . . . . . . . . . . . . . . . . . . . . . . . . . . . . . . . . . . . . . 134
Working with Builders, Runners, and Debuggers .... . . . . . . . . . . . . . . . . . . . . . . . . . . . . . . . . . . . . . . . . . . . . . . . . . . . . . . . . . . . . . . . . . . . . . 134Built-In Build, Run, and Debug Support ... . . . . . . . . . . . . . . . . . . . . . . . . . . . . . . . . . . . . . . . . . . . . . . . . . . . . . . . . . . . . . . . . . . . . . . . . . . 134Build Your Project's Files ... . . . . . . . . . . . . . . . . . . . . . . . . . . . . . . . . . . . . . . . . . . . . . . . . . . . . . . . . . . . . . . . . . . . . . . . . . . . . . . . . . . . . . . . . . . . . . . 134Run Your Code .... . . . . . . . . . . . . . . . . . . . . . . . . . . . . . . . . . . . . . . . . . . . . . . . . . . . . . . . . . . . . . . . . . . . . . . . . . . . . . . . . . . . . . . . . . . . . . . . . . . . . . . . . . . . 135Debug Your Code .... . . . . . . . . . . . . . . . . . . . . . . . . . . . . . . . . . . . . . . . . . . . . . . . . . . . . . . . . . . . . . . . . . . . . . . . . . . . . . . . . . . . . . . . . . . . . . . . . . . . . . . . 135Change a Built-In Runner .... . . . . . . . . . . . . . . . . . . . . . . . . . . . . . . . . . . . . . . . . . . . . . . . . . . . . . . . . . . . . . . . . . . . . . . . . . . . . . . . . . . . . . . . . . . . . 138Create a Run Configuration .... . . . . . . . . . . . . . . . . . . . . . . . . . . . . . . . . . . . . . . . . . . . . . . . . . . . . . . . . . . . . . . . . . . . . . . . . . . . . . . . . . . . . . . . . . . 138Create a Builder or Runner .... . . . . . . . . . . . . . . . . . . . . . . . . . . . . . . . . . . . . . . . . . . . . . . . . . . . . . . . . . . . . . . . . . . . . . . . . . . . . . . . . . . . . . . . . . . 139Define a Builder or Runner .... . . . . . . . . . . . . . . . . . . . . . . . . . . . . . . . . . . . . . . . . . . . . . . . . . . . . . . . . . . . . . . . . . . . . . . . . . . . . . . . . . . . . . . . . . . 139
Working with Custom Environment Variables .... . . . . . . . . . . . . . . . . . . . . . . . . . . . . . . . . . . . . . . . . . . . . . . . . . . . . . . . . . . . . . . . . . . . . . . . . . 142Set Command-Level Custom Environment Variables .... . . . . . . . . . . . . . . . . . . . . . . . . . . . . . . . . . . . . . . . . . . . . . . . . . . . . . . . . 142Set Custom User Environment Variables in ~/.bash_profile .... . . . . . . . . . . . . . . . . . . . . . . . . . . . . . . . . . . . . . . . . . . . . . . . 142Set Local Custom Environment Variables .... . . . . . . . . . . . . . . . . . . . . . . . . . . . . . . . . . . . . . . . . . . . . . . . . . . . . . . . . . . . . . . . . . . . . . . . 143Set Custom User Environment Variables in ~/.bashrc .... . . . . . . . . . . . . . . . . . . . . . . . . . . . . . . . . . . . . . . . . . . . . . . . . . . . . . . . 143Set Custom Environment Variables in the ENV List ... . . . . . . . . . . . . . . . . . . . . . . . . . . . . . . . . . . . . . . . . . . . . . . . . . . . . . . . . . . . 143
Working with Project Settings .... . . . . . . . . . . . . . . . . . . . . . . . . . . . . . . . . . . . . . . . . . . . . . . . . . . . . . . . . . . . . . . . . . . . . . . . . . . . . . . . . . . . . . . . . . . . . . . 144View or Change Project Settings .... . . . . . . . . . . . . . . . . . . . . . . . . . . . . . . . . . . . . . . . . . . . . . . . . . . . . . . . . . . . . . . . . . . . . . . . . . . . . . . . . . . . 144Apply the Current Project Settings for an Environment to Another Environment .... . . . . . . . . . . . . . . . . . . 144Project Setting Changes You Can Make .... . . . . . . . . . . . . . . . . . . . . . . . . . . . . . . . . . . . . . . . . . . . . . . . . . . . . . . . . . . . . . . . . . . . . . . . . . 144
Working with User Settings .... . . . . . . . . . . . . . . . . . . . . . . . . . . . . . . . . . . . . . . . . . . . . . . . . . . . . . . . . . . . . . . . . . . . . . . . . . . . . . . . . . . . . . . . . . . . . . . . . . 149View or Change Your User Settings .... . . . . . . . . . . . . . . . . . . . . . . . . . . . . . . . . . . . . . . . . . . . . . . . . . . . . . . . . . . . . . . . . . . . . . . . . . . . . . . . 150Share Your User Settings with Another User ... . . . . . . . . . . . . . . . . . . . . . . . . . . . . . . . . . . . . . . . . . . . . . . . . . . . . . . . . . . . . . . . . . . . 150User Setting Changes You Can Make .... . . . . . . . . . . . . . . . . . . . . . . . . . . . . . . . . . . . . . . . . . . . . . . . . . . . . . . . . . . . . . . . . . . . . . . . . . . . . . 150
Working with AWS Project and User Settings .... . . . . . . . . . . . . . . . . . . . . . . . . . . . . . . . . . . . . . . . . . . . . . . . . . . . . . . . . . . . . . . . . . . . . . . . . . 157Project-Level Settings .... . . . . . . . . . . . . . . . . . . . . . . . . . . . . . . . . . . . . . . . . . . . . . . . . . . . . . . . . . . . . . . . . . . . . . . . . . . . . . . . . . . . . . . . . . . . . . . . . . 157User-Level Settings .... . . . . . . . . . . . . . . . . . . . . . . . . . . . . . . . . . . . . . . . . . . . . . . . . . . . . . . . . . . . . . . . . . . . . . . . . . . . . . . . . . . . . . . . . . . . . . . . . . . . . . 158
Working with Keybindings .... . . . . . . . . . . . . . . . . . . . . . . . . . . . . . . . . . . . . . . . . . . . . . . . . . . . . . . . . . . . . . . . . . . . . . . . . . . . . . . . . . . . . . . . . . . . . . . . . . . . 158View or Change Your Keybindings .... . . . . . . . . . . . . . . . . . . . . . . . . . . . . . . . . . . . . . . . . . . . . . . . . . . . . . . . . . . . . . . . . . . . . . . . . . . . . . . . . 158Share Your Keybindings with Another User ... . . . . . . . . . . . . . . . . . . . . . . . . . . . . . . . . . . . . . . . . . . . . . . . . . . . . . . . . . . . . . . . . . . . . . 159Change Your Keyboard Mode .... . . . . . . . . . . . . . . . . . . . . . . . . . . . . . . . . . . . . . . . . . . . . . . . . . . . . . . . . . . . . . . . . . . . . . . . . . . . . . . . . . . . . . . . 159Change Your Operating System Keybindings .... . . . . . . . . . . . . . . . . . . . . . . . . . . . . . . . . . . . . . . . . . . . . . . . . . . . . . . . . . . . . . . . . . . 159Change Specific Keybindings .... . . . . . . . . . . . . . . . . . . . . . . . . . . . . . . . . . . . . . . . . . . . . . . . . . . . . . . . . . . . . . . . . . . . . . . . . . . . . . . . . . . . . . . . . 159Remove All of Your Custom Keybindings .... . . . . . . . . . . . . . . . . . . . . . . . . . . . . . . . . . . . . . . . . . . . . . . . . . . . . . . . . . . . . . . . . . . . . . . . 160
Working with Themes .... . . . . . . . . . . . . . . . . . . . . . . . . . . . . . . . . . . . . . . . . . . . . . . . . . . . . . . . . . . . . . . . . . . . . . . . . . . . . . . . . . . . . . . . . . . . . . . . . . . . . . . . . . 160View or Change Your Theme .... . . . . . . . . . . . . . . . . . . . . . . . . . . . . . . . . . . . . . . . . . . . . . . . . . . . . . . . . . . . . . . . . . . . . . . . . . . . . . . . . . . . . . . . . 161Overall Theme Settings You Can Change .... . . . . . . . . . . . . . . . . . . . . . . . . . . . . . . . . . . . . . . . . . . . . . . . . . . . . . . . . . . . . . . . . . . . . . . . 161Theme Overrides You Can Define with Code .... . . . . . . . . . . . . . . . . . . . . . . . . . . . . . . . . . . . . . . . . . . . . . . . . . . . . . . . . . . . . . . . . . . 161
v

AWS Cloud9 User Guide
Share Your Theme Overrides with Another User ... . . . . . . . . . . . . . . . . . . . . . . . . . . . . . . . . . . . . . . . . . . . . . . . . . . . . . . . . . . . . . . 162Working with Initialization Scripts ... . . . . . . . . . . . . . . . . . . . . . . . . . . . . . . . . . . . . . . . . . . . . . . . . . . . . . . . . . . . . . . . . . . . . . . . . . . . . . . . . . . . . . . . . . 162
View or Change Your Initialization Script ... . . . . . . . . . . . . . . . . . . . . . . . . . . . . . . . . . . . . . . . . . . . . . . . . . . . . . . . . . . . . . . . . . . . . . . . . 162Share Your Initialization Script with Another User ... . . . . . . . . . . . . . . . . . . . . . . . . . . . . . . . . . . . . . . . . . . . . . . . . . . . . . . . . . . . . 163Working with Initialization Script Code .... . . . . . . . . . . . . . . . . . . . . . . . . . . . . . . . . . . . . . . . . . . . . . . . . . . . . . . . . . . . . . . . . . . . . . . . . . . 163
Apple OSX Default Keybindings Reference .... . . . . . . . . . . . . . . . . . . . . . . . . . . . . . . . . . . . . . . . . . . . . . . . . . . . . . . . . . . . . . . . . . . . . . . . . . . . . . 181General ... . . . . . . . . . . . . . . . . . . . . . . . . . . . . . . . . . . . . . . . . . . . . . . . . . . . . . . . . . . . . . . . . . . . . . . . . . . . . . . . . . . . . . . . . . . . . . . . . . . . . . . . . . . . . . . . . . . . . . . 182Tabs .... . . . . . . . . . . . . . . . . . . . . . . . . . . . . . . . . . . . . . . . . . . . . . . . . . . . . . . . . . . . . . . . . . . . . . . . . . . . . . . . . . . . . . . . . . . . . . . . . . . . . . . . . . . . . . . . . . . . . . . . . . . 184Panels ... . . . . . . . . . . . . . . . . . . . . . . . . . . . . . . . . . . . . . . . . . . . . . . . . . . . . . . . . . . . . . . . . . . . . . . . . . . . . . . . . . . . . . . . . . . . . . . . . . . . . . . . . . . . . . . . . . . . . . . . . 185Code Editor ... . . . . . . . . . . . . . . . . . . . . . . . . . . . . . . . . . . . . . . . . . . . . . . . . . . . . . . . . . . . . . . . . . . . . . . . . . . . . . . . . . . . . . . . . . . . . . . . . . . . . . . . . . . . . . . . . . 186emmet .... . . . . . . . . . . . . . . . . . . . . . . . . . . . . . . . . . . . . . . . . . . . . . . . . . . . . . . . . . . . . . . . . . . . . . . . . . . . . . . . . . . . . . . . . . . . . . . . . . . . . . . . . . . . . . . . . . . . . . . 191Terminal ... . . . . . . . . . . . . . . . . . . . . . . . . . . . . . . . . . . . . . . . . . . . . . . . . . . . . . . . . . . . . . . . . . . . . . . . . . . . . . . . . . . . . . . . . . . . . . . . . . . . . . . . . . . . . . . . . . . . . . 191Run and Debug .... . . . . . . . . . . . . . . . . . . . . . . . . . . . . . . . . . . . . . . . . . . . . . . . . . . . . . . . . . . . . . . . . . . . . . . . . . . . . . . . . . . . . . . . . . . . . . . . . . . . . . . . . . . 191
Apple OSX Vim Keybindings Reference .... . . . . . . . . . . . . . . . . . . . . . . . . . . . . . . . . . . . . . . . . . . . . . . . . . . . . . . . . . . . . . . . . . . . . . . . . . . . . . . . . . . 192General ... . . . . . . . . . . . . . . . . . . . . . . . . . . . . . . . . . . . . . . . . . . . . . . . . . . . . . . . . . . . . . . . . . . . . . . . . . . . . . . . . . . . . . . . . . . . . . . . . . . . . . . . . . . . . . . . . . . . . . . 192Tabs .... . . . . . . . . . . . . . . . . . . . . . . . . . . . . . . . . . . . . . . . . . . . . . . . . . . . . . . . . . . . . . . . . . . . . . . . . . . . . . . . . . . . . . . . . . . . . . . . . . . . . . . . . . . . . . . . . . . . . . . . . . . 194Panels ... . . . . . . . . . . . . . . . . . . . . . . . . . . . . . . . . . . . . . . . . . . . . . . . . . . . . . . . . . . . . . . . . . . . . . . . . . . . . . . . . . . . . . . . . . . . . . . . . . . . . . . . . . . . . . . . . . . . . . . . . 196Code Editor ... . . . . . . . . . . . . . . . . . . . . . . . . . . . . . . . . . . . . . . . . . . . . . . . . . . . . . . . . . . . . . . . . . . . . . . . . . . . . . . . . . . . . . . . . . . . . . . . . . . . . . . . . . . . . . . . . . 196emmet .... . . . . . . . . . . . . . . . . . . . . . . . . . . . . . . . . . . . . . . . . . . . . . . . . . . . . . . . . . . . . . . . . . . . . . . . . . . . . . . . . . . . . . . . . . . . . . . . . . . . . . . . . . . . . . . . . . . . . . . 201Terminal ... . . . . . . . . . . . . . . . . . . . . . . . . . . . . . . . . . . . . . . . . . . . . . . . . . . . . . . . . . . . . . . . . . . . . . . . . . . . . . . . . . . . . . . . . . . . . . . . . . . . . . . . . . . . . . . . . . . . . . 201Run and Debug .... . . . . . . . . . . . . . . . . . . . . . . . . . . . . . . . . . . . . . . . . . . . . . . . . . . . . . . . . . . . . . . . . . . . . . . . . . . . . . . . . . . . . . . . . . . . . . . . . . . . . . . . . . . 202
Apple OSX Emacs Keybindings Reference .... . . . . . . . . . . . . . . . . . . . . . . . . . . . . . . . . . . . . . . . . . . . . . . . . . . . . . . . . . . . . . . . . . . . . . . . . . . . . . . 202General ... . . . . . . . . . . . . . . . . . . . . . . . . . . . . . . . . . . . . . . . . . . . . . . . . . . . . . . . . . . . . . . . . . . . . . . . . . . . . . . . . . . . . . . . . . . . . . . . . . . . . . . . . . . . . . . . . . . . . . . 203Tabs .... . . . . . . . . . . . . . . . . . . . . . . . . . . . . . . . . . . . . . . . . . . . . . . . . . . . . . . . . . . . . . . . . . . . . . . . . . . . . . . . . . . . . . . . . . . . . . . . . . . . . . . . . . . . . . . . . . . . . . . . . . . 205Panels ... . . . . . . . . . . . . . . . . . . . . . . . . . . . . . . . . . . . . . . . . . . . . . . . . . . . . . . . . . . . . . . . . . . . . . . . . . . . . . . . . . . . . . . . . . . . . . . . . . . . . . . . . . . . . . . . . . . . . . . . . 206Code Editor ... . . . . . . . . . . . . . . . . . . . . . . . . . . . . . . . . . . . . . . . . . . . . . . . . . . . . . . . . . . . . . . . . . . . . . . . . . . . . . . . . . . . . . . . . . . . . . . . . . . . . . . . . . . . . . . . . . 206emmet .... . . . . . . . . . . . . . . . . . . . . . . . . . . . . . . . . . . . . . . . . . . . . . . . . . . . . . . . . . . . . . . . . . . . . . . . . . . . . . . . . . . . . . . . . . . . . . . . . . . . . . . . . . . . . . . . . . . . . . . 211Terminal ... . . . . . . . . . . . . . . . . . . . . . . . . . . . . . . . . . . . . . . . . . . . . . . . . . . . . . . . . . . . . . . . . . . . . . . . . . . . . . . . . . . . . . . . . . . . . . . . . . . . . . . . . . . . . . . . . . . . . . 212Run and Debug .... . . . . . . . . . . . . . . . . . . . . . . . . . . . . . . . . . . . . . . . . . . . . . . . . . . . . . . . . . . . . . . . . . . . . . . . . . . . . . . . . . . . . . . . . . . . . . . . . . . . . . . . . . . 212
Apple OSX Sublime Keybindings Reference .... . . . . . . . . . . . . . . . . . . . . . . . . . . . . . . . . . . . . . . . . . . . . . . . . . . . . . . . . . . . . . . . . . . . . . . . . . . . . 213General ... . . . . . . . . . . . . . . . . . . . . . . . . . . . . . . . . . . . . . . . . . . . . . . . . . . . . . . . . . . . . . . . . . . . . . . . . . . . . . . . . . . . . . . . . . . . . . . . . . . . . . . . . . . . . . . . . . . . . . . 213Tabs .... . . . . . . . . . . . . . . . . . . . . . . . . . . . . . . . . . . . . . . . . . . . . . . . . . . . . . . . . . . . . . . . . . . . . . . . . . . . . . . . . . . . . . . . . . . . . . . . . . . . . . . . . . . . . . . . . . . . . . . . . . . 216Panels ... . . . . . . . . . . . . . . . . . . . . . . . . . . . . . . . . . . . . . . . . . . . . . . . . . . . . . . . . . . . . . . . . . . . . . . . . . . . . . . . . . . . . . . . . . . . . . . . . . . . . . . . . . . . . . . . . . . . . . . . . 217Code Editor ... . . . . . . . . . . . . . . . . . . . . . . . . . . . . . . . . . . . . . . . . . . . . . . . . . . . . . . . . . . . . . . . . . . . . . . . . . . . . . . . . . . . . . . . . . . . . . . . . . . . . . . . . . . . . . . . . . 218emmet .... . . . . . . . . . . . . . . . . . . . . . . . . . . . . . . . . . . . . . . . . . . . . . . . . . . . . . . . . . . . . . . . . . . . . . . . . . . . . . . . . . . . . . . . . . . . . . . . . . . . . . . . . . . . . . . . . . . . . . . 223Terminal ... . . . . . . . . . . . . . . . . . . . . . . . . . . . . . . . . . . . . . . . . . . . . . . . . . . . . . . . . . . . . . . . . . . . . . . . . . . . . . . . . . . . . . . . . . . . . . . . . . . . . . . . . . . . . . . . . . . . . . 223Run and Debug .... . . . . . . . . . . . . . . . . . . . . . . . . . . . . . . . . . . . . . . . . . . . . . . . . . . . . . . . . . . . . . . . . . . . . . . . . . . . . . . . . . . . . . . . . . . . . . . . . . . . . . . . . . . 223
Windows / Linux Default Keybindings Reference .... . . . . . . . . . . . . . . . . . . . . . . . . . . . . . . . . . . . . . . . . . . . . . . . . . . . . . . . . . . . . . . . . . . . . . 224General ... . . . . . . . . . . . . . . . . . . . . . . . . . . . . . . . . . . . . . . . . . . . . . . . . . . . . . . . . . . . . . . . . . . . . . . . . . . . . . . . . . . . . . . . . . . . . . . . . . . . . . . . . . . . . . . . . . . . . . . 224Tabs .... . . . . . . . . . . . . . . . . . . . . . . . . . . . . . . . . . . . . . . . . . . . . . . . . . . . . . . . . . . . . . . . . . . . . . . . . . . . . . . . . . . . . . . . . . . . . . . . . . . . . . . . . . . . . . . . . . . . . . . . . . . 226Panels ... . . . . . . . . . . . . . . . . . . . . . . . . . . . . . . . . . . . . . . . . . . . . . . . . . . . . . . . . . . . . . . . . . . . . . . . . . . . . . . . . . . . . . . . . . . . . . . . . . . . . . . . . . . . . . . . . . . . . . . . . 228Code Editor ... . . . . . . . . . . . . . . . . . . . . . . . . . . . . . . . . . . . . . . . . . . . . . . . . . . . . . . . . . . . . . . . . . . . . . . . . . . . . . . . . . . . . . . . . . . . . . . . . . . . . . . . . . . . . . . . . . 228emmet .... . . . . . . . . . . . . . . . . . . . . . . . . . . . . . . . . . . . . . . . . . . . . . . . . . . . . . . . . . . . . . . . . . . . . . . . . . . . . . . . . . . . . . . . . . . . . . . . . . . . . . . . . . . . . . . . . . . . . . . 233Terminal ... . . . . . . . . . . . . . . . . . . . . . . . . . . . . . . . . . . . . . . . . . . . . . . . . . . . . . . . . . . . . . . . . . . . . . . . . . . . . . . . . . . . . . . . . . . . . . . . . . . . . . . . . . . . . . . . . . . . . . 234Run and Debug .... . . . . . . . . . . . . . . . . . . . . . . . . . . . . . . . . . . . . . . . . . . . . . . . . . . . . . . . . . . . . . . . . . . . . . . . . . . . . . . . . . . . . . . . . . . . . . . . . . . . . . . . . . . 234
Windows / Linux Vim Keybindings Reference .... . . . . . . . . . . . . . . . . . . . . . . . . . . . . . . . . . . . . . . . . . . . . . . . . . . . . . . . . . . . . . . . . . . . . . . . . . 234General ... . . . . . . . . . . . . . . . . . . . . . . . . . . . . . . . . . . . . . . . . . . . . . . . . . . . . . . . . . . . . . . . . . . . . . . . . . . . . . . . . . . . . . . . . . . . . . . . . . . . . . . . . . . . . . . . . . . . . . . 235Tabs .... . . . . . . . . . . . . . . . . . . . . . . . . . . . . . . . . . . . . . . . . . . . . . . . . . . . . . . . . . . . . . . . . . . . . . . . . . . . . . . . . . . . . . . . . . . . . . . . . . . . . . . . . . . . . . . . . . . . . . . . . . . 237Panels ... . . . . . . . . . . . . . . . . . . . . . . . . . . . . . . . . . . . . . . . . . . . . . . . . . . . . . . . . . . . . . . . . . . . . . . . . . . . . . . . . . . . . . . . . . . . . . . . . . . . . . . . . . . . . . . . . . . . . . . . . 238Code Editor ... . . . . . . . . . . . . . . . . . . . . . . . . . . . . . . . . . . . . . . . . . . . . . . . . . . . . . . . . . . . . . . . . . . . . . . . . . . . . . . . . . . . . . . . . . . . . . . . . . . . . . . . . . . . . . . . . . 238emmet .... . . . . . . . . . . . . . . . . . . . . . . . . . . . . . . . . . . . . . . . . . . . . . . . . . . . . . . . . . . . . . . . . . . . . . . . . . . . . . . . . . . . . . . . . . . . . . . . . . . . . . . . . . . . . . . . . . . . . . . 243Terminal ... . . . . . . . . . . . . . . . . . . . . . . . . . . . . . . . . . . . . . . . . . . . . . . . . . . . . . . . . . . . . . . . . . . . . . . . . . . . . . . . . . . . . . . . . . . . . . . . . . . . . . . . . . . . . . . . . . . . . . 244Run and Debug .... . . . . . . . . . . . . . . . . . . . . . . . . . . . . . . . . . . . . . . . . . . . . . . . . . . . . . . . . . . . . . . . . . . . . . . . . . . . . . . . . . . . . . . . . . . . . . . . . . . . . . . . . . . 244
Windows / Linux Emacs Keybindings Reference .... . . . . . . . . . . . . . . . . . . . . . . . . . . . . . . . . . . . . . . . . . . . . . . . . . . . . . . . . . . . . . . . . . . . . . . 245General ... . . . . . . . . . . . . . . . . . . . . . . . . . . . . . . . . . . . . . . . . . . . . . . . . . . . . . . . . . . . . . . . . . . . . . . . . . . . . . . . . . . . . . . . . . . . . . . . . . . . . . . . . . . . . . . . . . . . . . . 245Tabs .... . . . . . . . . . . . . . . . . . . . . . . . . . . . . . . . . . . . . . . . . . . . . . . . . . . . . . . . . . . . . . . . . . . . . . . . . . . . . . . . . . . . . . . . . . . . . . . . . . . . . . . . . . . . . . . . . . . . . . . . . . . 247Panels ... . . . . . . . . . . . . . . . . . . . . . . . . . . . . . . . . . . . . . . . . . . . . . . . . . . . . . . . . . . . . . . . . . . . . . . . . . . . . . . . . . . . . . . . . . . . . . . . . . . . . . . . . . . . . . . . . . . . . . . . . 248
vi

AWS Cloud9 User Guide
Code Editor ... . . . . . . . . . . . . . . . . . . . . . . . . . . . . . . . . . . . . . . . . . . . . . . . . . . . . . . . . . . . . . . . . . . . . . . . . . . . . . . . . . . . . . . . . . . . . . . . . . . . . . . . . . . . . . . . . . 249emmet .... . . . . . . . . . . . . . . . . . . . . . . . . . . . . . . . . . . . . . . . . . . . . . . . . . . . . . . . . . . . . . . . . . . . . . . . . . . . . . . . . . . . . . . . . . . . . . . . . . . . . . . . . . . . . . . . . . . . . . . 254Terminal ... . . . . . . . . . . . . . . . . . . . . . . . . . . . . . . . . . . . . . . . . . . . . . . . . . . . . . . . . . . . . . . . . . . . . . . . . . . . . . . . . . . . . . . . . . . . . . . . . . . . . . . . . . . . . . . . . . . . . . 254Run and Debug .... . . . . . . . . . . . . . . . . . . . . . . . . . . . . . . . . . . . . . . . . . . . . . . . . . . . . . . . . . . . . . . . . . . . . . . . . . . . . . . . . . . . . . . . . . . . . . . . . . . . . . . . . . . 254
Windows / Linux Sublime Keybindings Reference .... . . . . . . . . . . . . . . . . . . . . . . . . . . . . . . . . . . . . . . . . . . . . . . . . . . . . . . . . . . . . . . . . . . . . 255General ... . . . . . . . . . . . . . . . . . . . . . . . . . . . . . . . . . . . . . . . . . . . . . . . . . . . . . . . . . . . . . . . . . . . . . . . . . . . . . . . . . . . . . . . . . . . . . . . . . . . . . . . . . . . . . . . . . . . . . . 255Tabs .... . . . . . . . . . . . . . . . . . . . . . . . . . . . . . . . . . . . . . . . . . . . . . . . . . . . . . . . . . . . . . . . . . . . . . . . . . . . . . . . . . . . . . . . . . . . . . . . . . . . . . . . . . . . . . . . . . . . . . . . . . . 258Panels ... . . . . . . . . . . . . . . . . . . . . . . . . . . . . . . . . . . . . . . . . . . . . . . . . . . . . . . . . . . . . . . . . . . . . . . . . . . . . . . . . . . . . . . . . . . . . . . . . . . . . . . . . . . . . . . . . . . . . . . . . 259Code Editor ... . . . . . . . . . . . . . . . . . . . . . . . . . . . . . . . . . . . . . . . . . . . . . . . . . . . . . . . . . . . . . . . . . . . . . . . . . . . . . . . . . . . . . . . . . . . . . . . . . . . . . . . . . . . . . . . . . 260emmet .... . . . . . . . . . . . . . . . . . . . . . . . . . . . . . . . . . . . . . . . . . . . . . . . . . . . . . . . . . . . . . . . . . . . . . . . . . . . . . . . . . . . . . . . . . . . . . . . . . . . . . . . . . . . . . . . . . . . . . . 265Terminal ... . . . . . . . . . . . . . . . . . . . . . . . . . . . . . . . . . . . . . . . . . . . . . . . . . . . . . . . . . . . . . . . . . . . . . . . . . . . . . . . . . . . . . . . . . . . . . . . . . . . . . . . . . . . . . . . . . . . . . 265Run and Debug .... . . . . . . . . . . . . . . . . . . . . . . . . . . . . . . . . . . . . . . . . . . . . . . . . . . . . . . . . . . . . . . . . . . . . . . . . . . . . . . . . . . . . . . . . . . . . . . . . . . . . . . . . . . 265
Commands Reference .... . . . . . . . . . . . . . . . . . . . . . . . . . . . . . . . . . . . . . . . . . . . . . . . . . . . . . . . . . . . . . . . . . . . . . . . . . . . . . . . . . . . . . . . . . . . . . . . . . . . . . . . . . . 266Working with Amazon Lightsail Instances .... . . . . . . . . . . . . . . . . . . . . . . . . . . . . . . . . . . . . . . . . . . . . . . . . . . . . . . . . . . . . . . . . . . . . . . . . . . . . . . . . . . . . . . 277
Step 1: Create a Linux-Based Lightsail Instance .... . . . . . . . . . . . . . . . . . . . . . . . . . . . . . . . . . . . . . . . . . . . . . . . . . . . . . . . . . . . . . . . . . . . . . . 277Step 2: Set up the Instance to Use It with AWS Cloud9 .... . . . . . . . . . . . . . . . . . . . . . . . . . . . . . . . . . . . . . . . . . . . . . . . . . . . . . . . . . . . . 279Step 3: Create and Connect to an AWS Cloud9 SSH Development Environment .... . . . . . . . . . . . . . . . . . . . . . . . . . . . 280Step 4: Use the AWS Cloud9 IDE to Change the Code on the Instance .... . . . . . . . . . . . . . . . . . . . . . . . . . . . . . . . . . . . . . . . . 283
Working with AWS CodeStar Projects ... . . . . . . . . . . . . . . . . . . . . . . . . . . . . . . . . . . . . . . . . . . . . . . . . . . . . . . . . . . . . . . . . . . . . . . . . . . . . . . . . . . . . . . . . . . . . . 284Step 1: Prepare to Work with AWS CodeStar Projects ... . . . . . . . . . . . . . . . . . . . . . . . . . . . . . . . . . . . . . . . . . . . . . . . . . . . . . . . . . . . . . . . 284Step 2: Create a Project in AWS CodeStar ... . . . . . . . . . . . . . . . . . . . . . . . . . . . . . . . . . . . . . . . . . . . . . . . . . . . . . . . . . . . . . . . . . . . . . . . . . . . . . . . 284Step 3: Create an AWS Cloud9 Development Environment and Connect It to the Project ... . . . . . . . . . . . . . . . . 285
Working with AWS Lambda Functions .... . . . . . . . . . . . . . . . . . . . . . . . . . . . . . . . . . . . . . . . . . . . . . . . . . . . . . . . . . . . . . . . . . . . . . . . . . . . . . . . . . . . . . . . . . . . 286Prepare to Work with Lambda Functions .... . . . . . . . . . . . . . . . . . . . . . . . . . . . . . . . . . . . . . . . . . . . . . . . . . . . . . . . . . . . . . . . . . . . . . . . . . . . . . . . 287
Step 1: Set Up Your IAM Group with Required Access Permissions .... . . . . . . . . . . . . . . . . . . . . . . . . . . . . . . . . . . . . . 287Step 2: Set Up Your Environment with Your AWS Access Credentials ... . . . . . . . . . . . . . . . . . . . . . . . . . . . . . . . . . . . 288Step 3: Create an Execution Role for Your Lambda Functions .... . . . . . . . . . . . . . . . . . . . . . . . . . . . . . . . . . . . . . . . . . . . 289Step 4: Set Your Environment to the Correct AWS Region .... . . . . . . . . . . . . . . . . . . . . . . . . . . . . . . . . . . . . . . . . . . . . . . . . 289Step 5: Open the Lambda Section of the AWS Resources Window ..... . . . . . . . . . . . . . . . . . . . . . . . . . . . . . . . . . . . . 289
Create a Lambda Function With the Create Serverless Application Wizard .... . . . . . . . . . . . . . . . . . . . . . . . . . . . . . . . . . . 290Create and Deploy Lambda Functions with the AWS Serverless Application Repository .... . . . . . . . . . . . . . . . . . 295Import a Lambda Function .... . . . . . . . . . . . . . . . . . . . . . . . . . . . . . . . . . . . . . . . . . . . . . . . . . . . . . . . . . . . . . . . . . . . . . . . . . . . . . . . . . . . . . . . . . . . . . . . . . . 296Invoke a Lambda Function .... . . . . . . . . . . . . . . . . . . . . . . . . . . . . . . . . . . . . . . . . . . . . . . . . . . . . . . . . . . . . . . . . . . . . . . . . . . . . . . . . . . . . . . . . . . . . . . . . . . . 299Invoke an API Gateway API for a Related Lambda Function .... . . . . . . . . . . . . . . . . . . . . . . . . . . . . . . . . . . . . . . . . . . . . . . . . . . . . . . 301Response Differences When Invoking a Lambda Function from API Gateway .... . . . . . . . . . . . . . . . . . . . . . . . . . . . . . . . 303Add Dependent Code to a Lambda Function .... . . . . . . . . . . . . . . . . . . . . . . . . . . . . . . . . . . . . . . . . . . . . . . . . . . . . . . . . . . . . . . . . . . . . . . . . . . 304Debug the Local Version of a Lambda Function or Its Related API Gateway API ... . . . . . . . . . . . . . . . . . . . . . . . . . . . . 307Change Code in a Lambda Function .... . . . . . . . . . . . . . . . . . . . . . . . . . . . . . . . . . . . . . . . . . . . . . . . . . . . . . . . . . . . . . . . . . . . . . . . . . . . . . . . . . . . . . . 309Upload Code for a Lambda Function .... . . . . . . . . . . . . . . . . . . . . . . . . . . . . . . . . . . . . . . . . . . . . . . . . . . . . . . . . . . . . . . . . . . . . . . . . . . . . . . . . . . . . . 310Convert a Lambda Function to a Serverless Application .... . . . . . . . . . . . . . . . . . . . . . . . . . . . . . . . . . . . . . . . . . . . . . . . . . . . . . . . . . . . 311Update Configuration Settings for a Lambda Function .... . . . . . . . . . . . . . . . . . . . . . . . . . . . . . . . . . . . . . . . . . . . . . . . . . . . . . . . . . . . . 313
Working with AWS CodePipeline .... . . . . . . . . . . . . . . . . . . . . . . . . . . . . . . . . . . . . . . . . . . . . . . . . . . . . . . . . . . . . . . . . . . . . . . . . . . . . . . . . . . . . . . . . . . . . . . . . . . 315Step 1: Create or Identify Your Source Code Repository .... . . . . . . . . . . . . . . . . . . . . . . . . . . . . . . . . . . . . . . . . . . . . . . . . . . . . . . . . . . . 315Step 2: Create an AWS Cloud9 Development Environment, Connect It to the Code Repository, andUpload Your Code .... . . . . . . . . . . . . . . . . . . . . . . . . . . . . . . . . . . . . . . . . . . . . . . . . . . . . . . . . . . . . . . . . . . . . . . . . . . . . . . . . . . . . . . . . . . . . . . . . . . . . . . . . . . . . . . 316Step 3: Prepare to Work with AWS CodePipeline .... . . . . . . . . . . . . . . . . . . . . . . . . . . . . . . . . . . . . . . . . . . . . . . . . . . . . . . . . . . . . . . . . . . . . 317Step 4: Create a Pipeline in AWS CodePipeline .... . . . . . . . . . . . . . . . . . . . . . . . . . . . . . . . . . . . . . . . . . . . . . . . . . . . . . . . . . . . . . . . . . . . . . . . 317
Samples .... . . . . . . . . . . . . . . . . . . . . . . . . . . . . . . . . . . . . . . . . . . . . . . . . . . . . . . . . . . . . . . . . . . . . . . . . . . . . . . . . . . . . . . . . . . . . . . . . . . . . . . . . . . . . . . . . . . . . . . . . . . . . . . . . . . . . 318AWS CLI and aws-shell Sample .... . . . . . . . . . . . . . . . . . . . . . . . . . . . . . . . . . . . . . . . . . . . . . . . . . . . . . . . . . . . . . . . . . . . . . . . . . . . . . . . . . . . . . . . . . . . . 318
Prerequisites ... . . . . . . . . . . . . . . . . . . . . . . . . . . . . . . . . . . . . . . . . . . . . . . . . . . . . . . . . . . . . . . . . . . . . . . . . . . . . . . . . . . . . . . . . . . . . . . . . . . . . . . . . . . . . . . . 319Step 1: Install the AWS CLI, the aws-shell, or Both in Your Environment .... . . . . . . . . . . . . . . . . . . . . . . . . . . . . . 319Step 2: Set up Credentials Management in Your Environment .... . . . . . . . . . . . . . . . . . . . . . . . . . . . . . . . . . . . . . . . . . . . 320Step 3: Run Some Basic Commands with the AWS CLI or the aws-shell in Your Environment .... . . 320Step 4: Clean Up .... . . . . . . . . . . . . . . . . . . . . . . . . . . . . . . . . . . . . . . . . . . . . . . . . . . . . . . . . . . . . . . . . . . . . . . . . . . . . . . . . . . . . . . . . . . . . . . . . . . . . . . . . 321
AWS CodeCommit Sample .... . . . . . . . . . . . . . . . . . . . . . . . . . . . . . . . . . . . . . . . . . . . . . . . . . . . . . . . . . . . . . . . . . . . . . . . . . . . . . . . . . . . . . . . . . . . . . . . . . . . 321Prerequisites ... . . . . . . . . . . . . . . . . . . . . . . . . . . . . . . . . . . . . . . . . . . . . . . . . . . . . . . . . . . . . . . . . . . . . . . . . . . . . . . . . . . . . . . . . . . . . . . . . . . . . . . . . . . . . . . . 322Step 1: Set Up Your IAM Group with Required Access Permissions .... . . . . . . . . . . . . . . . . . . . . . . . . . . . . . . . . . . . . . 322
vii

AWS Cloud9 User Guide
Step 2: Create a Repository in AWS CodeCommit .... . . . . . . . . . . . . . . . . . . . . . . . . . . . . . . . . . . . . . . . . . . . . . . . . . . . . . . . . . . . 323Step 3: Connect Your Environment to the Remote Repository .... . . . . . . . . . . . . . . . . . . . . . . . . . . . . . . . . . . . . . . . . . . . 324Step 4: Clone the Remote Repository into Your Environment .... . . . . . . . . . . . . . . . . . . . . . . . . . . . . . . . . . . . . . . . . . . . . 325Step 5: Add Files to the Repository .... . . . . . . . . . . . . . . . . . . . . . . . . . . . . . . . . . . . . . . . . . . . . . . . . . . . . . . . . . . . . . . . . . . . . . . . . . . . . . . . 325Step 6: Clean Up .... . . . . . . . . . . . . . . . . . . . . . . . . . . . . . . . . . . . . . . . . . . . . . . . . . . . . . . . . . . . . . . . . . . . . . . . . . . . . . . . . . . . . . . . . . . . . . . . . . . . . . . . . 327
GitHub Sample .... . . . . . . . . . . . . . . . . . . . . . . . . . . . . . . . . . . . . . . . . . . . . . . . . . . . . . . . . . . . . . . . . . . . . . . . . . . . . . . . . . . . . . . . . . . . . . . . . . . . . . . . . . . . . . . . . . . . 327Prerequisites ... . . . . . . . . . . . . . . . . . . . . . . . . . . . . . . . . . . . . . . . . . . . . . . . . . . . . . . . . . . . . . . . . . . . . . . . . . . . . . . . . . . . . . . . . . . . . . . . . . . . . . . . . . . . . . . . 327Step 1: Create a GitHub Account .... . . . . . . . . . . . . . . . . . . . . . . . . . . . . . . . . . . . . . . . . . . . . . . . . . . . . . . . . . . . . . . . . . . . . . . . . . . . . . . . . . . 328Step 2: Create a GitHub Repository .... . . . . . . . . . . . . . . . . . . . . . . . . . . . . . . . . . . . . . . . . . . . . . . . . . . . . . . . . . . . . . . . . . . . . . . . . . . . . . . 328Step 3: Install Git in Your Environment .... . . . . . . . . . . . . . . . . . . . . . . . . . . . . . . . . . . . . . . . . . . . . . . . . . . . . . . . . . . . . . . . . . . . . . . . . . . 328Step 4: Clone the Remote Repository into Your Environment .... . . . . . . . . . . . . . . . . . . . . . . . . . . . . . . . . . . . . . . . . . . . . 329Step 5: Add Files to the Repository .... . . . . . . . . . . . . . . . . . . . . . . . . . . . . . . . . . . . . . . . . . . . . . . . . . . . . . . . . . . . . . . . . . . . . . . . . . . . . . . . 329Step 6: Keep Working with the IDE and GitHub .... . . . . . . . . . . . . . . . . . . . . . . . . . . . . . . . . . . . . . . . . . . . . . . . . . . . . . . . . . . . . . . 331Step 7: Clean Up .... . . . . . . . . . . . . . . . . . . . . . . . . . . . . . . . . . . . . . . . . . . . . . . . . . . . . . . . . . . . . . . . . . . . . . . . . . . . . . . . . . . . . . . . . . . . . . . . . . . . . . . . . 331
Amazon DynamoDB sample .... . . . . . . . . . . . . . . . . . . . . . . . . . . . . . . . . . . . . . . . . . . . . . . . . . . . . . . . . . . . . . . . . . . . . . . . . . . . . . . . . . . . . . . . . . . . . . . . . . 331Prerequisites ... . . . . . . . . . . . . . . . . . . . . . . . . . . . . . . . . . . . . . . . . . . . . . . . . . . . . . . . . . . . . . . . . . . . . . . . . . . . . . . . . . . . . . . . . . . . . . . . . . . . . . . . . . . . . . . . 332Step 1: Install and Configure the AWS CLI, the aws-shell, or Both in Your Environment .... . . . . . . . . . 332Step 2: Create a Table .... . . . . . . . . . . . . . . . . . . . . . . . . . . . . . . . . . . . . . . . . . . . . . . . . . . . . . . . . . . . . . . . . . . . . . . . . . . . . . . . . . . . . . . . . . . . . . . . . . 333Step 3: Add an Item to the Table .... . . . . . . . . . . . . . . . . . . . . . . . . . . . . . . . . . . . . . . . . . . . . . . . . . . . . . . . . . . . . . . . . . . . . . . . . . . . . . . . . . 334Step 4: Add Multiple Items to the Table .... . . . . . . . . . . . . . . . . . . . . . . . . . . . . . . . . . . . . . . . . . . . . . . . . . . . . . . . . . . . . . . . . . . . . . . . . 334Step 5: Create a Global Secondary Index .... . . . . . . . . . . . . . . . . . . . . . . . . . . . . . . . . . . . . . . . . . . . . . . . . . . . . . . . . . . . . . . . . . . . . . . . 337Step 6: Get Items from the Table .... . . . . . . . . . . . . . . . . . . . . . . . . . . . . . . . . . . . . . . . . . . . . . . . . . . . . . . . . . . . . . . . . . . . . . . . . . . . . . . . . . 339Step 7: Clean Up .... . . . . . . . . . . . . . . . . . . . . . . . . . . . . . . . . . . . . . . . . . . . . . . . . . . . . . . . . . . . . . . . . . . . . . . . . . . . . . . . . . . . . . . . . . . . . . . . . . . . . . . . . 342
Node.js Sample .... . . . . . . . . . . . . . . . . . . . . . . . . . . . . . . . . . . . . . . . . . . . . . . . . . . . . . . . . . . . . . . . . . . . . . . . . . . . . . . . . . . . . . . . . . . . . . . . . . . . . . . . . . . . . . . . . . . 342Prerequisites ... . . . . . . . . . . . . . . . . . . . . . . . . . . . . . . . . . . . . . . . . . . . . . . . . . . . . . . . . . . . . . . . . . . . . . . . . . . . . . . . . . . . . . . . . . . . . . . . . . . . . . . . . . . . . . . . 343Step 1: Install Required Tools ... . . . . . . . . . . . . . . . . . . . . . . . . . . . . . . . . . . . . . . . . . . . . . . . . . . . . . . . . . . . . . . . . . . . . . . . . . . . . . . . . . . . . . . . . 343Step 2: Add Code .... . . . . . . . . . . . . . . . . . . . . . . . . . . . . . . . . . . . . . . . . . . . . . . . . . . . . . . . . . . . . . . . . . . . . . . . . . . . . . . . . . . . . . . . . . . . . . . . . . . . . . . . 343Step 3: Run the Code .... . . . . . . . . . . . . . . . . . . . . . . . . . . . . . . . . . . . . . . . . . . . . . . . . . . . . . . . . . . . . . . . . . . . . . . . . . . . . . . . . . . . . . . . . . . . . . . . . . . 344Step 4: Install and Configure the AWS SDK for JavaScript ... . . . . . . . . . . . . . . . . . . . . . . . . . . . . . . . . . . . . . . . . . . . . . . . . . 344Step 5: Add AWS SDK Code .... . . . . . . . . . . . . . . . . . . . . . . . . . . . . . . . . . . . . . . . . . . . . . . . . . . . . . . . . . . . . . . . . . . . . . . . . . . . . . . . . . . . . . . . . . 345Step 6: Run the AWS SDK Code .... . . . . . . . . . . . . . . . . . . . . . . . . . . . . . . . . . . . . . . . . . . . . . . . . . . . . . . . . . . . . . . . . . . . . . . . . . . . . . . . . . . . 346Step 7: Clean Up .... . . . . . . . . . . . . . . . . . . . . . . . . . . . . . . . . . . . . . . . . . . . . . . . . . . . . . . . . . . . . . . . . . . . . . . . . . . . . . . . . . . . . . . . . . . . . . . . . . . . . . . . . 347
Python Sample .... . . . . . . . . . . . . . . . . . . . . . . . . . . . . . . . . . . . . . . . . . . . . . . . . . . . . . . . . . . . . . . . . . . . . . . . . . . . . . . . . . . . . . . . . . . . . . . . . . . . . . . . . . . . . . . . . . . . 347Prerequisites ... . . . . . . . . . . . . . . . . . . . . . . . . . . . . . . . . . . . . . . . . . . . . . . . . . . . . . . . . . . . . . . . . . . . . . . . . . . . . . . . . . . . . . . . . . . . . . . . . . . . . . . . . . . . . . . . 347Step 1: Install Required Tools ... . . . . . . . . . . . . . . . . . . . . . . . . . . . . . . . . . . . . . . . . . . . . . . . . . . . . . . . . . . . . . . . . . . . . . . . . . . . . . . . . . . . . . . . . 347Step 2: Add Code .... . . . . . . . . . . . . . . . . . . . . . . . . . . . . . . . . . . . . . . . . . . . . . . . . . . . . . . . . . . . . . . . . . . . . . . . . . . . . . . . . . . . . . . . . . . . . . . . . . . . . . . . 349Step 3: Run the Code .... . . . . . . . . . . . . . . . . . . . . . . . . . . . . . . . . . . . . . . . . . . . . . . . . . . . . . . . . . . . . . . . . . . . . . . . . . . . . . . . . . . . . . . . . . . . . . . . . . . 349Step 4: Install and Configure the AWS SDK for Python (Boto) ... . . . . . . . . . . . . . . . . . . . . . . . . . . . . . . . . . . . . . . . . . . . . 350Step 5: Add AWS SDK Code .... . . . . . . . . . . . . . . . . . . . . . . . . . . . . . . . . . . . . . . . . . . . . . . . . . . . . . . . . . . . . . . . . . . . . . . . . . . . . . . . . . . . . . . . . . 350Step 6: Run the AWS SDK Code .... . . . . . . . . . . . . . . . . . . . . . . . . . . . . . . . . . . . . . . . . . . . . . . . . . . . . . . . . . . . . . . . . . . . . . . . . . . . . . . . . . . . 351Step 7: Clean Up .... . . . . . . . . . . . . . . . . . . . . . . . . . . . . . . . . . . . . . . . . . . . . . . . . . . . . . . . . . . . . . . . . . . . . . . . . . . . . . . . . . . . . . . . . . . . . . . . . . . . . . . . . 352
PHP Sample .... . . . . . . . . . . . . . . . . . . . . . . . . . . . . . . . . . . . . . . . . . . . . . . . . . . . . . . . . . . . . . . . . . . . . . . . . . . . . . . . . . . . . . . . . . . . . . . . . . . . . . . . . . . . . . . . . . . . . . . . 352Prerequisites ... . . . . . . . . . . . . . . . . . . . . . . . . . . . . . . . . . . . . . . . . . . . . . . . . . . . . . . . . . . . . . . . . . . . . . . . . . . . . . . . . . . . . . . . . . . . . . . . . . . . . . . . . . . . . . . . 352Step 1: Install Required Tools ... . . . . . . . . . . . . . . . . . . . . . . . . . . . . . . . . . . . . . . . . . . . . . . . . . . . . . . . . . . . . . . . . . . . . . . . . . . . . . . . . . . . . . . . . 353Step 2: Add Code .... . . . . . . . . . . . . . . . . . . . . . . . . . . . . . . . . . . . . . . . . . . . . . . . . . . . . . . . . . . . . . . . . . . . . . . . . . . . . . . . . . . . . . . . . . . . . . . . . . . . . . . . 353Step 3: Run the Code .... . . . . . . . . . . . . . . . . . . . . . . . . . . . . . . . . . . . . . . . . . . . . . . . . . . . . . . . . . . . . . . . . . . . . . . . . . . . . . . . . . . . . . . . . . . . . . . . . . . 353Step 4: Install and Configure the AWS SDK for PHP .... . . . . . . . . . . . . . . . . . . . . . . . . . . . . . . . . . . . . . . . . . . . . . . . . . . . . . . . . 354Step 5: Add AWS SDK Code .... . . . . . . . . . . . . . . . . . . . . . . . . . . . . . . . . . . . . . . . . . . . . . . . . . . . . . . . . . . . . . . . . . . . . . . . . . . . . . . . . . . . . . . . . . 355Step 6: Run the AWS SDK Code .... . . . . . . . . . . . . . . . . . . . . . . . . . . . . . . . . . . . . . . . . . . . . . . . . . . . . . . . . . . . . . . . . . . . . . . . . . . . . . . . . . . . 356Step 7: Clean Up .... . . . . . . . . . . . . . . . . . . . . . . . . . . . . . . . . . . . . . . . . . . . . . . . . . . . . . . . . . . . . . . . . . . . . . . . . . . . . . . . . . . . . . . . . . . . . . . . . . . . . . . . . 356
Ruby Sample .... . . . . . . . . . . . . . . . . . . . . . . . . . . . . . . . . . . . . . . . . . . . . . . . . . . . . . . . . . . . . . . . . . . . . . . . . . . . . . . . . . . . . . . . . . . . . . . . . . . . . . . . . . . . . . . . . . . . . . . 357Prerequisites ... . . . . . . . . . . . . . . . . . . . . . . . . . . . . . . . . . . . . . . . . . . . . . . . . . . . . . . . . . . . . . . . . . . . . . . . . . . . . . . . . . . . . . . . . . . . . . . . . . . . . . . . . . . . . . . . 357Step 1: Install Required Tools ... . . . . . . . . . . . . . . . . . . . . . . . . . . . . . . . . . . . . . . . . . . . . . . . . . . . . . . . . . . . . . . . . . . . . . . . . . . . . . . . . . . . . . . . . 357Step 2: Add Code .... . . . . . . . . . . . . . . . . . . . . . . . . . . . . . . . . . . . . . . . . . . . . . . . . . . . . . . . . . . . . . . . . . . . . . . . . . . . . . . . . . . . . . . . . . . . . . . . . . . . . . . . 358Step 3: Run the Code .... . . . . . . . . . . . . . . . . . . . . . . . . . . . . . . . . . . . . . . . . . . . . . . . . . . . . . . . . . . . . . . . . . . . . . . . . . . . . . . . . . . . . . . . . . . . . . . . . . . 358Step 4: Install and Configure the AWS SDK for Ruby .... . . . . . . . . . . . . . . . . . . . . . . . . . . . . . . . . . . . . . . . . . . . . . . . . . . . . . . . 358Step 5: Add AWS SDK Code .... . . . . . . . . . . . . . . . . . . . . . . . . . . . . . . . . . . . . . . . . . . . . . . . . . . . . . . . . . . . . . . . . . . . . . . . . . . . . . . . . . . . . . . . . . 359
viii
AWS Cloud9 User Guide
Step 6: Run the AWS SDK Code .... . . . . . . . . . . . . . . . . . . . . . . . . . . . . . . . . . . . . . . . . . . . . . . . . . . . . . . . . . . . . . . . . . . . . . . . . . . . . . . . . . . . 360Step 7: Clean Up .... . . . . . . . . . . . . . . . . . . . . . . . . . . . . . . . . . . . . . . . . . . . . . . . . . . . . . . . . . . . . . . . . . . . . . . . . . . . . . . . . . . . . . . . . . . . . . . . . . . . . . . . . 361
Go Sample .... . . . . . . . . . . . . . . . . . . . . . . . . . . . . . . . . . . . . . . . . . . . . . . . . . . . . . . . . . . . . . . . . . . . . . . . . . . . . . . . . . . . . . . . . . . . . . . . . . . . . . . . . . . . . . . . . . . . . . . . . . 361Prerequisites ... . . . . . . . . . . . . . . . . . . . . . . . . . . . . . . . . . . . . . . . . . . . . . . . . . . . . . . . . . . . . . . . . . . . . . . . . . . . . . . . . . . . . . . . . . . . . . . . . . . . . . . . . . . . . . . . 361Step 1: Install Required Tools ... . . . . . . . . . . . . . . . . . . . . . . . . . . . . . . . . . . . . . . . . . . . . . . . . . . . . . . . . . . . . . . . . . . . . . . . . . . . . . . . . . . . . . . . . 361Step 2: Add Code .... . . . . . . . . . . . . . . . . . . . . . . . . . . . . . . . . . . . . . . . . . . . . . . . . . . . . . . . . . . . . . . . . . . . . . . . . . . . . . . . . . . . . . . . . . . . . . . . . . . . . . . . 362Step 3: Run the Code .... . . . . . . . . . . . . . . . . . . . . . . . . . . . . . . . . . . . . . . . . . . . . . . . . . . . . . . . . . . . . . . . . . . . . . . . . . . . . . . . . . . . . . . . . . . . . . . . . . . 362Step 4: Install and Configure the AWS SDK for Go .... . . . . . . . . . . . . . . . . . . . . . . . . . . . . . . . . . . . . . . . . . . . . . . . . . . . . . . . . . . 363Step 5: Add AWS SDK Code .... . . . . . . . . . . . . . . . . . . . . . . . . . . . . . . . . . . . . . . . . . . . . . . . . . . . . . . . . . . . . . . . . . . . . . . . . . . . . . . . . . . . . . . . . . 364Step 6: Run the AWS SDK Code .... . . . . . . . . . . . . . . . . . . . . . . . . . . . . . . . . . . . . . . . . . . . . . . . . . . . . . . . . . . . . . . . . . . . . . . . . . . . . . . . . . . . 366Step 7: Clean Up .... . . . . . . . . . . . . . . . . . . . . . . . . . . . . . . . . . . . . . . . . . . . . . . . . . . . . . . . . . . . . . . . . . . . . . . . . . . . . . . . . . . . . . . . . . . . . . . . . . . . . . . . . 366
C++ Sample .... . . . . . . . . . . . . . . . . . . . . . . . . . . . . . . . . . . . . . . . . . . . . . . . . . . . . . . . . . . . . . . . . . . . . . . . . . . . . . . . . . . . . . . . . . . . . . . . . . . . . . . . . . . . . . . . . . . . . . . . 366Prerequisites ... . . . . . . . . . . . . . . . . . . . . . . . . . . . . . . . . . . . . . . . . . . . . . . . . . . . . . . . . . . . . . . . . . . . . . . . . . . . . . . . . . . . . . . . . . . . . . . . . . . . . . . . . . . . . . . . 367Step 1: Install Required Tools ... . . . . . . . . . . . . . . . . . . . . . . . . . . . . . . . . . . . . . . . . . . . . . . . . . . . . . . . . . . . . . . . . . . . . . . . . . . . . . . . . . . . . . . . . 367Step 2: Add Code .... . . . . . . . . . . . . . . . . . . . . . . . . . . . . . . . . . . . . . . . . . . . . . . . . . . . . . . . . . . . . . . . . . . . . . . . . . . . . . . . . . . . . . . . . . . . . . . . . . . . . . . . 367Step 3: Run the Code .... . . . . . . . . . . . . . . . . . . . . . . . . . . . . . . . . . . . . . . . . . . . . . . . . . . . . . . . . . . . . . . . . . . . . . . . . . . . . . . . . . . . . . . . . . . . . . . . . . . 368Step 4: Install and Configure the AWS SDK for C++ .... . . . . . . . . . . . . . . . . . . . . . . . . . . . . . . . . . . . . . . . . . . . . . . . . . . . . . . . . . 369Step 5: Add AWS SDK Code .... . . . . . . . . . . . . . . . . . . . . . . . . . . . . . . . . . . . . . . . . . . . . . . . . . . . . . . . . . . . . . . . . . . . . . . . . . . . . . . . . . . . . . . . . . 370Step 6: Build and Run the AWS SDK Code .... . . . . . . . . . . . . . . . . . . . . . . . . . . . . . . . . . . . . . . . . . . . . . . . . . . . . . . . . . . . . . . . . . . . . . 373Step 7: Clean Up .... . . . . . . . . . . . . . . . . . . . . . . . . . . . . . . . . . . . . . . . . . . . . . . . . . . . . . . . . . . . . . . . . . . . . . . . . . . . . . . . . . . . . . . . . . . . . . . . . . . . . . . . . 374
Amazon VPC Settings .... . . . . . . . . . . . . . . . . . . . . . . . . . . . . . . . . . . . . . . . . . . . . . . . . . . . . . . . . . . . . . . . . . . . . . . . . . . . . . . . . . . . . . . . . . . . . . . . . . . . . . . . . . . . . . . . . . 375Amazon VPC Requirements for AWS Cloud9 .... . . . . . . . . . . . . . . . . . . . . . . . . . . . . . . . . . . . . . . . . . . . . . . . . . . . . . . . . . . . . . . . . . . . . . . . . . . 375Create an Amazon VPC for AWS Cloud9 .... . . . . . . . . . . . . . . . . . . . . . . . . . . . . . . . . . . . . . . . . . . . . . . . . . . . . . . . . . . . . . . . . . . . . . . . . . . . . . . . . 378Create a Subnet for AWS Cloud9 .... . . . . . . . . . . . . . . . . . . . . . . . . . . . . . . . . . . . . . . . . . . . . . . . . . . . . . . . . . . . . . . . . . . . . . . . . . . . . . . . . . . . . . . . . . . 379
SSH Environment Host Requirements .... . . . . . . . . . . . . . . . . . . . . . . . . . . . . . . . . . . . . . . . . . . . . . . . . . . . . . . . . . . . . . . . . . . . . . . . . . . . . . . . . . . . . . . . . . . . . 381When and How to Create an SSH Environment .... . . . . . . . . . . . . . . . . . . . . . . . . . . . . . . . . . . . . . . . . . . . . . . . . . . . . . . . . . . . . . . . . . . . . . . 381SSH Host Requirements .... . . . . . . . . . . . . . . . . . . . . . . . . . . . . . . . . . . . . . . . . . . . . . . . . . . . . . . . . . . . . . . . . . . . . . . . . . . . . . . . . . . . . . . . . . . . . . . . . . . . . . . . 382
Inbound SSH IP Address Ranges .... . . . . . . . . . . . . . . . . . . . . . . . . . . . . . . . . . . . . . . . . . . . . . . . . . . . . . . . . . . . . . . . . . . . . . . . . . . . . . . . . . . . . . . . . . . . . . . . . . . . 384AMI Contents .... . . . . . . . . . . . . . . . . . . . . . . . . . . . . . . . . . . . . . . . . . . . . . . . . . . . . . . . . . . . . . . . . . . . . . . . . . . . . . . . . . . . . . . . . . . . . . . . . . . . . . . . . . . . . . . . . . . . . . . . . . . . . . 385Authentication and Access Control ... . . . . . . . . . . . . . . . . . . . . . . . . . . . . . . . . . . . . . . . . . . . . . . . . . . . . . . . . . . . . . . . . . . . . . . . . . . . . . . . . . . . . . . . . . . . . . . . . . 386
Overview .... . . . . . . . . . . . . . . . . . . . . . . . . . . . . . . . . . . . . . . . . . . . . . . . . . . . . . . . . . . . . . . . . . . . . . . . . . . . . . . . . . . . . . . . . . . . . . . . . . . . . . . . . . . . . . . . . . . . . . . . . . . . 386Authentication .... . . . . . . . . . . . . . . . . . . . . . . . . . . . . . . . . . . . . . . . . . . . . . . . . . . . . . . . . . . . . . . . . . . . . . . . . . . . . . . . . . . . . . . . . . . . . . . . . . . . . . . . . . . . 386Access Control ... . . . . . . . . . . . . . . . . . . . . . . . . . . . . . . . . . . . . . . . . . . . . . . . . . . . . . . . . . . . . . . . . . . . . . . . . . . . . . . . . . . . . . . . . . . . . . . . . . . . . . . . . . . . . . 387AWS Cloud9 Resources and Operations .... . . . . . . . . . . . . . . . . . . . . . . . . . . . . . . . . . . . . . . . . . . . . . . . . . . . . . . . . . . . . . . . . . . . . . . . . . 388Understanding Resource Ownership .... . . . . . . . . . . . . . . . . . . . . . . . . . . . . . . . . . . . . . . . . . . . . . . . . . . . . . . . . . . . . . . . . . . . . . . . . . . . . . . 388Managing Access to Resources .... . . . . . . . . . . . . . . . . . . . . . . . . . . . . . . . . . . . . . . . . . . . . . . . . . . . . . . . . . . . . . . . . . . . . . . . . . . . . . . . . . . . . . 389
AWS Managed (Predefined) Policies for AWS Cloud9 .... . . . . . . . . . . . . . . . . . . . . . . . . . . . . . . . . . . . . . . . . . . . . . . . . . . . . . . . . . . . . . . . 390Creating Customer-Managed Policies for AWS Cloud9 .... . . . . . . . . . . . . . . . . . . . . . . . . . . . . . . . . . . . . . . . . . . . . . . . . . . . . . . . . . . . . . 392
Specifying Policy Elements: Effects, Principals, Actions, and Resources .... . . . . . . . . . . . . . . . . . . . . . . . . . . . . . . . 392Customer-Managed Policy Examples .... . . . . . . . . . . . . . . . . . . . . . . . . . . . . . . . . . . . . . . . . . . . . . . . . . . . . . . . . . . . . . . . . . . . . . . . . . . . . . 393AWS Cloud9 Permissions Reference .... . . . . . . . . . . . . . . . . . . . . . . . . . . . . . . . . . . . . . . . . . . . . . . . . . . . . . . . . . . . . . . . . . . . . . . . . . . . . . . 399
AWS Managed Temporary Credentials ... . . . . . . . . . . . . . . . . . . . . . . . . . . . . . . . . . . . . . . . . . . . . . . . . . . . . . . . . . . . . . . . . . . . . . . . . . . . . . . . . . . . . 401Actions Supported by AWS Managed Temporary Credentials ... . . . . . . . . . . . . . . . . . . . . . . . . . . . . . . . . . . . . . . . . . . . . . 402Creating and Updating AWS Managed Temporary Credentials ... . . . . . . . . . . . . . . . . . . . . . . . . . . . . . . . . . . . . . . . . . . . . 403
Using Service-Linked Roles .... . . . . . . . . . . . . . . . . . . . . . . . . . . . . . . . . . . . . . . . . . . . . . . . . . . . . . . . . . . . . . . . . . . . . . . . . . . . . . . . . . . . . . . . . . . . . . . . . . . . . . . . . . . 404Service-Linked Role Permissions for AWS Cloud9 .... . . . . . . . . . . . . . . . . . . . . . . . . . . . . . . . . . . . . . . . . . . . . . . . . . . . . . . . . . . . . . . . . . . . . 404Creating a Service-Linked Role for AWS Cloud9 .... . . . . . . . . . . . . . . . . . . . . . . . . . . . . . . . . . . . . . . . . . . . . . . . . . . . . . . . . . . . . . . . . . . . . . . 406Editing a Service-Linked Role for AWS Cloud9 .... . . . . . . . . . . . . . . . . . . . . . . . . . . . . . . . . . . . . . . . . . . . . . . . . . . . . . . . . . . . . . . . . . . . . . . . . 406Deleting a Service-Linked Role for AWS Cloud9 .... . . . . . . . . . . . . . . . . . . . . . . . . . . . . . . . . . . . . . . . . . . . . . . . . . . . . . . . . . . . . . . . . . . . . . . 406
Deleting a Service-Linked Role in IAM ..... . . . . . . . . . . . . . . . . . . . . . . . . . . . . . . . . . . . . . . . . . . . . . . . . . . . . . . . . . . . . . . . . . . . . . . . . . . 406Troubleshooting .... . . . . . . . . . . . . . . . . . . . . . . . . . . . . . . . . . . . . . . . . . . . . . . . . . . . . . . . . . . . . . . . . . . . . . . . . . . . . . . . . . . . . . . . . . . . . . . . . . . . . . . . . . . . . . . . . . . . . . . . . . 407
Environment Creation Error: "Not authorized to perform sts:AssumeRole" ... . . . . . . . . . . . . . . . . . . . . . . . . . . . . . . . . . . . 407Console Error: "User is not authorized to perform action on resource" ... . . . . . . . . . . . . . . . . . . . . . . . . . . . . . . . . . . . . . . . . 407Federated Identities Cannot Create Environments .... . . . . . . . . . . . . . . . . . . . . . . . . . . . . . . . . . . . . . . . . . . . . . . . . . . . . . . . . . . . . . . . . . . . 408Cannot Open an Environment .... . . . . . . . . . . . . . . . . . . . . . . . . . . . . . . . . . . . . . . . . . . . . . . . . . . . . . . . . . . . . . . . . . . . . . . . . . . . . . . . . . . . . . . . . . . . . . . 408The AWS Cloud9 Installer Hangs or Fails ... . . . . . . . . . . . . . . . . . . . . . . . . . . . . . . . . . . . . . . . . . . . . . . . . . . . . . . . . . . . . . . . . . . . . . . . . . . . . . . . . 410SSH Environment Error: "Python version 2.7 is required to install pty.js" ... . . . . . . . . . . . . . . . . . . . . . . . . . . . . . . . . . . . . . . 410
ix

AWS Cloud9 User Guide
Application Preview Tab Displays an Error or is Blank .... . . . . . . . . . . . . . . . . . . . . . . . . . . . . . . . . . . . . . . . . . . . . . . . . . . . . . . . . . . . . . . 411Cannot Display Your Running Application outside of the IDE .... . . . . . . . . . . . . . . . . . . . . . . . . . . . . . . . . . . . . . . . . . . . . . . . . . . . . 411After Reloading an Environment, You Must Refresh Application Preview .... . . . . . . . . . . . . . . . . . . . . . . . . . . . . . . . . . . . . 413Unable to Preview Application in the AWS Cloud9 IDE with HTTP .... . . . . . . . . . . . . . . . . . . . . . . . . . . . . . . . . . . . . . . . . . . . . . 413Cannot Run Some Commands or Scripts in an EC2 Environment .... . . . . . . . . . . . . . . . . . . . . . . . . . . . . . . . . . . . . . . . . . . . . . . . 413AWS CLI / aws-shell Error: "The security token included in the request is invalid" in an EC2environment .... . . . . . . . . . . . . . . . . . . . . . . . . . . . . . . . . . . . . . . . . . . . . . . . . . . . . . . . . . . . . . . . . . . . . . . . . . . . . . . . . . . . . . . . . . . . . . . . . . . . . . . . . . . . . . . . . . . . . . . 413Amazon EC2 Instances Are Not Automatically Updated .... . . . . . . . . . . . . . . . . . . . . . . . . . . . . . . . . . . . . . . . . . . . . . . . . . . . . . . . . . . . 414Lambda Local Function Run Error: Cannot Install SAM Local ... . . . . . . . . . . . . . . . . . . . . . . . . . . . . . . . . . . . . . . . . . . . . . . . . . . . . . 414
Limits ... . . . . . . . . . . . . . . . . . . . . . . . . . . . . . . . . . . . . . . . . . . . . . . . . . . . . . . . . . . . . . . . . . . . . . . . . . . . . . . . . . . . . . . . . . . . . . . . . . . . . . . . . . . . . . . . . . . . . . . . . . . . . . . . . . . . . . . . . . 416AWS Cloud9 Limits ... . . . . . . . . . . . . . . . . . . . . . . . . . . . . . . . . . . . . . . . . . . . . . . . . . . . . . . . . . . . . . . . . . . . . . . . . . . . . . . . . . . . . . . . . . . . . . . . . . . . . . . . . . . . . . . 416Related AWS Service Limits ... . . . . . . . . . . . . . . . . . . . . . . . . . . . . . . . . . . . . . . . . . . . . . . . . . . . . . . . . . . . . . . . . . . . . . . . . . . . . . . . . . . . . . . . . . . . . . . . . . . 416
Document History .... . . . . . . . . . . . . . . . . . . . . . . . . . . . . . . . . . . . . . . . . . . . . . . . . . . . . . . . . . . . . . . . . . . . . . . . . . . . . . . . . . . . . . . . . . . . . . . . . . . . . . . . . . . . . . . . . . . . . . . 417
x
AWS Cloud9 User GuideWhat Can I Do with AWS Cloud9?
What Is AWS Cloud9?AWS Cloud9 contains a collection of tools that you use to code, build, run, test, debug, and releasesoftware in the cloud. To work with these tools, you use the AWS Cloud9 integrated developmentenvironment, or IDE.
You access the AWS Cloud9 IDE through a web browser. The IDE offers a rich code-editing experiencewith support for several programming languages and runtime debuggers, as well as a built-in terminal.
You can configure the IDE to your preferences. You can switch color themes, bind shortcut keys, enableprogramming language-specific syntax coloring and code formatting, and more.
• What Can I Do with AWS Cloud9? (p. 1)
• How Does AWS Cloud9 Work? (p. 2)
• Pricing (p. 3)
• How Do I Get Started? (p. 3)
• About Cloud9 Versions (p. 4)
• I Have Additional Questions or Need Help (p. 4)
What Can I Do with AWS Cloud9?Explore the following resources to learn about using AWS Cloud9 for some common scenarios.
Topics in This Guide
Scenario Resources
Create, run, and debug code in AWS Lambdafunctions, APIs in Amazon API Gateway, andserverless applications
AWS Lambda Tutorial (p. 45), Advanced AWSLambda Tutorial (p. 60), and Working with AWSLambda Functions (p. 286)
Work with Amazon Lightsail instancespreconfigured with popular apps and frameworkssuch as WordPress, LAMP (Linux, Apache, MySQL,and PHP), Node.js, Nginx, Drupal, and Joomla, aswell as Linux distributions such as Amazon Linux,Ubuntu, Debian, FreeBSD, and openSUSE
Working with Amazon LightsailInstances (p. 277)
Work with code in AWS software developmentprojects and toolchains in AWS CodeStar
Working with AWS CodeStar Projects (p. 284)
Work with code in continuous delivery solutions inAWS CodePipeline
Working with AWS CodePipeline (p. 315)
Automate AWS services by using the AWS CLI andthe aws-shell
AWS CLI and aws-shell Sample (p. 318)
1

AWS Cloud9 User GuideRelated Videos
Scenario Resources
Work with source code repositories in AWSCodeCommit
AWS CodeCommit Sample (p. 321)
Work with source code repositories in GitHub GitHub Sample (p. 327)
Work with NoSQL databases in AmazonDynamoDB
Amazon DynamoDB Sample (p. 331)
Work with code for Node.js and the AWS SDK forJavaScript
Node.js Sample (p. 342)
Work with code for Python and the AWS SDK forPython (Boto)
Python Sample (p. 347)
Work with code for PHP and the AWS SDK for PHP PHP Sample (p. 352)
Work with code for Ruby and the AWS SDK forRuby
Ruby Sample (p. 357)
Work with code for Go and the AWS SDK for Go Go Sample (p. 361)
Work with code for C++ and the AWS SDK for C++ C++ Sample (p. 366)
Invite others to use your environment along withyou, in real time and with text chat support
Working with Shared Environments (p. 90)
Related Videos• AWS re:Invent 2017 - Introducing AWS Cloud9: Werner Vogels Keynote (9 minutes, YouTube website)
• AWS re:Invent Launchpad 2017 - AWS Cloud9, (15 minutes, YouTube website)
• Introducing AWS Cloud9 - AWS Online Tech Talks (33 minutes, YouTube website)
• AWS re:Invent 2017 - Introducing AWS Cloud9, a cloud IDE to write, run & debug your code (1 hour, 4minutes; AWS re:Invent website)
How Does AWS Cloud9 Work?The following diagram shows a high-level overview of how AWS Cloud9 works.
You use the AWS Cloud9 IDE, running in a web browser on your local computer, to interact with yourenvironment. An Amazon EC2 instance or your own server connects to the environment. An environmentis a place where you store your project's files and where you run the tools to develop your apps.
You use the AWS Cloud9 IDE to work with files in the environment. You can:
• Store these files locally on the instance or server.
• Clone a remote code repository—such as a repo in AWS CodeCommit—into your environment.
2

AWS Cloud9 User GuidePricing
• Work with a combination of local and cloned files in the environment.
In the background, you can instruct AWS Cloud9 to have Amazon EC2 launch an Amazon EC2 instanceand then connect the environment to the newly-launched instance. We call this type of setup an EC2environment. You can also instruct AWS Cloud9 to connect an environment to an existing Amazon EC2instance or your own server. We call this type of setup an SSH environment.
Here are the key similarities and differences between EC2 environments and SSH environments.
EC2 environments SSH environments
AWS Cloud9 launches an associated Amazon EC2instance and manages that instance's lifecycle (forexample, start, stop, and terminate).
You use an existing Amazon EC2 instance or yourown server. You manage that instance's or server'slifecycle.
The instance runs on Amazon Linux. You can use any Amazon EC2 instance type thatruns Linux, or your own server running Linux.
AWS Cloud9 automatically sets up the instance tostart working with AWS Cloud9.
You must manually configure the instance or yourown server to work with AWS Cloud9.
AWS Cloud9 automatically sets up the AWSCommand Line Interface (AWS CLI) on theinstance for you to start using.
If you want to use the AWS CLI on the instance oryour own server, you must set it up yourself.
The instance has access to hundreds of usefulpackages, with some common packages alreadyinstalled and configured, such as Git, Docker,Node.js, and Python.
If you use your own sever, you might need todownload, install, and configure additionalpackages to complete common tasks.
You maintain the instance, for example byperiodically applying system updates.
You maintain the instance or your own server.
When you delete the environment, AWS Cloud9automatically terminates the associated instance.
When you delete the environment, the instance oryour own server remains.
You can create and switch between multiple environments, with each environment set up for a specificdevelopment project. By storing the environment in the cloud, your projects no longer need to betied to a single computer or server setup. This enables you to do things such as easily switch betweencomputers and more quickly onboard developers to your team.
PricingFor information, see AWS Cloud9 Pricing.
For education options, explore the AWS Educate program.
How Do I Get Started?Set up to start using AWS Cloud9 by following one of the sets of setup steps in GettingStarted (p. 5).
After you get set up, begin experimenting with AWS Cloud9 by following the steps in the IDETutorial (p. 19).
3

AWS Cloud9 User GuideAbout Cloud9 Versions
About Cloud9 VersionsThere are currently two versions of Cloud9 available: c9.io and AWS Cloud9. This AWS Cloud9 User Guideonly covers AWS Cloud9.
c9.io is available only to existing c9.io users. For more information, see Cloud9 now runs on andintegrates with AWS on the c9.io website.
c9.io and AWS Cloud9 are not interoperable. You can't use an account or workspace in c9.io with anaccount or environment in AWS Cloud9.
I Have Additional Questions or Need HelpTo ask questions or seek help from the AWS Cloud9 community, see the AWS Cloud9 Discussion Forum.(When you enter this forum, AWS might require you to sign in.)
See also our frequently asked questions (FAQs), or contact us directly.
4
AWS Cloud9 User GuideExpress Setup
Getting Started with AWS Cloud9To start using AWS Cloud9, follow one of these sets of procedures, depending on how you plan to useAWS Cloud9.
Usage pattern Follow these procedures
I will always be the only one using my own AWSaccount, and I don't need to share my AWS Cloud9development environments with anyone else.
Express Setup (p. 5)
Multiple people will be using a single AWSaccount to create and share environments withinthat account.
Team Setup (p. 7)
Multiple people will be using a single AWSaccount, and I need to restrict creatingenvironments within that account to control costs.
Advanced Setup for Teams (p. 13)
After you finish setting up, follow the steps in the IDE Tutorial (p. 19) to begin experimenting withAWS Cloud9.
See What Is AWS Cloud9? (p. 1) for general information about AWS Cloud9.
Topics
• Express Setup for AWS Cloud9 (p. 5)
• Team Setup for AWS Cloud9 (p. 7)
• Advanced Team Setup for AWS Cloud9 (p. 13)
• IDE Tutorial for AWS Cloud9 (p. 19)
• AWS Lambda Tutorial for AWS Cloud9 (p. 45)
• Advanced AWS Lambda Tutorial for AWS Cloud9 (p. 60)
Express Setup for AWS Cloud9To set up to use AWS Cloud9, follow one of these sets of procedures, depending on how you plan to useAWS Cloud9.
Usage pattern Follow these procedures
I will always be the only one using my own AWSaccount, and I don't need to share my AWS Cloud9development environments with anyone else.
This topic
Multiple people will be using a single AWSaccount to create and share environments withinthat account.
Team Setup (p. 7)
5

AWS Cloud9 User GuideStep 1: Create an AWS Account
Usage pattern Follow these procedures
Multiple people will be using a single AWSaccount, and I need to restrict creatingenvironments within that account to control costs.
Advanced Team Setup (p. 13)
To set up for a single person to use AWS Cloud9 as the only individual in a single AWS account, simplycreate an AWS account if you don't already have one, and then sign in to the AWS Cloud9 console withthe credentials of the AWS account root user.
ImportantAlthough it's possible to use AWS Cloud9 as an AWS account root user, this isn't an AWSsecurity best practice. We recommend you use AWS Cloud9 as an IAM user instead. For moreinformation, see Team Setup (p. 7). See also Create Individual IAM Users in the IAM UserGuide.
Step 1: Create an AWS AccountIf you already have an AWS account, skip ahead to Step 2: Sign in to the AWS Cloud9 Console with anAWS Account Root User (p. 6).
To watch a 4-minute video related to the following procedure, see Creating an Amazon Web ServicesAccount on the YouTube website.
To create an AWS account
1. Go to https://aws.amazon.com.2. Choose Sign In to the Console.3. Choose Create a new AWS account.4. Complete the process by following the on-screen directions. This includes giving AWS your email
address and credit card information. You must also use your phone to enter a code that AWS givesyou.
After you finish creating the account, AWS will send you a confirmation email. Do not go past this stepuntil you get this confirmation.
Step 2: Sign in to the AWS Cloud9 Console with anAWS Account Root UserAfter you complete the previous step, you're ready to sign in to the AWS Cloud9 console with an AWSaccount root user and start using it.
ImportantAlthough it's possible to sign in to the AWS Cloud9 console with an AWS account root user, thisisn't an AWS security best practice. We recommend you sign in as an IAM user instead. For moreinformation, see Team Setup (p. 7). See also Create Individual IAM Users in the IAM UserGuide.
1. Open the AWS Cloud9 console, at https://console.aws.amazon.com/cloud9/.2. If prompted, type the email address for the AWS account root user, and then choose Next.3. If prompted, type the password for the AWS account root user, and then choose Sign In.
You have now successfully signed in, and the AWS Cloud9 console is displayed.
6

AWS Cloud9 User GuideTeam Setup
Start experimenting with AWS Cloud9 by following the steps in the IDE Tutorial (p. 19).
Team Setup for AWS Cloud9To set up to use AWS Cloud9, follow one of these sets of procedures, depending on how you plan to useAWS Cloud9.
Usage pattern Follow these procedures
I will always be the only one using my own AWSaccount, and I don't need to share my AWS Cloud9development environments with anyone else.
Express Setup (p. 5)
Multiple people will be using a single AWSaccount to create and share environments withinthat account.
This topic
Multiple people will be using a single AWSaccount, and I need to restrict creatingenvironments within that account to control costs.
Advanced Setup for Teams (p. 13)
To set up for multiple people to use AWS Cloud9 in a single AWS account, start with one of the followingsteps, depending on which AWS resources you already have.
Do you have an AWS account? Do you have an IAM group anduser in that account?
Start with this step
No (or Not Sure) — Step 1: Create an AWSAccount (p. 7)
Yes No (or Not Sure) Step 2: Create an IAM Group andUser, and Add the User to theGroup (p. 8)
Yes Yes Step 3: Add AWS Cloud9Access Permissions to theGroup (p. 11)
Step 1: Create an AWS AccountYour organization might already have an AWS account set up for you. If your organization has an AWSaccount administrator, check with that person before starting the following procedure. If you alreadyhave an AWS account, skip ahead to Step 2: Create an IAM Group and User, and Add the User to theGroup (p. 8).
To watch a 4-minute video related to the following procedure, see Creating an Amazon Web ServicesAccount on the YouTube website.
To create an AWS account
1. Go to https://aws.amazon.com.
7

AWS Cloud9 User GuideStep 2: Create an IAM Group and
User, and Add the User to the Group
2. Choose Sign In to the Console.
3. Choose Create a new AWS account.
4. Complete the process by following the on-screen directions. This includes giving AWS your emailaddress and credit card information. You must also use your phone to enter a code that AWS givesyou.
After you finish creating the account, AWS will send you a confirmation email. Do not go past this stepuntil you get this confirmation.
Step 2: Create an IAM Group and User, and Add theUser to the GroupWe do not recommend using your AWS account root user to access AWS Cloud9. Instead, we recommendyou use AWS Identity and Access Management (IAM) to control access to your AWS account. IAM offersfeatures such as granular permissions and multi-factor authentication. And IAM is a feature of your AWSaccount offered at no additional charge. For more information, see IAM Features in the IAM User Guide.
In this step, you will create a group and a user in AWS Identity and Access Management (IAM), add theuser to the group, and then use the user to access AWS Cloud9. This is an AWS security best practice. Formore information, see IAM Best Practices in the IAM User Guide.
If you already have an IAM group and user, skip ahead to Step 3: Add AWS Cloud9 Access Permissions tothe Group (p. 11).
NoteYour organization might already have an IAM group and user set up for you. If your organizationhas an AWS account administrator, check with that person before starting the followingprocedures.
You can complete these tasks using the AWS Management Console (p. 8) or the AWS Command LineInterface (AWS CLI) (p. 9).
To watch a 9-minute video related to the following console procedures, see How do I set up an IAM userand sign in to the AWS Management Console using IAM credentials on the YouTube website.
Step 2.1: Create an IAM Group with the Console1. Sign in to the AWS Management Console, if you are not already signed in.
We recommend you sign in using credentials for an IAM administrator user in your AWS account. AnIAM administrator user has similar AWS access permissions to an AWS account root user and avoidssome of the associated security risks. If you cannot sign in as an IAM administrator user, check withyour AWS account administrator. For more information, see the following in the IAM User Guide.
• Creating Your First IAM Admin User and Group
• The IAM User Sign-in Page
2. Open the IAM console. To do this, in the console's navigation bar, choose Services. Then choose IAM.
3. In the IAM console's navigation pane, choose Groups.
4. Choose Create New Group.
5. On the Set Group Name page, for Group Name, type a name for the new group.
6. Choose Next Step.
7. On the Attach Policy page, choose Next Step without attaching any policies. (You will attach a policyin Step 3: Add AWS Cloud9 Access Permissions to the Group (p. 11).)
8

AWS Cloud9 User GuideStep 2: Create an IAM Group and
User, and Add the User to the Group
8. Choose Create Group.
NoteWe recommend that you create a separate AWS Cloud9 users group and AWS Cloud9administrators group. This AWS security best practice can help you better control, track, andtroubleshoot issues with AWS resource access.
Skip ahead to Step 2.2: Create an IAM User and Add the User to the Group with the Console (p. 9).
Step 2.1: Create an IAM Group with the AWS CLI1. Install and configure the AWS CLI, if you have not done so already. To do this, see the following in the
AWS CLI User Guide.
• Installing the AWS Command Line Interface
• Quick Configuration
We recommend you configure the AWS CLI using credentials for an IAM administrator user in yourAWS account. An IAM administrator user has similar AWS access permissions to an AWS accountroot user and avoids some of the associated security risks. If you cannot configure the AWS CLI as anIAM administrator user, check with your AWS account administrator. For more information, see thefollowing in the IAM User Guide.
• Creating Your First IAM Admin User and Group
• The IAM User Sign-in Page
2. Run the IAM create-group command, specifying the new group's name (for example,MyCloud9Group).
aws iam create-group --group-name MyCloud9Group
NoteWe recommend that you create a separate AWS Cloud9 users group and AWS Cloud9administrators group. This AWS security best practice can help you better control, track, andtroubleshoot issues with AWS resource access.
Skip ahead to Step 2.2: Create an IAM User and Add the User to the Group with the AWS CLI (p. 10).
Step 2.2: Create an IAM User and Add the User to the Groupwith the Console1. With the IAM console open from the previous procedure, in the navigation pane, choose Users.
2. Choose Add user.
3. On the Details page, for User name, type a name for the new user.
NoteYou can create multiple users at the same time by choosing Add another user. The othersettings in this procedure apply to each of these new users.
4. Select Programmatic access and AWS Management Console access. This allows the new user to usethe AWS API, AWS CLI, aws-shell, AWS SDKs, other AWS development tools, and AWS service consoles.
5. Leave the default choice of Autogenerated password, which creates a random password for the newuser to sign in to the console. Or choose Custom password and type a specific password for the newuser.
6. Leave the default choice of Require password reset, which prompts the new user to change theirpassword after they sign in to the console for the first time.
9

AWS Cloud9 User GuideStep 2: Create an IAM Group and
User, and Add the User to the Group
7. Choose Next: Permissions.8. On the Permissions page, leave the default choice of Add user to group (or Add users to group for
multiple users).9. In the list of groups, select the box (not the name) next to the group you want to add the user to.10.Choose Next: Review. (You will set permissions in Step 3: Add AWS Cloud9 Access Permissions to the
Group (p. 11).)11.On the Review page, choose Create user (or Create users for multiple users).12.On the Complete page, do one of the following:
• Next to each new user, choose Send email, and follow the on-screen directions to email the newuser their console sign in URL and user name. Then communicate to each new user their consolesign in password, AWS access key ID, and AWS secret access key separately.
• Choose Download .csv. Then communicate to each new user their console sign in URL, console signin password, AWS access key ID, and AWS secret access key that is in the downloaded file.
• Next to each new user, choose Show for both Secret access key and Password. Then communicateto each new user their console sign in URL, console sign in password, AWS access key ID, and AWSsecret access key.
NoteIf you do not choose Download .csv, this is the only time you can view the new user's AWSsecret access key and console sign in password. To generate a new AWS secret access key orconsole sign in password for the new user, see the following in the IAM User Guide.• Creating, Modifying, and Viewing Access Keys (Console)• Creating, Changing, or Deleting an IAM User Password (Console)
Skip ahead to Step 3: Add AWS Cloud9 Access Permissions to the Group (p. 11).
Step 2.2: Create an IAM User and Add the User to the Groupwith the AWS CLI1. Run the IAM create-user command to create the user, specifying the new user's name (for example,
MyCloud9User).
aws iam create-user --user-name MyCloud9User
2. Run the IAM create-login-profile command to create a new console sign in password for theuser, specifying the user's name and initial sign in password (for example, MyC10ud9Us3r!). After theuser signs in, AWS asks the user to change their sign in password.
aws iam create-login-profile --user-name MyCloud9User --password MyC10ud9Us3r! --password-reset-required
To generate a replacement console sign in password for the user later if needed, see Creating,Changing, or Deleting an IAM User Password (API, CLI, PowerShell) in the IAM User Guide.
3. Run the IAM create-access-key command to create a new AWS access key and corresponding AWSsecret access key for the user.
aws iam create-access-key --user-name MyCloud9User
Make a note of the AccessKeyId and SecretAccessKey values that are displayed. After you run theIAM create-access-key command, this is the only time you can view the user's AWS secret accesskey. To generate a new AWS secret access key for the user later if needed, see Creating, Modifying, andViewing Access Keys (API, CLI, PowerShell) in the IAM User Guide.
10

AWS Cloud9 User GuideStep 3: Add AWS Cloud9 Access Permissions to the Group
4. Run the IAM add-user-to-group command to add the user to the group, specifying the group's anduser's names.
aws iam add-user-to-group --group-name MyCloud9Group --user-name MyCloud9User
5. Communicate to the user their console sign in URL, initial console sign in password, AWS access key ID,and AWS secret access key.
Step 3: Add AWS Cloud9 Access Permissions to theGroupBy default, most IAM groups and users do not have access to AWS Cloud9. (An exception is IAMadministrator groups and IAM administrator users, which have access to all AWS services in their AWSaccount by default.) In this step, you use the IAM console to add AWS Cloud9 access permissions directlyto an IAM group to which one or more users belong, so that you can ensure those users can access AWSCloud9.
If you already have an IAM user you want to use, and that user belongs to an IAM administrator group,skip ahead to Step 4: Sign in to the AWS Cloud9 Console (p. 13).
NoteYour organization might already have a group set up for you with the appropriate accesspermissions. If your organization has an AWS account administrator, check with that personbefore starting the following procedure.
You can complete this task using the AWS Management Console (p. 11) or the AWS CLI (p. 12).
Add AWS Cloud9 Access Permissions to the Group with theConsole1. Sign in to the AWS Management Console, if you are not already signed in.
For this step, we recommend you sign in using credentials for an IAM administrator user in your AWSaccount. If you cannot do this, check with your AWS account administrator.
2. Open the IAM console. To do this, in the console's navigation bar, choose Services. Then choose IAM.
3. Choose Groups.
4. Choose the group's name.
5. Decide whether you want to add AWS Cloud9 user or AWS Cloud9 administrator access permissions tothe group. These permissions will apply to each user in the group.
AWS Cloud9 user access permissions allow each user in the group to do the following things withintheir AWS account:
• Create their own AWS Cloud9 development environments.
• Get information about their own environments.
• Change the settings for their own environments.
AWS Cloud9 administrator access permissions allow each user in the group to do additional thingswithin their AWS account, such as:
• Create environments for themselves or others.
• Get information about environments for themselves or others.
• Delete environments for themselves or others.
• Change the settings of environments for themselves or others.
11
AWS Cloud9 User GuideStep 3: Add AWS Cloud9 Access Permissions to the Group
NoteWe recommend that you add only a limited number of users to the AWS Cloud9administrators group. This AWS security best practice can help you better control, track, andtroubleshoot issues with AWS resource access.
6. On the Permissions tab, for Managed Policies, choose Attach Policy.
7. In the list of policy names, choose the box next to AWSCloud9User for AWS Cloud9 user accesspermissions or AWSCloud9Administrator for AWS Cloud9 administrator access permissions. (If youdon't see either of these policy names in the list, type the policy name in the Filter box to display it.)
8. Choose Attach Policy.
To see the list of access permissions that these AWS managed policies give to a group, see AWS Managed(Predefined) Policies (p. 390).
Skip ahead to Step 4: Sign in to the AWS Cloud9 Console (p. 13).
Add AWS Cloud9 Access Permissions to the Group with the AWSCLI1. Decide whether you want to add AWS Cloud9 user or AWS Cloud9 administrator access permissions to
the group. These permissions will apply to each user in the group.
AWS Cloud9 user access permissions allow each user in the group to do the following things withintheir AWS account.
• Create their own AWS Cloud9 development environments.
• Get information about their own environments.
• Change the settings for their own environments.
AWS Cloud9 administrator access permissions allow each user in the group to do additional thingswithin their AWS account, such as the following.
• Create environments for themselves or others.
• Get information about environments for themselves or others.
• Delete environments for themselves or others.
• Change the settings of environments for themselves or others.
NoteWe recommend that you add only a limited number of users to the AWS Cloud9administrators group. This AWS security best practice can help you better control, track, andtroubleshoot issues with AWS resource access.
2. Run the IAM attach-group-policy command, specifying the group's name and the AmazonResource Name (ARN) for the AWS Cloud9 access permissions policy to add.
For AWS Cloud9 user access permissions, specify the following ARN.
aws iam attach-group-policy --group-name MyCloud9Group --policy-arn arn:aws:iam::aws:policy/AWSCloud9User
For AWS Cloud9 administrator access permissions, specify the following ARN.
aws iam attach-group-policy --group-name MyCloud9Group --policy-arn arn:aws:iam::aws:policy/AWSCloud9Administrator
12

AWS Cloud9 User GuideStep 4: Sign in to the AWS Cloud9 Console
To see the list of access permissions that these AWS managed policies give to a group, see AWS Managed(Predefined) Policies (p. 390).
Step 4: Sign in to the AWS Cloud9 ConsoleAfter you complete the previous steps in this topic, you are ready to sign in to the AWS Cloud9 consoleand start using it.
1. If you are already signed in to the AWS Management Console as an AWS account root user, sign out ofthe console.
2. Open the AWS Cloud9 console, at https://console.aws.amazon.com/cloud9/.3. If prompted, type the AWS account number for the IAM user you created or identified earlier, and then
choose Next.
NoteIf you do not see an option for typing the AWS account number, choose Sign in to a differentaccount. Type the AWS account number on the next page, and then choose Next.
4. If prompted, type the user name and password of the IAM user you created or identified earlier, andthen choose Sign In.
5. If prompted, follow the on-screen directions to change your user's initial sign-in password. Save yournew sign-in password in a secure location.
You have now successfully signed in, and the AWS Cloud9 console is displayed. You can beginexperimenting with AWS Cloud9 by following the steps in the IDE Tutorial (p. 19).
Advanced Team Setup for AWS Cloud9To set up to use AWS Cloud9, follow one of these sets of procedures, depending on how you plan to useAWS Cloud9.
Usage pattern Follow these procedures
I will always be the only one using my own AWSaccount, and I don't need to share my AWS Cloud9development environments with anyone else.
Express Setup (p. 5)
Multiple people will be using a single AWSaccount to create and share environments withinthat account.
Team Setup (p. 7)
Multiple people will be using a single AWSaccount, and I need to restrict creatingenvironments within that account to control costs.
This topic
This topic assumes you have already completed the setup steps in Team Setup (p. 7).
In Team Setup (p. 7), you created IAM groups and added AWS Cloud9 access permissions directlyto those groups, to ensure that users in those groups can access AWS Cloud9. In this topic, you will addmore access permissions to restrict the kinds of environments that users in those groups can create. Thiscan help control costs related to AWS Cloud9 in an AWS account.
To add these access permissions, you create your own set of policies in IAM that define the AWS accesspermissions you want to enforce. (We call each of these a customer-managed policy.) Then you attach
13

AWS Cloud9 User GuideStep 1: Create a Customer-Managed Policy
those customer-managed policies to the IAM groups that the users belong to. (In some scenarios, youmust also detach existing AWS managed policies that are already attached to those IAM groups.) To setthis up, follow the procedures in this topic.
NoteThe following procedures cover attaching and detaching policies for AWS Cloud9 users groupsonly. These procedures assume you already have a separate AWS Cloud9 users group and AWSCloud9 administrators group and that you have only a limited number of users in the AWSCloud9 administrators group. This AWS security best practice can help you better control, track,and troubleshoot issues with AWS resource access.
• Step 1: Create a Customer-Managed Policy (p. 14)
• Step 2: Add Customer-Managed Policies to a Group (p. 15)
• Customer-Managed Policy Examples for Teams Using AWS Cloud9 (p. 15)
Step 1: Create a Customer-Managed PolicyYou can create a customer-managed policy using the AWS Management Console (p. 14) or the AWSCommand Line Interface (AWS CLI) (p. 14).
Create a Customer-Managed Policy Using the Console1. Sign in to the AWS Management Console, if you are not already signed in.
We recommend you sign in using credentials for an IAM administrator user in your AWS account. If youcannot do this, check with your AWS account administrator.
2. Open the IAM console. To do this, in the console's navigation bar, choose Services. Then choose IAM.
3. In the service's navigation pane, choose Policies.
4. Choose Create policy.
5. In the JSON tab, paste one of our suggested Customer-Managed Policy Examples (p. 15).
NoteYou can also create your own customer-managed policies. For more information, see the IAMJSON Policy Reference in the IAM User Guide and the AWS services' documentation.
6. Choose Review policy.
7. On the Review policy page, type a Name and an optional Description for the policy, and then chooseCreate policy.
Repeat this step for each additional customer-managed policy that you want to create, then skip aheadto Add Customer-Managed Policies to a Group Using the Console (p. 15).
Create a Customer-Managed Policy Using the AWS CLI1. On the computer where you run the AWS CLI, create a file to describe the policy (for example,
policy.json).
If you create the file with a different file name, substitute it throughout this procedure.
2. Paste one of our suggested Customer-Managed Policy Examples (p. 15) into the policy.json file.
NoteYou can also create your own customer-managed policies. For more information, see the IAMJSON Policy Reference in the IAM User Guide and the AWS services' documentation.
3. From the terminal or command prompt, switch to the directory that contains the policy.json file.
14

AWS Cloud9 User GuideStep 2: Add Customer-Managed Policies to a Group
4. Run the IAM create-policy command, specifying a name for the policy and the policy.json file.
aws iam create-policy --policy-document file://policy.json --policy-name POLICY_NAME
In the preceding command, replace POLICY_NAME with a name for the policy.
Skip ahead to Add Customer-Managed Policies to a Group Using the AWS CLI (p. 15).
Step 2: Add Customer-Managed Policies to a GroupYou can add customer-managed policies to a group using the AWS Management Console (p. 15) orthe AWS Command Line Interface (AWS CLI) (p. 15).
Add Customer-Managed Policies to a Group Using the Console1. With the IAM console open from the previous procedure, in the service's navigation pane, choose
Groups.
2. Choose the group's name.
3. On the Permissions tab, for Managed Policies, choose Attach Policy.
4. In the list of policy names, choose the box next to each customer-managed policy you want to attachto the group. (If you don't see a specific policy name in the list, type the policy name in the Filter boxto display it.)
5. Choose Attach Policy.
Add Customer-Managed Policies to a Group Using the AWS CLI
Run the IAM attach-group-policy command, specifying the group's name and the Amazon ResourceName (ARN) of the policy.
aws iam attach-group-policy --group-name GROUP_NAME --policy-arn POLICY_ARN
In the preceding command, replace GROUP_NAME with the name of the group. Replace POLICY_ARNwith the ARN of the customer-managed policy. These ARNs typically follow the formatarn:aws:iam::ACCOUNT_ID:policy/POLICY_NAME.
Customer-Managed Policy Examples for Teams UsingAWS Cloud9Following are some examples of policies you can use to restrict the kinds of environments that users in agroup can create in an AWS account.
• Prevent Users in a Group from Creating Environments (p. 16)
• Prevent Users in a Group from Creating EC2 Environments (p. 16)
• Allow Users in a Group to Create EC2 Environments Only with Specific Amazon EC2 InstanceTypes (p. 16)
• Allow Users in a Group to Create Only a Single EC2 Environment Per AWS Region (p. 18)
15

AWS Cloud9 User GuideCustomer-Managed Policy Examples
for Teams Using AWS Cloud9
Prevent Users in a Group from Creating EnvironmentsThe following customer-managed policy, when attached to an AWS Cloud9 users group, prevents thoseusers from creating environments in an AWS account. This is useful if you want an IAM administrator userin your AWS account to manage creating environments instead of users in an AWS Cloud9 users group.
{ "Version": "2012-10-17", "Statement": [ { "Effect": "Deny", "Action": [ "cloud9:CreateEnvironmentEC2", "cloud9:CreateEnvironmentSSH" ], "Resource": "*" } ]}
Note that the preceding customer-managed policy explicitly overrides "Effect": "Allow" for"Action": "cloud9:CreateEnvironmentEC2" and "cloud9:CreateEnvironmentSSH" on"Resource": "*" in the AWSCloud9User managed policy that is already attached to the AWS Cloud9users group.
Prevent Users in a Group from Creating EC2 EnvironmentsThe following customer-managed policy, when attached to an AWS Cloud9 users group, prevents thoseusers from creating EC2 environments in an AWS account. This is useful if you want an IAM administratoruser in your AWS account to manage creating EC2 environments instead of users in an AWS Cloud9 usersgroup. This assumes you haven't also attached a policy that prevents users in that group from creatingSSH environments. Otherwise, those users won't be able to create environments at all.
{ "Version": "2012-10-17", "Statement": [ { "Effect": "Deny", "Action": "cloud9:CreateEnvironmentEC2", "Resource": "*" } ]}
Note that the preceding customer-managed policy explicitly overrides "Effect": "Allow" for"Action": "cloud9:CreateEnvironmentEC2" on "Resource": "*" in the AWSCloud9Usermanaged policy that is already attached to the AWS Cloud9 users group.
Allow Users in a Group to Create EC2 Environments Only withSpecific Amazon EC2 Instance TypesThe following customer-managed policy, when attached to an AWS Cloud9 users group, allows thoseusers to create EC2 environments that only use instance types starting with t2 in an AWS account. Thispolicy assumes you haven't also attached a policy that prevents users in that group from creating EC2environments. Otherwise, those users won't be able to create EC2 environments at all.
You can replace "t2.*" in the following policy with a different instance class (for example, "m3.*"). Oryou can restrict it to multiple instance classes or instance types (for example, [ "t2.*", "m3.*" ] or[ "t2.nano", t2.micro" ]).
16

AWS Cloud9 User GuideCustomer-Managed Policy Examples
for Teams Using AWS Cloud9
For an AWS Cloud9 users group, detach the AWSCloud9User managed policy from the group, and thenadd the following customer-managed policy in its place. (If you do not detach the AWSCloud9Usermanaged policy, the following customer-managed policy will have no effect.)
{ "Version": "2012-10-17", "Statement": [ { "Effect": "Allow", "Action": [ "cloud9:CreateEnvironmentSSH", "cloud9:ValidateEnvironmentName", "cloud9:GetUserPublicKey", "cloud9:UpdateUserSettings", "cloud9:GetUserSettings", "iam:GetUser", "iam:ListUsers", "ec2:DescribeVpcs", "ec2:DescribeSubnets" ], "Resource": "*" }, { "Effect": "Allow", "Action": "cloud9:CreateEnvironmentEC2", "Resource": "*", "Condition": { "StringLike": { "cloud9:InstanceType": "t2.*" } } }, { "Effect": "Allow", "Action": [ "cloud9:DescribeEnvironmentMemberships" ], "Resource": [ "*" ], "Condition": { "Null": { "cloud9:UserArn": "true", "cloud9:EnvironmentId": "true" } } }, { "Effect": "Allow", "Action": [ "iam:CreateServiceLinkedRole" ], "Resource": "*", "Condition": { "StringLike": { "iam:AWSServiceName": "cloud9.amazonaws.com" } } } ]}
17
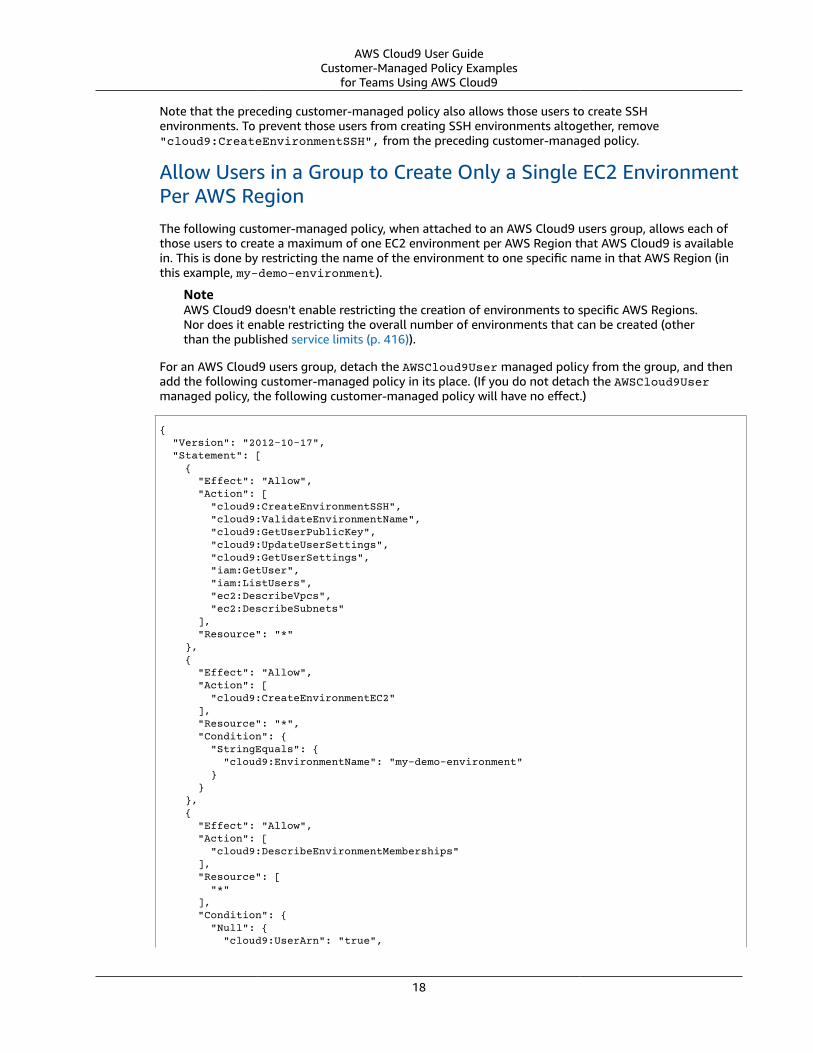
AWS Cloud9 User GuideCustomer-Managed Policy Examples
for Teams Using AWS Cloud9
Note that the preceding customer-managed policy also allows those users to create SSHenvironments. To prevent those users from creating SSH environments altogether, remove"cloud9:CreateEnvironmentSSH", from the preceding customer-managed policy.
Allow Users in a Group to Create Only a Single EC2 EnvironmentPer AWS RegionThe following customer-managed policy, when attached to an AWS Cloud9 users group, allows each ofthose users to create a maximum of one EC2 environment per AWS Region that AWS Cloud9 is availablein. This is done by restricting the name of the environment to one specific name in that AWS Region (inthis example, my-demo-environment).
NoteAWS Cloud9 doesn't enable restricting the creation of environments to specific AWS Regions.Nor does it enable restricting the overall number of environments that can be created (otherthan the published service limits (p. 416)).
For an AWS Cloud9 users group, detach the AWSCloud9User managed policy from the group, and thenadd the following customer-managed policy in its place. (If you do not detach the AWSCloud9Usermanaged policy, the following customer-managed policy will have no effect.)
{ "Version": "2012-10-17", "Statement": [ { "Effect": "Allow", "Action": [ "cloud9:CreateEnvironmentSSH", "cloud9:ValidateEnvironmentName", "cloud9:GetUserPublicKey", "cloud9:UpdateUserSettings", "cloud9:GetUserSettings", "iam:GetUser", "iam:ListUsers", "ec2:DescribeVpcs", "ec2:DescribeSubnets" ], "Resource": "*" }, { "Effect": "Allow", "Action": [ "cloud9:CreateEnvironmentEC2" ], "Resource": "*", "Condition": { "StringEquals": { "cloud9:EnvironmentName": "my-demo-environment" } } }, { "Effect": "Allow", "Action": [ "cloud9:DescribeEnvironmentMemberships" ], "Resource": [ "*" ], "Condition": { "Null": { "cloud9:UserArn": "true",
18
AWS Cloud9 User GuideIDE Tutorial
"cloud9:EnvironmentId": "true" } } }, { "Effect": "Allow", "Action": [ "iam:CreateServiceLinkedRole" ], "Resource": "*", "Condition": { "StringLike": { "iam:AWSServiceName": "cloud9.amazonaws.com" } } } ]}
Note that the preceding customer-managed policy allows those users to create SSHenvironments. To prevent those users from creating SSH environments altogether, remove"cloud9:CreateEnvironmentSSH", from the preceding customer-managed policy.
For additional examples, see the Customer-Managed Policy Examples (p. 393) in Authentication andAccess Control (p. 386).
IDE Tutorial for AWS Cloud9In this tutorial, you set up an AWS Cloud9 development environment and then tour the AWS Cloud9integrated development environment (IDE). Along the way, you use the IDE to code, run, and debug yourfirst app.
NoteCompleting this tutorial might result in charges to your AWS account. These include possiblecharges for Amazon EC2. For more information, see Amazon EC2 Pricing.
• Step 1: Create an EC2 Environment (p. 19)• Step 2: Tour the IDE (p. 24)• Step 3: Clean Up (p. 44)• Next Steps (p. 45)
Step 1: Create an EC2 EnvironmentIn this step, you use AWS Cloud9 console to create and then open an AWS Cloud9 EC2 developmentenvironment.
In AWS Cloud9, a development environment (or just environment) is a place where you store yourdevelopment project's files and where you run the tools to develop your apps. When you create a specialkind of environment called an EC2 environment, AWS Cloud9 launches and manages a new Amazon EC2instance running Amazon Linux, creates the environment, and then connects the environment to thenewly-launched instance. When you open the environment, AWS Cloud9 displays the AWS Cloud9 IDEthat enables you to work with the files and tools in that environment.
NoteWhen you create an EC2 environment, the environment doesn't contain any sample code bydefault. To create an environment along with sample code, skip this step, and see one of thefollowing topics instead.
19

AWS Cloud9 User GuideStep 1: Create an EC2 Environment
• To create an environment and connect it to an Amazon EC2 instance preconfigured witha popular app or framework such as WordPress, MySQL, PHP, Node.js, Nginx, Drupal, orJoomla, or a Linux distribution such as Ubuntu, Debian, FreeBSD, or openSUSE, you can useAmazon Lightsail along with AWS Cloud9. To do this, see Working with Amazon LightsailInstances (p. 277).
• To create a more complex solution that includes a toolchain with the AWS Cloud9 IDE,source control, build, deployment, virtual servers or serverless resources, and more, youcan use AWS CodeStar along with AWS Cloud9. To do this, see Working with AWS CodeStarProjects (p. 284).
If you use Lightsail or AWS CodeStar to create your environment and instance, we encourageyou to come back to this topic, and then skip ahead to Step 2: Tour the IDE (p. 24) to learnhow to use the AWS Cloud9 IDE to work with your new code.
You can create a blank EC2 environment with the AWS Management Console (p. 20) or the AWSCommand Line Interface (AWS CLI) (p. 23).
Create an EC2 Environment with the Console1. Sign in to the AWS Cloud9 console, at https://console.aws.amazon.com/cloud9/.
2. After you sign in to the AWS Cloud9 console, in the top navigation bar, choose an AWS Region tocreate the environment in. For a list of available AWS Regions, see AWS Cloud9 in the Amazon WebServices General Reference.
3. If a welcome page is displayed, for New AWS Cloud9 environment, choose Create environment.Otherwise, choose Create environment.
20

AWS Cloud9 User GuideStep 1: Create an EC2 Environment
Or:
4. On the Name environment page, for Name, type a name for your environment.
In this tutorial, we use the name my-demo-environment. If you use a different environment name,substitute it throughout this tutorial.
5. For Description, type something about your environment. For example, This environment is forthe AWS Cloud9 tutorial.
6. Choose Next step.
7. On the Configure settings page, for Environment type, leave the default choice of Create a newinstance for environment (EC2).
Choosing Create a new instance for enviroment (EC2) means you want AWS Cloud9 to connect theenvironment to a newly-launched Amazon EC2 instance that AWS Cloud9 manages. To use an existingAmazon EC2 instance or your own server instead (which we call an SSH environment), see Creating anEnvironment (p. 72).
NoteChoosing Create a new instance for environment (EC2) might result in possible charges toyour AWS account for Amazon EC2.
8. For Instance type, leave the default choice. This choice has relatively low RAM and vCPUs, which issufficient for this tutorial.
NoteChoosing instance types with more RAM and vCPUs might result in additional charges to yourAWS account for Amazon EC2.
9. AWS Cloud9 uses Amazon Virtual Private Cloud (Amazon VPC) in your AWS account to communicatewith the newly-launched Amazon EC2 instance. Depending on how Amazon VPC is set up in your AWSaccount, do one of the following.
21

AWS Cloud9 User GuideStep 1: Create an EC2 Environment
Does the account havea VPC with at leastone subnet in thatVPC?
Is the VPC you wantAWS Cloud9 to usethe default VPC in theaccount?
Does the VPC have asingle subnet?
Do this
No — — If no VPC exists, createone. To do this, expandNetwork settings. ForNetwork (VPC), chooseCreate new VPC, andthen follow the on-screen directions. Formore information, seeCreate an AmazonVPC (p. 378).
If a VPC exists but hasno subnet, create one.To do this, expandNetwork settings.For Network (VPC),choose Create newsubnet, and thenfollow the on-screendirections. For moreinformation, see Createa Subnet (p. 379).
Yes Yes Yes Skip ahead to the nextstep in this procedure.(AWS Cloud9 willautomatically use thedefault VPC with itssingle subnet.)
Yes Yes No Expand Networksettings (advanced).For Subnet, choosethe subnet you wantAWS Cloud9 to use inthe preselected defaultVPC.
Yes No — Expand Networksettings. For Network(VPC), choose the VPCthat you want AWSCloud9 to use. ForSubnet, choose thesubnet you want AWSCloud9 to use in thatVPC.
For more information, see Amazon VPC Settings (p. 375).
22

AWS Cloud9 User GuideStep 1: Create an EC2 Environment
10.For Cost-saving setting, choose the amount of time until AWS Cloud9 shuts down the Amazon EC2instance for the environment after all web browser instances that are connect to the IDE for theenvironment have been closed. Or leave the default choice.
NoteChoosing a shorter time period might result in fewer charges to your AWS account. Likewise,choosing a longer time might result in more charges.
11.Choose Next step.
12.On the Review choices page, choose Create environment. Wait while AWS Cloud9 creates yourenvironment. This can take several minutes. Please be patient.
After your environment is created, the AWS Cloud9 IDE is displayed. You'll learn about the AWS Cloud9IDE in the next step.
To learn more about what you can do with an environment after you finish this tutorial, see Working withEnvironments (p. 71).
Skip ahead to Step 2: Tour the IDE (p. 24).
Create an EC2 Environment with the AWS CLI1. Install and configure the AWS CLI, if you have not done so already. To do this, see the following in the
AWS CLI User Guide.
• Installing the AWS Command Line Interface
• Quick Configuration
We recommend you configure the AWS CLI using credentials for one of the following.
• The IAM user you created in Team Setup (p. 7).
• An IAM administrator user in your AWS account, if you will be working regularly with AWS Cloud9resources for multiple users across the account. If you cannot configure the AWS CLI as an IAMadministrator user, check with your AWS account administrator. For more information, see CreatingYour First IAM Admin User and Group in the IAM User Guide.
• An AWS account root user, but only if you will always be the only one using your own AWS account,and you don't need to share your environments with anyone else. For more information, seeCreating, Disabling, and Deleting Access Keys for Your AWS Account in the Amazon Web ServicesGeneral Reference.
2. Run the AWS Cloud9 create-environment-ec2 command.
aws cloud9 create-environment-ec2 --name my-demo-environment --description "This environment is for the AWS Cloud9 tutorial." --instance-type t2.micro --region us-west-2 --subnet-id SUBNET_ID
In the preceding command:
• --name represents the name of the environment. In this tutorial, we use the name my-demo-environment. If you use a different environment name, substitute it throughout this tutorial.
• --description represents an optional description for the environment.
• --instance-type represents the type of Amazon EC2 instance AWS Cloud9 will launch andconnect to the new environment. This example specifies t2.micro, which has relatively low RAMand vCPUs and is sufficient for this tutorial. Specifying instance types with more RAM and vCPUsmight result in additional charges to your AWS account for Amazon EC2. For a list of availableinstance types, see the create environment wizard in the AWS Cloud9 console.
• --region represents the ID of the AWS Region for AWS Cloud9 to create the environment in. For alist of available AWS Regions, see AWS Cloud9 in the Amazon Web Services General Reference.
23

AWS Cloud9 User GuideStep 2: Tour the IDE
• --subnet-id represents the subnet you want AWS Cloud9 to use. Replace SUBNET_ID with the IDof the subnet, which must be compatible with AWS Cloud9. For more information, see Amazon VPCSettings (p. 375).
• By default, AWS Cloud9 shuts down the Amazon EC2 instance for the environment 30 minutesafter all web browser instances that are connect to the IDE for the environment have been closed.To change this, add --automatic-stop-time-minutes along with the number of minutes. Ashorter time period might result in fewer charges to your AWS account. Likewise, a longer timemight result in more charges.
• By default, the entity that calls this command owns the environment. To change this, add --owner-id along with the Amazon Resource Name (ARN) of the owning entity.
After you successfully run this command, open the AWS Cloud9 IDE for the newly-created environment.To do this, see Opening an Environment (p. 77). Then return to this topic and continue on with Step 2:Tour the IDE (p. 24) to learn how to use the AWS Cloud9 IDE to work with your new environment.
Step 2: Tour the IDEIn the previous step, you created an environment, and the AWS Cloud9 IDE is now displayed. In this step,you'll learn how to use the IDE.
The AWS Cloud9 IDE is a collection of tools you use to code, build, run, test, debug, and release softwarein the cloud. In this step, you experiment with the most common of these tools. Toward the end of thistour, you use these tools to code, run, and debug your first app.
• Step 2.1: Menu Bar (p. 24)
• Step 2.2: Dashboard (p. 26)
• Step 2.3: Environment Window (p. 26)
• Step 2.4: Editor, Tabs, and Panes (p. 27)
• Step 2.5: Console (p. 28)
• Step 2.6: Open Files Section (p. 29)
• Step 2.7: Gutter (p. 30)
• Step 2.8: Status Bar (p. 30)
• Step 2.9: Navigate Window (p. 32)
• Step 2.10: Commands Window (p. 32)
• Step 2.11: Outline Window (p. 34)
• Step 2.12: Immediate Tab (p. 35)
• Step 2.13: Process List (p. 36)
• Step 2.14: Preferences (p. 37)
• Step 2.15: Terminal (p. 38)
• Step 2.16: Debugger Window (p. 39)
Step 2.1: Menu Bar
The menu bar, at the top edge of the IDE, contains common commands for working with files and codeand changing IDE settings. You can also preview and run code from the menu bar.
24

AWS Cloud9 User GuideStep 2: Tour the IDE
You can hide the menu bar by choosing the arrow at its edge, as follows.
You can show the menu bar again by choosing the arrow in the middle of where the menu bar wasearlier, as follows.
You can use the IDE to work with a set of files in the next several sections in this tutorial. To set up thesefiles, choose File, New File.
Next, copy the following text into the Untitled1 editor tab.
fish.txt--------A fish is any member of a group of organisms that consist ofall gill-bearing aquatic craniate animals that lack limbs withdigits. They form a sister group to the tunicates, togetherforming the olfactores. Included in this definition arelampreys and cartilaginous and bony fish as well as variousextinct related groups.
To save the file, choose File, Save. Name the file fish.txt, and then choose Save.
Repeat these instructions, saving the second file as cat.txt, with the following contents.
25

AWS Cloud9 User GuideStep 2: Tour the IDE
cat.txt-------The domestic cat is a small, typically furry, carnivorous mammal.They are often called house cats when kept as indoor pets orsimply cats when there is no need to distinguish them fromother felids and felines. Cats are often valued by humans forcompanionship and for their ability to hunt.
There are often several ways to do things in the IDE. For example, to hide the menu bar, instead ofchoosing the arrow at its edge, you can choose View, Menu Bar. To create a new file, instead of choosingFile, New File you can press Alt-N (for Windows/Linux) or Control-N (for Apple OSX). To reduce thistutorial's length, we only describe one way to do things. As you get more comfortable with the IDE, feelfree to experiment and figure out the way that works best for you.
Step 2.2: DashboardThe dashboard gives you quick access to each of your environments. From the dashboard, you can create,open, and change the setting for an environment.
To open the dashboard, on the menu bar, choose AWS Cloud9, Go To Your Dashboard, as follows.
To view the settings for your environment, choose the title inside of the my-demo-environment card.
To return to the IDE for your environment, do one of the following.
• Choose your web browser's back button, and then choose Open IDE inside of the my-demo-environment card.
• In the navigation breadcrumb, choose Environments, and then choose Open IDE inside of the my-demo-environment card.
NoteIt can take a few moments for the IDE to display again. Please be patient.
Step 2.3: Environment WindowThe Environment window shows a list of your folders and files in the environment. You can also showdifferent types of files, such as hidden files.
To hide the Environment window and the Environment button, choose Window, Environment on themenu bar.
26

AWS Cloud9 User GuideStep 2: Tour the IDE
To show the Environment button again, choose Window, Environment again.
To show the Environment window, choose the Environment button.
To show hidden files, in the Environment window, choose the gear icon, and then choose Show HiddenFiles, as follows.
To hide hidden files, choose the gear icon again, and then choose Show Hidden Files again.
Step 2.4: Editor, Tabs, and Panes
The editor is where you can do things such as write code, run a terminal session, and change IDE settings.Each instance of an open file, terminal session, and so on is represented by a tab. Tabs can be groupedinto panes. Tabs are shown at the edge of their pane, as follows.
To hide tabs, choose View, Tab Buttons on the menu bar.
To show tabs again, choose View, Tab Buttons again.
To open a new tab, choose the + icon at the edge of the row of tabs. Then choose one of the availablecommands, for example, New File, as follows.
To display two panes, choose the icon that looks like a drop-down menu, which is at the edge of the rowof tabs. Then choose Split Pane in Two Rows, as follows.
27

AWS Cloud9 User GuideStep 2: Tour the IDE
To return to a single pane, choose the drop-down menu icon again, and then choose the single squareicon, as follows.
Step 2.5: Console
The console is an alternate place for creating and managing tabs, as follows.
28

AWS Cloud9 User GuideStep 2: Tour the IDE
You can also change the console's display so that it takes over the entire IDE.
To hide the console, choose View, Console on the menu bar.
To show the console again, choose View, Console again.
To expand the console, choose the resize icon, which is at the edge of the console, as follows.
To shrink the console, choose the resize icon again.
Step 2.6: Open Files Section
The Open Files section shows a list of all files that are currently open in the editor. Open Files is part ofthe Environment window, as follows.
29

AWS Cloud9 User GuideStep 2: Tour the IDE
To open the Open Files section, choose View, Open Files on the menu bar.
To switch between open files, choose fish.txt and then cat.txt in the Open Files section.
To hide the Open Files section, choose View, Open Files again.
Step 2.7: GutterThe gutter, at the edge of each file in the editor, shows things like line numbers and contextual symbolsas you work with files, as follows.
To hide the gutter, choose View, Gutter on the menu bar.
To show the gutter again, choose View, Gutter again.
Step 2.8: Status BarThe status bar, at the edge of each file in the editor, shows things like line and character numbers, filetype preference, space and tab settings, and related editor settings, as follows.
30

AWS Cloud9 User GuideStep 2: Tour the IDE
To hide the status bar, choose View, Status Bar on the menu bar.
To show the status bar, choose View, Status Bar again.
To go to a specific line number, choose a tab such as cat.txt if it's not already selected. Then in the statusbar, choose the line and character number (it should be something like 7:45). Type a line number (like 4),and then press Enter, as follows.
To change the file type preference, in the status bar, choose a different file type. For example, for cat.txt,choose Ruby to see the syntax colors change. To go back to plain text colors, choose Plain Text, asfollows.
31

AWS Cloud9 User GuideStep 2: Tour the IDE
Step 2.9: Navigate Window
The Navigate window enables you to go to a different file. To use this window, begin typing the file'sname. When you see the file you want, choose it.
To hide the Navigate button, choose Window, Navigate on the menu bar.
To show the Navigate button again, choose Window, Navigate again.
To show the Navigate window, choose the Navigate button.
To go to a file, in the Navigate window, start typing the file name. For example, type fish. Whenfish.txt is highlighted, press Enter. You can repeat this to go to a different file. For example, try going tothe cat.txt file.
Step 2.10: Commands Window
The Commands window enables you to find and run IDE commands. To use this window, begin typingsomething about the command. When you see the command you want, choose it.
To hide the Commands window and Commands button, choose Window, Commands on the menu bar.
To show the Commands button again, choose Window, Commands again.
To show the Commands window, choose the Commands button.
For example, you can use a command to show two vertical panes in the editor. To do this, in theCommands window, type split. In the list of commands, choose twovsplit, as follows.
32

AWS Cloud9 User GuideStep 2: Tour the IDE
33
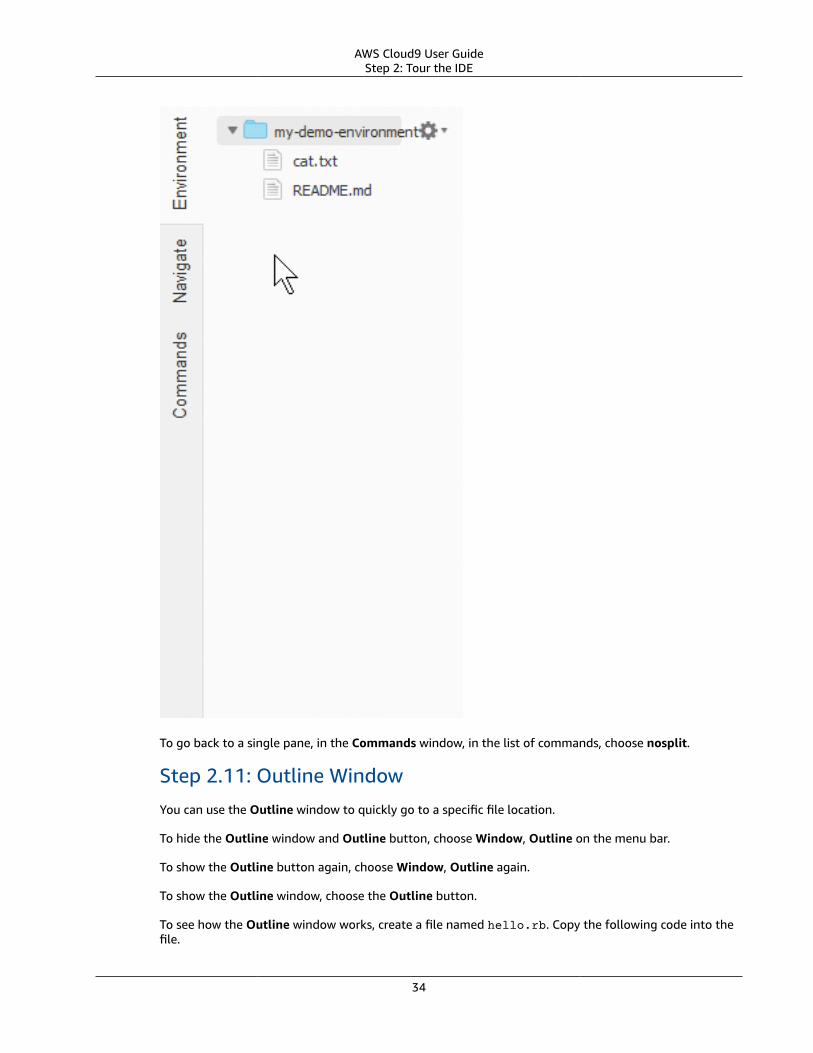
AWS Cloud9 User GuideStep 2: Tour the IDE
To go back to a single pane, in the Commands window, in the list of commands, choose nosplit.
Step 2.11: Outline Window
You can use the Outline window to quickly go to a specific file location.
To hide the Outline window and Outline button, choose Window, Outline on the menu bar.
To show the Outline button again, choose Window, Outline again.
To show the Outline window, choose the Outline button.
To see how the Outline window works, create a file named hello.rb. Copy the following code into thefile.
34

AWS Cloud9 User GuideStep 2: Tour the IDE
def say_hello(i) puts "Hello!" puts "i is #{i}"end
def say_goodbye(i) puts "i is now #{i}" puts "Goodbye!"end
i = 1say_hello(i)i += 1say_goodbye(i)
Then, in the Outline window, choose say_hello(i), and then choose say_goodbye(i), as follows.
Step 2.12: Immediate TabThe Immediate tab enables you to test small snippets of JavaScript code. To see how the Immediate tabworks, do the following.
1. Open an Immediate tab by choosing Window, New Immediate Window on the menu bar.
35

AWS Cloud9 User GuideStep 2: Tour the IDE
2. Run some code in the Immediate tab. To try this, type the following code into the window, pressingShift-Enter after typing line 1 and again after line 2. Press Enter after line 3. (If you press Enterinstead of Shift-Enter after you type line 1 or line 2, the code will run earlier than you want it to.)
for (i = 0; i <= 10; i++) { // Press Shift-Enter after typing this line. console.log(i) // Press Shift-Enter after typing this line.} // Press Enter after typing this line. The numbers 0 to 10 will be printed.
Step 2.13: Process List
The Process List shows all of the running processes. You can stop or even forcibly stop processes thatyou don't want to run anymore. To see how the Process List window works, do the following.
1. Show the Process List by choosing Tools, Process List on the menu bar.
2. Find a process. In the Process List, type the name of the process.
3. Stop or forcibly stop a process. In the list of processes, choose the process, and then choose Kill orForce Kill, as follows.
36
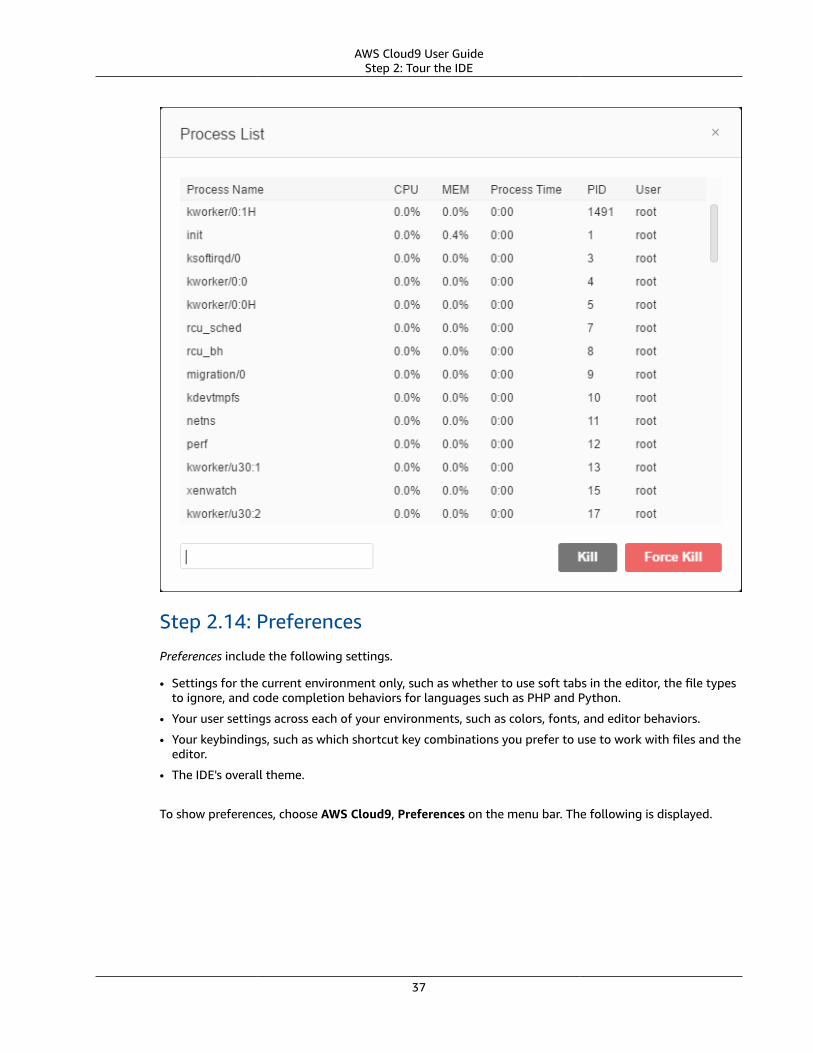
AWS Cloud9 User GuideStep 2: Tour the IDE
Step 2.14: Preferences
Preferences include the following settings.
• Settings for the current environment only, such as whether to use soft tabs in the editor, the file typesto ignore, and code completion behaviors for languages such as PHP and Python.
• Your user settings across each of your environments, such as colors, fonts, and editor behaviors.
• Your keybindings, such as which shortcut key combinations you prefer to use to work with files and theeditor.
• The IDE's overall theme.
To show preferences, choose AWS Cloud9, Preferences on the menu bar. The following is displayed.
37

AWS Cloud9 User GuideStep 2: Tour the IDE
Step 2.15: Terminal
You can run one or more terminal sessions in the IDE. To start a terminal session, choose Window, NewTerminal on the menu bar.
You can try running a command in the terminal. For example, in the terminal, type echo $PATH (to printthe value of the PATH environment variable), and then press Enter.
You can also try running additional commands. For example, try commands such as the following.
• pwd to print the path to the current directory.
• aws --version to print version information about the AWS CLI.
• ls -l to print information about the current directory.
38

AWS Cloud9 User GuideStep 2: Tour the IDE
Step 2.16: Debugger WindowYou can use the Debugger window to debug your code. For example, you can step through running codea portion at a time, watch the values of variables over time, and explore the call stack.
To hide the Debugger window and Debugger button, choose Window, Debugger on the menu bar.
To show the Debugger button again, choose Window, Debugger again.
To show the Debugger window, choose the Debugger button.
You can experiment with using the Debugger window and some JavaScript code. To try this, do thefollowing.
1. Prepare to use the Debugger window to debug JavaScript code by installing Node.js into yourenvironment, if it isn't already installed. To confirm whether your environment has Node.js installed,run the node --version command. If Node.js is installed, the Node.js version number is output,and you can skip ahead to step 3 in this procedure to write some JavaScript code.
2. To install Node.js, do the following.a. Run the following two commands, one at a time, to be sure your environment has the latest
updates, and then download Node Version Manager (nvm). (nvm is a simple Bash shell script thatis useful for installing and managing Node.js versions. For more information, see Node VersionManager on GitHub.)
39

AWS Cloud9 User GuideStep 2: Tour the IDE
sudo yum -y updatecurl -o- https://raw.githubusercontent.com/creationix/nvm/v0.33.0/install.sh | bash
b. Use a text editor to update your ~/.bashrc file to enable nvm to load. For example, in theEnvironment window of the IDE, choose the gear icon, and then choose Show Home in Favorites.Repeat this step and choose Show Hidden Files as well.
c. Open the ~/.bashrc file.
d. Type or paste the following code at the end of the file to enable nvm to load.
export NVM_DIR="/home/ec2-user/.nvm"[ -s "$NVM_DIR/nvm.sh" ] && \. "$NVM_DIR/nvm.sh" # This loads nvm.
e. Save the file.
f. Start a new terminal session, and then run this command to install the latest version of Node.js.
nvm install node
3. Write some JavaScript code to debug. For example, create a file, add the following code to the file,and save it as hello.js.
var i;
i = 10;
console.log("Hello!");console.log("i is " + i);
i += 1;
console.log("i is now " + i);console.log("Goodbye!");
4. Add some breakpoints to the code. For example, in the gutter, choose the margin next to lines 6 and10. A red circle is displayed next to each of these line numbers, as follows.
5. Now you're ready to debug the JavaScript code. To try this, do the following.
a. Show the Debugger window, if it's not already displayed.
b. Watch the value of the variable named i while the code is running. In the Debugger window, forWatch Expressions, choose Type an expression here. Type the letter i, and then press Enter, asfollows.
40

AWS Cloud9 User GuideStep 2: Tour the IDE
c. Begin running the code. Choose Run, Run With, Node.js, as follows.
d. The code pauses running on line 6. The Debugger window shows the value of i in WatchExpressions, which is currently 10, as follows.
41
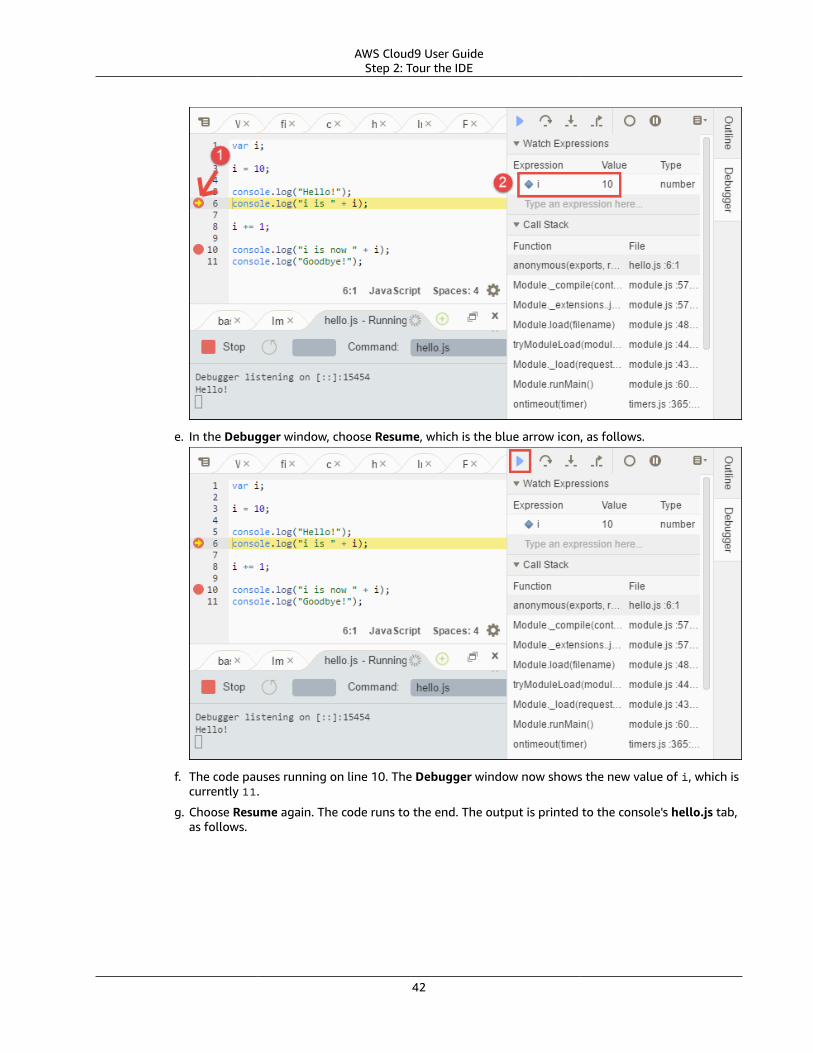
AWS Cloud9 User GuideStep 2: Tour the IDE
e. In the Debugger window, choose Resume, which is the blue arrow icon, as follows.
f. The code pauses running on line 10. The Debugger window now shows the new value of i, which iscurrently 11.
g. Choose Resume again. The code runs to the end. The output is printed to the console's hello.js tab,as follows.
42

AWS Cloud9 User GuideStep 2: Tour the IDE
Compare your results to the following.
43

AWS Cloud9 User GuideStep 3: Clean Up
Step 3: Clean UpTo prevent ongoing charges to your AWS account related to this tutorial, you should delete theenvironment.
WarningDeleting an environment cannot be undone.
You can delete the environment with the AWS Cloud9 console (p. 44) or the AWS CLI (p. 45).
Delete the Environment with the AWS Cloud9 Console1. Open the dashboard. To do this, on the menu bar in the IDE, choose AWS Cloud9, Go To Your
Dashboard.2. Do one of the following.
• Choose the title inside of the my-demo-environment card, and then choose Delete.
• Select the my-demo-environment card, and then choose Delete.
3. In the Delete dialog box, type Delete, and then choose Delete.
NoteIf the environment was an EC2 environment, AWS Cloud9 also terminates the Amazon EC2instance that was connected to that environment.
44

AWS Cloud9 User GuideNext Steps
However, if the environment was an SSH environment, and that environment was connected toan Amazon EC2 instance, AWS Cloud9 doesn't terminate that instance. If you don't terminatethat instance later, your AWS account might continue to have ongoing charges for Amazon EC2related to that instance.
Skip ahead to Next Steps (p. 45).
Delete the Environment with the AWS CLIRun the AWS Cloud9 delete-environment command, specifying the ID of the environment to delete.
aws cloud9 delete-environment --environment-id ENVIRONMENT_ID
In the preceding command, replace ENVIRONMENT_ID with the ID of the environment to delete. The IDshould look similar to this: 349c86d4579e4e7298d500ff57a6b2EX.
Next StepsExplore any or all of the following topics to continue getting familiar with AWS Cloud9.
Learn more about the AWS Cloud9 IDE Working with the IDE (p. 108)
Invite others to use your environment along withyou, in real time and with text chat support
Working with Shared Environments (p. 90)
Create SSH environments (environments that useyour own Amazon EC2 instance or server, insteadof an Amazon EC2 instance that is managed byAWS Cloud9)
Creating an Environment (p. 72) and SSHEnvironment Host Requirements (p. 381)
Use AWS Cloud9 with Lambda AWS Lambda Tutorial (p. 45), Advanced AWSLambda Tutorial (p. 60), and Working with AWSLambda Functions (p. 286)
Use AWS Cloud9 with Amazon Lightsail Working with Amazon LightsailInstances (p. 277)
Use AWS Cloud9 with AWS CodeStar Working with AWS CodeStar Projects (p. 284)
Use AWS Cloud9 with AWS CodePipeline Working with AWS CodePipeline (p. 315)
Use AWS Cloud9 with the AWS CLI, the aws-shell, AWS CodeCommit, GitHub, or AmazonDynamoDB, as well as Node.js, Python, or otherprogramming languages
Samples (p. 318)
To get help with AWS Cloud9 from the community, see the AWS Cloud9 Discussion Forum. (When youenter this forum, AWS might require you to sign in.)
To get help with AWS Cloud9 directly from AWS, see the support options on the AWS Support page.
AWS Lambda Tutorial for AWS Cloud9In this tutorial, you use the AWS Cloud9 IDE to create a function in AWS Lambda and an accompanyingAPI in Amazon API Gateway. After you create the function and its API, you run and debug them locally.Then you run the function and API in Lambda and API Gateway in production.
45
AWS Cloud9 User GuidePrerequisites
NoteCompleting this tutorial might result in charges to your AWS account. These include possiblecharges for Amazon EC2, Lambda, and API Gateway. For more information, see Amazon EC2Pricing, AWS Lambda Pricing, and Amazon API Gateway Pricing.
• Prerequisites (p. 46)• Step 1: Create and Open the AWS Cloud9 Development Environment (p. 46)• Step 2: Create the Lambda Function and API (p. 48)• Step 3: Add Code to the Function (p. 50)• Step 4: Run the Function Locally (p. 52)• Step 5: Debug the Function Locally (p. 54)• Step 6: Run the API Locally (p. 55)• Step 7: Debug the API Locally (p. 56)• Step 8: Run the Function in Production (p. 57)• Step 9: Run the API in Production (p. 57)• Step 10: Change the Function Locally (p. 58)• Step 11: Deploy the Changed Function into Production (p. 58)• Step 12: Clean Up (p. 59)• Next Steps (p. 60)
PrerequisitesTo successfully complete this tutorial, you need the following.
• An AWS account. If you don't already have an account, you can create one by following the instructionsin Step 1: Create an AWS Account (p. 6) in Express Setup.
• Although you can use the root user in your AWS account to immediately begin working with AWSCloud9, this isn't an AWS security best practice. Instead, we recommend you use one of the followingidentities in AWS Identity and Access Management (IAM) in your account to begin working with AWSCloud9.• (Recommended) An IAM user that has the appropriate AWS Cloud9 access permissions. To create an
IAM user and set its permissions, follow these instructions in this order.1. Step 2: Create an IAM Group and User, and Add the User to the Group (p. 8) in Team Setup2. Step 3: Add AWS Cloud9 Access Permissions to the Group (p. 11) in Team Setup3. Step 1: Set Up Your IAM Group with Required Access Permissions (p. 287) in Working with AWS
Lambda Functions• An IAM administrator user. This is a user that has unrestricted access across your AWS account,
avoiding some of the security-related concerns when using an AWS account root user. To create anIAM administrator user in your account, follow the instructions in Creating Your First IAM Admin Userand Group in the IAM User Guide.
Step 1: Create and Open the AWS Cloud9Development EnvironmentIn this step, you use the AWS Cloud9 console to create and then open an AWS Cloud9 EC2 developmentenvironment.
In AWS Cloud9, a development environment (or just environment) is a place where you store yourdevelopment project's files and where you run the tools to develop your apps. When you create a special
46

AWS Cloud9 User GuideStep 1: Create and Open the AWSCloud9 Development Environment
kind of environment called an EC2 environment, AWS Cloud9 launches a new Amazon EC2 instancerunning Amazon Linux, creates the environment, and then connects the environment to the newlylaunched instance. When you open the environment, AWS Cloud9 displays the AWS Cloud9 IDE thatenables you to work with the files and tools in that environment.
1. Sign in to AWS Cloud9 console, at https://console.aws.amazon.com/cloud9/.
2. In the top navigation bar, choose the AWS Region to create the environment in.
3. If a welcome page is displayed, for New AWS Cloud9 environment, choose Create environment.Otherwise, choose Create environment.
Or:
4. On the Name environment page, for Name, type a name for your environment (for example, my-lambda-environment).
5. For Description, type something about your environment (for example, This environment is forthe AWS Cloud9 tutorial for Lambda.).
47

AWS Cloud9 User GuideStep 2: Create the Lambda Function and API
6. Choose Next step.7. On the Configure settings page, for Environment type, leave the default choice of Create a new
instance for environment (EC2).8. For Instance type, leave the default choice of t2.micro. This choice has relatively low RAM and vCPUs,
which is sufficient for this tutorial.
NoteChoosing an instance type with greater compute resources might result in more charges toyour AWS account.
9. For Cost-saving setting, leave the default choice of After 30 minutes. This is the amount of timeuntil AWS Cloud9 shuts down the Amazon EC2 instance for the environment, after all web browserinstances that are connected to the IDE for the environment have been closed.
NoteChoosing a longer time period might result in more charges to your AWS account.
10.Choose Next step.11.On the Review page, choose Create environment. Wait while AWS Cloud9 creates your environment.
This can take a few minutes.
After AWS Cloud9 creates your environment, it displays the AWS Cloud9 IDE for the environment.
If AWS Cloud9 doesn't display the IDE after at least five minutes, there might be a problem with yourweb browser, your AWS access permissions, the instance, or the associated virtual private cloud (VPC).For possible fixes, see Cannot Open an Environment (p. 408) in Troubleshooting.
Step 2: Create the Lambda Function and APIIn this step, you use the AWS Cloud9 IDE to create the Lambda function and its accompanying API at thesame time. AWS Cloud9 stores the new function on the Amazon EC2 instance and deploys a copy of thefunction to Lambda. AWS Cloud9 also stores the new accompanying API on the instance and deploys acopy of the API to API Gateway.
The Lambda function returns information about the day or time you specify, for example, the day,month, and year, or the current hour, minute, and second.
Currently, you can use the IDE to automatically create functions that use only Node.js or Python. Thisfunction uses Node.js.
1. Set the AWS Region that you want to create the function in. To do this, with the IDE displayed for theenvironment, on the menu bar, choose AWS Cloud9, Preferences.
2. In the navigation pane of the Preferences tab, choose AWS Settings.3. For AWS Region, select the AWS Region you want to create the function in.
48
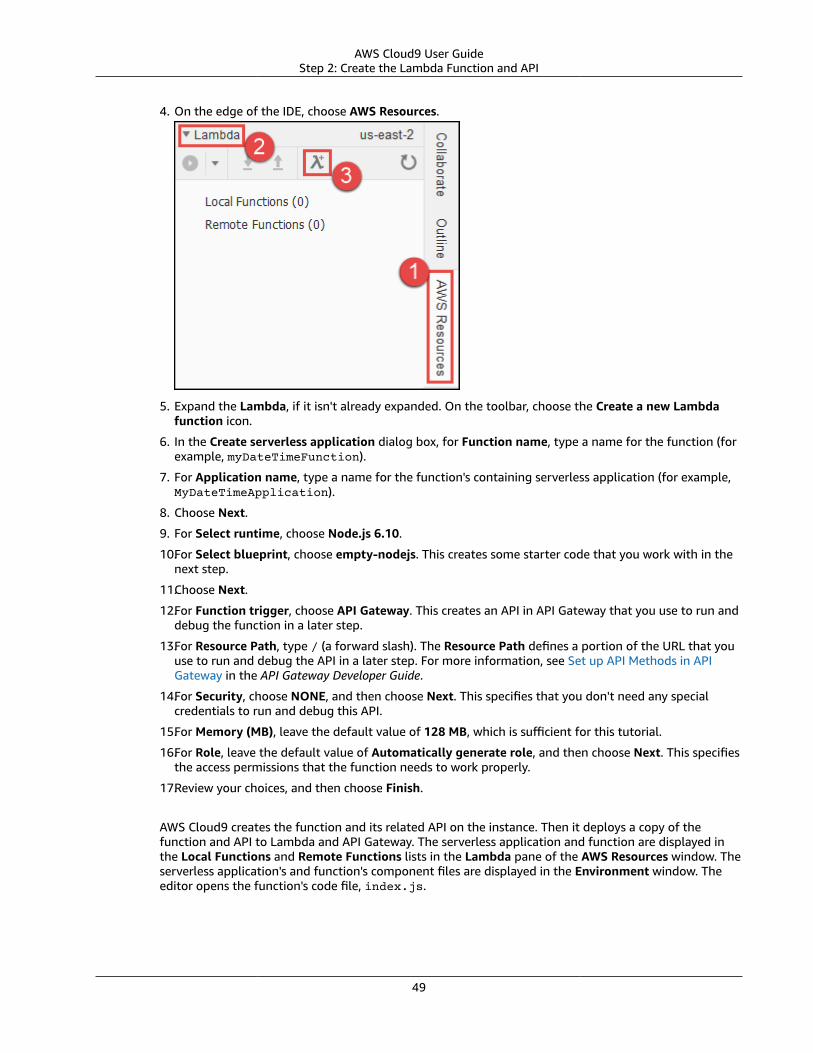
AWS Cloud9 User GuideStep 2: Create the Lambda Function and API
4. On the edge of the IDE, choose AWS Resources.
5. Expand the Lambda, if it isn't already expanded. On the toolbar, choose the Create a new Lambdafunction icon.
6. In the Create serverless application dialog box, for Function name, type a name for the function (forexample, myDateTimeFunction).
7. For Application name, type a name for the function's containing serverless application (for example,MyDateTimeApplication).
8. Choose Next.
9. For Select runtime, choose Node.js 6.10.
10.For Select blueprint, choose empty-nodejs. This creates some starter code that you work with in thenext step.
11.Choose Next.
12.For Function trigger, choose API Gateway. This creates an API in API Gateway that you use to run anddebug the function in a later step.
13.For Resource Path, type / (a forward slash). The Resource Path defines a portion of the URL that youuse to run and debug the API in a later step. For more information, see Set up API Methods in APIGateway in the API Gateway Developer Guide.
14.For Security, choose NONE, and then choose Next. This specifies that you don't need any specialcredentials to run and debug this API.
15.For Memory (MB), leave the default value of 128 MB, which is sufficient for this tutorial.
16.For Role, leave the default value of Automatically generate role, and then choose Next. This specifiesthe access permissions that the function needs to work properly.
17.Review your choices, and then choose Finish.
AWS Cloud9 creates the function and its related API on the instance. Then it deploys a copy of thefunction and API to Lambda and API Gateway. The serverless application and function are displayed inthe Local Functions and Remote Functions lists in the Lambda pane of the AWS Resources window. Theserverless application's and function's component files are displayed in the Environment window. Theeditor opens the function's code file, index.js.
49

AWS Cloud9 User GuideStep 3: Add Code to the Function
NoteIn addition to the function's code file, AWS Cloud9 creates the following helper files.
• .application.json: A hidden file that contains JSON-formatted settings that are specificto the serverless application. AWS Cloud9 uses these settings for its internal use. Do not editthis file.
• .gitignore: A hidden file that contains a list of files Git ignores, if you want to use Git tomanage your source code for this function.
• template.yaml: An AWS Serverless Application Model (AWS SAM) template file thatcontains information about the Lambda function, the related API in API Gateway, and anyother related, supported AWS resources. Whenever you update the local version of yourfunction and then upload it to Lambda, AWS Cloud9 calls AWS SAM to use this template fileto do the upload. For more information, see Using the AWS Serverless Application Model(AWS SAM) in the AWS Lambda Developer Guide.
The .application.json and .gitignore files are hidden. To show hidden files or hide themif they're shown, in the Environment window, choose the gear icon. Then choose Show HiddenFiles.
Step 3: Add Code to the FunctionIn this step, you replace the starter code for the generated function with specific code that returnsinformation about the day or time you specify.
With the index.js file already open in the editor, completely replace the file's contents with thefollowing code, and then save the file.
'use strict';
exports.handler = function(event, context, callback) {
if (event.body) {
50

AWS Cloud9 User GuideStep 3: Add Code to the Function
event = JSON.parse(event.body); }
var sc; // Status code var result = ""; // Response payload
switch(event.option) { case "date": switch(event.period) { case "yesterday": result = setDateResult("yesterday"); sc = 200; break; case "today": result = setDateResult(); sc = 200; break; case "tomorrow": result = setDateResult("tomorrow"); sc = 200; break; default: result = { "error": "Must specify 'yesterday', 'today', or 'tomorrow'." }; sc = 400; break; } break; case "time": var d = new Date(); var h = d.getHours(); var mi = d.getMinutes(); var s = d.getSeconds();
result = { "hour": h, "minute": mi, "second": s }; sc = 200; break; default: result = { "error": "Must specify 'date' or 'time'." }; sc = 400; break; }
const response = { statusCode: sc, headers: { "Content-type": "application/json" }, body: JSON.stringify( result ) };
callback(null, response);
function setDateResult(option) {
var d = new Date(); // Today var mo; // Month var da; // Day var y; // Year
switch(option) {
51

AWS Cloud9 User GuideStep 4: Run the Function Locally
case "yesterday": d.setDate(d.getDate() - 1); break; case "tomorrow": d.setDate(d.getDate() + 1); default: break; }
mo = d.getMonth() + 1; // Months are zero offset (0-11) da = d.getDate(); y = d.getFullYear();
result = { "month": mo, "day": da, "year": y };
return result; }};
This function takes an incoming payload with an option value of date or time. If date is specified, youmust also specify a period value of yesterday, today, or tomorrow. The function then returns thecorresponding month, day, and year. If, however, an option value of time is specified, the functionreturns the current hour, minute, and second.
Step 4: Run the Function LocallyIn this step, you use the IDE to run the function on the instance. Currently, you can use the IDE to runfunctions that use only Node.js or Python.
1. In the Lambda pane of the AWS Resources window, expand the MyDateTimeApplication Lambdafolder, and then right-click the myDateTimeFunction Lambda icon.
2. Choose Run, Run Local.
52

AWS Cloud9 User GuideStep 4: Run the Function Locally
3. In the Payload pane of the run tab, replace {} with the following, which sends this data as input tothe function for processing.
{ "option": "date", "period": "today"}
4. Choose Run.
5. The Response pane displays the following.
{ "statusCode": 200, "headers": { "Content-type": "application/json" }, "body": "{\"month\":4,\"day\":12,\"year\":2018}"}
NoteIf the Response pane displays null, be sure to save the index.js, and then choose Runagain.
Compare your results to the following.
6. Run the function several times with the following payloads to see what the Response pane displays.
{ "option": "date", "period": "yesterday"}
{ "option": "date", "period": "tomorrow"}
{
53

AWS Cloud9 User GuideStep 5: Debug the Function Locally
"option": "time"}
Displays an error. Must also specify a 'period' of 'yesterday', 'today', or 'tomorrow'.{ "option": "date"}
Displays an error. Must specify an 'option' of 'date' or 'time'.{ "option": "dates"}
Step 5: Debug the Function LocallyIn this step, you use the IDE to debug the function on the instance. Currently, you can use the IDE todebug functions that use only Node.js or Python. Also, you can use the IDE to debug functions locallyonly. You cannot use the IDE to debug functions in Lambda itself.
1. In the index.js file, create a breakpoint for the debugger. To do this, in the editor, next to the lineof code callback(null, response), click the gutter just to the left of line 62. A red circle isdisplayed, representing the breakpoint.
2. On the right edge of the IDE, choose Debugger.
3. Add four expressions for the debugger to watch. To do this, in the Watch Expressions area, for Typean expression here, type event.option, and then press Enter. Do this three more times, typingevent.period, sc, and response.body.
4. On the run tab that AWS Cloud9 opened in Step 4: Run the Function Locally (p. 52), choose theicon that looks like a bug. (It switches from grey to green.)
5. In the Payload pane on the run tab, be sure the following payload is still visible.
54

AWS Cloud9 User GuideStep 6: Run the API Locally
{ "option": "date", "period": "today"}
6. Choose Run.
Code execution pauses at the breakpoint. The current values of event.option, event.period, sc,and response.body are displayed in the Watch Expressions area of the Debugger window.
You can also see these values in the code by hovering your mouse over option in line 12 in the code,period in line 14, sc in line 21, and response in line 56. For response in line 56, expand Object {},and then see the body value.
Compare your results to the following.
7. In the Debugger window, choose the blue Resume arrow to finish running the code. (It looks like atriangular play button.)
Step 6: Run the API LocallyIn this step, you use the IDE to have API Gateway run the Lambda function on the instance.
1. In the Lambda pane of the AWS Resources window, right-click the myDateTimeFunction Lambdaicon, and then choose Run, Run APIGateway Local.
NoteYou can also do this by choosing the Lambda (local) list on the run tab from the previousstep, and then choosing API Gateway (local).
2. On the run tab, for Path, type / (a forward slash).3. For Method, choose POST.4. For Body, replace {} with the following, which sends this data as input to the API for processing.
{ "option": "date", "period": "today"}
5. If the bug icon is green, choose it to turn it off. (It switches back to grey.)
6. Choose Run.7. The Response pane displays the following response.
{ "month": 4, "day": 12,
55

AWS Cloud9 User GuideStep 7: Debug the API Locally
"year": 2018}
8. Run the function several times with the following payloads to see what the Response pane displays.
{ "option": "date", "period": "yesterday"}
{ "option": "date", "period": "tomorrow"}
{ "option":"time"}
Displays an error. Must also specify a 'period' of 'yesterday', 'today', or 'tomorrow'.{ "option":"date"}
Displays an error. Must specify an 'option' of 'date' or 'time'.{ "option":"dates"}
Compare your results to the following.
Step 7: Debug the API LocallyIn this step, you use the IDE to have API Gateway debug the Lambda function on the instance.
1. Ensure that the index.js file still has a breakpoint set on the line of code callback(null,response).
2. Ensure that the Watch Expressions area of the Debugger window is still watching event.option,event.period, sc, and response.body.
56

AWS Cloud9 User GuideStep 8: Run the Function in Production
3. On the run tab from the previous step, choose the icon that looks like a bug. (It switches from grey togreen.)
4. In the Body pane on the run tab, ensure the following is still visible.
{ "option": "date", "period": "today"}
5. Choose Run.
Code execution pauses at the breakpoint, and the current values of event.option, event.period,sc, and response.body are displayed in the Watch Expressions area of the Debugger window.
You can also see these values in the code by hovering your mouse over option, period, sc, andresponse in the code. For response, expand Object {}, and then see the body value.
6. In the Debugger window, choose the blue Resume arrow to finish running the code.
Step 8: Run the Function in ProductionIn this step, you use the IDE to run the function in Lambda itself.
AWS Cloud9 deployed the function to Lambda during Step 2: Create the Lambda Function andAPI (p. 48). However, AWS Cloud9 deployed the function before you made the changes in Step 3: AddCode to the Function (p. 50). That original function was very basic, taking no payload and returningno response. So, you must first deploy your changes to Lambda, and then you can run the deployedfunction there.
1. In the Lambda pane of the AWS Resources window, expand Local Functions, expand theMyDateTimeApplication Lambda folder, right-click the myDateTimeFunction Lambda icon, and thenchoose Deploy.
2. After the deployment finishes, right-click the myDateTimeFunction Lambda icon, and then chooseRun, Run Remote.
NoteYou can also do this by choosing the API Gateway (local) list on the run tab from theprevious step, and then choosing Lambda (remote).
3. In the Payload pane on the run tab, be sure one of the payloads from Step 4: Run the FunctionLocally (p. 52) is visible. If it isn't there, add it.
4. Choose Run, and see the results in the Response area. These should be the same results as in Step 4:Run the Function Locally (p. 52).
Step 9: Run the API in ProductionIn this step, you use the IDE to run the API in API Gateway itself.
NoteAWS Cloud9 deployed the API to API Gateway during Step 2: Create the Lambda Functionand API (p. 48). Because you haven't made any changes to the API since AWS Cloud9 firstdeployed it, you don't need to deploy the API again before you can run it in API Gateway itself.
1. In the Lambda pane of the AWS Resources window, right-click the myDateTimeFunction Lambdaicon, and then choose Run, Run APIGateway Remote.
57

AWS Cloud9 User GuideStep 10: Change the Function Locally
NoteYou can also do this by choosing the Lambda (remote) list on the run tab from the previousstep, and then choosing API Gateway (remote).
2. Ensure Path is still set to /, Method is still set to POST, and Body is still set to one of the bodies inStep 6: Run the API Locally (p. 55). If any of these aren't set correctly, set them.
3. Choose Run, and see the results in the Response area, which should be the same results as in Step 6:Run the API Locally (p. 55).
Step 10: Change the Function LocallyIn this step, you use the IDE to make a small change to the Lambda function. You then test the changedfunction locally and the original function in production to see the differences.
1. In the index.js file, on line 41, add a time value to the result variable, as follows.
result = { "time": d.toTimeString(), "hour": h, "minute": mi, "second": s};
2. On line 86, add a date value to the result variable, as follows.
result = { "date": d.toDateString(), "month": mo, "day": da, "year": y};
3. Save your changes to the index.js file.
4. Run the changed function locally by following the instructions in Step 4: Run the FunctionLocally (p. 52). Notice that the time or date value is now displayed in the response.
5. Run the original function in production by following the instructions in Step 8: Run the Function inProduction (p. 57). Notice that the time or date value doesn't display in the response yet. This isbecause you have not deployed the changed function into production. You do this in the next step.
Step 11: Deploy the Changed Function intoProductionIn this step, you deploy the changed function again to Lambda itself. You then test the changed functionin production to confirm the deployment.
1. In the Lambda pane of the AWS Resources window, right-click the myDateTimeFunction Lambdaicon, and then choose Deploy.
2. After the deployment succeeds, run the changed function in production by following the instructionsin Step 8: Run the Function in Production (p. 57). Notice that the time or date value now appearsin the response.
Remember, whenever you make a change to the local function and you want to deploy those changes toLambda (and API Gateway, if an accompanying API exists), be sure to follow this step.
58

AWS Cloud9 User GuideStep 12: Clean Up
Step 12: Clean UpTo prevent ongoing charges to your AWS account that are related to this tutorial after you're finished,you can delete the function from Lambda, the API from API Gateway, and the environment from AWSCloud9.
Step 12.1: Delete the Function and the API from Lambda andAPI Gateway
For AWS Cloud9 to create the function and its associated API, behind the scenes AWS Cloud9 usesthe AWS Serverless Application Model (AWS SAM) to create a stack in AWS CloudFormation. Thisstack then creates the function and its associated API. In this procedure, you use the IDE to have AWSCloudFormation delete the stack, which also deletes the function and the API. (You could use theLambda and API Gateway consoles instead of AWS CloudFormation to delete the function and itsassociated API. However, that approach takes longer and still leaves the stack in AWS CloudFormationwhen it's no longer needed.)
WarningDeleting a stack cannot be undone. When you delete this stack, the associated function and itsAPI are deleted from Lambda and API Gateway and cannot be recovered.
1. From the IDE, use the AWS Command Line Interface (AWS CLI) in the terminal to run the AWSCloudFormationdelete-stack command, specifying the name and the AWS Region ID for the stack.(To display the terminal, on the menu bar, choose Window, New Terminal). This stack's name followsthe format cloud9-APPLICATION_NAME, so you would specify cloud9-MyDateTimeApplicationfor this tutorial. To get the AWS Region ID (represented in the following command as REGION_ID), seethe corner of the Lambda pane in the AWS Resources window.
aws cloudformation delete-stack --stack-name cloud9-MyDateTimeApplication --region REGION_ID
If the command ran successfully, no output and no error message are displayed.
NoteIf you use an IAM user to run this command for this tutorial, instead of an AWS account rootuser or an IAM administrator, the IAM user must have the following additional AWS accesspermissions.
• cloudformation:ListStacks
• cloudformation:DeleteStackIf you cannot add these permissions to the IAM user, see your organization's AWS accountadministrator.
2. To verify that the stack is deleted, use the AWS CLI to run the AWS CloudFormationdescribe-stacks command. If the function is deleted, a message is displayed that the stack doesn't exist. (Youmight need to run this command multiple times until that message is displayed.)
aws cloudformation describe-stacks --query 'Stacks[0].StackStatus' --output text --stack-name cloud9-MyDateTimeApplication --region REGION_ID
3. If you no longer want to keep the local function in the IDE, delete the ~/environment/MyDateTimeApplication folder (for example, by running the command rm -rf ~/environment/MyDateTimeApplication).
NoteIn the IDE, ~/environment is the same as specifying the root directory in the Environmentwindow.
59

AWS Cloud9 User GuideNext Steps
Step 12.2: Delete the Environment from AWS Cloud9WarningDeleting an environment cannot be undone. Also, when you delete an EC2 environment, AWSCloud9 also terminates the Amazon EC2 instance that it previously launched and connectedto the environment. Once terminated in Amazon EC2, the instance cannot be reactivated orrecovered.
1. From the IDE, open the dashboard in the AWS Cloud9 console. To do this, on the menu bar, chooseAWS Cloud9, Go To Your Dashboard.
2. Do one of the following:• Choose the title inside of the my-demo-lambda-environment card, and then choose Delete.• Select the my-demo-lambda-environment card, and then choose Delete.
3. In the Delete dialog box, type Delete, and then choose Delete.
Next StepsExplore any or all of the following topics to continue getting familiar with AWS Cloud9.
Learn more about how to use AWS Cloud9 withLambda
Advanced AWS Lambda Tutorial (p. 60) andWorking with AWS Lambda Functions (p. 286)
Learn more about the AWS Cloud9 IDE IDE Tutorial (p. 19) and Working with theIDE (p. 108)
Invite others to use your environment with you, inreal time and with text chat support
Working with Shared Environments (p. 90)
Create SSH environments (environments that useyour own Amazon EC2 instance or server, insteadof an Amazon EC2 instance that is managed byAWS Cloud9)
Creating an Environment (p. 72) and SSHEnvironment Host Requirements (p. 381)
Use AWS Cloud9 with Amazon Lightsail Working with Amazon LightsailInstances (p. 277)
Use AWS Cloud9 with AWS CodeStar Working with AWS CodeStar Projects (p. 284)
Use AWS Cloud9 with AWS CodePipeline Working with AWS CodePipeline (p. 315)
Use AWS Cloud9 with the AWS CLI, the aws-shell, AWS CodeCommit, GitHub, or AmazonDynamoDB, as well as Node.js, Python, or otherprogramming languages
Samples (p. 318)
To get help with AWS Cloud9 from the community, see the AWS Cloud9 Discussion Forum. (When youenter this forum, AWS might require you to sign in.)
To get help with AWS Cloud9 directly from AWS, see the support options on the AWS Support page.
Advanced AWS Lambda Tutorial for AWS Cloud9In this tutorial, you use the AWS Cloud9 IDE to create a function in AWS Lambda and an accompanyingAPI in Amazon API Gateway. After you create the function and its API, you run and debug them locally.
60

AWS Cloud9 User GuidePrerequisites
Then you run the function and API in Lambda and API Gateway in production. The function and its APIcall Amazon Simple Notification Service (Amazon SNS) to send messages to an email address that youspecify.
NoteCompleting this tutorial might result in charges to your AWS account. These include possiblecharges for Amazon EC2, Lambda, API Gateway, and Amazon SNS. For more information, seeAmazon EC2 Pricing, AWS Lambda Pricing, Amazon API Gateway Pricing, and Amazon SNSPricing.
• Prerequisites (p. 61)
• Step 1: Create the Lambda Function and API (p. 61)
• Step 2: Set up Amazon SNS (p. 63)
• Step 3: Run the Function Locally (p. 64)
• Step 4: Debug the Function Locally (p. 65)
• Step 5: Run the API Locally (p. 66)
• Step 6: Debug the API Locally (p. 67)
• Step 7: Deploy and Run the Changed Function in Production (p. 67)
• Step 8: Clean Up (p. 68)
• Next Steps (p. 70)
PrerequisitesBefore you start this tutorial, we recommend that you first complete the companion AWS LambdaTutorial for AWS Cloud9 (p. 45). This tutorial builds on the prerequisites and concepts that arepresented there.
NoteIf you don't want to complete that entire tutorial first, you must at least complete the followingsteps in that tutorial or else create the equivalent AWS resources.
• Prerequisites (p. 46): This includes creating an AWS account if you don't already have one,and deciding which IAM entity in the account you'll use to complete this tutorial.
• Step 1: Create and Open the AWS Cloud9 Development Environment (p. 46): This includescreating an AWS Cloud9 EC2 development environment and opening the AWS Cloud9 IDE forthat environment.
Step 1: Create the Lambda Function and APIIn this step, you use the AWS Cloud9 IDE to create the Lambda function and its accompanying API at thesame time. AWS Cloud9 stores the new function on the Amazon EC2 instance and deploys a copy of thefunction to Lambda. AWS Cloud9 also stores the new accompanying API on the instance and deploys acopy of the API to API Gateway.
The function uses Amazon Simple Notification Service (Amazon SNS) to send messages to your emailaddress. In a later step, you create the Amazon SNS resources that this function needs.
Currently, you can use the IDE to create functions that use only Node.js or Python. This function usesNode.js.
1. With the IDE displayed for the environment, on the menu bar, choose AWS Cloud9, Preferences.
2. In the navigation pane of the Preferences tab, choose AWS Settings.
61

AWS Cloud9 User GuideStep 1: Create the Lambda Function and API
3. For AWS Region, select the AWS Region you want to create the function in.
4. On the edge of the IDE, choose AWS Resources.
5. Expand the Lambda pane, if it's not already expanded. On the toolbar, choose Create a new Lambdafunction.
6. In the Create serverless application dialog box, for Function name, type a name for the function (forexample, mySNSFunction).
7. For Application name, type a name for the function's containing serverless application (for example,MySNSApplication).
8. Choose Next.
9. For Select runtime, choose Node.js 6.10.
10.For Select blueprint, choose sns-send-message. (You might need to scroll through the list ofblueprints to see it.)
11.Choose Next.
12.For Function trigger, choose API Gateway.
13.For Resource Path, type /.
14.For Security, choose NONE, and then choose Next.
15.For Memory (MB), leave the default value of 128 MB, which is sufficient for this tutorial.
16.For Role, leave the default value of Automatically generate role, and then choose Next. (You changethis role in the next step.)
62

AWS Cloud9 User GuideStep 2: Set up Amazon SNS
17.Review your choices, and then choose Finish.
AWS Cloud9 creates the function and its related API on the instance and then deploys a copy of thefunction and API to Lambda and API Gateway. The serverless application and function are displayed inthe Local Functions and Remote Functions lists in the Lambda pane of the AWS Resources window. Theserverless application's and function's component files (for example, a AWS CloudFormation templatethat you use later to create Amazon SNS resources) are displayed in the Environment window. The editoropens the function's code file, index.js.
If you run this function or API now, it won't work. This is because the Amazon SNS resources that thisfunction needs are not set up yet. Also, the function doesn't have permission to call Amazon SNS. In thenext step, you set up these resources and provide this permission.
Step 2: Set up Amazon SNSIn this tutorial, the Lambda function uses Amazon SNS to send messages to your email address. Inthis step, you run an AWS CloudFormation stack that quickly creates a topic in Amazon SNS and thensubscribes your email address to the topic. The stack also creates an execution role in IAM to allow theLambda function permission to use Amazon SNS. (You could do all of this setup in Amazon SNS andIAM manually, but AWS CloudFormation makes this setup easier and faster.) After AWS CloudFormationcreates the stack, you attach the execution role to the function, and then give Amazon SNS permission tostart sending messages to your email address.
1. In the terminal, change to the directory that contains the AWS CloudFormation template file namedsns-create-topic-subscription.yaml.
cd ~/environment/MySNSApplication
NoteIn the IDE, ~/environment is the same as specifying the root directory in the Environmentwindow.
2. Use the AWS CLI to run the following command, which creates and runs a AWS CloudFormation stackbased on this template file.
aws cloudformation create-stack --template-body file://sns-create-topic-subscription.yaml --capabilities CAPABILITY_NAMED_IAM --parameters ParameterKey=SNSTopicName,ParameterValue=SNS_TOPIC_NAME ParameterKey=EmailAddress,ParameterValue=EMAIL_ADDRESS --stack-name STACK_NAME --region REGION_ID
In the preceding command, do the following.
• Leave CAPABILITY_NAMED_IAM unchanged.
• Replace SNS_TOPIC_NAME with whatever you want to name the Amazon SNS topic to sendmessages to (for example, MySNSTopic).
• Replace EMAIL_ADDRESS with your email address for Amazon SNS to send messages to.
• Replace STACK_NAME with whatever you want to name the stack (for example, MySNSStack).
• Replace REGION_ID with the ID of the AWS Region where you created the function (see the cornerof the Lambda pane in the AWS Resources window).
NoteIf you use an IAM user to call AWS CloudFormation for this tutorial, instead of an AWSaccount root user or an IAM administrator user, the IAM user must have the followingadditional AWS access permissions.
• cloudformation:CreateUploadBucket
63
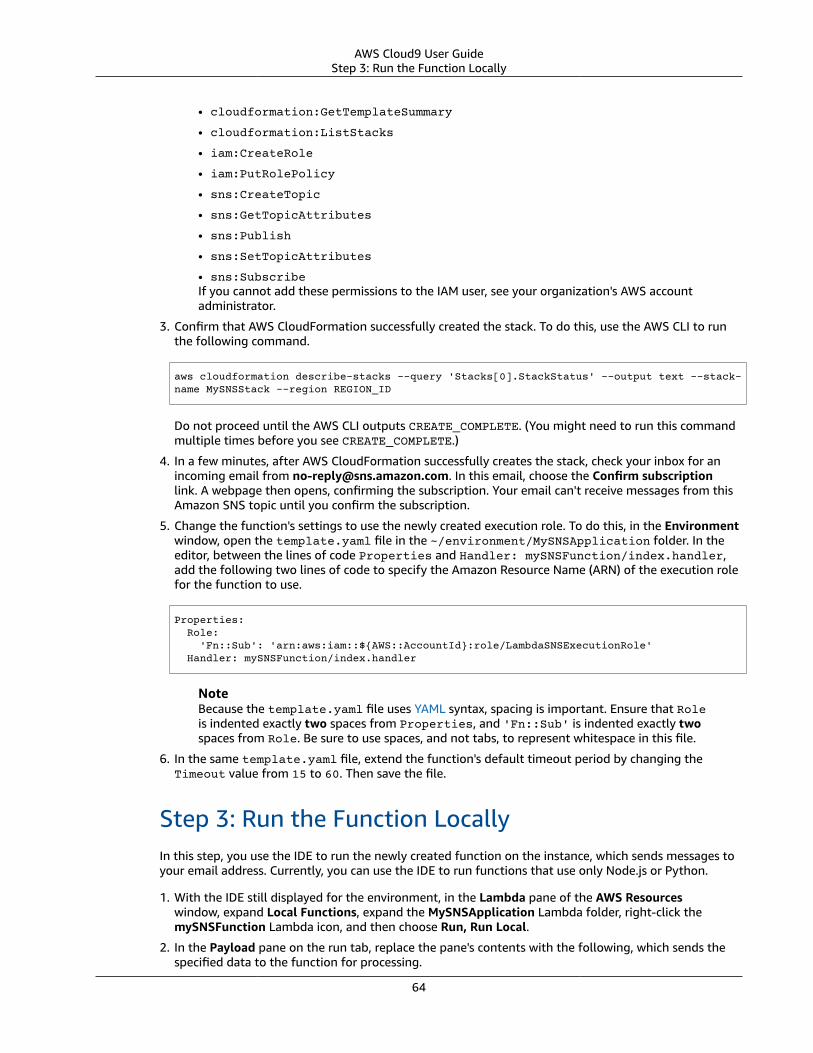
AWS Cloud9 User GuideStep 3: Run the Function Locally
• cloudformation:GetTemplateSummary
• cloudformation:ListStacks
• iam:CreateRole
• iam:PutRolePolicy
• sns:CreateTopic
• sns:GetTopicAttributes
• sns:Publish
• sns:SetTopicAttributes
• sns:SubscribeIf you cannot add these permissions to the IAM user, see your organization's AWS accountadministrator.
3. Confirm that AWS CloudFormation successfully created the stack. To do this, use the AWS CLI to runthe following command.
aws cloudformation describe-stacks --query 'Stacks[0].StackStatus' --output text --stack-name MySNSStack --region REGION_ID
Do not proceed until the AWS CLI outputs CREATE_COMPLETE. (You might need to run this commandmultiple times before you see CREATE_COMPLETE.)
4. In a few minutes, after AWS CloudFormation successfully creates the stack, check your inbox for anincoming email from [email protected]. In this email, choose the Confirm subscriptionlink. A webpage then opens, confirming the subscription. Your email can't receive messages from thisAmazon SNS topic until you confirm the subscription.
5. Change the function's settings to use the newly created execution role. To do this, in the Environmentwindow, open the template.yaml file in the ~/environment/MySNSApplication folder. In theeditor, between the lines of code Properties and Handler: mySNSFunction/index.handler,add the following two lines of code to specify the Amazon Resource Name (ARN) of the execution rolefor the function to use.
Properties: Role: 'Fn::Sub': 'arn:aws:iam::${AWS::AccountId}:role/LambdaSNSExecutionRole' Handler: mySNSFunction/index.handler
NoteBecause the template.yaml file uses YAML syntax, spacing is important. Ensure that Roleis indented exactly two spaces from Properties, and 'Fn::Sub' is indented exactly twospaces from Role. Be sure to use spaces, and not tabs, to represent whitespace in this file.
6. In the same template.yaml file, extend the function's default timeout period by changing theTimeout value from 15 to 60. Then save the file.
Step 3: Run the Function LocallyIn this step, you use the IDE to run the newly created function on the instance, which sends messages toyour email address. Currently, you can use the IDE to run functions that use only Node.js or Python.
1. With the IDE still displayed for the environment, in the Lambda pane of the AWS Resourceswindow, expand Local Functions, expand the MySNSApplication Lambda folder, right-click themySNSFunction Lambda icon, and then choose Run, Run Local.
2. In the Payload pane on the run tab, replace the pane's contents with the following, which sends thespecified data to the function for processing.
64

AWS Cloud9 User GuideStep 4: Debug the Function Locally
{ "region": "REGION_ID", "message": "You just sent an email by using Amazon SNS.", "subject": "Hello from Amazon SNS", "topicARN": "arn:aws:sns:REGION_ID:ACCOUNT_ID:TOPIC_NAME"}
In the preceding payload, do the following.
• Replace REGION_ID with the ID of the AWS Region where the Amazon SNS topic exists. (Forexample, we use us-east-2 throughout the rest of this tutorial.)
• Replace ACCOUNT_ID with your AWS account ID. (For example, we use the placeholder123456789012 throughout the rest of this tutorial.)
• Replace TOPIC_NAME with the name of the Amazon SNS topic. (For example, we use MySNSTopicthroughout the rest of this tutorial.)
3. Choose Run.
4. If the response shows a statusCode of 200, then in a few minutes, check your email for the messagethat was sent.
Compare your results to the following.
Step 4: Debug the Function LocallyIn this step, you use the IDE to debug the function on the instance. Currently, you can use the IDE todebug functions that use only Node.js or Python. Also, you can use the IDE to debug functions locallyonly. You cannot use the IDE to debug functions in Lambda itself.
1. With the IDE still displayed for the environment, open the index.js file.
2. Create a breakpoint for the debugger. To do this, in the editor, click inside the gutter next to theline of code that starts with sns.publish on line 45. A red circle is displayed, representing thebreakpoint.
3. On the edge of the IDE, choose Debugger.
4. Add four expressions for the debugger to watch. To do this, in the Watch Expressions area,for Type an expression here, type event['subject'], and then press Enter. Do this threemore times, typing context['memoryLimitInMB'], sns.endpoint.hostname, andAWS.config.credentials.accessKeyId.
65

AWS Cloud9 User GuideStep 5: Run the API Locally
NoteIf you completed the previous Lambda tutorial, you can delete any of those watch expressionsthat might still be there. To do this, simply right-click an expression, and then choose RemoveWatch Expression.
5. On the run tab from the previous step, choose the icon that looks like a bug. (It will switch from greyto green.)
6. Choose Run.
Code execution pauses at the breakpoint and displays the current values of the message's subject line,the function's memory limit in megabytes, the Amazon SNS service's hostname, and the caller's AWSaccess key ID.
Compare your results to the following.
You can also see these values by hovering your mouse over event, context, sns, and AWS in thecode, followed by expanding the screen tip that is displayed.
7. In the Debugger window, choose the blue Resume button to finish running the code.8. On the run tab, if the response shows a statusCode of 200, then in a few minutes, check your email
for the message that was sent.
Step 5: Run the API LocallyIn this step, you use the IDE to have API Gateway run the Lambda function on the instance.
1. In the Lambda pane of the AWS Resources window, right-click the mySNSFunction Lambda icon, andthen choose Run, Run APIGateway Local.
NoteYou can also do this by choosing the Lambda (local) list on the run tab from the previousstep, and then choosing API Gateway (local).
2. On the run tab, for Path, type /.3. For Method, choose POST.4. For Body, replace the pane's contents with the following, which sends this data as input to the API for
processing.
{ "region": "us-east-2", "message": "You just sent an email by using Amazon SNS.", "subject": "Hello from Amazon SNS", "topicARN": "arn:aws:sns:us-east-2:123456789012:MyDemoSNSTopic"}
5. If the bug icon is green, choose it to turn it off. (It switches back to grey.)
66

AWS Cloud9 User GuideStep 6: Debug the API Locally
6. Choose Run.7. If the response shows success, then in a few minutes, check your email for the message that was
sent.
Step 6: Debug the API LocallyIn this step, you use the IDE to have API Gateway debug the Lambda function on the instance.
1. Ensure that the index.js file still has a breakpoint set on the line of code sns.publish.2. Ensure that the Watch Expressions area of the Debugger window is still watching
event['subject'], context['memoryLimitInMB'], sns.endpoint.hostname, andAWS.config.credentials.accessKeyId.
3. On the run tab from the previous step, choose the icon that looks like a bug. (It switches from grey togreen.)
4. Choose Run.
Code execution pauses at the breakpoint and displays the current values of the message's subject line,the function's memory limit in megabytes, the Amazon SNS service's hostname, and the caller's AWSaccess key ID.
You can also see these values by hovering your mouse over event, context, sns, and AWS in thecode, followed by expanding the screen tip that is displayed.
5. In the Debugger window, choose the blue Resume button to finish running the code.6. If the response shows success, then in a few minutes, check your email for the message that was
sent.
Step 7: Deploy and Run the Changed Function inProductionIn this step, you deploy the function that you changed in Step 5: Run the API Locally (p. 66) toLambda and API Gateway. You then test the changes in production to confirm the deployment.
1. In the Lambda pane of the AWS Resources window, right-click the mySNSFunction Lambda icon, andthen choose Deploy.
2. After the deployment succeeds, run the changed function in production. To do this, in the Lambdapane of the AWS Resources window, right-click the mySNSFunction Lambda icon, and then chooseRun, Run Remote.
NoteYou can also do this by choosing the API Gateway (local) list on the run tab from theprevious step, and then choosing Lambda (remote).
3. Ensure that the Payload pane on the run tab still contains the following data.
{ "region": "us-east-2", "message": "You just sent an email by using Amazon SNS.", "subject": "Hello from Amazon SNS", "topicARN": "arn:aws:sns:us-east-2:123456789012:MyDemoSNSTopic"}
4. Choose Run.5. If the response shows a statusCode of 200, then in a few minutes, check your email for the message
that was sent.
67

AWS Cloud9 User GuideStep 8: Clean Up
6. Run the API in production. To do this, in the Lambda pane of the AWS Resources window, right-clickthe mySNSFunction Lambda icon, and then choose Run, Run APIGateway Remote.
NoteYou can also do this by choosing the Lambda (remote) list on the run tab, and then choosingAPI Gateway (remote).
7. On the run tab, for Path, type /.8. For Method, choose POST.9. For Body, be sure the following data is still displayed.
{ "region": "us-east-2", "message": "You just sent an email by using Amazon SNS.", "subject": "Hello from Amazon SNS", "topicARN": "arn:aws:sns:us-east-2:123456789012:MyDemoSNSTopic"}
10.Choose Run.11.If the response shows success, then in a few minutes, check your email for the message that was
sent.
Step 8: Clean UpTo prevent ongoing charges to your AWS account related to this tutorial, you can delete the functionfrom Lambda, the API from API Gateway, the topic and subscription from Amazon SNS, the Lambdaexecution role from IAM, and the environment from AWS Cloud9.
Step 8.1: Delete the Function and the API from Lambda and APIGatewayFor AWS Cloud9 to create the function and its associated API, behind the scenes AWS Cloud9 usesthe AWS Serverless Application Model (AWS SAM) to create a stack in AWS CloudFormation. Thisstack then creates the function and its associated API. In this procedure, you use the IDE to have AWSCloudFormation delete the stack, which also deletes the function and the API. (You could use theLambda and API Gateway consoles instead of AWS CloudFormation to delete the function and itsassociated API. However, that approach takes longer and still leaves the stack in AWS CloudFormationwhen it's no longer needed.)
WarningDeleting a stack cannot be undone. When you delete this stack, the associated function and itsAPI are deleted from Lambda and API Gateway and cannot be recovered.
1. From the IDE, use the AWS CLI in the terminal to run the AWS CloudFormationdelete-stackcommand, specifying the name of the stack. This stack's name follows the format cloud9-APPLICATION_NAME, so you would specify cloud9-MySNSApplication for this tutorial.
aws cloudformation delete-stack --stack-name cloud9-MySNSApplication --region REGION_ID
If the command ran successfully, no output and no error message are displayed.
NoteIf you use an IAM user to run this command for this tutorial, instead of an AWS account rootuser or an IAM administrator user, the IAM user must have the following additional AWSaccess permissions:• cloudformation:ListStacks
68

AWS Cloud9 User GuideStep 8: Clean Up
• cloudformation:DeleteStackIf you cannot add these permissions to the IAM user, see your organization's AWS accountadministrator.
2. To verify that the stack is deleted, use the AWS CLI to run the AWS CloudFormationdescribe-stacks command. If the function is deleted, a message is displayed that the stack doesn't exist.
aws cloudformation describe-stacks --query 'Stacks[0].StackStatus' --output text --stack-name cloud9-MySNSApplication --region REGION_ID
3. If you no longer want to keep the local function in the IDE, delete the ~/environment/MySNSApplication folder (for example, by running the command rm -rf ~/environment/MySNSApplication).
Step 8.2: Delete the Topic and Subscription from Amazon SNSand the Lambda Execution Role from IAM
When you delete the AWS CloudFormation stack that you created in Step 2: Set up AmazonSNS (p. 63), the Amazon SNS topic and subscription are deleted, as well as the execution role for theLambda function.
WarningDeleting a stack cannot be undone. When you delete this stack, the associated topic,subscription, and execution role are deleted from Amazon SNS and IAM and cannot berecovered.
1. With the IDE still displayed for the environment, use the AWS CLI in the terminal to run the AWSCloudFormationdelete-stack command, specifying the name of the stack.
aws cloudformation delete-stack --stack-name MySNSStack --region REGION_ID
NoteIf you use an IAM user to run this command, instead of an AWS account root user or an IAMadministrator user, the IAM user must have the following additional AWS access permissions.
• cloudFormation:DeleteStack
• iam:DeleteRole
• iam:DeleteRolePolicy
• sns:DeleteTopic
• sns:UnsubscribeIf you cannot add these permissions to the IAM user, see your organization's AWS accountadministrator.
If the command ran successfully, no output and no error message are displayed.
2. To verify that the stack is deleted, use the AWS CLI to run the following command.
aws cloudformation describe-stacks --query 'Stacks[0].StackStatus' --output text --stack-name MySNSStack --region REGION_ID
Keep running the preceding command until the output states that the stack doesn't exist.
69
AWS Cloud9 User GuideNext Steps
Step 8.3: Delete the Environment from AWS Cloud9WarningDeleting an environment cannot be undone. Also, when you delete an EC2 environment, AWSCloud9 also terminates the Amazon EC2 instance that it previously launched and connectedto the environment. Once terminated in Amazon EC2, the instance cannot be reactivated orrecovered.
1. With the IDE still displayed for the environment, open the dashboard in the AWS Cloud9 console. Todo this, on the menu bar in the IDE, choose AWS Cloud9, Go To Your Dashboard.
2. Do one of the following.• Choose the title that matches the name of the environment, and then choose Delete.• Select the card that contains the name of the environment, and then choose Delete.
3. In the Delete dialog box, type Delete, and then choose Delete.
Next StepsExplore any or all of the following topics to continue getting familiar with AWS Cloud9.
Learn more about how to use AWS Cloud9 withLambda
Working with AWS Lambda Functions (p. 286)
Learn more about the AWS Cloud9 IDE IDE Tutorial (p. 19) and Working with theIDE (p. 108)
Invite others to use your environment with you, inreal time and with text chat support
Working with Shared Environments (p. 90)
Create SSH environments (environments that useyour own Amazon EC2 instance or server, insteadof an Amazon EC2 instance that is managed byAWS Cloud9)
Creating an Environment (p. 72) and SSHEnvironment Host Requirements (p. 381)
Use AWS Cloud9 with Amazon Lightsail Working with Amazon LightsailInstances (p. 277)
Use AWS Cloud9 with AWS CodeStar Working with AWS CodeStar Projects (p. 284)
Use AWS Cloud9 with AWS CodePipeline Working with AWS CodePipeline (p. 315)
Use AWS Cloud9 with the AWS CLI, the aws-shell, AWS CodeCommit, GitHub, or AmazonDynamoDB, as well as Node.js, Python, or otherprogramming languages
Samples (p. 318)
To get help with AWS Cloud9 from the community, see the AWS Cloud9 Discussion Forum. (When youenter this forum, AWS might require you to sign in.)
To get help with AWS Cloud9 directly from AWS, see the support options on the AWS Support page.
70

AWS Cloud9 User Guide
Working with Environments in AWSCloud9
A development environment is a place in AWS Cloud9 where you store your project's files and where yourun the tools to develop your apps.
AWS Cloud9 provides two types of development environments: EC2 environments and SSH environments.Here are the key similarities and differences between them.
EC2 environments SSH environments
AWS Cloud9 launches an associated Amazon EC2instance and manages that instance's lifecycle (forexample, start, stop, and terminate).
You use an existing Amazon EC2 instance or yourown server. You manage that instance's or server'slifecycle.
The instance runs on Amazon Linux. You can use any Amazon EC2 instance type thatruns Linux, or your own server running Linux.
AWS Cloud9 automatically sets up the instance tostart working with AWS Cloud9.
You must manually configure the instance or yourown server to work with AWS Cloud9.
AWS Cloud9 automatically sets up the AWSCommand Line Interface (AWS CLI) on theinstance for you to start using.
If you want to use the AWS CLI on the instance oryour own server, you must set it up yourself.
The instance has access to hundreds of usefulpackages, with some common packages alreadyinstalled and configured, such as Git, Docker,Node.js, and Python.
If you use your own sever, you might need todownload, install, and configure additionalpackages to complete common tasks.
You maintain the instance, for example byperiodically applying system updates.
You maintain the instance or your own server.
When you delete the environment, AWS Cloud9automatically terminates the associated instance.
When you delete the environment, the instance oryour own server remains.
Learn how to work with an environment in AWS Cloud9 by reading one or more of these topics.
Topics
• Creating an Environment in AWS Cloud9 (p. 72)
• Opening an Environment in AWS Cloud9 (p. 77)
• Calling AWS Services from an Environment in AWS Cloud9 (p. 80)
• Changing Environment Settings in AWS Cloud9 (p. 86)
• Working with Shared Environments in AWS Cloud9 (p. 90)
• Moving or Resizing an Environment in AWS Cloud9 (p. 103)
• Deleting an Environment in AWS Cloud9 (p. 104)
71

AWS Cloud9 User GuideCreating an Environment
Creating an Environment in AWS Cloud9To create an AWS Cloud9 development environment, follow one of these sets of procedures, dependingon how you plan to use AWS Cloud9.
Usage pattern Follow these procedures
I want AWS Cloud9 to create a developmentenvironment, launch and manage a new AmazonEC2 instance running Amazon Linux with nosample code, connect the environment to the newinstance, and then open the AWS Cloud9 IDE.
(When AWS Cloud9 launches and manages anew Amazon EC2 instance this way, we call theenvironment an EC2 environment.)
This topic
I want AWS Cloud9 to create an environment,connect it to one of my existing Amazon EC2instances or my own server, and then open theIDE.
(When AWS Cloud9 connects an environmentto an existing Amazon EC2 instance or yourown server, we call the environment an SSHenvironment.)
This topic
I want to launch a new Amazon EC2 instancepreconfigured with a popular app or frameworksuch as WordPress, MySQL, PHP, Node.js, Nginx,Drupal, or Joomla, or a Linux distribution such asUbuntu, Debian, FreeBSD, or openSUSE. Then Iwant AWS Cloud9 to create an SSH environment,connect it to the new instance, and then open theIDE.
Working with Amazon LightsailInstances (p. 277)
I want to create a software development projectthat includes a toolchain with source control,build, deployment, and virtual servers orserverless resources. Then I want AWS Cloud9to create an EC2 environment, connect it to theproject, and then open the IDE.
Working with AWS CodeStar Projects (p. 284)
I want to create a continuous delivery pipelinethat models, visualizes, and automates the stepsrequired to release my software. Then I want AWSCloud9 to create an environment, open the IDE,and connect it to the repository that contains mysoftware's source code to be sent through thepipeline.
Working with AWS CodePipeline (p. 315)
NoteCompleting these procedures might result in charges to your AWS account. These includepossible charges for Amazon EC2. For more information, see Amazon EC2 Pricing.
• Creating an Environment with the Console (p. 73)
72

AWS Cloud9 User GuideCreating an Environment with the Console
• Creating an Environment with Code (p. 77)
Creating an Environment with the Console1. Sign in to the AWS Cloud9 console, at https://console.aws.amazon.com/cloud9/.
2. After you sign in to the AWS Cloud9 console, in the top navigation bar, choose an AWS Region tocreate the environment in. For a list of available AWS Regions, see AWS Cloud9 in the Amazon WebServices General Reference.
3. If a welcome page is displayed, for New AWS Cloud9 environment, choose Create environment.Otherwise, choose Create environment.
Or:
4. On the Name environment page, for Name, type a name for your AWS Cloud9 developmentenvironment.
73
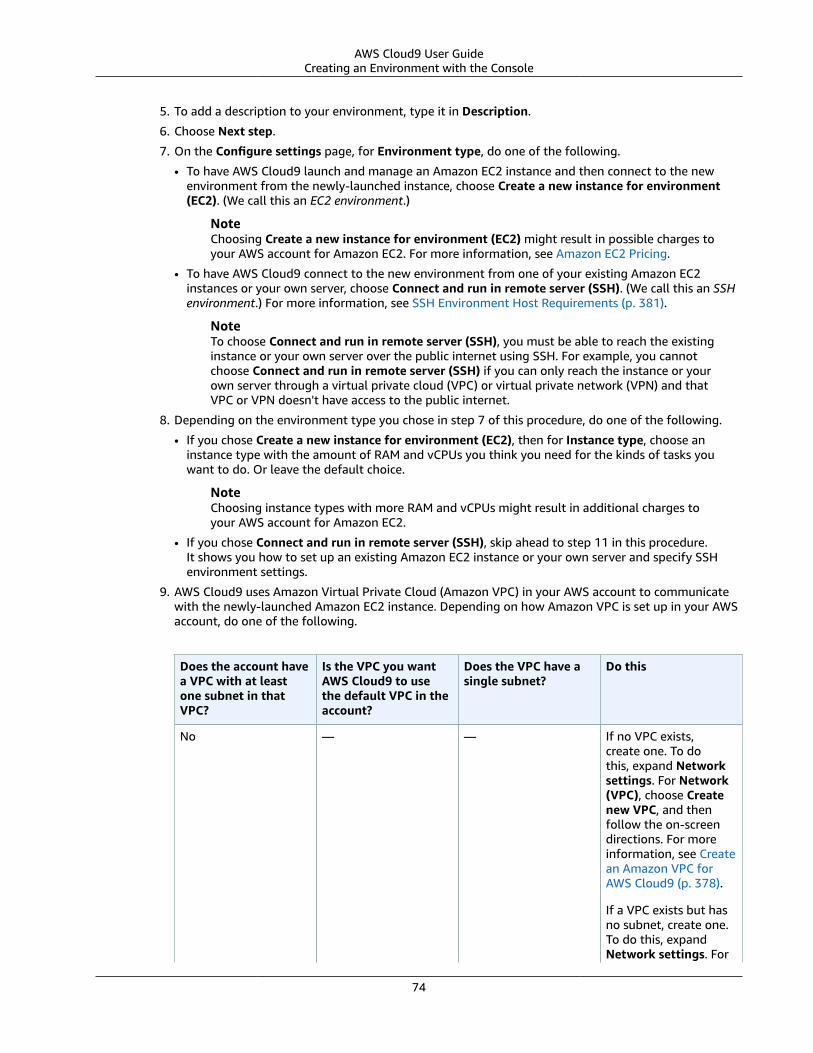
AWS Cloud9 User GuideCreating an Environment with the Console
5. To add a description to your environment, type it in Description.
6. Choose Next step.
7. On the Configure settings page, for Environment type, do one of the following.
• To have AWS Cloud9 launch and manage an Amazon EC2 instance and then connect to the newenvironment from the newly-launched instance, choose Create a new instance for environment(EC2). (We call this an EC2 environment.)
NoteChoosing Create a new instance for environment (EC2) might result in possible charges toyour AWS account for Amazon EC2. For more information, see Amazon EC2 Pricing.
• To have AWS Cloud9 connect to the new environment from one of your existing Amazon EC2instances or your own server, choose Connect and run in remote server (SSH). (We call this an SSHenvironment.) For more information, see SSH Environment Host Requirements (p. 381).
NoteTo choose Connect and run in remote server (SSH), you must be able to reach the existinginstance or your own server over the public internet using SSH. For example, you cannotchoose Connect and run in remote server (SSH) if you can only reach the instance or yourown server through a virtual private cloud (VPC) or virtual private network (VPN) and thatVPC or VPN doesn't have access to the public internet.
8. Depending on the environment type you chose in step 7 of this procedure, do one of the following.
• If you chose Create a new instance for environment (EC2), then for Instance type, choose aninstance type with the amount of RAM and vCPUs you think you need for the kinds of tasks youwant to do. Or leave the default choice.
NoteChoosing instance types with more RAM and vCPUs might result in additional charges toyour AWS account for Amazon EC2.
• If you chose Connect and run in remote server (SSH), skip ahead to step 11 in this procedure.It shows you how to set up an existing Amazon EC2 instance or your own server and specify SSHenvironment settings.
9. AWS Cloud9 uses Amazon Virtual Private Cloud (Amazon VPC) in your AWS account to communicatewith the newly-launched Amazon EC2 instance. Depending on how Amazon VPC is set up in your AWSaccount, do one of the following.
Does the account havea VPC with at leastone subnet in thatVPC?
Is the VPC you wantAWS Cloud9 to usethe default VPC in theaccount?
Does the VPC have asingle subnet?
Do this
No — — If no VPC exists,create one. To dothis, expand Networksettings. For Network(VPC), choose Createnew VPC, and thenfollow the on-screendirections. For moreinformation, see Createan Amazon VPC forAWS Cloud9 (p. 378).
If a VPC exists but hasno subnet, create one.To do this, expandNetwork settings. For
74
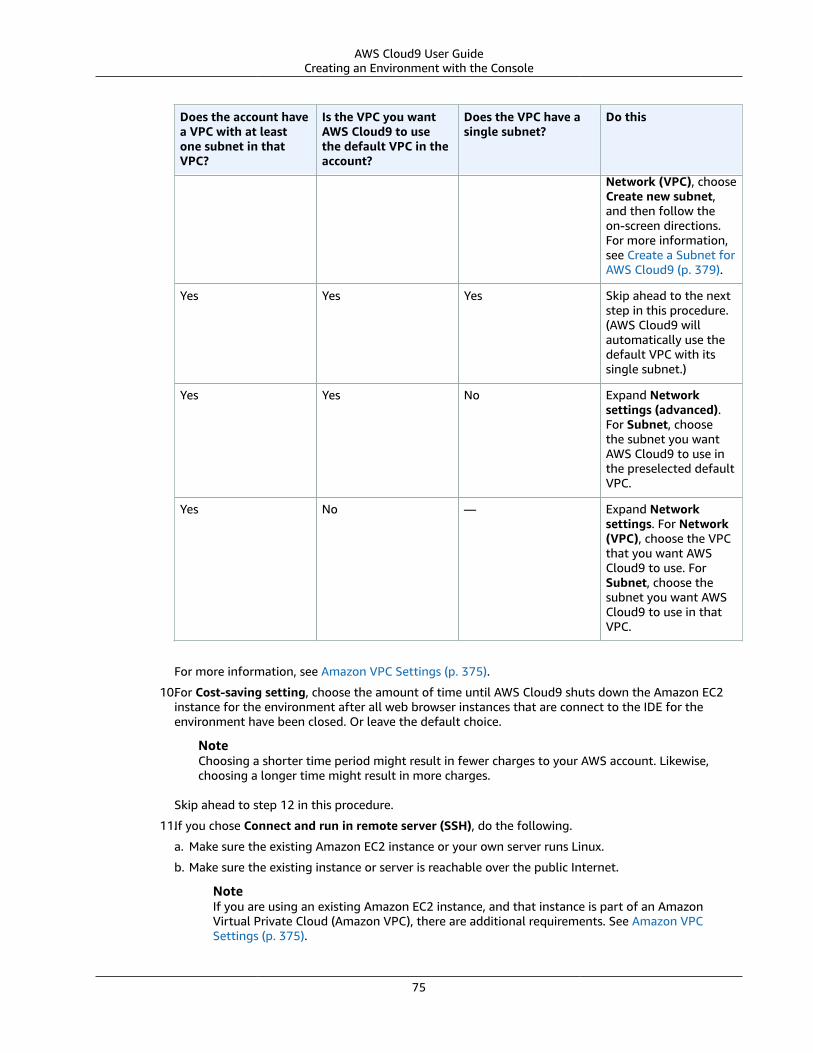
AWS Cloud9 User GuideCreating an Environment with the Console
Does the account havea VPC with at leastone subnet in thatVPC?
Is the VPC you wantAWS Cloud9 to usethe default VPC in theaccount?
Does the VPC have asingle subnet?
Do this
Network (VPC), chooseCreate new subnet,and then follow theon-screen directions.For more information,see Create a Subnet forAWS Cloud9 (p. 379).
Yes Yes Yes Skip ahead to the nextstep in this procedure.(AWS Cloud9 willautomatically use thedefault VPC with itssingle subnet.)
Yes Yes No Expand Networksettings (advanced).For Subnet, choosethe subnet you wantAWS Cloud9 to use inthe preselected defaultVPC.
Yes No — Expand Networksettings. For Network(VPC), choose the VPCthat you want AWSCloud9 to use. ForSubnet, choose thesubnet you want AWSCloud9 to use in thatVPC.
For more information, see Amazon VPC Settings (p. 375).
10.For Cost-saving setting, choose the amount of time until AWS Cloud9 shuts down the Amazon EC2instance for the environment after all web browser instances that are connect to the IDE for theenvironment have been closed. Or leave the default choice.
NoteChoosing a shorter time period might result in fewer charges to your AWS account. Likewise,choosing a longer time might result in more charges.
Skip ahead to step 12 in this procedure.
11.If you chose Connect and run in remote server (SSH), do the following.
a. Make sure the existing Amazon EC2 instance or your own server runs Linux.
b. Make sure the existing instance or server is reachable over the public Internet.
NoteIf you are using an existing Amazon EC2 instance, and that instance is part of an AmazonVirtual Private Cloud (Amazon VPC), there are additional requirements. See Amazon VPCSettings (p. 375).
75

AWS Cloud9 User GuideCreating an Environment with the Console
c. On the existing instance or server, you must have Python installed, and the version must be 2.7.To check your version, from your instance's or server's terminal, run the command python --version . To install Python 2.7 on your server, see one of the following.
• Step 1: Install Required Tools (p. 347) in the Python Sample.
• Download Python from the Python website and see Installing Packages in the Python PackagingUser Guide.
d. On the existing instance or server, you must have Node.js installed, and the version must be 0.6.16or later. To check your version, from your instance's or server's terminal, run the command node--version . To install Node.js on your server, see one of the following.
• Step 1: Install Required Tools (p. 343) in the Node.js Sample.
• Installing Node.js via package manager on the Node.js website.
• Node Version Manager on GitHub.
e. After you confirm that Node.js is installed on the existing instance or server, do the following.
i. Back in the AWS Cloud9 console, choose Copy key to clipboard. Paste the public SSH key valuethat was copied into the ~/.ssh/authorized_keys file on the existing instance or server.
NoteTo see the public SSH key value that was copied, expand View public SSH key.
ii. For Login name in the AWS Cloud9 console, type the login name you use for the instance orserver. For example, for an Amazon EC2 instance running Amazon Linux, it might be ec2-user.For another type of server, it might be root.
iii. For Host, type the public IP address (preferred) or the hostname of the instance or server.
iv. For Port, type the port that you want AWS Cloud9 to use to try to connect to the instance orserver, or leave the default port.
v. To specify the path to the directory on the instance or server that you want AWS Cloud9 to startfrom after login, expand Advanced settings, and then type the path in Environment path. If youleave this blank, AWS Cloud9 uses the directory that your server typically starts with after login.This is usually a home or default directory.
ImportantThis directory must have its access permissions set to rwxr-xr-x. This means read-write-execute permissions for the owner, read-execute permissions for the group, andread-execute permissions for others. For example, if the directory's path is ~, you can setthese permissions on the directory by running the chmod command, as follows.
sudo chmod u=rwx,g=rx,o=rx ~
vi. To specify the path to the Node.js binary on the instance or server, expand Advanced settings,and then type the path in Node.js binary path. To get the path, you can run the command which node (or nvm which node if you're using nvm) on your server. For example, the pathmight be /usr/bin/node. If you leave this blank, AWS Cloud9 will try to guess where theNode.js binary is when it tries to connect.
vii.To specify a jump host that the instance or server uses, type information about the jump hostin SSH jump host, using the format USER_NAME@HOSTNAME:PORT_NUMBER (for example, ec2-user@:ip-192-0-2-0:22)
The jump host must meet the following requirements.
• It must be reachable over the public Internet using SSH.
• It must allow inbound access by any IP address over the specified port.
• The public SSH key value that was copied into the ~/.ssh/authorized_keys file on theexisting instance or server must also be copied into the ~/.ssh/authorized_keys file onthe jump host.
12.Choose Next step.76

AWS Cloud9 User GuideCreating an Environment with Code
13.On the Review choices page, choose Create environment. Wait while AWS Cloud9 creates yourenvironment. This can take several minutes.
NoteIf you chose Connect and run in remote server (SSH) previously, you'll will be prompted toconfirm whether AWS Cloud9 can set up the new environment on the existing instance orserver. You'll also be given a choice to install some optional components. Simply choose Nexton each of these confirmation pages.
Creating an Environment with CodeTo use code to create an EC2 environment in AWS Cloud9, call the AWS Cloud9 create EC2 environmentoperation, as follows.
NoteYou cannot create an SSH environment with code.
AWS CLI create-environment-ec2
AWS SDK for C++ CreateEnvironmentEC2Request,CreateEnvironmentEC2Result
AWS SDK for Go CreateEnvironmentEC2,CreateEnvironmentEC2Request,CreateEnvironmentEC2WithContext
AWS SDK for Java CreateEnvironmentEC2Request,CreateEnvironmentEC2Result
AWS SDK for JavaScript createEnvironmentEC2
AWS SDK for .NET CreateEnvironmentEC2Request,CreateEnvironmentEC2Response
AWS SDK for PHP createEnvironmentEC2
AWS SDK for Python (Boto) create_environment_ec2
AWS SDK for Ruby create_environment_ec2
AWS Tools for Windows PowerShell New-C9EnvironmentEC2
AWS Cloud9 API CreateEnvironmentEC2
Opening an Environment in AWS Cloud9This procedure describes how to open an environment in AWS Cloud9.
NoteThis procedure assumes you have already created an AWS Cloud9 development environment. Tocreate an environment, see Creating an Environment (p. 72).
1. Sign in to the AWS Cloud9 console, at https://console.aws.amazon.com/cloud9/.
2. In the top navigation bar, choose the AWS Region where the environment is located.
77

AWS Cloud9 User GuideOpening an Environment
3. In the list of environments, for the environment you want to open, do one of the following.
• Inside of the card, choose the Open IDE link.
• Select the card, and then choose the Open IDE button.
78

AWS Cloud9 User GuideOpening an Environment
If your environment is not displayed in the console, try doing one or more of the following actions to tryto display it.
• In the side navigation bar, choose one or more of the following.
• Choose Your environments to display all environments that your AWS entity owns within theselected AWS Region and AWS account.
• Choose Shared with you to display all environments your AWS entity has been invited to within theselected AWS Region and AWS account.
• Choose Account environments to display all environments within the selected AWS Region and AWSaccount that your AWS entity has permissions to display.
• Choose the previous arrow, next arrow, or page number button to display more environments in thecurrent scope.
• If you think you should be a member of an environment, but the environment is not displayed in theShared with you list, check with the environment owner.
• In the top navigation bar, choose a different AWS Region.
79

AWS Cloud9 User GuideCall AWS Services from an Environment
Calling AWS Services from an Environment in AWSCloud9
You can call AWS services from an AWS Cloud9 development environment. For example, you can:
• Upload and download data in Amazon Simple Storage Service (Amazon S3) buckets.• Send broadcast notifications through Amazon Simple Notification Service (Amazon SNS) topics.• Read and write data in Amazon DynamoDB (DynamoDB) databases.
You can call AWS services from your environment in several ways. For example, you can use the AWSCommand Line Interface (AWS CLI) or the aws-shell to run commands from a terminal session. You canalso call AWS services from code you run within your environment, using AWS SDKs for programminglanguages such as JavaScript, Python, Ruby, PHP, Go, and C++. For more information, see the AWS CLIand aws-shell Sample (p. 318), the AWS CLI User Guide, and the AWS SDKs.
Each time the AWS CLI, the aws-shell, or your code calls an AWS service, the AWS CLI, the aws-shell, oryour code must provide a set of AWS access credentials along with the call. These credentials determinewhether the caller has the appropriate permissions to make the call. If the credentials don't cover theappropriate permissions, the call will fail.
There are several ways to provide credentials to your environment. The following table describes someapproaches.
Environment type Approach
EC2 Use AWS managed temporary credentials.
We recommend this approach for an EC2environment. AWS managed temporarycredentials manage AWS access credentials inan EC2 environment on your behalf, while alsofollowing AWS security best practices.
If you are using an EC2 environment, you canskip the rest of this topic, as AWS managedtemporary credentials are already set up for youin the environment.
For more information, see AWS ManagedTemporary Credentials (p. 401).
EC2 Attach an IAM instance profile to the instance.
You should only use this approach if for somereason you can't use AWS managed temporarycredentials. Similar to AWS managed temporarycredentials, an instance profile manages AWSaccess credentials on your behalf. However, youmust create, manage, and attach the instanceprofile to the Amazon EC2 instance yourself.
For instructions, see Create and Use anInstance Profile to Manage TemporaryCredentials (p. 81).
80

AWS Cloud9 User GuideCreate and Use an Instance Profileto Manage Temporary Credentials
Environment type Approach
EC2 or SSH Store your permanent AWS access credentialswithin the environment.
This approach is less secure than using temporaryAWS access credentials. However, it is the onlysupported approach for an SSH environment.
For instructions, see Create and Store PermanentAccess Credentials in an Environment (p. 84).
EC2 or SSH Insert your permanent AWS access credentialsdirectly into your code.
We discourage this approach because it doesn'tfollow AWS security best practices.
Because we discourage this approach, we do notcover it in this topic.
Create and Use an Instance Profile to ManageTemporary Credentials
NoteYou cannot use this procedure for an AWS Cloud9 SSH development environment. Instead, skipahead to Create and Store Permanent Access Credentials in an Environment (p. 84).We recommend using AWS managed temporary credentials instead of an instance profile.Follow these instructions only if for some reason you cannot use AWS managed temporarycredentials. For more information, see AWS Managed Temporary Credentials (p. 401).
In this procedure, you will use IAM and Amazon EC2 to create and attach an IAM instance profile to theAmazon EC2 instance that connects to your environment. This instance profile will manage temporarycredentials on your behalf. This procedure assumes you have already created a environment in AWSCloud9. To create a environment, see Create an Environment (p. 72).
You can complete these tasks with the IAM and Amazon EC2 consoles (p. 81) or the AWS CommandLine Interface (AWS CLI) (p. 82).
Create an Instance Profile with the IAM ConsoleNoteIf you already have an IAM role that contains an instance profile, skip ahead to Attach anInstance Profile to an Instance with the Amazon EC2 Console (p. 83).
1. Sign in to the IAM console, at https://console.aws.amazon.com/iam.
For this step, we recommend you sign in using credentials for an IAM administrator user in your AWSaccount. If you cannot do this, check with your AWS account administrator.
2. In the navigation bar, choose Roles.
NoteYou cannot use the IAM console to create an instance profile by itself. You must create an IAMrole, which contains an instance profile.
3. Choose Create role.
81

AWS Cloud9 User GuideCreate and Use an Instance Profileto Manage Temporary Credentials
4. On the Select type of trusted entity page, with AWS service already chosen, for Choose the servicethat will use this role, choose EC2.
5. For Select your use case, choose EC2.
6. Choose Next: Permissions.
7. On the Attach permissions policies page, in the list of policies, select the box next toAdministratorAccess, and then choose Next: Review.
NoteThe AdministratorAccess policy allows unrestricted access to all AWS actions and resourcesacross your AWS account. It should be used only for experimentation purposes. For moreinformation, see IAM Policies in the IAM User Guide.
8. On the Review page, for Role Name, type a name for the role (for example my-demo-cloud9-instance-profile).
9. Choose Create Role.
Skip ahead to Attach an Instance Profile to an Instance with the Amazon EC2 Console (p. 83).
Create an Instance Profile with the AWS CLINoteIf you already have an IAM role that contains an instance profile, skip ahead to Attach anInstance Profile to an Instance with the AWS CLI (p. 84).For this topic, we recommend you configure the AWS CLI using credentials for an IAMadministrator user in your AWS account. If you cannot do this, check with your AWS accountadministrator.
1. Define a trust relationship in AWS for the instance profile's required IAM role. To do this, createand then save a file with the following contents (for example, as my-demo-cloud9-instance-profile-role-trust.json).
{ "Version": "2012-10-17", "Statement": [ { "Sid": "", "Effect": "Allow", "Principal": { "Service": "ec2.amazonaws.com" }, "Action": "sts:AssumeRole" } ]}
2. Using the terminal or command prompt, switch to the directory where you just saved this file.
3. Create an IAM role for the instance profile. To do this, run the IAM create-role command,specifying a name for the new IAM role (for example, my-demo-cloud9-instance-profile-role),and the name of the file you just saved.
aws iam create-role --role-name my-demo-cloud9-instance-profile-role --assume-role-policy-document file://my-demo-cloud9-instance-profile-role-trust.json
4. Attach AWS access permissions to the instance profile's IAM role. To do this, run the IAM attach-role-policy command, specifying the name of the existing IAM role and the Amazon ResourceName (ARN) of the AWS managed policy named AdministratorAccess.
82

AWS Cloud9 User GuideCreate and Use an Instance Profileto Manage Temporary Credentials
aws iam attach-role-policy --role-name my-demo-cloud9-instance-profile-role --policy-arn arn:aws:iam::aws:policy/AdministratorAccess
NoteThe AdministratorAccess policy allows unrestricted access to all AWS actions and resourcesacross your AWS account. It should be used only for experimentation purposes. For moreinformation, see IAM Policies in the IAM User Guide.
5. Create the instance profile. To do this, run the IAM create-instance-profile command,specifying a name for the new instance profile (for example, my-demo-cloud9-instance-profile).
aws iam create-instance-profile --instance-profile-name my-demo-cloud9-instance-profile
6. Attach the IAM role to the instance profile. To do this, run the IAM add-role-to-instance-profile, specifying the names of the existing IAM role and instance profile.
aws iam add-role-to-instance-profile --role-name my-demo-cloud9-instance-profile-role --instance-profile-name my-demo-cloud9-instance-profile
Skip ahead to Create an Instance Profile with the AWS CLI (p. 82).
Attach an Instance Profile to an Instance with the Amazon EC2Console1. Sign in to the Amazon EC2 console, at https://console.aws.amazon.com/ec2.
For this step, we recommend you sign in using credentials for an IAM administrator user in your AWSaccount. If you cannot do this, check with your AWS account administrator.
2. In the navigation bar, be sure the region selector displays the AWS Region that matches the one foryour environment. For example, if you created your environment in the US East (Ohio) region, chooseUS East (Ohio) in the region selector here as well.
3. Choose the Running Instances link or, in the navigation pane, expand Instances, and then chooseInstances.
4. In the list of instances, choose the instance with the Name that includes your environment name. Forexample, if your environment name is my-demo-environment, choose the instance with the Namethat includes my-demo-environment.
5. Choose Actions, Instance Settings, Attach/Replace IAM Role.
NoteAlthough you are attaching a role to the instance, the role contains an instance profile.
6. On the Attach/Replace IAM Role page, for IAM role, choose the name of the role you identified orthat you created in the previous procedure, and then choose Apply.
7. Back in the environment, use the AWS CLI to run the aws configure command or the aws-shellto run the configure command. Do not specify any values for AWS Access Key ID or AWS SecretAccess Key (press Enter after each of these prompts). For Default region name, specify the AWSRegion closest to you or the region where your AWS resources are located. For example, us-east-2for the US East (Ohio) Region. For a list of regions, see AWS Regions and Endpoints in the Amazon WebServices General Reference. Optionally, specify a value for Default output format (for example, json).
You can now start calling AWS services from your environment. To use the AWS CLI, the aws-shell, orboth to call AWS services, see the AWS CLI and aws-shell Sample (p. 318). To call AWS services fromyour code, see our other samples (p. 318).
83

AWS Cloud9 User GuideCreate and Store Permanent Access
Credentials in an Environment
Attach an Instance Profile to an Instance with the AWS CLI1. Run the Amazon EC2 associate-iam-instance-profile command, specifying the name of the
instance profile and the ID and AWS Region ID of the Amazon EC2 instance for the environment.
aws ec2 associate-iam-instance-profile --iam-instance-profile Name=my-demo-cloud9-instance-profile --region REGION_ID --instance-id INSTANCE_ID
In the preceding command, replace REGION_ID with the AWS Region ID for the instance andINSTANCE_ID with the instance's ID.
To get the instance's ID, you could for example run the Amazon EC2 describe-instancescommand, specifying the name and AWS Region ID of the environment.
aws ec2 describe-instances --region=REGION_ID --filters Name=tag:Name,Values=*ENVIRONMENT_NAME* --query "Reservations[*].Instances[*].InstanceId" --output text
In the preceding command, replace REGION_ID with the AWS Region ID for the instance andENVIRONMENT_NAME with the name of the environment.
2. Back in the environment, use the AWS CLI to run the aws configure command or the aws-shellto run the configure command. Do not specify any values for AWS Access Key ID or AWS SecretAccess Key (press Enter after each of these prompts). For Default region name, specify the AWSRegion closest to you or the region where your AWS resources are located. For example, us-east-2for the US East (Ohio) Region. For a list of regions, see AWS Regions and Endpoints in the Amazon WebServices General Reference. Optionally, specify a value for Default output format (for example, json).
You can now start calling AWS services from your environment. To use the AWS CLI, the aws-shell, orboth to call AWS services, see the AWS CLI and aws-shell Sample (p. 318). To call AWS services fromyour code, see our other samples (p. 318).
Create and Store Permanent Access Credentials in anEnvironment
NoteIf you are using an AWS Cloud9 EC2 development environment, we recommend you use AWSmanaged temporary credentials instead of AWS permanent access credentials. To work withAWS managed temporary credentials, see AWS Managed Temporary Credentials (p. 401).
In this section, you use AWS Identity and Access Management (IAM) to generate a set of permanentcredentials that the AWS CLI, the aws-shell, or your code can use when calling AWS services. This setincludes an AWS access key ID and an AWS secret access key, which are unique to your user in your AWSaccount. If you already have an AWS access key ID and an AWS secret access key, note those credentials,and then skip ahead to Store Permanent Access Credentials in an Environment (p. 85).
You can create a set of permanent credentials with the IAM console (p. 84) or the AWS CLI (p. 85).
Create Permanent Access Credentials with the Console1. Sign in to the IAM console, at https://console.aws.amazon.com/iam.
For this step, we recommend you sign in using credentials for an IAM administrator user in your AWSaccount. If you cannot do this, check with your AWS account administrator.
2. In the navigation bar, choose Users.
84

AWS Cloud9 User GuideCreate and Store Permanent Access
Credentials in an Environment
3. In the list of users, choose the name of the user you created or identified in Team Setup (p. 7).4. Choose the Security credentials tab.5. For Access keys, choose Create access key.6. In the Create access key page, choose Show, and make a note of the Access key ID and Secret access
key values. We recommend you also choose Download .csv file and save these credentials in a securelocation.
Skip ahead to Store Permanent Access Credentials in an Environment (p. 85).
Create Permanent Access Credentials with the AWS CLINoteFor this section, we recommend you configure the AWS CLI using credentials for an IAMadministrator user in your AWS account. If you cannot do this, check with your AWS accountadministrator.
Run the IAM create-access-key command to create a new AWS access key and corresponding AWSsecret access key for the user.
aws iam create-access-key --user-name USER_NAME
In the preceding command, replace USER_NAME with the name of the user.
In a secure location, save the AccessKeyId and SecretAccessKey values that are displayed. After yourun the IAM create-access-key command, this is the only time you can use the AWS CLI to view theuser's AWS secret access key. To generate a new AWS secret access key for the user later if needed, seeCreating, Modifying, and Viewing Access Keys (API, CLI, PowerShell) in the IAM User Guide.
Store Permanent Access Credentials in an EnvironmentIn this procedure, you use the AWS Cloud9 IDE to store your permanent AWS access credentials in yourenvironment. This procedure assumes you have already created an environment in AWS Cloud9, openedthe environment, and are displaying the AWS Cloud9 IDE in your web browser. For more information, seeCreating an Environment (p. 72) and Opening an Environment (p. 77).
NoteThe following procedure shows how to store your permanent access credentials by usingenvironment variables. If you have the AWS CLI or the aws-shell installed in your environment,you can use the aws configure command for the AWS CLI or the configure commandfor the aws-shell to store your permanent access credentials instead. For instructions, see QuickConfiguration in the AWS CLI User Guide.
1. With your environment open, in the AWS Cloud9 IDE, start a new terminal session, if one is notalready started. To start a new terminal session, on the menu bar, choose Window, New Terminal.
2. Run each of the following commands, one command at a time, to set local environment variablesrepresenting your permanent access credentials. In these commands, after AWS_ACCESS_KEY_ID:,type your AWS access key ID. After AWS_SECRET_ACCESS_KEY, type your AWS secret access key. AfterAWS_DEFAULT_REGION_ID, type the AWS Region identifier associated with the AWS Region closest toyou (or your preferred AWS Region). For a list of available identifiers, see AWS Regions and Endpointsin the Amazon Web Services General Reference. For example, for the US East (Ohio) Region, you woulduse us-east-2.
export AWS_ACCESS_KEY_ID=export AWS_SECRET_ACCESS_KEY=export AWS_DEFAULT_REGION=
85
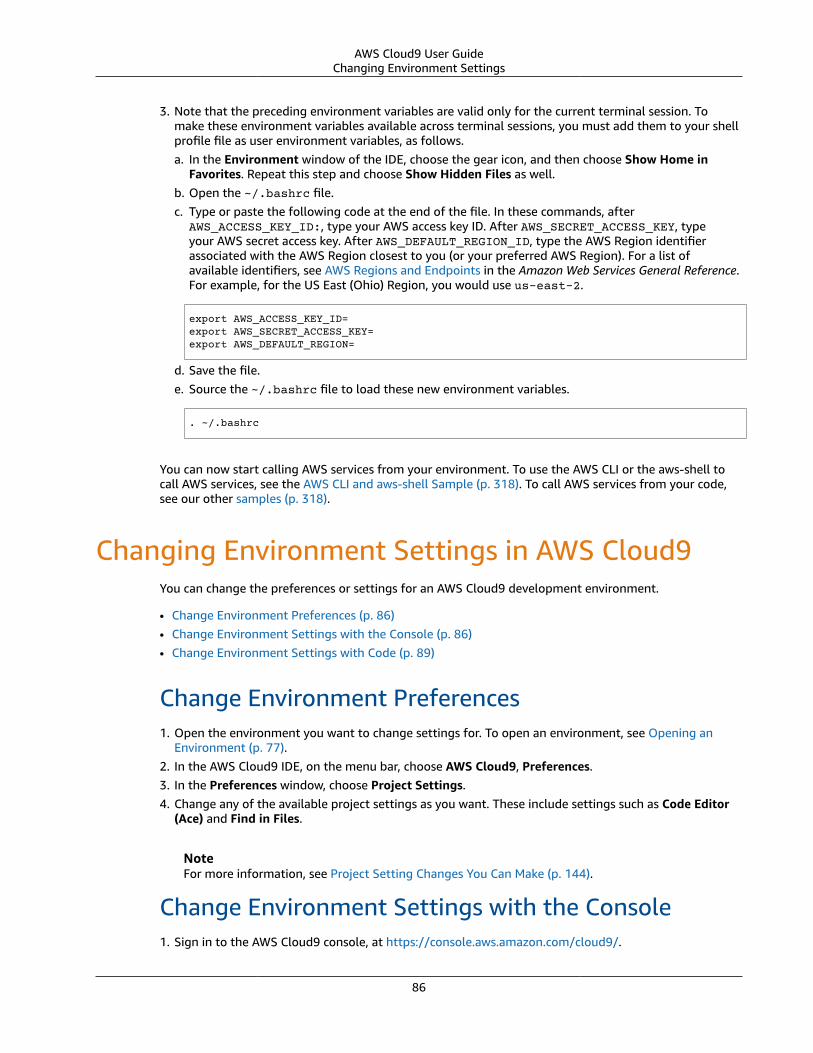
AWS Cloud9 User GuideChanging Environment Settings
3. Note that the preceding environment variables are valid only for the current terminal session. Tomake these environment variables available across terminal sessions, you must add them to your shellprofile file as user environment variables, as follows.a. In the Environment window of the IDE, choose the gear icon, and then choose Show Home in
Favorites. Repeat this step and choose Show Hidden Files as well.b. Open the ~/.bashrc file.c. Type or paste the following code at the end of the file. In these commands, after
AWS_ACCESS_KEY_ID:, type your AWS access key ID. After AWS_SECRET_ACCESS_KEY, typeyour AWS secret access key. After AWS_DEFAULT_REGION_ID, type the AWS Region identifierassociated with the AWS Region closest to you (or your preferred AWS Region). For a list ofavailable identifiers, see AWS Regions and Endpoints in the Amazon Web Services General Reference.For example, for the US East (Ohio) Region, you would use us-east-2.
export AWS_ACCESS_KEY_ID=export AWS_SECRET_ACCESS_KEY=export AWS_DEFAULT_REGION=
d. Save the file.e. Source the ~/.bashrc file to load these new environment variables.
. ~/.bashrc
You can now start calling AWS services from your environment. To use the AWS CLI or the aws-shell tocall AWS services, see the AWS CLI and aws-shell Sample (p. 318). To call AWS services from your code,see our other samples (p. 318).
Changing Environment Settings in AWS Cloud9You can change the preferences or settings for an AWS Cloud9 development environment.
• Change Environment Preferences (p. 86)• Change Environment Settings with the Console (p. 86)• Change Environment Settings with Code (p. 89)
Change Environment Preferences1. Open the environment you want to change settings for. To open an environment, see Opening an
Environment (p. 77).2. In the AWS Cloud9 IDE, on the menu bar, choose AWS Cloud9, Preferences.3. In the Preferences window, choose Project Settings.4. Change any of the available project settings as you want. These include settings such as Code Editor
(Ace) and Find in Files.
NoteFor more information, see Project Setting Changes You Can Make (p. 144).
Change Environment Settings with the Console1. Sign in to the AWS Cloud9 console, at https://console.aws.amazon.com/cloud9/.
86

AWS Cloud9 User GuideChange Environment Settings with the Console
2. In the top navigation bar, choose the AWS Region where the environment is located.
3. In the list of environments, for the environment whose settings you want to change, do one of thefollowing.
• Choose the title of the card for the environment. Then choose Edit on the next page.
• Select the card for the environment, and then choose the Edit button.
87

AWS Cloud9 User GuideChange Environment Settings with the Console
4. Make your changes, and then choose Save changes.
You can use the AWS Cloud9 console to change the following settings.
• For EC2 environments, Name and Description.
• For SSH environments: Name, Description, User, Host, Port, Environment path, Node.js binarypath, and SSH jump host.
To change other settings, do the following.
• For EC2 environments, do the following.
• You cannot change Type, Security groups, VPC, Subnet, Environment path, or EnvironmentARN.
• For Permissions or Number of members, see Change the Access Role of an EnvironmentMember (p. 100), Remove Your User (p. 100), Invite an IAM User (p. 92), and RemoveAnother Environment Member (p. 102).
• For EC2 instance type, Memory, or vCPU, see Moving or Resizing an Environment (p. 103).
• For SSH environments, do the following.
• You cannot change Type or Environment ARN.
• For Permissions or Number of members, see Change the Access Role of an EnvironmentMember (p. 100), Remove Your User (p. 100), Invite an IAM User (p. 92), and RemoveAnother Environment Member (p. 102).
If your environment is not displayed in the console, try doing one or more of the following actions to tryto display it.
• In the side navigation bar, choose one or more of the following.
• Choose Your environments to display all environments that your AWS entity owns within theselected AWS Region and AWS account.
• Choose Shared with you to display all environments your AWS entity has been invited to within theselected AWS Region and AWS account.
• Choose Account environments to display all environments within the selected AWS Region and AWSaccount that your AWS entity has permissions to display.
88
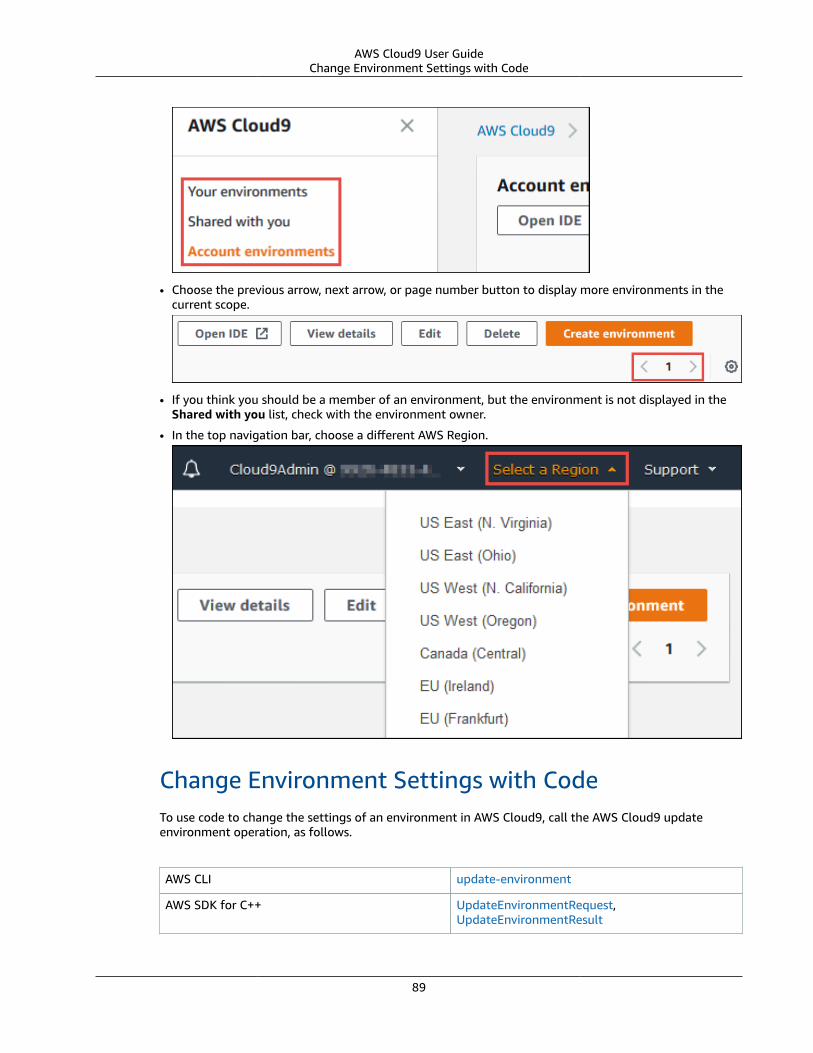
AWS Cloud9 User GuideChange Environment Settings with Code
• Choose the previous arrow, next arrow, or page number button to display more environments in thecurrent scope.
• If you think you should be a member of an environment, but the environment is not displayed in theShared with you list, check with the environment owner.
• In the top navigation bar, choose a different AWS Region.
Change Environment Settings with CodeTo use code to change the settings of an environment in AWS Cloud9, call the AWS Cloud9 updateenvironment operation, as follows.
AWS CLI update-environment
AWS SDK for C++ UpdateEnvironmentRequest,UpdateEnvironmentResult
89
AWS Cloud9 User GuideWorking with Shared Environments
AWS SDK for Go UpdateEnvironment, UpdateEnvironmentRequest,UpdateEnvironmentWithContext
AWS SDK for Java UpdateEnvironmentRequest,UpdateEnvironmentResult
AWS SDK for JavaScript updateEnvironment
AWS SDK for .NET UpdateEnvironmentRequest,UpdateEnvironmentResponse
AWS SDK for PHP updateEnvironment
AWS SDK for Python (Boto) update_environment
AWS SDK for Ruby update_environment
AWS Tools for Windows PowerShell Update-C9Environment
AWS Cloud9 API UpdateEnvironment
Working with Shared Environments in AWS Cloud9A shared environment is an AWS Cloud9 development environment that multiple IAM users have beeninvited to participate in.
A shared environment is good for the following.
• Pair programming (also know as peer programming). This is where two users work together on thesame code in a single environment. In pair programming, typically one user writes code while the otheruser observes the code being written. The observer gives immediate input and feedback to the codewriter. These positions frequently switch during a project. Without a shared environment, teams of pairprogrammers typically sit in front of a single machine, and only one user at a time can write code. Witha shared environment, both users can sit in front of their own machine and can write code at the sametime, even if they are in different physical offices.
• Computer science classes. This is useful when teachers or teaching assistants want to access a student'senvironment to review their homework or fix issues with their environment in real time. Students canalso work together with their classmates on shared homework projects, writing code together in asingle environment in real time. They can do this even though they might be in different locationsusing different computer operating systems and web browser types.
• Any other situation where multiple users need to collaborate on the same code in real time.
This topic provides instructions for sharing an environment in AWS Cloud9 and how to participate in ashared environment.
• About Environment Member Access Roles (p. 91)• Invite an IAM User in Your Account to Your Environment (p. 92)• Invite an IAM User in Another Account to Your Environment (p. 95)• Open a Shared Environment (p. 97)• See a List of Environment Members (p. 98)• Open the Active File of an Environment Member (p. 99)• Open the Open File of an Environment Member (p. 99)• Go to the Active Cursor of an Environment Member (p. 99)• Chat with Other Environment Members (p. 100)
90

AWS Cloud9 User GuideAbout Environment Member Access Roles
• View Chat Messages in a Shared Environment (p. 100)• Delete a Chat Message from a Shared Environment (p. 100)• Delete All Chat Messages from a Shared Environment (p. 100)• Change the Access Role of an Environment Member (p. 100)• Remove Your User From a Shared Environment (p. 101)• Remove Another Environment Member (p. 102)• Environment Sharing Best Practices (p. 103)
About Environment Member Access RolesBefore you share an environment or participate in a shared environment in AWS Cloud9, you shouldunderstand the access permission levels for a shared environment. We call these permission levelsenvironment member access roles.
A shared environment in AWS Cloud9 offers three environment member access roles: owner, read/write,and read-only.
• An owner has full control over an environment. Each environment has one and only one owner, who isthe environment creator. An owner can do the following.• Add, change, and remove members for the environment• Open, view, and edit files• Run code• Change environment settings• Chat with other members• Delete existing chat messages
In the AWS Cloud9 IDE, an environment owner is displayed with Read+Write access.• A read/write member can do the following.
• Open, view, and edit files• Run code• Change various environment settings from within the AWS Cloud9 IDE• Chat with other members• Delete existing chat messages
In the AWS Cloud9 IDE, read/write members are displayed with Read+Write access.• A read-only member can do the following.
• Open and view files• Chat with other members• Delete existing chat messages
In the AWS Cloud9 IDE, read-only members are displayed with Read Only access.
Before an IAM user can become an environment owner or member, that user must meet one of thefollowing criteria.
• The user is an IAM administrator user in your AWS account. For more information, see Creating YourFirst IAM Admin User and Group in the IAM User Guide.
• The user belongs to an IAM group in your AWS account, and that group has the AWS managed policyAWSCloud9Administrator or AWSCloud9User (or AWSCloud9EnvironmentMember, to be amember only) attached. For more information, see AWS Managed (Predefined) Policies (p. 390).
91

AWS Cloud9 User GuideInvite an IAM User in Your Account to Your Environment
To attach one of the preceding managed policies to a group, you can use the AWS ManagementConsole (p. 92) or the AWS Command Line Interface (AWS CLI) (p. 92).
Attach an AWS Managed Policy for AWS Cloud9 to a GroupUsing the Console1. Sign in to the AWS Management Console, if you are not already signed in.
For this step, we recommend you sign in using credentials for an IAM administrator user in your AWSaccount. If you cannot do this, check with your AWS account administrator.
2. Open the IAM console. To do this, in the console's navigation bar, choose Services. Then choose IAM.3. Choose Groups.4. Choose the group's name.5. On the Permissions tab, for Managed Policies, choose Attach Policy.6. In the list of policy names, choose one of the following boxes.
• AWSCloud9User (preferred) or AWSCloud9Administrator to enable each user in the group to be anenvironment owner
• AWSCloud9EnvironmentMember to enable each user in the group to be a member only
(If you don't see one of these policy names in the list, type the policy name in the Search box todisplay it.)
7. Choose Attach policy.
Attach an AWS Managed Policy for AWS Cloud9 to a GroupUsing the AWS CLIRun the IAM attach-group-policy command to attach the AWS managed policy for AWS Cloud9 tothe group, specifying the group's name and the Amazon Resource Name (ARN) of the policy, for example:
aws iam attach-group-policy --group-name GROUP_NAME --policy-arn POLICY_ARN
In the preceding command, replace GROUP_NAME with the name of the group. Replace POLICY_ARN withthe ARN of one of the following AWS managed policies.
• arn:aws:iam::aws:policy/AWSCloud9User (preferred) or arn:aws:iam::aws:policy/AWSCloud9Administrator to enable each user in the group to be an environment owner
• arn:aws:iam::aws:policy/AWSCloud9EnvironmentMember to enable each user in the group tobe a member only
Invite an IAM User in Your Account to YourEnvironmentUse the instructions in this section to share an AWS Cloud9 development environment in your AWSaccount with an IAM entity in the same account.
To share an environment in your account with an IAM user in another account, see Invite an IAM User inAnother Account to Your Environment (p. 95).
1. Be sure the corresponding access policy is attached to the IAM group containing the user you want toinvite. For more information, see About Environment Member Access Roles (p. 91).
92

AWS Cloud9 User GuideInvite an IAM User in Your Account to Your Environment
2. Sign in to AWS Cloud9 using the credentials of the environment owner, if you are not already signedin. For more information, see Step 4: Sign in to the AWS Cloud9 Console (p. 13) in Team Setup.
3. Open the environment that you own and want to invite the user to, if the environment is not alreadyopen. For more information, see Opening an Environment in AWS Cloud9 (p. 77).
4. In the menu bar in the AWS Cloud9 IDE, do one of the following.
• Choose Window, Share.
• Choose Share (located next to the Preferences gear icon).
5. In the Share this environment dialog box, for Invite Members, type the name of the IAM user youwant to invite to this environment. The invited user must be within the same AWS account as theenvironment owner.
NoteIn addition to inviting IAM users, you can invite the AWS account root user, IAM userswith assumed roles, and federated users, who are within the same AWS account as theenvironment owner.
• To invite the AWS account root user, type arn:aws:iam::ACCOUNT_ID:root.
• To invite an IAM user with an assumed role, type arn:aws:sts::ACCOUNT_ID:assumed-role/ROLE_NAME/ROLE_SESSION_NAME, where ROLE_NAME is the name of theassumed role, and ROLE_SESSION_NAME is the session name for the assumed role.
• To invite a federated user, type arn:aws:sts::ACCOUNT_ID:federated-user/USER_NAME, where USER_NAME is the name of the federated user identified in IAM.
6. To make this user a read-only member, choose R. To make this user read/write, choose RW.
7. Choose Invite.
NoteIf you make this user a read/write member, a dialog box is displayed, containing informationabout possibly putting your AWS security credentials at risk. The following informationprovides more background about this issue.You should share an environment only with those you trust.A read/write member may be able to use the AWS CLI, the aws-shell, or AWS SDK code inyour environment to take actions in AWS on your behalf. Furthermore, if you store yourpermanent AWS access credentials within the environment, that member could potentiallycopy those credentials and use them outside of the environment.Removing your permanent AWS access credentials from your environment and usingtemporary AWS access credentials instead does not fully address this issue. It lessens theopportunity of the member to copy those temporary credentials and use them outside ofthe environment (as those temporary credentials will work only for a limited time). However,temporary credentials still enable a read/write member to take actions in AWS from theenvironment on your behalf.
8. Contact the user to let them know they can open this environment and begin using it.
93

AWS Cloud9 User GuideInvite an IAM User in Your Account to Your Environment
NoteThe following entities can invite themselves to any environment in their AWS account.
• The AWS account root user.
• An IAM administrator user (or user belonging to an IAM administrator group) or equivalent intheir AWS account.
• An IAM user (or user belonging to an IAM group) in their AWS account that has the AWSmanaged policy AWSCloud9Administrator or equivalent attached.
To invite themselves (or other IAM users or federated users in their AWS account), theseentities can use the AWS CLI or the aws-shell to run the AWS Cloud9 create-environment-membership command, specifying the ID of the environment (represented here as ENVIRONMENT_ID ) and the Amazon Resource Name (ARN) (represented here as ENTITY_ARN) of the entity to invite. For example:
aws cloud9 create-environment-membership --environment-id ENVIRONMENT_ID --user-arn ENTITY_ARN --permissions PERMISSION_LEVEL
For example, to invite the AWS account root user for account ID 123456789012 to anenvironment with ID 0c00a6ff0e8244698d33fdab581ea3EX as a read/write member, run thefollowing command.
aws cloud9 create-environment-membership --environment-id 0c00a6ff0e8244698d33fdab581ea3EX --user-arn arn:aws:iam::123456789012:root --permissions read-write
NoteIf you're using the aws-shell, omit the aws prefix from the preceding commands.
To use code to invite an IAM entity in your AWS account with an IAM entity in the same account, call theAWS Cloud9 create environment membership operation, as follows.
AWS CLI create-environment-membership
AWS SDK for C++ CreateEnvironmentMembershipRequest,CreateEnvironmentMembershipResult
AWS SDK for Go CreateEnvironmentMembership,CreateEnvironmentMembershipRequest,CreateEnvironmentMembershipWithContext
AWS SDK for Java CreateEnvironmentMembershipRequest,CreateEnvironmentMembershipResult
AWS SDK for JavaScript createEnvironmentMembership
AWS SDK for .NET CreateEnvironmentMembershipRequest,CreateEnvironmentMembershipResponse
AWS SDK for PHP createEnvironmentMembership
AWS SDK for Python (Boto) create_environment_membership
AWS SDK for Ruby create_environment_membership
AWS Tools for Windows PowerShell New-C9EnvironmentMembership
94

AWS Cloud9 User GuideInvite an IAM User in Another Account to Your Environment
AWS Cloud9 API CreateEnvironmentMembership
Invite an IAM User in Another Account to YourEnvironmentUse the instructions in this section to share an AWS Cloud9 development environment in your AWSaccount with an IAM user in a separate AWS account.
To share an environment in your account with other IAM entities within your same account, see Invite anIAM User in Your Account to Your Environment (p. 92).
PrerequisitesBefore you complete the steps in the section, be sure you have the following.
• Two AWS accounts. One account contains the environment you want to share. To reduce confusion, werefer to this account as "your account" and as "account 111111111111" in this section's examples. Aseparate account contains the IAM user you want to share the environment with. To reduce confusion,we refer to this account as "the other account" and as "account 999999999999" in this section'sexamples.
• An IAM group in the other account 999999999999, which we refer to asAWSCloud9CrossAccountGroup in this section's examples. (To use a different group in that account,substitute its name throughout this section's examples).
• An IAM user named in the other account 999999999999, which we refer to asAWSCloud9CrossAccountUser in this section's examples. This user is a member of theAWSCloud9CrossAccountGroup group in the other account. (To use a different user in that account,substitute its name throughout this section's examples).
• An environment in your account 111111111111 that you want to allow the user in the other account999999999999 to access.
Step 1: Create an IAM Role in Your Account to Allow Access fromthe Other AccountIn this step, you create an IAM role in your account 111111111111. This role allows users in the otheraccount 999999999999 to access your account using the permissions you specify.
1. Sign in to the AWS Management Console using your AWS account 111111111111.
We recommend you sign in using credentials for an IAM administrator user in your AWS account. If youcan't do this, check with your AWS account administrator.
2. Open the IAM console. To do this, on the global navigation bar, choose Services, and then choose IAM.3. In the service navigation pane, choose Roles.4. On the Roles page, choose Create role.5. On the Select type of trusted entity page, choose the Another AWS account tile.6. In Specify accounts that can use this role, for Account ID, type the ID of the other AWS account:
999999999999. (Leave the Options boxes cleared.)7. Choose Next: Permissions.8. On the Attach permissions policies page, select the box next to the policy (or policies) that contain
the permissions you want the other AWS account to have in your account. For this example, chooseAWSCloud9EnvironmentMember. (If you can't find it, type AWSCloud9EnvironmentMember in the
95

AWS Cloud9 User GuideInvite an IAM User in Another Account to Your Environment
Search box to display it.) This particular policy allows users in the other account to become read-onlyor read/write members in shared environments in your account after you invite them.
9. Choose Review.10.On the Review page, for Role name, type a name for the role. For this example, type
AWSCloud9EnvironmentMemberCrossAccountRole. (To use a different name for the role, substituteit throughout this section's examples).
11.Choose Create role.12.In the list of roles that is displayed, choose AWSCloud9EnvironmentMemberCrossAccountRole.13.On the Summary page, copy the value of Role ARN, for example, arn:aws:iam::111111111111:role/
AWSCloud9EnvironmentMemberCrossAccountRole. You need this value for Step 3 in this section.
Step 2: Add the User in the Other Account as a Member of YourEnvironmentNow that you have an IAM role in your account 111111111111, and know the name of the user in otheraccount 999999999999, you can add the user as a member of the environment.
1. If you're not already signed in to the AWS Management Console as the owner of the environment inyour account 111111111111, sign in now.
2. Open the IDE for the environment. (If you're not sure how to do this, see Opening anEnvironment (p. 77).)
3. On the menu bar, choose Share.4. In the Share this environment dialog box, for Invite Members,
type arn:aws:sts::111111111111:assumed-role/AWSCloud9EnvironmentMemberCrossAccountRole/AWSCloud9CrossAccountUser, where:• 111111111111 is the actual ID of your AWS account.• AWSCloud9EnvironmentMemberCrossAccountRole is the name of the IAM role in your account111111111111, as specified earlier in Step 1 of this section.
• AWSCloud9CrossAccountUser is the name of the user in the other account 999999999999.5. Choose Invite, and follow the onscreen instructions to complete the invitation process.
Step 3: Grant Access in the Other Account to Use the IAM Role inYour AccountIn this step, you allow the user in the other account 999999999999 to use the IAM role you created inyour account 111111111111.
1. If you're still signed in to the AWS Management Console using your AWS account 111111111111, signout now.
2. Sign in to the AWS Management Console using the other AWS account 999999999999.
We recommend you sign in using credentials for an IAM administrator user in the other account. If youcan't do this, check with your AWS account administrator.
3. Open the IAM console. To do this, on the global navigation bar, choose Services, and then choose IAM.4. In the service navigation pane, choose Groups.5. In the list of groups that is displayed, choose AWSCloud9CrossAccountGroup.6. On the Permissions tab, expand Inline Policies, and then choose the link at the end of "To create one,
click here."7. On the Set Permissions page, choose Custom Policy, and then choose Select.
96

AWS Cloud9 User GuideOpen a Shared Environment
8. On the Review Policy page, for Policy Name, type a name for the policy. For this example, we suggesttyping AWSCloud9CrossAccountGroupPolicy. (You can use a different name for the policy).
9. For Policy Document, type the following, substituting 111111111111 for the actual ID of your AWSaccount.
{ "Version": "2012-10-17", "Statement": { "Effect": "Allow", "Action": "sts:AssumeRole", "Resource": "arn:aws:iam::111111111111:role/AWSCloud9EnvironmentMemberCrossAccountRole" }}
10.Choose Apply Policy.
Step 4: Use the Other Account to Open the Shared Environmentin Your AccountIn this step, the user in the other account 999999999999 uses the IAM role in your account111111111111 to open the shared environment that's also in your account.
1. If you're not already signed in to the AWS Management Console as the IAM user namedAWSCloud9CrossAccountUser in the other AWS account 999999999999, sign in now.
2. On the global navigation bar, choose AWSCloud9CrossAccountUser, and then choose Switch Role.3. On the Switch role page, choose Switch Role.4. For Account, type your AWS account ID: 111111111111.5. For Role, type AWSCloud9EnvironmentMemberCrossAccountRole.6. For Display Name, type a name that helps you more easily identify this role for later use, or leave the
suggested display name.7. Choose Switch Role. In the global navigation bar, AWSCloud9CrossAccountUser is replaced with the
Display Name value and also changes its background color.8. On the global navigation bar, choose Services, and then choose Cloud9.9. On the global navigation bar, choose the AWS Region that contains the environment.10.In the service navigation pane, choose Shared with you.11.In the card for the environment that you want to open, choose Open IDE.
You can switch back to using the original user identity AWSCloud9CrossAccountUser. With the AWSManagement Console still open for this step, on the global navigation bar choose the Display Namevalue from earlier in this step. Then choose Back to AWSCloud9CrossAccountUser.
To use the AWSCloud9EnvironmentMemberCrossAccountRole role again, with the AWS ManagementConsole still open for this step, on the global navigation bar choose AWSCloud9CrossAccountUser. ForRole History, choose the Display Name value from earlier in this step.
Open a Shared EnvironmentTo open a shared environment, you use your AWS Cloud9 dashboard. You then use the AWS Cloud9 IDEto do things in a shared environment such as work with files and chat with other members.
1. Be sure the corresponding access policy is attached to the group containing your user. For moreinformation, see About Environment Member Access Roles (p. 91).
97

AWS Cloud9 User GuideSee a List of Environment Members
2. Sign in to AWS Cloud9, if you are not already signed in. For more information, see Step 4: Sign in tothe AWS Cloud9 Console (p. 13) in Team Setup.
3. Open the shared environment from your AWS Cloud9 dashboard. For more information, see Openingan Environment in AWS Cloud9 (p. 77).
You use the Collaborate window to interact with other members, as described in the rest of this topic.
NoteIf the Collaborate window is not visible, choose the Collaborate button. If the Collaboratebutton is not visible, on the menu bar, choose Window, Collaborate.
See a List of Environment MembersWith the shared environment open, in the Collaborate window, expand Environment Members, if thelist of members is not visible.
A circle next to each member indicates their online status, as follows.
• Active members have a green circle• Offline members have a gray circle• Idle members have an orange circle
To use code to get a list of environment members, call the AWS Cloud9 describe environmentmemberships operation, as follows.
AWS CLI describe-environment-memberships
AWS SDK for C++ DescribeEnvironmentMembershipsRequest,DescribeEnvironmentMembershipsResult
AWS SDK for Go DescribeEnvironmentMemberships,DescribeEnvironmentMembershipsRequest,DescribeEnvironmentMembershipsWithContext
98

AWS Cloud9 User GuideOpen the Active File of an Environment Member
AWS SDK for Java DescribeEnvironmentMembershipsRequest,DescribeEnvironmentMembershipsResult
AWS SDK for JavaScript describeEnvironmentMemberships
AWS SDK for .NET DescribeEnvironmentMembershipsRequest,DescribeEnvironmentMembershipsResponse
AWS SDK for PHP describeEnvironmentMemberships
AWS SDK for Python (Boto) describe_environment_memberships
AWS SDK for Ruby describe_environment_memberships
AWS Tools for Windows PowerShell Get-C9EnvironmentMembershipList
AWS Cloud9 API DescribeEnvironmentMemberships
Open the Active File of an Environment MemberWith the shared environment open, in the menu bar, choose the member name. Then choose OpenActive File.
Open the Open File of an Environment Member1. With the shared environment open, in the Collaborate window, expand Environment Members, if the
list of members is not visible.2. Expand the name of the user whose open file you want to open in your environment.3. Double-click the name of the file you want to open.
Go to the Active Cursor of an Environment Member1. With the shared environment open, in the Collaborate window, expand Environment Members, if the
list of members is not visible.2. Right-click the member name, and then choose Show Location.
99

AWS Cloud9 User GuideChat with Other Environment Members
Chat with Other Environment MembersWith the shared environment open, at the bottom of the Collaborate window, for Enter your messagehere, type your chat message, and then press Enter.
View Chat Messages in a Shared EnvironmentWith the shared environment open, in the Collaborate window, expand Group Chat, if the list of chatmessages is not visible.
Delete a Chat Message from a Shared EnvironmentWith the shared environment open, in the Collaborate window, right-click the chat message in GroupChat, and then choose Delete Message.
NoteWhen you delete a chat message, it is deleted from the environment for all members.
Delete All Chat Messages from a Shared EnvironmentWith the shared environment open, in the Collaborate window, right-click anywhere in Group Chat, andthen choose Clear history.
NoteWhen you delete all chat messages, they are deleted from the environment for all members.
Change the Access Role of an Environment Member1. Open the environment that you own and that contains the member whose access role you want to
change, if the environment is not already open. For more information, see Opening an Environment inAWS Cloud9 (p. 77).
2. In the Collaborate window, expand Environment Members, if the list of members is not visible.3. Do one of the following:
• Next to the member name whose access role you want to change, choose R or RW to make thismember owner or read/write, respectively.
• To change a read/write member to read-only, right-click the member name, and then chooseRevoke Write Access.
100

AWS Cloud9 User GuideRemove Your User From a Shared Environment
• To change a read-only member to read/write, right-click the member name, and then choose GrantRead+Write Access.
NoteIf you make this user a read/write member, a dialog box is displayed, containinginformation about possibly putting your AWS security credentials at risk. Do not make auser a read/write member unless you trust that user to take actions in AWS on your behalf.For more information, see the related note in Invite an IAM User in Your Account to YourEnvironment (p. 92).
To use code to change the access role of a environment member, call the AWS Cloud9 updateenvironment membership operation, as follows.
AWS CLI update-environment-membership
AWS SDK for C++ UpdateEnvironmentMembershipRequest,UpdateEnvironmentMembershipResult
AWS SDK for Go UpdateEnvironmentMembership,UpdateEnvironmentMembershipRequest,UpdateEnvironmentMembershipWithContext
AWS SDK for Java UpdateEnvironmentMembershipRequest,UpdateEnvironmentMembershipResult
AWS SDK for JavaScript updateEnvironmentMembership
AWS SDK for .NET UpdateEnvironmentMembershipRequest,UpdateEnvironmentMembershipResponse
AWS SDK for PHP updateEnvironmentMembership
AWS SDK for Python (Boto) update_environment_membership
AWS SDK for Ruby update_environment_membership
AWS Tools for Windows PowerShell Update-C9EnvironmentMembership
AWS Cloud9 API UpdateEnvironmentMembership
Remove Your User From a Shared EnvironmentNoteYou cannot remove your user from an environment if you are the environment owner.Removing your user from a member does not remove your user from IAM.
1. With the shared environment open, in the Collaborate window, expand Enviroment Members, if thelist of members is not visible.
2. Do one of the following.
• Next to You, choose the trash can icon.
• Right-click You, and then choose Leave environment.
3. When prompted, choose Leave.
To use code to remove your user from a shared environment, call the AWS Cloud9 delete environmentmembership operation, as follows.
101

AWS Cloud9 User GuideRemove Another Environment Member
AWS CLI delete-environment-membership
AWS SDK for C++ DeleteEnvironmentMembershipRequest,DeleteEnvironmentMembershipResult
AWS SDK for Go DeleteEnvironmentMembership,DeleteEnvironmentMembershipRequest,DeleteEnvironmentMembershipWithContext
AWS SDK for Java DeleteEnvironmentMembershipRequest,DeleteEnvironmentMembershipResult
AWS SDK for JavaScript deleteEnvironmentMembership
AWS SDK for .NET DeleteEnvironmentMembershipRequest,DeleteEnvironmentMembershipResponse
AWS SDK for PHP deleteEnvironmentMembership
AWS SDK for Python (Boto) delete_environment_membership
AWS SDK for Ruby delete_environment_membership
AWS Tools for Windows PowerShell Remove-C9EnvironmentMembership
AWS Cloud9 API DeleteEnvironmentMembership
Remove Another Environment MemberNoteTo remove any member other than your user from an environment, you must be signed in toAWS Cloud9 using the credentials of the environment owner.Removing a member does not remove the user from IAM.
1. Open the environment that contains the member you want to remove, if the environment is notalready open. For more information, see Opening an Environment in AWS Cloud9 (p. 77).
2. In the Collaborate window, expand Environment Members, if the list of members is not visible.
3. Do one of the following.
• Next to the name of the member you want to delete, choose the trash can icon.
• Right-click the name of the member you want to delete, and then choose Revoke Access.
4. When prompted, choose Remove Member.
To use code to remove a member from an environment, call the AWS Cloud9 delete environmentmembership operation, as follows.
AWS CLI delete-environment-membership
AWS SDK for C++ DeleteEnvironmentMembershipRequest,DeleteEnvironmentMembershipResult
AWS SDK for Go DeleteEnvironmentMembership,DeleteEnvironmentMembershipRequest,DeleteEnvironmentMembershipWithContext
102

AWS Cloud9 User GuideEnvironment Sharing Best Practices
AWS SDK for Java DeleteEnvironmentMembershipRequest,DeleteEnvironmentMembershipResult
AWS SDK for JavaScript deleteEnvironmentMembership
AWS SDK for .NET DeleteEnvironmentMembershipRequest,DeleteEnvironmentMembershipResponse
AWS SDK for PHP deleteEnvironmentMembership
AWS SDK for Python (Boto) delete_environment_membership
AWS SDK for Ruby delete_environment_membership
AWS Tools for Windows PowerShell Remove-C9EnvironmentMembership
AWS Cloud9 API DeleteEnvironmentMembership
Environment Sharing Best PracticesWe recommend the following practices when sharing environments.
• Only invite read/write members you trust to your environments.
• For EC2 environments, read/write members can use the environment owner's AWS access credentials,instead of their own credentials, to make calls from the environment to AWS services. To preventthis, the environment owner can disable AWS managed temporary credentials for the environment.However, this also prevents the environment owner from making calls. For more information, see AWSManaged Temporary Credentials (p. 401).
• Turn on AWS CloudTrail to track activity in your environments. For more information, see the AWSCloudTrail User Guide.
• Do not use your AWS account root user to create and share environments. Use IAM users in the accountinstead. For more information, see First-Time Access Only: Your Root User Credentials and IAM Users inthe IAM User Guide.
Moving or Resizing an Environment in AWS Cloud9You can move an AWS Cloud9 development environment from one Amazon EC2 instance to another. Oryou can change an Amazon EC2 instance that connects to an AWS Cloud9 development environmentfrom one instance type to another. For example, you might want to do one of the following.
• Transfer an environment from an instance that is broken, or behaving in unexpected ways, to a healthyinstance.
• Transfer an environment from an older instance to an instance that has the latest system updates.
• Increase an instance's compute resources, because the environment is over-utilized on the instance.
• Decrease an instance's compute resources, because the environment is under-utilized on the instance.
NoteThis topic only covers moving an AWS Cloud9 development environment or resizing an AmazonEC2 instance. To move an SSH environment from one of your own servers to another, or toresize one of your own servers, refer to your server's documentation.You cannot move or resize an environment to an instance of the same type. When you move orresize, you must choose a different instance type for the new instance.
103

AWS Cloud9 User GuideTo move or resize an environment
To move or resize an environmentSee the Resizing an Amazon EBS-backed Instance procedure in the Amazon EC2 User Guide for LinuxInstances, noting the following details.
• Following this procedure might result in charges to your AWS account for Amazon EC2 and AmazonEBS. For more information, see Amazon EC2 Pricing and Amazon EBS Pricing.
• Skip the steps in this procedure that start with [EC2-Classic]. Both the original and new instances runin EC2-VPC. The original or new instances do not run in EC2-Classic.
• Skip the details in this procedure about Auto Scaling. The original or new instances do not run in anAuto Scaling group.
• The Amazon EC2 instance name starts with aws-cloud9- followed by the AWS Cloud9 developmentenvironment name. For example, if the environment is named my-demo-environment, the AmazonEC2 instance name will start with aws-cloud9-my-demo-environment.
• You don't need to restart the instance after you resize it. When you open an AWS Cloud9 developmentenvironment, AWS Cloud9 starts the instance automatically.
• We do not support using any of the other procedures in the topic, such as migrating the instance. Thisis because the Amazon Machine Image (AMI) that AWS Cloud9 uses is constantly changing. Therefore,we don't guarantee any individual AMI will be maintained for use with a migrated instance.
Deleting an Environment in AWS Cloud9To prevent ongoing charges to your AWS account related to an AWS Cloud9 development environmentthat you're no longer using, you should delete the environment.
• Deleting an Environment with the Console (p. 104)• Deleting an Environment with Code (p. 106)
Deleting an Environment with the Console1. Sign in to the AWS Cloud9 console, at https://console.aws.amazon.com/cloud9/.2. In the top navigation bar, choose the AWS Region where the environment is located.
104

AWS Cloud9 User GuideDeleting an Environment with the Console
3. In the list of environments, for the environment you want to delete, do one of the following.
• Choose the title of the card for the environment. Then choose Delete on the next page.
• Select the card for the environment, and then choose the Delete button.
4. In the Delete dialog box, type Delete, and then choose Delete.
If the environment was an EC2 environment, AWS Cloud9 also terminates the Amazon EC2 instancethat was connected to that environment.
However, if the environment was an SSH environment, and that environment was connected toan Amazon EC2 instance, AWS Cloud9 doesn't terminate that instance. If you don't terminate thatinstance later, your AWS account might continue to have ongoing charges for Amazon EC2 related tothat instance.
5. If the environment was an SSH environment, AWS Cloud9 leaves behind a hidden subdirectory onthe Amazon EC2 instance or your own server that was connected to that environment. You can nowsafely delete that subdirectory if you want to. The subdirectory is named .c9. It is located in theEnvironment path directory that you specified when you created the environment.
If your environment is not displayed in the console, try doing one or more of the following actions totry to display it.
• In the side navigation bar, choose one or more of the following.
• Choose Your environments to display all environments that your AWS entity owns within theselected AWS Region and AWS account.
105

AWS Cloud9 User GuideDeleting an Environment with Code
• Choose Shared with you to display all environments your AWS entity has been invited to withinthe selected AWS Region and AWS account.
• Choose Account environments to display all environments within the selected AWS Region andAWS account that your AWS entity has permissions to display.
• Choose the previous arrow, next arrow, or page number button to display more environments in thecurrent scope.
• If you think you should be a member of an environment, but the environment is not displayed in theShared with you list, check with the environment owner.
• In the top navigation bar, choose a different AWS Region.
Deleting an Environment with CodeTo use code to delete an environment in AWS Cloud9, call the AWS Cloud9 delete environmentoperation, as follows.
AWS CLI delete-environment
106

AWS Cloud9 User GuideDeleting an Environment with Code
AWS SDK for C++ DeleteEnvironmentRequest,DeleteEnvironmentResult
AWS SDK for Go DeleteEnvironment, DeleteEnvironmentRequest,DeleteEnvironmentWithContext
AWS SDK for Java DeleteEnvironmentRequest,DeleteEnvironmentResult
AWS SDK for JavaScript deleteEnvironment
AWS SDK for .NET DeleteEnvironmentRequest,DeleteEnvironmentResponse
AWS SDK for PHP deleteEnvironment
AWS SDK for Python (Boto) delete_environment
AWS SDK for Ruby delete_environment
AWS Tools for Windows PowerShell Remove-C9Environment
AWS Cloud9 API DeleteEnvironment
107

AWS Cloud9 User Guide
Working with the AWS Cloud9Integrated DevelopmentEnvironment (IDE)
An integrated development environment (IDE) provides a set of coding productivity tools such as a sourcecode editor, a debugger, and build tools.
Learn how to work with the AWS Cloud9 IDE by reading one or more of these topics.
Topics• Language Support in the AWS Cloud9 Integrated Development Environment (IDE) (p. 109)• Menu Bar Commands Reference for the AWS Cloud9 Integrated Development Environment
(IDE) (p. 110)• Finding and Replacing Text in the AWS Cloud9 Integrated Development Environment (IDE) (p. 120)• Previewing Files in the AWS Cloud9 Integrated Development Environment (IDE) (p. 123)• Previewing Running Applications in the AWS Cloud9 Integrated Development Environment
(IDE) (p. 124)• Working with File Revisions in the AWS Cloud9 Integrated Development Environment (IDE) (p. 131)• Working with Images Files in the AWS Cloud9 Integrated Development Environment (IDE) (p. 132)• Working with Builders, Runners, and Debuggers in the AWS Cloud9 Integrated Development
Environment (IDE) (p. 134)• Working with Custom Environment Variables in the AWS Cloud9 Integrated Development
Environment (IDE) (p. 142)• Working with Project Settings in the AWS Cloud9 Integrated Development Environment
(IDE) (p. 144)• Working with User Settings in the AWS Cloud9 Integrated Development Environment (IDE) (p. 149)• Working with AWS Project and User Settings in the AWS Cloud9 Integrated Development
Environment (IDE) (p. 157)• Working with Keybindings in the AWS Cloud9 Integrated Development Environment (IDE) (p. 158)• Working with Themes in the AWS Cloud9 Integrated Development Environment (IDE) (p. 160)• Working with Initialization Scripts in the AWS Cloud9 Integrated Development Environment
(IDE) (p. 162)• Apple OSX Default Keybindings Reference for the AWS Cloud9 Integrated Development Environment
(IDE) (p. 181)• Apple OSX Vim Keybindings Reference for the AWS Cloud9 Integrated Development Environment
(IDE) (p. 192)• Apple OSX Emacs Keybindings Reference for the AWS Cloud9 Integrated Development Environment
(IDE) (p. 202)• Apple OSX Sublime Keybindings Reference for the AWS Cloud9 Integrated Development
Environment (IDE) (p. 213)• Windows / Linux Default Keybindings Reference for the AWS Cloud9 Integrated Development
Environment (IDE) (p. 224)• Windows / Linux Vim Keybindings Reference for the AWS Cloud9 Integrated Development
Environment (IDE) (p. 234)• Windows / Linux Emacs Keybindings Reference for the AWS Cloud9 Integrated Development
Environment (IDE) (p. 245)
108

AWS Cloud9 User GuideLanguage Support
• Windows / Linux Sublime Keybindings Reference for the AWS Cloud9 Integrated DevelopmentEnvironment (IDE) (p. 255)
• Commands Reference for the AWS Cloud9 Integrated Development Environment (IDE) (p. 266)
Language Support in the AWS Cloud9 IntegratedDevelopment Environment (IDE)
The AWS Cloud9 IDE supports many programming languages. The following table lists the languagesthat are supported and to what level.
Language Syntaxhighlighting1
Run UI 2 Outlineview
Code hintsand linting
Codecompletion
Debugging 3
C++ X X X X 5 X 4
C# X X X 5
CoffeeScript X X
CSS X X
Dart X
Go X X X X X 4 X 4
Haskell X
HTML X X X X
Java X X X 5
JavaScript X X X X X
Node.js X X X X X X 6
PHP X X X X X 7 X
Python X X X X X 8 X
Ruby X X X X X 5
Shell script X X X X X 5
1 The AWS Cloud9 IDE provides syntax highlighting for many more languages. For a complete list, in themenu bar of the IDE, choose View, Syntax.2 You can run programs or scripts at the click of a button for languages marked with an X, withoutusing the command line. For languages not marked with an X or not displayed on the Run, Run Withmenu bar in the IDE, you can create a runner for that language. For instructions, see Create a Builder orRunner (p. 139).3 You can use the IDE's built-in tools to debug programs or scripts for languages marked with an X. Forinstructions, see Debug Your Code (p. 135).4 This feature is in an experimental state for this language. It is not fully implemented and is notdocumented or supported.
109

AWS Cloud9 User GuideMenu Commands Reference
5 This feature supports only local functions for this language.6 This feature is not supported for Node.js versions 7.7.0 and later.7 To specify paths for AWS Cloud9 to use for completion of custom PHP code, in the AWS Cloud9 IDEturn on the Project, PHP Support, Enable PHP code completion setting in Preferences, and then addthe paths to the custom code to the Project, PHP Support, PHP Completion Include Paths setting.8 To specify paths for AWS Cloud9 to use for completion of custom Python code, in the AWS Cloud9 IDEturn on the Project, Python Support, Enable Python code completion setting in Preferences, and thenadd the paths to the custom code to the Project, Python Support, PYTHONPATH setting.
Menu Bar Commands Reference for the AWSCloud9 Integrated Development Environment (IDE)
The following lists describe the default menu bar commands in the AWS Cloud9 IDE. If the menu bar isn'tvisible, choose the thin bar along the top edge of the IDE to show it.
• AWS Cloud9 Menu (p. 110)• File Menu (p. 111)• Edit Menu (p. 112)• Find Menu (p. 114)• View Menu (p. 115)• Goto Menu (p. 115)• Run Menu (p. 116)• Tools Menu (p. 117)• Window Menu (p. 117)• Support Menu (p. 119)• Preview Menu (p. 119)• Other Menu Bar Commands (p. 119)
AWS Cloud9 Menu
Command Description
Preferences Do one of the following:
• Open the Preferences tab if it isn't open.• Make the Preferences tab active if it is open but
not active.• Hide the Preferences tab if it is active.
See Working with Project Settings (p. 144),Working with User Settings (p. 149), Workingwith Keybindings (p. 158), Working withThemes (p. 160), and Working with InitializationScripts (p. 162).
Go To Your Dashboard Open the AWS Cloud9 console in a separate webbrowser tab. See Creating an Environment (p. 72),
110

AWS Cloud9 User GuideFile Menu
Command Description
Opening an Environment (p. 77), ChangingEnvironment Settings (p. 86), and Deleting anEnvironment (p. 104).
Welcome Page Open the Welcome tab.
Open Your Project Settings Open the project.settings file for thecurrent environment. See Working with ProjectSettings (p. 144).
Open Your User Settings Open the user.settings file for the currentuser. See Working with User Settings (p. 149).
Open Your Keymap Open the keybindings.settings filefor the current user. See Working withKeybindings (p. 158).
Open Your Init Script Open the init.js file for the current user. SeeWorking with Initialization Scripts (p. 162).
Open Your Stylesheet Open the styles.css file for the current user.See Working with Themes (p. 160).
File Menu
Command Description
New File Create a new file.
New From Template Create a new file, based on the chosen filetemplate.
Open Show and go to the Navigate window.
Open Recent Open the chosen file.
Save Save the current file.
Save As Save the current file with a different file name,location, or both.
Save All Save all unsaved files.
Revert to Saved Discard changes for current file since it was lastsaved.
Revert All to Saved Discard changes for all unsaved files since theywere last saved.
Upload Local Files Show the Upload Files dialog box, which enablesyou to drag files from your local computer intothe environment.
Download Project Combine the files in the environment into a .zipfile, which you can download to your localcomputer.
111

AWS Cloud9 User GuideEdit Menu
Command Description
Line Endings Use Windows (carriage return plus line feed) orUnix (line feed only) line endings.
Close File Close the current file.
Close All Files Close all open files.
Edit Menu
Command Description
Undo Undo the last action.
Redo Redo the last undone action.
Cut Move the selection to the clipboard.
Copy Copy the selection to the clipboard.
Paste Copy the clipboard's contents to the selectionpoint.
Keyboard Mode The set of keybindings to use, such as Default,Vim, Emacs, or Sublime. See Working withKeybindings (p. 158).
Selection, Select All Select all selectable content.
Selection, Split Into Lines Add a cursor at the end of the current line.
Selection, Single Selection Clear all previous selections.
Selection, Multiple Selections, Add Cursor Up Add a cursor one line above the active cursor. If acursor is already added, add another cursor abovethat one.
Selection, Multiple Selections, Add Cursor Down Add a cursor one line below the active cursor. If acursor is already added, add another cursor belowthat one.
Selection, Multiple Selections, Move ActiveCursor Up
Add a second cursor one line above the activecursor. If a second cursor is already added, movethe second cursor up one line.
Selection, Multiple Selections, Move ActiveCursor Down
Add a second cursor one line below the activecursor. If a second cursor is already added, movethe second cursor down one line.
Selection, Multiple Selections, Add NextSelection Match
Include more matching selections that are afterthe selection.
Selection, Multiple Selections, Add PreviousSelection Match
Include more matching selections that are beforethe selection.
Selection, Multiple Selections, Merge SelectionRange
Add a cursor at the end of the current line.
112

AWS Cloud9 User GuideEdit Menu
Command Description
Selection, Select Word Right Include the next word to the right of the cursor inthe selection.
Selection, Select Word Left Include the next word to the left of the cursor inthe selection.
Selection, Select to Line End Include from the cursor to the end of the currentline in the selection
Selection, Select to Line Start Include from the beginning of the current line tothe cursor in the selection.
Selection, Select to Document End Include from the cursor down to the end of thecurrent file in the selection.
Selection, Select to Document Start Include from the cursor up to the beginning of thecurrent file in the selection.
Line, Indent Indent the selection one tab.
Line, Outdent Outdent the selection one tab.
Line, Move Line Up Move the selection up one line.
Line, Move Line Down Move the selection down one line.
Line, Copy Lines Up Copy the contents of the line, and paste thecopied contents one line up.
Line, Copy Lines Down Copy the contents of the line, and paste thecopied contents one line down.
Line, Remove Line Delete the contents of the current line.
Line, Remove to Line End Delete from the cursor to the end of the currentline.
Line, Remove to Line Start Delete from the beginning of the current line upto the cursor.
Line, Split Line Move the contents of the cursor to the end of theline, to its own line.
Text, Remove Word Right Delete the word to the right of the cursor.
Text, Remove Word Left Delete the word to the left of the cursor.
Text, Align Move all cursors to the same space as theactive cursor on each of their lines, if they aremisaligned.
Text, Transpose Letters Transpose the selection.
Text, To Upper Case Change the selection to all uppercase.
Text, To Lower Case Change the selection to all lowercase.
Comment, Toggle Comment Add line comment characters at the start of eachselected line, or remove them if they are there.
113

AWS Cloud9 User GuideFind Menu
Command Description
Code Folding, Toggle Fold Fold code, or remove code folding if it is there.
Code Folding, Unfold Unfold the selected code.
Code Folding, Fold Other Fold all possibly foldable elements, except for thecurrent selection scope.
Code Folding, Fold All Fold all possibly foldable elements.
Code Folding, Unfold All Unfold code folding for the entire file.
Code Formatting, Apply Code Formatting Reformat the selected JavaScript code.
Code Formatting, Open Language & FormattingPreferences
Open the Project Settings section of thePreferences tab to programming languagesettings.
Find MenuFor more information, see Finding and Replacing Text (p. 120).
Command Description
Find Show the find and replace bar for the currentdocument, with focus on the Find expression.
Find Next Go to the next match in the current document forthe find query you entered last.
Find Previous Go to the previous match in the current documentfor the find query you entered last.
Replace Show the find and replace bar for the currentdocument, with focus on the Replace Withexpression.
Replace Next Replace the next match for Find with ReplaceWith in the find and replace bar for the currentdocument .
Replace Previous Replace the previous match for Find with ReplaceWith in the find and replace bar for the currentdocument.
Replace All Replace all matches for Find with Replace With inthe find and replace bar for the current document.
Find in Files Show the find and replace bar for multiple files.
114

AWS Cloud9 User GuideView Menu
View Menu
Command Description
Editors Show the chosen editor.
Open Files Show the Open Files list in the Environmentwindow, or hide if shown.
Menu Bar Show the menu bar, or hide if shown.
Tab Buttons Show tabs, or hide if shown.
Gutter Show the gutter, or hide if shown.
Status Bar Show the status bar, or hide if shown.
Console Show the Console window, or hide if shown.
Layout, Single Show a single pane.
Layout, Vertical Split Show two panes, top and bottom.
Layout, Horizontal Split Show two panes, side by side.
Layout, Cross Split Show four panes of equal size.
Layout, Split 1:2 Show one pane on the left and two panes on theright.
Layout, Split 2:1 Show two panes on the left and one pane on theright.
Font Size, Increase Font Size Increase the font size.
Font Size, Decrease Font Size Decrease the font size.
Syntax Show the syntax type for the current document.
Themes Show the IDE theme type.
Wrap Lines Wrap words to the edge of the current pane, orstop wrapping words if they are already wrapping.
Wrap To Print Margin Wrap words to the edge of the current printmargin, or stop wrapping words if they are alreadywrapping.
Goto Menu
Command Description
Goto Anything Show the Navigate window.
Goto Symbol Show the Outline window.
Goto Line Show the go to line box for the current document.
115

AWS Cloud9 User GuideRun Menu
Command Description
Goto Command Show the Commands window.
Next Error Go to the next error.
Previous Error Go to the previous error.
Word Right Go one word to the right.
Word Left Go one word to the left.
Line End Go to the end of the current line.
Line Start Go to the start of the current line.
Jump to Definition Go to the definition of the variable or function atthe cursor.
Jump to Matching Brace Go to the matching symbol in the current scope.
Scroll to Selection Scroll the selection into better view.
Run Menu
Command Description
Run Run or debug the current application.
Run Last Run or debug the last run file.
Run With Run or debug using the chosen runner.See Working with Builders, Runners, andDebuggers (p. 134).
Run History View run history.
Run Configurations Choose a run configuration to run or debugwith, or create or manage run configurations.See Working with Builders, Runners, andDebuggers (p. 134).
Show Debugger at Break When running code reaches a breakpoint, showthe Debugger window.
Build Build the current file.
Cancel Build Stop building the current file.
Build System Build using the chosen build system.
Show Build Result Show the related build result.
Automatically Build Supported Files Automatically build supported files.
Save All on Build When building, save all related unsaved files.
116

AWS Cloud9 User GuideTools Menu
Tools Menu
Command Description
Strip Trailing Space Trim whitespace at the ends of lines.
Preview, Preview File FILE-NAME Preview the current document in a preview tab.
Preview, Preview Running Application Preview the current application in a separate webbrowser tab.
Preview, Configure Preview URL Open the Project Settings section of thePreferences tab to the Run & Debug, PreviewURL box.
Preview, Show Active Servers Show a list of available active server addresses inthe Process List dialog box.
Process List Show the Process List dialog box.
Show Autocomplete Show the code completion context menu.
Rename Variable Start a rename refactor for the selection.
Toggle Macro Recording Start keystroke recording, of stop if it is alreadyrecording.
Play Macro Play previously recorded keystrokes.
Developer, Start in Debug Mode Reload the IDE in debug mode.
Window Menu
Command Description
New Terminal Open a new Terminal tab.
New Immediate Window Open a new Immediate tab.
Share Show the Share this environment dialog box.
Installer Show the AWS Cloud9 Installer dialog box.
Collaborate Show the Collaborate window, or hide if shown.
Outline Show the Outline window, or hide if shown.
AWS Resources Show the AWS Resources window, or hide ifshown.
Environment Show the Environment window, or hide if shown.
Debugger Show the Debugger window, or hide if shown.
Navigate Show the Navigate window, or hide if shown.
Commands Show the Commands window, or hide if shown.
117

AWS Cloud9 User GuideWindow Menu
Command Description
Navigation, Tab to the Right Go one tab right.
Navigation, Tab to the Left Go one tab left.
Navigation, Next Tab in History Go to the next tab.
Navigation, Previous Tab in History Go to the previous tab.
Navigation, Move Tab to Right Move the current tab right. If the tab is already atthe far right, create a split tab there.
Navigation, Move Tab to Left Move the current tab left. If the tab is already atthe far left, create a split tab there.
Navigation, Move Tab to Up Move the current tab up one pane. If the tab isalready at very top, create a split tab there.
Navigation, Move Tab to Down Move the current tab down one pane. If the tabis already at the very bottom, create a split tabthere.
Navigation, Go to Pane to Right Go one pane right.
Navigation, Go to Pane to Left Go one pane left.
Navigation, Go to Pane to Up Go one pane up.
Navigation, Go to Pane to Down Go one pane down.
Navigation, Switch Between Editor and Terminal Switch between the editor and the Terminal tab .
Navigation, Next Pane in History Go to the next pane.
Navigation, Previous Pane in History Go to the previous pane.
Saved Layouts, LAYOUT-ID Switch to the chosen layout.
Saved Layouts, Save Save the current layout. To switch to this layoutlater, choose Saved Layouts, LAYOUT-ID.
Saved Layouts, Save and Close All Save the current layout, and then close all tabsand panes.
Saved Layouts, Show Saved Layouts in File Tree Show all saved layouts in the Environmentwindow.
Tabs, Close Pane Close the current pane.
Tabs, Close All Tabs In All Panes Close all open tabs in all panes.
Tabs, Close All But Current Tab Close all open tabs in the current pane, except thecurrent tab.
Tabs, TAB-NAME Go to the chosen tab.
Tabs, Split Pane in Two Rows Split the current pane into two panes, top andbottom.
Tabs, Split Pane in Two Columns Split the current pane into two panes, left andright.
118

AWS Cloud9 User GuideSupport Menu
Command Description
Tabs, (visual layout indicator) Switch to the chosen view.
Presets, Full IDE Switch to full IDE mode.
Presets, Minimal Editor Switch to minimal editor mode.
Presets, Sublime Mode Switch to Sublime mode.
Support Menu
Command Description
Welcome Page Open the Welcome tab.
Get Help (Community) Opens the AWS Cloud9 online community websitein a separate web browser tab.
Read Documentation Opens the AWS Cloud9 User Guide in a separateweb browser tab.
Preview Menu
Command Description
Preview File FILE-NAME Preview the current document in a preview tab.
Preview Running Application Preview the current application in a separate webbrowser tab.
Configure Preview URL Open the Project Settings section of thePreferences tab to the Run & Debug, PreviewURL box.
Show Active Servers Show a list of available active server addresses inthe Process List dialog box.
Other Menu Bar Commands
Command Description
Run Run or debug the current application.
Share Opens the Share this environment dialog box.
Preferences (gear icon) Open the Preferences tab.
119
AWS Cloud9 User GuideFinding and Replacing Text
Finding and Replacing Text in the AWS Cloud9Integrated Development Environment (IDE)
You can use the find and replace bar in the AWS Cloud9 IDE to find and replace text in a single file ormultiple files.
• Find Text in a Single File (p. 120)
• Replace Text in a Single File (p. 120)
• Find Text in Multiple Files (p. 120)
• Replace Text in Multiple Files (p. 121)
• Find and Replace Options (p. 122)
Find Text in a Single File1. Open the file you want to find text in. If the file is already open, choose the file's tab to make the file
active.
2. On the menu bar, choose Find, Find.
3. In the find and replace bar, for Find, type the text you want to find.
4. To specify additional find options, see Find and Replace Options (p. 122).
5. If there are any matches, 0 of 0 in the Find box changes to non-zero numbers. If there are anymatches, the editor goes to the first match. If there is more than one match, to go to the next match,choose the right arrow in the Find box or choose Find, Find Next on the menu bar. To go to theprevious match, choose the left arrow in the Find box or choose Find, Find Previous on the menu bar.
Replace Text in a Single File1. Open the file you want to replace text in. If the file is already open, choose the file's tab to make the
file active.
2. On the menu bar, choose Find, Replace.
3. In the find and replace bar, for Find, type the text you want to find.
4. For Replace With, type the text you want to replace the text in Find with.
5. To specify additional find and replace options, see Find and Replace Options (p. 122).
6. If there are any matches, 0 of 0 in the Find box changes to non-zero numbers. If there are anymatches, the editor goes to the first match. If there is more than one match, to go to the next match,choose the right arrow in the Find box or choose Find, Find Next on the menu bar. To go to theprevious match, choose the left arrow in the Find box or choose Find, Find Previous on the menu bar.
7. To replace the current match with the text in Replace With and then go to the next match, chooseReplace. To replace all matches with the text in Replace With, choose Replace All.
Find Text in Multiple Files1. On the menu bar, choose Find, Find in Files.
2. In the find and replace bar, for Find, type the text you want to find.
3. To specify additional find options, see Find and Replace Options (p. 122).
120

AWS Cloud9 User GuideReplace Text in Multiple Files
4. In the box to the right of the Find button (the box with *.*, -.*), type any set of files to include orexclude in the find. For example:• Blank, *, or *.*: Find all files.• my-file.txt: Find only the file named my-file.txt.• my*: Find only files with file names starting with my.• my*.txt: Find only files with file names starting with my and that have the file extension .txt.• my*.htm*: Find all files with file names starting with my and a file extension starting with .htm.• my*.htm, my*.html: Find all files with file names starting with my and the file extension .htm or.html.
• -my-file.txt: Do not search the file named my-file.txt.• -my*: Do not search any files starting with my.• -my*.htm*: Do not search any files with file names starting with my and a file extension starting
with .htm.• my*.htm*, -my*.html: Search all files with file names starting with my and a file extension
starting with .htm. However, do not search any files with file names starting with my and a fileextension of .html.
5. In the drop-down list next to the preceding box, choose one of the following to further restrict thefind to only specific locations:• Environment: Find only files in the Environment window.• Project (excludes .gitignore'd): Find any file in the environment, except for files or file types listed
in the .gitignore file in the environment, if a .gitignore file exists.• Selection:: Find only files that are currently selected in the Environment window.
NoteTo further restrict the find to only a single folder, choose a folder in the Environmentwindow and then choose Selection. Alternatively, you can right-click the folder in theEnvironment window, and then choose Search In This Folder on the context menu.
• Favorites: Find only files in the Favorites list in the Environment window.• Active File: Find only the active file.• Open Files: Find only files in the Open Files list in the Environment window.
6. Choose Find.7. To go to a file containing matches, double-click the file name on the Search Results tab. To go to a
specific match, double-click the match in the Search Results tab.
Replace Text in Multiple Files1. On the menu bar, choose Find, Find in Files.2. In the find and replace bar, for Find, type the text you want to find.3. To specify additional find options, see Find and Replace Options (p. 122).4. In the box to the right of the Find button (the box with *.*, -.*), type any set of files to include or
exclude in the find. For example:• Blank, *, or *.*: All files.• my-file.txt: Only the file named my-file.txt.• my*: Only files with file names staring with my.• my*.txt: Only files with file names starting with my and that have the file extension .txt.• my*.htm*: All files with file names starting with my and a file extension starting with .htm.• my*.htm, my*.html: All files with file names starting with my and the file extension .htm or.html.
• -my-file.txt: Do not search the file named my-file.txt.
121

AWS Cloud9 User GuideFind and Replace Options
• -my*: Do not search any files starting with my.• -my*.htm*: Do not search any files with file names starting with my and a file extension starting
with .htm.• my*.htm*, -my*.html: Search all files with file names starting with my and a file extension
starting with .htm. However, do not search any files with file names starting with my and a fileextension of .html.
5. In the drop-down list next to the preceding box, choose one of the following to further restrict thefind to only specific locations:• Environment: Only files in the Environment window.• Project (excludes .gitignore'd): Any file in the environment, except for files or file types listed in the.gitignore file in the environment, if a .gitignore file exists.
• Selection: /: Only files that are currently selected.• Favorites: Only files in the Favorites list in the Environment window.• Active File: Only the active file.• Open Files: Only files in the Open Files list in the Environment window.
6. For Replace With, type the text you want to replace Find with.7. Choose Replace.
NoteThe replace operation happens immediately across all files in scope. This operation cannot beeasily undone. If you want to see what will be changed before you start the replace operation,choose Find instead.
8. To go to a file containing replacements, double-click the file name in the Search Results tab. To go toa specific replacement, double-click the replacement in the Search Results pane.
Find and Replace OptionsChoose any of the following buttons on the find and replace bar to modify find and replace operations.
• Regular Expressions: Find text matching the specified regular expression in Find or Find in Files.See Writing a regular expression pattern in the JavaScript Regular Expressions topic on the MozillaDeveloper Network.
• Match Case: Find text matching the specified casing in Find or Find in Files.• Whole Words: Use standard word character rules to find text in Find or Find in Files.• Wrap Around: For a single file only, do not stop at the end or beginning of the file when going to the
next or previous match.• Search Selection: For a single file only, find only in the selection.
122

AWS Cloud9 User GuidePreviewing Files
• Show in Console: For multiple files, show the Search Results tab in the Console instead of the activepane.
• Preserve Case: For a single file only, preserve casing as applicable when replacing text.
Previewing Files in the AWS Cloud9 IntegratedDevelopment Environment (IDE)
You can use the AWS Cloud9 IDE to preview the files in a AWS Cloud9 development environment fromwithin the IDE.
• Open a File for Preview (p. 123)
• Reload a File Preview (p. 124)
• Change the File Preview Type (p. 124)
• Open a File Preview in a Separate Web Browser Tab (p. 124)
• Switch to a Different File Preview (p. 124)
Open a File for PreviewDo one of the following in the AWS Cloud9 IDE to open a file preview tab within the environment:
• In the Environment window, right-click the file you want to preview, and then choose Preview.
NoteAlthough you can use this approach to preview any file, preview works best with files thathave the following file extensions:
• .htm
• .html
• .svg
• .xhtml
• Any file containing content in Markdown format.
• Open a file with one of the following file extensions:
• .svg
• With the file you want to preview already open and active, on the menu bar, choose Preview, PreviewFile FILE_NAME. Or choose Tools, Preview, Preview File FILE_NAME, where FILE_NAME is the nameof the file you want to preview.
NoteThese commands work only with the following file types:
• .htm
• .html
• .markdown
• .md
• .svg
• .txt: Preview works best if the file's content is in Markdown format.123

AWS Cloud9 User GuideReload a File Preview
• .xhtml: Preview works best if the file contains or references content presentationinformation.
NoteThe Preview Settings menu in the file preview tab is currently not functional and choosing anyof its menu commands will have no effect.
Reload a File PreviewOn the file preview tab, choose the Refresh button (the circular arrow).
Change the File Preview TypeOn the file preview tab, choose one of the following in the preview type list:
• Browser: Previews the file in a web browser format, for the following file types only:
• .htm
• .html
• .svg
• .xhtml: Preview works best if the file contains or references content presentation information.
• Raw Content (UTF-8): Previews the file's original contents in Unicode Transformation Format 8-bit(UTF-8) format. This might display unexpected content for some file types.
• Markdown: Previews any file containing Markdown format. Attempts to preview any other file type,but might display unexpected content.
Open a File Preview in a Separate Web Browser TabOn the file preview tab, choose Pop Out Into New Window.
Switch to a Different File PreviewOn the file preview tab, type the path to a different file path in the address bar. The address bar islocated between the Refresh button and the preview type list.
Previewing Running Applications in the AWSCloud9 Integrated Development Environment (IDE)
You can use the AWS Cloud9 IDE to preview a running application from within the IDE.
• Run an Application (p. 125)
• Preview a Running Application (p. 126)
• Reload an Application Preview (p. 126)
• Change the Application Preview Type (p. 127)
• Open an Application Preview in a Separate Web Browser Tab (p. 127)
• Switch to a Different Preview URL (p. 127)
124

AWS Cloud9 User GuideRun an Application
• Share a Running Application over the Internet (p. 127)
Run an ApplicationBefore you can preview your application from within the IDE, it must be running in the AWS Cloud9development environment using HTTP over port 8080, 8081, or 8082 with the IP of 127.0.0.1,localhost, or 0.0.0.0.
NoteYou don't have to run using HTTP over port 8080, 8081, or 8082 with the IP of 127.0.0.1,localhost, or 0.0.0.0. However, you won't be able to preview your running application fromwithin the IDE.If you run with the IP of 0.0.0.0, anyone can potentially access your running application. Forapproaches to address this issue, see the following:
• Step 2: Set Up the Security Group for the Instance (p. 128) in Share a Running Applicationover the Internet
• Step 3: Set Up the Subnet for the Instance (p. 129) in Share a Running Application over theInternet
To write the code to run your application on a specific port and IP, see your application's documentation.
To run your application, see Run Your Code (p. 135).
To test this behavior, for example you could add the following JavaScript code to a file with a name suchas server.js in the root of your environment. This code runs a server using Node.js, as follows.
var http = require('http');var fs = require('fs');var url = require('url');
http.createServer( function (request, response) { var pathname = url.parse(request.url).pathname; console.log("Trying to find '" + pathname.substr(1) + "'...");
fs.readFile(pathname.substr(1), function (err, data) { if (err) { response.writeHead(404, {'Content-Type': 'text/html'}); response.write("ERROR: Cannot find '" + pathname.substr(1) + "'."); console.log("ERROR: Cannot find '" + pathname.substr(1) + "'."); } else { console.log("Found '" + pathname.substr(1) + "'."); response.writeHead(200, {'Content-Type': 'text/html'}); response.write(data.toString()); } response.end(); });}).listen(8080, 'localhost'); // Or 8081 or 8082 instead of 8080. Or '127.0.0.1' instead of 'localhost'.
Or you could add the following Python code to a file with a name such as server.py in the root of yourenvironment. This code runs a server using Python, as follows.
import osimport SimpleHTTPServerimport SocketServer
ip = 'localhost' # Or '127.0.0.1' instead of 'localhost'.
125
AWS Cloud9 User GuidePreview a Running Application
port = '8080' # Or '8081' or '8082' instead of '8080'.Handler = SimpleHTTPServer.SimpleHTTPRequestHandlerhttpd = SocketServer.TCPServer((ip, int(port)), Handler)httpd.serve_forever()
Next, add the following HTML code to a file with a name such as index.html in the root of yourenvironment.
<html> <head> <title>Hello Home Page</title> </head> <body> <p style="font-family:Arial;color:blue">Hello, World!</p> </body></html>
To see this file's HTML output on the application preview tab, run server.js with Node.js orserver.py file with Python. Then follow the instructions in the next procedure to preview it. On theapplication preview tab, add /index.html to the end of the URL, and then press Enter.
Preview a Running ApplicationWith your application already running using HTTP over port 8080, 8081, or 8082 with the IP of127.0.0.1, localhost, or 0.0.0.0 in the environment, and with the corresponding application codefile open and active in the AWS Cloud9 IDE, choose one of the following on the menu bar:
• Preview, Preview Running Application
• Tools, Preview, Preview Running Application
This opens an application preview tab within the environment, and then displays the application's outputon the tab.
To enable others to preview the running application outside of the IDE, see Share a Running Applicationover the Internet (p. 127).
NoteIf the application is not already running, you will see an error on the application preview tab.Run or restart the application, and then choose the menu bar command again.If your application cannot run on any of the preceding ports or IPs, or if your application mustrun on more than one of these ports at the same time (for example, your application must runon ports 8080 and 3000 at the same time), the application preview tab might display an error ormight be blank. This is because the application preview tab within the environment works onlywith the preceding ports and IPs, and it works with only a single port at a time.We don't recommend sharing the URL in the application previewtab with others. (The URL displays using the format https://ENVIRONMENT_ID.vfs.cloud9.REGION_ID.amazonaws.com/.) This URL works only whenthe IDE for the environment is open and the application is running in the same web browser.
Reload an Application PreviewOn the application preview tab, choose the Refresh button (the circular arrow).
NoteThis command does not restart the server. It just refreshes the contents of the applicationpreview tab.
126

AWS Cloud9 User GuideChange the Application Preview Type
Change the Application Preview TypeOn the application preview tab, choose one of the following in the preview type list:
• Browser: Previews the output in a web browser format.• Raw Content (UTF-8): Attempts to preview the output in Unicode Transformation Format 8-bit
(UTF-8) format, if applicable.• Markdown: Attempts to preview the output in Markdown format, if applicable.
Open an Application Preview in a Separate WebBrowser TabOn the application preview tab, choose Pop Out Into New Window.
NoteThe application preview will not be displayed in a separate web browser tab unless the AWSCloud9 IDE is also running in at least one other tab in the same web browser.
Switch to a Different Preview URLOn the application preview tab, type the path to a different URL in the address bar. The address bar islocated between the Refresh button and the preview type list.
Share a Running Application over the InternetAfter you preview your running application, you can make it available to others over the internet.
To do this, if an Amazon EC2 instance is connected to your environment, follow these steps. Otherwise,see your server's documentation.
• Step 1: Get the ID and the IP Address of the Instance (p. 127)• Step 2: Set Up the Security Group for the Instance (p. 128)• Step 3: Set Up the Subnet for the Instance (p. 129)• Step 4: Change the Running Application IP (p. 130)• Step 5: Share the Running Application URL (p. 130)
Step 1: Get the ID and the IP Address of the InstanceIn this step, you note the instance ID and public IP address for the Amazon EC2 instance that isconnected to the environment. You need the instance ID in a later step to allow incoming applicationrequests. Then you give the public IP address to others so that they can access the running application.
1. Get the Amazon EC2 instance's ID. To get this, do one of the following:• In a terminal session in the AWS Cloud9 IDE for the environment, run the following command to get
the Amazon EC2 instance's ID.
curl http://169.254.169.254/latest/meta-data/instance-id
The instance ID will look similar to this: i-02ccbdf54d66e34EX. Make a note of this instance ID.• In the IDE for the environment, on the menu bar, choose your user icon, and then choose Manage
EC2 Instance.
127

AWS Cloud9 User GuideShare a Running Application over the Internet
In the Amazon EC2 console that displays, make a note of the instance ID that displays in theInstance ID column. The instance ID will look similar to this: i-02ccbdf54d66e34EX.
2. Get the Amazon EC2 instance's public IP address. To get this, do one of the following:
• In the IDE for the environment, on the menu bar, choose Share. In the Share this environmentdialog box, make a note of the public IP address in the Application box. The public IP address willlook similar to this: 192.0.2.0.
• In a terminal session in the IDE for the environment, run the following command to get the AmazonEC2 instance's public IP address.
curl http://169.254.169.254/latest/meta-data/public-ipv4
The public IP address will look similar to this: 192.0.2.0. Make a note of this public IP address.
• In the IDE for the environment, on the menu bar, choose your user icon, and then choose ManageEC2 Instance. In the Amazon EC2 console that displays, on the Description tab, make a note ofthe public IP address for the IPv4 Public IP field. The public IP address will look similar to this:192.0.2.0.
NoteThe instance's public IP address might change anytime the instance restarts. To prevent thisIP address from changing, one solution is to allocate an Elastic IP address and then assignthat address to the running instance. For instructions, see Allocating an Elastic IP Address andAssociating an Elastic IP Address with a Running Instance in the Amazon EC2 User Guide forLinux Instances. Note also that allocating an Elastic IP address might result in charges to yourAWS account. For more information, see Amazon EC2 Pricing.
Step 2: Set Up the Security Group for the InstanceIn this step, you use the Amazon EC2 console to set up the Amazon EC2 security group for the instancethat is connected to the environment, to allow incoming HTTP requests over port 8080, 8081, or 8082.
NoteYou don't have to run using HTTP over port 8080, 8081, or 8082. If you are running on adifferent protocol or port, substitute it throughout this step. You won't be able to preview yourrunning application from within the IDE until you switch back to running using HTTP over one ofthe ports and IPs as described in Preview a Running Application (p. 126).For an additional layer of security, you can also set up a network access control list (ACL) for asubnet in a virtual private cloud (VPC) that the instance can use. For more information aboutsecurity groups and network ACLs, see the following:
• Step 3: Set Up the Subnet for the Instance (p. 129)
• Security in the Amazon VPC User Guide
• Security Groups for Your VPC in the Amazon VPC User Guide
• Network ACLs in the Amazon VPC User Guide
1. In the IDE for the environment, on the menu bar, choose your user icon, and then choose Manage EC2Instance. Then skip ahead to step 3 in this procedure.
128

AWS Cloud9 User GuideShare a Running Application over the Internet
2. If choosing Manage EC2 Instance or other steps in this procedure display errors, we recommendyou sign in to the Amazon EC2 console using credentials for an IAM administrator user in your AWSaccount, and then complete the following instructions. If you cannot do this, check with your AWSaccount administrator.a. Sign in to the AWS Management Console, if you are not already signed in, at https://
console.aws.amazon.com.b. Open the Amazon EC2 console. To do this, in the AWS navigation bar, choose Services. Then choose
EC2.c. In the AWS navigation bar, choose the AWS Region where the environment is located.d. If the EC2 Dashboard is displayed, choose Running Instances. Otherwise, in the service navigation
pane, expand Instances if it is not already expanded, and then choose Instances.e. In the list of instances, select the instance where the Instance ID matches the instance ID you noted
earlier.3. In the Description tab for the instance, choose the security group link next to Security groups.4. With the security group displayed, look on the Inbound tab. If a rule already exists where Type is set
to Custom TCP Rule and Port Range is set to 8080, 8081, or 8082, choose Cancel, and skip ahead toStep 3: Set Up the Subnet for the Instance (p. 129). Otherwise, choose Edit.
5. In the Edit inbound rules dialog box, choose Add Rule.6. For Type, choose Custom TCP Rule.7. For Port Range, type 8080, 8081, or 8082.8. For Source, choose Anywhere.
NoteChoosing Anywhere for Source allows incoming requests from any IP address. To restrict thisto specific IP addresses, choose Custom and then type the IP address range, or choose My IPto restrict this to requests from your IP address only.
9. Choose Save.
Step 3: Set Up the Subnet for the InstanceIn this step, you use the consoles for Amazon EC2 and Amazon Virtual Private Cloud (Amazon VPC) to setup the subnet for the Amazon EC2 instance that is connected to the environment, to also allow incomingHTTP requests over port 8080, 8081, or 8082.
NoteYou don't have to run using HTTP over port 8080, 8081, or 8082. If you are running on adifferent protocol or port, substitute it throughout this step. You won't be able to preview yourrunning application from within the IDE until you switch back to running using HTTP over theports and IPs as described in Preview a Running Application (p. 126).This step describes how to set up a network ACL for a subnet in an Amazon VPC that theinstance can use. This step is not required. However, it adds an additional layer of security whencompared to just using security groups. For more information about network ACLs, see thefollowing:
• Security in the Amazon VPC User Guide• Network ACLs in the Amazon VPC User Guide
1. With the Amazon EC2 console already open from the previous step, in the service navigation pane,expand Instances if it is not already expanded, and then choose Instances.
2. In the list of instances, select the instance where the Instance ID matches the instance ID you notedearlier.
3. In the Description tab for the instance, note the value of Subnet ID. It should look similar to this:subnet-1fab8aEX.
129
AWS Cloud9 User GuideShare a Running Application over the Internet
4. Open the Amazon VPC console. To do this, in the AWS navigation bar, choose Services. Then chooseVPC.
For this step, we recommend you sign in to the Amazon VPC console using credentials for anIAM administrator user in your AWS account. If you cannot do this, check with your AWS accountadministrator.
5. If the VPC Dashboard is displayed, choose Subnets. Otherwise, in the service navigation pane, chooseSubnets.
6. In the list of subnets, select the subnet where the Subnet ID value matches the one you noted earlier.
7. On the Summary tab, choose the network ACL link next to Network ACL.
8. In the list of network ACLs, select the network ACL. (There is only one network ACL.)
9. Look on the Inbound Rules tab for the network ACL. If a rule already exists where Type is set toHTTP* (8080), HTTP* (8081), or HTTP* (8082), skip ahead to Step 4: Change the Running ApplicationIP (p. 130). Otherwise, choose Edit.
10.Choose Add another rule.
11.For Rule #, type a number for the rule (for example, 200).
12.For Type, choose Custom TCP Rule.
13.For Port Range, type 8080, 8081, or 8082.
14.For Source, type the range of IP addresses to allow incoming requests from. For example, to allowincoming requests from any IP address, type 0.0.0.0/0.
15.With Allow / Deny set to ALLOW, choose Save.
Step 4: Change the Running Application IPIn your code, switch from using IP 127.0.0.1, localhost, or 0.0.0.0 to using the IP address oraddresses you specified in the previous steps in this section. To use these new IPs, stop the application ifis already running, and then run the application again.
NoteYou won't be able to preview your running application from within the IDE until you switchback to running using HTTP over one of the ports and IPs as described in Preview a RunningApplication (p. 126).
Step 5: Share the Running Application URLWith the application running, give to others the public IP address you noted earlier. Be sure to start theURL with the correct protocol, and add the port number if it is not the default for that protocol (forexample, http://192.0.2.0:8080/index.html using HTTP over port 8080).
NoteThe instance's public IP address might change anytime the instance restarts. To prevent thisIP address from changing, one solution is to allocate an Elastic IP address and then assignthat address to the running instance. For instructions, see Allocating an Elastic IP Address andAssociating an Elastic IP Address with a Running Instance in the Amazon EC2 User Guide forLinux Instances. Note also that allocating an Elastic IP address might result in charges to yourAWS account. For more information, see Amazon EC2 Pricing.You don't have to run using HTTP over port 8080, 8081, or 8082. However, you won't be ableto preview your running application from within the IDE until you switch back to running usingHTTP over one of the ports and IPs as described in Preview a Running Application (p. 126).If users make requests to the preceding URL, and those requests originate from a virtual privatenetwork (VPN) that blocks traffic over the requested protocol or port, those requests might fail.Those users must use a different network that allows traffic over the requested protocol andport. For more information, see your network administrator.
130

AWS Cloud9 User GuideWorking with File Revisions
We don't recommend sharing the URL in the application preview tabin the IDE with others. (The URL displays using the format https://ENVIRONMENT_ID.vfs.cloud9.REGION_ID.amazonaws.com/.) This URL works only whenthe IDE for the environment is open and the application is running in the same web browser.
Working with File Revisions in the AWS Cloud9Integrated Development Environment (IDE)
You can use the File Revision History pane in the AWS Cloud9 IDE to view and manage changes to a filein an AWS Cloud9 EC2 development environment. The File Revision History pane is not available forfiles in an AWS Cloud9 SSH development environment.
To show the File Revision History pane for a file, open the file in the editor. Then, on the menu bar,choose File, Show File Revision History.
The File Revision History pane begins tracking a file's revision history in the IDE after you first open thefile in the editor in an environment, and only for that environment. The File Revision History pane tracksa file's revisions only from the editor itself. It does not track a file's revisions made in any other way (forexample by the terminal, Git, or other file revision tools).
You cannot edit a file while the File Revision History pane is displayed. To hide the pane, choose File,Show Revision History again, or choose the X (Close timeslider) in the corner of the pane.
To jump to a version of the file that is associated with a file save action, choose a File Saved on dotabove the revision slider.
131

AWS Cloud9 User GuideWorking with Image Files
To go forward or backward one version from the currently selected version of the file on the revisionslider, choose one of the step arrows (Step revision forward or Step revision backward).
To go forward automatically one version of the file at a time from the beginning to end of the revisionhistory, choose the play button (Playback file history).
To make the currently selected version of the file the latest version in the revision history, choose Revert.
Working with Images Files in the AWS Cloud9Integrated Development Environment (IDE)
You can use the AWS Cloud9 IDE to view and edit image files.
• View or Edit an Image (p. 132)
• Resize an Image (p. 132)
• Crop an Image (p. 133)
• Rotate an Image (p. 133)
• Flip an Image (p. 133)
• Zoom an Image (p. 133)
• Smooth an Image (p. 134)
View or Edit an ImageIn the AWS Cloud9 IDE, open the file for the image you want to view or edit. Supported image file typesinclude the following:
• .bmp
• .gif (view only)
• .ico (view only)
• .jpeg
• .jpg
• .png
• .tiff
Resize an Image1. Open the image file in the IDE.
2. On the image editing bar, choose Resize.
132

AWS Cloud9 User GuideCrop an Image
3. To change the image width, type a new Width in pixels. Or choose "-" or "+" next to Width to changethe current width one pixel at a time.
4. To change the image height, type a new Height in pixels. Or choose "-" or "+" next to Height tochange the current height one pixel at a time.
5. To maintain the image ratio of width to height, leave Maintain Aspect Ratio checked.
6. To confirm the image's new size, on the image editing bar, see the width (W) and height (H)measurements in pixels.
7. Choose Resize.
8. To discard the resizing, on the menu bar, choose Edit, Undo. To keep the new size, choose File, Save.
Crop an Image1. Open the image file in the IDE.
2. Drag the mouse pointer over the portion of the image that you want to keep.
3. To confirm the selection's dimensions, on the image editing bar, see the Selection dimensions, asfollows:
• The distance in pixels from the original image's left edge to the left edge of the selection (L)
• The distance in pixels from the original image's top edge to the top edge of the selection (T)
• The selection's width in pixels (W)
• The selection's height in pixels (H)
4. On the image editing bar, choose Crop.
5. To discard the crop, on the menu bar, choose Edit, Undo. To keep the new cropped image, choose File,Save.
Rotate an Image1. Open the image file in the IDE.
2. To rotate the image counterclockwise, on the image editing bar, choose Rotate 90 Degrees Left.
3. To rotate the image clockwise, on the image editing bar, choose Rotate 90 Degrees Right.
4. To discard the rotation, on the menu bar, choose Edit, Undo. To keep the new rotated image, chooseFile, Save.
Flip an Image1. Open the image file in the IDE.
2. To flip the image horizontally, on the image editing bar, choose FlipH.
3. To flip the image vertically, on the image editing bar, choose FlipV.
4. To discard the flip, on the menu bar, choose Edit, Undo. To keep the new flipped image, choose File,Save.
Zoom an Image1. Open the image file in the IDE.
2. On the image editing bar, choose one of the available zoom factors (for example, 75%, 100%, or200%).
133
AWS Cloud9 User GuideSmooth an Image
Smooth an Image1. Open the image file in the IDE.2. On the image editing bar, select Smooth to reduce the amount of pixelation in the image. To discard
the smoothing, deselect Smooth.3. On the menu bar, choose File, Save.
Working with Builders, Runners, and Debuggersin the AWS Cloud9 Integrated DevelopmentEnvironment (IDE)
A builder instructs the AWS Cloud9 IDE how to build a project's files. A runner instructs the AWS Cloud9IDE how to run files of a specific type. A runner can use a debugger to help find any problems in thesource code of the files.
You can use the AWS Cloud9 IDE to build, run, and debug your code in the following ways:
• Use a builder to build your project's files. See Build Your Project's Files (p. 134).• Use a runner to run (and optionally, to debug) your code. See Built-In Build, Run, and Debug
Support (p. 134) and Run Your Code (p. 135).• Change a built-in runner to run (and optionally, to debug) your code in a different way from how it was
originally defined. See Change a Built-In Runner (p. 138).• Use a runner to run (and optionally, to debug) your code with a custom combination of file name,
command line options, debug mode, current working directory, and environment variables. See Createa Run Configuration (p. 138).
• Create your own builder or runner. See Create a Builder or Runner (p. 139).
Built-In Build, Run, and Debug SupportThe AWS Cloud9 IDE provides built-in support for building, running, and debugging code for severallanguages. For a complete list, see Language Support (p. 109).
Built-in build support is available on the menu bar with the Run, Build System and Run, Build menucommands. To add support for a programming language or tool that isn't listed, see Create a Builder orRunner (p. 139).
Built-in run support is available with the Run button, and on the menu bar with the Run, Run With andRun, Run Configurations menu commands. To add support for a programming language or tool thatisn't listed, see Create a Builder or Runner (p. 139) and Create a Run Configuration (p. 138).
Built-in debug support is available through the Debugger window. To display the Debugger window,choose the Debugger button. If the Debugger button is not visible, choose Window, Debugger on themenu bar.
Build Your Project's Files1. Open a file that corresponds to the code you want to build.2. On the menu bar, choose Run, Build System, and then choose the name of the builder to use, if it isn't
already chosen. If the builder you want to use isn't listed, stop this procedure, complete the steps inCreate a Builder or Runner (p. 139), and then return to this procedure.
134

AWS Cloud9 User GuideRun Your Code
3. Choose Run, Build.
Run Your Code1. Open a file that corresponds to the code you want to run, if the file isn't already open and selected.
2. On the menu bar, choose one of the following:
• To run the code with the closest matching built-in runner, choose Run, Run. If AWS Cloud9 cannotfind one, this command is disabled.
• To run the code with the run configuration that AWS Cloud9 last used, choose Run, Run Last.
• To run the code with a specific runner, choose Run, Run With, and then choose the name of therunner. If the runner you want to use isn't listed, stop this procedure, complete the steps in Create aBuilder or Runner (p. 139), and then return to this procedure.
• To run the code with a specific runner with a custom combination of file name, command lineoptions, debug mode, current working directory, and environment variables, choose Run, RunConfigurations, and then choose the run configuration's name. In the run configuration tab that isdisplayed, choose Runner: Auto, choose the runner you want to use, and then choose Run. If therunner you want to use isn't listed, stop this procedure, complete the steps in Create a Builder orRunner (p. 139), and then return to this procedure.
Debug Your Code1. On the run configuration tab for your code, choose Run in Debug Mode. The bug icon turns to
green on a white background. For more information, see Run Your Code (p. 135) and Create a RunConfiguration (p. 138).
2. Set any breakpoints in your code you want to pause at during the run, as follows:
a. Open each file that you want to set a breakpoint in.
b. At each point in a file where you want to set a breakpoint, choose the blank area in the gutter tothe left of the line number. A red circle appears.
To remove a breakpoint, choose the existing breakpoint in the gutter.
To disable a breakpoint instead of removing it, in the Debugger window, in Breakpoints, clear thebox that corresponds to the breakpoint you want to disable. To enable the breakpoint again, selectthe box you cleared.
To disable all breakpoints at once, in the Debugger window, choose Deactivate All Breakpoints. Toenable all breakpoints again, choose Activate All Breakpoints.
If the Debugger window isn't visible, choose the Debugger button. If the Debugger button isn'tvisible, on the menu bar choose Window, Debugger.
3. Set any watch expressions for which you want to get the value at the point where a run pauses, asfollows:
a. In the Debugger window, in Watch Expressions, choose Type an expression here.
b. Type the expression you want to watch, and then press Enter.
To change an existing watch expression, right-click the watch expression, and then choose EditWatch Expression. Type the change, and then press Enter.
To remove an existing watch expression, right-click the watch expression, and then choose RemoveWatch Expression.
4. Run your code as described in Run Your Code (p. 135).
135
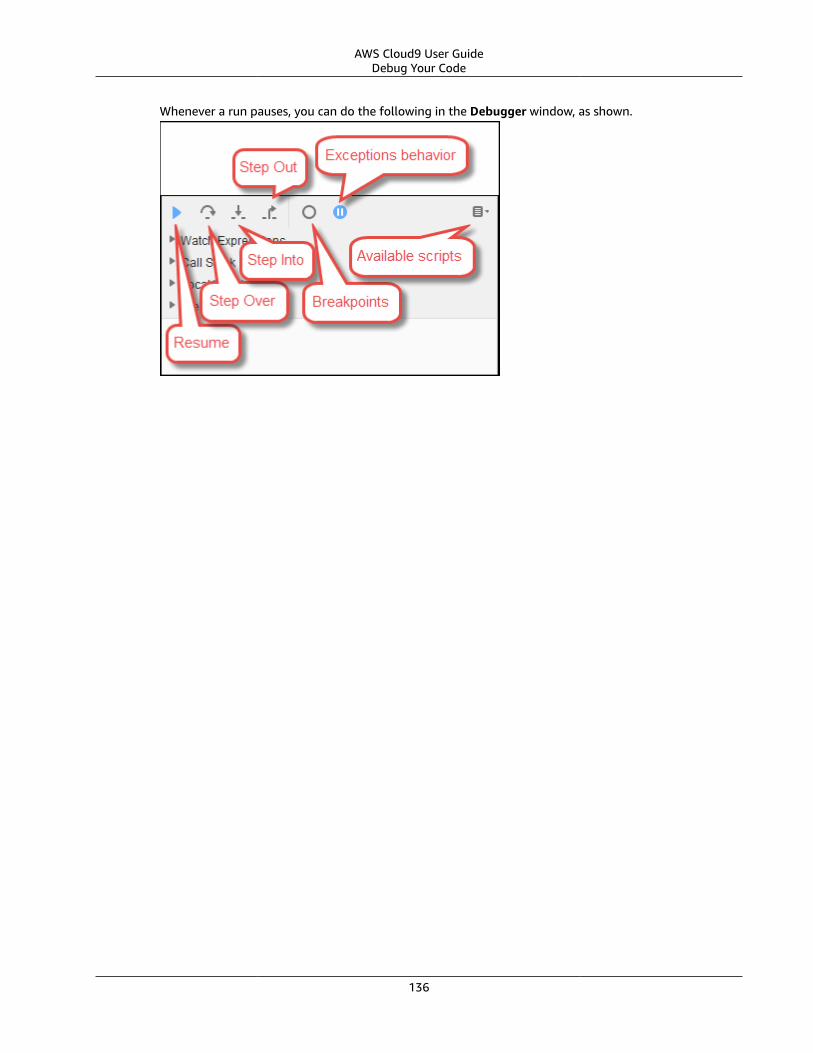
AWS Cloud9 User GuideDebug Your Code
Whenever a run pauses, you can do the following in the Debugger window, as shown.
136

AWS Cloud9 User GuideDebug Your Code
• Run your code to the next breakpoint (or to the next logical stopping point if there are no morebreakpoints): Choose Resume.
• Skip over running statement by statement through the next method or function call: Choose StepOver.
• Run your code to the next statement and then pause again: Choose Step Into.
• Stop running statement by statement in the current method or function call: Choose Step Out.
• Disable all existing breakpoints: Choose Deactivate All Breakpoints. Re-enable all breakpoints:Choose Activate All Breakpoints.
• Don't pause whenever the code throws an exception: Keep choosing the exceptions behavior buttonuntil the tooltip reads Don't pause on exceptions (gray).
137
AWS Cloud9 User GuideChange a Built-In Runner
• Pause whenever the code throws an exception: Keep choosing the exceptions behavior button untilthe tooltip reads Pause on all exceptions (red).
• Pause only when the code throws an uncaught exception: Keep choosing the exceptions behaviorbutton until the tooltip reads Pause on uncaught exceptions (blue).
• Open an available script: Choose Available internal and external scripts, and then choose the script.• View the list of current watch expressions: See the Watch Expressions area.• View the execution path that brought the code to the current breakpoint: See the Call Stack area.• View the list of local variables: See the Local Variables area.• Disable individual breakpoints: In Breakpoints, clear the boxes that correspond to the breakpoints
you want to disable. To enable the breakpoints again, select the boxes you cleared earlier.
Whenever a run pauses, you can also pause your mouse pointer on any displayed piece of code (forexample, a variable) to show any available information about it in a tooltip.
Change a Built-In Runner1. On the menu bar, choose Run, Run With, and then choose the built-in runner you want to change.2. Stop the runner from trying to run your code by choosing, Stop on the run configuration tab that
displays.3. Choose Runner: RUNNER_NAME, where RUNNER_NAME is the name of the runner you want to
change, and then choose Edit Runner.4. On the RUNNER_NAME.run tab that is displayed, change the runner's current definition. See Define a
Builder or Runner (p. 139).5. Choose File, Save As. Save the file with the same name (RUNNER_NAME.run) in the
ENVIRONMENT_NAME/.c9/runners directory, where ENVIRONMENT_NAME is the name of your AWSCloud9 development environment.
NoteAny changes you make to a built-in runner apply only to the environment you made thosechanges in. To apply your changes to a separate environment, open the other environment,and then follow the preceding steps to open, edit, and save those same changes to that built-inrunner.
Create a Run ConfigurationOn the menu bar, choose Run, Run Configurations, New Run Configuration. On the run configurationtab that is displayed, do the following:
1. In the box next to Run and Restart, type the name that will display on the Run, Run Configurationsmenu for this run configuration.
2. In the Command box, type any custom command line options you want to use.3. To have this run configuration use the runner's predefined debugging settings, choose Run in Debug
Mode. The bug icon will turn to green on a white background.4. To have this run configuration use a specific working directory, choose CWD, choose the directory to
use, and then choose Select.5. To have this run configuration use specific environment variables, choose ENV, and then type the
name and value of each environment variable.
To use this run configuration, open the file the corresponds to the code you want to run. ChooseRun, Run Configurations on the menu bar, and then choose this run configuration's name. In the run
138
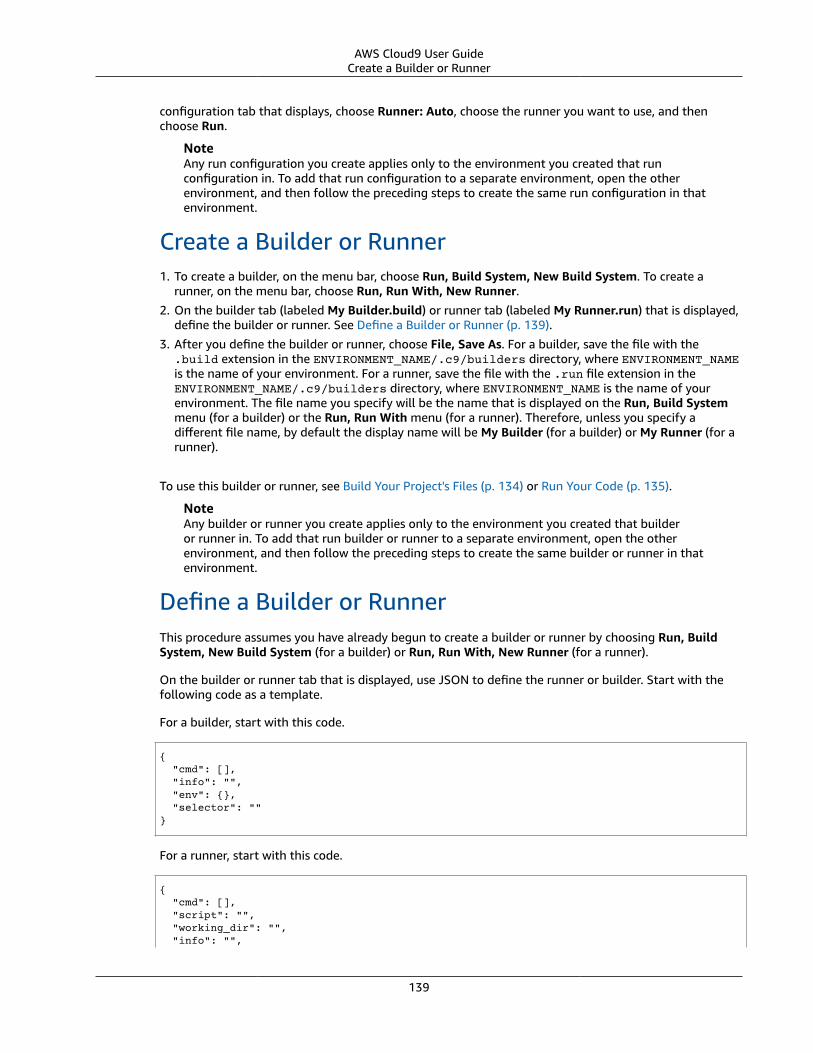
AWS Cloud9 User GuideCreate a Builder or Runner
configuration tab that displays, choose Runner: Auto, choose the runner you want to use, and thenchoose Run.
NoteAny run configuration you create applies only to the environment you created that runconfiguration in. To add that run configuration to a separate environment, open the otherenvironment, and then follow the preceding steps to create the same run configuration in thatenvironment.
Create a Builder or Runner1. To create a builder, on the menu bar, choose Run, Build System, New Build System. To create a
runner, on the menu bar, choose Run, Run With, New Runner.
2. On the builder tab (labeled My Builder.build) or runner tab (labeled My Runner.run) that is displayed,define the builder or runner. See Define a Builder or Runner (p. 139).
3. After you define the builder or runner, choose File, Save As. For a builder, save the file with the.build extension in the ENVIRONMENT_NAME/.c9/builders directory, where ENVIRONMENT_NAMEis the name of your environment. For a runner, save the file with the .run file extension in theENVIRONMENT_NAME/.c9/builders directory, where ENVIRONMENT_NAME is the name of yourenvironment. The file name you specify will be the name that is displayed on the Run, Build Systemmenu (for a builder) or the Run, Run With menu (for a runner). Therefore, unless you specify adifferent file name, by default the display name will be My Builder (for a builder) or My Runner (for arunner).
To use this builder or runner, see Build Your Project's Files (p. 134) or Run Your Code (p. 135).
NoteAny builder or runner you create applies only to the environment you created that builderor runner in. To add that run builder or runner to a separate environment, open the otherenvironment, and then follow the preceding steps to create the same builder or runner in thatenvironment.
Define a Builder or RunnerThis procedure assumes you have already begun to create a builder or runner by choosing Run, BuildSystem, New Build System (for a builder) or Run, Run With, New Runner (for a runner).
On the builder or runner tab that is displayed, use JSON to define the runner or builder. Start with thefollowing code as a template.
For a builder, start with this code.
{ "cmd": [], "info": "", "env": {}, "selector": ""}
For a runner, start with this code.
{ "cmd": [], "script": "", "working_dir": "", "info": "",
139

AWS Cloud9 User GuideDefine a Builder or Runner
"env": {}, "selector": "", "debugger": "", "debugport": "PORT_NUMBER"}
In the preceding code:
• cmd: Represents a comma-separated list of strings for AWS Cloud9 to run as a single command.
When AWS Cloud9 runs this command, each string in the list will be separated by a single space. Forexample, AWS Cloud9 will run "cmd": [ "ls", "$file", "$args"] as ls $file $args, whereAWS Cloud9 will replace $file with the full path to the current file and $args with any argumentsentered after the file name. For more information, see the list of supported variables later in thissection.
• script: Represents a bash script (which can also be specified as an array of lines as needed forreadability) that the runner executes in the terminal.
• working_dir: Represents the directory that the runner will run from.• info: Represents any string of text you want to display to the user at the beginning of the run. This
string can contain variables, for example Running $project_path$file_name..., where AWSCloud9 will replace $project_path with the directory path of the current file and $file_name withthe name portion of the current file. See the list of supported variables later in this section.
• env: Represents any array of command line arguments for AWS Cloud9 to use, for example:
"env": { "LANG": "en_US.UTF-8", "SHLVL": "1"}
• selector: Represents any regular expression that you want AWS Cloud9 to use to identify the filenames that apply to this runner. For example, you could specify source.py for Python files.
• debugger: Represents the name of any available debugger you want AWS Cloud9 to use that iscompatible with this runner. For example, you could specify v8 for the V8 debugger.
• debugport: Represents the port number you want AWS Cloud9 to use during debugging. Forexample, you could specify 15454 for the port number to use.
The following table shows the variables you can use.
Variable Description
$file_path The directory of the current file, for example, /home/ec2-user/environment.
$file The full path to the current file, for example, /home/ec2-user/environment/hello.py.
$args Any arguments entered after the file name, forexample, "5" "9".
$file_name The name portion of the current file, for example,hello.py.
$file_extension The extension of the current file, for example, py.
$file_base_name The name of the current file without the fileextension, for example, hello.
140

AWS Cloud9 User GuideDefine a Builder or Runner
Variable Description
$packages The full path to the packages folder.
$project The full path to the current project folder.
$project_path The directory of the current project file, forexample, /home/ec2-user/environment/.
$project_name The name of the current project file withoutthe file extension, for example, my-demo-environment.
$project_extension The extension of the current project file.
$project_base_name The name of the current project file without theextension.
$hostname The hostname of the environment, for example,192.0.2.0.
$hostname_path The hostname of the environment with therelative path to the project file, for example,https://192.0.2.0/hello.js.
$url The full URL to access the environment, forexample, https://192.0.2.0..
$port The port assigned to the environment, forexample, 8080.
$ip The IP address to run a process against theenvironment, for example, 0.0.0.0.
As an example, the following builder file named G++.build defines a builder for GCC that runs the g++ command with the -o option to compile the current file (for example, hello.cpp) into an objectmodule. Then it links the object module into a program with the same name as the current file (forexample, hello). Here the equivalent command is g++ -o hello hello.cpp.
{ "cmd": [ "g++", "-o", "$file_base_name", "$file_name" ], "info": "Compiling $file_name and linking to $file_base_name...", "selector": "source.cpp"}
As another example, the following runner file named Python.run defines a runner that uses Pythonto run the current file with any arguments that were provided. For example, if the current file is namedhello.py and the arguments 5 and 9 were provided, the equivalent command is python hello.py 59.
{ "cmd": [ "python", "$file_name", "$args" ], "info": "Running $file_name...", "selector": "source.py"}
Finally, the following runner file named Print Run Variables.run defines a runner that simplyoutputs the value of each available variable and then stops.
141

AWS Cloud9 User GuideWorking with Custom Environment Variables
{ "info": "file_path = $file_path, file = $file, args = $args, file_name = $file_name, file_extension = $file_extension, file_base_name = $file_base_name, packages = $packages, project = $project, project_path = $project_path, project_name = $project_name, project_extension = $project_extension, project_base_name = $project_base_name, hostname = $hostname, hostname_path = $hostname_path, url = $url, port = $port, ip = $ip"}
Working with Custom Environment Variables in theAWS Cloud9 Integrated Development Environment(IDE)
The AWS Cloud9 IDE supports getting and setting custom environment variables. You can get and setcustom environment variables in the AWS Cloud9 IDE in the following ways.
• Set Command-Level Custom Environment Variables (p. 142)
• Set Custom User Environment Variables in ~/.bash_profile (p. 142)
• Set Local Custom Environment Variables (p. 143)
• Set Custom User Environment Variables in ~/.bashrc (p. 143)
• Set Custom Environment Variables in the ENV List (p. 143)
Set Command-Level Custom Environment VariablesYou can set command-level custom environment variables as you run a command in your AWS Cloud9development environment. To test this behavior, create a file named script.sh with the followingcode:
#!/bin/bash
echo $MY_ENV_VAR
If you run the following command, the terminal displays Terminal session:
MY_ENV_VAR='Terminal session' sh ./script.sh
If you set the custom environment variable by using multiple approaches described in this topic, thenwhen you try to get the custom environment variable's value, this setting takes priority over all of theothers.
Set Custom User Environment Variables in~/.bash_profileYou can set custom user environment variables in the ~/.bash_profile file in your environment. Totest this behavior, add the following code to the ~/.bash_profile file in your environment:
export MY_ENV_VAR='.bash_profile file'
142

AWS Cloud9 User GuideSet Local Custom Environment Variables
If you then choose the Run, Run With, Shell script command on the menu bar, type ./script.sh inthe Command box of the runner tab, and then choose Run, the runner tab displays .bash_profilefile. (This assumes you created the script.sh file as described earlier.)
Set Local Custom Environment VariablesYou can set local custom environment variables in a terminal session by running the export command.To test this behavior, run the following command in a terminal session:
export MY_ENV_VAR='Command line export'
If you then choose the Run, Run With, Shell script command on the menu bar, type ./script.sh inthe Command box of the runner tab, and then choose Run, the runner tab displays Command lineexport. (This assumes you created the script.sh file as described earlier.)
If you set the same custom environment variable in your ~/.bash_profile file and with the export command, then when you try to get the customer environment variable's value, the ~/.bash_profilefile setting takes priority.
Set Custom User Environment Variables in ~/.bashrcYou can set custom user environment variables in ~/.bashrc file in your environment. To test thisbehavior, add the following code to the ~/.bashrc file in your environment:
export MY_ENV_VAR='.bashrc file'
If you then choose the Run, Run With, Shell script command on the menu bar, type ./script.sh inthe Command box of the runner tab, and then choose Run, the runner tab displays .bashrc file.(This assumes you created the script.sh file as described earlier.)
If you set the same custom environment variable with the export command and in your ~/.bashrcfile, then when you try to get the custom environment variable's value, the export command settingtakes priority.
Set Custom Environment Variables in the ENV ListYou can set custom environment variables in the ENV list on the Run tab.
To test this behavior, do the following:
1. On the menu bar, choose Run, Run Configurations, New Run Configuration.2. On the [New] - Idle tab, Choose Runner: Auto, and then choose Shell script.3. Choose ENV, and then type MY_ENV_VAR for Name and ENV list for Value.4. For Command, type ./script.sh.5. Choose the Run button. the runner tab displays ENV list. (This assumes you created the script.sh
file as described earlier.)
If you set the same custom environment variable in your ~/.bash_profile file, with the export command, in your ~/.bashrc file, and in the ENV list, then when you try to get the customenvironment variable's value, the ~/.bash_profile file setting takes first priority, followed by the export command setting, the ~/.bashrc file setting, and the ENV list setting.
NoteThe ENV list is the only approach for getting and setting custom environment variables by usingcode, separate from a shell script.
143
AWS Cloud9 User GuideWorking with Project Settings
Working with Project Settings in the AWS Cloud9Integrated Development Environment (IDE)
Project settings, which apply only to the current AWS Cloud9 development environment, include thefollowing kinds of settings:
• Code editor behaviors, such as whether to use soft tabs and new file line ending behavior• File types to ignore• The types of hints and warnings to display or suppress• Code and formatting behaviors for programming languages such as JavaScript, PHP, Python, and Go• The types of configurations to use when running and building code
Although project settings apply to only a single environment, you can apply the project settings for oneenvironment to any other environment.
• View or Change Project Settings (p. 144)• Apply the Current Project Settings for an Environment to Another Environment (p. 144)• Project Setting Changes You Can Make (p. 144)
View or Change Project Settings1. On the menu bar, choose AWS Cloud9, Preferences.2. To view the project settings for the current environment, on the Preferences tab, in the side
navigation pane, choose Project Settings.3. To change the current project settings for the environment, change the settings you want in the
Project Settings pane.
See Project Setting Changes You Can Make (p. 144).
Apply the Current Project Settings for anEnvironment to Another Environment1. In both the source and target environment, on the menu bar of the AWS Cloud9 IDE, choose AWS
Cloud9, Open Your Project Settings.2. In the source environment, copy the contents of the project.settings tab that is displayed.3. In the target environment, overwrite the contents of the project.settings tab with the copied contents
from the source environment.4. In the target environment, save the project.settings tab.
Project Setting Changes You Can MakeThese sections describe the kinds of project settings that you can change on the Preferences tab'sProject Settings pane.
• Code Editor (Ace) (p. 145)• Find in Files (p. 145)
144

AWS Cloud9 User GuideProject Setting Changes You Can Make
• Hints & Warnings (p. 145)
• JavaScript Support (p. 146)
• Build (p. 146)
• Run & Debug (p. 146)
• Run Configurations (p. 147)
• Code Formatters (p. 147)
• PHP Support (p. 148)
• Python Support (p. 149)
• Go Support (p. 149)
Code Editor (Ace)Soft Tabs
If selected, inserts the specified number of spaces instead of a tab character each time you pressTab.
Autodetect Tab Size on Load
If selected, AWS Cloud9 attempts to guess the tab size.
New File Line Endings
The type of line endings to use for new files.
Valid options include:
• Windows (CRLF) to end lines with a carriage return and then a line feed.
• Unix (LF) to end lines with just a line feed.
On Save, Strip Whitespace
If selected, AWS Cloud9 attempts to remove what it considers to be unnecessary spaces and tabsfrom a file each time that file is saved.
Find in FilesIgnore these Files
When finding in files, the types of files that AWS Cloud9 will ignore.
Maximum number of files to search (in 1000)
When finding in files, the maximum number of files, in multiples of 1,000, that AWS Cloud9 will findin the current scope.
Hints & WarningsWarning Level
The minimum level of messages to enable.
Valid values include:
• Info to enable informational, warning, and error messages.
145

AWS Cloud9 User GuideProject Setting Changes You Can Make
• Warning to enable just warning and error messages.
• Error to enable just error messages.
Mark Missing Optional Semicolons
If enabled, AWS Cloud9 flags in a file each time it notices a semicolon that could be used in code, butthat isn't used.
Mark Undeclared Variables
If enabled, AWS Cloud9 flags in a file each time it notices an undeclared variable in code.
Mark Unused Function Arguments
If enabled, AWS Cloud9 flags in a file each time it notices an unused argument in a function.
Ignore Messages Matching Regex
AWS Cloud9 will not display any messages matching the specified regular expression. For moreinformation, see Writing a regular expression pattern in the JavaScript Regular Expressions topic onthe Mozilla Developer Network.
JavaScript SupportCustomize JavaScript Warnings With .eslintrc
If enabled, AWS Cloud9 uses an .eslintrc file to determine which JavaScript warnings to enableor disable. For more information, see Configuration File Formats on the ESLint website.
JavaScript Library Code Completion
The JavaScript libraries AWS Cloud9 uses to attempt to suggest or do automatic code completion.
Format Code on Save
If enabled, AWS Cloud9 attempts to format the code in a JavaScript file every time that file is saved.
Use Builtin JSBeautify as Code Formatter
If enabled, AWS Cloud9 uses its internal implementation of JSBeautify to attempt to increase thereadability of code in files.
Custom Code Formatter
The command for AWS Cloud9 to attempt to run when formatting code in a JavaScript file.
BuildBuilder Path in environment
The path to any custom build configurations.
Run & DebugRunner Path in Environment
The path to any custom run configurations.
Preview URL
The URL to use to preview applications for the environment.
146

AWS Cloud9 User GuideProject Setting Changes You Can Make
Run ConfigurationsThe custom run configurations for this environment.
Remove Selected Configs
Deletes the selected run configurations.
Add New Config
Creates a new run configuration.
Set As Default
Sets the selected run configuration as the default run configuration.
Code FormattersJSBeautify settings
Settings for increasing the readability of code in files.
Format Code on Save
If enabled, AWS Cloud9 attempts to apply JSBeautify settings whenever code files are saved.
Use JSBeautify for JavaScript
If enabled, AWS Cloud9 attempts to apply JSBeautify settings whenever JavaScript files aresaved.
Preserve Empty Lines
If enabled, AWS Cloud9 does not remove empty lines in code files.
Keep Array Indentation
If enabled, AWS Cloud9 preserves the indentation of element declarations in arrays in code files.
JSLint Strict Whitespace
If enabled, AWS Cloud9 attempts to apply JSLint whitespace rules in code files. For moreinformation, see "Whitespace" in JSLint Help.
Braces
Specifies the alignment of braces in code.
Valid values include:
• Braces with control statement to move each beginning and end brace to align with its relatedcontrol statement, as needed.
For example, this code:
for (var i = 0; i < 10; i++) { if (i == 5) { console.log("Halfway done.") }}
Turns into this code when the file is saved:
for (var i = 0; i < 10; i++) { if (i == 5) { console.log("Halfway done.") }
147

AWS Cloud9 User GuideProject Setting Changes You Can Make
}
• Braces on own line to move each brace to its own line, as needed.
For example, this code:
for (var i = 0; i < 10; i++) { if (i == 5) { console.log("Halfway done.") }}
Turns into this code when the file is saved:
for (var i = 0; i < 10; i++) {if (i == 5) { console.log("Halfway done.") } }
• End braces on own line to move each end brace to its own line, as needed.
For example, this code:
for (var i = 0; i < 10; i++) { if (i == 5) { console.log("Halfway done.") }}
Turns into this code when the file is saved:
for (var i = 0; i < 10; i++) { if (i == 5) { console.log("Halfway done.") }}
Space Before Conditionals
If enabled, AWS Cloud9 adds a space before each conditional declaration, as needed.
Unescape Strings
If enabled, AWS Cloud9 converts escaped strings to their unescaped equivalents. For example,converts \n to a newline character and converts \r to a carriage return character.
Indent Inner Html
If enabled, AWS Cloud9 indents <head> and <body> sections in HTML code.
PHP SupportEnable PHP code Completion
If enabled, AWS Cloud9 attempts to complete PHP code.
PHP Completion Include Paths
Locations that AWS Cloud9 uses to attempt to help complete PHP code. For example, if you havecustom PHP files that you want AWS Cloud9 to use for completion, and those files are somewhere inthe ~/environment directory, add ~/environment to this path.
Format Code on Save
If enabled, AWS Cloud9 attempts to format PHP code whenever PHP files are saved.
148

AWS Cloud9 User GuideWorking with User Settings
Custom Code Formatter
The path to any custom code formatting configuration for PHP code.
Python SupportEnable Python code completion
If enabled, AWS Cloud9 attempts to complete Python code. To set the paths for AWS Cloud9 to useto complete Python code, use the PYTHONPATH setting.
Python Version
Specifies the version of Python to use.Pylint command-line options
Options for AWS Cloud9 to use for Pylint wih Python code. For more information, see the Pylint UserManual on the Pylint website.
PYTHONPATH
The paths to Python libraries and packages for AWS Cloud9 to use. For example, if you have customPython libraries and packages in the ~/environment directory, add ~/environment to this path.
Format Code on Save
If enabled, AWS Cloud9 attempts to format Python code whenever Python files are saved.Custom Code Formatter
The path to any custom code formatting configuration for Python code.
Go SupportEnable Go code completion
If enabled, AWS Cloud9 attempts to complete Go code.Format Code on Save
If enabled, AWS Cloud9 attempts to format Go code whenever Go files are saved.Custom Code Formatter
The path to any custom code formatting configuration for Go code.
Working with User Settings in the AWS Cloud9Integrated Development Environment (IDE)
User settings, which apply across each AWS Cloud9 development environment associated with your IAMuser, include the following kinds of settings:
• General user interface behaviors, such as whether to enable animations• File system navigation behaviors• File find and search behaviors• Color schemes for terminal sessions and output• Additional code editor behaviors, such as code folding, full line selection, scrolling animations, and
font sizes
149

AWS Cloud9 User GuideView or Change Your User Settings
As you make changes to your user settings, AWS Cloud9 pushes those changes to the cloud andassociates them with your IAM user. AWS Cloud9 also continually scans the cloud for changes to usersettings associated with your IAM user, and applies those settings to your current environment.
You can share your user settings with other users.
• View or Change Your User Settings (p. 150)• Share Your User Settings with Another User (p. 150)• User Setting Changes You Can Make (p. 150)
View or Change Your User Settings1. On the menu bar, choose AWS Cloud9, Preferences.2. To view your user settings across each environment of yours, on the Preferences tab, in the side
navigation pane, choose User Settings.3. To change your user settings across each environment of yours, in the User Settings pane, change the
settings you want.4. To apply your changes to any other environment of yours, simply open that environment. If that
environment is already open, refresh the web browser tab for that environment.
For more information, see User Setting Changes You Can Make (p. 150).
Share Your User Settings with Another User1. In both the source and target environment, on the menu bar of the AWS Cloud9 IDE, choose AWS
Cloud9, Open Your User Settings.2. In the source environment, copy the contents of the user.settings tab that is displayed.3. In the target environment, overwrite the contents of the user.settings tab with the copied contents
from the source environment.4. In the target environment, save the user.settings tab.
User Setting Changes You Can MakeThese sections describe the kinds of user settings on the Preferences tab's User Settings pane that youcan change.
• General (p. 151)• User Interface (p. 151)• Collaboration (p. 151)• Tree & Navigate (p. 152)• Find in Files (p. 152)• Meta Data (p. 153)• Watchers (p. 153)• Terminal (p. 153)• Output (p. 153)• Code Editor (Ace) (p. 154)• Input (p. 156)• Hints & Warnings (p. 156)
150

AWS Cloud9 User GuideUser Setting Changes You Can Make
• Run & Debug (p. 156)• Preview (p. 156)• Build (p. 157)
GeneralReset to Factory Settings
If the Reset to Default button is chosen, AWS Cloud9 resets all of your user settings to the AWSCloud9 default user settings. To confirm, choose Reset settings.
WarningThis action cannot be undone.
Warn Before Exiting
If enabled, whenever you attempt to close the IDE, AWS Cloud9 will prompt you about whether youreally want to exit AWS Cloud9.
User InterfaceEnable UI Animations
If enabled, AWS Cloud9 uses animations in the IDE.Use an Asterisk (*) to Mark Changed Tabs
If enabled, AWS Cloud9 adds an asterisk (*) to tabs that have changes, but for which the contentshave not yet been saved.
Display Title of Active Tab as Browser Title
If enabled, AWS Cloud9 changes the title of the associated web browser tab to the title of the activetab (for example, Untitled1, hello.js, Terminal, Preferences, and so on).
Automatically Close Empty Panes
If enabled, whenever you reload an environment, AWS Cloud9 automatically closes any panes itconsiders are empty.
Environment Files Icon and Selection Style
The icon AWS Cloud9 uses for environment files, and the file selection behaviors AWS Cloud9 uses.
Valid values include:• Default for AWS Cloud9 to use default icons and default file selection behaviors.• Alternative for AWS Cloud9 to use alternative icons and alternative file selection behaviors.
CollaborationShow Notification Bubbles
If enabled, AWS Cloud9 displays notifications if the environment is a shared environment andmultiple users are actively collaborating in that shared environment.
Disable collaboration security warning
If enabled, AWS Cloud9 does not display the security warning dialog box when a read/write memberis added to an environment.
151

AWS Cloud9 User GuideUser Setting Changes You Can Make
Show Authorship Info
If enabled, AWS Cloud9 underlines text entered by other environment members with relatedhighlights in the gutter.
Tree & NavigateScope Navigate to Favorites
If enabled, the Navigate window only works with items in the Environment window's Favoritessection.
Enable Preview on Navigation
If enabled, AWS Cloud9 displays the chosen file in the Navigate window with a single mouse clickinstead of a double mouse click.
Enable Preview on Tree Selection
If enabled, AWS Cloud9 displays the chosen file with a single mouse click instead of a double mouseclick.
Hidden File Pattern
The types of files for AWS Cloud9 to treat as hidden.Reveal Active File in Project Tree
If enabled, AWS Cloud9 highlights the active file in the Environment window.Download Files As
The behavior for AWS Cloud9 to use when downloading files.
Valid values include:• auto for AWS Cloud9 to download files without modification.• tar.gz for AWS Cloud9 to download files as compressed TAR files.• auto for AWS Cloud9 to download files as .zip files.
Find in FilesSearch In This Path When 'Project' Is Selected
On the find in files bar, when Project is selected for the search scope, the path to find in.Show Full Path in Results
If selected, displays the full path to each matching file in the Search Results tab.Clear Results Before Each Search
If selected, clears the Search Results tab of the results of any previous searches before the currentsearch begins.
Scroll Down as Search Results Come In
If selected, scrolls the Search Results tab to the bottom of the list of results as search results areidentified.
Open Files when Navigating Results with (Up and Down)
If selected, as the up and down arrow keys are pressed in the Search Results tab within the list ofresults, opens each matching file.
152
AWS Cloud9 User GuideUser Setting Changes You Can Make
Meta DataMaximum of Undo Stack Items in Meta Data
The maximum number of items that AWS Cloud9 keeps in its list of action that can be undone.
WatchersAuto-Merge Files When a Conflict Occurs
If enabled, AWS Cloud9 attempts to automatically merge files whenever a merge conflict happens.
TerminalText Color
The color of text in Terminal tabs.Background Color
The background color in Terminal tabs.Selection Color
The color of selected text in Terminal tabs.Font Family
The text font style in Terminal tabs.Font Size
The size of text in Terminal tabs.Antialiased Fonts
If enabled, AWS Cloud9 attempts to smooth the display of text in Terminal tabs.Blinking Cursor
If enabled, AWS Cloud9 continuously blinks the cursor in Terminal tabs.Scrollback
The number of lines that you can scroll up or back through in Terminal tabs.Use Cloud9 as the Default Editor
If selected, uses AWS Cloud9 as the default text editor.
OutputText Color
The color of text in tabs that display output.Background Color
The background color of text in tabs that display output.Selection Color
The color of selected text in tabs that display output.
153

AWS Cloud9 User GuideUser Setting Changes You Can Make
Warn Before Closing Unnamed Configuration
If enabled, AWS Cloud9 prompts you to save any unsaved configuration tab before it is closed.
Preserve log between runs
If enabled, AWS Cloud9 keeps a log of all attempted runs.
Code Editor (Ace)Auto-pair Brackets, Quotes, etc.
If enabled, AWS Cloud9 attempts to add a matching closing character for each related startingcharacter that is typed in editor tabs, such as for brackets, quotation marks, and braces.
Wrap Selection with Brackets, Quote, etc.
If enabled, AWS Cloud9 attempts to insert a matching closing character at the end of text in editortabs after the text is selected and a related started character is typed, such as for brackets, quotationmarks, and braces.
Code Folding
If enabled, AWS Cloud9 attempts to show, expand, hide, or collapse sections of code in editor tabsaccording to related code syntax rules.
Fade Fold Widgets
If enabled, AWS Cloud9 displays code folding controls in the gutter whenever you pause the mouseover those controls in editor tabs.
Full Line Selection
If enabled, AWS Cloud9 selects an entire line that is triple-clicked in editor tabs.
Highlight Active Line
If enabled, AWS Cloud9 highlights the entire active line in editor tabs.
Highlight Gutter Line
If enabled, AWS Cloud9 highlights the location in the gutter next to the active line in editor tabs.
Show Invisible Characters
If enabled, AWS Cloud9 displays what it considers to be invisible characters in editor tabs, forexample carriage returns and line feeds, spaces, and tabs.
Show Gutter
If enabled, AWS Cloud9 displays the gutter.
Show Line Numbers
The behavior for displaying line numbers in the gutter.
Valid values include:
• Normal to display line numbers.
• Relative to display line numbers relative to the active line.
• None to hide line numbers.
Show Indent Guides
If enabled, AWS Cloud9 displays guides to more easily visualize indented text in editor tabs.
154

AWS Cloud9 User GuideUser Setting Changes You Can Make
Highlight Selected Word
If enabled, AWS Cloud9 selects an entire word that is double-clicked in an editor tab.Scroll Past the End of the Document
The behavior for allowing the user to scroll past the end of the current file in editor tabs.
Valid values include:• Off to not allow any scrolling past the end of the current file.• Half Editor Height to allow scrolling past the end of the current file to up to half the editor's
screen height.• Full Editor Height to allow scrolling past the end of the current file to up to the editor's full
screen height.Animate Scrolling
If enabled, AWS Cloud9 applies animation behaviors during scrolling actions in editor tabs.Font Family
The style of font to use in editor tabs.Font Size
The size of the font to use in editor tabs.Antialiased Fonts
If enabled, AWS Cloud9 attempts to smooth the display of text in editor tabs.Show Print Margin
Displays a vertical line in editor tabs after the specified character location.Mouse Scroll Speed
The relative speed of mouse scrolling in editor tabs. Larger values result in faster scrolling.Cursor Style
The style and behavior of the cursor in editor tabs.
Valid values include:• Ace to display the cursor as a vertical bar that is relatively wider than Slim.• Slim to display the cursor as a relatively slim vertical bar.• Smooth to display the cursor as a vertical bar that is relatively wider than Slim and that blinks
more smoothly than Slim.• Smooth and Slim to display the cursor as a relatively slim vertical bar that blinks more smoothly
than Slim.• Wide to display the cursor as a relatively wide vertical bar.
Merge Undo Deltas
• Always to allow merge conflicts to be reverted.• Never to never allow merge conflicts to be reverted.• Timed to allow merge conflicts to be reverted after a specified time period.
Enable Wrapping For New Documents
If enabled, AWS Cloud9 wraps code in new files.
155

AWS Cloud9 User GuideUser Setting Changes You Can Make
InputComplete As You Type
If enabled, AWS Cloud9 attempts to display possible text completions as you type.Complete On Enter
If enabled, AWS Cloud9 attempts to display possible text completions after you press Enter.Highlight Variable Under Cursor
If enabled, AWS Cloud9 highlights all references in code to the selected variable.Use Cmd-Click for Jump to Definition
If enabled, AWS Cloud9 goes to any original definition for code that is clicked while pressing andholding Command for Mac or Ctrl for Windows.
Hints & WarningsEnable Hints and Warnings
If enabled, AWS Cloud9 displays applicable hint and warning messages.Ignore Messages Matching Regex
AWS Cloud9 does not display any messages matching the specified regular expression. For moreinformation, see Writing a regular expression pattern in the JavaScript Regular Expressions topic onthe Mozilla Developer Network.
Run & DebugSave All Unsaved Tabs Before Running
If enabled, before running the associated code, AWS Cloud9 attempts to save all unsaved files withopen tabs.
PreviewPreview Running Apps
If enabled, AWS Cloud9 attempts to display a preview of the output for the code in the active tabwhenever the Preview button is chosen.
Default Previewer
The format AWS Cloud9 uses to preview code output.
Valid values include:• Raw to attempt to display code output in a plain format.• Browser to attempt to display code output in a format that is preferred for web browsers.
When Saving Reload Previewer
The behavior AWS Cloud9 uses for previewing code output whenever a code file is saved.
Valid values include:• Only on Ctrl-Enter to attempt to preview code output whenever Ctrl-Enter is pressed for the
current code tab.
156

AWS Cloud9 User GuideWorking with AWS Project and User Settings
• Always to attempt to preview code output whenever a code file is saved.
BuildAutomatically Build Supported Files
If enabled, AWS Cloud9 attempts to automatically build the current code if a build action istriggered and the code is in a supported format.
Working with AWS Project and User Settings in theAWS Cloud9 Integrated Development Environment(IDE)
AWS service settings, located in the AWS Settings pane of the Preferences tab, include the followingkinds of settings:
• When to shut down an Amazon EC2 instance if the associated EC2 environment has not been used
• Which AWS Region to use for the AWS Resources window
• Whether to use AWS managed temporary credentials
• Whether to display the AWS Serverless Application Model (AWS SAM) template editor in plain text orvisual mode
To view or change these settings, choose AWS Cloud9, Preferences in the menu bar of an IDE for anenvironment.
In the following lists, project-level settings apply only to the current AWS Cloud9 developmentenvironment, while user-level settings apply across each environment associated with your IAMuser. For more information, see Apply the Current Project Settings for an Environment to AnotherEnvironment (p. 144) and Share Your User Settings with Another User (p. 150).
• Project-Level Settings (p. 157)
• User-Level Settings (p. 158)
Project-Level SettingsStop my environment
If the environment is an EC2 environment, after all web browser instances that are connected to theIDE for the environment are closed, the amount of time until AWS Cloud9 shuts down the AmazonEC2 instance for the environment.
AWS Region
Which AWS Region to use for the Lambda section of the AWS Resources window.
AWS managed temporary credentials
If turned on, uses AWS managed temporary credentials when calling AWS services from the AWSCLI, the aws-shell, or AWS SDK code from an environment. For more information, see AWS ManagedTemporary Credentials (p. 401).
157

AWS Cloud9 User GuideUser-Level Settings
User-Level SettingsUse AWS SAM visual editor
If turned on, displays the AWS Serverless Application Model (AWS SAM) template editor in visualmode when using the Lambda section of the AWS Resources window. If turned off, displays theeditor in text mode.
Working with Keybindings in the AWS Cloud9Integrated Development Environment (IDE)
Keybindings define your shortcut key combinations. Keybindings apply across each AWS Cloud9development environment associated with your IAM user. As you make changes to your keybindings,AWS Cloud9 pushes those changes to the cloud, and associates them with your IAM user. AWS Cloud9also continually scans the cloud for changes to keybindings associated with your IAM user, and appliesthose changes to your current environment.
You can share your keybindings with other users.
• View or Change Your Keybindings (p. 158)
• Share Your Keybindings with Another User (p. 159)
• Change Your Keyboard Mode (p. 159)
• Change Your Operating System Keybindings (p. 159)
• Change Specific Keybindings (p. 159)
• Remove All of Your Custom Keybindings (p. 160)
View or Change Your Keybindings1. On the menu bar, choose AWS Cloud9, Preferences.
2. To view your keybindings across each environment of yours, on the Preferences tab, in the sidenavigation pane, choose Keybindings.
3. To change your keybindings across each environment of yours, in the Keybindings pane, change thesettings you want.
4. To apply your changes to any environment, simply open that environment. If that environment isalready open, refresh the web browser tab for that environment.
For more information, see the following:
• Apple OSX Default Keybindings Reference (p. 181)
• Apple OSX Vim Keybindings Reference (p. 192)
• Apple OSX Emacs Keybindings Reference (p. 202)
• Apple OSX Sublime Keybindings Reference (p. 213)
• Windows / Linux Default Keybindings Reference (p. 224)
• Windows / Linux Vim Keybindings Reference (p. 234)
• Windows / Linux Emacs Keybindings Reference (p. 245)
• Windows / Linux Sublime Keybindings Reference (p. 255)
158
AWS Cloud9 User GuideShare Your Keybindings with Another User
Share Your Keybindings with Another User1. In both the source and target environment, on the menu bar of the AWS Cloud9 IDE, choose AWS
Cloud9, Open Your Keymap.
2. In the source environment, copy the contents of the keybindings.settings tab that is displayed.
3. In the target environment, overwrite the contents of the keybindings.settings tab with the copiedcontents from the source environment.
4. In the target environment, save the keybindings.settings tab.
Change Your Keyboard ModeYou can change the keyboard mode that the AWS Cloud9 IDE uses for interacting with text in the editoracross each environment associated with your IAM user.
1. On the menu bar, choose AWS Cloud9, Preferences.
2. On the Preferences tab, in the side navigation pane, choose Keybindings.
3. For Keyboard Mode, choose one of these keyboard modes:
• Default to use a set of default keybindings.
• Vim to use Vim mode. For more information, see the Vim help files website.
• Emacs to use Emacs mode. For more information, see The Emacs Editor on the GNU OperatingSystem website.
• Sublime to use Sublime mode. For more information, see the Sublime Text Documentation website.
Change Your Operating System KeybindingsYou can change the set of operating system keybindings the AWS Cloud9 IDE recognizes across eachenvironment associated with your IAM user.
1. On the menu bar, choose AWS Cloud9, Preferences.
2. On the Preferences tab, in the side navigation pane, choose Keybindings.
3. For Operating System, choose one of these operating systems:
• Auto for the AWS Cloud9 IDE to attempt to detect which set of operating system keybindings touse.
• Apple OSX for the AWS Cloud9 IDE to use the keybindings listed in Mac format.
• Windows / Linux for the AWS Cloud9 IDE to use the keybindings listed in Windows and Linuxformats.
Change Specific KeybindingsYou can change individual keybindings across each environment associated with your IAM user.
To change one keybinding at a time
1. On the menu bar, choose AWS Cloud9, Preferences.
2. On the Preferences tab, in the side navigation pane, choose Keybindings.
3. In the list of keybindings, double-click the keybinding in the Keystroke column you want to change.
4. Use the keyboard to specify the replacement key combination, and then press Enter.
159

AWS Cloud9 User GuideRemove All of Your Custom Keybindings
NoteTo completely remove the current key combination, press Backspace for Windows orLinux, or Delete for Mac.
To change multiple keybindings at once
1. On the menu bar, choose AWS Cloud9, Open Your Keymap.2. In the keybindings.settings file, define each keybinding to be changed, for example:
[ { "command": "addfavorite", "keys": { "win": ["Ctrl-Alt-F"], "mac": ["Ctrl-Option-F"] } }, { "command": "copyFilePath", "keys": { "win": ["Ctrl-Shift-F"], "mac": ["Alt-Shift-F"] } }]
In the example, addFavorite and copyFilePath are the names of keybindings in the Keystrokecolumn in the Keybindings pane on the Preferences tab. The keybindings you want are win andmac for Windows or Linux and Mac, respectively.
To apply your changes, save the keybindings.settings file. Your changes should appear in theKeybindings pane after a short delay.
Remove All of Your Custom KeybindingsYou can remove all custom keybindings and restore all keybindings to their default values, across eachenvironment associated with your IAM user.
WarningYou cannot undo this action.
1. On the menu bar, choose AWS Cloud9, Preferences.2. On the Preferences tab, in the side navigation pane, choose Keybindings.3. Choose Reset to Defaults.
Working with Themes in the AWS Cloud9Integrated Development Environment (IDE)
A theme defines your overall IDE colors. This applies across each AWS Cloud9 development environmentassociated with your IAM user. As you make changes to your theme, AWS Cloud9 pushes those changesto the cloud, and associates them with your IAM user. AWS Cloud9 also continually scans the cloudfor changes to the theme associated with your IAM user, and applies those changes to your currentenvironment.
160

AWS Cloud9 User GuideView or Change Your Theme
You can share any custom theme overrides you define with other users.
• View or Change Your Theme (p. 161)
• Overall Theme Settings You Can Change (p. 161)
• Theme Overrides You Can Define with Code (p. 161)
• Share Your Theme Overrides with Another User (p. 162)
View or Change Your Theme1. On the menu bar, choose AWS Cloud9, Preferences.
2. To view your theme across each environment of yours, on the Preferences tab, in the side navigationpane, choose Themes.
3. To change your theme across each environment of yours, in the Themes pane, change the settings youwant. To change portions of your theme by using code, choose the your stylesheet link.
4. To apply your changes to any environment of yours, simply open that environment. If thatenvironment is already open, refresh the web browser tab for that environment.
Overall Theme Settings You Can ChangeYou can change the following kinds of overall theme settings on the Preferences tab in the Themespane.
Flat Theme
Applies the built-in flat theme across the AWS Cloud9 IDE.
Classic Theme
Applies the selected built-in classic theme across the AWS Cloud9 IDE.
Syntax Theme
Applies the selected theme to code files across the AWS Cloud9 IDE.
Theme Overrides You Can Define with CodeYou can override portions of the overall theme in the AWS Cloud9 IDE. These overrides will persist even ifyou change the overall theme itself in the AWS Cloud9 IDE.
For example, let's say you want to change the background color of the titles on open tabs to yellow,regardless of the related setting for the current overall theme that is currently applied to the AWSCloud9 IDE.
First, use your web browser's developer tools to determine the CSS class for the portion of the themeyou want to change. For example, do the following for Google Chrome.
1. Choose Customize and control Google Chrome, More tools, Developer tools.
2. In the Developer tools pane, choose Select an element in the page to inspect it.
3. Pause your mouse over the portion of the IDE you want to change. In this example, pause your mouseover the title of an open tab.
4. Note the CSS class name. In this example, the CSS class name for the title of an open tab issessiontab_title.
161

AWS Cloud9 User GuideShare Your Theme Overrides with Another User
Next, add a corresponding CSS class selector to your styles.css file.
1. On the menu bar, choose AWS Cloud9, Preferences. In the side navigation pane, choose Themes.Then choose the your stylesheet link.
2. In the styles.css file, add the CSS class selector. In this example, you use the .sessiontab_titleselector to set background-color to yellow.
.sessiontab_title { background-color: yellow;}
Finally, save the styles.css file, and note the change to the theme. In this example, the backgroundcolor of the titles of open tabs changes to yellow. Even if you change the overall theme in the AWSCloud9 IDE, the CSS overrides in your styles.css file persist.
NoteTo revert this theme override, remove the preceding code from the styles.css file, and thensave the file again.
Share Your Theme Overrides with Another User1. In both the source and target environment, on the menu bar of the AWS Cloud9 IDE, choose AWS
Cloud9, Open Your Stylesheet.2. In the source environment, copy the contents of the styles.css tab that is displayed.3. In the target environment, overwrite the contents of the styles.css tab with the copied contents from
the source environment.4. In the target environment, save the styles.css tab.
Working with Initialization Scripts in the AWSCloud9 Integrated Development Environment (IDE)
An initialization script defines custom initialization code to run in your IDE after all plugins are loaded.This applies across each AWS Cloud9 development environment associated with your IAM user. As youmake changes to your initialization script, AWS Cloud9 pushes those changes to the cloud and associatesthem with your IAM user. AWS Cloud9 also continually scans the cloud for changes to the initializationscript associated with your IAM user, and applies those changes to your current environment.
You can share your initialization script with other users.
• View or Change Your Initialization Script (p. 162)• Share Your Initialization Script with Another User (p. 163)• Working with Initialization Script Code (p. 163)
View or Change Your Initialization Script1. To view your initialization script, on the menu bar, choose AWS Cloud9, Open Your Init Script.2. To change your initialization script, on the init.js tab, use code to change your initialization script's
behavior. For more information, see Working with Initialization Script Code (p. 163).3. To apply your changes to any other environment, simply open the environment you want to apply the
changes to. If that environment is already open, refresh the web browser tab for that environment.
162

AWS Cloud9 User GuideShare Your Initialization Script with Another User
Share Your Initialization Script with Another User1. In both the source and target environment, on the menu bar of the AWS Cloud9 IDE, choose AWS
Cloud9, Open Your Init Script.2. In the source environment, copy the contents of the init.js tab that is displayed.3. In the target environment, overwrite the contents of the init.js tab with the copied contents from the
source environment.4. In the target environment, save the init.js tab.
Working with Initialization Script CodeYou can add code to your initialization script (init.js file) in the AWS Cloud9 IDE to do common thingswhen your environment starts or reloads, such as the following:
• Add custom commands and menus to the menu bar.• Show built-in alert, question, and file dialog boxes, and create custom dialog boxes.• Add and delete files in the file system.• Set and get custom user preference settings.• Add custom side panels.• Add custom builders and runners.• Add custom tabs.
To run your init.js file after you add code to it or change existing code in it, save your init.js file,then reload your environment. Do this by choosing your web browser's reload button. For Windows orLinux, you can also press Ctrl+F5 or Ctrl+Shift+R. For Mac, you can also press Cmd+Shift+R.
• Declaring the Services Global Variable (p. 164)• Discovering the Services APIs (p. 164)• Working with Menus (p. 164)
• Add a Custom Command to the Menu Bar (p. 164)• Add a Custom Menu to the Menu Bar (p. 165)
• Working with Dialogs (p. 166)• Show a Built-In Alert Dialog (p. 167)• Show a Built-In Question Dialog (p. 167)• Show a Built-In File Dialog (p. 168)• Create a Custom Dialog (p. 168)
• Working with the File System (p. 174)• Add a File (p. 174)• Delete a File (p. 175)
• Working with Preference Settings (p. 175)• Create Custom Preference Settings (p. 175)• Set Existing Preference Settings (p. 176)• Get Preference Settings (p. 177)
• Working with Side Panels (p. 177)• Show and Hide Side Panels (p. 177)• Create a Custom Side Panel (p. 178)
• Working with Builders (p. 178)
163

AWS Cloud9 User GuideWorking with Initialization Script Code
• List All Available Builders (p. 179)• List Information about an Individual Builder (p. 179)• Create a Custom Builder (p. 179)
• Working with Runners (p. 180)• List All Available Runners (p. 180)• List Information about an Individual Runner (p. 180)• Create a Custom Runner (p. 180)
• Working with Tabs (p. 181)• List All Available Tabs (p. 181)• Create a Custom Tab (p. 181)
Declaring the Services Global VariableIn your initialization script, you access AWS Cloud9 IDE APIs from your code through the servicesglobal variable. At the beginning of your init.js file, you must add the /*global*/ directive tospecify that the services global variable is available to this file.
/*global services*/
Discovering the Services APIsTo see what is available to you as part of the services global variable, you can log the global to yourweb browser's console. For example:
console.log(services);
To display your web browser's console:
• For Google Chrome, choose Customize and control Google Chrome, More tools, Developer tools,Console.
• For Safari, choose Develop, Show JavaScript Console. (If the Develop menu isn't visible, chooseSafari, Preferences, Advanced, Show Develop menu in menu bar.)
• For Mozilla Firefox, choose Open menu, Developer, Web console.• For Internet Explorer, choose Tools, F12 Developer Tools, Console.• For Microsoft Edge, choose More, F12 Developer Tools, Console.• For other web browsers, consult the specific web browser documentation.
Working with MenusCode in your init.js file starts running immediately after your environment starts or reloads. Forexample, you can use custom menus to delay the running of preloaded commands until you choose torun them.
You can add custom menus anywhere throughout the AWS Cloud9 IDE. For example, you can add yourown menu command to an existing built-in menu on the menu bar. You can also add your own menu tothe menu bar.
Add a Custom Command to the Menu Bar
The following code example adds a menu command named Current Time to the end of the built-inTools menu. When you choose Current Time, an alert displays the current time.
164

AWS Cloud9 User GuideWorking with Initialization Script Code
// Add a custom menu command to an existing menu on the menu bar.var menus = services["menus"]; // Accesses the menu bar.var MenuItem = services.MenuItem; // Use this to create a menu item.var Divider = services.Divider; // Use this to create a menu divider.
// Add a Current Time command to the built-in Tools menu.menus.addItemByPath("Tools/Current Time", new MenuItem({ onclick: chooseCurrentTime}), 200001, plugin);
// Add a dividing line before the Current Time menu command on// the Tools menu.menus.addItemByPath("Tools/~", new Divider(), 200000, plugin);
// Run this when the user chooses the Current Time command.function chooseCurrentTime() {
var today = new Date(); var h = today.getHours(); var m = today.getMinutes(); var s = today.getSeconds();
// Add a zero in front of minutes or seconds, if less than 10. m = checkTime(m); s = checkTime(s);
// Show a built-in alert dialog box displaying the current time. services["dialog.alert"].show("Time", "Current time", "The current time is " + h + ":" + m + ":" + s + ".");}
// Add a zero in front of minutes or seconds, if less than 10.function checkTime(i) { if (i < 10) { i = "0" + i; } return i;}
To specify the menu to add the Current Time command to, in the addItemByPath method, provide themenu name (in this example, Tools), followed by a forward slash (/), followed by the name of the menucommand (in this example, Current Time).
To separate the Current Time command from the menu's other commands, add a divider before thecommand. The divider appears as a horizontal rule. To specify the menu to add the divider to, in theaddItemByPath method, provide the menu name (in this example, Tools), followed by a forward slash(/), followed by a tilde (~).
To add this command toward the end of the menu, you specify a sufficiently large index number(200000 for the divider and 200001 for the Current Time command). Menus and menu commands withlarger index numbers are placed toward the ends of menus. To see the index number of each menu andmenu command, add ?menus=1 to the end of your environment URL, then reload your environment. Tohide these index numbers, remove ?menus=1 from the end of your environment URL, then reload yourenvironment.
The show method of the dialog.alert service shows an alert dialog. For more information, seeShow a Built-In Alert Dialog (p. 167).
Add a Custom Menu to the Menu Bar
The following code example adds a top-level menu named Weekends to the end of the menu bar. Whenyou choose one of the menu's commands, an alert dialog box is displayed with various information.
165

AWS Cloud9 User GuideWorking with Initialization Script Code
Adding a custom menu to the menu bar is similar to adding a custom command to a built-in menu. Usethe setRootMenu method to set where to put the menu at the top level on the menu bar.
Because this code uses the plugin global variable, you must add the /*global services,plugin*/ directive at the beginning of your init.js file to specify that the services and pluginglobals are available to this file.
// Add a custom top-level menu to the menu bar.// Add commands and dividers to this menu.var menuCaption = "Weekends"; // Menu caption.var menus = services["menus"]; // Access the menu bar.var MenuItem = services.MenuItem; // Use this to create a menu item.var Divider = services.Divider; // Use this to create a menu divider.
// Set the top-level menu caption.menus.setRootMenu(menuCaption, 900, plugin);
// Add a Saturday menu command to the menu.// When the user chooses this command, run the chooseWeekendDay function,// passing in the string Saturday.menus.addItemByPath(menuCaption + "/Saturday", new MenuItem({ onclick: chooseWeekendDay.bind(null, "Saturday")}), 100, plugin);
// Add a Sunday menu command to the menu.// When the user chooses this command, run the chooseWeekendDay function,// passing in the string Sunday.menus.addItemByPath(menuCaption + "/Sunday", new MenuItem({ onclick: chooseWeekendDay.bind(null, "Sunday")}), 200, plugin);
// Add an About menu command to the menu.// When the user chooses this command, run the chooseAbout function.menus.addItemByPath(menuCaption + "/About", new MenuItem({ onclick: chooseAbout}), 400, plugin);
// Add a dividing line before the About menu command.menus.addItemByPath(menuCaption + "/~", new Divider(), 300, plugin);
// Show a built-in alert with the chosen day name.function chooseWeekendDay(day) { services["dialog.alert"].show("Results", "Which day?", "You chose " + day + ".");}
// Show a built-in alert with the menu caption.function chooseAbout() { services["dialog.alert"].show("About", menuCaption + " menu", "This is the " + menuCaption + " menu. Enjoy your weekend.");}
Working with DialogsYou use dialogs to display information to users, and to get information from users. This section describeshow to work with four types of dialog:
• A built-in alert dialog, which displays information but doesn't enable you to get information fromusers.
• A built-in question dialog, which enables you to capture "yes" or "no" responses from users.• A built-in file dialog, which enables you to capture information from users about folders and files in
the file system of the environment.
166

AWS Cloud9 User GuideWorking with Initialization Script Code
• A custom dialog, which enables you to display information and special controls to capture variousinformation from users.
Show a Built-In Alert Dialog
An alert dialog contains a title, optional heading, optional text, and an OK button.
The following code example uses the show method of the dialog.alert service to display variousinformation based on the current time of day.
// Create an alert dialog.var d = new Date(); // Get the current time.var n = d.getHours(); // Get the current hour.var greeting;var meal;
if ( n >= 0 && n <=11 ) { greeting = "Good morning"; meal = "breakfast";} else if ( n >=12 && n <=16 ) { greeting = "Good afternoon"; meal = "lunch";} else if ( n >= 17 && n <= 23) { greeting = "Good evening"; meal = "dinner";} else { greeting = "Hello"; meal = "something";}
// Show a built-in alert dialog with a message based on the current hour.services["dialog.alert"].show(greeting, "Reminder", "Have you eaten " + meal + " yet?");
Show a Built-In Question Dialog
A question dialog contains a title, optional heading, optional text, and Yes and No buttons.
The following code example displays various information based on the current time of day. To dosomething that depends on whether you choose Yes or No, declare related functions within the showmethod.
The following code example uses the show method of the dialog.question service to display variousinformation based on whether the user chooses Yes or No. In your own code, you can do somethingdifferent if the user chooses Yes or No.
// Create a question dialog.var language = "Node.js"; // Programming language type displayed in dialog.
// Show a built-in question dialog with a message based on whether the// user chooses Yes or No.services["dialog.question"].show( "Survey", "Do you like " + language + "?", "Choose Yes or No.", function() { // User chose the Yes button. services["dialog.alert"].show("Results", "Language preference", "You seem to like " + language + "."); }, function() {
167

AWS Cloud9 User GuideWorking with Initialization Script Code
// User chose the No button. services["dialog.alert"].show("Results", "Language preference", "It seems that you don't like " + language + "."); });
Show a Built-In File Dialog
A file dialog contains Save and Cancel buttons. It also contains file name, path, and folder boxes, aCreate folder button, and a Show files in tree check box.
Use the file dialog's filename and directory properties to get the specified file name and directoryname.
The following code example uses the show method of the dialog.file service to enable the userto select a file name and directory path. After the user chooses Save, information about the selectedfile name and directory path is displayed. In your own code, you can do something different if the userchooses Save or Cancel.
// Create a file dialog.var fileDialog = services["dialog.file"];
// Show a built-in file dialog.// After the user chooses Save, show a built-in alert with// information about the user's specified file name and directory path.fileDialog.show( "Specify the file name and choose a path", "my-filename", function() { // User chose the Save button. services["dialog.alert"].show("Results", "File info", "Filename = " + fileDialog.filename + "\nDirectory = " + fileDialog.directory); fileDialog.hide(); }, function() { // User chose the Cancel button. services["dialog.alert"].show("Results", "File info", "You chose Cancel."); fileDialog.hide(); });
Create a Custom Dialog
A custom dialog provides a row across its bottom edge that you can put special controls into, as shownhere.
This row, named the button bar, can contain the following items:
• button: Represents a button the user can choose. A button can have a name, caption, and functionto run when the user chooses it.
168

AWS Cloud9 User GuideWorking with Initialization Script Code
• checkbox: Represents a box with checked and unchecked states. A checkbox can have a name,default value (checked or unchecked), and custom values you can associate with the checked andunchecked states.
• divider: Represents a dividing line.• dropdown: Represents a list of choices for the user. A dropdown can have a name, list of items the
user can choose from, default choice, and message to return if the user doesn't select any choice andno default choice is specified.
• filler: Represents an empty space to separate items.• image: Represents a viewable picture. An image can have a name, source location, margin, and height.• label: Represents a string of text. A label can have a name and a caption.• textbox: Represents a box the user can type text into. A textbox can have a name, default value,
and message if the user doesn't type anything into the box. It can be set to continuously determine avalue as the user types or determine a value only after the user exits the box.
The following code demonstrates all of the available button bar items in a custom dialog. By default, thebutton bar displays items horizontally with no labels. When the user chooses the button, another dialogis displayed with the values of the checkbox, dropdown, and textbox.
var Dialog = services.Dialog;var myDialog = new Dialog("AWS Cloud9", [], { allowClose: true, title: "My Dialog", elements: [ { name: "myButton", type: "button", caption: "My Button", onclick: myButtonOnClick }, { name: "myCheckbox", type: "checkbox", defaultValue: "checked", values: [ "checked", "unchecked" ] }, { name: "myDivider", type: "divider" }, { name: "myDropdown", type: "dropdown", items: [ { value: "item1", caption: "Item 1" }, { value: "item2", caption: "Item 2" }, { value: "item3", caption: "Item 3" } ], defaultValue: "item1", emptyMessage: "No item selected" }, { type: "filler" }, { name: "myImage", type: "image", src: "", margin: "5 5 5 5", height: 20 }, { name: "myLabel",
169
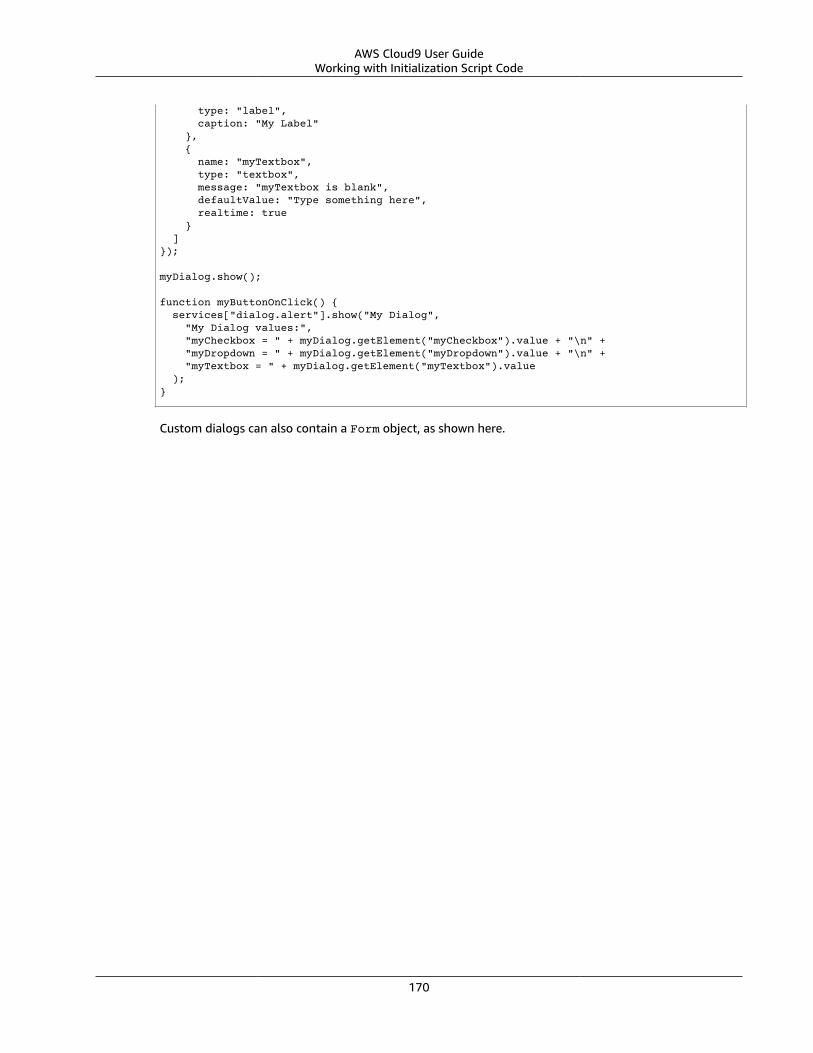
AWS Cloud9 User GuideWorking with Initialization Script Code
type: "label", caption: "My Label" }, { name: "myTextbox", type: "textbox", message: "myTextbox is blank", defaultValue: "Type something here", realtime: true } ]});
myDialog.show();
function myButtonOnClick() { services["dialog.alert"].show("My Dialog", "My Dialog values:", "myCheckbox = " + myDialog.getElement("myCheckbox").value + "\n" + "myDropdown = " + myDialog.getElement("myDropdown").value + "\n" + "myTextbox = " + myDialog.getElement("myTextbox").value );}
Custom dialogs can also contain a Form object, as shown here.
170

AWS Cloud9 User GuideWorking with Initialization Script Code
This Form object can contain the following items:
• button: Represents a button the user can choose. A button can have a title, name, caption, andfunction to run when the user chooses it.
• checkbox: Represents a sliding on (checked) and off (unchecked) switch. A check box can have a title,name, default value (checked or unchecked), and custom values you can associate with the checkedand unchecked states.
• checked-spinner: Represents a box with checked and unchecked states, with a spinner next to it. Achecked-spinner can have a title, name, default check box value (checked or unchecked), defaultspinner value, and minimum and maximum values. It can be set to continuously determine values asthe user changes them, or determine them only after the user exits the checked-spinner.
• colorbox: Represents a chosen color. A colorbox can have a title, name, and default value. It can beset to continuously determine the value as the user picks different color values, or determine the valueonly after the user exits the colorbox.
• divider: Represents a dividing line.• dropdown: Represents a list of choices for the user. A dropdown can have a title, name, list of items
the user can choose from, default choice, and message that can be returned if the user doesn't selectan item and no default choice is specified.
171
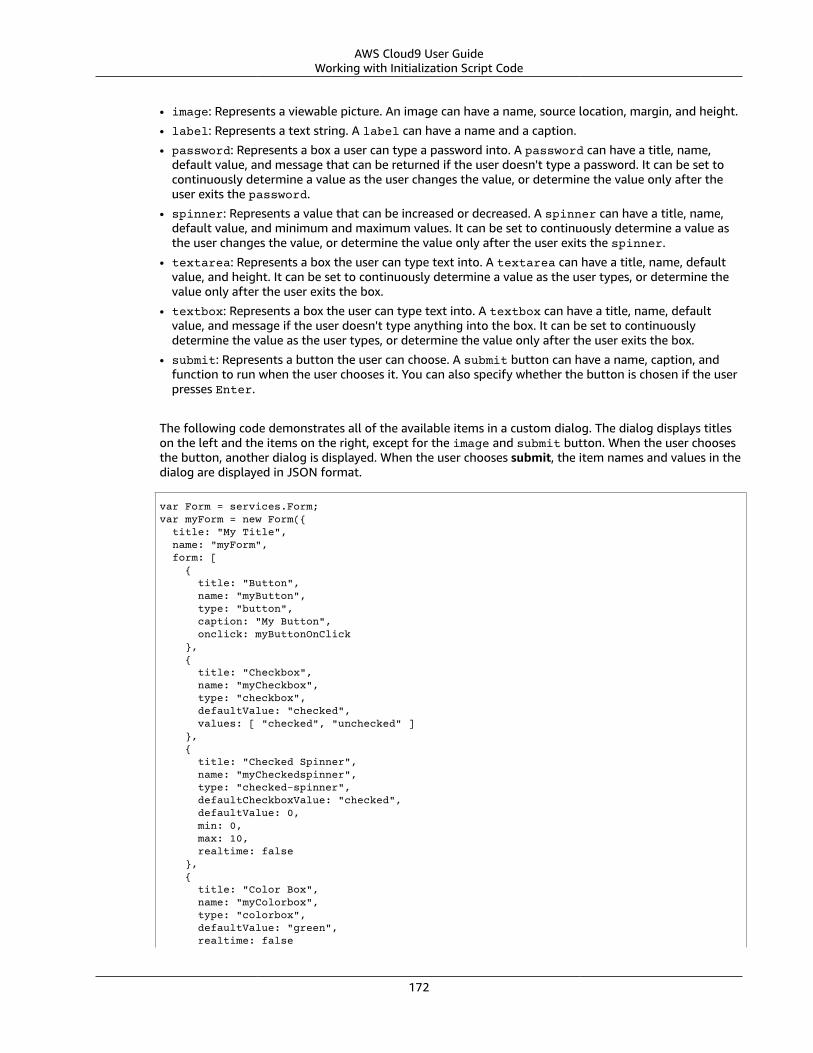
AWS Cloud9 User GuideWorking with Initialization Script Code
• image: Represents a viewable picture. An image can have a name, source location, margin, and height.
• label: Represents a text string. A label can have a name and a caption.
• password: Represents a box a user can type a password into. A password can have a title, name,default value, and message that can be returned if the user doesn't type a password. It can be set tocontinuously determine a value as the user changes the value, or determine the value only after theuser exits the password.
• spinner: Represents a value that can be increased or decreased. A spinner can have a title, name,default value, and minimum and maximum values. It can be set to continuously determine a value asthe user changes the value, or determine the value only after the user exits the spinner.
• textarea: Represents a box the user can type text into. A textarea can have a title, name, defaultvalue, and height. It can be set to continuously determine a value as the user types, or determine thevalue only after the user exits the box.
• textbox: Represents a box the user can type text into. A textbox can have a title, name, defaultvalue, and message if the user doesn't type anything into the box. It can be set to continuouslydetermine the value as the user types, or determine the value only after the user exits the box.
• submit: Represents a button the user can choose. A submit button can have a name, caption, andfunction to run when the user chooses it. You can also specify whether the button is chosen if the userpresses Enter.
The following code demonstrates all of the available items in a custom dialog. The dialog displays titleson the left and the items on the right, except for the image and submit button. When the user choosesthe button, another dialog is displayed. When the user chooses submit, the item names and values in thedialog are displayed in JSON format.
var Form = services.Form;var myForm = new Form({ title: "My Title", name: "myForm", form: [ { title: "Button", name: "myButton", type: "button", caption: "My Button", onclick: myButtonOnClick }, { title: "Checkbox", name: "myCheckbox", type: "checkbox", defaultValue: "checked", values: [ "checked", "unchecked" ] }, { title: "Checked Spinner", name: "myCheckedspinner", type: "checked-spinner", defaultCheckboxValue: "checked", defaultValue: 0, min: 0, max: 10, realtime: false }, { title: "Color Box", name: "myColorbox", type: "colorbox", defaultValue: "green", realtime: false
172

AWS Cloud9 User GuideWorking with Initialization Script Code
}, { name: "myDivider", type: "divider" }, { title: "Dropdown", name: "myDropdown", type: "dropdown", items: [ { value: "item1", caption: "Item 1" }, { value: "item2", caption: "Item 2" }, { value: "item3", caption: "Item 3" } ], defaultValue: "item1", emptyMessage: "No item selected" }, { name: "myImage", type: "image", src: "", margin: "5 5 5 5", height: 20 }, { name: "myLabel", type: "label", caption: "My Label" }, { title: "Password", name: "myPassword", type: "password", defaultValue: "No password typed", realtime: false }, { title: "Spinner", name: "mySpinner", type: "spinner", defaultValue: 0, min: 0, max: 10, realtime: false }, { title: "Text Area", name: "myTextarea", type: "textarea", height: 20, defaultValue: "Type something here", realtime: true }, { title: "Textbox", name: "myTextbox", type: "textbox", message: "myTextbox is blank", defaultValue: "Type something here", realtime: true }, { name: "mySubmit", type: "submit", caption: "Submit", onclick: mySubmitOnClick,
173

AWS Cloud9 User GuideWorking with Initialization Script Code
default: false } ]});
var Dialog = services.Dialog;var myDialog = new Dialog("AWS Cloud9", [], { allowClose: true, title: "My Dialog"});
myDialog.on("draw", function(e) { myForm.attachTo(e.html);});
myDialog.show();
function myButtonOnClick() { services["dialog.alert"].show("My Button", "My Button was clicked.");}
function mySubmitOnClick() { services["dialog.alert"].show("My Form", "My Form values", JSON.stringify(myForm.toJson())); myDialog.hide();}
Working with the File SystemYou can use the fs service to work with the file system in an environment. You can use the file system to:
• Add, read, and delete files.• Add, read, rename, and delete directories.• Search through files and directories.• Change file modes.
Add a File
To add a file, use the writeFile method. The following example adds a file named my-file.txt tothe root directory of the environment.
var fs = services["fs"];var writeFilePath = "~/environment/my-file.txt";
fs.writeFile(writeFilePath, "Hello, World!", function(err, success) { if (err) { services["dialog.alert"].show( "Error", "File Write Operation", "Could not write file '" + writeFilePath + "'."); } else { services["dialog.alert"].show( "Success", "File Write Operation", "Wrote file '" + writeFilePath + "'."); } });
174

AWS Cloud9 User GuideWorking with Initialization Script Code
Delete a File
To delete a file, use the rmfile method. The following example removes a file named my-file.txtfrom the root directory of the environment.
var fs = services["fs"];var fileDeletePath = "~/environment/my-file.txt";
fs.rmfile(fileDeletePath, function(err, success) { if (err) { services["dialog.alert"].show( "Error", "File Delete Operation", "Could not delete file '" + fileDeletePath + "'."); } else { services["dialog.alert"].show( "Success", "File Delete Operation", "Deleted file '" + fileDeletePath + "'."); } });
Working with Preference SettingsUse preferences to customize the behavior of the AWS Cloud9 IDE for users. Common preferencesinclude settings for code editors, code formatting, and terminal sessions. For more informationabout preference settings, see Working with Project Settings (p. 144) and Working with UserSettings (p. 149).
You can create your own custom preference settings. You can also set and get the values of existingcustom and built-in preference settings.
Create Custom Preference Settings
Use the add method of the preferences service to add custom preferences that users can set. For eachcollection of custom preference settings, specify information such as the collection's display name andlocation in the Preferences pane, and the collection's individual settings and display controls.
The following code example displays a collection of settings within a section named My CustomPreferences. It's displayed on the User Settings page in the Preferences pane.
services["preferences"].add({ "My Custom Preferences" : { // The title of the section to which // the following subsections will be added. // If this section doesn't already exist, // it will be added to the User Settings page. position: 500, // The index number of the section within the parent page. "Python Preferences": { // The title of this subsection. position: 100, // The index number of this subsection within the section. "I like Python" : { // The title of this setting, which // will be added to the subsection. type: "checkbox", // The type of control for this setting. position: 101, // The index number of this setting within the subsection. values: [ "yes", "no" ], // Values for checked and unchecked states. setting: "myCustomPrefs/myPythonPrefs/@likesPython" // Where the setting // will be stored. }, "Times per week (up to 10) I use Python" : { type: "spinner",
175

AWS Cloud9 User GuideWorking with Initialization Script Code
position: 102, defaultValue: 0, // Default spinner value. min: 0, // Lowest valid spinner value. max: 10, // Highest valid spinner value. setting: "myCustomPrefs/myPythonPrefs/@weeklyPythonTimesUsed" } }, "Favorite Food and Drink": { position: 200, "My favorite type of food" : { type: "dropdown", position: 201, items: [ // Dropdown choices. { value: "Grains", caption: "Bread" }, { value: "Grains", caption: "Cereal" }, { value: "Dairy", caption: "Cheese" }, { value: "Fruits", caption: "Fruits" }, { value: "Meat", caption: "Meat" }, { value: "Dairy", caption: "Milk" }, { value: "Grains", caption: "Pasta" }, { value: "Grains", caption: "Rice" }, { value: "Vegetables", caption: "Vegetables" }, { value: "Dairy", caption: "Yogurt" }, { value: "Other", caption: "Other" }, { value: "None of the above", caption: "None of the above" } ], setting: "myCustomPrefs/myFoodPrefs/@myFavoriteFood" }, "My favorite drink" : { type: "textbox", position: 202, setting: "myCustomPrefs/myFoodPrefs/@myFavoriteDrink" } } }}, plugin);
To display this section near the end of the User Settings page in the Preferences pane, you specify arelatively larger index number (500). Sections with larger index numbers are placed toward the endsof pages. Similarly, subsections with larger index numbers are placed toward the ends of sections,and settings with larger index numbers are placed toward the ends of subsections. To see the indexnumbers of sections, subsections, and settings in the Preferences pane, add ?menus=1 to the endof your environment URL and then reload your environment. To hide these index numbers, remove ?menus=1 from the end of your environment URL, and then reload your environment.
Set Existing Preference Settings
To set the value of an existing preference setting, use the set method of the settings service, andspecify the path to the setting and the value to set.
To view your existing project settings, choose AWS Cloud9, Open Your Project Settings. To view yourexisting user settings, choose AWS Cloud9, Open Your User Settings on the menu bar.
The following code example displays the Open Files section in the Environment window.
services["settings"].set("user/openfiles/@show", "true");
This is equivalent to manually choosing Show Open Files in the Environment window's settings contextmenu. To see this value, choose AWS Cloud9, Open Your User Settings on the menu bar. Then look inthe settings JSON for the following value. For brevity, ellipses (...) represent omitted JSON.
{
176

AWS Cloud9 User GuideWorking with Initialization Script Code
"ace": { ... }, "breakpoints": { ... }, ... "openfiles": { ... "@show": true }, ...}
Get Preference Settings
Use the get method of the settings service to get the value of a preference setting, specifying thepath to the setting.
The following code example displays various custom preference settings in a dialog box.
var settings = services["settings"];
services["dialog.alert"].show( "Custom Preferences", "My Custom Preferences", "Likes Python: " + settings.get("myCustomPrefs/myPythonPrefs/@likesPython") + "\n" + "Number of times using Python per week: " + settings.get("myCustomPrefs/myPythonPrefs/@weeklyPythonTimesUsed") + "\n" + "Favorite food category: " + settings.get("myCustomPrefs/myFoodPrefs/@myFavoriteFood") + "\n" + "Favorite drink: " + settings.get("myCustomPrefs/myFoodPrefs/@myFavoriteDrink"));
Working with Side PanelsBuilt-in side panels include windows such as Environment, Navigate, Commands, Outline, andDebugger. You can also create your own custom side panels.
Show and Hide Side Panels
To access side panels, use the panels service.
To get the list of all available side panels, use the panels property.
To get the list of side panels that are currently showing, use the activePanels property.
To show or hide a side panel, use the activate or deactivate method.
Side panels have corresponding buttons. To show or hide these buttons, use the enablePanel ordisablePanel method.
The following example demonstrates all of these properties and methods.
var panels = services["panels"];
// Lists all side panels that are currently shown.console.log(panels.activePanels);
177

AWS Cloud9 User GuideWorking with Initialization Script Code
// Lists all available side panels.console.log(panels.panels);
// Shows the Debugger side panel, if it isn't already shown.panels.activate("debugger");
// Hides the Environment side panel, if it isn't already hidden.panels.deactivate("tree");
// Removes the Outline side panel button, if it isn't already removed.panels.disablePanel("outline");
// Displays the Navigate side panel button, if it isn't already displayed.panels.enablePanel("navigate");
Create a Custom Side Panel
Use the Panel object to create a side panel, and specify settings such as the side panel's caption and sidelocation.
To format the side panel, use the on method.
To load and then display the side panel, use the load and show methods.
The following example creates, loads, and displays a custom side panel.
var Panel = services.Panel;var zooPanel = new Panel( "AWS Cloud9", [], { index: 100, caption: "Zoo", where: "right", autohide: true });
zooPanel.on("draw", function(e) { e.html.style.padding = "10px"; e.html.innerHTML = "<h1>Welcome</h1>" + "<p>Welcome to our zoo.</p>" + "<p>We have the following animals to visit:</p>" + "<ul>" + "<li>Bear</li>" + "<li>Lion</li>" + "<li>Monkey</li>" + "<li>Octopus</li>" + "</ul>" + "<h2>We want to hear from you!</h2>" + "<p>Please send us your feedback.</p>" + "<a href=\"mailto:[email protected]\">[email protected]</a>";});
zooPanel.load();zooPanel.show();
Working with BuildersYou use builders to build code. If AWS Cloud9 doesn't provide a built-in builder for your programminglanguage, you can create one manually or programmatically. To create a builder manually, see Create aBuilder or Runner (p. 139).
178

AWS Cloud9 User GuideWorking with Initialization Script Code
List All Available Builders
Use the build service to work with builders. The following code example uses the listBuildersmethod to list all builders that are available to your environment.
var build = services["build"];
build.listBuilders(function (err, builders) { if (err) { services["dialog.alert"].show( "Error", "Builders Listing Error", "Cannot display the list of builders: " + err ); } else { services["dialog.alert"].show( "Success", "Builders Listing", "The list of builders is:\n\n" + JSON.stringify(builders) ); }});
List Information about an Individual Builder
Use the build service to work with builders. The following code example uses the getBuilder methodto list information about the built-in CoffeeScript builder.
var build = services["build"];var builderName = "CoffeeScript";
build.getBuilder(builderName, false, function(err, builder) { if (err) { services["dialog.alert"].show( "Error", "Builder Listing Error", "Cannot display information for '" + builderName + "': " + err ); } else { services["dialog.alert"].show( "Success", "Builder Listing", "The builder definition for '" + builderName + "' is '" + builder.cmd + "'."); }});
Create a Custom Builder
Use the addBuilder method of the build service to create a builder. The following code examplecreates a builder that uses G++ to build C++ code. To learn how to specify what a builder does when itbuilds, see Define a Builder or Runner (p. 139).
var build = services["build"];
build.addBuilder("G++", { "cmd": [ "g++", "-o", "$file_base_name", "$file_name" ], "info": "Compiling $file_name and linking to $file_base_name...", "selector": "source.cpp"}, plugin);
179

AWS Cloud9 User GuideWorking with Initialization Script Code
Working with RunnersYou use runners to run code. If AWS Cloud9 doesn't provide a built-in runner for your programminglanguage, you can create one manually or programmatically. To create a runner manually, see Create aBuilder or Runner (p. 139).
List All Available Runners
Use the run service to work with runners. The following code example uses the listRunners methodto list all runners that are available to your environment.
var run = services["run"];
run.listRunners(function (err, runners) { if (err) { services["dialog.alert"].show( "Error", "Runners Listing Error", "Cannot display the list of runners: " + err ); } else { services["dialog.alert"].show( "Success", "Runners Listing", "The list of runners is:\n\n" + JSON.stringify(runners) ); }});
List Information about an Individual Runner
Use the build service to work with runners. The following code example uses the getRunner methodto list information about the built-in Ruby runner.
var run = services["run"];var runnerName = "Ruby";
run.getRunner(runnerName, false, function(err, runner) { if (err) { services["dialog.alert"].show( "Error", "Runner Listing Error", "Cannot display information for '" + runnerName + "': " + err ); } else { services["dialog.alert"].show( "Success", "Runner Listing", "The runner definition for '" + runnerName + "' is '" + runner.cmd + "'."); }});
Create a Custom Runner
Use the addRunner method of the run service to create a runner. The following code example createsa runner that runs Python code. To learn how to specify what a runner does when it runs, see Define aBuilder or Runner (p. 139).
var run = services["run"];
180

AWS Cloud9 User GuideApple OSX Default Keybindings Reference
run.addRunner("Python", { "cmd": [ "python", "$file_name", "$args" ], "info": "Running $file_name...", "selector": "source.py"}, plugin);
Working with TabsThe AWS Cloud9 IDE uses tabs to display files and some types of windows, for example, code files,terminal sessions, Immediate tabs, and run configurations. Tabs are contained within panes. Tabs cancontain editors or documents, for example, the JavaScript code editor or the contents of a read-only file.
List All Available Tabs
Use the tabManager service to work with tabs. The following code example displays the titles of all thetabs that are currently displayed and the names of the panes that host these tabs.
var tabManager = services["tabManager"];var tabs = tabManager.getTabs();var tabsList = "";
for (var i = 0; i < tabs.length; i++){ tabsList += tabs[i].title + " (in " + tabs[i].pane.name + ")\n";}
services["dialog.alert"].show( "Tab Manager", "Tabs", tabsList);
Create a Custom Tab
Use the open method of the tabManager service to create a custom tab. The following code examplecreates a text file and also creates a tab that displays the file's contents inside of a text editor.
var tabManager = services["tabManager"];
tabManager.open({ path: "~/hello.txt", pane: tabManager.findPane("pane0"), editorType: "ace", active: true, focus: true, value: "Hello, World!"});
Apple OSX Default Keybindings Reference for theAWS Cloud9 Integrated Development Environment(IDE)
Following is a list of default keyboard mode keybindings for Apple OSX operating systems in the AWSCloud9 IDE.
181

AWS Cloud9 User GuideGeneral
For more information, in the AWS Cloud9 IDE:
1. On the menu bar, choose AWS Cloud9, Preferences.2. On the Preferences tab, choose Keybindings.3. For Keyboard Mode, choose Default.4. For Operating System, choose Apple OSX.
See also Working with Keybindings (p. 158).
• General (p. 182)• Tabs (p. 184)• Panels (p. 185)• Code Editor (p. 186)• emmet (p. 191)• Terminal (p. 191)• Run and Debug (p. 191)
General
Description Keybinding Command
Add the selection as a watchexpression
Command-Shift-C addwatchfromselection
Remove the cut selection fromthe clipboard
Esc clearcut
Show the code completioncontext menu
Control-Space | Option-Space
complete
Code complete, and thenoverwrite
Control-Shift-Space |Option-Shift-Space
completeoverwrite
Copy the selection to theclipboard
Command-C copy
Cut the selection to theclipboard
Command-X cut
Expand code, where applicable Tab expandSnippet
Show the find and replace barfor the current document
Command-F find
Select all find matches in thecurrent document
Control-Option-G findAll
Go to the next match in thecurrent document for the findquery you entered last
Command-G findnext
Go to the previous match in thecurrent document for the findquery you entered last
Command-Shift-G findprevious
182
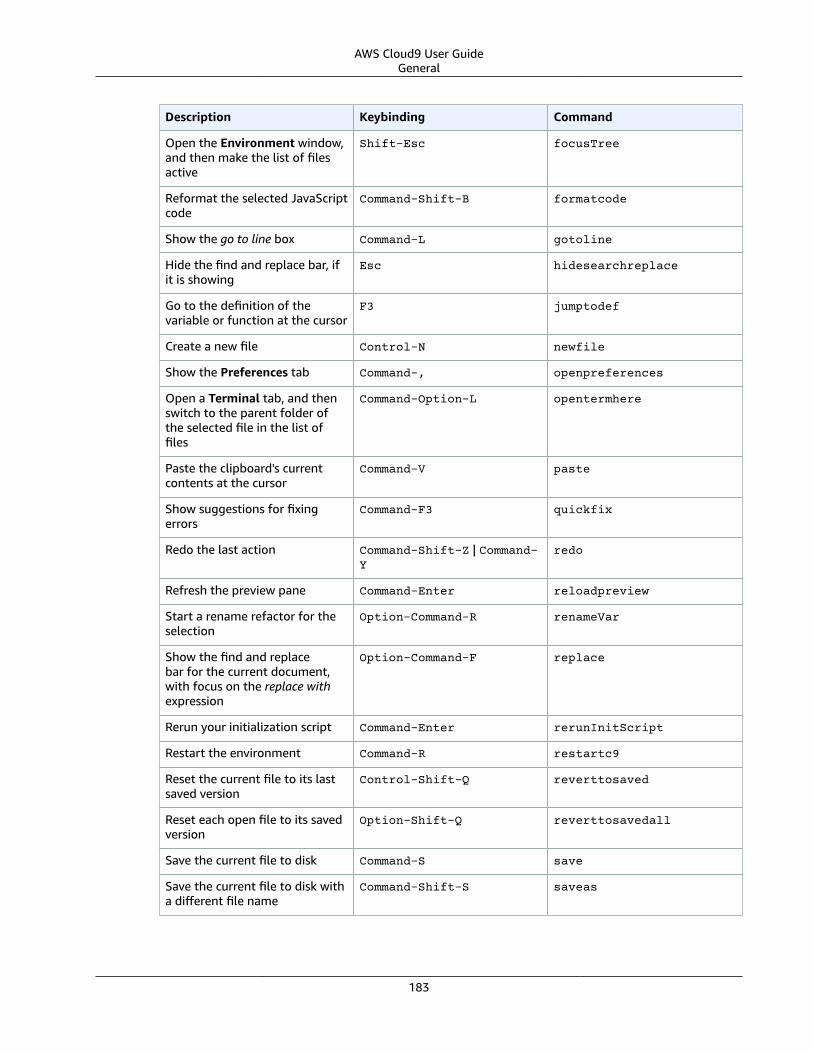
AWS Cloud9 User GuideGeneral
Description Keybinding Command
Open the Environment window,and then make the list of filesactive
Shift-Esc focusTree
Reformat the selected JavaScriptcode
Command-Shift-B formatcode
Show the go to line box Command-L gotoline
Hide the find and replace bar, ifit is showing
Esc hidesearchreplace
Go to the definition of thevariable or function at the cursor
F3 jumptodef
Create a new file Control-N newfile
Show the Preferences tab Command-, openpreferences
Open a Terminal tab, and thenswitch to the parent folder ofthe selected file in the list offiles
Command-Option-L opentermhere
Paste the clipboard's currentcontents at the cursor
Command-V paste
Show suggestions for fixingerrors
Command-F3 quickfix
Redo the last action Command-Shift-Z | Command-Y
redo
Refresh the preview pane Command-Enter reloadpreview
Start a rename refactor for theselection
Option-Command-R renameVar
Show the find and replacebar for the current document,with focus on the replace withexpression
Option-Command-F replace
Rerun your initialization script Command-Enter rerunInitScript
Restart the environment Command-R restartc9
Reset the current file to its lastsaved version
Control-Shift-Q reverttosaved
Reset each open file to its savedversion
Option-Shift-Q reverttosavedall
Save the current file to disk Command-S save
Save the current file to disk witha different file name
Command-Shift-S saveas
183
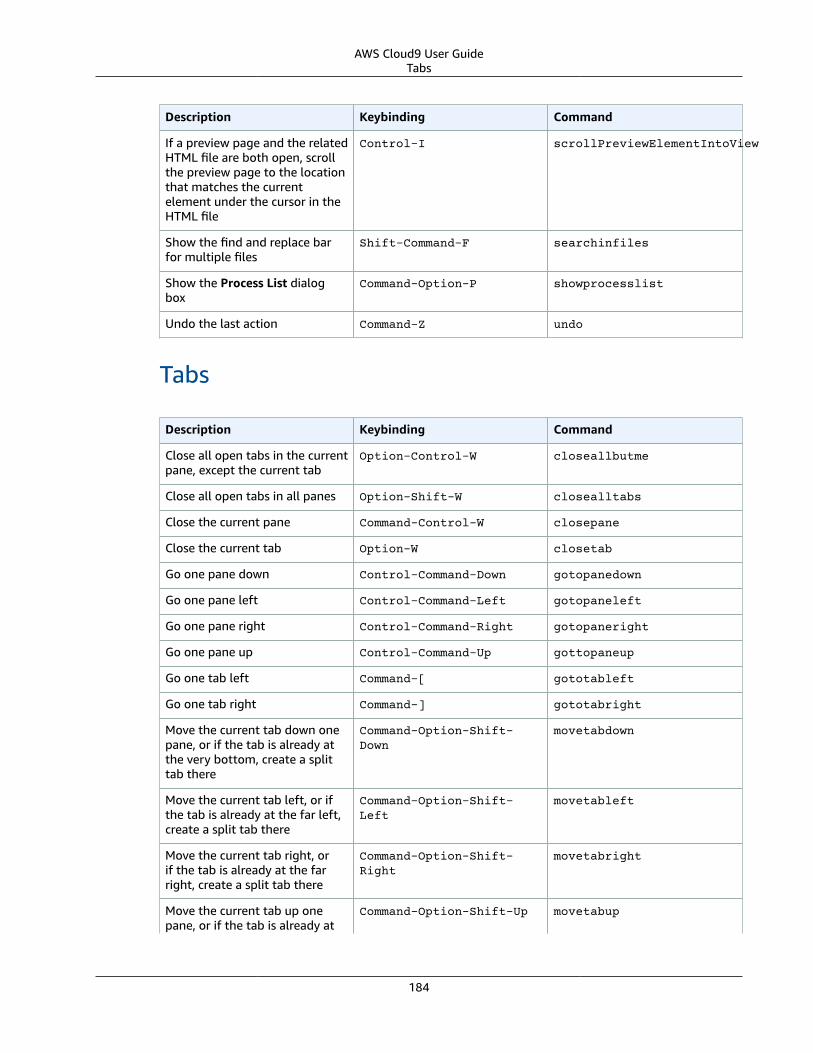
AWS Cloud9 User GuideTabs
Description Keybinding Command
If a preview page and the relatedHTML file are both open, scrollthe preview page to the locationthat matches the currentelement under the cursor in theHTML file
Control-I scrollPreviewElementIntoView
Show the find and replace barfor multiple files
Shift-Command-F searchinfiles
Show the Process List dialogbox
Command-Option-P showprocesslist
Undo the last action Command-Z undo
Tabs
Description Keybinding Command
Close all open tabs in the currentpane, except the current tab
Option-Control-W closeallbutme
Close all open tabs in all panes Option-Shift-W closealltabs
Close the current pane Command-Control-W closepane
Close the current tab Option-W closetab
Go one pane down Control-Command-Down gotopanedown
Go one pane left Control-Command-Left gotopaneleft
Go one pane right Control-Command-Right gotopaneright
Go one pane up Control-Command-Up gottopaneup
Go one tab left Command-[ gototableft
Go one tab right Command-] gototabright
Move the current tab down onepane, or if the tab is already atthe very bottom, create a splittab there
Command-Option-Shift-Down
movetabdown
Move the current tab left, or ifthe tab is already at the far left,create a split tab there
Command-Option-Shift-Left
movetableft
Move the current tab right, orif the tab is already at the farright, create a split tab there
Command-Option-Shift-Right
movetabright
Move the current tab up onepane, or if the tab is already at
Command-Option-Shift-Up movetabup
184
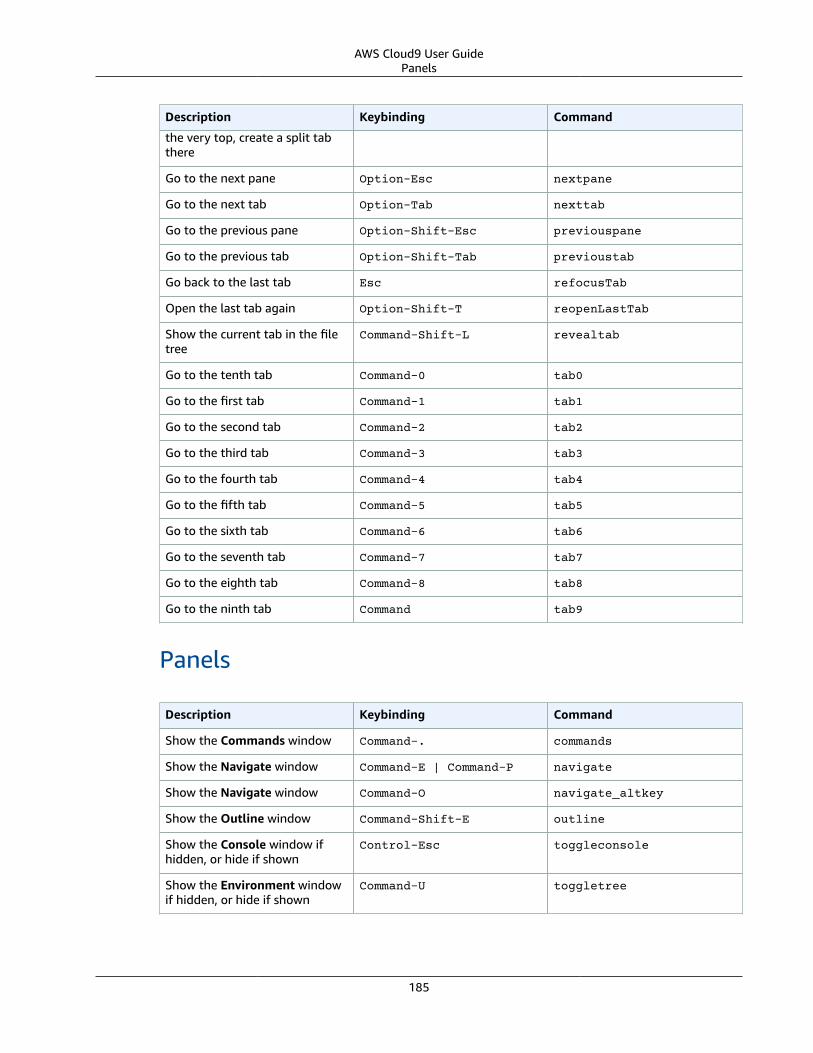
AWS Cloud9 User GuidePanels
Description Keybinding Command
the very top, create a split tabthere
Go to the next pane Option-Esc nextpane
Go to the next tab Option-Tab nexttab
Go to the previous pane Option-Shift-Esc previouspane
Go to the previous tab Option-Shift-Tab previoustab
Go back to the last tab Esc refocusTab
Open the last tab again Option-Shift-T reopenLastTab
Show the current tab in the filetree
Command-Shift-L revealtab
Go to the tenth tab Command-0 tab0
Go to the first tab Command-1 tab1
Go to the second tab Command-2 tab2
Go to the third tab Command-3 tab3
Go to the fourth tab Command-4 tab4
Go to the fifth tab Command-5 tab5
Go to the sixth tab Command-6 tab6
Go to the seventh tab Command-7 tab7
Go to the eighth tab Command-8 tab8
Go to the ninth tab Command tab9
Panels
Description Keybinding Command
Show the Commands window Command-. commands
Show the Navigate window Command-E | Command-P navigate
Show the Navigate window Command-O navigate_altkey
Show the Outline window Command-Shift-E outline
Show the Console window ifhidden, or hide if shown
Control-Esc toggleconsole
Show the Environment windowif hidden, or hide if shown
Command-U toggletree
185

AWS Cloud9 User GuideCode Editor
Code Editor
Description Keybinding Command
Add a cursor one line abovethe active cursor, or if a cursoris already added, add anothercursor above that one
Control-Option-Up addCursorAbove
Add a second cursor one lineabove the active cursor, or if asecond cursor is already added,move the second cursor up oneline
Control-Option-Shift-Up addCursorAboveSkipCurrent
Add a cursor one line belowthe active cursor, or if a cursoris already added, add anothercursor below that one
Control-Option-Down addCursorBelow
Add a second cursor one linebelow the active cursor, or if asecond cursor is already added,move the second cursor downone line
Control-Option-Shift-Down
addCursorBelowSkipCurrent
Move all cursors to the samespace as the active cursor oneach of their lines, if they aremisaligned
Control-Option-A alignCursors
Backspace one space Control-Backspace| Shift-Backspace |Backspace
backspace
Indent the selection one tab Control-] blockindent
Outdent the selection one tab Control-[ blockoutdent
Control whether focus can beswitched from the editor tosomewhere else in the IDE
Command-Z | Command-Shift-Z | Command-Y
cancelBrowserUndoInAce
Center the selection Control-L centerselection
Copy the contents of the line,and paste the copied contentsone line down
Command-Option-Down copylinesdown
Copy the contents of the line,and paste the copied contentsone line up
Command-Option-Up copylinesup
Delete one space Delete | Control-Delete| Shift-Delete
del
Copy the contents of theselection, and paste the copied
Command-Shift-D duplicateSelection
186

AWS Cloud9 User GuideCode Editor
Description Keybinding Command
contents immediately after theselection
Include the current line'scontents in the selection
Command-Shift-L expandtoline
Include up to next matchingsymbol in the selection
Control-Shift-M expandToMatching
Fold the selected code, or if afolded unit is selected, unfold it
Command-Option-L |Command-F1
fold
Fold all possibly foldableelements
Control-Command-Option-0 foldall
Fold all possibly foldableelements, except for the currentselection scope
Command-Option-0 foldOther
Go down one line Down | Control-N golinedown
Go up one line Up | Control-P golineup
Go to the end of the file Command-End | Command-Down
gotoend
Go left one space Left | Control-B gotoleft
Go to the end of the current line Command-Right | End |Control-E
gotolineend
Go to the start of the currentline
Command-Left | Home |Control-A
gotolinestart
Go to the next error F4 goToNextError
Go down one page Page Down | Control-V gotopagedown
Go up one page Page Up gotopageup
Go to the previous error Shift-F4 goToPreviousError
Go right one space Right | Control-F gotoright
Go to the start of the file Command-Home | Command-Up
gotostart
Go one word to the left Option-Left gotowordleft
Go one word to the right Option-Right gotowordright
Indent the selection one tab Tab indent
Go to the matching symbol inthe current scope
Control-P jumptomatching
Increase the font size Command-+ | Command-= largerfont
187
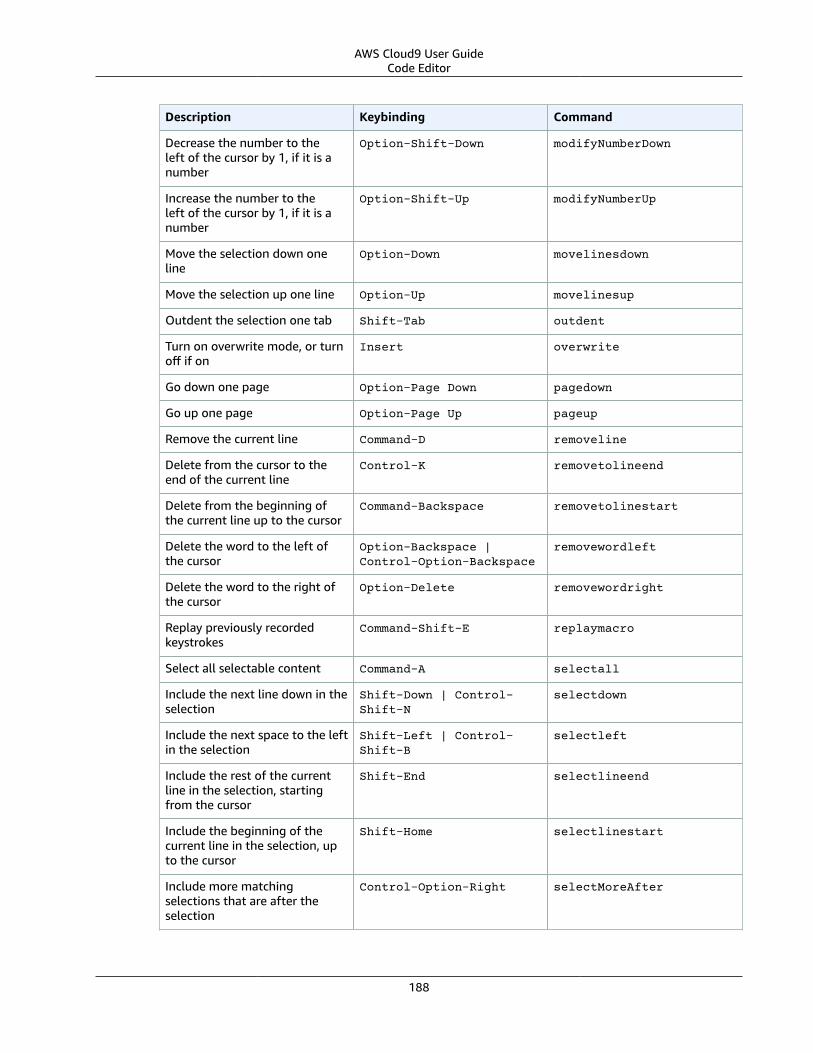
AWS Cloud9 User GuideCode Editor
Description Keybinding Command
Decrease the number to theleft of the cursor by 1, if it is anumber
Option-Shift-Down modifyNumberDown
Increase the number to theleft of the cursor by 1, if it is anumber
Option-Shift-Up modifyNumberUp
Move the selection down oneline
Option-Down movelinesdown
Move the selection up one line Option-Up movelinesup
Outdent the selection one tab Shift-Tab outdent
Turn on overwrite mode, or turnoff if on
Insert overwrite
Go down one page Option-Page Down pagedown
Go up one page Option-Page Up pageup
Remove the current line Command-D removeline
Delete from the cursor to theend of the current line
Control-K removetolineend
Delete from the beginning ofthe current line up to the cursor
Command-Backspace removetolinestart
Delete the word to the left ofthe cursor
Option-Backspace |Control-Option-Backspace
removewordleft
Delete the word to the right ofthe cursor
Option-Delete removewordright
Replay previously recordedkeystrokes
Command-Shift-E replaymacro
Select all selectable content Command-A selectall
Include the next line down in theselection
Shift-Down | Control-Shift-N
selectdown
Include the next space to the leftin the selection
Shift-Left | Control-Shift-B
selectleft
Include the rest of the currentline in the selection, startingfrom the cursor
Shift-End selectlineend
Include the beginning of thecurrent line in the selection, upto the cursor
Shift-Home selectlinestart
Include more matchingselections that are after theselection
Control-Option-Right selectMoreAfter
188
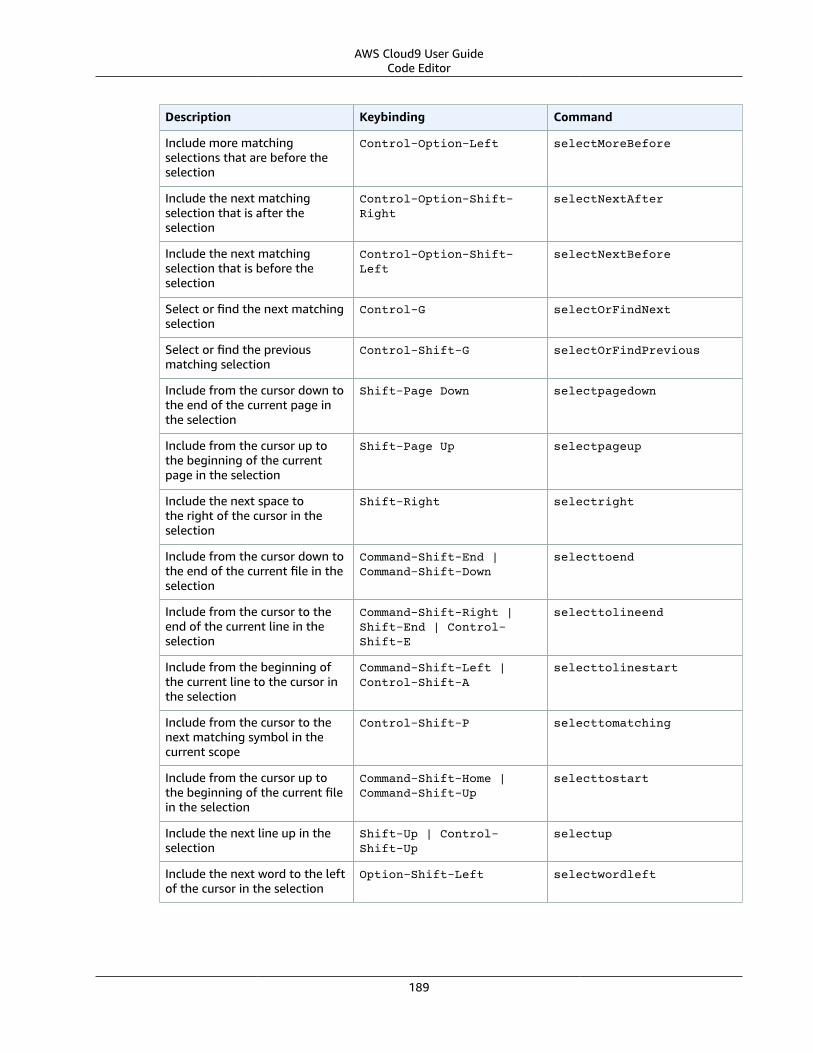
AWS Cloud9 User GuideCode Editor
Description Keybinding Command
Include more matchingselections that are before theselection
Control-Option-Left selectMoreBefore
Include the next matchingselection that is after theselection
Control-Option-Shift-Right
selectNextAfter
Include the next matchingselection that is before theselection
Control-Option-Shift-Left
selectNextBefore
Select or find the next matchingselection
Control-G selectOrFindNext
Select or find the previousmatching selection
Control-Shift-G selectOrFindPrevious
Include from the cursor down tothe end of the current page inthe selection
Shift-Page Down selectpagedown
Include from the cursor up tothe beginning of the currentpage in the selection
Shift-Page Up selectpageup
Include the next space tothe right of the cursor in theselection
Shift-Right selectright
Include from the cursor down tothe end of the current file in theselection
Command-Shift-End |Command-Shift-Down
selecttoend
Include from the cursor to theend of the current line in theselection
Command-Shift-Right |Shift-End | Control-Shift-E
selecttolineend
Include from the beginning ofthe current line to the cursor inthe selection
Command-Shift-Left |Control-Shift-A
selecttolinestart
Include from the cursor to thenext matching symbol in thecurrent scope
Control-Shift-P selecttomatching
Include from the cursor up tothe beginning of the current filein the selection
Command-Shift-Home |Command-Shift-Up
selecttostart
Include the next line up in theselection
Shift-Up | Control-Shift-Up
selectup
Include the next word to the leftof the cursor in the selection
Option-Shift-Left selectwordleft
189

AWS Cloud9 User GuideCode Editor
Description Keybinding Command
Include the next word tothe right of the cursor in theselection
Option-Shift-Right selectwordright
Show the Preferences tab Command-, showSettingsMenu
Clear all previous selections Esc singleSelection
Decrease the font size Command-- smallerfont
If multiple lines are selected,rearrange them into a sortedorder
Command-Option-S sortlines
Add a cursor at the end of thecurrent line
Control-Option-L splitIntoLines
Move the contents of the cursorto the end of the line, to its ownline
Control-O splitline
Surround the selection withblock comment characters, orremove them if they are there
Command-Shift-/ toggleBlockComment
Add line comment characters atthe start of each selected line, orremove them if they are there
Command-/ togglecomment
Fold code, or remove codefolding if it is there
F2 toggleFoldWidget
Fold parent code, or removefolding if it is there
Option-F2 toggleParentFoldWidget
Start keystroke recording, orstop if it is already recording
Command-Option-E togglerecording
Wrap words, or stop wrappingwords if they are alreadywrapping
Control-W toggleWordWrap
Change the selection to alllowercase
Control-Shift-U tolowercase
Change the selection to alluppercase
Control-U touppercase
Transpose the selection Control-T transposeletters
Unfold the selected code Command-Option-Shift-L |Command-Shift-F1
unfold
Unfold code folding for theentire file
Command-Option-Shift-0 unfoldall
190

AWS Cloud9 User Guideemmet
emmet
Description Keybinding Command
Evaluate a simple mathexpression (such as 2*4 or10/2), and output its result
Shift-Command-Y emmet_evaluate_math_expression
Expand CSS-like abbreviationsinto HTML, XML, or CSS code,depending on the current file'ssyntax
Control-Option-E emmet_expand_abbreviation
Traverse expanded CSS-likeabbreviations, by tab stop
Tab emmet_expand_abbreviation_with_tab
Go to the next editable codepart
Shift-Command-. emmet_select_next_item
Go to the previous editable codepart
Shift-Command-, emmet_select_previous_item
Expand an abbreviation, andthen place the current selectionwithin the last element of thegenerated snippet
Shift-Control-A emmet_wrap_with_abbreviation
Terminal
Description Keybinding Command
Open a new Terminal tab Option-T openterminal
Switch between the editor andthe Terminal tab
Option-S switchterminal
Run and Debug
Description Keybinding Command
Build the current file Command-B build
Resume the current pausedprocess
F8 | Command-\ resume
Run or debug the currentapplication
Option-F5 run
Run or debug the last run file F5 runlast
Step into the function that isnext on the stack
F11 | Command-; stepinto
191

AWS Cloud9 User GuideApple OSX Vim Keybindings Reference
Description Keybinding Command
Step out of the current functionscope
Shift-F11 | Command-Shift-'
stepout
Step over the current expressionon the stack
F10 | Command-' stepover
Stop running or debugging thecurrent application
Shift-F5 stop
Stop building the current file Control-Shift-C stopbuild
Apple OSX Vim Keybindings Reference for the AWSCloud9 Integrated Development Environment (IDE)
Following is a list of Vim keyboard mode keybindings for Apple OSX operating systems in the AWSCloud9 IDE.
For more information, in the AWS Cloud9 IDE:
1. On the menu bar, choose AWS Cloud9, Preferences.
2. On the Preferences tab, choose Keybindings.
3. For Keyboard Mode, choose Vim.
4. For Operating System, choose Apple OSX.
See also Working with Keybindings (p. 158).
• General (p. 192)
• Tabs (p. 194)
• Panels (p. 196)
• Code Editor (p. 196)
• emmet (p. 201)
• Terminal (p. 201)
• Run and Debug (p. 202)
General
Description Keybinding Command
Add the selection as a watchexpression
Command-Shift-C addwatchfromselection
Remove the cut selection fromthe clipboard
Esc clearcut
Show the code completioncontext menu
Control-Space | Option-Space
complete
192

AWS Cloud9 User GuideGeneral
Description Keybinding Command
Code complete, and thenoverwrite
Control-Shift-Space |Option-Shift-Space
completeoverwrite
Copy the selection to theclipboard
Command-C copy
Cut the selection to theclipboard
Command-X cut
Expand code, where applicable Tab expandSnippet
Show the find and replace barfor the current document
Command-F find
Select all find matches in thecurrent document
Control-Option-G findAll
Go to the next match in thecurrent document for the findquery you entered last
Command-G findnext
Go to the previous match in thecurrent document for the findquery you entered last
Command-Shift-G findprevious
Open the Environment window,and then make the list of filesactive
Shift-Esc focusTree
Reformat the selected JavaScriptcode
Command-Shift-B formatcode
Show the go to line box Command-L gotoline
Hide the find and replace bar, ifit is showing
Esc hidesearchreplace
Go to the definition of thevariable or function at the cursor
F3 jumptodef
Create a new file Control-N newfile
Show the Preferences tab Command-, openpreferences
Open a Terminal tab, and thenswitch to the parent folder ofthe selected file in the list offiles
Command-Option-L opentermhere
Paste the clipboard's currentcontents at the cursor
Command-V paste
Show suggestions for fixingerrors
Command-F3 quickfix
Redo the last action Command-Shift-Z | Command-Y
redo
Refresh the preview pane Command-Enter reloadpreview
193

AWS Cloud9 User GuideTabs
Description Keybinding Command
Start a rename refactor for theselection
Option-Command-R renameVar
Show the find and replacebar for the current document,with focus on the replace withexpression
Option-Command-F replace
Rerun your initialization script Command-Enter rerunInitScript
Restart the environment Command-R restartc9
Reset the current file to its lastsaved version
Control-Shift-Q reverttosaved
Reset each open file to its savedversion
Option-Shift-Q reverttosavedall
Save the current file to disk Command-S save
Save the current file to disk witha different file name
Command-Shift-S saveas
If a preview page and the relatedHTML file are both open, scrollthe preview page to the locationthat matches the currentelement under the cursor in theHTML file
Control-I scrollPreviewElementIntoView
Show the find and replace barfor multiple files
Shift-Command-F searchinfiles
Show the Process List dialogbox
Command-Option-P showprocesslist
Undo the last action Command-Z undo
Tabs
Description Keybinding Command
Close all open tabs in the currentpane, except the current tab
Option-Control-W closeallbutme
Close all open tabs in all panes Option-Shift-W closealltabs
Close the current pane Command-Control-W closepane
Close the current tab Option-W closetab
Go one pane down Control-Command-Down gotopanedown
Go one pane left Control-Command-Left gotopaneleft
Go one pane right Control-Command-Right gotopaneright
194

AWS Cloud9 User GuideTabs
Description Keybinding Command
Go one pane up Control-Command-Up gottopaneup
Go one tab left Command-[ gototableft
Go one tab right Command-] gototabright
Move the current tab down onepane, or if the tab is already atthe very bottom, create a splittab there
Command-Option-Shift-Down
movetabdown
Move the current tab left, or ifthe tab is already at the far left,create a split tab there
Command-Option-Shift-Left
movetableft
Move the current tab right, orif the tab is already at the farright, create a split tab there
Command-Option-Shift-Right
movetabright
Move the current tab up onepane, or if the tab is already atthe very top, create a split tabthere
Command-Option-Shift-Up movetabup
Go to the next pane Option-Esc nextpane
Go to the next tab Option-Tab nexttab
Go to the previous pane Option-Shift-Esc previouspane
Go to the previous tab Option-Shift-Tab previoustab
Go back to the last tab Esc refocusTab
Open the last tab again Option-Shift-T reopenLastTab
Show the current tab in the filetree
Command-Shift-L revealtab
Go to the tenth tab Command-0 tab0
Go to the first tab Command-1 tab1
Go to the second tab Command-2 tab2
Go to the third tab Command-3 tab3
Go to the fourth tab Command-4 tab4
Go to the fifth tab Command-5 tab5
Go to the sixth tab Command-6 tab6
Go to the seventh tab Command-7 tab7
Go to the eighth tab Command-8 tab8
Go to the ninth tab Command tab9
195

AWS Cloud9 User GuidePanels
Panels
Description Keybinding Command
Show the Commands window Command-. commands
Show the Navigate window Command-E | Command-P navigate
Show the Navigate window Command-O navigate_altkey
Show the Outline window Command-Shift-E outline
Show the Console window ifhidden, or hide if shown
Control-Esc toggleconsole
Show the Environment windowif hidden, or hide if shown
Command-U toggletree
Code Editor
Description Keybinding Command
Add a cursor one line abovethe active cursor, or if a cursoris already added, add anothercursor above that one
Control-Option-Up addCursorAbove
Add a second cursor one lineabove the active cursor, or if asecond cursor is already added,move the second cursor up oneline
Control-Option-Shift-Up addCursorAboveSkipCurrent
Add a cursor one line belowthe active cursor, or if a cursoris already added, add anothercursor below that one
Control-Option-Down addCursorBelow
Add a second cursor one linebelow the active cursor, or if asecond cursor is already added,move the second cursor downone line
Control-Option-Shift-Down
addCursorBelowSkipCurrent
Move all cursors to the samespace as the active cursor oneach of their lines, if they aremisaligned
Control-Option-A alignCursors
Backspace one space Control-Backspace| Shift-Backspace |Backspace
backspace
Indent selection one tab Control-] blockindent
Outdent selection one tab Control-[ blockoutdent
196
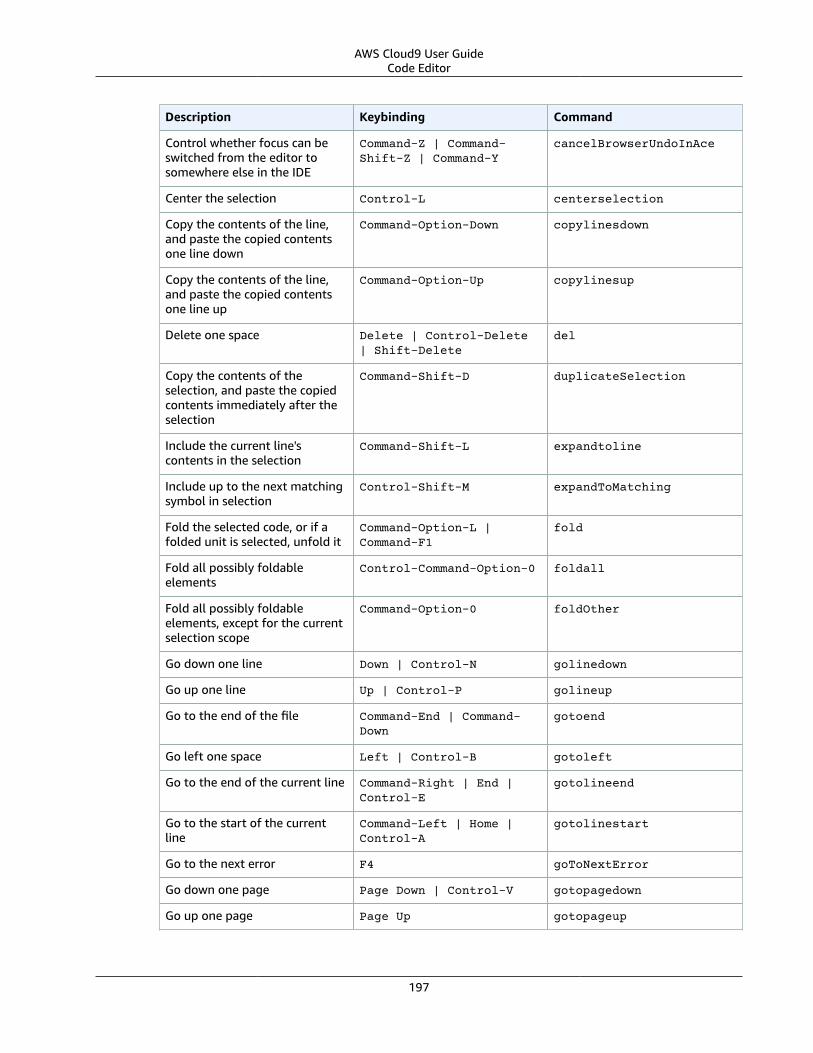
AWS Cloud9 User GuideCode Editor
Description Keybinding Command
Control whether focus can beswitched from the editor tosomewhere else in the IDE
Command-Z | Command-Shift-Z | Command-Y
cancelBrowserUndoInAce
Center the selection Control-L centerselection
Copy the contents of the line,and paste the copied contentsone line down
Command-Option-Down copylinesdown
Copy the contents of the line,and paste the copied contentsone line up
Command-Option-Up copylinesup
Delete one space Delete | Control-Delete| Shift-Delete
del
Copy the contents of theselection, and paste the copiedcontents immediately after theselection
Command-Shift-D duplicateSelection
Include the current line'scontents in the selection
Command-Shift-L expandtoline
Include up to the next matchingsymbol in selection
Control-Shift-M expandToMatching
Fold the selected code, or if afolded unit is selected, unfold it
Command-Option-L |Command-F1
fold
Fold all possibly foldableelements
Control-Command-Option-0 foldall
Fold all possibly foldableelements, except for the currentselection scope
Command-Option-0 foldOther
Go down one line Down | Control-N golinedown
Go up one line Up | Control-P golineup
Go to the end of the file Command-End | Command-Down
gotoend
Go left one space Left | Control-B gotoleft
Go to the end of the current line Command-Right | End |Control-E
gotolineend
Go to the start of the currentline
Command-Left | Home |Control-A
gotolinestart
Go to the next error F4 goToNextError
Go down one page Page Down | Control-V gotopagedown
Go up one page Page Up gotopageup
197

AWS Cloud9 User GuideCode Editor
Description Keybinding Command
Go to the previous error Shift-F4 goToPreviousError
Go right one space Right | Control-F gotoright
Go to the start of the file Command-Home | Command-Up
gotostart
Go one word to the left Option-Left gotowordleft
Go one word to the right Option-Right gotowordright
Indent the selection one tab Tab indent
Go to the matching symbol inthe current scope
Control-P jumptomatching
Increase the font size Command-+ | Command-= largerfont
Decrease the number to theleft of the cursor by 1, if it is anumber
Option-Shift-Down modifyNumberDown
Increase the number to theleft of the cursor by 1, if it is anumber
Option-Shift-Up modifyNumberUp
Move selection down one line Option-Down movelinesdown
Move selection up one line Option-Up movelinesup
Outdent selection one tab Shift-Tab outdent
Turn on overwrite mode, or turnoff if on
Insert overwrite
Go down one page Option-Page Down pagedown
Go up one page Option-Page Up pageup
Remove the current line Command-D removeline
Delete from the cursor to theend of the current line
Control-K removetolineend
Delete from the beginning ofthe current line up to the cursor
Command-Backspace removetolinestart
Delete the word to the left ofthe cursor
Option-Backspace |Control-Option-Backspace
removewordleft
Delete the word to the right ofthe cursor
Option-Delete removewordright
Replay previously recordedkeystrokes
Command-Shift-E replaymacro
Select all selectable content Command-A selectall
Include the next line down in theselection
Shift-Down | Control-Shift-N
selectdown
198

AWS Cloud9 User GuideCode Editor
Description Keybinding Command
Include the next space to the leftin the selection
Shift-Left | Control-Shift-B
selectleft
Include the rest of the currentline in the selection, startingfrom the cursor
Shift-End selectlineend
Include the beginning of thecurrent line in the selection, upto the cursor
Shift-Home selectlinestart
Include more matchingselections that are after theselection
Control-Option-Right selectMoreAfter
Include more matchingselections that are before theselection
Control-Option-Left selectMoreBefore
Include the next matchingselection that is after theselection
Control-Option-Shift-Right
selectNextAfter
Include the next matchingselection that is before theselection
Control-Option-Shift-Left
selectNextBefore
Select or find the next matchingselection
Control-G selectOrFindNext
Select or find the previousmatching selection
Control-Shift-G selectOrFindPrevious
Include from the cursor down tothe end of the current page inthe selection
Shift-Page Down selectpagedown
Include from the cursor up tothe beginning of the currentpage in the selection
Shift-Page Up selectpageup
Include the next space tothe right of the cursor in theselection
Shift-Right selectright
Include from the cursor down tothe end of the current file in theselection
Command-Shift-End |Command-Shift-Down
selecttoend
Include from the cursor to theend of the current line in theselection
Command-Shift-Right |Shift-End | Control-Shift-E
selecttolineend
Include from the beginning ofthe current line to the cursor inthe selection
Command-Shift-Left |Control-Shift-A
selecttolinestart
199

AWS Cloud9 User GuideCode Editor
Description Keybinding Command
Include from the cursor to thenext matching symbol in thecurrent scope
Control-Shift-P selecttomatching
Include from the cursor up tothe beginning of the current filein the selection
Command-Shift-Home |Command-Shift-Up
selecttostart
Include the next line up in theselection
Shift-Up | Control-Shift-P
selectup
Include the next word to the leftof the cursor in the selection
Option-Shift-Left selectwordleft
Include the next word tothe right of the cursor in theselection
Option-Shift-Right selectwordright
Show the Preferences tab Command-, showSettingsMenu
Clear all previous selections Esc singleSelection
Decrease the font size Command-- smallerfont
If multiple lines are selected,rearrange them into a sortedorder
Command-Option-S sortlines
Add a cursor at the end of thecurrent line
Control-Option-L splitIntoLines
Move the contents of the cursorto the end of the line, to its ownline
Control-O splitline
Surround the selection withblock comment characters, orremove them if they are there
Command-Shift-/ toggleBlockComment
Add line comment characters atthe start of each selected line, orremove them if they are there
Command-/ togglecomment
Fold code, or remove codefolding if it is there
F2 toggleFoldWidget
Fold parent code, or removefolding if it is there
Option-F2 toggleParentFoldWidget
Start keystroke recording, orstop if it is already recording
Command-Option-E togglerecording
Wrap words, or stop wrappingwords if they are alreadywrapping
Control-W toggleWordWrap
Change the selection to alllowercase
Control-Shift-U tolowercase
200

AWS Cloud9 User Guideemmet
Description Keybinding Command
Change the selection to alluppercase
Control-U touppercase
Transpose the selection Control-T transposeletters
Unfold the selected code Command-Option-Shift-L |Command-Shift-F1
unfold
Unfold code folding for theentire file
Command-Option-Shift-0 unfoldall
emmet
Description Keybinding Command
Evaluate a simple mathexpression (such as 2*4 or10/2), and output its result
Shift-Command-Y emmet_evaluate_math_expression
Expand CSS-like abbreviationsinto HTML, XML, or CSS code,depending on the current file'ssyntax
Control-Option-E emmet_expand_abbreviation
Traverse expanded CSS-likeabbreviations, by tab stop
Tab emmet_expand_abbreviation_with_tab
Go to the next editable codepart
Shift-Command-. emmet_select_next_item
Go to the previous editable codepart
Shift-Command-, emmet_select_previous_item
Expand an abbreviation, andthen place the current selectionwithin the last element of thegenerated snippet
Shift-Control-A emmet_wrap_with_abbreviation
Terminal
Description Keybinding Command
Open a new Terminal tab Option-T openterminal
Switch between the editor andthe Terminal tab
Option-S switchterminal
201

AWS Cloud9 User GuideRun and Debug
Run and Debug
Description Keybinding Command
Build the current file Command-B build
Resume the current pausedprocess
F8 | Command-\ resume
Run or debug the currentapplication
Option-F5 run
Run or debug the last run file F5 runlast
Step into the function that isnext on the stack
F11 | Command-; stepinto
Step out of the current functionscope
Shift-F11 | Command-Shift-'
stepout
Step over the current expressionon the stack
F10 | Command-' stepover
Stop running or debugging thecurrent application
Shift-F5 stop
Stop building the current file Control-Shift-C stopbuild
Apple OSX Emacs Keybindings Reference for theAWS Cloud9 Integrated Development Environment(IDE)
Following is a list of Emacs keyboard mode keybindings for Apple OSX operating systems in the AWSCloud9 IDE.
For more information, in the AWS Cloud9 IDE:
1. On the menu bar, choose AWS Cloud9, Preferences.2. On the Preferences tab, choose Keybindings.3. For Keyboard Mode, choose Emacs.4. For Operating System, choose Apple OSX.
See also Working with Keybindings (p. 158).
• General (p. 203)• Tabs (p. 205)• Panels (p. 206)• Code Editor (p. 206)• emmet (p. 211)• Terminal (p. 212)
202

AWS Cloud9 User GuideGeneral
• Run and Debug (p. 212)
General
Description Keybinding Command
Add the selection as a watchexpression
Command-Shift-C addwatchfromselection
Remove the cut selection fromthe clipboard
Esc clearcut
Show the code completioncontext menu
Control-Space | Option-Space
complete
Complete code, and thenoverwrite
Control-Shift-Space |Option-Shift-Space
completeoverwrite
Copy the selection to theclipboard
Command-C copy
Cut the selection to theclipboard
Command-X cut
Expand code, where applicable Tab expandSnippet
Show the find and replace barfor the current document
Command-F find
Select all find matches in thecurrent document
Control-Option-G findAll
Go to the next match in thecurrent document for the findquery you entered last
Command-G findnext
Go to the previous match in thecurrent document for the findquery you entered last
Command-Shift-G findprevious
Open the Environment window,and then make the list of filesactive
Shift-Esc focusTree
Reformat the selected JavaScriptcode
Command-Shift-B formatcode
Show the go to line box Command-L gotoline
Hide the find and replace bar, ifshown
Esc hidesearchreplace
Go to the definition of thevariable or function at the cursor
F3 jumptodef
Create a new file Control-N newfile
Show the Preferences tab Command-, openpreferences
203

AWS Cloud9 User GuideGeneral
Description Keybinding Command
Open a Terminal tab, thenswitch to the parent folder ofthe selected file in the list offiles
Command-Option-L opentermhere
Paste the clipboard's currentcontents at the cursor
Command-V paste
Show suggestions for fixingerrors
Command-F3 quickfix
Redo the last action Command-Shift-Z | Command-Y
redo
Refresh the preview pane Command-Enter reloadpreview
Start a rename refactor for theselection
Option-Command-R renameVar
Show the find and replacebar for the current document,with focus on the replace withexpression
Option-Command-F replace
Rerun your initialization script Command-Enter rerunInitScript
Restart the environment Command-R restartc9
Reset the current file to its lastsaved version
Control-Shift-Q reverttosaved
Reset each open file to its savedversion
Option-Shift-Q reverttosavedall
Save the current file to disk Command-S save
Save the current file to disk witha different file name
Command-Shift-S saveas
If a preview page and the relatedHTML file are both open, scrollthe preview page to the locationthat matches the currentelement under the cursor in theHTML file
Control-I scrollPreviewElementIntoView
Show the find and replace barfor multiple files
Shift-Command-F searchinfiles
Show the Process List dialogbox
Command-Option-P showprocesslist
Undo the last action Command-Z undo
204

AWS Cloud9 User GuideTabs
Tabs
Description Keybinding Command
Close all open tabs in the currentpane, except the current tab
Option-Control-W closeallbutme
Close all open tabs in all panes Option-Shift-W closealltabs
Close the current pane Command-Control-W closepane
Close the current tab Option-W closetab
Go one pane down Control-Command-Down gotopanedown
Go one pane left Control-Command-Left gotopaneleft
Go one pane right Control-Command-Right gotopaneright
Go one pane up Control-Command-Up gottopaneup
Go one tab left Command-[ gototableft
Go one tab right Command-] gototabright
Move the current tab down onepane, or if the tab is already atthe very bottom, create a splittab there
Command-Option-Shift-Down
movetabdown
Move the current tab left, or ifthe tab is already at the far left,create a split tab there
Command-Option-Shift-Left
movetableft
Move the current tab right, orif the tab is already at the farright, create a split tab there
Command-Option-Shift-Right
movetabright
Move the current tab up onepane, or if the tab is already atthe very top, create a split tabthere
Command-Option-Shift-Up movetabup
Go to the next pane Option-Esc nextpane
Go to the next tab Option-Tab nexttab
Go to the previous pane Option-Shift-Esc previouspane
Go to the previous tab Option-Shift-Tab previoustab
Go back to the last tab Esc refocusTab
Open the last tab again Option-Shift-T reopenLastTab
Show the current tab in the filetree
Command-Shift-L revealtab
Go to the tenth tab Command-0 tab0
205

AWS Cloud9 User GuidePanels
Description Keybinding Command
Go to the first tab Command-1 tab1
Go to the second tab Command-2 tab2
Go to the third tab Command-3 tab3
Go to the fourth tab Command-4 tab4
Go to the fifth tab Command-5 tab5
Go to the sixth tab Command-6 tab6
Go to the seventh tab Command-7 tab7
Go to the eighth tab Command-8 tab8
Go to the ninth tab Command tab9
Panels
Description Keybinding Command
Show the Commands window Command-. commands
Show the Navigate window Command-E | Command-P navigate
Show the Navigate window Command-O navigate_altkey
Show the Outline window Command-Shift-E outline
Show the Console window ifhidden, or hide if shown
Control-Esc toggleconsole
Show the Environment windowif hidden, or hide if shown
Command-U toggletree
Code Editor
Description Keybinding Command
Add a cursor one line abovethe active cursor, or if a cursoris already added, add anothercursor above that one
Control-Option-Up addCursorAbove
Add a second cursor one lineabove the active cursor, or if asecond cursor is already added,move the second cursor up oneline
Control-Option-Shift-Up addCursorAboveSkipCurrent
Add a cursor one line belowthe active cursor, or if a cursor
Control-Option-Down addCursorBelow
206

AWS Cloud9 User GuideCode Editor
Description Keybinding Command
is already added, add anothercursor below that one
Add a second cursor one linebelow the active cursor, or if asecond cursor is already added,move the second cursor downone line
Control-Option-Shift-Down
addCursorBelowSkipCurrent
Move all cursors to the samespace as the active cursor oneach of their lines, if they aremisaligned
Control-Option-A alignCursors
Backspace one space Control-Backspace| Shift-Backspace |Backspace
backspace
Indent selection one tab Control-] blockindent
Outdent selection one tab Control-[ blockoutdent
Control whether focus can beswitched from the editor tosomewhere else in the IDE
Command-Z | Command-Shift-Z | Command-Y
cancelBrowserUndoInAce
Center the selection Control-L centerselection
Copy the contents of the line,and paste the copied contentsone line down
Command-Option-Down copylinesdown
Copy the contents of the line,and paste the copied contentsone line up
Command-Option-Up copylinesup
Delete one space Delete | Control-Delete| Shift-Delete
del
Copy the contents of theselection, and paste the copiedcontents immediately after theselection
Command-Shift-D duplicateSelection
Include the current line'scontents in the selection
Command-Shift-L expandtoline
Include up to the next matchingsymbol in the selection
Control-Shift-M expandToMatching
Fold the selected code; if afolded unit is selected, unfold it
Command-Option-L |Command-F1
fold
Fold all possibly foldableelements
Control-Command-Option-0 foldall
207
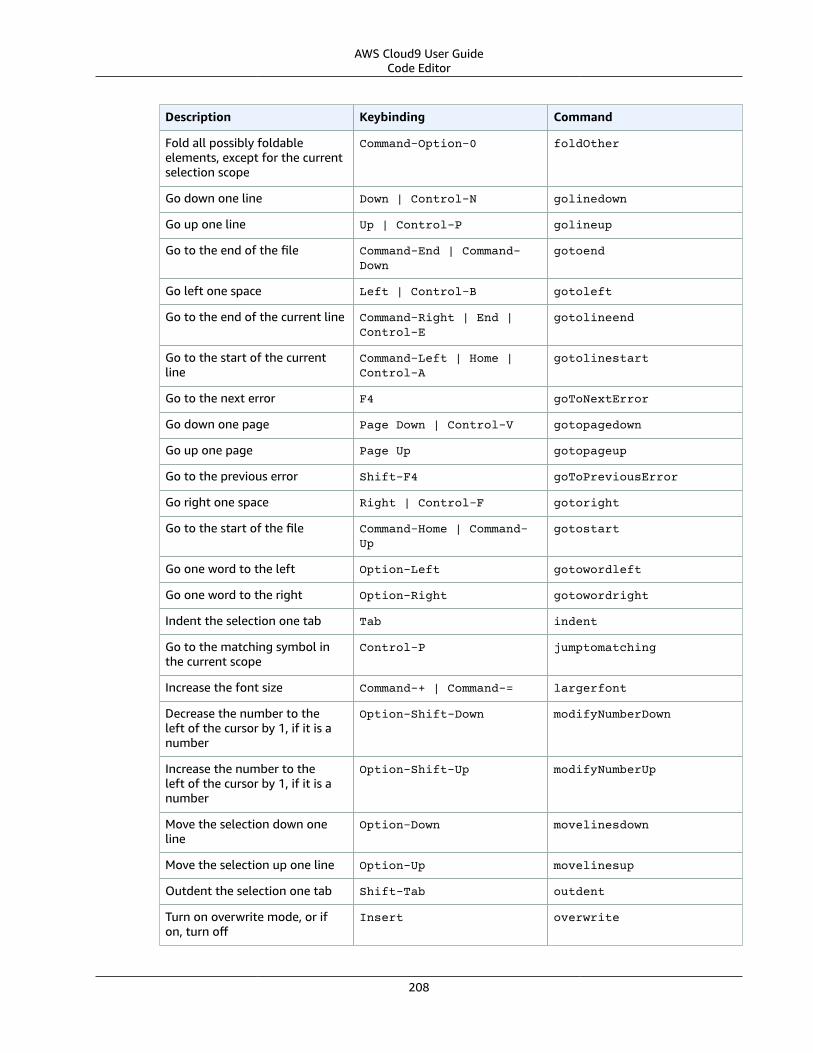
AWS Cloud9 User GuideCode Editor
Description Keybinding Command
Fold all possibly foldableelements, except for the currentselection scope
Command-Option-0 foldOther
Go down one line Down | Control-N golinedown
Go up one line Up | Control-P golineup
Go to the end of the file Command-End | Command-Down
gotoend
Go left one space Left | Control-B gotoleft
Go to the end of the current line Command-Right | End |Control-E
gotolineend
Go to the start of the currentline
Command-Left | Home |Control-A
gotolinestart
Go to the next error F4 goToNextError
Go down one page Page Down | Control-V gotopagedown
Go up one page Page Up gotopageup
Go to the previous error Shift-F4 goToPreviousError
Go right one space Right | Control-F gotoright
Go to the start of the file Command-Home | Command-Up
gotostart
Go one word to the left Option-Left gotowordleft
Go one word to the right Option-Right gotowordright
Indent the selection one tab Tab indent
Go to the matching symbol inthe current scope
Control-P jumptomatching
Increase the font size Command-+ | Command-= largerfont
Decrease the number to theleft of the cursor by 1, if it is anumber
Option-Shift-Down modifyNumberDown
Increase the number to theleft of the cursor by 1, if it is anumber
Option-Shift-Up modifyNumberUp
Move the selection down oneline
Option-Down movelinesdown
Move the selection up one line Option-Up movelinesup
Outdent the selection one tab Shift-Tab outdent
Turn on overwrite mode, or ifon, turn off
Insert overwrite
208

AWS Cloud9 User GuideCode Editor
Description Keybinding Command
Go down one page Option-Page Down pagedown
Go up one page Option-Page Up pageup
Remove the current line Command-D removeline
Delete from the cursor to theend of the current line
Control-K removetolineend
Delete from the beginning ofthe current line up to the cursor
Command-Backspace removetolinestart
Delete the word to the left ofthe cursor
Option-Backspace |Control-Option-Backspace
removewordleft
Delete the word to the right ofthe cursor
Option-Delete removewordright
Replay previously recordedkeystrokes
Command-Shift-E replaymacro
Select all selectable content Command-A selectall
Include the next line down in theselection
Shift-Down | Control-Shift-N
selectdown
Include the next space to the leftin the selection
Shift-Left | Control-Shift-B
selectleft
Include the rest of the currentline in the selection, startingfrom the cursor
Shift-End selectlineend
Include the beginning of thecurrent line in the selection, upto the cursor
Shift-Home selectlinestart
Include more matchingselections that are after theselection
Control-Option-Right selectMoreAfter
Include more matchingselections that are before theselection
Control-Option-Left selectMoreBefore
Include the next matchingselection that is after theselection
Control-Option-Shift-Right
selectNextAfter
Include the next matchingselection that is before theselection
Control-Option-Shift-Left
selectNextBefore
Select or find the next matchingselection
Control-G selectOrFindNext
Select or find the previousmatching selection
Control-Shift-G selectOrFindPrevious
209

AWS Cloud9 User GuideCode Editor
Description Keybinding Command
Include from the cursor down tothe end of the current page inthe selection
Shift-Page Down selectpagedown
Include from the cursor up tothe beginning of the currentpage in the selection
Shift-Page Up selectpageup
Include the next space tothe right of the cursor in theselection
Shift-Right selectright
Include from the cursor down tothe end of the current file in theselection
Command-Shift-End |Command-Shift-Down
selecttoend
Include from the cursor to theend of the current line in theselection
Command-Shift-Right |Shift-End | Control-Shift-E
selecttolineend
Include from the beginning ofthe current line to the cursor inthe selection
Command-Shift-Left |Control-Shift-A
selecttolinestart
Include from the cursor to thenext matching symbol in thecurrent scope
Control-Shift-P selecttomatching
Include from the cursor up tothe beginning of the current filein the selection
Command-Shift-Home |Command-Shift-Up
selecttostart
Include the next line up in theselection
Shift-Up | Control-Shift-Up
selectup
Include the next word to the leftof the cursor in the selection
Option-Shift-Left selectwordleft
Include the next word tothe right of the cursor in theselection
Option-Shift-Right selectwordright
Show the Preferences tab Command-, showSettingsMenu
Clear all previous selections Esc singleSelection
Decrease the font size Command-- smallerfont
If multiple lines are selected,rearrange them into a sortedorder
Command-Option-S sortlines
Add a cursor at the end of thecurrent line
Control-Option-L splitIntoLines
Move the contents of the cursorto the end of the line, to its ownline
Control-O splitline
210

AWS Cloud9 User Guideemmet
Description Keybinding Command
Surround the selection withblock comment characters, orremove them if they are there
Command-Shift-/ toggleBlockComment
Add line comment characters atthe start of each selected line, orremove them if they are there
Command-/ togglecomment
Fold code, or remove codefolding if it is there
F2 toggleFoldWidget
Fold parent code, or removefolding if it is there
Option-F2 toggleParentFoldWidget
Start keystroke recording, orstop if it is already recording
Command-Option-E togglerecording
Wrap words, or stop wrappingwords if they are alreadywrapping
Control-W toggleWordWrap
Change selection to alllowercase
Control-Shift-U tolowercase
Change selection to alluppercase
Control-U touppercase
Transpose selection Control-T transposeletters
Unfold the selected code Command-Option-Shift-L |Command-Shift-F1
unfold
Unfold code folding for theentire file
Command-Option-Shift-0 unfoldall
emmet
Description Keybinding Command
Evaluate a simple mathexpression (such as 2*4 or10/2), and output its result
Shift-Command-Y emmet_evaluate_math_expression
Expand CSS-like abbreviationsinto HTML, XML, or CSS code,depending on the current file'ssyntax
Control-Option-E emmet_expand_abbreviation
Traverse expanded CSS-likeabbreviations, by tab stop
Tab emmet_expand_abbreviation_with_tab
Go to the next editable codepart
Shift-Command-. emmet_select_next_item
211

AWS Cloud9 User GuideTerminal
Description Keybinding Command
Go to the previous editable codepart
Shift-Command-, emmet_select_previous_item
Expand an abbreviation, andthen place the current selectionwithin the last element of thegenerated snippet
Shift-Control-A emmet_wrap_with_abbreviation
Terminal
Description Keybinding Command
Open a new Terminal tab Option-T openterminal
Switch between the editor andthe Terminal tab
Option-S switchterminal
Run and Debug
Description Keybinding Command
Build the current file Command-B build
Resume the current pausedprocess
F8 | Command-\ resume
Run or debug the currentapplication
Option-F5 run
Run or debug the last run file F5 runlast
Step into the function that isnext on the stack
F11 | Command-; stepinto
Step out of the current functionscope
Shift-F11 | Command-Shift-'
stepout
Step over the current expressionon the stack
F10 | Command-' stepover
Stop running or debugging thecurrent application
Shift-F5 stop
Stop building the current file Control-Shift-C stopbuild
212

AWS Cloud9 User GuideApple OSX Sublime Keybindings Reference
Apple OSX Sublime Keybindings Reference for theAWS Cloud9 Integrated Development Environment(IDE)
Following is a list of Sublime keyboard mode keybindings for Apple OSX operating systems in the AWSCloud9 IDE.
For more information, in the AWS Cloud9 IDE:
1. On the menu bar, choose AWS Cloud9, Preferences.
2. On the Preferences tab, choose Keybindings.
3. For Keyboard Mode, choose Sublime.
4. For Operating System, choose Apple OSX.
See also Working with Keybindings (p. 158).
• General (p. 213)
• Tabs (p. 216)
• Panels (p. 217)
• Code Editor (p. 218)
• emmet (p. 223)
• Terminal (p. 223)
• Run and Debug (p. 223)
General
Description Keybinding Command
Add the selection as a watchexpression
Command-Shift-C addwatchfromselection
Remove the cut selection fromthe clipboard
Esc clearcut
Show the code completioncontext menu
Control-Space | Option-Space
complete
Code complete, and thenoverwrite
Control-Shift-Space |Option-Shift-Space
completeoverwrite
Copy the selection to theclipboard
Command-C copy
Cut the selection to theclipboard
Command-X cut
Delete from the cursor to startof the line
Command-K Command-Backspace | Command-Backspace
delete_to_hard_bol
213

AWS Cloud9 User GuideGeneral
Description Keybinding Command
Delete from the cursor to end ofthe line
Command-K Command-K | Command-Delete |Control-K
delete_to_hard_eol
Expand code, where applicable Tab expandSnippet
Show the find and replace barfor the current document
Command-F find
Highlight all matches for theselection
Control-Command-G find_all_under
Highlight next match for theselection
Option-Command-G find_under
Highlight around the cursor andall matches for the highlight
Command-D find_under_expand
Highlight around the cursorand outline all matches for thehighlight
Command-K Command-D find_under_expand_skip
Highlight the previous match forthe selection
Shift-Option-Command-G find_under_previous
Select all find matches in thecurrent document
Control-Option-G findAll
Go to the next match in thecurrent document for the findquery you entered last
Command-G findnext
Go to the previous match in thecurrent document for the findquery you entered last
Shift-Command-G findprevious
Open the Environment window,and then make the list of filesactive
Shift-Esc focusTree
Reformat the selected JavaScriptcode
Control-Option-F formatcode
Show the go to line box Control-G gotoline
Hide the find and replace bar, ifit is showing
Esc hidesearchreplace
Go to the definition of thevariable or function at the cursor
F12 | Command-Option-Down
jumptodef
Go to the end of the currentword
Option-Right moveToWordEndRight
Go to the start of the currentword
Option-Left moveToWordStartLeft
Create a new file Control-N newfile
214

AWS Cloud9 User GuideGeneral
Description Keybinding Command
Show the Preferences tab Command-, openpreferences
Open a Terminal tab, and thenswitch to the parent folder ofthe selected file in the list offiles
Command-Option-L opentermhere
Paste the clipboard's currentcontents at the cursor
Command-V paste
Show suggestions for fixingerrors
Command-F3 quickfix
Redo the last action Command-Shift-Z | Command-Y
redo
Refresh the preview pane Command-Enter reloadpreview
Start a rename refactor for theselection
Option-Command-R renameVar
Show the find and replacebar for the current document,with focus on the replace withexpression
Command-Option-F replace
Replace all find expressionmatches with replace withexpression in the find andreplace bar
Control-Option-Enter replaceall
Replace next find expressionmatch with replace withexpression in the find andreplace bar
Command-Option-E replacenext
Rerun your initialization script Command-Enter rerunInitScript
Restart the environment Command-R restartc9
Reset the current file to its lastsaved version
Control-Shift-Q reverttosaved
Reset each open file to its savedversion
Option-Shift-Q reverttosavedall
Save the current file to disk Command-S save
Save the current file to disk witha different file name
Command-Shift-S saveas
If a preview page and the relatedHTML file are both open, scrollthe preview page to the locationthat matches the currentelement under the cursor in theHTML file
Control-I scrollPreviewElementIntoView
215
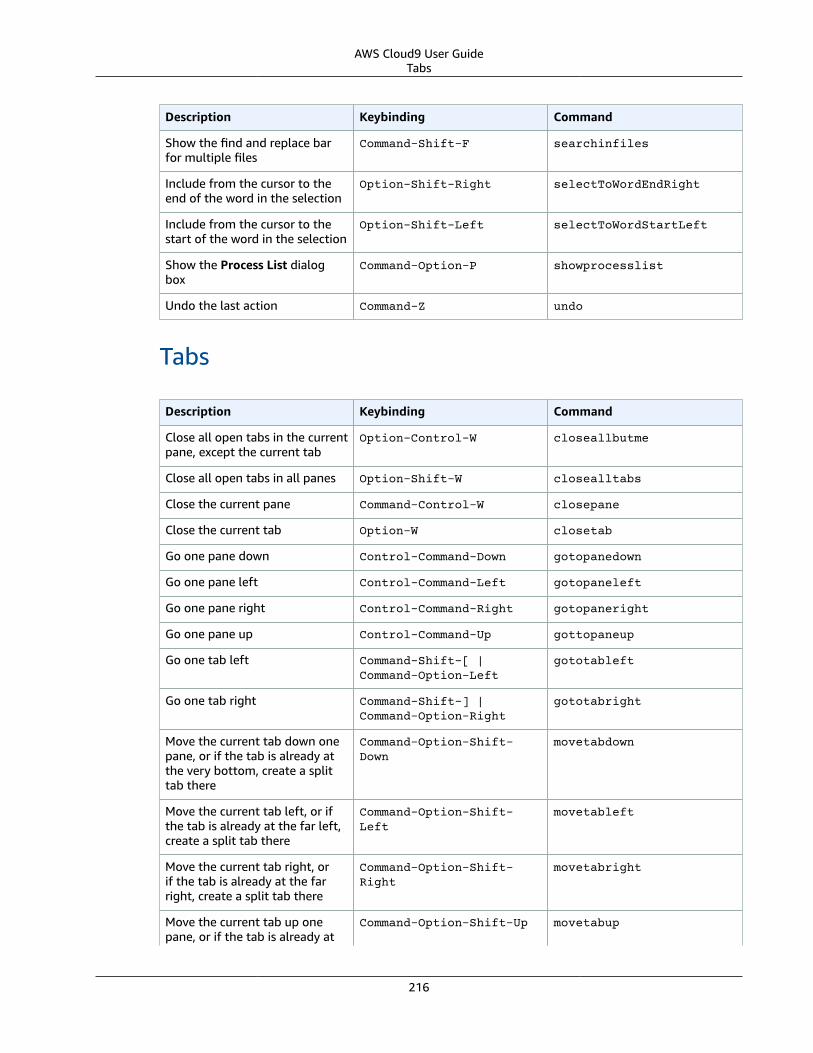
AWS Cloud9 User GuideTabs
Description Keybinding Command
Show the find and replace barfor multiple files
Command-Shift-F searchinfiles
Include from the cursor to theend of the word in the selection
Option-Shift-Right selectToWordEndRight
Include from the cursor to thestart of the word in the selection
Option-Shift-Left selectToWordStartLeft
Show the Process List dialogbox
Command-Option-P showprocesslist
Undo the last action Command-Z undo
Tabs
Description Keybinding Command
Close all open tabs in the currentpane, except the current tab
Option-Control-W closeallbutme
Close all open tabs in all panes Option-Shift-W closealltabs
Close the current pane Command-Control-W closepane
Close the current tab Option-W closetab
Go one pane down Control-Command-Down gotopanedown
Go one pane left Control-Command-Left gotopaneleft
Go one pane right Control-Command-Right gotopaneright
Go one pane up Control-Command-Up gottopaneup
Go one tab left Command-Shift-[ |Command-Option-Left
gototableft
Go one tab right Command-Shift-] |Command-Option-Right
gototabright
Move the current tab down onepane, or if the tab is already atthe very bottom, create a splittab there
Command-Option-Shift-Down
movetabdown
Move the current tab left, or ifthe tab is already at the far left,create a split tab there
Command-Option-Shift-Left
movetableft
Move the current tab right, orif the tab is already at the farright, create a split tab there
Command-Option-Shift-Right
movetabright
Move the current tab up onepane, or if the tab is already at
Command-Option-Shift-Up movetabup
216
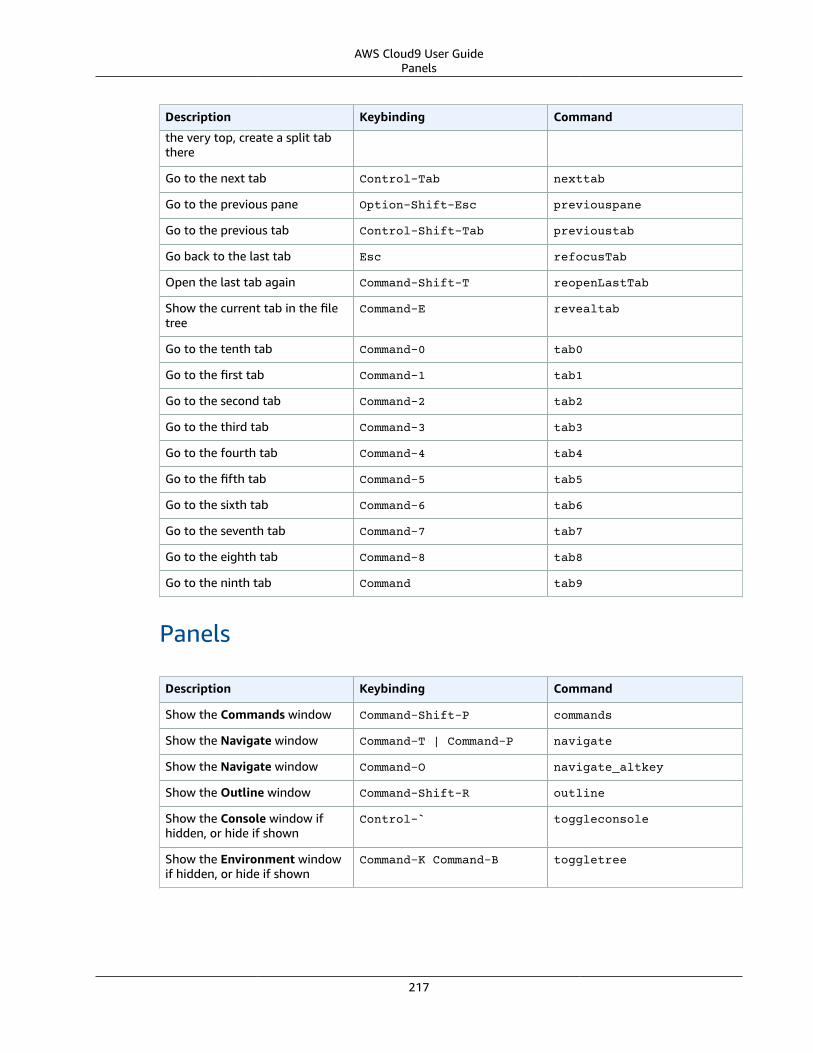
AWS Cloud9 User GuidePanels
Description Keybinding Command
the very top, create a split tabthere
Go to the next tab Control-Tab nexttab
Go to the previous pane Option-Shift-Esc previouspane
Go to the previous tab Control-Shift-Tab previoustab
Go back to the last tab Esc refocusTab
Open the last tab again Command-Shift-T reopenLastTab
Show the current tab in the filetree
Command-E revealtab
Go to the tenth tab Command-0 tab0
Go to the first tab Command-1 tab1
Go to the second tab Command-2 tab2
Go to the third tab Command-3 tab3
Go to the fourth tab Command-4 tab4
Go to the fifth tab Command-5 tab5
Go to the sixth tab Command-6 tab6
Go to the seventh tab Command-7 tab7
Go to the eighth tab Command-8 tab8
Go to the ninth tab Command tab9
Panels
Description Keybinding Command
Show the Commands window Command-Shift-P commands
Show the Navigate window Command-T | Command-P navigate
Show the Navigate window Command-O navigate_altkey
Show the Outline window Command-Shift-R outline
Show the Console window ifhidden, or hide if shown
Control-` toggleconsole
Show the Environment windowif hidden, or hide if shown
Command-K Command-B toggletree
217

AWS Cloud9 User GuideCode Editor
Code Editor
Description Keybinding Command
Add a cursor one line abovethe active cursor, or if a cursoris already added, add anothercursor above that one
Control-Shift-Up addCursorAbove
Add a second cursor one lineabove the active cursor, or if asecond cursor is already added,move the second cursor up oneline
Control-Option-Shift-Up addCursorAboveSkipCurrent
Add a cursor one line belowthe active cursor, or if a cursoris already added, add anothercursor below that one
Control-Shift-Down addCursorBelow
Add a second cursor one linebelow the active cursor, or if asecond cursor is already added,move the second cursor downone line
Control-Option-Shift-Down
addCursorBelowSkipCurrent
Move all cursors to the samespace as the active cursor oneach of their lines, if they aremisaligned
Control-Option-A alignCursors
Backspace one space Control-Backspace| Shift-Backspace |Backspace
backspace
Indent the selection one tab Control-] blockindent
Outdent the selection one tab Control-[ blockoutdent
Control whether focus can beswitched from the editor tosomewhere else in the IDE
Command-Z | Command-Shift-Z | Command-Y
cancelBrowserUndoInAce
Center the selection Command-K Command-C |Control-L
centerselection
Copy the contents of the line,and paste the copied contentsone line down
Command-Option-Down copylinesdown
Copy the contents of the line,and paste the copied contentsone line up
Command-Option-Up copylinesup
Delete one space Delete | Control-Delete| Shift-Delete
del
Copy the contents of theselection, and paste the copied
Command-Shift-D duplicateSelection
218

AWS Cloud9 User GuideCode Editor
Description Keybinding Command
contents immediately after theselection
Include the current line'scontents in the selection
Command-L expandtoline
Include up to the next matchingsymbol in the selection
Control-Shift-M expandToMatching
Fold the selected code; if afolded unit is selected, unfold it
Command-Option-L |Command-F1
fold
Fold all possibly foldableelements
Control-Command-Option-0 foldall
Fold all possibly foldableelements, except for the currentselection scope
Command-K Command-1 foldOther
Go down one line Down | Control-N golinedown
Go up one line Up | Control-P golineup
Go to the end of the file Command-End | Command-Down
gotoend
Go left one space Left | Control-B gotoleft
Go to the end of the current line Command-Right | End |Control-E
gotolineend
Go to the start of the currentline
Command-Left | Home |Control-A
gotolinestart
Go to the next error Control-F6 goToNextError
Go down one page Page Down | Control-V gotopagedown
Go up one page Page Up gotopageup
Go to the previous error Control-Shift-F6 goToPreviousError
Go right one space Right | Control-F gotoright
Go to the start of the file Command-Home | Command-Up
gotostart
Go one word to the left Option-Left gotowordleft
Go one word to the right Option-Right gotowordright
Indent the selection one tab Tab indent
Combine selected lines into asingle line
Command-J joinlines
Go to the matching symbol inthe current scope
Control-M jumptomatching
Increase the font size Command-= | Command-+ largerfont
219

AWS Cloud9 User GuideCode Editor
Description Keybinding Command
Decrease the number to theleft of the cursor by 1, if it is anumber
Option-Down modifyNumberDown
Increase the number to theleft of the cursor by 1, if it is anumber
Option-Up modifyNumberUp
Move selection down one line Control-Command-Down movelinesdown
Move selection up one line Control-Command-Up movelinesup
Outdent selection one tab Shift-Tab outdent
Turn on overwrite mode, or ifon, turn off
Insert overwrite
Go down one page Option-Page Down pagedown
Go up one page Option-Page Up pageup
Delete the contents of thecurrent line
Control-Shift-K removeline
Delete from the cursor to theend of the current line
Control-K removetolineend
Delete from the beginning ofthe current line up to the cursor
Command-Backspace removetolinestart
Delete the word to the left ofthe cursor
Option-Backspace |Control-Option-Backspace
removewordleft
Delete the word to the right ofthe cursor
Option-Delete removewordright
Replay previously recordedkeystrokes
Control-Shift-Q replaymacro
Select all selectable content Command-A selectall
Include the next line down in theselection
Shift-Down | Control-Shift-N
selectdown
Include the next space to the leftin the selection
Shift-Left | Control-Shift-B
selectleft
Include the rest of the currentline in the selection, startingfrom the cursor
Shift-End selectlineend
Include the beginning of thecurrent line in the selection, upto cursor
Shift-Home selectlinestart
Include more matchingselections that are after theselection
Control-Option-Right selectMoreAfter
220

AWS Cloud9 User GuideCode Editor
Description Keybinding Command
Include more matchingselections that are before theselection
Control-Option-Left selectMoreBefore
Include the next matchingselection that is after theselection
Control-Option-Shift-Right
selectNextAfter
Include the next matchingselection that is before theselection
Control-Option-Shift-Left
selectNextBefore
Select or find the next matchingselection
Control-G selectOrFindNext
Select or find the previousmatching selection
Control-Shift-G selectOrFindPrevious
Include from the cursor down tothe end of the current page inthe selection
Shift-Page Down selectpagedown
Include from the cursor up tothe beginning of the currentpage in the selection
Shift-Page Up selectpageup
Include the next space tothe right of the cursor in theselection
Shift-Right selectright
Include from the cursor down tothe end of the current file in theselection
Command-Shift-End |Command-Shift-Down
selecttoend
Include from the cursor to theend of the current line in theselection
Command-Shift-Right |Shift-End | Control-Shift-E
selecttolineend
Include from the beginning ofthe current line to the cursor inthe selection
Command-Shift-Left |Control-Shift-A
selecttolinestart
Include from the cursor to thenext matching symbol in thecurrent scope
Control-Shift-P selecttomatching
Include from the cursor up tothe beginning of the current filein the selection
Command-Shift-Home |Command-Shift-Up
selecttostart
Include the next line up in theselection
Shift-Up | Control-Shift-P
selectup
Include the next word to the leftof the cursor in the selection
Option-Shift-Left selectwordleft
221
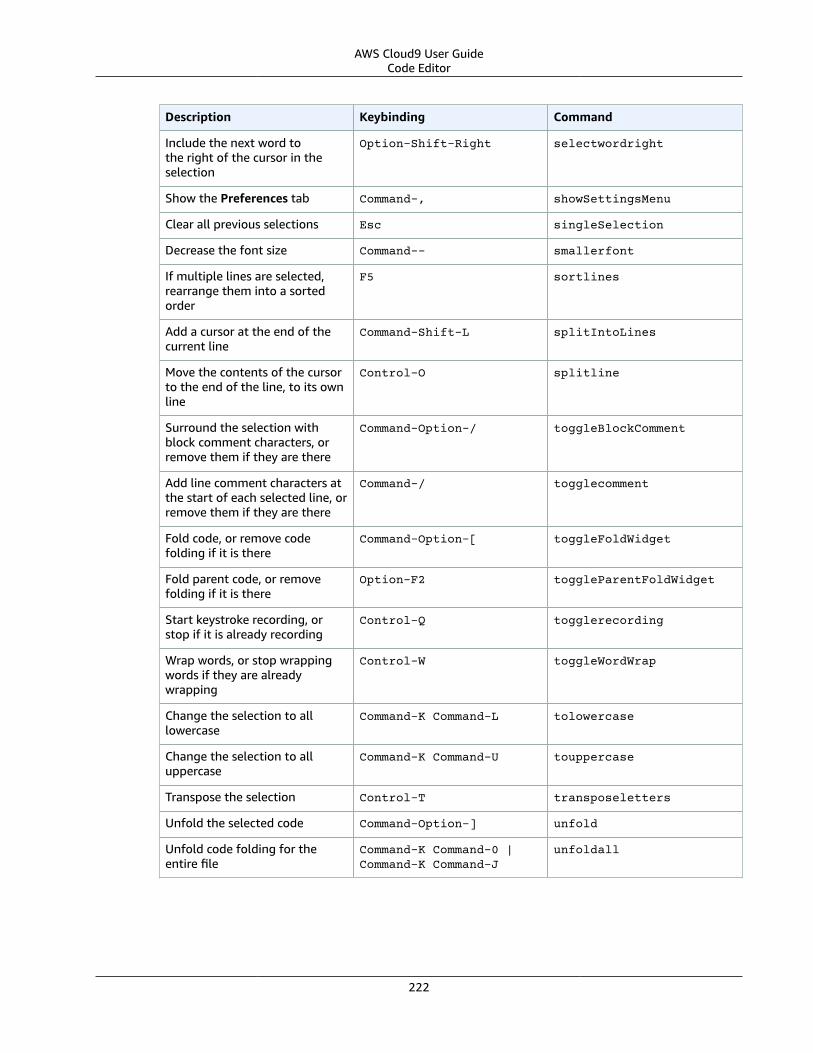
AWS Cloud9 User GuideCode Editor
Description Keybinding Command
Include the next word tothe right of the cursor in theselection
Option-Shift-Right selectwordright
Show the Preferences tab Command-, showSettingsMenu
Clear all previous selections Esc singleSelection
Decrease the font size Command-- smallerfont
If multiple lines are selected,rearrange them into a sortedorder
F5 sortlines
Add a cursor at the end of thecurrent line
Command-Shift-L splitIntoLines
Move the contents of the cursorto the end of the line, to its ownline
Control-O splitline
Surround the selection withblock comment characters, orremove them if they are there
Command-Option-/ toggleBlockComment
Add line comment characters atthe start of each selected line, orremove them if they are there
Command-/ togglecomment
Fold code, or remove codefolding if it is there
Command-Option-[ toggleFoldWidget
Fold parent code, or removefolding if it is there
Option-F2 toggleParentFoldWidget
Start keystroke recording, orstop if it is already recording
Control-Q togglerecording
Wrap words, or stop wrappingwords if they are alreadywrapping
Control-W toggleWordWrap
Change the selection to alllowercase
Command-K Command-L tolowercase
Change the selection to alluppercase
Command-K Command-U touppercase
Transpose the selection Control-T transposeletters
Unfold the selected code Command-Option-] unfold
Unfold code folding for theentire file
Command-K Command-0 |Command-K Command-J
unfoldall
222

AWS Cloud9 User Guideemmet
emmet
Description Keybinding Command
Evaluate a simple mathexpression (such as 2*4 or10/2), and output its result
Shift-Command-Y emmet_evaluate_math_expression
Expand CSS-like abbreviationsinto HTML, XML, or CSS code,depending on the current file'ssyntax
Control-Option-E emmet_expand_abbreviation
Traverse expanded CSS-likeabbreviations, by tab stop
Tab emmet_expand_abbreviation_with_tab
Go to the next editable codepart
Shift-Command-. emmet_select_next_item
Go to the previous editable codepart
Shift-Command-, emmet_select_previous_item
Expand an abbreviation, andthen place the current selectionwithin the last element of thegenerated snippet
Shift-Control-A emmet_wrap_with_abbreviation
Terminal
Description Keybinding Command
Open a new Terminal tab Option-T openterminal
Switch between the editor andthe Terminal tab
Option-S switchterminal
Run and Debug
Description Keybinding Command
Build the current file F7 | Command-B build
Resume the current pausedprocess
F8 | Command-\ resume
Run or debug the currentapplication
Command-Shift-B run
Run or debug the last run file F5 runlast
Step into the function that isnext on the stack
F11 | Command-; stepinto
223

AWS Cloud9 User GuideWindows / Linux Default Keybindings Reference
Description Keybinding Command
Step out of the current functionscope
Shift-F11 | Command-Shift-'
stepout
Step over the current expressionon the stack
F10 | Command-' stepover
Stop running or debugging thecurrent application
Shift-F5 stop
Stop building the current file Control-Break stopbuild
Windows / Linux Default Keybindings Referencefor the AWS Cloud9 Integrated DevelopmentEnvironment (IDE)
Following is a list of default keyboard mode keybindings for Windows / Linux operating systems in theAWS Cloud9 IDE.
For more information, in the AWS Cloud9 IDE:
1. On the menu bar, AWS Cloud9, Preferences.2. On the Preferences tab, choose Keybindings.3. For Keyboard Mode, choose Default.4. For Operating System, choose Windows / Linux.
See also Working with Keybindings (p. 158).
• General (p. 224)• Tabs (p. 226)• Panels (p. 228)• Code Editor (p. 228)• emmet (p. 233)• Terminal (p. 234)• Run and Debug (p. 234)
General
Description Keybinding Command
Add the selection as a watchexpression
Ctrl-Shift-C addwatchfromselection
Remove the cut selection fromthe clipboard
Esc clearcut
Show the code completioncontext menu
Ctrl-Space | Alt-Space complete
224

AWS Cloud9 User GuideGeneral
Description Keybinding Command
Code complete, and thenoverwrite
Ctrl-Shift-Space | Alt-Shift-Space
completeoverwrite
Copy the selection to theclipboard
Ctrl-C copy
Cut the selection to theclipboard
Ctrl-X cut
Expand code, where applicable Tab expandSnippet
Show the find and replace barfor the current document
Ctrl-F find
Select all find matches in thecurrent document
Ctrl-Alt-K findall
Go to the next match in thecurrent document for the findquery you entered last
Ctrl-K findnext
Go to the previous match in thecurrent document for the findquery you entered last
Ctrl-Shift-K findprevious
Open the Environment window,and then make the list of filesactive
Shift-Esc focusTree
Reformat the selected JavaScriptcode
Ctrl-Shift-B formatcode
Show the go to line box Ctrl-G gotoline
Hide the find and replace bar, ifit is showing
Esc hidesearchreplace
Go to the definition of thevariable or function at the cursor
F3 jumptodef
Create a new file Alt-N newfile
Show the Preferences tab Ctrl-, openpreferences
Open a Terminal tab, and thenswitch to the parent folder ofthe selected file in the list offiles
Alt-L opentermhere
Paste the clipboard's currentcontents at the cursor
Ctrl-V paste
Show suggestions for fixingerrors
Ctrl-F3 quickfix
Redo the last action Ctrl-Shift-Z | Ctrl-Y redo
Refresh the preview pane Ctrl-Enter reloadpreview
225

AWS Cloud9 User GuideTabs
Description Keybinding Command
Start a rename refactor for theselection
Ctrl-Alt-R renameVar
Show the find and replacebar for the current document,with focus on the replace withexpression
Alt-Shift-F | Ctrl-H replace
Rerun your initialization script Ctrl-Enter rerunInitScript
Restart the environment Ctrl-R restartc9
Reset the current file to its lastsaved version
Ctrl-Shift-Q reverttosaved
Reset each open file to its savedversion
Alt-Shift-Q reverttosavedall
Save the current file to disk Ctrl-S save
Save the current file to disk witha different file name
Ctrl-Shift-S saveas
If a preview page and the relatedHTML file are both open, scrollthe preview page to the locationthat matches the currentelement under the cursor in theHTML file
Ctrl-I scrollPreviewElementIntoView
Show the find and replace barfor multiple files
Ctrl-Shift-F searchinfiles
Show the Process List dialogbox
Ctrl-Alt-P showprocesslist
Undo the last action Ctrl-Z undo
Tabs
Description Keybinding Command
Close all open tabs in the currentpane, except the current tab
Ctrl-Alt-W closeallbutme
Close all open tabs in all panes Alt-Shift-W closealltabs
Close the current pane Ctrl-W closepane
Close the current tab Alt-W closetab
Go one pane down Ctrl-Meta-Down gotopanedown
Go one pane left Ctrl-Meta-Left gotopaneleft
Go one pane right Ctrl-Meta-Right gotopaneright
226

AWS Cloud9 User GuideTabs
Description Keybinding Command
Go one pane up Ctrl-Meta-Up gottopaneup
Go one tab left Ctrl-[ gototableft
Go one tab right Ctrl-] gototabright
Move the current tab down onepane, or if the tab is already atthe very bottom, create a splittab there
Ctrl-Meta-Down movetabdown
Move the current tab left, or ifthe tab is already at the far left,create a split tab there
Ctrl-Meta-Left movetableft
Move the current tab right, orif the tab is already at the farright, create a split tab there
Ctrl-Meta-Right movetabright
Move the current tab up onepane, or if the tab is already atthe very top, create a split tabthere
Ctrl-Meta-Up movetabup
Go to the next pane Ctrl-` nextpane
Go to the next tab Ctrl-Tab | Alt-` nexttab
Go to the previous pane Ctrl-Shift-` previouspane
Go to the previous tab Ctrl-Shift-Tab | Alt-Shift-`
previoustab
Go back to the last tab Esc refocusTab
Open the last tab again Alt-Shift-T reopenLastTab
Show the current tab in the filetree
Ctrl-Shift-L revealtab
Go to the tenth tab Ctrl-0 tab0
Go to the first tab Ctrl-1 tab1
Go to the second tab Ctrl-2 tab2
Go to the third tab Ctrl-3 tab3
Go to the fourth tab Ctrl-4 tab4
Go to the fifth tab Ctrl-5 tab5
Go to the sixth tab Ctrl-6 tab6
Go to the seventh tab Ctrl-7 tab7
Go to the eighth tab Ctrl-8 tab8
Go to the ninth tab Ctrl-9 tab9
227

AWS Cloud9 User GuidePanels
Panels
Description Keybinding Command
Show the Commands window Ctrl-. commands
Show the Navigate window Ctrl-E navigate
Show the Navigate window Ctrl-O navigate_altkey
Show the Outline window Ctrl-Shift-E outline
Show the Console window ifhidden, or hide if shown
F6 toggleconsole
Show the Environment windowif hidden, or hide if shown
Ctrl-I toggletree
Code Editor
Description Keybinding Command
Add a cursor one line abovethe active cursor, or if a cursoris already added, add anothercursor above that one
Ctrl-Alt-Up addCursorAbove
Add a second cursor one lineabove the active cursor, or if asecond cursor is already added,move the second cursor up oneline
Ctrl-Alt-Shift-Up addCursorAboveSkipCurrent
Add a cursor one line belowthe active cursor, or if a cursoris already added, add anothercursor below that one
Ctrl-Alt-Down addCursorBelow
Add a second cursor one linebelow the active cursor, or if asecond cursor is already added,move the second cursor downone line
Ctrl-Alt-Shift-Down addCursorBelowSkipCurrent
Move all cursors to the samespace as the active cursor oneach of their lines, if they aremisaligned
Ctrl-Alt-A alignCursors
Backspace one space Shift-Backspace |Backspace
backspace
Indent the selection one tab Ctrl-] blockindent
Outdent the selection one tab Ctrl-[ blockoutdent
228

AWS Cloud9 User GuideCode Editor
Description Keybinding Command
Control whether focus can beswitched from the editor tosomewhere else in the IDE
Ctrl-Z | Ctrl-Shift-Z |Ctrl-Y
cancelBrowserUndoInAce
Center the selection Ctrl-L centerselection
Copy the contents of the line,and paste the copied contentsone line down
Alt-Shift-Down copylinesdown
Copy the contents of the line,and paste the copied contentsone line up
Alt-Shift-Up copylinesup
Cut the selection, or if there isno selection, delete one space
Shift-Delete cut_or_delete
Delete one space Delete del
Copy the contents of theselection, and paste the copiedcontents immediately after theselection
Ctrl-Shift-D duplicateSelection
Include the current line'scontents in the selection
Ctrl-Shift-L expandtoline
Include up to the next matchingsymbol in the selection
Ctrl-Shift-M expandToMatching
Fold the selected code; if afolded unit is selected, unfold it
Alt-L | Ctrl-F1 fold
Fold all possibly foldableelements
Ctrl-Command-Option-0 foldall
Fold all possibly foldableelements, except for the currentselection scope
Alt-0 foldOther
Go down one line Down golinedown
Go up one line Up golineup
Go to the end of the file Ctrl-End gotoend
Go left one space Left gotoleft
Go to the end of the current line Alt-Right | End gotolineend
Go to the start of the currentline
Alt-Left | Home gotolinestart
Go to the next error Alt-E goToNextError
Go down one page Page Down gotopagedown
Go up one page Page Up gotopageup
229
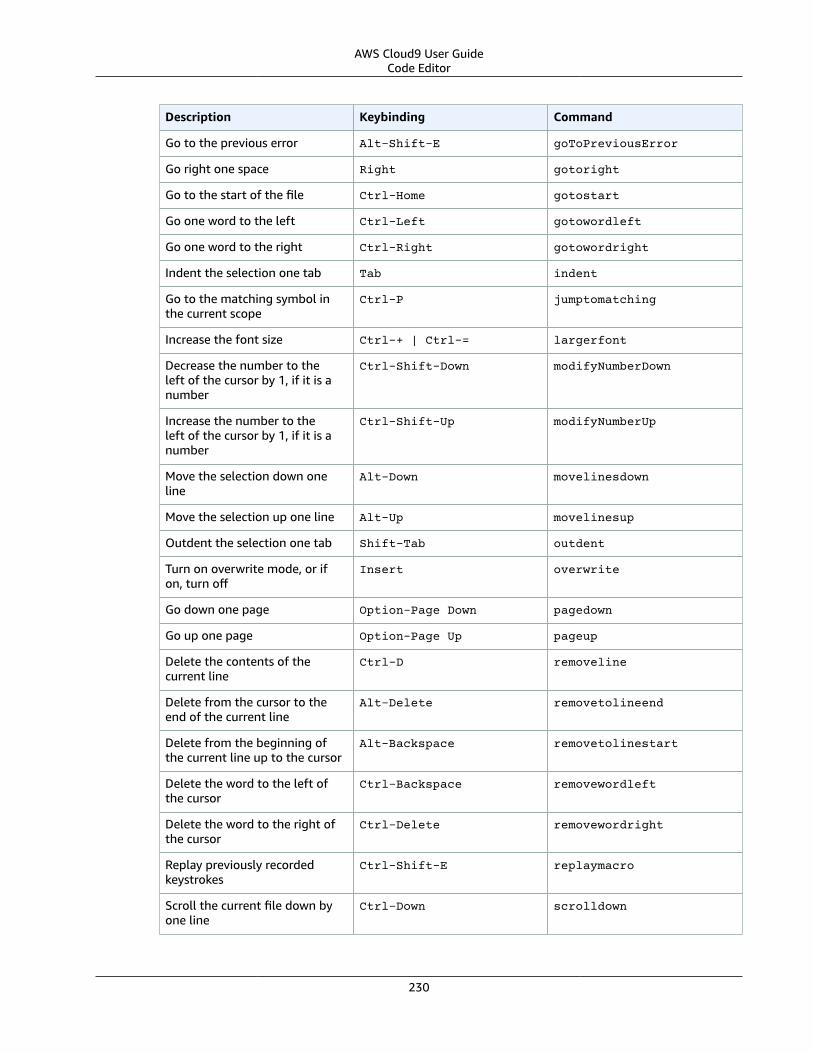
AWS Cloud9 User GuideCode Editor
Description Keybinding Command
Go to the previous error Alt-Shift-E goToPreviousError
Go right one space Right gotoright
Go to the start of the file Ctrl-Home gotostart
Go one word to the left Ctrl-Left gotowordleft
Go one word to the right Ctrl-Right gotowordright
Indent the selection one tab Tab indent
Go to the matching symbol inthe current scope
Ctrl-P jumptomatching
Increase the font size Ctrl-+ | Ctrl-= largerfont
Decrease the number to theleft of the cursor by 1, if it is anumber
Ctrl-Shift-Down modifyNumberDown
Increase the number to theleft of the cursor by 1, if it is anumber
Ctrl-Shift-Up modifyNumberUp
Move the selection down oneline
Alt-Down movelinesdown
Move the selection up one line Alt-Up movelinesup
Outdent the selection one tab Shift-Tab outdent
Turn on overwrite mode, or ifon, turn off
Insert overwrite
Go down one page Option-Page Down pagedown
Go up one page Option-Page Up pageup
Delete the contents of thecurrent line
Ctrl-D removeline
Delete from the cursor to theend of the current line
Alt-Delete removetolineend
Delete from the beginning ofthe current line up to the cursor
Alt-Backspace removetolinestart
Delete the word to the left ofthe cursor
Ctrl-Backspace removewordleft
Delete the word to the right ofthe cursor
Ctrl-Delete removewordright
Replay previously recordedkeystrokes
Ctrl-Shift-E replaymacro
Scroll the current file down byone line
Ctrl-Down scrolldown
230
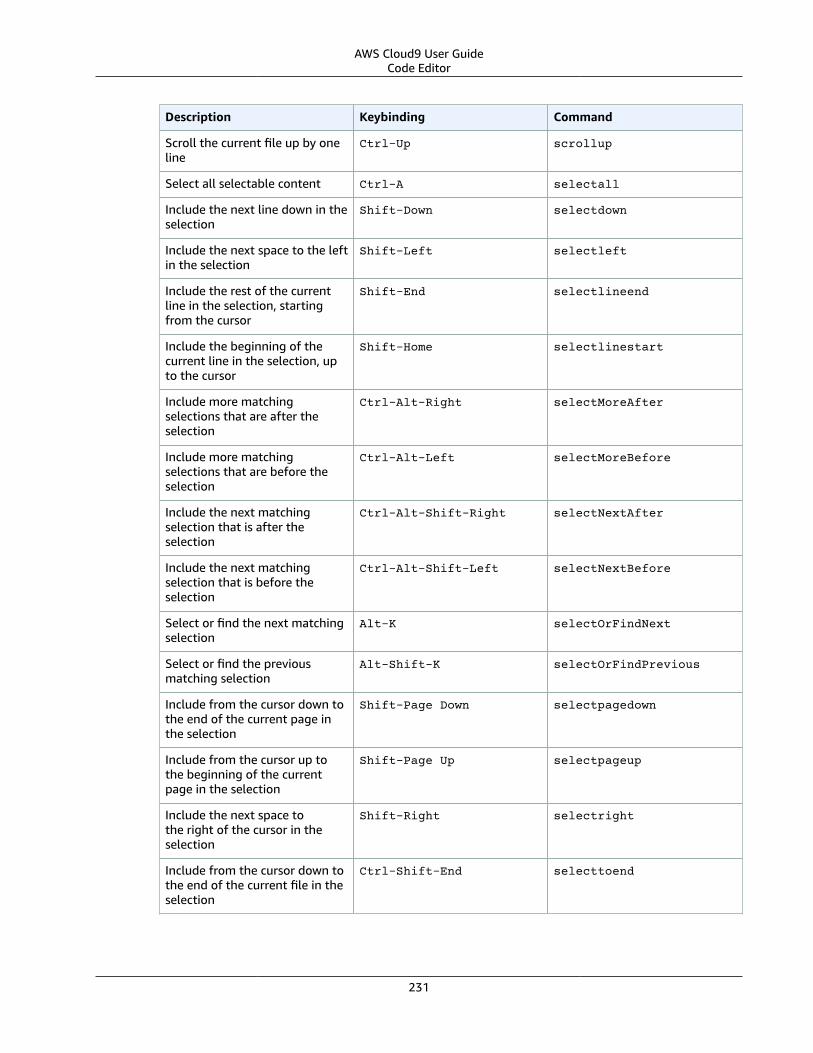
AWS Cloud9 User GuideCode Editor
Description Keybinding Command
Scroll the current file up by oneline
Ctrl-Up scrollup
Select all selectable content Ctrl-A selectall
Include the next line down in theselection
Shift-Down selectdown
Include the next space to the leftin the selection
Shift-Left selectleft
Include the rest of the currentline in the selection, startingfrom the cursor
Shift-End selectlineend
Include the beginning of thecurrent line in the selection, upto the cursor
Shift-Home selectlinestart
Include more matchingselections that are after theselection
Ctrl-Alt-Right selectMoreAfter
Include more matchingselections that are before theselection
Ctrl-Alt-Left selectMoreBefore
Include the next matchingselection that is after theselection
Ctrl-Alt-Shift-Right selectNextAfter
Include the next matchingselection that is before theselection
Ctrl-Alt-Shift-Left selectNextBefore
Select or find the next matchingselection
Alt-K selectOrFindNext
Select or find the previousmatching selection
Alt-Shift-K selectOrFindPrevious
Include from the cursor down tothe end of the current page inthe selection
Shift-Page Down selectpagedown
Include from the cursor up tothe beginning of the currentpage in the selection
Shift-Page Up selectpageup
Include the next space tothe right of the cursor in theselection
Shift-Right selectright
Include from the cursor down tothe end of the current file in theselection
Ctrl-Shift-End selecttoend
231

AWS Cloud9 User GuideCode Editor
Description Keybinding Command
Include from the cursor to theend of the current line in theselection
Alt-Shift-Right selecttolineend
Include from the beginning ofthe current line to the cursor inthe selection
Alt-Shift-Left selecttolinestart
Include from the cursor to thenext matching symbol in thecurrent scope
Ctrl-Shift-P selecttomatching
Include from the cursor up tothe beginning of the current filein the selection
Ctrl-Shift-Home selecttostart
Include the next line up in theselection
Shift-Up selectup
Include the next word to the leftof the cursor in the selection
Ctrl-Shift-Left selectwordleft
Include the next word tothe right of the cursor in theselection
Ctrl-Shift-Right selectwordright
Show the Preferences tab Ctrl-, showSettingsMenu
Clear all previous selections Esc singleSelection
Decrease the font size Ctrl-- smallerfont
If multiple lines are selected,rearrange them into a sortedorder
Ctrl-Alt-S sortlines
Add a cursor at the end of thecurrent line
Ctrl-Alt-L splitIntoLines
Move the contents of the cursorto the end of the line, to its ownline
Ctrl-O splitline
Surround the selection withblock comment characters, orremove them if they are there
Ctrl-Shift-/ toggleBlockComment
Add line comment characters atthe start of each selected line, orremove them if they are there
Ctrl-/ togglecomment
Fold code, or remove codefolding if it is there
F2 toggleFoldWidget
Fold parent code, or removefolding if it is there
Alt-F2 toggleParentFoldWidget
232

AWS Cloud9 User Guideemmet
Description Keybinding Command
Start keystroke recording, orstop if it is already recording
Ctrl-Alt-E togglerecording
Wrap words, or stop wrappingwords if they are alreadywrapping
Ctrl-Q toggleWordWrap
Change the selection to alllowercase
Ctrl-Shift-U tolowercase
Change the selection to alluppercase
Ctrl-U touppercase
Transpose the selection Alt-X transposeletters
Unfold the selected code Alt-Shift-L | Ctrl-Shift-F1
unfold
Unfold code folding for theentire file
Alt-Shift-0 unfoldall
emmet
Description Keybinding Command
Evaluate a simple mathexpression (such as 2*4 or10/2), and output its result
Shift-Ctrl-Y emmet_evaluate_math_expression
Expand CSS-like abbreviationsinto HTML, XML, or CSS code,depending on the current file'ssyntax
Ctrl-Alt-E emmet_expand_abbreviation
Traverse expanded CSS-likeabbreviations, by tab stop
Tab emmet_expand_abbreviation_with_tab
Go to the next editable codepart
Shift-Ctrl-. emmet_select_next_item
Go to the previous editable codepart
Shift-Ctrl-, emmet_select_previous_item
Expand an abbreviation, andthen place the current selectionwithin the last element of thegenerated snippet
Shift-Ctrl-A emmet_wrap_with_abbreviation
233

AWS Cloud9 User GuideTerminal
Terminal
Description Keybinding Command
Open a new Terminal tab Alt-T openterminal
Switch between the editor andthe Terminal tab
Alt-S switchterminal
Run and Debug
Description Keybinding Command
Build the current file Ctrl-B build
Resume the current pausedprocess
F8 resume
Run or debug the currentapplication
Alt-F5 run
Run or debug the last run file F5 runlast
Step into the function that isnext on the stack
F11 stepinto
Step out of the current functionscope
Shift-F11 stepout
Step over the current expressionon the stack
F10 stepover
Stop running or debugging thecurrent application
Shift-F5 stop
Stop building the current file Ctrl-Shift-C stopbuild
Windows / Linux Vim Keybindings Referencefor the AWS Cloud9 Integrated DevelopmentEnvironment (IDE)
Following is a list of Vim keyboard mode keybindings for Windows / Linux operating systems in the AWSCloud9 IDE.
For more information, in the AWS Cloud9 IDE:
1. On the menu bar, choose AWS Cloud9, Preferences.2. On the Preferences tab, choose Keybindings.3. For Keyboard Mode, choose Vim.4. For Operating System, choose Windows / Linux.
234

AWS Cloud9 User GuideGeneral
See also Working with Keybindings (p. 158).
• General (p. 235)• Tabs (p. 237)• Panels (p. 238)• Code Editor (p. 238)• emmet (p. 243)• Terminal (p. 244)• Run and Debug (p. 244)
General
Description Keybinding Command
Add the selection as a watchexpression
Ctrl-Shift-C addwatchfromselection
Remove the cut selection fromthe clipboard
Esc clearcut
Show the code completioncontext menu
Ctrl-Space | Alt-Space complete
Code complete, and thenoverwrite
Ctrl-Shift-Space | Alt-Shift-Space
completeoverwrite
Copy the selection to theclipboard
Ctrl-C copy
Cut the selection to theclipboard
Ctrl-X cut
Expand code, where applicable Tab expandSnippet
Show the find and replace barfor the current document
Ctrl-F find
Select all find matches in thecurrent document
Ctrl-Alt-K findall
Go to the next match in thecurrent document for the findquery you entered last
Ctrl-K findnext
Go to the previous match in thecurrent document for the findquery you entered last
Ctrl-Shift-K findprevious
Open the Environment window,and then make the list of filesactive
Shift-Esc focusTree
Reformat the selected JavaScriptcode
Ctrl-Shift-B formatcode
Show the go to line box Ctrl-G gotoline
235

AWS Cloud9 User GuideGeneral
Description Keybinding Command
Hide the find and replace bar, ifit is showing
Esc hidesearchreplace
Go to the definition of thevariable or function at the cursor
F3 jumptodef
Create a new file Alt-N newfile
Show the Preferences tab Ctrl-, openpreferences
Open a Terminal tab, and thenswitch to the parent folder ofthe selected file in the list offiles
Alt-L opentermhere
Paste the clipboard's currentcontents at the cursor
Ctrl-V paste
Show suggestions for fixingerrors
Ctrl-F3 quickfix
Redo the last action Ctrl-Shift-Z | Ctrl-Y redo
Refresh the preview pane Ctrl-Enter reloadpreview
Start a rename refactor for theselection
Ctrl-Alt-R renameVar
Show the find and replacebar for the current document,with focus on the replace withexpression
Alt-Shift-F | Ctrl-H replace
Rerun your initialization script Ctrl-Enter rerunInitScript
Restart the environment Ctrl-R restartc9
Reset the current file to its lastsaved version
Ctrl-Shift-Q reverttosaved
Reset each open file to its savedversion
Alt-Shift-Q reverttosavedall
Save the current file to disk Ctrl-S save
Save the current file to disk witha different file name
Ctrl-Shift-S saveas
If a preview page and the relatedHTML file are both open, scrollthe preview page to the locationthat matches the currentelement under the cursor in theHTML file
Ctrl-I scrollPreviewElementIntoView
Show the find and replace barfor multiple files
Ctrl-Shift-F searchinfiles
236
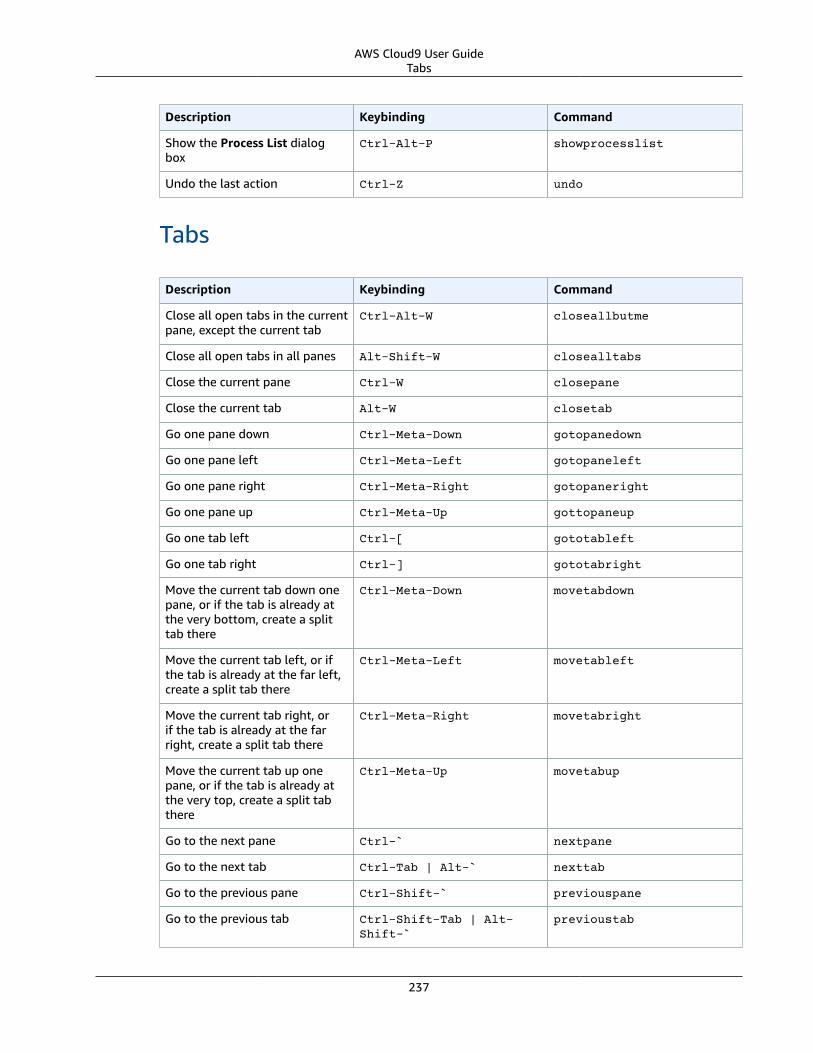
AWS Cloud9 User GuideTabs
Description Keybinding Command
Show the Process List dialogbox
Ctrl-Alt-P showprocesslist
Undo the last action Ctrl-Z undo
Tabs
Description Keybinding Command
Close all open tabs in the currentpane, except the current tab
Ctrl-Alt-W closeallbutme
Close all open tabs in all panes Alt-Shift-W closealltabs
Close the current pane Ctrl-W closepane
Close the current tab Alt-W closetab
Go one pane down Ctrl-Meta-Down gotopanedown
Go one pane left Ctrl-Meta-Left gotopaneleft
Go one pane right Ctrl-Meta-Right gotopaneright
Go one pane up Ctrl-Meta-Up gottopaneup
Go one tab left Ctrl-[ gototableft
Go one tab right Ctrl-] gototabright
Move the current tab down onepane, or if the tab is already atthe very bottom, create a splittab there
Ctrl-Meta-Down movetabdown
Move the current tab left, or ifthe tab is already at the far left,create a split tab there
Ctrl-Meta-Left movetableft
Move the current tab right, orif the tab is already at the farright, create a split tab there
Ctrl-Meta-Right movetabright
Move the current tab up onepane, or if the tab is already atthe very top, create a split tabthere
Ctrl-Meta-Up movetabup
Go to the next pane Ctrl-` nextpane
Go to the next tab Ctrl-Tab | Alt-` nexttab
Go to the previous pane Ctrl-Shift-` previouspane
Go to the previous tab Ctrl-Shift-Tab | Alt-Shift-`
previoustab
237

AWS Cloud9 User GuidePanels
Description Keybinding Command
Go back to the last tab Esc refocusTab
Open the last tab again Alt-Shift-T reopenLastTab
Show the current tab in the filetree
Ctrl-Shift-L revealtab
Go to the tenth tab Ctrl-0 tab0
Go to the first tab Ctrl-1 tab1
Go to the second tab Ctrl-2 tab2
Go to the third tab Ctrl-3 tab3
Go to the fourth tab Ctrl-4 tab4
Go to the fifth tab Ctrl-5 tab5
Go to the sixth tab Ctrl-6 tab6
Go to the seventh tab Ctrl-7 tab7
Go to the eighth tab Ctrl-8 tab8
Go to the ninth tab Ctrl-9 tab9
Panels
Description Keybinding Command
Show the Commands window Ctrl-. commands
Show the Navigate window Ctrl-E navigate
Show the Navigate window Ctrl-O navigate_altkey
Show the Outline window Ctrl-Shift-E outline
Show the Console window ifhidden, or hide if shown
F6 toggleconsole
Show the Environment windowif hidden, or hide if shown
Ctrl-I toggletree
Code Editor
Description Keybinding Command
Add a cursor one line abovethe active cursor, or if a cursoris already added, add anothercursor above that one
Ctrl-Alt-Up addCursorAbove
238

AWS Cloud9 User GuideCode Editor
Description Keybinding Command
Add a second cursor one lineabove the active cursor, or if asecond cursor is already added,move the second cursor up oneline
Ctrl-Alt-Shift-Up addCursorAboveSkipCurrent
Add a cursor one line belowthe active cursor, or if a cursoris already added, add anothercursor below that one
Ctrl-Alt-Down addCursorBelow
Add a second cursor one linebelow the active cursor. or if asecond cursor is already added,move the second cursor downone line
Ctrl-Alt-Shift-Down addCursorBelowSkipCurrent
Move all cursors to the samespace as the active cursor oneach of their lines, if they aremisaligned
Ctrl-Alt-A alignCursors
Backspace one space Shift-Backspace |Backspace
backspace
Indent the selection one tab Ctrl-] blockindent
Outdent the selection one tab Ctrl-[ blockoutdent
Control whether focus can beswitched from the editor tosomewhere else in the IDE
Ctrl-Z | Ctrl-Shift-Z |Ctrl-Y
cancelBrowserUndoInAce
Copy the contents of the line,and paste the copied contentsone line down
Alt-Shift-Down copylinesdown
Copy the contents of the line,and paste the copied contentsone line up
Alt-Shift-Up copylinesup
Cut the selection. If there is noselection, delete one space
Shift-Delete cut_or_delete
Delete one space Delete del
Copy the contents of theselection, and paste the copiedcontents immediately after theselection
Ctrl-Shift-D duplicateSelection
Include the current line'scontents in the selection
Ctrl-Shift-L expandtoline
Include up to the next matchingsymbol in the selection
Ctrl-Shift-M expandToMatching
239

AWS Cloud9 User GuideCode Editor
Description Keybinding Command
Fold the selected code; if afolded unit is selected, unfold it
Alt-L | Ctrl-F1 fold
Fold all possibly foldableelements, except for the currentselection scope
Alt-0 foldOther
Go down one line Down golinedown
Go up one line Up golineup
Go to the end of the file Ctrl-End gotoend
Go left one space Left gotoleft
Go to the end of the current line Alt-Right | End gotolineend
Go to the start of the currentline
Alt-Left | Home gotolinestart
Go to the next error Alt-E goToNextError
Go down one page Page Down gotopagedown
Go up one page Page Up gotopageup
Go to the previous error Alt-Shift-E goToPreviousError
Go right one space Right gotoright
Go to the start of the file Ctrl-Home gotostart
Go one word to the left Ctrl-Left gotowordleft
Go one word to the right Ctrl-Right gotowordright
Indent the selection one tab Tab indent
Go to the matching symbol inthe current scope
Ctrl-P jumptomatching
Increase the font size Ctrl-+ | Ctrl-= largerfont
Decrease the number to theleft of the cursor by 1, if it is anumber
Ctrl-Shift-Down modifyNumberDown
Increase the number to theleft of the cursor by 1, if it is anumber
Ctrl-Shift-Up modifyNumberUp
Move the selection down oneline
Alt-Down movelinesdown
Move the selection up one line Alt-Up movelinesup
Outdent the selection one tab Shift-Tab outdent
Turn on overwrite mode, or ifon, turn off
Insert overwrite
240

AWS Cloud9 User GuideCode Editor
Description Keybinding Command
Delete the contents of thecurrent line
Ctrl-D removeline
Delete from the cursor to theend of the current line
Alt-Delete removetolineend
Delete from the beginning ofthe current line up to the cursor
Alt-Backspace removetolinestart
Delete the word to the left ofthe cursor
Ctrl-Backspace removewordleft
Delete the word to the right ofthe cursor
Ctrl-Delete removewordright
Replay previously recordedkeystrokes
Ctrl-Shift-E replaymacro
Scroll the current file down byone line
Ctrl-Down scrolldown
Scroll the current file up by oneline
Ctrl-Up scrollup
Select all selectable content Ctrl-A selectall
Include the next line down in theselection
Shift-Down selectdown
Include the next space to the leftin the selection
Shift-Left selectleft
Include the rest of the currentline in the selection, startingfrom the cursor
Shift-End selectlineend
Include the beginning of thecurrent line in the selection, upto the cursor
Shift-Home selectlinestart
Include more matchingselections that are after theselection
Ctrl-Alt-Right selectMoreAfter
Include more matchingselections that are before theselection
Ctrl-Alt-Left selectMoreBefore
Include the next matchingselection that is after theselection
Ctrl-Alt-Shift-Right selectNextAfter
Include the next matchingselection that is before theselection
Ctrl-Alt-Shift-Left selectNextBefore
Select or find the next matchingselection
Alt-K selectOrFindNext
241
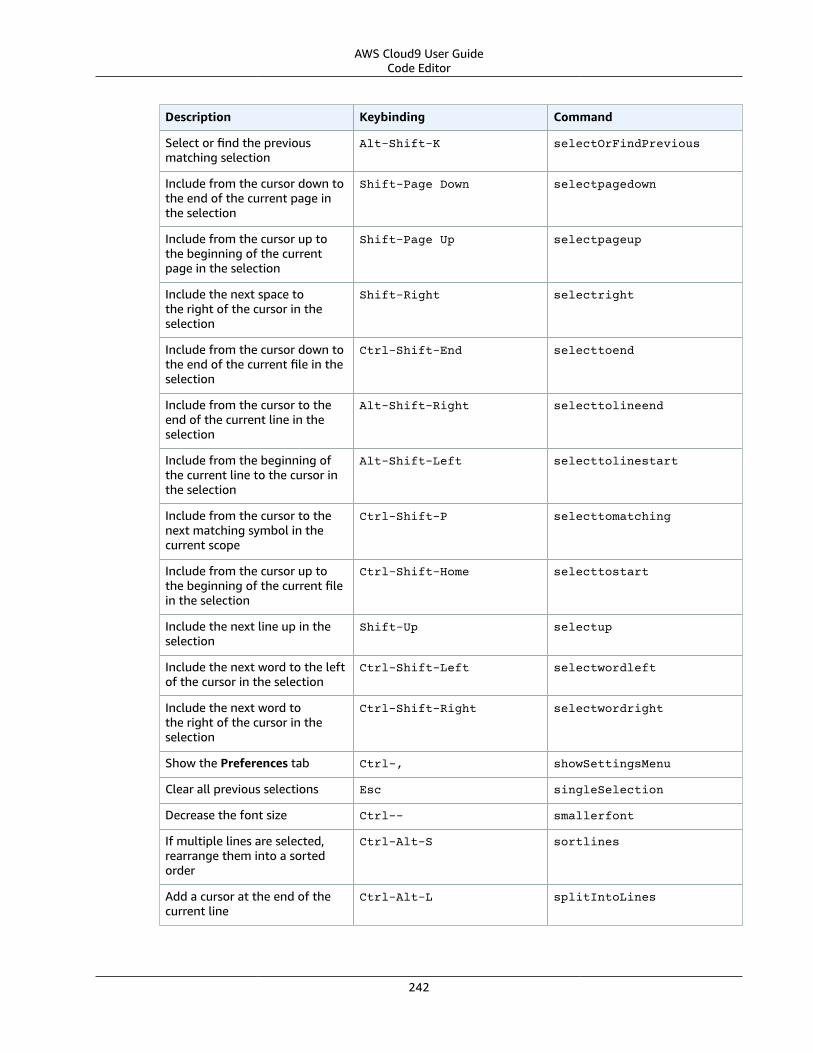
AWS Cloud9 User GuideCode Editor
Description Keybinding Command
Select or find the previousmatching selection
Alt-Shift-K selectOrFindPrevious
Include from the cursor down tothe end of the current page inthe selection
Shift-Page Down selectpagedown
Include from the cursor up tothe beginning of the currentpage in the selection
Shift-Page Up selectpageup
Include the next space tothe right of the cursor in theselection
Shift-Right selectright
Include from the cursor down tothe end of the current file in theselection
Ctrl-Shift-End selecttoend
Include from the cursor to theend of the current line in theselection
Alt-Shift-Right selecttolineend
Include from the beginning ofthe current line to the cursor inthe selection
Alt-Shift-Left selecttolinestart
Include from the cursor to thenext matching symbol in thecurrent scope
Ctrl-Shift-P selecttomatching
Include from the cursor up tothe beginning of the current filein the selection
Ctrl-Shift-Home selecttostart
Include the next line up in theselection
Shift-Up selectup
Include the next word to the leftof the cursor in the selection
Ctrl-Shift-Left selectwordleft
Include the next word tothe right of the cursor in theselection
Ctrl-Shift-Right selectwordright
Show the Preferences tab Ctrl-, showSettingsMenu
Clear all previous selections Esc singleSelection
Decrease the font size Ctrl-- smallerfont
If multiple lines are selected,rearrange them into a sortedorder
Ctrl-Alt-S sortlines
Add a cursor at the end of thecurrent line
Ctrl-Alt-L splitIntoLines
242
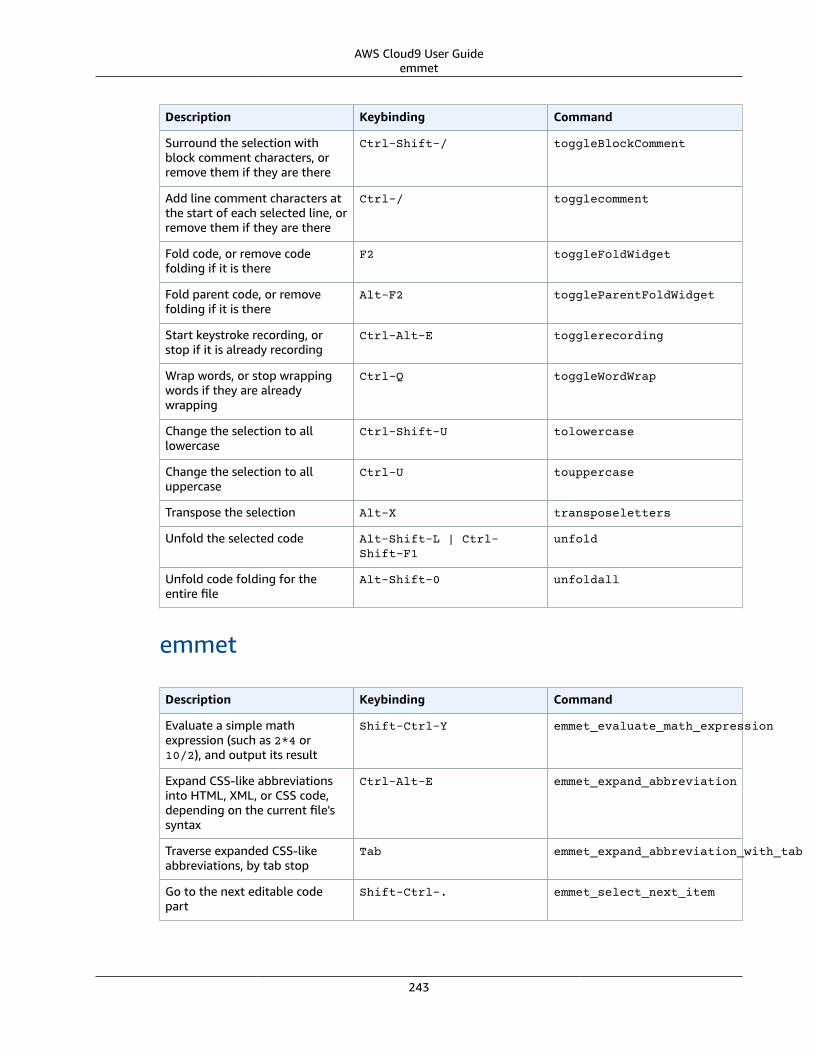
AWS Cloud9 User Guideemmet
Description Keybinding Command
Surround the selection withblock comment characters, orremove them if they are there
Ctrl-Shift-/ toggleBlockComment
Add line comment characters atthe start of each selected line, orremove them if they are there
Ctrl-/ togglecomment
Fold code, or remove codefolding if it is there
F2 toggleFoldWidget
Fold parent code, or removefolding if it is there
Alt-F2 toggleParentFoldWidget
Start keystroke recording, orstop if it is already recording
Ctrl-Alt-E togglerecording
Wrap words, or stop wrappingwords if they are alreadywrapping
Ctrl-Q toggleWordWrap
Change the selection to alllowercase
Ctrl-Shift-U tolowercase
Change the selection to alluppercase
Ctrl-U touppercase
Transpose the selection Alt-X transposeletters
Unfold the selected code Alt-Shift-L | Ctrl-Shift-F1
unfold
Unfold code folding for theentire file
Alt-Shift-0 unfoldall
emmet
Description Keybinding Command
Evaluate a simple mathexpression (such as 2*4 or10/2), and output its result
Shift-Ctrl-Y emmet_evaluate_math_expression
Expand CSS-like abbreviationsinto HTML, XML, or CSS code,depending on the current file'ssyntax
Ctrl-Alt-E emmet_expand_abbreviation
Traverse expanded CSS-likeabbreviations, by tab stop
Tab emmet_expand_abbreviation_with_tab
Go to the next editable codepart
Shift-Ctrl-. emmet_select_next_item
243

AWS Cloud9 User GuideTerminal
Description Keybinding Command
Go to the previous editable codepart
Shift-Ctrl-, emmet_select_previous_item
Expand an abbreviation, andthen place the current selectionwithin the last element of thegenerated snippet
Shift-Ctrl-A emmet_wrap_with_abbreviation
Terminal
Description Keybinding Command
Open a new Terminal tab Alt-T openterminal
Switch between the editor andthe Terminal tab
Alt-S switchterminal
Run and Debug
Description Keybinding Command
Build the current file Ctrl-B build
Resume the current pausedprocess
F8 resume
Run or debug the currentapplication
Alt-F5 run
Run or debug the last run file F5 runlast
Step into the function that isnext on the stack
F11 stepinto
Step out of the current functionscope
Shift-F11 stepout
Step over the current expressionon the stack
F10 stepover
Stop running or debugging thecurrent application
Shift-F5 stop
Stop building the current file Ctrl-Shift-C stopbuild
244

AWS Cloud9 User GuideWindows / Linux Emacs Keybindings Reference
Windows / Linux Emacs Keybindings Referencefor the AWS Cloud9 Integrated DevelopmentEnvironment (IDE)
Following is a list of Emacs keyboard mode keybindings for Windows / Linux operating systems in theAWS Cloud9 IDE.
For more information, in the AWS Cloud9 IDE:
1. On the menu bar, choose AWS Cloud9, Preferences.2. On the Preferences tab, choose Keybindings.3. For Keyboard Mode, choose Emacs.4. For Operating System, choose Windows / Linux.
See also Working with Keybindings (p. 158).
• General (p. 245)• Tabs (p. 247)• Panels (p. 248)• Code Editor (p. 249)• emmet (p. 254)• Terminal (p. 254)• Run and Debug (p. 254)
General
Description Keybinding Command
Add the selection as a watchexpression
Ctrl-Shift-C addwatchfromselection
Remove the cut selection fromthe clipboard
Esc clearcut
Show the code completioncontext menu
Ctrl-Space | Alt-Space complete
Code complete, and thenoverwrite
Ctrl-Shift-Space | Alt-Shift-Space
completeoverwrite
Copy the selection to theclipboard
Ctrl-C copy
Cut the selection to theclipboard
Ctrl-X cut
Expand code, where applicable Tab expandSnippet
Show the find and replace barfor the current document
Ctrl-F find
245
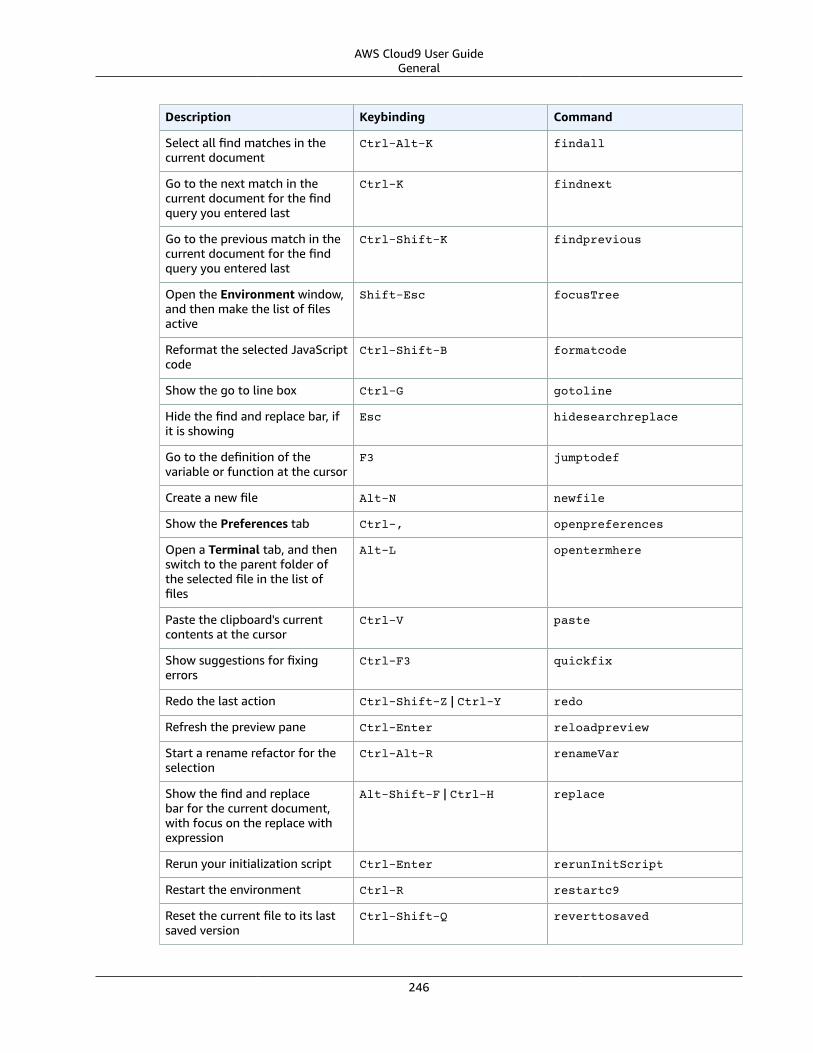
AWS Cloud9 User GuideGeneral
Description Keybinding Command
Select all find matches in thecurrent document
Ctrl-Alt-K findall
Go to the next match in thecurrent document for the findquery you entered last
Ctrl-K findnext
Go to the previous match in thecurrent document for the findquery you entered last
Ctrl-Shift-K findprevious
Open the Environment window,and then make the list of filesactive
Shift-Esc focusTree
Reformat the selected JavaScriptcode
Ctrl-Shift-B formatcode
Show the go to line box Ctrl-G gotoline
Hide the find and replace bar, ifit is showing
Esc hidesearchreplace
Go to the definition of thevariable or function at the cursor
F3 jumptodef
Create a new file Alt-N newfile
Show the Preferences tab Ctrl-, openpreferences
Open a Terminal tab, and thenswitch to the parent folder ofthe selected file in the list offiles
Alt-L opentermhere
Paste the clipboard's currentcontents at the cursor
Ctrl-V paste
Show suggestions for fixingerrors
Ctrl-F3 quickfix
Redo the last action Ctrl-Shift-Z | Ctrl-Y redo
Refresh the preview pane Ctrl-Enter reloadpreview
Start a rename refactor for theselection
Ctrl-Alt-R renameVar
Show the find and replacebar for the current document,with focus on the replace withexpression
Alt-Shift-F | Ctrl-H replace
Rerun your initialization script Ctrl-Enter rerunInitScript
Restart the environment Ctrl-R restartc9
Reset the current file to its lastsaved version
Ctrl-Shift-Q reverttosaved
246
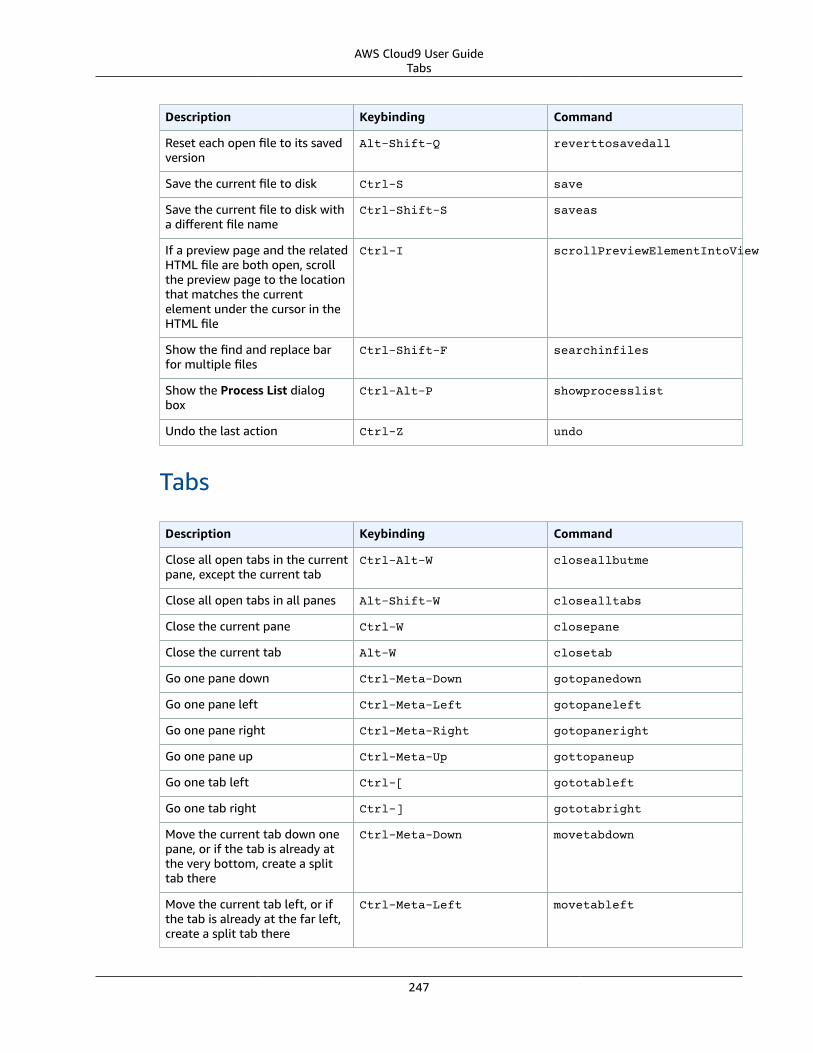
AWS Cloud9 User GuideTabs
Description Keybinding Command
Reset each open file to its savedversion
Alt-Shift-Q reverttosavedall
Save the current file to disk Ctrl-S save
Save the current file to disk witha different file name
Ctrl-Shift-S saveas
If a preview page and the relatedHTML file are both open, scrollthe preview page to the locationthat matches the currentelement under the cursor in theHTML file
Ctrl-I scrollPreviewElementIntoView
Show the find and replace barfor multiple files
Ctrl-Shift-F searchinfiles
Show the Process List dialogbox
Ctrl-Alt-P showprocesslist
Undo the last action Ctrl-Z undo
Tabs
Description Keybinding Command
Close all open tabs in the currentpane, except the current tab
Ctrl-Alt-W closeallbutme
Close all open tabs in all panes Alt-Shift-W closealltabs
Close the current pane Ctrl-W closepane
Close the current tab Alt-W closetab
Go one pane down Ctrl-Meta-Down gotopanedown
Go one pane left Ctrl-Meta-Left gotopaneleft
Go one pane right Ctrl-Meta-Right gotopaneright
Go one pane up Ctrl-Meta-Up gottopaneup
Go one tab left Ctrl-[ gototableft
Go one tab right Ctrl-] gototabright
Move the current tab down onepane, or if the tab is already atthe very bottom, create a splittab there
Ctrl-Meta-Down movetabdown
Move the current tab left, or ifthe tab is already at the far left,create a split tab there
Ctrl-Meta-Left movetableft
247
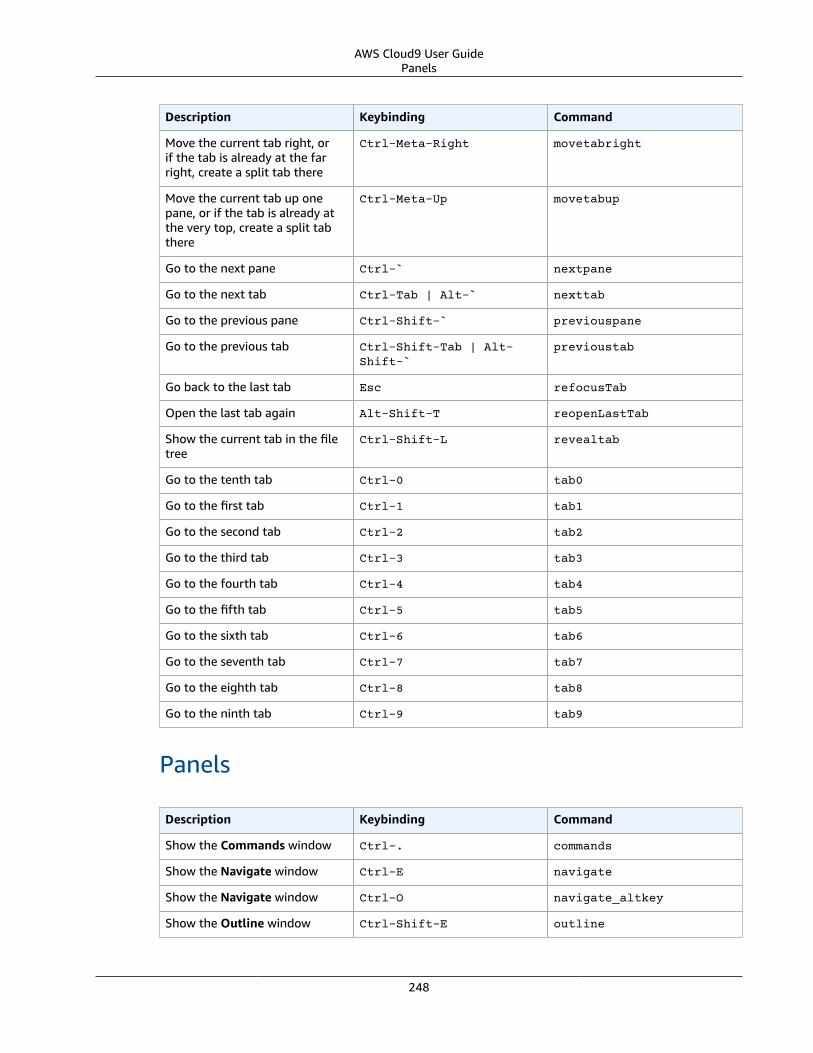
AWS Cloud9 User GuidePanels
Description Keybinding Command
Move the current tab right, orif the tab is already at the farright, create a split tab there
Ctrl-Meta-Right movetabright
Move the current tab up onepane, or if the tab is already atthe very top, create a split tabthere
Ctrl-Meta-Up movetabup
Go to the next pane Ctrl-` nextpane
Go to the next tab Ctrl-Tab | Alt-` nexttab
Go to the previous pane Ctrl-Shift-` previouspane
Go to the previous tab Ctrl-Shift-Tab | Alt-Shift-`
previoustab
Go back to the last tab Esc refocusTab
Open the last tab again Alt-Shift-T reopenLastTab
Show the current tab in the filetree
Ctrl-Shift-L revealtab
Go to the tenth tab Ctrl-0 tab0
Go to the first tab Ctrl-1 tab1
Go to the second tab Ctrl-2 tab2
Go to the third tab Ctrl-3 tab3
Go to the fourth tab Ctrl-4 tab4
Go to the fifth tab Ctrl-5 tab5
Go to the sixth tab Ctrl-6 tab6
Go to the seventh tab Ctrl-7 tab7
Go to the eighth tab Ctrl-8 tab8
Go to the ninth tab Ctrl-9 tab9
Panels
Description Keybinding Command
Show the Commands window Ctrl-. commands
Show the Navigate window Ctrl-E navigate
Show the Navigate window Ctrl-O navigate_altkey
Show the Outline window Ctrl-Shift-E outline
248

AWS Cloud9 User GuideCode Editor
Description Keybinding Command
Show the Console window ifhidden, or hide if shown
F6 toggleconsole
Show the Environment windowif hidden, or hide if shown
Ctrl-I toggletree
Code Editor
Description Keybinding Command
Add a cursor one line abovethe active cursor, or if a cursoris already added, add anothercursor above that one
Ctrl-Alt-Up addCursorAbove
Add a second cursor one lineabove the active cursor, or if asecond cursor is already added,move the second cursor up oneline
Ctrl-Alt-Shift-Up addCursorAboveSkipCurrent
Add a cursor one line belowthe active cursor, or if a cursoris already added, add anothercursor below that one
Ctrl-Alt-Down addCursorBelow
Add a second cursor one linebelow the active cursor, or if asecond cursor is already added,move the second cursor downone line
Ctrl-Alt-Shift-Down addCursorBelowSkipCurrent
Move all cursors to the samespace as the active cursor oneach of their lines, if they aremisaligned
Ctrl-Alt-A alignCursors
Backspace one space Shift-Backspace |Backspace
backspace
Indent the selection one tab Ctrl-] blockindent
Outdent the selection one tab Ctrl-[ blockoutdent
Control whether focus can beswitched from the editor tosomewhere else in the IDE
Ctrl-Z | Ctrl-Shift-Z |Ctrl-Y
cancelBrowserUndoInAce
Copy the contents of the line,and paste the copied contentsone line down
Alt-Shift-Down copylinesdown
Copy the contents of the line,and paste the copied contentsone line up
Alt-Shift-Up copylinesup
249

AWS Cloud9 User GuideCode Editor
Description Keybinding Command
Cut the selection, or if there isno selection, delete one space
Shift-Delete cut_or_delete
Delete one space Delete del
Copy the contents of theselection, and paste the copiedcontents immediately after theselection
Ctrl-Shift-D duplicateSelection
Include the current line'scontents in the selection
Ctrl-Shift-L expandtoline
Include up to the next matchingsymbol in selection
Ctrl-Shift-M expandToMatching
Fold the selected code; if afolded unit is selected, unfold it
Alt-L | Ctrl-F1 fold
Fold all possibly foldableelements, except for the currentselection scope
Alt-0 foldOther
Go down one line Down golinedown
Go up one line Up golineup
Go to the end of the file Ctrl-End gotoend
Go left one space Left gotoleft
Go to the end of the current line Alt-Right | End gotolineend
Go to the start of the currentline
Alt-Left | Home gotolinestart
Go to the next error Alt-E goToNextError
Go down one page Page Down gotopagedown
Go up one page Page Up gotopageup
Go to the previous error Alt-Shift-E goToPreviousError
Go right one space Right gotoright
Go to the start of the file Ctrl-Home gotostart
Go one word to the left Ctrl-Left gotowordleft
Go one word to the right Ctrl-Right gotowordright
Indent the selection one tab Tab indent
Go to the matching symbol inthe current scope
Ctrl-P jumptomatching
Increase the font size Ctrl-+ | Ctrl-= largerfont
250
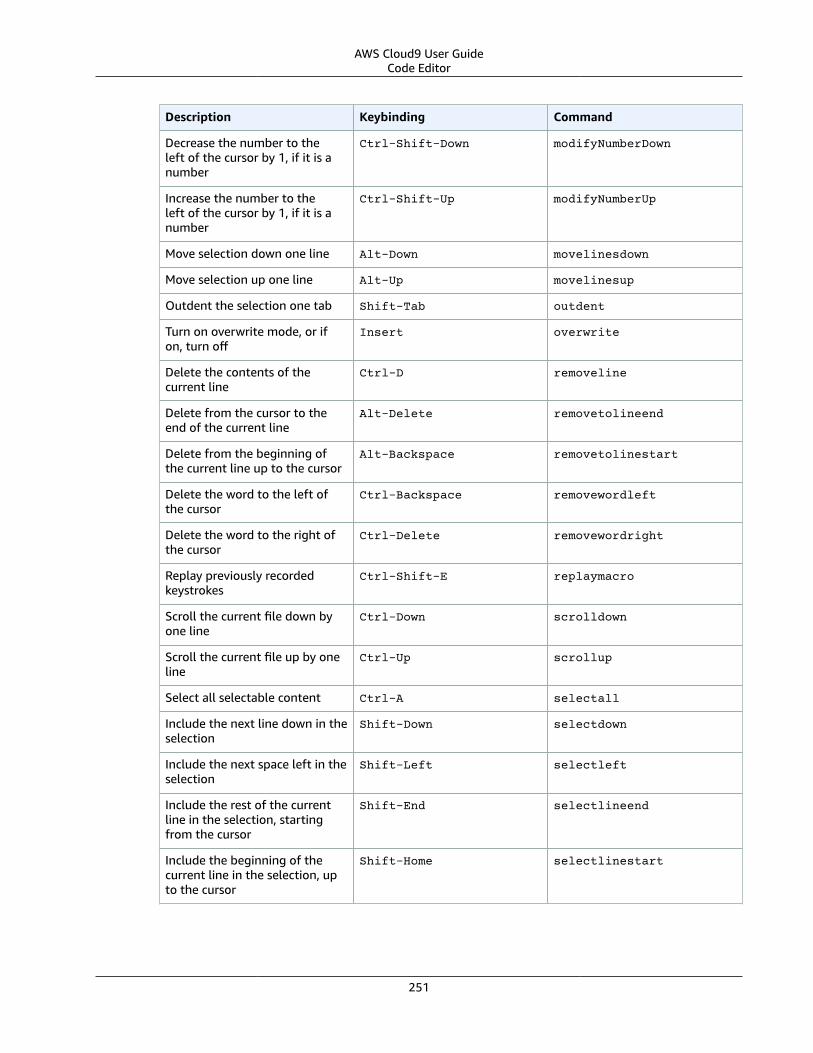
AWS Cloud9 User GuideCode Editor
Description Keybinding Command
Decrease the number to theleft of the cursor by 1, if it is anumber
Ctrl-Shift-Down modifyNumberDown
Increase the number to theleft of the cursor by 1, if it is anumber
Ctrl-Shift-Up modifyNumberUp
Move selection down one line Alt-Down movelinesdown
Move selection up one line Alt-Up movelinesup
Outdent the selection one tab Shift-Tab outdent
Turn on overwrite mode, or ifon, turn off
Insert overwrite
Delete the contents of thecurrent line
Ctrl-D removeline
Delete from the cursor to theend of the current line
Alt-Delete removetolineend
Delete from the beginning ofthe current line up to the cursor
Alt-Backspace removetolinestart
Delete the word to the left ofthe cursor
Ctrl-Backspace removewordleft
Delete the word to the right ofthe cursor
Ctrl-Delete removewordright
Replay previously recordedkeystrokes
Ctrl-Shift-E replaymacro
Scroll the current file down byone line
Ctrl-Down scrolldown
Scroll the current file up by oneline
Ctrl-Up scrollup
Select all selectable content Ctrl-A selectall
Include the next line down in theselection
Shift-Down selectdown
Include the next space left in theselection
Shift-Left selectleft
Include the rest of the currentline in the selection, startingfrom the cursor
Shift-End selectlineend
Include the beginning of thecurrent line in the selection, upto the cursor
Shift-Home selectlinestart
251

AWS Cloud9 User GuideCode Editor
Description Keybinding Command
Include more matchingselections that are after theselection
Ctrl-Alt-Right selectMoreAfter
Include more matchingselections that are before theselection
Ctrl-Alt-Left selectMoreBefore
Include the next matchingselection that is after theselection
Ctrl-Alt-Shift-Right selectNextAfter
Include the next matchingselection that is before theselection
Ctrl-Alt-Shift-Left selectNextBefore
Select or find the next matchingselection
Alt-K selectOrFindNext
Select or find the previousmatching selection
Alt-Shift-K selectOrFindPrevious
Include from the cursor down tothe end of the current page inthe selection
Shift-Page Down selectpagedown
Include from the cursor up tothe beginning of the currentpage in the selection
Shift-Page Up selectpageup
Include the next space tothe right of the cursor in theselection
Shift-Right selectright
Include from the cursor down tothe end of the current file in theselection
Ctrl-Shift-End selecttoend
Include from the cursor to theend of the current line in theselection
Alt-Shift-Right selecttolineend
Include from the beginning ofthe current line to the cursor inthe selection
Alt-Shift-Left selecttolinestart
Include from the cursor to thenext matching symbol in thecurrent scope
Ctrl-Shift-P selecttomatching
Include from the cursor up tothe beginning of the current filein the selection
Ctrl-Shift-Home selecttostart
Include the next line up in theselection
Shift-Up selectup
252
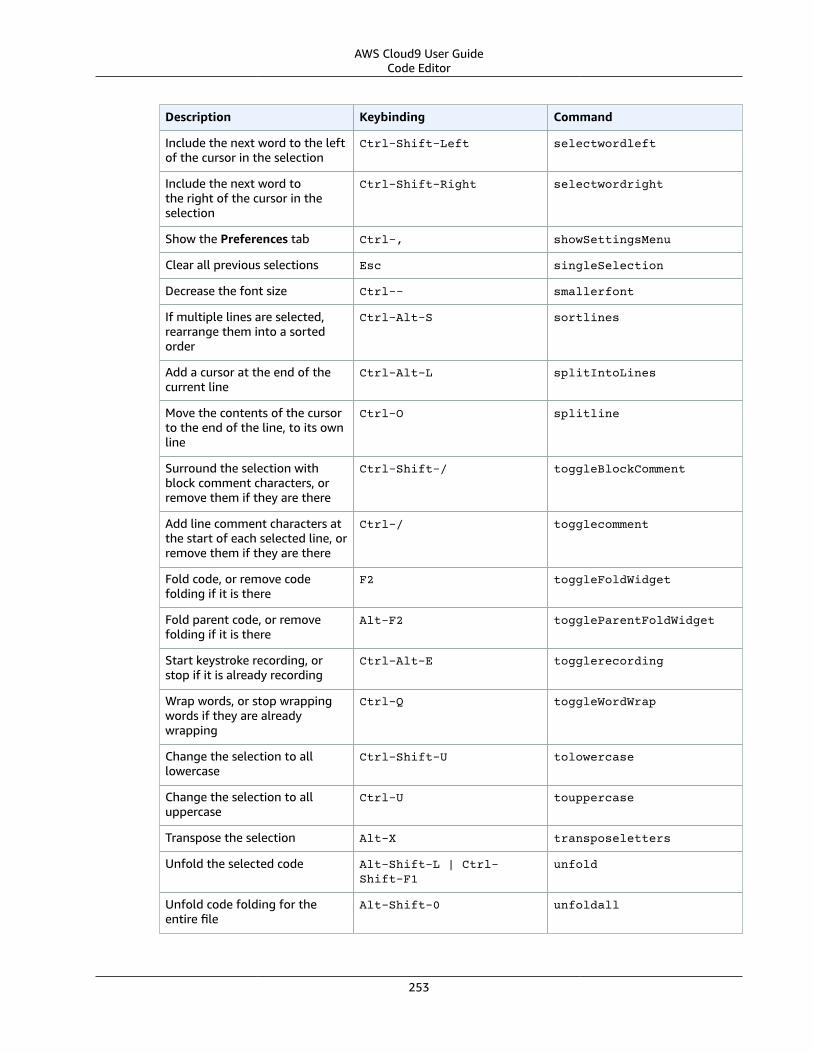
AWS Cloud9 User GuideCode Editor
Description Keybinding Command
Include the next word to the leftof the cursor in the selection
Ctrl-Shift-Left selectwordleft
Include the next word tothe right of the cursor in theselection
Ctrl-Shift-Right selectwordright
Show the Preferences tab Ctrl-, showSettingsMenu
Clear all previous selections Esc singleSelection
Decrease the font size Ctrl-- smallerfont
If multiple lines are selected,rearrange them into a sortedorder
Ctrl-Alt-S sortlines
Add a cursor at the end of thecurrent line
Ctrl-Alt-L splitIntoLines
Move the contents of the cursorto the end of the line, to its ownline
Ctrl-O splitline
Surround the selection withblock comment characters, orremove them if they are there
Ctrl-Shift-/ toggleBlockComment
Add line comment characters atthe start of each selected line, orremove them if they are there
Ctrl-/ togglecomment
Fold code, or remove codefolding if it is there
F2 toggleFoldWidget
Fold parent code, or removefolding if it is there
Alt-F2 toggleParentFoldWidget
Start keystroke recording, orstop if it is already recording
Ctrl-Alt-E togglerecording
Wrap words, or stop wrappingwords if they are alreadywrapping
Ctrl-Q toggleWordWrap
Change the selection to alllowercase
Ctrl-Shift-U tolowercase
Change the selection to alluppercase
Ctrl-U touppercase
Transpose the selection Alt-X transposeletters
Unfold the selected code Alt-Shift-L | Ctrl-Shift-F1
unfold
Unfold code folding for theentire file
Alt-Shift-0 unfoldall
253

AWS Cloud9 User Guideemmet
emmet
Description Keybinding Command
Evaluate a simple mathexpression (such as 2*4 or10/2), and output its result
Shift-Ctrl-Y emmet_evaluate_math_expression
Expand CSS-like abbreviationsinto HTML, XML, or CSS code,depending on the current file'ssyntax
Ctrl-Alt-E emmet_expand_abbreviation
Traverse expanded CSS-likeabbreviations, by tab stop
Tab emmet_expand_abbreviation_with_tab
Go to the next editable codepart
Shift-Ctrl-. emmet_select_next_item
Go to the previous editable codepart
Shift-Ctrl-, emmet_select_previous_item
Expand an abbreviation, andthen place the current selectionwithin the last element of thegenerated snippet
Shift-Ctrl-A emmet_wrap_with_abbreviation
Terminal
Description Keybinding Command
Open a new Terminal tab Alt-T openterminal
Switch between the editor andthe Terminal tab
Alt-S switchterminal
Run and Debug
Description Keybinding Command
Build the current file Ctrl-B build
Resume the current pausedprocess
F8 resume
Run or debug the currentapplication
Alt-F5 run
Run or debug the last run file F5 runlast
Step into the function that isnext on the stack
F11 stepinto
254

AWS Cloud9 User GuideWindows / Linux Sublime Keybindings Reference
Description Keybinding Command
Step out of the current functionscope
Shift-F11 stepout
Step over the current expressionon the stack
F10 stepover
Stop running or debugging thecurrent application
Shift-F5 stop
Stop building the current file Ctrl-Shift-C stopbuild
Windows / Linux Sublime Keybindings Referencefor the AWS Cloud9 Integrated DevelopmentEnvironment (IDE)
Following is a list of Sublime keyboard mode keybindings for Windows / Linux operating systems in theAWS Cloud9 IDE.
For more information, in the AWS Cloud9 IDE:
1. On the menu bar, choose AWS Cloud9, Preferences.2. On the Preferences tab, choose Keybindings.3. For Keyboard Mode, choose Sublime.4. For Operating System, choose Windows / Linux.
See also Working with Keybindings (p. 158).
• General (p. 255)• Tabs (p. 258)• Panels (p. 259)• Code Editor (p. 260)• emmet (p. 265)• Terminal (p. 265)• Run and Debug (p. 265)
General
Description Keybinding Command
Add the selection as a watchexpression
Ctrl-Shift-C addwatchfromselection
Remove the cut selection fromthe clipboard
Esc clearcut
Show the code completioncontext menu
Ctrl-Space complete
255

AWS Cloud9 User GuideGeneral
Description Keybinding Command
Code complete, and thenoverwrite
Ctrl-Shift-Space | Alt-Shift-Space
completeoverwrite
Copy the selection to theclipboard
Ctrl-C copy
Cut the selection to theclipboard
Ctrl-X cut
Delete from the cursor to thestart of the line
Ctrl-Shift-Backspace |Ctrl-K Ctrl-Backspace
delete_to_hard_bol
Delete from the cursor to theend of line
Ctrl-Shift-Delete |Ctrl-K Ctrl-K
delete_to_hard_eol
Expand code, where applicable Tab expandSnippet
Show the find and replace barfor the current document
Ctrl-F find
Highlight all matches for theselection
Alt-F3 find_all_under
Highlight next match for theselection
Ctrl-F3 find_under
Highlight around cursor and allmatches for highlight
Ctrl-D find_under_expand
Highlight around cursor andoutline all matches for highlight
Ctrl-K Ctrl-D find_under_expand_skip
Highlight previous match forselection
Ctrl-Shift-F3 find_under_prev
Select all find matches in thecurrent document
Ctrl-Alt-K findAll
Go to the next match in thecurrent document for the findquery you entered last
F3 findnext
Go to the previous match in thecurrent document for the findquery you entered last
Shift-F3 findprevious
Open the Environment window,and then make the list of filesactive
Shift-Esc focusTree
Reformat the selected JavaScriptcode
Ctrl-Alt-F formatcode
Show the go to line box Ctrl-G gotoline
Hide the find and replace bar, ifit is showing
Esc hidesearchreplace
256
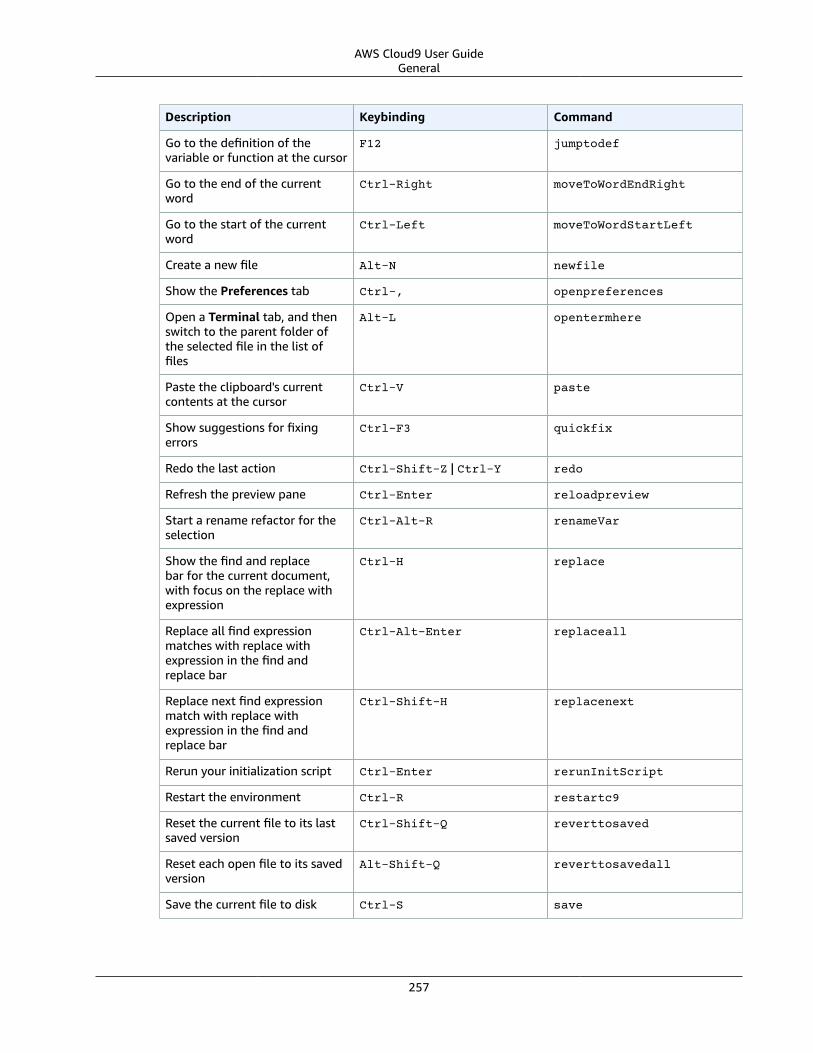
AWS Cloud9 User GuideGeneral
Description Keybinding Command
Go to the definition of thevariable or function at the cursor
F12 jumptodef
Go to the end of the currentword
Ctrl-Right moveToWordEndRight
Go to the start of the currentword
Ctrl-Left moveToWordStartLeft
Create a new file Alt-N newfile
Show the Preferences tab Ctrl-, openpreferences
Open a Terminal tab, and thenswitch to the parent folder ofthe selected file in the list offiles
Alt-L opentermhere
Paste the clipboard's currentcontents at the cursor
Ctrl-V paste
Show suggestions for fixingerrors
Ctrl-F3 quickfix
Redo the last action Ctrl-Shift-Z | Ctrl-Y redo
Refresh the preview pane Ctrl-Enter reloadpreview
Start a rename refactor for theselection
Ctrl-Alt-R renameVar
Show the find and replacebar for the current document,with focus on the replace withexpression
Ctrl-H replace
Replace all find expressionmatches with replace withexpression in the find andreplace bar
Ctrl-Alt-Enter replaceall
Replace next find expressionmatch with replace withexpression in the find andreplace bar
Ctrl-Shift-H replacenext
Rerun your initialization script Ctrl-Enter rerunInitScript
Restart the environment Ctrl-R restartc9
Reset the current file to its lastsaved version
Ctrl-Shift-Q reverttosaved
Reset each open file to its savedversion
Alt-Shift-Q reverttosavedall
Save the current file to disk Ctrl-S save
257
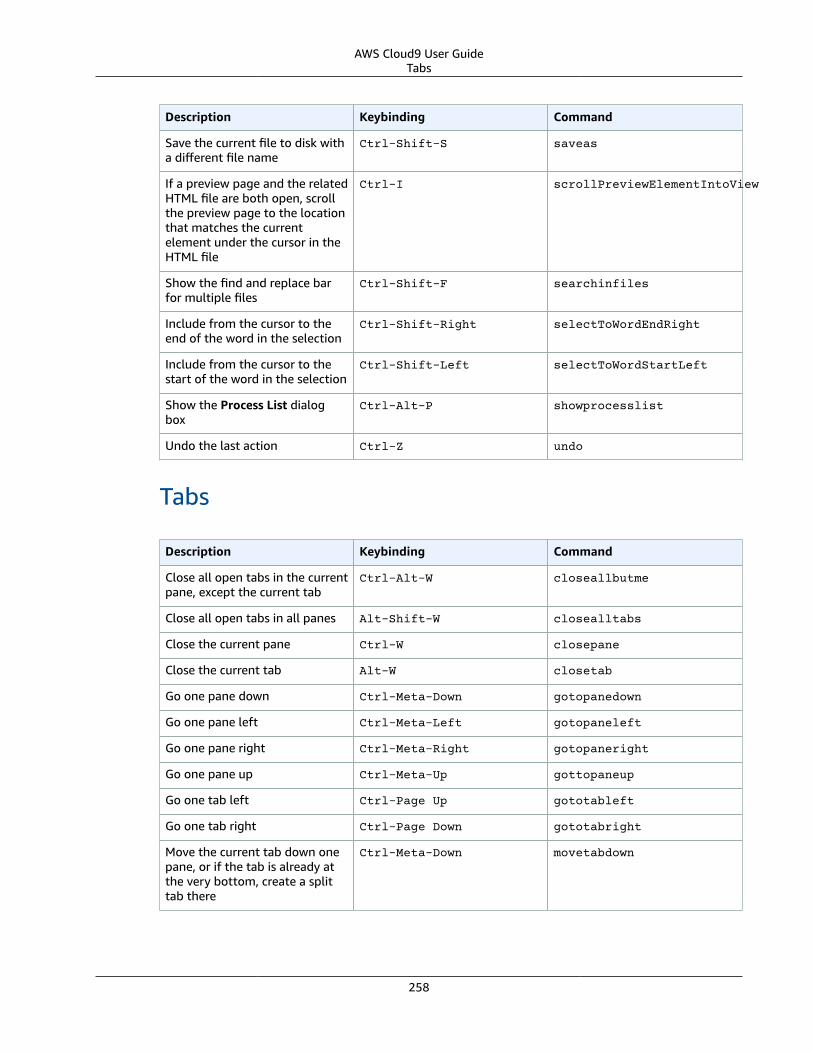
AWS Cloud9 User GuideTabs
Description Keybinding Command
Save the current file to disk witha different file name
Ctrl-Shift-S saveas
If a preview page and the relatedHTML file are both open, scrollthe preview page to the locationthat matches the currentelement under the cursor in theHTML file
Ctrl-I scrollPreviewElementIntoView
Show the find and replace barfor multiple files
Ctrl-Shift-F searchinfiles
Include from the cursor to theend of the word in the selection
Ctrl-Shift-Right selectToWordEndRight
Include from the cursor to thestart of the word in the selection
Ctrl-Shift-Left selectToWordStartLeft
Show the Process List dialogbox
Ctrl-Alt-P showprocesslist
Undo the last action Ctrl-Z undo
Tabs
Description Keybinding Command
Close all open tabs in the currentpane, except the current tab
Ctrl-Alt-W closeallbutme
Close all open tabs in all panes Alt-Shift-W closealltabs
Close the current pane Ctrl-W closepane
Close the current tab Alt-W closetab
Go one pane down Ctrl-Meta-Down gotopanedown
Go one pane left Ctrl-Meta-Left gotopaneleft
Go one pane right Ctrl-Meta-Right gotopaneright
Go one pane up Ctrl-Meta-Up gottopaneup
Go one tab left Ctrl-Page Up gototableft
Go one tab right Ctrl-Page Down gototabright
Move the current tab down onepane, or if the tab is already atthe very bottom, create a splittab there
Ctrl-Meta-Down movetabdown
258

AWS Cloud9 User GuidePanels
Description Keybinding Command
Move the current tab left, or ifthe tab is already at the far left,create a split tab there
Ctrl-Meta-Left movetableft
Move the current tab right, orif the tab is already at the farright, create a split tab there
Ctrl-Meta-Right movetabright
Move the current tab up onepane, or if the tab is already atvery top, create a split tab there
Ctrl-Meta-Up movetabup
Go to the next tab Ctrl-Tab nexttab
Go to the previous pane Ctrl-Shift-` previouspane
Go to the previous tab Ctrl-Shift-Tab previoustab
Go back to the last tab Esc refocusTab
Open the last tab again Ctrl-Shift-T reopenLastTab
Show the current tab in the filetree
Ctrl-E revealtab
Go to the tenth tab Ctrl-0 tab0
Go to the first tab Ctrl-1 tab1
Go to the second tab Ctrl-2 tab2
Go to the third tab Ctrl-3 tab3
Go to the fourth tab Ctrl-4 tab4
Go to the fifth tab Ctrl-5 tab5
Go to the sixth tab Ctrl-6 tab6
Go to the seventh tab Ctrl-7 tab7
Go to the eighth tab Ctrl-8 tab8
Go to the ninth tab Ctrl-9 tab9
Panels
Description Keybinding Command
Show the Commands window Ctrl-Shift-P commands
Show the Navigate window Ctrl-P navigate
Show the Navigate window Ctrl-O navigate_altkey
Show the Outline window Ctrl-Shift-R outline
259

AWS Cloud9 User GuideCode Editor
Description Keybinding Command
Show the Console window ifhidden, or hide if shown
Ctrl-` toggleconsole
Show the Environment windowif hidden, or hide if shown
Ctrl-K Ctrl-B toggletree
Code Editor
Description Keybinding Command
Add a cursor one line abovethe active cursor, or if a cursoris already added, add anothercursor above that one
Ctrl-Alt-Up addCursorAbove
Add a second cursor one lineabove the active cursor, or if asecond cursor is already added,move the second cursor up oneline
Ctrl-Alt-Shift-Up addCursorAboveSkipCurrent
Add a cursor one line belowthe active cursor, or if a cursoris already added, add anothercursor below that one
Ctrl-Alt-Down addCursorBelow
Add a second cursor one linebelow the active cursor, or if asecond cursor is already added,move the second cursor downone line
Ctrl-Alt-Shift-Down addCursorBelowSkipCurrent
Move all cursors to the samespace as the active cursor oneach of their lines, if they aremisaligned
Ctrl-Alt-A alignCursors
Backspace one space Shift-Backspace |Backspace
backspace
Indent the selection one tab Ctrl-] blockindent
Outdent the selection one tab Ctrl-[ blockoutdent
Control whether focus can beswitched from the editor tosomewhere else in the IDE
Ctrl-Z | Ctrl-Shift-Z |Ctrl-Y
cancelBrowserUndoInAce
Center the selection Ctrl-K Ctrl-C centerselection
Copy the contents of the line,and paste the copied contentsone line down
Alt-Shift-Down copylinesdown
260

AWS Cloud9 User GuideCode Editor
Description Keybinding Command
Copy the contents of the line,and paste the copied contentsone line up
Alt-Shift-Up copylinesup
Cut the selection, or if there isno selection, delete one space
Shift-Delete cut_or_delete
Delete one space Delete del
Copy the contents of theselection, and paste the copiedcontents immediately after theselection
Ctrl-Shift-D duplicateSelection
Include the current line'scontents in the selection
Ctrl-Shift-L expandtoline
Include up to the next matchingsymbol in the selection
Ctrl-Shift-M expandToMatching
Fold the selected code; if afolded unit is selected, unfold it
Alt-L | Ctrl-F1 fold
Fold all possibly foldableelements, except for the currentselection scope
Ctrl-K Ctrl-1 foldOther
Go down one line Down golinedown
Go up one line Up golineup
Go to the end of the file Ctrl-End gotoend
Go left one space Left gotoleft
Go to the end of the current line Alt-Right | End gotolineend
Go to the start of the currentline
Alt-Left | Home gotolinestart
Go to the next error Ctrl-F6 goToNextError
Go down one page Page Down gotopagedown
Go up one page Page Up gotopageup
Go to the previous error Ctrl-Shift-F6 goToPreviousError
Go right one space Right gotoright
Go to the start of the file Ctrl-Home gotostart
Go one word to the left Ctrl-Left gotowordleft
Go one word to the right Ctrl-Right gotowordright
Indent the selection one tab Tab indent
Include from the cursor to thestart of the word in the selection
Ctrl-J joinlines
261
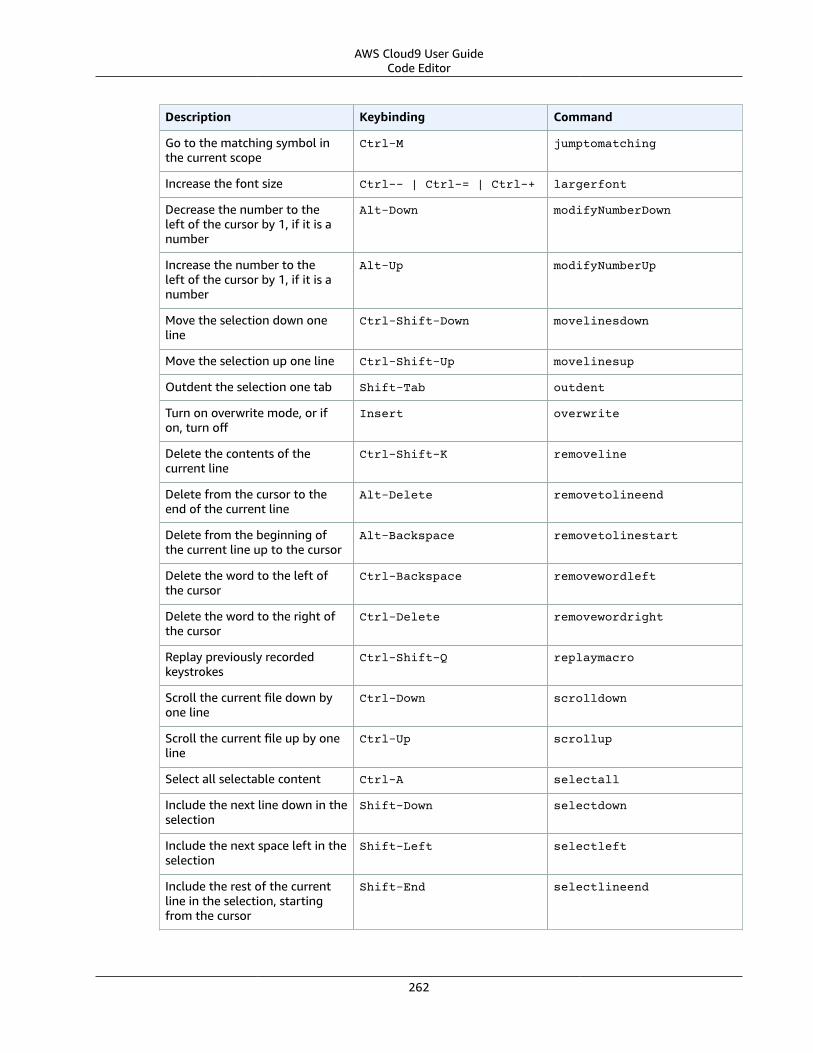
AWS Cloud9 User GuideCode Editor
Description Keybinding Command
Go to the matching symbol inthe current scope
Ctrl-M jumptomatching
Increase the font size Ctrl-- | Ctrl-= | Ctrl-+ largerfont
Decrease the number to theleft of the cursor by 1, if it is anumber
Alt-Down modifyNumberDown
Increase the number to theleft of the cursor by 1, if it is anumber
Alt-Up modifyNumberUp
Move the selection down oneline
Ctrl-Shift-Down movelinesdown
Move the selection up one line Ctrl-Shift-Up movelinesup
Outdent the selection one tab Shift-Tab outdent
Turn on overwrite mode, or ifon, turn off
Insert overwrite
Delete the contents of thecurrent line
Ctrl-Shift-K removeline
Delete from the cursor to theend of the current line
Alt-Delete removetolineend
Delete from the beginning ofthe current line up to the cursor
Alt-Backspace removetolinestart
Delete the word to the left ofthe cursor
Ctrl-Backspace removewordleft
Delete the word to the right ofthe cursor
Ctrl-Delete removewordright
Replay previously recordedkeystrokes
Ctrl-Shift-Q replaymacro
Scroll the current file down byone line
Ctrl-Down scrolldown
Scroll the current file up by oneline
Ctrl-Up scrollup
Select all selectable content Ctrl-A selectall
Include the next line down in theselection
Shift-Down selectdown
Include the next space left in theselection
Shift-Left selectleft
Include the rest of the currentline in the selection, startingfrom the cursor
Shift-End selectlineend
262

AWS Cloud9 User GuideCode Editor
Description Keybinding Command
Include the beginning of thecurrent line in the selection, upto the cursor
Shift-Home selectlinestart
Include more matchingselections that are after theselection
Ctrl-Alt-Right selectMoreAfter
Include more matchingselections that are before theselection
Ctrl-Alt-Left selectMoreBefore
Include the next matchingselection that is after theselection
Ctrl-Alt-Shift-Right selectNextAfter
Include the next matchingselection that is before theselection
Ctrl-Alt-Shift-Left selectNextBefore
Select or find the next matchingselection
Alt-K selectOrFindNext
Select or find the previousmatching selection
Alt-Shift-K selectOrFindPrevious
Include from the cursor down tothe end of the current page inthe selection
Shift-Page Down selectpagedown
Include from the cursor up tothe beginning of the currentpage in the selection
Shift-Page Up selectpageup
Include the next space tothe right of the cursor in theselection
Shift-Right selectright
Include from the cursor down tothe end of the current file in theselection
Ctrl-Shift-End selecttoend
Include from the cursor to theend of the current line in theselection
Alt-Shift-Right selecttolineend
Include from the beginning ofthe current line to the cursor inthe selection
Alt-Shift-Left selecttolinestart
Include from the cursor to thenext matching symbol in thecurrent scope
Ctrl-Shift-P selecttomatching
Include from the cursor up tothe beginning of the current filein the selection
Ctrl-Shift-Home selecttostart
263

AWS Cloud9 User GuideCode Editor
Description Keybinding Command
Include the next line up in theselection
Shift-Up selectup
Include the next word to the leftof the cursor in the selection
Ctrl-Shift-Left selectwordleft
Include the next word tothe right of the cursor in theselection
Ctrl-Shift-Right selectwordright
Show the Preferences tab Ctrl-, showSettingsMenu
Clear all previous selections Esc singleSelection
Decrease the font size Ctrl-- | Ctrl-Shift-= |Ctrl-Shift-+
smallerfont
If multiple lines are selected,rearrange them into a sortedorder
F9 sortlines
Add a cursor at the end of thecurrent line
Ctrl-Shift-L splitIntoLines
Surround the selection withblock comment characters, orremove them if they are there
Ctrl-Shift-/ toggleBlockComment
Add line comment characters atthe start of each selected line, orremove them if they are there
Ctrl-/ togglecomment
Fold code, or remove codefolding if it is there
Ctrl-Shift-[ toggleFoldWidget
Fold parent code, or removefolding if it is there
Alt-F2 toggleParentFoldWidget
Start keystroke recording, orstop if it is already recording
Ctrl-Q togglerecording
Wrap words, or stop wrappingwords if they are alreadywrapping
Ctrl-Q toggleWordWrap
Change the selection to alllowercase
Ctrl-K Ctrl-L tolowercase
Change the selection to alluppercase
Ctrl-K Ctrl-U touppercase
Transpose the selection Alt-X transposeletters
Unfold the selected code Ctrl-Shift-] unfold
Unfold code folding for theentire file
Ctrl-K Ctrl-0 | Ctrl-KCtrl-J
unfoldall
264

AWS Cloud9 User Guideemmet
emmet
Description Keybinding Command
Evaluate a simple mathexpression (such as 2*4 or10/2), and output its result
Shift-Ctrl-Y emmet_evaluate_math_expression
Expand CSS-like abbreviationsinto HTML, XML, or CSS code,depending on the current file'ssyntax
Ctrl-Alt-E emmet_expand_abbreviation
Traverse expanded CSS-likeabbreviations, by tab stop
Tab emmet_expand_abbreviation_with_tab
Go to the next editable codepart
Shift-Ctrl-. emmet_select_next_item
Go to the previous editable codepart
Shift-Ctrl-, emmet_select_previous_item
Expand an abbreviation, andthen place the current selectionwithin the last element of thegenerated snippet
Shift-Ctrl-A emmet_wrap_with_abbreviation
Terminal
Description Keybinding Command
Open a new Terminal tab Alt-T openterminal
Switch between the editor andthe Terminal tab
Alt-S switchterminal
Run and Debug
Description Keybinding Command
Build the current file F7 | Ctrl-B build
Resume the current pausedprocess
F8 resume
Run or debug the currentapplication
Ctrl-Shift-B run
Run or debug the last run file F5 runlast
Step into the function that isnext on the stack
F11 stepinto
265

AWS Cloud9 User GuideCommands Reference
Description Keybinding Command
Step out of the current functionscope
Shift-F11 stepout
Step over the current expressionon the stack
F10 stepover
Stop running or debugging thecurrent application
Shift-F5 stop
Stop building the current file Ctrl-Break stopbuild
Commands Reference for the AWS Cloud9Integrated Development Environment (IDE)
Following is a list of default commands in the AWS Cloud9 IDE.
For more information, in the AWS Cloud9 IDE, choose the Commands button to display the Commandswindow. If the Commands button is not visible, choose Window, Commands on the menu bar.
Command Description
addCursorAbove Add a cursor one line above the active cursor, orif a cursor is already added, add another cursorabove that one
addCursorAboveSkipCurrent Add a second cursor one line above the activecursor, or if a second cursor is already added,move the second cursor up one line
addCursorBelow Add a cursor one line below the active cursor, orif a cursor is already added, add another cursorbelow that one
addCursorBelowSkipCurrent Add a second cursor one line below the activecursor, or if a second cursor is already added,move the second cursor down one line
addfavorite Add the selected file or folder to the Favorites listin the Environment window
addwatchfromselection Add the selection as a watch expression
alignCursors Move all cursors to the same space as the activecursor on each of their lines, if they are misaligned
backspace Backspace one space
blockindent Indent the selection one tab
blockoutdent Outdent the selection one tab
build Build the current file
cancelBrowserAction Cancel various built-in web browser key bindingsthat can be annoying if triggered accidentally
266

AWS Cloud9 User GuideCommands Reference
Command Description
cancelBrowserUndoInAce Control whether focus can be switched from theeditor to somewhere else in the IDE
centerselection Center the selection
clearcut Remove the cut selection from the clipboard
clearterm Clear the buffer in the Terminal pane
clonetab Create a copy of the current tab in a new tab
closeallbutme Close all open tabs in the current pane, except thecurrent tab
closealltabs Close all open tabs in all panes
closealltotheleft Close all tabs to the left of the current tab
closealltotheright Close all tabs to the right of the current tab
closepane Close the current pane
closetab Close the current tab
commands Show the Commands window
complete Show the code completion context menu
completeoverwrite Code complete, and then overwrite
convertIndentation Convert between tabs and spaces in the editor
copy Copy the selection to the clipboard
copyFilePath Copy the full path of the current file to theclipboard
copylinesdown Copy the contents of the line, and paste thecopied contents one line down
copylinesup Copy the contents of the line, and paste thecopied contents one line up
cut Cut the selection to the clipboard
cut_or_delete Cut the selection to the clipboard, or delete to theright if the selection is empty
del Delete one space
detectIndentation Detect the indentation type (spaces or tabs) andlength, based on the document's contents
duplicateSelection Copy the contents of the selection, and paste thecopied contents immediately after the selection
emmet_decrement_number_by_01 Decrease the selected number by 0.1, if it is anumber
emmet_decrement_number_by_1 Decrease the selected number by 1, if is a number
267

AWS Cloud9 User GuideCommands Reference
Command Description
emmet_decrement_number_by_10 Decrease the selected number by 10, if is anumber
emmet_evaluate_math_expression Evaluate a simple math expression (such as 2*4 or10/2), and output its result
emmet_expand_abbreviation Expand CSS-like abbreviations into HTML, XML, orCSS code, depending on the current file's syntax
emmet_expand_abbreviation_with_tab Traverse expanded CSS-like abbreviations, by tabstop
emmet_increment_number_by_01 Increase the selected number by 0.1, if it is anumber
emmet_increment_number_by_1 Increase the selected number by 1, if it is anumber
emmet_increment_number_by_10 Increase the selected number by 10, if it is anumber
emmet_match_pair_inward Shrink the selection to the next inner set ofmatching tags
emmet_match_pair_outward Expand the selection to include the next outer setof matching tags
emmet_matching_pair Go between the opening and closing tag, if theselection is a tag
emmet_next_edit_point Go to the next tag, empty attribute, or newlinewith indentation
emmet_prev_edit_point Go to the previous tag, empty attribute, ornewline with indentation
emmet_reflect_css_value Copy the selected CSS property into all matchingvariations, if the selection is a CSS property
emmet_remove_tag Delete the selected tag, if the selection is a tag
emmet_select_next_item Go to the next editable code part
emmet_select_previous_item Go to the previous editable code part
emmet_split_join_tag If the selection is an empty tag, replace it withan opening and closing tag pair; if the tag has anopening and closing tag pair, replace it with anempty tag
emmet_toggle_comment Add comment characters to the current line, orremove them if they are there
emmet_wrap_with_abbreviation Expand an abbreviation, and then place theselection within the last element of the generatedsnippet
expandSnippet Expand code, where applicable
268

AWS Cloud9 User GuideCommands Reference
Command Description
expandtoline Include the current line's contents in the selection
expandToMatching Include up to the next matching symbol in theselection
find Show the find and replace bar for the currentdocument
findAll Select all find matches in the current document
findnext Go to the next match in the current document forthe find query you entered last
findprevious Go to the previous match in the current documentfor the find query you entered last
focusTree Open the Environment window, and then makethe list of files active
fold Fold the selected code; if a folded unit is selected,unfold it
foldall Fold all possibly foldable elements
foldOther Fold all possibly foldable elements, except for theselection scope
formatcode Reformat the selected JavaScript code
formatprefs Open the Project Settings section of thePreferences tab to programming languagesettings
foursplit Display a four-pane layout
golinedown Go down one line
golineup Go up one line
gotoend Go to the end of the file
gotoleft Go left one space
gotoline Show the go to line box
gotolineend Go to the end of the current line
gotolinestart Go to the start of the current line
goToNextError Go to the next error
gotopagedown Go down one page
gotopageup Go up one page
gotopanedown Go one pane down
gotopaneleft Go one pane left
gotopaneright Go one pane right
269

AWS Cloud9 User GuideCommands Reference
Command Description
gotopaneup Go one pane up
goToPreviousError Go to the previous error
gotoright Go right one space
gotostart Go to the start of the file
gototableft Go one tab left
gototabright Go one tab right
gotowordleft Go one word to the left
gotowordright Go one word to the right
hideGotoLine Hide the go to line box, if it is showing
hidesearchreplace Hide the find and replace bar, if it is showing
hsplit Split the current pane into two columns, and thenmove the current tab to the new column
indent Indent the selection one tab
insertstring Insert a string of text while typing or pasting
inserttext Insert text while typing or pasting
invertSelection Select everything other than the selection
joinlines Remove all line breaks from the current selection
jumptodef Go to the definition of the variable or function atthe cursor
jumptomatching Go to the matching symbol in the current scope
largerfont Increase the font size
maximizeconsole Expand the console to cover the entire IDE
modifyNumberDown Decrease the number to the left of the cursor by1, if it is a number
modifyNumberUp Increase the number to the left of the cursor by 1,if it is a number
movelinesdown Move selection down one line
movelinesup Move selection up one line
movetabdown Move the current tab down one pane, or if the tabis already at the very bottom, create a split tabthere
movetableft Move the current tab left, or if the tab is alreadyat the far left, create a split tab there
270

AWS Cloud9 User GuideCommands Reference
Command Description
movetabright Move the current tab right, or if the tab is alreadyat the far right, create a split tab there
movetabup Move the current tab up one pane, or if the tab isalready at very top, create a split tab there
navigate Show the Navigate window
navigate_altkey Show the Navigate window
newEnvironment Show the Create new environment wizard in theAWS Cloud9 console
newfile Create a new file
newfolder Create a new folder relative to the selection in theEnvironment window
nextpane Go to the next pane
nexttab Go to the next tab
nosplit Combine all split panes into a single pane
opencoverageview Show the Code Coverage tab
openpreferences Show the Preferences tab
opentermhere Open a Terminal tab, and then switch to theparent folder of the selected file in the list of files
openterminal Open a new Terminal tab
outdent Outdent the selection one tab
outline Show the Outline window
overwrite Turn on overwrite mode, or if on, turn off
pagedown Go down one page
pageup Go up one page
passKeysToBrowser Enable keys to be handled by the web browser
paste Paste the clipboard's current contents at thecursor
preview Show the preview pane
previouspane Go to the previous pane
previoustab Go to the previous tab
quickfix Show suggestions for fixing errors
redo Redo the last action
refocusTab Go back to the last tab
reloadpreview Refresh the preview pane
271

AWS Cloud9 User GuideCommands Reference
Command Description
removefavorite Delete the item from the Favorites list, if theselection is a favorite
removeline Delete the contents of the current line
removetolineend Delete from the cursor to the end of the currentline
removetolinestart Delete from the beginning of the current line upto the cursor
removewordleft Delete the word to the left of the cursor
removewordright Delete the word to the right of the cursor
renameVar Start a rename refactor for the selection
reopenLastTab Open the last tab again
replace Show the find and replace bar for the currentdocument, with focus on the replace withexpression
replaceall Replace all matches for Find with Replace With inthe find and replace bar for the current document
replacenext Replace the next match for Find with ReplaceWith in the find and replace bar for the currentdocument
replaceprevious Replace the previous match for Find with ReplaceWith in the find and replace bar for the currentdocument
replaymacro Replay previously recorded keystrokes
rerunInitScript Rerun your initialization script
restartc9 Restart the environment
restartc9vm Restart the environment
resume Resume the current paused process
revealtab Show the current tab in the file tree
reverttosaved Reset the current file to its last saved version
reverttosavedall Reset each open file to its saved version
run Run or debug the current application
runlast Run or debug the last run file
save Save the current file to disk
saveall Save all unsaved files to disk
saveas Save the current file to disk with a different filename
272

AWS Cloud9 User GuideCommands Reference
Command Description
savePaneLayout Save the current pane layout in the Window,Saved Layouts menu
savePaneLayoutAndCloseTabs Save the current pane layout in the Window,Saved Layouts menu, and then close all open tabs
scrolldown Scroll down in the current document
scrollPreviewElementIntoView If a preview page and the related HTML file areboth open, scroll the preview page to the locationthat matches the current element under thecursor in the HTML file
scrollup Scroll up in the current document
searchinfiles Show the find and replace bar for multiple files
selectall Select all selectable content
selectdown Include the next line down in the selection
selectleft Include the next space to the left in the selection
selectlineend Include the rest of the current line in theselection, starting from the cursor
selectlinestart Include the beginning of the current line in theselection, up to the cursor
selectMoreAfter Include more matching selections that are afterthe selection
selectMoreBefore Include more matching selections that are beforethe selection
selectNextAfter Include the next matching selection that is afterthe selection
selectNextBefore Include the next matching selection that is beforethe selection
selectOrFindNext Select or find the next matching selection
selectOrFindPrevious Select or find the previous matching selection
selectpagedown Include from the cursor down to the end of thecurrent page in the selection
selectpageup Include from the cursor up to the beginning of thecurrent page in the selection
selectright Include the next space to the right of the cursor inthe selection
selecttoend Include from the cursor down to the end of thecurrent file in the selection
selecttolineend Include from the cursor to the end of the currentline in the selection
273

AWS Cloud9 User GuideCommands Reference
Command Description
selecttolinestart Include from the beginning of the current line tothe cursor in the selection
selecttomatching Include from the cursor to the next matchingsymbol in the current scope
selecttostart Include from the cursor up to the beginning of thecurrent file in the selection
selectup Include the next line up in the selection
selectVar Select all instances of the variable, if the selectionis a variable
selectwordleft Include the next word to the left of the cursor inthe selection
selectwordright Include the next word to the right of the cursor inthe selection
setIndentation Set the indentation type (spaces or tabs) andlength
showimmediate Show the Immediate tab
showinstaller Show the AWS Cloud9 Installer dialog box
showoutput Show the Output tab
showprocesslist Show the Process List dialog box
showSettingsMenu Show the Preferences tab
singleSelection Clear all previous selections
smallerfont Decrease the font size
sortlines If multiple lines are selected, rearrange them intoa sorted order
splitIntoLines Add a cursor at the end of the current line
splitline Move the contents of the cursor to the end of theline, to its own line
stepinto Step into the function that is next on the stack
stepout Step out of the current function scope
stepover Step over the current expression on the stack
stop Stop running or debugging the currentapplication
stopbuild Stop building the current file
stripws Remove whitespace from the end of each line
suspend Suspend running or debugging the currentapplication
274

AWS Cloud9 User GuideCommands Reference
Command Description
switchterminal Switch between the editor and the Terminal tab
syntax Set the syntax type
tab0 Go to the tenth tab
tab1 Go to the first tab
tab2 Go to the second tab
tab3 Go to the third tab
tab4 Go to the fourth tab
tab5 Go to the fifth tab
tab6 Go to the sixth tab
tab7 Go to the seventh tab
tab8 Go to the eighth tab
tab9 Go to the ninth tab
term_detach Detach clients attached to the Terminal pane
term_help Show help for the Terminal pane
term_restart Restart the Terminal pane
threeleft Create a three-pane layout with two panes on theleft and one pane on the right
threeright Create a three-pane layout with two panes on theright and one pane on the left
toggle_term_status Show Terminal pane status, or hide if shown
toggleBlockComment Surround the selection with block commentcharacters, or remove them if they are there
toggleButtons Show tabs, or hide if shown
togglecomment Add line comment characters at the start of eachselected line, or remove them if they are there
toggleconsole Show the Console window if hidden, or hide ifshown
toggledebugger Show the Debugger window, or hide if shown
toggleFoldWidget Fold code, or remove code folding if it is there
toggleMenubar Show the menu bar, or hide if shown
toggleOpenfiles Show the Open Files list in the Environmentwindow, or hide if shown
toggleParentFoldWidget Fold parent code, or remove folding if it is there
275

AWS Cloud9 User GuideCommands Reference
Command Description
togglerecording Start keystroke recording, or stop if it is alreadyrecording
toggletree Show the Environment window if hidden, or hideif shown
toggleWordWrap Wrap words, or stop wrapping words if they arealready wrapping
tolowercase Change the selection to all lowercase
touppercase Change the selection to all uppercase
transposeletters Transpose the selection
trimTrailingSpace Trim whitespace at the ends of lines
twohsplit Create a two-pane layout, with panes side by side
twovsplit Create a two-pane layout, with panes top andbottom
undo Undo the last action
unfold Unfold selected code
unfoldall Unfold code folding for the entire file
vsplit Split the current pane into two panes, top andbottom, and move the current tab to the top pane
276

AWS Cloud9 User GuideStep 1: Create a Linux-Based Lightsail Instance
Working with Amazon LightsailInstances in the AWS Cloud9Integrated DevelopmentEnvironment (IDE)
You can use the AWS Cloud9 IDE to work with code on Amazon Lightsail instances preconfigured withpopular apps and frameworks such as WordPress, LAMP (Linux, Apache, MySQL, and PHP), Node.js,Nginx, Drupal, and Joomla, as well as Linux distributions such as Amazon Linux, Ubuntu, Debian,FreeBSD, and openSUSE.
Lightsail is the easiest way to get started with AWS for developers, small businesses, students, and otherusers who need a simple virtual private server (VPS) solution. Lightsail provides developers compute,storage, and networking capacity and capabilities to deploy and manage websites and web applicationsin the cloud. Lightsail includes everything you need to launch your project quickly—a virtual machine,SSD-based storage, data transfer, DNS management, and a static IP—for a low, predictable monthlyprice. For more information, see Amazon Lightsail Features.
In this topic, you create and set up a Linux-based Lightsail instance that is compatible with AWS Cloud9.You then create and connect an AWS Cloud9 SSH development environment to the Lightsail instance.
NoteCompleting these procedures might result in charges to your AWS account. These includepossible charges for services such as Lightsail. For more information, see Amazon LightsailPricing.To create and set up a more advanced solution that includes a toolchain with the AWS Cloud9IDE, source control, build, deployment, virtual servers or serverless resources, and more, skip therest of this topic, and see Working with AWS CodeStar Projects (p. 284) instead.To use the AWS Cloud9 IDE to work with an Amazon EC2 instance running Amazon Linux thatcontains no sample code, skip the rest of this topic, and see the IDE Tutorial (p. 19) instead.
• Step 1: Create a Linux-Based Lightsail Instance (p. 277)• Step 2: Set up the Instance to Use It with AWS Cloud9 (p. 279)• Step 3: Create and Connect to an AWS Cloud9 SSH Development Environment (p. 280)• Step 4: Use the AWS Cloud9 IDE to Change the Code on the Instance (p. 283)
Step 1: Create a Linux-Based Lightsail InstanceIn this step, you use the Lightsail console to create an Amazon EC2 instance running an app in a Linux-based distribution. This instance automatically includes:
• A public and private IP address. (You can create a static public IP later.)• Access to the instance using SSH over port 22, HTTP over port 80, and HTTPS over port 443. (You can
change this.)• A block storage disk. (You can attach additional disks later.)• Built-in system reporting.
The Lightsail console enables you to back up, reboot, stop, or delete the instance later.
277

AWS Cloud9 User GuideStep 1: Create a Linux-Based Lightsail Instance
1. Open and then sign in to the Lightsail console, at https://lightsail.aws.amazon.com.
We recommend you sign in using credentials for an IAM administrator user in your AWS account. If youcannot sign in as an IAM administrator user, check with your AWS account administrator.
2. If prompted, choose the language to use in the console, and then choose Save.
3. If prompted, choose Let's get started.
4. On the home page, with the Instances tab already selected, choose Create instance.
5. For Instance location, be sure the location matches an AWS Region where you want to create theinstance and where AWS Cloud9 is available. For more information, see AWS Cloud9 in the AmazonWeb Services General Reference. To change the AWS Region, Availability Zone, or both, choose ChangeAWS Region and Availability Zone, and then follow the onscreen instructions.
6. For Pick your instance image, with Linux/Unix already chosen for Select a platform, and Apps + OSalready chosen for Select a blueprint, choose a blueprint.
278

AWS Cloud9 User GuideStep 2: Set up the Instance to Use It with AWS Cloud9
NoteIf you want to create an instance with no app, choose OS Only instead of Apps + OS, andthen choose a distribution.To learn about the available choices, see Choosing an Amazon Lightsail instance image on theLightsail website.
7. For Choose your instance plan, choose a plan, or leave the selected default plan.
8. For Name your instance, type a name for the instance, or leave the suggested default name.
9. For the number of instances, type the number of instances you want to create, or leave the default ofa single instance (x 1).
10.Choose Create.
Step 2: Set up the Instance to Use It with AWSCloud9
In this step, you connect to the running instance and then set it up so that AWS Cloud9 can use it later.
NoteThe following instructions assume you chose Apps + OS in the previous step. If you chose OSOnly and a distribution other than Ubuntu instead, you might need to adapt the followinginstructions accordingly.
1. With the Lightsail console still open from the previous step, on the Instances tab, in the card for theinstance, choose the instance's name.
2. On the Connect tab, for Connect using your own SSH client, note the Public IP and User namevalues, as you will need them later.
279
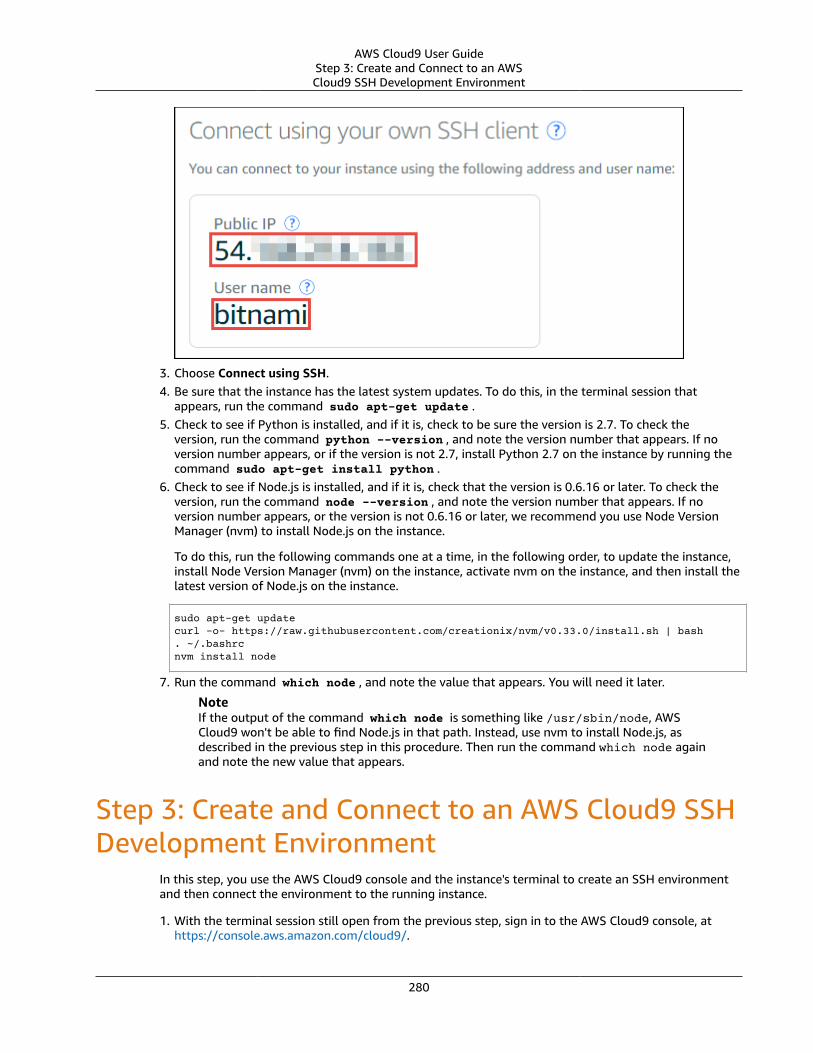
AWS Cloud9 User GuideStep 3: Create and Connect to an AWSCloud9 SSH Development Environment
3. Choose Connect using SSH.4. Be sure that the instance has the latest system updates. To do this, in the terminal session that
appears, run the command sudo apt-get update .5. Check to see if Python is installed, and if it is, check to be sure the version is 2.7. To check the
version, run the command python --version , and note the version number that appears. If noversion number appears, or if the version is not 2.7, install Python 2.7 on the instance by running thecommand sudo apt-get install python .
6. Check to see if Node.js is installed, and if it is, check that the version is 0.6.16 or later. To check theversion, run the command node --version , and note the version number that appears. If noversion number appears, or the version is not 0.6.16 or later, we recommend you use Node VersionManager (nvm) to install Node.js on the instance.
To do this, run the following commands one at a time, in the following order, to update the instance,install Node Version Manager (nvm) on the instance, activate nvm on the instance, and then install thelatest version of Node.js on the instance.
sudo apt-get updatecurl -o- https://raw.githubusercontent.com/creationix/nvm/v0.33.0/install.sh | bash. ~/.bashrcnvm install node
7. Run the command which node , and note the value that appears. You will need it later.
NoteIf the output of the command which node is something like /usr/sbin/node, AWSCloud9 won't be able to find Node.js in that path. Instead, use nvm to install Node.js, asdescribed in the previous step in this procedure. Then run the command which node againand note the new value that appears.
Step 3: Create and Connect to an AWS Cloud9 SSHDevelopment Environment
In this step, you use the AWS Cloud9 console and the instance's terminal to create an SSH environmentand then connect the environment to the running instance.
1. With the terminal session still open from the previous step, sign in to the AWS Cloud9 console, athttps://console.aws.amazon.com/cloud9/.
280

AWS Cloud9 User GuideStep 3: Create and Connect to an AWSCloud9 SSH Development Environment
NoteFor this step, you will work with two different AWS services at the same time. If you signed into the Lightsail console as an IAM administrator user, but you want a different entity to ownthe new SSH environment, we suggest opening a different web browser and signing in to theAWS Cloud9 console as that entity.
2. In the AWS Cloud9 console, choose the AWS Region that matches the one you created the instance in.
3. If a welcome page is displayed, for New AWS Cloud9 environment, choose Create environment.Otherwise, choose Create environment.
Or:
4. On the Name environment page, for Name, type a name for your environment.
5. To add a description to your environment, type it in Description.
6. Choose Next step.
281

AWS Cloud9 User GuideStep 3: Create and Connect to an AWSCloud9 SSH Development Environment
7. On the Configure settings page, for Environment type, choose Connect and run in remote server(SSH).
8. For User, type the User name value you noted earlier.
9. For Host, type the Public IP value you noted earlier.
10.For Port, leave the default value of 22.
11.Expand Advanced settings.
12.For Environment path, type the path that AWS Cloud9 will start from after login, which is ~/ (theroot of the user's home directory).
13.For Node.js binary path, type the value of the command which node you noted earlier.
14.Leave SSH jump host blank.
15.Store the public SSH key that AWS Cloud9 creates for this environment in your system clipboard. Todo this, choose Copy key to clipboard.
NoteTo see the public SSH key value that was copied, expand View public SSH key.
16.Save the public SSH key value you just copied to the instance. To do this, use vi, a popular text editor,which is already installed on the instance:
a. In the terminal session for the instance, run the command vi ~/.ssh/authorized_keys .
b. In the vi editor that appears, go to the end of the file, and switch to insert mode. To do this, press G,then A. (-- INSERT -- appears at the bottom of the vi editor.)
c. Add two carriage returns to the end of the file by pressing Enter twice.
d. Paste the contents of your system clipboard, which contains the public SSH key value you justcopied, to the terminal session clipboard. To do this, in the bottom corner of the terminal sessionwindow, choose the clipboard button, then paste the contents of your system clipboard into thebox.
e. Paste the contents of the terminal session clipboard into the vi editor. To do this, at the insertionpoint in the vi editor, press Ctrl + Shift + V.
f. Save the file. To do this, press Esc to enter command mode. (-- INSERT -- disappears from thebottom of the vi editor.) Type :wq (to write the file and then quit the vi editor), and then pressEnter.
17.Back in the AWS Cloud9 console, choose Next step.
18.On the Review choices page, choose Create environment. Wait while AWS Cloud9 creates yourenvironment and then displays the AWS Cloud9 IDE for the environment. This can take severalminutes. Please be patient.
282

AWS Cloud9 User GuideStep 4: Use the AWS Cloud9 IDE toChange the Code on the Instance
Step 4: Use the AWS Cloud9 IDE to Change theCode on the Instance
Now that the IDE appears for the new environment, you can use the terminal session in the IDE insteadof the Lightsail terminal session. The IDE provides a rich code editing experience with support forseveral programming languages and runtime debuggers, as well as color themes, shortcut keybindings,programming language-specific syntax coloring and code formatting, and more.
To learn how to use the IDE, see Tour the IDE (p. 24) in the IDE Tutorial.
To learn how to change the code on your instance, we recommend the following resources.
• All Getting the application password for your 'powered by Bitnami' Lightsail image on the Lightsailwebsite
• Drupal: Bitnami Drupal For AWS Cloud on the Bitnami website, and Tutorials and site recipes on theDrupal website
• GitLab CE: Bitnami GitLab CE for AWS Cloud on the Bitnami website, and GitLab Documentation onthe GitLab website
• Joomla: Bitnami Joomla! For AWS Cloud on the Bitnami website, and Getting Started with Joomla! onthe Joomla! website
• LAMP Stack: Bitnami LAMP for AWS Cloud on the Bitnami website• Magento: Bitnami Magento For AWS Cloud on the Bitnami website, and the Magento User Guide on
the Magento website• MEAN: Bitnami MEAN For AWS Cloud on the Bitnami website• Nginx: Bitnami Nginx For AWS Cloud on the Bitnami website, and the NGINX Wiki on the NGINX
website• Node.js: Bitnami Node.Js For AWS Cloud on the Bitnami website, and the Getting Started Guide on the
Node.js website• Plesk Hosting Stack on Ubuntu: Set up and configure Plesk on Lightsail on the Lightsail website• Redmine: Bitnami Redmine For AWS Cloud on the Bitnami website, and Getting Started on the
Redmine website• WordPress: Getting started using WordPress from your Amazon Lightsail instance on the Lightsail
website, and Bitnami WordPress For AWS Cloud on the Bitnami website
283

AWS Cloud9 User GuideStep 1: Prepare to Work with AWS CodeStar Projects
Working with AWS CodeStar Projectsin the AWS Cloud9 IntegratedDevelopment Environment (IDE)
You can use the AWS Cloud9 IDE to work with code in AWS CodeStar projects.
AWS CodeStar is a cloud-based service for creating, managing, and working with software developmentprojects on AWS. You can quickly develop, build, and deploy applications on AWS with an AWSCodeStar project. An AWS CodeStar project creates and integrates AWS services for your projectdevelopment toolchain. Depending on your choice of AWS CodeStar project template, that toolchainmight include source control, build, deployment, virtual servers or serverless resources, and more. Formore information, see the AWS CodeStar User Guide.
NoteCompleting these procedures might result in charges to your AWS account. These includepossible charges for services such as Amazon EC2, AWS CodeStar, and AWS services supportedby AWS CodeStar. For more information, see Amazon EC2 Pricing, AWS CodeStar Pricing, andCloud Services Pricing.To use the AWS Cloud9 IDE to work with a newly-launched Amazon EC2 instance preconfiguredwith a popular app or framework such as WordPress, MySQL, PHP, Node.js, Nginx, Drupal, orJoomla, or a Linux distribution such as Ubuntu, Debian, FreeBSD, or openSUSE, you can useAmazon Lightsail along with AWS Cloud9. To do this, skip the rest of this topic, and see Workingwith Amazon Lightsail Instances (p. 277) instead.To use the AWS Cloud9 IDE to work with a newly-launched Amazon EC2 instance runningAmazon Linux that contains no sample code, skip the rest of this topic, and see the IDETutorial (p. 19) instead.
• Step 1: Prepare to Work with AWS CodeStar Projects (p. 284)• Step 2: Create a Project in AWS CodeStar (p. 284)• Step 3: Create an AWS Cloud9 Development Environment and Connect It to the Project (p. 285)
Step 1: Prepare to Work with AWS CodeStarProjects
In this step, you create an AWS CodeStar service role and an Amazon EC2 key pair, so that you can begincreating and working with AWS CodeStar projects.
If you have used AWS CodeStar before, skip ahead to Step 2: Create a Project in AWS CodeStar (p. 284).
For this step, follow the instructions in Setting Up AWS CodeStar in the AWS CodeStar User Guide. Do notcreate a new AWS account, IAM user, or IAM group as part of those instructions. Use the ones you createdor identified in Team Setup for AWS Cloud9 (p. 7). When you finish following those instructions, return tothis topic.
Step 2: Create a Project in AWS CodeStarIn this step, you create a project in AWS CodeStar.
284
AWS Cloud9 User GuideStep 3: Create an AWS Cloud9 DevelopmentEnvironment and Connect It to the Project
If you already have a project in AWS CodeStar you want to use, skip ahead to Step 3: Create an AWSCloud9 Development Environment and Connect It to the Project (p. 285).
For this step, follow the instructions in Create a Project in AWS CodeStar in the AWS CodeStar User Guide.In the AWS CodeStar create project wizard, when you get to the Set up tools page or Connect to yoursource repository page, choose Skip, and then return to this topic.
Step 3: Create an AWS Cloud9 DevelopmentEnvironment and Connect It to the Project
In this step, you create an AWS Cloud9 development environment in the AWS CodeStar or AWS Cloud9consoles. You then connect the new environment to an AWS CodeStar project.
For this step, follow one of the following sets of instructions, depending on the AWS Cloud9development environment type you want to use and the type of repository where the AWS CodeStarproject stores its code.
Environment type Repository type Instructions
EC2 environment AWS CodeCommit Create an AWS Cloud9Environment for a Project in theAWS CodeStar User Guide
SSH environment AWS CodeCommit AWS CodeCommitSample (p. 321)
EC2 or SSH environment GitHub Use GitHub with AWS Cloud9 inthe AWS CodeStar User Guide
285

AWS Cloud9 User Guide
Working with AWS LambdaFunctions in the AWS Cloud9Integrated DevelopmentEnvironment (IDE)
You can use the AWS Cloud9 IDE to work with AWS Lambda functions and their related Amazon APIGateway APIs in an AWS Cloud9 development environment. For example, you can:
• Create a new function from within your environment, uploading the local version of the function toLambda, and optionally creating additional AWS resources to support the new function at the sametime.
• Run and debug a function and its related API in your environment, running the function and APIcompletely within the environment.
• Run the remote version of a function and its related API within your environment, running the remoteversion completely within Lambda and API Gateway.
• Import an existing function in Lambda into your environment, so that you can run and debug thefunction and its related API, edit the code, or both.
• Upload changes you make to the local version of the function code to the remote version in Lambda.
This topic assumes you already know about Lambda. For more information, see the AWS LambdaDeveloper Guide.
NoteCompleting these procedures might result in charges to your AWS account. These includepossible charges for services such as Lambda, API Gateway, and AWS services supported bythe AWS Serverless Application Model (SAM). For more information, see AWS Lambda Pricing,Amazon API Gateway Pricing, and Cloud Services Pricing.
• Prepare to Work with Lambda Functions (p. 287)
• Create a Lambda Function With the Create Serverless Application Wizard (p. 290)
• Create and Deploy Lambda Functions with the AWS Serverless Application Repository (p. 295)
• Import a Lambda Function (p. 296)
• Invoke a Lambda Function (p. 299)
• Invoke an API Gateway API for a Related Lambda Function (p. 301)
• Response Differences When Invoking a Lambda Function from API Gateway (p. 303)
• Add Dependent Code to a Lambda Function (p. 304)
• Debug the Local Version of a Lambda Function or Its Related API Gateway API (p. 307)
• Change Code in a Lambda Function (p. 309)
• Upload Code for a Lambda Function (p. 310)
• Convert a Lambda Function to a Serverless Application (p. 311)
286

AWS Cloud9 User GuidePrepare to Work with Lambda Functions
• Update Configuration Settings for a Lambda Function (p. 313)
Prepare to Work with Lambda FunctionsBefore you can work with Lambda functions in the AWS Cloud9 IDE, you must complete the followingsteps:
• Step 1: Set Up Your IAM Group with Required Access Permissions (p. 287)
• Step 2: Set Up Your Environment with Your AWS Access Credentials (p. 288)
• Step 3: Create an Execution Role for Your Lambda Functions (p. 289)
• Step 4: Set Your Environment to the Correct AWS Region (p. 289)
• Step 5: Open the Lambda Section of the AWS Resources Window (p. 289)
Step 1: Set Up Your IAM Group with Required AccessPermissionsIf your AWS access credentials are associated with an IAM administrator user in your AWS account,and you want to use that user to work with Lambda functions, skip ahead to Step 2: Set Up YourEnvironment with Your AWS Access Credentials (p. 288).
Otherwise, complete the following instructions to:
• Use the IAM console to attach the AWS managed policies named AWSLambdaFullAccess,AmazonAPIGatewayAdministrator, and AmazonAPIGatewayInvokeFullAccess to an IAM groupto which your user belongs.
• Use the AWS CloudFormation console to attach an additional inline policy to that group.
1. Sign in to the AWS Management Console, if you're not already signed in.
For this step, we recommend you sign in using credentials for an IAM administrator in your AWSaccount. If you can't do this, check with your AWS account administrator.
2. Open the IAM console. To do this, in the console's navigation bar, choose Services. Then choose IAM.
3. Choose Groups.
4. Choose the group's name.
5. On the Permissions tab, for Managed Policies, choose Attach Policy.
6. In the list of policy names, choose the boxes next to AWSLambdaFullAccess,AmazonAPIGatewayAdministrator, and AmazonAPIGatewayInvokeFullAccess. (If you don't see anyof these policy names in the list, type the policy name in the Search box to display it.)
7. Choose Attach Policy.
8. Open the AWS CloudFormation console. To do this, in the console's navigation bar, choose Services.Then choose CloudFormation.
9. Choose Create Stack.
10.On the Select Template page, for Choose a template, choose Specify an Amazon S3 template URL.In the box, type or paste one of the following URL to the AWS CloudFormation template.
https://s3.amazonaws.com/cloud9-cfn-templates/Cloud9LambdaAccessGroup.yaml
11.Choose Next.
287

AWS Cloud9 User GuideStep 2: Set Up Your Environmentwith Your AWS Access Credentials
12.On the Specify Details page, for Stack name, type a name for the stack, for exampleAWSCloud9LambdaAccessStack. If you type a different name, replace it throughout this procedure.
13.For Parameters, for GroupName, type the name of the existing group in your AWS account you wantto attach the access policy to.
14.Choose Next.15.On the Options page, choose Next. (Do not change any of the default settings on the Options page.)16.On the Review page, choose I acknowledge that AWS CloudFormation might create IAM resources.17.Choose Create.
Wait until the AWSCloud9LambdaAccessStack stack shows CREATE_COMPLETE. This might take a fewmoments. Please be patient.
NoteThe access policy that AWS CloudFormation attaches to the group is namedAWSCloud9LambdaGroupAccess and has the following definition, where ACCOUNT_ID isyour AWS account ID.
{ "Version": "2012-10-17", "Statement": [ { "Action": [ "cloudformation:CreateChangeSet", "cloudformation:CreateStack", "cloudformation:DescribeChangeSet", "cloudformation:DescribeStackEvents", "cloudformation:DescribeStacks", "cloudformation:ExecuteChangeSet", "cloudformation:ListStackResources", "cloudformation:UpdateStack", "iam:AttachRolePolicy", "iam:DetachRolePolicy", "iam:GetRole", "iam:GetUser", "iam:PassRole" ], "Resource": "*", "Effect": "Allow" }, { "Action": [ "iam:CreateRole", "iam:DeleteRole" ], "Resource": "arn:aws:iam::ACCOUNT_ID:role/cloud9-*", "Effect": "Allow" } ]}
Step 2: Set Up Your Environment with Your AWSAccess CredentialsThe AWS Cloud9 IDE uses the AWS Command Line Interface (AWS CLI) in your AWS Cloud9 developmentenvironment to interact with Lambda and other supporting AWS services. Therefore, the AWS CLI in yourenvironment needs access to your AWS access credentials.
Do one of the following to set up the AWS CLI in your environment:
288
AWS Cloud9 User GuideStep 3: Create an Execution
Role for Your Lambda Functions
• If you have an EC2 environment, AWS managed temporary credentials are already set up in yourenvironment for the AWS CLI to use, and you can skip ahead to Step 3: Create an Execution Rolefor Your Lambda Functions (p. 289). AWS managed temporary credentials have permission tointeract with most AWS services from your environment (provided the AWS entity that is usingthe environment also has those permissions). For more information, see AWS Managed TemporaryCredentials (p. 401).
• If you have an EC2 environment but AWS managed temporary credentials don't meet your needs, youcan attach an IAM instance profile to the Amazon EC2 instance that connects to your environment.Or you can store your permanent AWS access credentials within the environment. For instructions,see Create and Use an Instance Profile to Manage Temporary Credentials (p. 81) or Create and StorePermanent Access Credentials in an Environment (p. 84).
• If you have an SSH environment, you can store your permanent AWS access credentials withinthe environment. For instructions, see Create and Store Permanent Access Credentials in anEnvironment (p. 84).
Step 3: Create an Execution Role for Your LambdaFunctionsIf you want your Lambda functions to do things usings AWS resources, you must specify an IAM role(execution role) that contains the necessary access permissions for your functions to use.
When you create a Lambda function, AWS Cloud9 can create an execution role for you. This executionrole contains the permissions as described in Basic Lambda Permissions in the AWS Lambda DeveloperGuide.
If this execution role doesn't meet your needs, you must create an execution role on your own before youcreate your Lambda function. For more information, see the following:
• AWS Lambda Permissions Model in the AWS Lambda Developer Guide
• Creating a Role to Delegate Permissions to an AWS Service in the IAM User Guide
Step 4: Set Your Environment to the Correct AWSRegionYou must set your AWS Cloud9 development environment to use the AWS Region where you wantto create new Lambda functions in your AWS account, or where you want to import existing Lambdafunctions from your AWS account into your AWS Cloud9 development environment.
To do this:
1. In the AWS Cloud9 IDE, on the menu bar, choose AWS Cloud9, Preferences.
2. In the navigation pane of the Preferences tab, choose AWS Settings.
3. For AWS Region, select the AWS Region you want to use.
Step 5: Open the Lambda Section of the AWSResources WindowNow you're ready to begin using the AWS Cloud9 IDE to work with Lambda functions. To do this, expandthe Lambda section of the AWS Resources window, if it isn't already expanded.
289

AWS Cloud9 User GuideCreate a Lambda Function With the
Create Serverless Application Wizard
If the AWS Resources window isn't visible, choose the AWS Resources button.
If you don't see the AWS Resources button, choose Window, AWS Resources on the menu bar to show it.
Create a Lambda Function With the CreateServerless Application Wizard
You can use the AWS Cloud9 IDE to create a new Lambda function. If you already have a Lambdafunction in your AWS account for the AWS Region you set earlier, skip ahead to Import a LambdaFunction (p. 296).
NoteThis procedure describes how to use the Create serverless application wizard to create a singleLambda function based on function blueprints that are owned by AWS. To create multipleLambda functions at the same time, Lambda functions along with supporting components atthe same time, or Lambda functions that are owned by entities other than AWS, skip ahead toCreate and Deploy Lambda Functions with the AWS Serverless Application Repository (p. 295).
1. In the Lambda section of the AWS Resources window, choose where you want to create the function:• To create a single function by itself, choose the Local Functions heading.• To create a function and then add it to an existing group of one or more functions and related AWS
resources (referred to as a serverless application), in the Local Functions list, choose the serverlessapplication for the group (represented by the Lambda icon inside of a folder).
2. Do one of the following:• Choose Create a new Lambda function (the button with the Lambda icon).• Right-click the Local Functions heading or the serverless application folder you chose earlier, and
then choose Create Here.
290
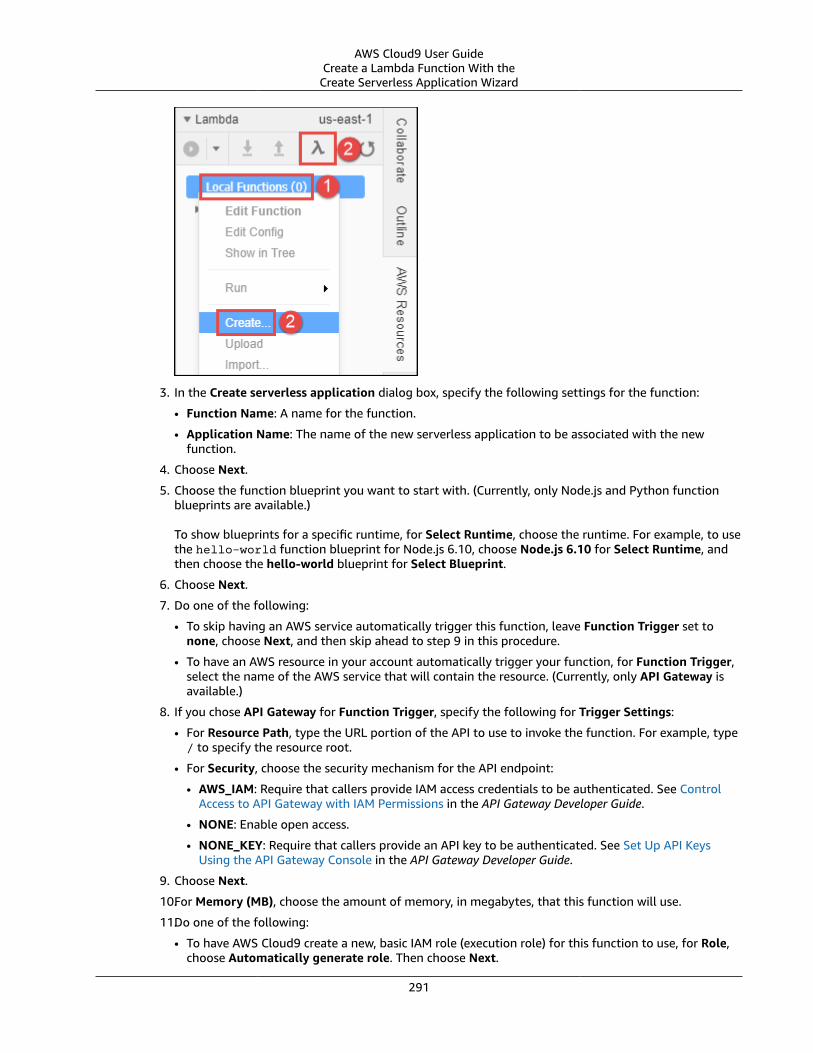
AWS Cloud9 User GuideCreate a Lambda Function With the
Create Serverless Application Wizard
3. In the Create serverless application dialog box, specify the following settings for the function:
• Function Name: A name for the function.
• Application Name: The name of the new serverless application to be associated with the newfunction.
4. Choose Next.
5. Choose the function blueprint you want to start with. (Currently, only Node.js and Python functionblueprints are available.)
To show blueprints for a specific runtime, for Select Runtime, choose the runtime. For example, to usethe hello-world function blueprint for Node.js 6.10, choose Node.js 6.10 for Select Runtime, andthen choose the hello-world blueprint for Select Blueprint.
6. Choose Next.
7. Do one of the following:
• To skip having an AWS service automatically trigger this function, leave Function Trigger set tonone, choose Next, and then skip ahead to step 9 in this procedure.
• To have an AWS resource in your account automatically trigger your function, for Function Trigger,select the name of the AWS service that will contain the resource. (Currently, only API Gateway isavailable.)
8. If you chose API Gateway for Function Trigger, specify the following for Trigger Settings:
• For Resource Path, type the URL portion of the API to use to invoke the function. For example, type/ to specify the resource root.
• For Security, choose the security mechanism for the API endpoint:
• AWS_IAM: Require that callers provide IAM access credentials to be authenticated. See ControlAccess to API Gateway with IAM Permissions in the API Gateway Developer Guide.
• NONE: Enable open access.
• NONE_KEY: Require that callers provide an API key to be authenticated. See Set Up API KeysUsing the API Gateway Console in the API Gateway Developer Guide.
9. Choose Next.
10.For Memory (MB), choose the amount of memory, in megabytes, that this function will use.
11.Do one of the following:
• To have AWS Cloud9 create a new, basic IAM role (execution role) for this function to use, for Role,choose Automatically generate role. Then choose Next.
291

AWS Cloud9 User GuideCreate a Lambda Function With the
Create Serverless Application Wizard
• To have Lambda use an existing IAM role (execution role) in your AWS account, for Role, chooseChoose an existing role. For Existing Role, choose the name of the role, and then choose Next.
12.Choose Next.
13.Choose Finish.
Compare your results to the following:
In the Lambda section of the AWS Resources window, AWS Cloud9 does the following:
• If you chose to create a single function by itself:
1. AWS Cloud9 creates a serverless application with the name that you specified earlier. Then it addsa serverless application (represented by a Lambda icon inside of a folder) to the Local Functionslist. Then it adds the Lambda function (represented by a Lambda icon by itself), to this serverlessapplication.
2. AWS Cloud9 creates a remote version of the function in Lambda and adds it to the RemoteFunctions list. AWS Cloud9 gives the remote version a different name. For example, if you namedthe serverless application myDemoServerlessApplication and the function myDemoFunction,the remote version name of your function would be cloud9-myDemoServerlessApplication-myDemoFunction-RANDOM_ID, where RANDOM_ID is a randomly determined ID.
292

AWS Cloud9 User GuideCreate a Lambda Function With the
Create Serverless Application Wizard
3. If you chose to have API Gateway automatically trigger the function, AWS Cloud9 creates an API inAPI Gateway with a name that corresponds to the function. For example, if you named the functionmyDemoFunction, the API name would be cloud9-myDemoFunction. AWS Cloud9 uses the valueyou specified in Resource Path to map the function to the API using the ANY method.
• If you chose to create a single function and then add it to an existing serverless application:
1. AWS Cloud9 adds the Lambda function (represented by a Lambda icon by itself), to the existingserverless application (represented by a Lambda icon inside of a folder).
2. AWS Cloud9 creates a remote version of the function in Lambda and adds it to the RemoteFunctions list. AWS Cloud9 gives the remote version a different name. For example,if you named the function myDemoFunction and added it to a serverless applicationnamed myDemoServerlessApplication, the remote version name would be cloud9-myDemoServerlessApplication-myDemoFunction-RANDOM_ID, where RANDOM_ID is arandomly determined ID.
3. If you chose to have API Gateway automatically trigger your function, AWS Cloud9 creates an API inAPI Gateway with a name that corresponds to the related serverless application, if it doesn't alreadyexist. For example, if the serverless application is named myDemoServerlessApplication, theAPI name would be cloud9-myDemoServerlessApplication. AWS Cloud9 uses the value youspecified in Resource Path to map the function to the API using the ANY method.
In the Environment window, AWS Cloud9 does the following:
• If you chose to create a single function by itself, AWS Cloud9 creates a folder with the same nameas the serverless application and puts this folder in the root of the AWS Cloud9 developmentenvironment. AWS Cloud9 then adds the following files to the folder:
• .application.json: A hidden file that contains JSON-formatted settings specific to the serverlessapplication. AWS Cloud9 uses these settings for its internal use. Do not edit this file.
• .gitignore: A hidden file that contains a list of files Git ignores, if you want to use Git to manageyour source code for this function.
• template.yaml: An AWS SAM template file that contains information about the Lambda functionand any other related supported AWS resources. Whenever you update the local version of yourfunction and then upload it to Lambda, AWS Cloud9 calls AWS SAM to use this template file to dothe upload. For more information, see Using the AWS Serverless Application Model (AWS SAM) inthe AWS Lambda Developer Guide.
293

AWS Cloud9 User GuideCreate a Lambda Function With the
Create Serverless Application Wizard
NoteYou can edit this file to create additional supporting AWS resources for your function. Formore information, see the AWS Serverless Application Model (AWS SAM) repository onGitHub.
• A subfolder with the same name as the function, containing a code file representing the functionlogic.
• If the function uses Python, additional subfolders and files are added to the preceding subfolder toenable Python debugging:
• .debug: A subfolder that contains Python modules and files for debugging purposes.
• venv: A standard Python virtualenv folder. This includes a module named ikpdb, which AWSCloud9 uses to debug Python applications.
• __init__.py: A standard Python package initialization file.
• requirements.txt: A standard file for installing Python modules.
• AWS Cloud9 also adds a CodeUri property to the template.yaml file and sets this property toreference the .debug/ folder.
• If you chose to create a single function and then add it to an existing serverless application, AWSCloud9 does the following to the folder that represents the serverless application:
• Updates the template.yaml file previously described to include information about the Lambdafunction and any other related supported AWS resources.
• A subfolder with the same name as the function, containing a code file representing the functionlogic.
• If the function uses Python, additional subfolders and files are added to the preceding subfolder toenable Python debugging:
• .debug: A subfolder that contains Python modules and files for debugging purposes.
• venv: A standard Python virtualenv folder. This includes a module named ikpdb, which AWSCloud9 uses to debug Python applications.
• __init__.py: A standard Python package initialization file.
• requirements.txt: A standard file for installing Python modules.
• AWS Cloud9 also adds a CodeUri property to the template.yaml file and sets this property toreference the .debug/ folder.
The .application.json and .gitignore files (and the .debug folder for Python) are hidden. Toshow hidden files or hide them if they're shown, in the Environment window, choose the gear icon, andthen choose Show Hidden Files.
To invoke the function, see Invoke a Lambda Function (p. 299). If the function has a related API in APIGateway, to invoke the API, see Invoke an API Gateway API for a Related Lambda Function (p. 301).
294

AWS Cloud9 User GuideCreate and Deploy Lambda Functions withthe AWS Serverless Application Repository
Create and Deploy Lambda Functions with theAWS Serverless Application Repository
You can use the AWS Cloud9 IDE and the AWS Serverless Application Repository to create multipleLambda functions at the same time, Lambda functions along with supporting components at the sametime, or Lambda functions that are owned by entities other than AWS. If you already have Lambdafunctions in your AWS account for the AWS Region you set earlier, skip ahead to Import a LambdaFunction (p. 296).
1. In a separate web browser tab, open the AWS Serverless Application Repository.
2. Find the serverless application you want to create, and then choose the title of the serverlessapplication that you want inside of its card. (If the card isn't visible, begin typing information aboutthe serverless application that you want in the Search applications by name, description, or labelsbox to show it.)
3. On the Application details page that appears, if a URL for a Git-based repository is displayed, copythat URL (for example, https://github.com/USER_NAME/REPOSITORY_NAME).
NoteIf a URL isn't displayed, try choosing the Deploy button on the Application details page, andthen look for a Source code URL value.
4. Back in the AWS Cloud9 IDE, open a terminal, if one isn't already open. (To open a terminal, on themenu bar, choose Window, New Terminal.)
5. In the terminal, change to the directory in your environment where you want to copy the serverlessapplication's starter files (for example, by running the command cd ~/environment).
6. Run the command git clone, followed by the Git URL you copied earlier (for example, git clonehttps://github.com/USER_NAME/REPOSITORY_NAME). The IDE then adds the serverlessapplication's functions to the Lambda section of the AWS Resources window.
NoteRunning the git clone command with some of the URLs in the Application details pagesor Source code URL values might not work as expected or might produce unexpected results.Alternatively, you can manually download the files you want from the desired repository toyour local workstation. Then manually upload those files to the IDE by running File, UploadLocal Files on the menu bar.When you clone the GitHub repository, the IDE uses the AWS Serverless Application Model(AWS SAM) template file in the repository to determine which of the serverless application'sfunctions to display in the Lambda section of the AWS Resources window. The AWS SAMtemplate file must follow the AWS Serverless Application Model (AWS SAM) file format. If therepository doesn't contain an AWS SAM template file, or if the file doesn't follow the AWSSAM file format, the IDE won't display those functions. You also won't be able to run, debug,or deploy those functions or any of their associated API Gateway resources from the Lambdasection of the AWS Resources window.
7. You might need to complete some setup before you can run, debug, or deploy the serverlessapplication from the IDE as expected. For setup instructions, see the Application details page thatyou opened earlier. Or look for any setup instructions within the serverless application's files that youcloned to your IDE.
To invoke the functions, see Invoke a Lambda Function (p. 299). If the functions have relatedAPIs in API Gateway, to invoke the APIs, see Invoke an API Gateway API for a Related LambdaFunction (p. 301). When you invoke a function or API this way for the first time, AWS Cloud9 addsa hidden .application.json file to the serverless application's component files. This file containsJSON-formatted settings that are specific to the serverless application. AWS Cloud9 uses these settingsfor its internal use. Do not edit this file.
295

AWS Cloud9 User GuideImport a Lambda Function
If the serverless application requires parameters to be specified during deployment, you can deploy itfrom the IDE only by using the terminal. To see if parameters are required, on the Application detailspage you opened earlier, choose the Deploy button, and then see the Configure application parameterscard for any parameters. If there are any parameters, deploy the serverless application from the terminalin the IDE by running the AWS CloudFormationdeploy command, for example:
aws cloudformation deploy --template-file TEMPLATE_FILE_PATH --parameter-overrides "PARAMETER_KEY_1=PARAMETER_VALUE_1" "PARAMETER_KEY_N=PARAMETER_VALUE_N" --region REGION_ID
In the preceding command:
• TEMPLATE_FILE_PATH represents the path to the AWS SAM template file.
• PARAMETER_KEY_1 represents the name of the first parameter.
• PARAMETER_VALUE_1 represents the value of the first parameter.
• PARAMETER_KEY_N represents the name of an additional parameter, and so on.
• PARAMETER_VALUE_N represents the value of an additional parameter, and so on.
• REGION_ID represents the ID of the AWS Region where you want to deploy the serverless application(for example, us-east-2).
• Additonal options might need to be specified, depending on the serverless application's requirements.For more information, see the Application details page that you opened earlier, or look for any setupinstructions within the serverless application's files that you cloned to your IDE.
If you try to use the Lambda section of the AWS Resources window to deploy a serverless applicationthat requires parameters, a message is displayed that required parameters are missing, and the serverlessapplication is not deployed.
Import a Lambda FunctionIf you have an existing Lambda function in your AWS account but not in your AWS Cloud9 developmentenvironment, you must import it before you can work with it in your environment.
NoteIf the Lambda function is part of an existing AWS CodeStar project, and the environment wascreated from within the project in the AWS CodeStar console, the function is already imported,so you do not need to import it again.To confirm this behavior, look in the Local Functions list in the Lambda section of the AWSResources window for a serverless application (represented by a Lambda icon inside of a folder)with the same name as the AWS CodeStar project, containing a Lambda function (representedby a Lambda icon by itself) with the function's base name. Look also in the Remote Functionslist for a Lambda function with a name in the format awscodestar-PROJECT_NAME-lambda-BASE_FUNCTION_NAME-RANDOM_ID, where PROJECT_NAME is the AWS CodeStar project name,BASE_FUNCTION_NAME is the function's base name, and RANDOM_ID is a randomly determinedID.
296

AWS Cloud9 User GuideImport a Lambda Function
Since the function is already imported, we do not recommend that you import the remoteversion of the function in the AWS CodeStar project. Otherwise, you will have two versions ofthe same function code in your Environment window but with different folder names, whichcould be confusing.
To import a Lambda function, do the following:
1. In the Environment window, choose where you want to import the function.
2. In the Lambda section of the AWS Resources window, choose the function's name in the RemoteFunctions list.
NoteIf you don't see your function in the Remote Functions list, choose the Refresh functions Listbutton (the button with the circular arrow icon).
3. Do one of the following:
• Double-click the function you just chose.
• On the menu bar in the Lambda section, choose the Import the selected Lambda function button(the button with the arrow that faces down).
• Right-click the function you just chose, and then choose Import.
297

AWS Cloud9 User GuideImport a Lambda Function
NoteYou cannot import a Lambda function into a folder that represents either a serverlessapplication or a Lambda function. If you try to do this, AWS Cloud9 will display a messagethat it will import the Lambda function into the environment's root location instead. To letAWS Cloud9 do this, choose Import. Otherwise, choose Cancel, choose a different folderto import the function (or create a new empty folder to import the function into), and thenrestart this procedure from the beginning.
4. When prompted to finish importing the function, choose OK.
AWS Cloud9 imports your function into a new folder in the root of your environment. (AWS Cloud9 alsoadds the function to the Local Functions list in the Lambda section of the AWS Resources window.) Thisfolder has the same name as the function. AWS Cloud9 adds the following files to this folder:
• .application.json: A hidden file that contains JSON-formatted settings specific to the function.AWS Cloud9 uses these settings for its internal use.
• .gitignore: A hidden file that contains a list of files Git ignores, if you want to use Git to manageyour source code for this function.
• template.yaml: A file for AWS Cloud9 internal use.
NoteAlthough the template.yaml file is expressed in AWS SAM format, it isn't used by AWS SAM.Therefore, you cannot edit this file to create additional supporting AWS resources for yourfunction. Do not modify this file.
• One or more code files containing the function logic.
The .application.json and .gitignore files are hidden. To display or hide hidden files, in theEnvironment window, choose the gear icon, and then choose Show Hidden Files.
To invoke the function, see Invoke a Lambda Function (p. 299).
298

AWS Cloud9 User GuideInvoke a Lambda Function
Invoke a Lambda FunctionTo invoke an existing Lambda function, you must first import the remote version of the function intoyour AWS Cloud9 development environment, if the function isn't already there. To do this, see Import aLambda Function (p. 296).
1. In the Lambda section of the AWS Resources window, expand the Local Functions list, if it isn'talready expanded.
2. Expand the serverless application folder that contains the function that you want to invoke.
3. Choose the function that you want to invoke, right-click it, and then choose Run.
4. Do one of the following:
• To run the local version of the function within your environment, choose Run Local.
• To run the remote version of the function within Lambda, choose Run Remote.
NoteIf nothing appears to happen, an invoke tab might already be open for the function. If so,choose Lambda (local) or Lambda (remote) in the open invoke tab.
5. In the Test payload pane of the invoke tab that is displayed, confirm any custom input data youwant your function to use when you test it. For information about the input data format, see Step2.2: Invoke the Lambda Function Manually and Verify Results, Logs, and Metrics in the AWS LambdaDeveloper Guide.
6. In the invoke tab, choose the Run button.
299

AWS Cloud9 User GuideInvoke a Lambda Function
NoteAfter you run the function for the first time, a lambda-payloads.json: file is added to thefunction's related serverless application folder in the Environment window. This file containsthe contents of the custom input data.If you invoke an existing Lambda function and then try to invoke the same function code forits related API in API Gateway with the same custom input data, you might get an error orthe code might not run as expected. For more information, see Response Differences WhenInvoking a Lambda Function from API Gateway (p. 303).
The invoke tab contains two panes:
• The Test payload pane displays any custom input data that was supplied for the function.
• The Execution results pane displays any output from the function and some information from therelated Amazon CloudWatch Logs for the function.
Compare your results to the following:
300

AWS Cloud9 User GuideInvoke an API Gateway API for a Related Lambda Function
For more information, see Step 2.2: Invoke the Lambda Function Manually and Verify Results, Logs, andMetrics in the AWS Lambda Developer Guide.
To upload the local version of any changed function code to the related remote version in Lambda, seeUpload Code for a Lambda Function (p. 310).
Invoke an API Gateway API for a Related LambdaFunction
To invoke an API in API Gateway that is related to an existing Lambda function, you must first importthe remote version of the function into your AWS Cloud9 development environment, if the function isn'talready there. To do this, see Import a Lambda Function (p. 296).
NoteYou cannot debug the remote version of the API Gateway API in your environment. You can onlyinvoke it. To debug the local version, see Debug the Local Version of a Lambda Function or ItsRelated API Gateway API (p. 307).
1. In the Lambda section of the AWS Resources window, expand the Local Functions list, if it isn'talready expanded.
2. Expand the serverless application folder that contains the function whose API you want to invoke.3. Choose the function, right-click it, and then choose Run.4. Do one of the following:
• To run the local version of the API within your environment, choose Run API Gateway Local.• To run the remote version of the function within Lambda, choose Run API Gateway Remote.
NoteIf nothing appears to happen, an invoke tab might already be open for the function. If so,choose API Gateway (local) or API Gateway (remote) in the open invoke tab.
5. In the Test payload pane of the invoke tab that is displayed, confirm the Function, Path, Method,Query String, and Body you want the API to use when you test it.
NoteSome APIs might not support settings such as Body. For more information, consult the ownerof the API.
301

AWS Cloud9 User GuideInvoke an API Gateway API for a Related Lambda Function
6. On the invoke tab, choose the Run button.
NoteIf the API isn't connected to the function, a message appears that says an API Gateway triggercan't be found in the function's AWS SAM file. To use this AWS SAM file to connect an API inAPI Gateway to the function, see the AWS Serverless Application Model (AWS SAM) repositoryon GitHub.If you invoke an API in API Gateway and then try to invoke the same code for its relatedfunction in Lambda with the same custom input data, you might get an error or the codemight not run as expected. For more information, see Response Differences When Invoking aLambda Function from API Gateway (p. 303).
The invoke tab contains two panes:
• The Test payload pane displays settings and any custom input data that was supplied for the API.
• The Execution results pane displays information such as the body, headers, and logs of the APIresponse.
Compare your results to the following:
302

AWS Cloud9 User GuideResponse Differences When Invokinga Lambda Function from API Gateway
Response Differences When Invoking a LambdaFunction from API Gateway
When you invoke a Lambda function from an API in API Gateway and then try to parse the response, youmight get an error or the code might not run as expected. This is because Lambda and API Gateway useslightly different response formats. Specifically, API Gateway wraps its response in a parent body object.To address this issue, you can add code to a function that checks to see if a parent body exists in theresponse. If it does, you can then extract the data from that body object.
For example, given the following Node.js function code:
'use strict';
exports.handler = function(event, context, callback) {
if (event.body) { event = JSON.parse(event.body); }
const message = "Your favorite fruit is " + event.fruit + ". " + "Your favorite vegetable is " + event.vegetable + ".";
const response = { statusCode: 200, headers: { "Content-type": "application/json" }, body: JSON.stringify( { "message": message } ) };
callback(null, response);};
And given the following equivalent Python function code:
import json
def lambda_handler(event, context):
303

AWS Cloud9 User GuideAdd Dependent Code to a Lambda Function
if 'body' in event: event = json.loads(event["body"])
message = ("Your favorite fruit is " + event["fruit"] + ". " + "Your favorite vegetable is " + event["vegetable"] + ".")
response = { "statusCode": "200", "headers": { "Content-type": "application/json" }, "body": json.dumps({"message": message}) }
return response
To invoke the preceding code, you use the following input payload (for Lambda) or input body (for APIGateway):
{ "fruit": "apple", "vegetable": "carrot"}
Which returns the following response for Lambda:
{ "statusCode": 200, "headers": { "Content-type": "application/json" }, "body": "{\"message\":\"Your favorite fruit is apple. Your favorite vegetable is carrot.\"}"}
And returns the following response for API Gateway (assuming a Path of / and a Method of POST):
{ "message": "Your favorite fruit is apple. Your favorite vegetable is carrot."}
If you do not include the if (event.body) check for Node.js or the if 'body' in event check forPython, then calling this function from API Gateway might return an error or the API might not run asexpected.
Add Dependent Code to a Lambda FunctionFor Node.js, we support using Node Package Manager (npm) to add dependent packages to Lambdafunctions in your environment. For Python, we support pip. For general information about npm and pip,see the npm and pip websites.
To depend on an npm package from a Node.js Lambda function, use for example the Node.js requirestatement. Then use npm to install the related npm package in the environment within the samedirectory as the function code. When you deploy the Lambda function as described in Upload Code for aLambda Function (p. 310), AWS Cloud9 deploys both the function and its related packages to Lambda.
To demonstrate, the following example Node.js Lambda function code depends on the lodash packageto sort the specified JSON input payload.
304
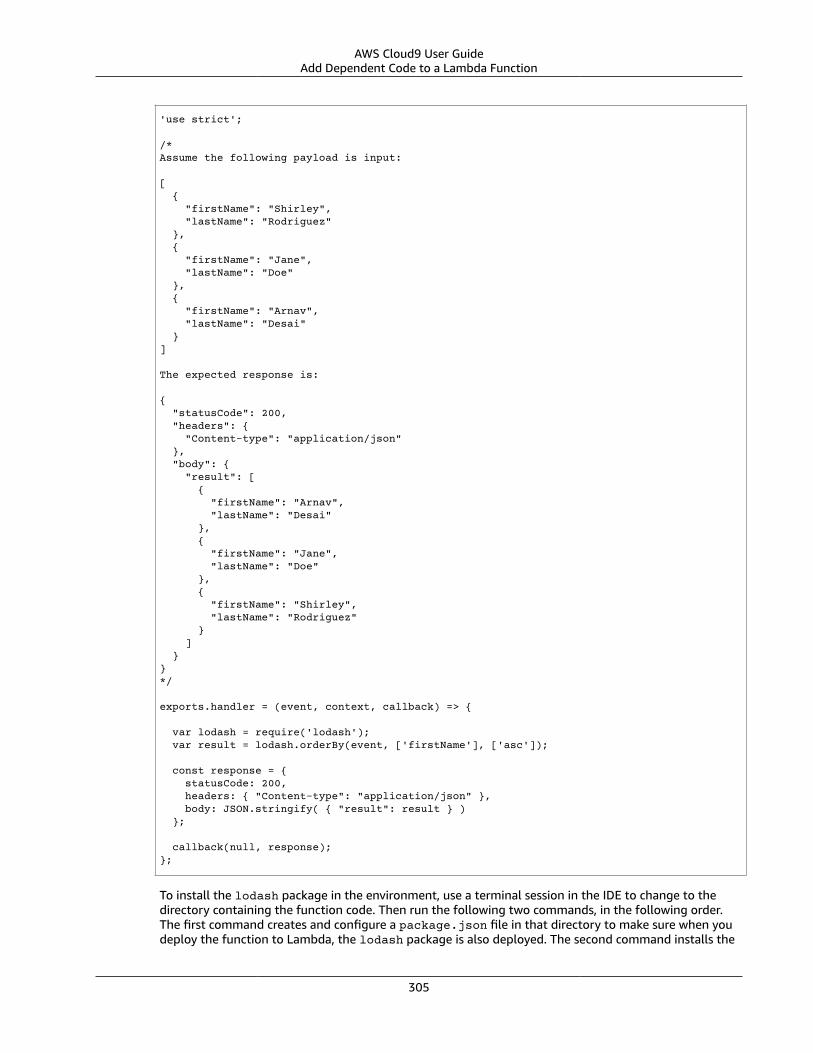
AWS Cloud9 User GuideAdd Dependent Code to a Lambda Function
'use strict';
/*Assume the following payload is input:
[ { "firstName": "Shirley", "lastName": "Rodriguez" }, { "firstName": "Jane", "lastName": "Doe" }, { "firstName": "Arnav", "lastName": "Desai" }]
The expected response is:
{ "statusCode": 200, "headers": { "Content-type": "application/json" }, "body": { "result": [ { "firstName": "Arnav", "lastName": "Desai" }, { "firstName": "Jane", "lastName": "Doe" }, { "firstName": "Shirley", "lastName": "Rodriguez" } ] }}*/
exports.handler = (event, context, callback) => {
var lodash = require('lodash'); var result = lodash.orderBy(event, ['firstName'], ['asc']);
const response = { statusCode: 200, headers: { "Content-type": "application/json" }, body: JSON.stringify( { "result": result } ) };
callback(null, response);};
To install the lodash package in the environment, use a terminal session in the IDE to change to thedirectory containing the function code. Then run the following two commands, in the following order.The first command creates and configure a package.json file in that directory to make sure when youdeploy the function to Lambda, the lodash package is also deployed. The second command installs the
305

AWS Cloud9 User GuideAdd Dependent Code to a Lambda Function
lodash package in the same directory in the environment as the function code and then updates thepackage.json file in that directory accordingly.
npm initnpm install lodash --save
For help with the npm init command and the package.json file, see Working with package.json onthe npm website.
From the IDE, invoke the local version of the Lambda function, as described in Invoke a LambdaFunction (p. 299). Deploy the function as described in Upload Code for a Lambda Function (p. 310),and then invoke the remote version of the function. The local and remote versions of the function shouldwork as expected.
To depend on a pip package from a Python Lambda function, use for example the Python importstatement. Then use pip to install the related pip package in the environment one directory above thedirectory that contains the function code. When you deploy the Lambda function as described in UploadCode for a Lambda Function (p. 310), AWS Cloud9 deploys both the function and its related packagesto Lambda.
To demonstrate, the following example Python Lambda function code depends on the requestspackage to make an HTTP request and then return information about the related HTTP response.
'''Assume the following payload is input:
{ "url": "https://aws.amazon.com"}
The expected response is similar to the following:
{ "statusCode": "200", "headers": { "Content-type": "application/json" }, "body": { "statusCode": 200, "date": "Fri, 19 Jan 2018 17:57:48 GMT", "lastModified": "Thu, 18 Jan 2018 18:08:23 GMT" }}'''
import requestsimport json
def lambda_handler(event, context):
result = requests.get(event["url"])
response = { "statusCode": "200", "headers": { "Content-type": "application/json" }, "body": json.dumps( { "statusCode": result.status_code, "date": result.headers["Date"], "lastModified": result.headers["Last-Modified"] } ) }
return response
306

AWS Cloud9 User GuideDebug the Local Version of a Lambda
Function or Its Related API Gateway API
To install the requests package in the environment, use a terminal session in the IDE to change to thedirectory containing the function code. Then run the following command. This command installs therequests package in the directory in the environment that is one directory above the function code.
pip install requests --target ../
From the IDE, invoke the local version of the Lambda function, as described in Invoke a LambdaFunction (p. 299). Deploy the function as described in Upload Code for a Lambda Function (p. 310),and then invoke the remote version of the function. The local and remote versions of the function shouldwork as expected.
For a Python Lambda function, to depend on code in a separate Python code file that is in the samedirectory as the function, use the from and import statements. When you deploy the Lambda functionas described in Upload Code for a Lambda Function (p. 310), AWS Cloud9 deploys to Lambda both thefunction and the separate Python code files in the same directory as the function.
To demonstrate, take for example the following directory structure in the AWS Cloud9 IDE for a PythonLambda function:
myDemoServerlessApplication `- myDemoFunction |- lambda-payloads.json |- lambda_function.py `- myClasses.py
If the myClasses.py file contains the definition of a class named MyClass1, for example:
class MyClass1: # Class definition...
To reference the MyClass1 class from the lambda_function.py file, add the following statement tothe file:
from myDemoFunction.myClasses import MyClass1
Debug the Local Version of a Lambda Function orIts Related API Gateway API
You can debug local Lambda function code or its related API Gateway API in your environment usingcommon debugging aids such as breakpoints, stepping through code, and setting watch expressions.
NoteYou cannot debug the remote version of a Lambda function or its related API Gateway API inyour environment. You can only invoke it.
To debug the local version of an existing Lambda function or its related API Gateway API, you mustfirst import the remote version of the function into your AWS Cloud9 development environment, if thefunction isn't already there. See Import a Lambda Function (p. 296).
ImportantIf you import the remote version of a Python function into your environment, you must chooseone of the following options before you can debug it:Option 1: If the Python function doesn't use venv, use pip to install IKPdb into the samedirectory as the function's template.yaml file.
307

AWS Cloud9 User GuideDebug the Local Version of a Lambda
Function or Its Related API Gateway API
Use a terminal session in the IDE to change to the directory containing the function'stemplate.yaml file. Then run one of the following commands. This command installs thePython debugger IKPdb in the same directory as the function's template.yaml file:
pip install ikpdb --target . # For a function that uses Python 2.7.pip-3.6 install ikp3db --target . # For a function that uses Python 3.6.
Option 2: If the Python function uses venv, use pip in venv to install IKPdb intothe function's venv directory, and then add the CodeUri property to the function'stemplate.yaml file.
1. Use a terminal session in the IDE to change to the directory containing the function'stemplate.yaml file. From that folder, run one of the following commands. This commanduses pip in the function's venv/bin directory to install the Python debugger IKPdb into thefunction's venv/lib/pythonMAJOR.MINOR/dist-packages directory:
venv/bin/pip install ikpdb # For a function that uses Python 2.7.venv/bin/pip3.6 install ikp3db # For a function that uses Python 3.6.
2. In the Environment window, open the function's template.yaml file for editing. In theProperties section for the function, add the CodeUri property, set its value to .debug/,and then save the file. For example:
AWSTemplateFormatVersion: '2010-09-09'Transform: 'AWS::Serverless-2016-10-31'Description: An AWS Serverless Specification template describing your function.Resources: myDemoFunction: Type: 'AWS::Serverless::Function' Properties: CodeUri: .debug/ # ...
1. In the Environment window, open the file that contains the Lambda function's code you want todebug.
2. Set any breakpoints and watch expressions for your code. See Debug Your Code (p. 135).3. In the Lambda section of the AWS Resources window, expand the Local Functions list, if it isn't
already expanded.4. Expand the serverless application folder that contains the function you want to debug.5. Choose the function to debug, right-click it, and then choose Run, Run Local or Run, Run API
Gateway Local.
NoteIf nothing appears to happen, an invoke tab might already be open for the function. If so, goto the open invoke tab and choose Lambda (local) or API Gateway (local).
6. For a Lambda function, in the Test payload pane of the invoke tab that is displayed, confirm anycustom input data you want your function to use when you test it. For information about the inputdata format, see Step 2.2: Invoke the Lambda Function Manually and Verify Results, Logs, and Metricsin the AWS Lambda Developer Guide.
7. For an API Gateway API, in the Test payload pane of the invoke tab that is displayed, confirm thePath, Method, Query String, and Body you want the API to use when you test it.
NoteSome APIs might not support settings such as Body. For more information, consult the ownerof the API.
8. Next to the Run button, choose Run in Debug Mode (the bug icon).
308

AWS Cloud9 User GuideChange Code in a Lambda Function
9. Choose the Run button.10.Decide what to do whenever function execution pauses at a breakpoint. See Debug Your Code (p. 135).
Compare your results to the following:
Change Code in a Lambda FunctionTo use the AWS Cloud9 IDE to change the code in a function, you must first import the related remoteversion of the function into your AWS Cloud9 development environment, if the function isn't alreadythere. To do this, see Import a Lambda Function (p. 296). Then do the following:
309

AWS Cloud9 User GuideUpload Code for a Lambda Function
1. In the Lambda section of the AWS Resources window, expand the Local Functions list, if it isn'talready expanded.
2. Expand the serverless application folder that contains the function whose code you want to change.
3. Right-click the function, and then choose Edit Function.
4. Make the changes you want to the code, and then save the file.
To upload the local version of the changed function code to the related remote version in Lambda, seeUpload Code for a Lambda Function (p. 310).
Upload Code for a Lambda FunctionTo upload the local version of a Lambda function in your environment to the related remote version ofthe function in Lambda, do the following.
NoteDo not follow this procedure if the Lambda function is part of an AWS CodeStar project.Otherwise, the error "Parameters: [ProjectId] must have values" will display, and the functionwill not deploy. Instead, use a terminal session in the IDE to run the git push command topush committed code changes to the repository for the AWS CodeStar project. This instructsAWS CodeStar to upload the local version of the Lambda function in your environment to therelated remote version of the function in Lambda.Also, do not follow this procedure if the Lambda function was created from a serverlessapplication in the AWS Serverless Application Repository, and that serverless applicationrequires parameters to be specified during deployment. Otherwise, an error will displaythat required parameters are missing, and the serverless application is not deployed. For analternative procedure, see coverage of the AWS CloudFormationdeploy command in Create andDeploy Lambda Functions with the AWS Serverless Application Repository (p. 295).
1. In the Lambda section of the AWS Resources window, expand the Local Functions list, if it isn'talready expanded.
310

AWS Cloud9 User GuideConvert a Lambda Function to a Serverless Application
2. Expand the serverless application folder that contains the function you want to upload.
3. Do one of the following:
• Right-click the serverless application folder that you just chose, and then choose Deploy.
• Right-click the function you want to upload, and then choose Deploy.
• Choose the function you want to upload, and then choose Deploy the selected Lambda function(the button with the arrow that faces up).
Convert a Lambda Function to a ServerlessApplication
If the local version of an existing Lambda function in your AWS Cloud9 development environment isn'talready part of a serverless application, you can use the AWS Cloud9 IDE to convert that function intoa serverless application. You can then use the AWS SAM template file for that serverless applicationto create additional supporting AWS resources for your function. For more information, see the AWSServerless Application Model (AWS SAM) repository on GitHub.
To convert the local version of an existing Lambda function into a serverless application, you must firstimport the remote version of the function into your AWS Cloud9 development environment, if thefunction isn't already there. See Import a Lambda Function (p. 296).
1. In the Lambda section of the AWS Resources window, expand the Local Functions list, if it isn'talready expanded.
2. Right-click the function you want to convert, and then choose Convert to SAM.
311

AWS Cloud9 User GuideConvert a Lambda Function to a Serverless Application
AWS Cloud9 does the following:
• In the function's folder in the Environment window, the DeploymentMethod setting in the.application.json file changes from lambda to cloudformation. This means that now AWSCloud9 will instruct AWS SAM to use AWS CloudFormation whenever you use the IDE to upload thefunction's code as part of the serverless application. (lambda means that AWS Cloud9 will instructLambda to deploy the function instead.) To upload the function code, see Upload Code for a LambdaFunction (p. 310).
• In the Lambda section of the AWS Resources window, in the Local Functions list, AWS Cloud9 addsthe existing Lambda function to a new serverless application (represented by a Lambda icon inside of afolder). The serverless application has the same name as the function.
When you upload the function's code as described in Upload Code for a Lambda Function (p. 310),because the function upload method is no longer Lambda but now AWS SAM using AWSCloudFormation, AWS Cloud9 creates a new remote version of the function in Lambda and adds it tothe Remote Functions list. AWS Cloud9 gives the remote version a name that is different from theoriginal Lambda function. For example, if the serverless application and the function are both namedmyDemoFunction, the remote version name of your function would be cloud9-myDemoFunction-myDemoFunction-RANDOM_ID, where RANDOM_ID is a randomly determined ID.
ImportantAfter you do the conversion, if you then use the IDE to make any changes to the functioncode and then upload that code to Lambda, only the remote version of the new function (forexample, cloud9-myDemoFunction-myDemoFunction-RANDOM_ID) will contain the change.The remote version of the original function (for example, myDemoFunction) will not change.If you change your mind and want to enable the IDE to go back to uploading your codechanges to the remote version of the original function (for example, myDemoFunction), do thefollowing:
1. In the function's folder in the Environment window, change the DeploymentMethod settingin the .application.json file from cloudformation back to lambda, and then save thefile. This removes the serverless application folder from the Local Functions list and causesAWS Cloud9 to go back to instructing Lambda to deploy the function.
2. Upload the function code as described in Upload Code for a Lambda Function (p. 310).Now, only the remote version of the original function (for example, myDemoFunction)will contain the change. The remote version of the new function (for example, cloud9-myDemoFunction-myDemoFunction-RANDOM_ID) will not change.
3. Because AWS Cloud9 will no longer upload code changes to the remote version of the newfunction (for example, cloud9-myDemoFunction-myDemoFunction-RANDOM_ID), if youwant you can use the Lambda console to delete the new function (for example, cloud9-myDemoFunction-myDemoFunction-RANDOM_ID).
312

AWS Cloud9 User GuideUpdate Configuration Settings for a Lambda Function
Update Configuration Settings for a LambdaFunction
You can use the AWS Cloud9 IDE to change function settings such as the description, handler identifier,amount of memory the function will use, and existing execution role the function will use.
To change configuration settings, you must first import the related remote version of the function intoyour AWS Cloud9 development environment, if the function isn't already there. To do this, see Import aLambda Function (p. 296). Then do the following.
1. In the Lambda section of the AWS Resources window, expand the Local Functions list, if it isn'talready expanded.
2. Expand the serverless application folder that contains the function whose setting you want to change.
3. Right-click the function, and then choose Edit Config.
4. Make changes to the configuration settings, and then save the file.
NoteBy default, configuration settings are displayed in plain text. To change this behavior todisplay configuration settings in a visual editor by default, choose AWS Cloud9, Preferenceson the menu bar. Choose AWS Settings, and then turn on Use AWS SAM visual editor. To usethe visual editor, close the function's template.yaml file, and then right-click the functionand choose Edit Config again. To switch back to using plain text by default, turn off the UseAWS SAM visual editor setting. To temporarily edit plain text, choose View with text editor(Ace) in the visual editor, and then choose View, Editors, Ace on the menu bar.
5. Do one of the following:
• On the configuration settings tab, in the simplified settings view, choose the Upload Settings toLambda button.
• Follow the instructions in Upload Code for a Lambda Function (p. 310).
313

AWS Cloud9 User GuideUpdate Configuration Settings for a Lambda Function
314

AWS Cloud9 User GuideStep 1: Create or Identify Your Source Code Repository
Working with AWS CodePipelinein the AWS Cloud9 IntegratedDevelopment Environment (IDE)
You can use the AWS Cloud9 IDE to work with source code in repositories that are compatible with AWSCodePipeline.
AWS CodePipeline is a continuous delivery service you can use to model, visualize, and automatethe steps required to release your software and ongoing changes you make to it. You can use AWSCodePipeline to quickly model and configure the different stages of a software release process. For moreinformation, see the AWS CodePipeline User Guide.
NoteCompleting these procedures might result in charges to your AWS account. These includepossible charges for services such as Amazon EC2, AWS CodePipeline, Amazon S3, and AWSservices supported by AWS CodePipeline. For more information, see Amazon EC2 Pricing, AWSCodePipeline Pricing, Amazon S3 Pricing, and Cloud Services Pricing.AWS CodeStar provides additional features along with pipelines, such as project templates,dashboards, and teams. To use AWS CodeStar instead of AWS CodePipeline, skip the rest of thistopic, and see Working with AWS CodeStar Projects (p. 284) instead.
• Step 1: Create or Identify Your Source Code Repository (p. 315)
• Step 2: Create an AWS Cloud9 Development Environment, Connect It to the Code Repository, andUpload Your Code (p. 316)
• Step 3: Prepare to Work with AWS CodePipeline (p. 317)
• Step 4: Create a Pipeline in AWS CodePipeline (p. 317)
Step 1: Create or Identify Your Source CodeRepository
In this step, you create or identify a source code repository that is compatible with AWS CodePipeline.
Later in this topic, you upload your software's source code to that repository. AWS CodePipeline willbuild, test, and deploy the uploaded source code in that repository by using related pipelines that youalso create.
Your source code repository must be one of the following repository types that AWS CodePipelinesupports:
• AWS CodeCommit. If you already have a repository in AWS CodeCommit that you want to use, skipahead to Step 2: Create an AWS Cloud9 Development Environment, Connect It to the Code Repository,and Upload Your Code (p. 316). Otherwise, to use AWS CodeCommit, follow these instructions in theAWS CodeCommit Sample in this order, and then return to this topic:
• Step 1: Set Up Your IAM Group with Required Access Permissions (p. 322)
315
AWS Cloud9 User GuideStep 2: Create an AWS Cloud9 Development Environment,Connect It to the Code Repository, and Upload Your Code
• Step 2: Create a Repository in AWS CodeCommit (p. 323)
• Amazon S3. If you already have a bucket in Amazon S3 that you want to use, skip ahead to Step 2:Create an AWS Cloud9 Development Environment, Connect It to the Code Repository, and UploadYour Code (p. 316). Otherwise, to use Amazon S3, follow these instructions in the Amazon S3 GettingStarted Guide in this order, and then return to this topic:
• Sign Up for Amazon S3
• Create a Bucket
• GitHub. If you already have a repository in GitHub that you want to use, skip ahead to Step 2: Createan AWS Cloud9 Development Environment, Connect It to the Code Repository, and Upload YourCode (p. 316). Otherwise, to use GitHub, follow these instructions in the GitHub Sample in this order,and then return to this topic:
• Step 1: Create a GitHub Account (p. 328)
• Step 2: Create a GitHub Repository (p. 328)
Step 2: Create an AWS Cloud9 DevelopmentEnvironment, Connect It to the Code Repository,and Upload Your Code
In this step, you create an AWS Cloud9 development environment in the AWS Cloud9 console. You thenconnect the environment to the repository that AWS CodePipeline will use. Finally, you use the AWSCloud9 IDE for the environment to upload your source code to the repository.
To create the environment, follow the instructions in Creating an Environment (p. 72), and then return tothis topic. (If you already have an environment, you can use it. You don't need to create a new one.)
To connect the environment to the repository, and then upload your source code to the repository if itisn't already there, use one of the following sets of instructions. The set you choose depends on the typeof repository that stores the source code.
Repository type Instructions
AWS CodeCommit Follow these instructions in the AWS CodeCommitSample:
• Step 3: Connect Your Environment to theRemote Repository (p. 324)
• Step 4: Clone the Remote Repository into YourEnvironment (p. 325)
• Step 5: Add Files to the Repository (p. 325),substituting your own source code for this step
Amazon S3 • Install and configure the AWS CLI or aws-shellin the environment, as described in the AWS CLIand aws-shell Sample (p. 318).
• To upload your source code to the bucket,use the AWS CLI or the aws-shell in theenvironment to run the aws s3 cp command.(For the aws-shell, you can remove aws fromthe command.)
316

AWS Cloud9 User GuideStep 3: Prepare to Work with AWS CodePipeline
Repository type Instructions
GitHub Follow these instructions in the GitHub Sample:
• Step 3: Install Git in Your Environment (p. 328)• Step 4: Clone the Remote Repository into Your
Environment (p. 329)• Step 5: Add Files to the Repository (p. 329),
substituting your own source code for this step
After you connect the environment to the repository, whenever you push source code changes from theAWS Cloud9 IDE to the repository, AWS CodePipeline automatically sends those changes through relatedpipelines to be built, tested, and deployed. You create a related pipeline later in this topic.
Step 3: Prepare to Work with AWS CodePipelineIn this step, you attach a specific AWS managed policy to the IAM group you created or identified inTeam Setup (p. 7). This enables the group's users to begin creating and working with pipelines in AWSCodePipeline.
If you have used AWS CodePipeline before, skip ahead to Step 4: Create a Pipeline in AWSCodePipeline (p. 317).
For this step, follow these instructions in Step 3: Use an IAM Managed Policy to Assign AWS CodePipelinePermissions to the IAM User in the AWS CodePipeline User Guide, and then return to this topic.
Step 4: Create a Pipeline in AWS CodePipelineIn this step, you create a pipeline in AWS CodePipeline that uses the repository you created or identifiedearlier in this topic.
For this step, follow the instructions in Create a Pipeline in AWS CodePipeline in the AWS CodePipelineUser Guide.
After you create the pipeline, AWS CodePipeline sends the current version of the source code in therepository through the pipeline to be built, tested, and deployed. Then, whenever you push sourcecode changes from the AWS Cloud9 IDE to the repository, AWS CodePipeline automatically sends thosechanges through the pipeline to be built, tested, and deployed.
To view the pipeline, follow the instructions in View Pipeline Details and History in AWS CodePipeline inthe AWS CodePipeline User Guide.
317

AWS Cloud9 User GuideAWS CLI and aws-shell Sample
Samples for AWS Cloud9Experiment with these samples to increase your knowledge and confidence using AWS Cloud9 withvarious programming languages and AWS services.
Topics
• AWS Command Line Interface and aws-shell Sample for AWS Cloud9 (p. 318)
• AWS CodeCommit Sample for AWS Cloud9 (p. 321)
• GitHub Sample for AWS Cloud9 (p. 327)
• Amazon DynamoDB Sample for AWS Cloud9 (p. 331)
• Node.js Sample for AWS Cloud9 (p. 342)
• Python Sample for AWS Cloud9 (p. 347)
• PHP Sample for AWS Cloud9 (p. 352)
• Ruby Sample for AWS Cloud9 (p. 357)
• Go Sample for AWS Cloud9 (p. 361)
• C++ Sample for AWS Cloud9 (p. 366)
AWS Command Line Interface and aws-shellSample for AWS Cloud9
This sample enables you to set up the AWS Command Line Interface (AWS CLI), the aws-shell, or both inan AWS Cloud9 development environment. The AWS CLI and the aws-shell are unified tools that providea consistent interface for interacting with all parts of AWS. You can use the AWS CLI or the aws-shellinstead of the AWS Management Console to quickly run commands to interact with AWS, and some ofthese commands can only be run with the AWS CLI or the aws-shell.
For more information about the AWS CLI, see the AWS CLI User Guide. For the aws-shell, see thefollowing resources:
• aws-shell on the GitHub website
• aws-shell on the pip website
For a list of commands you can run with the AWS CLI to interact with AWS, see the AWS CLI CommandReference. You use the same commands with the aws-shell, except that you start commands without theaws prefix.
Creating this sample might result in charges to your AWS account. These include possible chargesfor services such as Amazon EC2 and Amazon S3. For more information, see Amazon EC2 Pricing andAmazon S3 Pricing.
• Prerequisites (p. 319)
• Step 1: Install the AWS CLI, the aws-shell, or Both in Your Environment (p. 319)
• Step 2: Set up Credentials Management in Your Environment (p. 320)
318

AWS Cloud9 User GuidePrerequisites
• Step 3: Run Some Basic Commands with the AWS CLI or the aws-shell in Your Environment (p. 320)
• Step 4: Clean Up (p. 321)
PrerequisitesBefore you use this sample, be sure to meet the following requirements.
• You must have an existing AWS Cloud9 development environment. This sample assumes you alreadyhave an AWS Cloud9 EC2 development environment that is connected to an Amazon EC2 instancerunning Amazon Linux. If you have a different type of environment or operating system, you mightneed to adapt this sample's instructions to set up related tools. See Creating an Environment (p. 72)for details.
• You have the AWS Cloud IDE for the existing environment already open. When you open anenvironment, AWS Cloud9 opens the IDE for that environment in your web browser. See Opening anEnvironment (p. 77) for details.
Step 1: Install the AWS CLI, the aws-shell, or Both inYour EnvironmentIn this step, you use the AWS Cloud9 IDE to install the AWS CLI, the aws-shell, or both in yourenvironment so you can run commands to interact with AWS.
If you are using an AWS Cloud9 EC2 development environment and you only want to use the AWS CLI,you can skip ahead to Step 3: Run Some Basic Commands with the AWS CLI or the aws-shell in YourEnvironment (p. 320). This is because the AWS CLI is already installed in an EC2 environment, and a setof AWS access credentials is already set up in the environment. For more information, see AWS ManagedTemporary Credentials (p. 401).
If you are not using an EC2 environment, do the following to install the AWS CLI:
1. With your environment open, in the IDE, check whether the AWS CLI is already installed. In theterminal, run the aws --version command. (To start a new terminal session, on the menu bar,choose Window, New Terminal.) If the AWS CLI is installed, the version number is displayed, withinformation such as the version numbers of Python and the operating system version number of yourAmazon EC2 instance or your own server. For example, aws-cli N.NN.NN Python/N.N.NN OS/VERSION . If the AWS CLI is installed, skip ahead to Step 2: Set up Credentials Management in YourEnvironment (p. 320).
2. To install the AWS CLI, see Installing the AWS Command Line Interface in the AWS CLI User Guide. Forexample, for an EC2 environment running Amazon Linux, run these three commands, one at a time, inthe terminal to install the AWS CLI.
sudo yum -y update # Install the latest system updates.sudo yum -y install aws-cli # Install the AWS CLI.aws --version # Confirm the AWS CLI was installed.
Do the following to install the aws-shell:
1. With your environment open, in the IDE, check whether the aws-shell is already installed. Inthe terminal, run the aws-shell --version command. (To start a new terminal session, onthe menu bar, choose Window, New Terminal.) If the aws-shell is installed, the aws> prompt isdisplayed. If the aws-shell is installed, skip ahead to Step 2: Set up Credentials Management in YourEnvironment (p. 320).
319

AWS Cloud9 User GuideStep 2: Set up Credentials
Management in Your Environment
2. To install the aws-shell, you use pip. To use pip, you must have Python installed.
To check whether Python is already installed (and to install it if needed), follow the instructions inStep 1: Install Required Tools (p. 347) in the Python Sample, and then return to this topic.
To check whether pip is already installed, in the terminal, run the pip --version command. Ifpip is installed, the version number is displayed. If pip is not installed, install it. For example, for anEC2 environment running Amazon Linux, run these three commands, one at a time, in the terminal toinstall pip.
wget https://bootstrap.pypa.io/get-pip.py # Get the pip install file.sudo python get-pip.py # Install pip. (May need to run 'sudo python2 get-pip.py' or 'sudo python3 get-pip.py' instead, depending on how Python is installed.)rm get-pip.py # Delete the pip install file, as it is no longer needed.
3. To use pip to install the aws-shell, run the following command.
sudo pip install aws-shell
4. If the aws-shell is already installed, to upgrade to the latest version, run the following command.
sudo pip install --upgrade aws-shell
Step 2: Set up Credentials Management in YourEnvironmentEach time you use the AWS CLI or the aws-shell to call an AWS service, you must provide a set ofcredentials with the call. These credentials determine whether the AWS CLI or the aws-shell has theappropriate permissions to make that call. If the credentials don't cover the appropriate permissions, thecall will fail.
If you are using an AWS Cloud9 EC2 development environment, you can skip ahead to Step 3: RunSome Basic Commands with the AWS CLI or the aws-shell in Your Environment (p. 320). This isbecause credentials are already set up in an EC2 environment. For more information, see AWS ManagedTemporary Credentials (p. 401).
If you are not using an EC2 environment, you must manually store your credentials within theenvironment. To do this, follow the instructions in Calling AWS Services from an Environment in AWSCloud9 (p. 80), and then return to this topic.
Step 3: Run Some Basic Commands with the AWS CLIor the aws-shell in Your EnvironmentIn this step, you use the AWS CLI or the aws-shell in your environment to create a bucket in Amazon S3,list your available buckets, and then delete the bucket.
1. If you want to use the aws-shell but haven't started it yet, start the aws-shell by running the aws-shell command. The aws> prompt is displayed.
2. Create a bucket. Run the aws s3 mb command with the AWS CLI or s3 mb command with the aws-shell, supplying the name of the bucket to create. In this example, we use a bucket named s3://cloud9-ACCOUNT-ID-bucket, where ACCOUNT-ID is your AWS account ID. If you use a differentname, substitute it throughout this step.
320

AWS Cloud9 User GuideStep 4: Clean Up
aws s3 mb s3://cloud9-ACCOUNT-ID-bucket # For the AWS CLI.s3 mb s3://cloud9-ACCOUNT-ID-bucket # For the aws-shell.
NoteBucket names must be unique across all of AWS, not just your AWS account. The precedingsuggested bucket name can help you come up with a unique bucket name. If you get amessage that contains the error BucketAlreadyExists, you must run the command againwith a different bucket name.
3. List your available buckets. Run the aws s3 ls command with the AWS CLI or the s3 ls command with the aws-shell. A list of your available buckets is displayed.
4. Delete the bucket. Run the aws s3 rb command with the AWS CLI or the s3 rb command withthe aws-shell, supplying the name of the bucket to delete.
aws s3 rb s3://cloud9-ACCOUNT-ID-bucket # For the AWS CLI.s3 rb s3://cloud9-ACCOUNT-ID-bucket # For the aws-shell.
To confirm whether the bucket was deleted, run the aws s3 ls command again with the AWS CLIor the s3 ls command again with the aws-shell. The name of the bucket that was deleted should nolonger appear in the list.
NoteYou don't have to delete the bucket if you want to keep using it. For more information, seeAdd an Object to a Bucket in the Amazon S3 Getting Started Guide. See also s3 commands inthe AWS CLI Command Reference. (Remember, if you don't delete the bucket, it might result inongoing charges to your AWS account.)
To continue experimenting with the AWS CLI, see Working with Amazon Web Services in the AWS CLIUser Guide as well as the AWS CLI Command Reference. To continue experimenting with the aws-shell,see the AWS CLI Command Reference, noting that you start commands without the aws prefix.
Step 4: Clean UpIf you're using the aws-shell, you can stop using it by running the .exit or .quit command.
To prevent ongoing charges to your AWS account after you're done using this sample, you should deletethe environment. For instructions, see Deleting an Environment (p. 104).
AWS CodeCommit Sample for AWS Cloud9This sample enables you to set up an AWS Cloud9 development environment to interact with a remotecode repository in AWS CodeCommit. AWS CodeCommit is a source code control service that enablesyou to privately store and manage Git repositories in the AWS Cloud. For more information about AWSCodeCommit, see the AWS CodeCommit User Guide.
Creating this sample might result in charges to your AWS account. These include possible charges forservices such as Amazon EC2 and AWS CodeCommit. For more information, see Amazon EC2 Pricing andAWS CodeCommit Pricing.
• Prerequisites (p. 322)
• Step 1: Set Up Your IAM Group with Required Access Permissions (p. 322)
• Step 2: Create a Repository in AWS CodeCommit (p. 323)
321
AWS Cloud9 User GuidePrerequisites
• Step 3: Connect Your Environment to the Remote Repository (p. 324)
• Step 4: Clone the Remote Repository into Your Environment (p. 325)
• Step 5: Add Files to the Repository (p. 325)
• Step 6: Clean Up (p. 327)
PrerequisitesBefore you use this sample, be sure to meet the following requirements.
• You must have an existing AWS Cloud9 development environment. This sample assumes you alreadyhave an AWS Cloud9 EC2 development environment that is connected to an Amazon EC2 instancerunning Amazon Linux. If you have a different type of environment or operating system, you mightneed to adapt this sample's instructions to set up related tools. See Creating an Environment (p. 72)for details.
• You have the AWS Cloud IDE for the existing environment already open. When you open anenvironment, AWS Cloud9 opens the IDE for that environment in your web browser. See Opening anEnvironment (p. 77) for details.
Step 1: Set Up Your IAM Group with Required AccessPermissionsIf your AWS credentials are associated with an IAM administrator user in your AWS account, and youwant to use that user to work with AWS CodeCommit, skip ahead to Step 2: Create a Repository in AWSCodeCommit (p. 323).
You can complete this step using the AWS Management Console (p. 322) or the AWS Command LineInterface (AWS CLI) (p. 323).
Set Up Your IAM Group with Required Access Permissions Usingthe Console1. Sign in to the AWS Management Console, if you are not already signed in.
For this step, we recommend you sign in using credentials for an IAM administrator user in your AWSaccount. If you cannot do this, check with your AWS account administrator.
2. Open the IAM console. To do this, in the console's navigation bar, choose Services. Then choose IAM.
3. Choose Groups.
4. Choose the group's name.
5. On the Permissions tab, for Managed Policies, choose Attach Policy.
6. In the list of policy names, select one of the following boxes:
• Select AWSCodeCommitPowerUser for access to all of the functionality of AWS CodeCommit andrepository-related resources, except it does not allow deletion of AWS CodeCommit repositories orcreate or delete repository-related resources in other AWS services, such as Amazon CloudWatchEvents.
• Select AWSCodeCommitFullAccess for full control over AWS CodeCommit repositories and relatedresources in the AWS account, including the ability to delete repositories.
(If you don't see either of these policy names in the list, type the policy name in the Filter box todisplay it.)
322
AWS Cloud9 User GuideStep 2: Create a Repository in AWS CodeCommit
7. Choose Attach Policy.
To see the list of access permissions that these AWS managed policies give to a group, see AWS Managed(Predefined) Policies for AWS CodeCommit in the AWS CodeCommit User Guide.
Skip ahead to Step 2: Create a Repository in AWS CodeCommit (p. 323).
Set Up Your IAM Group with Required Access Permissions Usingthe AWS CLIRun the IAM attach-group-policy command, specifying the group's name and the Amazon ResourceName (ARN) of the AWS managed policy that describes the required access permissions, for example:
aws iam attach-group-policy --group-name GROUP_NAME --policy-arn POLICY_ARN
In the preceding command, replace GROUP_NAME with the name of the group. Replace POLICY_ARN withthe ARN of the AWS managed policy, as follows:
• arn:aws:iam::aws:policy/AWSCodeCommitPowerUser for access to all of the functionalityof AWS CodeCommit and repository-related resources, except it does not allow deletion of AWSCodeCommit repositories or create or delete repository-related resources in other AWS services, suchas Amazon CloudWatch Events.
• arn:aws:iam::aws:policy/AWSCodeCommitFullAccess for full control over AWS CodeCommitrepositories and related resources in the AWS account, including the ability to delete repositories.
To see the list of access permissions that these AWS managed policies give to a group, see AWS Managed(Predefined) Policies for AWS CodeCommit in the AWS CodeCommit User Guide.
Step 2: Create a Repository in AWS CodeCommitIn this step, you create a remote code repository in AWS CodeCommit by using the AWS CodeCommitconsole.
If you already have an AWS CodeCommit repository, skip ahead to Step 3: Connect Your Environment tothe Remote Repository (p. 324).
You can complete this step using the AWS Management Console (p. 323) or the AWS Command LineInterface (AWS CLI) (p. 324).
Create a Repository in AWS CodeCommit Using the Console1. If you are signed in to the AWS Management Console as an IAM administrator user from the previous
step, and you do not want to use the IAM administrator user to create the repository, sign out of theAWS Management Console.
2. Open the AWS CodeCommit console, at https://console.aws.amazon.com/codecommit.3. In the console's navigation bar, use the region selector to choose the AWS Region you want to create
the repository in (for example, US East (Ohio)).4. If a welcome page is displayed, choose Get started. Otherwise, choose Create repository.5. On the Create repository page, for Repository name, type a name for your new repository, for
example MyDemoCloud9Repo. If you choose a different name, substitute it throughout this sample.6. (Optional) For Description, type something about the repository, for example This is a
demonstration repository for the AWS Cloud9 sample.
323

AWS Cloud9 User GuideStep 3: Connect Your Environment
to the Remote Repository
7. Choose Create repository. A Connect to your repository pane is displayed. Choose Close, as you willconnect to your repository in a different way later in this topic.
Skip ahead to Step 3: Connect Your Environment to the Remote Repository (p. 324).
Create a Repository in AWS CodeCommit Using the AWS CLIRun the AWS CodeCommit create-repository command, specifying the repository's name, anoptional description, and the AWS Region to create the repository in, for example:
aws codecommit create-repository --repository-name MyDemoCloud9Repo --repository-description "This is a demonstration repository for the AWS Cloud9 sample." --region REGION_ID
In the preceding command, replace REGION_ID with the ID of the AWS Region to create the repositoryin. For a list of supported regions, see AWS CodeCommit in the Amazon Web Services General Reference.
If you choose to use a different repository name, substitute it throughout this sample.
Step 3: Connect Your Environment to the RemoteRepositoryIn this step, you use the AWS Cloud9 IDE to connect to the AWS CodeCommit repository you created oridentified in the previous step.
Complete one of the following sets of procedures, depending on the type of AWS Cloud9 developmentenvironment you have.
Environment type Follow these procedures
EC2 environment 1. From a terminal session in the IDE, run thefollowing 2 commands:
git config --global credential.helper '!aws codecommit credential-helper $@'git config --global credential.UseHttpPath true
For more information, see Step 2: Configurethe AWS CLI Credential Helper On Your AWSCloud9 EC2 Development Environment inIntegrate AWS Cloud9 with AWS CodeCommit inthe AWS CodeCommit User Guide.
2. Skip ahead to Step 4: Clone the RemoteRepository into Your Environment (p. 325),later in this topic.
SSH environment 1. If Git is not already installed in theenvironment, use a terminal session in the IDEto install it. For more information, see Step 2:Install Git in Setup Steps for SSH Connections toAWS CodeCommit Repositories on Linux, macOS,or Unix in the AWS CodeCommit User Guide.
324

AWS Cloud9 User GuideStep 4: Clone the Remote
Repository into Your Environment
Environment type Follow these procedures
2. Complete Step 3: Configure Credentialson Linux, macOS, or Unix in Setup Stepsfor SSH Connections to AWS CodeCommitRepositories on Linux, macOS, or Unix in theAWS CodeCommit User Guide.
When you are instructed to sign in to theAWS Management Console and open the IAMconsole, we recommend you sign in usingcredentials for an IAM administrator user inyour AWS account. If you cannot do this, checkwith your AWS account administrator.
3. Skip ahead to Step 4: Clone the RemoteRepository into Your Environment (p. 325),later in this topic.
Step 4: Clone the Remote Repository into YourEnvironmentIn this step, you use the AWS Cloud9 IDE to clone the remote repository in AWS CodeCommit into yourenvironment.
To clone the repository, run the git clone command, supplying the repository's clone URL, shownhere as CLONE_URL .
git clone CLONE_URL
For an EC2 environment, you supply an HTTPS clone URL that starts with https://. For an SSHenvironment, you supply an SSH clone URL that starts with ssh://.
To get the repository's full clone URL, see Use the AWS CodeCommit Console to View Repository Detailsin the AWS CodeCommit User Guide.
If your repository doesn't have any files in it, a warning message is displayed, such as You appear tohave cloned an empty repository. This is expected behavior, which you will address later.
Step 5: Add Files to the RepositoryIn this step, you create three simple files in the cloned repository in your environment. Then you add thefiles to the Git staging area in your cloned repository, commit the staged files, and push the commit toyour remote repository in AWS CodeCommit.
If the cloned repository already has files in it, you're done and can skip the rest of this sample.
To add files to the repository
1. Create a new file. On the menu bar, choose File, New File.2. Type the following content into the file, and then choose File, Save to save the file as bird.txt in
the MyDemoCloud9Repo directory in your environment.
bird.txt--------Birds are a group of endothermic vertebrates, characterized by feathers,
325

AWS Cloud9 User GuideStep 5: Add Files to the Repository
toothless beaked jaws, the laying of hard-shelled eggs, a high metabolicrate, a four-chambered heart, and a lightweight but strong skeleton.
NoteTo confirm you are saving this file in the correct directory, in the Save As dialog box, choosethe MyDemoCloud9Repo folder, and be sure Folder displays /MyDemoCloud9Repo.
3. Create two more files, named insect.txt and reptile.txt, with the following content, andsaving them in the same MyDemoCloud9Repo directory.
insect.txt----------Insects are a class of invertebrates within the arthropod phylum thathave a chitinous exoskeleton, a three-part body (head, thorax, and abdomen),three pairs of jointed legs, compound eyes, and one pair of antennae.
reptile.txt-----------Reptiles are tetrapod (four-limbed vertebrate) animals in the classReptilia, comprising today's turtles, crocodilians, snakes,amphisbaenians, lizards, tuatara, and their extinct relatives.
4. In the terminal, run the cd command to switch to the MyDemoCloud9Repo directory.
cd MyDemoCloud9Repo
5. Confirm the files were successfully saved in the MyDemoCloud9Repo directory by running the gitstatus command. All three files will be listed as untracked files.
Untracked files: (use "git add <file>..." to include in what will be committed)
bird.txt insect.txt reptile.txt
6. Add the files to the Git staging area by running the git add command.
git add --all
7. Confirm the files were successfully added to the Git staging area by running the git status command again. All three files are now listed as changes to commit.
Changes to be committed: (use "git rm --cached <file>..." to unstage)
new file: bird.txt new file: insect.txt new file: reptile.txt
8. Commit the staged files by running the git commit command.
git commit -m "Added information about birds, insects, and reptiles."
9. Push the commit to your remote repository in AWS CodeCommit by running the git push command.
git push -u origin master
326
AWS Cloud9 User GuideStep 6: Clean Up
10. Confirm whether the files were successfully pushed. Open the AWS CodeCommit console, if it isn'talready open, at https://console.aws.amazon.com/codecommit.
11. In the top navigation bar, near the right edge, choose the AWS Region where you created therepository (for example, US East (Ohio)).
12. On the Dashboard page, choose MyDemoCloud9Repo. The three files are displayed.
To continue experimenting with your AWS CodeCommit repository, see Browse the Contents of YourRepository in the AWS CodeCommit User Guide.
If you're new to Git and you don't want to mess up your AWS CodeCommit repository, experiment with asample Git repository on the Try Git website.
Step 6: Clean UpTo prevent ongoing charges to your AWS account after you're done using this sample, you should deletethe AWS CodeCommit repository. For instructions, see Delete an AWS CodeCommit Repository in theAWS CodeCommit User Guide.
You should also delete the environment. For instructions, see Deleting an Environment (p. 104).
GitHub Sample for AWS Cloud9This sample enables you to set up an AWS Cloud9 development environment to interact with a remotecode repository in GitHub. For more information about GitHub, see the GitHub and GitHub Helpwebsites.
Creating this sample might result in charges to your AWS account. These include possible charges forservices such as Amazon EC2. For more information, see Amazon EC2 Pricing.
• Prerequisites (p. 327)• Step 1: Create a GitHub Account (p. 328)• Step 2: Create a GitHub Repository (p. 328)• Step 3: Install Git in Your Environment (p. 328)• Step 4: Clone the Remote Repository into Your Environment (p. 329)• Step 5: Add Files to the Repository (p. 329)• Step 6: Keep Working with the IDE and GitHub (p. 331)• Step 7: Clean Up (p. 331)
PrerequisitesBefore you use this sample, be sure to meet the following requirements.
• You must have an existing AWS Cloud9 development environment. This sample assumes you alreadyhave an AWS Cloud9 EC2 development environment that is connected to an Amazon EC2 instancerunning Amazon Linux. If you have a different type of environment or operating system, you mightneed to adapt this sample's instructions to set up related tools. See Creating an Environment (p. 72)for details.
• You have the AWS Cloud IDE for the existing environment already open. When you open anenvironment, AWS Cloud9 opens the IDE for that environment in your web browser. See Opening anEnvironment (p. 77) for details.
327
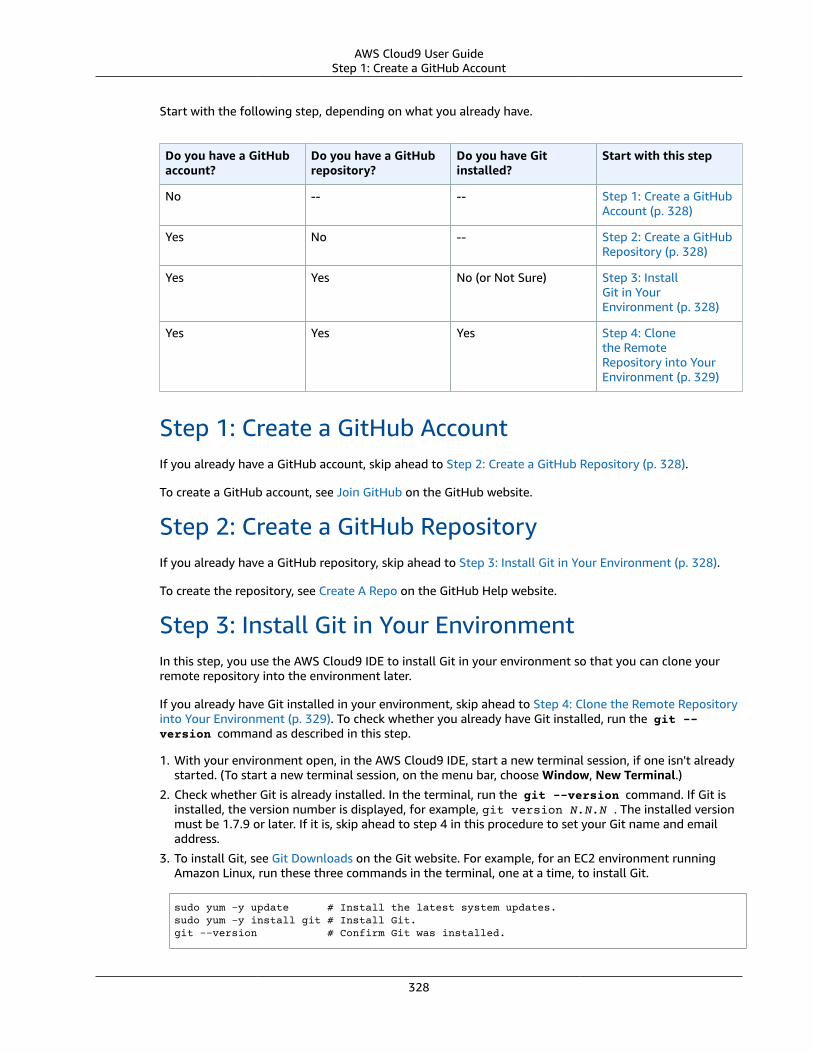
AWS Cloud9 User GuideStep 1: Create a GitHub Account
Start with the following step, depending on what you already have.
Do you have a GitHubaccount?
Do you have a GitHubrepository?
Do you have Gitinstalled?
Start with this step
No -- -- Step 1: Create a GitHubAccount (p. 328)
Yes No -- Step 2: Create a GitHubRepository (p. 328)
Yes Yes No (or Not Sure) Step 3: InstallGit in YourEnvironment (p. 328)
Yes Yes Yes Step 4: Clonethe RemoteRepository into YourEnvironment (p. 329)
Step 1: Create a GitHub AccountIf you already have a GitHub account, skip ahead to Step 2: Create a GitHub Repository (p. 328).
To create a GitHub account, see Join GitHub on the GitHub website.
Step 2: Create a GitHub RepositoryIf you already have a GitHub repository, skip ahead to Step 3: Install Git in Your Environment (p. 328).
To create the repository, see Create A Repo on the GitHub Help website.
Step 3: Install Git in Your EnvironmentIn this step, you use the AWS Cloud9 IDE to install Git in your environment so that you can clone yourremote repository into the environment later.
If you already have Git installed in your environment, skip ahead to Step 4: Clone the Remote Repositoryinto Your Environment (p. 329). To check whether you already have Git installed, run the git --version command as described in this step.
1. With your environment open, in the AWS Cloud9 IDE, start a new terminal session, if one isn't alreadystarted. (To start a new terminal session, on the menu bar, choose Window, New Terminal.)
2. Check whether Git is already installed. In the terminal, run the git --version command. If Git isinstalled, the version number is displayed, for example, git version N.N.N . The installed versionmust be 1.7.9 or later. If it is, skip ahead to step 4 in this procedure to set your Git name and emailaddress.
3. To install Git, see Git Downloads on the Git website. For example, for an EC2 environment runningAmazon Linux, run these three commands in the terminal, one at a time, to install Git.
sudo yum -y update # Install the latest system updates.sudo yum -y install git # Install Git.git --version # Confirm Git was installed.
328

AWS Cloud9 User GuideStep 4: Clone the Remote
Repository into Your Environment
4. Set your Git name and email address. In the terminal, run these two commands, one at a time,substituting your Git name and email address for USER_NAME and EMAIL_ADDRESS .
git config --global user.name "USER_NAME"git config --global user.email EMAIL_ADDRESS
Step 4: Clone the Remote Repository into YourEnvironmentIn this step, you use the AWS Cloud9 IDE to clone the remote repository in GitHub into yourenvironment.
To clone the repository, see Cloning a Repository on the GitHub website.
NoteThe rest of this sample assumes the current working directory that you clone the repositoryinto is the environment root directory. If you clone it somewhere else, substitute that locationwherever you see /YOUR_CLONED_REPO_NAME .
Step 5: Add Files to the RepositoryIn this step, you create three simple files in the cloned repository in your environment. Then you add thefiles to the Git staging area in your cloned repository, commit the staged files, and push the commit toyour remote repository in GitHub.
If the cloned repository already has files in it, skip ahead to Step 6: Keep Working with the IDE andGitHub (p. 331).
1. Create a new file. On the menu bar, choose File, New File.
2. Type the following content into the file, and then choose File, Save to save the file as bird.txt inthe /YOUR_CLONED_REPO_NAME directory in your environment.
bird.txt--------Birds are a group of endothermic vertebrates, characterized by feathers,toothless beaked jaws, the laying of hard-shelled eggs, a high metabolicrate, a four-chambered heart, and a lightweight but strong skeleton.
NoteTo confirm you are saving this file in the correct directory, in the Save As dialogbox, choose the YOUR_CLONED_REPO_NAME folder, and be sure Folder displays/YOUR_CLONED_REPO_NAME .
3. Create two more files, named insect.txt and reptile.txt, with the following content, savingthem also in the same /YOUR_CLONED_REPO_NAME directory.
insect.txt----------Insects are a class of invertebrates within the arthropod phylum thathave a chitinous exoskeleton, a three-part body (head, thorax, and abdomen),three pairs of jointed legs, compound eyes, and one pair of antennae.
reptile.txt-----------
329

AWS Cloud9 User GuideStep 5: Add Files to the Repository
Reptiles are tetrapod (four-limbed vertebrate) animals in the classReptilia, comprising today's turtles, crocodilians, snakes,amphisbaenians, lizards, tuatara, and their extinct relatives.
4. In the terminal, run the cd command to switch to the /YOUR_CLONED_REPO_NAME directory.
cd YOUR_CLONED_REPO_NAME
5. Confirm the files were successfully saved in the /YOUR_CLONED_REPO_NAME directory by runningthe git status command. All three files are listed as untracked files.
Untracked files: (use "git add <file>..." to include in what will be committed)
bird.txt insect.txt reptile.txt
6. Add the files to the Git staging area by running the git add command.
git add --all
7. Confirm the files were successfully added to the Git staging area by running the git status command again. All three files are now listed as changes to commit.
Changes to be committed: (use "git reset HEAD <file>..." to unstage)
new file: bird.txt new file: insect.txt new file: reptile.txt
8. Commit the staged files by running the git commit command.
git commit -m "Added information about birds, insects, and reptiles."
9. Push the commit to your remote repository in AWS CodeCommit by running the git push command.
git push
NoteYou are prompted for your GitHub user name and password. As you continue to work withGitHub, you might be prompted again. To keep from being prompted each time you tryto interact with the remote repository in the future, consider installing and configuringa Git credentials manager. For example, you can run this command in the terminal to beprompted no sooner than every 15 minutes: git config credential.helper 'cache--timeout 900'. Or you can run this command to never be prompted again, althoughGit stores your credentials in clear text in a plain file in your home directory: git configcredential.helper 'store --file ~/.git-credentials'. For more information,see Git Tools - Credential Storage on the Git website.If you use GitHub two-factor authentication, you must enter a personal access tokenwhenever you are prompted for a password. If you enter a password instead of a personalaccess token, an "invalid user name or password" message is displayed, and the operationfails. For more information, see Creating a personal access token for the command line on theGitHub Help website.You will not see your password or personal access token whenever you enter it in theterminal. This is by design.
330

AWS Cloud9 User GuideStep 6: Keep Working with the IDE and GitHub
10.To confirm whether the files were successfully pushed from your local copy of the repository to theremote repository, open your repository in the GitHub console, and look for the three files you justpushed.
Step 6: Keep Working with the IDE and GitHubUse the AWS Cloud9 IDE and GitHub to keep working with your code. Here are some things to try.
• Use the Environment window and editor tabs in the IDE to view, change, and save code. For moreinformation, see Step 2.3: Environment Window (p. 26) and Step 2.4: Editor, Tabs, and Panes (p. 27) inthe IDE Tutorial for AWS Cloud9.
• Use the IDE to run, debug, and build your code. For more information, see Working with Builders,Runners, and Debuggers (p. 134).
• Use Git in the terminal session in the IDE to continue pushing more code changes to the GitHubrepository, as well as periodically pull code changes from others from the repository. For moreinformation, see Pushing to a Remote and Fetching a remote on the GitHub Help website.
• Use additional Git commands as you need them. For a list of these commands, see Git cheatsheet onthe GitHub Help website.
• If you're new to Git and you don't want to mess up your GitHub repository, experiment with a sampleGit repository on the Try Git website.
• Invite others to work on your code with you in the same environment, in real time and with text chat.For more information, see Sharing an Environment (p. 90).
Step 7: Clean UpTo prevent ongoing charges to your AWS account after you're done using this sample, you should deletethe environment. For instructions, see Deleting an Environment (p. 104).
To delete the GitHub repository, see Deleting a Repository on the GitHub Help website.
Amazon DynamoDB Sample for AWS Cloud9This sample enables you to set up an AWS Cloud9 development environment to work with AmazonDynamoDB.
DynamoDB is a fully managed NoSQL database service. You can use DynamoDB to create a databasetable that can store and retrieve any amount of data, and serve any level of request traffic. DynamoDBautomatically spreads the data and traffic for the table over a sufficient number of servers to handlethe request capacity specified and the amount of data stored, while maintaining consistent and fastperformance. For more information, see Amazon DynamoDB on the AWS website.
Creating this sample might result in charges to your AWS account. These include possible chargesfor services such as Amazon EC2 and DynamoDB. For more information, see Amazon EC2 Pricing andAmazon DynamoDB Pricing.
For information about additional AWS database offerings, see Amazon Relational Database Service(RDS), Amazon ElastiCache, and Amazon Redshift on the AWS website. See also AWS Database MigrationService on the AWS website.
• Prerequisites (p. 332)• Step 1: Install and Configure the AWS CLI, the aws-shell, or Both in Your Environment (p. 332)• Step 2: Create a Table (p. 333)
331

AWS Cloud9 User GuidePrerequisites
• Step 3: Add an Item to the Table (p. 334)• Step 4: Add Multiple Items to the Table (p. 334)• Step 5: Create a Global Secondary Index (p. 337)• Step 6: Get Items from the Table (p. 339)• Step 7: Clean Up (p. 342)
PrerequisitesBefore you use this sample, be sure to meet the following requirements.
• You must have an existing AWS Cloud9 development environment. This sample assumes you alreadyhave an AWS Cloud9 EC2 development environment that is connected to an Amazon EC2 instancerunning Amazon Linux. If you have a different type of environment or operating system, you mightneed to adapt this sample's instructions to set up related tools. See Creating an Environment (p. 72)for details.
• You have the AWS Cloud IDE for the existing environment already open. When you open anenvironment, AWS Cloud9 opens the IDE for that environment in your web browser. See Opening anEnvironment (p. 77) for details.
Step 1: Install and Configure the AWS CLI, the aws-shell, or Both in Your EnvironmentIn this step, you use the AWS Cloud9 IDE to install and configure the AWS CLI, the aws-shell, or both inyour environment so you can run commands to interact with DynamoDB. Then you use the AWS CLI torun a basic DynamoDB command to test your installation and configuration.
1. To set up credentials management for the AWS CLI or the aws-shell and to install the AWS CLI,the aws-shell, or both in your environment, follow Steps 1 and 2 in the AWS CLI and aws-shellSample (p. 318), and then return to this topic. If you already installed and configured the AWS CLI,the aws-shell, or both in your environment, you don't need to do it again.
2. Test the installation and configuration of the AWS CLI, the aws-shell, or both by running theDynamoDB list-tables command from a terminal session in your environment to list your existingDynamoDB tables, if there are any. To start a new terminal session, on the menu bar, choose Windows,New Terminal.
aws dynamodb list-tables # For the AWS CLI.dynamodb list-tables # For the aws-shell.
NoteThroughout this sample, if you're using the aws-shell, omit aws from each command thatstarts with aws. To start the aws-shell, run the aws-shell command. To stop using theaws-shell, run the .exit or .quit command.
If this command succeeds, it outputs a TableNames array containing a list of existing DynamoDBtables that you might already have. If you have no DynamoDB tables yet, the TableNames array willbe empty.
{ "TableNames": []}
If you do have any DynamoDB tables, the TableNames array contains a list of the table names.
332

AWS Cloud9 User GuideStep 2: Create a Table
Step 2: Create a TableIn this step, you create a table in DynamoDB and specify the table's name, layout, simple primary key,and data throughput settings.
This sample table, named Weather, contains information about weather forecasts for a few cities inthe United States. The table holds the following types of information (in DynamoDB, each piece ofinformation is known as an attribute):
• Required unique city ID (CityID)• Required forecast date (Date)• City name (City)• State name (State)• Forecast weather conditions (Conditions)• Forecast temperatures (Temperatures)
• Forecast high, in degrees Fahrenheit (HighF)• Forecast low, in degrees Fahrenheit (LowF)
To create the table, in a terminal session in the AWS Cloud9 IDE, run the DynamoDB create-table command.
aws dynamodb create-table \--table-name Weather \--attribute-definitions \ AttributeName=CityID,AttributeType=N AttributeName=Date,AttributeType=S \--key-schema \ AttributeName=CityID,KeyType=HASH AttributeName=Date,KeyType=RANGE \--provisioned-throughput ReadCapacityUnits=5,WriteCapacityUnits=5
In this command:
• --table-name represents the table name (Weather in this sample). Table names must be uniquewithin each AWS Region in your AWS account.
• --attribute-definitions represents the attributes that are used to uniquely identify the tableitems. Each of this table's items are uniquely identified by a combination of a numerical ID attributeand a Date attribute represented as an ISO-8601 formatted string.
• --key-schema represents the table's key schema. This table has a composite primary key of CityIDand Date. This means that each of the table items must have a CityID attribute value and a Dateattribute value, but no two items in the table can have both the same CityID attribute value andDate attribute value.
• --provisioned-throughput represents the table's read-write capacity. DynamoDB allows up to 5strongly consistent reads per second for items up to 4 KB in size, or up to 5 eventually consistent readsper second for items up to 4 KB in size. DynamoDB also allows up to 5 writes per second for items upto 1 KB in size.
NoteSetting higher provisioned throughput might result in additional charges to your AWSaccount.For more information about this and other DynamoDB commands, see dynamodb in the AWSCLI Command Reference.
If this command succeeds, it displays summary information about the new table that is being created. Toconfirm the table is successfully created, run the DynamoDB describe-table command, specifyingthe table's name (--table-name).
333
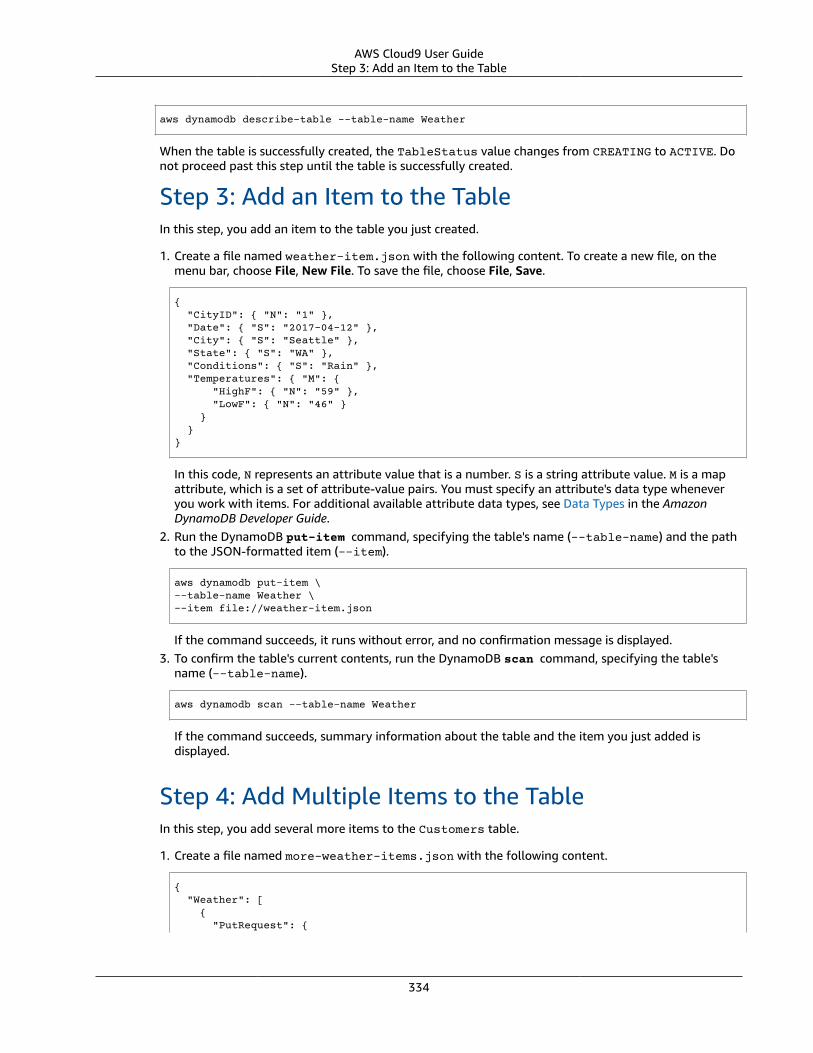
AWS Cloud9 User GuideStep 3: Add an Item to the Table
aws dynamodb describe-table --table-name Weather
When the table is successfully created, the TableStatus value changes from CREATING to ACTIVE. Donot proceed past this step until the table is successfully created.
Step 3: Add an Item to the TableIn this step, you add an item to the table you just created.
1. Create a file named weather-item.json with the following content. To create a new file, on themenu bar, choose File, New File. To save the file, choose File, Save.
{ "CityID": { "N": "1" }, "Date": { "S": "2017-04-12" }, "City": { "S": "Seattle" }, "State": { "S": "WA" }, "Conditions": { "S": "Rain" }, "Temperatures": { "M": { "HighF": { "N": "59" }, "LowF": { "N": "46" } } }}
In this code, N represents an attribute value that is a number. S is a string attribute value. M is a mapattribute, which is a set of attribute-value pairs. You must specify an attribute's data type wheneveryou work with items. For additional available attribute data types, see Data Types in the AmazonDynamoDB Developer Guide.
2. Run the DynamoDB put-item command, specifying the table's name (--table-name) and the pathto the JSON-formatted item (--item).
aws dynamodb put-item \--table-name Weather \--item file://weather-item.json
If the command succeeds, it runs without error, and no confirmation message is displayed.3. To confirm the table's current contents, run the DynamoDB scan command, specifying the table's
name (--table-name).
aws dynamodb scan --table-name Weather
If the command succeeds, summary information about the table and the item you just added isdisplayed.
Step 4: Add Multiple Items to the TableIn this step, you add several more items to the Customers table.
1. Create a file named more-weather-items.json with the following content.
{ "Weather": [ { "PutRequest": {
334

AWS Cloud9 User GuideStep 4: Add Multiple Items to the Table
"Item": { "CityID": { "N": "1" }, "Date": { "S": "2017-04-13" }, "City": { "S": "Seattle" }, "State": { "S": "WA" }, "Conditions": { "S": "Rain" }, "Temperatures": { "M": { "HighF": { "N": "52" }, "LowF": { "N": "43" } } } } } }, { "PutRequest": { "Item": { "CityID": { "N": "1" }, "Date": { "S": "2017-04-14" }, "City": { "S": "Seattle" }, "State": { "S": "WA" }, "Conditions": { "S": "Rain" }, "Temperatures": { "M": { "HighF": { "N": "49" }, "LowF": { "N": "43" } } } } } }, { "PutRequest": { "Item": { "CityID": { "N": "2" }, "Date": { "S": "2017-04-12" }, "City": { "S": "Portland" }, "State": { "S": "OR" }, "Conditions": { "S": "Thunderstorms" }, "Temperatures": { "M": { "HighF": { "N": "59" }, "LowF": { "N": "43" } } } } } }, { "PutRequest": { "Item": { "CityID": { "N": "2" }, "Date": { "S": "2017-04-13" }, "City": { "S": "Portland" }, "State": { "S": "OR" }, "Conditions": { "S": "Rain" }, "Temperatures": { "M": { "HighF": { "N": "51" }, "LowF": { "N": "41" } } } } } }, { "PutRequest": { "Item": { "CityID": { "N": "2" },
335

AWS Cloud9 User GuideStep 4: Add Multiple Items to the Table
"Date": { "S": "2017-04-14" }, "City": { "S": "Portland" }, "State": { "S": "OR" }, "Conditions": { "S": "Rain Showers" }, "Temperatures": { "M": { "HighF": { "N": "49" }, "LowF": { "N": "39" } } } } } }, { "PutRequest": { "Item": { "CityID": { "N": "3" }, "Date": { "S": "2017-04-12" }, "City": { "S": "Portland" }, "State": { "S": "ME" }, "Conditions": { "S": "Rain" }, "Temperatures": { "M": { "HighF": { "N": "59" }, "LowF": { "N": "40" } } } } } }, { "PutRequest": { "Item": { "CityID": { "N": "3" }, "Date": { "S": "2017-04-13" }, "City": { "S": "Portland" }, "State": { "S": "ME" }, "Conditions": { "S": "Partly Sunny" }, "Temperatures": { "M": { "HighF": { "N": "54" }, "LowF": { "N": "37" } } } } } }, { "PutRequest": { "Item": { "CityID": { "N": "3" }, "Date": { "S": "2017-04-14" }, "City": { "S": "Portland" }, "State": { "S": "ME" }, "Conditions": { "S": "Mostly Sunny" }, "Temperatures": { "M": { "HighF": { "N": "53" }, "LowF": { "N": "37" } } } } } } ]}
In this code, 8 Item objects define the 8 items to add to the table, similar to the single item definedin the previous step. However, when you run the DynamoDB batch-write-item command in the
336

AWS Cloud9 User GuideStep 5: Create a Global Secondary Index
next step, you must provide a JSON-formatted object that includes each Item object in a containingPutRequest object. Then you must include those PutRequest objects in a parent array that has thesame name as the table.
2. Run the DynamoDB batch-write-item command, specifying the path to the JSON-formatteditems to add (--request-items).
aws dynamodb batch-write-item \--request-items file://more-weather-items.json
If the command succeeds, it displays the following message, confirming that the items weresuccessfully added.
{ "UnprocessedItems": {}}
3. To confirm the table's current contents, run the DynamoDB scan command again.
aws dynamodb scan --table-name Weather
If the command succeeds, 9 items are now displayed.
Step 5: Create a Global Secondary IndexRunning the DynamoDB scan command to get information about items can be slow, especially as atable grows in size or if the type of information you want to get is complex. You can create one or moresecondary indexes to speed things up and make getting information easier. In this step, you learn abouttwo types of secondary indexes that DynamoDB supports to do just that. These are known as a localsecondary index and a global secondary index. Then you create a global secondary index.
To understand these secondary index types, you first need to know about primary keys, which uniquelyidentify a table's items. DynamoDB supports a simple primary key or a composite primary key. A simpleprimary key has a single attribute, and that attribute value must be unique for each item in the table.This attribute is also known as a partition key (or a hash attribute), which DynamoDB can use to partitionitems for faster access. A table can also have a composite primary key, which contains two attributes. Thefirst attribute is the partition key, and the second is a sort key (also known as a range attribute). In a tablewith a composite primary key, any two items can have the same partition key value, but they cannot alsohave the same sort key value. The Weather table has a composite primary key.
A local secondary index has the same partition key as the table itself, but this index type can havea different sort key. A global secondary index can have a partition key and a sort key that are bothdifferent from the table itself.
For example, you can already use the primary key to access Weather items by CityID. To accessWeather items by State, you could create a local secondary index that has a partition key of CityID(it must be the same as the table itself) and a sort key of State. To access Weather items by City, youcould create a global secondary index that has a partition key of City and a sort key of Date.
You can create local secondary indexes only while you are creating a table. Because the Weather tablealready exists, you cannot add any local secondary indexes to it. However, you can add global secondaryindexes. Practice adding one now.
NoteCreating secondary indexes might result in additional charges to your AWS account.
1. Create a file named weather-global-index.json with the following content.
337
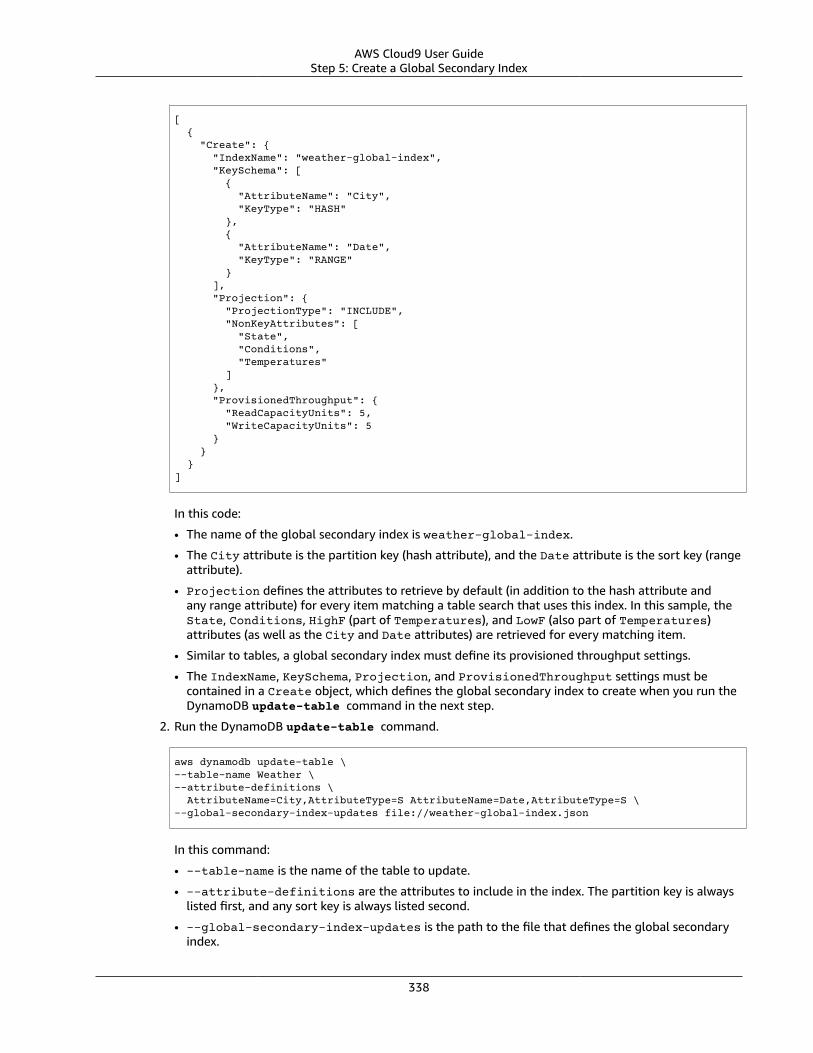
AWS Cloud9 User GuideStep 5: Create a Global Secondary Index
[ { "Create": { "IndexName": "weather-global-index", "KeySchema": [ { "AttributeName": "City", "KeyType": "HASH" }, { "AttributeName": "Date", "KeyType": "RANGE" } ], "Projection": { "ProjectionType": "INCLUDE", "NonKeyAttributes": [ "State", "Conditions", "Temperatures" ] }, "ProvisionedThroughput": { "ReadCapacityUnits": 5, "WriteCapacityUnits": 5 } } }]
In this code:
• The name of the global secondary index is weather-global-index.
• The City attribute is the partition key (hash attribute), and the Date attribute is the sort key (rangeattribute).
• Projection defines the attributes to retrieve by default (in addition to the hash attribute andany range attribute) for every item matching a table search that uses this index. In this sample, theState, Conditions, HighF (part of Temperatures), and LowF (also part of Temperatures)attributes (as well as the City and Date attributes) are retrieved for every matching item.
• Similar to tables, a global secondary index must define its provisioned throughput settings.
• The IndexName, KeySchema, Projection, and ProvisionedThroughput settings must becontained in a Create object, which defines the global secondary index to create when you run theDynamoDB update-table command in the next step.
2. Run the DynamoDB update-table command.
aws dynamodb update-table \--table-name Weather \--attribute-definitions \ AttributeName=City,AttributeType=S AttributeName=Date,AttributeType=S \--global-secondary-index-updates file://weather-global-index.json
In this command:
• --table-name is the name of the table to update.
• --attribute-definitions are the attributes to include in the index. The partition key is alwayslisted first, and any sort key is always listed second.
• --global-secondary-index-updates is the path to the file that defines the global secondaryindex.
338
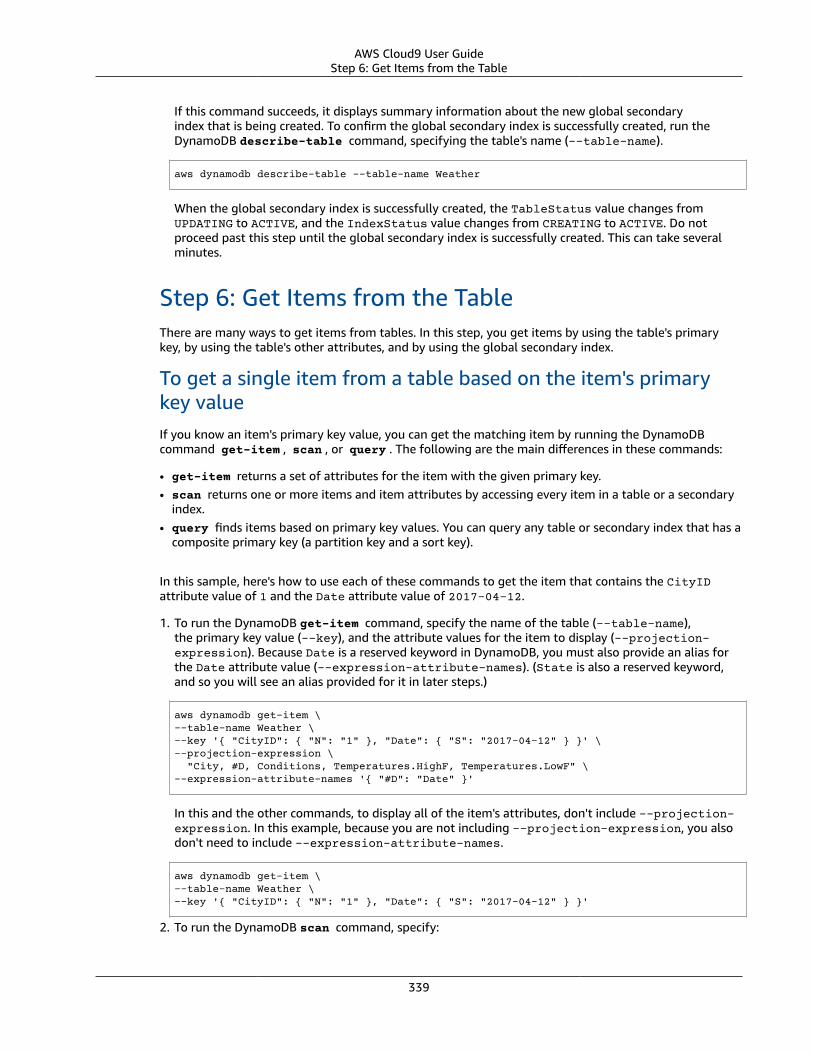
AWS Cloud9 User GuideStep 6: Get Items from the Table
If this command succeeds, it displays summary information about the new global secondaryindex that is being created. To confirm the global secondary index is successfully created, run theDynamoDB describe-table command, specifying the table's name (--table-name).
aws dynamodb describe-table --table-name Weather
When the global secondary index is successfully created, the TableStatus value changes fromUPDATING to ACTIVE, and the IndexStatus value changes from CREATING to ACTIVE. Do notproceed past this step until the global secondary index is successfully created. This can take severalminutes.
Step 6: Get Items from the TableThere are many ways to get items from tables. In this step, you get items by using the table's primarykey, by using the table's other attributes, and by using the global secondary index.
To get a single item from a table based on the item's primarykey valueIf you know an item's primary key value, you can get the matching item by running the DynamoDBcommand get-item , scan , or query . The following are the main differences in these commands:
• get-item returns a set of attributes for the item with the given primary key.• scan returns one or more items and item attributes by accessing every item in a table or a secondary
index.• query finds items based on primary key values. You can query any table or secondary index that has a
composite primary key (a partition key and a sort key).
In this sample, here's how to use each of these commands to get the item that contains the CityIDattribute value of 1 and the Date attribute value of 2017-04-12.
1. To run the DynamoDB get-item command, specify the name of the table (--table-name),the primary key value (--key), and the attribute values for the item to display (--projection-expression). Because Date is a reserved keyword in DynamoDB, you must also provide an alias forthe Date attribute value (--expression-attribute-names). (State is also a reserved keyword,and so you will see an alias provided for it in later steps.)
aws dynamodb get-item \--table-name Weather \--key '{ "CityID": { "N": "1" }, "Date": { "S": "2017-04-12" } }' \--projection-expression \ "City, #D, Conditions, Temperatures.HighF, Temperatures.LowF" \--expression-attribute-names '{ "#D": "Date" }'
In this and the other commands, to display all of the item's attributes, don't include --projection-expression. In this example, because you are not including --projection-expression, you alsodon't need to include --expression-attribute-names.
aws dynamodb get-item \--table-name Weather \--key '{ "CityID": { "N": "1" }, "Date": { "S": "2017-04-12" } }'
2. To run the DynamoDB scan command, specify:
339

AWS Cloud9 User GuideStep 6: Get Items from the Table
• The name of the table (--table-name).
• The search to run (--filter-expression).
• The search criteria to use (--expression-attribute-values).
• The kinds of attributes to display for the matching item (--select).
• The attribute values for the item to display (--projection-expression).
• If any of your attributes are using reserved keywords in DynamoDB, aliases for those attributes (--expression-attribute-names).
aws dynamodb scan \--table-name Weather \--filter-expression "(CityID = :cityID) and (#D = :date)" \--expression-attribute-values \ '{ ":cityID": { "N": "1" }, ":date": { "S": "2017-04-12" } }' \--select SPECIFIC_ATTRIBUTES \--projection-expression \ "City, #D, Conditions, Temperatures.HighF, Temperatures.LowF" \--expression-attribute-names '{ "#D": "Date" }'
3. To run the DynamoDB query command, specify:
• The name of the table (--table-name).
• The search to run (--key-condition-expression).
• The attribute values to use in the search (--expression-attribute-values).
• The kinds of attributes to display for the matching item (--select).
• The attribute values for the item to display (--projection-expression).
• If any of your attributes are using reserved keywords in DynamoDB, aliases for those attributes (--expression-attribute-names).
aws dynamodb query \--table-name Weather \--key-condition-expression "(CityID = :cityID) and (#D = :date)" \--expression-attribute-values \ '{ ":cityID": { "N": "1" }, ":date": { "S": "2017-04-12" } }' \--select SPECIFIC_ATTRIBUTES \--projection-expression \ "City, #D, Conditions, Temperatures.HighF, Temperatures.LowF" \--expression-attribute-names '{ "#D": "Date" }'
Notice that the scan command needed to scan all 9 items to get the result, while the query command only needed to scan for 1 item.
To get multiple items from a table based on the items' primarykey values
If you know the items' primary key values, you can get the matching items by running the DynamoDBbatch-get-item command. In this sample, here's how to get the items that contain the CityIDattribute value of 3 and Date attribute values of 2017-04-13 or 2017-04-14.
Run the DynamoDB batch-get-item command, specifying the path to a file describing the items toget (--request-items).
aws dynamodb batch-get-item --request-items file://batch-get-item.json
340
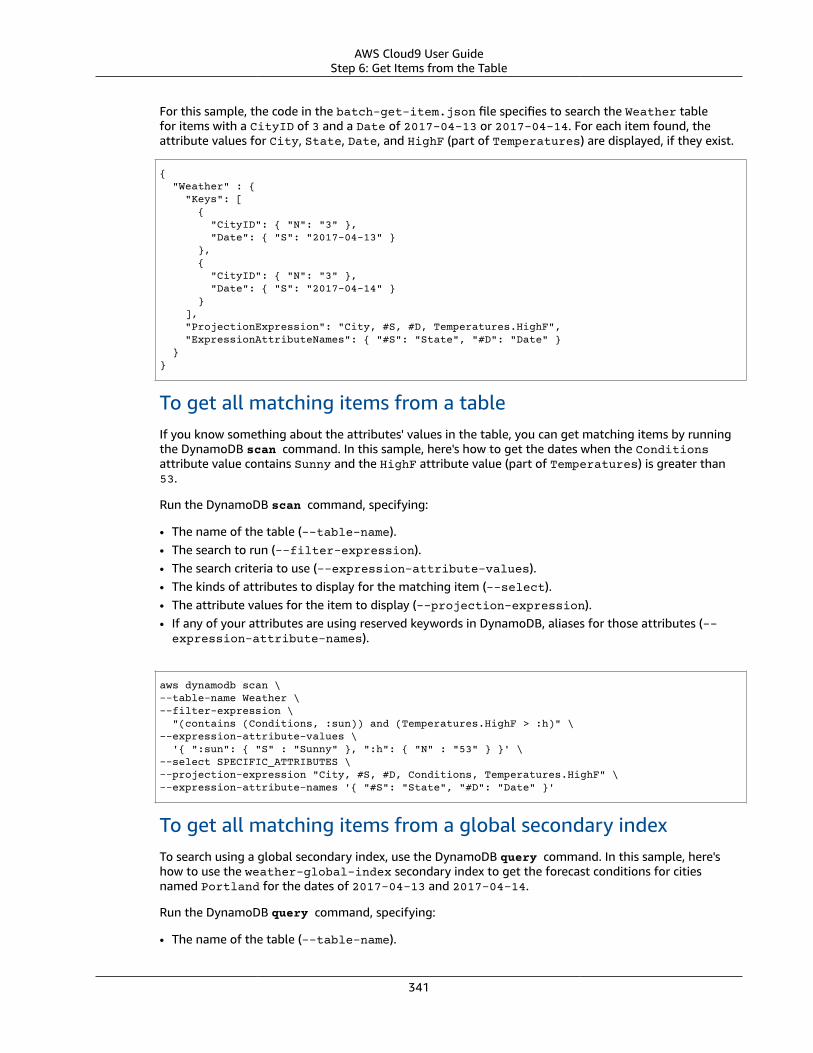
AWS Cloud9 User GuideStep 6: Get Items from the Table
For this sample, the code in the batch-get-item.json file specifies to search the Weather tablefor items with a CityID of 3 and a Date of 2017-04-13 or 2017-04-14. For each item found, theattribute values for City, State, Date, and HighF (part of Temperatures) are displayed, if they exist.
{ "Weather" : { "Keys": [ { "CityID": { "N": "3" }, "Date": { "S": "2017-04-13" } }, { "CityID": { "N": "3" }, "Date": { "S": "2017-04-14" } } ], "ProjectionExpression": "City, #S, #D, Temperatures.HighF", "ExpressionAttributeNames": { "#S": "State", "#D": "Date" } }}
To get all matching items from a tableIf you know something about the attributes' values in the table, you can get matching items by runningthe DynamoDB scan command. In this sample, here's how to get the dates when the Conditionsattribute value contains Sunny and the HighF attribute value (part of Temperatures) is greater than53.
Run the DynamoDB scan command, specifying:
• The name of the table (--table-name).• The search to run (--filter-expression).• The search criteria to use (--expression-attribute-values).• The kinds of attributes to display for the matching item (--select).• The attribute values for the item to display (--projection-expression).• If any of your attributes are using reserved keywords in DynamoDB, aliases for those attributes (--expression-attribute-names).
aws dynamodb scan \--table-name Weather \--filter-expression \ "(contains (Conditions, :sun)) and (Temperatures.HighF > :h)" \--expression-attribute-values \ '{ ":sun": { "S" : "Sunny" }, ":h": { "N" : "53" } }' \--select SPECIFIC_ATTRIBUTES \--projection-expression "City, #S, #D, Conditions, Temperatures.HighF" \--expression-attribute-names '{ "#S": "State", "#D": "Date" }'
To get all matching items from a global secondary indexTo search using a global secondary index, use the DynamoDB query command. In this sample, here'show to use the weather-global-index secondary index to get the forecast conditions for citiesnamed Portland for the dates of 2017-04-13 and 2017-04-14.
Run the DynamoDB query command, specifying:
• The name of the table (--table-name).
341

AWS Cloud9 User GuideStep 7: Clean Up
• The name of the global secondary index (--index-name).• The search to run (--key-condition-expression).• The attribute values to use in the search (--expression-attribute-values).• The kinds of attributes to display for the matching item (--select).• If any of your attributes are using reserved keywords in DynamoDB, aliases for those attributes (--expression-attribute-names).
aws dynamodb query \--table-name Weather \--index-name weather-global-index \--key-condition-expression "(City = :city) and (#D between :date1 and :date2)" \--expression-attribute-values \ '{ ":city": { "S" : "Portland" }, ":date1": { "S": "2017-04-13" }, ":date2": { "S": "2017-04-14" } }' \--select SPECIFIC_ATTRIBUTES \--projection-expression "City, #S, #D, Conditions, Temperatures.HighF" \--expression-attribute-names '{ "#S": "State", "#D": "Date" }'
Step 7: Clean UpTo prevent ongoing charges to your AWS account after you're done using this sample, you should deletethe table. Deleting the table deletes the global secondary index as well. You should also delete yourenvironment.
To delete the table, run the DynamoDB delete-table command, specifying the table's name (--table-name).
aws dynamodb delete-table --table-name Weather
If the command succeeds, information about the table is displayed, including the TableStatus value ofDELETING.
To confirm the table is successfully deleted, run the DynamoDB describe-table command, specifyingthe table's name (--table-name).
aws dynamodb describe-table --table-name Weather
If the table is successfully deleted, a message containing the phrase Requested resource not foundis displayed.
To delete your environment, see Deleting an Environment (p. 104).
Node.js Sample for AWS Cloud9This sample enables you to run some Node.js scripts in an AWS Cloud9 development environment.
Creating this sample might result in charges to your AWS account. These include possible chargesfor services such as Amazon EC2 and Amazon S3. For more information, see Amazon EC2 Pricing andAmazon S3 Pricing.
• Prerequisites (p. 343)• Step 1: Install Required Tools (p. 343)• Step 2: Add Code (p. 343)
342
AWS Cloud9 User GuidePrerequisites
• Step 3: Run the Code (p. 344)• Step 4: Install and Configure the AWS SDK for JavaScript (p. 344)• Step 5: Add AWS SDK Code (p. 345)• Step 6: Run the AWS SDK Code (p. 346)• Step 7: Clean Up (p. 347)
PrerequisitesBefore you use this sample, be sure to meet the following requirements.
• You must have an existing AWS Cloud9 development environment. This sample assumes you alreadyhave an AWS Cloud9 EC2 development environment that is connected to an Amazon EC2 instancerunning Amazon Linux. If you have a different type of environment or operating system, you mightneed to adapt this sample's instructions to set up related tools. See Creating an Environment (p. 72)for details.
• You have the AWS Cloud IDE for the existing environment already open. When you open anenvironment, AWS Cloud9 opens the IDE for that environment in your web browser. See Opening anEnvironment (p. 77) for details.
Step 1: Install Required ToolsIn this step, you install Node.js, which is required to run this sample.
1. In a terminal session in the AWS Cloud9 IDE, confirm whether Node.js is already installed by runningthe node --version command. (To start a new terminal session, on the menu bar, choose Window,New Terminal.) If successful, the output contains the Node.js version number. If Node.js is installed,skip ahead to Step 2: Add Code (p. 343).
2. Run the yum update command to help ensure the latest security updates and bug fixes areinstalled.
sudo yum -y update
3. To install Node.js, begin by running this command to download Node Version Manager (nvm). (nvmis a simple Bash shell script that is useful for installing and managing Node.js versions. For moreinformation, see Node Version Manager on the GitHub website.)
curl -o- https://raw.githubusercontent.com/creationix/nvm/v0.33.0/install.sh | bash
4. To start using nvm, either close the terminal session and start it again, or source the ~/.bashrc filethat contains the commands to load nvm.
. ~/.bashrc
5. Run this command to install the latest version of Node.js.
nvm install node
Step 2: Add CodeIn the AWS Cloud9 IDE, create a file with this content, and save the file with the name hello.js. (Tocreate a file, on the menu bar, choose File, New File. To save the file, choose File, Save.)
343

AWS Cloud9 User GuideStep 3: Run the Code
console.log('Hello, World!');
console.log('The sum of 2 and 3 is 5.');
var sum = parseInt(process.argv[2], 10) + parseInt(process.argv[3], 10);
console.log('The sum of ' + process.argv[2] + ' and ' + process.argv[3] + ' is ' + sum + '.');
Step 3: Run the Code1. In the AWS Cloud9 IDE, on the menu bar, choose Run, Run Configurations, New Run Configuration.2. On the [New] - Idle tab, choose Runner: Auto, and then choose Node.js.3. For Command, type hello.js 5 9. In the code, 5 represents process.argv[2], and 9 represents
process.argv[3]. (process.argv[0] represents the name of the runtime (node), andprocess.argv[1] represents the name of the file (hello.js).)
4. Choose the Run button, and compare your output.
Hello, World!The sum of 2 and 3 is 5.The sum of 5 and 9 is 14.
Step 4: Install and Configure the AWS SDK forJavaScriptYou can enhance this sample to use the AWS SDK for JavaScript to create an Amazon S3 bucket, list youravailable buckets, and then delete the bucket you just created.
In this step, you install and configure the AWS SDK for JavaScript, which provides a convenient way tointeract with AWS services such as Amazon S3, from your JavaScript code. After you install the AWSSDK for JavaScript, you must set up credentials management in your environment. The AWS SDK forJavaScript needs these credentials to interact with AWS services.
To install the AWS SDK for JavaScriptUse npm to run the install command.
344

AWS Cloud9 User GuideStep 5: Add AWS SDK Code
npm install aws-sdk
For more information, see Installing the SDK for JavaScript in the AWS SDK for JavaScript DeveloperGuide.
To set up credentials management in your environmentEach time you use the AWS SDK for JavaScript to call an AWS service, you must provide a set ofcredentials with the call. These credentials determine whether the AWS SDK for JavaScript has theappropriate permissions to make that call. If the credentials do not cover the appropriate permissions,the call will fail.
In this step, you store your credentials within the environment. To do this, follow the instructions in CallAWS Services from an Environment (p. 80), and then return to this topic.
For additional information, see Setting Credentials in Node.js in the AWS SDK for JavaScript DeveloperGuide.
Step 5: Add AWS SDK CodeIn this step, you add some more code, this time to interact with Amazon S3 to create a bucket, list youravailable buckets, and then delete the bucket you just created. You will run this code later.
In the AWS Cloud9 IDE, create a file with this content, and save the file with the name s3.js.
if (process.argv.length < 4) { console.log('Usage: node s3.js <the bucket name> <the AWS Region to use>\n' + 'Example: node s3.js my-test-bucket us-east-2'); process.exit(1);}
var AWS = require('aws-sdk'); // To set the AWS credentials and region.var async = require('async'); // To call AWS operations asynchronously.
AWS.config.update({ region: region});
var s3 = new AWS.S3({apiVersion: '2006-03-01'});var bucket_name = process.argv[2];var region = process.argv[3];
var create_bucket_params = { Bucket: bucket_name, CreateBucketConfiguration: { LocationConstraint: region }};
var delete_bucket_params = {Bucket: bucket_name};
// List all of your available buckets in this AWS Region.function listMyBuckets(callback) { s3.listBuckets(function(err, data) { if (err) {
} else { console.log("My buckets now are:\n");
for (var i = 0; i < data.Buckets.length; i++) {
345

AWS Cloud9 User GuideStep 6: Run the AWS SDK Code
console.log(data.Buckets[i].Name); } }
callback(err); });}
// Create a bucket in this AWS Region.function createMyBucket(callback) { console.log('\nCreating a bucket named ' + bucket_name + '...\n');
s3.createBucket(create_bucket_params, function(err, data) { if (err) { console.log(err.code + ": " + err.message); }
callback(err); });}
// Delete the bucket you just created.function deleteMyBucket(callback) { console.log('\nDeleting the bucket named ' + bucket_name + '...\n');
s3.deleteBucket(delete_bucket_params, function(err, data) { if (err) { console.log(err.code + ": " + err.message); }
callback(err); });}
// Call the AWS operations in the following order.async.series([ listMyBuckets, createMyBucket, listMyBuckets, deleteMyBucket, listMyBuckets]);
Step 6: Run the AWS SDK Code1. Enable the code to call Amazon S3 operations asynchronously by using npm to run the install
command.
npm install async
2. In the AWS Cloud9 IDE, on the menu bar, choose Run, Run Configurations, New Run Configuration.
3. On the [New] - Idle tab, choose Runner: Auto, and then choose Node.js.
4. For Command, type s3.js YOUR_BUCKET_NAME THE_AWS_REGION , where YOUR_BUCKET_NAMEis the name of the bucket you want to create and then delete, and THE_AWS_REGION is the ID ofthe AWS Region you want to create the bucket in. For example, for the US East (Ohio) Region, use us-east-2. For more IDs, see Amazon Simple Storage Service (Amazon S3) in the Amazon Web ServicesGeneral Reference.
NoteAmazon S3 bucket names must be unique across AWS—not just your AWS account.
5. Choose the Run button, and compare your output.
346

AWS Cloud9 User GuideStep 7: Clean Up
My buckets now are:
Creating a new bucket named 'my-test-bucket'...
My buckets now are:
my-test-bucket
Deleting the bucket named 'my-test-bucket'...
My buckets now are:
Step 7: Clean UpTo prevent ongoing charges to your AWS account after you're done using this sample, you should deletethe environment. For instructions, see Deleting an Environment (p. 104).
Python Sample for AWS Cloud9This sample enables you to run some Python scripts in an AWS Cloud9 development environment.
Creating this sample might result in charges to your AWS account. These include possible chargesfor services such as Amazon EC2 and Amazon S3. For more information, see Amazon EC2 Pricing andAmazon S3 Pricing.
• Prerequisites (p. 347)• Step 1: Install Required Tools (p. 347)• Step 2: Add Code (p. 349)• Step 3: Run the Code (p. 349)• Step 4: Install and Configure the AWS SDK for Python (Boto) (p. 350)• Step 5: Add AWS SDK Code (p. 350)• Step 6: Run the AWS SDK Code (p. 351)• Step 7: Clean Up (p. 352)
PrerequisitesBefore you use this sample, be sure to meet the following requirements.
• You must have an existing AWS Cloud9 development environment. This sample assumes you alreadyhave an AWS Cloud9 EC2 development environment that is connected to an Amazon EC2 instancerunning Amazon Linux. If you have a different type of environment or operating system, you mightneed to adapt this sample's instructions to set up related tools. See Creating an Environment (p. 72)for details.
• You have the AWS Cloud IDE for the existing environment already open. When you open anenvironment, AWS Cloud9 opens the IDE for that environment in your web browser. See Opening anEnvironment (p. 77) for details.
Step 1: Install Required ToolsIn this step, you install Python, which is required to run this sample.
347

AWS Cloud9 User GuideStep 1: Install Required Tools
1. In a terminal session in the AWS Cloud9 IDE, confirm whether Python is already installed by runningthe python --version command. (To start a new terminal session, on the menu bar, chooseWindow, New Terminal.) If successful, the output contains the Python version number. If Python isinstalled, skip ahead to Step 2: Add Code (p. 349).
2. Run the yum update command to help ensure the latest security updates and bug fixes areinstalled.
sudo yum -y update
3. Install Python by running one or more of these install commands.
sudo yum -y install python27 # Installs Python 2.7.sudo yum -y install python36 # Installs Python 3.6.
NoteIf you have Python 2 and 3 installed, and you want to use Python 3 but running the python--version command outputs a version of Python 2, you can use Python 3 in one or more ofthe following ways:
• Instead of using the built-in Python 2 runner in the IDE, use the built-in Python 3 runner.For more information, see Step 3: Run the Code (p. 349).
• Instead of running the python command in a terminal session in the IDE, run the python3command instead.
• To set up the python command to use Python 3, use a tool such as virtualenv to createa virtual environment for Python 3, and then activate the new virtual environment. Forexample, you can run commands similar to the following to create and then activate thevirtual environment:
virtualenv --version # If a version number is not output, see https://virtualenv.pypa.io/en/stable/installation/.which python # If the 'python' command is aliased to something like '/usr/bin/python27', prepare to unalias it.unalias python # If the 'python' command is aliased to something like '/usr/bin/python27', unalias it.python --version # Output the current Python version, for example 'Python 2.7.12'.python3 --version # Output the current version of Python 3, for example 'Python 3.6.2'.which python36 # Output the path to the python36 binary, for example '/usr/bin/python36'.cd ~/environment/ # Prepare to create a virtual environment in this path.virtualenv -p /usr/bin/python36 vpy36 # Create a virtual environment for Python 3.6 in this path.source vpy36/bin/activate # Switch to use Python 3.6 instead of Python 2.7.12 when you run the 'python --version' command.python --version # Output the current Python version, for example 'Python 3.6.2'.deactivate # If and when you are done using Python 3.6, prepare to make Python 2.7.12 active again.alias python=/usr/bin/python27 # Switch back to outputting '/usr/bin/python27' when you run the 'which python' command.
For more information, see Installation and Usage on the virtualenv website.
For more information, see Download Python on the Python website and Installing Packages in thePython Packaging User Guide.
348

AWS Cloud9 User GuideStep 2: Add Code
Step 2: Add CodeIn the AWS Cloud9 IDE, create a file with this content, and save the file with the name hello.py. (Tocreate a file, on the menu bar, choose File, New File. To save the file, choose File, Save.)
import sys
print('Hello, World!')
print('The sum of 2 and 3 is 5.')
sum = int(sys.argv[1]) + int(sys.argv[2])
print('The sum of {0} and {1} is {2}.'.format(sys.argv[1], sys.argv[2], sum))
NoteThe preceding code doesn't rely on any custom Python modules or packages. However, if youever import custom Python modules or packages, and you want AWS Cloud9 to use thosemodules or packages to do code completion as you type, turn on the Project, Python Support,Enable Python code completion setting in Preferences, and then add the paths to thosemodules or packages to the Project, Python Support, PYTHONPATH setting. (To view andchange your preferences, choose AWS Cloud9, Preferences on the menu bar.)
Step 3: Run the Code1. In the AWS Cloud9 IDE, on the menu bar, choose Run, Run Configurations, New Run Configuration.2. On the [New] - Idle tab, choose Runner: Auto, and then choose Python 2 or Python 3, depending on
which version of Python you want to use.
NoteIf Python 2 or Python 3 isn't available, you can create a custom runner for the version ofPython that is installed in your environment.a. On the [New] - Idle tab, choose Runner: Auto, and then choose New Runner.b. On the My Runner.run tab, replace the tab's contents with this code.
{ "cmd" : ["python", "$file", "$args"], "info" : "Running $project_path$file_name...", "selector" : "source.py"}
c. Choose File, Save As on the menu bar, and save the file as Python.run in the /.c9/runners folder.
d. On the [New] - Idle tab, choose Runner: Auto, and then choose Python.e. Choose the hello.py tab to make it active.To use a specific version of Python that is installed in your environment, change python tothe path to the Python executable in the preceding custom runner definition (for example, /usr/bin/python27, /usr/bin/python36, or similar).
3. For Command, type hello.py 5 9. In the code, 5 represents sys.argv[1], and 9 representssys.argv[2].
4. Choose the Run button, and compare your output.
Hello, World!The sum of 2 and 3 is 5.The sum of 5 and 9 is 14.
349

AWS Cloud9 User GuideStep 4: Install and Configure
the AWS SDK for Python (Boto)
Step 4: Install and Configure the AWS SDK for Python(Boto)You can enhance this sample to use the AWS SDK for Python (Boto) to create an Amazon S3 bucket, listyour available buckets, and then delete the bucket you just created.
In this step, you install and configure the AWS SDK for Python (Boto), which provides a convenient wayto interact with AWS services, such as Amazon S3, from your Python code. Before you can install theAWS SDK for Python (Boto), you must install pip. After you install the AWS SDK for Python (Boto), youmust set up credentials management in your environment. The AWS SDK for Python (Boto) needs thesecredentials to interact with AWS services.
To install pip
1. In the AWS Cloud9 IDE, confirm whether pip is already installed by running the pip --version command. If successful, the output contains the pip version number. Otherwise, an error messageshould be output. If pip is installed, skip ahead to the next procedure, "To install the AWS SDK forPython (Boto)."
2. To install pip, run these commands, one at a time.
curl -O https://bootstrap.pypa.io/get-pip.py # Get the install script.sudo python get-pip.py # Install pip.rm get-pip.py # Delete the install script.
For more information, see pip Installation on the pip website.
To install the AWS SDK for Python (Boto)
After you install pip, use Python to run the pip install command.
sudo python -m pip install boto3
For more information, see the "Installation" section of Quickstart in the AWS SDK for Python DeveloperGuide.
To set up credentials management in your environment
Each time you use the AWS SDK for Python (Boto) to call an AWS service, you must provide a set ofcredentials with the call. These credentials determine whether the AWS SDK for Python (Boto) has theappropriate permissions to make that call. If the credentials don't cover the appropriate permissions, thecall will fail.
In this step, you store your credentials within the environment. To do this, follow the instructions in CallAWS Services from an Environment (p. 80), and then return to this topic.
For additional information, see Credentials in the AWS SDK for Python Developer Guide.
Step 5: Add AWS SDK CodeIn this step, you add some more code, this time to interact with Amazon S3 to create a bucket, list youravailable buckets, and then delete the bucket you just created. You will run this code later.
350
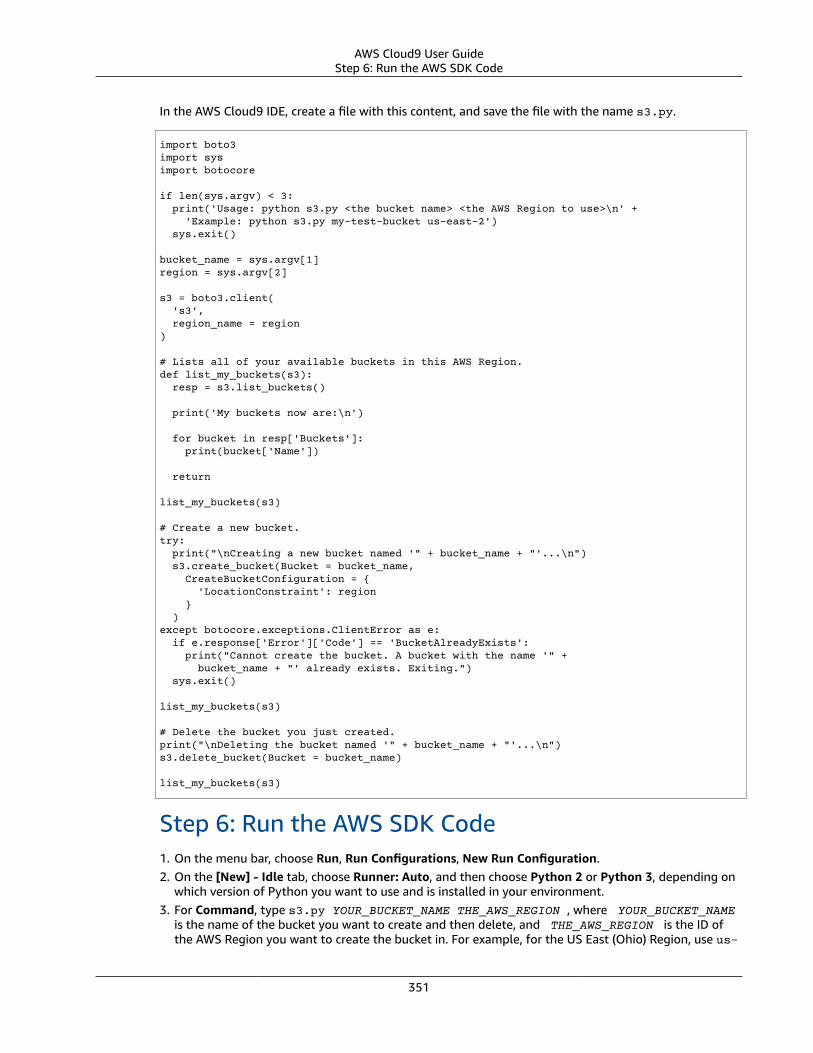
AWS Cloud9 User GuideStep 6: Run the AWS SDK Code
In the AWS Cloud9 IDE, create a file with this content, and save the file with the name s3.py.
import boto3import sysimport botocore
if len(sys.argv) < 3: print('Usage: python s3.py <the bucket name> <the AWS Region to use>\n' + 'Example: python s3.py my-test-bucket us-east-2') sys.exit()
bucket_name = sys.argv[1]region = sys.argv[2]
s3 = boto3.client( 's3', region_name = region)
# Lists all of your available buckets in this AWS Region.def list_my_buckets(s3): resp = s3.list_buckets()
print('My buckets now are:\n')
for bucket in resp['Buckets']: print(bucket['Name'])
return
list_my_buckets(s3)
# Create a new bucket.try: print("\nCreating a new bucket named '" + bucket_name + "'...\n") s3.create_bucket(Bucket = bucket_name, CreateBucketConfiguration = { 'LocationConstraint': region } )except botocore.exceptions.ClientError as e: if e.response['Error']['Code'] == 'BucketAlreadyExists': print("Cannot create the bucket. A bucket with the name '" + bucket_name + "' already exists. Exiting.") sys.exit()
list_my_buckets(s3)
# Delete the bucket you just created.print("\nDeleting the bucket named '" + bucket_name + "'...\n")s3.delete_bucket(Bucket = bucket_name)
list_my_buckets(s3)
Step 6: Run the AWS SDK Code1. On the menu bar, choose Run, Run Configurations, New Run Configuration.2. On the [New] - Idle tab, choose Runner: Auto, and then choose Python 2 or Python 3, depending on
which version of Python you want to use and is installed in your environment.3. For Command, type s3.py YOUR_BUCKET_NAME THE_AWS_REGION , where YOUR_BUCKET_NAME
is the name of the bucket you want to create and then delete, and THE_AWS_REGION is the ID ofthe AWS Region you want to create the bucket in. For example, for the US East (Ohio) Region, use us-
351
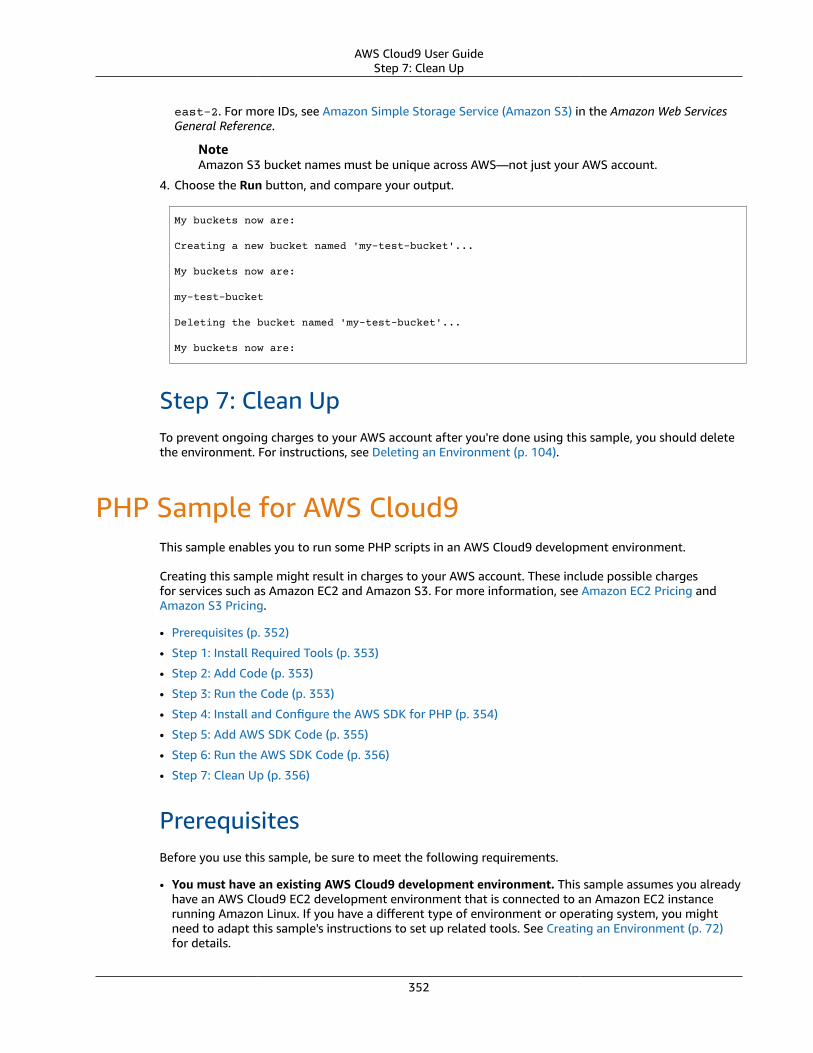
AWS Cloud9 User GuideStep 7: Clean Up
east-2. For more IDs, see Amazon Simple Storage Service (Amazon S3) in the Amazon Web ServicesGeneral Reference.
NoteAmazon S3 bucket names must be unique across AWS—not just your AWS account.
4. Choose the Run button, and compare your output.
My buckets now are:
Creating a new bucket named 'my-test-bucket'...
My buckets now are:
my-test-bucket
Deleting the bucket named 'my-test-bucket'...
My buckets now are:
Step 7: Clean UpTo prevent ongoing charges to your AWS account after you're done using this sample, you should deletethe environment. For instructions, see Deleting an Environment (p. 104).
PHP Sample for AWS Cloud9This sample enables you to run some PHP scripts in an AWS Cloud9 development environment.
Creating this sample might result in charges to your AWS account. These include possible chargesfor services such as Amazon EC2 and Amazon S3. For more information, see Amazon EC2 Pricing andAmazon S3 Pricing.
• Prerequisites (p. 352)
• Step 1: Install Required Tools (p. 353)
• Step 2: Add Code (p. 353)
• Step 3: Run the Code (p. 353)
• Step 4: Install and Configure the AWS SDK for PHP (p. 354)
• Step 5: Add AWS SDK Code (p. 355)
• Step 6: Run the AWS SDK Code (p. 356)
• Step 7: Clean Up (p. 356)
PrerequisitesBefore you use this sample, be sure to meet the following requirements.
• You must have an existing AWS Cloud9 development environment. This sample assumes you alreadyhave an AWS Cloud9 EC2 development environment that is connected to an Amazon EC2 instancerunning Amazon Linux. If you have a different type of environment or operating system, you mightneed to adapt this sample's instructions to set up related tools. See Creating an Environment (p. 72)for details.
352

AWS Cloud9 User GuideStep 1: Install Required Tools
• You have the AWS Cloud IDE for the existing environment already open. When you open anenvironment, AWS Cloud9 opens the IDE for that environment in your web browser. See Opening anEnvironment (p. 77) for details.
Step 1: Install Required ToolsIn this step, you install PHP, which is required to run this sample.
NoteThe following procedure installs PHP only. To install related tools such as an Apache web serverand a MySQL database, see Tutorial: Installing a LAMP Web Server on Amazon Linux in theAmazon EC2 User Guide for Linux Instances.
1. In a terminal session in the AWS Cloud9 IDE, confirm whether PHP is already installed by running the php --version command. (To start a new terminal session, on the menu bar, choose Window, NewTerminal.) If successful, the output contains the PHP version number. If PHP is installed, skip ahead toStep 2: Add Code (p. 353).
2. Run the yum update command to help ensure the latest security updates and bug fixes areinstalled.
sudo yum -y update
3. Install PHP by running the install command.
sudo yum -y install php56
For more information, see Installation and Configuration on the PHP website.
Step 2: Add CodeIn the AWS Cloud9 IDE, create a file with this content, and save the file with the name hello.php. (Tocreate a file, on the menu bar, choose File, New File. To save the file, choose File, Save, type hello.phpfor Filename, and then choose Save.)
<?php print('Hello, World!');
print("\nThe sum of 2 and 3 is 5.");
$sum = (int)$argv[1] + (int)$argv[2];
print("\nThe sum of $argv[1] and $argv[2] is $sum.");?>
NoteThe preceding code doesn't rely on any external files. However, if you ever include or requireother PHP files in your file, and you want AWS Cloud9 to use those files to do code completionas you type, turn on the Project, PHP Support, Enable PHP code completion settingin Preferences, and then add the paths to those files to the Project, PHP Support, PHPCompletion Include Paths setting. (To view and change your preferences, choose AWS Cloud9,Preferences on the menu bar.)
Step 3: Run the Code1. In the AWS Cloud9 IDE, on the menu bar, choose Run, Run Configurations, New Run Configuration.
353
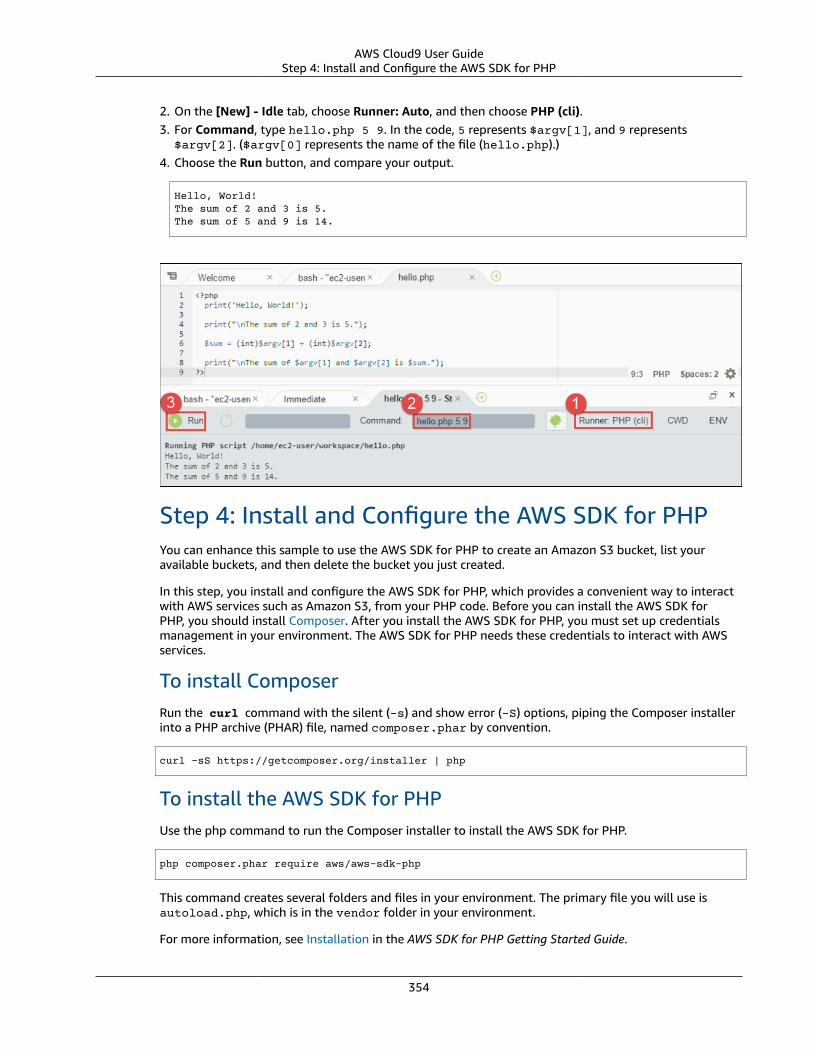
AWS Cloud9 User GuideStep 4: Install and Configure the AWS SDK for PHP
2. On the [New] - Idle tab, choose Runner: Auto, and then choose PHP (cli).3. For Command, type hello.php 5 9. In the code, 5 represents $argv[1], and 9 represents
$argv[2]. ($argv[0] represents the name of the file (hello.php).)4. Choose the Run button, and compare your output.
Hello, World!The sum of 2 and 3 is 5.The sum of 5 and 9 is 14.
Step 4: Install and Configure the AWS SDK for PHPYou can enhance this sample to use the AWS SDK for PHP to create an Amazon S3 bucket, list youravailable buckets, and then delete the bucket you just created.
In this step, you install and configure the AWS SDK for PHP, which provides a convenient way to interactwith AWS services such as Amazon S3, from your PHP code. Before you can install the AWS SDK forPHP, you should install Composer. After you install the AWS SDK for PHP, you must set up credentialsmanagement in your environment. The AWS SDK for PHP needs these credentials to interact with AWSservices.
To install ComposerRun the curl command with the silent (-s) and show error (-S) options, piping the Composer installerinto a PHP archive (PHAR) file, named composer.phar by convention.
curl -sS https://getcomposer.org/installer | php
To install the AWS SDK for PHPUse the php command to run the Composer installer to install the AWS SDK for PHP.
php composer.phar require aws/aws-sdk-php
This command creates several folders and files in your environment. The primary file you will use isautoload.php, which is in the vendor folder in your environment.
For more information, see Installation in the AWS SDK for PHP Getting Started Guide.
354

AWS Cloud9 User GuideStep 5: Add AWS SDK Code
To set up credentials management in your environmentEach time you use the AWS SDK for PHP to call an AWS service, you must provide a set of credentialswith the call. These credentials determine whether the AWS SDK for PHP has the appropriatepermissions to make that call. If the credentials don't cover the appropriate permissions, the call will fail.
In this step, you store your credentials within the environment. To do this, follow the instructions in CallAWS Services from an Environment (p. 80), and then return to this topic.
For additional information, see the "Creating a client" section of Basic Usage in the AWS SDK for PHPGetting Started Guide.
Step 5: Add AWS SDK CodeIn this step, you add some more code, this time to interact with Amazon S3 to create a bucket, list youravailable buckets, and then delete the bucket you just created. You will run this code later.
In the AWS Cloud9 IDE, create a file with this content, and save the file with the name s3.php.
<?php require './vendor/autoload.php';
if ($argc < 4) { exit("Usage: php s3.php <the time zone> <the bucket name> <the AWS Region to use>\n" . "Example: php s3.php America/Los_Angeles my-test-bucket us-east-2"); }
$timeZone = $argv[1]; $bucketName = $argv[2]; $region = $argv[3];
date_default_timezone_set($timeZone);
$s3 = new Aws\S3\S3Client([ 'region' => $region, 'version' => '2006-03-01' ]);
# Lists all of your available buckets in this AWS Region. function listMyBuckets($s3) { print("\nMy buckets now are:\n");
$promise = $s3->listBucketsAsync();
$result = $promise->wait();
foreach ($result['Buckets'] as $bucket) { print("\n"); print($bucket['Name']); } }
listMyBuckets($s3);
# Create a new bucket. print("\n\nCreating a new bucket named '$bucketName'...\n");
try { $promise = $s3->createBucketAsync([ 'Bucket' => $bucketName, 'CreateBucketConfiguration' => [ 'LocationConstraint' => $region ]
355

AWS Cloud9 User GuideStep 6: Run the AWS SDK Code
]);
$promise->wait();
} catch (Exception $e) { if ($e->getCode() == 'BucketAlreadyExists') { exit("\nCannot create the bucket. " . "A bucket with the name '$bucketName' already exists. Exiting."); } }
listMyBuckets($s3);
# Delete the bucket you just created. print("\n\nDeleting the bucket named '$bucketName'...\n");
$promise = $s3->deleteBucketAsync([ 'Bucket' => $bucketName ]);
$promise->wait();
listMyBuckets($s3);?>
Step 6: Run the AWS SDK Code1. In the AWS Cloud9 IDE, on the menu bar, choose Run, Run Configurations, New Run Configuration.
2. On the [New] - Idle tab, choose Runner: Auto, and then choose PHP (cli).
3. For Command, type s3.php YOUR_TIME_ZONE YOUR_BUCKET_NAME THE_AWS_REGION , where:
• YOUR_TIME_ZONE is your default time zone ID. For example, for the Pacific Time Zone, useAmerica/Los_Angeles. For more IDs, see List of Supported Timezones on the PHP website.
• YOUR_BUCKET_NAME is the name of the bucket you want to create and then delete.
• THE_AWS_REGION is the ID of the AWS Region you want to create the bucket in. For example,for the US East (Ohio) Region, use us-east-2. For more IDs, see Amazon Simple Storage Service(Amazon S3) in the Amazon Web Services General Reference.
NoteAmazon S3 bucket names must be unique across AWS—not just your AWS account.
4. Choose the Run button, and compare your output.
My buckets now are:
Creating a new bucket named 'my-test-bucket'...
My buckets now are:
my-test-bucket
Deleting the bucket named 'my-test-bucket'...
My buckets now are:
Step 7: Clean UpTo prevent ongoing charges to your AWS account after you're done using this sample, you should deletethe environment. For instructions, see Deleting an Environment (p. 104).
356

AWS Cloud9 User GuideRuby Sample
Ruby Sample for AWS Cloud9This sample enables you to run some Ruby scripts in an AWS Cloud9 development environment.
Creating this sample might result in charges to your AWS account. These include possible chargesfor services such as Amazon EC2 and Amazon S3. For more information, see Amazon EC2 Pricing andAmazon S3 Pricing.
• Prerequisites (p. 357)
• Step 1: Install Required Tools (p. 357)
• Step 2: Add Code (p. 358)
• Step 3: Run the Code (p. 358)
• Step 4: Install and Configure the AWS SDK for Ruby (p. 358)
• Step 5: Add AWS SDK Code (p. 359)
• Step 6: Run the AWS SDK Code (p. 360)
• Step 7: Clean Up (p. 361)
PrerequisitesBefore you use this sample, be sure to meet the following requirements.
• You must have an existing AWS Cloud9 development environment. This sample assumes you alreadyhave an AWS Cloud9 EC2 development environment that is connected to an Amazon EC2 instancerunning Amazon Linux. If you have a different type of environment or operating system, you mightneed to adapt this sample's instructions to set up related tools. See Creating an Environment (p. 72)for details.
• You have the AWS Cloud IDE for the existing environment already open. When you open anenvironment, AWS Cloud9 opens the IDE for that environment in your web browser. See Opening anEnvironment (p. 77) for details.
Step 1: Install Required ToolsIn this step, you install Ruby, which is required to run this sample.
1. In a terminal session in the AWS Cloud9 IDE, confirm whether Ruby is already installed by running the ruby --version command. (To start a new terminal session, on the menu bar, choose Window,New Terminal.) If successful, the output contains the Ruby version number. If Ruby is installed, skipahead to Step 2: Add Code (p. 358).
2. Run the yum update command to help ensure the latest security updates and bug fixes areinstalled.
sudo yum -y update
3. Install Ruby by running the install command.
sudo yum -y install ruby
For more information, see Installing Ruby on the Ruby website.
357
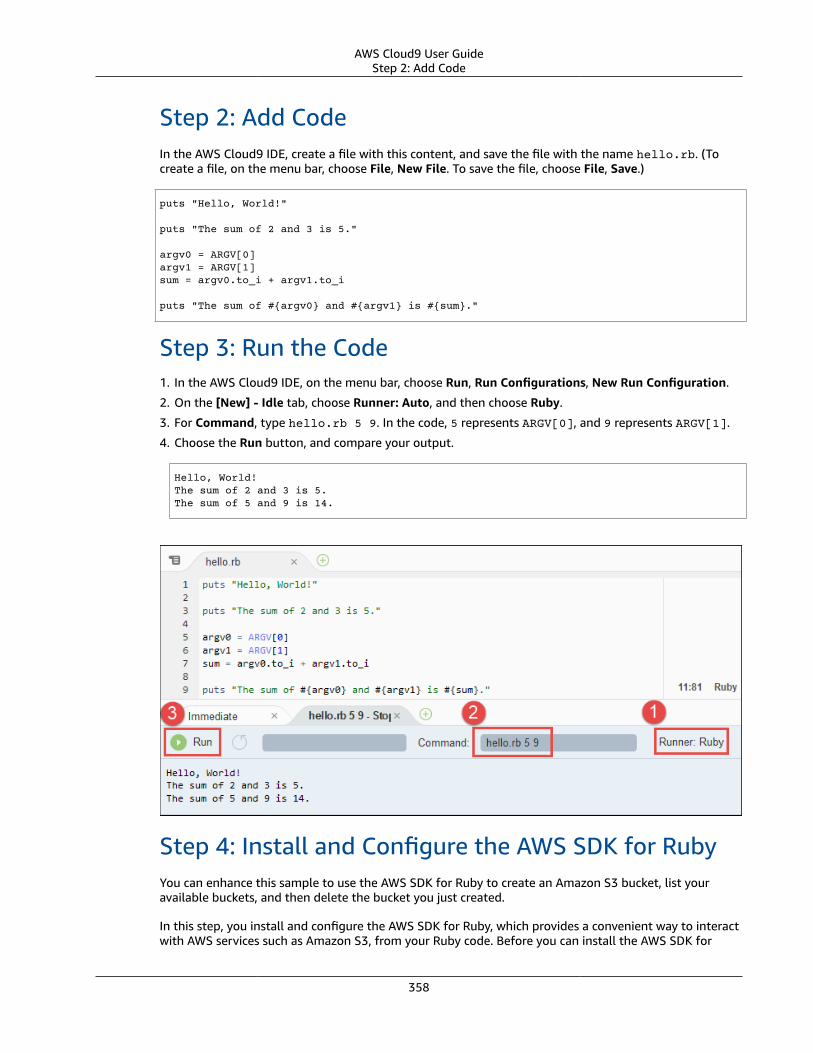
AWS Cloud9 User GuideStep 2: Add Code
Step 2: Add CodeIn the AWS Cloud9 IDE, create a file with this content, and save the file with the name hello.rb. (Tocreate a file, on the menu bar, choose File, New File. To save the file, choose File, Save.)
puts "Hello, World!"
puts "The sum of 2 and 3 is 5."
argv0 = ARGV[0]argv1 = ARGV[1]sum = argv0.to_i + argv1.to_i
puts "The sum of #{argv0} and #{argv1} is #{sum}."
Step 3: Run the Code1. In the AWS Cloud9 IDE, on the menu bar, choose Run, Run Configurations, New Run Configuration.
2. On the [New] - Idle tab, choose Runner: Auto, and then choose Ruby.
3. For Command, type hello.rb 5 9. In the code, 5 represents ARGV[0], and 9 represents ARGV[1].
4. Choose the Run button, and compare your output.
Hello, World!The sum of 2 and 3 is 5.The sum of 5 and 9 is 14.
Step 4: Install and Configure the AWS SDK for RubyYou can enhance this sample to use the AWS SDK for Ruby to create an Amazon S3 bucket, list youravailable buckets, and then delete the bucket you just created.
In this step, you install and configure the AWS SDK for Ruby, which provides a convenient way to interactwith AWS services such as Amazon S3, from your Ruby code. Before you can install the AWS SDK for
358

AWS Cloud9 User GuideStep 5: Add AWS SDK Code
Ruby, you must install RubyGems. After you install the AWS SDK for Ruby, you must set up credentialsmanagement in your environment. The AWS SDK for Ruby needs these credentials to interact with AWSservices.
To install RubyGems
1. In the AWS Cloud9 IDE, confirm whether RubyGems is already installed by running the gem --version command. If successful, the output contains the RubyGems version number. Otherwise,an error message should be output. If RubyGems is installed, skip ahead to "Step 4.2: Install the AWSSDK for Ruby."
2. To install RubyGems, run the install command.
sudo yum -y install gem
For more information, see Download RubyGems on the RubyGems website.
To install the AWS SDK for Ruby
After you install RubyGems, run the gem install command.
sudo gem install aws-sdk
For more information, see Installing the AWS SDK for Ruby in the AWS SDK for Ruby Developer Guide.
To set up credentials management in your environment
Each time you use the AWS SDK for Ruby to call an AWS service, you must provide a set of credentialswith the call. These credentials determine whether the AWS SDK for Ruby has the appropriatepermissions to make that call. If the credentials don't cover the appropriate permissions, the call will fail.
In this step, you will store your credentials within the environment. To do this, follow the instructions inCall AWS Services from an Environment (p. 80), and then return to this topic.
For additional information, see Configuring the AWS SDK for Ruby in the AWS SDK for Ruby DeveloperGuide.
Step 5: Add AWS SDK CodeIn this step, you will add some more code, this time to interact with Amazon S3 to create a bucket, listyour available buckets, and then delete the bucket you just created. You will run this code later.
In the AWS Cloud9 IDE, create a file with this content, and save the file with the name s3.rb.
require 'aws-sdk'
if ARGV.length < 2 puts "Usage: ruby s3.rb <the bucket name> <the AWS Region to use>\n" + "Example: ruby s3.rb my-test-bucket us-east-2"end
bucket_name = ARGV[0]region = ARGV[1]s3 = Aws::S3::Client.new(region: region)
359

AWS Cloud9 User GuideStep 6: Run the AWS SDK Code
# Lists all of your available buckets in this AWS Region.def list_my_buckets(s3) resp = s3.list_buckets() puts "My buckets now are:\n\n"
resp.buckets.each do |bucket| puts bucket.name end
end
list_my_buckets(s3)
# Create a new bucket.begin puts "\nCreating a new bucket named '#{bucket_name}'...\n\n" s3.create_bucket({ bucket: bucket_name, create_bucket_configuration: { location_constraint: region } })rescue Aws::S3::Errors::BucketAlreadyExists puts "Cannot create the bucket. " + "A bucket with the name '#{bucket_name}' already exists. Exiting." exit(false)end
list_my_buckets(s3)
# Delete the bucket you just created.puts "\nDeleting the bucket named '#{bucket_name}'...\n\n"s3.delete_bucket(bucket: bucket_name)
list_my_buckets(s3)
Step 6: Run the AWS SDK Code1. In the AWS Cloud9 IDE, on the menu bar, choose Run, Run Configurations, New Run Configuration.2. In the [New] - Idle tab, choose Runner: Auto, and then choose Ruby.3. For Command, type s3.rb YOUR_BUCKET_NAME THE_AWS_REGION , where YOUR_BUCKET_NAME
is the name of the bucket you want to create and then delete, and THE_AWS_REGION is the ID ofthe AWS Region you want to create the bucket in. For example, for the US East (Ohio) Region, use us-east-2. For more IDs, see Amazon Simple Storage Service (Amazon S3) in the Amazon Web ServicesGeneral Reference.
NoteAmazon S3 bucket names must be unique across AWS—not just your AWS account.
4. Choose the Run button, and compare your output.
My buckets now are:
Creating a new bucket named 'my-test-bucket'...
My buckets now are:
my-test-bucket
Deleting the bucket named 'my-test-bucket'...
My buckets now are:
360

AWS Cloud9 User GuideStep 7: Clean Up
Step 7: Clean UpTo prevent ongoing charges to your AWS account after you're done using this sample, you should deletethe environment. For instructions, see Deleting an Environment (p. 104).
Go Sample for AWS Cloud9This sample enables you to run some Go code in an AWS Cloud9 development environment.
Creating this sample might result in charges to your AWS account. These include possible chargesfor services such as Amazon EC2 and Amazon S3. For more information, see Amazon EC2 Pricing andAmazon S3 Pricing.
• Prerequisites (p. 361)
• Step 1: Install Required Tools (p. 361)
• Step 2: Add Code (p. 362)
• Step 3: Run the Code (p. 362)
• Step 4: Install and Configure the AWS SDK for Go (p. 363)
• Step 5: Add AWS SDK Code (p. 364)
• Step 6: Run the AWS SDK Code (p. 366)
• Step 7: Clean Up (p. 366)
PrerequisitesBefore you use this sample, be sure to meet the following requirements.
• You must have an existing AWS Cloud9 development environment. This sample assumes you alreadyhave an AWS Cloud9 EC2 development environment that is connected to an Amazon EC2 instancerunning Amazon Linux. If you have a different type of environment or operating system, you mightneed to adapt this sample's instructions to set up related tools. See Creating an Environment (p. 72)for details.
• You have the AWS Cloud IDE for the existing environment already open. When you open anenvironment, AWS Cloud9 opens the IDE for that environment in your web browser. See Opening anEnvironment (p. 77) for details.
Step 1: Install Required ToolsIn this step, you install and configure Go, which is required to run this sample.
1. In a terminal session in the AWS Cloud9 IDE, confirm whether Go is already installed by runningthe go version command. (To start a new terminal session, on the menu bar, choose Window,New Terminal.) If successful, the output should contain the Go version number. Otherwise, an errormessage should be output. If Go is installed, skip ahead to Step 2: Add Code (p. 362).
2. Run the yum update command to help ensure the latest security updates and bug fixes areinstalled.
sudo yum -y update
3. To install Go, run these commands, one at a time.
361

AWS Cloud9 User GuideStep 2: Add Code
wget https://storage.googleapis.com/golang/go1.9.3.linux-amd64.tar.gz # Download the Go installer.sudo tar -C /usr/local -xzf ./go1.9.3.linux-amd64.tar.gz # Install Go.rm ./go1.9.3.linux-amd64.tar.gz # Delete the installer.
The preceding commands assume the latest stable version of Go at the time this topic was written. Formore information, see Downloads on The Go Programming Language website.
4. Add the path to the Go binary to your PATH environment variable, like this.a. Open your shell profile file (for example, ~/.bashrc in Amazon Linux) for editing.b. At the end of this line of code, type the following, so that the code now looks like this.
PATH=$PATH:/usr/local/go/bin
a. Save the file.5. Source the ~/.bashrc file so that the terminal can now find the Go binary you just referenced.
. ~/.bashrc
6. Confirm that Go is now successfully installed and configured by running the go version command.If successful, the output contains the Go version number.
Step 2: Add CodeIn the AWS Cloud9 IDE, create a file with this content, and save the file with the name hello.go. (Tocreate a file, on the menu bar, choose File, New File. To save the file, choose File, Save.)
package main
import ( "fmt" "os" "strconv")
func main() { fmt.Printf("Hello, World!\n")
fmt.Printf("The sum of 2 and 3 is 5.\n")
first, _ := strconv.Atoi(os.Args[1]) second, _ := strconv.Atoi(os.Args[2]) sum := first + second
fmt.Printf("The sum of %s and %s is %s.", os.Args[1], os.Args[2], strconv.Itoa(sum))}
Step 3: Run the Code1. In the AWS Cloud9 IDE, on the menu bar, choose Run, Run Configurations, New Run Configuration.2. On the [New] - Idle tab, choose Runner: Auto, and then choose Go.
NoteIf Go is not available, you can create a custom runner for Go.
362

AWS Cloud9 User GuideStep 4: Install and Configure the AWS SDK for Go
a. On the [New] - Idle tab, choose Runner: Auto, and then choose New Runner.
b. On the My Runner.run tab, replace the tab's contents with this code.
{ "cmd" : ["go", "run", "$file", "$args"], "info" : "Running $project_path$file_name...", "selector" : "source.go"}
c. Choose File, Save As on the menu bar, and save the file as Go.run in the /.c9/runnersfolder.
d. On the [New] - Idle tab, choose Runner: Auto, and then choose Go.
e. Choose the hello.go tab to make it active.
3. For Command, type hello.go 5 9. In the code, 5 represents os.Args[1], and 9 representsos.Args[2].
4. Choose the Run button, and compare your output.
Hello, World!The sum of 2 and 3 is 5.The sum of 5 and 9 is 14.
Step 4: Install and Configure the AWS SDK for GoYou can enhance this sample to use the AWS SDK for Go to create an Amazon S3 bucket, list youravailable buckets, and then delete the bucket you just created.
In this step, you install and configure the AWS SDK for Go, which provides a convenient way to interactwith AWS services such as Amazon S3, from your Go code. Before you install the AWS SDK for Go, you
363

AWS Cloud9 User GuideStep 5: Add AWS SDK Code
must set your GOPATH environment variable. After you install the AWS SDK for Go and set your GOPATHenvironment variable, you must set up credentials management in your environment. The AWS SDK forGo needs these credentials to interact with AWS services.
To set your GOPATH environment variable
1. Open your ~/.bashrc file for editing.
2. After the last line in the file, type this code.
GOPATH=~/environment/go
export GOPATH
3. Save the file.
4. Source the ~/.bashrc file so that the terminal can now find the GOPATH environment variable youjust referenced.
. ~/.bashrc
5. Confirm that the GOPATH environment variable is successfully set by running the echo $GOPATH command. If successful, /home/ec2-user/environment/go should be output.
To install the AWS SDK for GoRun the go get command, specifying the location of the AWS SDK for Go source.
go get -u github.com/aws/aws-sdk-go/...
Go installs the AWS SDK for Go source into the location specified by your GOPATH environment variable,which is the go folder in your environment.
To set up credentials management in your environmentEach time you use the AWS SDK for Go to call an AWS service, you must provide a set of credentials withthe call. These credentials determine whether the AWS SDK for Go has the appropriate permissions tomake that call. If the credentials don't cover the appropriate permissions, the call will fail.
In this step, you store your credentials within the environment. To do this, follow the instructions in CallAWS Services from an Environment (p. 80), and then return to this topic.
For additional information, see Specifying Credentials in the AWS SDK for Go Developer Guide.
Step 5: Add AWS SDK CodeIn this step, you add some more code, this time to interact with Amazon S3 to create a bucket, list youravailable buckets, and then delete the bucket you just created. You will run this code later.
In the AWS Cloud9 IDE, create a file with this content, and save the file with the name s3.go.
package main
import ( "fmt" "os"
364

AWS Cloud9 User GuideStep 5: Add AWS SDK Code
"github.com/aws/aws-sdk-go/aws" "github.com/aws/aws-sdk-go/aws/session" "github.com/aws/aws-sdk-go/service/s3")
func main() {
if len(os.Args) < 3 { fmt.Printf("Usage: go run s3.go <the bucket name> <the AWS Region to use>\n" + "Example: go run s3.go my-test-bucket us-east-2\n") os.Exit(1) }
sess := session.Must(session.NewSessionWithOptions(session.Options{ SharedConfigState: session.SharedConfigEnable, })) svc := s3.New(sess, &aws.Config{ Region: aws.String(os.Args[2]), })
listMyBuckets(svc) createMyBucket(svc, os.Args[1], os.Args[2]) listMyBuckets(svc) deleteMyBucket(svc, os.Args[1]) listMyBuckets(svc)}
// List all of your available buckets in this AWS Region.func listMyBuckets(svc *s3.S3) { result, err := svc.ListBuckets(nil)
if err != nil { exitErrorf("Unable to list buckets, %v", err) }
fmt.Println("My buckets now are:\n")
for _, b := range result.Buckets { fmt.Printf(aws.StringValue(b.Name) + "\n") }
fmt.Printf("\n")}
// Create a bucket in this AWS Region.func createMyBucket(svc *s3.S3, bucketName string, region string) { fmt.Printf("\nCreating a new bucket named '" + bucketName + "'...\n\n")
_, err := svc.CreateBucket(&s3.CreateBucketInput{ Bucket: aws.String(bucketName), CreateBucketConfiguration: &s3.CreateBucketConfiguration{ LocationConstraint: aws.String(region), }, })
if err != nil { exitErrorf("Unable to create bucket, %v", err) }}
// Delete the bucket you just created.func deleteMyBucket(svc *s3.S3, bucketName string) { fmt.Printf("\nDeleting the bucket named '" + bucketName + "'...\n\n")
_, err := svc.DeleteBucket(&s3.DeleteBucketInput{ Bucket: aws.String(bucketName),
365

AWS Cloud9 User GuideStep 6: Run the AWS SDK Code
})
if err != nil { exitErrorf("Unable to delete bucket, %v", err) }}
// If there's an error, display it.func exitErrorf(msg string, args ...interface{}) { fmt.Fprintf(os.Stderr, msg+"\n", args...) os.Exit(1)}
Step 6: Run the AWS SDK Code1. In the AWS Cloud9 IDE, on the menu bar, choose Run, Run Configurations, New Run Configuration.
2. On the [New] - Idle tab, choose Runner: Auto, and then choose Go.
3. For Command, type s3.go YOUR_BUCKET_NAME THE_AWS_REGION , where YOUR_BUCKET_NAMEis the name of the bucket you want to create and then delete, and THE_AWS_REGION is the ID ofthe AWS Region you want to create the bucket in. For example, for the US East (Ohio) Region, use us-east-2. For more IDs, see Amazon Simple Storage Service (Amazon S3) in the Amazon Web ServicesGeneral Reference.
NoteAmazon S3 bucket names must be unique across AWS—not just your AWS account.
4. Choose the Run button, and compare your output.
My buckets now are:
Creating a new bucket named 'my-test-bucket'...
My buckets now are:
my-test-bucket
Deleting the bucket named 'my-test-bucket'...
My buckets now are:
Step 7: Clean UpTo prevent ongoing charges to your AWS account after you're done using this sample, you should deletethe environment. For instructions, see Deleting an Environment (p. 104).
C++ Sample for AWS Cloud9This sample enables you to run some C++ code in an AWS Cloud9 development environment.
Creating this sample might result in charges to your AWS account. These include possible chargesfor services such as Amazon EC2 and Amazon S3. For more information, see Amazon EC2 Pricing andAmazon S3 Pricing.
• Prerequisites (p. 367)
• Step 1: Install Required Tools (p. 367)
366
AWS Cloud9 User GuidePrerequisites
• Step 2: Add Code (p. 367)
• Step 3: Run the Code (p. 368)
• Step 4: Install and Configure the AWS SDK for C++ (p. 369)
• Step 5: Add AWS SDK Code (p. 370)
• Step 6: Build and Run the AWS SDK Code (p. 373)
• Step 7: Clean Up (p. 374)
PrerequisitesBefore you use this sample, be sure to meet the following requirements.
• You must have an existing AWS Cloud9 development environment. This sample assumes you alreadyhave an AWS Cloud9 EC2 development environment that is connected to an Amazon EC2 instancerunning Amazon Linux. If you have a different type of environment or operating system, you mightneed to adapt this sample's instructions to set up related tools. See Creating an Environment (p. 72)for details.
• You have the AWS Cloud IDE for the existing environment already open. When you open anenvironment, AWS Cloud9 opens the IDE for that environment in your web browser. See Opening anEnvironment (p. 77) for details.
Step 1: Install Required ToolsIn this step, you install and configure the GNU Complier Collection (GCC), which is required to run thissample.
1. In a terminal session in the AWS Cloud9 IDE, confirm whether GCC is already installed by running the g++ --version command. (To start a new terminal session, on the menu bar, choose Window, NewTerminal.) If successful, the output contains the GCC version number. Otherwise, an error messageshould be output. If GCC is installed, skip ahead to Step 2: Add Code (p. 367).
2. Run the yum update command to help ensure the latest security updates and bug fixes areinstalled.
sudo yum -y update
3. To install GCC, run the yum install command.
sudo yum -y install gcc-c++
4. Confirm that GCC is now successfully installed by running the g++ --version command. Ifsuccessful, the output contains the GCC version number.
Step 2: Add CodeIn the AWS Cloud9 IDE, create a file with this content, and save the file with the name hello.cpp. (Tocreate a file, on the menu bar, choose File, New File. To save the file, choose File, Save.)
#include <iostream>#include <stdlib.h>
int main( int argc, char *argv[] ){
367

AWS Cloud9 User GuideStep 3: Run the Code
std::cout << "Hello, World!\n"; std::cout << "The sum of 2 and 3 is 5.\n";
if (argc > 2) { std::cout << "The sum of " << argv[1] << " and " << argv[2] << " is " << atoi(argv[1]) + atoi(argv[2]) << ".\n"; }
return 0;}
Step 3: Run the Code1. Compile the hello.cpp source code into an object module, and then link the object module into a
program named hello. Do this by choosing Run, Build System, G++ followed by Run, Build on themenu bar.
NoteIf G++ is not available, you can create a custom builder for G++.a. Choose Run, Build System, New Build System on the menu bar.b. On the My Builder.build tab, replace the tab's contents with this code.
{ "cmd": [ "g++", "-o", "$file_base_name", "$file_name" ], "info": "Compiling $file_name and linking to $file_base_name...", "selector": "source.cpp"}
c. Choose File, Save As on the menu bar, and then save the file as G++.build in the /.c9/builders folder.
d. Choose the hello.cpp tab to make it active.e. Choose Run, Build System, G++ followed by Run, Build.
2. In the AWS Cloud9 IDE, run the code by choosing Run, Run Configurations, New Run Configurationon the menu bar.
3. On the [New] - Idle tab, choose Runner: Auto, and then choose C++.
NoteIf C++ isn't available, you can create a custom runner for C++.a. On the [New] - Idle tab, choose Runner: Auto, and then choose New Runner.b. On the My Runner.run tab, replace the tab's contents with this code.
{ "cmd" : ["$file", "$args"], "info" : "Running $project_path$file_name...", "selector" : "source"}
c. Choose File, Save As on the menu bar, and then save the file as C++.run in the /.c9/runners folder.
d. On the [New] - Idle tab, choose Runner: Auto, and then choose C++.4. For Command, type hello 5 9. In the code, 5 represents argv[1], and 9 represents argv[2].5. Choose the Run button, and compare your output.
Hello, World!The sum of 2 and 3 is 5.The sum of 5 and 9 is 14.
368

AWS Cloud9 User GuideStep 4: Install and Configure the AWS SDK for C++
Step 4: Install and Configure the AWS SDK for C++You can enhance this sample to use the AWS SDK for C++ to create an Amazon S3 bucket, list youravailable buckets, and then delete the bucket you just created.
In this step, you install and configure the AWS SDK for C++, which provides a convenient way to interactwith AWS services, such as Amazon S3, from your C++ code. Before you install the AWS SDK for C++,you must install some dependencies. After you install the AWS SDK for C++, you must set up credentialsmanagement in your environment. The AWS SDK for C++ needs these credentials to interact with AWSservices.
NoteThe following steps require your environment to be running on an Amazon EC2 instance or yourown server that has at least 4 GB of RAM.
To install AWS SDK for C++ dependenciesFrom a terminal session in the AWS Cloud9 IDE, run the following command to install several packagesthat the AWS SDK for C++ depends on to run correctly.
sudo yum -y install libcurl-devel openssl-devel libuuid-devel cmake3
To download and extract the AWS SDK for C++ source code
1. Run the wget command, specifying the location of the AWS SDK for C++ source.
wget https://github.com/aws/aws-sdk-cpp/archive/master.zip
2. Run the unzip command, specifying the name of the .zip file you just downloaded.
unzip master.zip
3. Run the rm command to delete the .zip file, as you no longer need it.
rm master.zip
To build the AWS SDK for C++NoteThis step could take up to one or more hours to complete, depending on the computingresources available to your Amazon EC2 instance or your own server and how much of the AWSSDK for C++ you choose to build.
1. Create a folder to build the AWS SDK for C++ into.
mkdir sdk_build
2. Switch to the folder you just created.
cd sdk_build
3. Prepare to build the AWS SDK for C++ into this folder.
cmake3 ../aws-sdk-cpp-master
369

AWS Cloud9 User GuideStep 5: Add AWS SDK Code
NoteTo build only the Amazon S3 portion of the AWS SDK for C++ and its dependencies, run thiscommand instead:
cmake3 ../aws-sdk-cpp-master -DBUILD_ONLY="s3"
4. Build the AWS SDK for C++ into this folder.
make
5. After the AWS SDK for C++ successfully builds, switch to the root of your environment.
cd ..
To set up credentials management in your environmentEach time you use the AWS SDK for C++ to call an AWS service, you must provide a set of credentialswith the call. These credentials determine whether the AWS SDK for C++ has the appropriate permissionsto make that call. If the credentials don't cover the appropriate permissions, the call will fail.
In this step, you store your credentials within the environment. To do this, follow the instructions in CallAWS Services from an Environment (p. 80), and then return to this topic.
For additional information, see Providing AWS Credentials in the AWS SDK for C++ Developer Guide.
Step 5: Add AWS SDK CodeIn this step, you add some more code, this time to interact with Amazon S3 to create a bucket, list youravailable buckets, and then delete the bucket you just created. You will run this code later.
1. In the AWS Cloud9 IDE, create a file with this content, and save the file with the name s3-demo.cppat the root (/) of your environment.
#include <aws/core/Aws.h>#include <aws/s3/S3Client.h>#include <aws/s3/model/Bucket.h>#include <aws/s3/model/CreateBucketConfiguration.h>#include <aws/s3/model/CreateBucketRequest.h>#include <aws/s3/model/DeleteBucketRequest.h>#include <string>
bool ListMyBuckets(Aws::S3::S3Client s3_client);bool CreateMyBucket(Aws::S3::S3Client s3_client, Aws::String bucket_name, Aws::S3::Model::BucketLocationConstraint region);bool DeleteMyBucket(Aws::S3::S3Client s3_client, Aws::String bucket_name);void Cleanup(Aws::SDKOptions options);
int main(int argc, char** argv) {
if (argc < 3) { std::cout << "Usage: ./s3-demo <the bucket name> <the AWS Region to use>" << std::endl << "Example: ./s3-demo my-test-bucket us-west-1" << std::endl; return false; }
Aws::String bucket_name = argv[1];
370

AWS Cloud9 User GuideStep 5: Add AWS SDK Code
Aws::Client::ClientConfiguration client_configuration; Aws::S3::Model::BucketLocationConstraint region;
// Set the AWS Region to use, based on the user's AWS Region input ID. if (strcmp(argv[2], "ap-northeast-1") == 0) { client_configuration.region = Aws::Region::AP_NORTHEAST_1; region = Aws::S3::Model::BucketLocationConstraint::ap_northeast_1; } else if (strcmp(argv[2], "ap-northeast-2") == 0) { client_configuration.region = Aws::Region::AP_NORTHEAST_2; region = Aws::S3::Model::BucketLocationConstraint::ap_northeast_2; } else if (strcmp(argv[2], "ap-south-1") == 0) { client_configuration.region = Aws::Region::AP_SOUTH_1; region = Aws::S3::Model::BucketLocationConstraint::ap_south_1; } else if (strcmp(argv[2], "ap-southeast-1") == 0) { client_configuration.region = Aws::Region::AP_SOUTHEAST_1; region = Aws::S3::Model::BucketLocationConstraint::ap_southeast_1; } else if (strcmp(argv[2], "ap-southeast-2") == 0) { client_configuration.region = Aws::Region::AP_SOUTHEAST_2; region = Aws::S3::Model::BucketLocationConstraint::ap_southeast_2; } else if (strcmp(argv[2], "cn-north-1") == 0) { client_configuration.region = Aws::Region::CN_NORTH_1; region = Aws::S3::Model::BucketLocationConstraint::cn_north_1; } else if (strcmp(argv[2], "eu-central-1") == 0) { client_configuration.region = Aws::Region::EU_CENTRAL_1; region = Aws::S3::Model::BucketLocationConstraint::eu_central_1; } else if (strcmp(argv[2], "eu-west-1") == 0) { client_configuration.region = Aws::Region::EU_WEST_1; region = Aws::S3::Model::BucketLocationConstraint::eu_west_1; } else if (strcmp(argv[2], "sa-east-1") == 0) { client_configuration.region = Aws::Region::SA_EAST_1; region = Aws::S3::Model::BucketLocationConstraint::sa_east_1; } else if (strcmp(argv[2], "us-west-1") == 0) { client_configuration.region = Aws::Region::US_WEST_1; region = Aws::S3::Model::BucketLocationConstraint::us_west_1; } else if (strcmp(argv[2], "us-west-2") == 0) { client_configuration.region = Aws::Region::US_WEST_2; region = Aws::S3::Model::BucketLocationConstraint::us_west_2; } else { std::cout << "Unrecognized AWS Region ID '" << argv[2] << "'" << std::endl; return false; }
Aws::SDKOptions options;
Aws::InitAPI(options); { Aws::S3::S3Client s3_client(client_configuration);
if (!ListMyBuckets(s3_client)) { Cleanup(options); }
if (!CreateMyBucket(s3_client, bucket_name, region)) { Cleanup(options); }
if (!ListMyBuckets(s3_client)) { Cleanup(options); }
if (!DeleteMyBucket(s3_client, bucket_name)) { Cleanup(options); }
if (!ListMyBuckets(s3_client)) { Cleanup(options);
371

AWS Cloud9 User GuideStep 5: Add AWS SDK Code
} } Cleanup(options);}
// List all of your available buckets.bool ListMyBuckets(Aws::S3::S3Client s3_client) { auto outcome = s3_client.ListBuckets();
if (outcome.IsSuccess()) { std::cout << "My buckets now are:" << std::endl << std::endl;
Aws::Vector<Aws::S3::Model::Bucket> bucket_list = outcome.GetResult().GetBuckets();
for (auto const &bucket: bucket_list) { std::cout << bucket.GetName() << std::endl; }
std::cout << std::endl; return true; } else { std::cout << "ListBuckets error: " << outcome.GetError().GetExceptionName() << std::endl << outcome.GetError().GetMessage() << std::endl;
return false; }}
// Create a bucket in this AWS Region.bool CreateMyBucket(Aws::S3::S3Client s3_client, Aws::String bucket_name, Aws::S3::Model::BucketLocationConstraint region) { std::cout << "Creating a new bucket named '" << bucket_name << "'..." << std::endl << std::endl;
Aws::S3::Model::CreateBucketConfiguration bucket_configuration; bucket_configuration.WithLocationConstraint(region);
Aws::S3::Model::CreateBucketRequest bucket_request; bucket_request.WithBucket(bucket_name).WithCreateBucketConfiguration(bucket_configuration);
auto outcome = s3_client.CreateBucket(bucket_request);
if (outcome.IsSuccess()) { return true; } else { std::cout << "CreateBucket error: " << outcome.GetError().GetExceptionName() << std::endl << outcome.GetError().GetMessage() << std::endl;
return false; }}
// Delete the bucket you just created.bool DeleteMyBucket(Aws::S3::S3Client s3_client, Aws::String bucket_name) { std::cout << "Deleting the bucket named '" << bucket_name << "'..." << std::endl << std::endl;
Aws::S3::Model::DeleteBucketRequest bucket_request; bucket_request.WithBucket(bucket_name);
372

AWS Cloud9 User GuideStep 6: Build and Run the AWS SDK Code
auto outcome = s3_client.DeleteBucket(bucket_request);
if (outcome.IsSuccess()) { return true; } else { std::cout << "DeleteBucket error: " << outcome.GetError().GetExceptionName() << std::endl << outcome.GetError().GetMessage() << std::endl;
return false; }}
void Cleanup(Aws::SDKOptions options) { Aws::ShutdownAPI(options);}
2. Create a file with this content, and save the file with the name CMakeLists.txt at the root (/) ofyour environment. This file enables you to build your code into an executable file.
# A minimal CMakeLists.txt file for the AWS SDK for C++.
# The minimum version of CMake that will work.cmake_minimum_required(VERSION 2.8)
# The project name.project(s3-demo)
# Locate the AWS SDK for C++ package.# Requires that you build with:# -Daws-sdk-cpp_DIR=/path/to/sdk_build# or export/set:# CMAKE_PREFIX_PATH=/path/to/sdk_buildfind_package(aws-sdk-cpp)
# Link to the AWS SDK for C++ shared libraries.add_definitions(-DUSE_IMPORT_EXPORT)
# The executable name and its source files.add_executable(s3-demo s3-demo.cpp)
# The libraries used by your executable.target_link_libraries(s3-demo aws-cpp-sdk-s3)
Step 6: Build and Run the AWS SDK Code1. In the terminal, prepare to build your source code.
cmake3 -Daws-sdk-cpp_DIR=sdk_build .
2. Build your source code.
make
3. Run the code by choosing Run, Run Configurations, New Run Configuration on the menu bar.
4. On the [New] - Idle tab, choose Runner: Auto, and then choose C++.
5. For Command, type s3-demo YOUR_BUCKET_NAME THE_AWS_REGION , where YOUR_BUCKET_NAME is the name of the bucket you want to create and then delete, and THE_AWS_REGION is the ID of the AWS Region you want to create the bucket in. For example, for
373

AWS Cloud9 User GuideStep 7: Clean Up
the US West (N. California) Region, use us-west-1. For more IDs, see Amazon Simple Storage Service(Amazon S3) in the Amazon Web Services General Reference.
NoteAmazon S3 bucket names must be unique across AWS—not just your AWS account.
6. Choose the Run button, and compare your output.
My buckets now are:
Creating a new bucket named 'my-test-bucket'...
My buckets now are:
my-test-bucket
Deleting the bucket named 'my-test-bucket'...
My buckets now are:
Step 7: Clean UpTo prevent ongoing charges to your AWS account after you're done using this sample, you should deletethe environment. For instructions, see Deleting an Environment (p. 104).
374

AWS Cloud9 User GuideAmazon VPC Requirements for AWS Cloud9
VPC Settings for AWS Cloud9Development Environments
Every AWS Cloud9 development environment associated with an Amazon Virtual Private Cloud (AmazonVPC) must meet specific VPC requirements. These environments include EC2 environments, as well asSSH environments associated with an Amazon EC2 instance that runs within a VPC.
• Amazon VPC Requirements for AWS Cloud9 (p. 375)• Create an Amazon VPC for AWS Cloud9 (p. 378)• Create a Subnet for AWS Cloud9 (p. 379)
Amazon VPC Requirements for AWS Cloud9The Amazon VPC that AWS Cloud9 uses requires the following settings. If you're already familiar withthese requirements and just want to quickly create a compatible VPC, skip ahead to Create an AmazonVPC for AWS Cloud9 (p. 378).
NoteFor these procedures, we recommend you sign in to the AWS Management Console and openthe Amazon VPC console (https://console.aws.amazon.com/vpc) using credentials for an IAMadministrator user in your AWS account. If you can't do this, check with your AWS accountadministrator.
1. The VPC must exist in the AWS account, and that VPC must be in the same AWS Region that AWSCloud9 will create the EC2 environment in.
Related tasks• Get the list of VPCs that are available for AWS Cloud9 to use in the account for an AWS Region:
In the navigation bar of the Amazon VPC console, choose the AWS Region that AWS Cloud9 willcreate the environment in. Then choose Your VPCs in the navigation pane.
• Create a VPC for AWS Cloud9 to use: See Create an Amazon VPC for AWS Cloud9 (p. 378).2. The VPC must have a public subnet for AWS Cloud9 to use. A subnet is public if its traffic is routed to
an internet gateway.
Related tasks• Get the list of subnets for a VPC: In the Amazon VPC console, choose Your VPCs in the navigation
pane. Note the VPC's ID in the VPC ID column. Then choose Subnets, and look for subnets thatcontain that ID in the VPC column.
• See whether a subnet is public: In the Amazon VPC console, choose Subnets in the navigationpane. Select the box next to the subnet you want AWS Cloud9 to use. On the Route Table tab, ifthere is an entry in the Target column that starts with igw-, the subnet is public.
• Create a subnet in a VPC: In the Amazon VPC console, choose Subnets in the navigation pane.Choose Create Subnet, and then follow the on-screen directions.
• See or change the settings for an internet gateway: In the Amazon VPC console, choose InternetGateways in the navigation pane. Select the box next to the internet gateway. To see the settings,look at each of the tabs. To change a setting on a tab, choose Edit, and then follow the on-screendirections.
• Create an internet gateway: In the Amazon VPC console, choose Internet Gateways in thenavigation pane. Choose Create Internet Gateway, and then follow the on-screen directions.
375

AWS Cloud9 User GuideAmazon VPC Requirements for AWS Cloud9
• Attach an internet gateway to a VPC: In the Amazon VPC console, choose Internet Gateways inthe navigation pane. Select the box next to the internet gateway. Choose Attach to VPC, and thenfollow the on-screen directions.
3. The VPC's public subnet must have a route table, and we recommend that the route table have thefollowing minimum settings.
Destination Target Status Propagated
CIDR-BLOCK local Active No
0.0.0.0/0 igw-INTERNET-GATEWAY-ID
Active No
In these settings, CIDR-BLOCK is the subnet's CIDR block, and igw-INTERNET-GATEWAY-ID isthe ID of a compatible internet gateway.
Related tasks
• See whether the VPC's public subnet has a route table: In the Amazon VPC console, chooseSubnets in the navigation pane. Select the box next to the VPC's public subnet that you want AWSCloud9 to use. On the Route table tab, if there is a value for Route Table, the public subnet has aroute table.
• See or change the settings for a route table: In the Amazon VPC console, choose Route Tables inthe navigation pane. Select the box next to the route table. To see the settings, look at each of thetabs. To change a setting on a tab, choose Edit, and then follow the on-screen directions.
• Create a route table: In the Amazon VPC console, choose Route Tables in the navigation pane.Choose Create Route Table, and then follow the on-screen directions.
4. The VPC must allow specific inbound and outbound traffic.
At a minimum, the VPC must allow the following inbound and outbound traffic.
• Inbound: All IP addresses using SSH over port 22. However, you can restrict these IP addressesto only those that AWS Cloud9 uses. For more information, see Inbound SSH IP AddressRanges (p. 384).
• Inbound: For EC2 environments, and for SSH environments associated with Amazon EC2 instancesrunning Amazon Linux, all IP addresses using TCP over ports 32768-61000. For more information,and for port ranges for other Amazon EC2 instance types, see Ephemeral Ports in the Amazon VPCUser Guide.
• Outbound: All traffic sources using any protocol and port.
You can set this behavior at the security group level. For an additional level of security, you can alsouse a network ACL.
For example, to add inbound and outbound rules to a security group, you could set up those rules asfollows.
Inbound rules:
Type Protocol Port Range Source
SSH (22) TCP (6) 22 0.0.0.0 (Butsee InboundSSH IP AddressRanges (p. 384).)
376

AWS Cloud9 User GuideAmazon VPC Requirements for AWS Cloud9
Type Protocol Port Range Source
Custom TCP Rule TCP (6) 32768-61000 (ForAmazon Linuxinstances. For otherinstance types, seeEphemeral Ports.)
0.0.0.0/0
Outbound rules:
Type Protocol Port Range Source
ALL Traffic ALL ALL 0.0.0.0/0
If you also choose to add inbound and outbound rules to a network ACL, you could set up those rulesas follows.
Inbound rules:
Rule # Type Protocol Port Range Source Allow / Deny
100 SSH (22) TCP (6) 22 0.0.0.0(But seeInbound SSHIP AddressRanges (p. 384).)
ALLOW
200 Custom TCPRule
TCP (6) 32768-61000(For AmazonLinuxinstances. Forother instancetypes, seeEphemeralPorts.)
0.0.0.0/0 ALLOW
* ALL Traffic ALL ALL 0.0.0.0/0 DENY
Outbound rules:
Rule # Type Protocol Port Range Source Allow / Deny
100 ALL Traffic ALL ALL 0.0.0.0/0 ALLOW
* ALL Traffic ALL ALL 0.0.0.0/0 DENY
For more information about security groups and network ACLs, see the following in the Amazon VPCUser Guide.
• Security
• Security Groups for your VPC
• Network ACLs
377
AWS Cloud9 User GuideCreate an Amazon VPC for AWS Cloud9
Related tasks• See whether the VPC has at least one network ACL: In the Amazon VPC console, choose Your
VPCs in the navigation pane. Select the box next to the VPC you want AWS Cloud9 to use. On theSummary tab, if there is a value for Network ACL, the VPC has at least one network ACL.
• See all network ACLs for a VPC: In the Amazon VPC console, choose Network ACLs in thenavigation pane. In the Search Network ACLs box, type the VPC's ID or name. Network ACLs for thatVPC appear in the list of search results.
• See or change the settings for a network ACL: In the Amazon VPC console, choose Network ACLsin the navigation pane. Select the box next to the network ACL. To see the settings, look at each ofthe tabs. To change a setting on a tab, choose Edit, and then follow the on-screen directions.
• Create a network ACL: In the Amazon VPC console, choose Network ACLs in the navigation pane.Choose Create Network ACL, and then follow the on-screen directions.
• See all security groups for a VPC: In the Amazon VPC console, choose Security Groups in thenavigation pane. In the Search Security Groups box, type the VPC's ID or name. Security groups forthat VPC appear in the list of search results.
• See or change the settings for a security group: In the Amazon VPC console, choose SecurityGroups in the navigation pane. Select the box next to the security group. To see the settings,look at each of the tabs. To change a setting on a tab, choose Edit, and then follow the on-screendirections.
• Create a security group: In the Amazon VPC console, choose Security Groups in the navigationpane. Choose Create Security Group, and then follow the on-screen directions.
Create an Amazon VPC for AWS Cloud9You can use the Amazon VPC console to create an Amazon VPC that is compatible with AWS Cloud9.
NoteFor this procedure, we recommend you sign in to the AWS Management Console and open theAmazon VPC console using credentials for an IAM administrator user in your AWS account. If youcan't do this, check with your AWS account administrator.Some organizations may not allow you to create VPCs on your own. If you cannot create a VPC,check with your AWS account administrator or network administrator.
1. If the Amazon VPC console isn't already open, sign in to the AWS Management Console and open theAmazon VPC console at https://console.aws.amazon.com/vpc.
2. In the navigation bar, if the AWS Region isn't the same as the environment, choose the correct AWSRegion.
3. Choose VPC Dashboard in the navigation pane, if the VPC Dashboard page isn't already displayed.4. Choose Start VPC Wizard.5. For Step 1: Select a VPC Configuration, with VPC with a Single Public Subnet already selected,
choose Select.6. For Step 2: VPC with a Single Public Subnet, we recommend that you leave the following default
settings. (However, you can change the CIDR settings if you have custom CIDRs you want to use. Formore information, see VPC and Subnet Sizing in the Amazon VPC User Guide.)• IPv4 CIDR block: 10.0.0.0/16• IPv6 CIDR block: No IPv6 CIDR Block• Public subnet's IPv4 CIDR: 10.0.0.0/24• Availability Zone: No Preference• Enable DNS hostnames: Yes• Hardware tenancy: Default
7. For VPC name, type a name for the VPC.
378

AWS Cloud9 User GuideCreate a Subnet for AWS Cloud9
8. For Subnet name, type a name for the subnet in the VPC.9. Choose Create new VPC.
Amazon VPC creates the following resources that are compatible with AWS Cloud9:• A VPC.• A public subnet for the VPC.• A route table for the public subnet with the minimum required settings.• An internet gateway for the public subnet.• A network ACL for the public subnet with the minimum required settings.
10.By default, the VPC allows incoming traffic from all types, protocols, ports, and IP addresses. You canrestrict this behavior to allow only IP addresses coming from AWS Cloud9 using SSH over port 22. Oneapproach is to set incoming rules on the VPC's default network ACL, as follows.a. In the navigation pane of the Amazon VPC console, choose Your VPCs.b. Select the box for the VPC you just created.c. On the Summary tab, choose the link next to Network ACL.d. Select the box next to the network ACL that is displayed.e. On the Inbound Rules tab, choose Edit.f. For Rule # 100, for Type, choose SSH (22).g. For Source, type one of the CIDR blocks in the Inbound SSH IP Address Ranges (p. 384) list that
matches the AWS Region for this VPC.h. Choose Add another rule.i. For Rule #, type 200.j. For Type, choose SSH (22).k. For Source, type the other CIDR block in the Inbound SSH IP Address Ranges (p. 384) list that
matches the AWS Region for this VPC.l. At minimum, you must also allow incoming traffic from all IP addresses using TCP over ports
32768-61000 for Amazon Linux instance types. (For background, and for port ranges for otherAmazon EC2 instance types, see Ephemeral Ports in the Amazon VPC User Guide). To do this, chooseAdd another rule.
m.For Rule #, type 300.n. For Type, choose Custom TCP Rule.o. For Port Range, type 32768-61000 (for Amazon Linux instance types).p. For Source, type 0.0.0.0/0.q. Choose Save.r. You might need to add more inbound or outbound rules to the network ACL, depending on how
you plan to use AWS Cloud9. See the documentation for the web services or APIs you want to allowto communicate into or out of the VPC for the Type, Protocol, Port Range, and Source values tospecify for these rules.
Create a Subnet for AWS Cloud9You can use the Amazon VPC console to create a subnet for a VPC that is compatible with AWS Cloud9.
If you followed the previous procedure, you do not also need to follow this procedure. This is because theCreate new VPC wizard creates a subnet for you automatically.
Important
• The AWS account must already have a compatible VPC in the same AWS Region for theenvironment. For more information, see the VPC requirements in Amazon VPC Requirementsfor AWS Cloud9 (p. 375).
379

AWS Cloud9 User GuideCreate a Subnet for AWS Cloud9
• For this procedure, we recommend you sign in to the AWS Management Console, and thenopen the Amazon VPC console using credentials for an IAM administrator user in your AWSaccount. If you can't do this, check with your AWS account administrator.
• Some organizations may not allow you to create subnets on your own. If you cannot create asubnet, check with your AWS account administrator or network administrator.
1. If the Amazon VPC console isn't already open, sign in to the AWS Management Console and open theAmazon VPC console at https://console.aws.amazon.com/vpc.
2. In the navigation bar, if the AWS Region isn't the same as the AWS Region for the environment, choosethe correct AWS Region.
3. Choose Subnets in the navigation pane, if the Subnets page isn't already displayed.4. Choose Create Subnet.5. In the Create Subnet dialog box, for Name tag, type a name for the subnet.6. For VPC, choose the VPC to associate the subnet with.7. For Availability Zone, choose the Availability Zone within the AWS Region for the subnet to use, or
choose No Preference to let AWS choose an Availability Zone for you.8. For IPv4 CIDR block, type the range of IP addresses for the subnet to use, in CIDR format. This range
of IP addresses must be a subset of IP addresses in the VPC.
For information about CIDR blocks, see VPC and Subnet Sizing in the Amazon VPC User Guide. See also3.1. Basic Concept and Prefix Notation in RFC 4632 or IPv4 CIDR blocks in Wikipedia.
9. After you create the subnet, be sure to associate it with a compatible route table and an internetgateway, as well as security groups, a network ACL, or both. For more information, see therequirements in Amazon VPC Requirements for AWS Cloud9 (p. 375).
380

AWS Cloud9 User GuideWhen and How to Create an SSH Environment
AWS Cloud9 SSH DevelopmentEnvironment Host Requirements
When you create an EC2 environment, AWS Cloud9 creates a new environment, requests Amazon EC2 tolaunch a new instance, and then connects the newly launched instance to the new environment. Creatingan EC2 environment has the following benefits:
• Automatic instance launching. When you create an EC2 environment, AWS Cloud9 requests AmazonEC2 to launch a new instance at the same time. In an SSH environment, you must launch a newAmazon EC2 instance yourself.
• Automatic instance shutdown. By default, AWS Cloud9 automatically shuts down the EC2environment 30 minutes after all web browser instances that are connected to the IDE for the EC2environment are closed. (You can change this behavior at any time.) This helps reduce additionalcharges to your AWS account for using Amazon EC2. In an SSH environment, automatic shutdownmight not work as expected when connected to an existing Amazon EC2 instance, and is turned offcompletely when connected to your own server.
• Automatic instance cleanup. When you delete an EC2 environment, the connected Amazon EC2instance is automatically deleted. This also helps reduce additional charges to your AWS account forusing Amazon EC2. In an SSH environment, you must remember to delete the Amazon EC2 instanceyourself.
When you create an SSH environment, AWS Cloud9 does not launch a new Amazon EC2 instance.Instead, AWS Cloud9 creates a new environment and then connects an existing instance or your ownserver to the new environment.
When and How to Create an SSH EnvironmentYou must create an SSH environment instead of an EC2 environment whenever any of the following istrue:
Requirement Directions
You don't want to incur additional charges toyour AWS account for using Amazon EC2, so youdecide to connect AWS Cloud9 to your own serverinstead.
1. Be sure your server meets therequirements (p. 382) later in this topic.
2. Create an SSH environment (p. 72) for AWSCloud9 to connect your server to.
You want to use an existing Amazon EC2 instancein your AWS account instead of having AWSCloud9 to launch a new instance at the same timethe environment is created.
1. Be sure the instance meets therequirements (p. 382) later in this topic.
2. Create an SSH environment (p. 72) for AWSCloud9 to connect the instance to.
You want to use an Amazon EC2 instance typethat AWS Cloud9 currently doesn't support for anEC2 environment (for example, R4).
1. Launch an Amazon EC2 instance based on thedesired instance type. Or identify an existinginstance in your AWS account that runs thedesired instance type.
2. Be sure the instance meets therequirements (p. 382) later in this topic.
381
AWS Cloud9 User GuideSSH Host Requirements
Requirement Directions
3. Create an SSH environment (p. 72) for AWSCloud9 to connect the instance to.
You want to use an Amazon EC2 instance that isbased on an Amazon Machine Image (AMI) otherthan Amazon Linux (for example, Ubuntu Server).
1. Launch an Amazon EC2 instance based on thedesired AMI. Or identify an existing instance inyour AWS account that is based on the desiredAMI.
2. Be sure the instance meets therequirements (p. 382) later in this topic.
3. Create an SSH environment (p. 72) for AWSCloud9 to connect the instance to.
You want to connect multiple environments to asingle existing Amazon EC2 instance or your ownserver.
1. Be sure the instance or server meets therequirements (p. 382) later in this topic.
2. Create an SSH environment (p. 72) for eachenvironment you want AWS Cloud9 to connectthe instance or server to.
NoteLaunching an Amazon EC2 instance might result in possible charges to your AWS account forAmazon EC2. For more information, see Amazon EC2 Pricing.
SSH Host RequirementsThe existing Amazon EC2 instance or your own server must meet the following requirements for AWSCloud9 to connect it to an SSH environment.
• It must run Linux.
NoteTo log in to an existing Amazon EC2 instance to verify and meet requirements, see one ormore of the following resources:
• For Amazon EC2, see Connect to Your Linux Instance in the Amazon EC2 User Guide for LinuxInstances.
• For Amazon Lightsail, see Connect to your Linux/Unix-based Lightsail instance in theAmazon Lightsail Documentation.
• For AWS Elastic Beanstalk, see Listing and Connecting to Server Instances in the AWS ElasticBeanstalk Developer Guide.
• For AWS OpsWorks, see Using SSH to Log In to a Linux Instance in the AWS OpsWorks UserGuide.
• For other AWS services, see the service's documentation.
• It must be reachable over the public internet.
NoteIf you are using an existing Amazon EC2 instance, and that instance is part of an AmazonVirtual Private Cloud (Amazon VPC), there are additional requirements. See Amazon VPCSettings (p. 375).
• It must have Python installed, and the version must be 2.7. To check the version, from the existinginstance's or server's terminal, run the command python --version . To install Python 2.7 on theinstance or server, see one of the following:
• Step 1: Install Required Tools (p. 347) in the Python Sample.
382

AWS Cloud9 User GuideSSH Host Requirements
• Download Python from the Python website and see Installing Packages in the Python PackagingUser Guide.
• It must have Node.js installed, and the version must be 0.6.16 or later. To check the version, from theexisting instance's or server's terminal, run the command node --version . To install Node.js on theinstance or server, see one of the following:• Step 1: Install Required Tools (p. 343) in the Node.js Sample.• Installing Node.js via package manager on the Node.js website.• Node Version Manager on GitHub.
• The public SSH key value that AWS Cloud9 generates for the SSH environment must be stored in thecorrect location on the existing instance or server. To do this, as you create a new environment (p. 72),with the create environment wizard open to the Configure settings page and Connect and runremote server (SSH) chosen, choose Copy key to clipboard. Paste the public SSH key value that wascopied into the ~/.ssh/authorized_keys file on the existing instance or server.
NoteTo see the public SSH key value that was copied, expand View public SSH key on theConfigure settings page.
• The path to the directory on the existing instance or server that you want AWS Cloud9 to startfrom after login must have its access permissions set to rwxr-xr-x. This means read-write-executepermissions for the owner, read-execute permissions for the group, and read-execute permissionsfor others. For example, if the directory's path is ~, you can set these permissions on the directory byrunning the chmod command from the instance's or server's terminal, as follows.
sudo chmod u=rwx,g=rx,o=rx ~
• Optionally, you can restrict inbound traffic over SSH to only the IP addresses that AWS Cloud9uses. To do this, set inbound SSH traffic to the IP ranges as described in Inbound SSH IP AddressRanges (p. 384).
• If the SSH environment will be associated with an Amazon EC2 instance that runs within an AmazonVirtual Private Cloud (Amazon VPC), there are additional requirements. See VPC Settings for AWSCloud9 Development Environments (p. 375).
After you are sure your instance or server meets the preceding requirements, create an SSHenvironment (p. 72) for AWS Cloud9 to connect it to.
383
AWS Cloud9 User Guide
Inbound SSH IP Address Ranges forAWS Cloud9
You can restrict incoming traffic to just the IP address ranges that AWS Cloud9 uses to connect over SSHto Amazon EC2 instances in an Amazon VPC or your own servers in your network.
These IP address ranges are in the ip-ranges.json file, as described in AWS IP Address Ranges in theAmazon Web Services General Reference. To find the IP ranges in that file:
• For Windows, using the AWS Tools for Windows PowerShell, run this command: Get-AWSPublicIpAddressRange -ServiceKey CLOUD9
• For Linux, download the ip-ranges.json file. Then you can query it by using a tool such as jq, forexample, by running this command: jq '.prefixes[] | select(.service=="CLOUD9")' <ip-ranges.json
These IP ranges might change occasionally. Whenever there's a change, we send notifications tosubscribers of the AmazonIpSpaceChanged topic. To get these notifications, see AWS IP AddressRanges Notifications in the Amazon Web Services General Reference.
To use these IP address ranges when configuring environments that use Amazon EC2 instances, seeAmazon VPC Settings (p. 375). Also, if you choose to restrict incoming traffic for EC2 environments, orfor SSH environments associated with Amazon EC2 instances running Amazon Linux, be sure to alsoallow at minimum all IP addresses using TCP over ports 32768-61000. For more information, as well asport ranges for other Amazon EC2 instance types, see Ephemeral Ports in the Amazon VPC User Guide.
To use these IP address ranges when configuring SSH environments that use your own network, see yournetwork's documentation or your network administrator.
384

AWS Cloud9 User Guide
Amazon Machine Image (AMI)Contents for an AWS Cloud9 EC2Development Environment
The Amazon Machine Image (AMI) that AWS Cloud9 uses for an EC2 environment contains the followingcomponents:
• The packages listed in Amazon Linux AMI 2017.09 Packages on the Amazon Linux AMI website.• Apache HTTP Server 2.4• AWS CLI (p. 318)• AWS SAM Local• CoffeeScript• Docker 17.03.2-ce• GCC, G++ 4.8.5• GDB 7.6.1• Git 2.13.6• GNU libc 2.17• Go 1.9.1• MySQL 14.14• MySQL native driver for PHP• Node.js v6.11.4• Node Package manager (npm) 3.10.10• Node Version Manager (nvm) 0.31.7• PHP 5.6.31• Pylint 1.7.4• Python 2.7.12• Python 3.6.2• Ruby on Rails 5.1.4• Ruby 2.4.1• virtualenv 15.1.0
385

AWS Cloud9 User GuideOverview
Access Permissions Reference forAWS Cloud9
Access to AWS Cloud9 requires AWS access credentials. Those credentials must have permissions to dothings such as create, share, or delete an AWS Cloud9 development environment. The following sectionsdescribe how you can use AWS Identity and Access Management (IAM) to allow or deny access to yourAWS Cloud9 resources and then map those permissions to credentials.
• Overview (p. 386)
• AWS Managed (Predefined) Policies for AWS Cloud9 (p. 390)
• Creating Customer-Managed Policies for AWS Cloud9 (p. 392)
• AWS Managed Temporary Credentials (p. 401)
OverviewThis section provides an overview of the IAM authentication and access control model that applies toAWS Cloud9.
NoteIf you just want to set up predefined sets of access permissions for common usage scenarios anduser types, skip ahead to AWS Managed (Predefined) Policies for AWS Cloud9 (p. 390).
• Authentication (p. 386)
• Access Control (p. 387)
• AWS Cloud9 Resources and Operations (p. 388)
• Understanding Resource Ownership (p. 388)
• Managing Access to Resources (p. 389)
AuthenticationYou can access AWS as any of the following types of identities:
AWS account root user
When you sign up for AWS, you provide an email address and password that is associated with your AWSaccount. These are your root credentials, and they provide complete access to all of your AWS resources.
ImportantAs an AWS security best practice, we recommend that you use the root credentials only to createan IAM administrator group with an IAM administrator user. This is a group that gives the userfull permissions to your AWS account. Then you can use this administrator user to create otherIAM users and roles with limited permissions. For more information, see Create Individual IAMUsers and Creating Your First IAM Admin User and Group in the IAM User Guide.
386
AWS Cloud9 User GuideAccess Control
IAM user
An IAM user is simply an identity within your AWS account that has specific custom permissions (forexample, permissions to create an AWS Cloud9 development environment). You can use an IAM username and password to sign in to secure AWS webpages like the AWS Cloud9 console, AWS ManagementConsole, AWS Discussion Forums, and AWS Support Support Center.
In addition to a user name and password, you can also generate access keys for each user. You can usethese keys when you access AWS services programmatically, either through one of the several AWS SDKsor by using the AWS Command Line Interface (AWS CLI) or the aws-shell. The AWS SDKs, the AWS CLI,and the aws-shell use these access keys to cryptographically sign your request. If you don't use thesetools, you must sign the request yourself. AWS Cloud9 supports Signature Version 4, a protocol forauthenticating inbound API requests. For more information about authenticating requests, see SignatureVersion 4 Signing Process in the Amazon Web Services General Reference.
IAM role
An IAM role is another IAM identity you can create in your account that has specific permissions. It'ssimilar to an IAM user, but it isn't associated with a specific person. An IAM role enables you to obtaintemporary access keys that can be used to access AWS services and resources. IAM roles with temporarycredentials are useful in the following situations:
AWS service access
You can use an IAM role in your account to grant an AWS service permissions to access your account'sresources. For example, you can create a role that allows AWS Lambda to access an Amazon S3 bucket onyour behalf, and then load data stored in the bucket into an Amazon Redshift. For more information, seeCreating a Role to Delegate Permissions to an AWS Service in the IAM User Guide.
Applications running on Amazon EC2
Instead of storing access keys within an Amazon EC2 instance for use by applications running on theinstance and making AWS API requests, you can use an IAM role to manage temporary credentialsfor these applications. To assign an AWS role to an Amazon EC2 instance and make it available toall of its applications, you can create an instance profile that is attached to the instance. An instanceprofile contains the role and enables programs running on the Amazon EC2 instance to get temporarycredentials. For more information, see Create and Use an Instance Profile to Manage TemporaryCredentials (p. 81) and Using an IAM Role to Grant Permissions to Applications Running on Amazon EC2Instances in the IAM User Guide.
NoteInstead of attaching an instance profile to an Amazon EC2 instance that connects to anenvironment, AWS Cloud9 can automatically set up and manage temporary credentials onyour behalf in an EC2 environment. For more information, see AWS Managed TemporaryCredentials (p. 401).
Federated user access
Instead of creating an IAM user, you can use pre-existing user identities from AWS Directory Service, yourenterprise user directory, or a web identity provider. These are known as federated users. AWS assigns arole to a federated user when access is requested through an identity provider. For more information, seeFederated Users and Roles in the IAM User Guide.
Access ControlYou can have valid credentials to authenticate your requests, but unless you have permissions, youcannot create or access AWS Cloud9 resources. For example, you must have permissions to create, share,or delete an AWS Cloud9 development environment.
387

AWS Cloud9 User GuideAWS Cloud9 Resources and Operations
Every AWS resource is owned by an AWS account, and permissions to create or access a resource aregoverned by permissions policies. An account administrator can attach permissions policies to IAMidentities (that is, users, groups, and roles).
When you grant permissions, you decide who is getting the permissions, the resources they can access,and the actions that can be performed on those resources.
AWS Cloud9 Resources and OperationsIn AWS Cloud9, the primary resource is an AWS Cloud9 development environment. In a policy, you usean Amazon Resource Name (ARN) to identify the resource that the policy applies to. The following tablelists environment ARNs. For more information, see Amazon Resource Names (ARNs) and AWS ServiceNamespaces in the Amazon Web Services General Reference.
Resource type ARN format
Environment arn:aws:cloud9:REGION_ID:ACCOUNT_ID:environment:ENVIRONMENT_ID
Every environment owned by the specifiedaccount in the specified region
arn:aws:cloud9:REGION_ID:ACCOUNT_ID:environment:*
Every environment owned by the specifiedaccount in the specified region
arn:aws:cloud9:REGION_ID:ACCOUNT_ID:*
Every AWS Cloud9 resource, regardless of accountand region
arn:aws:cloud9:*
For example, you can indicate a specific environment in your statement using its ARN, as follows.
"Resource": "arn:aws:cloud9:us-east-2:123456789012:environment:70d899206236474f9590d93b7c41dfEX"
To specify all resources, use the wildcard character (*) in the Resource element, as follows.
"Resource": "*"
To specify multiple resources in a single statement, separate their ARNs with commas, as follows.
"Resource": [ "arn:aws:cloud9:us-east-2:123456789012:environment:70d899206236474f9590d93b7c41dfEX", "arn:aws:cloud9:us-east-2:123456789012:environment:81e900317347585a0601e04c8d52eaEX"]
AWS Cloud9 provides a set of operations to work with AWS Cloud9 resources. For a list, see the AWSCloud9 Permissions Reference (p. 399).
Understanding Resource OwnershipThe AWS account owns the resources that are created in the account, regardless of who created theresources. For example:
• If you use the root account credentials of your AWS account to create an AWS Cloud9 developmentenvironment (which, although possible, is not recommend as an AWS security best practice), your AWSaccount is the owner of the environment.
388
AWS Cloud9 User GuideManaging Access to Resources
• If you create an IAM user in your AWS account and grant permissions to create an environment to thatuser, the user can create an environment. However, your AWS account, to which the user belongs, ownsthe environment.
• If you create an IAM role in your AWS account with permissions to create an environment, anyone whocan assume the role can create an environment. Your AWS account, to which the role belongs, ownsthe environment.
Managing Access to ResourcesA permissions policy describes who has access to which resources.
NoteThis section discusses the use of IAM in AWS Cloud9. It doesn't provide detailed informationabout the IAM service. For complete IAM documentation, see What Is IAM? in the IAM UserGuide. For information about IAM policy syntax and descriptions, see the IAM JSON PolicyReference in the IAM User Guide.
Policies attached to an IAM identity are referred to as identity-based policies (or IAM policies). Policiesattached to a resource are referred to as resource-based policies. AWS Cloud9 supports both identity-based and resource-based policies.
Each of the following API actions requires only an IAM policy to be attached to the IAM identity whowants to call these API actions.
• CreateEnvironmentEC2
• DescribeEnvironments
The following API actions require a resource-based policy. An IAM policy isn't required, but AWS Cloud9will use an IAM policy if it is attached to the IAM identity who wants to call these API actions. Theresource-based policy must be applied to the desired AWS Cloud9 resource.
• CreateEnvironmentMembership
• DeleteEnvironment
• DeleteEnvironmentMembership
• DescribeEnvironmentMemberships
• DescribeEnvironmentStatus
• UpdateEnvironment
• UpdateEnvironmentMembership
For details on what each of these API actions do, see the AWS Cloud9 API Reference.
You cannot attach a resource-based policy to an AWS Cloud9 resource directly. Instead, AWS Cloud9attaches the appropriate resource-based policies to AWS Cloud9 resources as you add, modify, update, ordelete environment members.
To grant a user permissions to perform actions on AWS Cloud9 resources, you attach a permissions policyto an IAM group that the user belongs to. We recommend you attach an AWS managed (predefined)policy for AWS Cloud9 whenever possible. AWS managed policies are easier and faster to attach. Theyalso contain predefined sets of access permissions for common usage scenarios and user types, such asfull administration of an environment, environment users, and users who have only read-only access toan environment. For a list of AWS managed policies for AWS Cloud9, see AWS Managed (Predefined)Policies for AWS Cloud9 (p. 390).
389

AWS Cloud9 User GuideAWS Managed (Predefined) Policies for AWS Cloud9
For more detailed usage scenarios and unique user types, you can create and attach your own customer-managed policies. See Advanced Team Setup for AWS Cloud9 (p. 13) and Creating Customer-ManagedPolicies for AWS Cloud9 (p. 392).
To attach an IAM policy (AWS managed or customer-managed) to an IAM identity, see Attaching IAMPolicies (Console) in the IAM User Guide.
AWS Managed (Predefined) Policies for AWSCloud9
AWS addresses many common use cases by providing standalone IAM policies that AWS creates andadministers. These AWS managed policies grant necessary permissions for common use cases so youcan avoid having to investigate what permissions are needed. For example, you can use AWS managedpolicies for AWS Cloud9 to quickly and easily allow users to have full administration of an AWS Cloud9development environment, act as an environment user, or use an environment they are added to. Formore information, see AWS Managed Policies in the IAM User Guide.
To attach an AWS managed policy to an IAM identity, see Attaching IAM Policies (Console) in the IAMUser Guide.
The following AWS managed policies, which you can attach to IAM identities in your account, are specificto AWS Cloud9.
• AWSCloud9Administrator: Provides the following permissions:• Amazon EC2: get information about Amazon VPCs and subnets in their AWS account.• AWS Cloud9: all AWS Cloud9 actions in their AWS account.• IAM: get information about IAM users in their AWS account, and create the AWS Cloud9 service-
linked role in their AWS account as needed.
The AWSCloud9Administrator managed policy contains the following permissions:
{ "Version": "2012-10-17", "Statement": [ { "Effect": "Allow", "Action": [ "cloud9:*", "ec2:DescribeSubnets", "ec2:DescribeVpcs", "iam:GetUser", "iam:ListUsers" ], "Resource": "*" }, { "Effect": "Allow", "Action": [ "iam:CreateServiceLinkedRole" ], "Resource": "*", "Condition": { "StringLike": { "iam:AWSServiceName": "cloud9.amazonaws.com" } } } ]
390

AWS Cloud9 User GuideAWS Managed (Predefined) Policies for AWS Cloud9
}
• AWSCloud9User: Provides the following permissions:
• Amazon EC2: get information about Amazon VPCs and subnets in their AWS account.
• AWS Cloud9: create and get information about their environments, and get and change user settingsfor their environments.
• IAM: get information about IAM users in their AWS account, and create the AWS Cloud9 service-linked role in their AWS account as needed.
The AWSCloud9User managed policy contains the following permissions:
{ "Version": "2012-10-17", "Statement": [ { "Effect": "Allow", "Action": [ "cloud9:CreateEnvironmentEC2", "cloud9:CreateEnvironmentSSH", "cloud9:GetUserPublicKey", "cloud9:GetUserSettings", "cloud9:UpdateUserSettings", "cloud9:ValidateEnvironmentName", "ec2:DescribeSubnets", "ec2:DescribeVpcs", "iam:GetUser", "iam:ListUsers" ], "Resource": "*" }, { "Effect": "Allow", "Action": [ "cloud9:DescribeEnvironmentMemberships" ], "Resource": "*", "Condition": { "Null": { "cloud9:UserArn": "true", "cloud9:EnvironmentId": "true" } } }, { "Effect": "Allow", "Action": [ "iam:CreateServiceLinkedRole" ], "Resource": "*", "Condition": { "StringLike": { "iam:AWSServiceName": "cloud9.amazonaws.com" } } } ]}
• AWSCloud9EnvironmentMember: Provides the following permissions:
• AWS Cloud9: get information about environments they've been invited to, and get user settings forenvironments they've been invited to.
• IAM: get information about IAM users in their AWS account.
391
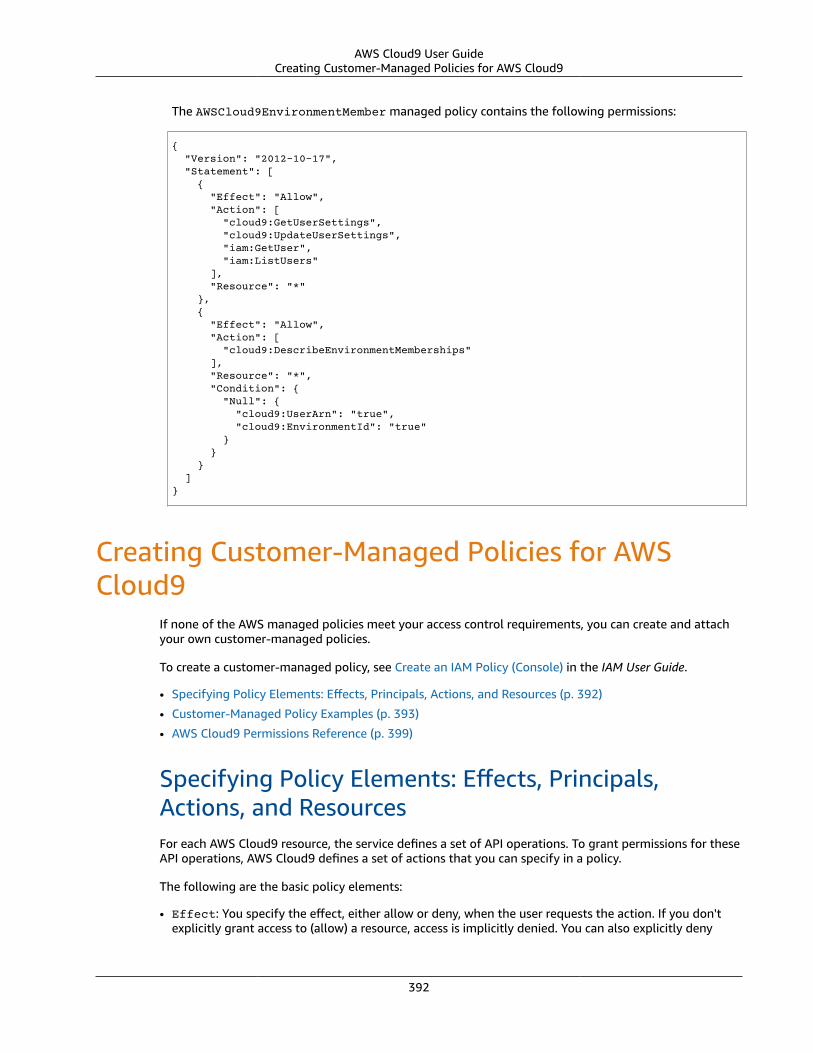
AWS Cloud9 User GuideCreating Customer-Managed Policies for AWS Cloud9
The AWSCloud9EnvironmentMember managed policy contains the following permissions:
{ "Version": "2012-10-17", "Statement": [ { "Effect": "Allow", "Action": [ "cloud9:GetUserSettings", "cloud9:UpdateUserSettings", "iam:GetUser", "iam:ListUsers" ], "Resource": "*" }, { "Effect": "Allow", "Action": [ "cloud9:DescribeEnvironmentMemberships" ], "Resource": "*", "Condition": { "Null": { "cloud9:UserArn": "true", "cloud9:EnvironmentId": "true" } } } ]}
Creating Customer-Managed Policies for AWSCloud9
If none of the AWS managed policies meet your access control requirements, you can create and attachyour own customer-managed policies.
To create a customer-managed policy, see Create an IAM Policy (Console) in the IAM User Guide.
• Specifying Policy Elements: Effects, Principals, Actions, and Resources (p. 392)
• Customer-Managed Policy Examples (p. 393)
• AWS Cloud9 Permissions Reference (p. 399)
Specifying Policy Elements: Effects, Principals,Actions, and ResourcesFor each AWS Cloud9 resource, the service defines a set of API operations. To grant permissions for theseAPI operations, AWS Cloud9 defines a set of actions that you can specify in a policy.
The following are the basic policy elements:
• Effect: You specify the effect, either allow or deny, when the user requests the action. If you don'texplicitly grant access to (allow) a resource, access is implicitly denied. You can also explicitly deny
392

AWS Cloud9 User GuideCustomer-Managed Policy Examples
access to a resource. You might do this to ensure a user cannot access a resource, even if a differentpolicy grants access.
• Principal: In identity-based policies (IAM policies), the user the policy is attached to is the implicitprincipal. For resource-based policies, you specify the user, account, service, or other entity that youwant to receive permissions.
• Resource: You use an ARN to identify the resource that the policy applies to.
• Action: You use action keywords to identify resource operations you want to allow or deny. Forexample, the cloud9:CreateEnvironmentEC2 permission gives the user permissions to perform theCreateEnvironmentEC2 operation.
To learn more about IAM policy syntax and descriptions, see the IAM JSON Policy Reference in the IAMUser Guide.
For a table showing all of the AWS Cloud9 API actions and the resources they apply to, see the AWSCloud9 Permissions Reference (p. 399).
Customer-Managed Policy ExamplesIn this section, you can find example policies that grant permissions for AWS Cloud9 actions. You canadapt the following example IAM policies to allow or explicitly deny AWS Cloud9 access for your IAMidentities.
To create or attach a customer-managed policy to an IAM identity, see Create an IAM Policy (Console)and Attaching IAM Policies (Console) in the IAM User Guide.
NoteThe following examples use the US East (Ohio) Region (us-east-2), a fictitious AWSaccount ID (123456789012), and a fictitious AWS Cloud9 development environment ID(81e900317347585a0601e04c8d52eaEX).
• Get Information About Environments (p. 393)
• Create EC2 Environments (p. 394)
• Create EC2 Environments with Specific Amazon EC2 Instance Types (p. 394)
• Create EC2 Environments in Specific Amazon VPC Subnets (p. 395)
• Create an EC2 Environment with a Specific Environment Name (p. 395)
• Create SSH Environments Only (p. 395)
• Update Environments, or Prevent Updating an Environment (p. 396)
• Get Lists of Environment Members (p. 396)
• Share Environments Only with a Specific User (p. 397)
• Prevent Sharing Environments (p. 397)
• Change, or Prevent Changing, the Settings of Environment Members (p. 398)
• Remove, or Prevent Removing, Environment Members (p. 398)
• Delete Environments, or Prevent Deleting an Environment (p. 399)
Get Information About EnvironmentsThe following example IAM policy statement, attached to an IAM entity, allows that entity to getinformation about any environment in their account.
{
393

AWS Cloud9 User GuideCustomer-Managed Policy Examples
"Version": "2012-10-17", "Statement": [ { "Effect": "Allow", "Action": "cloud9:DescribeEnvironments", "Resource": "*" } ]}
Note that the preceding access permission is already included in the AWS managed policiesAWSCloud9Administrator and AWSCloud9User.
Create EC2 EnvironmentsThe following example IAM policy statement, attached to an IAM entity, allows that entity to create AWSCloud9 EC2 development environments in their account.
{ "Version": "2012-10-17", "Statement": [ { "Effect": "Allow", "Action": "cloud9:CreateEnvironmentEC2", "Resource": "*" } ]}
Note that the preceding access permission is already included in the AWS managed policiesAWSCloud9Administrator and AWSCloud9User.
Create EC2 Environments with Specific Amazon EC2 InstanceTypesThe following example IAM policy statement, attached to an IAM entity, allows that entity to create AWSCloud9 EC2 development environments in their account. However, EC2 environments can use only thespecified class of Amazon EC2 instance types.
{ "Version": "2012-10-17", "Statement": [ { "Effect": "Allow", "Action": "cloud9:CreateEnvironmentEC2", "Resource": "*", "Condition": { "StringLike": { "cloud9:InstanceType": "t2.*" } } } ]}
Note that if the AWS managed policy AWSCloud9Administrator or AWSCloud9User is alreadyattached to the IAM entity, those AWS managed policies will override the behavior of the preceding IAMpolicy statement, as those AWS managed policies are more permissive.
394

AWS Cloud9 User GuideCustomer-Managed Policy Examples
Create EC2 Environments in Specific Amazon VPC SubnetsThe following example IAM policy statement, attached to an IAM entity, allows that entity to create AWSCloud9 EC2 development environments in their account. However, EC2 environments can use only thespecified Amazon VPC subnets.
{ "Version": "2012-10-17", "Statement": [ { "Effect": "Allow", "Action": "cloud9:CreateEnvironmentEC2", "Resource": "*", "Condition": { "StringLike": { "cloud9:SubnetId": [ "subnet-12345678", "subnet-23456789" ] } } } ]}
Note that if the AWS managed policy AWSCloud9Administrator or AWSCloud9User is alreadyattached to the IAM entity, those AWS managed policies will override the behavior of the preceding IAMpolicy statement, as those AWS managed policies are more permissive.
Create an EC2 Environment with a Specific Environment NameThe following example IAM policy statement, attached to an IAM entity, allows that entity to create anAWS Cloud9 EC2 development environment in their account. However, the EC2 environment can use onlythe specified name.
{ "Version": "2012-10-17", "Statement": [ { "Effect": "Allow", "Action": "cloud9:CreateEnvironmentEC2", "Resource": "*", "Condition": { "StringEquals": { "cloud9:EnvironmentName": "my-demo-environment" } } } ]}
Note that if the AWS managed policy AWSCloud9Administrator or AWSCloud9User is alreadyattached to the IAM entity, those AWS managed policies will override the behavior of the preceding IAMpolicy statement, as those AWS managed policies are more permissive.
Create SSH Environments OnlyThe following example IAM policy statement, attached to an IAM entity, allows that entity to create AWSCloud9 SSH development environments in their account. However, the entity cannot create AWS Cloud9EC2 development environments.
395

AWS Cloud9 User GuideCustomer-Managed Policy Examples
{ "Version": "2012-10-17", "Statement": [ { "Effect": "Allow", "Action": "cloud9:CreateEnvironmentSSH", "Resource": "*" }, { "Effect": "Deny", "Action": "cloud9:CreateEnvironmentEC2", "Resource": "*" } ]}
Update Environments, or Prevent Updating an EnvironmentThe following example IAM policy statement, attached to an IAM entity, allows that entity to changeinformation about any AWS Cloud9 development environment in their account.
{ "Version": "2012-10-17", "Statement": [ { "Effect": "Allow", "Action": "cloud9:UpdateEnvironment", "Resource": "*" } ]}
Note that the preceding access permission is already included in the AWS managed policyAWSCloud9Administrator.
The following example IAM policy statement, attached to an IAM entity, explicitly prevents that entityfrom changing information about the environment with the specified ARN.
{ "Version": "2012-10-17", "Statement": [ { "Effect": "Deny", "Action": "cloud9:UpdateEnvironment", "Resource": "arn:aws:cloud9:us-east-2:123456789012:environment:81e900317347585a0601e04c8d52eaEX" } ]}
Get Lists of Environment MembersThe following example IAM policy statement, attached to an IAM entity, allows that entity to get a list ofmembers for any environment in their account.
{ "Version": "2012-10-17", "Statement": [
396

AWS Cloud9 User GuideCustomer-Managed Policy Examples
{ "Effect": "Allow", "Action": "cloud9:DescribeEnvironmentMemberships", "Resource": "*" } ]}
Note that the preceding access permission is already included in the AWS managed policyAWSCloud9Administrator. Also note that the preceding access permission is more permissive than theequivalent access permission in the AWS managed policy AWSCloud9User.
Share Environments Only with a Specific User
The following example IAM policy statement, attached to an IAM entity, allows that entity to share anyenvironment in their account with only the specified user.
{ "Version": "2012-10-17", "Statement": [ { "Effect": "Allow", "Action": [ "cloud9:CreateEnvironmentMembership" ], "Resource": "*", "Condition": { "StringEquals": { "cloud9:UserArn": "arn:aws:iam::123456789012:user/MyDemoUser" } } } ]}
Note that if the AWS managed policy AWSCloud9Administrator or AWSCloud9User is alreadyattached to the IAM entity, those AWS managed policies will override the behavior of the preceding IAMpolicy statement, as those AWS managed policies are more permissive.
Prevent Sharing Environments
The following example IAM policy statement, attached to an IAM entity, prevents that entity fromsharing any environment in their account.
{ "Version": "2012-10-17", "Statement": [ { "Effect": "Deny", "Action": [ "cloud9:CreateEnvironmentMembership", "cloud9:UpdateEnvironmentMembership" ], "Resource": "*" } ]}
397

AWS Cloud9 User GuideCustomer-Managed Policy Examples
Change, or Prevent Changing, the Settings of EnvironmentMembersThe following example IAM policy statement, attached to an IAM entity, allows that entity to change thesettings of members in any environment in their account.
{ "Version": "2012-10-17", "Statement": [ { "Effect": "Allow", "Action": "cloud9:UpdateEnvironmentMembership", "Resource": "*" } ]}
Note that the preceding access permission is already included in the AWS managed policyAWSCloud9Administrator.
The following example IAM policy statement, attached to an IAM entity, explicitly prevents that entityfrom changing the settings of members in the environment with the specified ARN.
{ "Version": "2012-10-17", "Statement": [ { "Effect": "Deny", "Action": "cloud9:UpdateEnvironmentMembership", "Resource": "arn:aws:cloud9:us-east-2:123456789012:environment:81e900317347585a0601e04c8d52eaEX" } ]}
Remove, or Prevent Removing, Environment MembersThe following example IAM policy statement, attached to an IAM entity, allows that entity to remove anymember from any environment in their account.
{ "Version": "2012-10-17", "Statement": [ { "Effect": "Allow", "Action": "cloud9:DeleteEnvironmentMembership", "Resource": "*" } ]}
Note that the preceding access permission is already included in the AWS managed policyAWSCloud9Administrator.
The following example IAM policy statement, attached to an IAM entity, explicitly prevents that entityfrom removing any member from the environment with the specified ARN.
{ "Version": "2012-10-17",
398

AWS Cloud9 User GuideAWS Cloud9 Permissions Reference
"Statement": [ { "Effect": "Deny", "Action": "cloud9:DeleteEnvironmentMembership", "Resource": "arn:aws:cloud9:us-east-2:123456789012:environment:81e900317347585a0601e04c8d52eaEX" } ]}
Delete Environments, or Prevent Deleting an EnvironmentThe following example IAM policy statement, attached to an IAM entity, allows that entity to delete anyenvironment in their account.
{ "Version": "2012-10-17", "Statement": [ { "Effect": "Allow", "Action": "cloud9:DeleteEnvironment", "Resource": "*" } ]}
Note that the preceding access permission is already included in the AWS managed policyAWSCloud9Administrator.
The following example IAM policy statement, attached to an IAM entity, explicitly prevents that entityfrom deleting the environment with the specified ARN.
{ "Version": "2012-10-17", "Statement": [ { "Effect": "Deny", "Action": "cloud9:DeleteEnvironment", "Resource": "arn:aws:cloud9:us-east-2:123456789012:environment:81e900317347585a0601e04c8d52eaEX" } ]}
AWS Cloud9 Permissions ReferenceYou can use the following table as a reference when you are setting up access control and writingpermissions policies that you can attach to an IAM identity (identity-based policies).
You can use AWS-wide condition keys in your AWS Cloud9 policies to express conditions. For a list, seeIAM JSON Policy Elements: Condition in the IAM User Guide.
You specify the actions in the policy's Action field. To specify an action, use the cloud9: prefixfollowed by the API operation name (for example, "Action": "cloud9:DescribeEnvironments").To specify multiple actions in a single statement, separate them with commas (for example, "Action":[ "cloud9:UpdateEnvironment", "cloud9:DeleteEnvironment" ]).
• Using Wildcard Characters (p. 400)• AWS Cloud9 API Operations and Required Permissions for Actions (p. 400)
399

AWS Cloud9 User GuideAWS Cloud9 Permissions Reference
Using Wildcard CharactersYou specify an ARN, with or without a wildcard character (*), as the resource value in the policy'sResource field. You can use a wildcard to specify multiple actions or resources. For example, cloud9:*specifies all AWS Cloud9 actions and cloud9:Describe* specifies all AWS Cloud9 actions that beginwith Describe.
The following example allows an IAM entity to get information about environments and environmentmemberships for any environment in their account.
{ "Version": "2012-10-17", "Statement": [ { "Effect": "Allow", "Action": [ "cloud9:Describe*" ], "Resource": "*" } ]}
Note that the preceding access permission is already included in the AWS managed policyAWSCloud9Administrator. Also note that the preceding access permission is more permissive than theequivalent access permission in the AWS managed policy AWSCloud9User.
AWS Cloud9 API Operations and Required Permissions forActions
AWS Cloud9 operation Required permission (APIaction)
Resource
CreateEnvironmentEC2 cloud9:CreateEnvironmentEC2
Required to create an AWSCloud9 EC2 developmentenvironment.
*
CreateEnvironmentMembershipcloud9:CreateEnvironmentMembership
Required to add a member to anenvironment.
arn:aws:cloud9:REGION_ID:ACCOUNT_ID:environment:ENVIRONMENT_ID
DeleteEnvironment cloud9:DeleteEnvironment
Required to delete anenvironment.
arn:aws:cloud9:REGION_ID:ACCOUNT_ID:environment:ENVIRONMENT_ID
DeleteEnvironmentMembershipcloud9:DeleteEnvironmentMembership
Required to remove a memberfrom an environment.
arn:aws:cloud9:REGION_ID:ACCOUNT_ID:environment:ENVIRONMENT_ID
DescribeEnvironmentMembershipscloud9:DescribeEnvironmentMemberships
Required to get a list ofmembers in an environment.
*
400
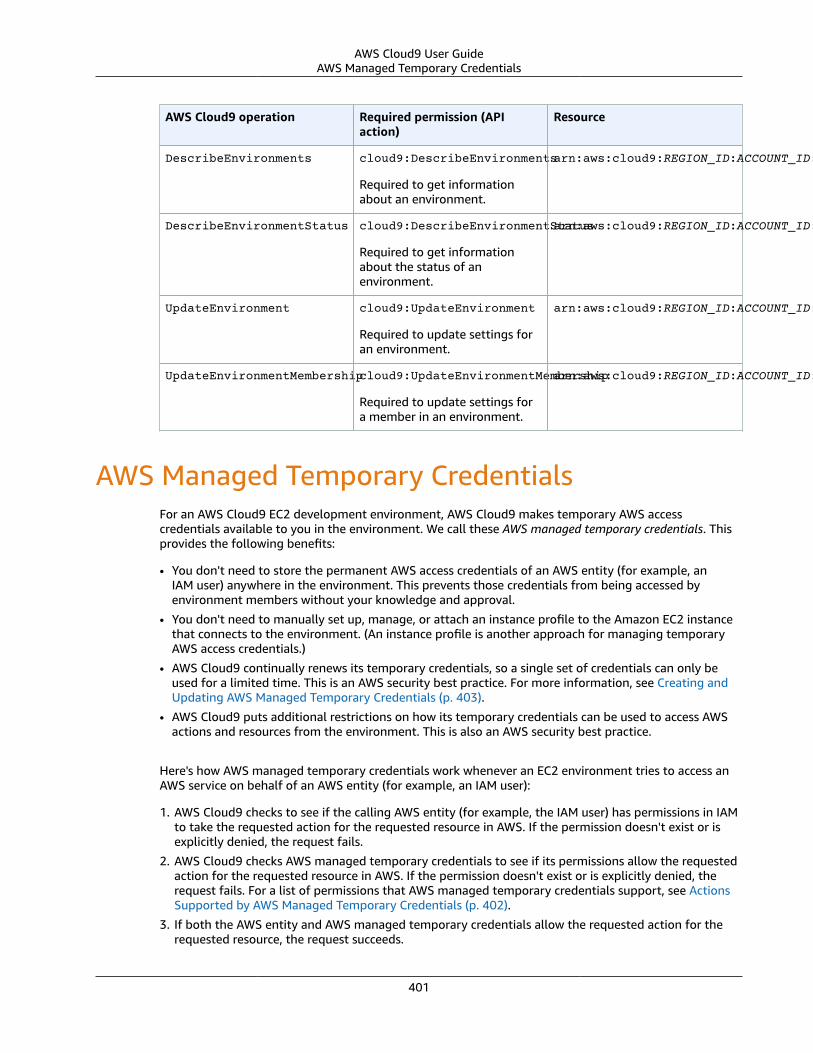
AWS Cloud9 User GuideAWS Managed Temporary Credentials
AWS Cloud9 operation Required permission (APIaction)
Resource
DescribeEnvironments cloud9:DescribeEnvironments
Required to get informationabout an environment.
arn:aws:cloud9:REGION_ID:ACCOUNT_ID:environment:ENVIRONMENT_ID
DescribeEnvironmentStatus cloud9:DescribeEnvironmentStatus
Required to get informationabout the status of anenvironment.
arn:aws:cloud9:REGION_ID:ACCOUNT_ID:environment:ENVIRONMENT_ID
UpdateEnvironment cloud9:UpdateEnvironment
Required to update settings foran environment.
arn:aws:cloud9:REGION_ID:ACCOUNT_ID:environment:ENVIRONMENT_ID
UpdateEnvironmentMembershipcloud9:UpdateEnvironmentMembership
Required to update settings fora member in an environment.
arn:aws:cloud9:REGION_ID:ACCOUNT_ID:environment:ENVIRONMENT_ID
AWS Managed Temporary CredentialsFor an AWS Cloud9 EC2 development environment, AWS Cloud9 makes temporary AWS accesscredentials available to you in the environment. We call these AWS managed temporary credentials. Thisprovides the following benefits:
• You don't need to store the permanent AWS access credentials of an AWS entity (for example, anIAM user) anywhere in the environment. This prevents those credentials from being accessed byenvironment members without your knowledge and approval.
• You don't need to manually set up, manage, or attach an instance profile to the Amazon EC2 instancethat connects to the environment. (An instance profile is another approach for managing temporaryAWS access credentials.)
• AWS Cloud9 continually renews its temporary credentials, so a single set of credentials can only beused for a limited time. This is an AWS security best practice. For more information, see Creating andUpdating AWS Managed Temporary Credentials (p. 403).
• AWS Cloud9 puts additional restrictions on how its temporary credentials can be used to access AWSactions and resources from the environment. This is also an AWS security best practice.
Here's how AWS managed temporary credentials work whenever an EC2 environment tries to access anAWS service on behalf of an AWS entity (for example, an IAM user):
1. AWS Cloud9 checks to see if the calling AWS entity (for example, the IAM user) has permissions in IAMto take the requested action for the requested resource in AWS. If the permission doesn't exist or isexplicitly denied, the request fails.
2. AWS Cloud9 checks AWS managed temporary credentials to see if its permissions allow the requestedaction for the requested resource in AWS. If the permission doesn't exist or is explicitly denied, therequest fails. For a list of permissions that AWS managed temporary credentials support, see ActionsSupported by AWS Managed Temporary Credentials (p. 402).
3. If both the AWS entity and AWS managed temporary credentials allow the requested action for therequested resource, the request succeeds.
401
AWS Cloud9 User GuideActions Supported by AWS
Managed Temporary Credentials
4. If either the AWS entity or AWS managed temporary credentials explicitly deny (or fail to explicitlyallow) the requested action for the requested resource, the request fails. This means that even ifthe calling AWS entity has the correct permissions, the request will fail if AWS Cloud9 doesn't alsoexplicitly allow it. Likewise, if AWS Cloud9 allows a specific action to be taken for a specific resource,the request will fail if the AWS entity doesn't also explicitly allow it.
The owner of an EC2 environment can turn on or off AWS managed temporary credentials for thatenvironment at any time, as follows:
1. With the environment open, in the AWS Cloud9 IDE, on the menu bar choose AWS Cloud9,Preferences.
2. In the Preferences tab, in the navigation pane, choose AWS Settings, Credentials.3. Use AWS managed temporary credentials to turn AWS managed temporary credentials on or off.
If you turn off AWS managed temporary credentials, by default the environment cannot access any AWSservices, regardless of the AWS entity who makes the request. If you cannot or do not want to turn onAWS managed temporary credentials for an environment, but you still need the environment to accessAWS services, consider the following alternatives:
• Attach an instance profile to the Amazon EC2 instance that connects to the environment. Forinstructions, see Create and Use an Instance Profile to Manage Temporary Credentials (p. 81).
• Store your permanent AWS access credentials in the environment, for example, by setting specialenvironment variables or by running the aws configure command. For instructions, see Create andStore Permanent Access Credentials in an Environment (p. 84).
The preceding alternatives override all permissions that are allowed (or denied) by AWS managedtemporary credentials in an EC2 environment.
Actions Supported by AWS Managed TemporaryCredentialsFor an AWS Cloud9 EC2 development environment, AWS managed temporary credentials allow all AWSactions for all AWS resources in the caller's AWS account, with the following restrictions:
• For IAM, only the following actions are allowed:• iam:AttachRolePolicy
• iam:ChangePassword
• iam:CreatePolicy
• iam:CreatePolicyVersion
• iam:CreateRole
• iam:CreateServiceLinkedRole
• iam:DeletePolicy
• iam:DeletePolicyVersion
• iam:DeleteRole
• iam:DeleteRolePolicy
• iam:DeleteSSHPublicKey
• iam:DetachRolePolicy
• iam:GetInstanceProfile
• iam:GetPolicy
• iam:GetPolicyVersion
402

AWS Cloud9 User GuideCreating and Updating AWS
Managed Temporary Credentials
• iam:GetRole
• iam:GetSSHPublicKey
• iam:GetUser
• iam:List*
• iam:PassRole
• iam:PutRolePolicy
• iam:SetDefaultPolicyVersion
• iam:UpdateAssumeRolePolicy
• iam:UpdateRoleDescription
• iam:UpdateSSHPublicKey
• iam:UploadSSHPublicKey
• All IAM actions that interact with roles are allowed only for role names starting with cloud9-.However, iam:PassRole works with all role names.
• For AWS Security Token Service (AWS STS), only the following actions are allowed:• sts:GetCallerIdentity
• sts:DecodeAuthorizationMessage
• All supported AWS actions are restricted to the IP address of the environment. This is an AWS securitybest practice.
If AWS Cloud9 doesn't support an action or resource that you need an EC2 environment to access, or ifAWS managed temporary credentials is turned off for an EC2 environment and you cannot turn it backon, consider the following alternatives:
• Attach an instance profile to the Amazon EC2 instance that connects to the EC2 environment. Forinstructions, see Create and Use an Instance Profile to Manage Temporary Credentials (p. 81).
• Store your permanent AWS access credentials in the EC2 environment, for example, by setting specialenvironment variables or by running the aws configure command. For instructions, see Create andStore Permanent Access Credentials in an Environment (p. 84).
The preceding alternatives override all permissions that are allowed (or denied) by AWS managedtemporary credentials in an EC2 environment.
Creating and Updating AWS Managed TemporaryCredentialsFor an AWS Cloud9 EC2 development environment, AWS managed temporary credentials are created thefirst time you open the environment.
AWS managed temporary credentials are updated under any of the following conditions:
• Whenever a certain period of time passes. Currently, this is every 5 minutes.• Whenever you reload the web browser tab that displays the IDE for the environment.• When the timestamp that is listed in the ~/.aws/credentials file for the environment is reached.• If the AWS managed temporary credentials setting is set to off, whenever you turn it back on.
(To view or change this setting, choose AWS Cloud, Preferences in the menu bar of the IDE. In thePreferences tab, in the navigation pane, choose AWS Settings, Credentials.)
403

AWS Cloud9 User GuideService-Linked Role Permissions for AWS Cloud9
Using Service-Linked Roles for AWSCloud9
AWS Cloud9 uses AWS Identity and Access Management (IAM) service-linked roles. A service-linked roleis a unique type of IAM role that is linked directly to AWS Cloud9. Service-linked roles are predefined byAWS Cloud9 and include all the permissions that the service requires to call other AWS services on yourbehalf.
A service-linked role makes setting up AWS Cloud9 easier because you don’t have to manually add thenecessary permissions. AWS Cloud9 defines the permissions of its service-linked roles, and only AWSCloud9 can assume its roles. The defined permissions include the trust policy and the permissions policy,and that permissions policy cannot be attached to any other IAM entity.
You can delete the roles only after first deleting their related resources. This protects your AWS Cloud9resources because you can't inadvertently remove permission to access the resources.
For information about other services that support service-linked roles, see AWS Services That Work withIAM and look for the services that have Yes in the Service-Linked Role column. Choose a Yes with a linkto view the service-linked role documentation for that service.
• Service-Linked Role Permissions for AWS Cloud9 (p. 404)• Creating a Service-Linked Role for AWS Cloud9 (p. 406)• Editing a Service-Linked Role for AWS Cloud9 (p. 406)• Deleting a Service-Linked Role for AWS Cloud9 (p. 406)
Service-Linked Role Permissions for AWS Cloud9AWS Cloud9 uses the service-linked role named AWSServiceRoleForAWSCloud9. This service-linked roletrusts the service cloud9.amazonaws.com to assume the role.
The role permissions policy allows AWS Cloud9 to complete the following actions on the specifiedresources.
{ "Version": "2012-10-17", "Statement": [ { "Effect": "Allow", "Action": [ "cloudformation:CreateStack", "cloudformation:DescribeStacks", "ec2:CreateSecurityGroup", "ec2:DescribeInstances", "ec2:DescribeSecurityGroups", "ec2:DescribeVpcs", "ec2:RunInstances" ], "Resource": "*" }, { "Effect": "Allow",
404

AWS Cloud9 User GuideService-Linked Role Permissions for AWS Cloud9
"Action": [ "ec2:AuthorizeSecurityGroupIngress", "ec2:DeleteSecurityGroup", "ec2:TerminateInstances" ], "Resource": "*" }, { "Effect": "Allow", "Action": [ "cloudformation:DeleteStack" ], "Resource": "arn:aws:cloudformation:*:*:stack/aws-cloud9-*" }, { "Effect": "Allow", "Action": [ "ec2:CreateTags" ], "Resource": "arn:aws:ec2:*:*:instance/*", "Condition": { "StringLike": { "aws:RequestTag/Name": "aws-cloud9-*" } } }, { "Effect": "Allow", "Action": [ "ec2:StartInstances" ], "Resource": "*", "Condition": { "StringLike": { "ec2:ResourceTag/aws:cloudformation:stack-name": "aws-cloud9-*" } } } ]}
You must configure permissions to allow AWS Cloud9 to create a service-linked role on behalf of an IAMentity (such as a user, group, or role).
To allow AWS Cloud9 to create the AWSServiceRoleForAWSCloud9 service-linked role, add the followingstatement to the permissions policy for the IAM entity on whose behalf AWS Cloud9 needs to create theservice-linked role.
{ "Effect": "Allow", "Action": [ "iam:CreateServiceLinkedRole" ], "Resource": "*", "Condition": { "StringLike": { "iam:AWSServiceName": "cloud9.amazonaws.com" } }}
Alternatively, you can add the AWS managed policies AWSCloud9User or AWSCloud9Administratorto the IAM entity.
405

AWS Cloud9 User GuideCreating a Service-Linked Role for AWS Cloud9
To allow an IAM entity to delete the AWSServiceRoleForAWSCloud9 service-linked role, add thefollowing statement to the permissions policy for the IAM entity that needs to delete a service-linkedrole.
{ "Effect": "Allow", "Action": [ "iam:DeleteServiceLinkedRole", "iam:GetServiceLinkedRoleDeletionStatus" ], "Resource": "*", "Condition": { "StringLike": { "iam:AWSServiceName": "cloud9.amazonaws.com" } }}
Creating a Service-Linked Role for AWS Cloud9You don't need to manually create a service-linked role. When you create an AWS Cloud9 developmentenvironment, AWS Cloud9 creates the service-linked role for you.
Editing a Service-Linked Role for AWS Cloud9AWS Cloud9 doesn't allow you to edit the AWSServiceRoleForAWSCloud9 service-linked role. Forexample, after you create a service-linked role, you can't change the name of the role because variousentities might reference the role. However, you can edit the description of the role using IAM. For moreinformation, see Editing a Service-Linked Role in the IAM User Guide.
Deleting a Service-Linked Role for AWS Cloud9If you no longer need to use a feature or service that requires a service-linked role, we recommendthat you delete that role. That way you don’t have an unused entity that is not actively monitored ormaintained.
Deleting a Service-Linked Role in IAMBefore you can use IAM to delete a service-linked role, you must remove any AWS Cloud9 resources usedby the role. To remove AWS Cloud9 resources, see Deleting an Environment (p. 104).
You can use the IAM console to delete the AWSServiceRoleForAWSCloud9 service-linked role. For moreinformation, see Deleting a Service-Linked Role in the IAM User Guide.
406

AWS Cloud9 User GuideEnvironment Creation Error: "Not
authorized to perform sts:AssumeRole"
Troubleshooting AWS Cloud9Use the following information to help you identify and address issues with AWS Cloud9.
• Environment Creation Error: "Not authorized to perform sts:AssumeRole" (p. 407)• Console Error: "User is not authorized to perform action on resource" (p. 407)• Federated Identities Cannot Create Environments (p. 408)• Cannot Open an Environment (p. 408)• The AWS Cloud9 Installer Hangs or Fails (p. 410)• SSH Environment Error: "Python version 2.7 is required to install pty.js" (p. 410)• Cannot Run Some Commands or Scripts in an EC2 Environment (p. 413)• Application Preview Tab Displays an Error or is Blank (p. 411)• Cannot Display Your Running Application outside of the IDE (p. 411)• After Reloading an Environment, You Must Refresh Application Preview (p. 413)• Unable to Preview Application in the AWS Cloud9 IDE with HTTP (p. 413)• AWS CLI / aws-shell Error: "The security token included in the request is invalid" in an EC2
environment (p. 413)• Amazon EC2 Instances Are Not Automatically Updated (p. 414)• Lambda Local Function Run Error: Cannot Install SAM Local (p. 414)
Environment Creation Error: "Not authorized toperform sts:AssumeRole"
Issue: When you try to create a new environment, you see this error: "Not authorized to performsts:AssumeRole," and the environment is not created.
Possible causes: An AWS Cloud9 service-linked role doesn't exist in your AWS account.
Recommended solutions: Create an AWS Cloud9 service-linked role in your AWS account by running thefollowing command with the AWS Command Line Interface (AWS CLI) or the aws-shell.
aws iam create-service-linked-role --aws-service-name cloud9.amazonaws.com # For the AWS CLI.iam create-service-linked-role --aws-service-name cloud9.amazonaws.com # For the aws-shell.
If you cannot do this, check with your AWS account administrator.
After you run this command, try creating the environment again.
Console Error: "User is not authorized to performaction on resource"
Issue: When you try to use the AWS Cloud9 console to create or manage an AWS Cloud9 developmentenvironment, you see this error: "User USER-ARN is not authorized to perform ACTION on resourceRESOURCE-ARN," where:
407

AWS Cloud9 User GuideFederated Identities Cannot Create Environments
• USER-ARN is the Amazon Resource Name (ARN) of the IAM user that tried to access the resource.• ACTION is the AWS action the IAM user tried to perform.• RESOURCE-ARN is the ARN of the AWS resource that the IAM user tried to access.
Cause: The IAM user you signed in to the AWS Cloud9 console with doesn't have the correct AWS accesspermissions to perform the action.
Solution: Ensure the IAM user has the correct AWS access permissions, and then try to perform theaction again. For more information, see the following:
• Step 3: Add AWS Cloud9 Access Permissions to the Group (p. 11) in Team Setup• About Environment Member Access Roles (p. 91) in Working with Shared Environments
Federated Identities Cannot Create EnvironmentsIssue: When you try to use an AWS federated identity to create an AWS Cloud9 developmentenvironment, an access error message is displayed, and the environment isn't created.
Cause: : AWS Cloud9 uses service-linked roles. The service-linked role is created the first time anenvironment is created in an account using the iam:CreateServiceLinkedRole call. However,federated users can't call IAM APIs. For more information, see GetFederationToken in the AWS STS APIReference.
Solution: Ask an AWS account administrator to create the service-linked role for AWS Cloud9 eitherin the IAM console or by running the command aws iam create-service-linked-role --aws-service-name cloud9.amazonaws.com from the AWS Command Line Interface (AWS CLI) or thecommand iam create-service-linked-role --aws-service-name cloud9.amazonaws.comfrom the aws-shell. For more information, see Using Service-Linked Roles in the IAM User Guide.
Cannot Open an EnvironmentIssue: When you try to open an environment, the IDE does not display for a long time (after at least fiveminutes).
Possible causes:
• Your web browser does not have third-party cookies enabled.• The IAM user that is signed in to the AWS Cloud9 console does not have the required AWS access
permissions to open the environment.• If the environment is associated with an Amazon EC2 instance, the instance's associated VPC is not set
to the correct settings for AWS Cloud9.• If the environment is associated with an Amazon EC2 instance, the instance is transitioning between
states or is failing automated status checks, during the time when AWS Cloud9 is trying to connect tothe instance.
• If the environment is an SSH environment, the associated Amazon EC2 instance or your own server isnot set up correctly to allow AWS Cloud9 to access it.
Recommended solution:
• Enable third-party cookies in your web browser, and then try opening the environment again. Toenable third-party cookies:• For Apple Safari, see Manage cookies and website data using Safari on the Apple Support website.
408

AWS Cloud9 User GuideCannot Open an Environment
• For Google Chrome, see Change your cookie settings in Clear, enable, and manage cookies inChrome on the Google Chrome Help website.
• For Internet Explorer, see To block or allow all cookies in Description of Cookies on the MicrosoftSupport website.
• For Mozilla Firefox, see the Accept third party cookies setting in Enable and disable cookies thatwebsites use to track your preferences on the Mozilla Support website.
• For other web browsers, see their web browser's documentation.
If you want to restrict enabling third-party cookies only for AWS Cloud9 and your web browser allowsthis, specify the following domains, depending on the supported AWS Regions where you want to useAWS Cloud9.
AWS Region Domains
Asia Pacific (Singapore) *.vfs.cloud9.ap-southeast-1.amazonaws.com
vfs.cloud9.ap-southeast-1.amazonaws.com
EU (Ireland) *.vfs.cloud9.eu-west-1.amazonaws.com
vfs.cloud9.eu-west-1.amazonaws.com
US East (N. Virginia) *.vfs.cloud9.us-east-1.amazonaws.com
vfs.cloud9.us-east-1.amazonaws.com
US East (Ohio) *.vfs.cloud9.us-east-2.amazonaws.com
vfs.cloud9.us-east-2.amazonaws.com
US West (Oregon) *.vfs.cloud9.us-west-2.amazonaws.com
vfs.cloud9.us-west-2.amazonaws.com
• Make sure the IAM user that is signed in to the AWS Cloud9 console has the required AWS accesspermissions to open the environment, and then try opening the environment again. For moreinformation see the following, or check with your AWS account administrator:
• Step 3: Add AWS Cloud9 Access Permissions to the Group (p. 11) in Team Setup
• AWS Managed (Predefined) Policies for AWS Cloud9 (p. 390) in Authentication and Access Control
• Customer-Managed Policy Examples for Teams (p. 15) in Advanced Team Setup
• Customer-Managed Policy Examples (p. 393) in Authentication and Access Control
• Changing Permissions for an IAM User in the IAM User Guide
• Troubleshoot IAM Policies in the IAM User Guide
If the signed-in IAM user still cannot open the environment, you could try signing out and then signingback in as either the AWS account root user or an IAM administrator user in the account. Then tryopening the environment again. If you are able to open the environment in this way, then there is mostlikely a problem with the IAM user's access permissions.
• If the environment is associated with an Amazon EC2 instance, make sure the instance's associated VPCis set to the correct settings for AWS Cloud9, and then try opening the environment again. For details,see Amazon VPC Requirements for AWS Cloud9 (p. 375).
If the instance's associated VPC is set to the correct settings for AWS Cloud9 and you still cannotopen the environment, the instance's Amazon EC2 security group might be preventing access to AWS
409
AWS Cloud9 User GuideThe AWS Cloud9 Installer Hangs or Fails
Cloud9. Check the security group to make sure that at minimum, inbound SSH traffic is allowed overport 22 for all IP addresses (Anywhere or 0.0.0.0/0). For instructions, see Describing Your SecurityGroups and Updating Security Group Rules in the Amazon EC2 User Guide for Linux Instances.
• If the environment is associated with an Amazon EC2 instance, restart the instance, make sure theinstance is running and has passed all system checks, and then try opening the environment again. Fordetails, see Reboot Your Instance and Viewing Status Checks in the Amazon EC2 User Guide for LinuxInstances.
• If the environment is an SSH environment, make sure the associated Amazon EC2 instance or yourown server is set up correctly to allow AWS Cloud9 to access it, and then try opening the environmentagain. For details, see SSH Environment Host Requirements (p. 381).
The AWS Cloud9 Installer Hangs or FailsIssue: When you open an AWS Cloud9 SSH development environment, you are prompted to run the AWSCloud9 Installer. When you try to run it, it either hangs or displays errors, and you cannot use the AWSCloud9 IDE for the environment as expected. (In some cases, a message might display before you areprompted to run the AWS Cloud9 Installer. The message states that opening the environment is takinglonger than expected.)
Cause: The AWS Cloud9 Installer cannot run a required setup script to properly set up the environment.
Solution: Manually run the install.sh script that the AWS Cloud9 Installer unsuccessfully tried torun, as follows:
1. Close the web browser tab for the environment, which stops the AWS Cloud9 Installer.
2. Connect to the Amazon EC2 instance or your own server using an SSH connection client outside ofAWS Cloud9, for example by using the ssh command or PuTTY.
3. Run one of the following commands on the Amazon EC2 instance or your own server:
curl -L https://raw.githubusercontent.com/c9/install/master/install.sh | bashwget -O - https://raw.githubusercontent.com/c9/install/master/install.sh | bash
4. Try opening the environment again. You might be prompted to run the AWS Cloud9 Installer again.When you try to run it this time though, it should run without hangs or errors. However, dependingon your Linux distribution and build, you might need to repeat this process to successfully set up theenvironment.
SSH Environment Error: "Python version 2.7 isrequired to install pty.js"
Issue: After you open an AWS Cloud9 SSH development environment, the terminal in the AWS Cloud9IDE displays a message that begins with "Python version 2.7 is required to install pty.js."
Cause: To work as expected, an SSH environment requires that Python version 2.7 is installed.
Solution: Install Python version 2.7 in the environment. To check your version, from your server'sterminal, run the command python --version . To install Python 2.7 on your server, see one of thefollowing:
• Step 1: Install Required Tools (p. 347) in the Python Sample.
410

AWS Cloud9 User GuideApplication Preview Tab Displays an Error or is Blank
• Download Python on the Python website and Installing Packages in the Python Packaging User Guide.
Application Preview Tab Displays an Error or isBlank
Issue: On the menu bar in the IDE, when you choose Preview, Preview Running Application or Tools,Preview, Preview Running Application to try to display your application in a preview tab in the IDE, thetab displays an error, or the tab is blank.
Possible causes:
• Your application is not running in the IDE.• Your application is not running using HTTP.• Your application is running over more than one port.• Your application is running over a port other than 8080, 8081, or 8082.• Your application is running with an IP other than 127.0.0.1, localhost, or 0.0.0.0.• The port (8080, 8081, or 8082) is not specified in the URL on the preview tab.• Your network blocks inbound traffic to ports 8080, 8081, or 8082.
Recommended solutions:
• Ensure that the application is running in the IDE.• Ensure that the application is running using HTTP. For some examples in Node.js and Python, see Run
an Application (p. 125).• Ensure that the application is running over only one port. For some examples in Node.js and Python,
see Run an Application (p. 125).• Ensure that the application is running over port 8080, 8081, or 8082. For some examples in Node.js
and Python, see Run an Application (p. 125).• Ensure that the application is running with an IP of 127.0.0.1, localhost, or 0.0.0.0. For some
examples in Node.js and Python, see Run an Application (p. 125).• Add :8080, :8081, or :8082 to the URL on the preview tab.• Ensure that your network allows inbound traffic over ports 8080, 8081, or 8082. If you cannot make
changes to your network, see your network administrator.• After you are sure that all of the preceding conditions are met, try stopping the application and then
starting it again.• If you stopped the application and then started it again, try choosing Preview, Preview Running
Application or Tools, Preview, Preview Running Application on the menu bar again. Or try choosingthe Refresh button (the circular arrow) on the corresponding application preview tab, if the tab isalready visible.
Cannot Display Your Running Application outsideof the IDE
Issue: When you or others try to display your running application in a web browser tab outside of theIDE, that web browser tab displays an error, or the tab is blank.
Possible causes:
411

AWS Cloud9 User GuideCannot Display Your Running Application outside of the IDE
• The application is not running in the IDE.
• The application is running with an IP of 127.0.0.1 or localhost.
• The application is running in an AWS Cloud9 EC2 development environment, and one or more securitygroups that are associated with the corresponding Amazon EC2 instance do not allow inbound trafficover the protocols, ports, or IP addresses that the application requires.
• The application is running in an EC2 environment, and the network ACL for the subnet in the virtualprivate cloud (VPC) that is associated with the corresponding Amazon EC2 instance does not allowinbound traffic over the protocols, ports, or IP addresses that the application requires.
• The URL is incorrect.
• The URL in the application preview tab is being requested instead of the instance's public IP address.
• The instance's public IP address has changed.
• The web request originates from a virtual private network (VPN) that blocks traffic over the protocols,ports, or IP addresses that the application requires.
• The application is running in an AWS Cloud9 SSH development environment, and your server or theassociated network does not allow traffic over the protocols, ports, or IP addresses that the applicationrequires.
Recommended solutions:
• Ensure that the application is running in the IDE.
• Ensure that the application is not running with an IP of 127.0.01 or localhost. For some examplesin Node.js and Python, see Run an Application (p. 125).
• If the application is running in an EC2 environment, ensure all security groups that are associatedwith the corresponding Amazon EC2 instance allow inbound traffic over the protocols, ports, and IPaddresses that the application requires. For instructions, see Step 2: Set Up the Security Group for theInstance (p. 128) in Share a Running Application over the Internet. See also Security Groups for YourVPC in the Amazon VPC User Guide.
• If the application is running in an EC2 environment, and a network ACL exists for the subnet inthe VPC that is associated with the corresponding Amazon EC2 instance, ensure that network ACLallows inbound traffic over the protocols, ports, and IP addresses that the application requires. Forinstructions, see Step 3: Set Up the Subnet for the Instance (p. 129) in Share a Running Application overthe Internet. See also Network ACLs in the Amazon VPC User Guide.
• Ensure that the requesting URL, including the protocol (and port, if it must be specified), is correct.For more information, see Step 5: Share the Running Application URL (p. 130) in Share a RunningApplication over the Internet.
• We do not recommend requesting a URL with the format https://ENVIRONMENT_ID.vfs.cloud9.REGION_ID.amazonaws.com/. This URL works only when the IDEfor the environment is open and the application is running in the same web browser.
• Determine whether the instance's public IP address has changed. The instance's public IP addressmight change anytime the instance restarts. To prevent this IP address from changing, you can allocatean Elastic IP address and assign it to the running instance. For more information, see Step 5: Share theRunning Application URL (p. 130) in Share a Running Application over the Internet.
• If the web request originates from a VPN, ensure that VPN allows traffic over the protocols, ports, andIP addresses that the application requires. If you cannot make changes to your VPN, see your networkadministrator. Or make the web request from a different network if possible.
• If the application is running in an SSH environment, ensure your server and the associated networkallow traffic over the protocols, ports, and IP addresses that the application requires. If you cannotmake changes to your server or the associated network, see your server or network administrator.
• Try running the application from a terminal in the environment by running the curl command,followed by the URL. If this command displays an error message, there might be some other issue thatis not related to AWS Cloud9.
412

AWS Cloud9 User GuideAfter Reloading an Environment, You
Must Refresh Application Preview
After Reloading an Environment, You Must RefreshApplication Preview
Issue: After you reload an environment that displays an application preview tab, the tab doesn't displaythe application preview.
Cause: Sometimes users write code that can run an infinite loop or that otherwise uses so much memorythat the AWS Cloud9 IDE can pause or stop when the application preview is running. To keep this fromhappening, AWS Cloud9 doesn't reload application preview tabs whenever an environment is reloaded.
Solution: After you reload an environment that displays an application preview tab, to display theapplication preview, choose the Click to load the page button on the tab.
Unable to Preview Application in the AWS Cloud9IDE with HTTP
Issue: In the address box of an application preview tab in the AWS Cloud9 IDE, the URL always startswith https. If you try to change https in the box to http and then press Enter, the tab doesn't displaythe application preview.
Cause: To help improve code safety, in the address box of the application preview tab in the IDE, AWSCloud9 always uses https. This behavior cannot be changed.
Solution: To view an application preview with an address starting with http instead of https, changehttps in the address box of the tab to http and then press Enter. Then choose the Open your pagein a new tab button. This displays the application preview in a separate web browser tab using HTTP.
Cannot Run Some Commands or Scripts in an EC2Environment
Issue: After you open an AWS Cloud9 EC2 development environment, you cannot install some types ofpackages, run commands such as apt, or run scripts containing commands that typically work with Linuxoperating systems such as Ubuntu.
Cause: The Amazon EC2 instance that AWS Cloud9 uses for an EC2 environment relies on Amazon Linux,which is based on Red Hat Enterprise Linux (RHEL).
Solution: If you install or manage packages or run commands or scripts in the IDE for an EC2environment, ensure they are compatible with RHEL.
AWS CLI / aws-shell Error: "The security tokenincluded in the request is invalid" in an EC2environment
Issue: When you try to use the AWS Command Line Interface (AWS CLI) or the aws-shell to run acommand in the AWS Cloud9 IDE for an EC2 environment, an error displays: "The security token includedin the request is invalid."
413

AWS Cloud9 User GuideAmazon EC2 Instances Are Not Automatically Updated
Possible causes:
• If you have AWS managed temporary credentials enabled, you are trying to run a command that is notallowed with those temporary credentials. For a list of allowed commands, see Actions Supported byAWS Managed Temporary Credentials (p. 402).
• If you have AWS managed temporary credentials enabled and the environment is a sharedenvironment, the environment owner has not opened the environment within the past 12 hours sothat AWS Cloud9 can refresh AWS managed temporary credentials in the environment. (AWS Cloud9sets this 12-hour limit as an AWS security best practice.)
Recommended solutions:
• If you have AWS managed temporary credentials enabled, run allowed commands only. If you mustrun a command that is not allowed by AWS managed temporary credentials, one approach would beto configure the AWS CLI or aws-shell in the environment with a set of permanent credentials, whichremoves this limitation. For instructions, see Create and Store Permanent Access Credentials in anEnvironment (p. 84).
• Have the environment owner open the environment so that AWS Cloud9 can refresh temporarycredentials in the environment.
For more information, see AWS Managed Temporary Credentials (p. 401).
Amazon EC2 Instances Are Not AutomaticallyUpdated
Issue: Recent system updates are not automatically applied to an Amazon EC2 instance that connects toan AWS Cloud9 development environment.
Cause: Automatically applying recent system updates could cause your code or the Amazon EC2 instanceto behave in unexpected ways, without your prior knowledge or approval.
Recommended solutions:
Apply system updates to the Amazon EC2 instance on a regular basis by following the instructions inUpdating Instance Software in the Amazon EC2 User Guide for Linux Instances.
To run commands on the instance, you can use a terminal session in the AWS Cloud9 IDE from theenvironment that is connected to the instance.
Alternatively, you can use an SSH remote access utility such as ssh or PuTTY to connect to the instance.To do this, from your local computer, use an SSH key pair creation utility such as ssh-keygen orPuTTYgen. Use the AWS Cloud9 IDE from the environment that is connected to the instance to store thegenerated public key on the instance. Then use the SSH remote access utility along with the generateprivate key to access the instance. For more information, see your utility's documentation.
Lambda Local Function Run Error: Cannot InstallSAM Local
Issue: After you try to run the local version of an AWS Lambda function in the AWS Cloud9 IDE, a dialogbox is displayed, stating that AWS Cloud9 is having trouble installing SAM Local. AWS Cloud9 needs SAM
414

AWS Cloud9 User GuideLambda Local Function Run Error: Cannot Install SAM Local
Local to run local versions of AWS Lambda functions in the IDE. Until SAM Local is installed, you cannotrun local versions of Lambda functions in the IDE.
Cause: AWS Cloud9 can't find SAM Local at the expected path in the environment, which is ~/.c9/bin/sam. This is because SAM Local is not yet installed, or if it is installed, AWS Cloud9 can't find it at thatlocation.
Recommended solutions: You can wait for AWS Cloud9 to try to finish installing SAM Local, or you caninstall it yourself.
To see how AWS Cloud9 is doing with attempting to install SAM Local, choose Window, Installer on themenu bar.
To install SAM Local yourself, run the following commands, one at a time in the following order, from aterminal session in the IDE.
npm install -g aws-sam-local # Use Node Package Manager (npm) to install SAM Local as a global package in the environment.ln -sfn $(which sam) ~/.c9/bin/sam # Create a symbolic link (a shortcut) from the path that AWS Cloud9 expects to where SAM Local is installed.
For more information, see the awslabs/aws-sam-local repository on the GitHub website.
415
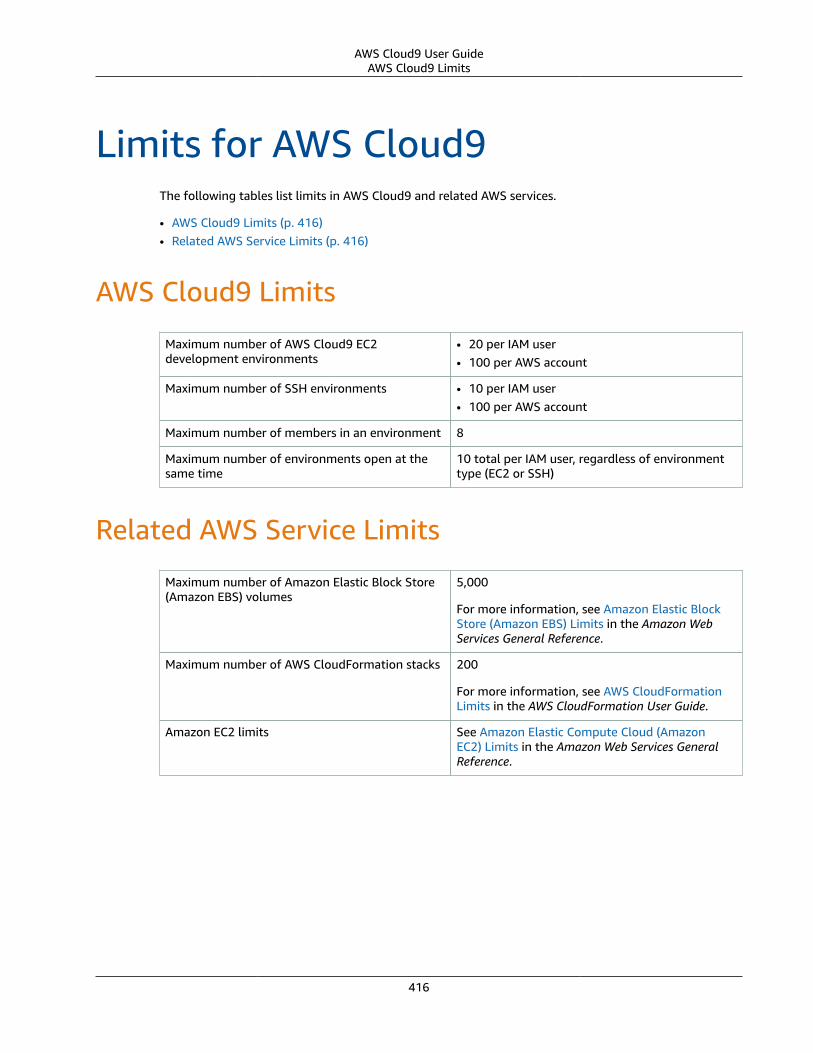
AWS Cloud9 User GuideAWS Cloud9 Limits
Limits for AWS Cloud9The following tables list limits in AWS Cloud9 and related AWS services.
• AWS Cloud9 Limits (p. 416)• Related AWS Service Limits (p. 416)
AWS Cloud9 Limits
Maximum number of AWS Cloud9 EC2development environments
• 20 per IAM user• 100 per AWS account
Maximum number of SSH environments • 10 per IAM user• 100 per AWS account
Maximum number of members in an environment 8
Maximum number of environments open at thesame time
10 total per IAM user, regardless of environmenttype (EC2 or SSH)
Related AWS Service Limits
Maximum number of Amazon Elastic Block Store(Amazon EBS) volumes
5,000
For more information, see Amazon Elastic BlockStore (Amazon EBS) Limits in the Amazon WebServices General Reference.
Maximum number of AWS CloudFormation stacks 200
For more information, see AWS CloudFormationLimits in the AWS CloudFormation User Guide.
Amazon EC2 limits See Amazon Elastic Compute Cloud (AmazonEC2) Limits in the Amazon Web Services GeneralReference.
416
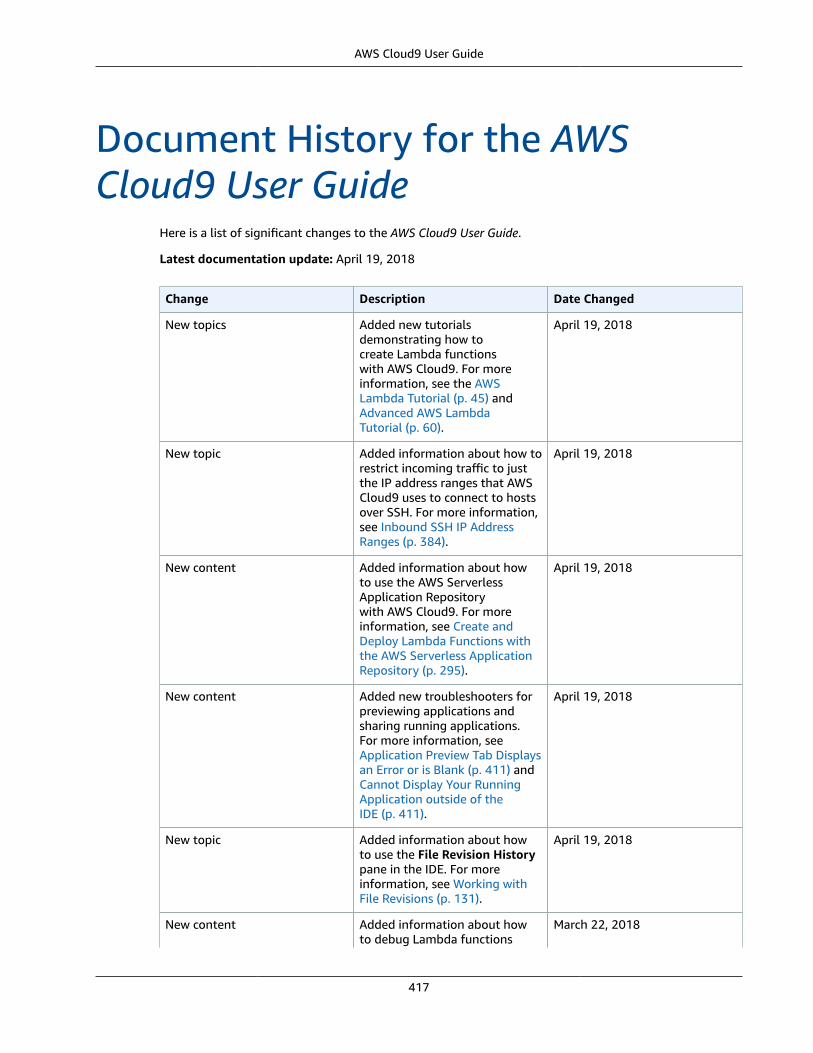
AWS Cloud9 User Guide
Document History for the AWSCloud9 User Guide
Here is a list of significant changes to the AWS Cloud9 User Guide.
Latest documentation update: April 19, 2018
Change Description Date Changed
New topics Added new tutorialsdemonstrating how tocreate Lambda functionswith AWS Cloud9. For moreinformation, see the AWSLambda Tutorial (p. 45) andAdvanced AWS LambdaTutorial (p. 60).
April 19, 2018
New topic Added information about how torestrict incoming traffic to justthe IP address ranges that AWSCloud9 uses to connect to hostsover SSH. For more information,see Inbound SSH IP AddressRanges (p. 384).
April 19, 2018
New content Added information about howto use the AWS ServerlessApplication Repositorywith AWS Cloud9. For moreinformation, see Create andDeploy Lambda Functions withthe AWS Serverless ApplicationRepository (p. 295).
April 19, 2018
New content Added new troubleshooters forpreviewing applications andsharing running applications.For more information, seeApplication Preview Tab Displaysan Error or is Blank (p. 411) andCannot Display Your RunningApplication outside of theIDE (p. 411).
April 19, 2018
New topic Added information about howto use the File Revision Historypane in the IDE. For moreinformation, see Working withFile Revisions (p. 131).
April 19, 2018
New content Added information about howto debug Lambda functions
March 22, 2018
417

AWS Cloud9 User Guide
Change Description Date Changed
that use Python. For moreinformation, see Debug theLocal Version of a LambdaFunction or Its Related APIGateway API (p. 307).
New content Added a new troubleshooterfor opening AWS Cloud9development environments. Formore information, see CannotOpen an Environment (p. 408).
March 19, 2018
New content Added a new troubleshooterfor the AWS Cloud9 Installer.For more information, see TheAWS Cloud9 Installer Hangs orFails (p. 410).
March 19, 2018
New topic Added information abouthow to use AWS Cloud9 withAWS CodePipeline. For moreinformation, see Working withAWS CodePipeline (p. 315).
February 13, 2018
New content Added information abouthow to share AWS Cloud9development environmentsacross AWS accounts. For moreinformation, see Invite an IAMUser in Another Account to YourEnvironment (p. 95).
February 5, 2018
New content Added information about how touse AWS Cloud9 with the aws-shell. For more information,see the AWS CLI and aws-shellSample (p. 318).
January 19, 2018
GitHub availability This guide is now available onGitHub. You can also use GitHubto submit feedback and changerequests for this guide's content.For more information, choosethe Edit on GitHub icon in theguide's navigation bar, or seethe awsdocs/aws-cloud9-user-guide repository on the GitHubwebsite.
January 10, 2018
Kindle format availability This guide is now available inAmazon Kindle format. Formore information, choosethe Open Kindle icon in theguide's navigation bar, or seeAWS Cloud9: User Guide KindleEdition on the Amazon website.
January 2, 2018
418
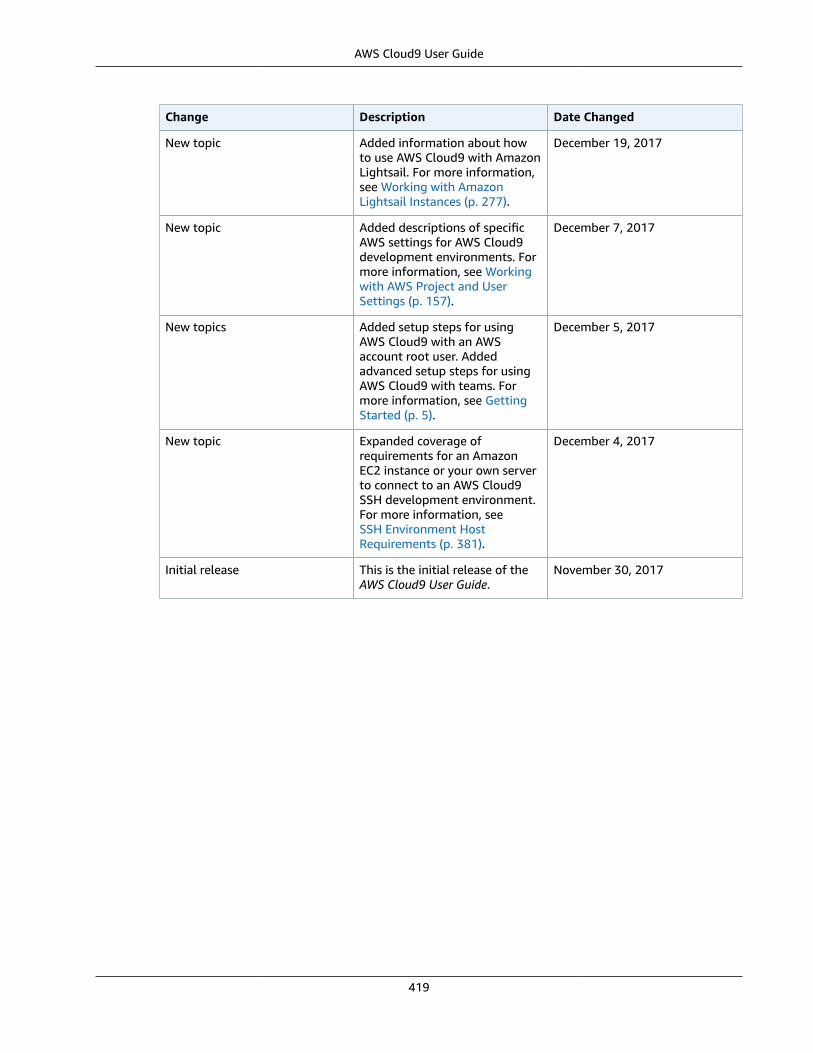
AWS Cloud9 User Guide
Change Description Date Changed
New topic Added information about howto use AWS Cloud9 with AmazonLightsail. For more information,see Working with AmazonLightsail Instances (p. 277).
December 19, 2017
New topic Added descriptions of specificAWS settings for AWS Cloud9development environments. Formore information, see Workingwith AWS Project and UserSettings (p. 157).
December 7, 2017
New topics Added setup steps for usingAWS Cloud9 with an AWSaccount root user. Addedadvanced setup steps for usingAWS Cloud9 with teams. Formore information, see GettingStarted (p. 5).
December 5, 2017
New topic Expanded coverage ofrequirements for an AmazonEC2 instance or your own serverto connect to an AWS Cloud9SSH development environment.For more information, seeSSH Environment HostRequirements (p. 381).
December 4, 2017
Initial release This is the initial release of theAWS Cloud9 User Guide.
November 30, 2017
419