autopilot 3 manual rev a - burk · autopilot® 3 instruction manual 1 1 installation thank you for...
TRANSCRIPT
0
AutoPilot® 3
Instruction Manual
April 2006 (REV A)
7 Beaver Brook Road Littleton, MA 01460
Customer Support: 978-486-3711
Copyright © 2006 Burk Technology, Inc. All rights reserved.

1
AutoPilot® 3 Instruction Manual Revision A (April 2006) Copyright © 2006 Burk Technology, Inc. All rights reserved. No parts of this manual may be reproduced in any form or by any means without written permission from Burk Technology, Inc. Information in this manual is subject to change without notice. Burk Technology, Inc. reserves specification privileges. Printed in the United States of America.
2
Table of Contents
Installation.................................................................................................................................1 Minimum System Requirements ............................................................................................1 Getting Help ...........................................................................................................................1 Upgrading from AutoPilot 2.x................................................................................................1
Navigating AutoPilot 3 .............................................................................................................3 The Navigator Tool ................................................................................................................3 Creating Shortcut Tabs ...........................................................................................................3
ARC-16 Setup ...........................................................................................................................5 ARC-16 Properties .................................................................................................................5 ARC-16 Group .......................................................................................................................6 Time Zone ..............................................................................................................................7 Logging Options.....................................................................................................................7 Add New Connection ............................................................................................................. 8 Connection Details .................................................................................................................9 Add Channels .......................................................................................................................11 Channel Properties................................................................................................................12 Meter Properties ...................................................................................................................13 Default View ........................................................................................................................14 Finishing the Wizard ............................................................................................................14
Managing Connections...........................................................................................................16 Managing Groups...................................................................................................................18 Managing Users ......................................................................................................................20 Basic Operation ......................................................................................................................22
Logging In ............................................................................................................................22 Connecting to your ARC-16.................................................................................................22 Connection Details ...............................................................................................................22 Commands............................................................................................................................23 Logging.................................................................................................................................23 Alarms ..................................................................................................................................25 Events ...................................................................................................................................26 Calendars ..............................................................................................................................27 Changing your Password......................................................................................................28
Application Options................................................................................................................29 General Options....................................................................................................................29 Startup Options.....................................................................................................................30 Alarm Options ......................................................................................................................31 Event List Options................................................................................................................31 Script/Macro Options ...........................................................................................................32 Incoming Calls......................................................................................................................33 Data Options.........................................................................................................................33 Warning Dialog Options.......................................................................................................34 Email Options.......................................................................................................................35
3
Macros .....................................................................................................................................36 Creating And Editing Macros...............................................................................................36 Composing The Macro .........................................................................................................36 Scheduling The Macro .........................................................................................................37 Saving The Macro ................................................................................................................37
Scripts ......................................................................................................................................38 Converting AutoPilot 1.x Functions.....................................................................................38 Script Wizard........................................................................................................................40 Modifying Wizard Generated Scripts...................................................................................41 Using the Script Editor .........................................................................................................42 Scheduling Scripts ................................................................................................................43 Using the Script Scheduler ...................................................................................................44 Script Errors..........................................................................................................................45
Writing Scripts........................................................................................................................47 If Statements.........................................................................................................................47 Variables and Constants .......................................................................................................48 Functions and Subs...............................................................................................................49 Loops ....................................................................................................................................50 Date/Time Functions ............................................................................................................51
AutoPilot Script Commands..................................................................................................52 ARCTime .............................................................................................................................52 Connect.................................................................................................................................52 Disconnect ............................................................................................................................53 IsConnected ..........................................................................................................................54 IssueCommand .....................................................................................................................54 Raise .....................................................................................................................................55 Lower....................................................................................................................................55 Status ....................................................................................................................................56 Value.....................................................................................................................................56 NewStatus.............................................................................................................................57 NewValue .............................................................................................................................57 PreSunrise.............................................................................................................................58 Sunrise ..................................................................................................................................59 Sunset ...................................................................................................................................59 PostSunset.............................................................................................................................60 User1.....................................................................................................................................60 User2.....................................................................................................................................61 GetScriptStatus .....................................................................................................................61 RunScript ..............................................................................................................................62 StopScript .............................................................................................................................62 UnScheduleScript .................................................................................................................63 Wait ......................................................................................................................................63 Message ................................................................................................................................64 TakeLog................................................................................................................................64 VChan...................................................................................................................................64 GetMacroStatus ....................................................................................................................65

4
RunMacro .............................................................................................................................65 StopMacro ............................................................................................................................66 UnScheduleMacro ................................................................................................................66 EndScript ..............................................................................................................................66 Global Variables...................................................................................................................67 Email.....................................................................................................................................67 Print Report ..........................................................................................................................67
Reports.....................................................................................................................................68 Using the Report Writer .......................................................................................................68 Report Writer: General .........................................................................................................68 Report Writer: Date ..............................................................................................................69 Report Writer: Telemetry .....................................................................................................70 Report Writer: Status Channels ............................................................................................71 Report Writer: Other Fields..................................................................................................72 Report Writer: Header ..........................................................................................................73 Report Writer: Footer ...........................................................................................................74 Saving and Printing Reports.................................................................................................75
Exporting Data........................................................................................................................76 Custom Views..........................................................................................................................77
Opening a Saved Custom View............................................................................................77 Creating and editing custom views.......................................................................................77 Component Properties ..........................................................................................................79 Building a drill-down custom view ......................................................................................81
Using Real-Time Charts.........................................................................................................82 Viewing Charts.....................................................................................................................82 Creating Charts.....................................................................................................................82
Email Alarm Notifications .....................................................................................................86 Creating Notification Lists ...................................................................................................86
Glossary ...................................................................................................................................89 Appendix A..............................................................................................................................90
AutoPilot® 3 Instruction Manual 1
1
Installation Thank you for purchasing AutoPilot control, monitoring, and logging software for the ARC-16. Version 3 is designed to maximize the capabilities of the ARC-16 system and improve your operation’s workflow. AutoPilot 3 is a significant upgrade from previous versions, giving you even greater control and flexibility for managing your ARC-16 sites. In addition to a new interface and enhancements to existing features, version 3 offers several major new features such as custom views, virtual channels, email alarm notification, macro editor, automatic report printing, and real-time charting. Minimum System Requirements
• 1 GHz or higher processor • Windows® 2000 Professional w/ SP1, Windows XP • 100MB free hard drive space • 256MB RAM • Microsoft Internet Explorer 4.01 w/ SP2 or higher • 1024x768 screen resolution • One available COM port for each direct cable connection • Bell 212A compatible modem for dial-up modem connection • CD-ROM Drive • Multimedia speakers (if using the audible alarm feature) • ARC-16 firmware version 5.0 or higher (5.4 or above recommended)
Note: Large or complex operations may require greater system resources. Additionally, AutoPilot requires your ARC-16 units have firmware version 5.0 or higher. Version 5.4 or higher is recommended. Getting Help AutoPilot’s onboard help guide provides detailed instructions for using AutoPilot, including a complete reference to VBS script syntax. Once you have installed AutoPilot, go to the Help menu and select Contents to open the help guide. Check the Burk Technology web site at www.burk.com for knowledgebase articles, release notes, updated software versions, and other support content. If you need further assistance, please do not hesitate to contact a Burk Technology customer support representative. Send email to [email protected], or call 978-486-3711 (M-F 9AM to 5PM Eastern). Upgrading from AutoPilot 2.x Upgrading An Existing Installation Since AutoPilot 3 performs an upgrade of certain AutoPilot 2 files, it is recommended that you store a copy of your AutoPilot 2 config.mdb and history.mdb files in a folder other than
AutoPilot® 3 Instruction Manual 2
2
the AutoPilot 3 target folder. Once you use these files in AutoPilot 3, you cannot use them with AutoPilot 2. Your script files can be used in either version. Before you upgrade to AutoPilot 3, use the Windows add/remove programs utility to remove AutoPilot 2 from your computer. Your configuration, history and script files will be saved. To automatically upgrade your existing configuration (recommended), install AutoPilot 3 to your AutoPilot 2 folder. Your configuration files will be updated automatically when you run AutoPilot 3 for the first time. If you install AutoPilot 3 to a different folder, you will need to copy your existing AutoPilot 2 configuration files (config.mdb and history.mdb) and scripts to the AutoPilot 3 directory. These files will be upgraded for use in AutoPilot 3 the first time you run AutoPilot 3. Upgrading Your Program Key & Authorization Codes AutoPilot 3 requires a new program key and different authorization codes from the ones you used with AutoPilot 2. During installation and setup you will be prompted to enter the AutoPilot 3 program key and authorization codes you were given when you purchased your upgrade. If you are unable to locate your codes, please contact Customer Support for assistance. You can, however, enter your old program key and authorization codes to use AutoPilot 3 for 30 days as a fully functional demo. Installation Instructions: Follow the instructions below to install AutoPilot: If you are installing from CD, insert the AutoPilot CD in your CD ROM drive. If Autorun is enabled for this drive, a menu screen will open automatically. Otherwise go to My Computer and double-click the CD ROM drive. The menu screen should automatically launch. Choose “Install” to begin installation. If you have downloaded the AutoPilot setup program and saved it to your computer, double-click on the setup icon and installer will launch. During the installation you will be prompted to enter the program key you received when you purchased AutoPilot 3. If you have an AutoPilot 2 program key, you may use it to run AutoPilot as a 30-day demo.
AutoPilot® 3 Instruction Manual 3
3
Navigating AutoPilot 3 The Navigator Tool
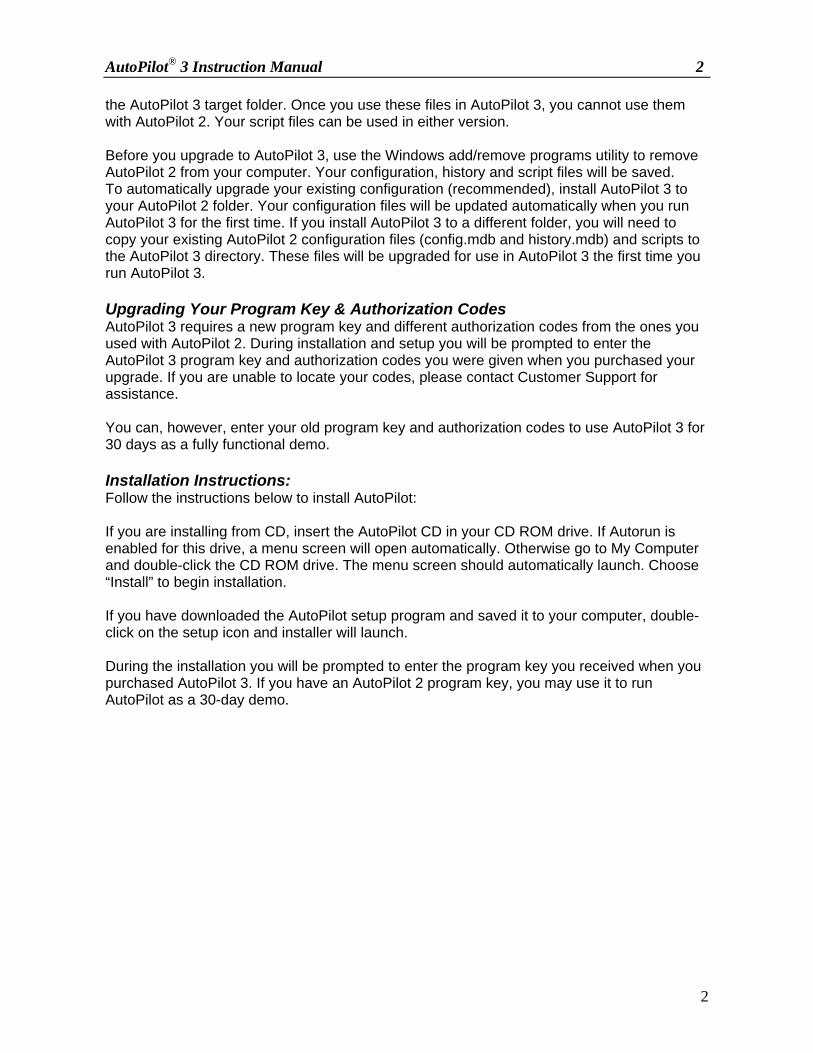
The AutoPilot navigator is the central tool used for displaying sites, custom views, charts and reports. When you create any of these in AutoPilot, an icon for the new site, custom view, chart or report will appear in the navigator. Clicking on the icon causes the object to appear in the main display area. You can show or hide the navigator by selecting Navigator in the View menu. Using the up and down arrows in the navigator allows you to reorder the icons in the navigator.
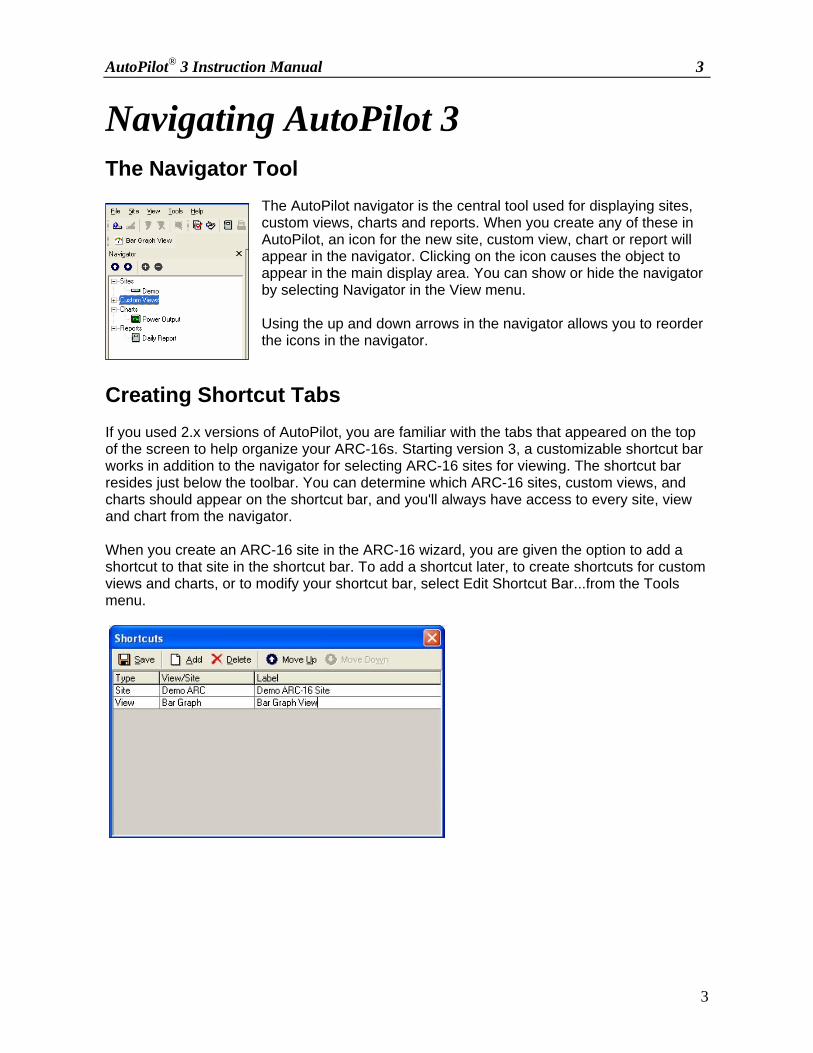
Creating Shortcut Tabs If you used 2.x versions of AutoPilot, you are familiar with the tabs that appeared on the top of the screen to help organize your ARC-16s. Starting version 3, a customizable shortcut bar works in addition to the navigator for selecting ARC-16 sites for viewing. The shortcut bar resides just below the toolbar. You can determine which ARC-16 sites, custom views, and charts should appear on the shortcut bar, and you'll always have access to every site, view and chart from the navigator. When you create an ARC-16 site in the ARC-16 wizard, you are given the option to add a shortcut to that site in the shortcut bar. To add a shortcut later, to create shortcuts for custom views and charts, or to modify your shortcut bar, select Edit Shortcut Bar...from the Tools menu.
AutoPilot® 3 Instruction Manual 4
4
To add a shortcut:
1. Click the Add icon. A blank entry in the shortcut list is created. 2. Click in the Type field for that blank entry and choose whether you are adding a
shortcut to an ARC-16 site, a custom view, or a chart. 3. Then click in the View/Site field to select the view, site or chart to use. 4. The Label field is used to specify the text that will appear on the shortcut bar. You can
make the label read differently from the name of the site, view or chart. 5. Click Save when you are done.
To edit a shortcut, simply click in the field you want to change modify the entry. Click Save when you are done.
To delete a shortcut, click inside any field corresponding to the entry you want to delete and click the Delete icon. When you press Save, AutoPilot will remove the shortcut from the shortcut bar.
To reorder the shortcut bar, click inside any field and use the move up and move down buttons to change the position of the corresponding shortcut. Press Save when you are done.
Note: When you edit ARC-16 properties, the shortcut name is updated to reflect the name of the ARC-16, even if you had given the shortcut a name other than the ARC-16 name.
AutoPilot® 3 Instruction Manual 5
5
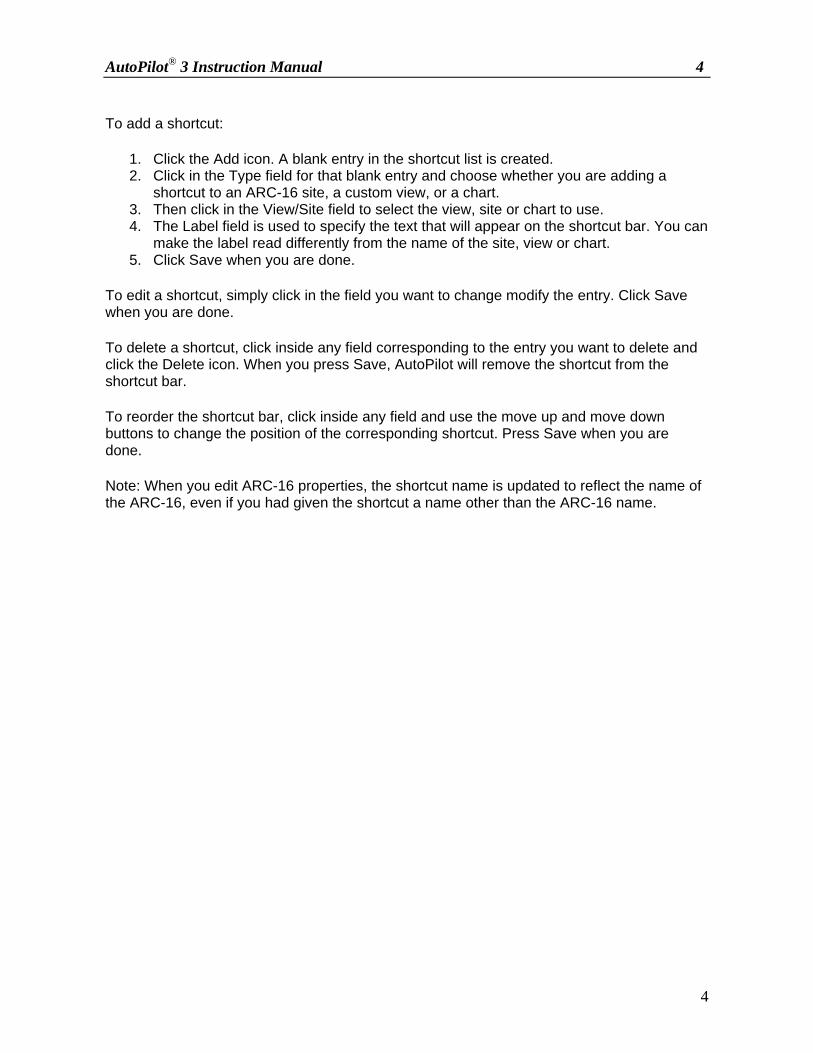
ARC-16 Setup The ARC-16 Wizard takes you step-by-step through the process of adding ARC-16s to AutoPilot. This section of the will guide you through each page of the wizard. To start the wizard, click "New ARC-16" from the Site menu. To change your ARC-16 settings, you can return to the ARC-16 Wizard by clicking "ARC-16 Properties..." from the Edit menu. To delete an ARC, click "Delete ARC-16..." from the Edit menu. Note: you can only add a new connection using the wizard when you first setup the ARC-16. To add connections later, see Managing Connections. ARC-16 Properties
ARC-16 Name Enter a name for your ARC-16. This name will be used to select your ARC-16 in AutoPilot, as well as in scripts. Serial Number Enter your ARC-16's serial number. The serial number is printed on the back of the ARC-16, and appears at the end of the configuration menu on the front panel of the unit. Password Enter the User Password for your ARC-16. This appears in the system configuration menu on the ARC-16. Re-enter the password in the "Confirm Password" field. Program Key When you installed AutoPilot, you entered a program key that was included on the registration sheet sent with your order. This number will automatically appear in the Program Key field here and you will normally not have to change it. If this site will use authorization codes registered under a different program key, you can change that program key here.
AutoPilot® 3 Instruction Manual 6
6
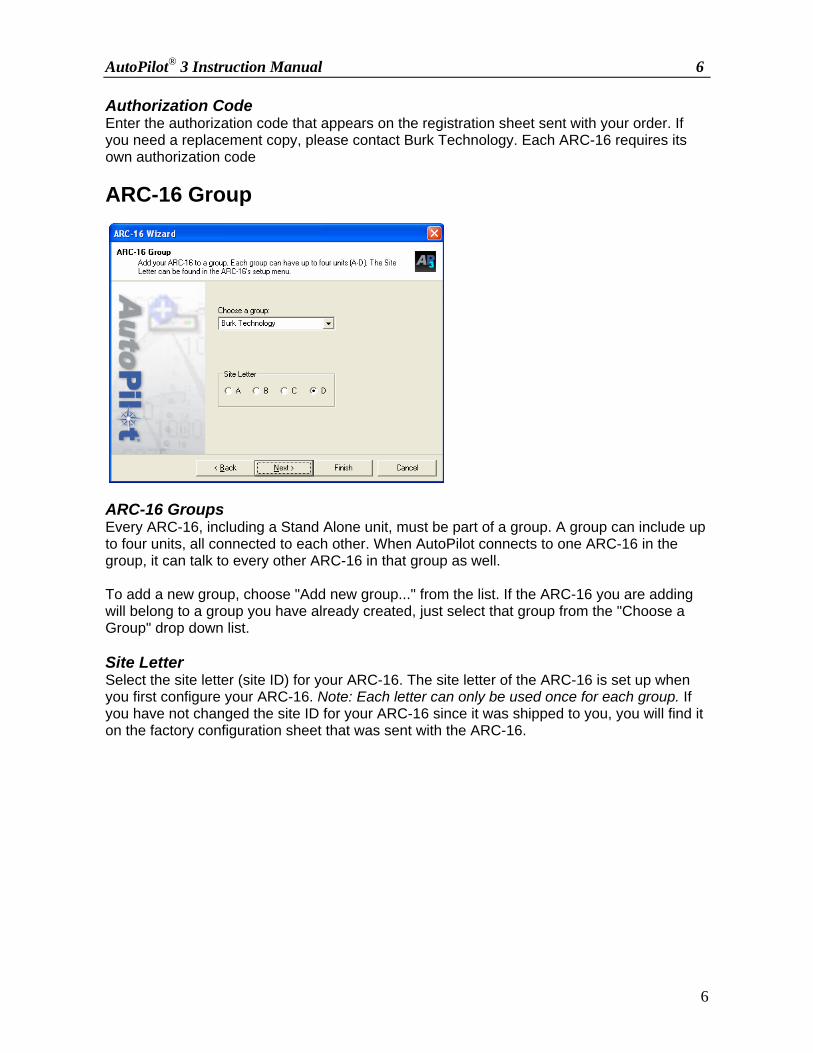
Authorization Code Enter the authorization code that appears on the registration sheet sent with your order. If you need a replacement copy, please contact Burk Technology. Each ARC-16 requires its own authorization code ARC-16 Group
ARC-16 Groups Every ARC-16, including a Stand Alone unit, must be part of a group. A group can include up to four units, all connected to each other. When AutoPilot connects to one ARC-16 in the group, it can talk to every other ARC-16 in that group as well. To add a new group, choose "Add new group..." from the list. If the ARC-16 you are adding will belong to a group you have already created, just select that group from the "Choose a Group" drop down list. Site Letter Select the site letter (site ID) for your ARC-16. The site letter of the ARC-16 is set up when you first configure your ARC-16. Note: Each letter can only be used once for each group. If you have not changed the site ID for your ARC-16 since it was shipped to you, you will find it on the factory configuration sheet that was sent with the ARC-16.

AutoPilot® 3 Instruction Manual 7
7
Time Zone
When AutoPilot takes a log, or runs a script, it is sensitive to which time zone your ARC-16 is in. Choose the appropriate time zone from the list. You can also enter abbreviations for Standard Time and Daylight Time. These abbreviations will appear in your logs. If your time zone does not use Daylight Saving Time (DST), remember to uncheck the DST option. Note: if you are not using DST, AutoPilot will ignore the Daylight Time abbreviation field. Logging Options
Enable Logging Check "Enable Logging" if you want AutoPilot to log readings from this ARC-16. Interval Enter the number of hours or minutes after which AutoPilot should record a log. Select "Hours" or "Minutes" using the options below the interval field.
AutoPilot® 3 Instruction Manual 8
8
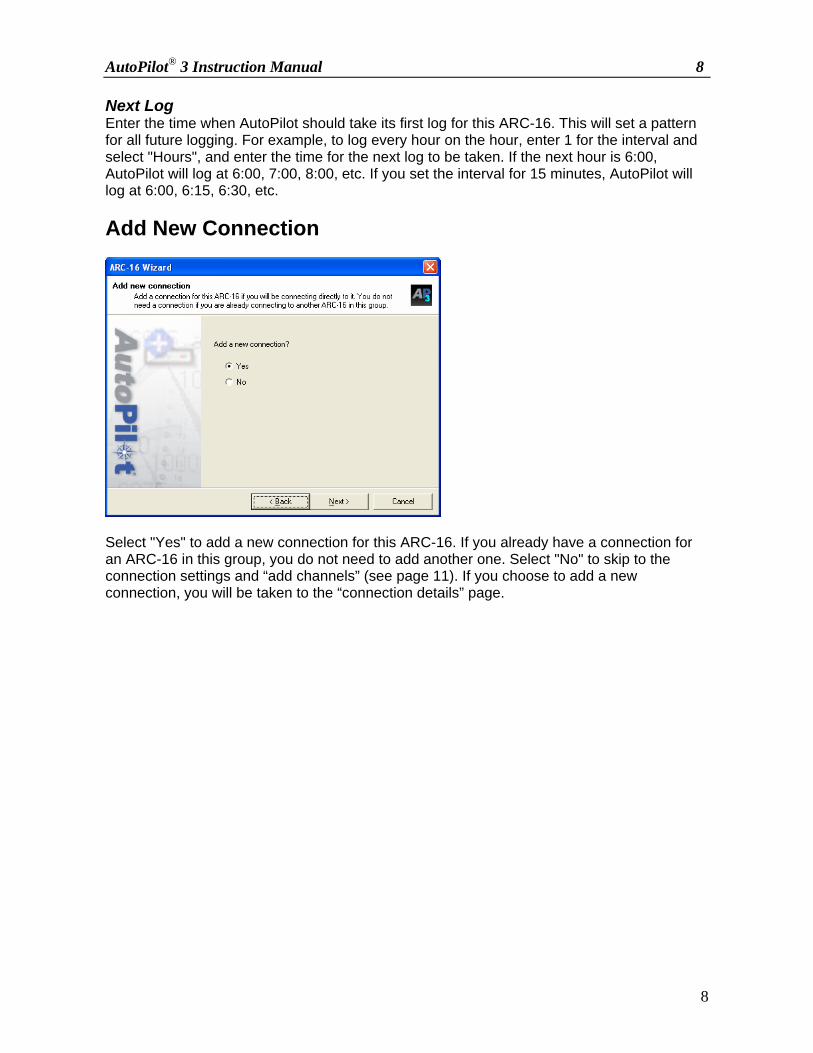
Next Log Enter the time when AutoPilot should take its first log for this ARC-16. This will set a pattern for all future logging. For example, to log every hour on the hour, enter 1 for the interval and select "Hours", and enter the time for the next log to be taken. If the next hour is 6:00, AutoPilot will log at 6:00, 7:00, 8:00, etc. If you set the interval for 15 minutes, AutoPilot will log at 6:00, 6:15, 6:30, etc. Add New Connection
Select "Yes" to add a new connection for this ARC-16. If you already have a connection for an ARC-16 in this group, you do not need to add another one. Select "No" to skip to the connection settings and “add channels” (see page 11). If you choose to add a new connection, you will be taken to the “connection details” page.

AutoPilot® 3 Instruction Manual 9
9
Connection Details
Connection Type Choose which type of connection you will use to link the computer to the ARC-16. You can connect directly, via a modem, or using the ARC-16 Web Interface. No matter which option you choose, you will be asked to specify your preferences for the following three settings: Connection Name Enter a name for the connection. The connection name will identify this connection in AutoPilot and in scripts. Default Connection Check this box to make this the default connection for the group. When connecting to any ARC-16 in the group, AutoPilot will use this connection without asking you to first choose from a list. Note: when you select a default connection, you can still choose a different connection method by clicking "Connect Using..." from the File menu. Connect Automatically If you made this the default connection, you can check this option to allow AutoPilot to connect to this group when the program is started.

AutoPilot® 3 Instruction Manual 10
10
COM Port (Direct Connection) If using a direct connection, choose the COM Port that you want to use from the list. Note: if you do not see your COM Port in the list, it is not installed correctly in Windows.
Modem(Modem Connection) If using a modem connection, choose the modem that you want to use from the list. Note: if you do not see your modem in the list, it is not installed correctly in Windows. Phone Number If using a modem connection, you must also enter the phone number that you want AutoPilot to dial.
Remote Host (Web Interface Connection) If using a Web Interface connection, enter the IP address or the name of the remote host that corresponds with the Web Interface you are connecting to. The IP address is set up when you configure the Web Interface. For more information, consult the Web Interface manual. TCP Port You must also specify the TCP port you are using to connect to the Web Interface. The setting here must match the TCP port setting you entered when you configured the Web Interface.

AutoPilot® 3 Instruction Manual 11
11
Add Channels
Add Channels Click the checkbox in the "Add" column for each ARC-16 channel you want AutoPilot to display. Note: adding a channel adds analog readings, control, and status. Channel Label Enter a label for your analog metering channel. Note: control and status labels will be entered later. As you type in the name, it will appear in the sample meter to the left allowing you to see if your label fits. Units Enter the units in which your analog readings are measured.
AutoPilot® 3 Instruction Manual 12
12
Channel Properties
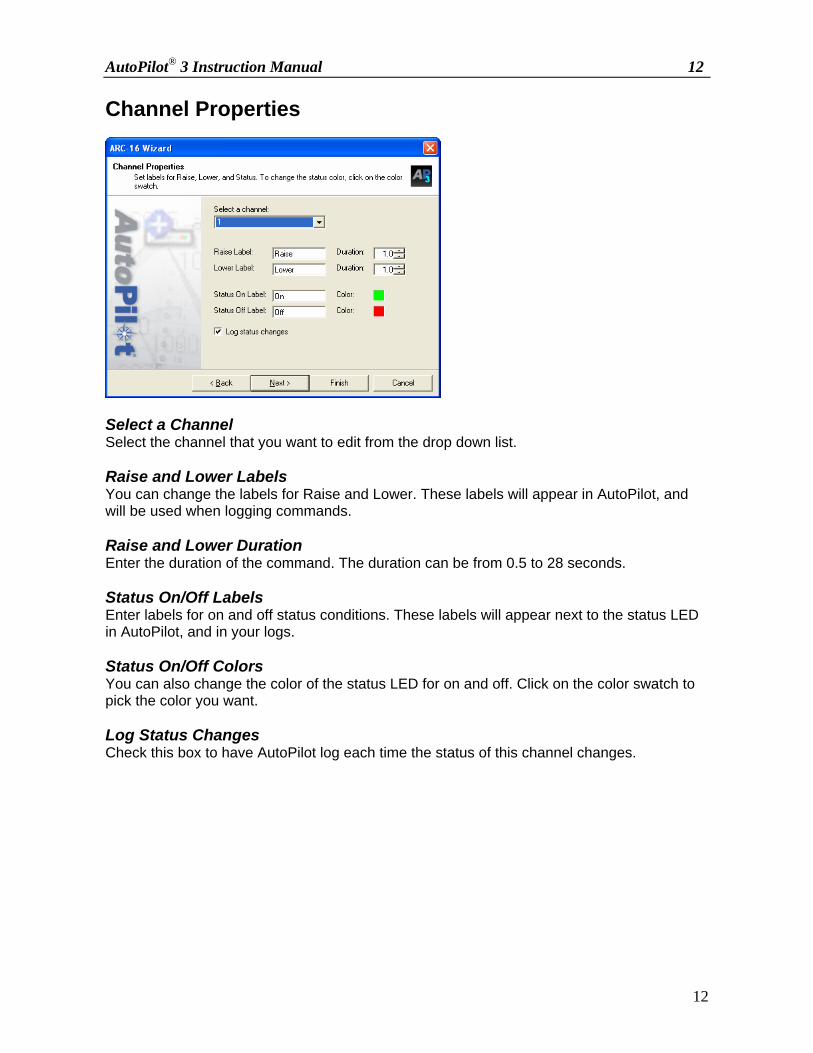
Select a Channel Select the channel that you want to edit from the drop down list. Raise and Lower Labels You can change the labels for Raise and Lower. These labels will appear in AutoPilot, and will be used when logging commands. Raise and Lower Duration Enter the duration of the command. The duration can be from 0.5 to 28 seconds. Status On/Off Labels Enter labels for on and off status conditions. These labels will appear next to the status LED in AutoPilot, and in your logs. Status On/Off Colors You can also change the color of the status LED for on and off. Click on the color swatch to pick the color you want. Log Status Changes Check this box to have AutoPilot log each time the status of this channel changes.

AutoPilot® 3 Instruction Manual 13
13
Meter Properties
Select a Channel Use the drop down list to select the channel that you want to edit. Meter Colors Click on a color swatch to change the color. The meter colors are numbered top to bottom. You can use up to five colors, but to use fewer, set the "Ends at" value to be greater than or equal to the maximum value. For example, if you want your meter to range from 0 to 100 and use two colors, set the ends at value of colors 3-5 to equal the minimum value, and set color 2 to any value between 0 and 100. "Ends at" The "Ends at" field determines the value at which the meter color ends. The range of values is -1,000 to 10,000. Meter Color 1 is always set to 10,000, since this is the highest value allowed. Minimum Value Enter the minimum value for the meter. If a reading is below the minimum value, the meter will point directly to the left, but still display the correct value. Maximum Value Enter the maximum value for the meter. If a reading is above the maximum value, the meter will point directly up, but still display the correct value.
AutoPilot® 3 Instruction Manual 14
14
Default View
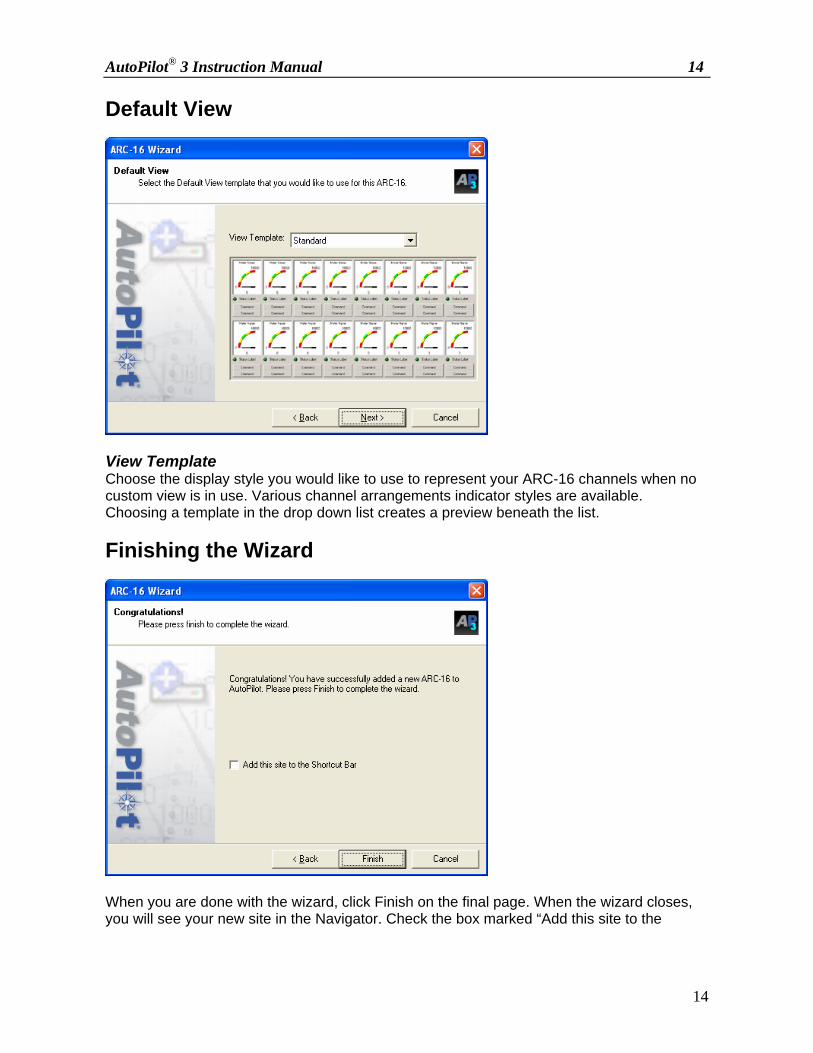
View Template Choose the display style you would like to use to represent your ARC-16 channels when no custom view is in use. Various channel arrangements indicator styles are available. Choosing a template in the drop down list creates a preview beneath the list. Finishing the Wizard
When you are done with the wizard, click Finish on the final page. When the wizard closes, you will see your new site in the Navigator. Check the box marked “Add this site to the

AutoPilot® 3 Instruction Manual 15
15
Shortcut Bar” to add the newly created ARC Plus site to the shortcut bar at the top of the screen. This allows easy one-click access to the site at any time.
AutoPilot® 3 Instruction Manual 16
16
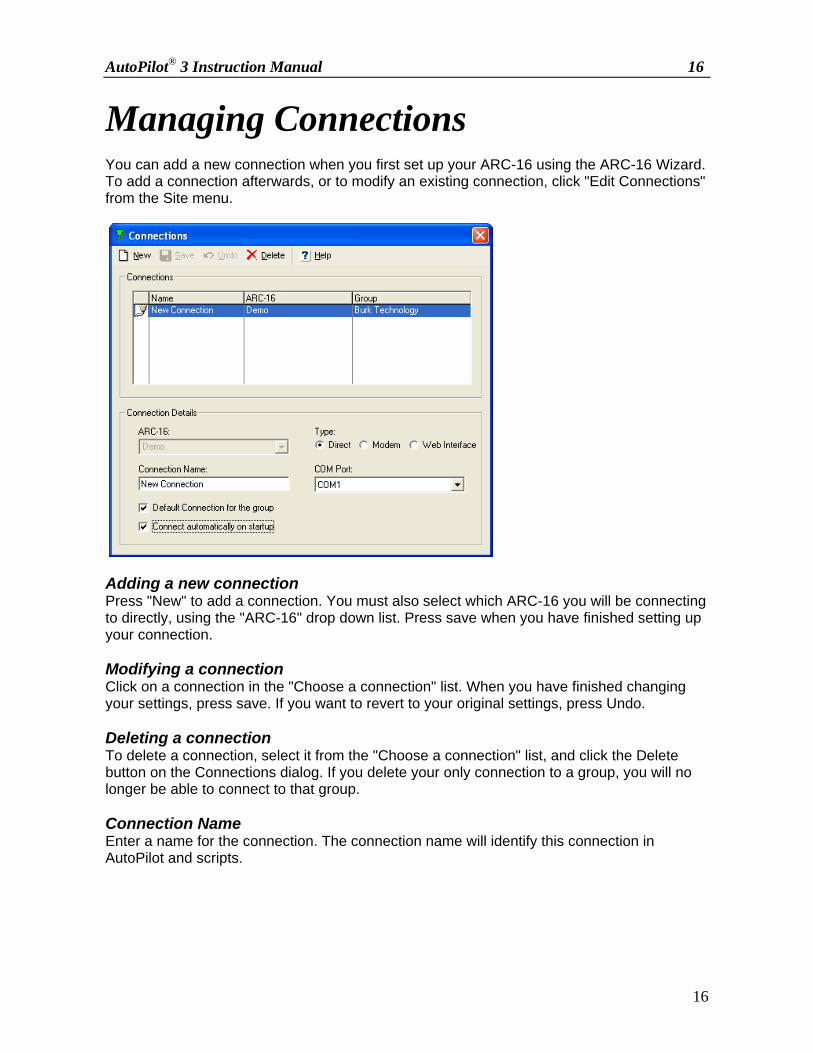
Managing Connections You can add a new connection when you first set up your ARC-16 using the ARC-16 Wizard. To add a connection afterwards, or to modify an existing connection, click "Edit Connections" from the Site menu.
Adding a new connection Press "New" to add a connection. You must also select which ARC-16 you will be connecting to directly, using the "ARC-16" drop down list. Press save when you have finished setting up your connection. Modifying a connection Click on a connection in the "Choose a connection" list. When you have finished changing your settings, press save. If you want to revert to your original settings, press Undo. Deleting a connection To delete a connection, select it from the "Choose a connection" list, and click the Delete button on the Connections dialog. If you delete your only connection to a group, you will no longer be able to connect to that group. Connection Name Enter a name for the connection. The connection name will identify this connection in AutoPilot and scripts.
AutoPilot® 3 Instruction Manual 17
17
Default Connection for the group Check this box to make this the default connection for the group. When connecting to any ARC-16 in the group, AutoPilot will use this connection without asking you to first choose from a list. Note: you can still choose which connection to use by clicking "Connect Using..." from the File menu. Connect automatically on startup If you made this the default connection, you can check this option to allow AutoPilot to connect to this group when the program is started. Connection Type Choose either a direct connection (using your computer's serial port and a null modem cable), or a modem connection, using your modem to dial into the ARC-16. COM Port If using a direct connection, choose the COM Port that you want to use from the list. Note: if you do not see your COM Port in the list, it is not installed correctly in Windows. Modem (not shown) If using a modem connection, choose the modem that you want to use from the list. Note: if you do not see your modem in the list, it is not installed correctly in Windows. Phone Number (not shown) If using a modem connection, you must also enter the phone number that you want AutoPilot to dial. Remote Host (not shown) If using a Web Interface connection, enter the IP address or the name of the remote host that corresponds with the Web Interface you are connecting to. The IP address is set up when you configure the Web Interface. For more information, consult the Web Interface manual. TCP Port (not shown) You must also specify the TCP port you are using to connect to the Web Interface. The setting here must match the TCP port setting you entered when you configured the Web Interface.

AutoPilot® 3 Instruction Manual 18
18
Managing Groups An ARC-16 "group" can comprise up to four units. Every ARC-16 in AutoPilot is part of a group, even if you are only using one ARC-16. When you connect to any ARC-16 in a group, AutoPilot is able to communicate with all of the units in that group. To add, delete, or edit groups, click "Edit Groups" from the Site menu.
Adding Groups Click New to create a new group. Enter a name for the group, and press save. Because this is a new group, there will not be any other ARC-16s in this group and there will not be any connections to it. Modifying Groups Select the group from the Groups list. You can change the name, and set one of the connections to the group as the default. If you make a mistake, you can click Undo to revert to the original settings. Deleting Groups Select the group that you want to delete from the Groups list. Click the Delete button on the dialog to delete it. Warning: when you delete a group, all of the ARC-16s and connections for that group will be deleted as well. Groups list The Groups list displays all of the groups that you have added to AutoPilot. Clicking on a group in the list will display its properties in the fields below. Group Name The group name is used to refer to this group in AutoPilot. ARC-16s in this Group The ARC-16 list shows all of the ARCs, if any, that are part of this group. Connections to this group The connections drop down list displays all of the connections to this group (connections can
AutoPilot® 3 Instruction Manual 19
19
be defined to any of the ARC-16s in the group). Select a connection if you want to change its default status. Default Connection If a connection is the default for the group, AutoPilot will use that connection when connecting without first prompting you to choose from a list. Connect to this group automatically at startup If the connection is the default for the group, AutoPilot can use it to connect when the program starts up.
AutoPilot® 3 Instruction Manual 20
20
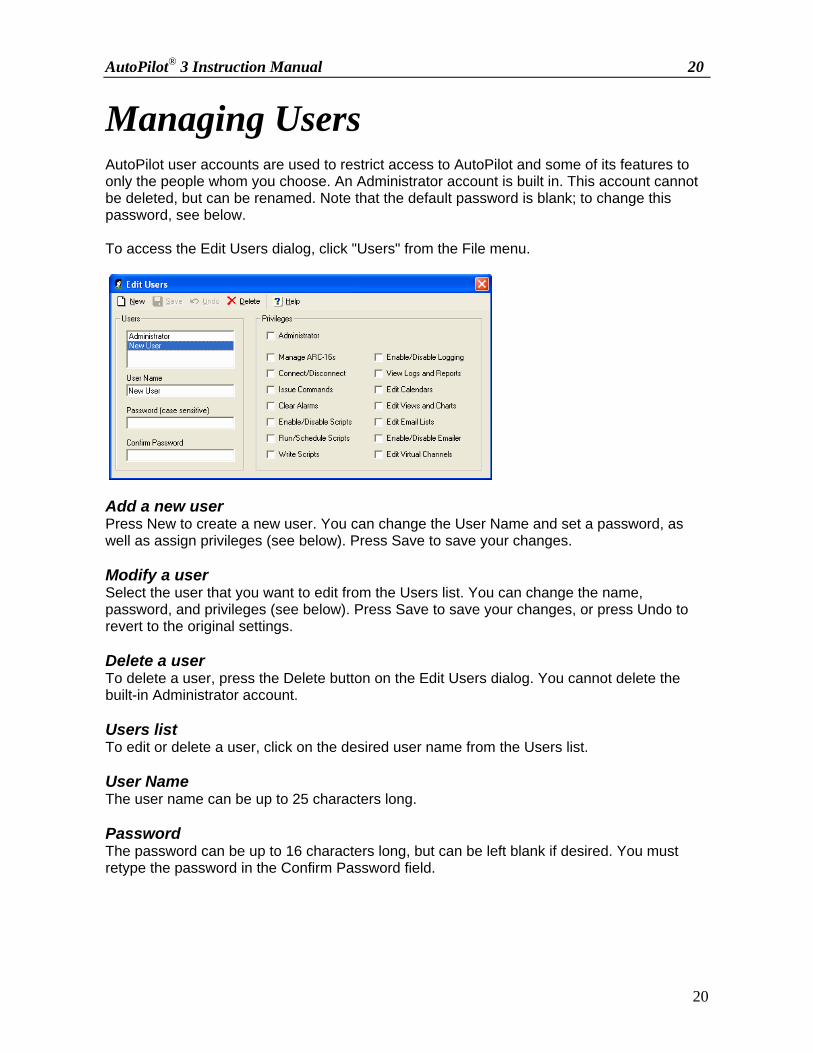
Managing Users AutoPilot user accounts are used to restrict access to AutoPilot and some of its features to only the people whom you choose. An Administrator account is built in. This account cannot be deleted, but can be renamed. Note that the default password is blank; to change this password, see below. To access the Edit Users dialog, click "Users" from the File menu.
Add a new user Press New to create a new user. You can change the User Name and set a password, as well as assign privileges (see below). Press Save to save your changes. Modify a user Select the user that you want to edit from the Users list. You can change the name, password, and privileges (see below). Press Save to save your changes, or press Undo to revert to the original settings. Delete a user To delete a user, press the Delete button on the Edit Users dialog. You cannot delete the built-in Administrator account. Users list To edit or delete a user, click on the desired user name from the Users list. User Name The user name can be up to 25 characters long. Password The password can be up to 16 characters long, but can be left blank if desired. You must retype the password in the Confirm Password field.
AutoPilot® 3 Instruction Manual 21
21
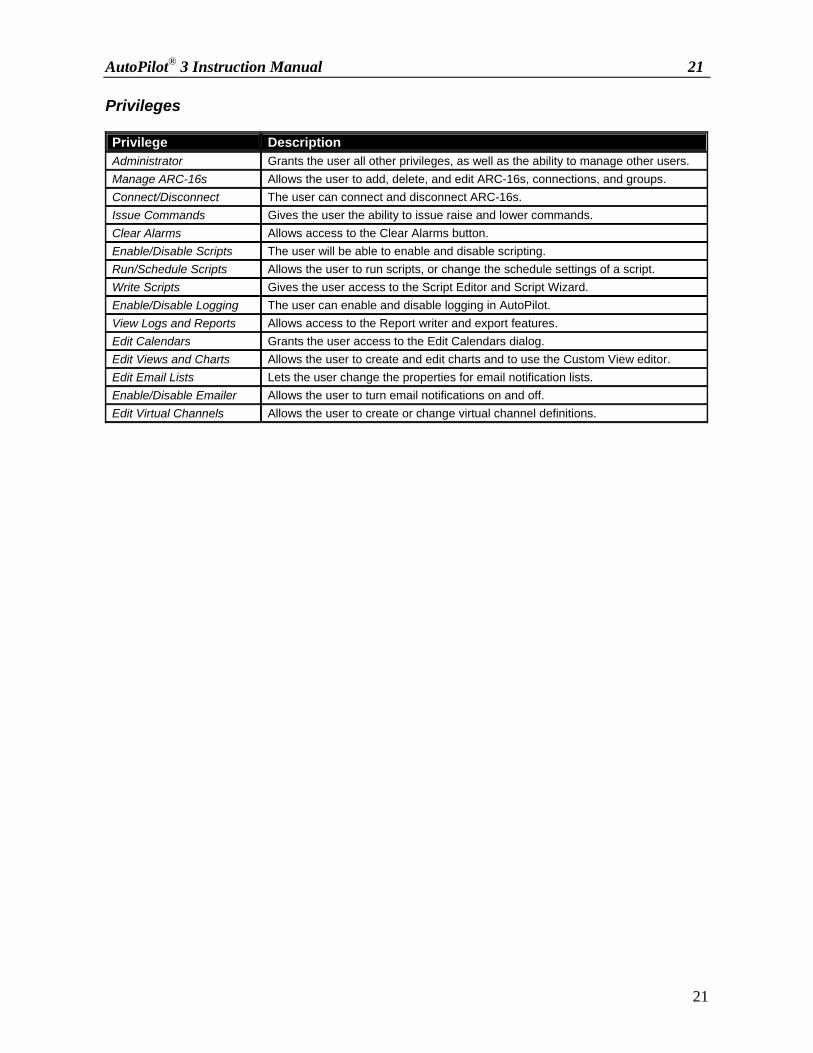
Privileges Privilege Description Administrator Grants the user all other privileges, as well as the ability to manage other users. Manage ARC-16s Allows the user to add, delete, and edit ARC-16s, connections, and groups. Connect/Disconnect The user can connect and disconnect ARC-16s. Issue Commands Gives the user the ability to issue raise and lower commands. Clear Alarms Allows access to the Clear Alarms button. Enable/Disable Scripts The user will be able to enable and disable scripting. Run/Schedule Scripts Allows the user to run scripts, or change the schedule settings of a script. Write Scripts Gives the user access to the Script Editor and Script Wizard. Enable/Disable Logging The user can enable and disable logging in AutoPilot. View Logs and Reports Allows access to the Report writer and export features. Edit Calendars Grants the user access to the Edit Calendars dialog. Edit Views and Charts Allows the user to create and edit charts and to use the Custom View editor. Edit Email Lists Lets the user change the properties for email notification lists. Enable/Disable Emailer Allows the user to turn email notifications on and off. Edit Virtual Channels Allows the user to create or change virtual channel definitions.

AutoPilot® 3 Instruction Manual 22
22
Basic Operation Logging In
When AutoPilot starts, you will be prompted to log in. Select your user name from the drop down list, and enter your password in the Password field. Click Login to continue. If you entered your password incorrectly, you will be prompted to log in again. Click Cancel to close AutoPilot. You cannot run AutoPilot without logging in. Auto Login Check the "Always log in as this user automatically" box to enable Auto Login. When AutoPilot starts, it will automatically log in using the user name and password that you entered. This feature can be turned off from the Options dialog. Logging Off You can log off of AutoPilot by clicking on "Log off..." in the File menu. After logging off, you will be prompted to log in as a different user with the Login dialog. Connecting to your ARC-16 When AutoPilot connects to an ARC-16, it will also talk to all of the other units in the group - allowing you to control up to four ARCs with one connection. You must add a connection to at least one ARC-16 in the group before you can connect. You can add connections in the ARC-16 Wizard, or from the Site menu. Establish a Connection Use the navigator to select the ARC-16 that you want to connect to, or any other ARC-16 in the same group. To connect, click "Connect" from the toolbar or File menu. If you have a "default" connection, AutoPilot will use that connection. Otherwise, you will be prompted to choose from a list of connections for the group. If you want to override the default, click "Connect Using..." to see the list of connections. Connection Details To view the Connection Details dialog, click "Connection Details" from the Site menu.

AutoPilot® 3 Instruction Manual 23
23
Connected since The connected since field shows the date and time that the connection was established. Connected via Connected via shows the COM Port or modem that AutoPilot is using for the connection. Quality The quality field indicates how stable or "clean" the connection is. The field shows a percentage - 100% indicating a flawless connection. This value is actually the percentage of readable or "good" packets received from the ARC-16. If some packets are unreadable, you will see a value of less than 100%. If you see a low value, for example 75%, this means that AutoPilot is unable to read 25% of the data being reported by the ARC-16. This also means that if you issue a command, there is a 25% chance that the ARC-16 will not receive it. Poor connection quality may be the result of a bad null modem cable or a noisy phone line. Connected to This shows which ARC-16 you are connected to directly. Other ARC-16s using this connection This list includes the other ARC-16s in the group that are connected through the unit in the "connected to" field. Commands
To issue a raise or lower command, just click on the command button (as seen above). The command will be issued using the duration that you set in the ARC-16 Wizard. Note: both of the command buttons for this channel will be "locked out" for the duration of the command. You can still issue commands to other channels, though. When a command is issued, it is logged in the Event Log. If the command is locked out... Commands will be "locked out" (command buttons will appear grayed out) under the following circumstances:
• You are not connected to the ARC-16. • You just issued a command to this channel and the duration has not yet elapsed. • Your ARC-16 is in Maintenance Mode. • You do not have permission to issue commands.
Logging

AutoPilot® 3 Instruction Manual 24
24
AutoPilot will log each ARC-16 for which you enabled logging during configuration. AutoPilot will also log status changes (for channels on which this feature is enabled), alarms, and events. To enable logging, click "Enable Logging" from the Tools menu in AutoPilot. Note: the logging icon will appear down by the clock in the Windows taskbar tray.
Logging icon When logging is disabled, the logging icon will appear with a red line through it. You can enable/disable logging by right clicking on this icon in the tray. AutoPilot will continue to log after you close the program (the logging icon will remain in the Tray). This allows you to log without leaving AutoPilot open all the time. If you want to stop logging and close the logging application, right-click on the logging icon in the Tray, and click on "Exit". If you are connected to any of your ARC-16s when you close AutoPilot, the logging application maintains those connections. If you are using a modem and want to free up the phone line, be sure to disconnect before closing AutoPilot. Note that logging data is recorded in 12 hour or 24 hour time format, depending on your PC clock settings. Connecting to ARC-16s for Logging If AutoPilot needs to log an ARC-16 that is not connected, it will connect to the ARC-16 first, and disconnect when it is finished. Note: You must define a default connection for this feature to work. If AutoPilot needs to use a modem that is already in use, it will prompt you to either disconnect the modem first, or cancel the log. If you are not at your computer when this prompt appears, AutoPilot will automatically disconnect the modem, dial the ARC-16 that it needs to log, and then re-connect the modem. Note: AutoPilot can only disconnect/reconnect the modem if it is in use by AutoPilot, not by any other application (for example, if you are using your modem to connect to the Internet). Using One Modem for Multiple ARC-16s AutoPilot can use one modem to log multiple ARC-16s that are not in the same group. To do this, define a modem connection to at least one ARC-16 in each group that you want to log. When AutoPilot needs to log one of these ARC-16s, it will use the modem to establish a connection, log each ARC-16 in the group, and then disconnect - freeing up the modem to log another ARC-16. Note: when setting up your logging interval, be sure to take into account the time required for the modem to establish a connection. If your intervals are too short, AutoPilot may not be able to log all of your sites quickly enough.
AutoPilot® 3 Instruction Manual 25
25
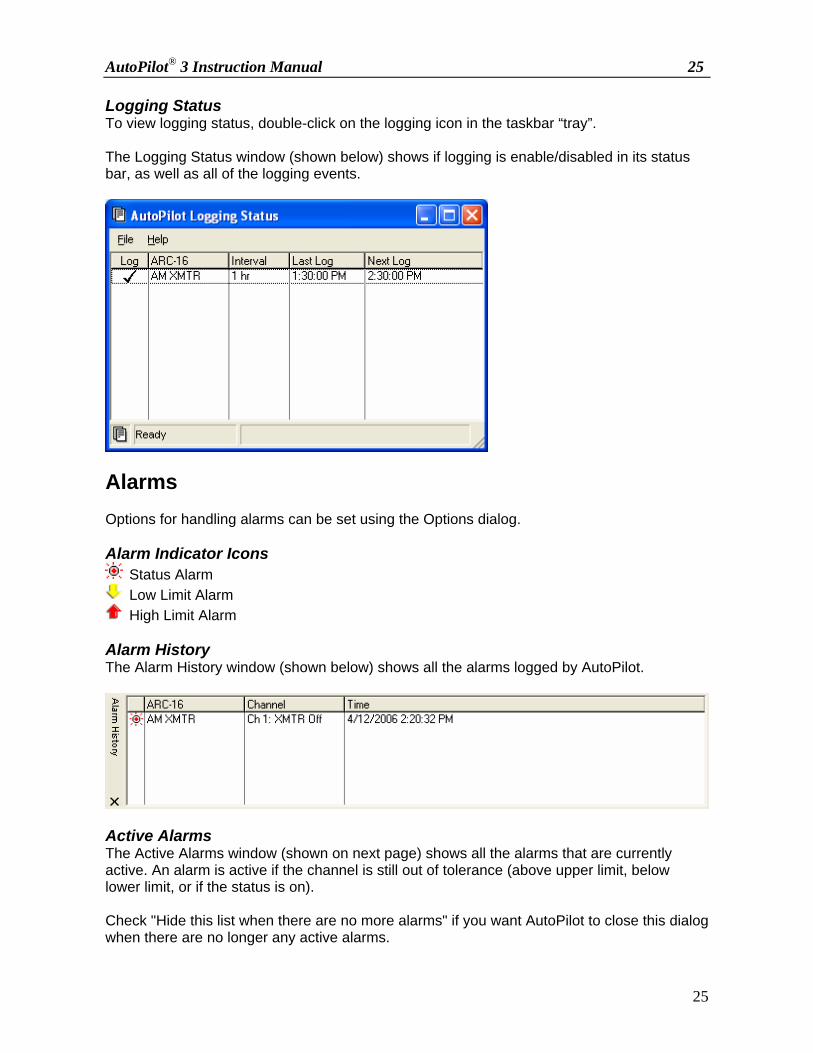
Logging Status To view logging status, double-click on the logging icon in the taskbar “tray”. The Logging Status window (shown below) shows if logging is enable/disabled in its status bar, as well as all of the logging events.
Alarms Options for handling alarms can be set using the Options dialog. Alarm Indicator Icons
Status Alarm Low Limit Alarm High Limit Alarm
Alarm History The Alarm History window (shown below) shows all the alarms logged by AutoPilot.
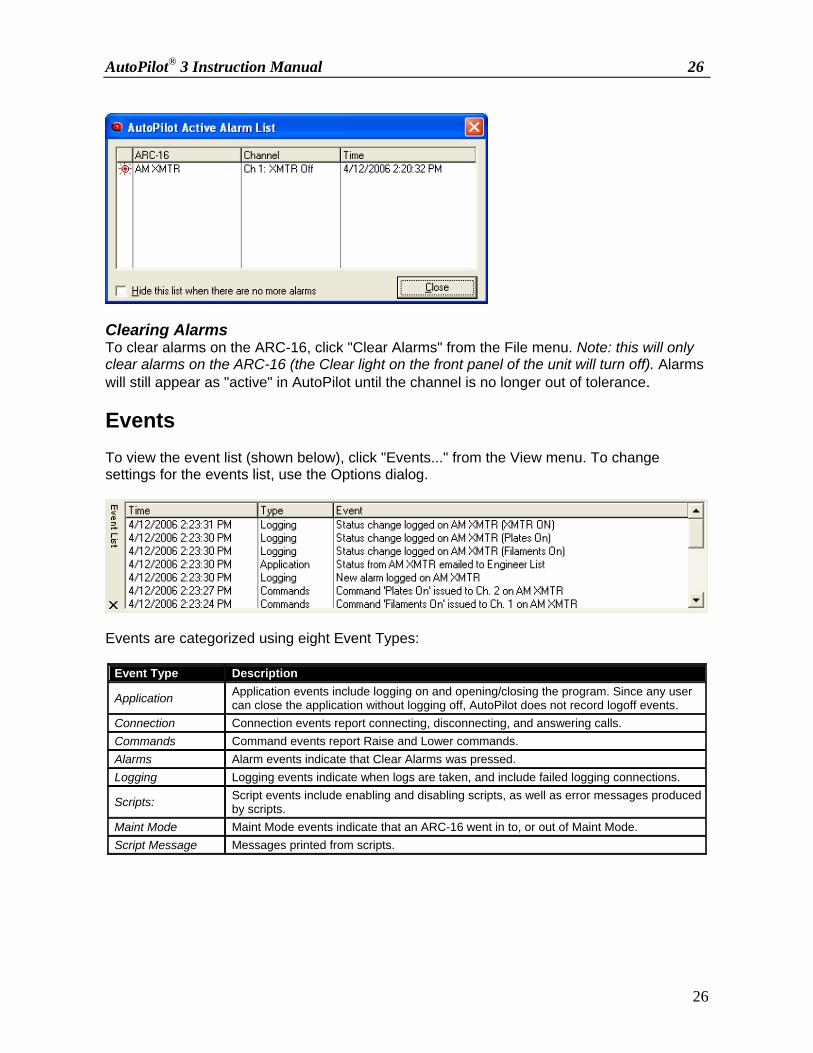
Active Alarms The Active Alarms window (shown on next page) shows all the alarms that are currently active. An alarm is active if the channel is still out of tolerance (above upper limit, below lower limit, or if the status is on). Check "Hide this list when there are no more alarms" if you want AutoPilot to close this dialog when there are no longer any active alarms.
AutoPilot® 3 Instruction Manual 26
26
Clearing Alarms To clear alarms on the ARC-16, click "Clear Alarms" from the File menu. Note: this will only clear alarms on the ARC-16 (the Clear light on the front panel of the unit will turn off). Alarms will still appear as "active" in AutoPilot until the channel is no longer out of tolerance. Events To view the event list (shown below), click "Events..." from the View menu. To change settings for the events list, use the Options dialog.
Events are categorized using eight Event Types:
Event Type Description
Application Application events include logging on and opening/closing the program. Since any user can close the application without logging off, AutoPilot does not record logoff events.
Connection Connection events report connecting, disconnecting, and answering calls. Commands Command events report Raise and Lower commands. Alarms Alarm events indicate that Clear Alarms was pressed. Logging Logging events indicate when logs are taken, and include failed logging connections.
Scripts: Script events include enabling and disabling scripts, as well as error messages produced by scripts.
Maint Mode Maint Mode events indicate that an ARC-16 went in to, or out of Maint Mode. Script Message Messages printed from scripts.
AutoPilot® 3 Instruction Manual 27
27
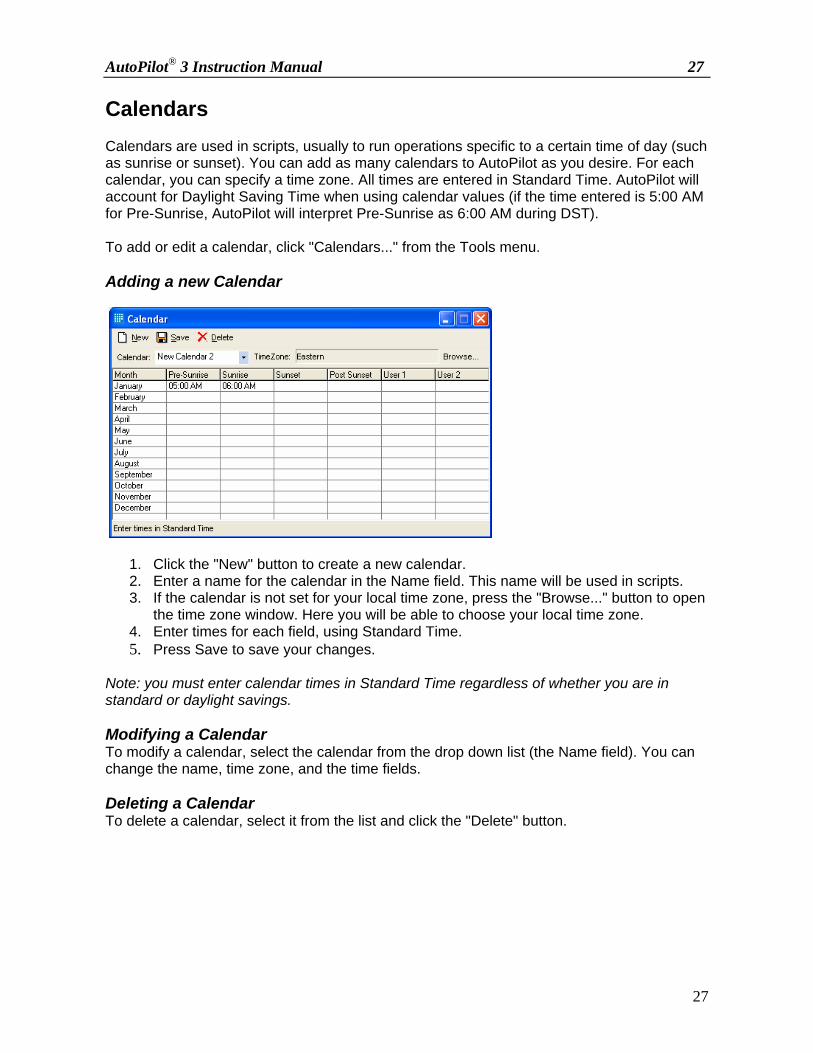
Calendars Calendars are used in scripts, usually to run operations specific to a certain time of day (such as sunrise or sunset). You can add as many calendars to AutoPilot as you desire. For each calendar, you can specify a time zone. All times are entered in Standard Time. AutoPilot will account for Daylight Saving Time when using calendar values (if the time entered is 5:00 AM for Pre-Sunrise, AutoPilot will interpret Pre-Sunrise as 6:00 AM during DST). To add or edit a calendar, click "Calendars..." from the Tools menu. Adding a new Calendar
1. Click the "New" button to create a new calendar. 2. Enter a name for the calendar in the Name field. This name will be used in scripts. 3. If the calendar is not set for your local time zone, press the "Browse..." button to open
the time zone window. Here you will be able to choose your local time zone. 4. Enter times for each field, using Standard Time. 5. Press Save to save your changes.
Note: you must enter calendar times in Standard Time regardless of whether you are in standard or daylight savings. Modifying a Calendar To modify a calendar, select the calendar from the drop down list (the Name field). You can change the name, time zone, and the time fields. Deleting a Calendar To delete a calendar, select it from the list and click the "Delete" button.

AutoPilot® 3 Instruction Manual 28
28
Changing your Password To change your AutoPilot password, click "Change AutoPilot Password" in the File menu.
Enter your old password in the "Old Password" field. Enter a new password in the "New Password" and "Confirm New Password" fields. The password can be up to 16 characters long, and can be left blank if desired. Note: this changes only your AutoPilot user password. You cannot change the password on your ARC-16 through AutoPilot.
AutoPilot® 3 Instruction Manual 29
29
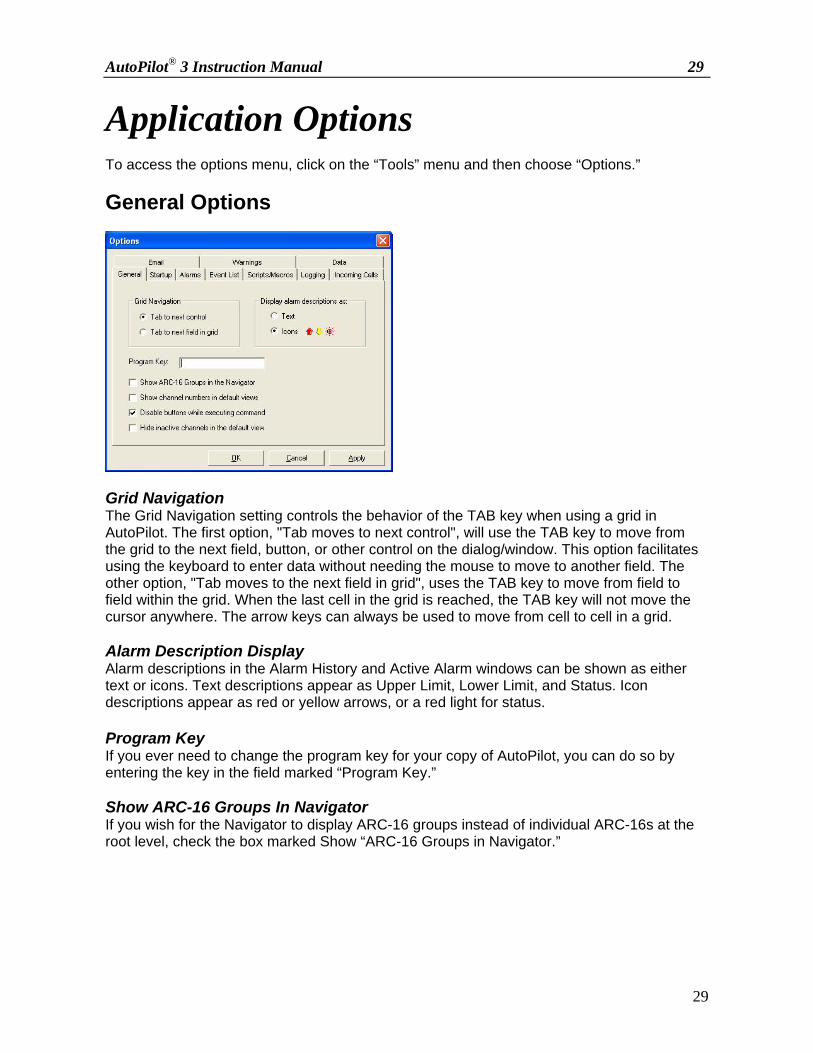
Application Options To access the options menu, click on the “Tools” menu and then choose “Options.” General Options
Grid Navigation The Grid Navigation setting controls the behavior of the TAB key when using a grid in AutoPilot. The first option, "Tab moves to next control", will use the TAB key to move from the grid to the next field, button, or other control on the dialog/window. This option facilitates using the keyboard to enter data without needing the mouse to move to another field. The other option, "Tab moves to the next field in grid", uses the TAB key to move from field to field within the grid. When the last cell in the grid is reached, the TAB key will not move the cursor anywhere. The arrow keys can always be used to move from cell to cell in a grid. Alarm Description Display Alarm descriptions in the Alarm History and Active Alarm windows can be shown as either text or icons. Text descriptions appear as Upper Limit, Lower Limit, and Status. Icon descriptions appear as red or yellow arrows, or a red light for status. Program Key If you ever need to change the program key for your copy of AutoPilot, you can do so by entering the key in the field marked “Program Key.” Show ARC-16 Groups In Navigator If you wish for the Navigator to display ARC-16 groups instead of individual ARC-16s at the root level, check the box marked Show “ARC-16 Groups in Navigator.”
AutoPilot® 3 Instruction Manual 30
30
Disable buttons when executing commands Previous versions of AutoPilot locked out commands while they were active. Now this behavior is available as an option. When you disable active commands, the command button will be "grayed out" and available again when it has finished executing. To turn this feature on, select check the box marked “Disable command buttons while executing command.” When the lock-out feature is off, clicking the command button for an active command channel will increase the duration of the command. Clicking the LOWER command while a RAISE command is active (or vice versa) will cancel the raise command and issue a lower command. Show Channel Numbers in Default View The meter gauges that appear in AutoPilot's default view can be configured to display (or to not display) the channel number associated with the corresponding metering channel. To show or hide the channel numbers on the meter display, click Options from the Tools menu and go to the General tab. Check or uncheck the box marked “Show channel numbers in default view.” Hide Inactive Channels in the Default View If this box is checked, unused channels will be hidden rather than shown as disabled. Startup Options
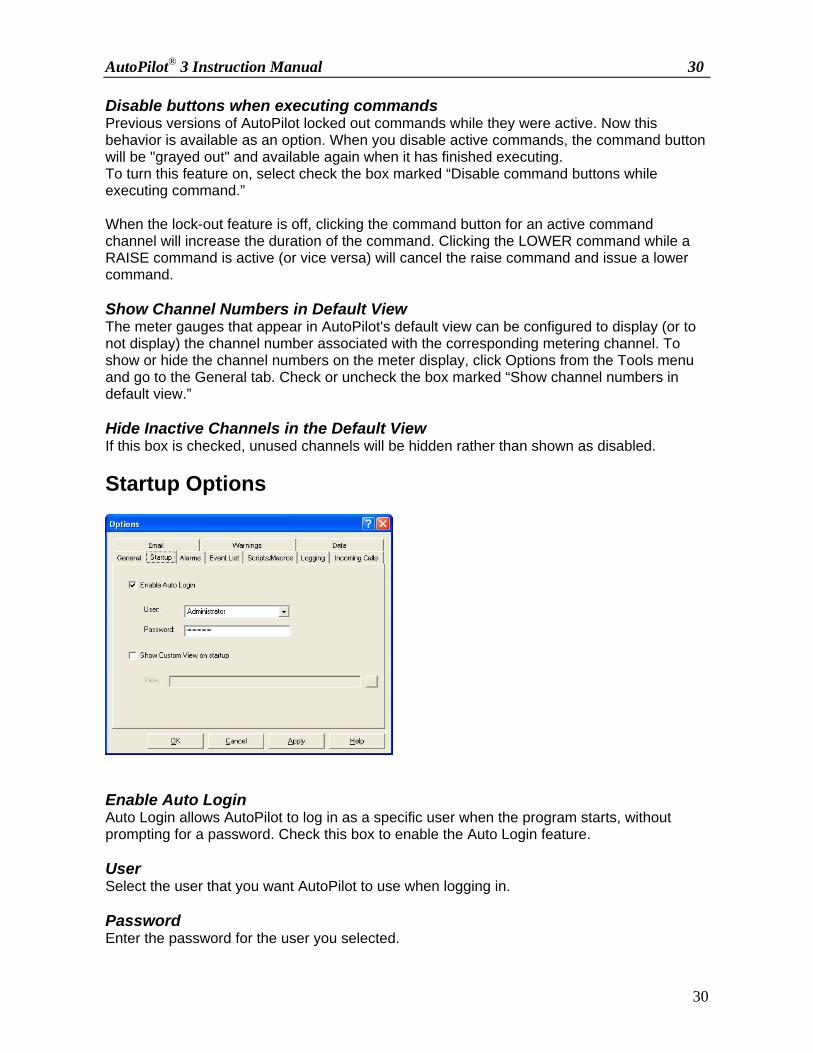
Enable Auto Login Auto Login allows AutoPilot to log in as a specific user when the program starts, without prompting for a password. Check this box to enable the Auto Login feature. User Select the user that you want AutoPilot to use when logging in. Password Enter the password for the user you selected.

AutoPilot® 3 Instruction Manual 31
31
Show Custom View on Startup You can configure AutoPilot to automatically open a custom view when the application is started. This is useful if you primarily use a specific custom view and would like to avoid the need to navigate to that view every time you run AutoPilot. To launch a custom view on startup, check the box marked “Show custom view on startup” and click the Browse button and select the file name of the custom view you want to use. Alarm Options
Show Active Alarms Check this box to show the Active Alarms list when a new alarm is found. Show Alarm History Check this box to show the Alarm History list when a new alarm is found. Play a sound Check this box to play a sound when a new alarm is found (see below to choose a sound). Loop the sound Check this box if you want the sound to continuously loop as long as the out of tolerance condition is active. Sound File Click the "..." button to browse for a sound file on your computer. Press play to hear the sound.
Number of alarms to show in Alarm History Move the slider to set the number of alarms shown in the Alarm History list. The range is 10 to 1000.
Event List Options
AutoPilot® 3 Instruction Manual 32
32
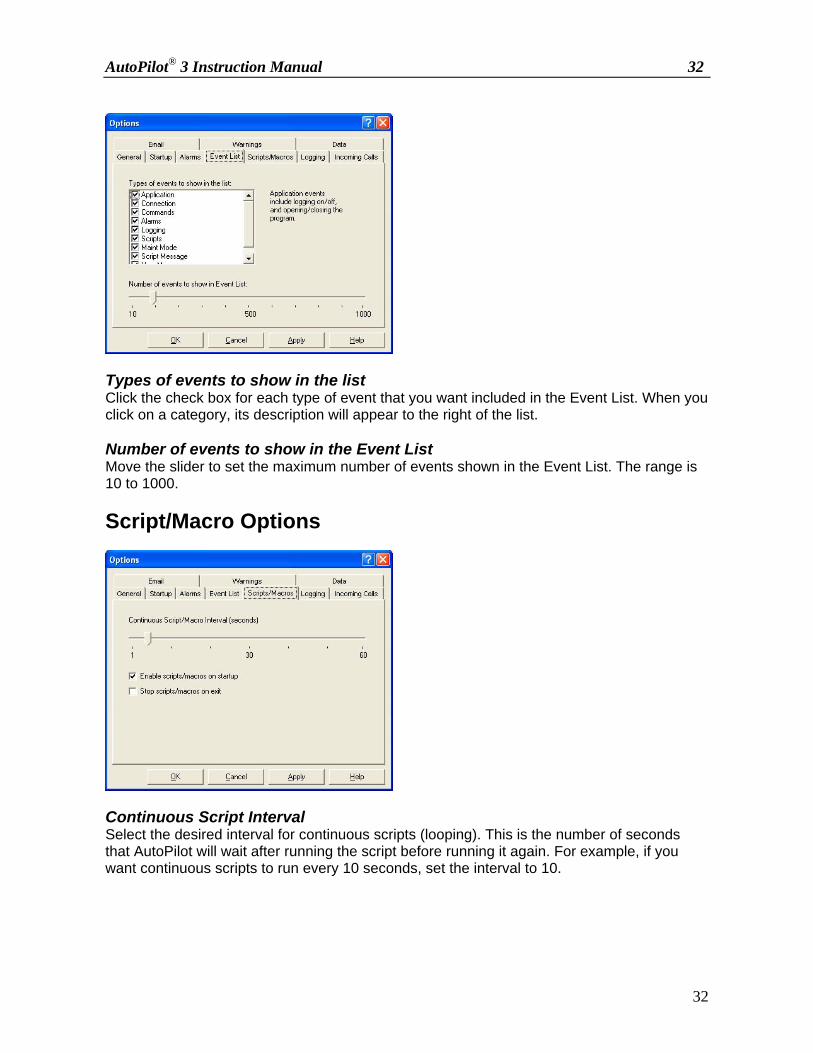
Types of events to show in the list Click the check box for each type of event that you want included in the Event List. When you click on a category, its description will appear to the right of the list. Number of events to show in the Event List Move the slider to set the maximum number of events shown in the Event List. The range is 10 to 1000. Script/Macro Options
Continuous Script Interval Select the desired interval for continuous scripts (looping). This is the number of seconds that AutoPilot will wait after running the script before running it again. For example, if you want continuous scripts to run every 10 seconds, set the interval to 10.
AutoPilot® 3 Instruction Manual 33
33
Enable Scripts/Macros on Startup (Disable on exit) Check the box marked “Enable scripts/macros on startup” if you want scripts and macros to run as scheduled when AutoPilot is started. If you want to disable scripts and macros when AutoPilot is closed, check the box marked “Stop scripts/macros on exit.” Incoming Calls
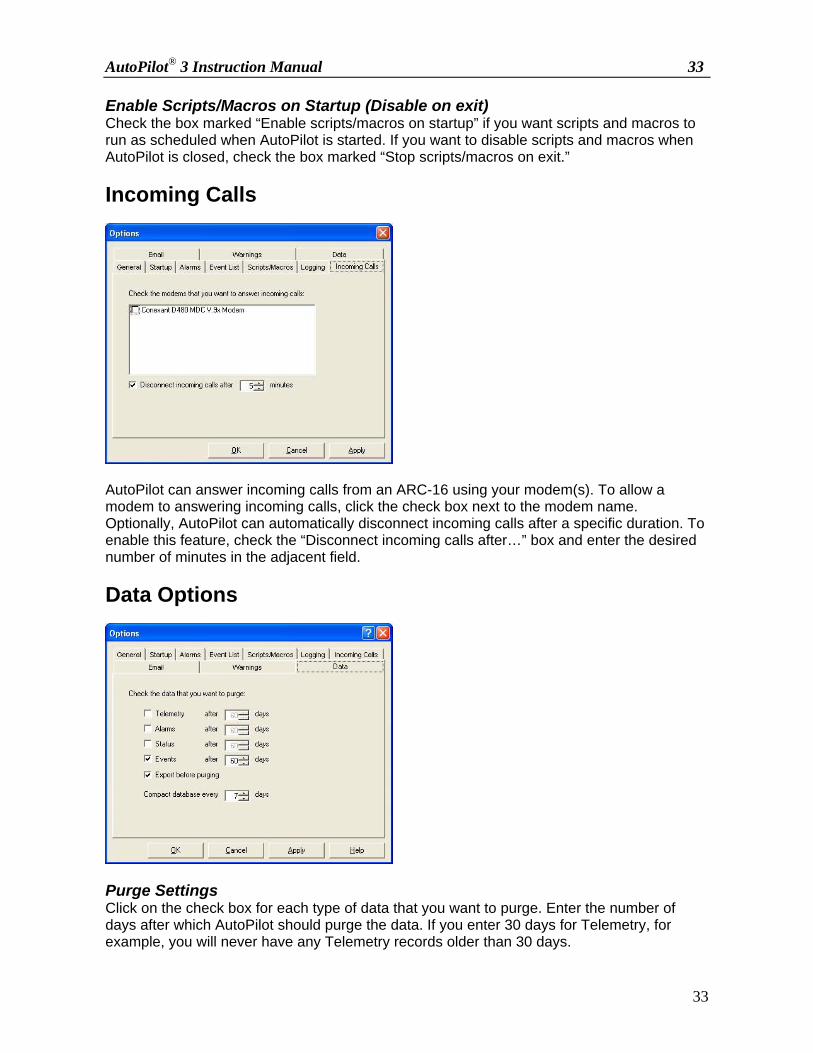
AutoPilot can answer incoming calls from an ARC-16 using your modem(s). To allow a modem to answering incoming calls, click the check box next to the modem name. Optionally, AutoPilot can automatically disconnect incoming calls after a specific duration. To enable this feature, check the “Disconnect incoming calls after…” box and enter the desired number of minutes in the adjacent field. Data Options
Purge Settings Click on the check box for each type of data that you want to purge. Enter the number of days after which AutoPilot should purge the data. If you enter 30 days for Telemetry, for example, you will never have any Telemetry records older than 30 days.
AutoPilot® 3 Instruction Manual 34
34
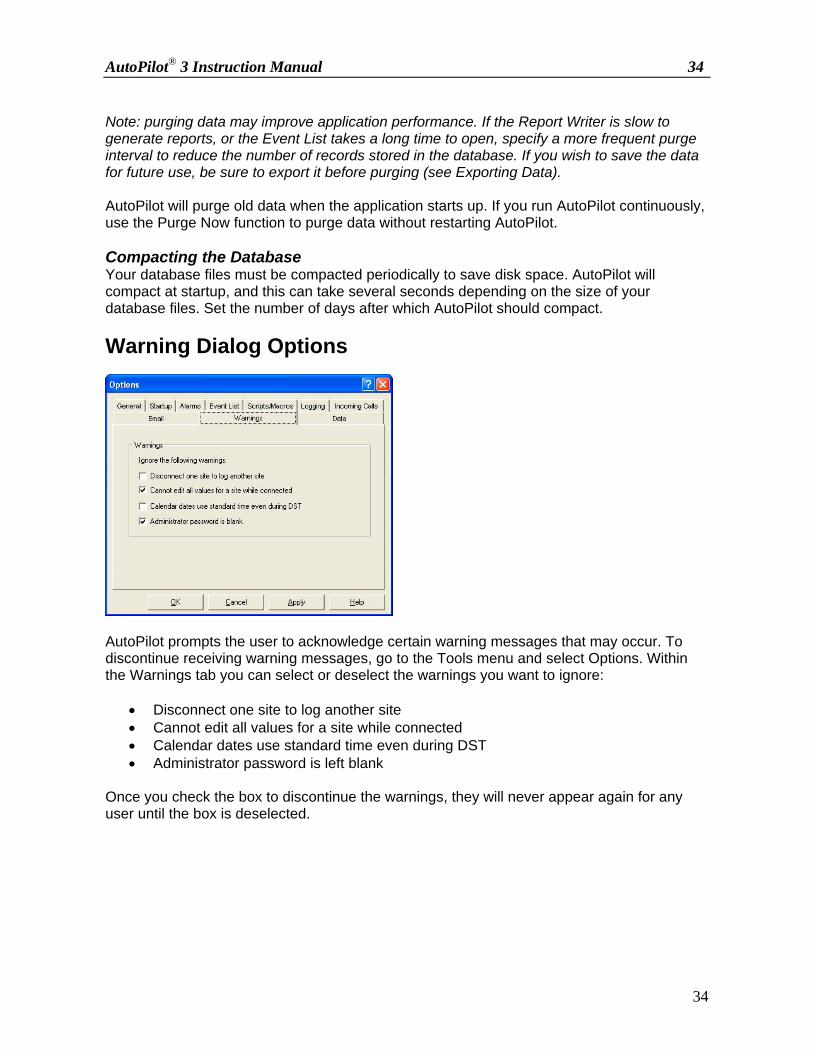
Note: purging data may improve application performance. If the Report Writer is slow to generate reports, or the Event List takes a long time to open, specify a more frequent purge interval to reduce the number of records stored in the database. If you wish to save the data for future use, be sure to export it before purging (see Exporting Data). AutoPilot will purge old data when the application starts up. If you run AutoPilot continuously, use the Purge Now function to purge data without restarting AutoPilot. Compacting the Database Your database files must be compacted periodically to save disk space. AutoPilot will compact at startup, and this can take several seconds depending on the size of your database files. Set the number of days after which AutoPilot should compact. Warning Dialog Options
AutoPilot prompts the user to acknowledge certain warning messages that may occur. To discontinue receiving warning messages, go to the Tools menu and select Options. Within the Warnings tab you can select or deselect the warnings you want to ignore:
• Disconnect one site to log another site • Cannot edit all values for a site while connected • Calendar dates use standard time even during DST • Administrator password is left blank
Once you check the box to discontinue the warnings, they will never appear again for any user until the box is deselected.
AutoPilot® 3 Instruction Manual 35
35
Email Options
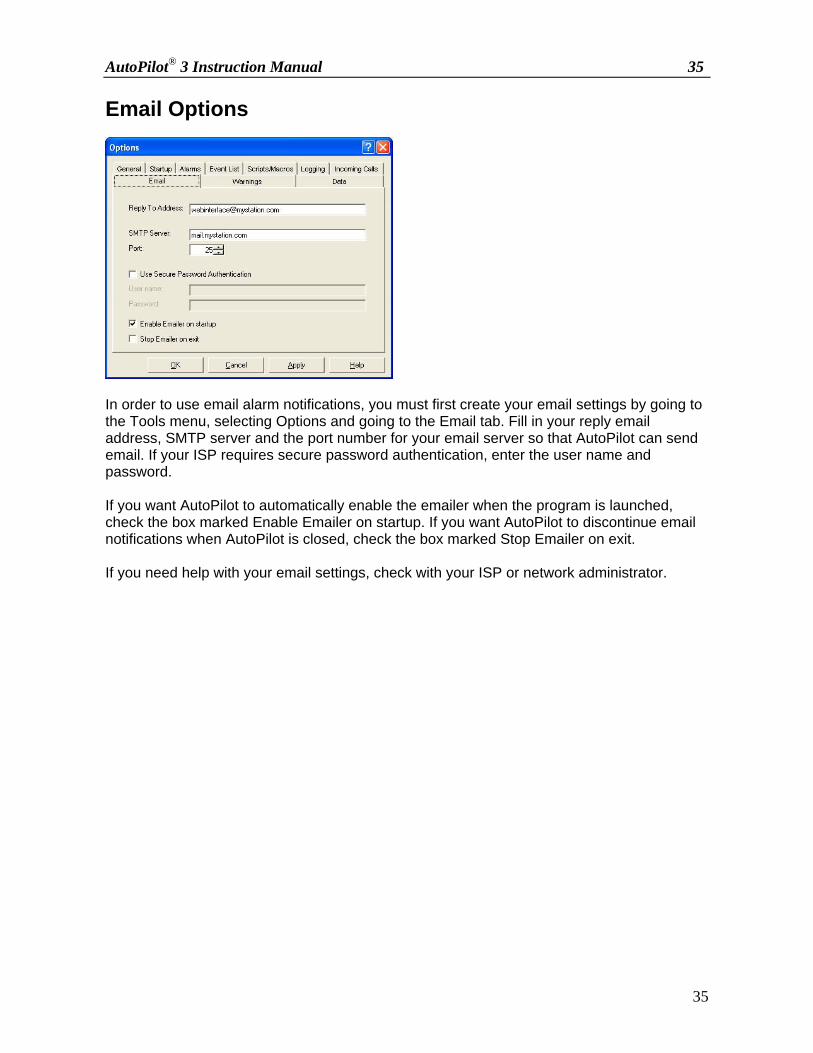
In order to use email alarm notifications, you must first create your email settings by going to the Tools menu, selecting Options and going to the Email tab. Fill in your reply email address, SMTP server and the port number for your email server so that AutoPilot can send email. If your ISP requires secure password authentication, enter the user name and password. If you want AutoPilot to automatically enable the emailer when the program is launched, check the box marked Enable Emailer on startup. If you want AutoPilot to discontinue email notifications when AutoPilot is closed, check the box marked Stop Emailer on exit. If you need help with your email settings, check with your ISP or network administrator.

AutoPilot® 3 Instruction Manual 36
36
Macros AutoPilot features a macros utility to create and execute time-based and event-driven automatic routines. It can be used in place of or in addition to the VB Scripting feature used in previous versions. Macros are based on the syntax made popular in the DOS version of AutoPilot, although there is no need to be familiar with AP DOS in order to make use of macros. Unlike the DOS version, you can create as many macros as you want, and there is no limit to the number of instructions in the macro.
Creating And Editing Macros Macros are composed in the macro editor, which is opened by clicking the macro icon in the toolbar.
The macro editor consists of a menu bar and toolbar containing macro editing tools, a composition area showing the lines of programming that define the macro, and a code generator
on the bottom the screen that you use to make each line of code. Composing The Macro
To start writing your macro, choose a command in the code generator and complete all the fields relating to the command and press OK. The
macro editor will format the line of code and add it to the end of the macro composition. Lines are numbered automatically, and you can change the order of the lines by clicking on a line and using the up and down arrows in the toolbar. To insert a line in the middle of the macro, click on the line beneath the desired insertion point, and click the insert icon in the toolbar. This will increment all of the line numbers that follow, and you will be prompted to let the macro editor update the Goto references that are affected. Each time you select a new command from the drop down list, brief help text appears below

AutoPilot® 3 Instruction Manual 37
37
Scheduling The Macro After creating your macro instructions, click the macro properties icon in the macro editor toolbar. This allows you to determine when this macro should run.
Saving The Macro When you are finished, go to the File menu to save the macro. IMPORTANT! Scripts and macros must be enabled in order to run. Click the Enable Scripts and Macros icon in the main AutoPilot toolbar to enable/disable macros. You will see the Script and Macro Scheduler icon in the system tray.

AutoPilot® 3 Instruction Manual 38
38
Scripts AutoPilot Scripts allow you to fully automate your sites using the power of Visual BASIC Script. Scripts will run when only when Scripting is enabled. To enable scripting, click "Enable Scripts" from the Tools/Scripts menu. Note: the scripting icon will appear down by the clock in the Windows taskbar “tray” (shown below).
Script icon When scripting is disabled, the script icon will appear with a red line through it. Note: you can enable/disable scripting by right clicking on this icon in the Tray. When you close AutoPilot, scripts will continue to run (the Script icon will remain in the Tray). This allows you to run scripts without leaving AutoPilot open all the time. If you want to stop scripts and close the scripting application, right-click on the script icon in the Tray, and click on "Exit". Note: you can double-click on the script icon in the taskbar ”task” to open Script Scheduler. Converting AutoPilot 1.x Functions If you have used a 1.x version of AutoPilot, you are probably familiar with AutoPilot Functions. With versions AutoPilot 2 and above, Functions are no longer used. Instead, AutoPilot uses a scripting language based on Visual BASIC Script (VBS). To make the transition from Functions to Scripts easier, the following table explains the Script equivalent to the old Functions.
Function Script Equivalent If Function Use the GetScriptStatus command in an If statement.
If ScriptStatus(“Script”) = x Then ... End If
If Date Use the VBS Date() function in an If statement. If Date() = x Then ... End If
AutoPilot® 3 Instruction Manual 39
39
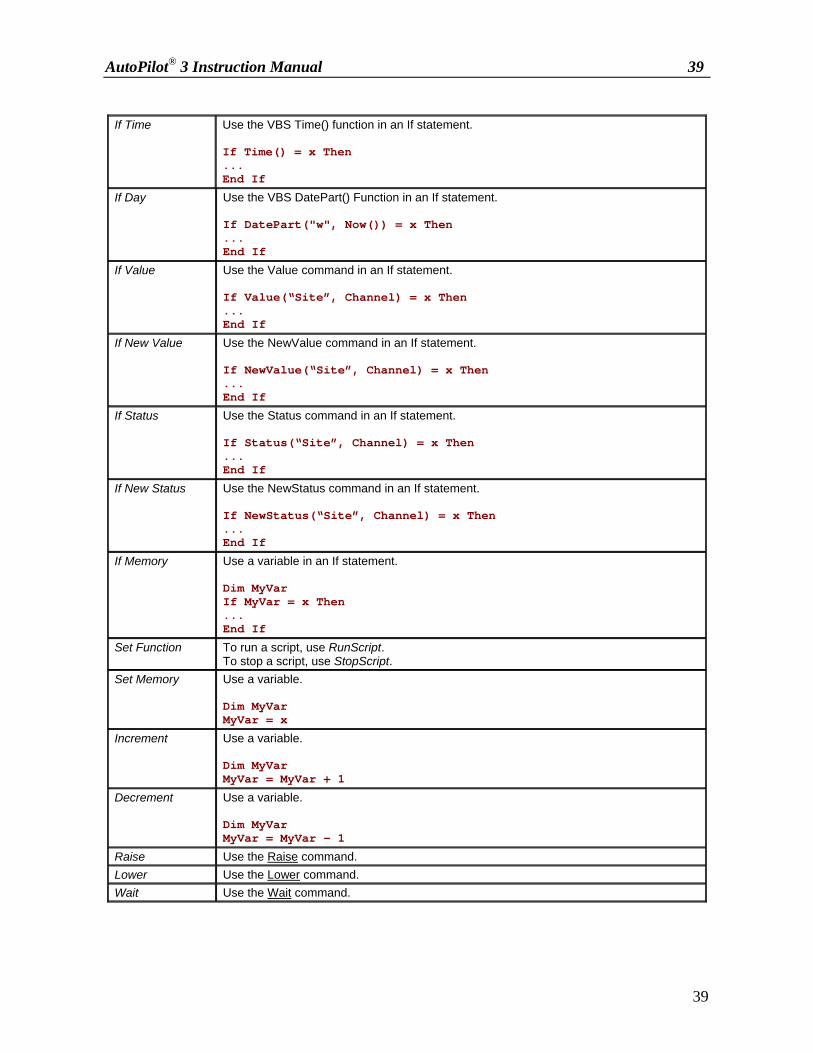
If Time Use the VBS Time() function in an If statement.
If Time() = x Then ... End If
If Day Use the VBS DatePart() Function in an If statement. If DatePart("w", Now()) = x Then ... End If
If Value Use the Value command in an If statement. If Value(“Site”, Channel) = x Then ... End If
If New Value Use the NewValue command in an If statement. If NewValue(“Site”, Channel) = x Then ... End If
If Status Use the Status command in an If statement. If Status(“Site”, Channel) = x Then ... End If
If New Status Use the NewStatus command in an If statement. If NewStatus(“Site”, Channel) = x Then ... End If
If Memory Use a variable in an If statement. Dim MyVar If MyVar = x Then ... End If
Set Function To run a script, use RunScript. To stop a script, use StopScript.
Set Memory Use a variable. Dim MyVar MyVar = x
Increment Use a variable. Dim MyVar MyVar = MyVar + 1
Decrement Use a variable. Dim MyVar MyVar = MyVar - 1
Raise Use the Raise command. Lower Use the Lower command. Wait Use the Wait command.
AutoPilot® 3 Instruction Manual 40
40
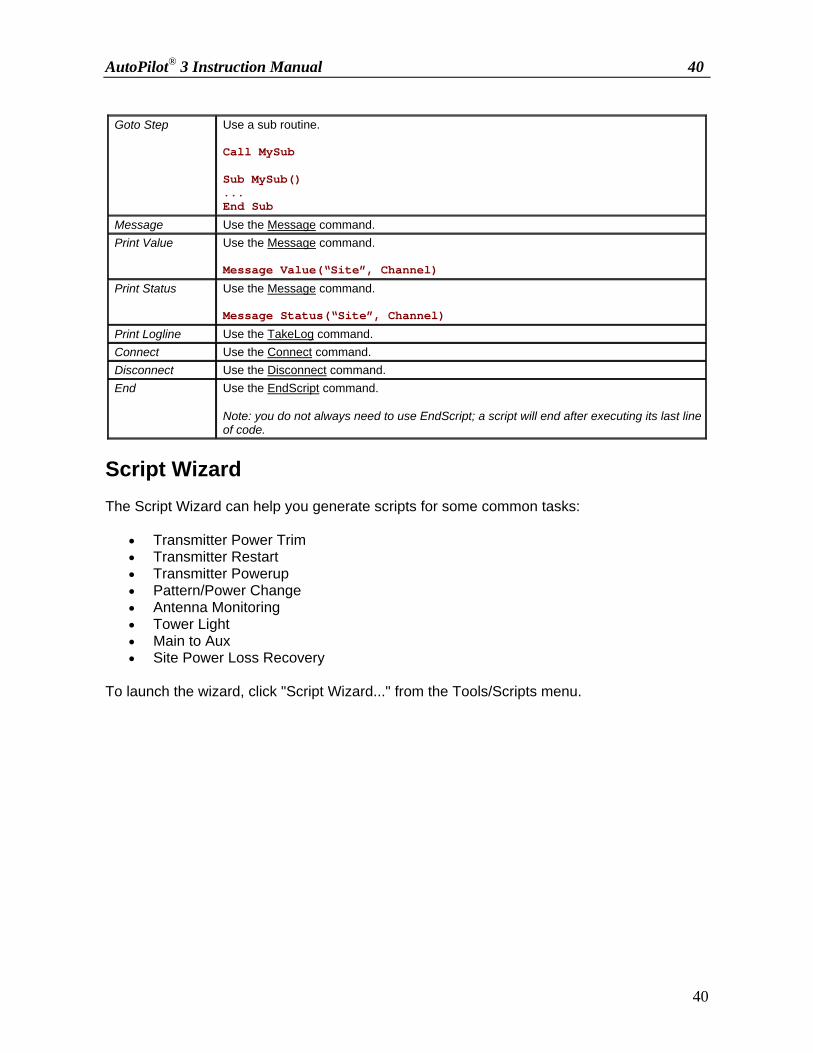
Goto Step Use a sub routine.
Call MySub Sub MySub() ... End Sub
Message Use the Message command. Print Value Use the Message command.
Message Value(“Site”, Channel)
Print Status Use the Message command. Message Status(“Site”, Channel)
Print Logline Use the TakeLog command. Connect Use the Connect command. Disconnect Use the Disconnect command. End Use the EndScript command.
Note: you do not always need to use EndScript; a script will end after executing its last line of code.
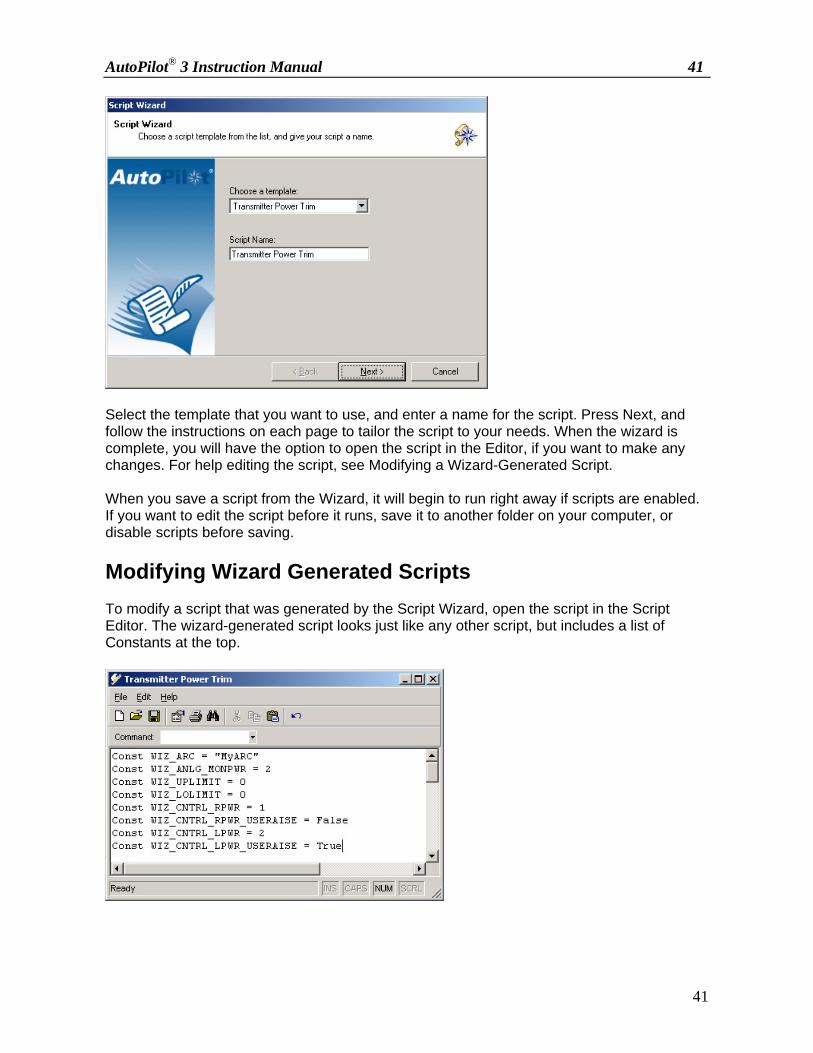
Script Wizard The Script Wizard can help you generate scripts for some common tasks:
• Transmitter Power Trim • Transmitter Restart • Transmitter Powerup • Pattern/Power Change • Antenna Monitoring • Tower Light • Main to Aux • Site Power Loss Recovery
To launch the wizard, click "Script Wizard..." from the Tools/Scripts menu.
AutoPilot® 3 Instruction Manual 41
41
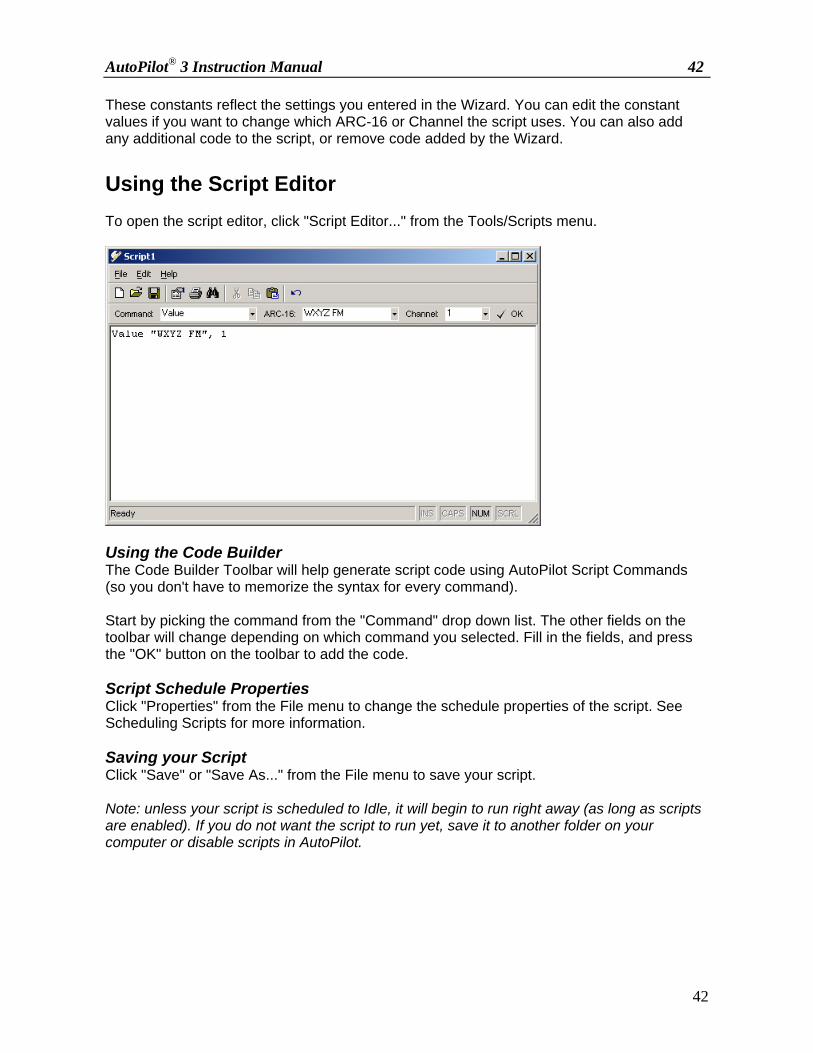
Select the template that you want to use, and enter a name for the script. Press Next, and follow the instructions on each page to tailor the script to your needs. When the wizard is complete, you will have the option to open the script in the Editor, if you want to make any changes. For help editing the script, see Modifying a Wizard-Generated Script. When you save a script from the Wizard, it will begin to run right away if scripts are enabled. If you want to edit the script before it runs, save it to another folder on your computer, or disable scripts before saving. Modifying Wizard Generated Scripts To modify a script that was generated by the Script Wizard, open the script in the Script Editor. The wizard-generated script looks just like any other script, but includes a list of Constants at the top.
AutoPilot® 3 Instruction Manual 42
42
These constants reflect the settings you entered in the Wizard. You can edit the constant values if you want to change which ARC-16 or Channel the script uses. You can also add any additional code to the script, or remove code added by the Wizard. Using the Script Editor To open the script editor, click "Script Editor..." from the Tools/Scripts menu.
Using the Code Builder The Code Builder Toolbar will help generate script code using AutoPilot Script Commands (so you don't have to memorize the syntax for every command). Start by picking the command from the "Command" drop down list. The other fields on the toolbar will change depending on which command you selected. Fill in the fields, and press the "OK" button on the toolbar to add the code. Script Schedule Properties Click "Properties" from the File menu to change the schedule properties of the script. See Scheduling Scripts for more information. Saving your Script Click "Save" or "Save As..." from the File menu to save your script. Note: unless your script is scheduled to Idle, it will begin to run right away (as long as scripts are enabled). If you do not want the script to run yet, save it to another folder on your computer or disable scripts in AutoPilot.

AutoPilot® 3 Instruction Manual 43
43
Scheduling Scripts
Scripts can be scheduled to run in five different modes. To set the schedule, open the Script Properties dialog from the Script Scheduler or Script Editor. Choose the type of schedule from the options shown above. On Demand Only (Idle) The script will only run if started from the Script Scheduler or if RunScript is used to start it from another script. Continuous The script will run in a loop. After the script runs, there is a break (about five seconds), and then it will run again. The script will continue running until the schedule is changed. Interval The script will run after a certain interval has elapsed. To set the interval, choose either Minutes or Hours, and enter the interval in the field. Specific Time
The script will only run at the time selected (accurate to the minute). The script can be set to run at a specific time, or a calendar time. If using a calendar time, you must select the calendar that you want to use, as well as the time (Sunrise, Sunset, etc). The script can run every day, or only on certain days. Check the days of the week on which you want the script to run. Note that when a script is scheduled to run at a specific time, it can be executed only once on the day(s) it is scheduled to execute. Between Times

AutoPilot® 3 Instruction Manual 44
44
The script will run only between the times selected. For both the start and stop times, either a specific time or a calendar time can be used. If using a calendar time, you must select the calendar that you want to use, as well as the time (Sunrise, Sunset, etc). Note: if you want a script to start running before midnight, and stop running after midnight, AutoPilot will add one day to the stop time. For example, to run between 10:00 PM and 2:00 AM, just enter those times exactly as they are. AutoPilot will run the script if it is later than 10:00 PM today or earlier than 2:00 AM tomorrow. Using the Script Scheduler To open the Script Scheduler, click "Scheduler..." from the Tools/Scripts menu.

AutoPilot® 3 Instruction Manual 45
45
Script Status Icons Status Description
Off (Idle) The script is not running.
Running The script is running.
Loop Wait The script is waiting to loop.
Paused The script is paused (using Wait).
Waiting to run between certain times The script is scheduled to run between two times.
Waiting for Interval The script is scheduled to run after a certain interval.
Scheduled The script is scheduled to run at a certain time.
Data Wait The script is waiting for data from an ARC-16 (using NewValue or NewStatus).
Connecting The script is connecting to an ARC-16 (using Connect).
Running Scripts Select the script you want to run and click "Run" from the Scripts menu. Stopping Scripts Select the script you want to stop and click "Stop" from the Scripts menu. Note: this will not change the schedule of the script; it will just stop the script. Stop Looping Select a script that is in Loop Wait and click "Stop Looping" from the Scripts menu. Note: this will not stop the script, but only prevent it from running again by changing its schedule to Idle. This allows you to stop a loop while still allowing the script to complete its current run. Scheduling Scripts To change the schedule of a script, click "Schedule" from the Scripts menu. See Scheduling Scripts (page 43) for more information. Editing Scripts Select the script that you want to edit and click "Edit" from the Scripts menu to open the Script Editor. To delete the script, click "Delete" from the File menu. Adding New Scripts You can add a script using the Editor or the Wizard from the File/New menu. Script Errors If an error occurs in your script, it will be logged in the Event Log. Your script will stop immediately after the error. Errors may be caused by VBS syntax errors, or by referencing invalid ARCs, channels, connections, etc. Note: the Event Log will include the line number in your script that caused the error.
AutoPilot® 3 Instruction Manual 46
46
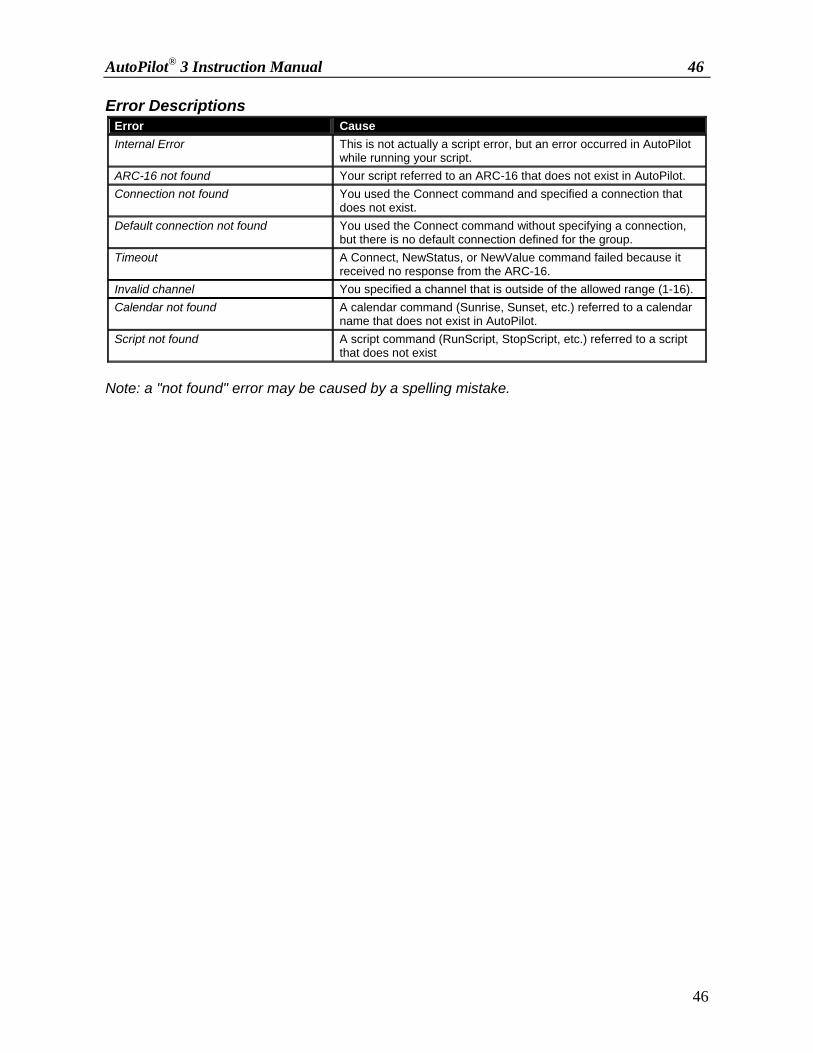
Error Descriptions Error Cause Internal Error This is not actually a script error, but an error occurred in AutoPilot
while running your script. ARC-16 not found Your script referred to an ARC-16 that does not exist in AutoPilot. Connection not found You used the Connect command and specified a connection that
does not exist. Default connection not found You used the Connect command without specifying a connection,
but there is no default connection defined for the group. Timeout A Connect, NewStatus, or NewValue command failed because it
received no response from the ARC-16. Invalid channel You specified a channel that is outside of the allowed range (1-16). Calendar not found A calendar command (Sunrise, Sunset, etc.) referred to a calendar
name that does not exist in AutoPilot. Script not found A script command (RunScript, StopScript, etc.) referred to a script
that does not exist Note: a "not found" error may be caused by a spelling mistake.
AutoPilot® 3 Instruction Manual 47
47
Writing Scripts If you're not familiar with Visual BASIC Script, the following sections will help you get started. The Script Command reference (page 52) is especially useful, even if you already know VBS. If Statements Use the VBS If statement in a script to make a decision. The If statement follows this basic structure: If [condition] Then [action] End If If...Then Here is an example of a simple If statement that prints a message if an analog channel is over 1000. Example If Value("MyARC", 1) > 1000 Then
Message "Channel 1 is above 1000" End If Using Else You can add an Else clause to give the If statement an alternative. This example prints ON if the status is on, but prints OFF otherwise. Example If Status("MyARC", 1) = True Then
Message "Channel 1 is ON" Else
Message "Channel 1 is Off" End If Using ElseIf Use ElseIf to write more complex statements. If the first condition fails, the second condition will be tested. You can still use Else to provide an alternative if your If and ElseIf conditions fail. Note: you can use as many ElseIf statements as you like. This example tests an analog channel for a reading over 1000. If the reading is less than 1000, it tests for a reading of less than 0. If both of these conditions are false, the Else action will be used.

AutoPilot® 3 Instruction Manual 48
48
Example If Value("MyARC", 1) > 1000 Then
Message "Channel 1 is above 1000" ElseIf Value("MyARC" 1) < 0 Then
Message "Channel 1 is below 0" Else
Message "Channel 1 is between 0 and 1000" End If Variables and Constants You can use a variable to store data temporarily in a script. A variable can be changed while the script is running. A constant is like a variable, only it must be assigned a value when it is declared. Constants cannot be changed, however. Declaring a Variable To declare a variable, use the Dim keyword, followed by the variable name. Note: variable names can be up to 255 characters long, and must be unique (you can not use the same variable name twice in one script). To assign a value to a variable, just use the variable name followed by "=". Note: if the variable is going to hold text, you must use "quotes". Example 'Create a variable named MyVar, and set it to equal 0 Dim MyVar MyVar = 0 'Add 1 to the variable MyVar = MyVar + 1 'Assign the text "hello" to the variable MyVar = "hello" Declaring a Constant To declare a constant, use the Const keyword followed by the constant name, and assign it a value in the same step. Note: constant names follow the same rules as variable names (see above). Example 'Create a constant named MyConst and set it to 100 Const MyConst = 100 Note: it is a good idea to use constants in your scripts when dealing with unchanging values, such as ARC-16 names. Example

AutoPilot® 3 Instruction Manual 49
49
'Use a constant to represent an ARC-16 named "WXZY FM Backup" Const MyARC = "WXYZ FM Backup" 'Raise channel 1 on this ARC Raise MyARC, 1 Functions and Subs Functions and Subs are used to encapsulate code in your script that you can run from elsewhere inside the script. This is useful if you want to perform the same action in different places in your script. Subs To declare a sub, use the Sub keyword followed by a unique name for the sub. Your sub must end with "End Sub." Here is the format of a sub: Sub SubName(Parameter1, Parameter2, ...) [action] End Sub You can use as many parameters as you want, or none at all. To run a sub, use Call followed by the name of the sub. Example Sub MySub(MyParameter)
Message MyParameter End Sub 'This will write a message with the text "hello" Call MySub("hello") Functions A function is just like a sub, only it "returns" a result. To assign the return value, include a statement like this: FunctionName = Value Example Function MyFunction(MyParameter)
MyFunction = MyParameter + 1 End Function 'This will write a message with the text "2" Message MyFunction(1)
AutoPilot® 3 Instruction Manual 50
50
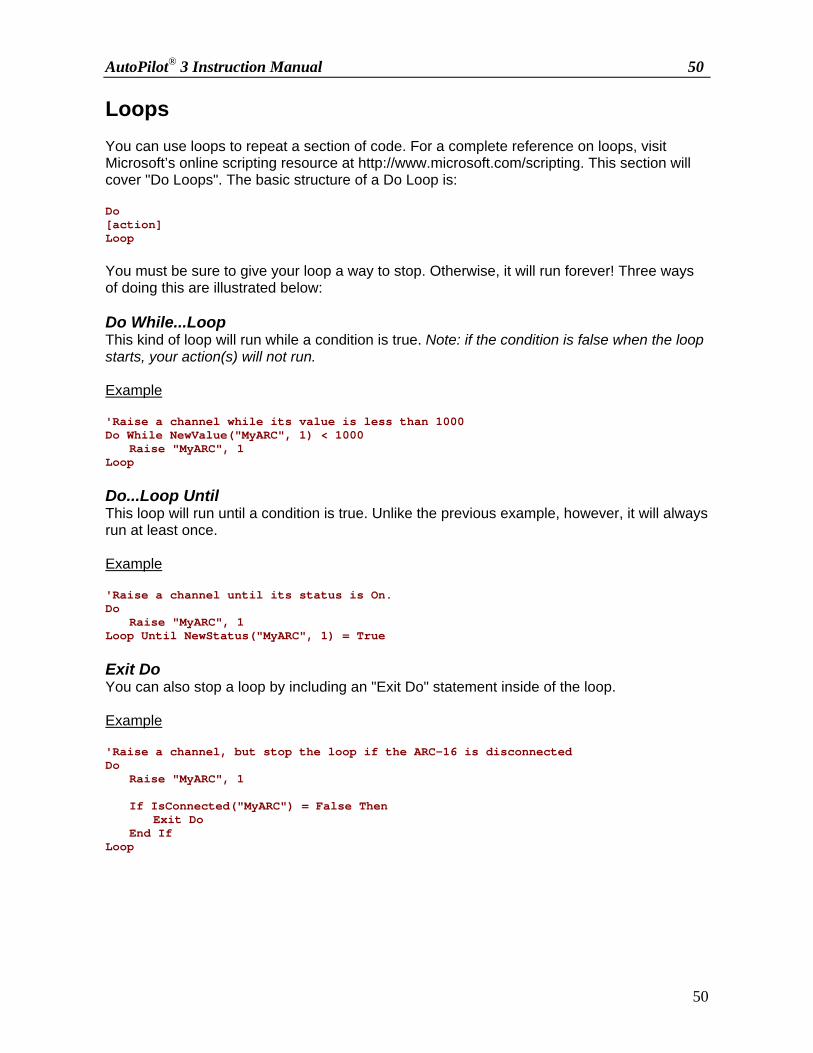
Loops You can use loops to repeat a section of code. For a complete reference on loops, visit Microsoft’s online scripting resource at http://www.microsoft.com/scripting. This section will cover "Do Loops". The basic structure of a Do Loop is: Do [action] Loop You must be sure to give your loop a way to stop. Otherwise, it will run forever! Three ways of doing this are illustrated below: Do While...Loop This kind of loop will run while a condition is true. Note: if the condition is false when the loop starts, your action(s) will not run. Example 'Raise a channel while its value is less than 1000 Do While NewValue("MyARC", 1) < 1000
Raise "MyARC", 1 Loop Do...Loop Until This loop will run until a condition is true. Unlike the previous example, however, it will always run at least once. Example 'Raise a channel until its status is On. Do
Raise "MyARC", 1 Loop Until NewStatus("MyARC", 1) = True Exit Do You can also stop a loop by including an "Exit Do" statement inside of the loop. Example 'Raise a channel, but stop the loop if the ARC-16 is disconnected Do
Raise "MyARC", 1 If IsConnected("MyARC") = False Then
Exit Do End If
Loop
AutoPilot® 3 Instruction Manual 51
51
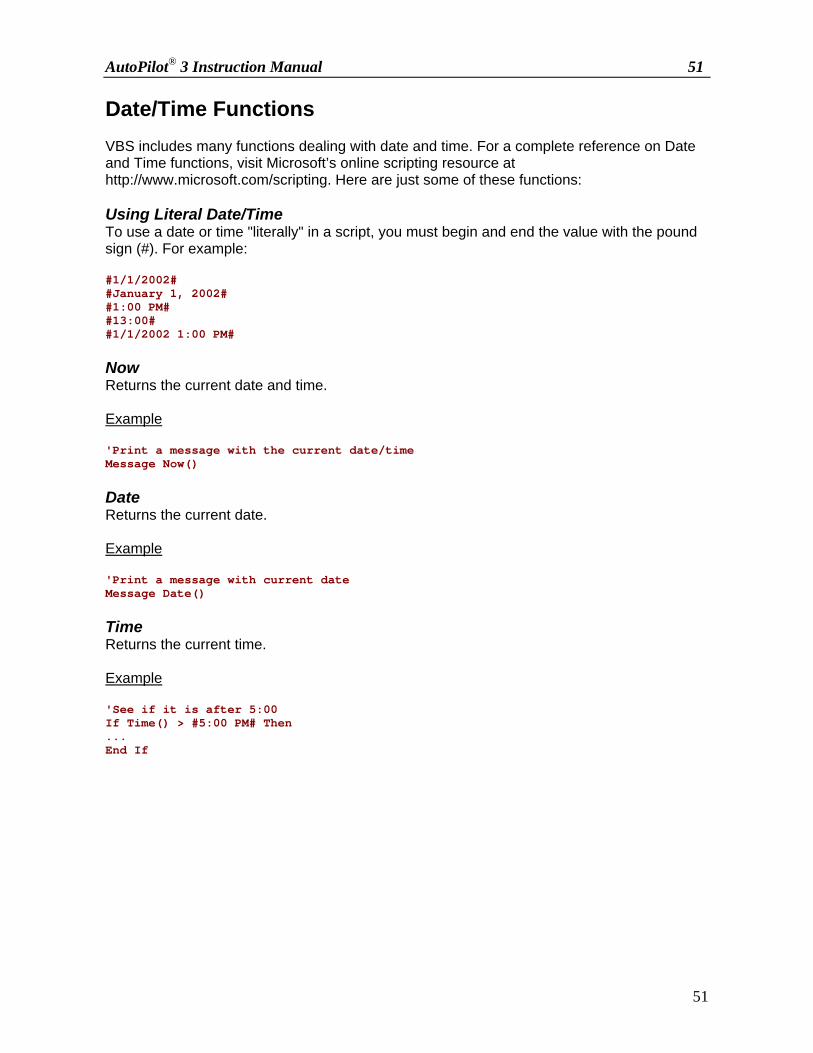
Date/Time Functions VBS includes many functions dealing with date and time. For a complete reference on Date and Time functions, visit Microsoft’s online scripting resource at http://www.microsoft.com/scripting. Here are just some of these functions: Using Literal Date/Time To use a date or time "literally" in a script, you must begin and end the value with the pound sign (#). For example: #1/1/2002# #January 1, 2002# #1:00 PM# #13:00# #1/1/2002 1:00 PM# Now Returns the current date and time. Example 'Print a message with the current date/time Message Now() Date Returns the current date. Example 'Print a message with current date Message Date() Time Returns the current time. Example 'See if it is after 5:00 If Time() > #5:00 PM# Then ... End If

AutoPilot® 3 Instruction Manual 52
52
AutoPilot Script Commands ARCTime Description Use the ARCTime command to convert the current time to the time zone used by the ARC-16. If your ARC-16 is in your local time zone, you will not need this command. For example: if you are in EST, and your ARC-16 is in CST, at 5:00 Eastern ARCTime will return 4:00. Syntax ARCTime(ARCName) Parameters
Parameter Description ARCName Name of the ARC-16 (use "quotes")
Return ARCTime returns a time value. Example 'See if it is past Sunrise in the ARC's time zone: If ARCTime("MyARC") > Sunrise("MyCalendar") Then ... End If Connect Description Connects to an ARC-16, and optionally to all the other ARCs in that group. Syntax Connect(ARCName, Connection, ConnectAll) Parameters
Parameter Description ARCName Name of the ARC-16 to which you want to connect (use quotes). Connection (Optional) Name of the connection that you want to use (use quotes). Leave blank
to use the default connection. ConnectAll (Optional) Use True to connect to all the other ARCs in the group; otherwise use
False. If left blank, True is assumed.
AutoPilot® 3 Instruction Manual 53
53
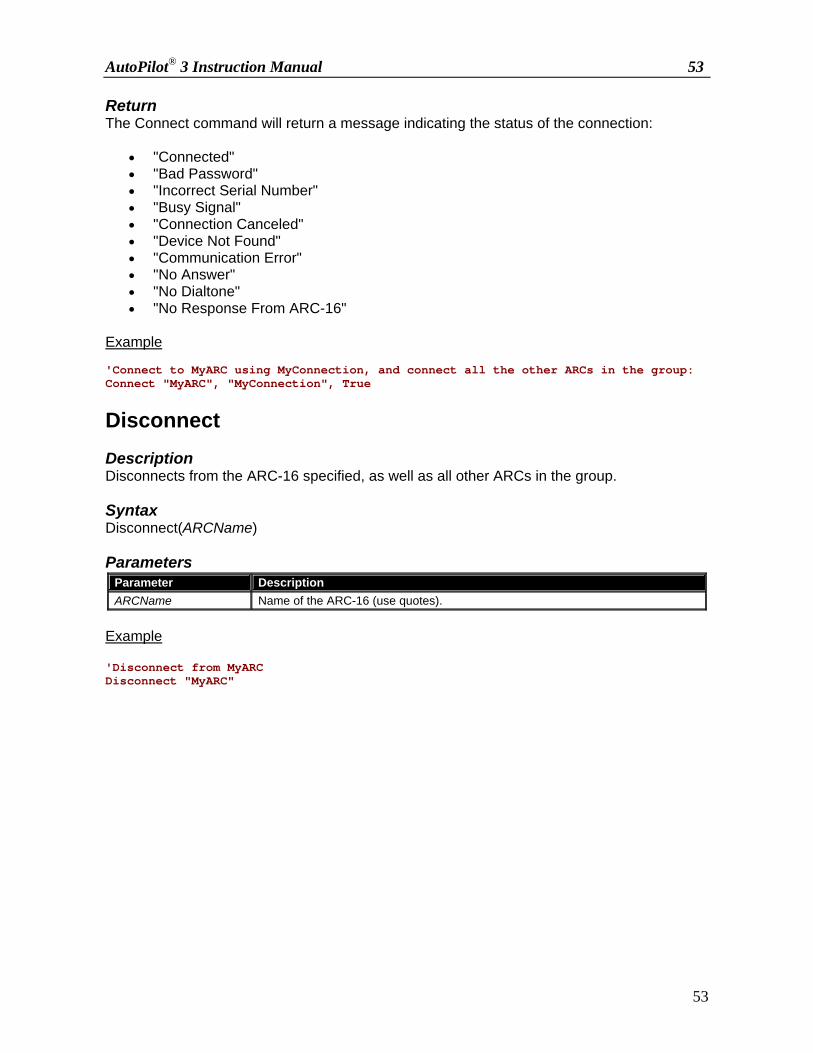
Return The Connect command will return a message indicating the status of the connection:
• "Connected" • "Bad Password" • "Incorrect Serial Number" • "Busy Signal" • "Connection Canceled" • "Device Not Found" • "Communication Error" • "No Answer" • "No Dialtone" • "No Response From ARC-16"
Example 'Connect to MyARC using MyConnection, and connect all the other ARCs in the group: Connect "MyARC", "MyConnection", True Disconnect Description Disconnects from the ARC-16 specified, as well as all other ARCs in the group. Syntax Disconnect(ARCName) Parameters
Parameter Description ARCName Name of the ARC-16 (use quotes).
Example 'Disconnect from MyARC Disconnect "MyARC"

AutoPilot® 3 Instruction Manual 54
54
IsConnected Description Use IsConnected to determine if AutoPilot is already connected to your ARC-16. Syntax IsConnected(ARCName) Parameters
Parameter Description ARCName Name of the ARC-16 (use quotes).
Return IsConnected will return True or False. Example 'If not already connected, run the Connect command If Not IsConnected("MyARC") Then
Connect("MyARC") End If IssueCommand Description Sends a Raise or Lower command to the ARC-16. Syntax IssueCommand(ARCName, Channel, UseRaise, Duration) Parameters
Parameter Description ARCName Name of the ARC-16 (use quotes). Channel Channel Number UseRaise True for Raise, False for Lower. Duration (Optional) Duration of the command in seconds (can use decimal). If left blank, 1
second is used. Example 'Send a Raise command to MyARC channel 12 for 3 seconds IssueCommand "MyARC", 12, True, 3
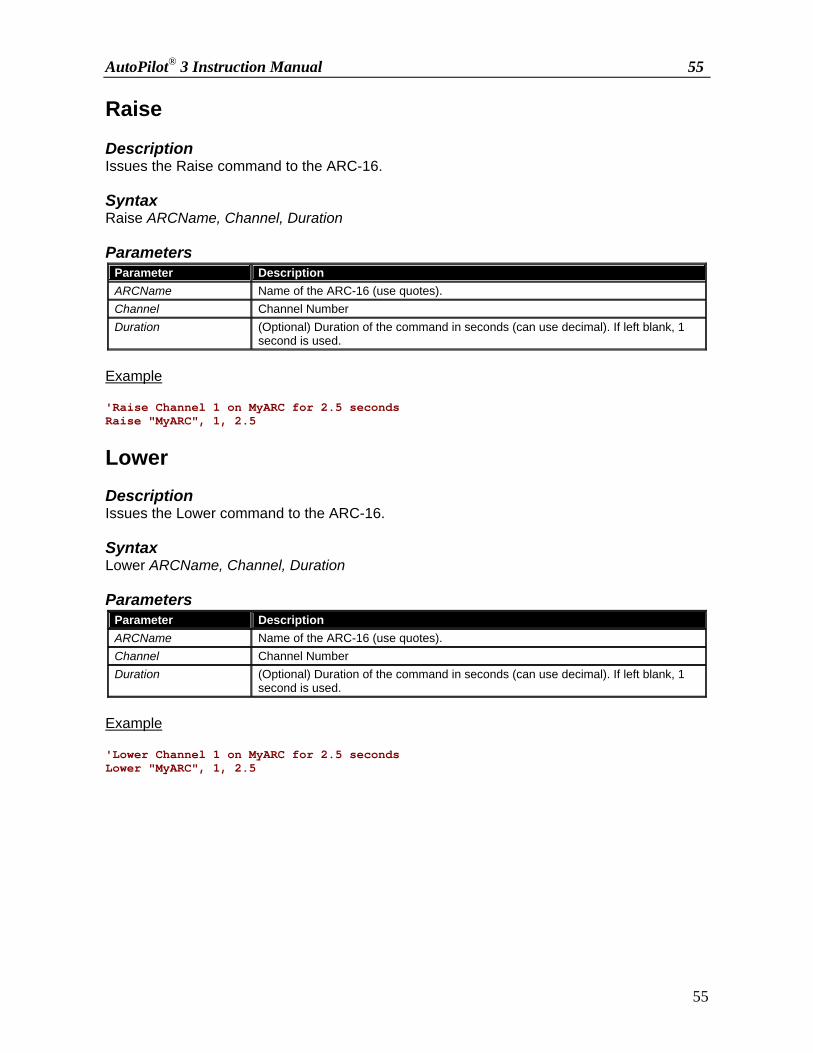
AutoPilot® 3 Instruction Manual 55
55
Raise Description Issues the Raise command to the ARC-16. Syntax Raise ARCName, Channel, Duration Parameters
Parameter Description ARCName Name of the ARC-16 (use quotes). Channel Channel Number Duration (Optional) Duration of the command in seconds (can use decimal). If left blank, 1
second is used. Example 'Raise Channel 1 on MyARC for 2.5 seconds Raise "MyARC", 1, 2.5 Lower Description Issues the Lower command to the ARC-16. Syntax Lower ARCName, Channel, Duration Parameters
Parameter Description ARCName Name of the ARC-16 (use quotes). Channel Channel Number Duration (Optional) Duration of the command in seconds (can use decimal). If left blank, 1
second is used. Example 'Lower Channel 1 on MyARC for 2.5 seconds Lower "MyARC", 1, 2.5
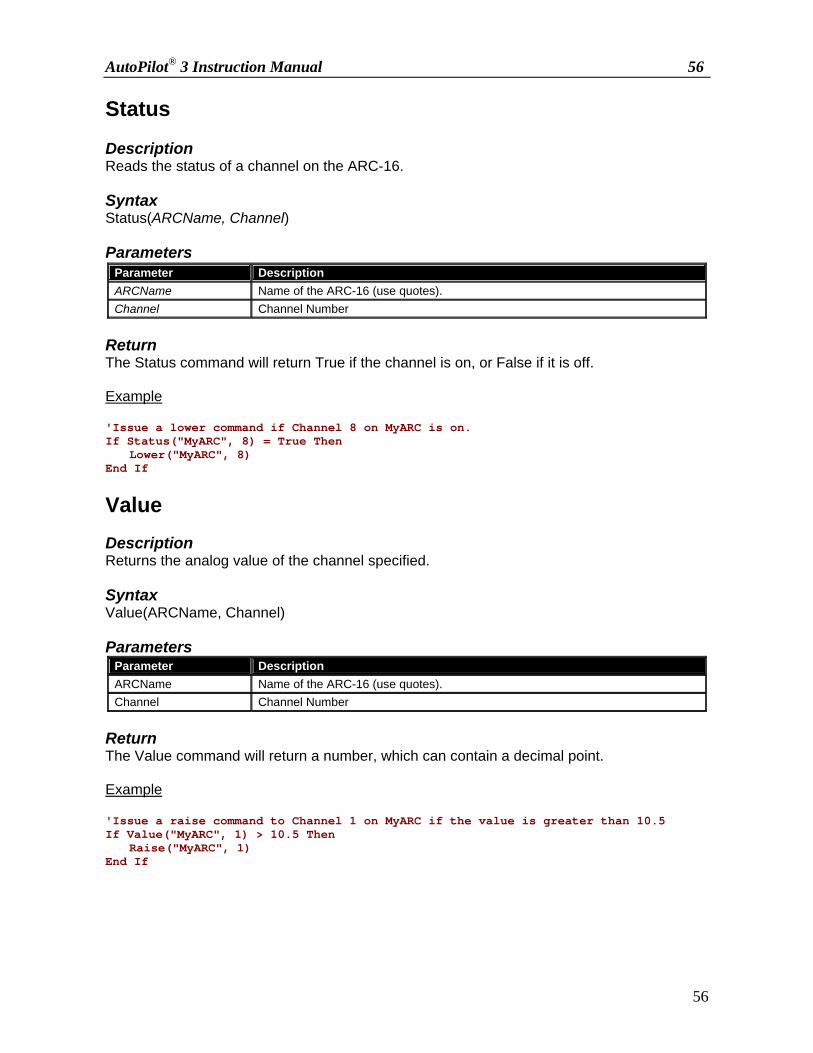
AutoPilot® 3 Instruction Manual 56
56
Status Description Reads the status of a channel on the ARC-16. Syntax Status(ARCName, Channel) Parameters
Parameter Description ARCName Name of the ARC-16 (use quotes). Channel Channel Number
Return The Status command will return True if the channel is on, or False if it is off. Example 'Issue a lower command if Channel 8 on MyARC is on. If Status("MyARC", 8) = True Then
Lower("MyARC", 8) End If Value Description Returns the analog value of the channel specified. Syntax Value(ARCName, Channel) Parameters
Parameter Description ARCName Name of the ARC-16 (use quotes). Channel Channel Number
Return The Value command will return a number, which can contain a decimal point. Example 'Issue a raise command to Channel 1 on MyARC if the value is greater than 10.5 If Value("MyARC", 1) > 10.5 Then
Raise("MyARC", 1) End If
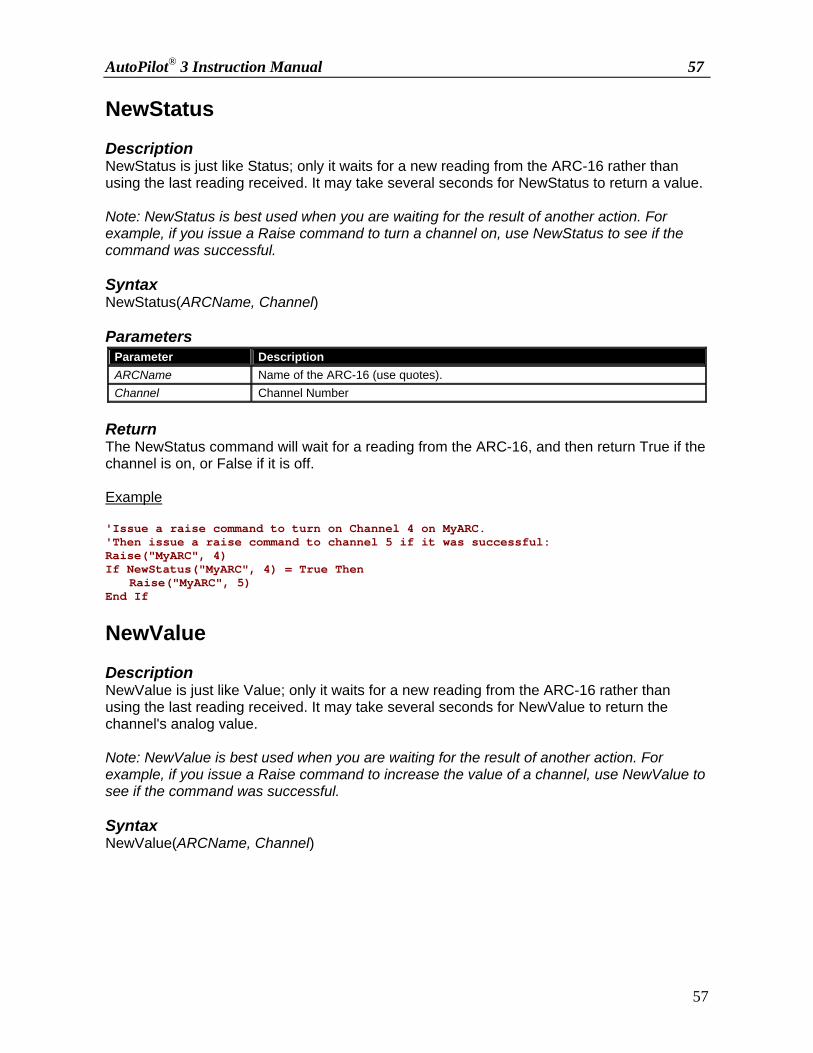
AutoPilot® 3 Instruction Manual 57
57
NewStatus Description NewStatus is just like Status; only it waits for a new reading from the ARC-16 rather than using the last reading received. It may take several seconds for NewStatus to return a value. Note: NewStatus is best used when you are waiting for the result of another action. For example, if you issue a Raise command to turn a channel on, use NewStatus to see if the command was successful. Syntax NewStatus(ARCName, Channel) Parameters
Parameter Description ARCName Name of the ARC-16 (use quotes). Channel Channel Number
Return The NewStatus command will wait for a reading from the ARC-16, and then return True if the channel is on, or False if it is off. Example 'Issue a raise command to turn on Channel 4 on MyARC. 'Then issue a raise command to channel 5 if it was successful: Raise("MyARC", 4) If NewStatus("MyARC", 4) = True Then
Raise("MyARC", 5) End If NewValue Description NewValue is just like Value; only it waits for a new reading from the ARC-16 rather than using the last reading received. It may take several seconds for NewValue to return the channel's analog value. Note: NewValue is best used when you are waiting for the result of another action. For example, if you issue a Raise command to increase the value of a channel, use NewValue to see if the command was successful. Syntax NewValue(ARCName, Channel)
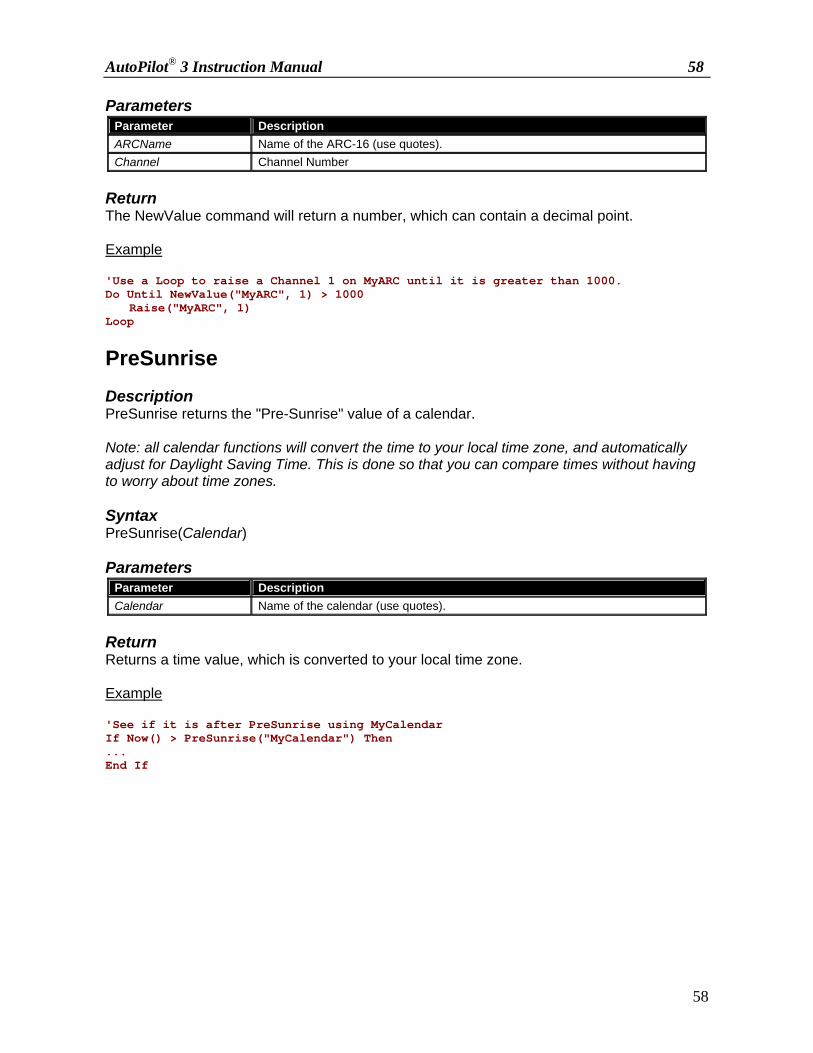
AutoPilot® 3 Instruction Manual 58
58
Parameters Parameter Description ARCName Name of the ARC-16 (use quotes). Channel Channel Number
Return The NewValue command will return a number, which can contain a decimal point. Example 'Use a Loop to raise a Channel 1 on MyARC until it is greater than 1000. Do Until NewValue("MyARC", 1) > 1000
Raise("MyARC", 1) Loop PreSunrise Description PreSunrise returns the "Pre-Sunrise" value of a calendar. Note: all calendar functions will convert the time to your local time zone, and automatically adjust for Daylight Saving Time. This is done so that you can compare times without having to worry about time zones. Syntax PreSunrise(Calendar) Parameters
Parameter Description Calendar Name of the calendar (use quotes).
Return Returns a time value, which is converted to your local time zone. Example 'See if it is after PreSunrise using MyCalendar If Now() > PreSunrise("MyCalendar") Then ... End If

AutoPilot® 3 Instruction Manual 59
59
Sunrise Description Sunrise returns the "Sunrise" value of a calendar. Note: all calendar functions will convert the time to your local time zone, and automatically adjust for Daylight Saving Time. This is done so that you can compare times without having to worry about time zones. Syntax Sunrise(Calendar) Parameters
Parameter Description Calendar Name of the calendar (use quotes).
Return Returns a time value, which is converted to your local time zone. Example 'See if it is after Sunrise using MyCalendar If Now() > Sunrise("MyCalendar") Then ... End If
Sunset Description Sunset returns the "Sunset" value of a calendar. Note: all calendar functions will convert the time to your local time zone, and automatically adjust for Daylight Saving Time. This is done so that you can compare times without having to worry about time zones. Syntax Sunset(Calendar) Parameters
Parameter Description Calendar Name of the calendar (use quotes).
Return Returns a time value, which is converted to your local time zone.
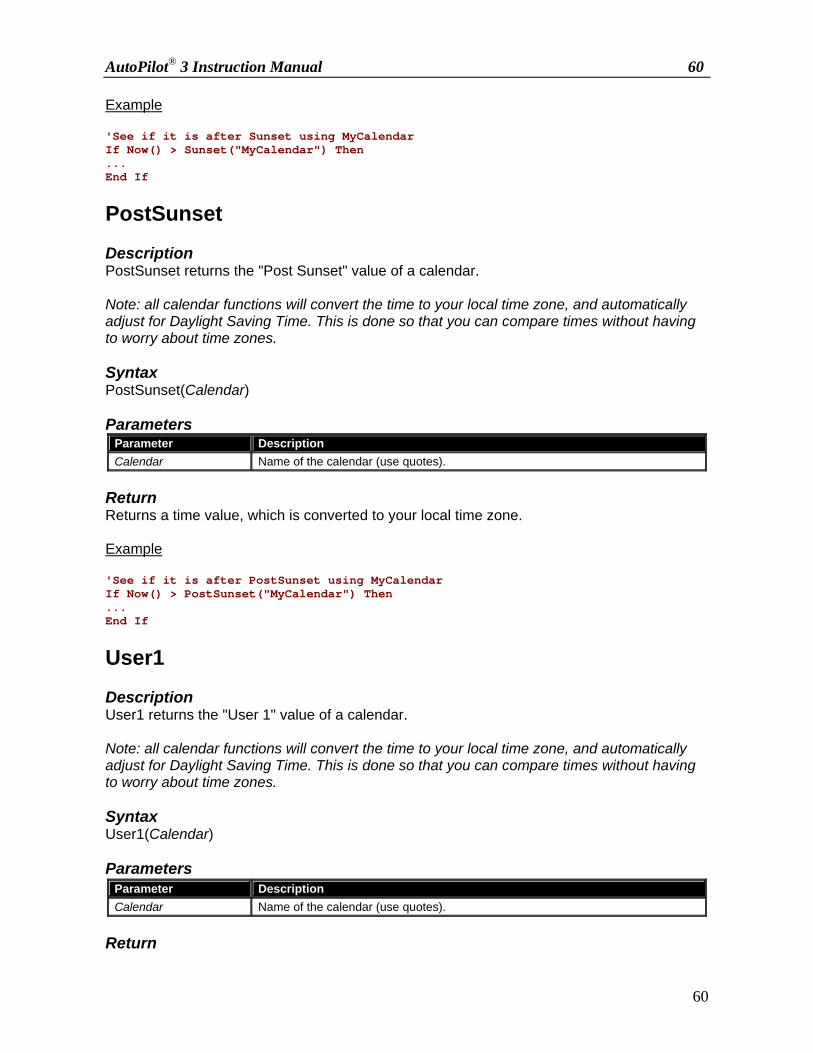
AutoPilot® 3 Instruction Manual 60
60
Example 'See if it is after Sunset using MyCalendar If Now() > Sunset("MyCalendar") Then ... End If PostSunset Description PostSunset returns the "Post Sunset" value of a calendar. Note: all calendar functions will convert the time to your local time zone, and automatically adjust for Daylight Saving Time. This is done so that you can compare times without having to worry about time zones. Syntax PostSunset(Calendar) Parameters
Parameter Description Calendar Name of the calendar (use quotes).
Return Returns a time value, which is converted to your local time zone. Example 'See if it is after PostSunset using MyCalendar If Now() > PostSunset("MyCalendar") Then ... End If User1 Description User1 returns the "User 1" value of a calendar. Note: all calendar functions will convert the time to your local time zone, and automatically adjust for Daylight Saving Time. This is done so that you can compare times without having to worry about time zones. Syntax User1(Calendar) Parameters
Parameter Description Calendar Name of the calendar (use quotes).
Return

AutoPilot® 3 Instruction Manual 61
61
Returns a time value, which is converted to your local time zone. Example 'See if it is after User 1 time using MyCalendar If Now() > User1("MyCalendar") Then ... End If User2 Description User1 returns the "User 2" value of a calendar. Note: all calendar functions will convert the time to your local time zone, and automatically adjust for Daylight Saving Time. This is done so that you can compare times without having to worry about time zones. Syntax User2(Calendar) Parameters
Parameter Description Calendar Name of the calendar (use quotes).
Return Returns a time value, which is converted to your local time zone. Example 'See if it is after User 2 time using MyCalendar If Now() > User2("MyCalendar") Then ... End If GetScriptStatus Description Returns the status of a script. Syntax GetScriptStatus(Script) Parameters
Parameter Description Script Name of the Script (use quotes).
Return GetScriptStatus will return one of the following statuses:
• "Off" • "Running"

AutoPilot® 3 Instruction Manual 62
62
• "Scheduled" • "Looping" • "Paused" • "DataWait" • "Connecting"
Example 'If the script MyScript is off, run it" If GetScriptStatus("MyScript") = "Off" Then
RunScript "MyScript" End If RunScript Description Runs a script. Syntax RunScript(Script) Parameters
Parameter Description Script Name of the Script (use quotes).
Example 'Run MyScript RunScript "MyScript" StopScript Description Immediately stops a running script. Note: if the script is looping, you must use UnScheduleScript to prevent it from running again. Syntax StopScript(Script) Parameters
Parameter Description Script Name of the Script (use quotes).
Example 'Stop MyScript StopScript "MyScript"

AutoPilot® 3 Instruction Manual 63
63
UnScheduleScript Description Changes the script's schedule to "Idle." Use this on a script that is looping to prevent it from running again. Note: UnScheduleScript will not actually stop a script. Use the StopScript command to stop the script immediately. Syntax UnScheduleScript(Script) Parameters
Parameter Description Script Name of the Script (use quotes).
Example 'UnSchedule MyScript UnScheduleScript "MyScript"
Wait Description Pauses the script for the specified number of milliseconds. Syntax Wait(Duration) Parameters
Parameter Description Duration Number of milliseconds to wait.
Example 'Issue two commands, spaced 2 seconds apart Raise "MyARC", 1 Wait 2000 Raise "MyARC", 2

AutoPilot® 3 Instruction Manual 64
64
Message Description Records the specified message in the Event Log as a Script Message. Syntax Message(Text) Parameters
Parameter Description Text Text of the message (use quotes).
Example 'Write the message "Hello": Message "Hello" 'Write the status of Channel 1 on MyARC: Message Status("MyARC", 1) 'Write the value of Channel 1 on MyARC and add "volts" to the message '(This message will appear as "1000 volts"): Message Value("MyARC", 1) & " volts"
TakeLog Description Takes a log on the specified ARC-16. Syntax TakeLog(ARCName) Parameters
Parameter Description ARCName Name of the ARC-16 (use quotes).
Example 'Take a log on MyARC TakeLog "MyARC" VChan Description Returns the value of the specified virtual channel. Syntax VChan("name")

AutoPilot® 3 Instruction Manual 65
65
Example 'Raise channel 1 on MyARC for 2.5 seconds if virtual channel “MyChan” is greater than 50: If VChan(“MyChan”) > 50 Then
Raise "MyARC", 1, 2.5 End If
GetMacroStatus Description Returns the status of a macro. Syntax GetMacroStatus(“Macro”) Return GetMacroStatus will return one of the following statuses:
• "Off" • "Running" • "Scheduled" • "Looping" • "Paused" • "DataWait" • "Connecting"
Example 'If the macro MyMacro is off, run it" If GetMacroStatus("MyMacro") = "Off" Then RunMacro "MyMacro" End If
RunMacro Description Runs a macro.
Syntax RunMacro(“Macro”) Note: It is not possible to run a macro from within itself. For example, if a macro is called "MyMacro", the command RunMacro "MyMacro" will fail. Example 'Run MyMacro' RunMacro "MyMacro"
AutoPilot® 3 Instruction Manual 66
66
StopMacro Description Stops a macro.
Syntax StopMacro(“Macro”) Example 'Stop MyMacro' StopMacro "MyMacro" Note: If the macro is looping, you must use UnScheduleMacro to prevent it from running again.
UnScheduleMacro Description Changes the macro's schedule to "Idle." Use this on a macro that is looping to prevent it from running again. Note: UnScheduleMacro will not actually stop a script, use StopMacro to stop the script immediately. Syntax UnScheduleMacro(“Macro”) Example 'UnSchedule MyMacro UnScheduleMacro "MyMacro"
EndScript Description EndScript can be used to immediately stop the script. Note: You do not always need to use EndScript; scripts will stop when the last line of code is executed. You only need to use EndScript to stop before the last line of code. Syntax EndScript
AutoPilot® 3 Instruction Manual 67
67
Global Variables Description Changes or tests the condition of global variables, which are variables that are common to all scripts. Syntax SetGlobal "Name", Value (Assigns a new value to the global variable) GetGlobal("Name") (Returns the valuable of a global variable) ClearGlobal "Name" (Removes the value assigned to a global variable) Email Description Sends an email using the configured SMTP server. Syntax Email "[email protected]", "subject", "message" Print Report Description Prints the specified report on your computer's default printer.
Syntax PrintReport "Name"
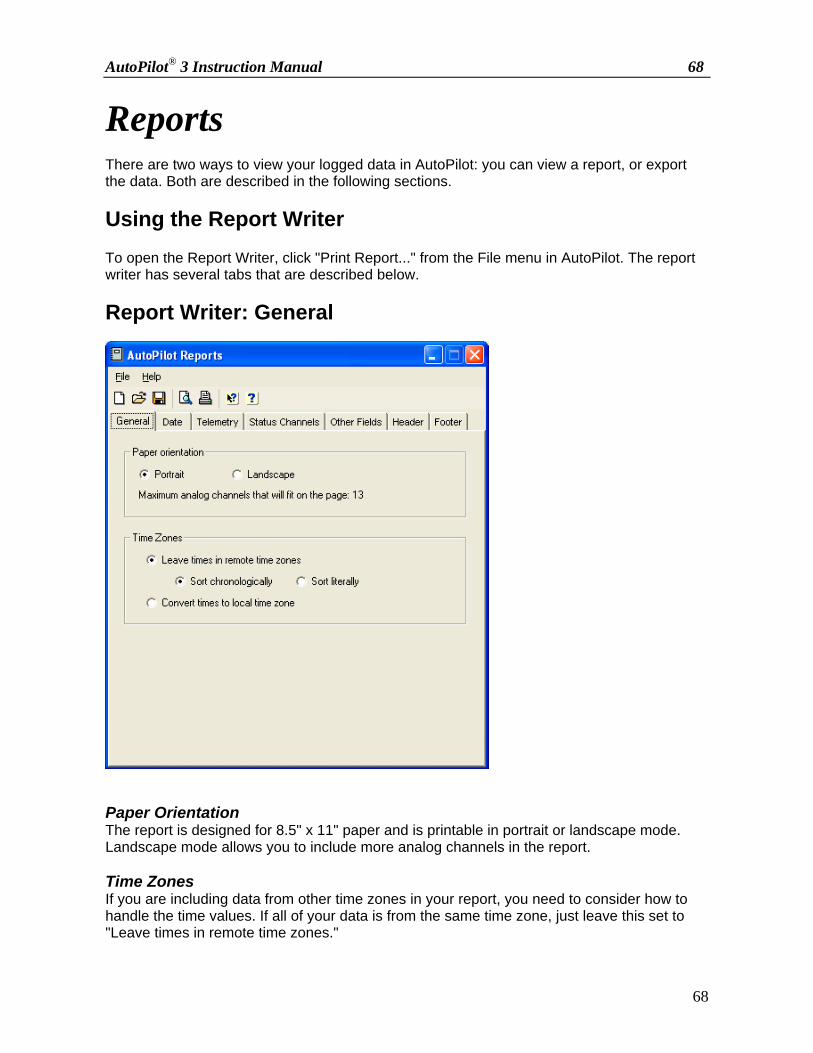
AutoPilot® 3 Instruction Manual 68
68
Reports There are two ways to view your logged data in AutoPilot: you can view a report, or export the data. Both are described in the following sections. Using the Report Writer To open the Report Writer, click "Print Report..." from the File menu in AutoPilot. The report writer has several tabs that are described below. Report Writer: General
Paper Orientation The report is designed for 8.5" x 11" paper and is printable in portrait or landscape mode. Landscape mode allows you to include more analog channels in the report. Time Zones If you are including data from other time zones in your report, you need to consider how to handle the time values. If all of your data is from the same time zone, just leave this set to "Leave times in remote time zones."
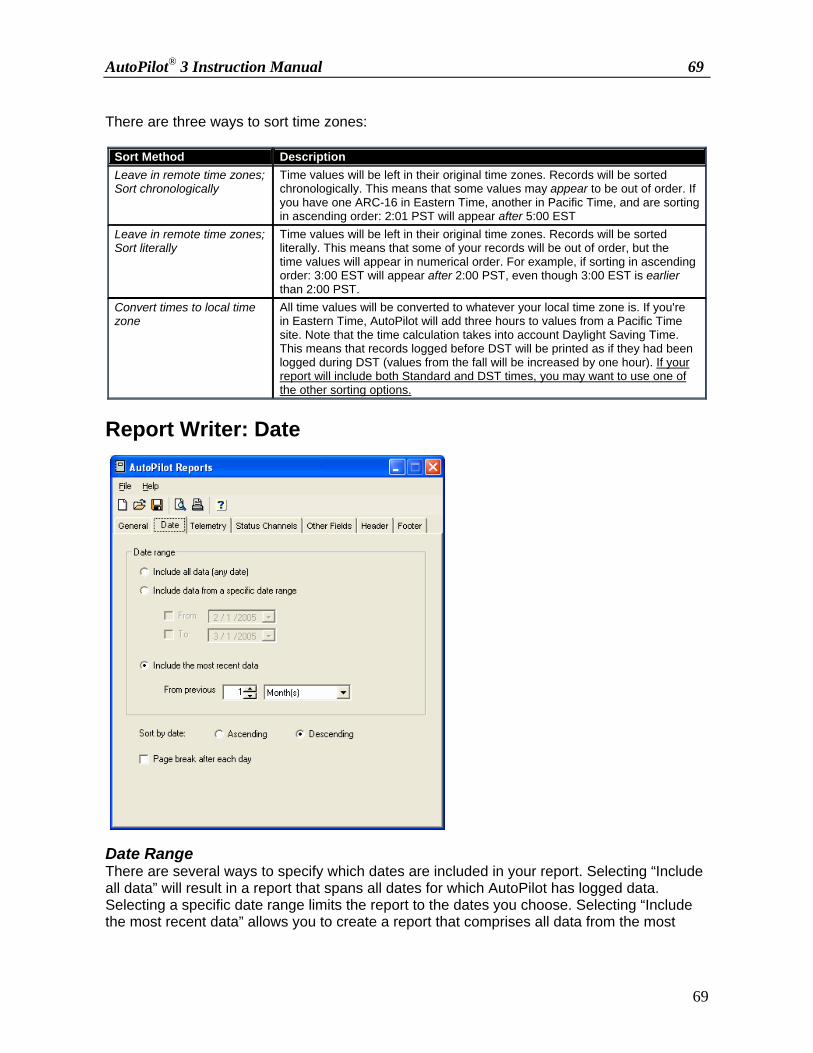
AutoPilot® 3 Instruction Manual 69
69
There are three ways to sort time zones:
Sort Method Description Leave in remote time zones; Sort chronologically
Time values will be left in their original time zones. Records will be sorted chronologically. This means that some values may appear to be out of order. If you have one ARC-16 in Eastern Time, another in Pacific Time, and are sorting in ascending order: 2:01 PST will appear after 5:00 EST
Leave in remote time zones; Sort literally
Time values will be left in their original time zones. Records will be sorted literally. This means that some of your records will be out of order, but the time values will appear in numerical order. For example, if sorting in ascending order: 3:00 EST will appear after 2:00 PST, even though 3:00 EST is earlier than 2:00 PST.
Convert times to local time zone
All time values will be converted to whatever your local time zone is. If you're in Eastern Time, AutoPilot will add three hours to values from a Pacific Time site. Note that the time calculation takes into account Daylight Saving Time. This means that records logged before DST will be printed as if they had been logged during DST (values from the fall will be increased by one hour). If your report will include both Standard and DST times, you may want to use one of the other sorting options.
Report Writer: Date
Date Range There are several ways to specify which dates are included in your report. Selecting “Include all data” will result in a report that spans all dates for which AutoPilot has logged data. Selecting a specific date range limits the report to the dates you choose. Selecting “Include the most recent data” allows you to create a report that comprises all data from the most

AutoPilot® 3 Instruction Manual 70
70
recent number of months, days, hours or minutes. This allows you to create a single report template that can be used over again without changing the specific dates. Sorting Options You can sort data from oldest to newest (ascending) or from newest to oldest (descending) by making a selection in the “sort by date” field. Check the box marked “Page break after each day” to start a new page after the last log entry on each day. Report Writer: Telemetry
If you want to include analog readings in your report, first select the number of channels that you want to include. The number of channels available is determined by the paper orientation (see General tab). For each column, choose the ARC-16 and analog channel. You are not limited to one ARC-16 per report - you may include channels from as many ARC-16s as you like. Note: you cannot use the same channel from the same ARC-16 twice.
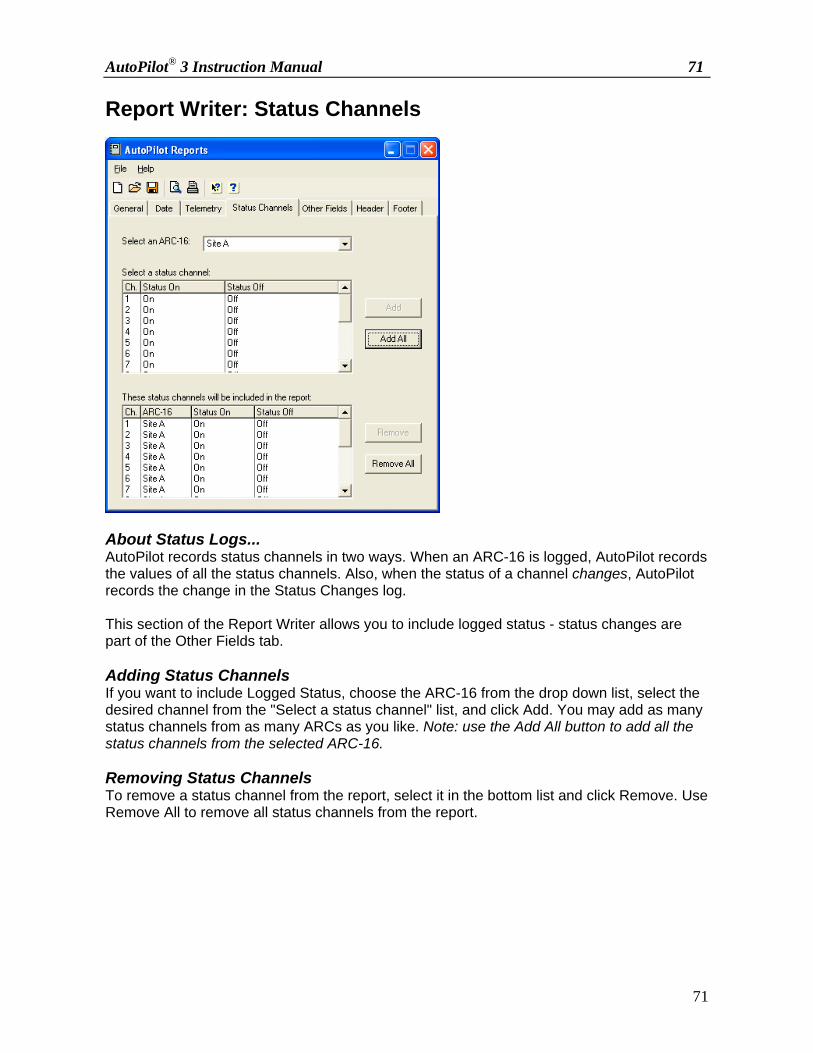
AutoPilot® 3 Instruction Manual 71
71
Report Writer: Status Channels
About Status Logs... AutoPilot records status channels in two ways. When an ARC-16 is logged, AutoPilot records the values of all the status channels. Also, when the status of a channel changes, AutoPilot records the change in the Status Changes log. This section of the Report Writer allows you to include logged status - status changes are part of the Other Fields tab. Adding Status Channels If you want to include Logged Status, choose the ARC-16 from the drop down list, select the desired channel from the "Select a status channel" list, and click Add. You may add as many status channels from as many ARCs as you like. Note: use the Add All button to add all the status channels from the selected ARC-16. Removing Status Channels To remove a status channel from the report, select it in the bottom list and click Remove. Use Remove All to remove all status channels from the report.

AutoPilot® 3 Instruction Manual 72
72
Report Writer: Other Fields
Status Changes To add status changes to your report, click on the check box next to the desired ARC-16(s) in the Status Changes list. Note: the Status Changes log indicates a change in status. To include status channels that are logged along with analog values, see the Status Channels tab. Alarms If you want to include alarms in your report, click the check box next to the desired ARC-16(s) in the Alarms list. Events To include events in your report, click the check box next to each of the type of events that you want to include. Note: when you click on an event type, a description of that type will appear in the area to the right of the list.
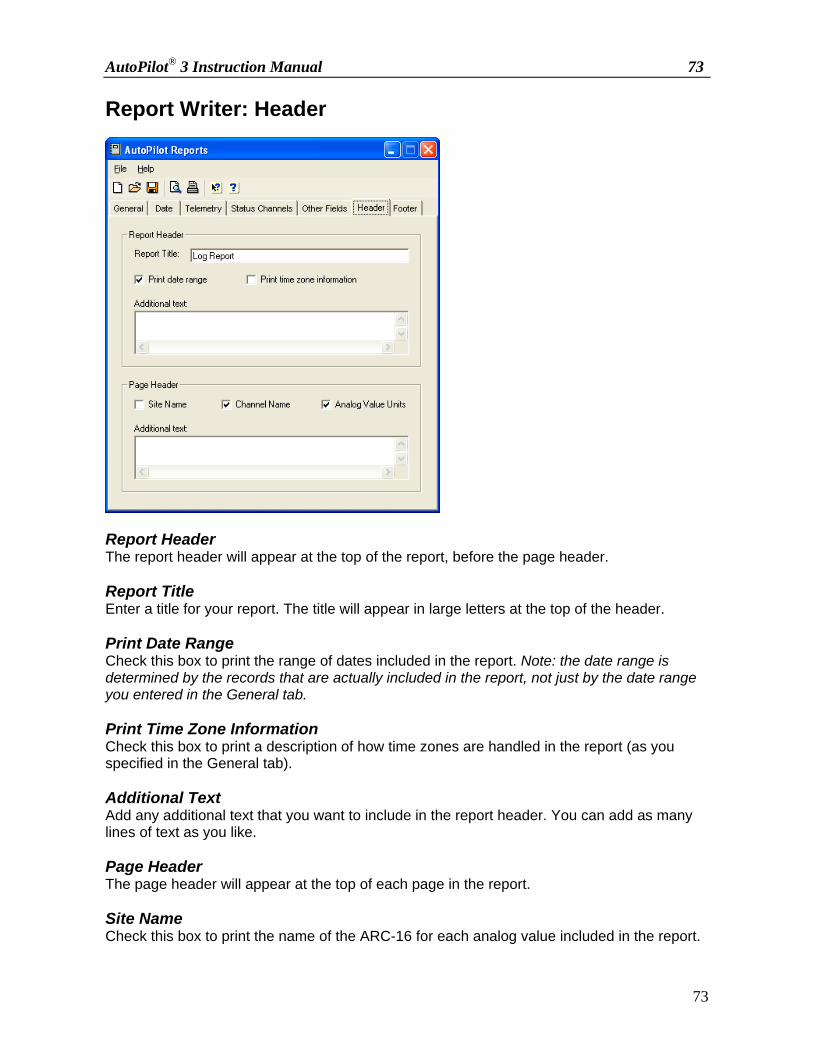
AutoPilot® 3 Instruction Manual 73
73
Report Writer: Header
Report Header The report header will appear at the top of the report, before the page header. Report Title Enter a title for your report. The title will appear in large letters at the top of the header. Print Date Range Check this box to print the range of dates included in the report. Note: the date range is determined by the records that are actually included in the report, not just by the date range you entered in the General tab. Print Time Zone Information Check this box to print a description of how time zones are handled in the report (as you specified in the General tab). Additional Text Add any additional text that you want to include in the report header. You can add as many lines of text as you like. Page Header The page header will appear at the top of each page in the report. Site Name Check this box to print the name of the ARC-16 for each analog value included in the report.
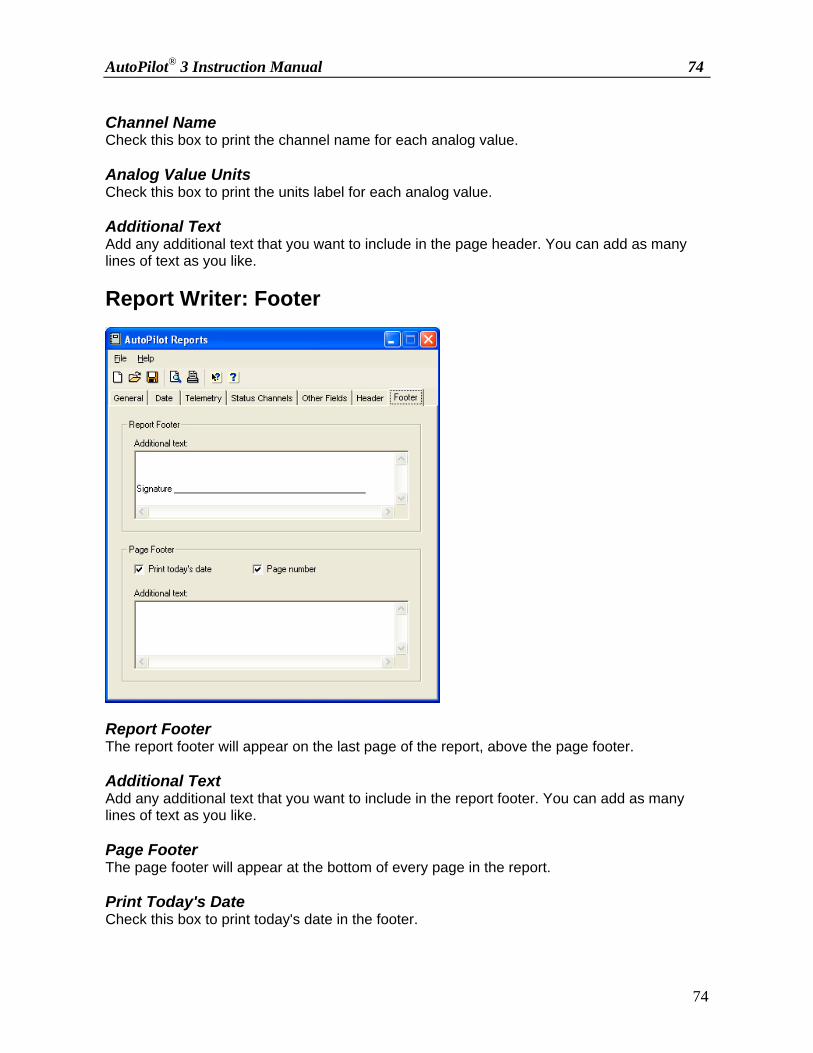
AutoPilot® 3 Instruction Manual 74
74
Channel Name Check this box to print the channel name for each analog value. Analog Value Units Check this box to print the units label for each analog value. Additional Text Add any additional text that you want to include in the page header. You can add as many lines of text as you like. Report Writer: Footer
Report Footer The report footer will appear on the last page of the report, above the page footer. Additional Text Add any additional text that you want to include in the report footer. You can add as many lines of text as you like. Page Footer The page footer will appear at the bottom of every page in the report. Print Today's Date Check this box to print today's date in the footer.
AutoPilot® 3 Instruction Manual 75
75
Page Number Check this box to print the page number in the footer. Additional Text Add any additional text that you want to include in the page footer. You can add as many lines of text as you like. Saving and Printing Reports Saving Reports If you are going to reuse this report in the future, you can save the template. To do this, click "Save..." on the Report Writer's File menu. You will be prompted to choose a file name. Note: you are saving the template (the layout of the report), but not the actual data included in the report. This allows you to print a similar report in the future, but always with current data. Opening Saved Reports To load a previously saved template, click "Open..." from the File menu in the Report Writer. You will be prompted to pick a template file. Select the file you want to use and click Open. All of the settings that you saved with this template will be loaded into the Report Writer. Printing To preview your report, click "Print Preview..." from the File menu. You will see a progress dialog while your report is generated. Note: it may take up to several minutes to generate a lengthy report, depending on the speed of your computer. You can then print from the preview window. The Export icon from in print preview toolbar allows you to export the report data in HTML (.html) and text (.txt) formats. To export in Comma Separated Value (.csv) format, use the Export Data function from the File menu (see the next section). If you do not need to preview the report, click "Print..." from the File menu. You will see the progress dialog and then be prompted to choose a printer.
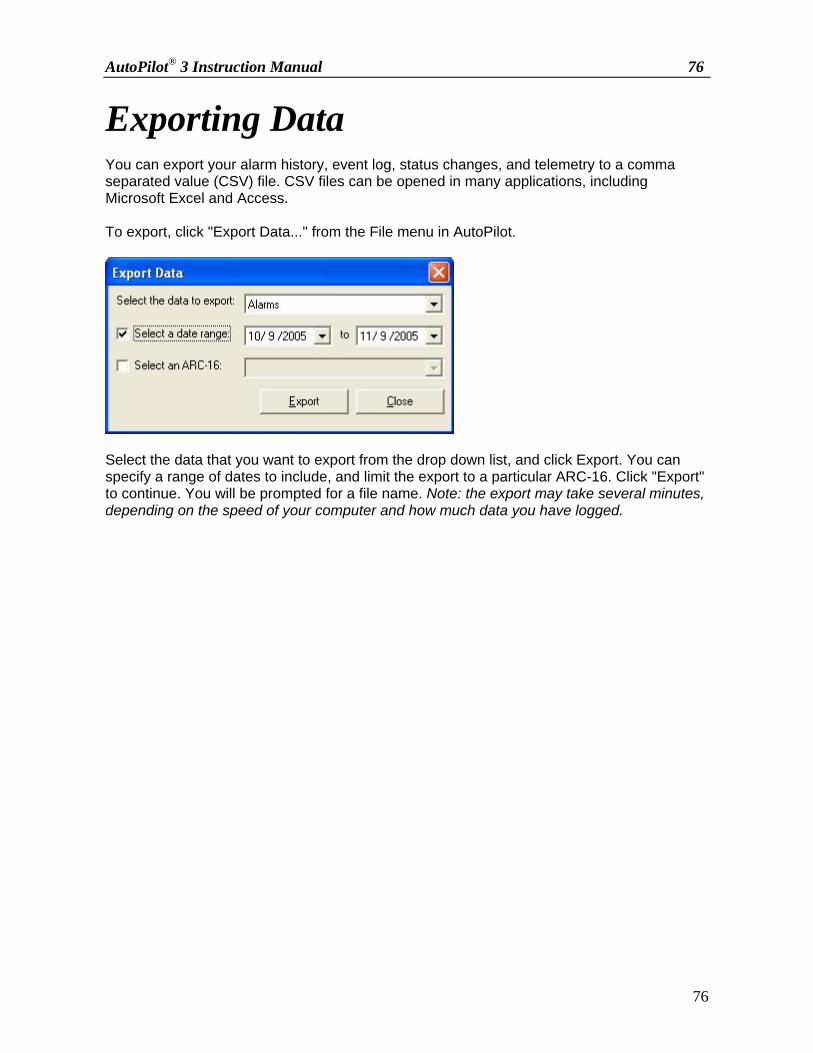
AutoPilot® 3 Instruction Manual 76
76
Exporting Data You can export your alarm history, event log, status changes, and telemetry to a comma separated value (CSV) file. CSV files can be opened in many applications, including Microsoft Excel and Access. To export, click "Export Data..." from the File menu in AutoPilot.
Select the data that you want to export from the drop down list, and click Export. You can specify a range of dates to include, and limit the export to a particular ARC-16. Click "Export" to continue. You will be prompted for a file name. Note: the export may take several minutes, depending on the speed of your computer and how much data you have logged.
AutoPilot® 3 Instruction Manual 77
77
Custom Views With custom views, you can tailor the appearance of your site and channel data in the Lynx interface. The Custom View Editor lets you place metering and status indicators and command controls exactly where you want them, and you can insert additional text and graphics anywhere on the screen. For quick assessment of multiple locations, one custom view can contain channel indicators for more than one site and unit. Opening a Saved Custom View The View List contains a list of your custom views, sorted by category. When you create a new view, you will be able to create new category names. To open the View List, select “View List” from the View menu. Click on the name of the view to see it displayed in the Lynx main window. If your custom views are arranged in more than one category, click the category name in the View List to display all the custom views for that category. Creating and editing custom views The custom view editor is where you create and edit all of your custom views. To create a new custom view, point to Custom Views in the File menu and select New or Edit. This will open the Custom View Editor.
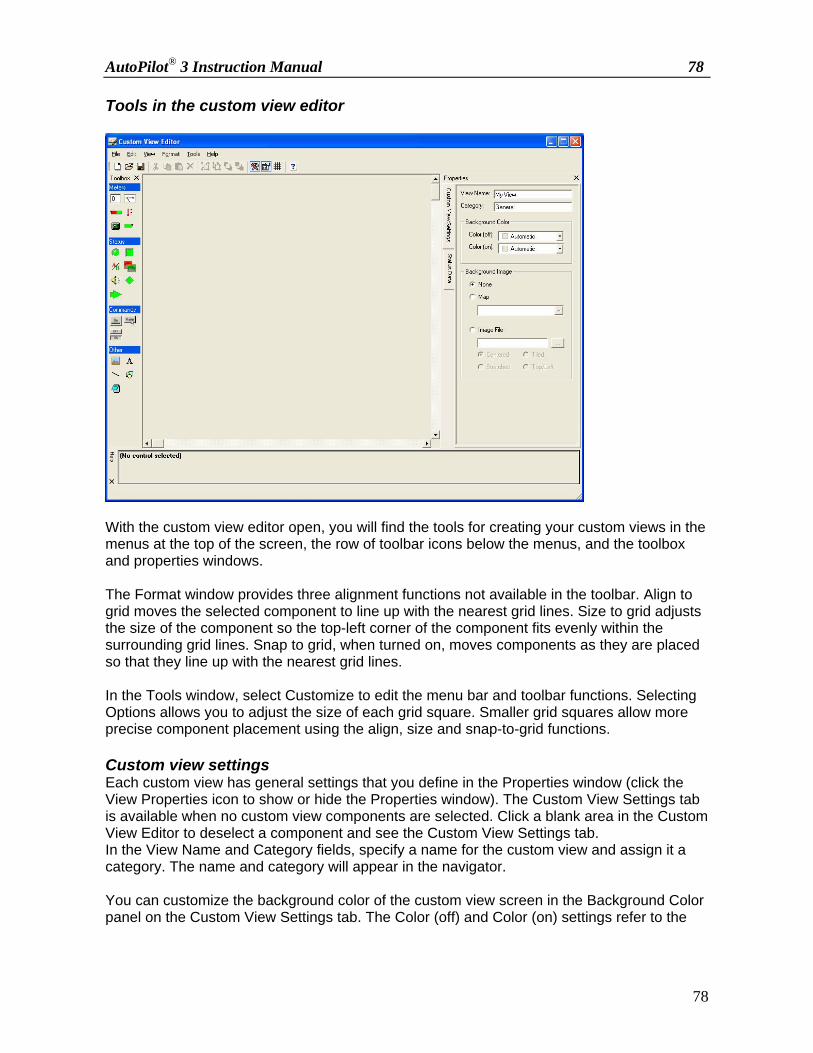
AutoPilot® 3 Instruction Manual 78
78
Tools in the custom view editor
With the custom view editor open, you will find the tools for creating your custom views in the menus at the top of the screen, the row of toolbar icons below the menus, and the toolbox and properties windows. The Format window provides three alignment functions not available in the toolbar. Align to grid moves the selected component to line up with the nearest grid lines. Size to grid adjusts the size of the component so the top-left corner of the component fits evenly within the surrounding grid lines. Snap to grid, when turned on, moves components as they are placed so that they line up with the nearest grid lines. In the Tools window, select Customize to edit the menu bar and toolbar functions. Selecting Options allows you to adjust the size of each grid square. Smaller grid squares allow more precise component placement using the align, size and snap-to-grid functions. Custom view settings Each custom view has general settings that you define in the Properties window (click the View Properties icon to show or hide the Properties window). The Custom View Settings tab is available when no custom view components are selected. Click a blank area in the Custom View Editor to deselect a component and see the Custom View Settings tab. In the View Name and Category fields, specify a name for the custom view and assign it a category. The name and category will appear in the navigator. You can customize the background color of the custom view screen in the Background Color panel on the Custom View Settings tab. The Color (off) and Color (on) settings refer to the
AutoPilot® 3 Instruction Manual 79
79
status condition you specify in the Status Data tab. Then decide if you want a background image displayed and enter your preference in the Background Image box. Adding, moving and deleting custom view components Custom view Components are the meters, status indicators, images, labels, etc. that you will see in AutoPilot when your custom view is complete. Add a component by clicking on the component in the toolbox window and dragging it into the editing area. To resize a component, click on the component and use the resizing handles, or specify the desired size in the General tab of the Properties window. You can move the component by clicking and dragging, or by going to the General tab of the Properties window and specifying X and Y coordinates for the top-left corner of the component. To delete the selected component, click the Delete icon in the toolbar, or press the delete key. Grouping components When you use multiple components in a single display area (i.e. a status indicator with a label next to it), it is helpful to group those components so that you can later move them around together instead of individually. To group components, click on one of them, then press and hold the Crtl key while you click the remaining components. Then click the Group icon in the toolbar. Now when you click on one of the components to move it or delete it, then entire group will be selected. Once selected, you can ungroup a cluster of components by simply clicking the Ungroup toolbar icon. Saving custom views When you are done creating a custom view, click the Save icon to save your work. When you close the custom biew editor, you will see the custom view in the navigator. Note: If you have been editing the view that is currently displayed in the AutoPilot main window, click Refresh to see your changes. If you have added components that depend on channel configurations for their appearance (such as a command that uses the “automatically set caption” feature), you will have to connect to the site before the label will appear as intended. Component Properties When you add a custom view component, you will need to define properties for that object in the Properties window. If the Properties window has been closed, you can display it by clicking the View Tool Properties icon in the toolbar. The Properties window shows properties for the component you have selected in the editor. To select a component, click on it. To deselect a component, click a blank area in the designer. The properties for the selected component are sorted into different category tabs. Click the tab to display the associated properties. General properties Every component you add to the custom view has General properties and Click Actions that need to be defined. In the General tab, define the sizing and placement parameters – this affects where on the screen you will see this component, and how large an area the component will occupy. Enter the desired height and width of the component (in pixels), and define the horizontal (X) and
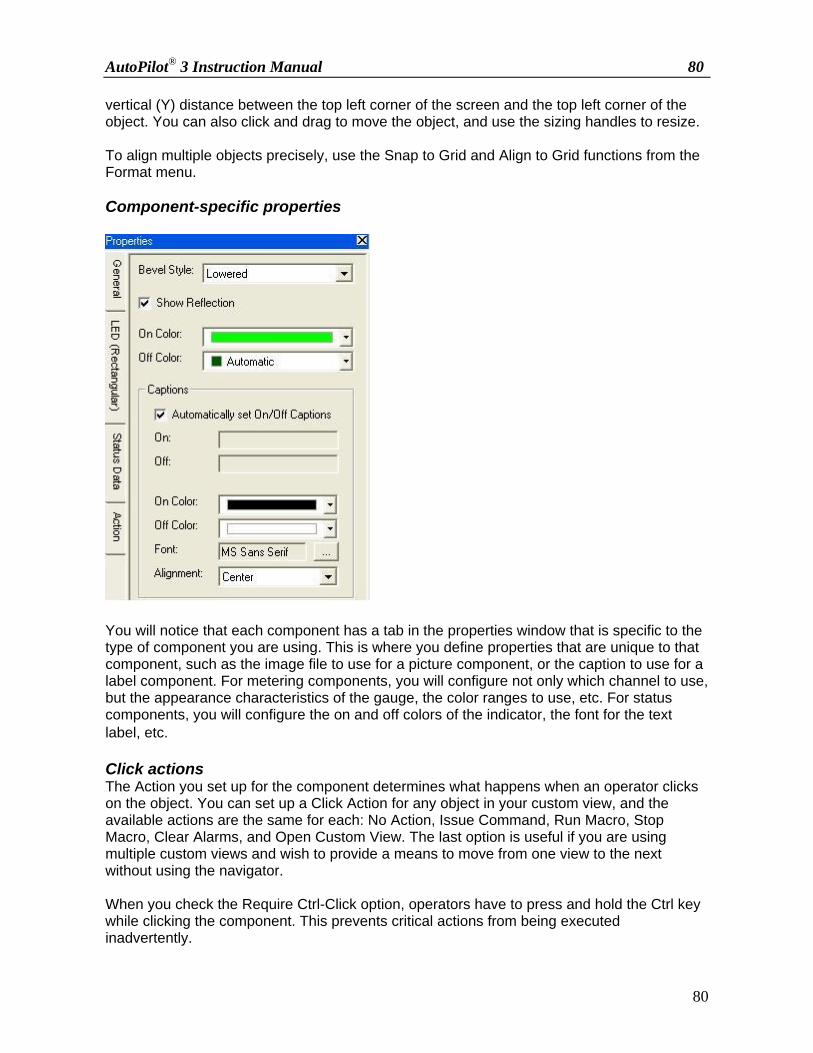
AutoPilot® 3 Instruction Manual 80
80
vertical (Y) distance between the top left corner of the screen and the top left corner of the object. You can also click and drag to move the object, and use the sizing handles to resize. To align multiple objects precisely, use the Snap to Grid and Align to Grid functions from the Format menu. Component-specific properties
You will notice that each component has a tab in the properties window that is specific to the type of component you are using. This is where you define properties that are unique to that component, such as the image file to use for a picture component, or the caption to use for a label component. For metering components, you will configure not only which channel to use, but the appearance characteristics of the gauge, the color ranges to use, etc. For status components, you will configure the on and off colors of the indicator, the font for the text label, etc. Click actions The Action you set up for the component determines what happens when an operator clicks on the object. You can set up a Click Action for any object in your custom view, and the available actions are the same for each: No Action, Issue Command, Run Macro, Stop Macro, Clear Alarms, and Open Custom View. The last option is useful if you are using multiple custom views and wish to provide a means to move from one view to the next without using the navigator. When you check the Require Ctrl-Click option, operators have to press and hold the Ctrl key while clicking the component. This prevents critical actions from being executed inadvertently.

AutoPilot® 3 Instruction Manual 81
81
Building a drill-down custom view Whether you monitor a small number of sites or a larger operation, you can use custom views to build a drill-down approach to zero in on site detail. In a multi-site system, this could involve a map view with status LEDs to show any sites with alarm conditions. The click action on each LED could open a new custom view dedicated to a specific site, where the operator would then trace the cause of the alarm. In this setup, custom views are used to display critical information from multiple sites, with site-specific detail available on demand. Using Maps
A complete package of U.S. maps is included to make it easier to create a geographic view of your sites. Inserting a map is the same as inserting a picture. When selecting the file name, browse to the directory containing the AutoPilot maps, and select which one you want to use. The default location is C:\Program Files\Burk Technology\AutoPilot\Maps. Align the image in the center or top-left of the screen (do not use the stretch or tile alignment options). You can then overlay components on the map. A basic approach is to use LEDs referenced back to virtual
channels to indicate which sites are online, but you could add status pictures, Command-and-LED components, or any other object useful to your operation. When placing components on top of one another, use the transparency options in the Properties window and the Send to Back and Bring to Front features in the Format menu to create the desired appearance.
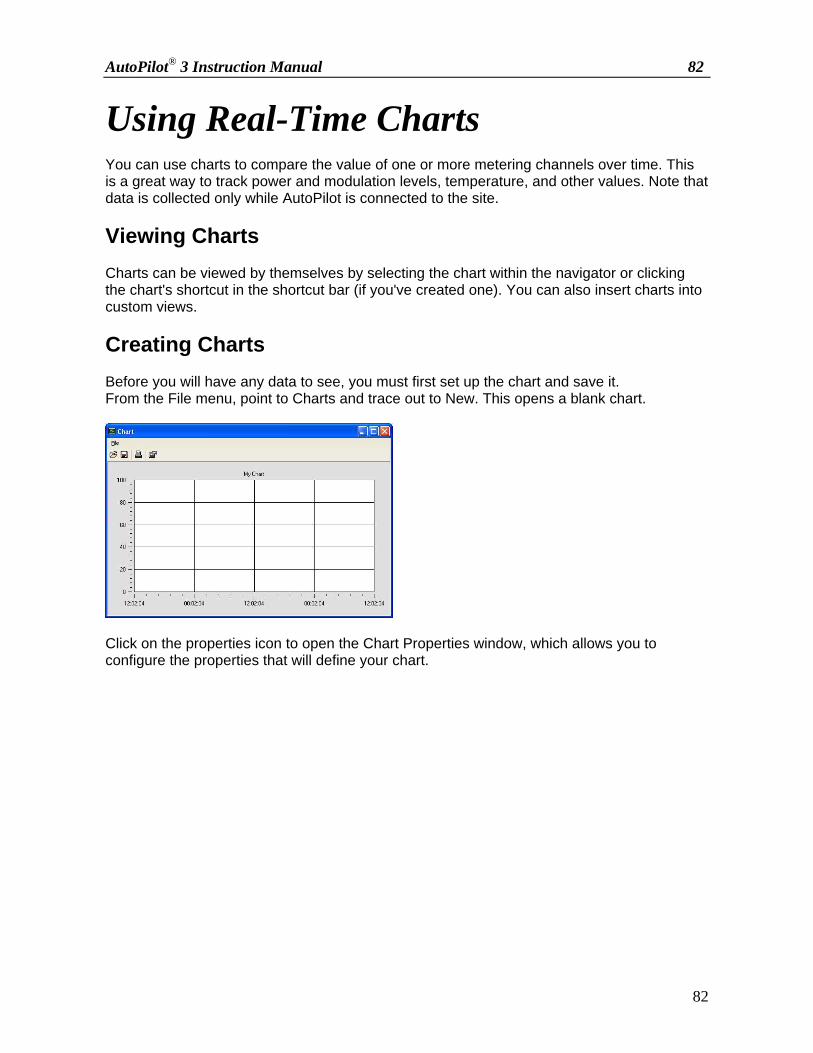
AutoPilot® 3 Instruction Manual 82
82
Using Real-Time Charts You can use charts to compare the value of one or more metering channels over time. This is a great way to track power and modulation levels, temperature, and other values. Note that data is collected only while AutoPilot is connected to the site. Viewing Charts Charts can be viewed by themselves by selecting the chart within the navigator or clicking the chart's shortcut in the shortcut bar (if you've created one). You can also insert charts into custom views. Creating Charts Before you will have any data to see, you must first set up the chart and save it. From the File menu, point to Charts and trace out to New. This opens a blank chart.
Click on the properties icon to open the Chart Properties window, which allows you to configure the properties that will define your chart.
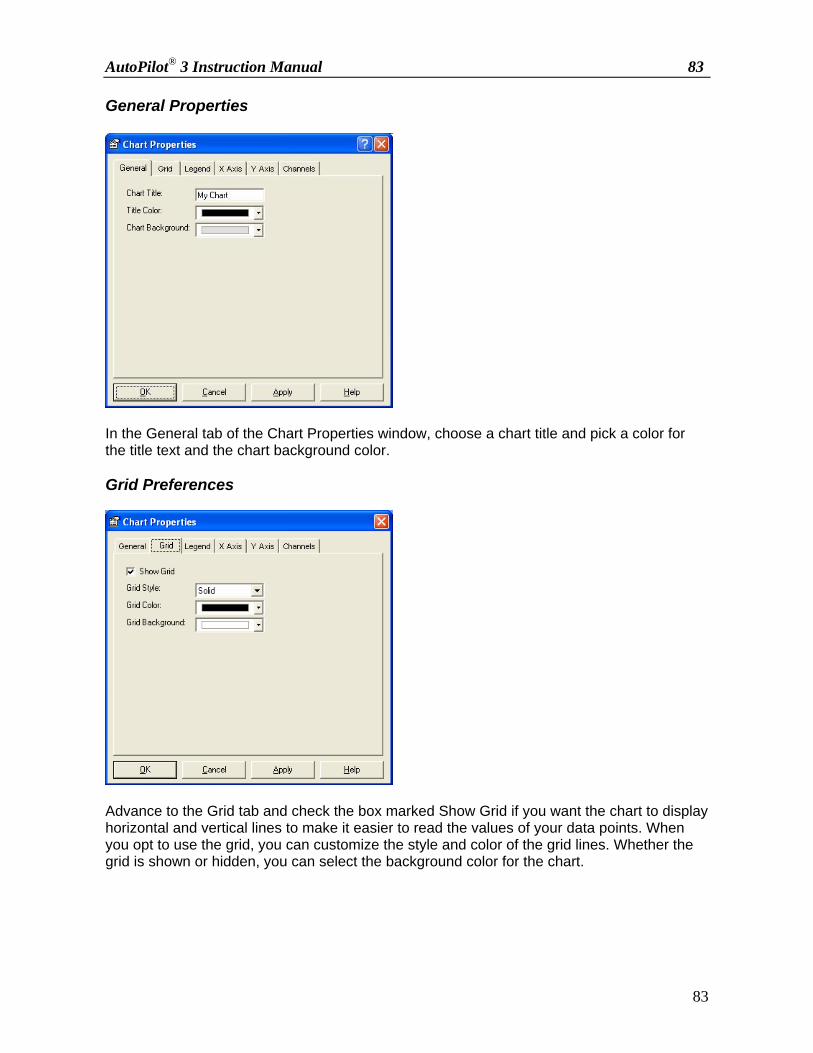
AutoPilot® 3 Instruction Manual 83
83
General Properties
In the General tab of the Chart Properties window, choose a chart title and pick a color for the title text and the chart background color. Grid Preferences
Advance to the Grid tab and check the box marked Show Grid if you want the chart to display horizontal and vertical lines to make it easier to read the values of your data points. When you opt to use the grid, you can customize the style and color of the grid lines. Whether the grid is shown or hidden, you can select the background color for the chart.

AutoPilot® 3 Instruction Manual 84
84
Chart Legend
In the Legend tab, check the box marked Show Legend if you want a legend to appear on your chart. The legend indicates to which channels the lines on the graph correspond. You can customize the color of the legend text and the width (in pixels) of the legend box. X-Axis and Y-Axis
In the X Axis and Y Axis tabs, you are asked to insert a label to identify each axis. The X axis always denotes time (you can choose to label the axis or leave it blank). The Y axis denotes the meter value (in degrees, volts, percent, etc). You can also choose how many large ticks divide the chart's X axis, and how many small ticks are drawn between each large tick. A grid line is drawn for each large tick, which can make it easier to read the chart. However, too many ticks can make a chart appear cluttered. The tick length field lets you decide how far the axis value is displayed from the chart. You are also asked to define the time range (X

AutoPilot® 3 Instruction Manual 85
85
axis) and the min value and max value (Y axis). These properties determine how much time is represented on your chart and the range of values that is displayed. To monitor fine changes over time, use a small value range. For channels that change dramatically over time, a larger value range may be needed to capture all the history. Channel Properties
The Channels tab is where you determine which channels are displayed in the graph. You can include as many as ten, but keep in mind that all channels share the same Y axis, so the expected values should fall within a similar range. Check the box marked Automatically set the label if you want AutoPilot to generate the label based on the metering channel's label. Saving the Chart When you are done setting your chart properties, click OK. This returns you to the Chart window where you can click the Save icon to keep your changes.

AutoPilot® 3 Instruction Manual 86
86
Email Alarm Notifications AutoPilot can send email notifications on alarm or as parts of scripts and macros. The first step to using email notifications is to configure your email settings by selecting Options from the Tools menu and going to the Email tab. Once these settings are complete, you can create the lists of email addresses used for the alarm notifications that AutoPilot will send. When you create an email list, you define one or more email addresses that belong to the list, and then indicate which alarms should cause notification to that list. In order for emails to be sent, the Emailer must be enabled (select Enable Emailer from the Tools menu). Important! Email alarm notifications are designed for full-time PC connections to the ARC-16 so that notifications are sent as soon as the ARC-16 reports the alarm condition. If you have a dial-up connection to the ARC-16, AutoPilot will email notifications about alarm conditions every time AutoPilot connects. If a previous alarm condition is still active, users will receive duplicate alarm notifications.
Creating Notification Lists To set up an email notification list, select Emailer from the Tools menu. This opens the Emailer utility, which allows you to add new email lists or edit existing ones. If you are creating a new list, choose New... from the File menu within the Emailer utility. To edit an existing one, double click the list's icon. Both actions will open the Email List wizard.

AutoPilot® 3 Instruction Manual 87
87
Address List
Start by giving this list a name, which will be used to identify the list in scripts and macros. Then type the first email address in the Email Address field. Click Add, and then continuing entering new email addresses until your list is complete. Press Next. Channels
The next page of the wizard asks you to choose which alarms are reported this email list. You can choose individual channels on a specific ARC-16, or you can configure all alarms to be reported to the list. If you want alarms from multiple ARC-16s reported to the list - but you do not want all of the channels reported to the list - create a new list for each ARC-16.

AutoPilot® 3 Instruction Manual 88
88
Message Text
The final configuration page of the wizard is where you can customize the outgoing email message. You can configure the message to read anything you want. To enter information specific to the alarm condition, type the tokens listed beneath the text box. For example, to indicate whether the alarm was an upper limit, lower limit, or status alarm, enter "%type" (no quotes) in the text box. Press Next and then Finish to complete the wizard. An icon for you new email list will appear in the Emailer window.
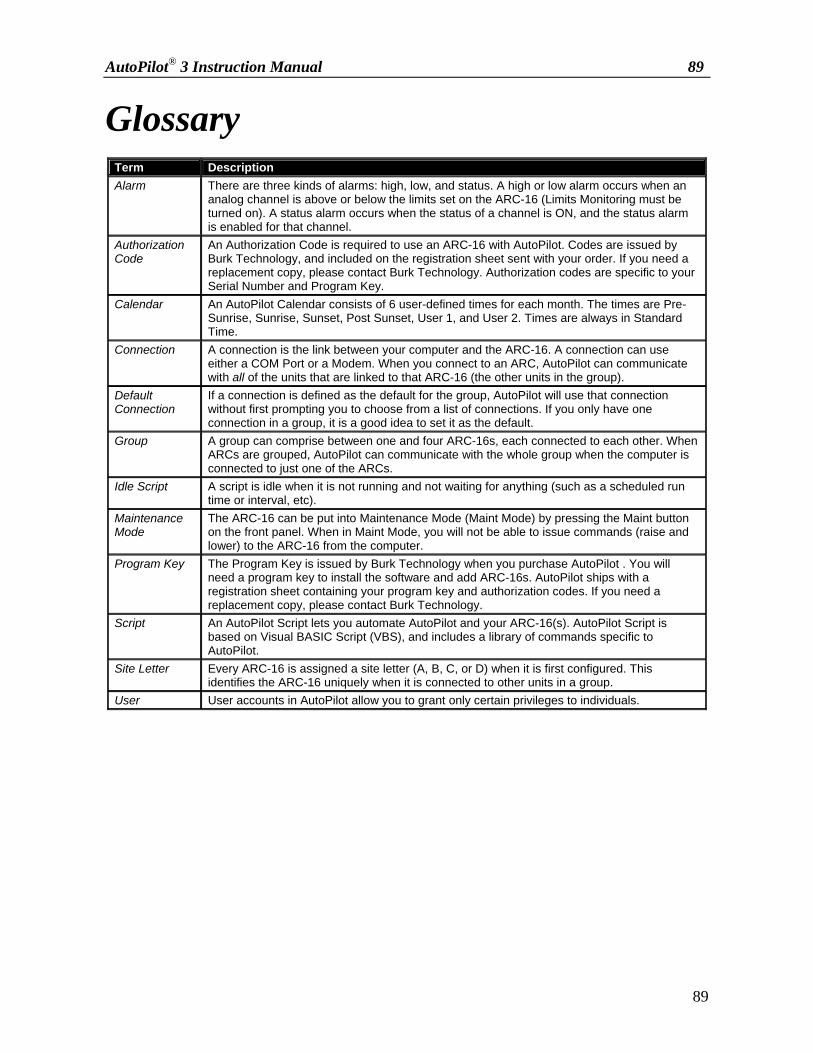
AutoPilot® 3 Instruction Manual 89
89
Glossary
Term Description Alarm There are three kinds of alarms: high, low, and status. A high or low alarm occurs when an
analog channel is above or below the limits set on the ARC-16 (Limits Monitoring must be turned on). A status alarm occurs when the status of a channel is ON, and the status alarm is enabled for that channel.
Authorization Code
An Authorization Code is required to use an ARC-16 with AutoPilot. Codes are issued by Burk Technology, and included on the registration sheet sent with your order. If you need a replacement copy, please contact Burk Technology. Authorization codes are specific to your Serial Number and Program Key.
Calendar An AutoPilot Calendar consists of 6 user-defined times for each month. The times are Pre-Sunrise, Sunrise, Sunset, Post Sunset, User 1, and User 2. Times are always in Standard Time.
Connection A connection is the link between your computer and the ARC-16. A connection can use either a COM Port or a Modem. When you connect to an ARC, AutoPilot can communicate with all of the units that are linked to that ARC-16 (the other units in the group).
Default Connection
If a connection is defined as the default for the group, AutoPilot will use that connection without first prompting you to choose from a list of connections. If you only have one connection in a group, it is a good idea to set it as the default.
Group A group can comprise between one and four ARC-16s, each connected to each other. When ARCs are grouped, AutoPilot can communicate with the whole group when the computer is connected to just one of the ARCs.
Idle Script A script is idle when it is not running and not waiting for anything (such as a scheduled run time or interval, etc).
Maintenance Mode
The ARC-16 can be put into Maintenance Mode (Maint Mode) by pressing the Maint button on the front panel. When in Maint Mode, you will not be able to issue commands (raise and lower) to the ARC-16 from the computer.
Program Key The Program Key is issued by Burk Technology when you purchase AutoPilot . You will need a program key to install the software and add ARC-16s. AutoPilot ships with a registration sheet containing your program key and authorization codes. If you need a replacement copy, please contact Burk Technology.
Script An AutoPilot Script lets you automate AutoPilot and your ARC-16(s). AutoPilot Script is based on Visual BASIC Script (VBS), and includes a library of commands specific to AutoPilot.
Site Letter Every ARC-16 is assigned a site letter (A, B, C, or D) when it is first configured. This identifies the ARC-16 uniquely when it is connected to other units in a group.
User User accounts in AutoPilot allow you to grant only certain privileges to individuals.
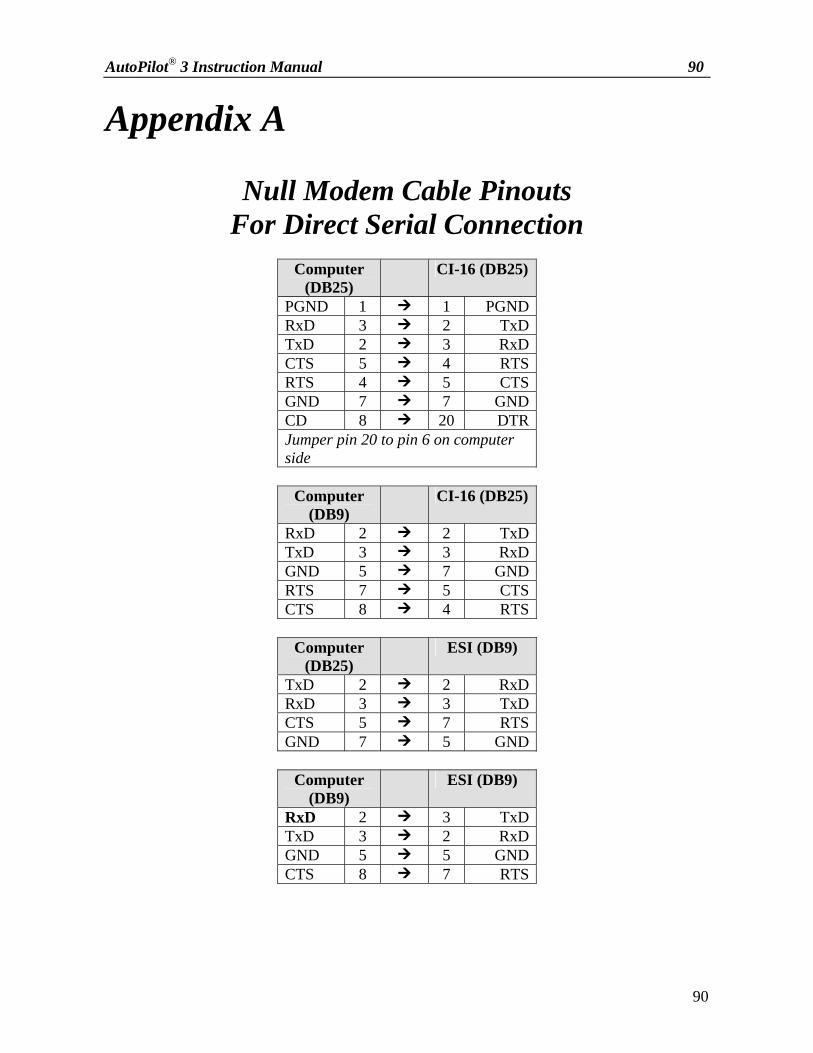
AutoPilot® 3 Instruction Manual 90
90
Appendix A
Null Modem Cable Pinouts For Direct Serial Connection
Computer
(DB25) CI-16 (DB25)
PGND 1 1 PGNDRxD 3 2 TxDTxD 2 3 RxDCTS 5 4 RTSRTS 4 5 CTSGND 7 7 GNDCD 8 20 DTRJumper pin 20 to pin 6 on computer side
Computer
(DB9) CI-16 (DB25)
RxD 2 2 TxDTxD 3 3 RxDGND 5 7 GNDRTS 7 5 CTSCTS 8 4 RTS
Computer (DB25)
ESI (DB9)
TxD 2 2 RxDRxD 3 3 TxDCTS 5 7 RTSGND 7 5 GND
Computer (DB9)
ESI (DB9)
RxD 2 3 TxDTxD 3 2 RxDGND 5 5 GNDCTS 8 7 RTS