automatic unit plk-g 1010 v4 series … · instruction manual for the operator introduction ......
TRANSCRIPT
VI.BE.MAC.spa 1
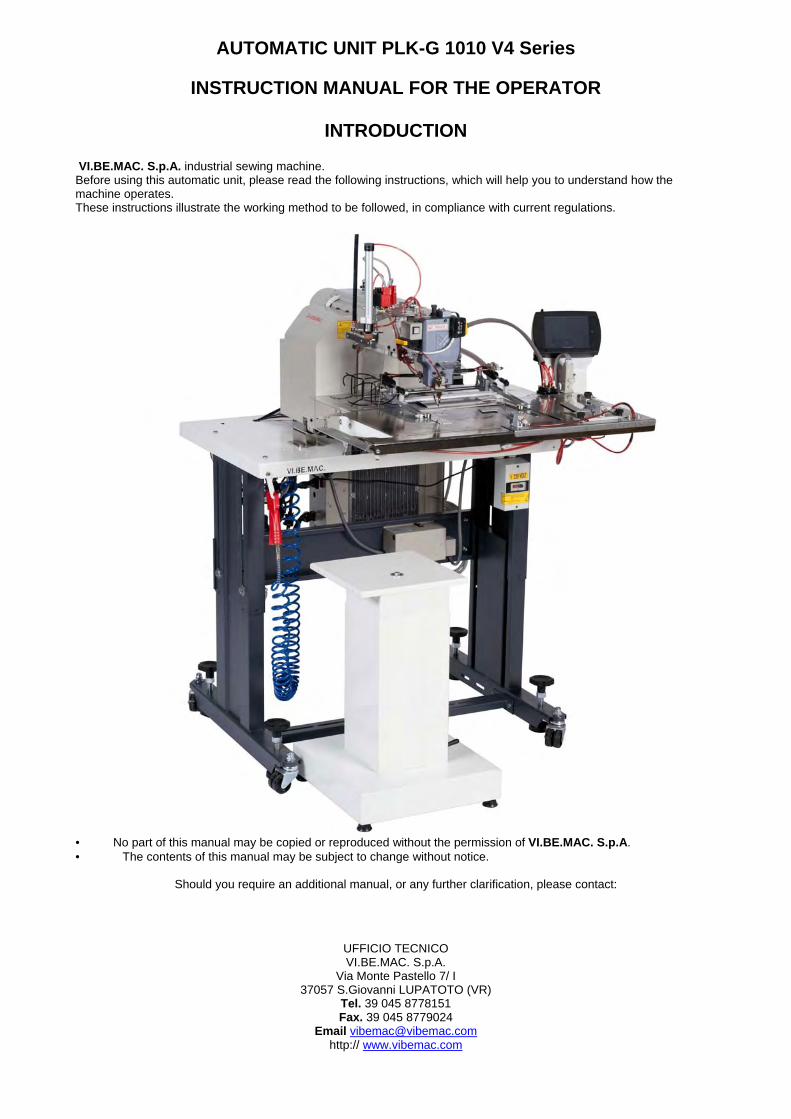
AUTOMATIC UNIT PLK-G 1010 V4 Series
INSTRUCTION MANUAL FOR THE OPERATOR
INTRODUCTION VI.BE.MAC. S.p.A. industrial sewing machine. Before using this automatic unit, please read the following instructions, which will help you to understand how the machine operates. These instructions illustrate the working method to be followed, in compliance with current regulations. • No part of this manual may be copied or reproduced without the permission of VI.BE.MAC. S.p.A. • The contents of this manual may be subject to change without notice.
Should you require an additional manual, or any further clarification, please contact:
UFFICIO TECNICO VI.BE.MAC. S.p.A.
Via Monte Pastello 7/ I 37057 S.Giovanni LUPATOTO (VR)
Tel. 39 045 8778151 Fax. 39 045 8779024
Email [email protected] http:// www.vibemac.com

VI.BE.MAC.spa 2
1. GENERAL MACHINE SPECIFICATIONS...............................................................................4 2. FORM OF WARRANTY ............................................................................................................6 3. INPUT DESCRIPTION...............................................................................................................7 4. MACHINE START UP ...............................................................................................................8 5. STOPPING THE MACHINE ......................................................................................................8 6. MECHANICAL ADJUSTMENTS..............................................................................................9
6.1. Home position regulation.....................................................................................................9 7. SEWING MECHANISMS REGULATION..............................................................................10
7.1. Needle height adjustment...................................................................................................11 7.2. Internal regulation of the needle bar .................................................................................11 7.3. Needle bar movement cylinders.........................................................................................12 7.4. Adjustment of the presser foot timing................................................................................13 7.5. Presser foot thickness.........................................................................................................14 7.6. Needle bar unlocking pin regulation..................................................................................17
8. THREADING THE MACHINE................................................................................................18 9. MANUAL NEEDLE CHANGE................................................................................................19 10. LUBRIFICATION.................................................................................................................20 11. MAINTENANCE ..................................................................................................................20 12. SELECTING FUNCTIONING SYSTEM.............................................................................22
12.1. Read a program ..............................................................................................................24 12.2. Delete a program............................................................................................................24 12.3. Write a program (save) ..................................................................................................25 12.4. Coping all programs from USB to memory or vice versa .............................................25 12.5. Setting bobbin and production counters.........................................................................26 12.6. Setting bobbin counter ...................................................................................................26
12.6.1. Resetting bobbin counter ...........................................................................................26 12.7. Bobbin winding..............................................................................................................27
13. SEWING PROGRAMMATION ...........................................................................................28 13.1. Programming a seam......................................................................................................29 13.2. Programming a Pocket design........................................................................................32 13.3. Programming a label ......................................................................................................39 13.4. Creating a program using multiple function ..................................................................41 13.5. Presser foot regulation during programmation mode ....................................................45 13.6. Create a bar tack during programmation........................................................................46 13.7. Inserting the needle bar code .........................................................................................46
14. GENERAL SPECIFICATIONS OF MODIFY MODE.........................................................47 14.1. Move the complete program ..........................................................................................48 14.2. Modifying an angle ........................................................................................................49 14.3. Modifying a curve..........................................................................................................51 14.4. Modifying sewing speed ................................................................................................53 14.5. Modifying stitch length..................................................................................................55 14.6. Modify the presser foot height .......................................................................................57 14.7. Adding codes .................................................................................................................59 14.8. Deleting codes................................................................................................................61 14.9. Re programming a straight seam ...................................................................................62 14.10. Reducing the program size.............................................................................................64 14.11. Rotation of a program ....................................................................................................70 14.12. Creating a sequence of programs ...................................................................................72 14.13. Exit from a sequence of programs .................................................................................73
15. BASIC PARAMETER ADJUSTMENTS .............................................................................74 15.1. Regulation of the tension opening delay........................................................................75 15.2. Feed speed control .........................................................................................................75 15.3. Sewing speed..................................................................................................................75

VI.BE.MAC.spa 3
15.4. Slow start .......................................................................................................................75 16. SOFTWARE INSTALLATION............................................................................................76
16.1. Loading the ....................................................................................................................78 16.2. Loading VI.BE.MAC setting ........................................................................................81
17. TEST INGRESSI (INPUT) / USCITE (OUTPUT) ...............................................................82 17.1. Input test.........................................................................................................................82 17.2. Test sewing head signal .................................................................................................85 17.3. Test output......................................................................................................................85
18. FREQUENTLY ASKED QUESTIONS................................................................................87

VI.BE.MAC.spa 4
1. GENERAL MACHINE SPECIFICATIONS The 1010 V4 unit can be programmed along two axes, with a MITSUBISHI PLK G 1010 sewing head, which according to the equipment installed consents, within the sewing head range: -ornamental stitching on rear trouser pockets with or without automatic material loading/unloading. -the performance of dart-shaped seams. -the application of patch pockets. -flap stitching. -application of labels of any format or thickness. -Velcro® application. -sewing of chin straps on helmets. The high level of flexibility of the unit makes it possible to buy the sewing head with a fitting (e.g. Labels) and, with a quick change, to change easily the present fitting on the machine with another optional fitting for a different operation. Four different operating modes can be selected for the unit. The unit allows for a quick change of forms (in about three minutes), supplied together with a floppy disk containing the personalised programmes requested by the client. Changing the form does not require the intervention of a technician, but its simple design, together with the use of special materials, mean that it can be carried out by the operator. SUPPLY VOLTAGE The supply voltage is 220 V single-phase 50/60 Hz COMPRESSED AIR CONSUMPTION AND PRESSURE Consumption is about 1.5 litres of air intake per cycle with pressure of 5.5 bars. DIMENSIONS AND WEIGHT Width: 120cm Length: 140cm Height: 135cm Weight: 160kg (approx.)
VI.BE.MAC.spa 5
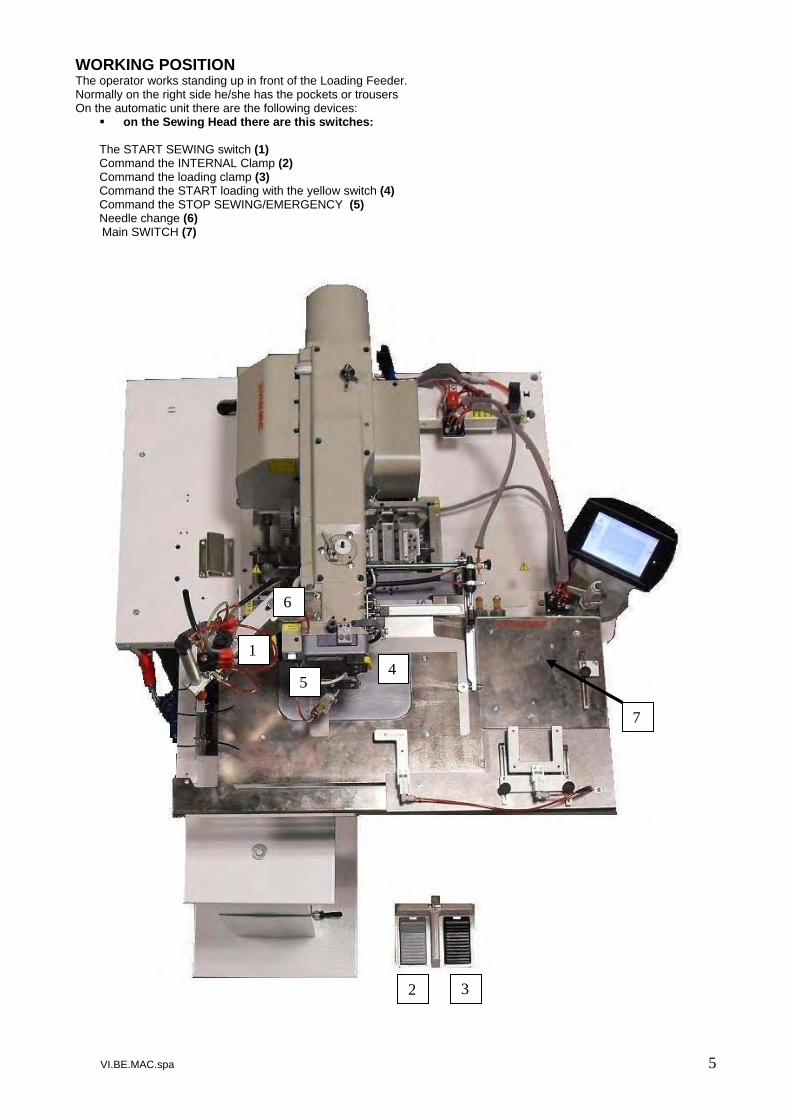
WORKING POSITION The operator works standing up in front of the Loading Feeder. Normally on the right side he/she has the pockets or trousers On the automatic unit there are the following devices:
on the Sewing Head there are this switches:
The START SEWING switch (1) Command the INTERNAL Clamp (2) Command the loading clamp (3) Command the START loading with the yellow switch (4) Command the STOP SEWING/EMERGENCY (5) Needle change (6)
Main SWITCH (7)
45
6
7
1
2 3

VI.BE.MAC.spa 6
“Normal” operation includes all those operations for the preparation and application of a pocket onto trousers, respecting the following conditions: • the operator must first have read and fully understood all parts of this manual. • the operator must abide by all the instructions in this manual and "CE" regulations • the maximum width of the pocket embroidery must be 220mm • the maximum height of the pocket EMBROIDERY must be 90mm. • the maximum width of the LABEL must be 110mm. (250 in SPECIAL version). • the maximum height of the LABEL must be 80mm. (120 in SPECIAL version). • the maximum width of the POCKET must be 220 in the SPECIAL version. • the maximum height of the POCKET must be 130mm in the SPECIAL version. • the material thickness of the trousers where the LABEL is to be applied must not be greater than 5 mm • all safety regulations must be respected; safety covers installed by the manufacturer must not be removed. • the electrical supply must be constant. the unit has to be connected under an automatic cut-out switch of 30mA • the machine must be earthed to prevent disturbances and electric shocks. • the machine must not operate at high temperatures (above 40°c) or low temperatures (below 10°c). • water or other liquids (with the exception of oil) must not get into the sewing machine. • water or other liquids must not get into the control panel, solenoid valves and cylinders. • the automatic unit must be installed on a flat surface checking that the feet rest all together on the ground, and are blocked with the special nut. • the automatic unit must not be used in areas where there is explosive gas, powder or oil vapours. • the machine must not be connected to a compressed air circuit containing water or other liquids in the pressure circuit. • the machine must be connected to a compressed air circuit with a constant minimum internal pressure of 5.5 bar. • the operator must use soundproof earplugs to prevent damage to the ear. • installation of the machine and extraordinary maintenance must be performed by qualified personnel.
The manufacturer declines any responsibility for damage to persons or things caused by the machine in cases where:
• the unit is not properly installed on an even surface. • installation of the machine is not performed by qualified personnel. • ordinary and extraordinary maintenance of the machine have not been performed by qualified personnel. • the electrical supply is not constant. • the air pressure in the pneumatic circuit does not satisfy the requirements. • routine maintenance of the unit is not performed as required. • non-original spare parts or parts which are not specified for the model are used. • there is a partial or total lack of observance of the instructions on the part of the user. • the maximum thickness of the trousers, at the point where the pocket is to be applied, is not respected. • the operator has been working with broken or unsuitable needles, thereby ruining the trousers.
Under no circumstances: • deactivate the safety devices provided by the manufacturer, thereby making the machine dangerous for the operator. • remove the safety covers and devices from their position, thereby making the machine dangerous for the operator. • remove the eye protection shield without supplying the operator with special eye protection glasses in compliance with current regulations. • modify the machine, without authorisation from the manufacturer, thereby making the machine dangerous for the operator.
2. FORM OF WARRANTY A Warranty of 1 (one) year applies to all parts that make up the unit, when delivered to the manufacturer and found to be defective. All parts damaged through improper use by the operator, and/or improper adjustment of the unit by technical personnel not authorized by VI.BE.MAC. S.p.A., will NOT be considered as defective by the manufacturer. In this case these will be charged for, including all transport costs and/or subsequent installation costs.

VI.BE.MAC.spa 7
3. INPUT DESCRIPTION TYPE FUNCTION CONNECTION FOOT SWITCH I1 FOOT SWITCH I2 MICRO SWITCH STOP SWITCH I4 PRESSURE SWITCH TILT SAFETY SWITCH I5 SENSOR RIGHT THREAD BREAKAGE SENSOR I6 SENSOR LEFT THREAD BREAKAGE SENSOR I7 MICRO SWITCH LOADER REST POSITION SWITCH I8 MICRO SWITCH NEEDLE CHANGE I9 MICRO SWITCH LOADING CARRIAGE AT END STROKE SWITCH IA PUSH BOTTON LOADIN CARRIAGE START BOTTON ID MICRO SWITCH SEWING START BOTTON IF
I4
I5
I6 e I7
I8
I9
IF
ID
IA
I1 I2

VI.BE.MAC.spa 8
4. MACHINE START UP The flow of the TURN ON operation is shown below. Check the position of these parts: - If the steel Plate has the needle hole on the top of the hole on the Needle Plate (Original Position) - If the Loader is all to right backwards. Switch on the power supply by pressing the ON key on the mains switch. Once the computer has performed check-up, the main menu will appear on the display:
Press the key . The machine will search for the two positioning sensors. When the machine has read the positioning sensors it finds the Original Point. The jigs rise and the machine is ready for use with the program last used in the memory.
5. STOPPING THE MACHINE Press the STOP button and the current by pressing the OFF button on the main current switch only when the machine has stopped. The compressed air is automatically turned off.
ATTENTION In the event of an electricity BLACK OUT, the sewing machine stops by inertia, the Loader unit remains in its resting position and the loading cycle, if running, is cancelled.
VI.BE.MAC.spa 9
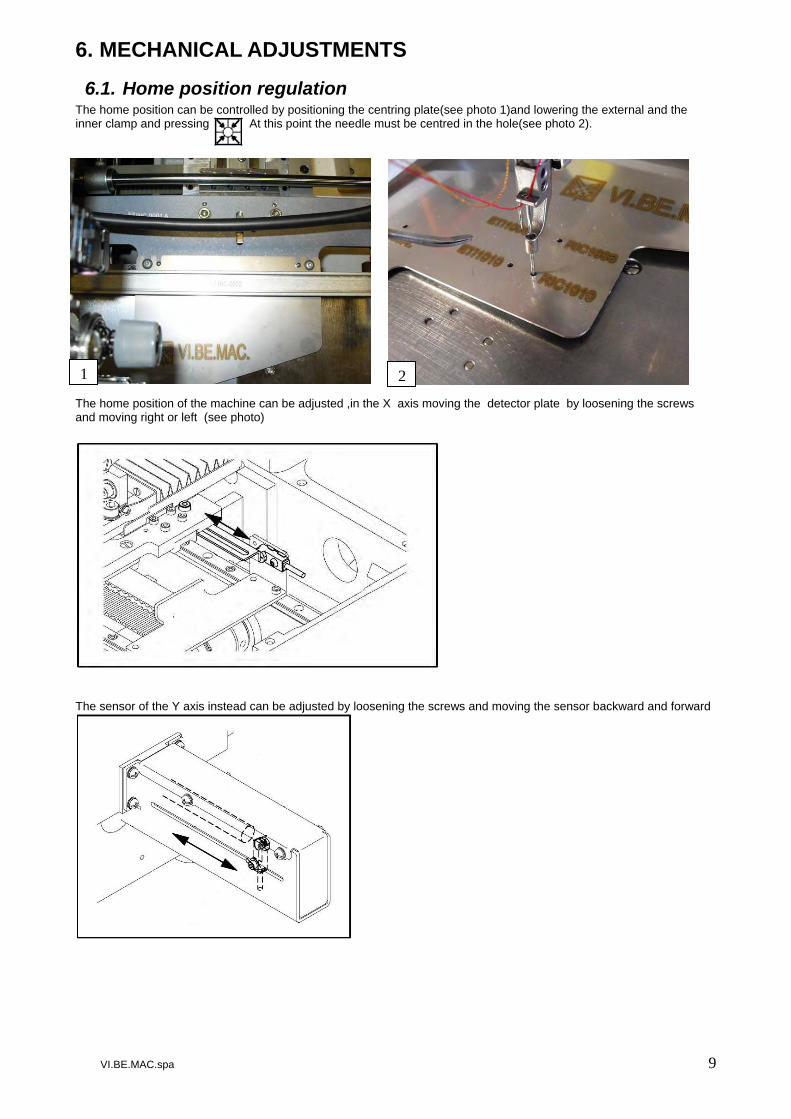
6. MECHANICAL ADJUSTMENTS
6.1. Home position regulation The home position can be controlled by positioning the centring plate(see photo 1)and lowering the external and the inner clamp and pressing At this point the needle must be centred in the hole(see photo 2). The home position of the machine can be adjusted ,in the X axis moving the detector plate by loosening the screws and moving right or left (see photo) The sensor of the Y axis instead can be adjusted by loosening the screws and moving the sensor backward and forward
1 2

VI.BE.MAC.spa 10
7. SEWING MECHANISMS REGULATION
Adjust the positon
Loosen the screw
3mm

VI.BE.MAC.spa 11
7.1. Needle height adjustment
7.2. Internal regulation of the needle bar
ATTENTION THIS SCREW IS TO LOOSEN THE INTERNAL MECHANISMS
RELEASE THIS SCREW TO LOOSEN THE NEEDLE CLAMP,ADJUST THE NEEDLE HIGHT SCREWING OR UNSCREWING THE NEEDLE CLAMP AS DESIRED .
VI.BE.MAC.spa 12
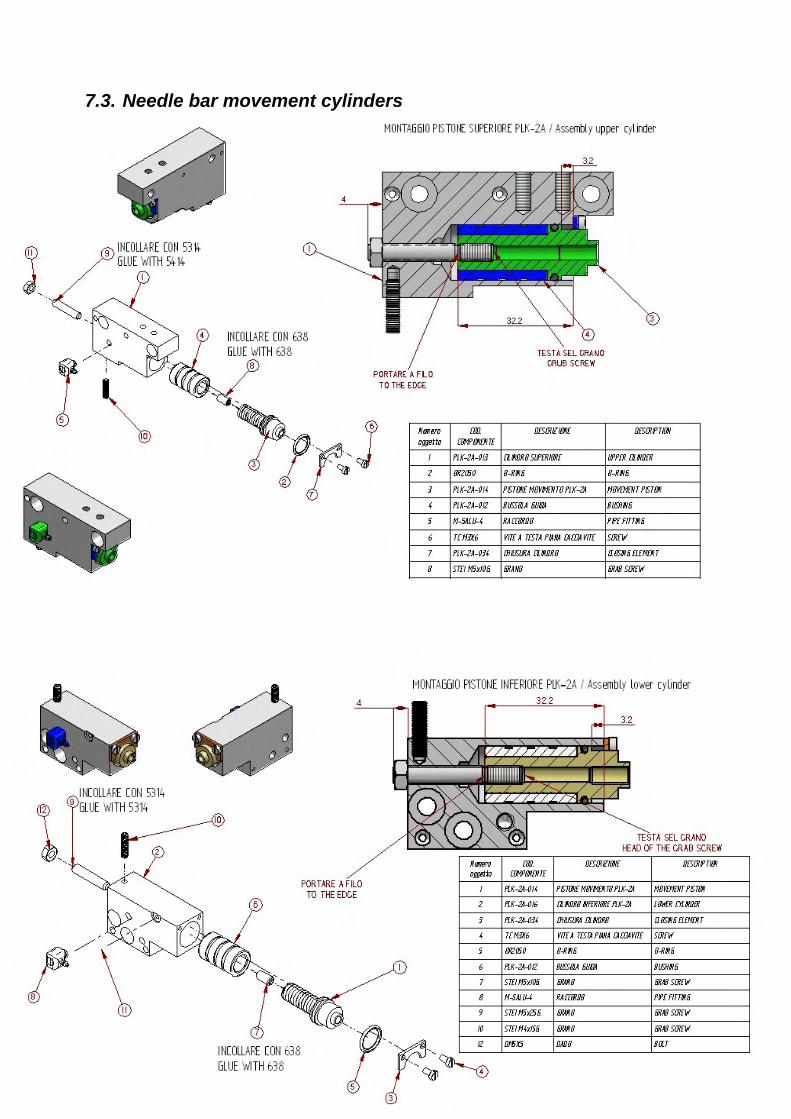
7.3. Needle bar movement cylinders
VI.BE.MAC.spa 13
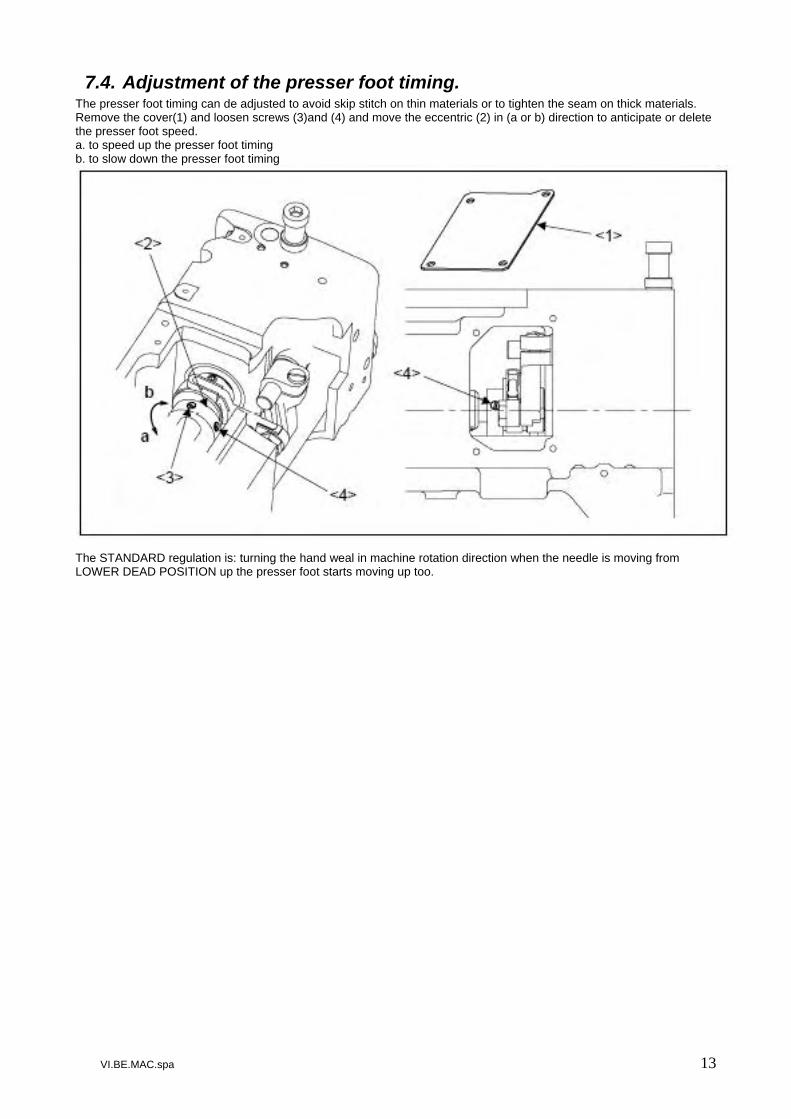
7.4. Adjustment of the presser foot timing. The presser foot timing can de adjusted to avoid skip stitch on thin materials or to tighten the seam on thick materials. Remove the cover(1) and loosen screws (3)and (4) and move the eccentric (2) in (a or b) direction to anticipate or delete the presser foot speed. a. to speed up the presser foot timing b. to slow down the presser foot timing The STANDARD regulation is: turning the hand weal in machine rotation direction when the needle is moving from LOWER DEAD POSITION up the presser foot starts moving up too.

VI.BE.MAC.spa 14
7.5. Presser foot thickness Before doing this adjustment please control that : 1) Presser foot THICKNESS from main menu
At this point the “THICKNESS” menu is displayed press Set the thickness at 0mm using the arrow keys and press
If this icon is WHITE means that the thickness is set at 0mm so it is OK If it is BLACK means that the thickness is not at 0mm to adjust follow the following instructions

VI.BE.MAC.spa 15
Turning by hand verify that the lever is always toutching the washer.
On the touch screen lower the presser foot by pressing turning the hand well control that there is at least 1mm between the presser foot link and the the needle bar bracket If the link is touching loosen the eccentric screw (image B)and move by hand the link to have 1mm of space as (image A) Control that the presser foot lift eccentric is ALWAYS in lowest position (as image )
AB
VI.BE.MAC.spa 16
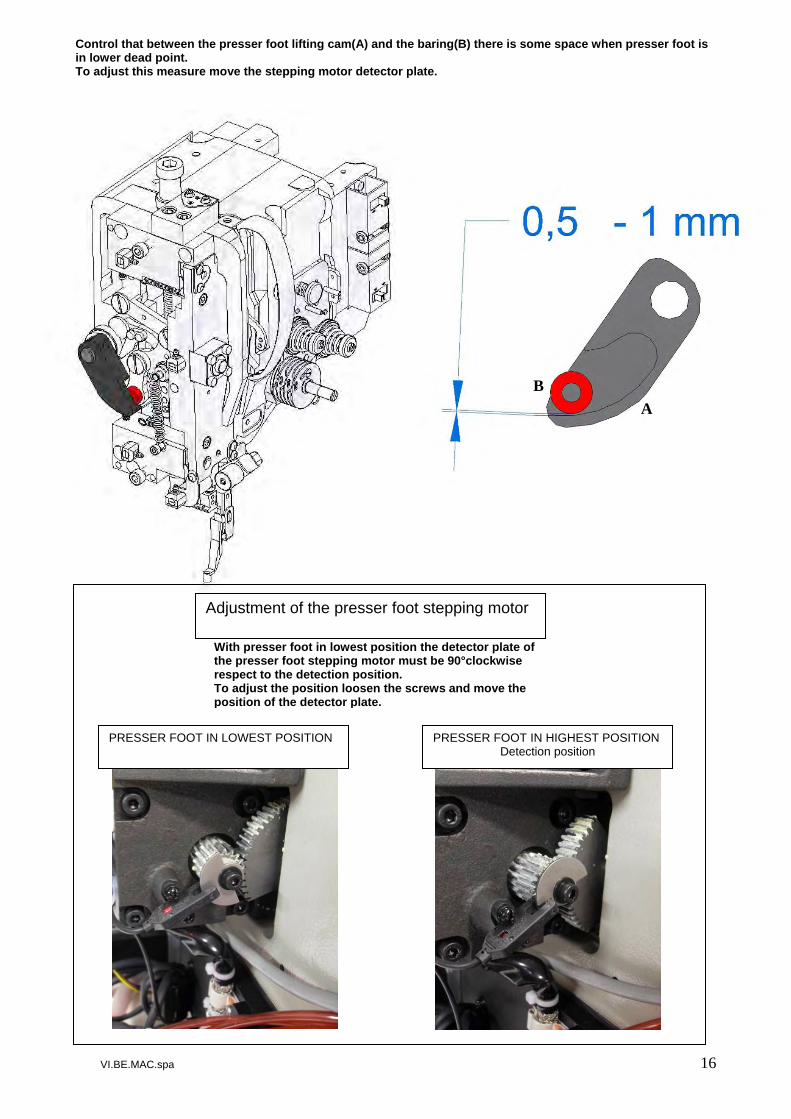
Control that between the presser foot lifting cam(A) and the baring(B) there is some space when presser foot is in lower dead point. To adjust this measure move the stepping motor detector plate.
A B
With presser foot in lowest position the detector plate of the presser foot stepping motor must be 90°clockwise respect to the detection position. To adjust the position loosen the screws and move the position of the detector plate.
Adjustment of the presser foot stepping motor
PRESSER FOOT IN HIGHEST POSITIONDetection position
PRESSER FOOT IN LOWEST POSITION

VI.BE.MAC.spa 17
7.6. Needle bar unlocking pin regulation With needle bar in highest position:
BACK
VI.BE.MAC.spa 18
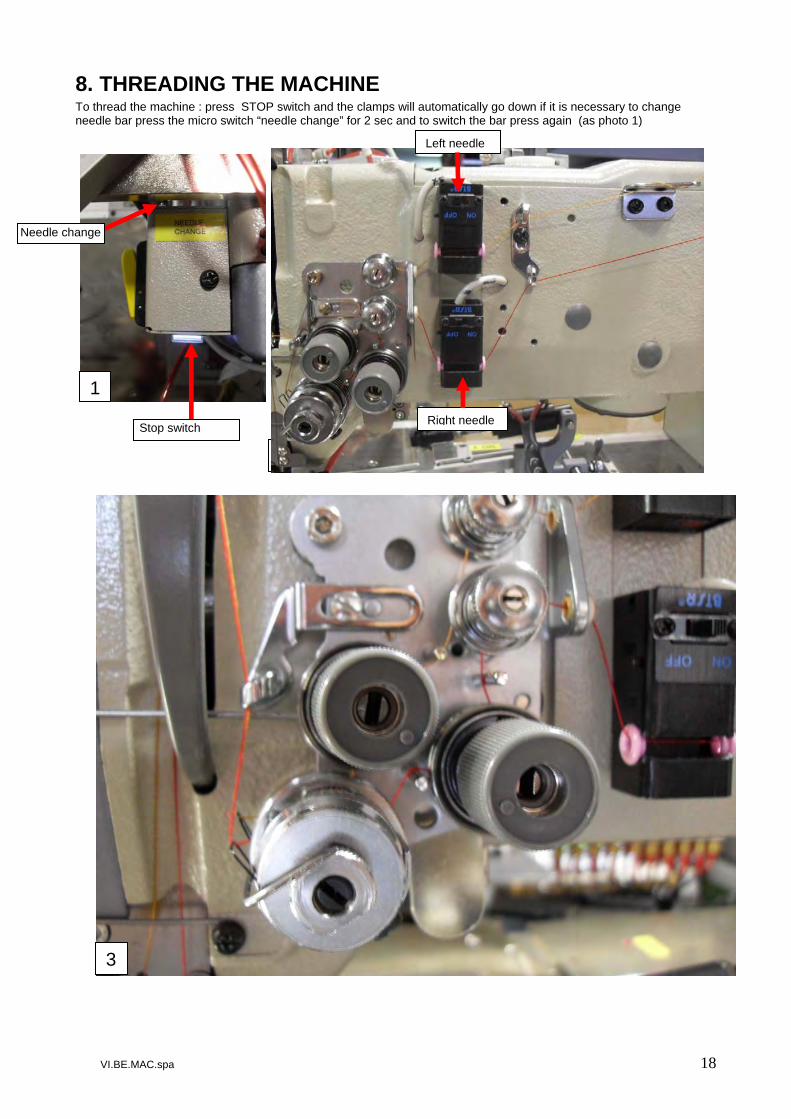
8. THREADING THE MACHINE To thread the machine : press STOP switch and the clamps will automatically go down if it is necessary to change needle bar press the micro switch “needle change” for 2 sec and to switch the bar press again (as photo 1)
Needle change
Stop switch
1
2
3
Left needle
Right needle

VI.BE.MAC.spa 19
9. MANUAL NEEDLE CHANGE To execute a manual needle change : Set the machine in home position pressing Press the stop button on the sewing head (1) and keep pressed the needle change button(2) for at least 2sec until the machine lowers the clamps to change the needle bar position just press the needle change button(2) again. To exit from this mode release the emergency stop button (1) and the machine will return in working mode.
Right thread clamp
Left thread clamp
4
1
2

VI.BE.MAC.spa 20
10. LUBRIFICATION In this machine there are 3 oil tancks before starting up the machine make sure the oil tanks are at the correct level.
VI.BE.MAC. racommends to use oil type sae32
11. MAINTENANCE The PLK-G machine requires low maintenance and we highly recommend to do these operations once a week Remove the dust and the thread waste sticking to the threading parts or the hook area Remove the dust from the X and Y rail and clean very well then apply some grease (Lithium grease 2 recommended)
VI.BE.MAC.spa 21
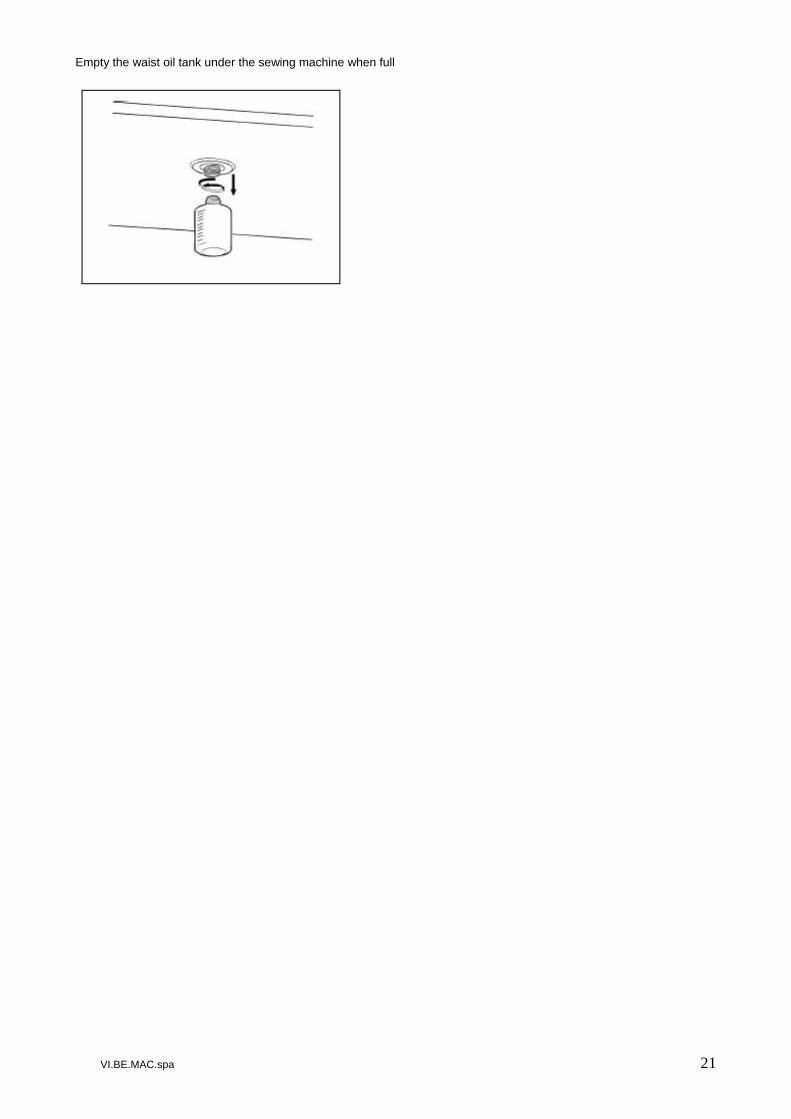
Empty the waist oil tank under the sewing machine when full

VI.BE.MAC.spa 22
12. SELECTING FUNCTIONING SYSTEM On the screen id displayed the main menu: Press home key then press . Press . Press Then digit the password 1010 and then confirm pressing Press . Select the NUMBER of the functioning mode desired confirm by pressing when the machine has finished loading the functioning system press Once returned to the main menu switch OFF the machine and wait until the LED on the control box turns off and then turn ON the machine to start working
VI.BE.MAC.spa 23
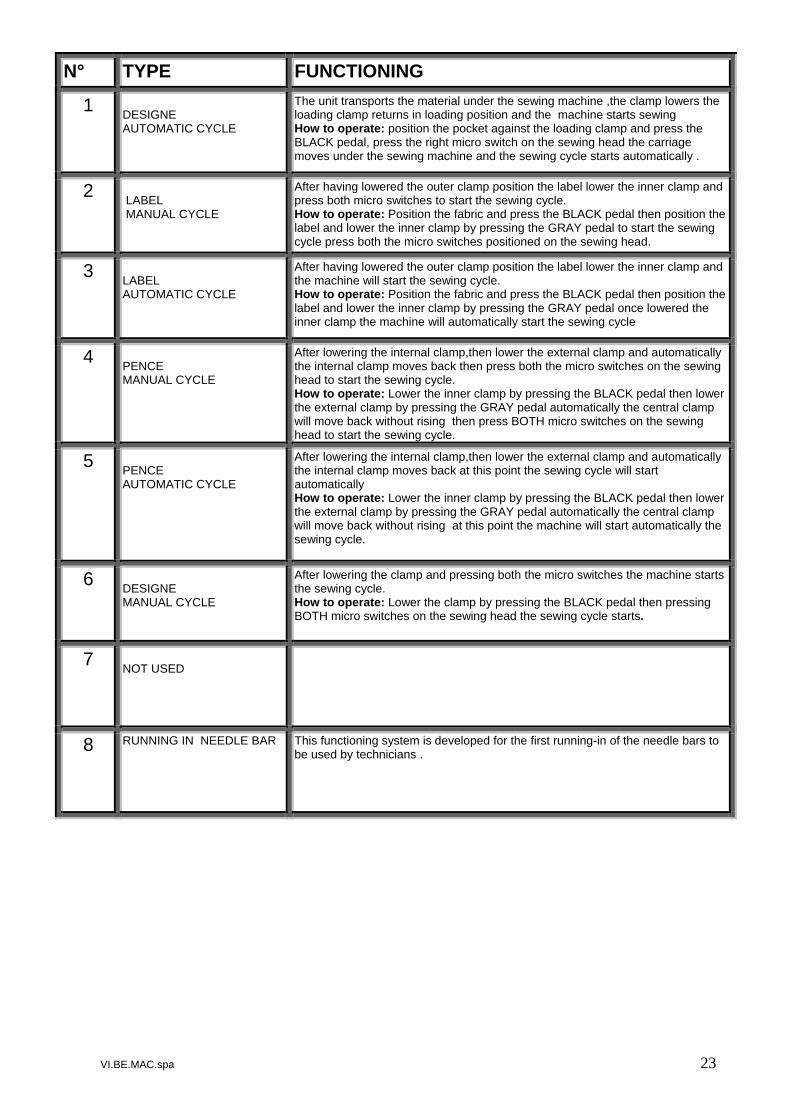
N° TYPE FUNCTIONING
1 DESIGNE AUTOMATIC CYCLE
The unit transports the material under the sewing machine ,the clamp lowers the loading clamp returns in loading position and the machine starts sewing How to operate: position the pocket against the loading clamp and press the BLACK pedal, press the right micro switch on the sewing head the carriage moves under the sewing machine and the sewing cycle starts automatically .
2 LABEL MANUAL CYCLE
After having lowered the outer clamp position the label lower the inner clamp and press both micro switches to start the sewing cycle. How to operate: Position the fabric and press the BLACK pedal then position the label and lower the inner clamp by pressing the GRAY pedal to start the sewing cycle press both the micro switches positioned on the sewing head.
3 LABEL AUTOMATIC CYCLE
After having lowered the outer clamp position the label lower the inner clamp and the machine will start the sewing cycle. How to operate: Position the fabric and press the BLACK pedal then position the label and lower the inner clamp by pressing the GRAY pedal once lowered the inner clamp the machine will automatically start the sewing cycle
4 PENCE MANUAL CYCLE
After lowering the internal clamp,then lower the external clamp and automatically the internal clamp moves back then press both the micro switches on the sewing head to start the sewing cycle. How to operate: Lower the inner clamp by pressing the BLACK pedal then lower the external clamp by pressing the GRAY pedal automatically the central clamp will move back without rising then press BOTH micro switches on the sewing head to start the sewing cycle.
5 PENCE AUTOMATIC CYCLE
After lowering the internal clamp,then lower the external clamp and automatically the internal clamp moves back at this point the sewing cycle will start automatically How to operate: Lower the inner clamp by pressing the BLACK pedal then lower the external clamp by pressing the GRAY pedal automatically the central clamp will move back without rising at this point the machine will start automatically the sewing cycle.
6 DESIGNE MANUAL CYCLE
After lowering the clamp and pressing both the micro switches the machine starts the sewing cycle. How to operate: Lower the clamp by pressing the BLACK pedal then pressing BOTH micro switches on the sewing head the sewing cycle starts.
7 NOT USED
8 RUNNING IN NEEDLE BAR This functioning system is developed for the first running-in of the needle bars to be used by technicians .

VI.BE.MAC.spa 24
12.1. Read a program To call up a program : Press .Then press . Select from where to read the program by pressing,
With this icon the program is read from the internal memory ,with this icon instead from the USB. This menu is displayed :
Select the desired program by touching the number,to change page press .To confirm press .
12.2. Delete a program To delete a program: Press . Then press . NOTE: THE PROGRAM IN USE CANT BE DELEATED Select from where you want to delete the program by pressing if you want to delete from the memory or from the USB. Select the desired program by touching the number or to change page press .,once reached the desired program press. And to confirm press

VI.BE.MAC.spa 25
12.3. Write a program (save) To write a program:
Press . Press . Select where to write the program by pressing ,to write on the internal memory or to write on the USB This page is displayed
Select . Digit the desired name using the letters ,to erase press . To change the number of the program press and digit the desired number. The programs have to be saved with a numeration included between 600 e 999.
Confirm pressing .
12.4. Coping all programs from USB to memory or vice versa To copy all the programs: Press . Then press . and then At this point select where to copy the programs pressing to copy in the internal memory or to copy on the USB. Once selected the destination of the programs select and confirm pressing
NAME NO
VI.BE.MAC.spa 26
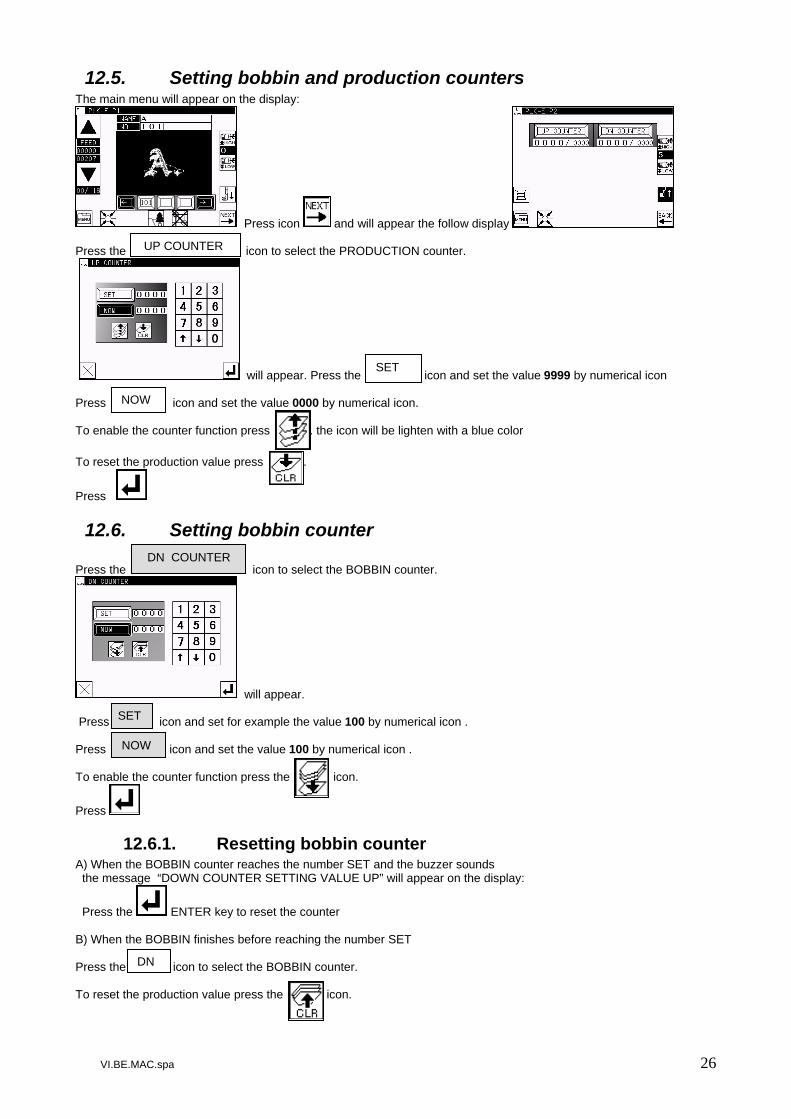
12.5. Setting bobbin and production counters The main menu will appear on the display:
Press icon and will appear the follow display Press the . icon to select the PRODUCTION counter.
will appear. Press the icon and set the value 9999 by numerical icon Press icon and set the value 0000 by numerical icon. To enable the counter function press . the icon will be lighten with a blue color To reset the production value press .
Press
12.6. Setting bobbin counter Press the icon to select the BOBBIN counter.
will appear. Press icon and set for example the value 100 by numerical icon . Press icon and set the value 100 by numerical icon . To enable the counter function press the icon.
Press
12.6.1. Resetting bobbin counter A) When the BOBBIN counter reaches the number SET and the buzzer sounds the message “DOWN COUNTER SETTING VALUE UP” will appear on the display:
Press the ENTER key to reset the counter B) When the BOBBIN finishes before reaching the number SET Press the icon to select the BOBBIN counter. To reset the production value press the icon.
UP COUNTER
SET
NOW
DN COUNTER
SET
NOW
DN

VI.BE.MAC.spa 27
12.7. Bobbin winding The bobbing winding works while the machine is running If it is necessary to load a bobbin without starting a sewing cycle : Once in HOME POSITION On the main menu page press This page will appear At this point press and this screen appears At this point press the left micro switch on the sewing head ,the machine will start sewing on the home position once the bobbing is full release the micro switch and to exit from the bobbing winding mode press

VI.BE.MAC.spa 28
13. SEWING PROGRAMMATION GENERAL SPECIFICATIONS The MITSUBISHI PLK G 1010 machine is equipped with an extremely versatile and easy-to-use software. To create a new sewing program of a FLY, follow the instructions given below, which will take you, step by step, all the way to saving the program onto a USB KEY or into the Internal Memory. STITCH LENGTH Stitch lengths of between 0.1mm and 20.0mm can be programmed, in variations of 0.1mm. The machine turns at its maximum speed if the stitch length is in between 0.1 and 3.2mm and with a lenger stitch automatically the speed is reduced. SEWING SPEED Four different types of speed may be selected (H – MD1 – MD2 – L) during the sewing program. The machine is calibrated for a maximum speed of 2500 rpm. The thread cutting speed is calibrated at 180 rpm. CODES A series of codes manage some operation of the unit .The codes may be inserted in the sewing program. Type of codes used in the programs: F6_H LEFT NEEDLE is working F6_L RIGHT NEEDLE is working FUN 1 CENTRAL PLATE MOOVMENT ASRT STOP & GO adjustable from 1to 9 every number equals 0.2 seconds

VI.BE.MAC.spa 29
13.1. Programming a seam Lower the clamp: PRESS: MENU PROGRAMMATION KEY TO MODIFY THE PROGRAM IN USE
TO CREATE A NEW PROGRAM SELECT THE SEWING SPEED BEETWIN: H HIGH SPEED
MD1 MEDIUM-HIGH SPEED
MD2 MEDIUM-LOW SPEED
L LOW SPEED
To set the stitch lenght use te numbers from to or the arrow keys the stitch length can be set between 0,1 and 20,0mm To confirm press
VI.BE.MAC.spa 30
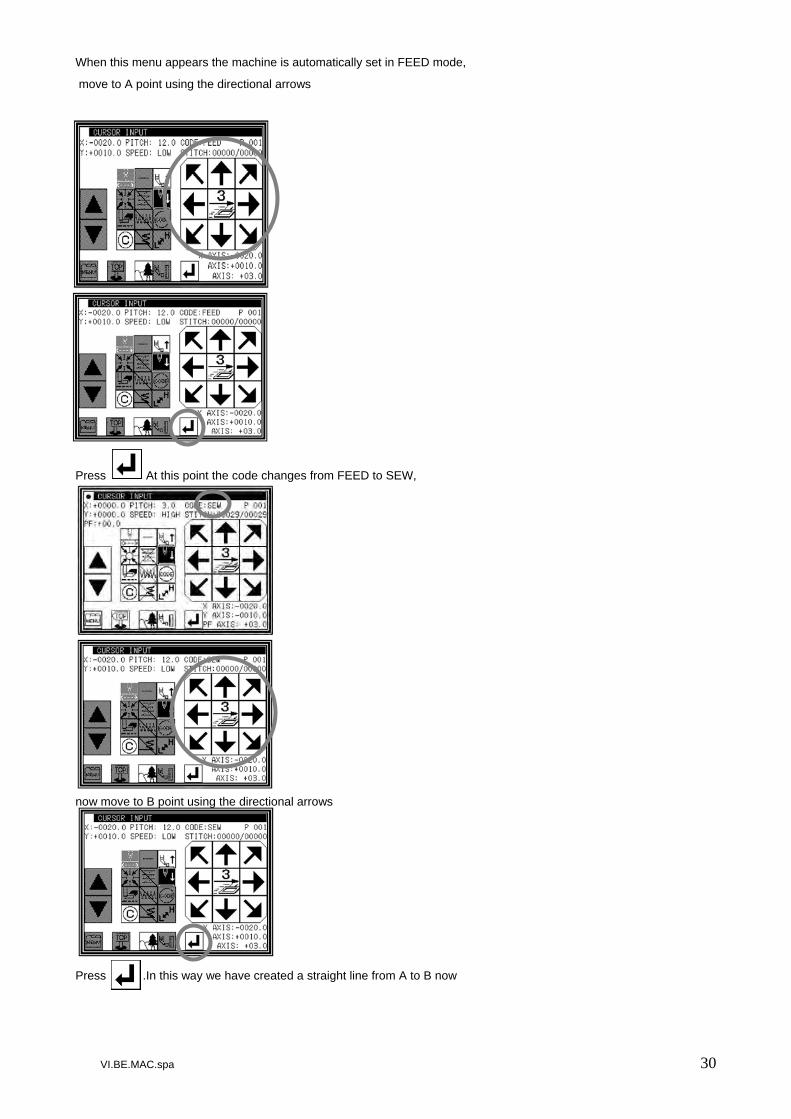
When this menu appears the machine is automatically set in FEED mode,
move to A point using the directional arrows
Press At this point the code changes from FEED to SEW,
now move to B point using the directional arrows
Press .In this way we have created a straight line from A to B now

VI.BE.MAC.spa 31
Press and this menu appears
Press to end the program This screen appears ,press Home Position The machine returns to Home Position
Always memorize the programs with numbers between 600 and 999 with a maximum of 20,000 stitches.
Once selected the desired number and name confirm pressing
Follow the instructions at page 25 paragraph 12.3
!ATTENTION!
After having pressed the machine moves quickly towards the home position,control that the position of the needle is high
OVERWRITE
SAVE NEW PROGRAM
EXIT WITHOUT SAVING

VI.BE.MAC.spa 32
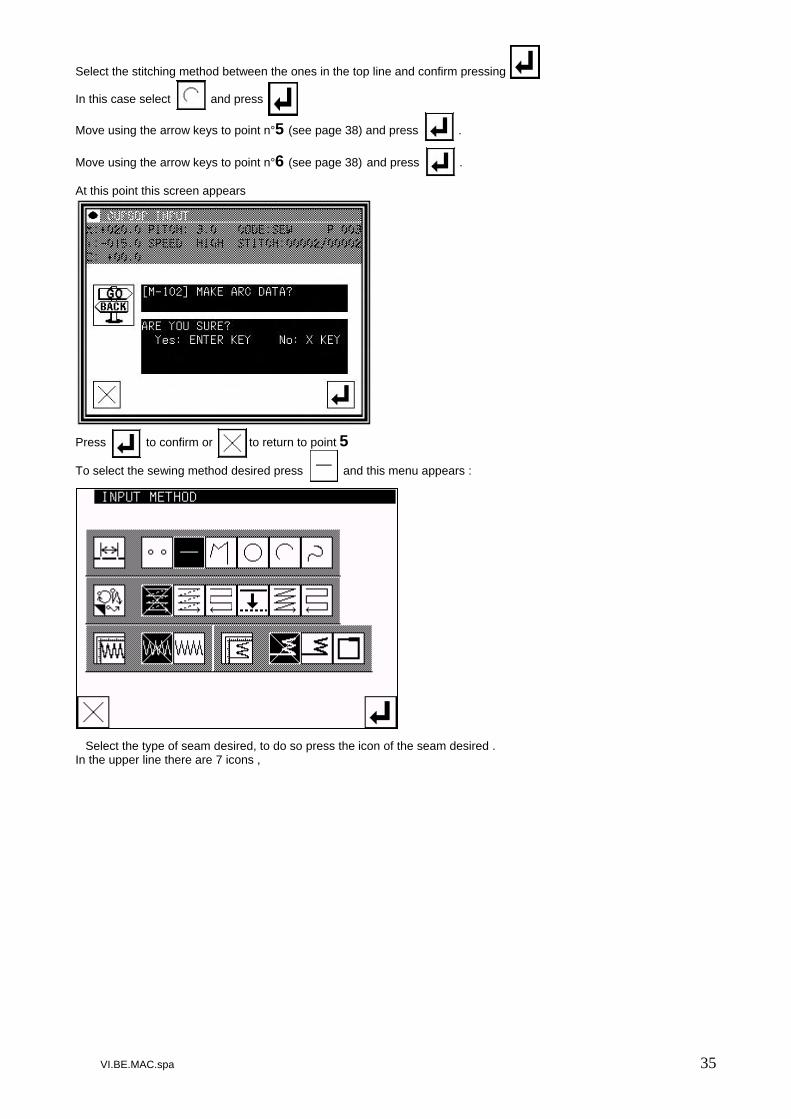
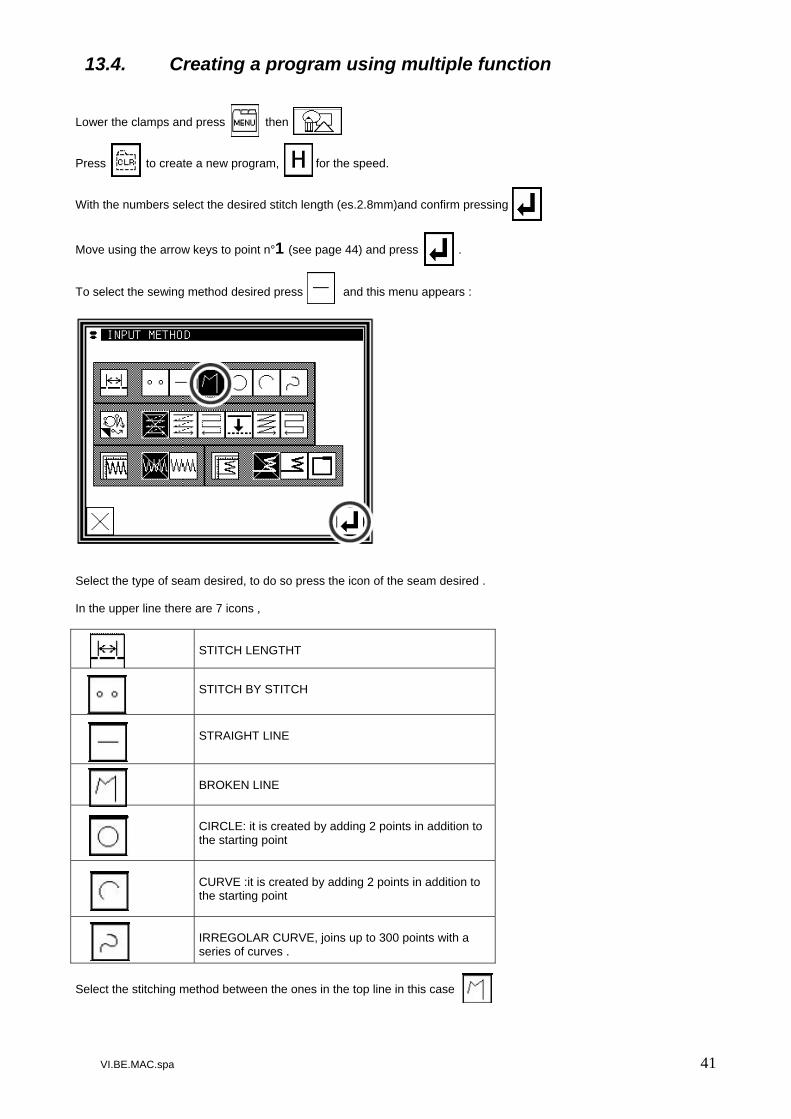
13.2. Programming a Pocket design Lower the clamps and press then Press to create a new program, for the speed. With the numbers select the desired stitch length (es.2.8mm)and confirm pressing Press Move using the arrow keys to point n°1 (see page 38) and press . To select the sewing method desired press and this menu appears : Select the type of seam desired, to do so press the icon of the seam desired . In the upper line there are 7 icons ,
Select the stitching method between the ones in the top line in this case and confirm pressing
STITCH LENGTHT
STITCH BY STITCH
STRAIGHT LINE
BROKEN LINE
CIRCLE: it is created by adding 2 points in addition to the starting point
CURVE :it is created by adding 2 points in addition to the starting point
IRREGOLAR CURVE, joins up to 300 points with a series of curves .

VI.BE.MAC.spa 33
Move using the arrow keys to point n°2 (see page 38) and press . At this point : To select the sewing method desired press and this menu appears : Select the type of seam desired, to do so press the icon of the seam desired . In the upper line there are 7 icons ,
Select the stitching method between the ones in the top line and confirm pressing In this case select and press Move using the arrow keys to point n°3 (see page 38) and press .
STITCH LENGTHT
STITCH BY STITCH
STRAIGHT LINE
BROKEN LINE
CIRCLE: it is created by adding 2 points in addition to the starting point
CURVE :it is created by adding 2 points in addition to the starting point
IRREGOLAR CURVE, joins up to 300 points with a series of curves .

VI.BE.MAC.spa 34
Move using the arrow keys to point n°4 (see page 38) and press . At this point this screen appears Press to confirm or to return to point 3 At this point : To select the sewing method desired press and this menu appears : Select the type of seam desired, to do so press the icon of the seam desired . In the upper line there are 7 icons ,
STITCH LENGTHT
STITCH BY STITCH
STRAIGHT LINE
BROKEN LINE
CIRCLE: it is created by adding 2 points in addition to the starting point
CURVE :it is created by adding 2 points in addition to the starting point
IRREGOLAR CURVE, joins up to 300 points with a series of curves .
VI.BE.MAC.spa 35
Select the stitching method between the ones in the top line and confirm pressing In this case select and press Move using the arrow keys to point n°5 (see page 38) and press . Move using the arrow keys to point n°6 (see page 38) and press . At this point this screen appears Press to confirm or to return to point 5 To select the sewing method desired press and this menu appears : Select the type of seam desired, to do so press the icon of the seam desired . In the upper line there are 7 icons ,

VI.BE.MAC.spa 36
Select the stitching method between the ones in the top line and confirm pressing In this case select and press Move using the arrow keys to point n°7 (see page 38) and press To insert a code press and select the desired code ,in this case then repeat the operation and Press and select and press select and press Select FEED Move using the arrow keys to point n°8 (see page 38) and press . Move using the arrow keys to point n°9 (see page 38) and press . Move using the arrow keys to point n°10 (see page 38) and press . Move using the arrow keys to point n°11 (see page 38) and press Move using the arrow keys to point n°12 (see page 38) and press Select FEED Move using the arrow keys to point n°13 ( near home position)press and select code and then select and press then select and press At the end press then Press
STITCH LENGTHT
STITCH BY STITCH
STRAIGHT LINE
BROKEN LINE
CIRCLE: it is created by adding 2 points in addition to the starting point
CURVE :it is created by adding 2 points in addition to the starting point
IRREGOLAR CURVE, joins up to 300 points with a series of curves .

VI.BE.MAC.spa 37
SAVING THE PROGRAM Always memorize the program using numbers between 600 and 999 with maximum 20,000 stitches Press to confirm,input the desired name and number and confirm pressing Follow the instructions at page 25 paragraph 12.3

VI.BE.MAC.spa 38
1
2
3 4 5
6 7
8
9
10
11
12
13
Home Position

VI.BE.MAC.spa 39
13.3. Programming a label Lower the clamps and press then Press to create a new program, for the speed. With the numbers select the desired stitch length (es.2.8mm)and confirm pressing Press Move using the arrow keys to point n°1 (see page 40) and press . Select FEED Move using the arrow keys to point n°2 (see page 40)and press Move using the arrow keys to point n°3 (see page 40)and press . Move using the arrow keys to point n°4 (see page 40)and press . Move using the arrow keys to point n°5 (see page 40)and press . Move using the arrow keys to point n°6 (see page 40)and press . To insert a code press and select the desired code ,in this case and press Then repeat the same operation ,press and select and press select the desired stop time with the numerical key board and press the numerical key board considering that each number is equal to 0,2 sec.(example number set: 4 = 0,8 sec.)this stop time is necessary to give time to the central clamp to move out . Move using the arrow keys to point n°7 (see page 40)and press . After all press then Press SAVING THE PROGRAM Always memorize the program using numbers between 600 and 999 with maximum 20,000 stitches Press to confirm,input the desired name and number and confirm pressing
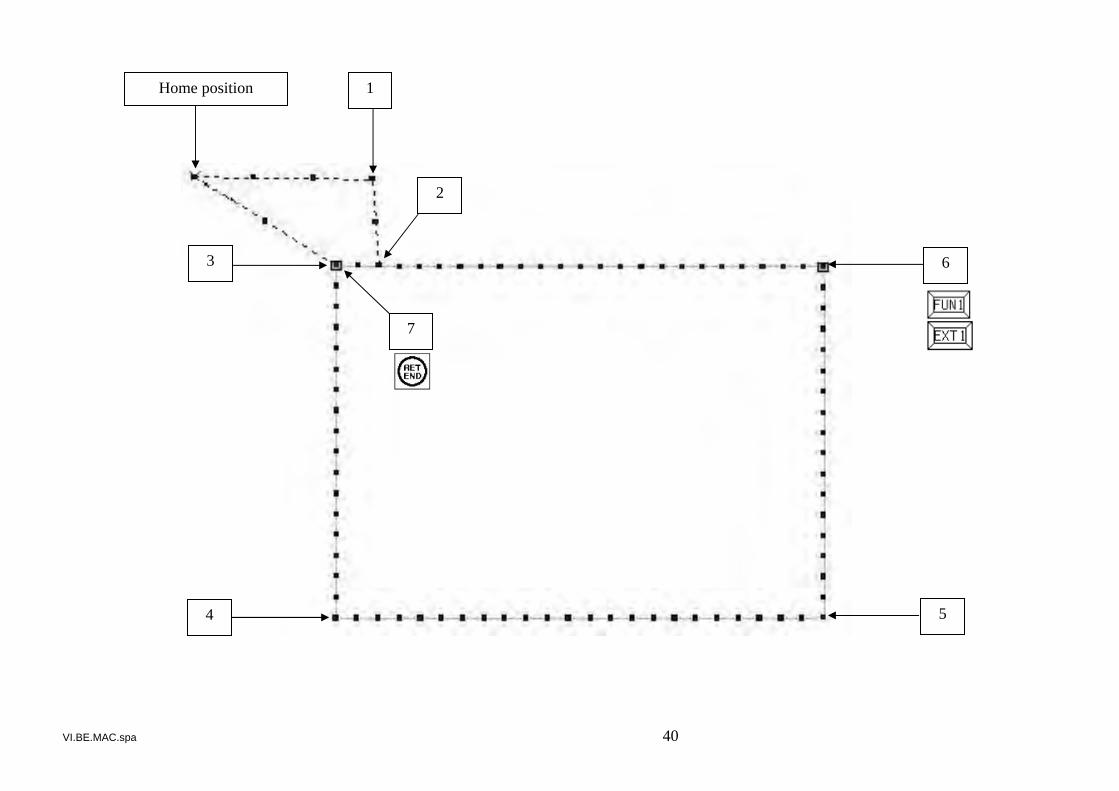
VI.BE.MAC.spa 40
Home position 1
2
3
4 5
6
7
VI.BE.MAC.spa 41
13.4. Creating a program using multiple function Lower the clamps and press then Press to create a new program, for the speed. With the numbers select the desired stitch length (es.2.8mm)and confirm pressing Move using the arrow keys to point n°1 (see page 44) and press . To select the sewing method desired press and this menu appears : Select the type of seam desired, to do so press the icon of the seam desired . In the upper line there are 7 icons ,
Select the stitching method between the ones in the top line in this case
STITCH LENGTHT
STITCH BY STITCH
STRAIGHT LINE
BROKEN LINE
CIRCLE: it is created by adding 2 points in addition to the starting point
CURVE :it is created by adding 2 points in addition to the starting point
IRREGOLAR CURVE, joins up to 300 points with a series of curves .

VI.BE.MAC.spa 42
Then from the second line select the multiple mode desired: In this case and press From the programming menu press Then select the desired sewing direction between ( in this case select L )and input the desired distance and repetition times using the numerical key board. Move using the arrow keys to point n°2 (see page 44) and press
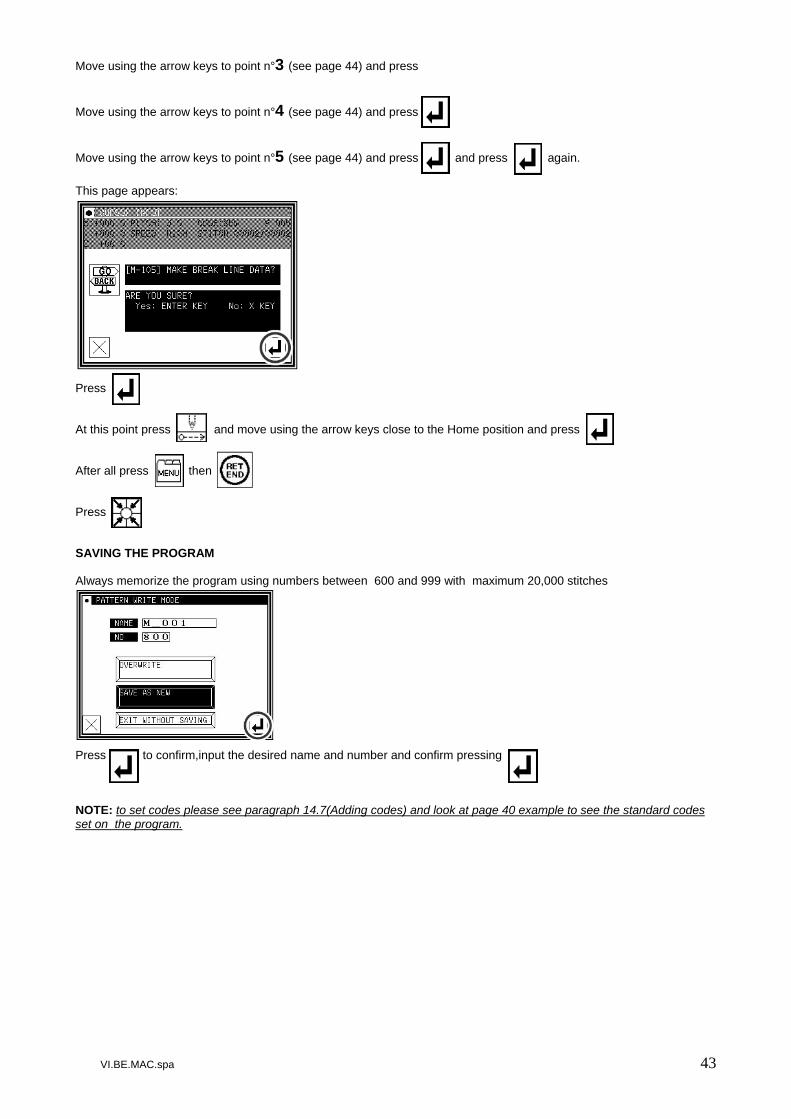
VI.BE.MAC.spa 43
Move using the arrow keys to point n°3 (see page 44) and press Move using the arrow keys to point n°4 (see page 44) and press Move using the arrow keys to point n°5 (see page 44) and press and press again. This page appears: Press At this point press and move using the arrow keys close to the Home position and press After all press then Press SAVING THE PROGRAM Always memorize the program using numbers between 600 and 999 with maximum 20,000 stitches Press to confirm,input the desired name and number and confirm pressing NOTE: to set codes please see paragraph 14.7(Adding codes) and look at page 40 example to see the standard codes set on the program.

VI.BE.MAC.spa 44
1 2
3
4 5
Home position
VI.BE.MAC.spa 45
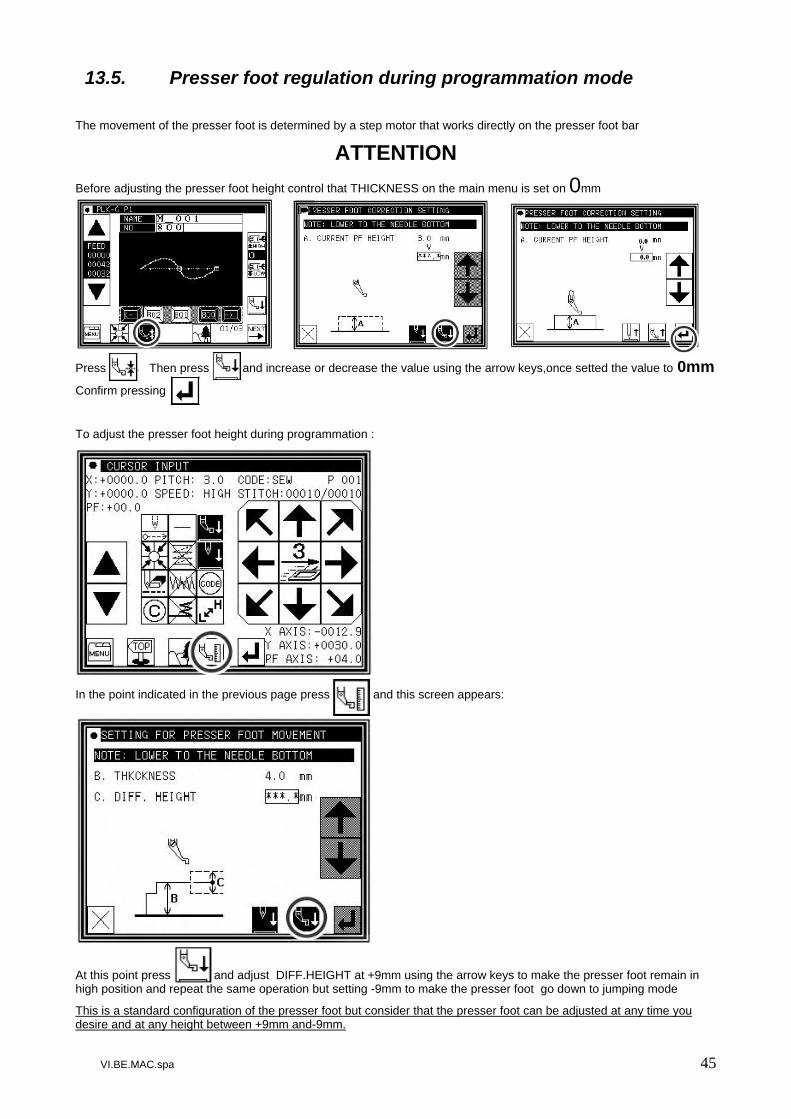
13.5. Presser foot regulation during programmation mode The movement of the presser foot is determined by a step motor that works directly on the presser foot bar
ATTENTION Before adjusting the presser foot height control that THICKNESS on the main menu is set on 0mm
Press Then press and increase or decrease the value using the arrow keys,once setted the value to 0mm Confirm pressing
To adjust the presser foot height during programmation : In the point indicated in the previous page press and this screen appears:
At this point press and adjust DIFF.HEIGHT at +9mm using the arrow keys to make the presser foot remain in high position and repeat the same operation but setting -9mm to make the presser foot go down to jumping mode
This is a standard configuration of the presser foot but consider that the presser foot can be adjusted at any time you desire and at any height between +9mm and-9mm.
VI.BE.MAC.spa 46
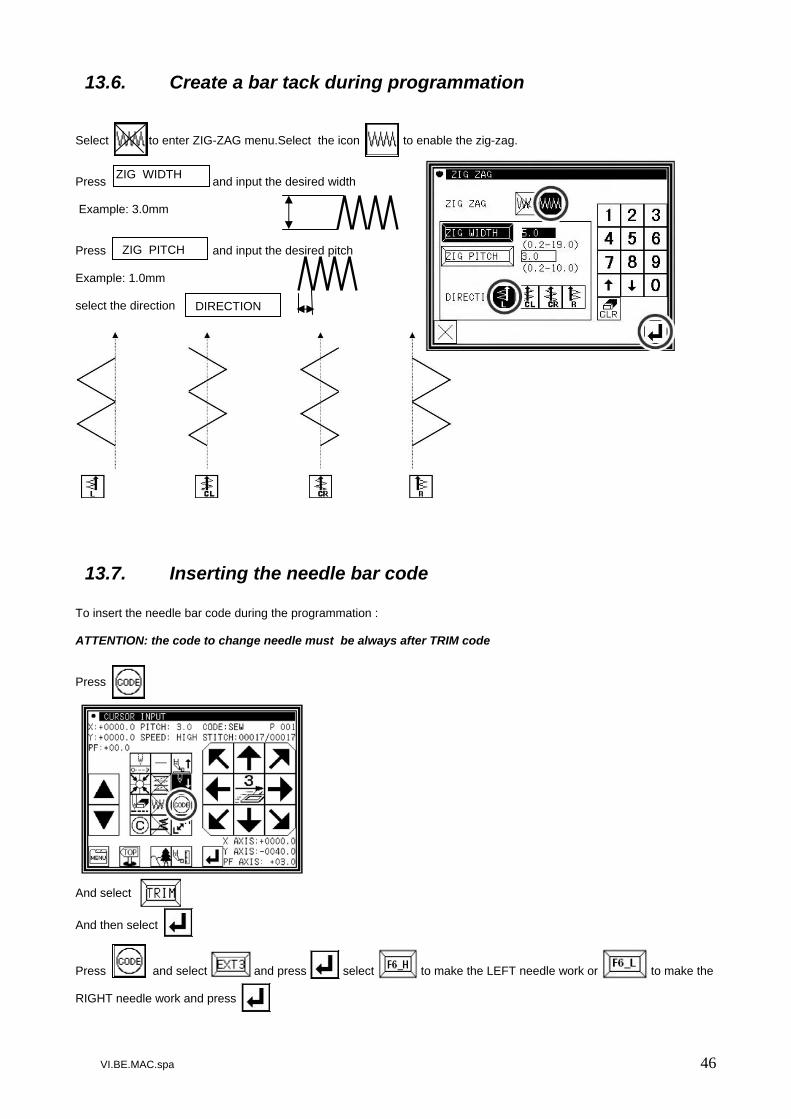
13.6. Create a bar tack during programmation Select to enter ZIG-ZAG menu.Select the icon to enable the zig-zag. Press and input the desired width Example: 3.0mm Press and input the desired pitch Example: 1.0mm select the direction
13.7. Inserting the needle bar code To insert the needle bar code during the programmation : ATTENTION: the code to change needle must be always after TRIM code Press And select And then select Press and select and press select to make the LEFT needle work or to make the RIGHT needle work and press
ZIG WIDTH
ZIG PITCH
DIRECTION

VI.BE.MAC.spa 47
14. GENERAL SPECIFICATIONS OF MODIFY MODE The MITSUBISHI PLK-G machines are equipped whit a user friendly software . Following there are specified step by step the most common modifications on a pocket ,embroidery or label . Lower the clamps: Press and then press (MODIFY) On the upper line there are the 3 keys that enter the various modification functions:
Modifies the position of the first sewing stitch
The complete program is moved of the measure desired
Deletes a specified number of stitches Deleats all stitches
Deleat stitch
Add stitch Add a stitch
Adds a sewing stitch adding keeping the same stitch length
Modify a stitch position
Moves only the specifyed stitch
Moves all the stitches from the specified one on
Move a block The modification changes the length of the stitch where it is performed. The modification ADDS a stitch where it is performed
Modify a block The area between 2 points is modified using arc,line,zig zag feed……
Modify stitch lengh
Modify presser foot hight
Modify speed
Add or remove a code
Modifies the presser foot hight
Modifies the stitch lenght of a specified number of stitches
Modifies all the stitches stitch lenght.
Modifies the speed of a specified number of stitches
Modifies the speed of all stitches
Add code Delete code
ALWAYS select this icon
NEVER select this icon

VI.BE.MAC.spa 48
14.1. Move the complete program Lower the clamp.Press .Then press Select and confirm pressing The machine moves to the first sewing stitch And display changes : Move of the desired amount using the arrow keys (every pressure of the arrow key is a movement of 0.1mm in that direction ) Press Press Press . Always test the program with JOG At the end of the program press . SAVING THE PROGRAM Always memorize the program using numbers between 600 and 999 with maximum 20,000 stitches
Press to confirm,input the desired name and number and confirm pressing

VI.BE.MAC.spa 49
14.2. Modifying an angle Lower the plates. Press the key . Press the key. The display will change, select the icon. At this point select the modification method, in this case select and confirm with . The following menu will appear: Select the type of seam . Set the desired stitch length Example 3.0mm Confirm with .
The display will change to show: START POINT JOG Use to go to the start of the modification (point A). Press . The display will change to: END POINT JOG Use to go to the end of the modification (point B) Press . Press . Use to go to the POINT TO BE MODIFIED (point C) Press . The display will change to show: Advance the desired quantity using the direction arrows (point D) (Each pulse is equal to a one tenth of a millimeter shift in that direction). Press
DB
C
A
Sewing direction

VI.BE.MAC.spa 50
The display will change to show: Press . Press . The main menu will appear Press to confirm the modification Press . SAVING THE PROGRAM Always memorize the program using numbers between 600 and 999 with maximum 20,000 stitches Press to confirm,input the desired name and number and confirm pressing

VI.BE.MAC.spa 51
14.3. Modifying a curve Lower the plates. Press the key. Press the key. The display will change, select the icon. Now select the modification mode, in this case select and confirm with . The following menu will appear: Select the stitch type . Set the desired stitch length Example 3.0mm Confirm with . The display changes to show: START POINT JOG Use to go to the START of the modification (point A) Press The display changes to show: END POINT JOG Use to go to the END of the modification (point B) Press . Press Use TO GO TO THE POINT TO BE MODIFIED (point C) Press The display will change to: Move the desired quantity using the direction arrows (point D) (Each pulse is equal to a tenth of a millimetre shift in that direction) Press . Press .
Stitching direction
D
B
C
A

VI.BE.MAC.spa 52
The main menu will appear Press to confirm the modification made. Press . SAVING THE PROGRAM Always memorize the program using numbers between 600 and 999 with maximum 20,000 stitches Press to confirm,input the desired name and number and confirm pressing
VI.BE.MAC.spa 53
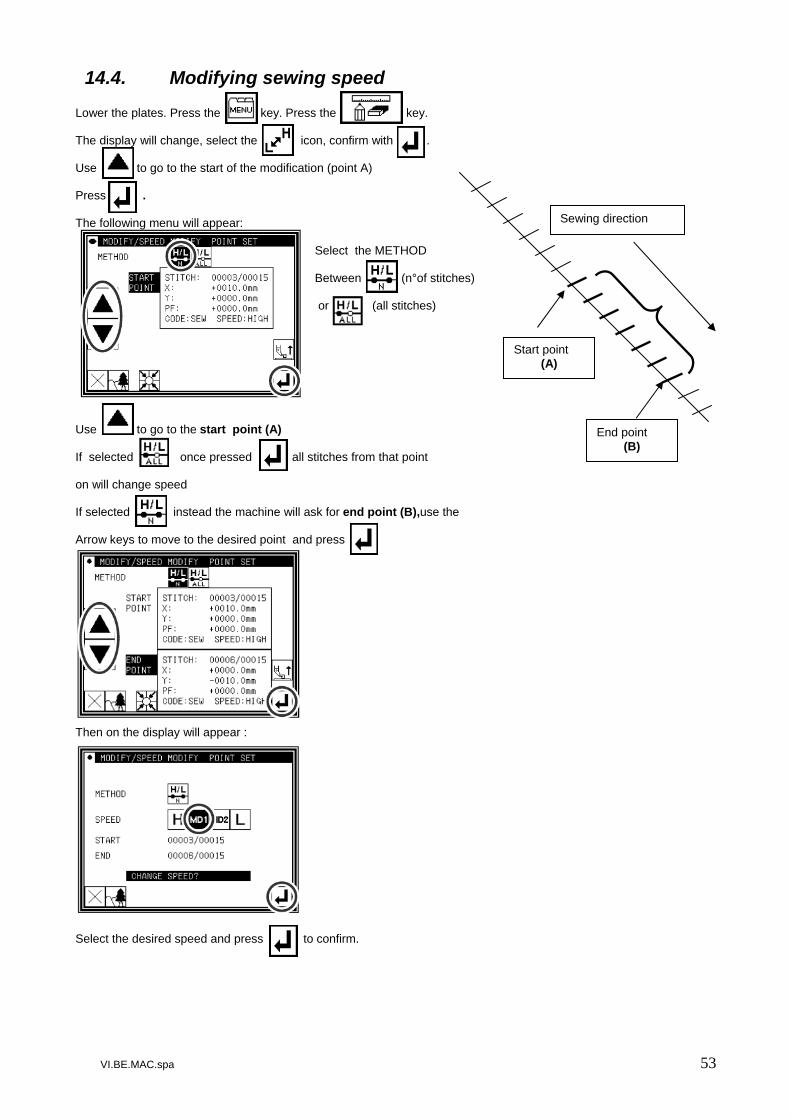
14.4. Modifying sewing speed Lower the plates. Press the key. Press the key. The display will change, select the icon, confirm with . Use to go to the start of the modification (point A) Press . The following menu will appear:
Select the METHOD
Between (n°of stitches) or (all stitches)
Use to go to the start point (A) If selected once pressed all stitches from that point on will change speed If selected instead the machine will ask for end point (B),use the Arrow keys to move to the desired point and press Then on the display will appear : Select the desired speed and press to confirm.
Sewing direction
Start point (A)
End point (B)

VI.BE.MAC.spa 54
Press to confirm the modification. Press At the end press SAVING THE PROGRAM Always memorize the program using numbers between 600 and 999 with maximum 20,000 stitches Press to confirm,input the desired name and number and confirm pressing
VI.BE.MAC.spa 55
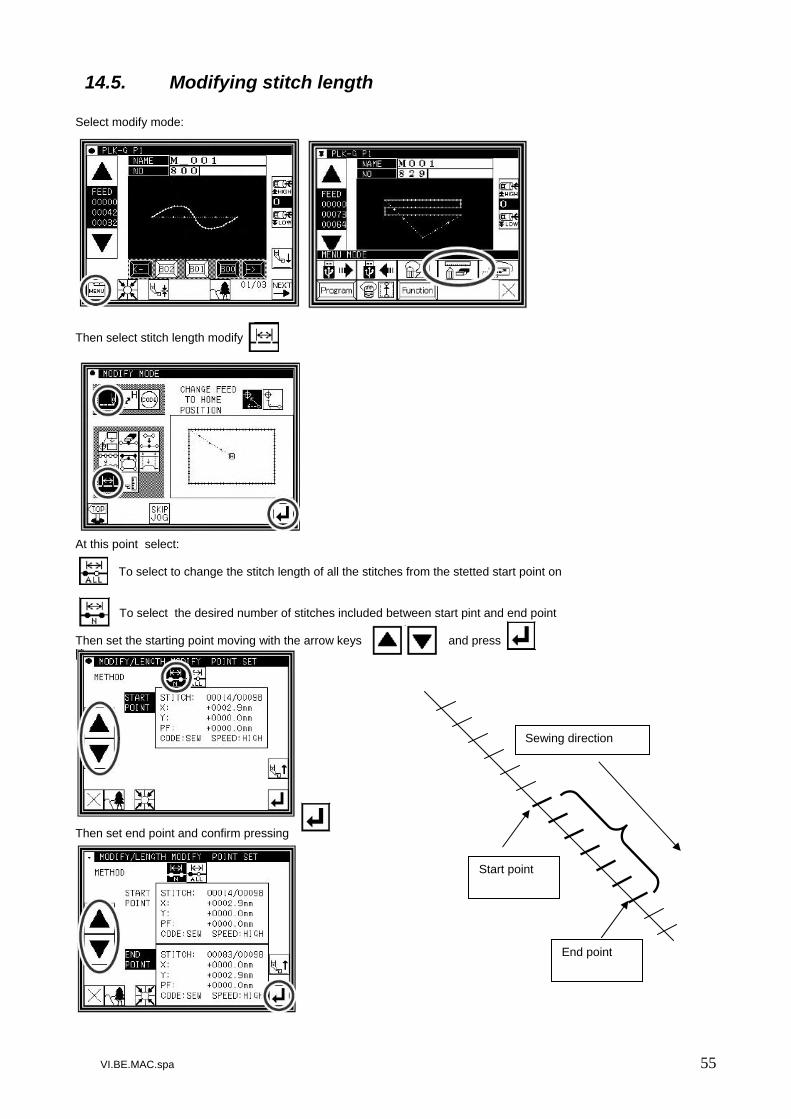
14.5. Modifying stitch length Select modify mode: Then select stitch length modify At this point select: To select to change the stitch length of all the stitches from the stetted start point on To select the desired number of stitches included between start pint and end point Then set the starting point moving with the arrow keys and press Then set end point and confirm pressing
Sewing direction
Start point
End point

VI.BE.MAC.spa 56
Input the desired stitch length included between 0.1 and 20.0 mm and confirm pressing Press SAVING THE PROGRAM Always memorize the program using numbers between 600 and 999 with maximum 20,000 stitches
Press to confirm,input the desired name and number and confirm pressing
VI.BE.MAC.spa 57
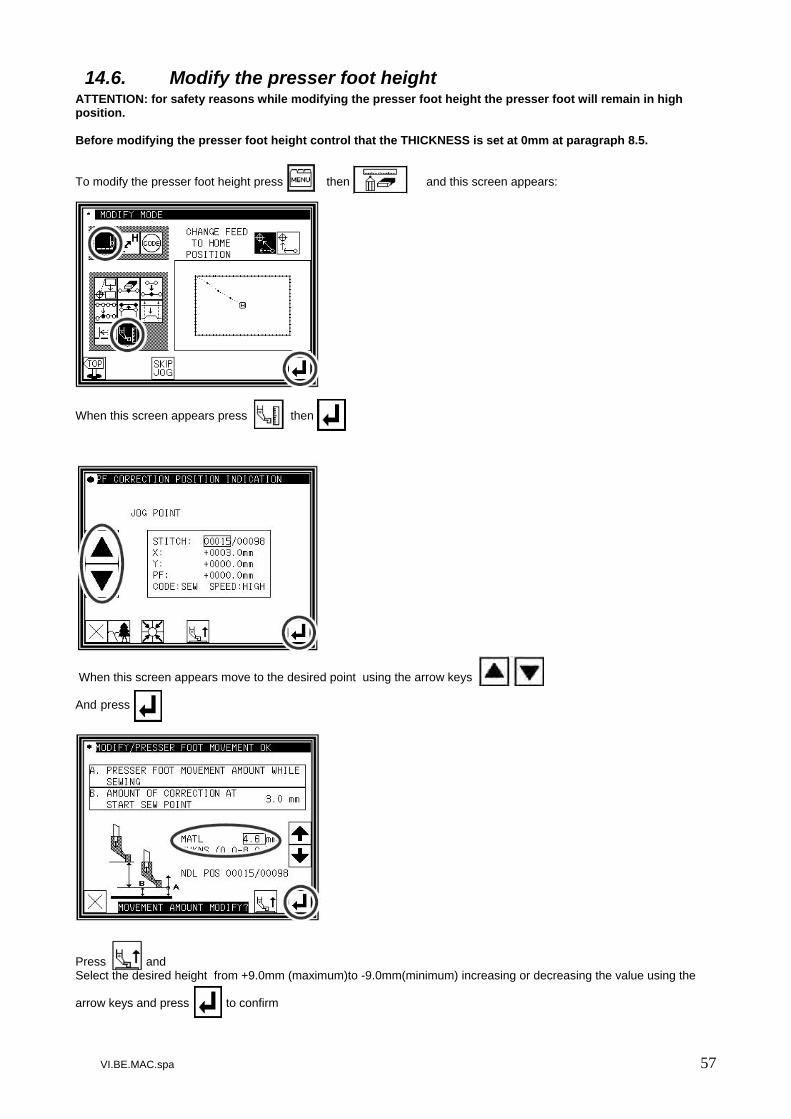
14.6. Modify the presser foot height ATTENTION: for safety reasons while modifying the presser foot height the presser foot will remain in high position. Before modifying the presser foot height control that the THICKNESS is set at 0mm at paragraph 8.5. To modify the presser foot height press then and this screen appears: When this screen appears press then When this screen appears move to the desired point using the arrow keys And press Press and Select the desired height from +9.0mm (maximum)to -9.0mm(minimum) increasing or decreasing the value using the arrow keys and press to confirm
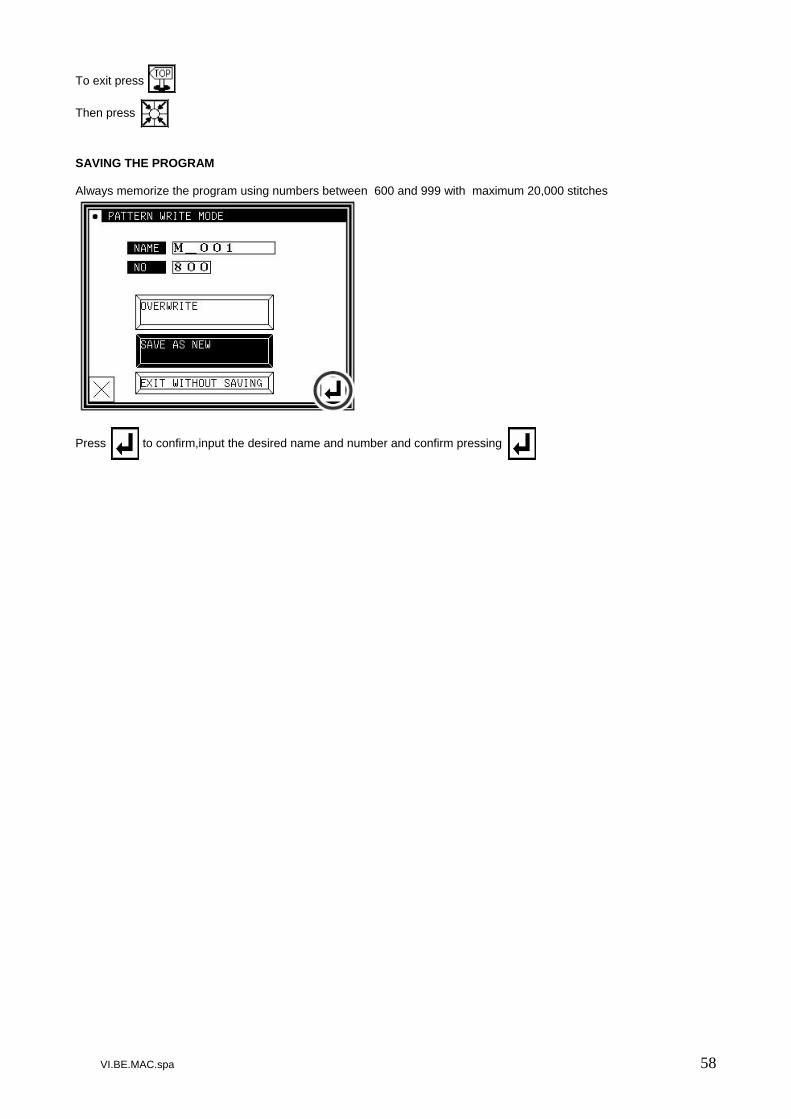
VI.BE.MAC.spa 58
To exit press Then press SAVING THE PROGRAM Always memorize the program using numbers between 600 and 999 with maximum 20,000 stitches Press to confirm,input the desired name and number and confirm pressing

VI.BE.MAC.spa 59
14.7. Adding codes FUN 1 INNER CLAMP-re entry F6_H LEFT NEEDLE is working F6_L RIGHT NEEDLE is working ASRT STOP & GO adjustable from 1to 9 every number equals 0.2 seconds Lower the plates. Press the key. Press the key The display will change, select the icon. Press . Press . ATTENTION: the code to change needle must be always after TRIM code Use to go to the required point. On the display will appear all the codes already set on the program, to select the needle bar change code press
and press then select then to make the LEFT needle bar work or then to make the RIGHT needle bar work Select for example Press . Press . The main menu will appear Press to confirm the modification. Press .

VI.BE.MAC.spa 60
Test the program, lower the jig using the relevant switch. Test the program by the key to go to the end of the sewing program. At the end of the program press SAVING THE PROGRAM Always memorize the program using numbers between 600 and 999 with maximum 20,000 stitches Press to confirm,input the desired name and number and confirm pressing

VI.BE.MAC.spa 61
14.8. Deleting codes Lower the clamps. Press the key. Press the . key. The display will change, select the icon. Press . . Press . Use to go to the required point. (Check on the screen) When the code to be removed appears on the display, for example Press . Press again . The main menu will appear Press to confirm the modification Press . SAVING THE PROGRAM Always memorize the program using numbers between 600 and 999 with maximum 20,000 stitches
Press to confirm,input the desired name and number and confirm pressing

VI.BE.MAC.spa 62
14.9. Re programming a straight seam Lower the plates. Press the key. Press the key. The display will change, select the icon. At this point select the modification method, in this case select and confirm with . The following menu will appear: Select the type of stitch . Set the desired stitch length Example 3.0mm Confirm with . The display will change to show: Use to go to the START of the modification (point A) Press . The display will change to show: Use to go to the END of the modification (point B) Press .
VI.BE.MAC.spa 63
The display will change to show: Press . The main menu will appear Press to confirm the modification Press . SAVING THE PROGRAM Always memorize the program using numbers between 600 and 999 with maximum 20,000 stitches Press to confirm,input the desired name and number and confirm pressing

VI.BE.MAC.spa 64
14.10. Reducing the program size This operation is used on fly and embroidery to reduce the program to easily create a smaller size Lower the plates. Press the key. Press the key. The display will change, select the icon. At this point select the modification method, in this case select and confirm with . The following menu will appear: Press and The display will change to show: At Home position (point A) Press
A home position
B
D
C
E
F

VI.BE.MAC.spa 65
The display will change to show: Use to go to the END of the modification (point B) select JOG OFF and press . The display will change to show: Press . The display will change to show: Press The display will change to show: Press . and confirm with

VI.BE.MAC.spa 66
The following menu will appear: Select and press The display will change to show: Use to go to the START of the modification (point C) Press The display will change to show: Use to go to the END of the modification (point D) and select JOG OFF and press . The display will change to show: Press .

VI.BE.MAC.spa 67
The display will change to show: Press The display will change to show: Press . and confirm with The following menu will appear: Select and press The display will change to show: Use to go to the START of the modification (point E) Press
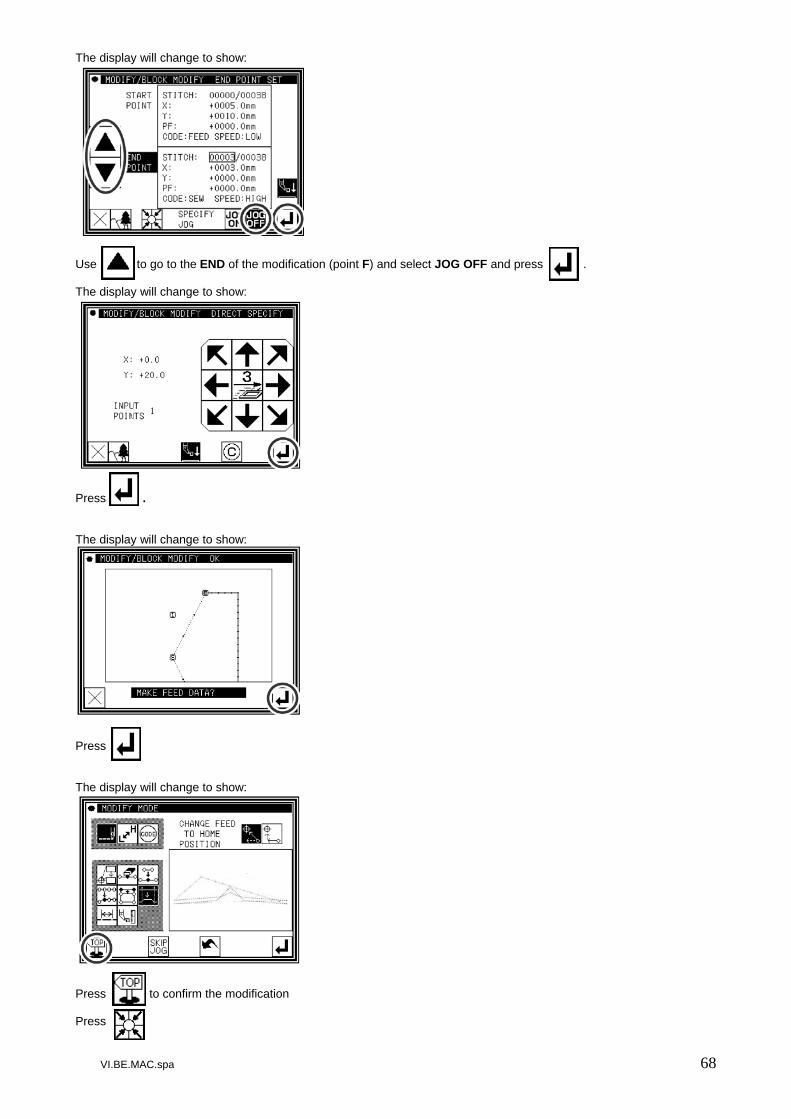
VI.BE.MAC.spa 68
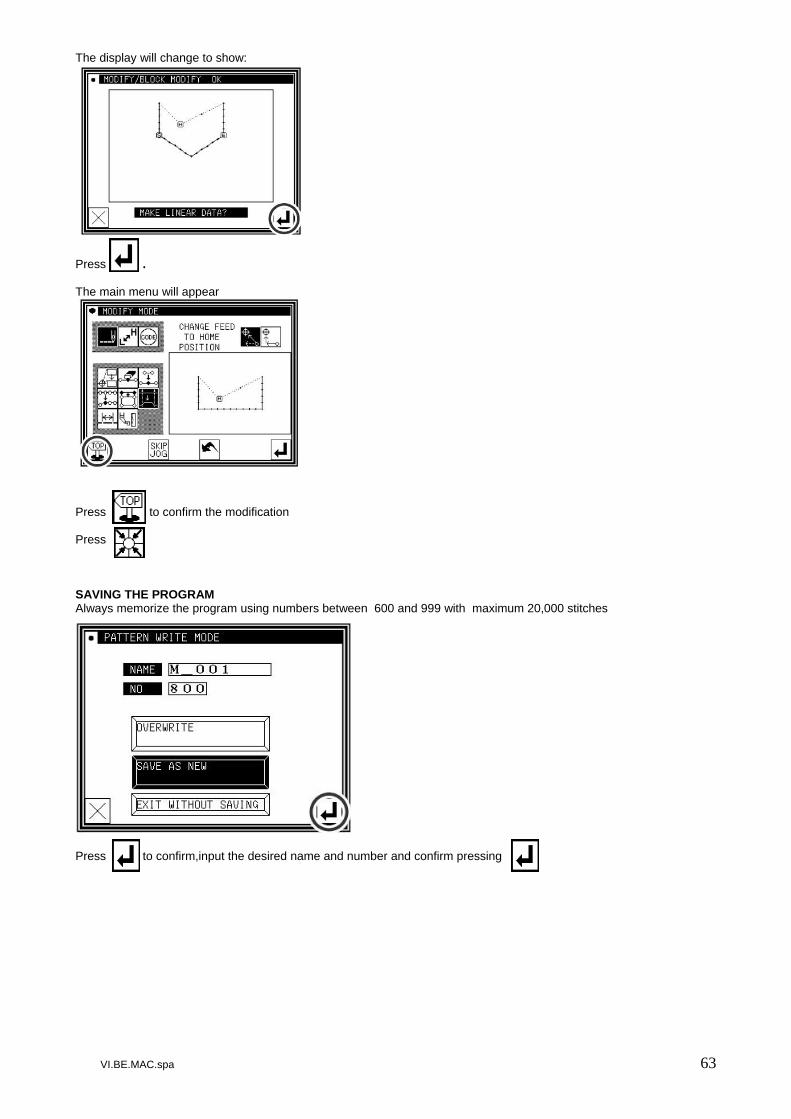
The display will change to show: Use to go to the END of the modification (point F) and select JOG OFF and press . The display will change to show: Press . The display will change to show: Press The display will change to show: Press to confirm the modification Press .

VI.BE.MAC.spa 69
SAVING THE PROGRAM Always memorize the program using numbers between 600 and 999 with maximum 20,000 stitches Press to confirm,input the desired name and number and confirm pressing ATTENTION: reducing the program can happen to delete the CODES to re add the codes follow paragraph 14.7
VI.BE.MAC.spa 70
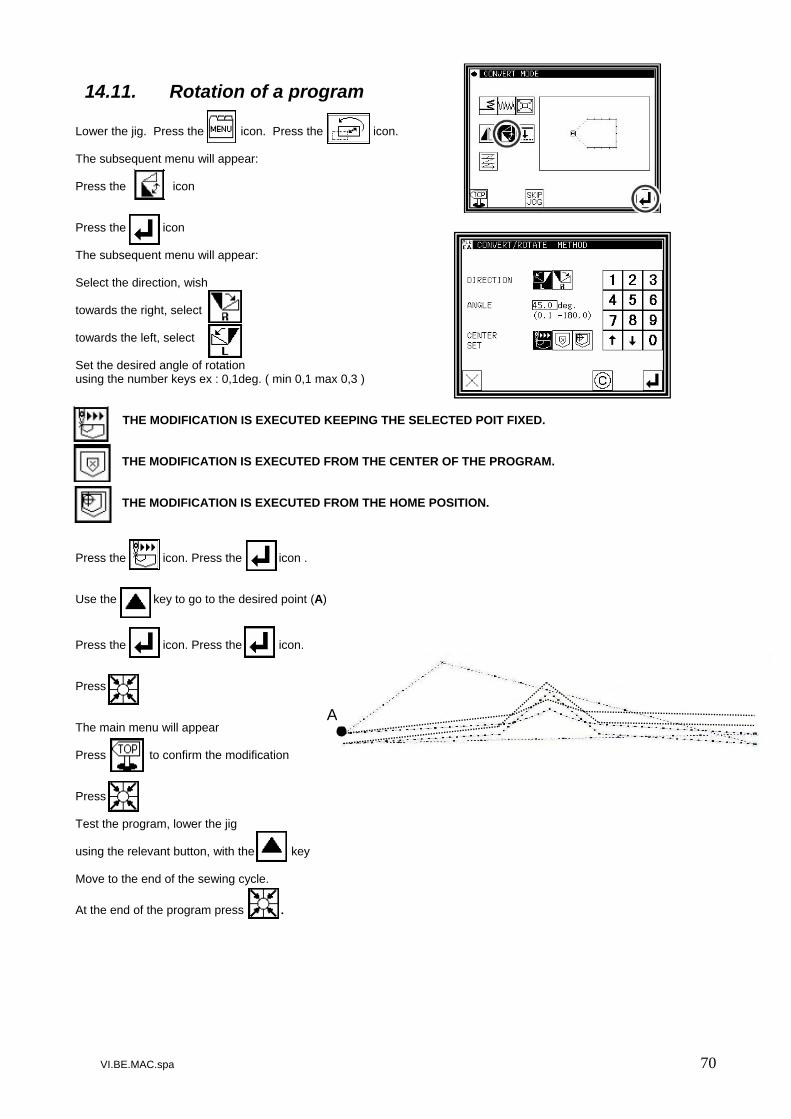
14.11. Rotation of a program Lower the jig. Press the icon. Press the . icon. The subsequent menu will appear: Press the icon Press the icon The subsequent menu will appear: Select the direction, wish towards the right, select towards the left, select Set the desired angle of rotation using the number keys ex : 0,1deg. ( min 0,1 max 0,3 )
THE MODIFICATION IS EXECUTED KEEPING THE SELECTED POIT FIXED. THE MODIFICATION IS EXECUTED FROM THE CENTER OF THE PROGRAM. THE MODIFICATION IS EXECUTED FROM THE HOME POSITION. Press the icon. Press the icon . Use the key to go to the desired point (A)
Press the icon. Press the icon. Press The main menu will appear Press to confirm the modification Press Test the program, lower the jig using the relevant button, with the key Move to the end of the sewing cycle. At the end of the program press .
A

VI.BE.MAC.spa 71
SAVING THE PROGRAM Always memorize the program using numbers between 600 and 999 with maximum 20,000 stitches Press to confirm,input the desired name and number and confirm pressing
VI.BE.MAC.spa 72
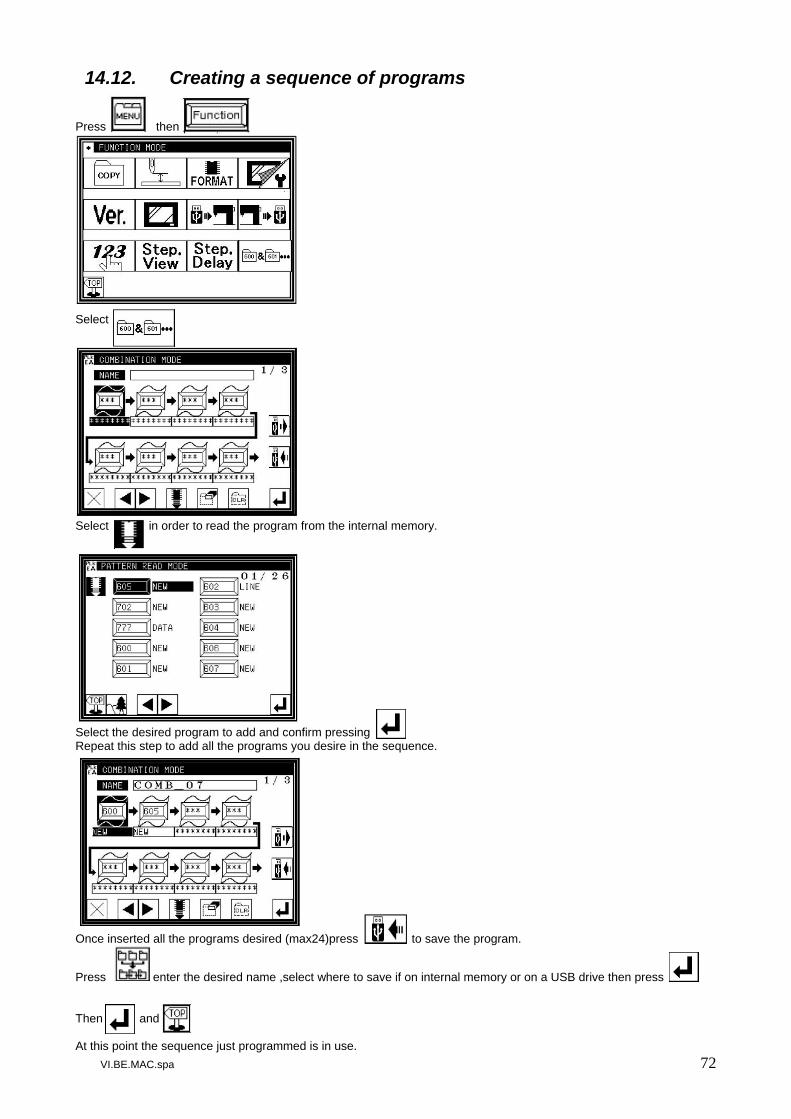
14.12. Creating a sequence of programs Press then Select Select in order to read the program from the internal memory. Select the desired program to add and confirm pressing Repeat this step to add all the programs you desire in the sequence. Once inserted all the programs desired (max24)press to save the program.
Press enter the desired name ,select where to save if on internal memory or on a USB drive then press Then and At this point the sequence just programmed is in use.
VI.BE.MAC.spa 73
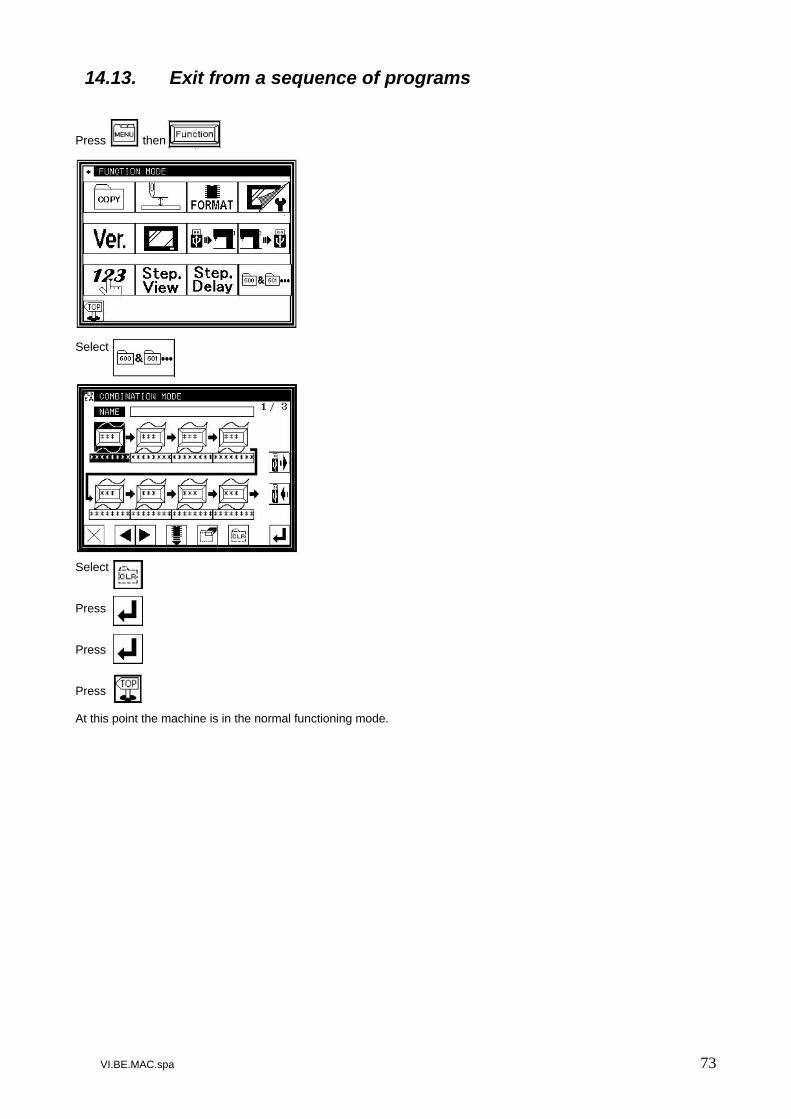
14.13. Exit from a sequence of programs Press then Select Select Press Press Press At this point the machine is in the normal functioning mode.

VI.BE.MAC.spa 74
15. BASIC PARAMETER ADJUSTMENTS From the working menu Press . Then press . In the display are visualized various icons in various pages to select . To change from one page to the other use the arrow keys.
PAGE 1
PAGE 2
PAGE 3
PAGE 4

VI.BE.MAC.spa 75
15.1. Regulation of the tension opening delay Select the parameter LRS.(220 standard setting)( Tension opening delay) the parameter LRE.(50 standard setting) (duration time of the tension impulse). T (180 standard value)(thread trimming speed)
15.2. Feed speed control Select F e s. ( 9 standard setting)(Feed speed can be setted from 0 to9 ).
15.3. Sewing speed Select H = XXXX(High speed). Standard speed 2499 Rpm (2100during the running in) MD1 = XXXX(Medium-high speed) Standard speed 2000 Rpm MD2= XXXX(Medium-low speed). Standard speed 1000 Rpm L = XXXX(Low speed). Standard speed 200 Rpm
15.4. Slow start
Select S = xxx (SLOW START speed). SL = off /on (SLOW START on/off). SLn = x (N°of stitches ).Standard value 2

VI.BE.MAC.spa 76
16. SOFTWARE INSTALLATION PLKG_system To load the software : Copy the folders PLKG_system and User_system from CD/Computer on the empty USB drive and insert it in the control box Turn on the machine and keep pressed the F key until the RED LED is ON This screen appears Then Press to select the language (Spanish,French,English,Chinese,Japanese)

VI.BE.MAC.spa 77
To select the machine model press and select 2516R for the pocket setter machine or select 1010icon for the pocket design and FLY machine and confirm pressing Press Press This screen appears Turn OFF the machine and wait until the GREEN LED is completely off and then turn on the machine again.

VI.BE.MAC.spa 78
16.1. Loading the User_system Turn on the machine and keep pressed the F key until the RED LED is ON This screen appears Then Then select Select TBL&STP and press

VI.BE.MAC.spa 79
This screen appears : Select the setting file and press Then this screen appears again Then select the step file and press At this point if the machine asks for a password please contact (VI.BE.MAC) Insert the PASSWORD and Press
VI.BE.MAC.spa 80
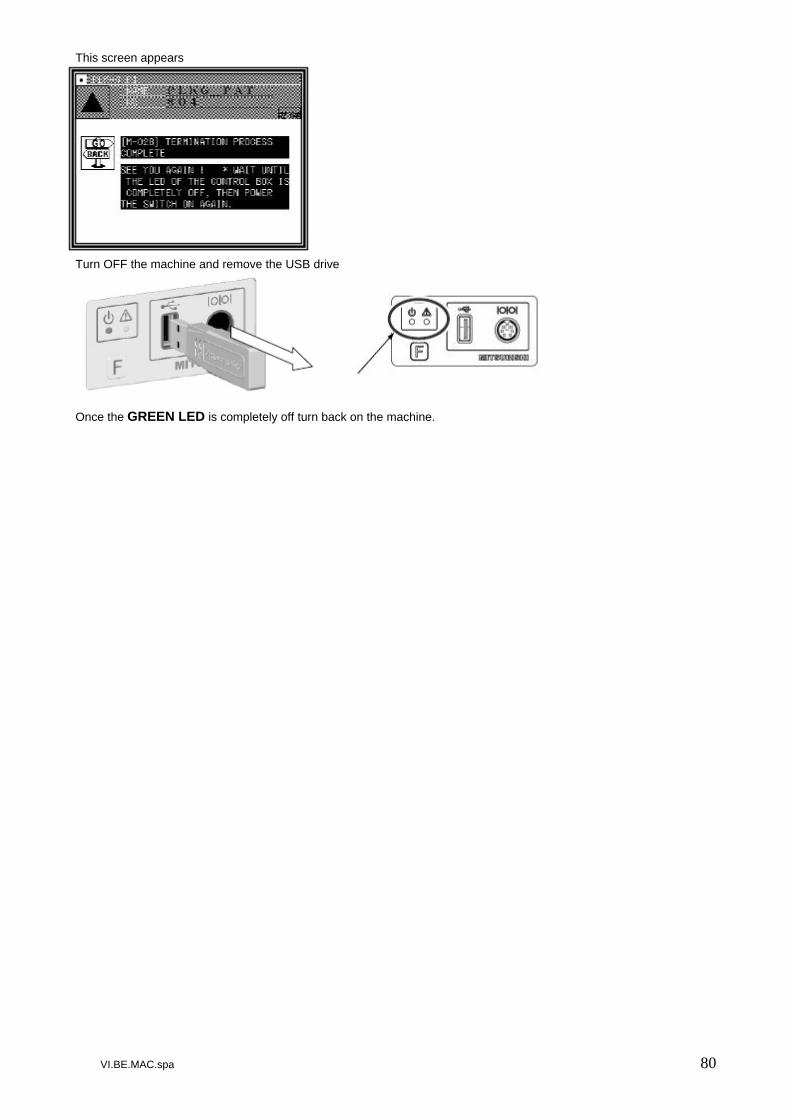
This screen appears Turn OFF the machine and remove the USB drive Once the GREEN LED is completely off turn back on the machine.
VI.BE.MAC.spa 81
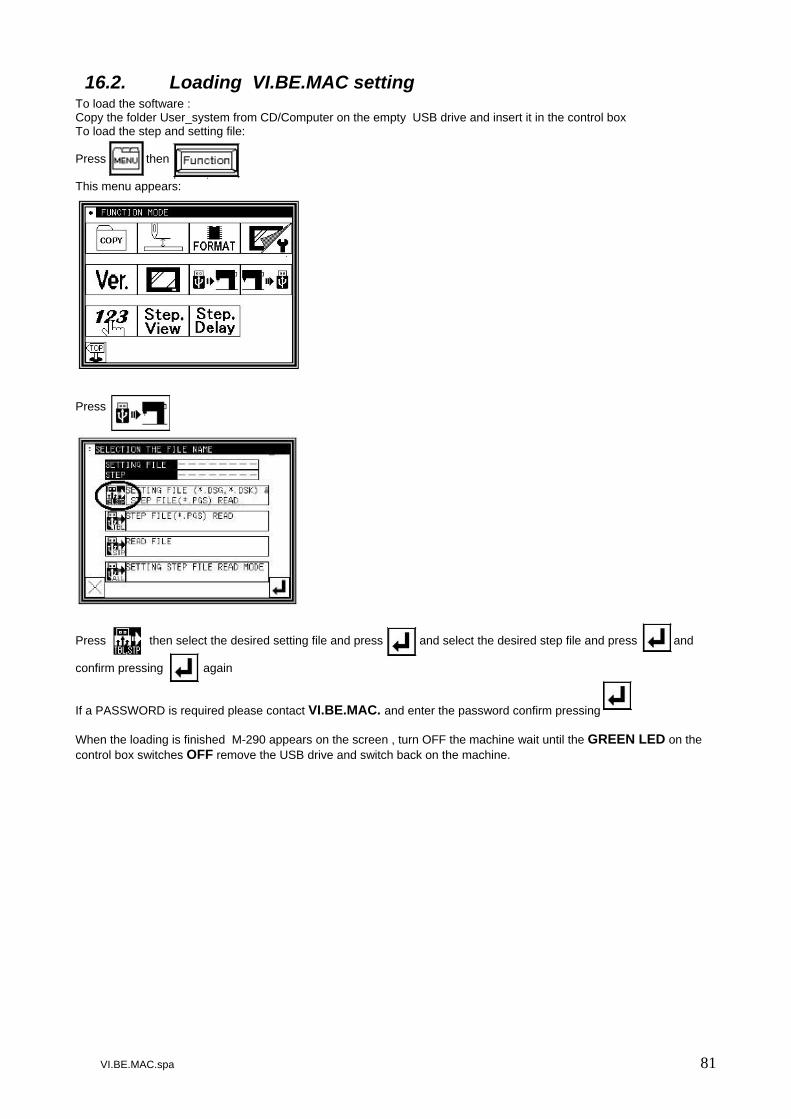
16.2. Loading VI.BE.MAC setting To load the software : Copy the folder User_system from CD/Computer on the empty USB drive and insert it in the control box To load the step and setting file: Press then This menu appears: Press Press then select the desired setting file and press and select the desired step file and press and confirm pressing again If a PASSWORD is required please contact VI.BE.MAC. and enter the password confirm pressing When the loading is finished M-290 appears on the screen , turn OFF the machine wait until the GREEN LED on the control box switches OFF remove the USB drive and switch back on the machine.

VI.BE.MAC.spa 82
17. TEST INGRESSI (INPUT) / USCITE (OUTPUT) The main menu will appear on the display:
Press icon . Press icon . The following menu will appear, where the icons have the following meaning: INPUTS test OUTPUTS test SEWING HEAD SIGNALS test (HOME POSITION, ENCODER, SINCRONISING) INPUT ADDRESS PROGRAMMING (do not use ONLY FOR VI.BE.MAC TECHNICIANS) OUTPUT ADDRESS PROGRAMMING(do not use ONLY FOR VI.BE.MAC TECHNICIANS) Select the icon required from those shown.
17.1. Input test Press the icon. All the INPUTS present are shown and can be tested manually (from i 1 to i P) The display will show the INPUT value.
By pressing the respective function pedal or switch, It can be changed from on to off and/or vice versa.
When the contact is closed = ON the following icon appears
When the contact is open = OFF the following icon appears
TYPE FUNCTION CONNECTION FOOT SWITCH INTERNAL CLAMP I1 FOOT SWITCH LOADING CLAMP/INTERNAL CLAMP I2 MICRO SWITCH STOP SWITCH I4 MICRO SWITCH SAFETY LIFT SWITCH I5 SENSOR LEFT THREAD BREAKAGE SENSOR I6 SENSOR RIGHT THREAD BREAKAGE SENSOR I7 MICRO SWITCH LOADER REST POSITION SWITCH I8 MICRO SWITCH NEEDLE SWITCH I9 MICRO SWITCH LOADING CARRIAGE AT END STROKE SWITCH IA N.C. IB N.C. IC MICRO SWITCH RIGHT HEAD MICRO SWITCH ID N.C. IE MICRO SWITCH LEFT HEAD MICRO SWITCH IF
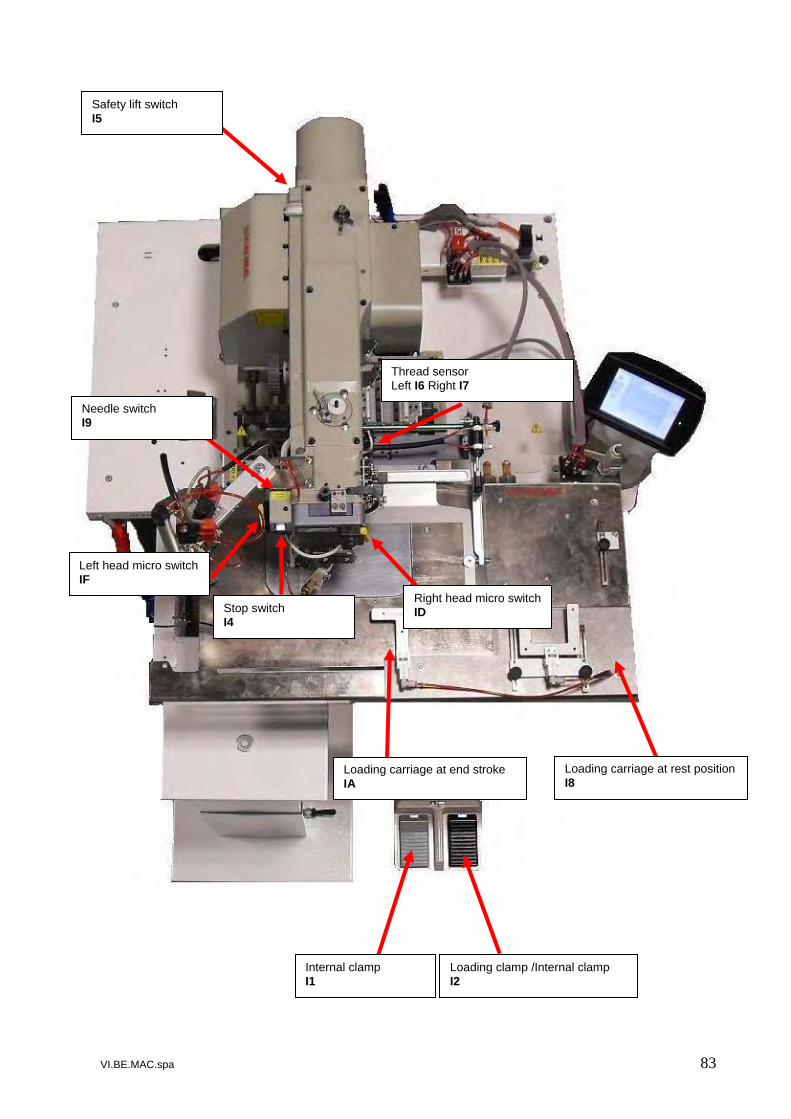
VI.BE.MAC.spa 83
Internal clamp I1
Loading clamp /Internal clamp I2
Right head micro switchID
Safety lift switch I5
Needle switch I9
Left head micro switch IF
Stop switch I4
Loading carriage at rest positionI8
Loading carriage at end stroke IA
Thread sensor Left I6 Right I7

VI.BE.MAC.spa 84
ELECTRIC CONNECTIONS 1010 PLK-G INPUT CON-L
CON-L INPUT
Pin01: I8 Blue Pin07: IC N.C. Pin02: 0 Vcc N.C. Pin08: 0 Vcc Black Pin03: I9 Gray Pin09: ID Red Pin04: IA Yellow Pin10: IE N.C. Pin05: 0 Vcc Black Pin11: 0 Vcc N.C. Pin06: IB N.C. Pin12: IF Green
COLOUR INPUT PIN INPUT 0Vcc
Stop switch Pin 3 CON6(ES) Pin 4 CON6(ES)
Safety lift switch Pin 2 CON7(S6) Pin 3 CON7(S6)
Black Left thread sensor Pin 2 CON9(FSW) Brown (out signal)
Pin 1 CON8(THS) Red +Vcc
Pin 3 CON8(THS) White 0Vcc
Orange Right thread sensor Pin 2 CON8(THS) Brown (out signal)
Pin 1 CON8(THS) Red +Vcc
Pin 3 CON8(THS) White 0Vcc
Blue Right loading carriage switch SB3 Pin 1 CON-L Pin 5 o Pin 8 CON-L
Gray Needle switch SB4 Pin 3 CON-L Pin 5 o Pin 8 CON-L
White Right loading carriage switch SB5 Pin 4 CON-L Pin 5 o Pin 8 CON-L
N.C. Pin 6 CON-L Pin 5 o Pin 8 CON-L
N.C. Pin 7 CON-L Pin 5 o Pin 8 CON-L
Red Right micro switch (sewing head)SB6 Pin 9 CON-L Pin 5 o Pin 8 CON-L
N.C. Pin 10 CON-L Pin 5 o Pin 8 CON-L
Green Left micro switch (sewing head) SB7 Pin 12 CON-L Pin 5 o Pin 8 CON-L

VI.BE.MAC.spa 85
VERIFY BEFORE ACTIVATING ANY OUTPUT THAT NO OBJECTS OR PERSONS ARE IN THE RANGE OF ACTION OF THE OUTPUT TESTED
17.2. Test sewing head signal
Press icon . Press icon . Press Entering this function all the inputs of the sewing head can be controlled : UP POSITION = Sensor needle in highest position DOWN POSITION = Sensor needle in lowest position X SENSOR = Sensor X position Y SENSOR = Sensor Y position ENCODER = Signals from the motor encoder When the sensor is reading = ON
When the sensor is not reading = OFF.
17.3. Test output
Press icon . Press icon . Press Using this test the logical status of the each output can be contolled and tested (from 0 1 to 0 F)
when the output is activated the icon is this colour When the output is deactivated the icon is this colour To test manually if the output is working : Press Press the icon of the desired output to test ( ES : 01 = thread trimmer) to verify if it is working. ATTENTION : before testing the 0C output remove the loading clamp and keep the icon pressed until the carriage reaches the loading end stroke position. To exit from the output test mode press and to return to the working position press
PARAMETER FUNCTION O1 Thread trimmer O2 Stacker (down stroke) O3 Tension opening + wiper O4 External clamp O5 Unloader O6 Stop light O7 Needle change +thread clamp O8 Carriage movement / Central clamp backwards-forwardsO9 N.C. OA N.C. OB N.C. OC Loading clamp / Central clamp up -down

VI.BE.MAC.spa 86
ELECTRIC CONNECTIONS 1010 PLK-G OUTPUT CON-M AND INTERNAL CON
COLOUR ELECTROVALVE PIN OUT 0Vcc +24Vcc
Black EV0 = General Air Pin 5 o Pin 8 CON-L Pin 8 o 11 CON-M
EV1 = External clamp Pin 1 CON13(FU) Pin 2 CON13(FU)
Brown/Green EV2 = Loading clamp or Central clamp Pin 10 CON-M Pin 8 o 11 CON-M
White/Yellow EV3 = Carrage movement Central clamp backwards/forwards Pin 1 CON-M Pin 8 o 11 CON-M
EV4 = Needle change+thread clamp Pin 1 CON14(OP2) Pin 3 CON14(OP2)
EV5 = Tension opening Pin 1 CON12(L) Pin 2 CON12(L)
Brown/ Yellow EV9 = Wiper Pin 3 CON-M Pin 8 o 11 CON-M
N.C. Pin 4 CON-M Pin 8 o 11 CON-M
N.C. Pin 6 CON-M Pin 8 o 11 CON-M
EV8 = Stacker (down) Pin 1 CON11(W) Pin 3 CON11(W)
Thread trimmer T Pin 1 CON10(T) Pin 2 CON 10 (T)
EV6/7 = Unloader Pin 1 CON15(OP1) Pin 3 CON15 (OP1)
Stop light Pin 4 CON6(ES) Pin 3 CON6(ES)
CON-M USCITE
Pin01: O8 White/Yellow Pin09: +24Vcc N.C. Pin02: +24Vcc N.C. Pin10: OC Brown/Green Pin03: O9 Brown/Yellow Pin11: +24Vcc Brown Pin04: OA N.C. Pin12: OD N.C. Pin05: +24Vcc N.C. Pin13: OE N.C. Pin06: OB N.C. Pin14: +24Vcc N.C. Pin07: +24Vcc N.C. Pin15: OF N.C. Pin08: +24Vcc Brown

VI.BE.MAC.spa 87
18. FREQUENTLY ASKED QUESTIONS • If after several modification on a program the machine doesn’t let us modify any more Press MENU Then press FUNCTION Select FORMAT Reached this screen select OPTIMIZE Then confirm pressing The pattern data are not erased. And at this point you can re apply the modification to the program

VI.BE.MAC.spa 88
.
Via Monte Pastello 7/ I. 37057 S. GIOVANNI LUPATOTO (VERONA) ITALIA
Tel. (+39) 045 8778151 Fax (+39) 045 8779024. Web Site: www.vibemac.com Email: [email protected]