auto-focus zoom cameraeng.hitron.co.kr/wp-content/uploads/2016/07/hsui-h75dxz2... · 2017-04-27 ·...
TRANSCRIPT

PRODUCTION RELEASE & REVISION
REV DESCRIPT'N/BUYER DWG No PARTS No. BY CHK DATE
105(+/-5)mm
14
8+
/-5
)mm
TITLE
SIZE REV.
SCALE
MATERIAL
UNLESS OTHERWISE SPECIFIEDALL DIMENSIONS ARE IN MM.- TOLERANCE LABEL +/- 3 MANUAL +/- 5 GUIDE +/- 5
COLOR
DATE
DRAWN
CHKED
APPROVALS
PARTS LIST
DESCRIPTION/MATERIALITEM QTY
A4DO NOT SCALE
2MANUAL INSTRUCTION
50303467
NOTES1.MODEL: HSUI-H75DxZ2U8 /NO BRAND (SDI 88pi AIO)
2.MATERIAL: 모조지
3.COLOR: BLACK4.SIZE: 105(+/-5)mm x 148(+/-5)mm
WHITE
3
BIND : STAPLES-2
B
전자
J.Y.LIU
W.S.OH
M.J.KWON
A INITIAL ------------------- 50303467 J.Y.LIU M.J.KWON 02-26-M13
04-04-M13
Full HD 20x Auto-Focus
ZOOM CAMERA
Please read this manual thoroughly before use, and keep it handy for future reference.Design and specifications are subject to change without notice.
김경기
B INITIAL ------------------- 50303467 J.Y.LIU M.J.KWON 04-04-M13
04-04-M13
04-04-M13
04-04-M13
REV.B - 1p protocol 수정 2p 케이블라벨수정. 15p protocol&power input 수정
(재고 폐기 즉시적용)

Full HD 20x Auto-Focus
ZOOM CAMERA
Please read this manual thoroughly before use, and keep it handy for future reference.Design and specifications are subject to change without notice.

WARNING
CAUTION
CAUTION
CAUTION: TO REDUCE THE RISK OF ELECTRIC SHOCK, DO NOT REMOVE COVER(OR BACK). NO USER-SERVICEABLE PARTS INSIDE.REFER SERVICING TO QUALIFIED SERVICE PERSONNEL.
EXPLANATION OF GRAPHICAL SYMBOLSThe lightning flash with arrowhead symbol, within an equilateral triangle, is intended to alert the user to the presence of uninsulated "dangerous voltage" within the product's enclosure that may be of sufficient magnitude to constitute a risk of electric shock to persons.
The exclamation point within an equilateral triangle is intended to alert the user to the presence of important operating and maintenance (servicing) instructions in the literature accompanying the product.
Should any liquid or solid object fall into the cabinet, unplug the unit and have it checked by the qualified personnel before operating it any further.
Unplug the unit from the wall oulet if it is not going to be used for several days or more. To disconnect the cord, pull it out by the plug. Never pull the cord itself.
Allow adequate air circulation to prevent internal heat build-up. Do not place the unit on surfaces (rugs, blankets, etc.) or near materials(curtains, draperies) that may block the ventilation holes.
Height and vertical linearity controls located at the rear panel are for special adjustments by qualified personnel only.
Clean the unit with a slightly damp soft cloth.Use a mild household detergent. Never use strong solvents such as thinner or benzine as they might damage the finish of the unit.
Retain the original carton and packing materials for safe transport of this unit in the future.
Safety ----------------------------------------- Cleaning --------------------------------------
PRECAUTIONS
TO REDUCE THE RISK OF FIRE OR ELECTRIC SHOCK, DO NOT EXPOSE THIS PRODUCT TO RAIN OR MOISTURE. DO NOT INSERT ANY METALLIC OBJECTS THROUGH THE VENTILATION GRILLS OR OTHER OPENINGS ON THE EQUIPMENT.
ii

iii
FCC INFORMATION : THIS EQUIPMENT HAS BEEN TESTED AND FOUND TO COMPLY WITH THE LIMITS FOR A CLASS A DIGITAL DEVICE, PURSUANT TO PART 15 OF THE FCC RULES. THESE LIMITS ARE DESIGNED TO PROVIDE REASONABLE PROTECTION AGAINST HARMFUL INTERFERENCE WHEN THE EQUIPMENT IS OPERATED IN A COMMERCIAL ENVIRONMENT. THIS EQUIPMENT GENERATES, USES, AND CAN RADIATE RADIO FREQUENCY ENERGY AND IF NOT INSTALLED AND USED IN ACCORDANCE WITH THE INSTRUCTION MANUAL, MAY CAUSE HARMFUL INTERFERENCE TO RADIO COMMUNICATIONS. OPERATION OF THIS EQUIPMENT IN A RESIDENTIAL AREA IS LIKELY TO CAUSE HARMFUL INTERFERENCE IN WHICH CASE THE USER WILL BE REQUIRED TO CORRECT THE INTERFERENCE AT HIS OWN EXPENSE.
CAUTION : CHANGES OR MODIFICATIONS NOT EXPRESSLY APPROVED BY THE PARTY RESPONSIBLE FOR COMPLIANCE COULD VOID THE USER'S AUTHORITY TO OPERATE THE EQUIPMENT.
THIS CLASS A DIGITAL APPARATUS COMPLIES WITH CANADIAN ICES-003.
NORME NMB-003 DU CANADA.
WARNINGThis is a Class A product. In a domestic environment this product may cause radio interference in which case the user may be required to take adequate measures.
CE COMPLIANCE STATEMENT
FCC COMPLIANCE STATEMENT

iv
IMPORTANT SAFETY INSTRUCTIONS

1
IMPORTANT : The user of this camera is responsible for checkingand complying with local, state, and federal laws and statutes concerningthe recording and monitoring of audio signals.
The 1/2.9” 2M full HD CMOS X20 ZOOM camera, especially for closed circuit
television CCTV and security surveillance application.
THE CAMERA FEATURES
INTRODUCTION
High performance SONY 1/2.9” Exmor CMOS.
2.2M 1080p Full HD, Excellent picture quality.
1920x1080p / 30fps, 1280x720p / 60fps.
20x Optical zoom. (x320 Zooming capability / Digital : 16x)
Zoom and Focus Control via Remote or Keyboard Controller.
IR Range distance up to 50M.
Day & Night. (ICR)
OSD. (on screen display)
WDR (Wide Dynamic Range)/ BLC. (Back-light compensation)
DNR. (Digital Noise Reduction, 2D+3D)
Privacy mask Function.
HLC. (High Light Compensation Function)
Motion Detection.
Defog.
Composite Video Output. (700TV Lines)
Protocol. (COMMAND, Fastrax, Pelco-D, Pelco-P, VISCA)
Motion External OUT.
Day & Night External Control.
Operates in AC24V ± 10% / DC12V ± 10%.
Weatherproof housing IP-66.
Use Certified / Listed Class 2 power source only.
Camera Mount : camera mount directly to the wall or ceiling.
TM

2
CAMERA CONNECTIONS
1. Lens : 20x Optical Zoom( f=4.7~94mm) Lens for wide area monitoring.2. Video(CVBS) : BNC connector used to connect the camera to a monitor, switcher, etc.3. Video(HD-SDI) : BNC connector used to connect the camera to a HD-SDI monitor, HD-SDI convertor, etc.4. Power : 24 AC input / 12V DC input Power source from a DC 12V or AC 24V ac +/-10% 60/50Hz +/-1Hz Use Certified/Listed Class 2 power source only. * If using DC 12V power adaptor, use a power supply capable of supplying 15 Watts.5. RS 485 CONTROL GREEN : RS485+ BLUE : RS485-6. Day & Night External CONTROL7. ALRAM OUT8. GROUND How to Adjust ZOOM/FOCUS. - Remote Controller. Insert the din jack of remote controller to the hall of housing Adjust the zoom using up/down key. Adjust the focus using left/right key. - Keyboard Controller. Connect the 485(+)(-) of keyboard controller with 485(+)(-) Terminal Block. Adjust the zoom using tele/wide key. Adjust the focus using near/far key.
REMINDER:
Never aim the camera directly into the sun.

3
Screw Firmly attach the bracket to the wall or ceiling
DIMENSIONS
WATER INGRESS PREVENTION
UNIT : mm (inches)
REMOTE CONTROL PORT CAP
After using the Remote Control cable, disconnect it and insert the Remote Control Port Cap. Secure it tightly.
PACKAGE CONTENTS
Caution : This is a sealed camera with no internaladjustments and as such opening the case mayinvalidate the warranty.
(3.4) (6.5)
(10.9)
SUNSHIELD
SUNSHIELD-BOLT SCREWS REMOTE CONTROLLER
CAMERA

4
CAMERA FIXING
CAMERA ADJUSTMENT

CAMERA CONNECTION
5
Connect the remote control using the 6 pin din connector end to the socket within the camera:
Connect the BNC to a set up monitor to view the picture and On Screen Menus.
To Enter the menus press the button on the remote control.
To Navigate the menus, move the button left/Right/Up and Down, press the button to Enter.
END - takes you back a step in the OSD or exits from the OSD

6
STRUCTURE OF THE SETUP MENU
<SETUP>
<ZOOM LENS>
FOCUS MODEZOOM SPEEDFOCUS SPEEDDISTANCEDZOOM COMBIZOOM DISPLENS INITRETURN
<EXPOSURE>
IRISSHUTTERBRIGHTNESSAGCDSSACEDEFOGRETURN
<DAY & NIGHT>
AUTOCOLORB&WEXT
< >WDR/BLC
OFFWDRBLC
< >AWB
AUTOAUTOextPRESETMANUAL
LENSEXPOSUREAWB
WDR/BLCDAY & NIGHTIMAGEFUNCTIONSYSTEMEXIT
<SYSTEM>
RS485CAM TITLEDISPLAYOUT MODELANGUAGEVERSIONRESETRETURN
< >FUNCTION
DNRMOTIONPRIVACYSHADING DETDEFECT DETRESETRETURN
< >IMAGE
CHROMASHARPNESSEFFECTSTILLSHADINGHLMASKDZOOMGAMMARETURN

7
LENS
EXPOSUREThe EXPOSURE menu is used to set the automatic light control method for the camera. It provides the ability to adjust the SHUTTER speed, BRIGHTNESS, AGC, DSS and ACEfunctions of the camera.
1) IRISSelect the IRIS open. ▶ CLOSE, F1.8 - F322) SHUTTERSelect the SHUTTER speed level.▶Auto,1/30(25), 1/60(50), FLK~ 1/240 - 1/60.000sec)3) BRIGHTNESSAdjust the BRIGHTNESS level. ▶ 0 ~ 204) AGCAdjust the Auto Gain Control level. ▶ 0 ~ 75) DSSSelct the Digital Slow Shutter level. ▶ OFF, x2 ~ x86) ACESelect the Adaptive Contrast Enhancer. (D-WDR) ▶ ON, OFF7) DEFOGSelect the DEFOG mode. ▶ OFF, LOW, MIDDLE, HIGH* When DEFOG is ON. ACE and WDR function can not turn on.
<EXPOSURE>
►AUTOOFF
LENSEXPOSUREAWBWDR/BLCDAY&NIGHTIMAGEFUNCTIONSYSTEMEXIT
<SETUP>
AUTOAUTOIIIIIIIII 7IIIIIIIII 5OFFOFFOFF
IRISSHUTTERBRIGHTNESSAGCDSSACEDEFOGRETURN
1) FOCUS MODESelect the FOCUS MODE. ▶AUTO, PUSHAF, MANUAL
2) ZOOM SPEEDSelect the ZOOM SPEED. ▶ 0~7
3) FOCUS SPEEDSelect the FOCUS SPEED. ▶ 0~74) DISTANCESelect the minimum DISTANCE in focus between camera and
object.▶ 0.1 ~ 6.0 m
5) DZOOM COMBISelect the Digital-ZOOM DISPLAY. ▶ ON,OFF
6) ZOOM DISPSelect the ZOOM DISPLAY. ▶ON,OFF7) LENS INITThe LENS INITIALIZATION.
►
AUTOOFF
LENSEXPOSUREAWBWDR/BLCDAY&NIGHTIMAGEFUNCTIONSYSTEMEXIT
<SETUP>
0.1M
FOCUS MODEZOOM SPEEDFOCUS SPEEDDISTANCEDZOOM COMBIZOOM DISPLENS INITRETURN
<ZOOM LENS>
OFFOFF
IIIIIIIII 5AUTO
IIIII II 2II
<LENS>
<EXPOSURE>
The LENS menu is used to set the AF lens control and initialization. It provides the ability to adjust zoom speed, focus speed, distance and lens initialization functions of the camera.

8
<EXPOSURE>
F1.8F NORETURN
<IRIS>
<EXPOSURE>
AUTOAUTOIIIIIIIII 7IIIIIIIII 5OFFOFFOFF
IRISSHUTTERBRIGHTNESSAGCDSSACEDEFOGRETURN
►
AWBThe screen color can be adjusted by using the Auto White Balance function. It compensates for deviations in the white color caused by changes in the color temmperature of the light source so that the colors are reproduced correctly.
1) AUTO Automatically adjust color temperature.2) AUTOext Automatically extended range of color temperature adjustment.3) PRESET Automatically readjust only by pressing PRESET.4) MANUAL Manual mode.
User can change Red and Blue gain value manually.COLOR TEMPERATURE LOW, MIDLE, HIGHR-GAIN 0 ~ 20B-GAIN 0 ~ 20
<MANUAL>
► AUTOOFF
LENSEXPOSUREAWBWDR/BLCDAY&NIGHTIMAGEFUNCTIONSYSTEMEXIT
<SETUP>
<AWB>
COLOR TEMPR-GAINB-GAINRETURN
MIDDLEIIIIIIIII 10IIIIIIIII 10
WDR/BLC
The WDR/BLC menu is used to the ability to expand the dynamic range and to prevent back lighting from the image.1) WDR Select the Dynamic Range level.
* When WDR is ON, ACE and DEFOG function can not turn on.GAIN Adjust gain level. ▶ 0 ~ 10 WEIGHT
2) BLC Adjust the size of Back Light Compensation area. X-POS Adjust the window X-Axis position.Y-POS Adjust the window Y-Axis position.X-SIZ Adjust the window X-Axis size.Y-SIZ Adjust the window Y-Axis size.
Adjust WDR level. ▶ 0 ~ 4

9
<DAY&NIGHT>
The DAY&NIGHT menu is used to configure the day and night related setting for the camera.
1) D&N AUTO- Input Method SENSOR DAY&NIGHT mode are changed according to the sensor inputs.
MODE Select input mode. ▶ SENSOR, AGC
D&N LEVEL Adjust levels of transition ▶ 0 - 255
N&D LEVEL Adjust levels of transition ▶ 0 - 255 DELAY 1 - 60 SEC
- Input Method AGC DAY&NIGHT mode are changed according to the brightness of the image. Use only when the
camera is installed in a dark place but the camera is viewing a bright place. When used in a normal installation, hunting may occur.
MODE Select input mode. ▶ AGC, SENSOR
D&N LEVEL Adjust levels of transition ▶ 0 - 255
N&D LEVEL Adjust levels of transition ▶ 0 - 255 DELAY 1 - 60 SEC
2) D&N B&W SMART IR ON, OFF LEVEL 1 - 20
DAY&NIGHT
►
AUTOOFF
LENSEXPOSUREAWBWDR/BLCDAY&NIGHTIMAGEFUNCTIONSYSTEMEXIT
<SETUP> <D&N AUTO>
MODE
D▶N LEVEL
N▶D LEVELDELAYRETURN
SENSOR
IIIIIIIII 20
IIIIIIIII 70
3 SEC
<D&N B&W>
SMART IRLEVELRETURN
ON
IIIIIIIII 7
< WDR/BLC>
►AUTOOFF
LENSEXPOSUREAWBWDR/BLCDAY&NIGHTIMAGEFUNCTIONSYSTEMEXIT
<SETUP> <WDR>
GAINWEIGHTRETURN
IIIIIIIII 10IIIIIIIII 2
<BLC>
X-POSY-POSX-SIZY-SIZRETURN
IIIIIIIII 6IIIIIIIII 6IIIIIIIII 7IIIIIIIII 7

10
IMAGE
The IMAGE menu provides the ability to adjust the CHROMA, SHARPNESS, EFFECT, STILL, SHADING, HLMASK, DZOOM and GAMMA functions of the camera.
1) CHROMA Adjust the CHROMA level. ▶ 0 ~ 20
2) SHARPNESS Adjust the SHARPNESS level. ▶ 0 ~ 103) EFFECT OFF, MIRROR, FLIP, ROTATE
4) STILL Select real or still mode. ▶ ON, OFF
5) SHADING Select the lens SHADING compensation. ▶ ON, OFF6) HLMASK Mask the high light zone with specific color & level. - MLASK
LEVEL Adjust High Light Mask level. ▶ 0 - 20
COLOR Select Color mask. ▶ BLACK, WHITE, YELLOW, CYAN, GREEN, MAGENTA, RED, BLUE
-SMART HLC
LEVEL Adjust High Light Mask level. ▶ 0 - 15
DELAY Adjust DELAY time. ▶ 1 - 15 SEC
7)DZOOM Adjust the Digital ZOOM level. ▶ 0 ~ 120
8)GAMMA Adjust the GAMMA level. ▶ 0 ~ 4
<IMAGE>
►
AUTOOFF
LENSEXPOSUREAWBWDR/BLCDAY&NIGHTIMAGEFUNCTIONSYSTEMEXIT
<SETUP>
OFF
CHROMASHARPNESSEFFECTSTILLSHADINGHLMASKDZOOMGAMMARETURN
<IMAGE>
OFFOFF
OFF
IIIIIIIII 15IIIIIIIII 5
IIIIIIIII 0IIIIIIIII 1
<HLMASK>
<HLMASK>LEVELCOLORRETURN
IIIIIIIII 17
BLACK
<SMART HLC>LEVELDELAYRETURN
IIIIIIIII 8
3 SEC
OFF
CHROMASHARPNESSEFFECTSTILLSHADINGHLMASKDZOOMGAMMARETURN
<IMAGE>
OFFOFF
OFF
IIIIIIIII 15IIIIIIIII 5
IIIIIIIII 0IIIIIIIII 1
►
11
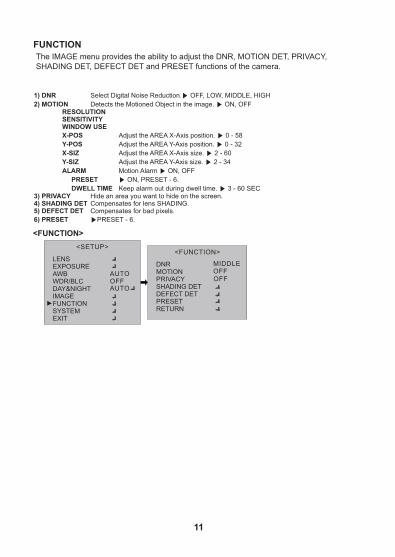
FUNCTION
The IMAGE menu provides the ability to adjust the DNR, MOTION DET, PRIVACY, SHADING DET, DEFECT DET and PRESET functions of the camera.
1) DNR Select Digital Noise Reduction.▶ OFF, LOW, MIDDLE, HIGH
2) MOTION Detects the Motioned Object in the image. ▶ ON, OFFRESOLUTIONSENSITIVITYWINDOW USE
X-POS Adjust the AREA X-Axis position. ▶ 0 - 58
Y-POS Adjust the AREA Y-Axis position. ▶ 0 - 32
X-SIZ Adjust the AREA X-Axis size. ▶ 2 - 60
Y-SIZ Adjust the AREA Y-Axis size. ▶ 2 - 34
ALARM Motion Alarm ▶ ON, OFF
PRESET ▶ ON, PRESET - 6.
DWELL TIME Keep alarm out during dwell time. ▶ 3 - 60 SEC3) PRIVACY Hide an area you want to hide on the screen.4) SHADING DET Compensates for lens SHADING.5) DEFECT DET Compensates for bad pixels.
6) PRESET ▶PRESET - 6.
<FUNCTION>
►
AUTOOFF
LENSEXPOSUREAWBWDR/BLCDAY&NIGHTIMAGEFUNCTIONSYSTEMEXIT
<SETUP>
DNRMOTIONPRIVACYSHADING DETDEFECT DETPRESETRETURN
<FUNCTION>
OFF
MIDDLEOFF

12
FUNCTION
<MOTION>
<ALARM>
RESOLUTIONSENSITIVITYWINDOW USEX-POSY-POSX-SIZY-SIZALARMRETURN
<MOTION>
IIIIIIIII 2IIIIIIIII 10ONIIIIIIIII 20IIIIIIIII 6IIIIIIIII 20IIIIIIIII 20OFF►
DWELL TIMERETURN
<ALARM>
3 SEC
RESOLUTIONSENSITIVITYWINDOW USEX-POSY-POSX-SIZY-SIZALARMRETURN
<MOTION>
IIIIIIIII 2IIIIIIIII 10ONIIIIIIIII 20IIIIIIIII 6IIIIIIIII 20IIIIIIIII 20OFF
DNRMOTIONPRIVACYSHADING DETDEFECT DETRETURN
<FUNCTION>
OFF
MIDDLEOFF►
<PRIVACY>
DNRMOTIONPRIVACYSHADING DETDEFECT DETPRESETRETURN
<FUNCTION>
OFF
MIDDLEOFF
►
ZONE SELECTZONE USEX-POSY-POSX-SIZY-SIZCOLORTRANSRETURN
<PRIVACY>
0OFFIIIIIIIII 9IIIIIIIII 4IIIIIIIII 3IIIIIIIII 3WHITEIIIIIIIII 4
<SHADING DET>
TURN LENS TO LOOK WHITEENTER KEY FOR START
OTHER KEYS FOR RETURN
<SHADING DET>
PROCESSING
<SHADING DET>
<DEFECT DET>
COVER THE LENSENTER KEY FOR START
OTHER KEYS FOR RETURN
<DEFECT DET>
DIR KEYS FOR THRESHOLD ADJENTER KEY FOR FINISH
THRESHOLD 0000000009
<DEFECT DET>

13
1) RS485CAM ID Select the CAMERA ID. ▶ 1 - 255
PROTOCOL Select RS485 PROTOCOL. ▶ FASTRAX, PELCO-P, PELCO-D,COMMANDBAUD RATE Select serial communication speed.▶2400, 4800, 9600, 19200, 38400 BPSSAVE Save the current settings.
2) CAM TITLE Maximum of 10 characters are allowed.3) DISPLAY Set the position of the camera ID. & title.4) OUT MODE Image output method.
RESOLUTION Select Digital output 1080P or 720P. ▶ 1080P, 720PVIDEO MODE Select NTSC or PAL.CVBS SCALE Select image scale. ▶ CROP(4:3), OFF, FULL(4:3)COLOR RANGE Select image color range. ▶ CLIP, FULL
5) LANGUAGE OSD menu LANGUAGE.6) VERSION Firmware VERSION.7) RESET Factory initialization of camera settings. ▶ NTSC, PAL
SYSTEM
The IMAGE menu provides the ability to adjust the RS485, CAM TITLE, DISPLAY,OUT MODE, LANGUAGE, VERSION and RESET functions of the camera.
<SYSTEM>
►
AUTOOFF
LENSEXPOSUREAWBWDR/BLCDAY&NIGHTIMAGEFUNCTIONSYSTEMEXIT
<SETUP>
RS485CAM TITLEDISPLAYOUT MODELANGUAGEVERSIONRESETRETURN
<SYSTEM>
NTSC/60Hz
<RS485>
ENGLISH1.0
CAM IDPROTOCOLBAUD RATESAVERETURN
<RS485>
9600 BPS
IIIIIIIII 1FASTRAX
RS485CAM TITLEDISPLAYOUT MODELANGUAGEVERSIONRESETRETURN
<SYSTEM>
NTSC/60Hz
ENGLISH1.0
►

14
<CAM TITLE>
^ ^ ^ ^ ^ ^ ^ ^ ^ ^
0 1 2 3 4 5 6 7 8 9A B C D E F G H I JKLMNOPQRSTUVWXYZ @#$/ & * ( ) - = : , .
< > CLR RET
<CAM TITLE>
RS485CAM TITLEDISPLAYOUT MODELANGUAGEVERSIONRESETRETURN
<SYSTEM>
NTSC/60Hz
ENGLISH1.0
►
<DISPLAY>
CAM IDID POSCAM TITLETITLE POSRETURN
<DISPLAY>RS485CAM TITLEDISPLAYOUT MODELANGUAGEVERSIONRESETRETURN
<SYSTEM>
NTSC/60Hz
ENGLISH1.0
►
<OUT MODE>
RS485CAM TITLEDISPLAYOUT MODELANGUAGEVERSIONRESETRETURN
<SYSTEM>
NTSC/60Hz
ENGLISH1.0
►
OFFTOP-LEFTOFFTOP-LEFT
RESOLUTIONVIDEO MODECVBS SCALECOLOR RANGERETURN
<OUT MODE>
1080PNTSC/60HZCROP(4:3)CLIP
SYSTEM

SPECIFICATIONS
Scanning system
Image Sensor
Scanning Mode
Zoom Movement Speed
Digital Zoom
Min. Working Distance
Focusing System
Effective Pixels (H x V)
Image Size (H x V)
Min. illumination
Back Light Compensation
Electronic Shutter Speed
White Balance
AE Control
Wide Dynamic Range
True Day and Night (ICR)
Noise Reduction (2D, 3D)
Slow Shutter
Color Enhancement
Aperture Control
Lens Shading
Defect Suppression
Video Out
Day&Night Ext-In
ALARM Out (Motion Detect)
Camera Control
Camera Title / ID Display
Privacy Zone Masking
Video Preset
Video Motion Detection
Digital PTZ
Video Flip / Mirror / Freeze
Protocol
IR LED/SENSOR
LED Lighting Distance
Power Input
Video Output
Operating Temperature
IP Rating
Meterials
Operating humidity
External Dimension
* Specifications are subject to change without notice.
Progressive
1/2.9” CMOS 2.1M
Progressive Scan
Optical WIDE to Optical TELE: 2.0 sec (Variable)
Digital WIDE to Digital TELE: 4.0 sec
16x (320x with optical zoom)
30 mm (WIDE end), 1000 mm (TELE end)
AUTO, ONE PUSH AF, MANUAL
1920 x 1080
1920 x 1080, 1280 x 720
1.7 Lux(Color), 0Lux (IR LED ON) at F1.6, 50 IRE
Yes (ON/OFF)
1/30 sec ~ 1/60,000 sec (12 steps)
AUTO, AUTOext(Sodium Vapor Lamp), PRESET(One Push), Manual
AUTO, IRIS Manual, SHUTTER Manual
Yes (ON/OFF, Max 15 fps)
0 ~ 96% (non-condensing)
88 (Dia) x 166.8(L) / 286.8(L)mm including bracket
Die-Casting Aluminum
Ip66
-10° ~ +50° C [14℉ ~ 122℉]
BNC Connector
2-Pin Wire (RED, WHITE)
50M
IR LED 90EA, Sensor 1EA
COMMAND, FASTRAX, PELCO-D, PELCO-P, VISCA
Yes
Yes
Yes
Yes
Yes
HD: Digital(SDI), SD: Analog(CVBS)
Yes
Yes
External remote control(ADKEY), RS485
Yes
Max 24
Yes
Specific Area/Full Screen
x16
Yes
Yes (ON/OFF)
YES
MODEL HSUI-H75DxZ2U8
Composite Out NTSC/PAL Selectable
Lens Optical Zoom 20x(f=4.7mm ~ 94.0mm) F1.6(wide)~ F3.5(tele)
Power Source AC24V / DC12V ± 10%
Power Consumption 10.0Watts (700mA)POWER
VIDEOResolution 1080p@30fps, 720p@60fps
Connector&
ETC
IR LED
IMAGE

50303467B