audyssey multeq pro user guide for sub equalizerinstaller.audyssey.com/files/audyssey multeq pro...
TRANSCRIPT

Audyssey MultEQ Pro User Guide
for the Audyssey Sub Equalizer
Audyssey Laboratories, Inc, 350 South Figueroa Street, Suite 233, Los Angeles, CA 90071 www.audyssey.com

Table of Contents
Important Safety Instructions ........................................................................................ 1
Introduction ..................................................................................................................... 2
MultEQ Pro Setup Guide ............................................................................................................................. 2
License Keys ............................................................................................................................................... 2
Sub Equalizer Contents ............................................................................................................................... 2
The Audyssey Installer Kit ........................................................................................................................... 3
Audyssey Installer Kit Contents ............................................................................................................... 3
Setup Before Customer Installation .............................................................................. 5
MultEQ Pro Main Setup ............................................................................................................................... 5
Installing Microsoft .NET Framework 2.0 .................................................................................................... 5
Installing MultEQ Pro ................................................................................................................................... 5
Uninstalling MultEQ Pro .............................................................................................................................. 6
Viewing the Setup Guide ............................................................................................................................. 6
Add Microphone File to MultEQ Pro ............................................................................................................ 6
USB to RS232 Driver Installation ................................................................................................................ 6
Register on the Audyssey Installer Website ................................................................................................ 7
Audyssey Registered Installers ................................................................................................................... 8
The Auto EQ Assist Feature Overview .......................................................................... 9
Sub Equalizer Connections ......................................................................................... 10
Configuring the Receiver, Preamplifier/Processor .................................................................................... 13
Before the MultEQ Pro Calibration......................................................................................................... 13
During the MultEQ Pro Calibration......................................................................................................... 13
The MultEQ Pro Application ........................................................................................ 14
Overview and Screen Sequence ............................................................................................................... 14
Product Selection....................................................................................................................................... 15
Job Information .......................................................................................................................................... 15
Options ...................................................................................................................................................... 16
About Audyssey Professional Microphones .......................................................................................... 16
Room Dimensions ..................................................................................................................................... 17
Equipment Info........................................................................................................................................... 18
Auto EQ Assist ........................................................................................................................................... 19
Channel Configuration ............................................................................................................................... 20
One IN to one OUT ................................................................................................................................ 20
One IN to one OUT (Zone 2) ................................................................................................................. 20
One in to two OUT ................................................................................................................................. 21
Dual Discrete .......................................................................................................................................... 21
Configuring More Than Two Subwoofers .............................................................................................. 21
Table of Contents
Level Matching........................................................................................................................................... 22
Before Level Measurement .................................................................................................................... 22
Performing Level Measurements ........................................................................................................... 22
Level Matching Subwoofer Groups ........................................................................................................ 23
Measurement ............................................................................................................................................. 24
Before Measurements ............................................................................................................................ 24
Positioning the Microphone .................................................................................................................... 24
Position 1 Measurement ........................................................................................................................ 25
Additional Position Measurements......................................................................................................... 25
Detection Results....................................................................................................................................... 26
Save Results .............................................................................................................................................. 27
Transfer the MultEQ XT Filters .............................................................................................................. 27
MultEQ XT On/Off Demo ....................................................................................................................... 27
Changing the MultEQ XT Filters ............................................................................................................ 27
View Results – The Customer Certificate .............................................................................................. 27
Printing the Customer Certificate ........................................................................................................... 28
Permanently Save the MultEQ XT Filters .............................................................................................. 28
Uploading the MultEQ Pro Results ........................................................................................................ 28
Appendix ....................................................................................................................... 29
Product Specifications ............................................................................................................................... 29
Warranty .................................................................................................................................................... 30
Technical Support ...................................................................................................................................... 30
© 2009 Audyssey Laboratories, Inc.


MultEQ Pro User Guide for the Audyssey Sub Equalizer Page 1
Important Safety Instructions
1) Read these instructions – All the safety and operating instructions should be read before the product is operated.
2) Retain these instructions – The safety and operating instructions should be retained for future use.
3) Heed all warnings – on the product and in the owner’s guide.
4) Follow instructions – All operating and use instructions should be followed.
5) Do not use this apparatus near water or moisture. For example, do not use this product near a bathtub, washbowl, kitchen sink, laundry tub, in a wet basement, near a swimming pool, or anywhere else that water or moisture are present.
6) Clean only with a dry cloth – and as directed by Audyssey Laboratories, Inc. Unplug this product from the wall outlet before cleaning.
7) Do not place this product on an unstable cart, stand, tripod, bracket, or table. The product may fall, causing injury to a child or adult, and damage to the product. Use only with a cart, stand, tripod, bracket, or table recommended by the manufacturer, or sold with the product.
8) Do not block any ventilation openings. Install in accordance with the manufacturer’s instructions – To ensure reliable operation of the product and to protect it from overheating, put the product in a position and location that will not interfere with its proper ventilation. For example, do not place the product on a bed, sofa, or similar surface that may block the ventilation openings. Do not put it in a built-in system, such as a bookcase or a cabinet that may keep air from flowing through its ventilation openings.
9) Do not install near any heat sources, such as radiators, heat registers, stoves, or other apparatus (including amplifiers) that produce heat.
10) Do not place anything on top of this product.
11) Only use attachments/accessories specified by the manufacturer.
12) Protect the power cord from being walked on or pinched by items placed upon or against them, particularly at plugs, convenience receptacles, and the point where they exit from the product.
13) Unplug this apparatus during lightning storms or when unused for long periods of time – to prevent damage to this product.
14) Refer all servicing to qualified service personnel. Servicing is required when the apparatus has been damaged in any way: such as power supply cord or plug is damaged; liquid has been spilled or objects have fallen into the apparatus; the apparatus has been exposed to rain or moisture, does not operate normally, or has been dropped – Do not attempt to service this product yourself. Opening or removing covers may expose you to dangerous voltages or other hazards. Please call Audyssey to be referred to an authorized service center near you.
15) To prevent risk of fire or electric shock, avoid overloading wall outlets, extension cords, or integral convenience receptacles.
16) Do not let objects or liquids enter the product – as they may touch dangerous voltage points or short-out parts that could result in a fire or electric shock and damage to the product.
17) See product enclosure for safety-related markings.
18) Use proper power sources – Plug the product into a proper power source, as described in the operating instructions or as marked on the product. This product should be operated only from the type of power source indicated on the marking label. If you are not sure of the type of power supply to your home, consult your local power company.
19) Do not cascade other devices into the calibrated microphone-to-calibrated preamplifier-to-Sub Equalizer path. Serious damage could occur to each piece of equipment.
20) Do not connect a source, such as a DVD player, directly to the Sub Equalizer.
There are several reasons for this, but the primary reason is the difference in voltage levels. Most sources provide 2 V RMS line-level output, and the Sub Equalizer has a maximum allowable input level of 1.5 V RMS as is typical for high quality preamplifiers and processors. Connecting a source directly may cause some material to clip the input of the Sub Equalizer. Additionally, you will not have volume control, bass management, delay correction, or level correction. Therefore, to have these features and achieve the correct input levels you should always use a pre-amp/processor between the source and the Sub Equalizer.
CAUTION: To reduce risk of electrical shock, do not remove chassis cover. No user serviceable parts inside. Refer servicing to qualified service personnel.
WARNING: TO REDUCE THE RISK OF FIRE OR ELECTRICAL SHOCK, DO NOT EXPOSE THIS APPLIANCE TO RAIN OR MOISTURE.

Audyssey MultEQ Pro User Guide for the Audyssey Sub Equalizer Page 2
Introduction The Audyssey Sub Equalizer
TM is a stand-alone hardware platform for custom installers to implement
Audyssey MultEQ® XT sound equalization technology adapted specifically for subwoofers.
The Sub Equalizer removes distortion caused by the interaction of sound from subwoofers with the acoustics of the listening room. This results in delivery of low frequency content as it was intended, without distortion and coloration, not just in one seat, but over a large listening area.
The installation of every Sub Equalizer requires professional calibration using the MultEQ Pro®
application and the Audyssey Installer Kit. Installers bring the Installer Kit and a laptop to an installation site, run the MultEQ Pro application, create correction filters, and transfer MultEQ XT filters from the laptop to the Sub Equalizer. The intuitive steps for completing this installation are described in detail in this User Guide.
The latest MultEQ Pro User Guides are available to registered Audyssey Installers through the Audyssey Installer Website: http://www.audyssey.com/InstallerWeb.
MultEQ Pro Setup Guide
The MultEQ Pro Setup Guide is included in the Installer Kit package. This guide provides simple instructions for the installation of the MultEQ Pro application. Be sure to review this guide prior to installing MultEQ Pro on a laptop or PC.
License Keys
The MultEQ Pro application is used to calibrate the Audyssey Sub Equalizer, as well as other Audyssey Installer-Ready products. Some Audyssey Installer-Ready Products require that a license key be purchased from the Audyssey Installer Web before in order to perform the professional calibration.
The Audyssey Sub Equalizer does not require a License Key to calibrate using MultEQ Pro.
Sub Equalizer Contents The Audyssey Sub Equalizer ships with the following contents:
• MultEQ Pro Installer Guide for the Audyssey Sub Equalizer
• Detachable Magnetic Faceplate (remove for front panel access)
• Power Supply & Power Cord (Elementech International Co., Ltd. part no. AU1241202g)
• Mono-1/8th
inch pass-through cable (used for Auto EQ Assist feature)
• Self-Adhesive Black Rubber Feet (4)
• Rack Ears, Left and Right
These items, in conjunction with the contents of the Audyssey Installer Kit are all that is required to calibrate the Audyssey Sub Equalizer.

MultEQ Pro User Guide for the Audyssey Sub Equalizer Page 3
The Audyssey Installer Kit Every Audyssey Installer is required to purchase an Audyssey Installer Kit. More than one kit may be
ordered. The Audyssey Installer Kit contains the necessary equipment for calibrating an Audyssey Sub
Equalizer or Audyssey Installer-Ready products.
The Installer Kit contains several components that have been designed specifically for Audyssey
Installer-Ready products and are enclosed in a durable carrying bag.
Audyssey Installer Kit Contents
MultEQ Pro Application CD and Setup Guide
The MultEQ Pro Application and User Guide may be found on the enclosed CD. A printed Setup Guide is included in the Installer Kit. The application must be installed on your laptop.
Calibrated Microphone and Microphone Stand
Each Audyssey microphone is calibrated by Audyssey and comes with a custom calibration curve that matches the microphone to a high-precision, ¼” reference microphone. The calibration curve for your microphone is stored on your MultEQ Pro application CD. The absolute sensitivity, including the exact gain of each individually calibrated preamplifier, is included in the correction curve.
Warning: Only use the supplied Audyssey Calibrated Microphone. Do not plug in other microphones.
Calibrated Preamplifier and Power Supply
This microphone preamplifier provides phantom power to the microphone and applies fixed gain amplification to the microphone signal with no external controls. The microphone connects to the Mic In mini-XLR jack. The Line Out mini-XLR output connects to the Cal Line In input of the Sub Equalizer. Use the enclosed mini-XLR microphone cables for both the Mic In and Line Out connections to this preamp.
Warning: Only use the supplied Audyssey calibrated preamplifier. Do not use any other microphone preamplifier.
Audyssey MultEQ Pro User Guide for the Audyssey Sub Equalizer Page 4
RCA to Mini-XLR Adapter
This adapter connects the mic preamplifier mini-XLR cable to mic inputs of Sound Equalizers or Audyssey Installer-Ready products.
10 ft. USB Cable
The laptop running the MultEQ Pro application connects to the Sub Equalizer via the 10 ft. USB cable.
Microphone Mini-XLR Cables
The Installer Kit contains three 25 ft. mini-XLR cables and two XLR-to-mini-XLR cables. The cables are used to connect the microphone preamp (from the Line Out interface) to the Sub Equalizer or other Audyssey Installer-Ready devices. The cables can be linked together to provide up to 75 feet of length for large rooms or multi-room installations.
USB to RS232 Serial Cable
This cable connects certain Audyssey Installer-Ready products to a laptop running the MultEQ Pro application.
Previous Installer Kit Components
Items from previous versions of the Audyssey Installer Kit (such as the Audyssey MM01 professional calibration microphone) can still be used for calibration with MultEQ Pro v2.5 or later as long as the microphone calibration file is copied into the new Audyssey MultEQ Pro directory.

Setup Before Customer Installation Perform these setup steps before arriving at the installation site.
MultEQ Pro Main Setup
Insert the MultEQ Pro CD included in your Audyssey Installer Kit into your PC’s CD-ROM drive. There are four possible options to choose from in the MultEQ Pro Main Setup window (depending on the status of necessary installations). You will click on the text itself to begin the operation desired.
• Install Microsoft .NET
• Install MultEQ Pro
• Uninstall MultEQ Pro
• View Setup Guide
• Add Microphone File to MultEQ Pro
The options to Install MultEQ Pro will not appear unless Microsoft .NET 2.0 is already installed.
Installing Microsoft .NET Framework 2.0
Microsoft .NET 2.0 Framework must be installed before installing, uninstalling, or running the MultEQ Pro software. The Microsoft .NET Framework is a software component that can be added to the Microsoft Windows operating system.
The .NET 2.0 installation can be found on the MultEQ Pro CD. After inserting the CD into your laptop, the ‘autorun’ function should launch the MultEQ Pro Main Setup Window (see next page). If it does not automatically run, you can double-click the disc (typically the D: drive) in the My Computer folder.
In the image, “Install Microsoft .NET”, the option to install the MultEQ Pro application is not available because Microsoft .NET (v2.0) is not installed. Therefore, left-click on the Install Microsoft .NET option to begin the installation. Note that during the installation process, highlighted items are shown with green font. You must accept the End-User License Agreement (or “EULA”) to install the .NET software.
It is highly recommended that the Windows Update is run after installation of .NET Framework 2.0 in order to receive the latest service packs and security updates from Microsoft. This is typically found by clicking the Start button and looking in All Programs.
The option to install MultEQ Pro will only become available once .NET 2.0 Framework has been installed.
Installing MultEQ Pro
Click Install MultEQ Pro to begin the installation wizard. The software installation program will guide you through the MultEQ Pro application setup. You must accept the Audyssey End-User License Agreement (or EULA) to continue the installation the MultEQ Pro application. Select the location you would like to install the application to or install to the default location. Once the MultEQ Pro installation is complete, the software application will appear in the “Audyssey Labs” folder in the Start menu (unless other location was specifically
Install Microsoft .NET
Accept the EULA
Select Installation Folder
Install MultEQ Pro
After installing .NET & MultEQ Pro
Copied one file successfully

Audyssey MultEQ Pro User Guide for the Audyssey Sub Equalizer Page 6
specified by you). Repeat the above MultEQ Pro install for each laptop your company will use for installations.
Uninstalling MultEQ Pro
A dialog with a progress bar will appear as the MultEQ Pro application is uninstalled. The dialog will disappear once the uninstallation is complete.
Viewing the Setup Guide
An electronic version of the MultEQ Pro Setup Guide is available to view at any time during the setup.
Add Microphone File to MultEQ Pro
If your company has purchased more than one installer kit, it is highly recommended you save the microphone calibration file from each of your MultEQ Pro CDs on each company laptop used for installation. This allows measurement microphones to be shared and used with any of your laptops. The “Copied One File” window will be displayed after each microphone calibration file is successfully copied to your laptop. It is important to have the correct microphone calibration file with the corresponding microphone and preamp marked with the matching 5-digit serial number. Each microphone and preamplifier set is measured by Audyssey and the unique mic calibration file is stored on the installation CD of the installer kit. Registered Installers may conveniently retrieve microphone calibration files through the Audyssey Installer Website.
USB to RS232 Driver Installation
Some Audyssey Installer-Ready products require the laptop running the MultEQ Pro application connect to using the USB to RS232 connector provided in the Audyssey Installer Kit. In MultEQ Pro 3.0, and later, the driver to allow you to use the RS232 connector is located on the MultEQ Pro Installation disc. Microsoft XP or Vista will prompt you if needed to locate the driver. See Found New Hardware image. Select the option: Locate and install driver software (recommended). A new window will launch asking you to insert the disc that came with your USB Serial Controller. Insert the MultEQ Pro CD. It is advised to not search online for the driver as it is included on the MultEQ Pro CD and the result may differ greatly. If a Windows Security warning appears stating that it cannot verify the publisher, select to, “Install this driver software anyway”. Once the installation is complete, you will be able to use MultEQ Pro with the RS232 connection. It is only necessary to perform this procedure once on a PC.
Locate and install driver software
Search online for driver?
Windows Security Install this driver anyway
Insert the MultEQ Pro setup disc

MultEQ Pro User Guide for the Audyssey Sub Equalizer Page 7
Register on the Audyssey Installer Website
Before arriving with the Sub Equalizer at a customer’s home, be sure to visit the Audyssey Installer Website (A) at www.audyssey.com/InstallerWeb to register your personal account and get the latest software version of MultEQ Pro.
You must register on the Audyssey Installer Website in order to:
• Upload installation results, store, and retrieve customer certificates (B) (page).
• Receive version updates for MultEQ Pro software
• Download user guides, manuals, and marketing materials
A B

Audyssey MultEQ Pro User Guide for the Audyssey Sub Equalizer Page 8
Audyssey Registered Installers
After signing in, the Welcome screen gives a brief overview of the Installer Website. Use the links on the left- to navigate.
Certificate Overview This page explains the details of the Customer Certificate.
Create Customer Certificate Upload MultEQ Pro calibrations results to generate a Customer Certificate. At completion of the intuitive process, certificates can be printed.
View Customer Certificates View archived MultEQ Pro calibration results by clicking the View Customer Certificate link next to the name assigned to each job (see Job Information, page 15).
Purchase/Activate MultEQ Pro Licenses Purchase and manage your MultEQ Pro Licenses and License Keys.
Purchase Audyssey Software Purchase the latest version of MultEQ Pro.
Download Microphone Calibration Files Retrieve lost Audyssey Microphone Calibration files using the 5-digit serial number labeled on the mic.
Edit Account Settings Change account settings such as Username, Password, Company Name, Address, etc.
Discussion Forums Connect with other Audyssey Installers to discuss all things Audyssey.
Frequently Asked Questions Access to multiple FAQs that answer commonly asked questions about how solve problems or find out more about the many Audyssey technologies.
Contact/Tech Support Contact Audyssey with questions or comments.
Downloads Download Audyssey support materials.
Privacy Audyssey does not sell, license, or rent personal information gathered from this Installer Website.
Sign Out Sign out of the Audyssey Installer Website.

MultEQ Pro User Guide for the Audyssey Sub Equalizer Page 9
The Auto EQ Assist Feature Overview The Auto EQ Assist feature was designed to allow the Sub Equalizer to be integrated with non-Audyssey automatic room equalization-enabled receivers or separates.
When calibrating the Audyssey Sub Equalizer in conjunction with an auto-calibrating room equalization receiver (or separate), you will need to perform the external calibration while using the Auto EQ Assist feature of MultEQ Pro.
This patent-pending feature defeats the calibration that would normally be set for the Subwoofer by the external calibration, allowing MultEQ Pro to set the filter for the subwoofer instead. The other surround channels are still able to be calibrated normally by the external calibration method.
Set the radio button to On for the duration of the external calibration. Do not leave this screen, quit this application, power off or disconnect the computer from the Sub Equalizer for the duration of the external calibration.
When the external calibration is complete, click the Off radio button to turn External Calibration Mode to Off and press to continue.

Audyssey MultEQ Pro User Guide for the Audyssey Sub Equalizer Page 10
Sub Equalizer Connections Setup, Calibration, and Auto EQ Assist Connection Diagram
System connection diagram.
Important: Before making any connections, be sure to power off the Sub Equalizer, amplifier(s), powered subwoofers, and receiver or Pre/Pro. 1. Connect the receiver’s calibration microphone and pass-through connections.
a. Connect the Sub Equalizer mono 1/8 inch pass-through cable included with the Sub Equalizer to the receiver or Pre/Pro’s Calibration Microphone In connector.
b. Connect the other end of the cable to the Sub Equalizer Pass-through Mic OUT connector on the front chassis.
Note: Only use the cable included with the Sub Equalizer. Other connectors may appear identical when in fact, they are not.
Also, if the external microphone does not use an 1/8 inch connector, an adapter may be required. This is not included with the Sub Equalizer. Be sure to check the receiver’s calibration microphone connection prior to arriving at the installation site.
c. Connect the receiver or Pre/Pro calibration microphone to the Sub Equalizer Pass-through Mic IN connector.
2. Connect the receiver’s subwoofer outputs to the Sub Equalizer.
a. Connect the receiver or Pre/Pro Subwoofer Out to the Sub Equalizer SUB A INPUT connector on the back panel.
If the receiver has more than one subwoofer output, in most cases, these pre-outs are typically internally Y-corded within the receiver. So you only need to connect ONE subwoofer pre-out, to the Sub Equalizer Input.
b. If you are certain that there are two discrete subwoofer outputs from the receiver or separate, and you want to use the dual discrete channel configuration of the Sub Equalizer, connect the second subwoofer output to the SUB B INPUT of the Sub Equalizer.
1a
1c
1b
2b 2a 3 4 4
5b
5c
6
5a

MultEQ Pro User Guide for the Audyssey Sub Equalizer Page 11
3. Connect SAT OUTPUT to the receiver.
Connect the SAT OUTPUT of the Sub Equalizer to either the Center (preferred) or Left channel Input of the receiver. This connection is necessary for Level Matching the Subwoofers to the Satellites.
If multichannel input in not available for the receiver, connect to the Left channel of any stereo input (e.g., AUX IN). Be sure to select that input during the level matching and measurement procedure of MultEQ Pro. See Level Matching, page 22 and Measurement, page 24.
4. Connect the Subwoofer(s) to the Sub Equalizer.
Position and connect the powered subwoofer(s) to the SUB A, and SUB B OUTPUT of the Sub Equalizer.
If setting up for multi-zone, set the subwoofers in the different zones you will calibrate for, and connect to the SUB A and SUB B OUTPUT of the Sub Equalizer.
5. Connect and position the Audyssey Professional Microphone and Preamplifier.
a. Set the Audyssey Calibrated Microphone using the professional microphone stand included with the Audyssey Installer Kit.
b. Using one mini-XLR cable from the Audyssey Installer Kit, connect the Cal Line In of the Sub Equalizer to the LINE OUT of the Calibrated Preamplifier (Model ACP2).
If using an older version of the Audyssey Installer Kit that includes standard XLR cables, you will need to use the XLR to mini-XLR adapters included in the latest Audyssey Installer Kits to connect the older preamplifier to the mini-XLR Cal Line In connector of the Sub Equalizer. Contact your local distributor or Audyssey Technical Support to find out more about acquiring this adapter. See page 30 for contact information.
c. Use another mini-XLR cable to connect the MIC IN of the Calibrated Preamplifier to the Audyssey professional microphone.
d. Place the microphone stand upright and extend the boom arm to avoid sound reflections from the stand. Attach the microphone holder to the end of the boom arm. Insert the microphone in a vertical position in the holder so that it is pointed to the ceiling.
Position the microphone at the central listening position within the listening area for the first Measurement. This is the position from which delays and trims will be calculated.
Before performing any measurements, be sure to place the microphone in a vertical position with the capsule pointing directly at the ceiling. Make sure there are no nearby obstructions or large reflecting surfaces.
6. Connect the computer or laptop running MultEQ Pro using the A to B USB cable included with the Audyssey Installer Kit to the USB connection on the front panel of the Sub Equalizer.
The Sub Equalizer USB port can be found beneath the magnetic faceplate of the unit. The detachable magnetic faceplate is easily removed and reinstalled by hand.
Any of the computer’s USB ports may be used for this connection.
EXTEND ARM

Audyssey MultEQ Pro User Guide for the Audyssey Sub Equalizer Page 12
Be sure to provide enough slack for the USB cable so that it will not suddenly disconnect during MultEQ Pro calibration. Accidental USB disruption/disconnection will likely require MultEQ Pro to be restarted.
The USB cable supplied in the Audyssey Installer Kit is 10 ft. long. Substitution of other USB cable is acceptable for a longer connection (the longest USB cables available are 15 ft).
7. Connect the remaining speakers to the receiver, amplifier, etc. and position them as they will remain (in their respective zones, etc). Make all other connections as instructed by the product’s user guide.
8. Setup and position the receiver or separate’s calibration microphone as instructed by the product’s user guide.
Once these steps are complete, you are ready to run MultEQ Pro and to calibrate the Sub Equalizer and receiver.

MultEQ Pro User Guide for the Audyssey Sub Equalizer Page 13
Configuring the Receiver, Preamplifier/Processor
The MultEQ Pro application measures the room response and computes the MultEQ XT room correction filters. The crossover frequency, level, and trim settings reported by the Detection Results screen of MultEQ Pro must be entered manually into the preamplifier/processor or receiver. See Detection Results, page 26.
Before the MultEQ Pro Calibration
If the subwoofer(s) has a built-in lowpass filter it should be bypassed, or set to the THX setting. Sometimes there is an input called “LFE” that has the lowpass filter already bypassed. This must be done before MultEQ Pro measurements are made. If the subwoofer lowpass filter cannot be defeated, set it to its maximum frequency. Any subwoofer gain controls should be set to their nominal settings, such as at the THX position, or at 12 o’clock on a conventional level control. Phase controls, if they exist, should be set to 0°.
Defeating the lowpass filter in the subwoofer ensures that the MultEQ Pro software has the best possible chance of producing the smoothest response through the crossover region.
If the subwoofer has any sort of “Auto”, “Standby”, or “Sleep” mode that turns the power to the subwoofer off after it does not receive any signal for some period of time, disable this mode. This will ensure that the subwoofer is always on and ready to output the MultEQ test signals. Failure to disable this mode could chop off the start of the test signal and this would result in inaccurate subwoofer measurements.
During the MultEQ Pro Calibration
Consult the manufacturer’s documentation of the preamplifier/processor on how to manually set the parameters reported by the MultEQ Pro application at the Detection Results screen.

Audyssey MultEQ Pro User Guide for the Audyssey Sub Equalizer Page 14
The MultEQ Pro Application
Overview and Screen Sequence
The MultEQ Pro application consists of a series of screens which leads installers through the
calibration process. The names of each screen are listed in the left column of the application (A,
C) to help track progress.
Within the application, the current screen is highlighted in bold (A).
Move forward and backwards through the application’s screens by clicking the and buttons on each screen (B).
While the mouse cursor is over the forward and back buttons, black / buttons indicate available back and forward functionality, while light grey and buttons indicate that forward or back are currently unavailable.
B
Product Selection
Job Information
Options
Room Dimensions
Equipment Info
Auto EQ Assist
Channel Configuration
Level Matching
Measurement
Detection Results
Save Results
Calibration Complete
C
A

MultEQ Pro User Guide for the Audyssey Sub Equalizer Page 15
Product Selection
Choose Audyssey Sub Equalizer from the list of Audyssey products and press the button to continue.
MultEQ Pro supports multiple products from various manufacturers. Many of the MultEQ Pro screens that follow are common to most Audyssey Installer-Ready products. Some screens and elements within may vary so it is important to review the each product’s User Guide.
Job Information
Enter the customer or job name in the Customer or Job Name fields.
Enter your name in the Technician’s Name field and press the button to continue.
This information will be used in the creation of the customer certificate later.
This information is stored for uploading customer calibration results to the Audyssey Installer Website. All of your organization’s uploaded calibration results and customer certificates are listed on the Audyssey Installer Website by the customer or job name entered at the Job Information screen.

Audyssey MultEQ Pro User Guide for the Audyssey Sub Equalizer Page 16
Options
Choose which microphone you are using from the menu under the Microphone heading. Select the microphone that has the serial number matching the serial number on the microphone you are using.
About Audyssey Professional Microphones
Even the highest quality microphones often contain small variations that cause measurement artifacts. As part of preparing the Installer Kit, Audyssey measures each microphone individually and stores a unique calibration file on each MultEQ Pro application CD. This file ensures that the MultEQ Pro room correction filters take into account the frequency response variations of each individual microphone used for calibration.
In the case that multiple Installer Kits are available (more than one microphone), it is important to choose the correct serial number for the microphone in use during installation.
If the serial number listed in the menu does not match the serial number on the microphone you are using, you can conveniently download the mic file again using the Audyssey Installer Website.
If you have more than one Installer Kit, it is highly recommended that you install the mic calibration curve file from each MultEQ Pro Installation CD on each of your laptops so that everyone at your company can share Kits and/or microphones.
MultEQ Pro User Guide for the Audyssey Sub Equalizer Page 17
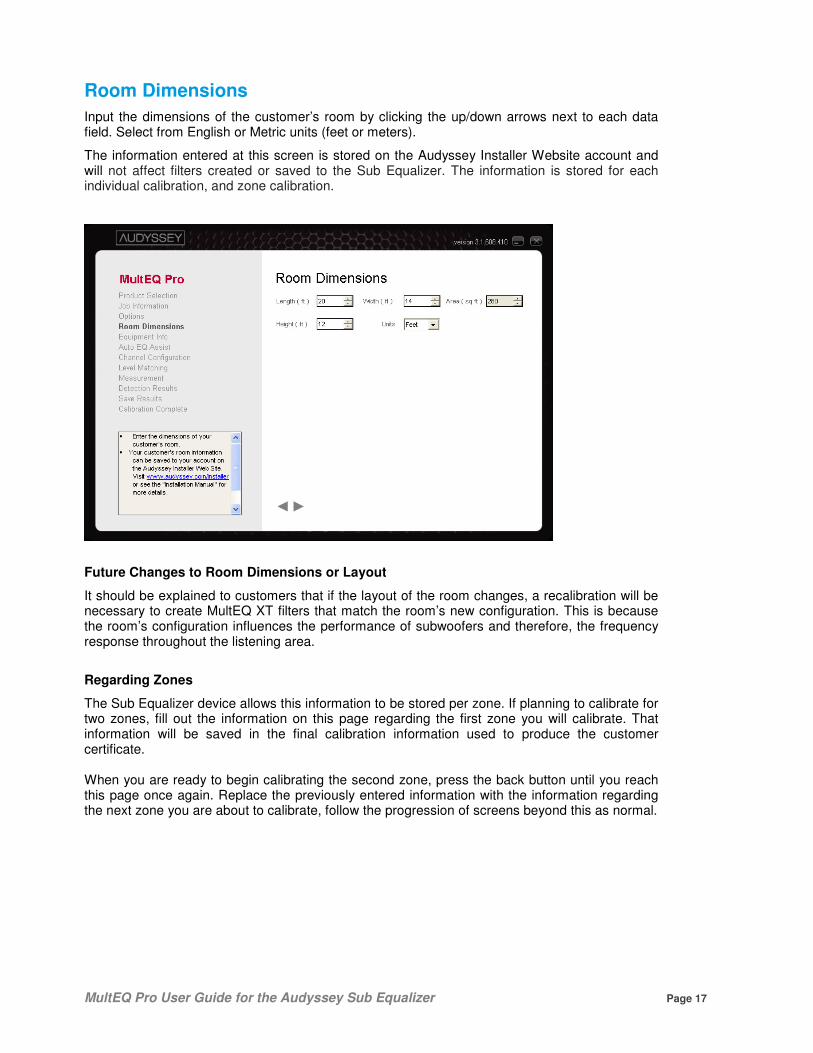
Room Dimensions
Input the dimensions of the customer’s room by clicking the up/down arrows next to each data field. Select from English or Metric units (feet or meters).
The information entered at this screen is stored on the Audyssey Installer Website account and will not affect filters created or saved to the Sub Equalizer. The information is stored for each individual calibration, and zone calibration.
Future Changes to Room Dimensions or Layout
It should be explained to customers that if the layout of the room changes, a recalibration will be necessary to create MultEQ XT filters that match the room’s new configuration. This is because the room’s configuration influences the performance of subwoofers and therefore, the frequency response throughout the listening area.
Regarding Zones
The Sub Equalizer device allows this information to be stored per zone. If planning to calibrate for two zones, fill out the information on this page regarding the first zone you will calibrate. That information will be saved in the final calibration information used to produce the customer certificate. When you are ready to begin calibrating the second zone, press the back button until you reach this page once again. Replace the previously entered information with the information regarding the next zone you are about to calibrate, follow the progression of screens beyond this as normal.

Audyssey MultEQ Pro User Guide for the Audyssey Sub Equalizer Page 18
Equipment Info
Enter information about the customer’s audio equipment.
The information entered at this screen is stored on the Audyssey Installer Website account and will not affect filters created or saved to the Sub Equalizer. The information is stored for each individual calibration, and zone calibration.
Regarding Zones
The Sub Equalizer device allows this information to be stored per zone. If planning to calibrate for two zones, fill out the information on this page regarding the first zone you will calibrate. That information will be saved in the final calibration information used to produce the customer certificate. Then when you are ready to begin calibrating the second zone, press the back button until you reach the Room Dimensions screen. Replace the previously entered information with the information regarding the next zone you are about to calibrate, follow the progression of screens beyond this as normal, being sure to enter information about the zone you are calibrating as necessary.

MultEQ Pro User Guide for the Audyssey Sub Equalizer Page 19
Auto EQ Assist
Please review the Auto EQ Assist Overview on page 9. Also, refer to the necessary connections related to the Auto EQ Assist feature detailed on page 10.
Installers will need to set the External Calibration Mode to ON at this screen in order to calibrate a receiver that utilizes an automatic room equalization feature.
If the AVR or Pre/Pro within the system does not have an Auto EQ feature, uses any type of Audyssey room calibration (2EQ, MultEQ, MultEQ XT, or MultEQ Pro), or you do not plan on using its auto EQ feature, skip this step.
If you are using the Sub Equalizer in conjunction with the Audyssey Sound Equalizer, you should configure the Sound Equalizer without including the subwoofer channels. This can be accomplished at the Zone Configuration screen of MultEQ Pro for the Sound Equalizer. By default, channel 4 is set to Subwoofer. So change subwoofer to none, or configure in another manner that does not use the Subwoofer channel.
Then, connect the Sub Equalizer directly to the Pre/Pro subwoofer output. Each system should be calibrated as normal. However, the only the crossover displayed at the Detections Results of the Sub Equalizer calibration should be entered into the Pre/Pro.
When complete with the external calibration, or you choose not to perform an external calibration, press the button to continue.
Note: If calibrating an Audyssey-enabled device, you will not use the Auto EQ Assist feature. Instead, you will perform the Sub Equalizer calibration first, and then run the Audyssey-enabled calibration through the calibrated Sub Equalizer. Delays and crossovers from the receiver’s calibration should be used, not the Sub Equalizer results from the Detection Results screen.

Audyssey MultEQ Pro User Guide for the Audyssey Sub Equalizer Page 20
Channel Configuration
The Audyssey Sub Equalizer has been designed to work within most home theater setups that use one or more powered subwoofers. It is important to understand and consider each of the various ways to configure the Audyssey Sub Equalizer.
This screen allows configuration of the Sub Equalizer at a basic level. The number of filters created by the MultEQ Pro and used within the Sub Equalizer are directly related to the selections made at this screen.
One IN to one OUT
If there is only one subwoofer in the system (or collocated subs of identical make and model that you will equalize as a single subwoofer), attach the subwoofer pre-out from your AVR or Pre/Pro to the SUB A INPUT. Take the cable formerly connecting your AVR or Pre/Pro to your subwoofer and connect to the Sub Equalizer SUB A OUTPUT. One filter will be created for the single subwoofer channel.
One IN to one OUT (Zone 2)
Use this configuration when configuring a second zone with a single subwoofer (or a second pair of collocated subs you will equalize as a single subwoofer). Different makes/models of subs should be calibrated using One IN to two OUT, even if they are collocated. Select this mode if you wish to calibrate one subwoofer in the system, plus calibrate another subwoofer in a different room or zone. Each Zone will be calibrated though a separate procedure. So only perform a calibration using this setting after you have successfully completed a calibration using the setting “One IN to one OUT (Sub A)”. Important: If you initially calibrated the Sub Equalizer using “Dual discrete IN to dual discrete OUT”, or “One IN to two OUT”, performing a calibration next using “One IN to one OUT” (either with Sub A or Sub B) will clear the previous calibration. So if you intend on using dual-zones, use only One IN to one OUT configurations together.

MultEQ Pro User Guide for the Audyssey Sub Equalizer Page 21
One in to two OUT
This is the default case. The most common configuration for preamplifier/processors that provide multiple (usually two) subwoofer output connectors is to have them internally connected in parallel (y-cord). In these cases, it is not possible to enter separate delays and trims for each subwoofer in the Pre/Pro.
In this case, connect ONE of the subwoofer outputs from the AVR or Pre/Pro to the SUB A INPUT of the Sub Equalizer. This configuration will apply the correct individual trims and delays for each subwoofer in the Sub Equalizer. Therefore, it is not necessary to place the subwoofers in symmetrical locations at equal distance from the main listening position (see Measurement, page 24).
One filter will be created and used for the combined subwoofer channel.
Dual Discrete
If the Pre/Pro has an advanced bass management system that directs different/unique bass content to different subwoofers, then each subwoofer output should be connected to a separate Sub Equalizer channel using the Dual Discrete Channel Configuration setting. An example of this would be stereo bass outputs (L/R). In these systems, the delay and trims calculated by MultEQ Pro (displayed at the Detection Results screen, page 26) will need to be entered for each individual subwoofer channel setting in the Pre/Pro or receiver.
Configuring More Than Two Subwoofers
Although there are only two physical outputs for subwoofers as part of the Sub Equalizer, it is possible to configure more than two subwoofers in the system. This will require y-cording of one or more of the output channels depending on the number of subwoofers intended. Pairs of subwoofers can be equalized as one subwoofer by the Sub Equalizer, but certain conditions are advised.
1) The subwoofer pair should be placed equidistant from the Main Listening Position.
2) The subwoofers being used as pairs should be of consistent performance both in power handling and frequency range/response. It is recommended to use subwoofers of the same make and model in this instance.
3) When level matching the subwoofer pair, some conditions need to be taken into account that are not handled explicitly by the level matching routines.
For more information, see Level Matching Subwoofer Groups, page 23.

Audyssey MultEQ Pro User Guide for the Audyssey Sub Equalizer Page 22
Level Matching
This screen is used to manually adjust the level of the receiver, and powered subwoofers connected to the Sub Equalizer.
Note: Be sure the Audyssey professionally calibrated microphone included with the Audyssey Installer Kit is connected before beginning this process (as set at the Options screen of this application). See page 10 for more information regarding the connection of the microphone and mic preamp to the Sub Equalizer.
Before Level Measurement
With the SAT OUTPUT of the Sub Equalizer connected to the receiver’s Center (preferred) or Left Channel Input, and one or more subwoofers connected to the Sub Equalizer SUB A and/or SUB B outputs, this feature allows for level matching of the satellite speaker and subwoofers.
Connections from the Sub Equalizer output to the SAT channel, the subwoofer(s) line level input on the plate amp to the Sub Equalizer, and the Audyssey Professional Microphone to microphone preamplifier and Sub Equalizer should already be in place. If you have not made any of these connections, refer to page 10 for connection steps.
Set the subwoofer gain knob to the middle of its range.
Disable the receiver's bass management crossover by setting the satellite speaker (Center/Left) to “Large” or “Full Range.”
Set the Level Trim adjustment for the Center or Left channel being measured to 0 dB.
Place the microphone at the main listening position with its tip pointed directly at the ceiling. The main listening position is the most central position where one would commonly listen to the system.
Performing Level Measurements
Click the “Measure” button to begin testing the level of the currently highlighted channel. When the Measure button is pressed, test noise is played starting with the connected satellite loudspeaker (highlighted by default). Observe the displayed level of the satellite loudspeaker onscreen and adjust the volume knob of the receiver until the screen reports the channel as

MultEQ Pro User Guide for the Audyssey Sub Equalizer Page 23
green which means the level is measuring within ±3 dB of Reference Level. After every adjustment you make, you must click the Reset button to achieve proper level measurements.
This process is repeated for each connected subwoofer. During measurements, observe the highlighted channel indicator, making adjustments up or down as advised on the Level Matching screen. Click the Reset button after every adjustment to the subwoofer’s gain knob to start the measurement routine over again to ensure accurate measurement.
Channel Indicators
Two or three channel indicators appear at this screen depending on the Channel Configuration selected previously.
Each indicator represents one of the available output channels of the Sub Equalizer (SAT, SUB A, or SUB B), a level value (shown as n dB), and a color indicating the channel’s measurement status.
The goal of the screen is to level match all channels to reference which will be indicated as 0 dB.
The color of the indicator is a quick way to tell from a distance if the level being measured is in range. Also, red arrow indicators appear showing from a distance if the level needs to be raised or lowered in order to reach the suggested level.
Channel Indicator Colors
Gray: A gray color indicates that the channel has not yet been successfully measured.
Green: A green color indicates that the channel is measuring within the acceptable range (±3 dB of Reference Level).
Red: A red color indicates that the current measurement is not within ±3 dB of Reference Level and still requires adjustment.
When MultEQ Pro detects that the correct level has been achieved, the next included subwoofer may be selected and measured in the same manner.
The Reset Button
When testing the subwoofer, make adjustments to the gain knob and press the Reset button to start the measurement process over again for that channel. It will take a few seconds for the level to stabilize once the measurement has started.
Adjust the level on each connected subwoofer until the meters show green (i.e., within ±3 dB of Reference Level) before continuing.
The Next Button
Clicking the Next button during measurement will immediately stop playing the test noise from that channel, and begin to play the test noise from the next channel. The highlight will reflect which channel is currently being tested.
Clicking the Next button while no measurement is in progress will simply highlight the next available channel.
The Stop Button
The Stop button is only available while a measurement is in progress. Click Stop to immediately stop all measurements.
Once all channel indicators turn green and report in range, press the button to move on to the next step.
Level Matching Subwoofer Groups
When multiple subwoofers are playing correlated content together (in phase), there will be an increase in level. This increase is in the range of 3 dB to 6 dB. The actual increase depends on many factors, but a 4 dB increase is a typical expectation. In these instances, expect that the Detection Results screen will likely report a -3 to -6 dB trim.

Audyssey MultEQ Pro User Guide for the Audyssey Sub Equalizer Page 24
Measurement
Before Measurements
Review the following guidelines:
1 Some subwoofers have a standby mode. Be sure to turn this function off before measuring
(see Before the MultEQ Pro Calibration, page 13)
2 The microphone should be placed in a vertical position (grazing incidence) for all
measurements.
3 Connect the mini-XLR cable from the microphone preamp LINE OUT to the MIC input of the
Sub Equalizer.
4 Make the room as quiet as possible. Background noise can disrupt the room measurements.
Close windows, silence cell phones, televisions, radios, air conditioners, fluorescent lights,
home appliances, light dimmers, or other devices.
Cell phones should be placed away from all audio electronics during the measurement
process as Radio Frequency Interference (RFI) may cause measurement disruptions (even if
the cell phone is not in use).
5 Refrain from talking during measurements. Do not sit or stand directly between any of the
subwoofers and the microphone during the room measurements. Each subwoofer emits a
series of test signals during the measurements. Obstacles between the subwoofers and the
microphone, and background noise can disrupt the microphone’s ability to record the room
response to the test signals.
Positioning the Microphone
The microphone should be positioned as far out from the stand as possible to minimize the effect of stand reflections. The microphone has been calibrated at grazing incidence and should point to the ceiling.
Correct Incorrect

MultEQ Pro User Guide for the Audyssey Sub Equalizer Page 25
Position 1 Measurement
Place the microphone at the primary (or center-most) listening location. The microphone should be positioned at ear height of a sitting listener. It is important to have the microphone in the primary listening position for the first measurement so that delays are calculated correctly.
The Position 1 measurement is different from the other position measurements that follow. Every position measurement measures the room’s frequency and time response at that particular position. But Position 1 also detects the absolute polarity of each subwoofer, calculates the exact acoustical distances (within half an inch) for setting delays, and determines levels (within half a dB) for each subwoofer. The polarity, distance, and level from the Position 1 Measurement are displayed later on the Detection Results screen where you will manually input the data into the preamplifier/processor (see page 26).
Press the Measure button. The Audyssey test signal will play a series of chirps through each channel. The text under the status bar indicates the channel currently being measured. The room measurement process plays a series of full-bandwidth test signals through each channel to measure the room’s response. Audyssey has designed the test signals so that several thousand measurement samples are collected.
During room measurement, some channels may repeat the series of test signals at a louder volume. This is done to overcome background noise problems and achieve the required signal-to-noise ratio for creating precise room correction filters. The level trim calculation is not influenced by the increase in test signal level.
After the test signal is finished, the application will transfer each measurement from the DSP in the Sub Equalizer to the
computer for further processing. This takes several seconds.
Click Undo Last to erase the previous measurement. Click Clear All to erase all of the previous position’s measurements and start over at Position 1.
Additional Position Measurements
Move the microphone to another listening position and press the Measure button. Repeat the process for several positions in the main listening area of the room. It is required to measure a minimum of three positions before continuing. Audyssey strongly recommends measuring at least 8 positions for average-sized rooms. Stagger the height of the microphone by a few inches from one measurement position to the next to account for the varying heights of listeners.
The larger the room, the more positions should be measured up to a maximum of 32 positions. Be sure to measure only in locations within the main listening area, and try to avoid extreme off-axis positions. Measuring in a distant corner of the room will not be beneficial and will detract from the overall benefit within the main listening area.
Click the button to complete the measurement process.
Note: You can always return to the Measurement screen and measure additional positions by clicking the arrow (the application will remember the last measured position).

Audyssey MultEQ Pro User Guide for the Audyssey Sub Equalizer Page 26
Detection Results
This screen displays the Distance and Trim results derived from the Position 1 measurement, and the recommended crossover for the single connected satellite speaker derived from all measurements.
Note: You must manually enter the information on this screen into the preamplifier/processor’s settings.
Speaker Type indicates whether the detected loudspeaker is a satellite, subwoofer, or displays a status (such as “undetected”).
Distance can be displayed in either English (feet) or Metric (meters) units by clicking the “Dist” heading (in blue). By default, the values are shown in feet, and must be used to manually set the distance (delay) in the Pre/Pro. When entered, the settings shown will time-align the subwoofers to the same point (Position 1).
In some cases there may be excessive low frequency noise in the room not necessarily audible to the human ear, but picked up by the microphone. This may be due to rumble from the street or HVAC equipment that generates structure-borne noise in the building. This may cause the subwoofer, and possibly the satellite, to be detected at an incorrect distance. If this happens, and the low frequency noise cannot be reduced, the only option is to use a tape measure to measure the distances.
Occasionally the subwoofer distance will be found to be greater than the actual measured distance. This is due to the delay that the subwoofer low-pass filtering circuitry introduces. Although the physical distance may be shorter, the MultEQ Pro-measured distance is in fact correct because it is measuring the total delay (acoustical and electrical) that the low frequency signal experiences.
Trim is displayed in dB. This number is not a dB SPL number; it is a relative Trim. The Trim information must used to configure the level trims in the Pre/Pro. Using the numbers shown will ensure that playback with the volume knob at “0” on the Pre/Pro will be at reference level. If the values shown are out of the adjustment range provided by the Pre/Pro you can subtract a fixed number from each one of them and enter the resulting values. Correctly level matching the subwoofers as part of the Level Matching screen will help prevent this situation. But if reference level playback is still not be achievable, most consumers listen at 10 dB (or more) below reference so this will not be a problem.
Crossover is displayed in Hz. Use these numbers to enter the crossover frequency for bass management purposes. The Sub Equalizer does not apply crossovers. It suggests what value to use in the bass management system of the preamplifier/processor. The crossover recommendation is derived from the room measurements and is optimized for the in-room response based on the satellite channel measured.

MultEQ Pro User Guide for the Audyssey Sub Equalizer Page 27
Save Results
The Save Results screen allows for demonstration of the filters set by the Sub Equalizer, and the permanent transfer of those filter. Additionally, installers can prepare a customer certificate that shows graphs of the improvements.
Transfer the MultEQ XT Filters
Transfer the correction filters you have calculated to the Sub Equalizer by clicking the Transfer to SubEQ button. This process only temporarily stores the filters in the Sub Equalizer so you can listen to them before deciding to permanently save them. Previously saved filters will not be erased until you click the Save Permanently to SubEQ button. The Sub Equalizer can only store one set of filters at a time.
The Transfer to Sub EQ process may take several minutes depending on how many channels and how many positions were measured. The download status bar will indicate the progress of the transfer.
MultEQ XT On/Off Demo
After the results are transferred to the Sub Equalizer, the Turn MultEQ On and Turn MultEQ Off buttons will become available. You can use these buttons to demonstrate the MultEQ XT filters before deciding to save them permanently to the Sub Equalizer.
Changing the MultEQ XT Filters
To make adjustments to the MultEQ XT filters, you will need to add more measurement positions or redo your measurements. Click the button until you return to the Measurement screen.
View Results – The Customer Certificate
Click the View Results button to view a graphical display of the frequency response correction for each channel. The default HTML browser should automatically open a window displaying a Customer Certificate titled, “Audyssey MultEQ XT Room Correction Results”. After permanently

Audyssey MultEQ Pro User Guide for the Audyssey Sub Equalizer Page 28
saving your results, you can print out this certificate immediately or print later from the Audyssey Installer Website.
Until the filters are permanently committed to the Sub Equalizer, only a draft version of the Customer Certificate is available to view. This is clearly shown by the text “DRAFT” over the certificate.
Printing the Customer Certificate
To correctly print customer certificates, set the printing margins to their minimum values within the page setup of the browser. From this browser menu, open the File menu and select Page Setup. Enter 0 for all 4 margins and your browser will automatically adjust them to their minimum values. You may print out this certificate later using the Audyssey Installer Website which stores all of your certificates.
Permanently Save the MultEQ XT Filters
If you are satisfied with the MultEQ XT filters, click the Save Permanently to SubEQ button. This action will take several seconds. The status bar will indicate the saving progress.
If there are still remaining zones needing calibration, click the button a few times until you return to the Select a Zone screen.
If installing only one zone, or all zones are now complete, you may proceed to the Calibration Complete screen.
A screen will appear indicating the customer’s Sub Equalizer is now MultEQ Pro calibrated!
Uploading the MultEQ Pro Results
After the Sub Equalizer installation is complete, upload the MultEQ Pro calibration results to the Audyssey Installer Website. This allows for:
• Storing and printing customer certificates
• Storing the installation delays, levels, subwoofer crossovers, and equipment information
To register as an Audyssey Installer, please visit www.audyssey.com/InstallerWeb

MultEQ Pro User Guide for the Audyssey Sub Equalizer Page 29
Appendix
Product Specifications
Dimensions (1RU) 17.25 in. W x 8 in. D x 1.75 in. H /
43.8 cm W x 20.3 cm D x 4.4 cm H Weight 6.5 lbs /
2.94 kg
Analog Input Format 2 channels unbalanced Calibration Microphone: 3 pin mini-XLR female Input Impedance 47 kΩ Maximum Input 6.0 Volts RMS
Analog Output Format 2 subwoofer channels unbalanced 1 satellite channel unbalanced (for measurement purposes only) Output 8.46 Volts RMS Overall Frequency Response ± 0.5 dB, 10 Hz to 3 kHz S/N Ratio >103 dB (typical), A-weighted, re: Maximum Output Sampling Rate 48 kHz fixed Measurement Pos. Up to 32
Audyssey MultEQ Pro User Guide for the Audyssey Sub Equalizer Page 30
Warranty
See www.audyssey.com/support for information regarding Audyssey warranties.
Technical Support
Audyssey Laboratories, Inc
Audyssey provides free technical support to Audyssey Installers. Technical support by phone is
available from 9:00 A.M. to 5:00 P.M. (Pacific Standard Time).
Audyssey Installer Technical Support
Tel: (213) 625-4300 Fax: (213) 625-4383 E-mail: [email protected]
Manufacturer’s Representatives
Your Audyssey Installer-Ready product manufacturer’s representative also provides technical support. Sub Equalizer User Guide version 1.2.2 (10/1/09)