attunity replicate ec2 instance tutorial · contents overview 4 supportedsourcedatabases 4...
TRANSCRIPT

Getting Started with AttunityReplicate on Amazon EC2
Version 6.4
October 30, 2019

Copyright © 2019 Qlik Analytics (ISR) Ltd. All rights reserved.
Primary Author: Charlton Book
The Programs (which include both the software and documentation) contain proprietary information;they are provided under a license agreement containing restrictions on use and disclosure and are alsoprotected by copyright, patent, and other intellectual and industrial property laws. Reverseengineering, disassembly, or decompilation of the Programs, except to the extent required to obtaininteroperability with other independently created software or as specified by law, is prohibited.
The information contained in this document is subject to change without notice. If you find anyproblems in the documentation, please report them to us in writing. This document is not warranted tobe error-free. Except as may be expressly permitted in your license agreement for these Programs, nopart of these Programsmay be reproduced or transmitted in any form or by any means, electronic ormechanical, for any purpose.
If the Programs are delivered to the United States Government or anyone licensing or using thePrograms on behalf of the United States Government, the following notice is applicable:
U.S. GOVERNMENT RIGHTS Programs, software, endpoints, and related documentation and technicaldata delivered to U.S. Government customers are "commercial computer software" or "commercialtechnical data" pursuant to the applicable Federal Acquisition Regulation and agency-specificsupplemental regulations. As such, use, duplication, disclosure, modification, and adaptation of thePrograms, including documentation and technical data, shall be subject to the licensing restrictions setforth in the applicable Attunity license agreement, and, to the extent applicable, the additional rightsset forth in FAR 52.227-19, Commercial Computer Software—Restricted Rights (June 1987). QlikAnalytics (ISR) Ltd., 70 Blanchard Road, Burlington, MA 01803
The Programs are not intended for use in any nuclear, aviation, mass transit, medical, or otherinherently dangerous applications. It shall be the licensee's responsibility to take all appropriate fail-safe, backup, redundancy and other measures to ensure the safe use of such applications if thePrograms are used for such purposes, andwe disclaim liability for any damages caused by such use ofthe Programs.
Attunity is a registered trademark of Qlik Analytics (ISR) Ltd. and/or its affiliates. Other namesmay betrademarks of their respective owners.
The Programsmay provide links toWeb sites and access to content, products, and services from thirdparties. Qlik Analytics (ISR) Ltd. is not responsible for the availability of, or any content provided on,third-party Web sites. You bear all risks associated with the use of such content. If you choose topurchase any products or services from a third party, the relationship is directly between you and thethird party. Attunity is not responsible for: (a) the quality of third-party products or services; or (b)fulfilling any of the terms of the agreement with the third party, including delivery of products orservices andwarranty obligations related to purchased products or services. Qlik Analytics (ISR) Ltd. isnot responsible for any loss or damage of any sort that you may incur from dealing with any third party.
ContentsOverview 4Supported Source Databases 4
Supported Target Databases 4
Pre-installed Third-Party Clients 5
Part 1: What You Need 6Oracle Source Prerequisites 6
Amazon Redshift Target Prerequisites 6
Part 2: Set up a Replication Task 9Step 1: Open the Attunity Replicate Console 10
Step 2: Add a Replication Task to the Attunity Replicate Console 10
Step 3: Define your Source and Target Endpoint Connections 13Add an Oracle Source Endpoint Connection 13
Add an Amazon Redshift Target Endpoint Connection 14
Step 4: Add the Source and Target Endpoint Connections to the Task 16
Step 5: Select Source Tables for Replication 18
Part 3: Run and Monitor the Replication Task 20
What Next? 22
Getting Started with Attunity Replicate on Amazon EC2 | Page 3Qlik Analytics (ISR) Ltd.
OverviewAttunity Replicate on Amazon EC2 facilitates data replication across a wide range ofheterogeneous sources and targets (listed below). In this tutorial, you will learn how to setup a basic replication task that replicates data from an on-premises Oracle database to anAmazon Redshift database in the cloud.
For more detailed information about topics covered in this tutorial or if you simply wish tolearn more about Attunity Replicate's capabilities, click the Help link in the top tight of theAttunity Replicate console.
Supported Source DatabasesAttunity Replicate on Amazon EC2 can replicate data from the following source databases:
Oracle (including Amazon RDS for Oracle)
Microsoft SQL Server
MySQL (including Amazon RDS for MySQL and Amazon Aurora MySQL)
PostgreSQL
IBM DB2 for LUW
Supported Target DatabasesAttunity Replicate on Amazon EC2 can replicate data to the following target databases:
Oracle (including Amazon RDS for Oracle)
Microsoft SQL Server (including Amazon RDS for SQL Server)
MySQL (including Amazon RDS for MySQL, Amazon RDS for MariaDB and AmazonAurora MySQL)
PostgreSQL (including Amazon RDS for PostgreSQL and Amazon Aurora PostgreSQL )
Teradata
Amazon Redshift
Hadoop
Overview | Page 4Qlik Analytics (ISR) Ltd.

Pre-installed Third-Party ClientsThe following third-party clients are pre-installed on the Attunity Replicate Amazon EC2instance:
Oracle
Microsoft SQL Server
PostgreSQL
Amazon Redshift
As these clients are already installed on the Attunity Replicate Amazon EC2 Instance, youcan replicate both to and from the corresponding database servers without needing toinstall any client-side software. All other supported sources and targets require you toinstall the appropriate client-side software before replication can be performed.
Overview | Page 5Qlik Analytics (ISR) Ltd.

Part 1:What You Need | Page 6
Part 1: What You NeedBefore starting this tutorial, make sure that the following prerequisites have been met:
Oracle Source Prerequisites
Amazon Redshift Target Prerequisites
Oracle Source PrerequisitesBefore you can use Oracle as a source endpoint in this tutorial, make sure the followingprerequisites have been met:
Oracle 10.x, 11.x, or 12.1 installed in your network and accessible from the AttunityReplicate machine
Port 1521 open for outbound communication on the Attunity Replicate machine
system/<password> for an admin user
Amazon Redshift Target PrerequisitesBefore you can use Amazon Redshift as a target endpoint in this tutorial, make sure thefollowing prerequisites have been met:
Amazon Redshift Cluster: If you haven't already done so, set up an AmazonRedshift cluster and make sure that following information about your Amazon RedshiftCluster is readily available:
Amazon Redshift Cluster Name
Amazon Redshift Cluster Port
Amazon Redshift User Name and Password
Amazon Redshift Database Name
Port: Make sure that port 5439 (the Amazon Redshift Cluster port) is open for inboundconnections from your Attunity Replicate Amazon EC2 instance.
Amazon S3 Bucket Details: During the first stage of the replication process,Attunity Replicate moves the data files created by the source database into an AmazonS3 bucket. The files are then loaded into the proper tables in the Amazon Redshift datawarehouse (using the "copy" command). Therefore, in addition to setting up anAmazon Redshift Cluster, you also need to set up and Amazon S3 Bucket.
Qlik Analytics (ISR) Ltd.

Make sure that the following information about your Amazon S3 Bucket is readilyavailable:
Amazon S3 Bucket Name
Amazon S3 Bucket Region
Amazon S3 Access Key and Secret Key
Amazon S3 Bucket Permissions: The Attunity Replicate user must have thefollowing permission on the Amazon S3 staging bucket:
On the Amazon S3 Bucket itself: 'List Bucket Objects'
On the Amazon S3 Bucket Folder: 'Read, Write, Delete of Objects'
The following is a sample policy with these permissions:
{
“Statement”: [
{
“Effect”: “Allow”,
“Action”: [
“s3:ListAllMyBuckets”
],
“Resource”: “arn:aws:s3:::*”
},
{
“Effect”: “Allow”,
“Action”: [
“s3:ListBucket”,
“s3:GetBucketLocation”
],
“Resource”: “arn:aws:s3:::demo-virginia”
},
{
“Effect”: “Allow”,
“Action”: [
“s3:PutObject”,
Part 1:What You Need | Page 7Qlik Analytics (ISR) Ltd.

“s3:GetObject”,
“s3:DeleteObject”
],
“Resource”: “arn:aws:s3:::demo-virginia/*:
}
]
}
Part 1:What You Need | Page 8Qlik Analytics (ISR) Ltd.

Part 2: Set up a Replication Task | Page 9
Part 2: Set up a Replication TaskAfter fulfilling the prerequisites, the next stage is to set up your replication task.
This consists of the following steps:
Step 1: Open the Attunity Replicate Console
Step 2: Add a Replication Task to the Attunity Replicate Console
Step 3: Define your Source and Target Endpoint Connections
Step 4: Add the Source and Target Endpoint Connections to the Task
Step 5: Select Source Tables for Replication
Qlik Analytics (ISR) Ltd.
Part 2: Set up a Replication Task | Page 10
Step 1: Open the Attunity Replicate ConsoleFrom the Windows Start menu, select All Programs > Attunity Replicate > AttunityReplicate Console.
Note You can access Attunity Replicate from any computer in your network.
To access the Console from a remote computer, type the following address in theaddress bar of your Web browser:
https://<computer name>/attunityreplicate
where <computer name> is the name or IP address of the computer (including theWindows domain name) on which the Attunity Replicate for Amazon EC2 instance isinstalled.
Step 2: Add a Replication Task to the AttunityReplicate ConsoleAfter opening the console, the next step is to add a replication task.
Note that in actual production environments, some customers prefer to set up theirendpoint connections before adding tasks. The order that you choose will depend on theyour specific replication needs. For instance, setting up the endpoint connections first maybe preferable when setting up several tasks that use different endpoints.
To add a replication task:
1. Make sure that you are in TASKS view. The word "TASKS" should be displayed in theupper left corner of the Attunity Replicate Console.
Qlik Analytics (ISR) Ltd.

2. Click New Task to open the New Task dialog box.
3. In the Name field, enter oracletoredshift and then click OK.
4. Click the Apply Changes button to disable this task option. When this option isenabled, Replicate detects any changes to the source tables and automatically appliesthem to the target tables.
Note Using the Apply Changes task option has special requirements such asgranting additional permissions on the source database. Therefore, to keep thingsimple, in this tutorial we will be setting up a Full Load only task. For informationon setting up a task with Apply Changes, please refer to the Attunity ReplicateSetup and User Guide.
5. Click OK to add the task.
The task is displayed in a new tab.
Part 2: Set up a Replication Task | Page 11Qlik Analytics (ISR) Ltd.

Part 2: Set up a Replication Task | Page 12Qlik Analytics (ISR) Ltd.
Step 3: Define your Source and Target EndpointConnectionsAfter adding a new task, the next step is to set up your source and target endpointconnections. An endpoint connection is basically a set of connection parameters thatenables Replicate to extract data from the source database and replicate it to the targetdatabase. Connection parameters specify information such as the database server name,the database name, the user name, and so on.
In this tutorial, we will be using Oracle as our source and Amazon Redshift as our target.
Add an Oracle Source Endpoint Connection
Add an Amazon Redshift Target Endpoint Connection
For a full list of supported endpoints, see Overview.
Add an Oracle Source Endpoint ConnectionThis section guides you through process of defining your Oracle endpoint connection.
Note Before beginning this section, make sure that Oracle prerequisites have beenmet.
To add an Oracle source endpoint connection:
1. In TASKS view, click the Manage Endpoint Connections toolbar button.
The Manage Endpoint Connections dialog box opens.
2. Click the New Endpoint Connection toolbar button.
3. Provide the following information:
Name: Enter any name that will help you identify the endpoint.
Description: Optionally, enter a description.
Role: Select Source.
Type: Select Oracle.
Connection string: Enter the connection string to your Oracle database, in anyOracle format.
Part 2: Set up a Replication Task | Page 13Qlik Analytics (ISR) Ltd.
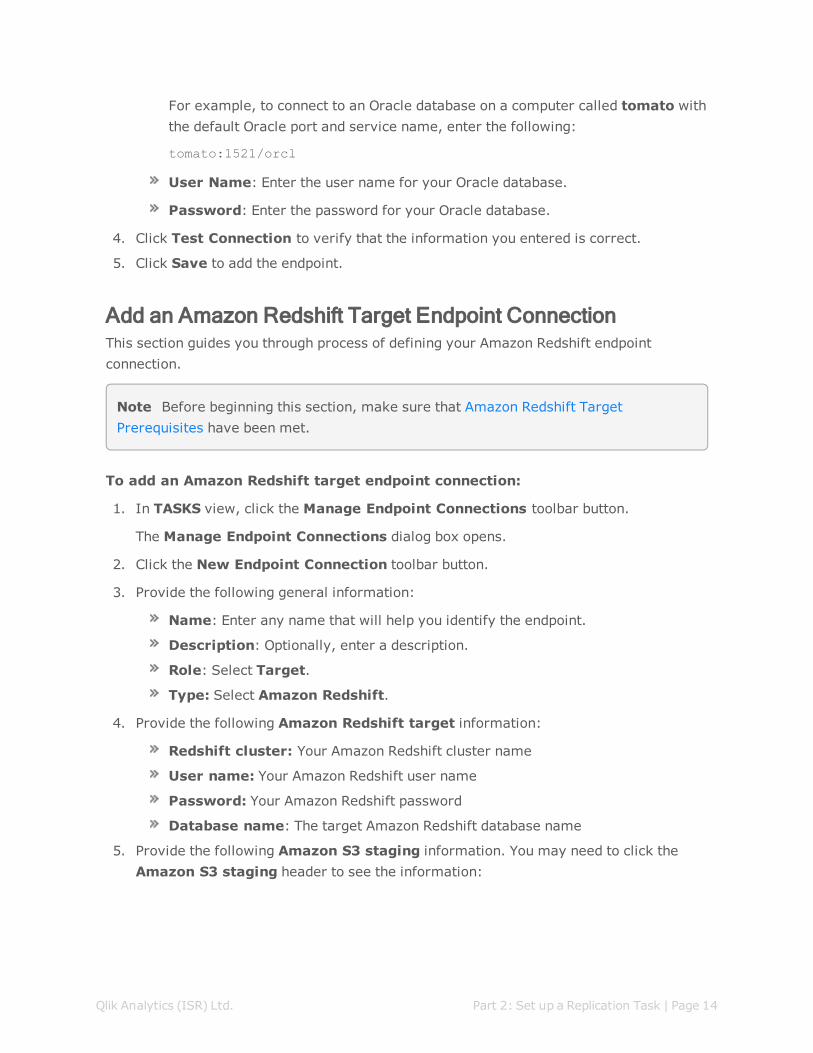
For example, to connect to an Oracle database on a computer called tomato withthe default Oracle port and service name, enter the following:
tomato:1521/orcl
User Name: Enter the user name for your Oracle database.
Password: Enter the password for your Oracle database.
4. Click Test Connection to verify that the information you entered is correct.
5. Click Save to add the endpoint.
Add an Amazon Redshift Target Endpoint ConnectionThis section guides you through process of defining your Amazon Redshift endpointconnection.
Note Before beginning this section, make sure that Amazon Redshift TargetPrerequisites have been met.
To add an Amazon Redshift target endpoint connection:
1. In TASKS view, click the Manage Endpoint Connections toolbar button.
The Manage Endpoint Connections dialog box opens.
2. Click the New Endpoint Connection toolbar button.
3. Provide the following general information:
Name: Enter any name that will help you identify the endpoint.
Description: Optionally, enter a description.
Role: Select Target.
Type: Select Amazon Redshift.
4. Provide the following Amazon Redshift target information:
Redshift cluster: Your Amazon Redshift cluster name
User name: Your Amazon Redshift user name
Password: Your Amazon Redshift password
Database name: The target Amazon Redshift database name
5. Provide the following Amazon S3 staging information. You may need to click theAmazon S3 staging header to see the information:
Part 2: Set up a Replication Task | Page 14Qlik Analytics (ISR) Ltd.
Bucket name: The name of the Amazon S3 bucket where you are copying filesto.
Bucket region: The Amazon S3 region where the S3 buckets and folders you areusing are hosted.
Access key: The access key information for your Amazon S3 bucket
Secret key: The secret key information for your Amazon S3 bucket
Folder: The S3 folder to which the files will be copied
6. Click Test Connection to verify that the information you entered is correct.
Note If the connection is successful a message in green is displayed. If theconnection fails, an error message is displayed at the bottom of the dialog box.
To view the log entry if the connection fails, click View Log. The server log isdisplayed with the information for the connection failure. Note that this button isnot available unless the test connection fails.
7. Click Save to add the endpoint.
Part 2: Set up a Replication Task | Page 15Qlik Analytics (ISR) Ltd.

Step 4: Add the Source and Target EndpointConnections to the TaskAfter defining you source and target endpoint connections, the next step is to add them tothe replication task.
The Endpoints pane is located in the left of the console. Replicate supports severalendpoint types (database, cloud, Hadoop, data warehouse, file, NoSQL) with each endpointtype having its own icon. As the source endpoint type is a database and the target endpointtype is cloud-based, the following icons will be displayed:
The source endpoint.
The target endpoint.
To add the source and target endpoints to the task
1. In the Endpoints pane, select the All tab.
2. Add the Oracle source endpoint to the task using any of the following methods:
Drag the endpoint to the Drop source endpoint here area in the endpointsdiagram to the right of the Endpoints pane.
-OR-
Hover your mouse cursor over the endpoint name and click the arrow thatappears to its right.
3. Add the Amazon Redshift target endpoint to the task using any of the followingmethods:
Drag the endpoint to the Drop target endpoint here area in the endpointsdiagram to the right of the Endpoints pane.
-OR-
Hover your mouse cursor over the endpoint name and click the arrow thatappears to its right.
Part 2: Set up a Replication Task | Page 16Qlik Analytics (ISR) Ltd.

The endpoint connections diagram should now appear similar to this:
Part 2: Set up a Replication Task | Page 17Qlik Analytics (ISR) Ltd.
Step 5: Select Source Tables for ReplicationAfter adding the source and target endpoints, you now need to select the Oracle sourcetables that you want to replicate to Amazon Redshift.
To add Oracle tables to the replication task:
1. In the right pane of the Attunity Replicate Console, click the Table Selection button.
The Select Tables dialog box opens.
2. In the Select Tables dialog box, do the following:
a. From the Schema list, select the schema containing your source tables, and thenclick Search.
b. From the Table List, either:
Hold down the [Ctrl] button and select the tables you want to replicate. Then,click the button to move the tables to the Selected Tables list.
-OR-
Click the button to move all the tables to the Selected Tables list.
Part 2: Set up a Replication Task | Page 18Qlik Analytics (ISR) Ltd.
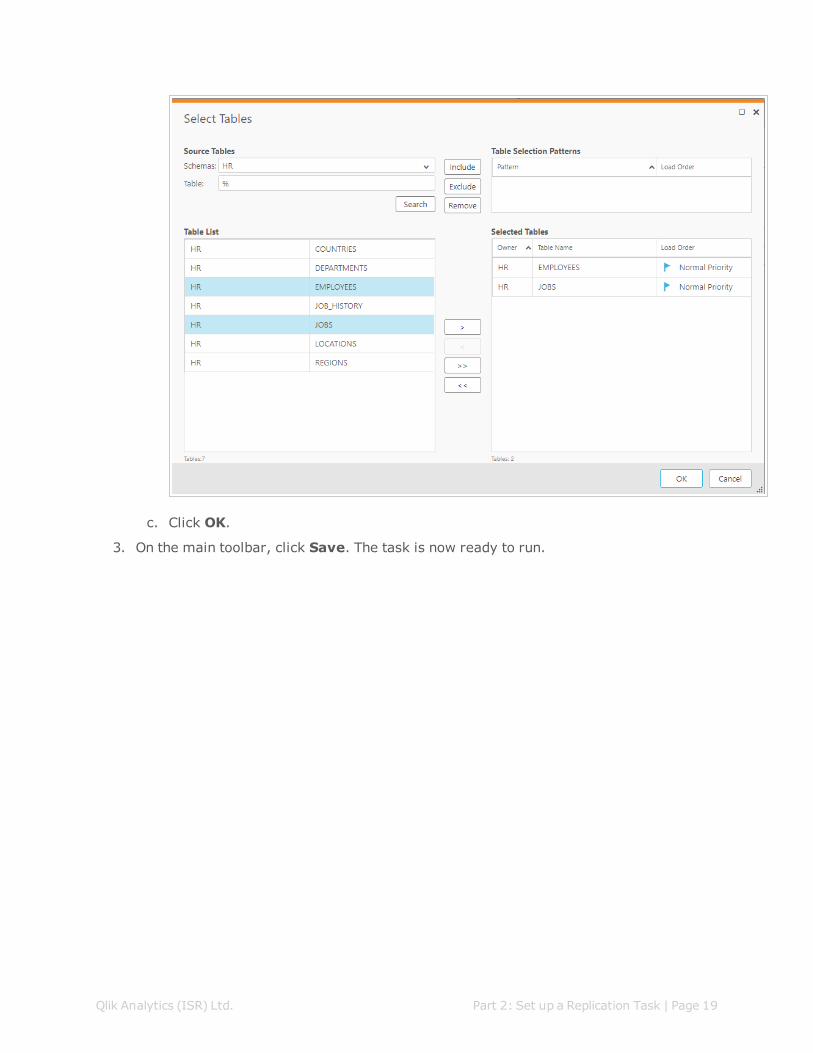
c. Click OK.
3. On the main toolbar, click Save. The task is now ready to run.
Part 2: Set up a Replication Task | Page 19Qlik Analytics (ISR) Ltd.
Part 3: Run andMonitor the Replication Task | Page 20
Part 3: Run and Monitor the Replication TaskIn this part of the tutorial, you'll learn how to run a replication task and monitor itsprogress.
To run and monitor the replication task
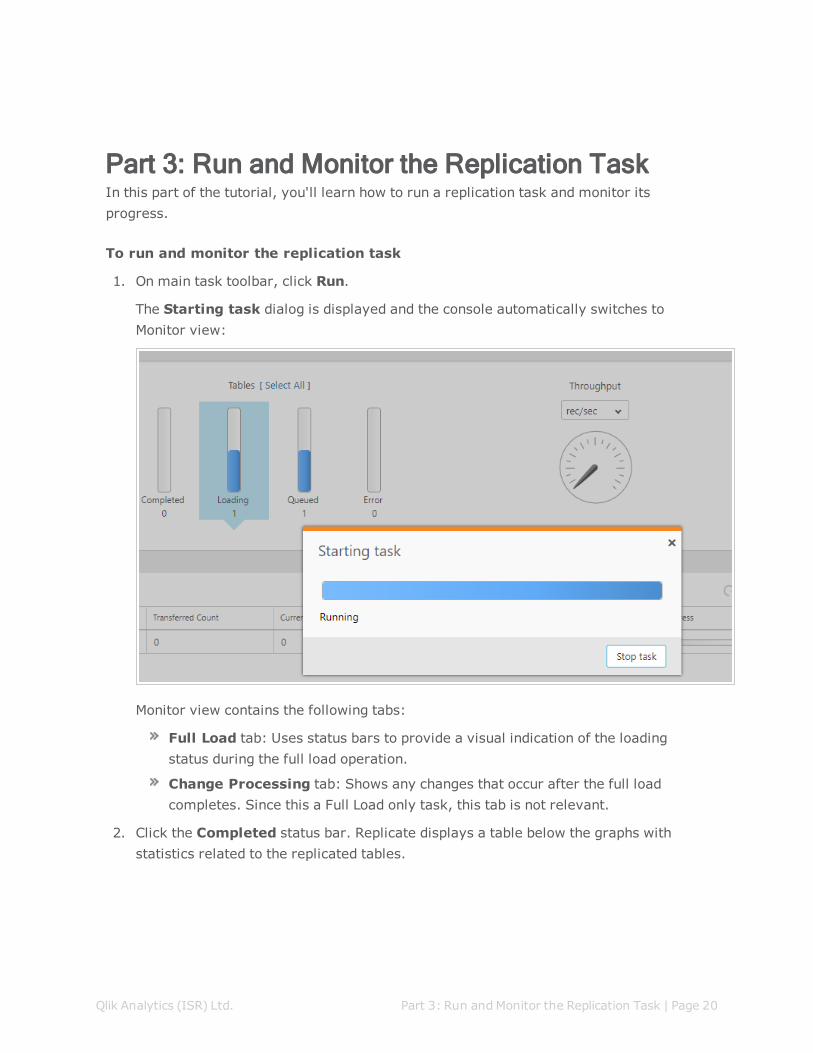
1. On main task toolbar, click Run.
The Starting task dialog is displayed and the console automatically switches toMonitor view:
Monitor view contains the following tabs:
Full Load tab: Uses status bars to provide a visual indication of the loadingstatus during the full load operation.
Change Processing tab: Shows any changes that occur after the full loadcompletes. Since this a Full Load only task, this tab is not relevant.
2. Click the Completed status bar. Replicate displays a table below the graphs withstatistics related to the replicated tables.
Qlik Analytics (ISR) Ltd.
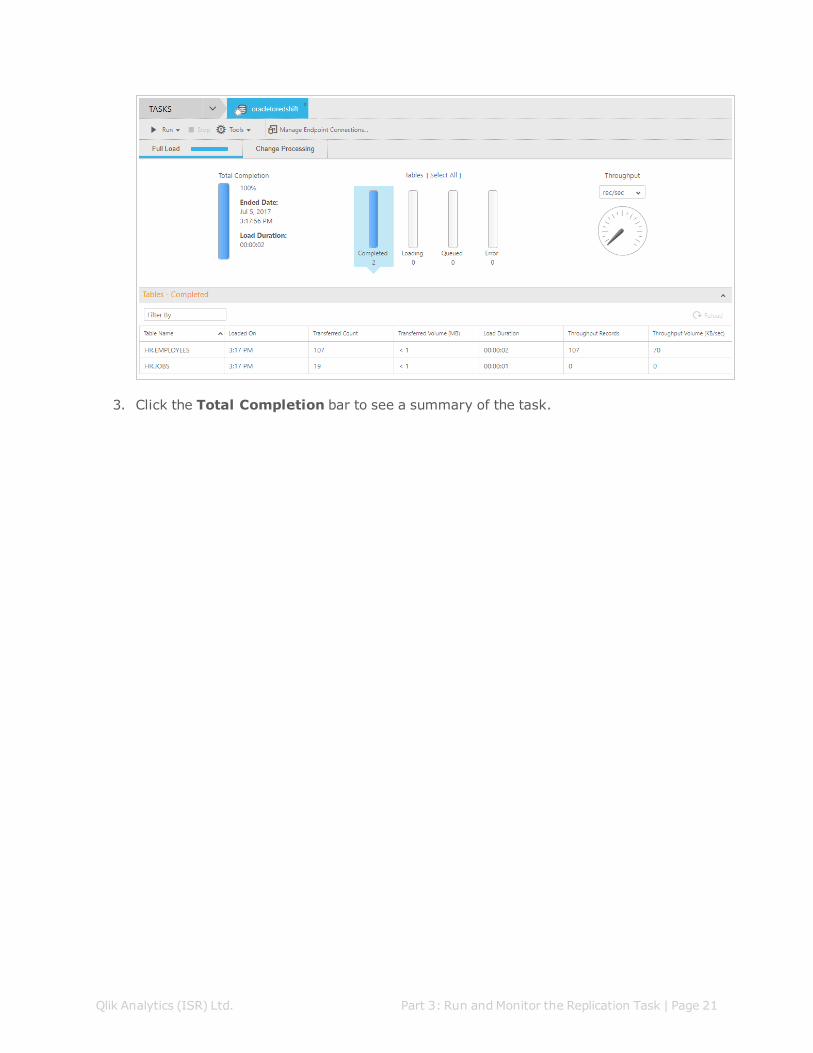
3. Click the Total Completion bar to see a summary of the task.
Part 3: Run andMonitor the Replication Task | Page 21Qlik Analytics (ISR) Ltd.

What Next?Now that you've successfully completed the tutorial, you'll probably want to waste no timeapplying what you've learned to your own environment.
For detailed setup and usage instructions, simply click the Help link in the top tight of theAttunity Replicate console.
What Next? | Page 22Qlik Analytics (ISR) Ltd.