ato annual 06 3 · rules of this lps simulation game to follow ... the german 150th panzer brigade...
TRANSCRIPT

1.0 INTRODUCTION
2.0 COMPONENT DESCRIPTION2.1 Combat Units
2.2 Counter Abbreviations
2.3 Game Markers
2.4 Game Scale
3.0 IMPORTANT CONCEPTS3.1 Stacking
3.2 Zones of Control
3.3 Supply
3.4 Leaders
3.5 Command Control
3.6 Out of Command Control
3.7 Out of Command and Supply Summary
4.0 GAME TURN4.1 Command Segment
4.2 Movement Segment
4.3 Combat Segment
4.4 Exploitation Segment
4.5 Final Reorganization Segment
5.0 COMMAND SEGMENT5.1 Weather
5.2 Army Group Boundaries
6.0 MOVEMENT6.1 Major Rivers
6.2 Strategic Movement
6.3 Overruns
6.4 Railroad Movement
6.5 Replacements and Reinforcements
7.0 COMBAT7.1 Regular Combat
7.2 Statement of Attack Strength
7.3 Defensive Intervention
7.4 Combat Modifiers
7.5 Final Resolution
7.6 Step Loss Result
7.7 Stalemate Result
7.8 Retreat Result
7.9 Hot Pursuit
7.10 Breakthroughs
7.11 Attrition Combat
8.0 EXPLOITATION
9.0 FINAL REORGANIZATION
10.0 SPECIAL UNITS10.1 Commandos
10.2 Armored Assets
10.3 German 150th Panzer Brigade
10.4 Engineers
10.5 Paratroops
11.0 AIRPOWER11.1 Airpower Status
11.2 Counter-air
11.3 Aerial Interdiction
11.4 Combat Air Patrol (CAP)
11.5 Aerial Re-supply
11.6 Close Air Support
11.7 Offensive Patrol
11.8 Paratroop Drops
12.0 OPTIONAL RULES12.1 Allied Corps Reorganization
12.2 German Panzer Corps Reorganization
12.3 German Infantry Corps Breakdown
13.0 INTELLIGENCE AND DECEPTION13.1 ULTRA Intelligence
13.2 Concealed Units
13.3 Unknown Units
13.4 “Herbstnebel” Option
14.0 VICTORY CONDITIONS
15.0 SCENARIO SET-UP15.1 Situation
15.2 Victory Conditions
15.3 At-Start Orders of Battle
15.4 Deployment Limitations
15.5 Reinforcements and Replacements
15.6 Withdrawals
15.7 Special Rules
15.8 Start-Line
DESIGN
JOHN PRADOSDEVELOPMENT
PAUL ROHRBAUGH
GAME GRAPHICS & RULES LAYOUT
CRAIG GRANDO
EDITING
JACK BECKMAN & WARREN KINGSLEY
MAP PROOFREADING
ULRICH BLENNEMANN, KNUT GRÜNITZ, OLIVIER REVENU & BEN SANDERS
PRODUCTION COORDINATION
C. RAWLING
PLAYTESTING
BRIAN BRENNAN, CAMERON MOIR, GARY PERKINS, HENRY ROBINETTE, PAUL ROHRBAUGH, VAUGHN THORSTEINSON & DALE WOODS
SPECIAL THANKS FOR WORK “ABOVE AND BEYOND” TO
WARREN KINGSLEY & VAUGHN THORSTEINSON
SPECIAL THANKS FOR DESIGN FEEDBACK
MIKE TRAYNOR
LPS PART # GA2006R PRINTED IN THE USA
COPYRIGHT © 2006 JOHN PRADOS
����
����
���
����
����
����
����
����
���
����
������
����
����
����
����
����
�����
����
����
����
����
����
����
����
����
�����
����
����
���
����
�����
�����
�����
�����
����
����
�����
�����
�����
����
����
���
�����
����
����
�����
����
����
����
����
�����
������
����
�����
����
����
����
����
�����
����
�����
����
���
�����
����
����
�����
�����
����
����
����
����
����
������
����
���
����
����
��� �
����
����
����
����
�����
����
�����
�����
�����
����
����
�����
����
����
����
����
����
������
���
�����
����
����
����
����
�����
�����
����
����
����
���
����
���
��
����
��
�����
����
����
������
����
����
�����
�����
�����
����
����
����
����
���
���
����
����
����
����
���
����
����
����
����
�����
����
����
���� ��
����
���
���
����
���
���
����
����
����
�����
����
����
����
����
�
����
����
�����
���
����
���
�����
����
����
����
����
����
����
������
������
�����
����
����
����
���
�����
����
�
����
����
����
����
����
����
����
������
������
�����
�
����
����
����
����
����
����
����
����
����
����
����
����
����
����
����
����
����
����
����
�����
����
����
����
����
����
����
����
����
����
����
����
����
����
����
����
�����
����
����
�����
����
�����
�����
����
����
����
����
����
�����
��
����
�����
����
��
���
����
����
���
����
���
���
����
����
�����
�����
����
����
�����
�����
����
�����
����
����
���
����
����
�����
����
����
����
����
�����
����
����
�����
�����
�����
����
����
�����
����
�����
����
����
����
����
�����
����
����
�����
�����
����
����
����
����
�����
������
����
����
�����
����
����
��
����
����
�����
����
�����
����
����
����
����
�����
����
����
�����
����
����
����
����
����
������
����
����
�����
����
����
�����
�����
����
����
�����
����
�����
�����
�����
����
����
����
����
����
����
����
����
����
����
����
����
������
��
����
����
����
�����
����
����
����
����
����
����
���
�����
����
����
�����
�����
����
����
�����
�����
����
�����
����
����
����
����
����
�����
����
����
�����
����
����
����
�����
�����
����
����
����
����
�����
����
���
����
����
����
����
����
���
����
����
���
���
���
����
���
���
����
����
���
���
����
����
������
����
����
����
����
����
����
�����
����
������
���
�����
����
����
����
����
�����
����
����
����
�����
�����
����
���
���
����
�����
����
�����
����
����
�����
�����
����
�����
����
����
����
����
������
����
������
����
����
����
����
����
���
����
���
�����
�����
����
�����
�����
����
����
����
�����
����
���
�����
����
����
�����
����
����
����
�����
��
�����
����
����
�����
����
�����
�����
����
����
����
����
��� �
����
������
����
����
����
�����
����
����
����
�����
������
���
����
����
����
����
���
����
����
����
�����
����
����
�����
����
���
����
����
����
�����
����
����
�����
����
����
�����
����
�����
����
����
����
����
�����
����
�����
����
�����
�����
����
���
�����
����
� ���
�����
�����
����
�����
�����
����
����
����
�����
�����
����
�����
����
�����
����
���
����
����
����
�����
����
�����
����
����
���
�����
����
����
����
����
�����
����
�����
�����
����
�����
���
����
�����
������
����
����
�����
����
��
����
�����
����
�����
����
�����
����
����
����
����
����
����
������
�����
�����
����
����
����
����
����
����
��
�����
����
����
�����
����
�����
����
���
�����
����
����
��� �
����
������
����
����
����
����
����
����
����
�����
����
����
����
������
�����
����
����
����
�����
����
�
�����
����
�����
����
����
����
����
����
����
������
����
�����
����
����
����
�����
����
����
����
����
����
��
���
���
����
����
����
���
�����
����
�����
����
�����
�����
����
����
����
�����
����
����
����
����
�����
�����
����
�����
�����
����
�����
�����
�����
����
����
�����
����
����
����
�����
����
����
����
�����
����
�����
����
���
�����
����
����
����
����
������
����
�����
����
�����
����
����
����
����
����
����
�����
����
�����
���
����
����
���
����
����
����
�����
����
����
����
����
���
����
�����
����
�����
�����
����
�����
�����
�����
����
�����
����
����
����
����
�����
����
����
�����
�����
�����
����
����
����
����
�����
��
����
�����
�����
����
����
����
����
����
����
����
��
����
����
����
�����
����
��
���
���
����
����
���
����
���
�����
����
�����
����
����
�����
����
�����
����
�����
����
�����
����
����
����
����
����
����
�����
����
�
�����
����
����
�����
����
������
����
����
����
����
���
����
����
����
������
����
����
����
����
����
����
����
�����
����
�����
��
����
����
����
������
����
���
����
����
����
�����
����
��
����
�����
����
����
����
����
����
����
���
����
����
���
�����
�����
����
������
����
����
����
���
����
����
����
����
�����
�����
����
����
����
����
����
�����
�����
���
��
���
���
����
����
���
����
���
�����
����
�����
����
����
����
���
����
����
����
�����
����
�����
����
����
����
����
����
����
�����
����
��
�����
����
����
�����
����
������
�����
����
����
�����
����
���
����
����
����
�����
�����
����
����
����
�����
����
����
�����
�����
����
����
����
����
����
����
����
����
����
�����
����
����
����
���
���
����
����
����
�����
����
����
�����
�����
���
����
����
����
������
����
���
����
����
����
�����
����
��
���
���
���
���
����
���
���
����
����
����
�����
����
����
�����
�����
����
����
�����
����
����
�
���
����
���
�����
����
����
����
����
����
����
����
�����
�����
����
�����
���
����
����
��
����
����
�����
����
����
�����
����
����
����
�
����
����
����
����
����
����
����
�����
����
�����
����
����
����
�����
����
�
����
����
����
����
����
����
����
�����
����
�����
����
����
����
�����
����
�
����
����
����
����
����
����
�����
����
����
�����
����
����
����
����
����
����
����
�����
�����
����
�����
����
��
����
����
����
����
�����
����
����
����
����
�����
����
���
����
����
�����
��
����
����
����
����
����
����
����
��
����
����
����
����
����
����
�����
����
�����
����
����
����
����
�����
��
����
����
����
����
�����
����
����
����
����
����
�
����
����
����
����
�����
����
����
����
����
����
����
����
����
����
�����
����
����
�����
����
���
����
����
����
����
�����
����
�����
����
�����
����
��
����
����
����
����
�����
���
����
�����
����
����
����
����
�����
�����
����
�����
����
��
����
����
�����
����
����
���
�����
����
����
�����
����
�����
�
�����
����
����
�����
����
����
�����
�����
����
����
�����
����
����
����
����
����
����
��
�����
����
�����
����
����
����
����
���
����
�
����
����
����
����
�����
����
�
���
����
����
���
����
���
���
����
����
�����
����
���
����
�����
�����
����
�����
����
����
����
����
�����
����
����
�����
����
�����
����
����
����
����
���
�����
���
����
����
����
����
������
����
����
����
����
����
���
����
����
����
�����
����
�����
�����
����
�����
����
�����
�����
���
����
�����
����
����
���
�����
������
��
����
����
����
����
����
��
����
����
����
�����
�����
����
����
����
����
�����
������
����
�����
����
����
����
����
����
�����
�����
����
����
����
�����
����
�����
�����
����
���
����
���
����
��
����
����
�����
����
����
����
����
����
����
����
����
����
����
����
�����
����
����
����
����
�
����
����
����
����
�����
����
�����
����
���
�����
����
����
����
����
����
����
�����
����
�����
����
�����
����
����
�����
�����
�����
����
����
����
����
����
����
�����
����
�����
����
����
����
����
����
����
����
����
������
�����
����
����
����
����
�����
���
����
����
����
����
����
����
����
�����
�����
����
�����
�����
����
����
���
�����
����
����
����
����
����
����
����
����
�����
����
����
����
����
����
����
�����
����
����
����
����
���
�����
���
���
���
����
����
����
����
�����
����
����
����
����
����
����
����
����
�����
����
����
����
����
���
�����
����
����
�����
�����
�����
����
����
�����
�����
���
����
����
����
����
�����
��
���
���
����
���
��
����
����
��
����
����
���
����
���
�����
����
����
�����
����
����
�����
�����
����
����
����
����
���
����
����
�
�����
����
�����
�����
�����
����
�����
����
����
����
����
����
������
����
�����
����
���
����
����
����
�����
����
��
���
���
����
����
���
����
����
�����
����
�����
����
����
����
����
����
����
����
�����
����
������
����
����
����
����
�����
�����
����
�����
���
�����
����
�����
����
�����
����
�����
�
�����
����
�����
�����
�����
����
�����
����
����
����
����
����
������
����
�����
����
���
����
����
����
�����
����
��
���
���
����
����
���
����
���
�����
����
�����
�����
����
�����
�����
����
����
�����
����
���
���
�����
����
�����
������
�����
�����
����
����
����
����
����
����
����
����
����
����
����
�����
����
����
�����
�����
����
�����
���
����
�����
����
����
�����
����
����
���
�����
����
������
�����
����
����
����
����
�����
����
����
����
����
����
�����
����
����
����
�����
����
����
�����
����
����
����
����
�����
����
����
����
����
����
����
�����
����
�����
����
�����
�
�����
����
�����
�����
�����
����
�����
����
����
�
����
����
����
������
����
�����
����
���
����
����
����
�����
����
��
���
���
����
����
���
����
���
�����
����
������
����
����
����
����
����
�����
����
����
����
����
����
����
�
�����
����
�����
�����
�����
����
�����
����
����
����
����
����
������
����
�����
����
���
����
����
����
�����
����
��
����
����
����
��
����
����
��
����
���
����
����
����
����
��
���
��
���
����
����
�����
����
����
����
����
����
���
����
����
����
����
����
����
����
����
����
����
����
����
����
����
�����
����
����
��

READ THIS FIRSTWe’ve organized the overall structure of the rules of this LPS simulation game to follow this game’s sequence of play in introducing concepts. The rules themselves are written in a format known as the Case System. This approach divides the rules into Modules (each of which deals with a major important aspect of play). Modules are numbered sequentially as well as possessing a title. Each Module is divided into Sections (that deal with a major sub-topic inside the Module) which are also numbered sequentially. Modules and Sec-tions are introduced by some text that briefly describes the subject covered by that particu-lar Module or Section. Finally, the majority of each Section consists of Cases. These are the specific, detailed rules that govern play. Each Case is also numbered sequentially. The numbering follows a logical progression based upon the number of the Module of which the Cases are a part. A Case with the number 7.51, for example, is the first Case of the fifth Section of the seventh Module of the rules. Each Module can have as many as ninety-nine Sections and each Section can have as many as ninety-nine Cases. The numbering system is designed as an organizational aid. Use it to determine where a Case is located in the rules.
3.1.4The example above is the number of the fourth Case of the first Section of the third Module of the rules.
Learning to Play the GameBegin by familiarizing yourself with all of the components listed for this game. Then skim through the charts and rules, reading all the titles of the Modules and Sections. Set up a game scenario or portion of a scenario (after reading the applicable Module) and play a trial game against yourself. During this trial game, try referring to the rules only when you have a question and remember the numbering system we employ makes it easy to look up rules when you do. While a trial game may take you an hour or two, it is the quickest and most pleasant way to learn (short of having an experienced friend teach you). We also don’t recommend attempting to learn the rules word-for-word. Memorizing all the details is an effort that few can do. We’ve written these rules to be as comprehensive as possible – but they are not designed to be memorized. Taking in the rules in this way (as you play along) is the best approach to mastering this game. We’re always open to suggestions on how to improve the comprehension of our rules. Write to us (see addresses in 3.0) if you have an idea on how we can communicate better with you.
1.0 INTRODUCTIONToppling the Reich is an operational level simulation of the fighting for the Rhine River and Westwall that occurred in 1944 and 1945. It covers the major episodes of this period on the Western Front by means of scenarios, which can also be linked together to form a campaign game.
2.0 GAME COMPONENTSBasic components of the game are the map, a set of die-cut counters, the rules, and a die for use with the Combat Results Table. The map includes the relevant portions of Germany, France, Luxembourg, Belgium and Holland, on which a hexagonal grid has been superimposed to regulate the movement of the pieces. The pieces, or counters, depict the major forces available to both sides. The Combat Results Table, printed on the map, provides ways to determine the outcome of battles that occur during the course of the game. The rules are a set of agreed procedures by which Toppling the Reich is played.
This framework is used to play one of six scenarios that recreate important phases of the campaign that led to the crossing of the Rhine by the Allied forces. The scenarios are printed in this booklet following the body of the rules. All information necessary to the play of an individual scenario, such as the setup, combat units available, and special limitations, is recorded in the scenario list-ings. All information necessary to the play of the game is recorded in the rules. Disagree-ments over rules interpretation should be resolved by a roll of a six-sided die or some other impartial method.
Against the Odds Magazine PO Box 165 Southeastern, PA 19399-0165 USA Attn: Toppling the Reich
Or e-mail us at: [email protected]
We hope you enjoy this game. Should you have any difficulty interpreting the rules, please write to us at the postal or e-mail address above, phrasing your questions so that a simple sentence, word, or number can answer them. If you send a letter by post, you must enclose a stamped, self-addressed enve-lope to receive a reply. We recommend e-mail as the best way to resolve a query. Although we welcome comments and suggestions about the game’s interpretation of events, we cannot promise to respond to questions on theory or design intent.
2.1 Combat UnitsToppling the Reich is played with units that have a variety of information printed on them. In the rules these will be called “pieces,” “units,” or “counters,” terms that will be used interchangeably. Units include both information of historical interest and information directly necessary to the play of the game. There are two varieties of pieces: combat units and game markers. Examples of combat units are shown to the right.
Note The reduced side has a lesser combat factor. Units with a CF and/or MF printed with a letter or icon have special rules/abili-ties governing Combat and/or Movement (see Module 10.0).
2.1.1 Combat Unit Size Designations Combat units are back-printed with reduced values. For German Corps, substitute units representing the same formation are used to assess combat losses (Exception US and Canadian Corps have only 2 steps. If compelled to take an additional step loss such a corps must break down into its constituent units, some of which will be reduced and/or eliminated to satisfy the step loss). Each side of a unit is termed a “step,” and losses are taken in steps. Although there are a few exceptions, in gen-eral corps possess four steps, divisions have two (the remnant being a battle group or kampfgruppe), and brigades and regiments have only one.
2.2 Game MarkersThe use of each type of game marker will be explained in the various rules.
2.3 Game ScaleA hex on the map is five miles across. Each turn represents six days of real time.
3.0 IMPORTANT CONCEPTS BEFORE YOU BEGINThe rules about stacking, Zones of Control, Supply, Leaders and HQs all affect play pro-foundly and are found in this Module.
3.1 StackingPlacing more than a single piece in one hex is allowed in Toppling the Reich. In any one hex the player may place up to four division-size units, or one corps-size unit plus one additional division. (Note Three regiments or brigades equal a division for stacking purposes).
Exception Players may stack one extra unit (up to a division in size), in addition to the limits above, in a Bridgehead (Case 10.4.3) hex.
Headquarters, Engineer and Commando units, along with Leaders and game mark-ers, do not count for stacking and may stack without regard to these limits.
3.1.1 Penalties A player may not stack in excess of the permitted stacking limits. Units in excess of the overall stacking limits in a hex at the end of a player’s turn are elimi-nated. Units eliminated to meet stacking limits are chosen by the owning player.
3.2 Zones of ControlAll corps-size units, Armor, and Panzer Gren-adier/Motorized (see Unit ID Chart) type units of any size project a Zone of Control (ZOC) into the six hexes immediately sur-rounding the piece itself. Zones of Control never extend across Major Rivers (whether bridged or not), or into Sea hexes or other impassable terrain. The presence of a friendly unit in a hex controlled by the opponent’s ZOC cancels the ZOC for purposes of trac-ing Lines of Supply, an HQ’s dispatching of Reserves, and retreat after combat.
3.2.1 ZOC and Movement Units must stop their movement upon entering a hex covered by an enemy ZOC and may move no further in that player-turn. A unit may only move directly from one enemy ZOC-controlled hex to another, expending all of its movement points to do so, if it begins the turn in the enemy unit’s ZOC and the hex entered is already occupied by a friendly unit. A few units (Commandos in Section 10.1, the German 150th Panzer Brigade in Section 10.3) have the special ability to move through enemy ZOC (and, in the case of the 150th Panzer Brigade, to continue moving additional hexes if movement points remain) at an additional movement point cost. Other units, even if they first exited a ZOC, would have to halt movement on entering a new enemy ZOC-controlled hex.
3.2.2 Other ZOC Effects Zones of Control generally block the further tracing of lines of Supply for General Supply (Case 3.3.1), further movement of opposing Reserves during Combat (Module 7.0), and retreat after combat (Section 7.8) by the opponent’s units.
3.3 SupplySupply is important to all aspects of Move-ment and Combat. Supply status is judged at the beginning of the Movement Segment for Movement and at the instant of Combat for Combat. There are two types of Supply: General Supply and Attack Supply. Each is detailed below.
3.3.1 General Supply A unit is in General Supply if it is within Command Control
Allied Unit AbbreviationsALG AlgerianAP AlpineAT Anti-tankBGN BelgianCCA/B/C Combat Command A/B/CCDN CanadianCDO CommandoCMP A/B Composite A/BCOL ColonialCZEC CzechGDS GuardsLOCU Locust tanksMOR MoroccanRCP Regiment Chasseurs de ParachuteR DCH Royal DutchSHAEF Supreme Headquarters Allied
Expeditionary ForceSSF Special Services ForcesTETR Tetrarch tanks
German Unit AbbreviationsAG Armee GruppeERDM ErdemarkeFE Fuhrer EscortFJ FallschirmjagerHEYD Von der HeydteKOEN KoenigKMRN KriegsmarineLW LuftwaffeNEDER NederlandOB W Obercommando WestPZ PanzerPZA Panzer ArmeeSS SchutzStaffelnVOLKS Volkssturm
Marker AbbreviationsBRG-HD BridgeheadC-A-P Combat Air PatrolCHEM-W Chemical WeaponsCRPT-B Carpet BombingDAM-BL Dam BlownINTRDCT InterdictionOP OperationRAIL-HD RailheadRPLCMT/REPLAC ReplacementRR-MOV Railroad movementSTLMT StalemateST-MOV Strategic movementU Ultra DeceptionV VictoryWTHR WeatherW-WALL Westwall
SAMPLE LEADER
Combat Factor Movement Factor
Leader Name
Rank (see 3.4.1)
SAMPLE HEADQUARTERS
HQ Level(see 3.5.1)
Combat andMovementFactorsHQ Name
SAMPLE COMBAT UNIT
Front Full Strength
Back Reduced Strength
Unit ID
Combat Factor (CF) Movement Factor (MF)
StepsRemaining
Unit Size(see below)
Unit Type(see below)
UNIT TYPES
Infantry Paratrooper Engineer
Armor Motorized Armored Car
Anti-Aircraft Static Division Corps
UNIT RANKS
Corps Division Brigade
Regiment or Kampfgruppe Battalion
2 TOPPLING THE REICH rules TOPPLING THE REICH rules 3

range of a friendly Headquarters (Section 3.5) that itself is in supply. A Headquarters is in supply if it can trace a Line of Supply (LOS) no more than 12 hexes long to a rail-road hex that is connected with a map entry hex by an uninterrupted series of friendly rail hexes. The LOS and the railroad connection must be free of opposing units or their ZOC and may cross Major Rivers only at Bridges or where an Engineer unit is located (Case 10.4.2). The presence of a friendly unit in a hex negates the opponent’s Zone of Control for purposes of tracing Supply.
Also, any German unit is in General Supply if it is able to trace an LOS of five (5) or fewer hexes to the eastern map edge, or if it is in a non-Westwall fortification (Dunkirk, for example). Any Allied unit is in General Supply if it is able to trace an LOS of five or fewer hexes to the western or southern France map edges.
A unit that is in General Supply may use its full movement allowance during the Move-ment Segment, and may use Strategic Move-ment (Section 6.2) and Railroad Movement (Section 6.4). Only units that are in General Supply and can trace a Line of Supply to a supply source (German units cut-off in a for-tification, for example, could not) are eligible to attack during the Combat Segment of the player-turn.
3.3.2 Attack Supply A Major Attack is any that involves two or more stacks (Section 3.1) of attacking units. A Major Attack
costs one Attack Supply Point (ASP) and all attacking units must be in General Supply. Each turn the player is awarded ASP by the scenario in play. These may be expended in the turn received or accumulated for use in future game turns.
The expenditure of one ASP is required for any combat in which the player attacks with two or more stacks (Section 3.1). ASP may also be used in connection with Airpower (Module 11.0), in exchange for bringing new units in from the Allied Communications Zone (COM Z, see Case 6.5.2), for deploy-ing German Engineer units (Case 10.4.2), for placement of Paratroop units (Section 10.5) on Airdrop status, and to fuel espe-cially powerful Oversupplied Attacks (Case 3.3.3).
3.3.3 Oversupplied Attacks Major and Minor as well as Attrition Attacks may be over-supplied in order to make an attack more pow-erful (this represents increased stocks of ammo and pre-battle planning). An Oversupplied Attack costs two ASP. The effect of making an Oversupplied Attack is to give the attacker a one-column shift to the right on the Combat Results Table.
Oversupplied Attacks may not be made by units tracing supply across a Major River hex side bridged by an Engineer unit or into/through a Flooded Hex (Cases 10.4.2 and 5.1.2).
3.3.4 Minor Attacks An attack made by the player involving only a single attacking stack (Section 3.1) is defined as a Minor Attack. Minor Attacks do not require the expenditure of an ASP. A Minor Attack may still be oversupplied by the player, if desired, by expending two ASP. Units making Minor Attacks must be in General Supply, however.
3.3.5 Out of Supply Units that cannot trace a line of supply during the Command Seg-ment (Section 4.1), hence not in General Supply, are considered Out of Supply (OoS). Use the Out of Supply markers to indicate this status. Units that are OoS move with only half their printed MP allowance (drop fractions, but not to less than 1). An attack by a stack containing even one OoS unit can only be a Minor Attack, and OoS units attack with half their printed CF (drop frac-tions, but not to less than 1). Any units that are OoS during the Final Reorganization Segment of the owning player’s turn lose one step of combat strength each. OoS units always defend with the printed value of their current (i.e., full or reduced strength) CF as modified by terrain. Note The effects of being OoS are cumulative with those for being Out of Command (Section 3.6); a unit’s CF and MP cannot be reduced to less than 1, however.
3.3.6 Airborne Supply Each game turn the Allied player (only) may choose to deliver the equivalent of one Attack Supply Point by air rather than through his Lines of Supply. An ASP delivered by air conveys both General Supply and Attack Supply to all of the units in one hex for one complete game turn. Units to be supplied by air are designated in the Movement Segment of the Allied player-turn. Delivery of an ASP by air requires the expenditure of an Air Action (Section 11.5) from the Allied player’s current inventory. In addition, in any turn in which the Allied player uses this Airborne Supply provision he is prohibited from landing any Paratroop units (Section 10.5).
3.4 LeadersLeaders represent officers of particularly great ability exercising personal control over sec-tors of the front. Leaders have movement and combat factors like combat units but Lead-ers are not regular combat units. Leaders’ combat values are conditional on the values of the combat units in the hex they occupy. Leader counters add a number of additional combat factors to a stack equal to either the Leader’s printed combat value or the total
combat value of the units in the hex, which-ever value is lower. Leaders cannot attack or defend by themselves and are eliminated if unaccompanied and an opposing combat (non Leader) unit enters the hex they occupy. Leaders also modify the DR used to resolve Combat with the Combat Results Table.
Most Leaders in Toppling the Reich are Army Leaders and may only be used to affect battles involving units with which they are stacked. A few Leaders are called Higher Commanders and may affect combat within their Army Group HQ Boundaries or across the entire front. Army Group and Front Leaders may only exercise this capability when stacked with their respective Head-quarters units (Section 3.5). Each Leader is marked with a number according to the ranking system of his nation, thus allowing for differentiation between Army Leaders and Higher Commanders. The marking system follows:
3.4.1 Leader Ranks
Higher Commander of Front (SHAEF, OB West)
Higher Commander of Army Group
Army Commander of Army
Leaders may be sent to different commands provided that the Leader has a sufficient command level, as indicated by his rank, to function in his new post. In this manner Leaders may be “promoted” to replace lost officers.
Note Leader rank graphics are based on German sleeve insignia of WWII.
3.4.2 Leaders in Combat Each friendly Leader adds his combat factor to the value of attacking or defending units for one combat (in a game turn) that is within the Command Control range (Case 3.5.1) of his (own) HQ with which he is stacked, or in the hex where he is located (if he is an Army Leader). Each Leader also modifies the DR by two (2) in favor of the owning player (attacking Lead-ers add to the die roll, defending Leaders subtract from it). No more than one Leader at each command level may participate in a single combat, making a theoretical maxi-mum of three Leaders that may be in one combat on each side (one Army Leader, one Army Group commander and the Front commander). There will be a net DR modi-fication for the number of attacking Leaders minus the number of defending Leaders and any terrain effects (see the Terrain Effects
Chart) and Weather. This net result modifies the combat resolution die roll.
Each Leader may be used once in a game turn to support combat during either Combat Segment. Turn a Leader unit over to indicate that he has been committed for the game turn (i.e., if a Leader is used to support an attack he cannot be used later in the turn to support a defense or another attack). Exception If the player-turn extends into an Exploitation Segment, Leaders used in the attack on the first round of combat that caused the Exploitation may be used again (but no others).
A Leader may not stack with an HQ having a greater command status than the rank he himself possesses. No Leader may add more to the combat value of the units involved in the combat than the value of the units themselves. For example, if all of the friendly units’ CF in a combat total 5 and all of the Leaders that are committed to support have a combined CF of 7, only 5 of the Leaders’ CF can be applied to the combat (the excess 2 CF are ignored). Leader values do not count in Attrition Combat (Section 7.11). Leaders are not themselves Headquarters units and cannot be used to dispatch Reserves (Cases 3.5.3 and 3.5.4). Leader contributions to combat strength and DRM are not affected in any manner by lack of Supply, terrain modifications, Weather or Command Con-trol. They are added in after all these modifi-cations have taken place.
A Leader is eliminated when the last friendly unit he is stacked with is eliminated, or if caught alone in a hex that is entered by an enemy combat unit. An eliminated Leader cannot be returned to play or otherwise replaced.
3.5 Command ControlThe presence of Headquarters (HQ) units has a direct effect on the ability of units to move and fight. To move at their full MP allowance units must be able to trace com-
mand to an eligible Headquarters unit that is within Command Control range. HQs are vital in Combat in order to give Command Control to engaged units and to provide them with Attack Supply Points. Army Group and Front HQ communications facilities also enable Higher Commanders to intervene in battles within their areas, while Army HQs may dispatch Reserves in defense.
Headquarters act in their various capacities by means of ranges within which they may exer-cise functions. HQs are provided with a range for Supply, a range for Command Control, and a Reserve range. This range is the maxi-mum number of hexes away from the HQ unit itself at which an activity may be carried out. See example on Campaign Insert.
3.5.1 Command Control Ranges See Table 1, above.
3.5.2 Tracing Command Control Combat units trace Command Control to an Army HQ if the unit is within the requisite Com-mand Control range of the HQ. The Army HQ to which command is traced must be within an Army Group HQ’s Boundaries (see below). Tracing Command Control range to an Army HQ and an Army Group HQ is not affected by the presence of the opponent’s units or ZOC (Note, however, that tracing Supply is affected by enemy ZOC).
Units that cannot trace Command Con-trol to an Army HQ cannot participate in an attack. Army HQs coordinate both the provision of General Supply and of ASP for units in their sectors. Units cannot receive ASP unless within the Command Control and Supply range of an Army HQ. Defend-ing units that cannot trace Supply at the instant Combat is declared are marked as Out of Supply.
Army Group Headquarters use a somewhat different method of tracing Command Control by using Army Group Boundary markers (Section 5.2). An Army Group HQ exercises Command Control over all units
located within its Boundary markers and the map edges, provided the Army Group HQ can trace command to the Front HQ. Army Group Boundary frontages are a matter of choice for the player and may be set during the Command Segment as narrowly or broadly as desired.
Front Command Headquarters cover the entire map. Front and Army Group HQs cannot be used to provide Attack Supply (Case 3.3.2) directly for units in combats; Attack Supply coordination must come from Army HQs.
Front and Army Group HQ Leaders (Sec-tion 3.4) may intervene in battles only if the Leader counter is stacked directly with its respective HQ unit. Army Leaders can influ-ence only the hex they occupy.
3.5.3 Army HQ Reserves Army HQ Reserves are those combat units that are stacked with Army HQs at the time of battle. The defender may use these units to support hexes that the opposing player has attacked. Reserves may proceed to any hex within the Reserve Range of the dispatching Army HQ unit. Reserves may reinforce the hex under attack and/or backstop the front line to limit the consequences of the opposing player’s potential Breakthroughs (Section 7.10). Army HQs (only) can also dispatch Reserves during the Exploitation Segment (see Module 8.0). See example on Campaign Insert.
Non-exploitation Reserve units do not pay MP costs for terrain they enter, but they may cross Major Rivers only at Bridges or Bridgeheads, and they may enter and even pass through enemy ZOC only if those hexes are already occupied by friendly units. Reserve units may not exceed stacking limits in any of the hexes they enter. Any type of Headquarters unit that is in an opponent’s ZOC cannot dispatch Reserves. Exploitation Reserve units must pay terrain costs for hexes entered (Module 8.0) and are not limited to the HQ’s Reserve Range while moving. The dispatched reserve unit(s) may enter and pass
4 TOPPLING THE REICH rules TOPPLING THE REICH rules 5
Headquarters Level Command Control Supply Reserve
German Army 4 hexes 4 hexes 3 hexes
German Army Group Army Group boundaries NA 8 hexes to Army HQ only
German Front Command (OB West) Entire map NA 8 hexes to Army HQ only
Allied Army 5 hexes 5 hexes 3 hexes
Allied Army Group Army Group boundaries NA 6 hexes to Army HQ only
Allied Front Command (SHAEF) Entire map NA 8 hexes to Army HQ only
Table 1: Command Control Ranges

through enemy ZOC if the hex is occupied by a friendly unit. Leader units are not HQs and cannot dispatch Reserves nor can they be sent as a Reserve unit. Corps-size units cannot be used as Reserves. Reserve units cannot cross Army Group Boundaries.
3.5.4 Higher Command Reserves Army Group and Front Command HQs cannot send Reserve units directly to hexes under attack which are within the HQ’s Com-mand Control range. Rather, Army Group and Front HQs can dispatch Reserves only to Army-level HQs that are within the HQ unit’s Command Control range and (if appli-cable) Army Group Boundaries. Each time a hex that is within an Army Group HQ Command Control Boundary is attacked, the Army Group HQ or Front HQ can dis-patch one Reserve unit that is stacked with the dispatching Higher Command HQ to an Army HQ that has the attacked hex within the latter’s Command Control range. Reserve units may not exceed stacking limits in any of the hexes they enter. Dispatching Reserves is voluntary, but if the opportunity is passed up at the time Reserves are to be commit-ted, before Combat is resolved, the chance is lost. A unit cannot be dispatched by a Higher Command HQ if it cannot reach an eligible Army HQ’s hex (i.e., it cannot stop in some hex “on the way”. Units moving out of Higher Command reserve may travel no further than the Reserve Range of the Army Group/Front Command HQ, and they cannot cross the Army Group’s Boundar-ies if sent by that type of HQ. Note Think of Higher Command Reserves as “back ups to the back ups.” A unit dispatched by a Higher Command cannot go to a hex where a combat is being resolved, but it can be sent to an Army HQ to replace unit(s) previously dispatched as Reserves. While this may not be of help to the combat being resolved currently, the new Army Reserve units sent by the Higher Command may come in handy down the road….
3.5.5 Defense of Headquarters Headquar-ters units have an intrinsic combat strength of three (3) that can only be used defen-sively. Destroyed Headquarters units may be replaced in the Movement Segment of the owning player’s next player-turn.
3.5.6 Nationalities British and Canadian Headquarters units may freely provide Supply and Command Control only to Brit-ish, Canadian, and Minor Allied (Czech, Polish, Dutch and Belgian) units. These nationalities of units may also stack together freely. American and French Headquarters units may freely provide Supply and Com-mand Control only to American and French units, which may also stack together freely. American and French units may never stack
with British and associated units (and vice versa) nor may they draw Supply and Com-mand Control from British/Canadian HQs. The German player is not subject to any Nationality restrictions.
3.6 Out of Command Control (OoC)A unit that cannot trace Command Control is considered Out of Command (OoC). Use an Out of Command marker to indicate this. OoC units move with half of their printed MP allowance, cannot use Railroad or Stra-tegic Movement, defend with half of their printed CF, and cannot participate in a regu-lar attack (i.e., non-Attrition, see Case 3.5.2). Additionally, if the unit is OoC Leaders may not support the unit, nor may the unit receive replacements (Case 6.5.4). OoC HQs cannot serve as sources for ASP, dispatch Reserves, nor may any Leader stacked with the HQ support any combat. Note The effects of being OoC are cumulative with the adverse effects applicable to those units that are not in General Supply (Case 3.3.5). A unit’s CF and MP cannot be reduced to less than 1, however.
Any combat result that compels any HQ to retreat will render it OoC for the remainder of the current game turn. If a Front or Army Group HQ is compelled to retreat, however, subordinate HQs will remain in Command Control if the HQ(s) was/were in command before the combat.
Note See also Case 13.1.1.
3.7 Out of Command and Supply Summary
No Supply No Command Neither
1/2 MP 1/2 MP 1/4 MP1/2 CF No Attack No AttackFull Defense 1/2 Defense 1/2 Defense
4.0 THE GAME TURNToppling the Reich is played in complete turns, each of which is subdivided into successive moves, or player-turns, for the
Allied and German players. Scenarios vary from four to ten game turns in length. Each complete game turn is the representation of a real-time of six days. Each complete game turn is made up of two player-turns in which the Allied and German players move pieces, fight battles, and perform other activities as enumerated below and detailed in separate rules. The order of play within the game turn
is set by the scenario in play, but both play-ers have player-turns within the game turn. Each player-turn is divided into segments (Sections 4.2 through 4.5) which must be performed in order as follows.
4.1 Command SegmentThe player designated to move first in the game turn must roll for Weather (Section 5.1). Both players adjust their Attack Supply levels (Case 3.3.2), determine their avail-able Air Actions (Module 11.0) for the game turn, and conduct those particular air mis-sions which may only be conducted during the Command Segment (see Sections 11.2 through 11.4). Before checking for Air Status each player may expend one Attack Supply Point for a Concentrated Effort this turn (Section 11.1d). Players alternate allocating air units to certain air missions, with the Allied player declaring the first such air mis-sion. Both players flip Leader units that were used in the last game turn to Available Status. Also, both players, German player first, may re-align Army Group Boundaries (Section 5.2) separating their Army Groups. Finally, both players trace Command and Supply paths (Cases 3.3.1 and 3.5.2) and place OoS and OoC markers as applicable.
4.2 Movement SegmentDuring the Movement Segment the player moves his units on the map in order to execute his game strategy. The player consults the scenario listing to determine what new units (reinforcements) and replacements arrive, and these units may be brought into play according to the COM Z rules (Case 6.5.2 for the Allied player). Note If using the Optional Rules, the German player expends an ASP for entering reinforcement units, or declares a DR check will be made. Any Para-chute Drops the Allied player wishes to make this turn must be announced at this time (Section 11.8). The player may move none, any, or all of the units he has avail-able depending on his strategy and the rules of Movement (Module 6.0). The player may move units adjacent to hexes occupied by enemy forces in order to engage them in Combat (Module 7.0). He allocates Air Actions to help with combat or hinder the opponent during the adversary’s own player-turn. The Movement Segment ends when the player indicates he has no more moves to make.
4.3 Combat SegmentThe player may now attack with any or all of his units that are located in hexes adjacent to the opponent’s pieces. Units must have proper Attack Supply (Section 3.3) and be in
Command Control (Section 3.5) in order to attack. Attacking is voluntary. However, the number of large attacks that may be made is limited by the available Attack Supply (Case 3.3.2). Both players may support the combat with Close Air Support (Section 11.6), and Leaders (Section 3.4). The attacking player (only) can commit Paratroop units (Section 10.5). The defending player (only) may aid attacked units with Reserves (Case 3.5.3) and move Reserves dispatched by Higher Com-mand HQs to hexes occupied by eligible in-Command Army HQs (Case 3.5.4). Individ-ual battles are resolved in the order desired by the attacking player. The Attacker may also elect to engage in Attrition Combat (Sec-tion 7.11). All Combat is resolved by a DR and the appropriate Combat Results Table (CRT). All Attrition Combat, and all regu-lar combats above a certain size, require the expenditure of Attack Supply (Case 3.3.2). Oversupplied Attacks (Case 3.3.3) require the expenditure of additional Attack Supply. An attack cannot be made if the player does not have the requisite Attack Supply Points.
4.4 Exploitation SegmentThe length of the player-turn is conditional on the outcomes of the player’s individual attacks. If the player’s attacking ground units achieve any “Breakthrough” results on the CRT, then certain of the units involved in the attack, as well as certain of the attacker’s units previously designated as Reserves, may be eligible for a special Movement-Combat sequence called Exploitation (Module 8.0). Movement and Combat during the Exploi-tation Segment generally follow, all regular rules for these purposes, including Supply, Reserves, Leaders, Airpower, etc.
4.5 Final Reorganization SegmentThe player now removes any units on the map listed as “For Withdrawal” during the current player-turn. Remove any OoS mark-ers from units that can now trace an LOS (Case 3.3.1). Friendly units that remain OoS (Case 3.3.5) are reduced one step. Railheads (Case 6.5.4) that are under construction by Allied Engineers move forward at this time. The German player removes Temporary Bridge(s) during the Second Player’s Final Reorganization Segment (Case 10.4.2).
With completion of the first player-turn, play reverts to the opponent. The second player repeats Sections 4.2-4.5 for his own player-turn. When both players have finished their player-turns, the Game Turn marker is moved ahead on the Turn Record Track to denote the passage of a complete game turn. A new game turn begins. This is repeated once for each game turn included in the scenario.
5.0 COMMAND SEGMENTIn this Segment, the players determine the Weather for the upcoming game turn and may adjust their Army Group Boundary markers.
5.1 WeatherWeather plays an important part in the game by affecting the movement costs for entering the different types of terrain on
the map, through the Terrain Effects Chart (TEC), and also by affecting the level of available Airpower (Module 11.0). Weather is checked in the Command Segment of each game turn. The first player rolls one die on the Weather Table. This is cross-indexed with the month of the current game turn to give Weather conditions on the Weather Table. Movement cost modifications due to Weather are stated underneath the Weather Table itself. The map areas affected by the Table are delineated in Case 5.1.1 below. See also Section 11.1 and the Weather Table, as well as the Air Status Chart.
5.1.1 Weather Zones There are three Weather Zones delineated on the map by text labels, white borders and varying tex-tures (see map key). All hexes so indicated are affected by the posited Weather when that condition is rolled on the Weather Table. The Weather Zones are Holland (north of the Rhine), the Ardennes (forest textured zone east of the Meuse) and the Black Forest (forest textured zone east of the Rhine).
5.1.2 Flooded Areas Several different rivers may flood due to Weather. When rivers flood, both the river itself and all its tributar-ies are affected. Trace tributaries by begin-ning with the hex side at which the specified river ends and then noting all minor rivers that flow into the river before the latter either flows into a Major River or into the sea. See the TEC or map key for examples of the appearance of floodable rivers. Note The Meuse and Maas Rivers are one and the same (differing spelling).
5.1.3 Flooding the Roer River There is one Weather condition that can be deliberately created by the German player. This is
flooding the Roer River, a small minor river at the gateway to Germany that would have become a rising torrent if the Germans had blown the dams. The two Roer River dams are located adjacent to hex 3422. Any dam may be blown by any German combat unit that occupies a hex adjacent to the specific Roer dam to be demolished. Demolition occurs during the Final Reorganization Seg-ment of the German player-turn. Demoli-tion of both dams causes the Roer River to be completely impassable for three turns. If only one dam is blown the Roer River is impassable for two turns (four turns maxi-mum in the game if the two dams are blown seperately). Use the third DAM-BL marker to indicate the last turn of the Roer River’s flooding on the Turn Record Track.
5.2 Army Group BoundariesArmy Group HQ commands determine their Command Con-trol range in part by means of the placement of Army Group
Boundary markers. Army Group Boundary markers may be placed along hex sides on the map (Figure 1) during the Command Segment of the game turn. Boundary mark-ers may be placed only on hex side rows and not across the grain of the map hex grid. An Army Group HQ exercises Command Con-trol over all units located within its boundar-ies and the map edges. Army Group HQ frontages are a matter of choice for the player and may be set as narrowly or broadly as desired but realignment may take place only during the Command Segment of the game turn. Boundary markers are used by a side only when more than one Army Group HQ on that side is in play.
6 TOPPLING THE REICH rules TOPPLING THE REICH rules 7
Figure 1: Army Group Boundaries
Yes Yes No

6.0 MOVEMENT SEGMENTDuring the Movement Segment of his player-turn the player may move any, all, or none of his units that are able to do so. A unit’s movement is subject to the restric-tions of the Movement Allowance printed on the piece, the unit’s General Supply (Case 3.3.1) and Command Control (Section 3.5) statuses, the Weather (Module 5.0), and the terrain the unit traverses. A unit moves by expending Movement Points (MP) from its allowance in order to enter hexes on the map. The MP expenditure required to enter any given hex depends on the terrain type of the hex. All MP costs are specified on the Terrain Effects Chart (TEC). In general, an expendi-ture of one MP is required to enter each clear terrain hex. There are terrain costs for each type of hex on the map and also separate costs for crossing river and Major River hex sides. These listed terrain movement costs may be increased by poor Weather. All MP costs are cumulative and a unit cannot enter a hex unless it has sufficient MP remaining to pay required costs.
Exception A unit may always move one single hex (even if its Movement Points are insuf-ficient) or to move from one enemy ZOC to another that is already occupied by a friendly unit, but not into or across impassable terrain. See also Section 10.1.
Units may not enter hexes containing enemy combat units (Exception Overruns Section 6.3) but may freely move through hexes containing only enemy Leaders and/or game markers (Exception Aerial Interdiction mark-ers) in which case the enemy Leaders are removed from play.
Supply status for Movement is determined at the beginning of the Command Segment. A unit which is in General Supply (Case 3.3.1) may move its full printed Movement Allow-ance. Units not in General Supply are limited to moving only one half of their printed MP value (fractions are ignored). Units that are Out of Command are further limited in Movement (Section 3.6).The Movement Allowance of a unit need not be used up every turn. Movement is wholly voluntary. No unit can spend more MP than its Move-ment Allowance as modified by its Supply and Command Control status. Unused MP cannot be transferred to other units or accu-mulated from turn to turn.
6.1 Major RiversMajor Rivers are those with dark centers. These rivers can be crossed only at Bridges that are printed on the map. Units’ supply lines can cross Major Rivers only at Bridges, as must Reserve units moving into position. Engineers may ferry other units across a
Major River without a Bridge (Case 10.4.2). Also, Engineers may provide a Supply path if serving as a ferry (Case 10.4.2). Attacks and Movement across Major Rivers may be supported with the use of Engineer units (Case 10.4.4). Commando units (Section 10.1) have the special ability to cross Major Rivers without using Bridges or being ferried by Engineers. A unit’s ZOC does not cross Major Rivers, not even at Bridges. Units may not attack across a Major River (Exception Attrition Combat, Section 7.11), even if adja-cent to the opponent’s units, unless a Bridge intersects the hex side between the oppos-ing units. Units attacking across a Major River always suffer any strength reduction in Combat (see TEC), whether or not adverse DR modifiers are avoided by the attackers having attacked from both sides of the Major River (Section 7.4 and TEC).
6.1.1 Flushing The dotted lines to/from Flushing to Breskens and the mainland indicate that movement across those hex sides is only possible if the hexes are under the player’s control; otherwise movement is prohibited. Combat of any form across those hex sides is not allowed.
6.2 Strategic MovementA player may use Strategic Move-ment to redeploy his pieces rap-idly, at the expense of precluding their use in Combat during that
player-turn. Units using Strategic Movement may move at twice their printed Move-ment Allowance and pay terrain MP costs as specified by the Terrain Effects Chart (TEC). Units must be in General Supply (Case 3.3.1) and Command Control (Section 3.5) to use Strategic Movement; they may not begin their turn in the opponent’s ZOC, nor may they move into such a ZOC at any time during their move. In non-Campaign Games units may use Strategic Movement only on their side of the scenario start-line of the scenario in play (i.e., in hexes that started the game under friendly control). In the Cam-paign Game any hex that is under friendly control (i.e., hexes which are occupied, or which were previously passed through by a friendly unit) at the start of a player’s turn, and is not in an enemy ZOC, may be used for Strategic Movement. Units utilizing this variety of Movement cannot be used for Combat or Exploitation in the player’s turn.
6.3 OverrunsWhen a player can bring sufficient force to bear on a hex it is possible to eliminate opposing units as a function of Move-ment rather than in the Combat Segment. To Overrun a defending stack the player must have in one hex a force with a combat
strength ratio advantage of 10-1 (excluding Leaders) over the unit(s) being Overrun, plus a Movement Allowance sufficient for each unit in the overrunning stack to expend 4 MP in addition to the MP cost of the hex occupied by the stack being Overrun. The defender’s strength in the Overrun is calculated using all terrain considerations (but again, not including Leaders). All units making an Overrun must be from a single stack (Section 3.1) and must begin and end their Movement for the player-turn in the same hex. Overrun attacks are a function of Movement and do not require the expendi-ture of Attack Supply (Case 3.3.2).
6.4 Railroad MovementBoth players may use Railroad Movement to move pieces along railroad trackage that has been maintained in operation.
6.4.1 German Rail Lines Operating track-age for the German player is considered to be all railroad trackage on the German (eastern) side of the scenario start line that is not inter-rupted by the presence of (or adjacent to) Allied units, Allied ZOC, or Allied Aerial Interdiction (Section 11.3) markers.
6.4.2 Allied Rail Lines Operating trackage for the Allied player is considered to be all railroad trackage extending from the west and south map edges to Allied Railhead (Case 6.5.4) markers that are present on the map. Rail movement is not permitted in hexes occupied by or adjacent to German units, in a German ZOC, or subject to German Aerial Interdiction.
6.4.3 Procedure Units may be railed freely over operating railroad trackage, including German Static Divisions, which may be moved by rail if initially placed on Westwall Hexes containing rail lines. There is no limit on the distance or the number of units that may move by rail in a turn. Units moving by rail may never move adjacent to an enemy combat unit, regardless of whether it projects a ZOC or not, nor may they perform any action other than rail movement in the game turn (no Exploitation Movement, etc.). A unit is free to move normally in the game turn following its rail movement.
6.5 Replacements and ReinforcementsNew units entering the game, and units built back up to strength, may move only during the Movement Segment of the player-turn according to the procedures detailed below.
6.5.1 Reinforcements New units arrive as specified in the listings for each scenario, during the Movement Segment of the player-turn. These listings detail the number and
type of new units and give the number of the map entry hex on which they must come into play. German units entering the east and north edges of the game map may use Railroad Movement. Allied units entering the west and south edges of the map may enter at a connected Railhead, or anywhere along the railroad between the map entry hex and the Railhead (see Case 6.5.4). Reinforce-ments may use Strategic Movement on the turn they enter. New units may not arrive in the opponent’s ZOC. If a designated map entry hex is blocked, or a ZOC of an enemy unit is projected into the entry hex, then the designated reinforcements are delayed one turn but thereafter may arrive at any entry hex on the same edge of the map.
6.5.2 Communications Zone (COM Z) Starting with turn 2 of both the Campaign Game and Scenario 1, the Allied player’s reinforcements do not automatically enter play onto the map but instead are deployed to the Communications Zone (COM Z). Some at-start units in each scenario are also designated as Communications Zone (COM Z) reinforcements. These forces are units that were not immediately brought up to the front in order that priority could be given to the transport of Attack Supply. Each turn all Allied reinforcement combat units (but not Leaders or HQs; see below) first enter the COM Z. The number of units that can then be deployed from the COM Z to the map is determined by two DR checks. Two DR6 (i.e., the sum thereof ) determine the total number of units that can be entered via map entry hexes 1-6 that Allied player-turn. A single DR6 is made for map entry hex 7. Each DR check is modified as follows (use all that apply):
+1 if Antwerp is under Allied control (map entry hexes 1-6 only).
+1 if Rotterdam is under Allied control (map entry hexes 1-6 only).
-1 if 1 to 3 Allied Engineer units are cur-rently in play on the map.
-2 if 4+ Allied Engineer units are currently in play on the map (these assets are not available to help dockside).
-1 for map entry hex 7.
The modified DR indicates the number of units that may enter at the designated map entry hex(es). If the modified DR is 0 or less then no units may leave the COM Z for the turn for the designated map entry hex(es). Allied HQs and Leaders do not count against the COM Z DR limits and can enter the game immediately (i.e., these units do not have to enter the COM Z unless the Allied player wants them to do so). Allied reinforce-
ment and rebuilt units that do not enter play on the scheduled turn of arrival must be left in the COM Z. COM Z entry DRs may be made each and every turn for any units located there. See also Examples of Play in Campaign insert.
The Allied player can elect to deploy addi-tional units from the COM Z, regardless of and in addition to the limits determined by the DRs made above. In any Allied Move-ment Segment, after all allowable new units are deployed, the Allied player can deploy additional units from the COM Z box at a cost of one ASP for each unit (Case 3.3.2.). This represents the resources that must be expended in transport tonnage allocated to the additional reinforcements. This cost is paid only after the normal entry DR checks are made.
6.5.2.1 US Composite Divisions US Infan-try Divisions Comp A and B may only be taken from the COM Z by either of the fol-lowing means:
• The Allied player pays 2 ASP per unit (4 ASP total) or
• Operation “Herbstnebel” has been declared by the German player (Section 13.4 and Case 16.4.7). In this instance the Allied player pays no ASP to deploy these units from the COM Z.
6.5.3 Replacements The scenario listings detail the replacements available each turn, separately indicating infantry and armor (panzer) replacements. Each replacement may be used to restore one step of a reduced unit on the map. Armor replacements may be used to rebuild armor (panzer) or Panzer Grenadier (motorized, armored cavalry) units. Infantry replacements may be used to rebuild Infantry, HQ, Paratroop, or Panzer Grenadier (motorized, armored cavalry) units (Note Yes, armor and/or infantry replacements can be used for Panzer Grenadier, motorized, and armored cavalry units). Flip the reduced unit to its full-strength side. In preference to rebuilding existing units the player may also elect to rebuild the reduced steps of eliminated units that are in the Replacement Pool. A newly rebuilt unit appears at any map entry hex or connected Railhead (Case 6.5.5), or can be held off-map for entry on a later turn (Allied rebuilt units that do not enter play immediately are placed in the COM Z; Case 6.5.2).
Units receiving replacements must be in General Supply (Case 3.3.1) and in Com-mand Control (Case 3.5.2). No unit may receive more than one step of replacements in any one game turn. Units may be rebuilt even in the front line and in the opponent’s Zone of Control, except that no unit
involved in a Stalemate situation (Section 7.7) may receive replacements. Should a HQ unit be rebuilt it appears at any map entry hex the owning player chooses.
Note Engineers, the 150th Panzer Brigade and the Von der Heydte Paratroop unit cannot receive replacements, or be rebuilt if eliminated (Sections 10.3, 10.4 and 10.5).
6.5.4 Railheads and New Units Railheads are the places where new units can enter into play during the Movement Segment
and represent the furthest point to which a rail line is open. In order to enter play at a Railhead the rail line must be connected to a map entry hex. The rail line from the map entry hex to the Railhead cannot be adjacent to enemy units or be interrupted by enemy units, their ZOC, or enemy Aerial Inter-diction markers. All reinforcements, new Engineer units, and units rebuilt from the Replacement Pool may arrive at Railheads, subject to stacking limitations for the hex. Paratroop units exiting the map to return to Airdrop status must exit the map at Rail-heads (Section 10.5). The Allied and German Railhead rules are slightly different:
• German railroads are considered to be open to traffic from the map edge along connecting railroad lines westward as far as the front line. Rail movement is not pos-sible into hexes blocked by Allied units (or adjacent to them), Allied ZOCs, or Allied Aerial Interdiction markers.
• The Allied rail system is more complex. Sites for Railheads are initially set by the scenario in play, and the railroad is con-sidered open only between these Railheads and map entry hexes. No connecting rail lines are considered open. To open railway communications for Railroad Movement between one Allied Railhead and another it is necessary for Engineer units to physically move along the rail line putting it back in service (Case 10.4.1). The opening of such rail lines is designated by the use of Rail-head markers on the sections of trackage thus opened.
• Antwerp can be used as a Railhead once under Allied control and the Scheldt Estu-ary is free of any German ZOC (from Breskens, hex 2016, along the estuary to Antwerp on the south, and from hex 2518 to Flushing , hex 2115, on the north side of the estuary).
7.0 COMBATBattles occur during the Combat Segment of the player-turn in Toppling the Reich. Combat is always voluntary.
8 TOPPLING THE REICH rules TOPPLING THE REICH rules 9
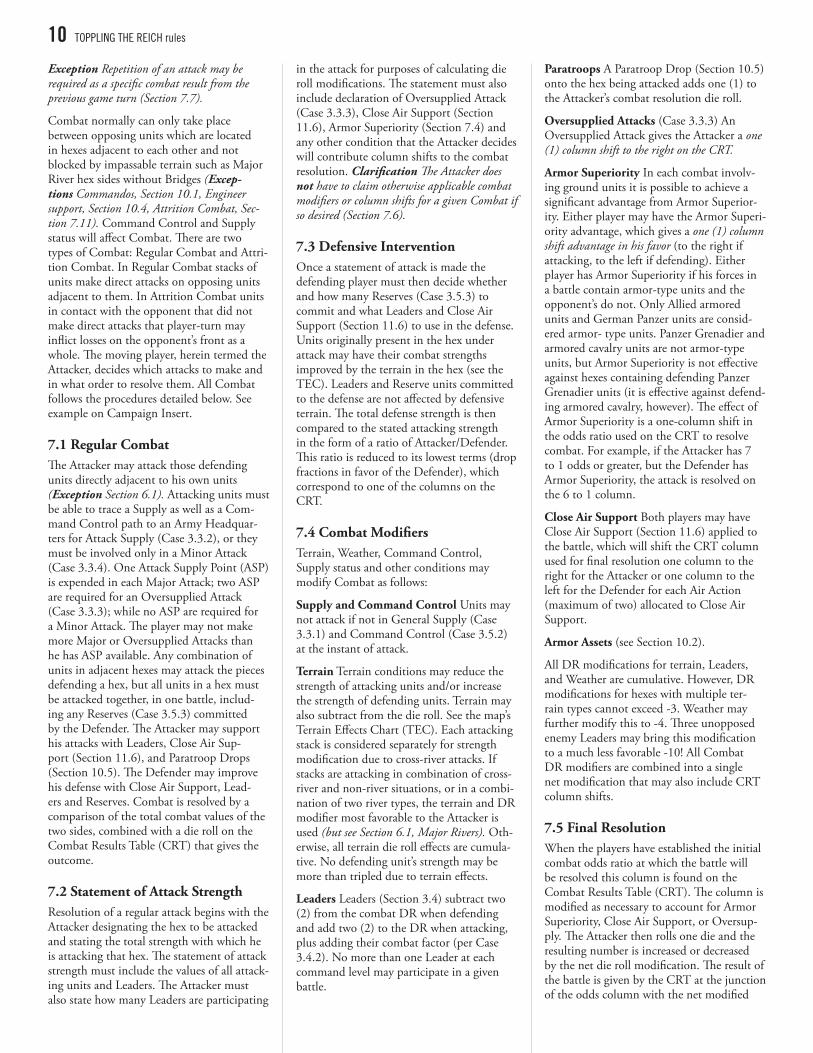
Exception Repetition of an attack may be required as a specific combat result from the previous game turn (Section 7.7).
Combat normally can only take place between opposing units which are located in hexes adjacent to each other and not blocked by impassable terrain such as Major River hex sides without Bridges (Excep-tions Commandos, Section 10.1, Engineer support, Section 10.4, Attrition Combat, Sec-tion 7.11). Command Control and Supply status will affect Combat. There are two types of Combat: Regular Combat and Attri-tion Combat. In Regular Combat stacks of units make direct attacks on opposing units adjacent to them. In Attrition Combat units in contact with the opponent that did not make direct attacks that player-turn may inflict losses on the opponent’s front as a whole. The moving player, herein termed the Attacker, decides which attacks to make and in what order to resolve them. All Combat follows the procedures detailed below. See example on Campaign Insert.
7.1 Regular CombatThe Attacker may attack those defending units directly adjacent to his own units (Exception Section 6.1). Attacking units must be able to trace a Supply as well as a Com-mand Control path to an Army Headquar-ters for Attack Supply (Case 3.3.2), or they must be involved only in a Minor Attack (Case 3.3.4). One Attack Supply Point (ASP) is expended in each Major Attack; two ASP are required for an Oversupplied Attack (Case 3.3.3); while no ASP are required for a Minor Attack. The player may not make more Major or Oversupplied Attacks than he has ASP available. Any combination of units in adjacent hexes may attack the pieces defending a hex, but all units in a hex must be attacked together, in one battle, includ-ing any Reserves (Case 3.5.3) committed by the Defender. The Attacker may support his attacks with Leaders, Close Air Sup-port (Section 11.6), and Paratroop Drops (Section 10.5). The Defender may improve his defense with Close Air Support, Lead-ers and Reserves. Combat is resolved by a comparison of the total combat values of the two sides, combined with a die roll on the Combat Results Table (CRT) that gives the outcome.
7.2 Statement of Attack StrengthResolution of a regular attack begins with the Attacker designating the hex to be attacked and stating the total strength with which he is attacking that hex. The statement of attack strength must include the values of all attack-ing units and Leaders. The Attacker must also state how many Leaders are participating
in the attack for purposes of calculating die roll modifications. The statement must also include declaration of Oversupplied Attack (Case 3.3.3), Close Air Support (Section 11.6), Armor Superiority (Section 7.4) and any other condition that the Attacker decides will contribute column shifts to the combat resolution. Clarification The Attacker does not have to claim otherwise applicable combat modifiers or column shifts for a given Combat if so desired (Section 7.6).
7.3 Defensive InterventionOnce a statement of attack is made the defending player must then decide whether and how many Reserves (Case 3.5.3) to commit and what Leaders and Close Air Support (Section 11.6) to use in the defense. Units originally present in the hex under attack may have their combat strengths improved by the terrain in the hex (see the TEC). Leaders and Reserve units committed to the defense are not affected by defensive terrain. The total defense strength is then compared to the stated attacking strength in the form of a ratio of Attacker/Defender. This ratio is reduced to its lowest terms (drop fractions in favor of the Defender), which correspond to one of the columns on the CRT.
7.4 Combat ModifiersTerrain, Weather, Command Control, Supply status and other conditions may modify Combat as follows:
Supply and Command Control Units may not attack if not in General Supply (Case 3.3.1) and Command Control (Case 3.5.2) at the instant of attack.
Terrain Terrain conditions may reduce the strength of attacking units and/or increase the strength of defending units. Terrain may also subtract from the die roll. See the map’s Terrain Effects Chart (TEC). Each attacking stack is considered separately for strength modification due to cross-river attacks. If stacks are attacking in combination of cross-river and non-river situations, or in a combi-nation of two river types, the terrain and DR modifier most favorable to the Attacker is used (but see Section 6.1, Major Rivers). Oth-erwise, all terrain die roll effects are cumula-tive. No defending unit’s strength may be more than tripled due to terrain effects.
Leaders Leaders (Section 3.4) subtract two (2) from the combat DR when defending and add two (2) to the DR when attacking, plus adding their combat factor (per Case 3.4.2). No more than one Leader at each command level may participate in a given battle.
Paratroops A Paratroop Drop (Section 10.5) onto the hex being attacked adds one (1) to the Attacker’s combat resolution die roll.
Oversupplied Attacks (Case 3.3.3) An Oversupplied Attack gives the Attacker a one (1) column shift to the right on the CRT.
Armor Superiority In each combat involv-ing ground units it is possible to achieve a significant advantage from Armor Superior-ity. Either player may have the Armor Superi-ority advantage, which gives a one (1) column shift advantage in his favor (to the right if attacking, to the left if defending). Either player has Armor Superiority if his forces in a battle contain armor-type units and the opponent’s do not. Only Allied armored units and German Panzer units are consid-ered armor- type units. Panzer Grenadier and armored cavalry units are not armor-type units, but Armor Superiority is not effective against hexes containing defending Panzer Grenadier units (it is effective against defend-ing armored cavalry, however). The effect of Armor Superiority is a one-column shift in the odds ratio used on the CRT to resolve combat. For example, if the Attacker has 7 to 1 odds or greater, but the Defender has Armor Superiority, the attack is resolved on the 6 to 1 column.
Close Air Support Both players may have Close Air Support (Section 11.6) applied to the battle, which will shift the CRT column used for final resolution one column to the right for the Attacker or one column to the left for the Defender for each Air Action (maximum of two) allocated to Close Air Support.
Armor Assets (see Section 10.2).
All DR modifications for terrain, Leaders, and Weather are cumulative. However, DR modifications for hexes with multiple ter-rain types cannot exceed -3. Weather may further modify this to -4. Three unopposed enemy Leaders may bring this modification to a much less favorable -10! All Combat DR modifiers are combined into a single net modification that may also include CRT column shifts.
7.5 Final ResolutionWhen the players have established the initial combat odds ratio at which the battle will be resolved this column is found on the Combat Results Table (CRT). The column is modified as necessary to account for Armor Superiority, Close Air Support, or Oversup-ply. The Attacker then rolls one die and the resulting number is increased or decreased by the net die roll modification. The result of the battle is given by the CRT at the junction of the odds column with the net modified
die roll. Results are explained underneath the CRT and generally involve losses of steps (casualties) and retreats by one or both sides.
7.6 Step Loss ResultThis result indicates the number of steps lost by either side, or both sides in the case of an Exchange step loss result. Flipping a full strength unit over to its reduced side counts as one step loss. Removing a unit already flipped over to its reduced side, or a unit with only one step of strength, counts as a step loss. Corps-level units can have 2-6 step losses (see Sections 12.1 and 12.2). When assigning step losses to a side resulting from a battle, no unit may be eliminated until all units involved have suffered at least one step loss. Any player claiming the Armor Superiority shift or Paratroop DR modifier who suffers a step loss must extract at least one step loss from among the armor (or Para-troop) units used to claim the modifier(s), as applicable. In other words, where the modifier is claimed, these types of units must absorb at least 1 step loss each before other required step losses are assigned to other friendly units involved in the Combat. Clarification The owning player does not have to claim otherwise applicable combat modifiers or column shifts for a Combat if so desired.
7.7 Stalemate ResultAll units remain in place. The Attacker (the player in whose player-turn the Stalemate resulted) must repeat the attack
in the next game turn. The Attacker may not add to or remove ground units from the original attack to the repeat attack.
Defending units in a Stalemate result must remain stationary throughout their subse-quent friendly player-turn, or counter-attack. Reserves committed to a defense which results in a Stalemate do receive terrain ben-efits when the attack is repeated in the next game-turn. The Defender may only with-draw from a Stalemate situation by counter-attacking all of the attacker’s Stalemated units and rolling some sort of retreat result. The Defender may add additional units (subject to stacking limits) into the hex containing his Stalemated units without counterattacking, however. Assuming a new Stalemate result is not again achieved in a counterattack, should one be launched, the original attacking units are no longer Stalemated and may move and engage in combat normally in their next player-turn.
In either case above, CAP and Close Air Support may be reassigned, at a cost in Air Actions, to or from the battle for the Stale-mated hex.
7.8 Retreat ResultEither side can suffer a Retreat result as a result of Combat. The direction of any retreat is determined by the player owning the retreating units, subject to the following prior-ities (Exception Breakthroughs; Section 7.10).
• Retreating units must retreat toward the nearest friendly Headquarters if possible and they may not cross Army Group Boundaries.
• Retreating units may not cross hexes cov-ered by the opponent’s ZOC unless those hexes are already occupied by friendly ground units.
• Retreating units may freely cross hexes occupied by other friendly units and/or stop on such hexes provided that stacking limits in the hex in which the units end their retreat are not violated.
• Defending German units in a Westwall hex can have a Retreat result reduced by 1.
Excess retreating units that exceed the stacking limits of a hex are eliminated (owning player’s choice). Units may not enter the same hex twice while retreating. Retreating units may cross Major Rivers only at Bridges and may not retreat off the map. Units unable to retreat due to the opponent’s units and/or ZOC and/or impassable terrain are eliminated.
7.9 Hot PursuitIn all cases where the Defender is forced to retreat as a result of Combat, surviving attacking units may occupy the vacated hex (Exception Paratroop units executing an air-drop may not advance after combat). In addi-tion, whenever a required retreat is two (2) or more hexes the Attacker may follow up the retreat route with some units in Hot Pursuit. Units eligible to make Hot Pursuit advances after combat are armored, Panzer Grenadier and motorized infantry units on both sides (including armored cavalry), Allied Infantry units, and German Parachute units. Units in Hot Pursuit may occupy the Defender’s vacated hex without regard to ZOC. Thereaf-ter such units must stop in the first hex they enter that is covered by the opponent’s ZOC and is not occupied by a friendly unit.
7.10 Breakthroughs A Breakthrough (“Bkth”) is a specific combat result on the CRT that only the Defender can suffer as a result of Combat. As the Attacker’s margin of superiority (odds ratio) increases relative to the Defender and attack resolution moves up to the higher columns on the CRT it becomes increasingly possible for the Attacker to achieve a Breakthrough result. This result, possible only at certain
odds levels and with certain die roll results, enables the Attacker to conduct a special Movement-Combat sequence known as Exploitation (Module 8.0) with some of his participating units. A Leader need not be present to obtain a Breakthrough result. In the case of a Breakthrough, all defend-ing units are immediately reduced to their lowest step of strength (units with only a single step remaining are instead eliminated) and retreated four hexes in a direction deter-mined by the Attacker, although still sub-ject to Retreat priorities (Section 7.8). The Attacker cannot conduct Hot Pursuit (Sec-tion 7.9) in the case of a Breakthrough but may advance into the Defender’s hex.
7.11 Attrition CombatIn addition to regular Combat, during the Combat Segment a second type of Combat, called Attrition, is available. Attrition repre-sents the combined effects of small-scale mil-itary engagements all along the battlefront, including constant probes, patrol actions and minor operations in which losses are taken but territory does not change hands. Attri-tion takes place after all regular Combat has been resolved but before the Exploitation Segment. All units located on hexes adja-cent to any opponent, including those on opposite banks of Major Rivers, are totaled into one overall combat value, correspond-ing to one of the columns of the Attrition Results Table (ART). Leader units may not be added to the total for Attrition Combat purposes. Units not in General Supply (Case 3.3.1) and Command Control (Section 3.6) may be used for Attrition Combat purposes. Attrition attacks may be Oversupplied (Case 3.3.3). An Oversupplied Attrition Attack gives a 1 Right column shift on the Attrition Combat Results Table. Total all participating strength points, find the proper column on the ART, and roll one die, cross-indexing the result on the Table. The Attrition Combat Results Table outcome will be a number indi-cating the number of steps of strength that the opponent must immediately extract for losses. These losses are chosen by the oppo-nent, but must be taken from units that are in contact with opposing units. Each Attrition Combat expends one ASP, or two if launched in an Oversupplied condition. Units that participated in regular Combat in that player-turn cannot be used in Attrition Combat in that player-turn. See also Section 19.5.
8.0 EXPLOITATION Exploitation is a special Move-ment-Combat sequence that occurs when the Attacker achieves a Breakthrough (Bkth)
combat result on the CRT. Whenever a
10 TOPPLING THE REICH rules TOPPLING THE REICH rules 11

Breakthrough occurs, the Attacker may des-ignate one stack of the involved units to be eligible for Exploitation (either one of the attacking stacks or the stack that advanced into the Defender’s hex). The stack is desig-nated with an Exploitation Eligibility marker. To be eligible for Exploitation, a stack must contain at least one armored- type unit (see Section 7.4, as defined in Armor Superiority) and cannot contain any Corps-sized units. In addition, units in Reserve (those stacked with any Army HQ; see Case 3.5.3) within Command Control range of the Exploitation Eligible force are free to move up to their full Movement Allowance.
After all Combat has been resolved in the Combat Segment, the player may now move again in the Exploitation Segment with any units that are eligible. These follow all Move-ment rules and TEC costs, moving from the hex in which they became eligible (Excep-tion Railroad and Strategic Movement is not allowed). When all Exploitation Movement has been completed, the player may make further direct attacks with his Exploitation units, following all rules of Combat. The Attacker may support his attacks with Lead-ers, Paratroop Drops, and Close Air Support. The Defender may use Close Air Support, Leaders and dispatch Reserves. Exploitation units are considered to be automatically in Supply for both Exploitation Movement and Combat (but an Oversupplied Attack is not permitted). Exploitation eligibility lasts only for the player’s current player-turn and must be achieved independently each game turn. A Breakthrough Combat result achieved during Exploitation Combat has no additional effect and does not confer further Exploitation eli-gibility on the player’s units.
9.0 FINAL REORGANIZATION The player now removes any units on the map listed as “For Withdrawal” during the current player-turn. Allied Railheads (Case 6.5.5) that are under construction by Engi-neers move forward at this time. Units that are still OoS (i.e., cannot trace an LOS in this Segment; Case 3.3.5) are reduced by one step of strength. During the Reorganiza-tion Segment of the final player-turn of the complete game turn, all Combat Air Patrol (Section 11.4) and Aerial Interdiction (Sec-tion 11.3) markers that remain on the map are removed.
10.0 SPECIAL UNITSBoth sides in Toppling the Reich have special units with extraordinary capabilities. Each of these units is described below.
10.1 CommandosThe Allied player has a British Commando Brigade, and the US 1st Special Services Brigade, both of which may cross Major Rivers
without Engineer support (Section 10.4) and regardless of the absence of Bridges. To cross a Major River hex side the Commando unit must begin its Movement Segment adjacent to the hex side it wishes to cross. The cross-ing costs four (4) movement points in addi-tion to the MP cost of the terrain entered. Commandos have no stacking value and may stack freely with other units in excess of normal limits.
A Commando unit also has the special abil-ity to freely enter and cross hexes covered by enemy ZOC, expending all of its movement allowance to move directly from one ZOC-covered hex to another. This is an exception to the prohibition in Module 6.0 that units can only move from one hex to another, both in an enemy ZOC, if both hexes are occu-pied by friendly units.
10.2 Armored AssetsThe Allied player has the two armored units of the British 79th Armored Division, and the German player has a Koenig Tiger Tank battalion.
10.2.1 79th Armored Divi-sion These two armored units can stack one to a hex with any British or Canadian units for
free. The units do not have a conventional Combat Factor. Instead, the units shift the odds one column to the right when stacked with an attacking force. Each unit has a “Rs” indicator where the CF would be located. The odds shift is applicable in most terrain but not across bridged Major or Flooded Rivers. Only one 79th Armored unit can affect an attack. A 79th Armored unit is eliminated if caught alone in a hex that is within an enemy unit’s ZOC, or which is occupied by an enemy unit.
10.2.2 Koenig (King) Tiger Tank Battalion The German Tiger Tank battalion shifts the odds one column to the right
when stacked with an attacking force, or one column to the left when stacked with a defending force. The unit has no stacking value and can stack with any German unit(s) for free. The unit has a “LRs” indicator where the CF would be located. The attack shift is not applicable in Mountain or Forest terrain, or across (bridged) Major or Flooded Rivers. The Tiger Tank unit is eliminated if caught alone in a hex that is within an enemy unit’s ZOC, or which is occupied by an enemy unit.
10.3 German 150th Panzer BrigadeThe German 150th Panzer Bri-gade is a special unit set up to deceive the Allies by using Allied equipment and men proficient
in English. To reflect the deceptive quality of this unit, the 150th Panzer Brigade has the special ability to freely enter and cross hexes covered by Allied ZOC, expending an additional three (3) movement points for each time it moves directly from one Allied ZOC-covered hex to another. This unit has a “Z” printed next to its MF to indicate this special status. The 150th Panzer Brigade has no stacking value and may stack freely with other units in excess of normal limits.
The 150th Panzer Brigade must be the first unit in an attacking force to take a step loss. If reduced, the 150th Panzer Brigade loses all of its unique abilities under this rule and will function as a regular German armor unit for the rest of the game (note the lack of the “Z” MF indicator on the unit’s reduced side). The 150th Panzer Brigade cannot receive replace-ments if reduced or be returned to the game if eliminated.
10.4 EngineersEngineer units have a number of important uses in Toppling the Reich. Allied Engineers may be used to open rail lines. All
Engineer units may be used to permit Major River crossings at places other than Bridges, to build Bridgeheads which function like printed Bridges, and to reduce the effects on Combat of attack across rivers. The special functions of Engineer units are detailed below.
Allied Engineer units may deploy to and from the COM Z holding area without the expenditure of Attack Supply (see Cases 3.3.2 and 6.5.2) but do so after the COM Z die rolls are performed. Note Since the number of Allied Engineer units will affect the Allied reinforcement COM Z deployment DRs, the Allied player will want to monitor the number of Engineers in play on the map.
10.4.1 Allied Railroad Opening Allied Engineers may open rail lines (German rail lines are already considered open). The pro-cess of opening begins with the Engineer unit beginning the player-turn on the desired rail line and remaining in place for one com-plete Allied player-turn to construct a new Railhead. The Railhead Marker is placed on the map with the Engineer unit in the Final Reorganization Segment of the Allied player-turn. In subsequent turns the Engineer unit may advance along the rail line at a rate of up to two hexes per player-turn. The first linked rail hex the Engineer unit enters can
be opened. A second linked rail hex can be opened in the same Allied player-turn pro-vided the Engineer unit has the MP to enter the hex. In the Allied Final Reorganization Segment each game turn, the Railhead coun-ter is moved up to join the Engineer and the rail line is considered open to that point. Up to two Rail line hexes may be opened per Allied player-turn regardless of the number of Engineer units being used for construction (i.e., 1 Rail line hex on one line and 1 Rail line hex on another, or 2 connected Rail line hexes on one). Note If any Railhead marker(s) advances 2 hexes in a game turn, a -1 DR modifier applies to the Allied Air Status DR in the next game turn’s Command Segment; see Section 11.1, Case C.
10.4.2 Engineers and Major Rivers An Engineer unit may be used to “ferry” other units across a Major River at places other than Bridges. To cross, the Engineer unit and the unit to be “ferried” must both begin the Movement Segment adjacent to the Major River hex side the player wishes to cross. Corps-sized units cannot be “ferried” across Major Rivers. Crossing a Major River costs a unit six (6) movement points in addition to the MP cost of the hex entered. One Engi-neer unit can ferry only one unit across a Major River in one turn. Note Engineers serv-ing as a ferry can be used to trace Supply and Command Control paths. However, units trac-ing Supply via such an Engineer unit cannot conduct Oversupplied Attacks (Case 3.3.3).
There are no German Engineer units but the German player has a limited engineering capacity for crossing Major Rivers. During the Command Segment the German player can expend 1 or 2 ASP to place 1 or 2 Tem-porary Bridges at any Major River hex side(s) under German control. Use a Bridgehead marker to indicate the location of the Tem-porary Bridge(s). Any Temporary Bridge placed by the German player is removed during the second player’s Final Reorganiza-tion Segment of the same game turn. The German player can expend 1 or 2 ASP for Temporary Bridges until Turn 25.
10.4.3 Bridgeheads The player may, in effect, create “Bridges” across Major Rivers in the game. This is done by means of emplac-
ing Engineer units on both banks of a Major River at the desired crossing point. A Bridge-head becomes active (place the marker) in the Movement Segment of the player’s turn following the turn in which Engineers moved adjacent to each other across the river. Thereafter the Bridgehead is considered to link the hexes occupied by the two Engineer units in the same way that two hexes are linked by a Bridge. Movement point costs of the Bridgehead are the same as those for
crossing a Bridge. Players may stack one extra division-sized (or smaller) unit in addi-tion to the normal stacking limits (Section 3.1) in a Bridgehead hex. If either Engineer unit moves away from a Bridgehead cross-ing point then the crossing capability at that point is lost and the Bridgehead marker is immediately removed from play.
10.4.4 Engineers and River Assault The presence of an Engineer unit with a stack making a cross-river attack has the effect of reducing the adverse impact of terrain mandated by the TEC. In attacks across minor river hex sides the terrain effect is eliminated altogether. In attacks across Major Rivers at Bridges the TEC effect is reduced to that for attacking across a minor river. In regular attacks across Major Rivers at places other than Bridges (which normally are not allowed), the TEC effect is that of attacking across a bridged Major River hex side.
10.4.5 Engineer Reinforcements New Engi-neers are brought into play as specified in the Reinforcement rule (Case 6.5.1). The Allied player may have in play more Engineer units than are provided by the counter mix. Engi-neer units may not be replaced if eliminated (they are permanently out of the game).
10.5 ParatroopsThe Allies in all scenarios and in the Campaign Game, and the Germans in one scenario (Herbstnebel-Nordwind), have the
capability to land airborne troops (Exception German Paratroop divisions cannot make Para-troop Drops). Paratroops Drops can be made only by units in Airdrop status that are held in the Airdrop Status unit box printed on the map. To reach Airdrop status, the player must expend one Attack Supply Point (Case 3.3.2) for each unit placed in this status. A Paratroop unit must be placed on Airdrop status at least one game turn before it is used in a Paratroop Drop.
During the Combat or Exploitation Seg-ments of his player-turn, the Allied player may “drop” Paratroop units onto the map. Units may be landed in any hex that is not under “cloud” as a result of the Weather. No more than three Allied Paratroop units can land in any one player-turn, and no more than two of them can drop into any one hex. Paratroop Drops must be made within five (5) hexes of other friendly units. The landing of each Paratroop unit requires the expen-diture of Air Actions from the player’s total available (Section 11.8).
Paratroop units that are dropped are con-sidered to have General Supply and Attack Supply for one full game-turn after landing. Paratroop units that are landed may not
move and must attack any opposing units in whose hex they land. If the opponent’s pieces are not displaced as a result of Combat, all Paratroop units in the same hex with the Defenders are immediately reduced by one step and must retreat two hexes. These losses are in addition to any other losses suffered in combat and such Paratroop losses are in addition to any required CRT losses per Sec-tion 7.6.
The use of Paratroop units in an attack auto-matically adds 1 to the Attacker’s die roll used to resolve the attack (+1 maximum). A Paratroop Drop in a Defender’s hex does not negate any river defensive bonus in an attack with other friendly ground units should one apply. If the Defender is driven out of the hex the Paratroop units remain in place. Paratroop units may move and fight nor-mally on the game turn following their drop onto the map.
Note The German Von der Heydte Paratroop unit cannot receive replacements or be rebuilt if eliminated.
11.0 AIRPOWERAirpower has multiple uses in warfare, and had a vital role in the campaign that is the subject of Toppling the Reich. Airpower is depicted in the game by a variety of “mis-sions” the players may undertake. Air Actions are expended each time the player engages in air missions. Some missions require the expenditure of multiple Air Actions. Air mis-sions include Combat Air Patrol, Offensive Patrol, Close Air Support, Aerial Interdic-tion, Parachute Drop, Aerial Re-supply, and Counter-air. Each mission type is explained below.
Air Action availability is separately deter-mined by each player in the Command Seg-ment of each game turn. By using the Air Status Chart players will determine the Air Actions available to each for the duration of the game turn. Each player records the number of Air Actions available to him/her using a number track printed on the map plus a marker. As Air Actions are expended the marker is adjusted downward accord-ingly. During the Command Segment, with the Allied player normally going first, both players alternately declare and execute Coun-ter-air, Combat Air Patrol and Aerial Inter-diction missions. The German player declares Air Actions first when Operation Herbstnebel is in effect (Section 13.4). Other air missions take place during the Movement or Combat Segments of the player-turns. As the player proceeds through the game turn he uses up his available Air Actions. Air Status is reset, as applicable (see Section 11.2), at the begin-
12 TOPPLING THE REICH rules TOPPLING THE REICH rules 13
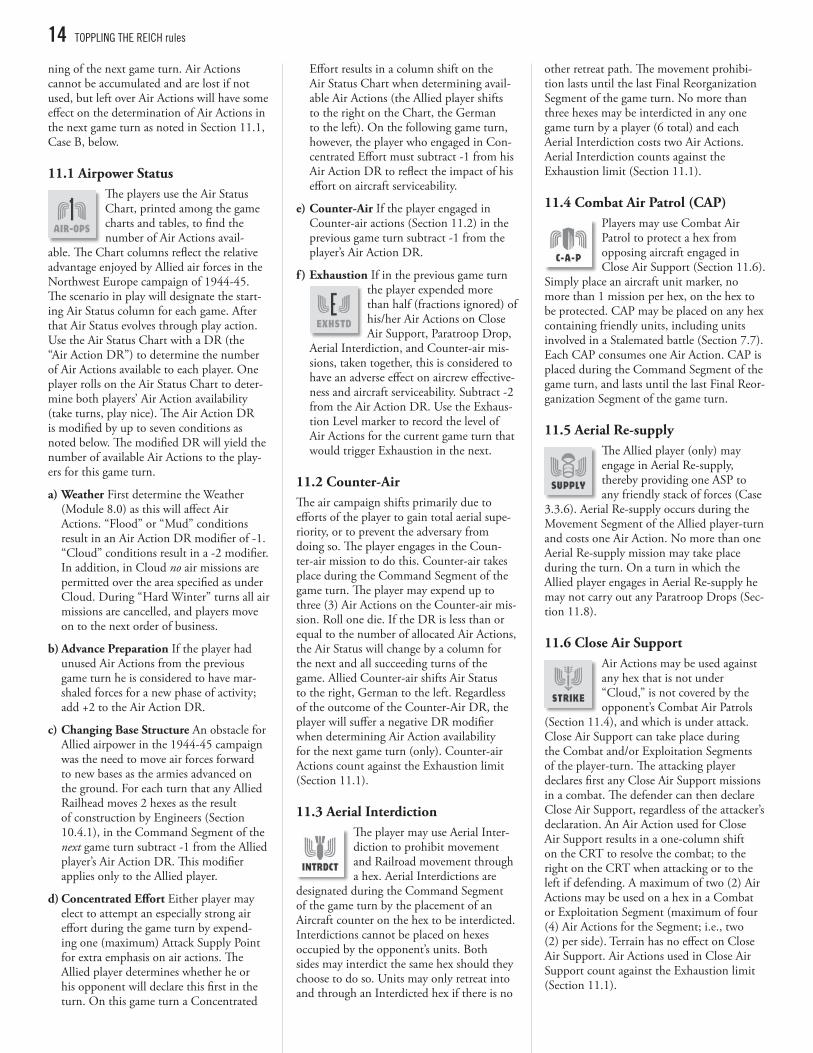
ning of the next game turn. Air Actions cannot be accumulated and are lost if not used, but left over Air Actions will have some effect on the determination of Air Actions in the next game turn as noted in Section 11.1, Case B, below.
11.1 Airpower StatusThe players use the Air Status Chart, printed among the game charts and tables, to find the number of Air Actions avail-
able. The Chart columns reflect the relative advantage enjoyed by Allied air forces in the Northwest Europe campaign of 1944-45. The scenario in play will designate the start-ing Air Status column for each game. After that Air Status evolves through play action. Use the Air Status Chart with a DR (the “Air Action DR”) to determine the number of Air Actions available to each player. One player rolls on the Air Status Chart to deter-mine both players’ Air Action availability (take turns, play nice). The Air Action DR is modified by up to seven conditions as noted below. The modified DR will yield the number of available Air Actions to the play-ers for this game turn.
a) Weather First determine the Weather (Module 8.0) as this will affect Air Actions. “Flood” or “Mud” conditions result in an Air Action DR modifier of -1. “Cloud” conditions result in a -2 modifier. In addition, in Cloud no air missions are permitted over the area specified as under Cloud. During “Hard Winter” turns all air missions are cancelled, and players move on to the next order of business.
b) Advance Preparation If the player had unused Air Actions from the previous game turn he is considered to have mar-shaled forces for a new phase of activity; add +2 to the Air Action DR.
c) Changing Base Structure An obstacle for Allied airpower in the 1944-45 campaign was the need to move air forces forward to new bases as the armies advanced on the ground. For each turn that any Allied Railhead moves 2 hexes as the result of construction by Engineers (Section 10.4.1), in the Command Segment of the next game turn subtract -1 from the Allied player’s Air Action DR. This modifier applies only to the Allied player.
d) Concentrated Effort Either player may elect to attempt an especially strong air effort during the game turn by expend-ing one (maximum) Attack Supply Point for extra emphasis on air actions. The Allied player determines whether he or his opponent will declare this first in the turn. On this game turn a Concentrated
Effort results in a column shift on the Air Status Chart when determining avail-able Air Actions (the Allied player shifts to the right on the Chart, the German to the left). On the following game turn, however, the player who engaged in Con-centrated Effort must subtract -1 from his Air Action DR to reflect the impact of his effort on aircraft serviceability.
e) Counter-Air If the player engaged in Counter-air actions (Section 11.2) in the previous game turn subtract -1 from the player’s Air Action DR.
f ) Exhaustion If in the previous game turn the player expended more than half (fractions ignored) of his/her Air Actions on Close Air Support, Paratroop Drop,
Aerial Interdiction, and Counter-air mis-sions, taken together, this is considered to have an adverse effect on aircrew effective-ness and aircraft serviceability. Subtract -2 from the Air Action DR. Use the Exhaus-tion Level marker to record the level of Air Actions for the current game turn that would trigger Exhaustion in the next.
11.2 Counter-AirThe air campaign shifts primarily due to efforts of the player to gain total aerial supe-riority, or to prevent the adversary from doing so. The player engages in the Coun-ter-air mission to do this. Counter-air takes place during the Command Segment of the game turn. The player may expend up to three (3) Air Actions on the Counter-air mis-sion. Roll one die. If the DR is less than or equal to the number of allocated Air Actions, the Air Status will change by a column for the next and all succeeding turns of the game. Allied Counter-air shifts Air Status to the right, German to the left. Regardless of the outcome of the Counter-Air DR, the player will suffer a negative DR modifier when determining Air Action availability for the next game turn (only). Counter-air Actions count against the Exhaustion limit (Section 11.1).
11.3 Aerial InterdictionThe player may use Aerial Inter-diction to prohibit movement and Railroad movement through a hex. Aerial Interdictions are
designated during the Command Segment of the game turn by the placement of an Aircraft counter on the hex to be interdicted. Interdictions cannot be placed on hexes occupied by the opponent’s units. Both sides may interdict the same hex should they choose to do so. Units may only retreat into and through an Interdicted hex if there is no
other retreat path. The movement prohibi-tion lasts until the last Final Reorganization Segment of the game turn. No more than three hexes may be interdicted in any one game turn by a player (6 total) and each Aerial Interdiction costs two Air Actions. Aerial Interdiction counts against the Exhaustion limit (Section 11.1).
11.4 Combat Air Patrol (CAP)Players may use Combat Air Patrol to protect a hex from opposing aircraft engaged in Close Air Support (Section 11.6).
Simply place an aircraft unit marker, no more than 1 mission per hex, on the hex to be protected. CAP may be placed on any hex containing friendly units, including units involved in a Stalemated battle (Section 7.7). Each CAP consumes one Air Action. CAP is placed during the Command Segment of the game turn, and lasts until the last Final Reor-ganization Segment of the game turn.
11.5 Aerial Re-supplyThe Allied player (only) may engage in Aerial Re-supply, thereby providing one ASP to any friendly stack of forces (Case
3.3.6). Aerial Re-supply occurs during the Movement Segment of the Allied player-turn and costs one Air Action. No more than one Aerial Re-supply mission may take place during the turn. On a turn in which the Allied player engages in Aerial Re-supply he may not carry out any Paratroop Drops (Sec-tion 11.8).
11.6 Close Air SupportAir Actions may be used against any hex that is not under “Cloud,” is not covered by the opponent’s Combat Air Patrols
(Section 11.4), and which is under attack. Close Air Support can take place during the Combat and/or Exploitation Segments of the player-turn. The attacking player declares first any Close Air Support missions in a combat. The defender can then declare Close Air Support, regardless of the attacker’s declaration. An Air Action used for Close Air Support results in a one-column shift on the CRT to resolve the combat; to the right on the CRT when attacking or to the left if defending. A maximum of two (2) Air Actions may be used on a hex in a Combat or Exploitation Segment (maximum of four (4) Air Actions for the Segment; i.e., two (2) per side). Terrain has no effect on Close Air Support. Air Actions used in Close Air Support count against the Exhaustion limit (Section 11.1).
11.7 Offensive PatrolThe phasing player may attempt to coun-ter his opponent’s Aerial Interdictions or Combat Air Patrols through Offensive Patrol. During the Movement, Combat, or Exploitation Segments of the player-turn, Air Actions can be dedicated to Offensive Patrol to neutralize the opponent’s Aerial Interdic-tions or CAP. Up to three (3) Air Actions can be used in each Offensive Patrol. After allocating the Air Actions the owning player rolls one die; a result less than or equal to the number of Air Actions committed neutralizes the Aerial Interdiction and/or CAP in the targeted hex. If neutralized, the opponent’s aircraft marker is simply removed from the hex. The player is then free to move through or to use Close Air Support against the hex. If the DR exceeds the number of Air Actions committed to Offensive Patrol there is no effect and the Air Actions committed to that Offensive Patrol are wasted. A hex cannot be subjected to Offensive Patrol more than once per Segment.
11.8 Paratroop DropsEach time the Allied player makes a Para-troop Drop, Air Actions are expended in the process. Airborne landings take place in either the Combat Segment or the Exploita-tion Segment of the Allied player’s player -turn. The Allied player must declare that Paratroop Drops will be made during the current player-turn before the beginning of the Combat Segment. Landing a full-strength Paratroop Division costs two Air Actions. The cost for landing a Paratroop Brigade, Regiment, or reduced strength Para-troop Division is one Air Action. The Allied
player may not engage in Aerial Re-supply in any game turn in which he carries out a Para-troop Drop. Air Actions used for Paratroop Drop count against the Exhaustion limit (Section 11.1).
Note The German player has the Von der Heydte Parachute unit. The procedure for Para-chute dropping this unit is given in the scenario rule (Case 16.4.7).
12.0 OPTIONAL RULESOptional Rules are just that, optional. Both players must agree ahead of time to use any of the rules below.
12.1 Allied Corps ReorganizationThe Allied player has the capability to con-centrate U.S. forces in a hex by means of substituting a Corps unit for three U.S. divisions. Corps-size pieces may be cre-ated during the Movement Segment of the Allied player-turn by substituting a U.S. Corps-size piece for the three divisions. All of the U.S. Divisions that will make up the Corps must be stacked at the beginning of the Allied player-turn. Place the substituted units on the U.S. Corps Composition Chart. Substitution costs half of the movement allowance of each of the units involved. The Allied player must include at least one U.S. armor division in each set of U.S. divisions substituted for a U.S. Corps. The number of Corps-size units in play cannot exceed the number of U.S. Army Headquarters units currently in play. The maximum number of U.S. Corps that may be in play at any one time is six (6). Corps-size units have two
steps of strength. If compelled to take more than one step of loss, the Corps must break down to its constituent units, some of which must be reduced to accommodate all of the step losses. Only full-strength divisions can be substituted to initially constitute a Corps.
12.1.1 Canadian Corps Similarly, the Allied player can form the Canadian Corps by sub-stituting the following full-strength units:
• One Canadian infantry division and one Canadian armored division, or
• One Canadian infantry division and two Canadian armor brigades.
Place the substituted units on the Canadian Corps Composition Chart.
12.2 German Panzer Corps ReorganizationThe German player has the capability to con-centrate forces in a hex by means of forming Panzer Corps-size units. During the Move-ment Segment of the German player-turn the player can substitute three divisions, of which two must be Panzer divisions, for a Panzer Corps unit. All of the units that will make up the Panzer Corps must be stacked at the beginning of the German player-turn. Place the substituted units on the German Panzer Corps Composition Chart. If both Panzer divisions exchanged for a Corps-size unit are SS Panzer units then the player may deploy an SS Panzer Corps. Substitution costs half of the movement allowance of each of the units involved. Only full-strength divi-sions can be substituted to initially constitute a Panzer Corps. German Panzer Corps have six steps of combat strength. The maximum
14 TOPPLING THE REICH rules TOPPLING THE REICH rules 15
Table 2: Air Mission Summary
Exhaustion Turn Segment(s) Air Action Point (AAP) cost and Notes
Counter-Air Yes Command 1-3 AAPs.
Aerial Interdiction Yes Command 2 AAPs each, 3 maximum per turn.
Combat Air Patrol Yes Command 1 AAP. Remove during Final Reorganization Segment.
Aerial Re-supply No MovementApplies to Allies only. 1 AAP to provide Attack Supply to one friendly stack of forces this turn, allowing a Major Attack. Disallows a Paratrop Drop this turn.
Close Air Yes Combat, Exploitation 1 AAP each, 2 maximum per hex.
Offensive Patrol No Movement, Combat, Exploitation 1-3 AAPs per attempt.
Paratroop Drop Yes Before Combat2 AAPs for full strength Paratroop Division, 1 AAP for a reduced Division, Brigade or Regiment. No re-supply allowed this turn.
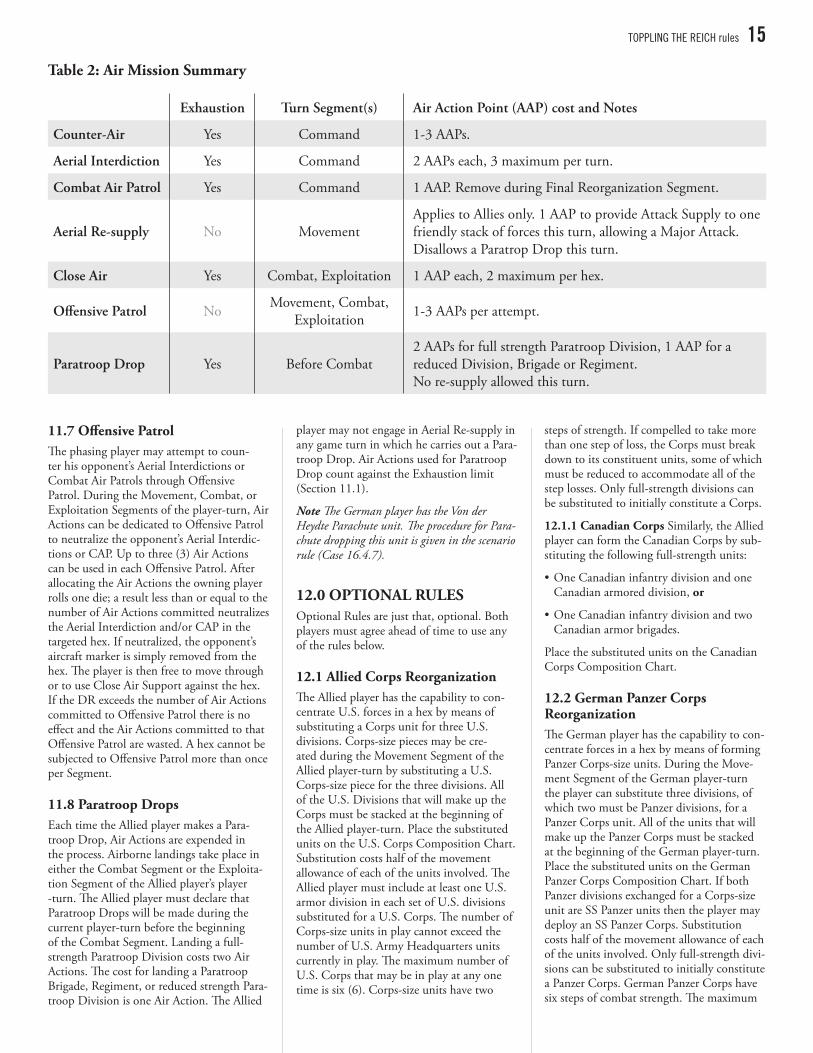

number of Panzer Corps that may be in play at any one time is two Panzer Corps plus two SS Panzer Corps.
12.3 German Infantry Corps BreakdownThe German player has a limited capacity to break down full-strength Infantry Corps into their component divisions. One 15-6 Wehrmacht Corps, or a 12-6 Luftwaffe Field Infantry Corps, yields three 4-6 divisions; a 9-4 Volksgrenadier/Luftwaffe Field Infantry Corps yields three 3-4 divisions. These units are placed in the hex formerly occupied by the Infantry Corps counter, which is removed from play. Substitutions can only be made if the Corps has suffered no losses, is in General Supply, and is under Command Control. Substitution takes place during the Final Reorganization Segment of the German player-turn (Note Not during the Movement Phase). Divisions cannot recombine into Infantry Corps (i.e., once broken-down the Corps cannot be recreated). Only five Infantry Corps pieces may be broken down during any game (three regular infantry, one Volksgrenadier, and one Luftwaffe), and only one Corps may break down during any one German player-turn. The German player is limited in breaking down German Infantry Corps by the number of divisional units in the counter mix.
13.0 INTELLIGENCE AND DECEPTION OPTIONSDuring the 1944-1945 campaign the German High Command was able to mislead Allied Intelligence as to German intentions and dispositions on several important occa-sions. To reflect this, in the Campaign Game (only) of Toppling the Reich the players may make use of this rule which allows for lim-ited intelligence. Three capabilities for the German player result from the intelligence situation. These are the use of “Concealed Units,” of “Unknown Units,” and the timing of the German “Herbstnebel” Counterof-fensive (use of this rule is particularly recom-mended with the Campaign Game). The extent to which the German player may use these capabilities is dependent on an “intel-ligence level” generated by Allied success in recovering “ULTRA” intelligence, as follows.
13.1 ULTRA IntelligenceFor much of the war the Allies were able to read German secret directives and to check the information against reports from the Resistance. Resistance reports dried up as the Allies neared the German frontier, while at the same time the Germans began to use their radio net for more deceptive purposes.
To reflect this, the game includes an ULTRA Intelligence Table. This Table is used once each game turn during the Command Seg-ment to provide for German deception. The German player totals the current number of his Victory Points and finds the column on the ULTRA Intelligence Table that cor-responds to his total. The German player then rolls one die. The die result will give a number for the limit on German use of Con-cealed Units and Unknown Units that will prevail for the current game turn. The die result also determines whether the German player is able to declare his Counteroffensive during the current game turn.
13.1.1 Intelligence Breakthrough On turns with an Ultra No Effect result each player rolls another die and the DR results are totaled. The player with the high roll is the winner (ties go to the Allied player normally, but when Operation “Herbstnebel” is in effect ties go to the German player). If the sum of the two players’ DRs total 10 or more the losing player suffers the following:
10 One Army HQ and any Leader(s) stacked with it, selected by the winner, may not coordinate Attack Supply or dis-patch Reserves for the turn (Cases 3.4.2, 3.5.2 and 3.5.3). Rotate the affected units 180 degrees to indicate this status.
11 One Army Group HQ, and any Leader(s) stacked with it, selected by the winner, may not support combats or dis-patch Reserves for the turn (Cases 3.4.2 and 3.5.4). Rotate the affected units 180 degrees to indicate this status.
12 The losing player’s Front Command HQ can only put in Command a number of subordinate HQs equal to the losing player’s DR (4 through 6). The losing player chooses the HQs to be adversely affected. All others, and any Leader(s) stacked with these HQ(s), may not sup-port combats or dispatch Reserves per DR results 10 and 11 above. Rotate the affected units 180 degrees to indicate this status.
13.2 Concealed Units (Ultra Deception)
The German player’s counter mix includes ten Ultra Decep-tion markers. The reverse side of each counter is labeled from
“A” through “J.” These markers denote the location of real German units removed from the map and replaced by the Ultra Decep-tion marker. Only units with Movement Allowances of eight (8) or more MP may be concealed. Units to be concealed must be in General Supply, under Command Control
and not in the ZOC of any opposing unit. Each unit to be concealed is removed from the game map and replaced by two Ultra Deception Unit markers (one is the dummy). The German player should use the Ultra Deception Chart to place the unit on the box corresponding to the Ultra Deception Unit that will take its place on the map. Put this Chart behind a screen to conceal the Decep-tion markers that are dummies and those that represent actual units. [The Allied player should avert his eyes, take a break or perform some other task while the German player attends to this. Play nice!] Both Ultra Decep-tion Unit markers move with the same move-ment allowance as the actual replaced unit. The German player moves his Ultra Decep-tion Unit markers to mislead the opponent as to the true locations/strengths of his forces. If he so chooses, the German player may elect to have both of the markers initially placed on a hex conceal actual units rather than utilize either of them as a dummy. The composition of the Ultra Deception Units is revealed by Combat, by voluntary revela-tion, or if the ULTRA Deception Level in a subsequent game turn falls below what is required to keep the unit(s) Concealed. Units may be given Ultra Deception status only at the beginning of the Movement Segment of the German player-turn and only if the Ultra Deception Level provides for the capability.
13.3 Unknown UnitsUnknown Units are removed entirely from the map and moved in conventional “hidden movement” fashion. The German player must plot both the identity and location of Unknown Units on his Corps Roster Sheet. Unknown Units’ locations are revealed when the opponent enters their ZOC or a hex adjacent to the unit’s actual location. At this time an Ultra Deception Unit marker is immediately placed on the hex containing the Unknown Unit and the opponent must stop his movement. (The Allied player should avert his eyes, take a break or perform some other task while the German player attends to this. Play nice!) The actual identity of the unit is revealed by Combat, by voluntary revelation, or if the ULTRA Deception Level in a subsequent game turn falls below what is required to keep the unit(s) Unknown. The German player can only remove units to Unknown status at the beginning of the Movement Segment of the German player-turn and only if the ULTRA Deception Level provides for the capability. Units to be given Unknown status must be in General Supply, under Command Control and not located in the ZOC of any opposing unit.
13.4 “Herbstnebel” OptionGerman ability to launch the “Bulge” offen-sive was to a large extent a product of their success in misleading Allied Intelligence. Under this rule the German player may only declare his Counteroffensive in the Campaign Game on a game turn in which the ULTRA Intelligence Table shows an asterisk (*) next to the ULTRA Deception Level result.
14.0 VICTORY CONDITIONSThe way to win a game of Top-pling the Reich is to fulfill the conditions of victory, which are separately specified for each
scenario. These conditions are specified with the burden of attack placed on one side, corresponding to that side which held the initiative in the actual historical situation. The conditions of victory are listed in the written description of the scenario in play. Condi-tions of victory first say which player is “to win” and then specify the number of Victory Points (VPs) that player must have in order to win.
Victory is absolute in Toppling the Reich; there are no levels of victory. Each town and Ruhr Industry hex on the map is worth one VP if the player controls it at the end of the game, and each city hex is worth two VPs. Each player controls all hexes that are occupied by his units or through which his units were the last to pass. The player may also reduce his opponent’s VP total by recap-turing towns and cities controlled by the opponent. If the player who is “to win” in the game has the required number of VPs at the end of the last game turn he is the winner. The opponent wins by preventing his oppo-nent from fulfilling the specified Victory Conditions.
15.0 SCENARIO SET-UP INSTRUCTIONSToppling the Reich is actually six different games: five scenarios which cover the West-ern Front from September 1944 to April 1945, and one Campaign Game which covers this entire period. Players may choose to play any situation by selecting the appro-priate scenario insert. Each insert contains all information necessary to set up that par-ticular game. In all cases the information is presented in an identical format as outlined in this rule.
15.1 The SituationEach scenario lists the dates involved in the game and gives a short description of the historical circumstances depicted. The Situ-
ation also specifies which player is to set up first and who is to move first.
15.2 Victory ConditionsThe scenario then tells which player is to win and what things he must accomplish in order to do so. The opponent wins by preventing his victory.
15.3 At-Start Orders of BattleThe scenario lists for each player the numbers and types of units available at the beginning of the game and details which units, if any, must be set up at reduced strength. The list-ing also names all Leaders available and spec-ifies the Air Status at the start of the game. Information in brackets [ ] are the historical IDs for the listed units and is for players’ edification only (i.e., is not necessary to the play of the game).
15.4 Deployment LimitationsSome of the available combat units may have to be placed in predetermined positions in order to duplicate historical conditions. These Deployment Limitations are specified and apply for the set up only. Units are free to move away from starting locations and all units whose deployment is not specified may set up freely within scenario start-lines and observing stacking limits in the hexes they are placed. Deployment Limitations are minimums and players are free, subject to the stacking limits, to place greater numbers of units than are required by any given limita-tion. Units that are eligible to do so may form into Corps-level formations (see Sec-tions 12.1 and 12.2).
Generally, there are three types of Deploy-ment Limitation: first, an area limit on which units must be grouped within a set distance of some town or city; second, a specific loca-tion limit; and third, a general requirement that hexes along the start-line must be occu-pied by units or covered by their Zones of Control.
15.5 Reinforcements and ReplacementsFor each game turn the scenario specifies what new units and what replacements are available and the map entry hexes for new units entering the game. This section also specifies the number of Attack Supply Points available to each player in the turn.
In some scenarios units begin the game eliminated. These units are placed in each side’s Replacement Pool to indicate they can be rebuilt and entered into play.
15.6 WithdrawalsSome units may also be listed as having to be withdrawn or removed from play, mostly on the German side due to the drains of a wider war. Such Withdrawals are listed in the scenario by the numbers and types of pieces to be Withdrawn. Players must remove full-strength units in preference to reduced ones if at all possible. Withdrawals are nor-mally made during the Final Reorganization Segment of the player-turn, chosen by the owning player, and the pieces in question are simply removed from the game map.
15.7 Special RulesA scenario may require one or more special rules that pertain to that scenario only. These rules are intended to help recreate the histori-cal situation. See the special rules insert, a single card containing the special rules for all scenarios.
15.8 Start-lineOne bit of information necessary to the play of any scenario is the location of the front line. This information is marked on the indi-vidual scenario cards. Allied units are always set up to the west of the start-line; German units go on the eastern side. Both sides may set up units directly on start-line hexes in contact with each other.
16 TOPPLING THE REICH rules TOPPLING THE REICH rules 17