athlet - pages - homeweb.orthofix.com/products/products/athlet/athlet...do not re-sterilize or...
TRANSCRIPT

ATHLET®
VBR in PEEK-OPTIMA®
The real winner
VBR
P R O D U C T I N F O R M A T I O N
2
PRODUCT INFORMATION
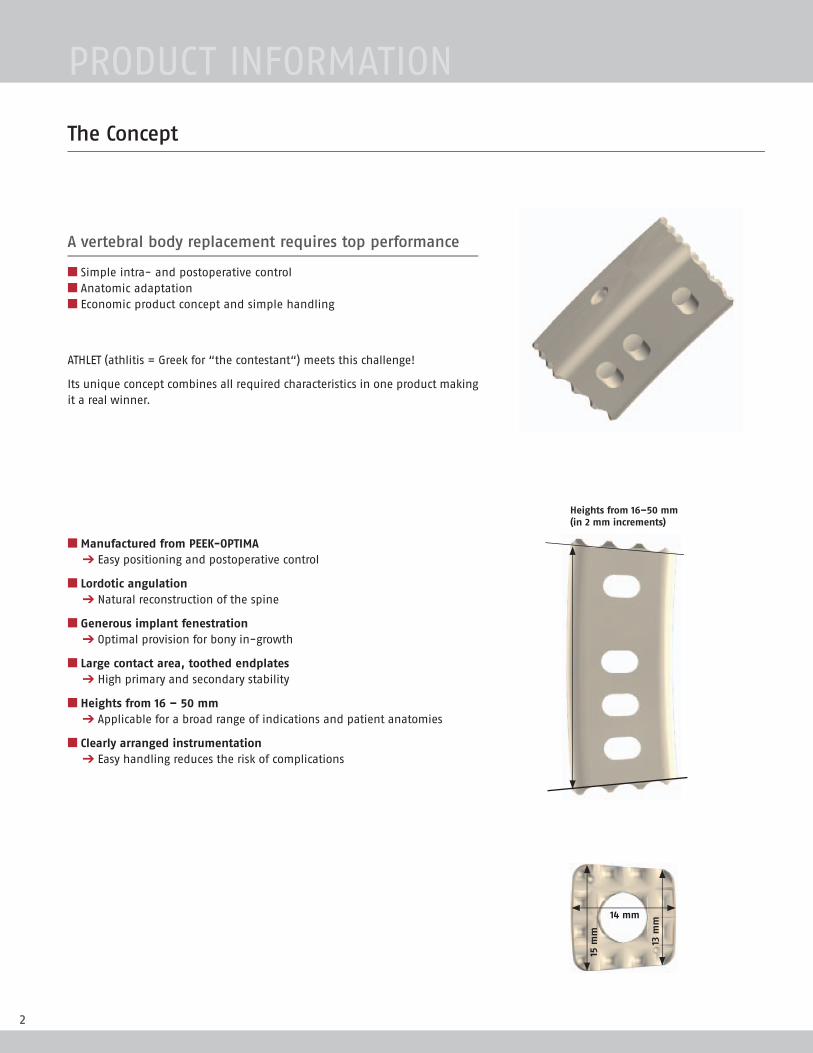
A vertebral body replacement requires top performance
■ Simple intra- and postoperative control■ Anatomic adaptation■ Economic product concept and simple handling
The Concept
■ Manufactured from PEEK-OPTIMA ➔ Easy positioning and postoperative control
■ Lordotic angulation ➔ Natural reconstruction of the spine
■ Generous implant fenestration ➔ Optimal provision for bony in-growth
■ Large contact area, toothed endplates ➔ High primary and secondary stability
■ Heights from 16 – 50 mm ➔ Applicable for a broad range of indications and patient anatomies
■ Clearly arranged instrumentation ➔ Easy handling reduces the risk of complications
ATHLET (athlitis = Greek for “the contestant“) meets this challenge!
Its unique concept combines all required characteristics in one product making it a real winner.
Heights from 16–50 mm (in 2 mm increments)
14 mm
15 m
m
13 m
m

3
ATHLET
You start – we help
with our clearly arranged
Starter Kit:
Your mobile warehouse with
all implant components
1 construct = 1 main body + 1 end body
The Implant
9 implant components: 6 main bodies and 3 end bodies
Latch mechanism for secure connection of the implant components
Ordering information
ATHLET end body
Art. No. Height (mm)1 AT0104 42 AT0206 63 AT0308 8
ATHLET main body
Art. No. Height (mm)4 AT0412 125 AT0518 186 AT0624 247 AT0730 308 AT0836 369 AT0942 42
Special sizes (available on request)
Art. No. Height (mm)12 AT1212 12 one-piece implant13 AT1314 14 one-piece implant14 AT1448 48 main body15 AT1554 54 main body16 AT1660 60 main body
Single, sterile packed, ready to use.
This device has labeling restrictions as indicated in the IFU.

4
PRODUCT INFORMATION
Instruments
Art. No. Description1 AT0004 Template2 AT0003 Disconnector3 AT0001 InserterA AT0005 Inserter Plate small (for main body 4 and 5)B AT0006 Inserter Plate medium (for main body 6 and 7)C AT0007 Inserter Plate large (for main body 8 and 9)4 AT001AY Instrument tray5 AT002AY Tray for Trials6 AT1100 Inserter for Trials7 AT1016 - AT1050 Trial 16-50 mm (2 mm increments)
1
2
3
6 7
5
A
B
C
4
7
When special ATHLET sizes are used, the appropriate instruments are included in the tray.

5
ATHLET
Preoperative planning
The extent of the resection and therewith the height of the vertebral body replacement can be estimated as usual with the preoperative radiographs and CT /MRI scans.
Optionally, SIGNUS offers templates for various imaging modalities that can assist with planning.
Short description of the implantation
Performing the corpectomy and preparing the endplates
After preparation the corpectomy is performed. To achieve an optimal fusion result the exposed vertebral body endplates are cleaned carefully.
Attention
Avoid excessive cleaning or complete removal of the cortical bone. This may weaken the endplates which leads to an increased risk of implant subsi-dence into the adjacent vertebral bodies.
50
16 m
m
1822263034384246
mm
After preparation the corpectomy is performed. To achieve an optimal fusion result the exposed vertebral body endplates are cleaned carefully.
Avoid excessive cleaning or complete removal of the cortical bone. This may weaken the endplates which leads to an increased risk of implant subsi-

6
PRODUCT INFORMATION
Determining the implant height
To determine the height, use the Trials 7 . Attach the Trial to the Inserter 6 and carefully insert it into the defect under lateral fluoroscopy.
The Trial must be seated firmly in the intervertebral space. To verify this try to pull the Trial out after release of the distraction. If the Trial is seated loosely or can even be withdrawn, then the next greater height must be selected.
Assembly of the implant components
For simple identification all implant components are provided with a number from 1 – 9 (according to the height). On the Template 1 you will find an over-view of all the heights that can be bridged with ATHLET and the implant combinations to achieve these heights.
Assemble the main body and end body required for the construct.
The implant components are connected together by a latch mechanism that engages with an audible click.
Disassembly of the implant components
The connected implant components can only be disassembled with the Disconnector 2 . Hold the instrument with the labeling upwards. Place the implant between the jaws of the instrument so that the protrusion fits into the window below the latch mechanism. By pressing the release button, the implant components are separated from each other.
The connected implant components can only be disassembled with the
Attention
Ensure the implant is correctly oriented during the disassembly process otherwise the implant can be damaged.
Short description of the implantation

7
ATHLET
This device has labeling restrictions as indicated in the IFU.
Distraction and implantation
Distract the spinal segment to the desired height with a suitable spreader.
Select the appropriate Inserter Plate A B C for the implant and slide this onto the tip of the Inserter 3 . The implant heights and the corresponding Inserter Plates are listed in the instrument description.
Assembly
1a Place the tip of the Inserter into the wide portion of the opening in the Inserter Plate1b Make sure that the slot in the tip of the Inserter is aligned as shown2 Push the tip of the Inserter into the narrower
opening of the Inserter Plate
The assembled implant is threaded onto the Inserter by rotating the blue thumb wheel.
The vertebral body replacement ATHLET can now be introduced into the situs of the patient. The final position of ATHLET has been reached when the Implant is flush with the ventral edge of the vertebral body and does not protrude into the spinal canal. The insertion of the implant is performed under imaging control.
Note
To improve the fusion result it is recommended to place bone graft and/or a bone substitute into and around the implant.
Additional fixation
As with all vertebral body replacements, ATHLET requires supplemental fixation.
Short description of the implantation
2
1a
2
1a
1b

8
PRODUCT INFORMATION
Device description:
The ATHLET VBR System is a lordotic, modular vertebral body replacement system. One cranial and one caudal component are assembled to create a device construct. These components are available in a variety of sizes. This enables the surgeon to choose the size suited to the individual pathology and anatomical condition. The assemble device comprises a central cannula for bone graft and lateral fenestrations for bony in-growth.
The ATHLET VBR components are manufactured from polyetheretherketone (PEEK-OPTIMA® LT1, Invibio™) as described by ASTM F2026. Integral marker pins are manufactured from titanium alloy (Ti-6Al-4V) as described by ASTM F136 / ISO 5832-3.
Additionally, on special request there are two single component implants in heights of 12 and 14 mm available.
Indications for use:
The ATHLET VBR System is indicated for use to replace a vertebral body that has been resected or excised due to tumor or trauma/fracture. The device is intended for use as a vertebral body replacement in the thora-columbar spine (from T1 to L5). The ATHLET VBR System is intended for use with supplemental fixation and should be implanted in pairs.
Caution:
■ These implants are intended for single use only and should not be re-implanted.
■ Federal law restricts this device to sale by or on the order of a physician.
Contraindications:
■ Advanced osteoporosis
■ Specific metal allergy (Titanium Only)
■ Infection
Complications:
The patient should be informed of the following possible complications:
■ Haematoma
■ Pain
■ Implant impaction
■ Local or systemic infection
■ Paraplegia
■ Damage to local structures
Precautions:
1. These implants are supplied sterile. Do not use if sterile packaging is opened or damaged. These devices are intended for single use only. Do not re-implant, re-sterilize, reprocess or reuse.
2. The physician/surgeon should consider the levels of implantation, patient weight, patient activity level and other patient conditions which may impact the performance of the system.
3. Throughout the entire procedure particular care must be exercised to protect nerve roots.
4. Carefully check and remove any bone splinters following resection.5. Prior to implantation, check the required implant size.6. Do not use excessive force to introduce the implants.7. The selection of size and implantation of the implant remain the
exclusive responsibility of the user surgeon who must be experi-enced in spinal surgery.
8. It is imperative that dissimilar metals do not come into contact in vivo. Accelerated corrosion may occur when two dissimilar metals are in contact within the body environment.
9. The ATHLET VBR System has not been evaluated for safety and compatibility in the MR environment. The ATHLET VBR System has not been tested for heating or migration in the MR environment.
How supplied:
The ATHLET VBR System is provided sterile. All sterile products are labelled “STERILE.” Do not use sterile products if the packaging has been damaged or previously opened. Do not re-sterilize or autoclave sterile implants.
The associated instruments are provided clean but not sterile. Instruments are provided in an autoclavable tray. All instruments must be disassem-bled (if applicable) and cleaned before sterilization and introduction into a sterile surgical field.
Cleaning:
During use, keep instruments moist and do not allow blood and/or bodily fluids to dry on the instruments. Thoroughly clean all instruments as soon as possible after use. Implant inserters must be disassembled prior to cleaning. This is accomplished by pulling on the knob end of the threaded inserter to withdraw the component from the cannulated outer shaft.
Pre-Cleaning:
Manual pre-cleaning is performed to remove gross contaminants. Immerse the instrument without any bubbles at minimum of 5 min, in cold regular tap water. All movable components must be repeatedly mobilized under running water, until no visible contamination remains. Brush all exposed surfaces with a nylon bristle brush.
Instruments with cavities as well as jointings, threads, hinges and springs have to be soaked in an ultrasonic bath for 10 min. at 40°C with 0,5% solution of alkanine cleaner (neodisher FA) and then rinsed from the inside and outside with a water spray gun at 58 psi (4 bar) static power for minim 20 s with cold regular tap water.
The ATHLET VBR System Instructions for Use

9
ATHLET
Automated cleaning:
Automated cleaning is the preferred cleaning method. Manual cleaning (above) should be performed prior to using automated cleaning equip-ment. Instruments have to be placed in the instrument tray of the purifier / disinfector (e.g Miele G7735). Instruments with cannula must be placed in the tray for micro-invasive surgery (MIS) instruments and must be connected to the spray nozzle system.
Clean the instruments by using a program with analogue parameters (e.g. Vario TD):
■ Minimum 2 min pre-washing with cold regular tap water
■ Drain
■ Dosing of e.g. neodisher FA (Dr. Weigert, Hamburg) at 40°C
■ At 55°C, for 5 min cleaning with Neodisher FA forte, 0.5% (Miele, Princeton NJ) or alternative cleaning with an adequate purifier
■ drain
■ 3 min neutralization with warm water (> 40°C)
■ drain
■ 2 min rinsing with warm water (> 40°C)
■ Drain with demineralised water
Disinfection:
Manual disinfection:Disinfect the instruments by using an FDA cleared disinfectant (VAH-list of the Association of applied Hygiene). Cavities as well as joints, threads, hinges and springs must be water-rinsed inside and outside.
Automated operation:Automated thermal disinfection, at a maximum temperature of 93°C in the purifier / disinfector (part of the above mentioned Vario TD program) is performed under consideration of national requirements regarding the thermal disinfection performance of the equipment in use (e.g. A0=Value according standard EN ISO 15883-1).
Drying:
Manual drying:Dry the instrument with a fluff-free fabric. Cavities as well as joints, threads, hinges and springs have to be dried by compressed air. Also, the application of a vapor-permeable lubricant, suitable for steam steriliza-tion based on paraffin/white-oil basis, should be used on moving parts.
Automated operation:Drying of the instrument in the purifier / disinfector (one drying cycle, part of the Vario TD program) if applicable, the instrument can be dried by a fluff-free fabric. Cavities as well as joints, threads, hinges and springs have to be dried by compressed air. The application of a vapor-perme-able lubricant, suitable for steam sterilization based on paraffin/white-oil basis, should be considered at these parts, too.
After cleaning/disinfecting, the disassembled instruments should be re-examined for visible soil. If visible soil is found, repeat the cleaning process. Following re-examination, the instruments should be dried using a soft cloth and placed in their proper locations in the instrument cases. The disassembled inserter components are reassembled by intro-ducing the threaded inserter shaft into the cannulated outer shaft until the two pieces are engaged.
Inspection:
Unless marked otherwise, instruments may be reused after reprocessing and sterilization. Before each reuse, inspect instruments including inac-cessible areas, joints and moving parts for possible damage, wear or non-functioning parts. Carefully inspect the critical, inaccessible areas, joints and all movable parts. Damaged or defective instruments should not be used or processed. Contact your local sales representative for repair or replacement.
Sterilization:
Sterilization validation studies have shown the following recommenda-tions for instrument sterilization are effective to an SAL of 10-6. The use of an FDA approved sterilization wrap is recommended.
Method: Steam sterilisationCycle: 4 times pre-vacuumTemperature: minimum 270°F (132°C) maximum 280°F (137°C)Exposure Time: 4 minutesDrying Time: 20 minutes
Storage:
Store the sterilised instruments in a dry, clean and non-fuzzing environ-ment at room ambient temperature.
Further Information:
Recommended directions for the use of these systems (surgical operative techniques) are available at no charge upon request. For additional infor-mation please contact:
SIGNUS MEDICAL LLC18888 Lake Drive EastChanhassen, MN 55317, USAPhone: 1-952-294-8700Fax: 1-952-975-0465E-mail: [email protected]
Product Guarantee:
SIGNUS Medizintechnik GmbH guarantees that each individual spinal implant is manufactured with the greatest of care and from selected material. The entire process, from manufacture to final packaging, is under constant quality control. However, given that SIGNUS Medizin-technik GmbH has no influence over the selection or use of the implant, the diagnosis of the patient or the surgical technique used, or the handling of the implant following dispatch from our company, no guar-antees can be given regarding a successful surgical result or the lack of complications.
The ATHLET VBR System Instructions for Use

10
PRODUCT INFORMATION

11
ATHLET
Notes

NOTICE: This document was written by SIGNUS technical staff and is intended only to intro-duce the product. Information contained within this brochure should not be construed as surgical advice or medical opinion expressed or implied by SIGNUS.
SignuS Medical LLC 18888 Lake Drive East Chanhassen, MN 55318
Tel: 952-294-8700 Fax: 952-975-0465
[email protected] www.signusmedical.com
Rev
. 2013-0
2 /
03
Distributed by:
3451 Plano Parkway Lewisville, TX 75056 Tel: 1-888-288-5700 orthofix.com