astro’s remore setup manual pdf - astro – pay tv ... · contents introduction ... your astro...
TRANSCRIPT

1
Contents
INTRODUCTION . . . . . . . . . . . . . . . . . . . . . . . . . . . . . . . . . . . . . . . . . . . . . . . . . . . . . . . . . . . . . . . . . . . . . . . . . . . . . . . . . . . . . . .2Storage . . . . . . . . . . . . . . . . . . . . . . . . . . . . . . . . . . . . . . . . . . . . . . . . . . . . . . . . . . . . . . . . . . . . . . . . . . . . . . . . . . . . . . . . . . . . . . . . . . . . . .2Maintenance . . . . . . . . . . . . . . . . . . . . . . . . . . . . . . . . . . . . . . . . . . . . . . . . . . . . . . . . . . . . . . . . . . . . . . . . . . . . . . . . . . . . . . . . . . . . . . . .2Handling . . . . . . . . . . . . . . . . . . . . . . . . . . . . . . . . . . . . . . . . . . . . . . . . . . . . . . . . . . . . . . . . . . . . . . . . . . . . . . . . . . . . . . . . . . . . . . . . . . . .2Environmental issues . . . . . . . . . . . . . . . . . . . . . . . . . . . . . . . . . . . . . . . . . . . . . . . . . . . . . . . . . . . . . . . . . . . . . . . . . . . . . . . . . . . . . . . .2IMPORTANT SAFETY INFORMATION . . . . . . . . . . . . . . . . . . . . . . . . . . . . . . . . . . . . . . . . . . . . . . . . . . . . . . . . . . . . . . . . . . . .3Using equipment safely . . . . . . . . . . . . . . . . . . . . . . . . . . . . . . . . . . . . . . . . . . . . . . . . . . . . . . . . . . . . . . . . . . . . . . . . . . . . . . . . . . . . . .3Connecting to the mains supply . . . . . . . . . . . . . . . . . . . . . . . . . . . . . . . . . . . . . . . . . . . . . . . . . . . . . . . . . . . . . . . . . . . . . . . . . . . . .3ELECTRICAL INFORMATION . . . . . . . . . . . . . . . . . . . . . . . . . . . . . . . . . . . . . . . . . . . . . . . . . . . . . . . . . . . . . . . . . . . . . . . . . . . .4Mains plug and its fuse . . . . . . . . . . . . . . . . . . . . . . . . . . . . . . . . . . . . . . . . . . . . . . . . . . . . . . . . . . . . . . . . . . . . . . . . . . . . . . . . . . . . . .4BEFORE YOU BEGIN . . . . . . . . . . . . . . . . . . . . . . . . . . . . . . . . . . . . . . . . . . . . . . . . . . . . . . . . . . . . . . . . . . . . . . . . . . . . . . . . . . .5Unpacking the carton . . . . . . . . . . . . . . . . . . . . . . . . . . . . . . . . . . . . . . . . . . . . . . . . . . . . . . . . . . . . . . . . . . . . . . . . . . . . . . . . . . . . . . .5YOUR ASTRO SET TOP BOX . . . . . . . . . . . . . . . . . . . . . . . . . . . . . . . . . . . . . . . . . . . . . . . . . . . . . . . . . . . . . . . . . . . . . . . . . . . .6Front panel . . . . . . . . . . . . . . . . . . . . . . . . . . . . . . . . . . . . . . . . . . . . . . . . . . . . . . . . . . . . . . . . . . . . . . . . . . . . . . . . . . . . . . . . . . . . . . . . . .6Rear panel . . . . . . . . . . . . . . . . . . . . . . . . . . . . . . . . . . . . . . . . . . . . . . . . . . . . . . . . . . . . . . . . . . . . . . . . . . . . . . . . . . . . . . . . . . . . . . . . . . .7CONNECTING UP . . . . . . . . . . . . . . . . . . . . . . . . . . . . . . . . . . . . . . . . . . . . . . . . . . . . . . . . . . . . . . . . . . . . . . . . . . . . . . . . . . . . . .8Connecting your Astro set top box . . . . . . . . . . . . . . . . . . . . . . . . . . . . . . . . . . . . . . . . . . . . . . . . . . . . . . . . . . . . . . . . . . . . . . . . . . .8Connecting to a TV . . . . . . . . . . . . . . . . . . . . . . . . . . . . . . . . . . . . . . . . . . . . . . . . . . . . . . . . . . . . . . . . . . . . . . . . . . . . . . . . . . . . . . . . . .8Alternative audio connections . . . . . . . . . . . . . . . . . . . . . . . . . . . . . . . . . . . . . . . . . . . . . . . . . . . . . . . . . . . . . . . . . . . . . . . . . . . . . . .8Connecting to the satellite dish . . . . . . . . . . . . . . . . . . . . . . . . . . . . . . . . . . . . . . . . . . . . . . . . . . . . . . . . . . . . . . . . . . . . . . . . . . . . . .9Connecting to the power supply . . . . . . . . . . . . . . . . . . . . . . . . . . . . . . . . . . . . . . . . . . . . . . . . . . . . . . . . . . . . . . . . . . . . . . . . . . . .9Switching your Astro set top box on and off . . . . . . . . . . . . . . . . . . . . . . . . . . . . . . . . . . . . . . . . . . . . . . . . . . . . . . . . . . . . . . . 10Inserting batteries in your remote control . . . . . . . . . . . . . . . . . . . . . . . . . . . . . . . . . . . . . . . . . . . . . . . . . . . . . . . . . . . . . . . . . . 10YOUR SMART CARD . . . . . . . . . . . . . . . . . . . . . . . . . . . . . . . . . . . . . . . . . . . . . . . . . . . . . . . . . . . . . . . . . . . . . . . . . . . . . . . . . 11Inserting your Smart Card . . . . . . . . . . . . . . . . . . . . . . . . . . . . . . . . . . . . . . . . . . . . . . . . . . . . . . . . . . . . . . . . . . . . . . . . . . . . . . . . . . 11TV SETTINGS . . . . . . . . . . . . . . . . . . . . . . . . . . . . . . . . . . . . . . . . . . . . . . . . . . . . . . . . . . . . . . . . . . . . . . . . . . . . . . . . . . . . . . . 12HD SETTINGS . . . . . . . . . . . . . . . . . . . . . . . . . . . . . . . . . . . . . . . . . . . . . . . . . . . . . . . . . . . . . . . . . . . . . . . . . . . . . . . . . . . . . . . 13DIGITAL AUDIO SETTINGS . . . . . . . . . . . . . . . . . . . . . . . . . . . . . . . . . . . . . . . . . . . . . . . . . . . . . . . . . . . . . . . . . . . . . . . . . . 14YOUR REMOTE CONTROL . . . . . . . . . . . . . . . . . . . . . . . . . . . . . . . . . . . . . . . . . . . . . . . . . . . . . . . . . . . . . . . . . . . . . . . . . . . 15Controlling your TV’s features with your remote control . . . . . . . . . . . . . . . . . . . . . . . . . . . . . . . . . . . . . . . . . . . . . . . . . . . . 16TV codes . . . . . . . . . . . . . . . . . . . . . . . . . . . . . . . . . . . . . . . . . . . . . . . . . . . . . . . . . . . . . . . . . . . . . . . . . . . . . . . . . . . . . . . . . . . . . . . . . . 17ON-SCREEN MESSAGES . . . . . . . . . . . . . . . . . . . . . . . . . . . . . . . . . . . . . . . . . . . . . . . . . . . . . . . . . . . . . . . . . . . . . . . . . . . . . 18GENERAL PROBLEMS . . . . . . . . . . . . . . . . . . . . . . . . . . . . . . . . . . . . . . . . . . . . . . . . . . . . . . . . . . . . . . . . . . . . . . . . . . . . . . . . 20SPECIFICATION . . . . . . . . . . . . . . . . . . . . . . . . . . . . . . . . . . . . . . . . . . . . . . . . . . . . . . . . . . . . . . . . . . . . . . . . . . . . . . . . . . . . . 22General . . . . . . . . . . . . . . . . . . . . . . . . . . . . . . . . . . . . . . . . . . . . . . . . . . . . . . . . . . . . . . . . . . . . . . . . . . . . . . . . . . . . . . . . . . . . . . . . . . . . 22Rear-panel connectors . . . . . . . . . . . . . . . . . . . . . . . . . . . . . . . . . . . . . . . . . . . . . . . . . . . . . . . . . . . . . . . . . . . . . . . . . . . . . . . . . . . . . 22Front-panel connector . . . . . . . . . . . . . . . . . . . . . . . . . . . . . . . . . . . . . . . . . . . . . . . . . . . . . . . . . . . . . . . . . . . . . . . . . . . . . . . . . . . . . 22NOTICES . . . . . . . . . . . . . . . . . . . . . . . . . . . . . . . . . . . . . . . . . . . . . . . . . . . . . . . . . . . . . . . . . . . . . . . . . . . . . . . . . . . . . . . . . . . . 23
B427-Installer-Iss1.indd 1 18/09/09 11:53 PM
2
Please follow the instructions in this Installation Guide carefully to enjoy all the advantages of your Astro set top box for watching and recording television programmes.
STORAGEIf your Astro set top box is not used directly after purchase, it can be stored in its original packaging, in a cool dry place, at a temperature between –20 °C and +70 °C . Before use, wait until your Astro set top box has reached room temperature .
MAINTENANCEBefore cleaning, always disconnect the power from your Astro set top box and disconnect the cable at the SAT-IN connector . To clean your Astro set top box, dust with either a clean dry cloth, or one that has been slightly dampened with distilled water . Never use detergents of any kind .
HANDLINGTo avoid possible damage, do not pick up or move your Astro set top box while it is connected to the power supply .
If you move your Astro set top box between locations at different temperatures, allow it to reach room temperature before you apply power to it .
IntRoDUCtIon
ENVIRONMENTAL ISSUES
Packaging
When disposing of this product packaging, please ensure that it is recycled.
This will reduce the demand for virgin wood pulp, whilst diverting material that would otherwise end up in landfill .
Product and batteries
Recycling - Do not dispose of this product or its remote-control batteries with your domestic rubbish.
At the end of their useful lives, the product and batteries contain materials
that, when processed correctly, can be recovered and recycled . By participating in the responsible recycling of the product and batteries, you will be reducing the requirement for new raw materials and reducing the amount of material that would otherwise end up in landfill . You will therefore help to prevent potential negative consequences for the environment and human health .
When you purchase a new, similar product your retailer may offer to take this old one from you . Alternatively, you can take it to your local recycling centre . Your retailer or local municipal authority will advise you of the collection facilities available in your area for waste electronic products and batteries . Use of these services will be free to you .
B427-Installer-Iss1.indd 2 18/09/09 11:53 PM

3
IMPoRtAnt sAFetY InFoRMAtIon
USING EqUIPMENT SAFELYYour Astro set top box has been manufactured to meet international safety standards, but you must take care to operate it safely .
It is important that you read these safety instructions .
WARnInG: Remember that contact with AC mains can be lethal or can cause severe electric shock. to avoid the risk of electric shock:
Never remove the top cover from the 12 V power supply unit, as there are high-voltage live parts inside . There are no user-serviceable parts inside this power supply unit .
Never remove the top cover from your Astro set top box . There are no user-serviceable parts inside it .
On the rear panel of your Astro set top box, there is a tamper-evident label that states ‘Warranty void if broken or removed’ .
Make sure all electrical connections are properly made .
Do not connect any equipment to the mains supply until you have properly connected all the other leads .
Before you disconnect any other equipment from your Astro set top box’s rear panel, put your Astro set top box into standby, wait 60 seconds, then disconnect your Astro set top box from the power supply (by disconnecting the 12 V power supply unit from the mains socket on the wall) .
Never push anything into holes, slots or other openings in the case (except a Smart Card into the slot provided) .
the model number, serial number and electrical rating of your Astro set top box are on a label on its base.
CAUtIon:
Do not use or store your Astro set top box in hot, cold, damp or dusty places .
Do not block the ventilation holes of your Astro set top box . Leave a gap of at least 5 cm above and around it to allow for adequate ventilation . Never stand it on soft furnishings .
Do not put anything on your Astro set top box which might drip or spill into it . Never stand objects filled with liquids, such as vases, on top of your Astro set top box .
Do not place your Astro set top box in an unventilated cabinet or on top of a unit that emits heat (e .g . a VCR) .
Never place naked flame sources, such as lighted candles, on or adjacent to your Astro set top box .
CONNECTING TO THE MAINS SUPPLY• Your Astro set top box is designed for use only
with the supplied 12 V power supply unit .
• The 12 V power supply unit operates with a 100-240 V AC, 50-60 Hz mains supply . Do not connect it to any other electricity supply than this .
• Connect the 12 V power supply unit to your Astro set top box . Then insert the 2-way connector on the supplied mains lead into the 12 V power supply unit, then finally insert the mains plug into the mains supply at the wall socket .
• To disconnect power from your Astro set top box, always remove the 12 V power supply unit from the mains supply (rather than disconnect the 12 V power supply unit from your Astro set top box) . Therefore you must install your Astro set top box near to the mains socket-outlet, which should be easily accessible .
• If you are in any doubt about the mains lead, its plug or its connection, consult a competent electrician .
B427-Installer-Iss1.indd 3 18/09/09 11:53 PM

4
eLeCtRICAL InFoRMAtIon
MAINS PLUG AND ITS FUSEThe supplied mains plug is a non-rewireable type . If you need to replace the fuse, you must use an ASTA- or BSI-approved BS 1362 fuse, rated at 3 A and marked as shown below .
or
The plug has its fuse beneath a fuse cover on its face . Use a screwdriver to lever off the fuse cover, replace the fuse with a new one and refit its cover . never use a plug if its fuse cover is missing.
AM
The fuse is inside the rewireable plug . Use a screwdriver to remove the plug’s back cover . Never put the plug into the mains socket when its cover is removed. Lever out the fuse and replace it with a new one . Replace the plug’s back cover .
3 AMP
LN
E
FUSE of correct value
WARnInG
If the supplied mains plug is not suitable for your mains socket-outlet, Do not plug it in. Remove its fuse and then cut the plug off the lead. Destroy the severed plug immediately to avoid the shock hazard which would exist if this were to be plugged into a mains socket.
Fit an appropriate mains plug on the lead. If this plug contains a fuse, it should be as described left. If you are using a non-fused plug, an external fuse must not exceed 5 A.
B427-Installer-Iss1.indd 4 18/09/09 11:53 PM

5
UNPACkING THE CARTONBefore you start installing your Astro set top box, please check you have the following supplied accessories:
• A 12 V power supply unit
• A mains lead
• A 3-way AV phono lead
• A remote control and 2 ‘AAA’ batteries
• A Smart Card
• A warranty card
BeFoRe YoU BeGIn
B427-Installer-Iss1.indd 5 18/09/09 11:53 PM

6
smart card
ch+ ch- rec
FRONT PANEL
Display Shows the current time when your Astro set top box is in standby .Shows the channel number when your Astro set top box is tuned to a channel .
Standby button (S) To switch your Astro set top box on and off .
IR indicatorFlashes when your Astro set top box is receiving a signal from your remote control .
Slot for Smart Card
note: the front panel of your Astro set top box is covered with a protective clear plastic film. Carefully remove this film before using your Astro set top box.
YoUR AstRo set toP BoX
USB 2 .0 port For future use .
ch+ and ch– buttonsTo change channel by stepping through them .
rec indicator Is lit while your Astro set top box is recording a program . (For future use)
B427-Installer-Iss1.indd 6 18/09/09 11:53 PM
7
Y Pb Pr
SAT-IN13/18V 350mA MAX
COMPOSITEVIDEO AUDIO
LEFT
COMPONENT VIDEO
RIGHT DIGITALAUDIO
NETWORKPORT
DC POWER12V 2.5A MAX5V
500mA MAX
ANALOGUESTANDARD
DEFINITION
YoUR AstRo set toP BoX
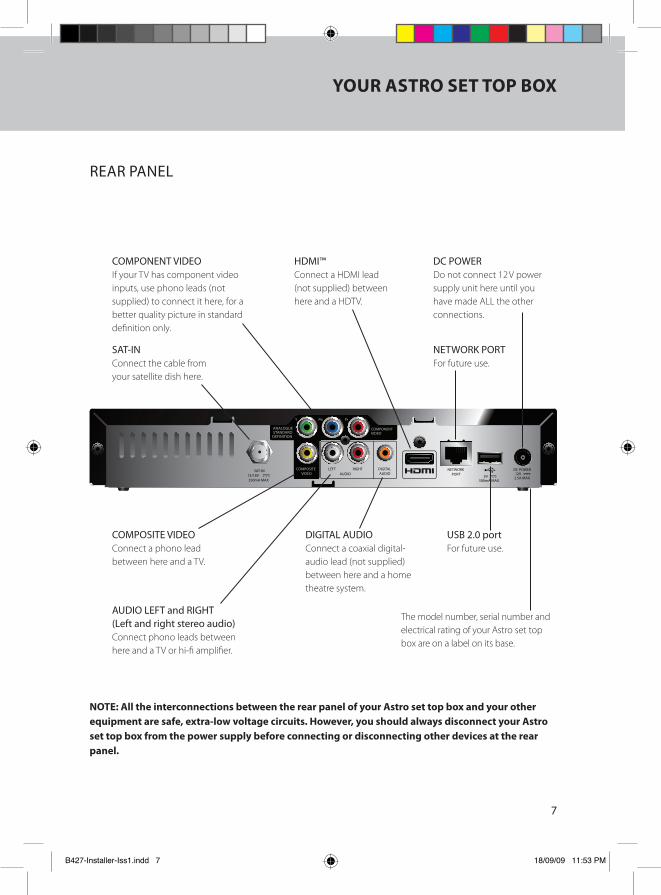
REAR PANEL
DC POWERDo not connect 12 V power supply unit here until you have made ALL the other connections .
COMPOSITE VIDEOConnect a phono lead between here and a TV .
USB 2 .0 portFor future use .
AUDIO LEFT and RIGHT(Left and right stereo audio)Connect phono leads between here and a TV or hi-fi amplifier .
DIGITAL AUDIOConnect a coaxial digital-audio lead (not supplied) between here and a home theatre system .
SAT-INConnect the cable from your satellite dish here .
note: All the interconnections between the rear panel of your Astro set top box and your other equipment are safe, extra-low voltage circuits. However, you should always disconnect your Astro set top box from the power supply before connecting or disconnecting other devices at the rear panel.
NETWORk PORTFor future use .
COMPONENT VIDEOIf your TV has component video inputs, use phono leads (not supplied) to connect it here, for a better quality picture in standard definition only .
The model number, serial number and electrical rating of your Astro set top box are on a label on its base .
HDMI™Connect a HDMI lead (not supplied) between here and a HDTV .
B427-Installer-Iss1.indd 7 18/09/09 11:53 PM
8
Y Pb Pr
SAT-IN13/18V 350mA MAX
COMPOSITEVIDEO AUDIO
LEFT
COMPONENT VIDEO
RIGHT DIGITALAUDIO
NETWORKPORT
DC POWER12V 2.5A MAX5V
500mA MAX
ANALOGUESTANDARD
DEFINITION
HDMI
TV
ConneCtInG UP
CONNECTING YOUR ASTRO SET TOP BOXBefore starting, choose a suitable position for your Astro set top box, observing the ventilation requirements set out on page 3 .
WARnInG: Before you connect or disconnect your Astro set top box to/from any other equipment, make sure you disconnect all the equipment from the mains supply.
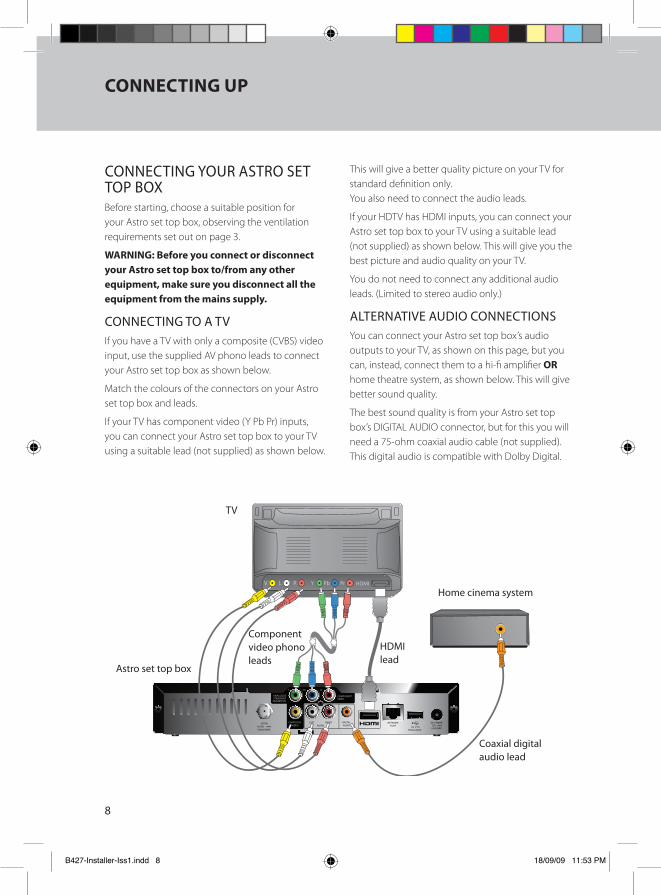
CONNECTING TO A TVIf you have a TV with only a composite (CVBS) video input, use the supplied AV phono leads to connect your Astro set top box as shown below .
Match the colours of the connectors on your Astro set top box and leads .
If your TV has component video (Y Pb Pr) inputs, you can connect your Astro set top box to your TV using a suitable lead (not supplied) as shown below .
This will give a better quality picture on your TV for standard definition only . You also need to connect the audio leads .
If your HDTV has HDMI inputs, you can connect your Astro set top box to your TV using a suitable lead (not supplied) as shown below . This will give you the best picture and audio quality on your TV .
You do not need to connect any additional audio leads . (Limited to stereo audio only .)
ALTERNATIVE AUDIO CONNECTIONSYou can connect your Astro set top box’s audio outputs to your TV, as shown on this page, but you can, instead, connect them to a hi-fi amplifier oR home theatre system, as shown below . This will give better sound quality .
The best sound quality is from your Astro set top box’s DIGITAL AUDIO connector, but for this you will need a 75-ohm coaxial audio cable (not supplied) . This digital audio is compatible with Dolby Digital .
Astro set top box
Component video phono leads
HDMI lead
Home cinema system
Coaxial digitalaudio lead
B427-Installer-Iss1.indd 8 18/09/09 11:53 PM

9
ConneCtInG UP
Coaxial digitalaudio lead
Y Pb Pr
SAT-IN13/18V 350mA MAX
COMPOSITEVIDEO AUDIO
LEFT
COMPONENT VIDEO
RIGHT DIGITALAUDIO
NETWORKPORT
DC POWER12V 2.5A MAX5V
500mA MAX
ANALOGUESTANDARD
DEFINITION
CONNECTING TO THE SATELLITE DISHIf necessary, fit an F-connector to the cable from the satellite dish .
Connect the lead directly from the dish to the connector labelled SAT-IN on your Astro set top box’s rear panel .
The signal cable coming from the dish cannot be used with a signal splitter . Using a splitter will reduce the signal strength to your Astro set top box and will damage other set top boxes connected to the same dish .
Please ensure that the signal cable is properly installed while setting up your Astro set top box .
WARnInG: Your Astro set top box should be installed by an Astro authorized installer.
Y Pb Pr
SAT-IN13/18V 350mA MAX
COMPOSITEVIDEO AUDIO
LEFT
COMPONENT VIDEO
RIGHT DIGITALAUDIO
NETWORKPORT
DC POWER12V 2.5A MAX5V
500mA MAX
ANALOGUESTANDARD
DEFINITION
CONNECTING TO THE POWER SUPPLY1 . Plug the fixed lead on the 12 V power supply
unit into the socket labelled DC POWER on your Astro set top box’s rear panel .
2 . Plug the 2-way connector on the supplied mains lead into the socket on the 12 V power supply unit .
3 . When all the connections are properly made, connect the mains plug from the 12 V power supply into a mains wall socket .
4 . Connect other equipment, such as your TV, to the mains supply .
B427-Installer-Iss1.indd 9 18/09/09 11:53 PM
10
ConneCtInG UP
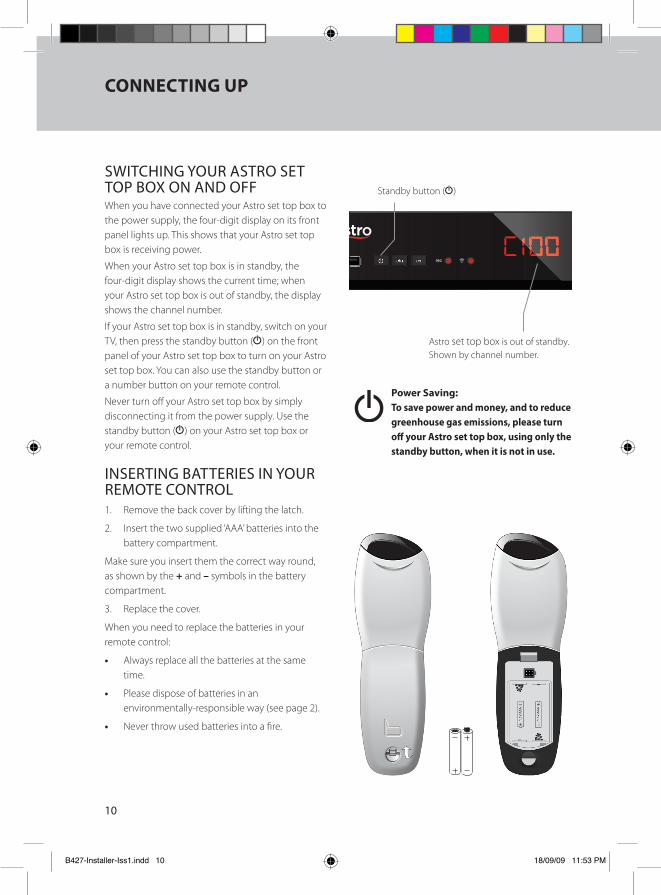
SWITCHING YOUR ASTRO SET TOP BOX ON AND OFFWhen you have connected your Astro set top box to the power supply, the four-digit display on its front panel lights up . This shows that your Astro set top box is receiving power .
When your Astro set top box is in standby, the four-digit display shows the current time; when your Astro set top box is out of standby, the display shows the channel number .
If your Astro set top box is in standby, switch on your TV, then press the standby button (S) on the front panel of your Astro set top box to turn on your Astro set top box . You can also use the standby button or a number button on your remote control .
Never turn off your Astro set top box by simply disconnecting it from the power supply . Use the standby button (S) on your Astro set top box or your remote control .
smart card
ch+ ch- rec
Power saving: to save power and money, and to reduce greenhouse gas emissions, please turn off your Astro set top box, using only the standby button, when it is not in use.
B
Standby button (S)
Astro set top box is out of standby .Shown by channel number .
INSERTING BATTERIES IN YOUR REMOTE CONTROL1 . Remove the back cover by lifting the latch .
2 . Insert the two supplied ‘AAA’ batteries into the battery compartment .
Make sure you insert them the correct way round, as shown by the + and – symbols in the battery compartment .
3 . Replace the cover .
When you need to replace the batteries in your remote control:
• Always replace all the batteries at the same time .
• Please dispose of batteries in an environmentally-responsible way (see page 2) .
• Never throw used batteries into a fire .
B427-Installer-Iss1.indd 10 18/09/09 11:53 PM

11
YoUR sMARt CARD
INSERTING YOUR SMART CARDYou will need the supplied Astro Smart Card so that you can receive Astro programmes and services on your Astro b .yond set top box . Insert it as follows and leave it in your Astro b .yond set top box permanently .
1 . Hold your Astro Smart Card with the gold chip uppermost and the arrow pointing towards your Astro b .yond set top box .
2 . Insert your Smart Card into the front-panel slot, pushing it in as far as it will go without forcing it .
Care for your Smart Card as follows:
• Don’t remove or insert your Smart Card unnecessarily .
• Don’t bend your Smart Card .
• Keep your Smart Card dry . Never clean it with fluids – use a soft dry cloth .
• Keep your Smart Card away from heat and sunlight, small children and pets .
Please use the Smart Card which came with your Astro b .yond set top box . Smart Cards from other set top boxes will not work with your Astro b .yond set top box .
smart card
ch+ ch- rec
Please use your Smart Card only with the Astro b .yond set top box bearing the below serial number:
Astro b .yond set top box serial number Smart Card number
B427-Installer-Iss1.indd 11 18/09/09 11:53 PM

12
tV settInGs
You can access the TV Settings by navigating through the following screens:
Home > settings > Installation settings > tV settings
In the Installation Settings screen, enter your PIN code when prompted . The default PIN code is 0000 .
Item settings Comments
TV Type Standard Definition For TVs that support Standard Definition
High Definition* For TVs that support High Definition
TV Aspect Ratio 4:3 For ‘standard’ (4:3) TVs
16:9* For ‘widescreen’ (16:9) TVs
Conversion for 16:9 input video (Determines how widescreen (16:9) programmes are displayed on a standard (4:3) TV – available only if the TV Aspect Ratio has been set to 4:3)
Letter Box* The entire frame of the widescreen programme will be displayed in a standard (4:3) TV, but the frame will not fill the screen . There will be black bars on the top and bottom of the frame .
Pan Scan The side edges of the widescreen programme will be cut-off but the entire screen will be filled .
Conversion for 4:3 input video (Determines how standard (4:3) programmes are displayed on a widescreen (16:9) TV – available only if the TV Aspect Ratio has been set to 16:9)
Stretch (Default if the TV Type is set to Standard Definition .)
The entire frame will stretch horizontally to fill the screen .
Pillar Box* (Default if the TV Type is set to High Definition .)
The entire frame will be displayed as if it were on a standard TV with black bars on either side of the frame .
* Default setting
B427-Installer-Iss1.indd 12 18/09/09 11:53 PM
13
HD settInGs
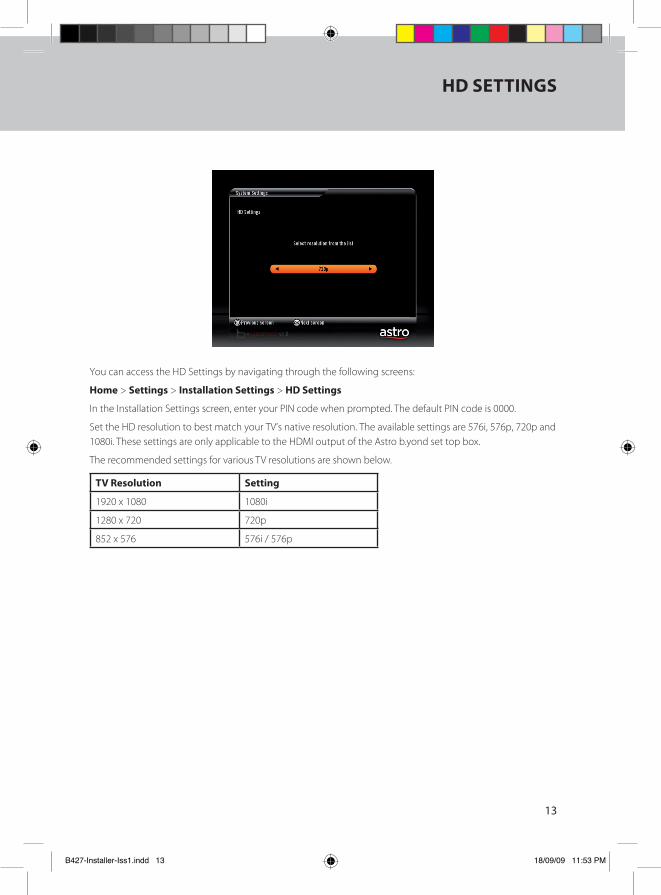
You can access the HD Settings by navigating through the following screens:
Home > settings > Installation settings > HD settings
In the Installation Settings screen, enter your PIN code when prompted . The default PIN code is 0000 .
Set the HD resolution to best match your TV’s native resolution . The available settings are 576i, 576p, 720p and 1080i . These settings are only applicable to the HDMI output of the Astro b .yond set top box .
The recommended settings for various TV resolutions are shown below .
tV Resolution setting
1920 x 1080 1080i
1280 x 720 720p
852 x 576 576i / 576p
B427-Installer-Iss1.indd 13 18/09/09 11:53 PM

14
DIGItAL AUDIo settInGs
You can access the Digital Audio Settings by navigating through the following screens:
Home > settings > Your settings > Digital Audio settings
The audio quality will depend on the Digital Audio Settings and the type of audio output used, as shown below .
Channel type Digital Audio setting Rear-panel audio outputs
HDMI Digital Audio Audio L & R
Channel with Dolby
Dolby Digital 5 .1 (Digital Only)
Dolby Digital Dolby Digital No audio
Stereo (Analogue and Digital)
Stereo Stereo Stereo
Channel without Dolby
Dolby Digital 5 .1 (Digital Only)
Stereo Stereo Stereo
Stereo (Analogue and Digital)
Stereo Stereo Stereo
If you notice that the audio is not in sync with the video, you may set the time delay accordingly to compensate for this delay .
B427-Installer-Iss1.indd 14 18/09/09 11:53 PM
15
YoUR ReMote ContRoL
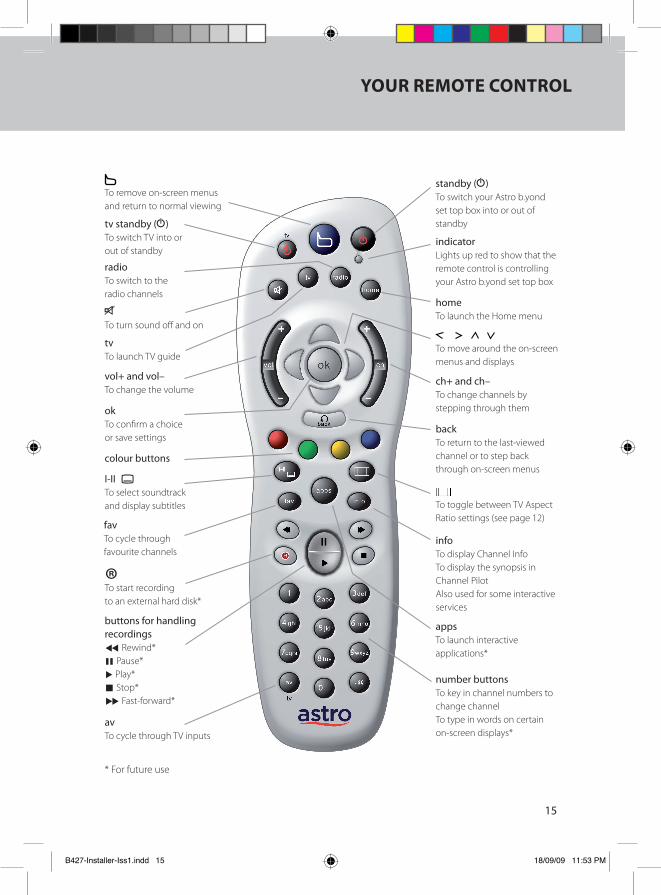
back To return to the last-viewed channel or to step back through on-screen menus
standby (S) To switch your Astro b .yond set top box into or out of standby
ok To confirm a choice or save settings
ch+ and ch–To change channels by stepping through them
To move around the on-screen menus and displays
®buttons for handling recordingsG Rewind*K Pause*B Play*L Stop*F Fast-forward*
indicatorLights up red to show that the remote control is controlling your Astro b .yond set top box
colour buttons
number buttons To key in channel numbers to change channelTo type in words on certain on-screen displays*
vol+ and vol–To change the volume
Z To turn sound off and on
I-II c To select soundtrack and display subtitles To toggle between TV Aspect
Ratio settings (see page 12)
To remove on-screen menus and return to normal viewing
tvTo launch TV guide
infoTo display Channel InfoTo display the synopsis in Channel PilotAlso used for some interactive services
tv standby (S) To switch TV into or out of standby
To start recording to an external hard disk*
av To cycle through TV inputs
* For future use
appsTo launch interactive applications*
favTo cycle through favourite channels
homeTo launch the Home menu
radioTo switch to the radio channels
B427-Installer-Iss1.indd 15 18/09/09 11:53 PM

16
YoUR ReMote ContRoL
CONTROLLING YOUR TV’S FEATURES WITH YOUR REMOTE CONTROLYou can use your remote control to control some of your TV’s features, after you press the tv button . Then, you can:
• turn your TV on/off using the tv S button
• adjust the volume* using vol+ and vol–
• mute the volume using the Z button
• select AV channels using the av button
First, you must configure your remote control to use the correct TV Code for your brand of TV . You can either set the code yourself (Option 1), or let your remote control search for the correct code (Option 2) .
* The volume control and mute is by default set to control your Astro b .yond set top box even if the remote has been set up properly . Holding down ok and vol+ until the remote blinks twice will allow you to control your TV’s volume . To revert the remote to controlling your Astro b .yond set top box’s volume, hold down the ok and vol- until the remote blinks 4 times .
OPTION 11 . Hold down tv S and ok together, until the indicator blinks twice .
2 . Use the number buttons to enter a 4-digit TV Code for your brand of TV (see table on page 17) .
3 . If the code you entered is valid, the indicator blinks twice .
4 . Verify if the other controllable TV functions are functioning .
note: If the tV Code is invalid, or you press an incorrect button, the indicator blinks once for a longer period. the previous settings are restored and the setup routine ends.
OPTION 21 . Hold down tv S and ok together, until the indicator blinks twice .
2 . Press 9 – 9 – 1 . The indicator will blink twice again .
3 . Press tv S button . Aim the remote at the TV, and press ch+ .
4 . If the TV does not turn off after 3 seconds, press ch+ again . Keep repeating this until it the TV turns off . If the remote blinks 3 times after pressing ch+, that indicates that the remote has cycled through the entire database and if you still cannot control your TV, your TV is not supported by this remote . Once the TV responds, proceed to step 5 .
5 . Press ok . The indicator blinks twice to confirm that the TV Code has been set .
6 . Verify if the other controllable TV functions are functioning .
If you do not press any remote control buttons within a 20-second period during either setup method, the previous settings are restored and the setup routine ends.
B427-Installer-Iss1.indd 16 18/09/09 11:53 PM

17
YoUR ReMote ContRoL
TV CODESIf a 4-digit code does not work, try the next 4-digit code for your brand of TV .
samsung 0060 0812 0618 0178 0587 0009 0093 0556 1235 0108 0037 0217 0264 0370 0072 0156 1208 0766 0226 0814 0216 0290 0821 0163
sony 1825 1505 0011 1651 0036 0650 1010 0037 0556 0093 0170 0074
Philips 0037 0556 1744 0772 1246 1304 0178 0108 0195 0087 0374 0760 0343 0595 0009 0200 0361 1521
Panasonic 0650 0226 1650 1636 0108 1310 0037 0556 0163 1208 0508 0896 0361 0853 1335 0367 0516 0548 0001
toshiba 1508 0508 0060 0009 0714 0036 0156 1656 0070 0093 2060 0264 1935 0412 1164 0618 1582 0650 0821 1704 0217 0109 1457 1916 1908 0698 0037 0736 1556 1037
LG 1423 0001 0178 0037 0556 0876 0370 1768 0377 0009 0714 0060 0217 0108 0216 0290 0163 0606 0109 0698 0715 0823 0829 1556 1191 0247 0367 1681 1539
Pioneer 1260 0760 0011 0170 1457 0698 0109 0163 0037 0287 0556 0428 0370 0343 0361 0486 0512
sharp 0093 0009 1393 0036 0491 0818 0256 1819 1163 0650 0294 0653 0412 0516 0200 0760 2214
JVC 0653 1818 0036 1153 0606 1653 0371 0508 0731 0683 0192 0218 0418 0093 0650
If the brand of your tV’s Codes is not listed here, please refer to the Astro website (www.astro.com.my) for additional information.
If you wish to clear the current TV Code that is programmed to the remote, hold down tv S and ok together, until the indicator blinks twice . Follow this up with 9 – 7 – 7 . The indicator will blink twice again . The remote will still be able to control your Astro b .yond set top box .
B427-Installer-Iss1.indd 17 18/09/09 11:53 PM

18
on-sCReen MessAGes
If any of the following on-screen messages appear, you may attempt the suggested solutions to resolve it before contacting Astro Customer Service .
on-screen message Possible cause suggested solution
Please insert your Astro Smart Card .
Your Astro Smart Card is not inserted in the smart card slot of your Astro b .yond set top box .
Please insert your Astro Smart Card into the smart card slot .
Invalid Smart Card . Please insert your Astro Smart Card or insert your Astro Smart Card correctly .
The smart card is not inserted properly .
Reinsert the smart card correctly .
There is a mismatch in the customer type of the Astro Smart Card inserted in your Astro b .yond set top box .
Please insert the Astro Smart Card that came with your Astro b .yond set top box .
The smart card in your Astro b .yond set top box is not an Astro Smart Card .
This channel is not included in your subscription . To subscribe, please call Astro customer service .
Your current subscription does not include this channel .
Please contact Astro Customer Service if you are interested in viewing the channel .
Your Smart Card is inactive . Please call Astro customer service to activate .
Your Astro Smart Card has not been activated or has been deactivated .
Please contact Astro Customer Service to activate the card . Ensure that the smart card is in your Astro b .yond set top box, powered up with the signal locked on .
The Astro Smart Card has not been in your Astro b .yond set top box for several months .
Leave the Astro Smart Card for a couple of hours inside the Astro b .yond set top box, powered up with the signal locked on .
You have inserted the wrong Smart Card . Please insert the correct Smart Card .
You have inserted a smart card from another set top box . Your Astro b .yond set top box will work only with the Astro Smart Card that it came paired with .
Insert the Astro Smart Card that came paired with your Astro b .yond set top box .
B427-Installer-Iss1.indd 18 18/09/09 11:53 PM

19
on-sCReen MessAGes
on-screen message Possible cause suggested solution
Services currently not available .
This may be a temporary condition due to the rain . If this condition persists, please call Astro customer service .
The satellite input is not connected properly .
Ensure that the satellite input is connected properly .
The dish is not be aligned properly .
Have an authorized installer align the dish properly .
Booking is not allowed when Smart Card is removed .
The Astro Smart Card is not inserted in your Astro b .yond set top box while you trying to book a reminder .
Insert your Astro Smart Card and retry booking the reminder .
You have already booked the maximum numbers of reminders .
You have already booked 50 reminders .
You can either delete some of the existing reminders or book new reminders after the existing reminders have lapsed .
The following events start at the same time . Please cancel one of the events to proceed .
You have already set another programme to start at the same time, thereby causing a reminder conflict .
You can either cancel the current booking or continue booking a new reminder by overwriting the old reminder .
No favourite channels found . You have not assigned any channels to your favourite channels list .
You can access the Home menu using the home button on the remote control . You can assign favourite channels by navigating to:
Settings > User Settings > Edit Favourites .
You have already selected the maximum number of favourite channels .
You have already selected 30 favourite channels .
You need to delete some of your old favourite channels to add additional channels .
This channel is blocked under parental control .
You have blocked this channel using the Channel Block function under Parental Control .
You can either enter the correct PIN code to view the channel or switch to another channel .
You have already selected the maximum number of blocked channels .
You have already selected 30 blocked channels .
You need to delete some of the old blocked channels to block additional channels .
B427-Installer-Iss1.indd 19 18/09/09 11:53 PM

20
GeneRAL PRoBLeMs
Problem Possible cause suggested solution
The display on the front panel does not light up/is not lit .
Your Astro b .yond set top box is not connected .
Make sure the lead from the 12 V power supply unit is properly plugged into your Astro b .yond set top box . Check that the 12 V power supply unit is properly connected to the mains supply, and that the mains supply is switched on .
There is no sound and picture on your TV, but your Astro b .yond set top box’s front panel shows the time .
Your Astro b .yond set top box is still in standby .
Press the standby button (S) on your remote control or your Astro b .yond set top box’s front panel . Make sure that your TV is out of standby and the correct AV input has been selected on the TV .
Your remote control does not operate your Astro b .yond set top box .(note: if your Astro b.yond set top box is out of standby, then the IR indicator light on it’s front panel should flash when you press the remote-control buttons.)
Your Astro b .yond set top box is still in standby .
Press the standby button on your remote control .
Something is blocking the path between your remote control and your Astro b .yond set top box’s front panel .
Ensure that nothing is blocking the path .
Your remote control’s batteries need replacing .
Replace all the batteries in your remote control . Never throw used batteries into a fire . Dispose of them in an environmentally-responsible way (see page 2) .
There is no sound or picture, or the picture is of poor quality or looks blocky .
Your satellite dish is not connected properly to your Astro b .yond set top box .
Make sure that your satellite dish is connected properly to your Astro b .yond set top box .
Your TV is not connected properly to your Astro b .yond set top box .
Make sure that your TV is connected properly to your Astro b .yond set top box, your TV is out of standby and the correct AV input has been selected on the TV .
Your satellite dish is not pointing in the right direction or has a faulty LNB .note: severe weather and heavy cloud cover can cause this problem.
Check the signal-level indicator . If it is low, please contact Astro Customer Service for further assistance .
Before attempting to check the connections between your equipment, please ensure that you have disconnected them from the mains supply . When you are done checking or reconnecting your equipment, safely reconnect them to the mains supply .
B427-Installer-Iss1.indd 20 18/09/09 11:53 PM
21
GeneRAL PRoBLeMs
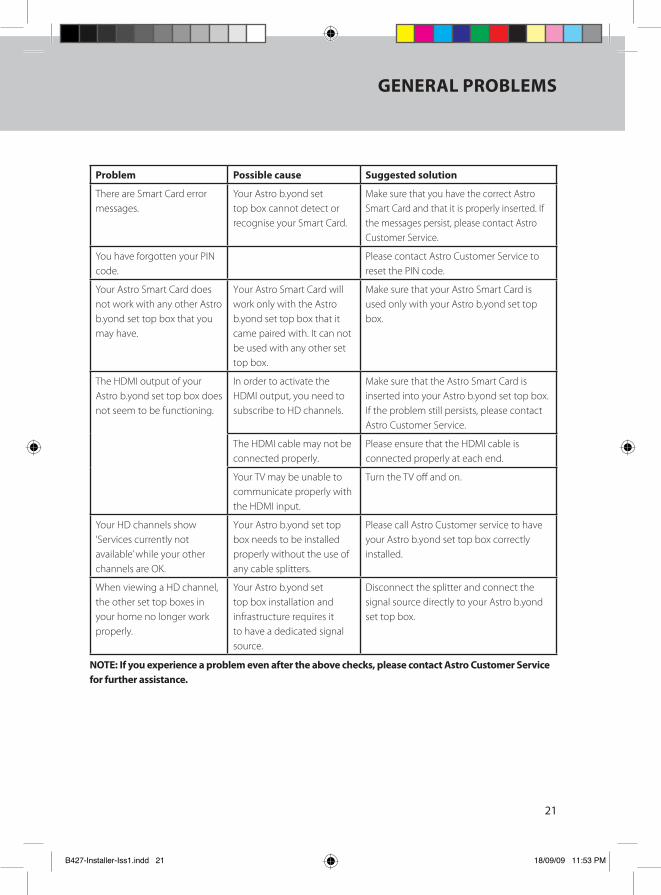
Problem Possible cause suggested solution
There are Smart Card error messages .
Your Astro b .yond set top box cannot detect or recognise your Smart Card .
Make sure that you have the correct Astro Smart Card and that it is properly inserted . If the messages persist, please contact Astro Customer Service .
You have forgotten your PIN code .
Please contact Astro Customer Service to reset the PIN code .
Your Astro Smart Card does not work with any other Astro b .yond set top box that you may have .
Your Astro Smart Card will work only with the Astro b .yond set top box that it came paired with . It can not be used with any other set top box .
Make sure that your Astro Smart Card is used only with your Astro b .yond set top box .
The HDMI output of your Astro b .yond set top box does not seem to be functioning .
In order to activate the HDMI output, you need to subscribe to HD channels .
Make sure that the Astro Smart Card is inserted into your Astro b .yond set top box . If the problem still persists, please contact Astro Customer Service .
The HDMI cable may not be connected properly .
Please ensure that the HDMI cable is connected properly at each end .
Your TV may be unable to communicate properly with the HDMI input .
Turn the TV off and on .
Your HD channels show ‘Services currently not available’ while your other channels are OK .
Your Astro b .yond set top box needs to be installed properly without the use of any cable splitters .
Please call Astro Customer service to have your Astro b .yond set top box correctly installed .
When viewing a HD channel, the other set top boxes in your home no longer work properly .
Your Astro b .yond set top box installation and infrastructure requires it to have a dedicated signal source .
Disconnect the splitter and connect the signal source directly to your Astro b .yond set top box .
note: If you experience a problem even after the above checks, please contact Astro Customer service for further assistance.
B427-Installer-Iss1.indd 21 18/09/09 11:53 PM

22
sPeCIFICAtIon
Due to continued product improvement, this specification may change without notice .
GENERALOperating voltage 12 V DC 2 .5 A
Power consumption 30 W (max)
Dimensions (W x D x H) 324 mm x 238 mm x 56 mm
Weight 1 .5 kg (packed, including accessories)
Operating temperature range +5 °C to +42 °C
Storage temperature range –20 °C to +70 °C
REAR-PANEL CONNECTORSDC POWER 12 V DC 2 .5 A
SAT-IN (satellite dish input) F-type female
AUDIO LEFT and RIGHT 2 x phono audio-out sockets
VIDEO Phono composite video-out socket
COMPONENT VIDEO Y Pb Pr 3 x RCA (phono) component video-out sockets
DIGITAL AUDIO Coaxial S/PDIF connector RCA/Cinch (female)
HDMI HDMI interface
USB 2 .0 Host Port (Type A) (for future use)
NETWORK PORT RJ45 female (for future use)
FRONT-PANEL CONNECTOR USB 2 .0 (for future use)
B427-Installer-Iss1.indd 22 18/09/09 11:53 PM

23
notICes
Astro is a trademark of MEASAT Broadcast Network Systems Sdn . Bhd (240064-A)
This product incorporates copyright protection technology that is protected by U .S . patents and other intellectual property rights . Use of this copyright protection technology must be authorized by Macrovision, and is intended for home and other limited pay-per-view uses only unless otherwise authorized by Macrovision . Reverse engineering or disassembly is prohibited .
HDMI, the HDMI Logo and High-Definition Multimedia Interface are trademarks or registered trademarks of HDMI Licensing LLC .
Other trademarks listed herein are the property of their respective owners .
OPEN SOURCE SOFTWARECertain components of the software contained in this product are subject to either:
(i) the GNU General Public Licence (“GPL”);
(ii) the GNU Lesser General Public Licence (“LGPL”); or
(iii) OpenSSL license .
In compliance with the GPL and LGPL Pace makes the source code of the Linux software, libraries and associated utilities it uses, together with its modifications (if any), available to the public in source code form at: http://www.pace.com/opensource/request .
OPEN SOURCE LICENSESThe software contained in this product may be covered by certain components consisting of free software or open source software . A list of these components and a copy of the relevant copyright notices and license term notices that are required by such licenses are available at this web page: http://www.pace.com/opensource/license This list may change from time to time and may depend on the model of product or the version of software you have received . If you are unable to access this web page and wish to have a copy of this list, please contact the Open Source Administrator at: Pace plc, Victoria Road, Saltaire, West Yorkshire, BD18 3LF, United Kingdom . To the extent the terms of these open source or free software licenses prohibit any of the restrictions in any end user license included with the product, such restrictions will not apply to the applicable open source or free software component .
COPYRIGHTThis document is copyrighted and may not, in whole or part, be copied, photocopied, reproduced, translated or reduced to any electronic or machine-readable form without prior consent in writing from MEASAT Broadcast Network Systems Sdn . Bhd .
© 2009 MeAsAt Broadcast network systems sdn. Bhd.
All rights reserved .
B427-Installer-Iss1.indd 23 18/09/09 11:53 PM

24
notes
B427-Installer-Iss1.indd 24 18/09/09 11:53 PM