assembly instructions urban
TRANSCRIPT
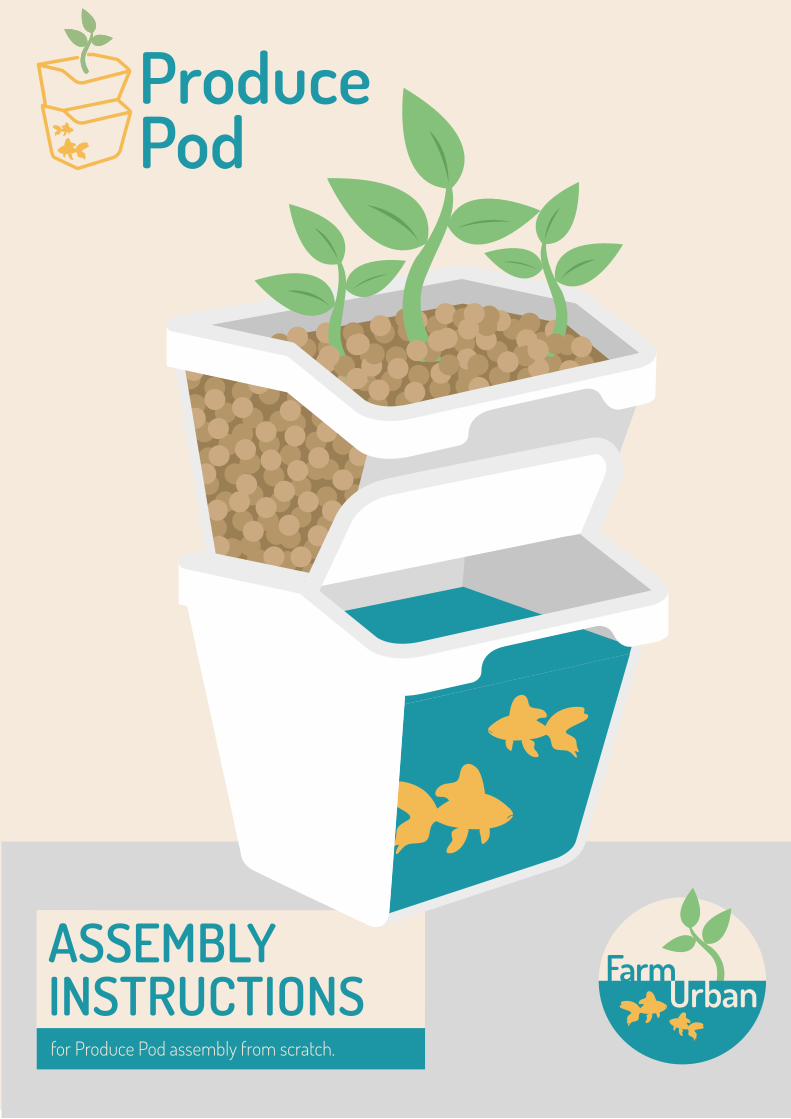
ASSEMBLY INSTRUCTIONS Urbanfor Produce Pod assembly from scratch.
1
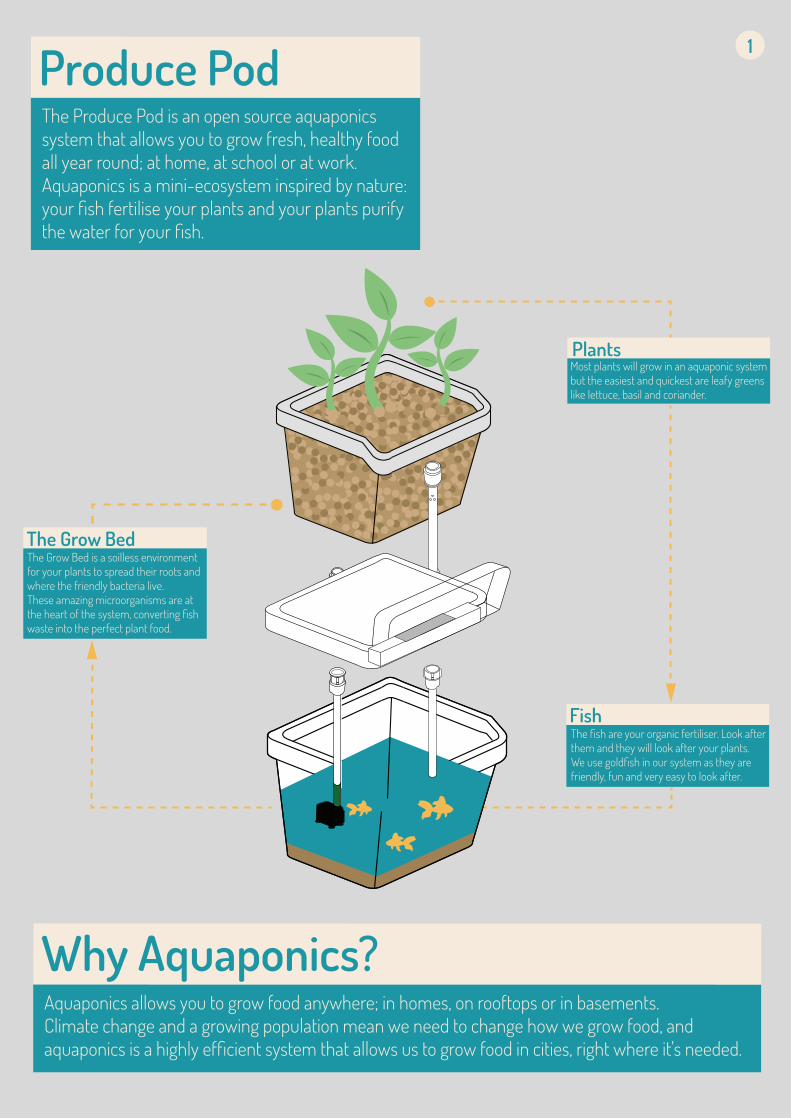
The Grow Bed is a soilless environment for your plants to spread their roots and where the friendly bacteria live. These amazing microorganisms are at the heart of the system, converting fish waste into the perfect plant food.
The fish are your organic fertiliser. Look after them and they will look after your plants. We use goldfish in our system as they are friendly, fun and very easy to look after.
Most plants will grow in an aquaponic system but the easiest and quickest are leafy greens like lettuce, basil and coriander.
The Grow Bed
Fish
Plants
The Produce Pod is an open source aquaponics system that allows you to grow fresh, healthy food all year round; at home, at school or at work. Aquaponics is a mini-ecosystem inspired by nature: your fish fertilise your plants and your plants purify the water for your fish.
Produce Pod
Aquaponics allows you to grow food anywhere; in homes, on rooftops or in basements. Climate change and a growing population mean we need to change how we grow food, and aquaponics is a highly efficient system that allows us to grow food in cities, right where it's needed.
Why Aquaponics?
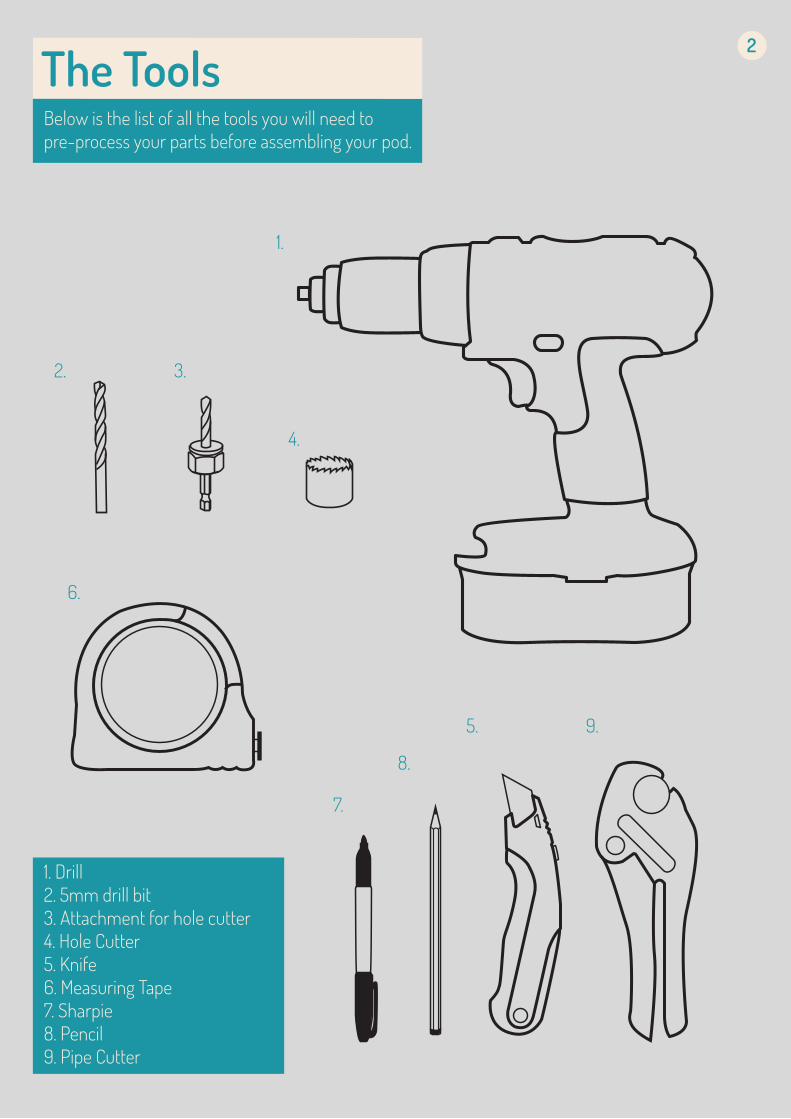
Below is the list of all the tools you will need to pre-process your parts before assembling your pod.
The Tools
1. Drill2. 5mm drill bit 3. Attachment for hole cutter4. Hole Cutter5. Knife6. Measuring Tape7. Sharpie8. Pencil9. Pipe Cutter
2
1.
2. 3.
4.
5.
6.
7.
8.
9.
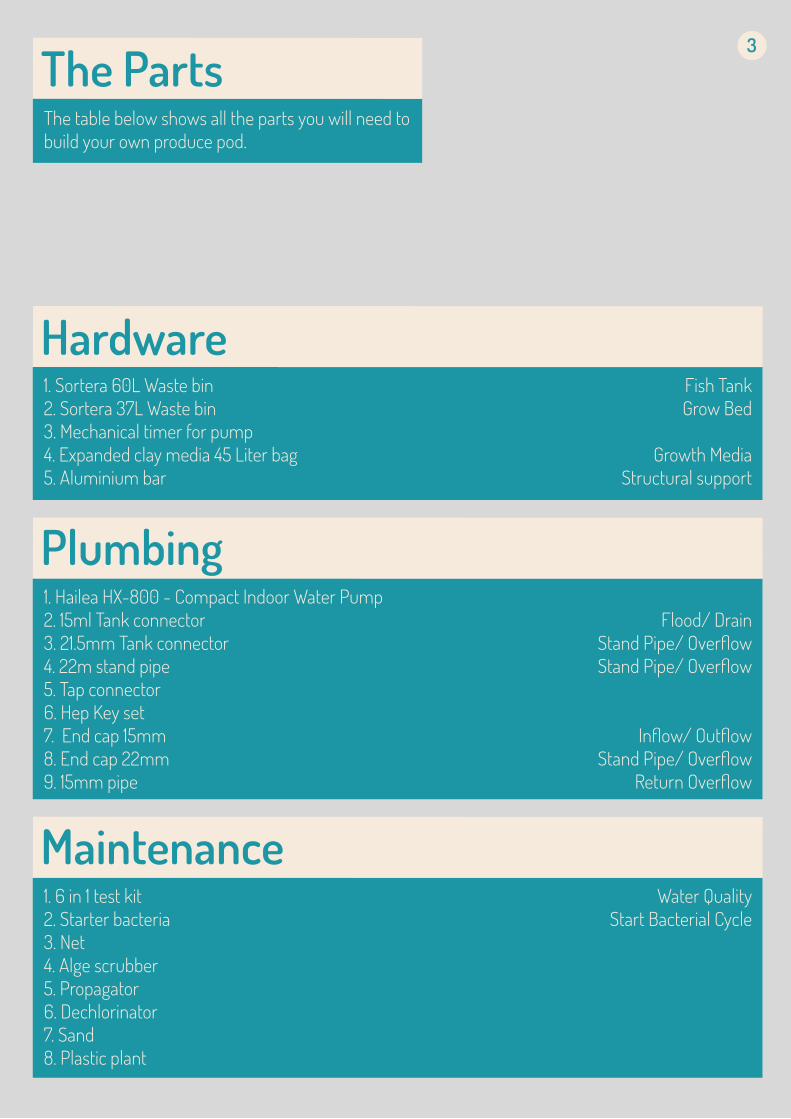
1. Sortera 60L Waste bin2. Sortera 37L Waste bin3. Mechanical timer for pump4. Expanded clay media 45 Liter bag5. Aluminium bar
Hardware
The table below shows all the parts you will need to build your own produce pod.
The Parts
1. Hailea HX-800 - Compact Indoor Water Pump2. 15ml Tank connector3. 21.5mm Tank connector4. 22m stand pipe5. Tap connector6. Hep Key set7. End cap 15mm8. End cap 22mm9. 15mm pipe
Plumbing
1. 6 in 1 test kit2. Starter bacteria3. Net4. Alge scrubber5. Propagator6. Dechlorinator7. Sand 8. Plastic plant
Maintenance
Fish TankGrow Bed
Growth MediaStructural support
Flood/ DrainStand Pipe/ OverflowStand Pipe/ Overflow
Inflow/ OutflowStand Pipe/ Overflow
Return Overflow
Water QualityStart Bacterial Cycle
3
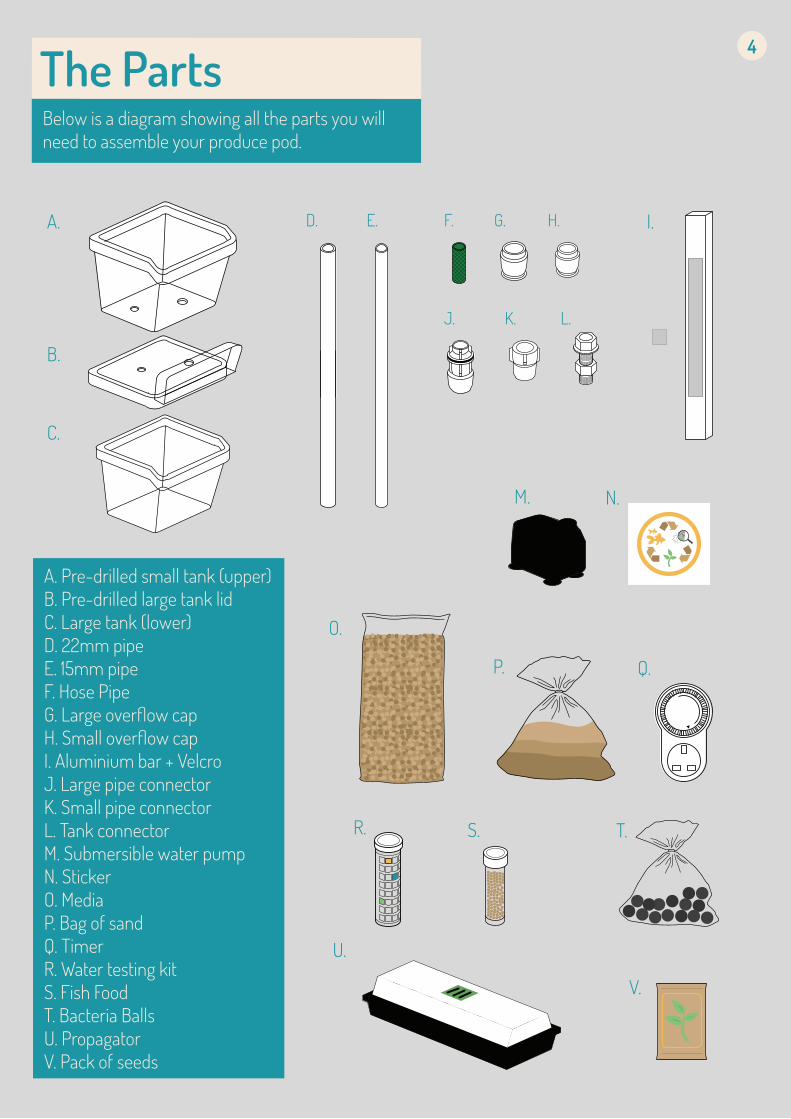
Below is a diagram showing all the parts you will need to assemble your produce pod.
The Parts44
A. Pre-drilled small tank (upper)B. Pre-drilled large tank lidC. Large tank (lower)D. 22mm pipeE. 15mm pipeF. Hose PipeG. Large overflow capH. Small overflow capI. Aluminium bar + VelcroJ. Large pipe connectorK. Small pipe connectorL. Tank connectorM. Submersible water pumpN. Sticker O. MediaP. Bag of sandQ. TimerR. Water testing kitS. Fish FoodT. Bacteria BallsU. PropagatorV. Pack of seeds
A.
N.
I.
M.
O.
U.
V.
Q.
S. T.R.
P.
C.
B.
D. E. F. G. H.
J. K. L.
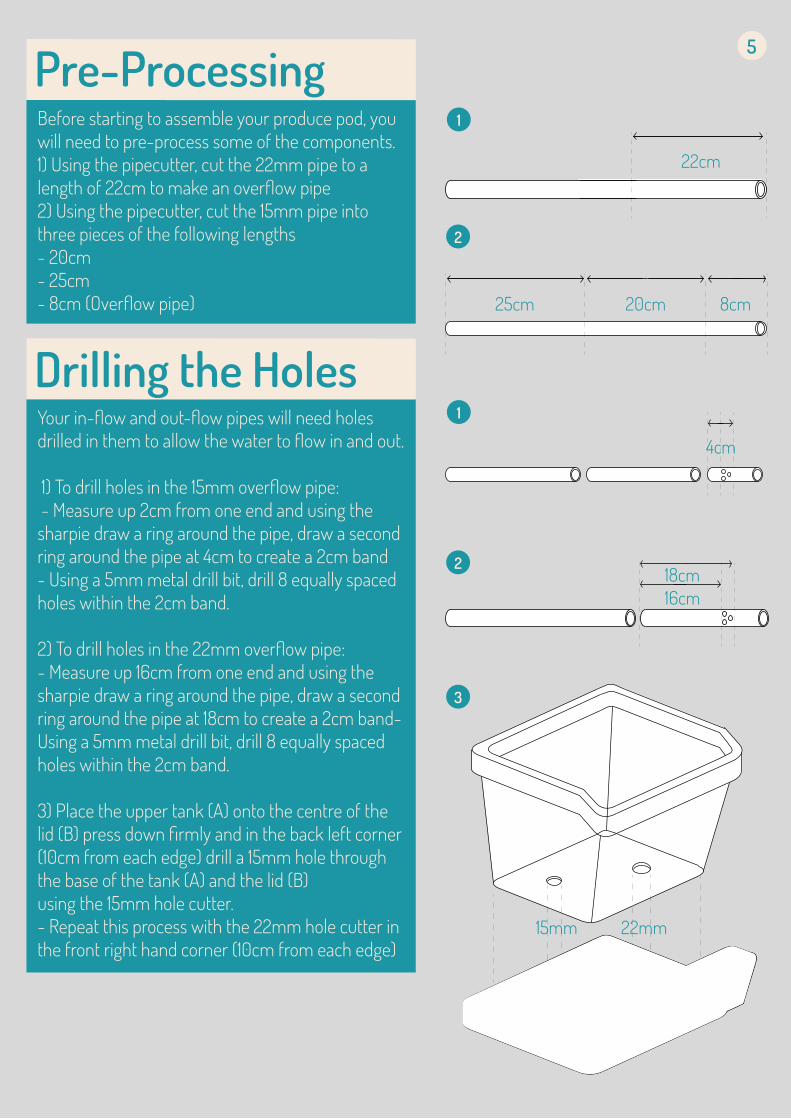
Before starting to assemble your produce pod, you will need to pre-process some of the components.1) Using the pipecutter, cut the 22mm pipe to alength of 22cm to make an overflow pipe2) Using the pipecutter, cut the 15mm pipe intothree pieces of the following lengths- 20cm- 25cm- 8cm (Overflow pipe)
Pre-Processing
Your in-flow and out-flow pipes will need holes drilled in them to allow the water to flow in and out.
1) To drill holes in the 15mm overflow pipe: - Measure up 2cm from one end and using the sharpie draw a ring around the pipe, draw a second ring around the pipe at 4cm to create a 2cm band - Using a 5mm metal drill bit, drill 8 equally spaced holes within the 2cm band.
2) To drill holes in the 22mm overflow pipe: - Measure up 16cm from one end and using the sharpie draw a ring around the pipe, draw a second ring around the pipe at 18cm to create a 2cm band- Using a 5mm metal drill bit, drill 8 equally spaced holes within the 2cm band.
3) Place the upper tank (A) onto the centre of the lid (B) press down firmly and in the back left corner (10cm from each edge) drill a 15mm hole through the base of the tank (A) and the lid (B)using the 15mm hole cutter.- Repeat this process with the 22mm hole cutter in the front right hand corner (10cm from each edge)
Drilling the Holes
5
2
1
2
1
3
25cm
22cm
20cm 8cm
4cm
16cm18cm
15mm 22mm
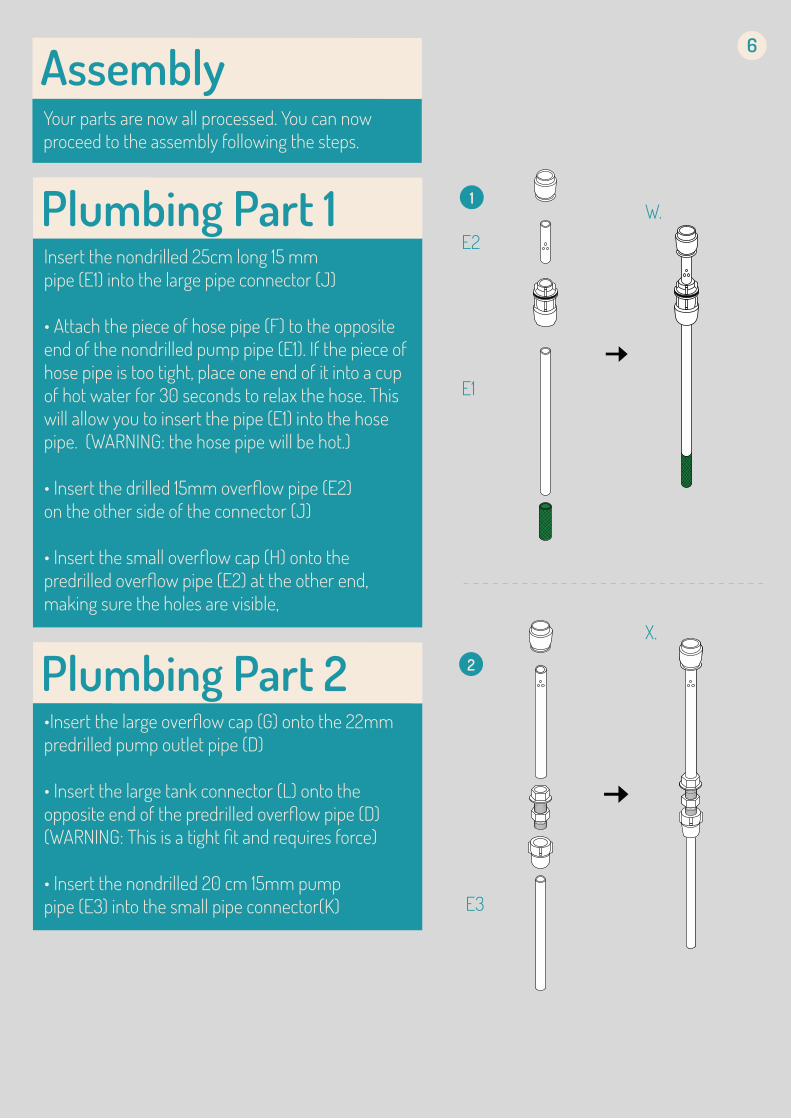
Your parts are now all processed. You can now proceed to the assembly following the steps.
Assembly
Insert the nondrilled 25cm long 15 mmpipe (E1) into the large pipe connector (J)
• Attach the piece of hose pipe (F) to the opposite end of the nondrilled pump pipe (E1). If the piece of hose pipe is too tight, place one end of it into a cup of hot water for 30 seconds to relax the hose. This will allow you to insert the pipe (E1) into the hose pipe. (WARNING: the hose pipe will be hot.)
• Insert the drilled 15mm overflow pipe (E2) on the other side of the connector (J)
• Insert the small overflow cap (H) onto thepredrilled overflow pipe (E2) at the other end, making sure the holes are visible,
Plumbing Part 1
•Insert the large overflow cap (G) onto the 22mm predrilled pump outlet pipe (D)
• Insert the large tank connector (L) onto the opposite end of the predrilled overflow pipe (D) (WARNING: This is a tight fit and requires force)
• Insert the nondrilled 20 cm 15mm pumppipe (E3) into the small pipe connector(K)
Plumbing Part 2
6
2
1
E1
E2
W.
X.
E3
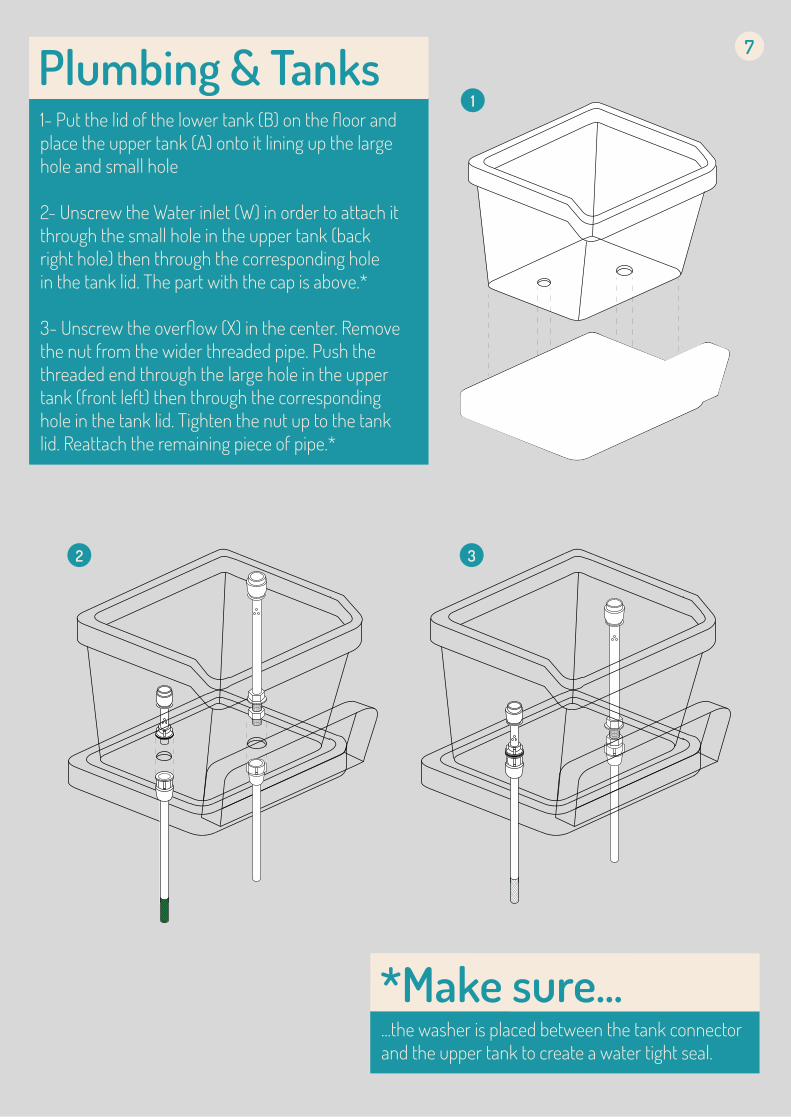
Plumbing & Tanks1- Put the lid of the lower tank (B) on the floor and place the upper tank (A) onto it lining up the large hole and small hole
2- Unscrew the Water inlet (W) in order to attach it through the small hole in the upper tank (back right hole) then through the corresponding hole in the tank lid. The part with the cap is above.*
3- Unscrew the overflow (X) in the center. Remove the nut from the wider threaded pipe. Push the threaded end through the large hole in the upper tank (front left) then through the corresponding hole in the tank lid. Tighten the nut up to the tank lid. Reattach the remaining piece of pipe.*
...the washer is placed between the tank connector and the upper tank to create a water tight seal.
*Make sure...
7
3
1
2

Final Assembly1- Attach the pump (M) to the hose pipe on the pump inlet (F). Place the upper tank, lid and plumbing assembly on top of lower tank (C).• Set the timer so that the pump runs for 15 minutes, then switches off for 45 minutes on a continual basis (press every 4th pin down). • Plug the pump plug (M) into the timer (Q).
2- Peel the film off the velcro attached to the aluminum bar. Lift the tank lid slightly and slide the aluminium bar under it so that it sits just behind the tank lid hinge. Press down on the top tank to secure and leave for 5 minutes.
8
3- Peel the film off the Velcro square stuck to the front rim of the lid, open the lid fully and press against the front face of the upper tank, leave 5 minutes.
4- Fill the lower tank with water to 10cm below the front edge of the lower tank of and turn the pump on. The water should pump up from the bottom tank and half fill the top tanks. Ensure there are no leaks between the base of the top tank and the lid of the bottom tank.
Check for leaks
1
2
3
9
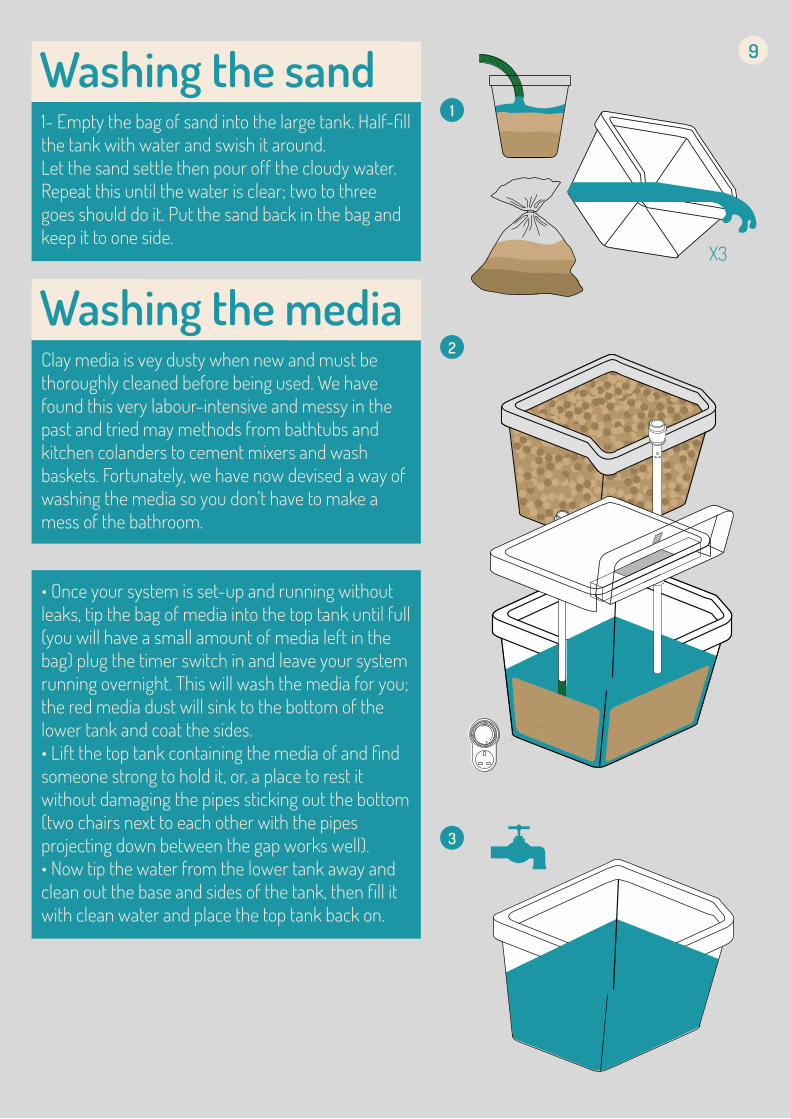
1- Empty the bag of sand into the large tank. Half-fill the tank with water and swish it around. Let the sand settle then pour off the cloudy water. Repeat this until the water is clear; two to three goes should do it. Put the sand back in the bag and keep it to one side.
Washing the sand
Clay media is vey dusty when new and must be thoroughly cleaned before being used. We have found this very labour-intensive and messy in the past and tried may methods from bathtubs and kitchen colanders to cement mixers and wash baskets. Fortunately, we have now devised a way of washing the media so you don’t have to make a mess of the bathroom.
• Once your system is set-up and running without leaks, tip the bag of media into the top tank until full (you will have a small amount of media left in the bag) plug the timer switch in and leave your system running overnight. This will wash the media for you; the red media dust will sink to the bottom of the lower tank and coat the sides. • Lift the top tank containing the media of and find someone strong to hold it, or, a place to rest it without damaging the pipes sticking out the bottom (two chairs next to each other with the pipes projecting down between the gap works well).• Now tip the water from the lower tank away and clean out the base and sides of the tank, then fill it with clean water and place the top tank back on.
Washing the media
3
2
1
X3

10
4-Test water for ammonia, nitrites, nitrates and pH by following the instructions on your 6-in-1 test kit (R) Before we add the fish, we need to acclimatise them to their new home. Fish are cold-blooded so do not internally regulate their body temperature; adding them straight to the system might shock them. Add the fish following the instruction below.• Float the bag with the fish in on the surface of the water in your system for 15 minutes.• Untie the bag and gradually, over a period of another 15 minutes, mix the water from the bag and your system.• Gently tip the bag in the water and let the fish out.
Add the fish
Follow the instructions in the propagation kit...
Plant the seeds
• Bury a ball of start-up bacteria (T) in the media of the upper tank. Add washed sand (P) to lower tank.
Leave the system running overnight to dechlorinate the water.
Set up the system
4
11
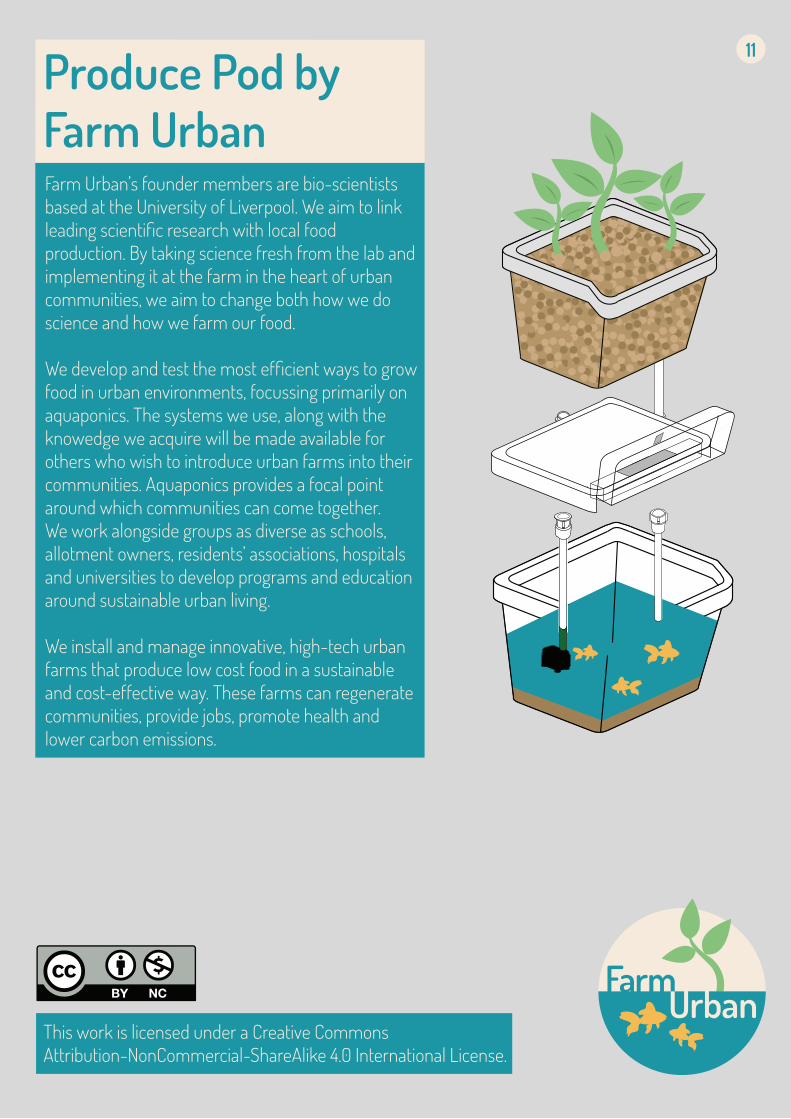
Farm Urban’s founder members are bio-scientists based at the University of Liverpool. We aim to link leading scientific research with local food production. By taking science fresh from the lab and implementing it at the farm in the heart of urban communities, we aim to change both how we do science and how we farm our food.
We develop and test the most efficient ways to grow food in urban environments, focussing primarily on aquaponics. The systems we use, along with the knowedge we acquire will be made available for others who wish to introduce urban farms into their communities. Aquaponics provides a focal point around which communities can come together. We work alongside groups as diverse as schools, allotment owners, residents’ associations, hospitals and universities to develop programs and education around sustainable urban living.
We install and manage innovative, high-tech urban farms that produce low cost food in a sustainable and cost-effective way. These farms can regenerate communities, provide jobs, promote health and lower carbon emissions.
Produce Pod byFarm Urban
UrbanThis work is licensed under a Creative CommonsAttribution-NonCommercial-ShareAlike 4.0 International License.