assembly instructions - american...
TRANSCRIPT
ASSEMBLY INSTRUCTIONS50" AND 60" Snow Plow Kit - 200 Runabout and Full Size UTV
Congratulations on the purchase of your Snow Plow Kit! These instructions will guide you through the assembly process.Carefully read these instructions and familiarize yourself with components before starting the assembly process. NOTE: Use of this Snow Plow requires a winch (not included). Please call 1-800-643-7332, visit our website at www.amsportworks.com, or your local dealer, to purchase awinch kit or to see the full selection of accessories available for your vehicle.
WEAR PROPER EYE PROTECTION DURING THE UNPACKING AND ASSEMBLY PROCESS TO AVOID POTENTIAL EYE INJURIES
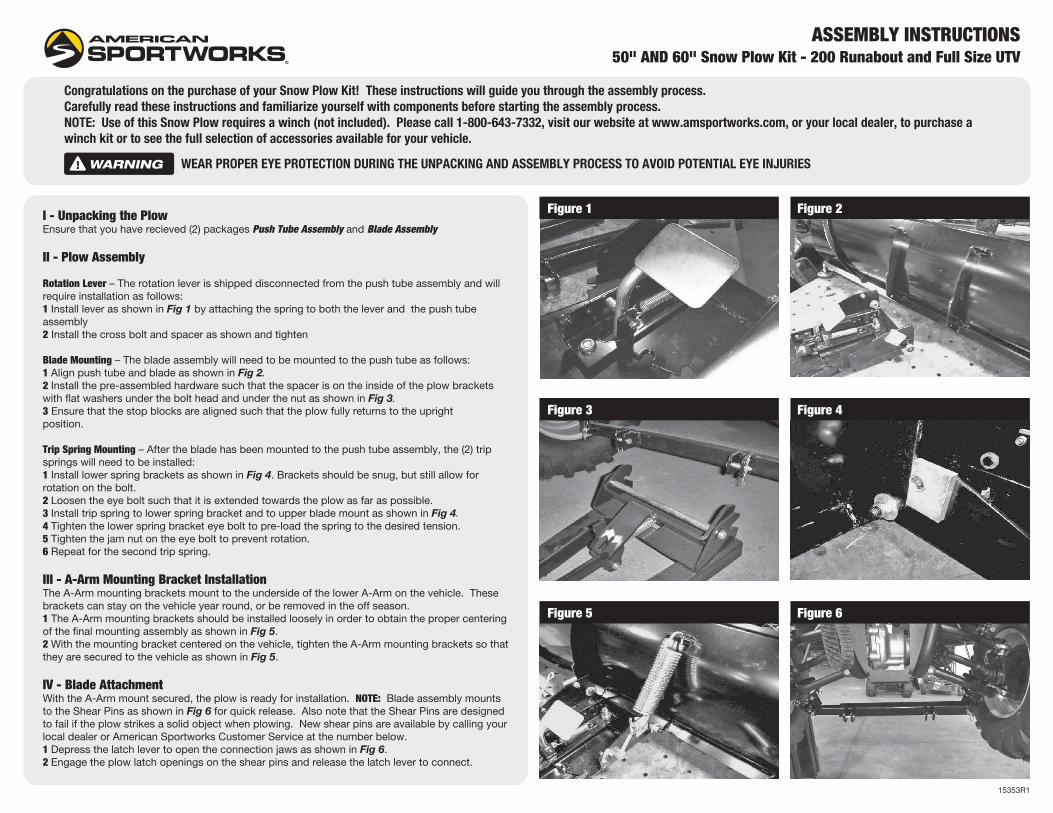
I - Unpacking the PlowEnsure that you have recieved (2) packages Push Tube Assembly and Blade Assembly
II - Plow Assembly
Rotation Lever – The rotation lever is shipped disconnected from the push tube assembly and will require installation as follows:1 Install lever as shown in Fig 1 by attaching the spring to both the lever and the push tube assembly2 Install the cross bolt and spacer as shown and tighten
Blade Mounting – The blade assembly will need to be mounted to the push tube as follows:1 Align push tube and blade as shown in Fig 2.2 Install the pre-assembled hardware such that the spacer is on the inside of the plow brackets with flat washers under the bolt head and under the nut as shown in Fig 3.3 Ensure that the stop blocks are aligned such that the plow fully returns to the upright position.
Trip Spring Mounting – After the blade has been mounted to the push tube assembly, the (2) trip springs will need to be installed:1 Install lower spring brackets as shown in Fig 4. Brackets should be snug, but still allow for rotation on the bolt.2 Loosen the eye bolt such that it is extended towards the plow as far as possible.3 Install trip spring to lower spring bracket and to upper blade mount as shown in Fig 4.4 Tighten the lower spring bracket eye bolt to pre-load the spring to the desired tension. 5 Tighten the jam nut on the eye bolt to prevent rotation.6 Repeat for the second trip spring.
III - A-Arm Mounting Bracket InstallationThe A-Arm mounting brackets mount to the underside of the lower A-Arm on the vehicle. These brackets can stay on the vehicle year round, or be removed in the off season.1 The A-Arm mounting brackets should be installed loosely in order to obtain the proper centering of the final mounting assembly as shown in Fig 5.2 With the mounting bracket centered on the vehicle, tighten the A-Arm mounting brackets so that they are secured to the vehicle as shown in Fig 5.
IV - Blade AttachmentWith the A-Arm mount secured, the plow is ready for installation. NOTE: Blade assembly mounts to the Shear Pins as shown in Fig 6 for quick release. Also note that the Shear Pins are designed to fail if the plow strikes a solid object when plowing. New shear pins are available by calling your local dealer or American Sportworks Customer Service at the number below.1 Depress the latch lever to open the connection jaws as shown in Fig 6.2 Engage the plow latch openings on the shear pins and release the latch lever to connect.
Figure 1 Figure 2
Figure 3 Figure 4
Figure 5 Figure 6
15353R1
WARNING!
REF # PART # DESCRIPTION QTY
1 15327 KIT, 50" SNOW PLOW - UNIV MOUNT (ALL PARTS AS SHOWN) 1
2 15333 KIT, 60 SNOW PLOW UNIV MOUNT (ALL PARTS AS SHOWN) 1
3 15328 ASM, BLADE 50" UNIV MOUNT 1
4 15334 ASM, BLADE 60 UNIV MOUNT 1
5 15336 BLADE, SCRAPER 50" 1
6 15335 BLADE, SCRAPER 60" 1
7 15329 ASM, PUSH TUBE UNIV MOUNT 1
8 15354 ASM, SKID PAD - UNIV SNOWPLOW 2
9 15330 SPRING, BLADE TRIP - UNIV MOUNT 2
10 15331 PIN, SHEAR UNIV MOUNT BLADE 2
11 15337 SPRING, ROTATION LEVER 1
12 15348 SPRING, LATCH LEVER - UNIV PLOW 1
13 15410 BOLT, 3/8-16 X 1.75 CARRIAGE G5 ZN 10
REF # PART # DESCRIPTION QTY
14 15411 NUT, 3/8-16 NYLOC G5 ZN 13
15 15392 BOLT, 3/8-16 X 1.25 HHCS G5 ZN 2
16 N/A STOP, BLADE ROTATION 2
17 15393 BOLT, 5/16-18 X 3.00 EYE ZN 2
18 15394 NUT, 5/16-18 NYLOC G5 ZN 8
19 9176 BOLT, 5/16-18 X 1.00 HHCS G5 ZN 2
20 N/A BRACKET, TRIP SPRING 2
21 15395 BOLT, 7/16-14 X 1.50 HHCS G5 ZN 2
22 15396 WASHER, 7/16 FLAT AN 4
23 15397 SPACER, 12.7ID X 22.2OD X 9.5 STEEL ZN 2
24 15398 NUT, 7/16-14 NYLOC G5 ZN 2
25 15399 BOLT, 5/8-11 X 2.50 HHCS G5 ZN 1
26 15400 NUT, 5/16-18 G5 ZN 4
REF # PART # DESCRIPTION QTY
27 15401 WASHER, 3/8 FLAT 6
28 15402 BOLT, 5/16-18 X 0.75 CARRIAGE G5 ZN 1
29 15403 SPACER, 8.7ID X 12.7OD X 16 STEEL ZN 1
30 2383 BOLT, 5/16-18 X 2.50 HHCS G5 ZN 1
31 15404 PEDAL, BLADE ROTATION - ZN 1
32 15405 NUT, 5/8-11 NYLOC G5 ZN 1
33 15406 CLIP, 10.0ID X 20.0OD X 1.6 E 2
34 15407 HAIRPIN CLIP, .063 X 1.38 ZN 4
35 15408 PIN, 3/8 X 2.75 CLEVIS ZN 2
36 15409 BOLT, 5/16-18 X 2.50 CARRIAGE G5 ZN 4
37 9060 WASHER, 5/16 FLAT ZN 4
5, 63, 4
7
8
9
10
11
12
13
14
15
16
14
17
26
19
20
18
2122
2324
25
13
27
14
28
18
1829
30
3132
33
33
34
35
36
37
18
26
50” / 60” PLOW BLADE DIAGRAM
15353R1