assembly instructions 2 people 70 mins item # hik 77-t (mop)...l1 drawer slide ''14 6 1....
TRANSCRIPT

HODEDAH ®
Assembly Instructions
This instruction booklet contains important safety information, please read and keep for future reference.
ITEM # HIK 77-T (MOP)MICROWAVE CART
FRONT VIEW
REAR VIEW
Product Dimensions : Height 23.6'' x Width 45.3'' x Depth 15.6''
www.Hodedah.com1 | Page
2 people
70 mins
1 YR LTD
1 Box

HODEDAH ®
Questions, need parts, we are here to help!
Phone Email Website
Mon - Fri | 9:30am to 5pm EST Send us an email Visit our website to open a case
1 - 855 - HODEDAH
1 - 855 - 463 - 3324
[email protected] www. Hodedah.com
FOR PROMPT, RELIABLE SERVICE PLEASE HAVE YOUR INSTRUCTION MANUAL READY
DO NOT RETURN PRODUCT TO THE STORE
If parts are missing or damaged please contact our customer service team and we will
gladly ship your replacement parts FREE of charge within ONE YEAR of purchase!
WARRANTY
Hodedah warrants this product to be free from defect in materials and workmanship and agrees to remedy and such defect.
This warranty covers one year from the date of original purchase. This is solely limited to replacement of defective parts and no
assembly for labor is included. This warranty does not apply to any product that has been improperly assembled, subjected to
misuse, abuse or which has been altered or repaired in any way. To obtain warranty service, original purchaser must present the
following; original bill of sale, date of purchase, where the product was purchased and images if applicable. Components replaced
warranted through the remainder of the original warranty only. The defective part will be replaced without charge, subject to the
terms and conditions described above.
WARNING
This product contains small parts, keep away from children.
This product contains plastic bags, keep away from children.
Serious or fatal crushing injuries can occur from furniture tip-over. To help prevent this,
place heaviest items on the lower shelves and drawers. Do not set heavy object on top
shelves and drawers.
Never allow children to climb or hang on drawers, shelves and doors.
Never open more than one drawer at a time.
The use of tip-over restraints may reduce but not eliminate the risk of tip-over.
www.Hodedah.com2 | Page

HODEDAH ®
www.Hodedah.com3 | Page
5m
Let's get started...
Helpful hints, read before beginning assembly
Make sure you receive all boxes. if your item is packed in one box, box count will read 1
of 1, likewise if your item is packed in two boxes, box count will read 1 of 2 and second
box will read 2 of 2.
Read each step carefully. It is very important that each step is performed in the correct
order. If these steps are not followed in sequence, assembly difficulties will occur.
Work in a spacious level area, preferably carpet, near the place the unit will be used.
DO NO USE power tools to assemble your furniture, it will strip and damage parts.
Your package should include the following hardware and parts. Parts are labeled or
stamped on the raw edge. Please inspect contents to ensure you have received all
components. If you are missing any hardware or parts please contact customer
service right away before assembly.
Assembly Tools Required (not supplied)
Hammer Philips Screwdriver Tape Measure No Power Tools Needed
Product Care and Maintenance
Wipe clean with dry soft cloth, never use chemicals or cleaning products they will
damage the finish.
Avoid placing your furniture in direct sunlight, as sunlight causes fading.
Never push, drag or pull your furniture, to move to a new location carefully with two or
more people carry the unit to its new location.
Avoid extreme changes in temperature by arranging furniture away from radiators, heat
and air vents and air conditioning units.

HODEDAH ®
www.Hodedah.com4 | Page
Hardware List
A1
M6x50MM
A2
CSK CAP
QTY
14
Pcs
QTY
14
Pcs
B
M4X38MM
QTY
10
Pcs
D1
Moon
Handle 96MM
D2
Allen Key
3
Pcs
4
Pcs
E
1
Pcs
M4x20MM
Important
1.Before you throw the package, please use the Check Box to identify the parts and hardware to ensure that you have
everything you need.
2.Check and measure the bolts before applying them to parts.
3.Do not completely tighten all hardware until the entire assembly is complete, unless indicated otherwise.
C
M3.5x16MM
QTY
12
Pcs
Shelf Support
F
4
Pcs Metal Piece
G1
2
Pcs
3.5KG
Magnet (1 Hole)
G2
2
Pcs
M3X12MM
G3
2
Pcs
Door
Support Spring
H
4
Pcs
M8x25MM
I
18
Pcs Nail 5/8
J
32
Pcs
K1
6
PcsMinifix Nut
6
Pcs
6
Pcs
K2
Minifix Cap
K3
Minifix Bolt Drawer Slide 14''
2
Pcs
L1
2
Pcs
L2
Drawer Slide 14''
2
Pcs
Caster
With Stopper
M1
2
Pcs
M2
Caster
W/Out Stopper

HODEDAH ®
www.Hodedah.com5 | Page
Hardware List
M3
Caster's Screw
M4
Caster's Nut
QTY
4
Pcs
QTY
4
Pcs
Important
1.Before you throw the package, please use the Check Box to identify the parts and hardware to ensure that you have
everything you need.
2.Check and measure the bolts before applying them to parts.
3.Do not completely tighten all hardware until the entire assembly is complete, unless indicated otherwise.

HODEDAH ®
www.Hodedah.com6 | Page
Parts List
1 2
QTY QTY
3
QTY
1100x394x15mm
1
Pcs 568x30x30mm
2
Pcs568x362x15mm
1
Pcs
4 5 6
568x362x15mm
1
Pcs 568x76x15mm
1
Pcs568x340x15mm
1
Pcs
7 8 9
568x384x15mm
1
Pcs 568x76x15mm
1
Pcs
1
Pcs1100x394x15mm
10 11 12
1018x297x2.5mm
2
Pcs 560x140x15mm
1
Pcs
2
Pcs 350x90x15mm
13 14 15
512x60x15mm
1
Pcs 522x350x2.5mm
1
Pcs
1
Pcs
16
394x278x15mm
1
Pcs
1
Pcs394x278x15mm

HODEDAH ®
www.Hodedah.com7 | Page
The Breakdown...
1
2
3
4
3
5
6
7
8
9
1010
11
12
13
12
14
16
15
I) Main Unit :
II) Door & Drawer :

I
WOOD DOWEL M8x25MM
18
1. Insert 18 x wood dowels (I) into panel (2,4,5,7 & 8).
2. Tighten 6 x minifix bolt (K2) into 2 x panel (3).
I
HODEDAH ®
www.Hodedah.com8 | Page
Step 1
K2
MINIFIX BOLT
6
2 4
5
7
8
3 3

L1
DRAWER SLIDE ''14
6
1. Place drawer slide (L1) onto 3 holes area shown at right view side panel (1). Then tighten
it with 3 x cb screws M3.5x16mm (C).
2. Place drawer slide (L1) onto 3 holes area shown at left view side panel (9). Then tighten
it with 3 x cb screws M3.5x16mm (C).
3. Insert 4 x door support spring (H) into door panel (15 & 16) top side and bottom side.
C
CB SCREW M3.5X16MM
2
HODEDAH ®
www.Hodedah.com9 | Page
Step 2
4H
DOOR SUPPORT SPRING
1 9
1516
H

CB SCREW M4X20MM
4
1. Tighten 4 x cb screws M4x20mm (D2) from door panel (15 & 16) back side into the 2 x
handle (D1) 's holes.
2. Insert 2 x magnet (G2) into panel (5) bottom side.
D1
MOON HANDLE 96MM
2
D2
3.5KG MAGNET (1 HOLE)
2G2
HODEDAH ®
www.Hodedah.com10 | Page
Step 3
15
16
5

F
SHELF SUPPORT
METAL PIECE
4
2
1. Fix & tighten 2 x metal piece (G1) by using 2 x cb screws M3x12mm (G3) to door panel
(15 & 16) as shown.
2. Insert 4 x shelf support (F) into panel (1 & 9).
G1
HODEDAH ®
www.Hodedah.com11 | Page
Step 4
CB SCREW M3X12MM
2G3
15 16
1 9

B 10
1. Place 2 x panel (12) next to each side of panel (11&13). (As Shown). Then tighten 8 x
screws (B) from the sides of panel (12) to the edges of panel (11&13) with screwdriver.
2. Flip drawer bottom side up, take panel (14) and slide it into the groove of side panel (12).
Then using 10 x nails (J) with hammer nails into the edges thru panel (14) onto panel
(11 # Drawer front) and panel (13 # Drawer back).
3. Then place drawer slides (L2) onto the edges of panels (12 #Both sides) and screw in
three Letter (C) screws onto each hole of the drawer slides connecting it to panels (12)
with screwdriver. (As Shown).
4. Flip down around and attach (D1) handle to front panel (11) using 2 x screws (B) from
the inner side panel (11) with screwdriver.
CB SCREW M4X38MM
HODEDAH ®
www.Hodedah.com
Step 5
12 | Page
C 6
CB SCREW M3.5X16MM
D1 1
MOON HANDLE 96MM
L2 2
DRAWER SLIDE ''14
COMPLETED
J 10
NAIL 5/8

E 1
1. Place panel (3) to panel (2 & 4) by using 6 x minifix nut (K1), onto 3 thru-holes as
shown at panel (2 & 4) with allen key (E) to tighten it. After that insert 6 x cap (K3).
ALLEN KEY
HODEDAH ®
www.Hodedah.com
Step 6
13 | Page
K1 6
MINIFIX NUT
K3 6
MINIFIX CAP
3
4
2
3
A1 7
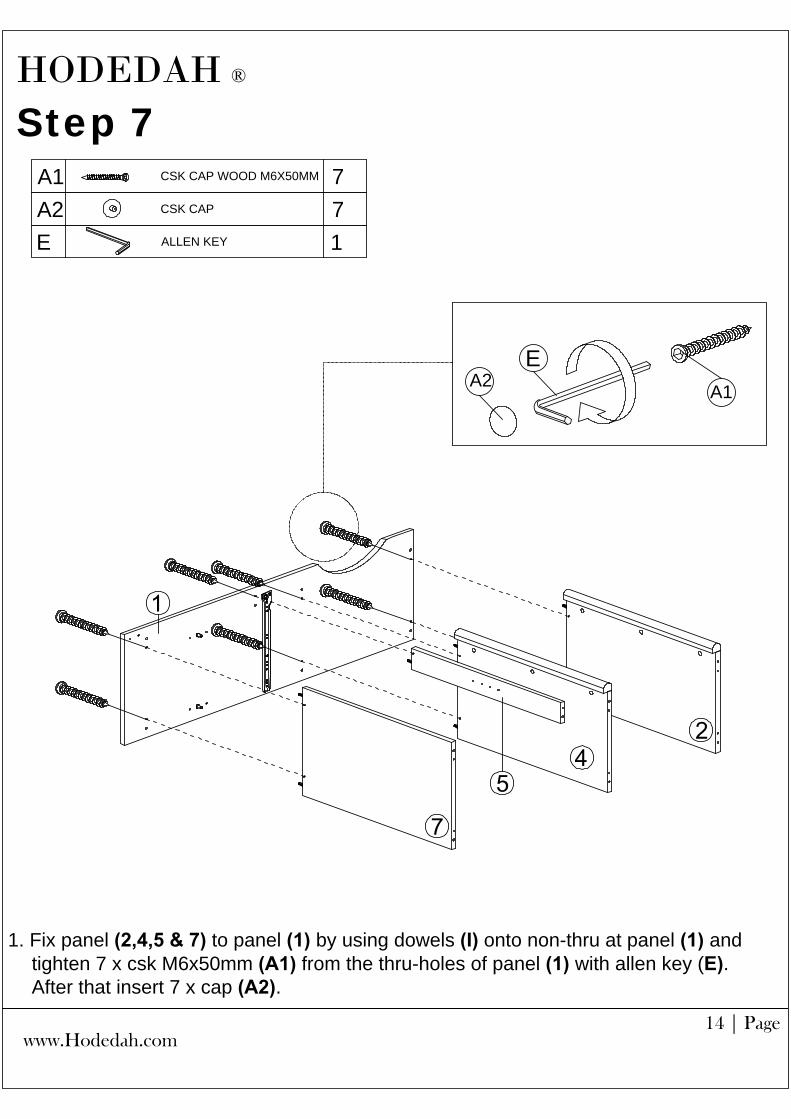
1. Fix panel (2,4,5 & 7) to panel (1) by using dowels (I) onto non-thru at panel (1) and
tighten 7 x csk M6x50mm (A1) from the thru-holes of panel (1) with allen key (E).
After that insert 7 x cap (A2).
CSK CAP WOOD M6X50MM
HODEDAH ®
www.Hodedah.com
Step 7
14 | Page
E
7
CSK CAP
A2
1
ALLEN KEY
A1
E
A2

1. Fix panel (8) to panel (1) by uisng dowels (I) onto thru-holes as shown at panel (1).
HODEDAH ®
www.Hodedah.com15 | Page
1
8
Step 8

1. Fix panel (9) to panel (2,4,5,7 & 8) by using dowels (I) onto non-thru at panel
(2,4,5,7 & 8) and tighten 7 x csk M6x50mm (A1) from the thru-holes of panel (9) with
allen key (E). After that insert 7 x cap (A2).
HODEDAH ®
www.Hodedah.com16 | Page
A1
E
A2
9
7
8
5
2
4
A1 7
CSK CAP WOOD M6X50MM
E
7
CSK CAP
A2
1
ALLEN KEY
Step 9

1. Take caster (M1 & M2) insert with (One By One) and push the caster's screw (M3)
thru from outside to inside, then tighten the nut (M4) as shown for all 4 casters.
HODEDAH ®
www.Hodedah.com17 | Page
M1 2
CASTER WITH STOPPER
M3
2
CASTER W/OUT STOPPER
M2
4
CASTER'S SCREW
M3
M2
M4
M3
M1
M4
4
CASTER'S NUT
M4
Step 10
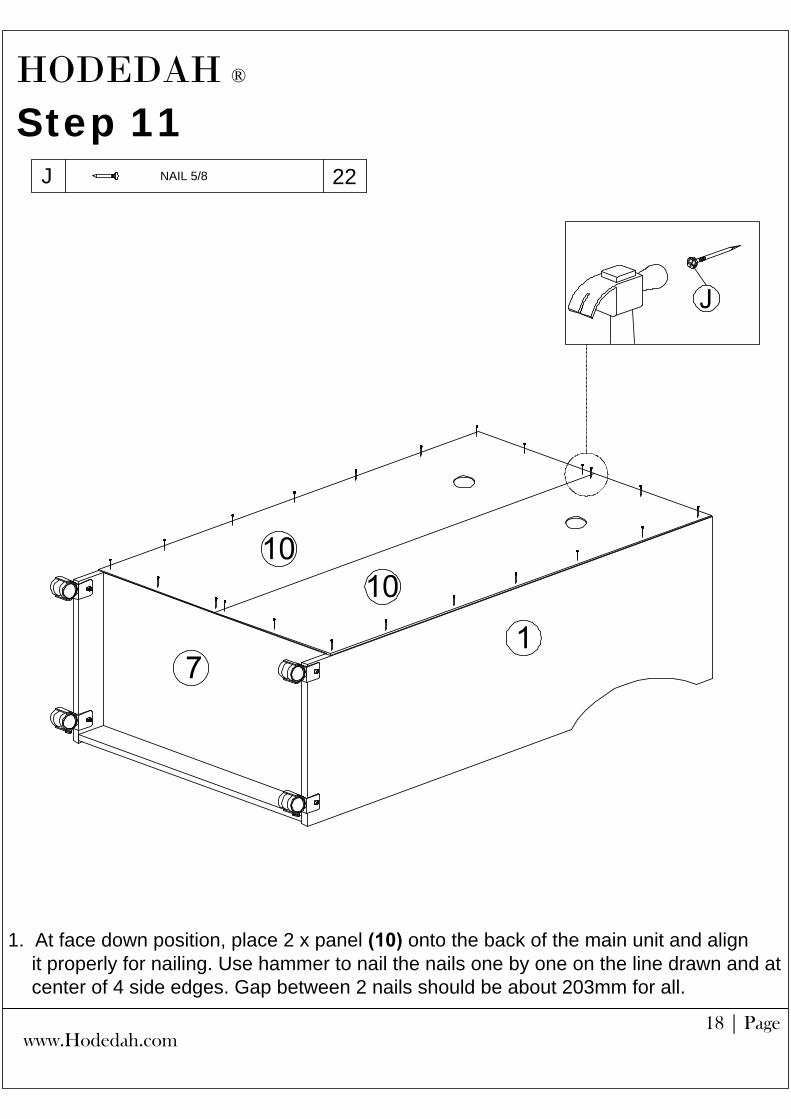
1. At face down position, place 2 x panel (10) onto the back of the main unit and align
it properly for nailing. Use hammer to nail the nails one by one on the line drawn and at
center of 4 side edges. Gap between 2 nails should be about 203mm for all.
HODEDAH ®
www.Hodedah.com18 | Page
J22
NAIL 5/8
Step 11

1. Slide in the drawer (11) by slotting the rollers at each and of drawer slide (L2) onto
the rail of drawer slide (L1) fixed at side panel (1 & 9). Then push the drawer in slowly.
2. Take panel (6) and slide it inside the top compartment by putting it on the 4 shelf
support as shown.
HODEDAH ®
www.Hodedah.com19 | Page
Step 12

1. Press the door support spring (H) at the panel (15 & 16) top side. After that, inside to
the holes at panel (5).
2. Press the door support spring (H) at the panel (15 & 16) bottom side. After that, inside
to the holes at panel (7).
HODEDAH ®
www.Hodedah.com20 | Page
Final step...
Step 13
15 16&
H
H
5
15 16&
7

HODEDAH ®
www.Hodedah.com21 | Page
Job Complete...
Enjoy & Thank you for purchasing from Hodedah!

HODEDAH ®
Installation of Anti-Tip Restraint
Kit includes:
Long screw
A (x2)
Mounting bracket
B (x4)
Restraint strap
C (x2)
Short screw
D (x2)
Serious of fatal crushing injuries can occur
from furniture tip-over. To help Prevent tip-over:
Install tip-over restraint provided
Place heaviest items in the lower drawers
Do not set TV's or other heavy objectS on top of this product
Never allow children to climb or hang on drawers, doors or
shelves
Never open more than one drawer at a time
Do not defeat or remove the drawer interlock system
Use tip-over restraints may only reduce but not eliminate the
risk of tip-over.
www.Hodedah.com22 | Page
IMPORTANT: Use of this safety kit is mandatory. This restraint is not a substitute for properadult supervision. Failure to detach this restraint before moving furniture may result in injuryand damage. If the safety kit is not in the box, please contact our consumer service team atTel. 1 (718) 456 0505 or Email [email protected] in order to obtain one before usingthe furniture.

HODEDAH ®
FITTING OF ANTI-TIP SAFETY STRAP
STEP 1:
Attach the mounting bracket to the furniture in the
solid part below the top panel a few inches away from the
side of the unit.
b
Screw through the smallest hole of .
d
b
www.Hodedah.com23 | Page
BACK SIDE OF
TOP PANEL
FURNITURE
b
d
a
b
c
STEP 2:
Locate a stud in
behind the
have to
Place the other mounting
bracket on the wall
stud 2 inches below the
mounting bracket
secured to the back of
your unit.
Attach to the wall stud
using through the
smaller hole of .
b
c
b
STEP 3:
Repeat the same step a few inches away from
the other side of the unit.
Place the furniture into position so both mounting
brackets are vertically in line.
Lace the end of the restraint strap through the
larger holes in each mounting bracket.
Secure the straps and lock into place.
b d
ac
Mounting bracket
4 Pcs.
TP 6#x5/8'' Screw
2 Pcs.2 Pcs.
Restraint strap
2 Pcs.
TP 8#x2'' Screw
WALL