assembly for kegsmarts the world’s smartest kegerator · kegsmarts the world’s smartest...
TRANSCRIPT

Assembly for KegSmartsthe world’s smartest kegerator
V15-0622

Safety Instructions
Read and follow all safety instructions noted in the kegerator manufacturer’s instruction manual.
!
© 2015 PicoBrew Inc. Zymatic® is a registered trademark, and KegSmarts, KegPlate and KegWarmer are trademarks of PicoBrew, Inc. All other marks are property of their respective owners.

76
SECTION 1 - KegSmarts Contents
1.1 KegSmarts Package Contents ...................................................... 8
1.2 KegPlate Package .............................................................................10
1.3 KegWarmer Package .......................................................................11
SECTION 2 - Before You Begin
2.1 Tools Required ...................................................................................13
2.2 Assembly Time ...................................................................................13
SECTION 3 - Assembling Your Kegerator
3.1 Unpack Your Kegerator .................................................................16
3.2 Install Wheels .....................................................................................20
3.3 Install Metal Trim ..............................................................................22
3.4 Install Tower ........................................................................................23
3.5 Attach Faucets ...................................................................................24
3.6 Assemble Beer Lines ......................................................................25
3.7 Assemble CO2 Lines and Regulator ........................................27
SECTION 4 - Assembling KegSmarts
4.1 Install the KegSmarts Head Unit ..............................................30
4.2 Install the KegSmarts Tail Unit ..................................................36
SECTION 5 - Using KegSmarts
5.1 The KegSmarts Interface and Controls ................................40
5.2 How KegSmarts Manages Your Beer .....................................42
5.3 Connect KegSmarts to the Internet ........................................44
5.4 Add KegSmarts to Your PicoBrew Account ........................45
5.5 KegPlates/CO2 Plates ....................................................................46
5.6 KegWarmers ........................................................................................54
SECTION 6 - Fermenting and Dispensing
6.1 My BrewPub ........................................................................................60
6.2 Fermenting with KegSmarts .......................................................60
6.3 Dispensing and Tracking Your Beer .........................................66
SECTION 7 - Firmware
7.1 Updating the KegSmarts Firmware ........................................70
TABLE OF CONTENTS

8 9
SECTION 1
KegSmarts ContentsPlease check to make sure everything is included before moving any further. If you find that something is missing contact PicoBrew immediately.
1.1 KegSmarts Package
Accessories bag containing:
5/64” hex key
1/8” hex key
Two (2) Velcro strips
USB Mini-B cable
Glass vial and rubber ring
Beer line labels
Tower Adaptor ring
*ILLUSTRATIONS NOT TO SCALE
Head Unit
Beer line cleaner
Tail unit
Assembly & User Manual

10 11SECTION 1: KEGSMARTS CONTENTS - CONTINUED
SECTION 1: KEGSMARTS CONTENTS - CONTINUED
1.2 KegPlate Package
The KegPlate is an optional KegSmarts component used to track a keg’s liquid volume. Each KegPlate ordered includes
1.3 KegWarmer Package
The KegWarmer is an optional KegSmarts component used to control a keg’s temperature for serving or during fermentation. Each KegWarmer ordered includes these items:
KegPlate
Connector cable
KegWarmer keg cozy
Connector cable
KegWarmer ID labelsCable CouplerCable Coupler
KegPlate ID labels

12 13
SECTION 2
Before You BeginPlease review the safety instructions in your kegerator’s user manual.
A new kegerator should stand upright for at least 8 hours before plugging it in, to allow the cooling system suffi cient time to settle after transportation and handling.
If you purchased a kegerator as part of your KegSmarts order, the installation package includes ball-lock connectors for all necessary connections. If you use commercial (Sanke) kegs, or have pin-lock connectors, please contact PicoBrew for additional setup instructions.
The CO2 tank ships empty from the factory, so we recommend you fi ll the CO2 tank before starting KegSmarts assembly. That way, you are ready to go with your KegSmarts system when you fi nish.
Make a note of your KegSmarts Machine ID. You need this number to register KegSmarts after assembly. The Machine ID is a 12-digit number found on the side of your KegSmarts box and on the KegSmarts Tail unit label:
Tips call out valuable information or advice to help you complete the step.
Caution items warn of potential safety issues or highlight problems you can encounter at that step. Pay close attention to any cautions.
2.1 Tools Required
Assembly requires the following tools not included in the KegSmarts package:
- #2 Phillips screwdriver
- Flat-blade screwdriver
- 1⅛” wrench
2.2 Assembly Time
Complete installation and setup of the KegSmarts system will take 60-90 minutes.

SECTION 2: BEFORE YOU BEGIN - CONTINUED
SECTION 2: BEFORE YOU BEGIN - CONTINUED
14 15
New Kegerator Installation
If you are installing KegSmarts in a brand-new kegerator, begin installation in Section 3.
Existing Kegerator Installation
If you are installing KegSmarts in a kegerator that is already set up and running, begin installation in Section 4
New
! !

16 17
SECTION 3
Assembling Your KegeratorBefore installing KegSmarts, you need to have your kegerator up and running. To simplify your setup experience, these instructions summarize the assembly instructions included with your kegerator.
If you encounter any issues while setting up your kegerator that are not covered in this summary, please consult the kegerator assembly manuals included with your kegerator.
CAUTION: Do not plug the kegerator in until directed to in these instructions.
3.1 Unpack the Kegerator
Open the kegerator and unpack accessories:
Kegerator faucet tower
Kegerator tower gasket
Kegerator faucets
One or two depending on kegerator style ordered.
Faucet handles
One or two depending on kegerator style ordered.
Faucet wrench
Kegerator top metal trim piece
Four kegerator wheels and two castor washers
Black (beer line) ball-lock connectors
One or two depending on kegerator style ordered.
Kegerator tower screws

SECTION 3: ASSEMBLING YOUR KEGERATOR - CONTINUED
SECTION 3: ASSEMBLING YOUR KEGERATOR - CONTINUED
18 19
Grey (CO2) Ball-Lock Connectors
One or two depending on kegerator style ordered.
Gas line hose
One or two depending on kegerator style ordered.
Hose clamps
Three or six depending on kegerator style ordered.
CO2 tank
CO2 regulator
Nut and bolt (for internal CO2 tank holder)
External CO2 tank holder (not used)

SECTION 3: ASSEMBLING YOUR KEGERATOR - CONTINUED
SECTION 3: ASSEMBLING YOUR KEGERATOR - CONTINUED
20 21
3.2 Install wheels
To install the kegerator wheels, flip the kegerator on its side.
Screw the wheels with brakes into the kegerator’s back two holes.
Place a castor washer on each regular wheel screw post and screw the wheels into the kegerator’s front two holes.
1
2
3

SECTION 3: ASSEMBLING YOUR KEGERATOR - CONTINUED
SECTION 3: ASSEMBLING YOUR KEGERATOR - CONTINUED
22 23
3.3 Install metal trim
Flip the kegerator back up and install the metal trim piece by lining up black pegs on the bottom of the trim with pre-drilled holes on top of the kegerator.
Push down on the metal trim until the pegs lock firmly into the holes.
Set the drip tray into the indent on the top of the kegerator.
Set the tower gasket over the tower hole, lining up the four screw holes in the gasket with the corresponding screw holes in the top of the kegerator.
Guide the tower beer line(s) through the hole, and attach the tower to the kegerator using a #2 Phillips screwdriver and the four (4) screws provided.
3.4 Install tower
Remove the plug from the top of the kegerator to expose the tower hole.
5
6
8
9
4 7

SECTION 3: ASSEMBLING YOUR KEGERATOR - CONTINUED
SECTION 3: ASSEMBLING YOUR KEGERATOR - CONTINUED
24 25
3.5 Attach Faucets
Attach each faucet to the tower by lining up the faucet teeth with the teeth inside the tower coupling nut, then screw the coupling nut onto the faucet.
Tighten the coupling nut with the faucet wrench.
Screw a faucet handle on each faucet.
Slide the end of each beer line onto the barbs of a BLACK ball-lock connector.
TIP: If the beer line is too stiff and difficult to fit over the ball-lock barbs, soak the line end in a mug of hot water for 2-3 minutes until it becomes flexible.
3.6 Assemble Beer Lines
Before connecting the beer lines to the ball-lock connectors, slide a hose clamp onto each beer line.
11
12
14
10 13

SECTION 3: ASSEMBLING YOUR KEGERATOR - CONTINUED
SECTION 3: ASSEMBLING YOUR KEGERATOR - CONTINUED
26 27
3.6 Assemble beer lines (continued)
Slide the hose clamp over the ball lock barbs. Tighten witha fl at-blade screwdriver until secure.
Slide one end of a gas line over a GREY ball-lock connector’s barbs until the gas line is fl ush against the ball-lock connector.
Slide a hose clamp over the ball-lock barbs. Tighten with a fl at-blade screwdriver until snug.
TIP: If the gas line is too stiff and diffi cult to fi t over the ball-lock barbs, soak the line end in a mug of hot water for several minutes until it becomes fl exible.
TIP: The hose clamp is tight when the gas line protrudes through the slots in the clamp just enough to be even with the outside of the clamp. It should not be so tight that it cuts in to the gas line.
TIP: The hose clamp is tight when the beer line protrudes through the slots in the clamp just enough to be even with the outside of the clamp. It should not be so tight that it cuts in to the beer line.
3.7 Assemble CO2 lines and Regulator
CAUTION: The CO2 tank should be mounted inside the kegerator. While it is possible to install KegSmarts with an external CO2 tank, the kegerator access port may not be large enough to accommodate the required KegSmarts cables and CO2 gas lines if the tank is mounted externally.
16
17
15

SECTION 3: ASSEMBLING YOUR KEGERATOR - CONTINUED
SECTION 3: ASSEMBLING YOUR KEGERATOR - CONTINUED
28 29
3.7 Assemble CO2 lines and Regulator (cont.)
Slide a hose clamp onto the gas line, then slip the open end of the gas line over a barbed fi tting on the CO2 regulator. This is often a tight fi t and you will likely need to soak the gas line end in hot water for several minutes to soften it.
Attach the regulator and hose assembly to the CO2 tank and hand-tighten the coupling nut onto the tank.
Use a 1-1/8” wrench to tighten an additional quarter turn. Do not overtighten!
Set the CO2 tank and regulator assembly in a safe location nearby, where it cannot fall over.
TIP: Some shops provide a regulator washer when you fi ll your CO2 tank, however the regulator included with the Kegco kegerator does not require this washer.
TIP: The clamps are tight when the gas line protrudes through the slots in the clamp just enough to be even with the outside of the clamp. The clamp should not be so tight that it cuts in to the gas line.
Slide the gas line’s hose clamp over the regulator barbs. Tighten with a fl at-blade screwdriver until snug.
20
21
22
18
19

30 31
SECTION 4
Assembling KegSmartsCAUTION: Do not remove protective fi lm on Head unit until installation is complete.
4.1 Install the KegSmarts Head unit
Remove the kegerator tower lid by turning counter-clockwise until lid unscrews.
Remove the foam insulation disc under the lid.
With the kegerator tower lid removed, you can see the beer line connections to kegerator taps. Wrap a corresponding “Tap” label around each beer line, near the ball-lock connector on the end, attaching the label ends together to form a fl ag.
Use the smaller (1/8”) hex key to tighten the two adaptor ring set screws. Alternate between the set screws when tightening, to ensure the adaptor remains centered on the kegerator tower.
CAUTION: Do not over-tighten the set screws! The screws are tight enough when the adaptor does not rotate or rock back and forth in the tower.
Unpack the KegSmarts tower adaptor ring and remove the tape from the interior of the adaptor. Remove the black screw from the adaptor and set it aside.
Place the adaptor on top of the tower with the split ring facing down and the black screw hole facing the back of the kegerator.
TIP: Number the taps in order from left to right (as seen when facing the kegerator) to help identify tap connections when hooking up kegs.
1
6
4
5
2
3

SECTION 4: INSTALLING KEGSMARTS - CONTINUED
SECTION 4: INSTALLING KEGSMARTS - CONTINUED
32 33
Continue pulling the cables through the tower until the Head unit rests on the tower adaptor ring, aligning the hole on the back of the Head unit with the matching hole on the adaptor.
The Head unit display should be parallel to the front of the kegerator. If it is not, remove the Head unit and adjust the tower adaptor ring until the display sits parallel to the front of the kegerator.
Feed the bundled cables down through the kegerator tower into the kegerator, avoiding beer lines and insulation.
Open the kegerator door so you can look down through the kegerator tower into the kegerator and straighten the coil of cables attached to the KegSmarts Head unit.
Pull gently to ease the cable bundle through the kegerator tower until the ends of all three cables clear the tower into the kegerator.
CAUTION: Do not pull too hard on the cables as you could damage the cables or the Head unit.
10
118
9
7

SECTION 4: INSTALLING KEGSMARTS - CONTINUED
SECTION 4: INSTALLING KEGSMARTS - CONTINUED
34 35
Test the Head unit assembly by pressing its control knob. The unit should not wobble or feel loose.
If the unit wobbles, verify the adaptor ring and Head unit set screws are properly tightened. Adjust as needed.
Inside the kegerator, cut the zip tie and tape off the cable bundle.
CAUTION: Do not plug the Tail power cord into an outlet until Tail unit is completely installed.
4.1 Install the KegSmarts Head unit (cont.)
Place the Head unit back on the adaptor, align the Head unit’s screw hole with the matching hole on the adaptor ring and insert the black set screw.
Tighten the set screw with the larger (5/64”) hex key.
17
First remove the kegerator access port plug from the rear of the kegerator.
TIP: If you are installing KegSmarts in a kegerator where the CO2 tank and regulator are already mounted inside the kegerator, the tank may block this access port. Remove it temporarily to simplify Tail unit installation.
18
The Tail unit hangs on the top two CO2 tank external mounting pins, located on the rear exterior of the kegerator.
19
Some older kegerators do not have external mounting pins. If you install KegSmarts on one of these kegerators, use the Velcro strips as described in step 22.
TIP: If you install KegSmarts on a kegerator with the CO2 tank mounted on the outside, the external mounting pins are already used.
20
Remove the protective film from the KegSmarts head unit.16
14
15
12
13

SECTION 4: INSTALLING KEGSMARTS - CONTINUED
SECTION 4: INSTALLING KEGSMARTS - CONTINUED
36 37
4.2 Install the KegSmarts Tail unit
The Head unit power cable and any KegWarmer jacket cables need to pass through the kegerator access hole in order to function.
Only if mounting CO2 tank externally:If the KegSmarts cables and gas lines fit through the access hole and you wish to keep the CO2 tank external, apply the included Velcro strips vertically on the back of the Tail unit.
Remove the plastic backing from the Velcro strips and position the Tail unit on the back of the kegerator. Press the box firmly to the back of the kegerator.
CAUTION: Make sure the Tail unit location is close enough to the kegerator access hole to connect the black Head unit and any KegWarmer cables.
The KegSmarts Head unit has three cables:A - KegSmarts power and data (black)B - Temperature sensor (black with a metal tip)C - KegPlate cable (green)
24
A
C
B
If your KegSmarts system includes a KegWarmer keg jacket, feed the KegWarmer cable through the access port and plug into the KW connector on the Tail unit. (Labeled in the diagram below.)
Feed the black power and data cable through the access port and plug it into the corresponding Tail unit socket. (Labeled in the diagram below.)
A
B
A
B
25
26
Slide the rubber ring onto the temperature sensor. It should cover the edge between the metal sensor and its black plastic fitting.
27
21
22

SECTION 4: INSTALLING KEGSMARTS - CONTINUED
SECTION 4: INSTALLING KEGSMARTS - CONTINUED
38 39
4.2 Install the KegSmarts Tail unit (cont.)
Fill the glass vial ¾ full with water and slip the temperature sensor into the bottle, using the rubber ring to secure the sensor in place.
TIP: The temperature sensor should be submerged in the water but not touch the bottom of the glass bottle.
Next turn the kegerator’s temperature control knob to its coldest setting.
Install the CO2 tank and attached regulator assembly in the mounting bracket located above the compressor shelf in the back left corner of the kegerator.
29
30
Thread the clamp bolt through the clamp and use the nut to tighten the clamp.
Plug the kegerator’s power cord into the female power socket on the Tail unit.
32
31
Plug the Tail unit into the wall outlet.
CAUTION: A new kegerator should stand upright for at least 8 hours before plugging it in, to allow the cooling system sufficient time to settle after transportation and handling.
Congratulations, your KegSmarts kegerator is now assembled!
33
28

40 41
SECTION 5
Using KegSmarts is as easy as using a kegerator, but smarter.
With KegSmarts, you assign beer kegs to taps, access information about your beer and track consumption directly from the Head unit display on the kegerator, or with the PicoBrew “My Brew Pub” web service.
You can also use KegSmarts to manage fermenting kegs: KegSmarts adjusts the temperature as needed and monitors your brew through fermentation so you don’t have to!
5.1 The KegSmarts Interface and Controls
KegSmarts uses a single control knob on the Head unit to navigate the user interface.
To scroll through items, rotate the control knob to move the selection indicator.
To click an item, press the control knob.
The KegSmarts Status screen displays your brew pub name, and cycles through beers on tap and active fermentation sessions. This screen also displays any system alerts such as software updates or warnings.
The Status screen appears when KegSmarts powers up. The display returns to Status from any other KegSmarts screen after 1 minute of inactivity.
Kegs and TapsKegSmarts manages up to 3 kegs, and creates three configuration bins to manage these kegs (Keg1, Keg2 and Keg3) when the system first starts up:
Keg1 Keg3Keg2
The KegSmarts Home screen displays the current tap and beer assignments, active fermentation sessions, and the KegSmarts Main menu.
The Home screen appears whenever you touch the control knob on the Status screen.

SECTION 5: USING KEGSMARTS - CONTINUED
SECTION 5: USING KEGSMARTS - CONTINUED
42 43
5.2 How KegSmarts Manages Your Beer
KegSmarts AccessoriesKegSmarts also assigns accessories to a specific Tap/Keg. For example, you could add two KegPlates to your KegSmarts system and assign one to Tap2 and the other to Keg3:
Tap1 Keg3Tap2
KPKP
KegSmarts automatically assigns each kegerator tap to a keg, to simplify connecting kegs. If the kegerator has less than three taps, some kegs will not have an assigned tap, but can still be managed by KegSmarts. For example, KegSmarts views a double-tap kegerator like this:
The KegSmarts interface refers to the keg connected to Tap1 as Keg1. Similarly, Keg2 is the keg connected to Tap2. Keg3 is available, but not connected to any tap because the kegerator only has two taps.
Keep in mind that the numbering of taps and kegs is arbitrary and only indicates the physical connection between a tap and a keg. The labels applied to the beer lines during KegSmarts installation help you remember this relationship when you connect kegs to kegerator taps.
Tap1 Keg3Tap2
Later, you could add a KegWarmer to the KegSmarts system and assign it to Tap2:
Accessories like KegPlates and KegWarmers need to be flexible in their assignments—you may have a KegPlate that you normally use to manage dispensing beer, but want to use it for a fermentation session. For this reason, accessories have unique IDs that only identify them in KegSmarts: you can assign any accessory to any tap or keg regardless of the accessory ID number.
Tap1 Keg3Tap2
KW
KPKP
Brew InformationKegSmarts associates brew-specific information such as beer details, fermentation profiles or ratings to a specific Keg/Tap, also using the KegSmarts display or the PicoBrew web services.
Speaking of beer, enough of this: let’s get back to setting up KegSmarts!

SECTION 5: USING KEGSMARTS - CONTINUED
SECTION 5: USING KEGSMARTS - CONTINUED
44 45
5.3 Connect KegSmarts to the Internet
KegSmarts requires a WiFi connection in order to function.
5.4 Add KegSmarts to your PicoBrew account
Your PicoBrew account provides a web view to manage and monitor your KegSmarts system, including beers you are dispensing, beers you might like to try and optional KegSmarts hardware components. Through your PicoBrew account, KegSmarts can also manage fermenting beers you brew with the PicoBrew Zymatic beer brewing appliance.
If you already have a PicoBrew account:KegSmarts ships from the factory pre-registered to your PicoBrew account and will automatically display the Status screen listing your brew pub once it connects to the Internet.
If you do not have a PicoBrew account:
The fi rst time KegSmarts starts, it displays a list of available WiFi networks.
Register your KegSmarts by entering its Machine ID code and the email address you want to use for your PicoBrew account.
The Machine ID is a 12-digit number found on the side of your KegSmarts box, or on the KegSmarts Tail unit.
In a web browser, navigate to www.picobrew.com.
Click Log In on the PicoBrew home page and click Create Account
Click your WiFi network and use the control knob to enter the network password by clicking the required characters.• Click Shft to switch to uppercase characters.• Click Sym to switch to symbols.• Click Del to delete the last character entered.• Click Done when fi nished entering the password.
Switch WiFi NetworksTo switch to a different WiFi network from the KegSmarts Home screen, click Confi gure KegSmarts > Diagnostics > Confi gure WiFi
Click the new WiFi network and use the control knob to enter the network password by clicking the required characters.
Click Done when fi nished entering the password.

SECTION 5: USING KEGSMARTS - CONTINUED
SECTION 5: USING KEGSMARTS - CONTINUED
46 47
5.5 KegPlates/CO2 plates
KegSmarts uses a KegPlate to monitor the volume of beer in a keg and track consumption or monitor fermentation progress. The CO2 plate monitors how much gas is in the CO2 tank.
Add a KegPlate or CO2 plateThe KegPlate package contains a KegPlate, connection cable and a small coupler. There are two ports (“In” and “Out”) on the side of a KegPlate, along with a recessed toggle switch used to set the KegPlate ID.
The CO2 plate package contains a CO2 plate. The connection cable is already attached to the plate.
Each KegPlate must have a unique ID.
To set a KegPlate’s ID, toggle one of the white tabs on the recessed switch in the KegPlate base to set the ID = 1, 2, 3, or 4.
If your KegSmarts system has more than one KegPlate, each KegPlate must be set to a different ID to function correctly.
TIP: The KegPlate ID is only used to uniquely-identify a KegPlate: it has no bearing on what tap that KegPlate is assigned to. Any KegPlate can be assigned to any tap/keg or left unassigned.
CAUTION: Toggle only one tab on the KegPlate ID switch. The KegPlate will not work properly if more than one tab is set.
CAUTION: CO2 plates are factory set to ID = 4. If your KegSmarts system includes a CO2 plate, do not set any KegPlate ID = 4.
CAUTION: If you are adding KegPlates and a CO2 plate, the CO2 plate must be installed last.
If this is the first KegPlate added to KegSmarts, connect the cable to the “In” port. Connect the other end of the KegPlate cable to the green cable hanging from the Head unit, using the included coupler.
Use a small rubber band or twist tie to form a drip loop in the Head unit cable. Loop the cable around the CO2 regulator to keep the KegPlate cable from snagging your keg and prevent condensation from damaging the cable or coupler.
CAUTION: Only connect one KegPlate at a time.
1

SECTION 5: USING KEGSMARTS - CONTINUED
SECTION 5: USING KEGSMARTS - CONTINUED
48 49
Select the KegPlate ID you are attaching.
2
3
KegSmarts calibrates each new KegPlate to ensure accurate measurements. To prevent errors, make sure nothing is sitting on the KegPlate when you click to continue.
The calibration process completes after a few seconds.
4
From the KegSmarts Home screen, click Configure KegSmarts > Configure Equipment > KegPlate > Attach a KegPlate
5.5 KegPlates/CO2 plates (cont.)
Position the KegPlate inside your kegerator and set the keg on top of KegPlate.
TIP: For accurate measurements, a keg should rest on the KegPlate without touching other kegs or resting on other KegPlates.
TIP: When adding a CO2 plate, the CO2 tank strap should be tight enough to steady the CO2 tank, but not so tight that it prevents the CO2 tank from resting completely on the CO2
plate. If the strap is too tight, KegSmarts cannot accurately track the CO2 tank volume.
If you have additional KegPlates, attach another KegPlate by plugging a new KegPlate’s cable into the previous KegPlate’s “Out” port, then repeat these configuration steps for the new KegPlate.
6
7
Assign the KegPlate to a specific kegerator tap if you know which tap the keg on this KegPlate will serve.
If you are not sure which tap this KegPlate will serve, or if the KegPlate will be used to monitor a fermentation session, assign it to None.
This screen does not appear when you add a CO2 plate.
5
When you finish adding KegPlates, attach the CO2 plate to the empty KegPlate “Out” port and repeat these configuration steps for the CO2 plate.

SECTION 5: USING KEGSMARTS - CONTINUED
SECTION 5: USING KEGSMARTS - CONTINUED
50 51
5.5 KegPlates/CO2 plates (cont.)
Assign a KegPlate to a tapYou can assign a KegPlate to a tap if you did not when you originally added the KegPlate.
Scroll across the KegPlate row (KP) to the tap you want to assign, click that location and click the desired KegPlate.
From the KegSmarts Home screen, click Configure KegSmarts > Configure Equipment > Keg Setup
The KegPlate is now assigned to the desired tap.
Click Done to leave this screen.
2
1
3
4
Switch a KegPlate to a different tapYou can switch a KegPlate from one tap to another.
Select, then click the KegPlate you want to re-assign and set the assignment to None.
From the KegSmarts Home screen, click Configure KegSmarts > Configure Equipment > Keg Setup
2
1
The KegPlate is now unassigned.
SECTION 5: USING KEGSMARTS - CONTINUED
SECTION 5: USING KEGSMARTS - CONTINUED
52 53
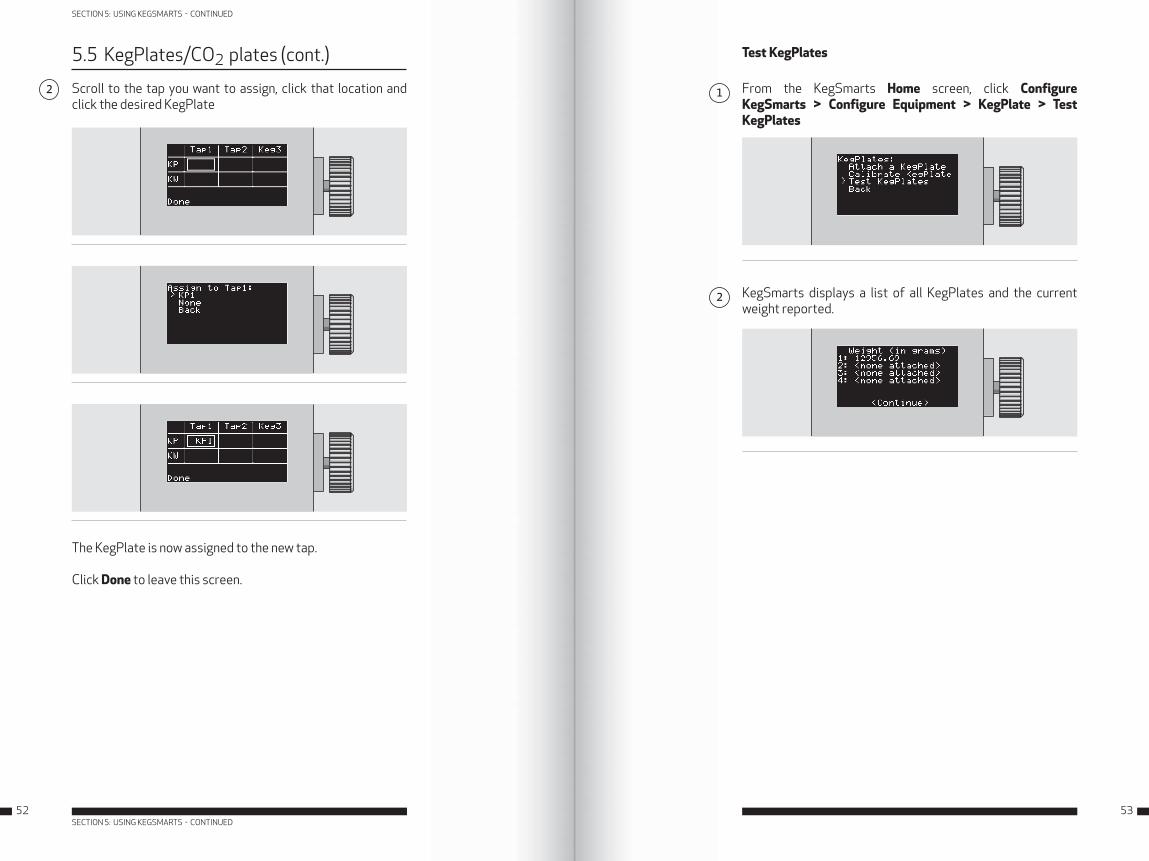
5.5 KegPlates/CO2 plates (cont.) Test KegPlates
KegSmarts displays a list of all KegPlates and the current weight reported.
From the KegSmarts Home screen, click Configure KegSmarts > Configure Equipment > KegPlate > Test KegPlates
2
1Scroll to the tap you want to assign, click that location and click the desired KegPlate
The KegPlate is now assigned to the new tap.
Click Done to leave this screen.
2

SECTION 5: USING KEGSMARTS - CONTINUED
SECTION 5: USING KEGSMARTS - CONTINUED
54 55
5.6 KegWarmers
Add a KegWarmer
Pull the KegWarmer over the top of your keg, making sure the KegWarmer does not snag on any parts of the keg. The KegWarmer should completely cover the metal portion of the keg.
Make sure the KegWarmer cable is plugged into the KW port on the KegSmarts tail box. Inside the kegerator, connect the cable to the KegWarmer.
TIP: It is easier to pull the KegWarmer onto the keg if the connector panel at the top of the KegWarmer lines up with gap between the keg handles.
From the KegSmarts Home screen, choose Configure KegSmarts > Configure Equipment > KegWarmer > Attach a KegWarmer
Select the KegWarmer you are attaching.
TIP: The KegWarmer ID is only used to uniquely-identify a KegWarmer: it has no bearing on what tap that KegWarmer is assigned to. Any KegWarmer can be assigned to any tap/keg or left unassigned.
Assign the KegWarmer to a specific kegerator tap if you know which tap this KegWarmer will serve.
If you are not sure which tap this KegWarmer will serve, or if the KegWarmer will be used by a fermentation session, assign it to None.
1
2
3
The KegWarmer controls a keg’s temperature, allowing you to set a keg’s serving temperature warmer than the kegerator temperature, or automatically control wort temperature during a multi-step fermentation.
You can leave the KegWarmer jacket on a keg and plugged in during regular use. The KegWarmer only heats during a fermentation session or if you set that keg’s temperature higher than the kegerator’s temperature using the My Brew Pub controls.
CAUTION: Due to space limitations, KegSmarts only supports using one KegWarmer inside the Kegco kegerator. Two KegWarmers may fit inside other kegerators. Customers with a larger kegerator who wish to use two KegWarmers should contact PicoBrew for the extended Tail unit that supports double KegWarmers.

SECTION 5: USING KEGSMARTS - CONTINUED
SECTION 5: USING KEGSMARTS - CONTINUED
56 57
5.6 KegWarmers (cont.) Switch a KegWarmer to a different tap
From the KegSmarts Home screen, click Configure KegSmarts > Configure Equipment > Keg Setup
Click the KegWarmer you want to re-assign and set the assignment to None.
1
2
Assign a KegWarmer to a tap
Scroll across the KegWarmer row (KW) to the tap you want to assign, click that location and click the desired KegWarmer.
From the KegSmarts Home screen, click Configure KegSmarts > Configure Equipment > Keg Setup
2
1
The KegWarmer is now assigned to the desired tap.
Click Done to leave this screen.3

SECTION 5: USING KEGSMARTS - CONTINUED
SECTION 5: USING KEGSMARTS - CONTINUED
58 59
5.6 KegWarmers (cont.)
Test KegWarmersFrom the KegSmarts Home screen, click Configure KegSmarts > Configure Equipment > KegWarmer > Test KegWarmers
KegSmarts displays the current temperature for each active KegWarmer.
Click to leave this screen.
Click the tap you want to assign the KegWarmer to, then click the desired KegWarmer.
The KegWarmer is now assigned to the new tap.
Click Done to leave this screen.
3
4
5.7 KegSmarts Temperature Test
TIP: This process calibrates the temperature range your kegerator supports. You do not need to run this test if you are using a Kegco kegerator. KegSmarts ships from the factory pre-calibrated for the Kegco kegerator.
TIP: This process takes about 6 hours to complete, so we recommend running the temperature test overnight or at a time you do not plan to use KegSmarts for at least 6 hours. The test verifies the maximum and minimum temperatures your kegerator can reach, so do not store any items in the kegerator during the test.
From the KegSmarts Home screen, choose Configure Equipment > Diagnostics > Temperature Test
1
You may click the control knob to cancel the temperature test at any time, however any calibration data collected up to that point will be lost.
2

60 61
SECTION 6
KegSmarts is the ultimate smart kegerator, allowing you to ferment and serve your beer with unique control. You can use PicoBrew’s Pick-a-Brew beer finder to source and tap beer from local craft breweries.
If you brew your own craft beer with the PicoBrew Zymatic, you may transfer your unfermented beer to KegSmarts and let it handle fermentation for you.
6.1 My BrewPub
My BrewPub is your KegSmarts home page on the Internet, accessible wherever you can connect to picobrew.com. The BrewPub view displays kegs, taps and any additional accessories connected to your KegSmarts system. It also provides information about beers you are dispensing or fermenting with KegSmarts.
To view your BrewPub, log in to your picobrew.com account and switch to My BrewPub. Click a Tap or Keg location on this screen to assign a beer. You can also configure BrewPub settings.
TIP: You can ferment using KegSmarts without a KegPlate or KegWarmer. In this configuration, KegSmarts manages the wort temperature using the general kegerator temperature control, and determines when fermentation completes based on this temperature profile.
CAUTION: Using the kegerator temperature to control fermentation affects ALL kegs in the kegerator. If you are also dispensing beer from the kegerator, keep in mind that beer will likely be warmer than you prefer while the other keg ferments.
If you plan to use a KegWarmer for fermentation, the desired KegWarmer should be fitted on the fermentation keg and assigned to None.
If you plan to use a KegPlate for fermentation, the fermentation keg should be placed on the desired KegPlate and assigned to None.
6.2 Fermenting with KegSmarts
Use KegSmarts to manage fermentation for beer brewed with your PicoBrew Zymatic beer appliance. KegSmarts automatically imports the beer brewing profiles from your PicoBrew Zymatic for recently-brewed beers. It uses that profile to manage a custom fermentation process for that beer, so you don’t have to.
Fermenting PicoBrew Zymatic-brewed beerFermentation with KegSmarts is best done in a keg with a KegWarmer and KegPlate.
KegSmarts uses the KegWarmer jacket for multi-step control of wort temperature, while the KegPlate monitors CO2 production (a fermentation indicator). With these accessories, KegSmarts can reduce fermentation time as well as accurately predict when your brew is ready.
From the KegSmarts Home screen, click Configure KegSmarts > Start Fermenting
1
Click the beer you wish to ferment from the list. Beers that you have already fermented appear in the list with a leading asterisk (*).
2

SECTION 6: USING KEGSMARTS - CONTINUED
SECTION 6: USING KEGSMARTS - CONTINUED
62 63
6.2 Fermenting with KegSmarts (cont.)
If KegSmarts detects a KegPlate, this screen appears to select the desired KegPlate.
If KegSmarts detects a KegWarmer, this screen appears to select the desired KegWarmer.
Fermentation begins and KegSmarts displays the Fermentation Status screen, including temperature, target temperature, and time remaining.
3
4
5
The KegSmarts Home screen now displays a Fermentation Session icon for this session.
Clicking the Fermentation Session icon displays the Fermentation Status screen.
6
Finished FermentingOnce a beer finishes fermenting, the Fermentation Session icon disappears from the Home screen and the beer is ready for racking to a dispensing keg and carbination.
The Fermenting Status screen displays an “X” next to any beer that has finished fermenting.
The fermented beer also appears in your Brew House on picobrew.com, where you assign it to a KegSmarts tap for dispensing.
Moving to the Next Fermentation StepSome beer styles have multiple fermentation steps that are timed by the brewer’s personal preference.
To move KegSmarts manually to the next fermentation step, click the Fermentation Session icon corresponding to the beer you are fermenting then click Move to Next Step.

SECTION 6: USING KEGSMARTS - CONTINUED
SECTION 6: USING KEGSMARTS - CONTINUED
64 65
6.2 Fermenting with KegSmarts (cont.)
Ending FermentationIf you need to stop a fermentation session for any reason, from the KegSmarts Home screen, click the Fermentation Session icon corresponding to the beer you are fermenting and click End Fermentation.This cancels the fermentation session and the beer is not listed in the “My Beers” list in your Brew House on picobrew.com.
CAUTION: To avoid spilling beer, make sure the kegerator taps are closed before continuing!
CAUTION: It is important to make sure all gas fi ttings are tight and secure before continuing. Take a minute to double-check that all connectors and hose clamps are secure and in place.
CarbonationBeer must be carbonated to dispense. Some beers carbonate automatically as part of the fermentation process, however many beers are carbonated using forced carbonation. It can take 3-5 days to carbonate a keg of beer using forced carbonation.
To carbonate, attach a gas line from the CO2 tank to your beer keg’s IN post.
Then using a carbonation chart or calculator, set the gas line’s regulator to the appropriate pressure setting.
To adjust pressure, pull red regulator knob straight out and turn clockwise to increase pressure and counter-clockwise to decrease pressure. Push regulator knob in to lock the pressure setting.
You can fi nd carbonation charts on the Internet, using your favorite search engine, or try these sources:
http://www.kegerators.com/carbonation-table.php
http://www.brewersfriend.com/keg-carbonation-calculator/
TIP: CO2 absorbs better in cold temperatures, so keep your keg and CO2 tank in the kegerator.

SECTION 6: USING KEGSMARTS - CONTINUED
SECTION 6: USING KEGSMARTS - CONTINUED
66 67
6.3 Dispensing & Tracking Your Beer
Connect Beer linesWhen you are ready to dispense beer, connect a BLACK beer line ball lock to the beer keg’s OUT post.
TIP: Make sure that you are connecting the beer line corresponding with the tap you wish to use.
Connect a GREY gas line ball lock to the beer keg’s IN post if it is not already attached. Adjust CO2 pressure until the gas line’s gauge reads between 8-10 psi.
OPEN the CO2 gas supply to the keg, using the regulator cut-off switch. The switch is open when it points straight, in-line with the gas line.
Place a glass under the correct tap and dispense beer.
Cheers!
Associating a Zymatic-brewed beerAt this point, your KegSmarts system is ready to go, however you may want to associate a specifi c beer with this tap. After associating a beer, you can view details of that beer or rate the beer in My BrewPub and on the KegSmarts Head display.
For example, to add a recently-brewed keg to KegSmarts:
1. Log in to your picobrew.com account and switch to My BrewPub.
2. Click Tap under the keg you want to assign. This takes you to the Pick a Brew screen.
3. Select the beer you wish to add to the tap from the My Brews list. You can also create a new beer on
this screen.
4. Select Add to Tap.
5. Choose the applicable keg type. If you are dispensing beer brewed with your Zymatic, select either the 2.5 or 5 gallon Corny keg “brewed with Zymatic”.
The beer is now associated with the chosen tap, and displayed on both your BrewPub screen and the KegSmarts display.
Associating a beer using Pick-a-BrewUse Pick-a-Brew to fi nd beer retailers in your area and automatically assign beer information for a specifi c beer to a KegSmarts tap.
For example, to add a keg of Fremont Brewery Interurban IPA to KegSmarts:
1. Log in to your picobrew.com account and switch to My Brew Pub.
2. Click add to beer.
3. Use the search fi elds to narrow your beer selection. For example, Fremont Brewery.
4. Click the brewer information to see the beers they provide.
5. Click Add to Tap, next to the desired beer.
6. Choose the applicable keg type.
The beer is now associated with the chosen tap, and displayed on both your BrewPub screen and the KegSmarts display.

SECTION 6: USING KEGSMARTS - CONTINUED
SECTION 6: USING KEGSMARTS - CONTINUED
68 69
6.3 Dispensing & Tracking Your Beer (cont.)
Viewing Beer Information on KegSmartsYou can view the same beer information on KegSmarts that you see in My BrewPub.
From the Home screen, click the tap for which you wish to see additional information, then click Beer Info.
Rating Your BeerYou can rate beers from the KegSmarts Head unit display. Ratings transfer to your PicoBrew account and also appear in My BrewPub.
From the Home screen, click the beer tap you wish to rate and click Ratings.
KegSmarts displays a scrolling list showing:- Serving temperature- Beer name- Style- ABV- IBUs- Volume remaining- Time since added to tap- Rating- Brewer- Hops used- Grains used
When finished, click to exit this screen.
Turn the control knob to rate the beer from 0 stars to 5 stars. Click to accept the rating.

70 71
SECTION 7
Updating the KegSmarts FirmwarePerform this process on a computer running Microsoft Windows 7 (or newer), connected to the KegSmarts Head unit using the included USB cable.
The USB cable connects to a port located under the front-right corner of the KegSmarts Head unit.
Log in to your PicoBrew.com account and select Support > Downloads > Download Flash Utility.
TIP: If you are a PicoBrew Zymatic owner, you have already downloaded the Flash Utility and do not need to download it again.
After downloading the Flash Utility, download the updated firmware image from Support > Downloads > KegSmarts Firmware.
Each firmware release includes release notes describing the changes and updates included in that firmware version.
Run the Flash Utility and follow the onscreen instructions.
