art 13218 coati
DESCRIPTION
instrucciones termoregulador coatiTRANSCRIPT

MANUAL DE INSTRUCCIONESMANUAL DE INSTRUÇÕESOPERATING INSTRUCTIONSBEDIENUNGSANWEISUNG
(E)(P)
(GB)(D)
Art.: 13218
GARANTÍA/GUARANTEE/GARANTIE


Esp
añol
Por
tugu
ésE
nglis
hD
euts
ch
MANUAL DE INSTRUÇÕES ............ 19
OPERATING INSTRUCTIONS ......... 33
BEDIENUNGSANWEISUNG............ 47
MANUAL DE INSTRUCCIONES ...... 5


5
Esp
añolE) PROGRAMADOR DIGITAL
ÍNDICE1. INTRODUCCIÓN .................................... 52. FUNCIONAMIENTO................................ 63. DESCRIPCIÓN ....................................... 74. AJUSTE DE TIEMPO ............................. 105. AJUSTE DEL DÍA/HORA........................ 106. AJUSTE AL HORARIO DE VERANO..... 117. SELECCIÓN DEL MODO DE
FUNCIONAMIENTO ............................... 128. AJUSTE DE PROGRAMA ...................... 139. FUNCIÓN ALEATORIA........................... 1510. FUNCIÓN CUENTA ATRÁS.................. 1611. MANTENIMIENTO ................................ 1712. CARACTERÍSTICAS TÉCNICAS ......... 18
1. INTRODUCCIÓNAnte todo gracias por haber adquirido este nuevo programador de Coati®, que le permitirá controlar cualquiera de sus electrodomésticos

6
Esp
añol de una manera fácil y cómoda.
Atención! Lea atentamente estas instrucciones antes de utilizar este programador.
2. FUNCIONAMIENTOEste nuevo programador digital le ayudará a conectar o desconectar a una hora preseleccio-nada cualquiera de los electrodomésticos que usted usa normalmente, por ejemplo la cafetera eléctrica, un radiador o una lampara.El programador digital Coati es ideal para ayu-darle a ahorrar energía, con la función cuenta atrás usted podrá preseleccionar maniobras de encendido o apagado de cualquiera de sus electrodomésticos, como estufas eléctricas, ventiladores, lámparas, etc. E incluso puede ser utilizado como un elemento de seguridad, con su función aleatoria, usted podrá conectar y desconectar lámparas, la radio o la televisión de tal manera que en su ausencia su vivienda parecerá seguir ocupada.

7
Esp
añol3. DESCRIPCIÓN

8
Esp
añol Numero Descripción Función
1 Pantalla LCD
En ella se muestra la hora actual y el programa elegido.
2 Reloj: Si está programando y pulsa volverá al modo normal.Si lo pulsa junto al botón SET, entrará al modo progra-mación de hora y semana.Pulsándolo junto a entra-rá en modo Verano.
3 Countdown: Cuenta atrás, al presionar este botón en modo PROGRAM comenzará la cuenta atrás.
4 Random: Aleatorio, al pre-sionar este botón en modo PROGRAM el programador realizará conexiones y des-conexiones aleatoriamente.

9
Esp
añol5 Al presionar este botón
el programador pasa de modo , PROGRAM o , siguiendo la secunecia:
PROGRAM
6 SET Este botón le servirá para fijar en modo PROGRAM la hora, la semana y la pro-gramación.
7 Sirve para incrementar el tiempo tanto en la hora, la semana o la programación.
8 Sirve para disminuir el tiempo tanto en la hora, la semana o la programación.
9 Summer: Verano, llegado el tiempo de verano, y teniendo que añadir una hora, pulsan-do a la vez, y , en el display se añade una hora y aparece una .

10
Esp
añol 10 Reset Borra toda la programación
que tenga usted realizada en el programador.
4. AJUSTE DE TIEMPOEl nuevo programador Coati tiene la posibilidad de ajustar el reloj en modo 12 o 24 horas, pulsando el botón y manteniéndolo pulsado pasará de modo 12 horas, con el indicador AM o PM, al modo 24 horas y viceversa.
5. AJUSTE DEL DÍA/HORAPara establecer la hora y el día actual en el pro-gramador, debe activar la función Ajuste de Día/Hora. Los pasos a seguir son los siguientes:1.Presione la tecla SET hasta que el icono del
día parpadee, utilizando las teclas o ajuste el día actual.
2.Presione la tecla SET cuando haya seleccio-nado el día actual de la semana. La cifra de la hora parpadeará, utilizando las teclas o

11
Esp
añolajuste la hora actual.
3.Presione la tecla SET cuando tenga la hora actual seleccionada, la cifra de los minutos parpadeará, utilizando las teclas o ajuste los minutos.
4.Presione de nuevo la tecla SET cuando el reloj muestre los minutos actuales, y saldrá de la función ajuste del día/hora.
6. AJUSTE AL HORARIO DE VERANOEn la función de Ajuste al Horario de Verano, el usuario puede alternar el reloj entre el Horario de Verano y el Horario de Invierno.Presione a la vez las teclas y hasta que aparezca en pantalla el icono correspondien-te a la función de Ajuste al Horario de Verano (Summer).Cuando está fijado el Horario de Verano, el reloj avanzará 1 hora y en la pantalla, aparecerá el icono del Horario de Verano (en la parte dere-cha de la pantalla).

12
Esp
añol Presionando otra vez ambas teclas se cancela-
rá la función y volverá a ajustarse el horario de invierno, desapareciendo el icono .
7. SELECCIÓN DEL MODO DE FUNCIONAMIENTOEste programador cuenta con tres modos de funcionamiento, /PROGRAM/ .Presionando la tecla se activa sucesiva-mente cada uno de los tres modos La función activa permanentemente el pro-gramador, sin hacer caso a la programación.La función PROGRAM activa y desactiva el pro-gramador, de acuerdo a la programación.La función desactiva permanentemente el programador, sin hacer caso a la programa-ción.La función Manual puede activarse estando en cualquiera de las funciones (excepto en la función de Ajuste de Programa).

13
Esp
añol8. AJUSTE DE PROGRAMA
Es necesario que en la pantalla del programa-dor usted vea la hora actual.Para establecer un programa, debe activar la función programa. Los pasos a seguir son los siguientes:1. Presione la tecla para entrar en la función
programa, en la esquina inferior izquierda aparecerá el programa 1ON, si pulsa otra vez pasará a 1OFF, y así continuará 2ON, 2OFF, … hasta 14OFF.
2.Cuando esté dentro del programa que quiere activar, presione la tecla SET hasta que el icono del día parpadee, utilizando las teclas
o ajuste el día o grupo de días en los que quiera que funcione el programa.
Las opciones son:• Toda la semana de lunes a domingo.• Cada día de la semana.• Lunes, Miércoles y Viernes.• Martes, Jueves y Sábado.

14
Esp
añol • Fin de semana, Sábado y Domingo
• De Lunes a Miércoles.• De Jueves a Sábado.• De Lunes a Viernes.• De Lunes a Sábado.3.Presione la tecla SET cuando haya seleccio-
nado el día o grupo de días de la semana. La cifra de la hora parpadeará, utilizando las teclas o ajuste la hora deseada.
4.Presione la tecla SET cuando tenga la hora deseada seleccionada, la cifra de los minutos parpadeará, utilizando las teclas o ajuste los minutos.
5.Presione de nuevo la tecla SET cuando el reloj muestre los minutos desados, usted habrá terminado el ajuste del encendido del programa y saldrá de la función , si presiona una vez el botón entrará en la función del mismo programa. Repita los puntos del 2 al 4 para programar los apagados.

15
Esp
añol9. FUNCIÓN ALEATORIA
Es necesario que en la pantalla del programa-dor usted vea la hora actual y el programador esté en modo automático PROGRAM.En la función Aleatoria, el programador se encenderá o se apagará de forma aleatoria. Esta función es útil cuando se utiliza el pro-gramador como elemento de seguridad para simular presencia en el hogar, por ejemplo programando el encendido de una luz o una radio. Cada día, la luz o la radio se encenderá y apagará varias veces y a diferentes horas.Para activar la función Aleatoria, enchufe el programador a una toma de corriente schucko de su casa, presione la tecla hasta que aparezca el icono parpadeando. Cuando desee desactivar esta función, presione la tecla
otra vez.Los periodos de apagado son de entre 26 y 42 minutos y los de encendido varían entre 10 y 26 minutos.

16
Esp
añol 10. FUNCIÓN CUENTA ATRÁS
Es necesario que en la pantalla del programa-dor usted vea la hora actual.La función Cuenta Atrás consiste en un tempo-rizador que retrasa el encendido o apagado del programador. Para ajustar el contador, siga los pasos siguientes:1.Presione la tecla hasta que aparezca el
programa “d”. Pulse la tecla SET y parpadeará el icono de
encendido , con las teclas o podrá elegir la maniobra de encendido o de apaga-do, .
2.Cuando esté dentro del programa de cuenta atrás, presione la tecla SET hasta que el icono de la hora parpadee, utilizando las teclas o
ajuste el número de horas que quiera que funcione la cuenta atrás.
3.Presione la tecla SET cuando tenga las horas seleccionadas, el dígito de los minutos parpadeará, utilizando las teclas o

17
Esp
añolajuste los minutos que desee que funcione
la cuenta atrás.4.Presione la tecla SET cuando tenga los minu-
tos seleccionados, el dígito de los segundos parpadeará, utilizando las teclas o ajuste los segundos que desee que funcione la cuenta atrás.
5.Presione de nuevo la tecla SET, cuando el reloj muestre los segundos elegidos, usted habrá terminado el ajuste del programa de cuenta atrás. Presione el botón , la pantalla mostrará la hora actual.
6. Para iniciar la cuenta atrás presione una vez el botón , para detenerla, vuelva a presionar el mismo botón.
11. MANTENIMIENTOLas siguientes sugerencias de mantenimiento le ayudarán a conservar el programador durante años.• Utilice y guarde el programador en lugares

18
Esp
añol a temperatura ambiente. Las temperaturas
extremas pueden acortar la duración de los dispositivos electrónicos o dañar las pilas.
• Para limpiar el programador no utilice pro-ductos químicos, disolventes o detergentes fuertes.
12. CARACTERÍSTICAS TÉCNICASAlimentación: 230V, 50Hz.Intensidad: 16(4) ACarga máxima: 3500W resistivos, 920W inductivos

19
Por
tugu
és
P) PROGRAMADOR DIGITAL
ÍNDICE1. INTRODUÇÃO ........................................ 192. FUNCIONAMENTO................................. 203. DESCRIÇÃO........................................... 214. AJUSTE DA MODO DA HORA............... 245. AJUSTE DO DIA/HORA.......................... 246. AJUSTE PARA O HORÁRIO DE VERÃO.............................................. 247. SELECÇÃO DO MODO FUNCIONAMENTO ................................ 268. AJUSTE DE PROGRAMA ...................... 279. FUNÇÃO ALEATÓRIA ............................ 2910. FUNÇÃO DE CONTAGEM
DECRESCENTE ................................... 3011. MANUTENÇÃO..................................... 3112. CARACTERÍSTICAS TÉCNICAS ......... 32
1. INTRODUÇÃOAntes de tudo, obrigado por ter adquirido este

20
Por
tugu
és
novo programador da Coati®, que permitir-lhe-á controlar qualquer dos seus electrodomésticos de uma forma fácil e cómoda.Atenção! Leia atentamente estas instruções antes de utilizar este programador.
2. FUNCIONAMENTOEste novo programador digital ajudá-lo-á a ligar ou desligar a uma hora pré-seleccionada qualquer dos electrodomésticos que utiliza normalmente, por exemplo a cafeteira eléctrica, um radiador ou uma lâmpada.O programador digital Coati é ideal para ajudá-lo a poupar energia, pois com a função descrita anteriormente poderá seleccionar operações de ligação ou desactivação de qualquer dos seus electrodomésticos, como aquecedores eléctricos, ventiladores, lâmpadas, etc. Inclusivamente, pode ser utilizado como elemento de segurança, com a sua função aleatória; poderá ligar e desligar lâmpadas, a

21
Por
tugu
és
rádio ou a televisão de modo que, na sua ausência, a sua habitação parecerá estar habitada.
3. DESCRIÇÃO

22
Por
tugu
és
Número Descrição Função
1 Ecrã LCD Neste são exibidos a hora actual e o programa seleccionado.
2 Relógio: Se está programando e premir regressará ao modo normal.Se o premir juntamente com o botão SET, entrará no modo de programação da hora e semana.Premindo-o em conjunto com
entrará no modo Verão.
3 Contagem decrescente: efectua uma contagem decrescente e ao pressionar este botão no modo PROGRAM iniciará a contagem decrescente.
4 Random: Aleatório, ao pressionar este botão no modo PROGRAM, o programador realizará ligações e desactivações aleatoriamente.

23
Por
tugu
és
5 Ao pressionar este botão, o programador passa do modo , PROGRAM ou , da seguinte forma: PROGRAM
6 SET Este botão servirá para fixar, no modo PROGRAM, a hora, a semana e a programação.
7 Serve para aumentar o tempo, tanto na hora como na semana ou na programação.
8 Serve para diminuir o tempo, tanto na hora como na semana ou na programação.
9 Summer: Verão, quando chega a hora de Verão e é necessário adicionar uma hora, premindo simultaneamente e , é adicionada uma hora no ecrã e é exibido um “S”.

24
Por
tugu
és
10 Reset Apagar todas as programações que tiver realizado no programador.
4. AJUSTE DA MODO DA HORAO novo programador Coati oferece a possibilidade de ajustar o relógio no modo de 12 ou 24 horas, premindo o botão e mantendo-o premido passará do modo de 12 horas, com o indicador AM ou PM, ao modo de 24 horas e vice-versa.
5. AJUSTE DO DIA/HORAPara definir a hora e o dia actual no programador, deve activar a função Ajuste de Dia/Hora. Os passos a seguir são os seguintes:1.Pressione a tecla SET até o ícone do dia
começar a piscar, utilizando as teclas ou ajuste o dia actual.
2.Pressione a tecla SET depois de seleccionar o dia da semana actual. O dígito da hora

25
Por
tugu
és
piscará, utilizando as teclas ou ajuste a hora actual.
3.Pressione a tecla SET depois de seleccionar a hora actual e o dígito dos minutos começa a piscar, utilizando as teclas ou ajuste os minutos.
4.Pressione de novo a tecla SET quando o relógio apresentar os minutos actuais e sairá da função de ajuste do dia/hora.
6. AJUSTE PARA O HORÁRIO DE VERÃONa função de Ajuste para o Horário de Verão, o utilizador pode alternar o relógio entre o Horário de Verão e o Horário de Inverno.Pressione as teclas e até aparecer no ecrã o ícone correspondente à função de Ajuste para o Horário de Verão (Summer).Quando estiver definido o Horário de Verão, o relógio avançará 1 hora e, no ecrã, surgirá o ícone do Horário de Verão (no lado direito do ecrã).
26
Por
tugu
és
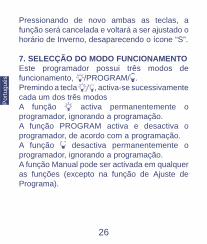
Pressionando de novo ambas as teclas, a função será cancelada e voltará a ser ajustado o horário de Inverno, desaparecendo o ícone “S”.
7. SELECÇÃO DO MODO FUNCIONAMENTOEste programador possui três modos de funcionamento, /PROGRAM/ .Premindo a tecla , activa-se sucessivamente cada um dos três modosA função activa permanentemente o programador, ignorando a programação.A função PROGRAM activa e desactiva o programador, de acordo com a programação.A função desactiva permanentemente o programador, ignorando a programação.A função Manual pode ser activada em qualquer as funções (excepto na função de Ajuste de Programa).

27
Por
tugu
és
8. AJUSTE DE PROGRAMAÉ necessário que esteja a ver a hora actual no ecrã do programador.Para definir um programa, deve activar a função programa. Os passos a seguir são os seguintes:1. Pressione a tecla para entrar na função
programa, no canto inferior esquerdo surgirá o programa 1ON; se premir outra vez passará a 1OFF e assim sucessivamente a 2ON, 2OFF, … até 14OFF.
2.Quando estiver dentro do programa que quer activar, prima a tecla SET até que o ícone do dia comece a piscar; utilizando as teclas ou ajuste o dia ou grupo de dias nos quais pretende que o programa funcione.
As opções são:• Toda a semana, de segunda a domingo.• Em cada dia da semana.• Segundas, quartas e sextas.• Terças, quintas e sábados.

28
Por
tugu
és
• Fim-de-semana, sábado e domingo• De segunda a quarta.• De quinta a sábado.• De segunda a sexta.• De segunda a sábado.3.Prima a tecla SET depois de seleccionar o dia
da semana actual. O dígito da hora piscará, utilizando as teclas ou ajuste a hora.
4.Pressione a tecla SET depois de seleccionar a hora e o dígito dos minutos começa a piscar, utilizando as teclas ou ajuste os minutos.
5.Prima de novo a tecla SET; quando o relógio mostrar os minutos, terá terminado o ajuste de activação do programa e sairá da função ; se premir uma vez o botão entrará na função do mesmo programa. Repita os pontos 2 a 4 para programar as desactivações.

29
Por
tugu
és
9. FUNÇÃO ALEATÓRIAÉ necessário que esteja a ver a hora actual no ecrã do programador e que o programador esteja no modo automático PROGRAM.Na função Aleatória, o programador acender-se-á ou apagar-se-á de forma aleatória. Esta função é útil quando se utiliza o programador como elemento de segurança para simular a presença num local, por exemplo programando a acendimento duma luz ou um rádio. Diariamente, a luz ou o rádio acender-se-ão e apagar-se-ão várias vezes e a horas diferentes.Para activar a função Aleatória, ligue o programador a uma tomada de corrente schucko da sua casa, prima a tecla até aparecer o ícone a piscar. Para sair da função aleatória, pressione a tecla outra vez.Os períodos de apagado são de entre 26 e 42 minutos e os de aceso variam entre 10 e 26 minutos.

30
Por
tugu
és
10. FUNÇÃO DE CONTAGEM DECRESCENTEÉ necessário que esteja a ver a hora actual no ecrã do programador.A função Contagem decrescente consiste num temporizador que atrasa a ligação ou desactivação do programador. Para ajustar o contador, siga os passos seguintes:1.Prima a tecla até surgir o programa “d”. Prima a tecla SET e o ícone de ligado
piscará; com as teclas ou poderá seleccionar a operação de aceso ou apagado,
.2.Quando estiver dentro do programa de
contagem decrescente, prima a tecla SET até que o ícone do hora comece a piscar; utilizando as teclas ou ajuste o número de horas durante as quais pretende que a contagem decrescente funcione.
3.Pressione a tecla SET depois de seleccionar as horas e o dígito dos minutos começa a

31
Por
tugu
és
piscar; utilizando as teclas ou ajuste os minutos durante os quais pretende que a contagem decrescente funcione.
4.Pressione a tecla SET depois de seleccionar os minutos e o dígito dos segundos começa a piscar; utilizando as teclas ou ajuste os segundos durante os quais pretende que a contagem decrescente funcione.
5.Pressione de novo a tecla SET quando o relógio apresentar os segundos seleccionados e terá terminado o ajuste do programa de contagem decrescente. Prima o botão “clock”, o ecrã mostrará a hora actual.
6. Para iniciar a contagem decrescente, prima uma vez o botão ; para interrompê-la, prima novamente o mesmo botão.
11. MANUTENÇÃOAs sugestões de manutenção seguintes ajudá-lo-ão a conservar o programador durante anos.• Utilize e guarde o programador em locais

32
Por
tugu
és
à temperatura ambiente. As temperaturas extremas podem encurtar a duração dos dispositivos electrónicos ou danificar as pilhas.
• Para limpar o programador não utilize produtos químicos, solventes ou detergentes fortes.
12. CARACTERÍSTICAS TÉCNICASAlimentação: 230V, 50Hz.Intensidade: 16(4) ACarga máxima: 3500W resistivos, 920W indutivos

33
Eng
lish
GB) DIGITAL TIMER
INDEX1. INTRODUCTION..................................... 332. OPERATING INSTRUCTIONS ............... 343. DESCRIPTION........................................ 354. ADJUSTING THE TIME.......................... 385. ADJUSTING THE DAY/TIME.................. 386. SUMMER TIME ADJUSTMENT ............. 397. SELECTING THE FUNCTION MODE.... 408. PROGRAMME ADJUSTMENT............... 419. RANDOM FUNCTION............................. 4310. COUNTDOWN FUNCTION .................. 4411. MAINTENANCE .................................... 4512. TECHNICAL FEATURES...................... 46
1.INTRODUCTIONFirstly, we would like to thank you for purchasing this new Coati® timer with which you can easily control any of your household appliances.Attention! Read these instructions carefully

34
Eng
lish
before using this timer.
2. OPERATING INSTRUCTIONSThanks to this new digital timer, you can con-nect and disconnect any of your household appliances, such as your electric coffee-maker, radiators or lamps, at a preset time.The Coati digital timer is an ideal device for help-ing you save energy. Thanks to the Countdown function, you can preset the time at which you would like your appliances such as electric heat-ers, fans, lamps, etc. to turn on and off. It can even be used as a security device. Thanks to its Random function, you can set lamps, radios and TVs to be turned on and off when you are away from home so that it looks like the house is occupied.

35
Eng
lish
3. DESCRIPTION

36
Eng
lish
Number Description Function
1 LCD Display This displays the current time and the selected programme.
2 Clock: If you press when in mode, the timer will return to the normal mode.If you press together with the SET button, you will enter the time and week programme mode.Press together with to enter Summer mode.
3 Countdown: Press this button in PROGRAM mode to start the countdown.
4 Random: Press this button in PROGRAM mode to random-ly connect and disconnect the selected apparatus.
37
Eng
lish
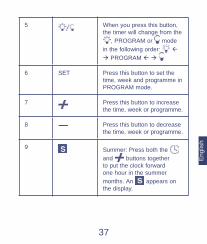
5 When you press this button, the timer will change from the
, PROGRAM or mode in the following order:
PROGRAM
6 SET Press this button to set the time, week and programme in PROGRAM mode.
7 Press this button to increase the time, week or programme.
8 Press this button to decrease the time, week or programme.
9 Summer: Press both the and buttons together to put the clock forward one hour in the summer months. An appears on the display.

38
Eng
lish
10 Reset Press this button to delete all the programmes you have set on your timer.
4. ADJUSTING THE TIMEThe new Coati timer can be used in either the 12 or 24 hour mode. Hold the button down until it changes from the 12 hour mode with the AM and PM indicator to the 24 hour mode and vice-versa.
5. ADJUSTING THE DAY/TIMEActivate the “DAY/TIME ADJUSTMENT” func-tion to set the current time and day. To do so follow these steps:1. Press the SET button until the day icon
flashes, then use the or buttons to set the correct day.
2. Press the SET button when the correct day of the week has been selected. When the hour digits flash, use the or buttons to set

39
Eng
lish
the correct hour. 3. Press the SET button when the correct hour
has been set. The minute digits will then flash. Use the or buttons to select the minutes.
4. Press the SET button again when the clock shows the correct minutes to exit the DAY/TIME ADJUSTMENT function.
6. SUMMER TIME ADJUSTMENTIn this mode, the clock can alternate between summer time and winter time.Press the buttons and together until the
icon, denoting the Summer Time Adjustment mode, appears on screen.When the Summer Time mode has been set, the clock will be brought forward one hour and the Summer Time icon will appear on the right hand side of the screen.Press both buttons again to cancel this function and return to the Winter Time mode. When this

40
Eng
lish
occurs, the will disappear.
7. SELECTING THE FUNCTION MODEThis timer has three function modes: /PROGRAM/ .Press the button to scroll through each of the three modes until you reach the mode you wish to set.When the function is set, the timer will remain permanently activated, regardless of any pro-grammes you may have set.The PROGRAM function activates and deac-tivates the timer according to the programmes you have set.When the function is set, the timer will remain permanently off, regardless of any programmes you may have set.The Manual function can be activated in any of the functions (except for the Programme Adjustment function).

41
Eng
lish
8. PROGRAMME ADJUSTMENTThe current time must be displayed on the screen.In order to set a programme, you must activate the Programme function. To do so follow these steps:1. Press the button to enter the Programme
function. The programme 1ON will appear on the bottom left hand corner. If you press repeatedly it will change to 1OFF, 2ON, 2OFF and so on until 14OFF.
2. When you are in the programme that you wish to activate, press the SET button until the icon flashes and use the or buttons to adjust the day or group of days for which you want to set the programme.
The options are:• The entire week from Monday to Sunday.• Each day of the week.• Monday, Wednesday and Friday.• Tuesday, Thursday and Saturday.

42
Eng
lish
• Weekend, Saturday and Sunday• From Monday to Wednesday.• From Thursday to Saturday.• From Monday to Friday.• From Monday to Saturday.3. Press the SET button when the correct day of
the week or group of days has been selected. When the hour digits flash, use the or buttons to set the hour.
4. Press the SET button when the hour has been set. The minute digits will then flash. Use the
or buttons to select the minutes.5. Press the SET button again when the clock
displays the minutes to finish setting the programme and exit the function. Press the button once to enter the function of the same programme. Repeat steps 2 to 4 to programme the apparatus to turn off.

43
Eng
lish
9. RANDOM FUNCTIONThe current time must be displayed on the screen and the timer should be in PROGRAM mode.In the random mode, the timer will turn on and off randomly. This function is useful when the timer is being used as a security device that simulates presence in the home, for example by programming a light or a radio to be turned on. The light or a radio will turn on and off several times throughout the day and at different times.In order to activate the Random function, plug the timer into a Schuko socket and press the
button until the icon flashes. To exit the Random function, press the key again.The off times last for a period of 26 to 42 min-utes and the on times vary between 10 and 26 minutes.

44
Eng
lish
10. COUNTDOWN FUNCTIONThe current time must be displayed on the screen.The Countdown function consists of a timer that delays the turning on and off of the timer. To adjust the counter, follow these steps:1. Press the key until the “d” programme
appears, and then press the SET key. The icon will flash. Use the / keys to choose the programme.
2. When you are in the countdown programme, press the SET button until the hour icon flashes and use the or buttons to adjust the number of hours during which you would like the countdown programme to be set.
3. Press the SET button when the hours have been chosen. The minute digits will then flash. Use the or buttons to select the minutes during which you would like the countdown programme to be set.

45
Eng
lish
4. Press the SET button when the minutes have been chosen. The seconds digits will then flash. Use the or buttons to select the seconds during which you would like the countdown programme to be set.
5. Press the SET button again; the clock will display the seconds that have been selected indicating that the adjustment of the count-down programme has been completed. Press the button to display the current time on the screen.
6. To start the countdown, press the button once. Press it again to stop the countdown.
11. MAINTENANCEThe following maintenance suggestions will help you conserve your timer for years.• Use and store your timer at room tempera-
ture. Extreme temperatures can shorten the life of the electronic devices which you con-nect to the timer and damage the batteries.

46
Eng
lish
• Do not use chemical products, dissolvents or strong detergents to clean the timer.
12. TECHNICAL FEATURESPower Supply: 230V, 50Hz.Intensity: 16(4) AMaximun load: 3500W resistive, 920W inductive
47
Deu
tsch
D) DIGITALE PROGRAMMIERER
INHALT1. EINLEITUNG........................................... 472. FUNKTIONSWEISE................................ 483. BESCHREIBUNG ................................... 494. ZEITEINSTELLUNG ............................... 535. EINSTELLUNG VON TAG/STUNDE ...... 536. EINSTELLUNG DER SOMERZEIT ........ 547. AUSWAHL DES FUNKTIONSMODUS... 558. PROGRAMMEINSTELLUNG.................. 569. ZUFALLSFUNKTION .............................. 5810. COUNTDOWNFUNKTION.................... 5911. WARTUNG ............................................ 6112. TECHNISCHE MERKMALE.................. 62
1. EINLEITUNGHerzlichen Glückwunsch zum Kauf des neuen Coati®-Programmiergeräts, das es Ihnen von nun an ermöglicht, alle Ihre elektronischen Haushaltsgeräte einfach und bequem zu

48
Deu
tsch
überwachen.Achtung! Lesen Sie diese Bedienungsanleitung sorgfältig bevor Sie das Programmiergerät benutzen.
2. FUNKTIONSWEISEDank diesem neuen Programmiergerät können Sie jedes Ihrer üblichen Haushaltsgeräte, wie elektrische Kaffeemaschine, Heizung oder Lampe, zu einer festgelegten Zeit anschalten oder abschalten.Das digitale Programmierer von Coati hilft Energie zu sparen. Mittels der soeben beschriebenen Funktion können Sie vorprogrammierte Einschalt- oder Abschaltsteuerungen für jedes Ihrer Haushaltsgeräte - elektrische Öfen, Ventilatoren, Lampen, etc. – durchführen. Darüber hinaus kann es auch als Sicherheitsvorrichtung verwendet werden. Mit dem Zufallsmodus können Sie in Ihrer
49
Deu
tsch
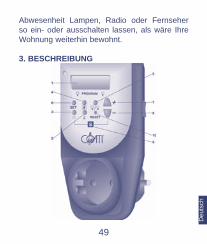
Abwesenheit Lampen, Radio oder Fernseher so ein- oder ausschalten lassen, als wäre Ihre Wohnung weiterhin bewohnt.
3. BESCHREIBUNG

50
Deu
tsch
Nummer Beschreibung Funktion
1 LCD-Display Hier werden die aktuelle Uhrzeit und das ausgewählte Programm angezeigt.
2 Uhr: Wenn Sie während dem Programmieren drücken, kehren Sie in den normalen Modus zurück.Wenn Sie gleichzeitig die Taste SET drücken, gelangen Sie in den Programmiermodus für Stunde und Woche.Bei gleichzeitiger Betätigung mit der Taste
, gelangt man in den Sommmermodus.

51
Deu
tsch
3 Countdown: Wenn Sie diese Taste im PROGRAM-Modus drücken, startet die Countdownfunktion.
4 Random: Zufallsfunktion. Bei Betätigung dieser Taste im PROGRAM-Modus führt das Programmiergerät Ein- und Abschaltvorgänge im Zufallsmodus durch.
5 Wenn Sie diese Taste drücken, schaltet das Programmiergerät zwischen den Modi , PROGRAM oder nach dem folgenden Schema um: AUTO

52
Deu
tsch
6 SET Mithilfe dieser Taste können Sie im PROGRAM-Modus die Uhrzeit, Woche oder Programmierung einstellen.
7 Mit dieser Taste erhöhen Sie die Zeit der Stunde, Woche oder Programmierung.
8 Mit dieser Taste verringern Sie die Zeit der Stunde, Woche oder Programmierung.
9 Summer: Im Sommer können Sie durch gleichzeitiges Drücken der Tasten und eine Stunde hinzufügen. Im Display erscheint dann .

53
Deu
tsch
10 Reset Löscht alle bisher gemachten Einstellungen.
4. ZEITEINSTELLUNGMit dem neuen Programmiergerät von Coati können Sie die Uhr im 12- oder 24-Stunden-Modus einstellen, indem Sie die Taste drücken und wenn Sie diese gedrückthalten, wechseln Sie vom 12-Stunden-Modus mit den Anzeigen AM oder PM, in den 24-Stunden-Modus und umgekehrt.
5. EINSTELLUNG VON TAG/STUNDEAktivieren Sie die Funktion Tag/Stunde, um die Stunde und den aktuellen Tag im Programmiergerät einzustellen. Die folgenden Schritte sind durchzuführen:1. Drücken Sie die Taste SET solange bis das
Symbol für den Tag blinkt. Stellen Sie den aktuellen Tag mit den Tasten oder ein.
2. Nach Einstellen des aktuellen Wochentags,

54
Deu
tsch
drücken Sie die Taste SET. Wenn die Stundenziffern blinken, stellen Sie die aktuelle Stunde mit den Tasten oder ein.
3. Wenn Sie die aktuelle Stunde ausgewählt haben, blinken die Minutenziffern. Die Minuten stellen Sie mit den Tasten oder
ein.4. Wenn die Uhr die aktuellen Minuten anzeigt,
drücken Sie die Taste und verlassen Sie die Einstellung der Funktion Tag/Uhrzeit.
6. EINSTELLUNG DER SOMERZEITMittels dieser Funktion können Sie die Uhr von Sommerzeit auf Winterzeit umstellen.Drücken Sie gleichzeitig die Tasten und bis auf dem Display das Symbol für die Funktion Einstellung der Sommerzeit (Summer) erscheint.Wenn die Sommerzeit eingestellt ist, ist die Uhr um eine Stunde vorgestellt und auf dem Display erscheint das Symbol für die Sommerzeit (auf

55
Deu
tsch
der rechten Seite des Bildschirms).Bei wiederholter gleichzeitiger Betätigung der Tasten wird diese Funktion wieder gelöscht, die Winterzeit wird automatisch wiedereingestellt und das Symbol verschwindet wieder.
7. AUSWAHL DES FUNKTIONSMODUSDieses Programmiergerät verfügt über drei Funktionsmodi: /PROGRAM/ .Mit der Taste kann hintereinander jeder der drei Modi eingeschaltet werden. Die Funktion aktiviert das Programmiergerät dauerhaft, ohne die Programmierung zu berücksichtigen.Die Funktion PROGRAM aktiviert oder deaktiviert je nach entsprechender Programmierung das Programmiergerät.Die Funktion stellt den dauerhaft aus, ohne die Programmierung zu berücksichtigen.Die Funktion Manual (manuelle) kann von jeder der Funktionen aus aktiviert werden (außer in

56
Deu
tsch
der Funktion Programmeinstellung). 8. PROGRAMMEINSTELLUNGAuf dem Display des Programmiergeräts muss die aktuelle Uhrzeit sichtbar sein.Um eine Einstellung zu programmieren, müssen Sie die Funktion Programm aktivieren. Die folgenden Schritte sind durchzuführen:1. Drücken Sie die Taste , um die Funktion
Programm zu öffnen. In der unteren linken Ecke erscheint dann das Programm 1ON. Wenn Sie die Taste nochmals drücken, schalten Sie weiter zu 1OFF und in gleicher Weise zu 2ON, 2OFF, … bis 14OFF.
2. Wenn Sie sich in dem Programm befinden, das Sie aktivieren möchten, drücken Sie die Taste SET bis das Tagessymbol blinkt. Mit den Tasten oder stellen Sie den Tag oder die Tagesgruppe ein, für die Sie das Programm aktivieren möchten.
Sie haben folgende Optionen:

57
Deu
tsch
• Die ganze Woche von Montag bis Sonntag• Jeden Wochentag• Montag, Mittwoch und Donnerstag• Dienstag, Donnerstag und Samstag• Wochenende, Samstag und Sonntag• Von Montag bis Mittwoch• Von Donnerstag bis Samstag• Von Montag bis Freitag• Von Montag bis Samstag3. Wenn Sie den Tag oder die Tagesgruppen
einer Woche ausgewählt haben, drücken Sie die Taste SET. Wenn die Stundenziffern blinken, stellen Sie die Stunde mit den Tasten
oder ein. 4. Wenn Sie die Stunde ausgewählt haben,
blinken die Minutenziffern. Die Minuten stellen Sie mit den Tasten oder ein.
5. Sobald die Uhr die Minuten anzeigt, drücken Sie die Taste SET nochmals. Nun haben Sie die Einstellungen für die Aktivierung des Programms abgeschlossen. Bei einmaligem

58
Deu
tsch
Drücken der Taste schalten Sie das Programm in -Modus. Wiederholen Sie die Punkte 2 bis 4, um die Abschaltzeiten zu programmieren.
9. ZUFALLSFUNKTIONAuf dem Display des Programmiergeräts muss die aktuelle Uhrzeit sichtbar sein und das Programmiergerät muss sich im PROGRAM-Modus befinden.In der Zufallsfunktion schaltet sich das Programmiergerät in zufälliger Weise an- und aus. Die Funktion ist besonders dann sehr nützlich, wenn man das Programmiergerät als Sicherheitsvorrichtung verwenden möchte, um die Anwesenheit in seinem Heim zu simulieren, zum Beispiel durch das Einschalten des Lichts oder Radios. Jeden Tag schaltet sich das Licht oder das Radio mehrmals täglich zu verschiedenen Zeiten an und aus.Um die Zufallsfunktion zu aktivieren, schließen

59
Deu
tsch
Sie das Programmiergerät an eine Schuko-Steckdose in Ihrem Haushalt an und drücken Sie die Taste bis das Symbol blinkt. Um diese Funktion zu verlassen, drücken Sie nochmals die Taste .Die Abschaltzeiten sind zwischen 26 und 42 Minuten und die Anschaltzeiten zwischen 10 und 26 Minuten.
10. COUNTDOWNFUNKTIONAuf dem Display des Programmiergeräts muss die aktuelle Uhrzeit sichtbar sein.Die Funktion Countdown besteht aus einem Timer, der das Ein- und Ausschalten des Programmiergeräts zurückstellt. Um den Zähler einzustellen, führen Sie folgende Schritte durch:1. Drücken Sie die Taste bis das Programm
“d” erscheint. Drücken Sie die Taste SET und das
Einschaltsymbol blinkt. Mit den Tasten

60
Deu
tsch
oder können Sie den Einschalt- oder Abschaltvorgang wählen.
2. Wenn Sie sich im Countdownprogramm befinden, drücken Sie die Taste SET bis das Stundensymbol blinkt. Mit den Tasten oder
stellen Sie die Anzahl der Stunden ein, für die Sie die Funktion Countdown aktivieren möchten.
3. Wenn Sie die aktuellen Stunden eingestellt haben, drücken Sie die Taste SET. Die Minutenziffern blinken und mit den Tasten oder stellen Sie die Minuten ein.
4. Wenn Sie die aktuellen Minuten eingestellt haben, drücken Sie die Taste SET. Die Sekundenziffern blinken und mit den Tasten
oder stellen Sie die Sekunden ein.5. Wenn die Uhr die ausgewählten Sekunden
anzeigt, drücken Sie die Taste SET erneut. Nun ist die Einstellung des Countdownprogramms abgeschlossen. Drücken Sie die Taste ; auf dem Display
61
Deu
tsch
wird die aktuelle Stunde angezeigt.6. Um den Countdown zu aktivieren, drücken
Sie die Taste , um die Funktion anzuhalten, drücken Sie die Taste erneut.
11. WARTUNGDie folgenden Wartungsempfehlungen helfen Ihnen das Programmiergerät über Jahre zu erhalten.• Verwenden und bewahren Sie das
Programmiergerät bei Umgebungstemperatur auf. Extreme Temperaturen können die Lebensdauer von elektronischen Geräten verkürzen oder die Batterien beschädigen.
• Für die Reinigung des Geräts verwenden Sie keine chemischen Produkte, Lösungsmittel oder starke Waschmittel.

62
Deu
tsch
12. TECHNISCHE MERKMALENetzspannung: 230V, 50Hz.Intensität: 16(4) AMaximale lampenstärke: 3500W ohmnisch, 920W induktiv
Art.: 13218
GARANTÍA/GUARANTEE/GARANTIE2 años/anos/années/anni/years/jahre
Nombre/Name/Nom/Nome:
Fecha de venta/Data de vendaDate of purchase/Verkaufsdatum
Sello del establecimiento/Canmbo da firma vendedoraDealer stamp/Händlerstempel
Grupo de Empresas Temper S.L. garantiza este aparato por 2 años ante todo defecto de fabrica-ción. Para hacer válida esta garantía, es imprescindible presentar con este resguardo el ticket o factura de compra.Grupo de Empresas Temper S.L. garantia este aparelho contra defeitos de fabrico ate 2 anos.Grupo de Empresas Temper S.L. guarantees this device during 2 years against any manufacturing defect.Grupo de Empresas Temper S.L. gewährleistet dieses Gerät während 2 Jahre gegen alle Herstellungsdefekte.
(P)
(GB)
(D)
(P)
(E) (P)
(GB)(D)
Programador Digital GrafitoProgramador DigitalDigital TimerDigitale Programmierer

ESPAÑACOATI, S.A.Poligono industrial Agro - ReusC/Victor Catalá, 143206 Reus (SPAIN)Tel.: +34 977 330 507Fax: +34 977 330 251E-mail:[email protected]
PORTUGALSFT Equipamento eléctrico, S.A.Praceta Jorge Barradas, Lote A6, Loja Dta.Massamá 2745-802 (QUELUZ)PORTUGALTel.:+ 351-214308550Fax.: +351-214370994E-mail: [email protected]