arlington soccer clubsoccer.arlingtonsoccerclub.org/wp-content/uploads/...arlington soccer club u6...
TRANSCRIPT

Arlington Soccer Club U6 & U7 Clinic Program
Coaching Manual
Bill McKersie September 4, 2006
Bill McKersie [email protected][email protected] 781-316-2723

Table of Contents Organization of Clinics..................................................................................................... 4
Days and Times............................................................................................................... 4 Game Format .................................................................................................................. 4 Field Format.................................................................................................................... 4 Laws of the Game (Rules of Play).................................................................................. 6 Assistant Coaches ........................................................................................................... 6 Clinic Cancellation (Due to Weather): ........................................................................... 7
Guidelines .......................................................................................................................... 8 Methods.............................................................................................................................. 9 Overall Training Advice................................................................................................. 10 Dribbling .......................................................................................................................... 11
Coaching Pointers ......................................................................................................... 11 Games for Dribbling ..................................................................................................... 12
Find Your Teammate (Name Game) ........................................................................ 12 Snakes ....................................................................................................................... 13 Runaway Truck......................................................................................................... 14 Gates ......................................................................................................................... 15 Red Light, Green Light!............................................................................................ 16 Sharks and Minnows................................................................................................. 17 Eggs! ......................................................................................................................... 18 World Cup Nations ................................................................................................... 20 Buzz Lightyear.......................................................................................................... 22 Alligator Alley .......................................................................................................... 23 Boo!! ......................................................................................................................... 24 Haunted Trees ........................................................................................................... 25
Stealing the Ball .............................................................................................................. 27
Coaching Pointers ......................................................................................................... 27 Games for Stealing the Ball .......................................................................................... 28
Mirrors (Variation on Simon Says)........................................................................... 28 Block Tackle Basics.................................................................................................. 29 Matador: Controlling the Bull................................................................................... 30 1 v 1 Roll-Out ........................................................................................................... 31 Adding a “Stealer” (Defender).................................................................................. 32
Striking the Ball .............................................................................................................. 33
Coaching Pointers ......................................................................................................... 33 Games for Striking the Ball .......................................................................................... 34
Coconut Tree............................................................................................................. 34 Ghost Busters ............................................................................................................ 34 Gates Passing (Static and Dynamic) ......................................................................... 35
2

Small-Sided Games ......................................................................................................... 38 Coaching Pointers ......................................................................................................... 38 Examples of Games ...................................................................................................... 39
End Zone Scoring ..................................................................................................... 39 Multi-goal Games ..................................................................................................... 40 Chameleon 3 v 3 ....................................................................................................... 41 Free Wings ................................................................................................................ 42
RESOURCES .................................................................................................................. 44
KEY TO DIAGRAMS
3

Organization of Clinics
Days and Times:
The U6 Clinic will run from 9 to 10:15 am on Saturday mornings. Plan on using 35-40 minutes for technique activities and the remainder of the time for scrimmaging.
The U7 Clinic will run from 1 to 2:30 pm on Sundays. Plan on using 45 to 50 minutes for technique activities and the remainder of the time for scrimmaging.
As a coach you should arrive 10 to 15 minutes prior to the start time so that you are set up and ready to begin activities on the hour. Please ask your players to arrive 5 to 10 minutes prior to the start of the Clinic so that they are ready to start on the hour as well. It is important to “train” the players and families to arrive on time.
Game Format
The U6 Clinic games should be 3 v 3 with no goal keepers,
The U7 Clinic games should be 4 v 4 with no goal keepers. You should not play with more than 4 players per team.
For both U6 and U7, please run two games at once, on parallel fields, with coaches and players between the two fields (see diagrams below). When running two parallel games in U7, consider reducing the team size to 3 v 3. With 10 players the numbers may work better, for example 3 players per field and 2 substitutes if the players are getting tired.
If one team is short on players one week, move a few players from the opposing team to balance the sides.
Field Format:
The U6 games should use cones for goals. Make them large to encourage goal scoring. Please move your children out of the goal if they start to play goal keeper. The players love to score goals.
The U7 games will have pug nets for the goals. Please move your children out of the goal if they start to play goal keeper.
Estimate the field size for both U6 and U7 games. A good place to start is 20 by 30 yards, which you can adjust to account for level of play, weather, etc.
The two diagrams below show how to set up parallel games for U6 and U7 games. Please note that the pictured space is too small for the number of players (at least for young players—older players will train in tight space to increase the challenge). Coaches should adjust the field size accordingly.
4

DIAGRAM 1: U6 3 v 3 Parallel Game Set-up
5

DIAGRAM 2: U7 4 v 4 Parallel Game Set-up
Laws of the Game (Rules of Play)
Please do not keep score during the Clinic games. We do not keep track of goals nor do we keep standings for the Clinic program. This is to make the game less competitive and more focused on having fun. The players will keep score, please do not encourage this.
There are no throw-ins during the Clinic games. Instead, please use kick-ins when the ball travels out of touch. (Players will not start using throw-ins until U9.) Coaches will have to help players position the ball correctly for the kick-in (on the touch line, where it went out of touch) and move players back from the kicker. It helps if a few parents circle the field to keep errant balls less time consuming to chase down.
We do not call penalties during the Clinic games. You should stop any excessive pushing or use of hands. This can be done without stopping play in most cases. You can stop play to highlight the rule with all of the players, use your discretion.
Assistant Coaches:
Please find an assistant coach to help you with the clinic. No previous soccer experience is necessary. Assisting with the equipment and setting up will be a big help. In addition, exposing more parents to coaching will help ASC in the future as we can recruit them as lead coaches for their younger children.
6

Parent Roles:
The ASC expects at least one parent of each child to remain at the field during the clinic. If a child is hurt or loses interest in the game that day, you as a coach will not be able to devote all of your attention to the issue as you will also need to run the clinic session. As a coach, you can structure this policy as you wish (i.e., parents can be responsible for more than one child during the clinic).
Please review the game day philosophy with your parents at the beginning of the season. The Clinic program is designed for the players to have fun. Parents should keep it fun for their players. Cheering should be for both sides and focused on encouraging words, not advice and criticism. These are themes we need to train parents and players on early. If we do not, they could become bigger issues as the players get older.
Clinic Cancellation (Due to Weather):
If there is a rain out, the information will be posted on the ASC soccer line, 781-641-4085. Please do not distribute this number to your parents. This line is for coaches only. Once you get the information, you should call all of your parents. (If everyone calls the soccer line, it will be overloaded with calls).
7

Guidelines
1. Make training fun and engaging. 2. Ensure maximum participation
• No Lines, No Laps, No Lectures
o Small Lines and Little Talk – Only for Rest & Guidance o Clinic activities should be focused on participation and touching the
ball. Please do not run “line” drills, where children have to wait their turn for a brief touch on the ball.
o You should not spend more than 1 or 2 minutes discussing something with the players (they will quickly lose interest). It is best to get the activity started quickly and then fix it as necessary.
• Ball: Player Ratio
o For all of your activities, each child should have a ball as much as possible.
1:1 or 1:2 should be the norm. 1:3 when want to give sense of team play. 1:6 in games only.
3. Encourage creative play
• Remember: Ball = Toy • Encourage experimentation with the ball
4. Help the game teach
• Set up fun, safe activities • Get Players Moving • Explain Activity Briefly; Start Activity; Observe, Adjust; Restart. • Model Street Soccer – Whereby players just play soccer, in small numbers,
with minimal to no adult coaching.
8

Methods 1. Guided Discovery; Not Command Coaching
• Players learn by trying & doing, not by being told. • Ask lots of questions.
2. Focus on techniques, not tactics
• Dribbling – Primary Focus at the U6 & U7 Level • Stealing the Ball (Properly & Safely – No Sliding, Charging, Pushing) • Controlling the Ball • Striking the Ball
Basic tactics will be taught through the technique games shared in this manual. Such tactics include: Moving to space; Moving to Support Your Teammate; Changing the Point of Attack (going left, right, backwards and straight up the field); Passing and moving for a return pass; Getting by an opponent; Getting the ball from an opponent.
You do not need to spend time teaching positions at the Clinic level.
3. Have a simple plan for each week, based on your players’ talents and interests.
• Warm Up Activity – 10 minutes • Activity 1 – 10 minutes • Activity 2 – 10 minutes • Activity 3 – 10 minutes • Scrimmage – 3 v 3 or 4 v 4 – 30 minutes • Good Words – 5 minutes
o Bring players together and have a specific, positive comment for each individual player about their play that day. At start of season, have the coaches offer the comments. Later in the season, ask players to make a comment about themselves or a teammate. I call this practice “Oscars,” using the juice box as an “Oscar.”
4. Teach via small games & activities
• Lots of touches on ball 5. Build-up
• Simple to complex • Static to dynamic
6. Friendly, Constructive, Specific Comments
9
Overall Training Advice –
• Your training hallmark should be simple plans, with a progression of simple activities, which naturally flow from one to the other.
• Your activities should in some way mirror what goes on in a soccer game. Your players should be able to answer the question, “How is this like a soccer game?” With a little help for the youngest players, they should come up with answers such as: “My head is up; I’m going left and right, straight and backwards; I’m going to open space; I’m trying to get the ball; I’m running fast, and then slow, and then fast; I’m keeping the ball; I’m moving to help my teammates; I’m not crowding my teammates; I’m keeping the ball close; I’m learning when to kick it far away; I’m learning when to kick it right to my teammate; I’m learning how to make the ball go where I decide it should go; etc.” If you and your players are able to give these answers, based on the activity you have designed, then they are playing soccer.
• All of the activities and games shared in this manual meet the standard of “simple to organize, simple to do, simple for learning soccer.”
• This manual emphasizes dribbling over other techniques. It is the most important technique to work on with U6 and U7 players, since it is fundamental to all other techniques. It also is the technique most in-tune with the general development phase of players ages 5-7, who tend to have a healthy focus on themselves and their own interests, as well as creating and exploring with toys or other objects. Stealing the Ball, Striking the Ball and Controlling the Ball also should receive attention, but second to dribbling and individual play with the ball.
10

Dribbling
Coaching Pointers
Great Dribblers: Simple stuff done with precision and speed, under pressure
Basic
1. Ball close to feet 2. Parts of feet: Inside, Outside, Instep/Laces. Have the players tap these spots on
their feet to illustrate where they are. 3. Body: Head up, Knees Bent, Light on Feet (Dance)
4. Change Direction & Change Speed, the keys to getting by an opponent
Advanced
1. Vision 2. Touch 3. Turning 4. Shielding 5. Beating 6. Speed Dribble – Running with the Ball
Feints/Fakes
1. Chops 2. Turns 3. Lunges 4. Draws 5. Step-Overs
KEY TO FOLLOWING DIAGRAMS
11

Games for Dribbling Ways to Change Difficulty:
1. Make space smaller (harder); Make space larger (easier). 2. Create safe zones for dribblers – teach going to space 3. Add defenders (or stealers)
1. Find Your Teammate (Name Game) Set-up:
• Rectangular area with cones. • Each player has a ball.
DIAGRAM 3: Find Your Teammate
Game:
• All players are dribbling slowly in the area. • Coach calls out name of one player (#1 in Picture), who then dribbles to open
space. • All other players dribble after #1 until several have caught him/her.
12
• Coach calls out another player, preferably one not in the pack, which then dribbles to open space.
• All other players dribble after the new player until several have caught the player. • Repeat quickly until all players have been called and chased.
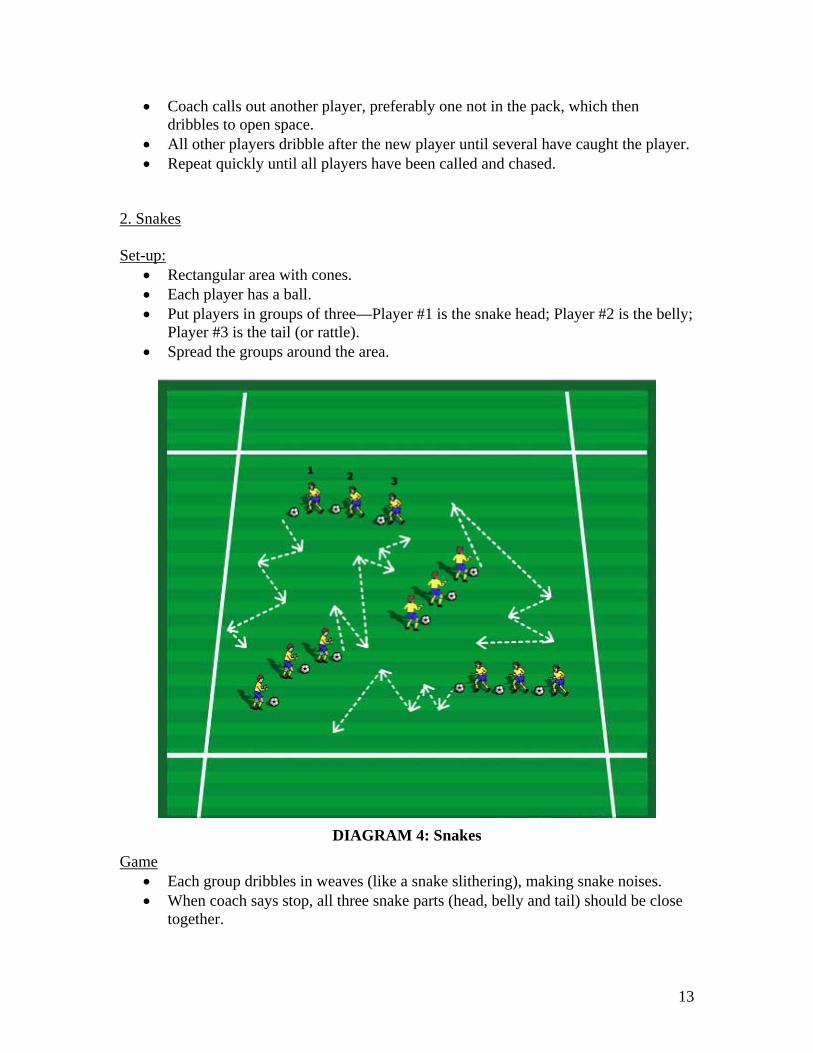
2. Snakes Set-up:
• Rectangular area with cones. • Each player has a ball. • Put players in groups of three—Player #1 is the snake head; Player #2 is the belly;
Player #3 is the tail (or rattle). • Spread the groups around the area.
DIAGRAM 4: Snakes
Game • Each group dribbles in weaves (like a snake slithering), making snake noises. • When coach says stop, all three snake parts (head, belly and tail) should be close
together.
13

• Have players switch parts: head goes to tail, tail steps up to belly, belly steps up to the head.
• Restart dribbling. • After a couple of trys, add points for snakes that stay together, or stay in play, or
don’t bump into other snakes. •
3. Runaway Truck (Source: Henry Brush) Set-up:
• Rectangular area with cones. • Each player has a ball.
DIAGRAM 5: Runaway Truck
Game: The coach will call out different commands.
• “Green light” and the players should start dribbling at medium speed, and must avoid running into other players.
14
• “Forgot your shin guards” the player stops the ball with the sole of their foot and then rolls it backward, turns around and goes in the other direction.
• “Flat tire on the left side” means they must only dribble with their right foot. • “Starting to rain” means they have to turn on their windshield wipers, which
includes moving your foot over the top of the ball from the inside to the outside, switching feet with each wipe.
• “A dirty car” means you have to wash your car, put the sole of your foot on the ball and role it back and forth.
• “A broken down car” means you need to stop your ball and then find a new one, i.e., everyone switches balls.
• “Your parents are running late for soccer practice and they have do drive fast to get there on time” means everyone dribbling around the rectangle as fast as they can.
• “Runaway truck!!” means everyone has to avoid having the coach touch their ball. If the coach touches their ball they have to do six toe touches to get back in the game. You can include a lot of loud truck noises at this point.
Variations:
• Silly one is to yell “roller coaster,” players pick up their ball, throw it up in the air, and catch it, stop, drop and roll.
• You can make up additional ones or change the name of the game, for example use a pirate theme instead.
4. Gates Set-up:
• Pairs of cones spread around inside rectangular area. • Each player has a ball.
15

DIAGRAM 6: Gates (Dribbling)
Game:
• Every time player dribbles between a pair of cones he/she gets a point. They can not go through the same pair twice.
• Introduce some competition: o Have players dribble for 2 minutes and see if everyone can get at least 10
points. At the end of 2 minutes, players say how many points they have. o Increase the target number of points and repeat.
Variation:
• The players dribble around and now have to knock the cones down with their ball (not their feet). How long does it take to knock them all down? The coach can set them up again as they get knocked down. Ask players, why are the cones getting knocked down (or why not)?
5. Red Light, Green Light! Set-up:
• A large rectangular area. • Each player has a ball.
16

DIAGRAM 7: Red Light, Green Light
Game:
• The players line up with a ball at one end of the field. • The coach stands at the other end. • Coach turns away from players, calling ut “green light.” • After a few seconds, Coach yells “red light” and turns around. • The players have to stop the ball with the sole of their foot and freeze. If coach
sees them moving or they do not have the ball, they have to return to the starting line.
• The first player to hit the coach with the ball wins the game. • Repeat.
6. Sharks and Minnows Set-up:
• A large rectangular area. • Each player has a ball.
17

DIAGRAM 8: Sharks & Minnows
Game:
• The players line up at one end of rectangle with a ball. • The players are the minnows and the coach is the shark. The shark forgot to eat
breakfast this morning and is very hungry. The minnows have to swim/dribble to the other end without the shark touching their ball.
• Coach shouts, “Swim away fishes!” • If the minnow’s ball is touched, they become a shark.
Variations:
• When there are several sharks, make it easier on the minnows by requiring several sharks to hold hands. If they let go of each others hands, they can not catch the minnows.
• If the minnows go out of the rectangular area, they become a shark. 7. Eggs!
Set-up:
• Small square area • Each player has a ball
18
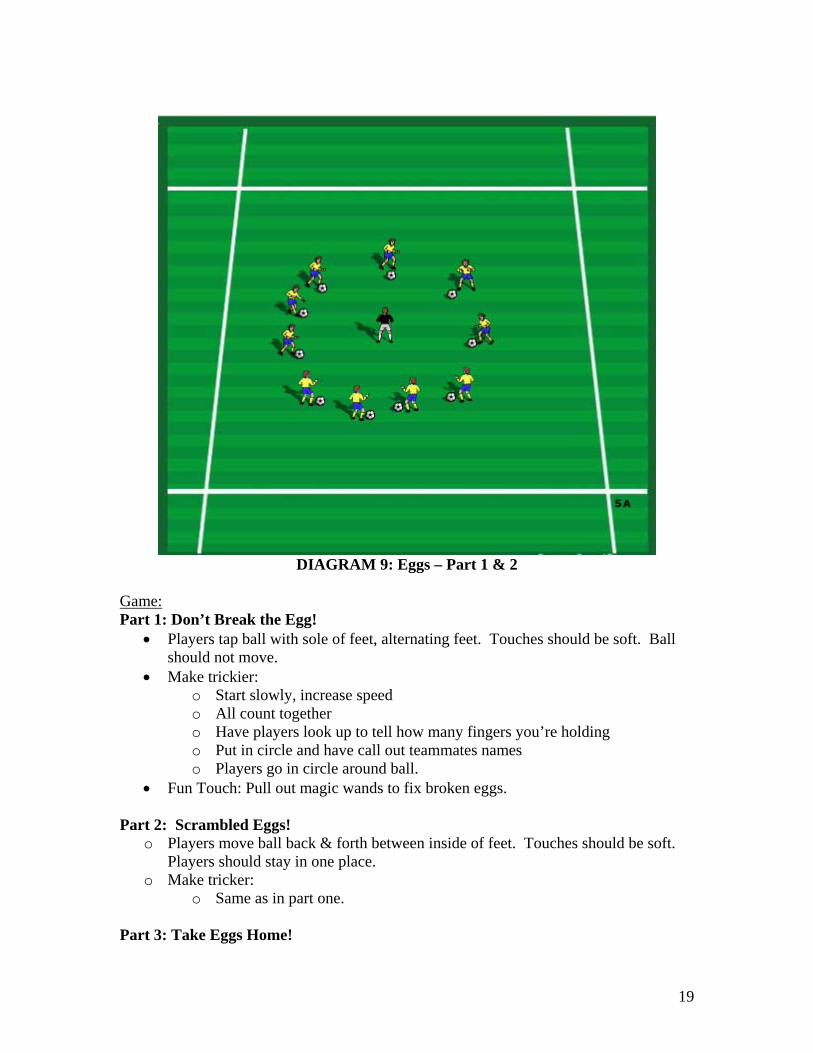
DIAGRAM 9: Eggs – Part 1 & 2
Game: Part 1: Don’t Break the Egg!
• Players tap ball with sole of feet, alternating feet. Touches should be soft. Ball should not move.
• Make trickier: o Start slowly, increase speed o All count together o Have players look up to tell how many fingers you’re holding o Put in circle and have call out teammates names o Players go in circle around ball.
• Fun Touch: Pull out magic wands to fix broken eggs.
Part 2: Scrambled Eggs! o Players move ball back & forth between inside of feet. Touches should be soft.
Players should stay in one place. o Make tricker:
o Same as in part one.
Part 3: Take Eggs Home!
19

o Players dribble around the rectangle slowly, making sure every time their foot touches the ground it also is touching the ball. Players can use any part of foot other than toe, but start with inside of foot. Players should avoid bumping into each other, or breaking eggs by having them touch other players or balls.
o Make trickier: o Change speed and/or direction on a command. o Count how many people they can go by o Count how many hands they can slap as go by
DIAGRAM 10: Eggs – Part 3
Variation:
o In Part 3, have them move ball only with sole; or only with inside and outside of one foot, than the other.
8. World Cup Nations Set-up:
• Square area • Each player has a ball
20

DIAGRAM 11: World Cup Nations
Game: • Have players label each side of square a nation in the recent World Cup (Indicated
in Picture by #1-4.) • Start players dribbling around in square. (See “A” in the Picture.) • Call out one of the “Nations.” (In the Picture, “#2” has been called out.) • Players must dribble to that side. (See “B” in the Picture—all dribbling to “#2”.) • When all there, have them do something fun related to that nation (i.e., France:
Stand like Eiffel Tower) • All return to dribbling in square. • Call out another nation. • Repeat.
Variations:
o Make it individual competition o Make it a team competition – two teams (in different colors). Whole team has to
get to the correct side to win.
21

9. Buzz Lightyear Set-up:
• Small square area • Cones spread randomly in circle around the square. Cones should be at least 10-
15 yards away from square. • Each player has a ball. • Ask players if they know Buzz Lightyear. If not, explain. If so, ask them what he
shouts when taking off: “To Infinity & Beyond.” • Tell players that they are on a space-ship (the square). When they hear “To
Infinity & Beyond,” they have to race out to one of the stars (the outer cones). Only one “Buzz” can be at each star.
• Players only come back to ship when hear “Return to Ship.”
DIAGRAM 12: Buzz Lightyear
Game:
o Have players dribble around grid. (#1 in Picture.) o When coach shouts, “Infinity & Beyond,” players dribble out to an open star. (#2
in Picture). o Call them back in by shouting “Return to Ship.”
22

Variations:
o Make it a race out. o Make it a race out and back (after return command). o Have players call out commands. o Have players go out to star in fun ways (with nose, backwards, on their head, etc.) o This can be a passing game, by having half the players at a star, the other half in
the grid. At command, they pass the ball out to their teammate, and then back in. 10: Alligator Alley Set-up:
• Wide, narrow rectangular area • Each player has a ball
DIAGRAM 13: Alligator Alley
Game:
o Pick several players to be “alligators.” They are inside the rectangular area (the Alley). They cannot leave the alley.
o All other players are outside the rectangle on one long side.
23

o On command, players try to dribble through the rectangle, without loosing ball to an “Alligator.”
o Make sure send players only one direction through the rectangle (have players already through wait on other side for command to come back through).
o After several repetitions, change alligators. o Decrease or increase number of alligators based on success level
Variation:
o Urge players to find gaps between alligators by going sideways outside of rectangle before attacking straight ahead.
o This can be a passing game, by placing players on both sides of the “alley,” and saying they have to pass the ball by the alligators.
11. Boo!! Set-up:
• Wide, narrow rectangular area • Cone “walls” spread across field, separated by “doors” (gaps). Have a gap on
each side of field (the flanks) • One parent stands behind each “wall.” • All players are on the far end. Each player has a ball.
DIAGRAM 14: Boo!!
24

Game: • On coach’s command, players try to dribble through the “doors” and get to the
other side of the field. • Parents jump out from behind the “wall,” into the opening (the door), and shout
“Boo!” (Parents should stay behind the wall for the first several runs, so that the players figure out what are the “doors” and “walls.”)
• Player must change direction of dribble to find an open door—one without a parent shouting “Boo!”
• Players always can run the flanks. 12. Haunted Trees
Set-up:
• Wide, narrow rectangular area • Parents spread around the field, standing with legs spread apart, waving arms. • All players are on the far end. Each player has a ball.
DIAGRAM 15: Haunted Trees
25

Game: • Players try to dribble to other end, not bumping into or being distracted by the
haunted trees (the parents). • Variations to use:
o Dribble as fast as possible to other side; o Weave around as many trees as possible by the count of “20” o Push ball through as many “tree trunks” (parents spread legs) as possible o Have Haunted Trees walk around.
26

Stealing the Ball Don’t Charge the Bull Coaching Pointers: 1. Get between Ball and Goal 2. Contain & Shepard 3. Don’t Swing 4. Poke and Block Tackles Feet & Body 1. Light & Balanced on Feet 2. Feet Diagonal, not Parallel 3. Move Body & Feet to Ball; Not Just Legs & Feet 4. Drop Step 5. Ankle Locked on Tackles
KEY TO DIAGRAMS
27

Games for Stealing the Ball This is a useful five-game progression for helping players learn how to safely steal (tackle) the ball. You will need to keep repeating basic “rules,” such as “no swinging” and “no sliding” (Slide Tackles are a valuable technique for the older player to develop and use.) 1. Mirrors (Variation on Simon Says) Set-up:
• Whole team in large rectangle area • No balls
DIAGRAM 16: Mirrors
Game:
• Coach asks team as group to “mirror” his stances – o Good feet (Right or Left set in front of the other--diagonal); Bad feet (Feet
set even—parallel)
28
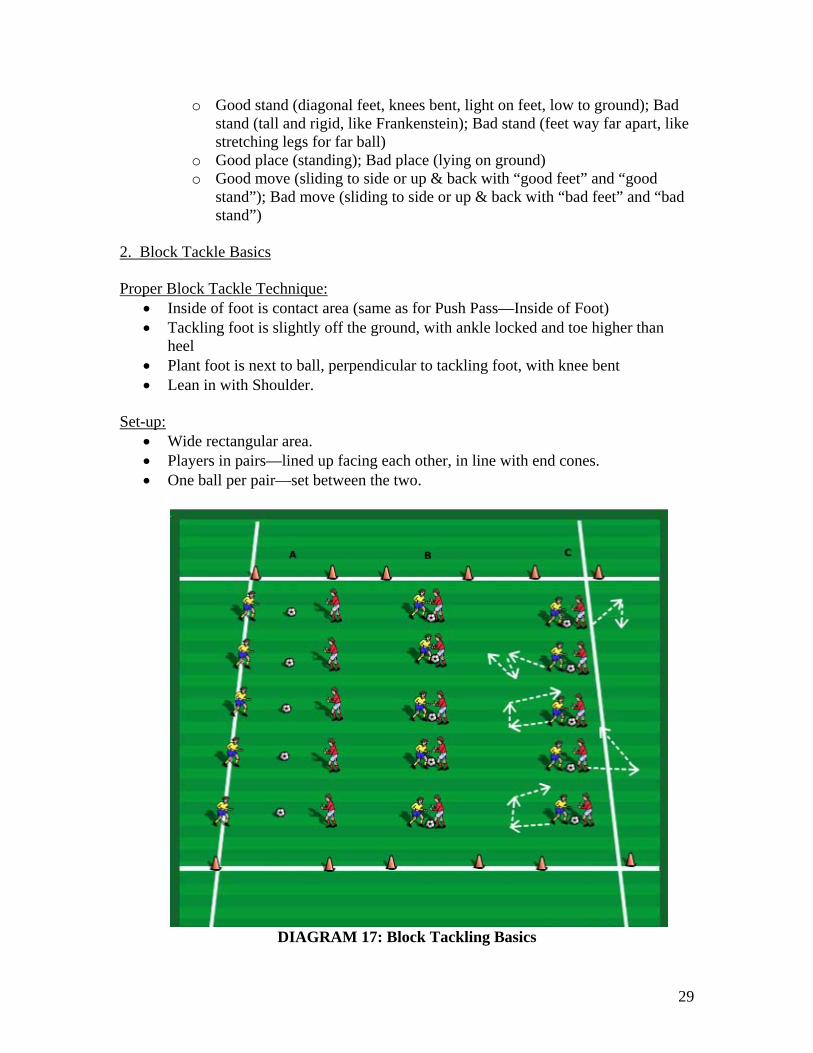
o Good stand (diagonal feet, knees bent, light on feet, low to ground); Bad stand (tall and rigid, like Frankenstein); Bad stand (feet way far apart, like stretching legs for far ball)
o Good place (standing); Bad place (lying on ground) o Good move (sliding to side or up & back with “good feet” and “good
stand”); Bad move (sliding to side or up & back with “bad feet” and “bad stand”)
2. Block Tackle Basics Proper Block Tackle Technique:
• Inside of foot is contact area (same as for Push Pass—Inside of Foot) • Tackling foot is slightly off the ground, with ankle locked and toe higher than
heel • Plant foot is next to ball, perpendicular to tackling foot, with knee bent • Lean in with Shoulder.
Set-up:
• Wide rectangular area. • Players in pairs—lined up facing each other, in line with end cones. • One ball per pair—set between the two.
DIAGRAM 17: Block Tackling Basics
29

Game: • Version 1: On Coach’s single, players try to pin the ball between their right feet,
and then their left feet (In Picture, A & B.) • Version Two: On Coach’s single, players try to win a ball set directly between
them; Player that wins the ball tries to possess it (dribble with it) until the coach says stop. Player with the ball gets a point. (In Picture, A, B & C.)
• [PICTURE BELOW shows the same five pairs of players in each step of the three sequences in the Block Tackle games: A = Starting Point; B = Block Tackle; C = One Player Wins Ball and Dribbles Away.]
3. Matador: Controlling the Bull Set-up:
• Wide and narrow rectangular area • Players in pairs—lined up on one long side • No Balls at First
DIAGRAM 18: Matador Part I
30

DIAGRAM 19: Matador Part II
Game:
• One player is the bull (offense); other is the matador (defense). • Offensive player walks toward other side of grid, cutting back and forth;
Defensive player tries to stay in front of offensive player, moving feet and body. • Switch roles at other side. • Increase pace from walk to jog to run.
Variation:
• As players improve dribbling in other activities, can add ball. 4. 1 v 1 Roll-Out Set-up:
• Small rectangular area • Six players per grid • Three on one long-side are offense; three on opposite long-side are defense • Coach is on one short-side with six balls
31

DIAGRAM 20: 1 v 1 Roll-Out
Game:
• Coach rolls ball to first player in offense line (#1). Player tries to score on first player in defense line (#3), who moves to close and attempt tackle (#2).
• Offense gets point for dribbling across opposing line (not passing or shooting it). • Defense gets point for stealing ball and passing to coach. • Players return to their designated lines. • Coach starts new play fast, immediately after score or ball goes out. • After several repetitions, switch role of lines from offense to defense.
Variation:
• Don’t designate which line is offense or defense; that is determined by: o Line where coach rolls ball; or o Player who wins a ball rolled into the middle of grid.
5. Adding a “Stealer” (Defender) to Any Offense Game Set-up:
• Nearly all of the dribbling games, as well as the “striking the ball” games, can become “defender games” by adding one or more defenders.
32

Striking the Ball
• Knowing My Target; Knowing My Decision. • Power Flows from Technique
Coaching Pointers 1. Eyes on Ball, Then Check Target 2. Plant Foot – Next to or Behind the Ball 3. Striking Foot
o Ankle Locked o Toe up or down (see below)
4. Swing & Follow Through – Foot, Knee, Arms 5. Light on Feet & Good Balance Parts of Foot: Inside/Push Pass – Toe Up Instep/Laces – Toe Down Outside – Toe Down Toe Ways to Change Difficulty:
1. Make space smaller (harder); Make space larger (easier). 2. Create safe zones for players who are receiving passes – teach going to space 3. Add defenders (or stealers)
KEY TO DIAGRAMS
33

Games for Striking the Ball 1. Coconut Tree (Source: Henry Brush) Set-up:
o Players in pairs with two balls and a flat cone.
DIAGRAM 21: Coconut Tree
Game:
o The ball (“coconut”) is placed on top of a flat cone (not shown in the above picture).
o The players kick back and forth trying to knock the coconut out of tree. Have them do this with their left and right foot.
o How many coconuts can they knock out of the tree? 2. Ghost Busters Set-up:
o Make a narrow lane with your cones.
34

o Each player has a ball o Divide the players into two teams.
DIAGRAM 22: Ghost Busters
Game:
o Have Team One line up at one end, each player with their ball o Have Team Two line -up on both sides of the lane, each player with a ball. o Coach calls out “Ghost Busters,” Team One tries to dribble to the other end of the
lane without their ball or feet getting hit by Team Two’s balls. Team One counts how many balls or players feet they hit. (Warning: Insist that all balls go lower than the knee. Points only scored for hitting a ball or feet.)
o After Team One has several tries, switch roles. Variation:
o Have one Team dribbling around inside grid, with other Team around the outside, trying to hit players’ balls and feet.
3. Gates Passing (Static and Dynamic)
35

Set-up:
• Pairs of cones around your rectangular area. • Players are in pairs, with one ball per pair.
DIAGRAM 23: Gates Passing (Static)
Game – Static Version:
• Players pass back and forth with the requirement that the ball passes between the cones.
• Each completed pass is a point. How many points can each team score?
36

DIAGRAM 24: Gates Passing (Dynamic)
Game -- Dynamic Version:
• Diagram 24 only shows one pair (A & B) to help explain the movement of each player and the ball. In practice, there would be five pairs moving around the grid passing through cones. The “crowd effect” is useful developmentally.
• Players move around the rectangular area in pairs, one ball per pair. • Players pass to each other with the ball passing between any one set of cones. • They must move to a new pair of cones after each pass. • Each completed pass is a point. How many points can each team score?
37

Small-Sided Games Coaching Pointers 1. Allow lots of touches 2. Allow free movement – Don’t lock players into positions or channels 3. Reward players moving up and back, left and right on the field 4. Break the beehive – Encourage players moving to space 5. Reward creativity 6. Facilitate success – make field size conducive to success More Space: Easier for Offense; Harder for Defense Less Space: Easier for Defense; Harder for Offense
KEY TO DIAGRAMS
38

Examples of Games 1. End Zone Scoring Set-up:
• Large rectangular grid with end zones at both ends • Two teams of three players • One ball (with extra available)
DIAGRAM 25: End Zone Scoring – Dribble to Score
Game:
• Players play 3 vs. 3 • Score by dribbling ball completely across opposite end line. • Players may pass before dribbling across, or try to do it all on own. • Coach should feed in balls promptly to keep game moving.
39

DIAGRAM 26: End Zone Scoring – Pass to Score
Variation:
• Players try to pass across end line to score. 2. Multi-goal Games Set-up:
• Large rectangular grid • Two teams of three players • One ball (with extra available) • Two goals set at both ends • Variation: Goals set on each side of rectangle (all four sides).
40

DIAGRAM 27: Multi-Goal Games
Game:
• Players play 3 vs. 3 • Score by dribbling ball completely through goal. • Players may pass before dribbling across, or try to do it all on own. • Coach should feed in balls promptly to keep game moving.
Variation:
• Players try to pass ball into goal to score. 3. Chameleon 3 v 3 Set-up:
• Large rectangular grid • Two teams of three players • A coach (or strongest player) is added as a free player (Chameleon) for whichever
team has the ball. The Chameleon cannot score. (“C” in Diagram 28.) • One ball (with extra available)
41

DIAGRAM 28: Chameleon 3 v 3
Game:
• Players play 3 vs. 3, with addition of the Chameleon (“C”). • Score by dribbling ball completely across opposite end line or through goals. • Coach should feed in balls promptly to keep game moving.
Variation:
• Players try to pass across end line or into goal to score. 4. Free Wings (This will be challenging for young players.) Set-up:
• Large rectangular grid • Two teams of three players • Place two players (one for each team) along each sideline—they are in a free
zone, and cannot be challenged when the ball is passed to them. They must pass the ball back to their team; they cannot score.
• One ball (with extra available)
42

DIAGRAM 29: Free Wings
Game:
• Players play 3 vs. 3, with addition of the Free Wings. • Score by dribbling ball completely across opposite end line or through goals. • A team must pass to a Free Wing before scoring. • Coach should feed in balls promptly to keep game moving.
Variation:
• Players try to pass across end line or into goal to score.
43
RESOURCES This manual contains just a small sample of the ideas, activities, and games that coaches of ASC’s youngest players may draw on to hook them to soccer. While the material here should carry coaches through much of the fall and spring clinic program, please explore the range of materials ASC has made available to coaches. Recommended:
1) The MLS website, which you may access free of charge. Go to www.soccermadesimple.com, username: arlingtonsoccer, password: smscd04. You will find up to 10 weeks of practice sessions.
2) The DVD, “The Novice Coach: An Introduction to Coaching Youth Soccer,”
from US Youth Soccer. Featuring Sam Snow, a youth coaching guru, the DVD is invaluable. This DVD was distributed at the Fall 2005 coaches meeting.
3) The Arlington Library has books and videotapes on coaching soccer.
4) I personally recommend The Baffled Parent’s Guide to Great Soccer Drills, by
Tom Fleck and Ron Quinn (Ragged Mountain Press, 2002). Fleck and Quinn helped create the new National Youth License Course (“Y“ License) now offered by the United States Soccer Federation and US Youth Soccer. Despite an off-putting title (Baffled? Drills?), the book is superb—it opens with a valuable philosophy and set of guiding principles, before presenting 125 easy to understand and use activities. You would need to purchase this book on-line or in a bookstore.
5) I also recommend the Web site www.soccerspecific.com. Created by Anthony
Latronica (National “A” License; Assistant Men’s Coach, Harvard University), SoccerSpecific.com provides a treasure trove of coaching advice, insights and information. Of special note is access to “session planning software,” which I used in creating this manual. There is a membership fee for the site.
______________
44