arizona department of water resources gwsi quick reference
TRANSCRIPT

Arizona Department of Water Resources
GWSI Quick Reference User’s Guide for GWSI Web Application
2010

INTRODUCTION This User’s Guide is a reference on how to get started with the Groundwater Sites Inventory (GWSI) Web Application. There are links provided throughout the document to provide further documentation of the application. For a more complete description of the application please refer to https://gisweb.azwater.gov/gwsi/2009AHSPaper.pdf. For further information on GWSI wells please visit: http://www.azwater.gov/AzDWR/Hydrology/default.htm. In order to use this application open your internet browser to https://gisweb.azwater.gov/waterresourcedata/GWSI.aspx. From this webpage you will enter the application by one of two methods: Search Wizard or Map. Both methods will provide registered well information. All of the pages within this application are interlinked. The user guide will explain the four main pages of the application:
1. Search Wizard 2. Map 3. Hydrograph 4. Well Details
GWSI Web
Search Wizard
Interactive Map
Well Details
Interactive Hydrograph
Data Download
User 1
GWSI Entry Page
User 2
Figure 1. Diagram displaying the different parts of the GWSI Web Application

Well Registry User’s Guide
Page 3 of 8
SEARCH WIZARD The search wizard walks the user through a short series of questions to help narrow the search for GWSI records of interest. Choose to search by individual well identification numbers or by spatial filters such as basin, subbasin, cadastral, or USGS topo quad.
Figure 2. Search Wizard
At the end of the questions, click the View Results button. Then a results table will show
up below the last question. The results table is a summary of information for each
GWSI site. The records shown in red are automated sites, blue records are index wells
and the rest are other GWSI records. There is the option to sort your results in the
table, to help get to the data of interest quicker. For example, if you are looking for wells
with recent water levels, you could sort the water level date (WL Date) field.
When the results table is displayed, a toolbar is also displayed just above the results
table. This toolbar provides you different options to view more information. The toolbar
buttons are: Well Info, Hydrograph, Auto Site Hydrograph, Map, Data Export, Water
Level Export, and Auto Water Level Export. To use the Well Info button, you must select
a record in the results table (by clicking anywhere on that record’s row), and then click
the Well Info button. This action opens a new well information page that displays all the
information in the GWSI database for that particular well. To view a wells hydrograph,
click the well record of interest, then click the Hydrograph button. The Map button
opens a new window with the GWSI interactive map, which is zoomed into the area of
the well you selected before clicking the Map button. The Data Export button will export
your current search results to an XML file, which is formatted in a way that allows you to
open it in Microsoft Excel. The GWSI site’s latitude and longitude (in NAD 27, Zone 12)
are included in this data export, so that you can incorporate these data in your own
mapping software. The Water Level Export button downloads all of the standard water
level measurements from your search results to Microsoft Excel. And the Auto Water

Well Registry User’s Guide
Page 4 of 8
Level Export button downloads all of the automated sites water levels within your search
results.
Figure 3. Results Table displaying automated sites in red and index wells in blue
For more help on the data provided in the Results: http://gisweb.azwater.gov/GWSI/GWSI_BOOK2_1.pdf For more help on the Search Wizard: http://gisweb.azwater.gov/GWSI/FAQ.aspx

Well Registry User’s Guide
Page 5 of 8
MAP The map has tools to navigate to GWSI wells within a desired area. The navigation tools are highlighted below in yellow. Use them to move around the map and view wells in an area. When the map scale is below 1:150,000, aerial imagery will become the default background and well labels will appear. Also at or below 1:40,000 map scale, a map tip will appear when the mouse hovers over a well. Click the map tip and a summary of water level information for that well will appear. Use the Hydrograph or Well Info hyperlinks to view those features of the well. For more help on how to use the map: https://gisweb.azwater.gov/GWSI/MapHelp.aspx For more help on the data provided in the Results: http://gisweb.azwater.gov/GWSI/GWSI_BOOK2_1.pdf
Figure 4. Map’s navigation tools in yellow

Well Registry User’s Guide
Page 6 of 8
Figure 5. Map Tips
Well Registry User’s Guide
Page 7 of 8
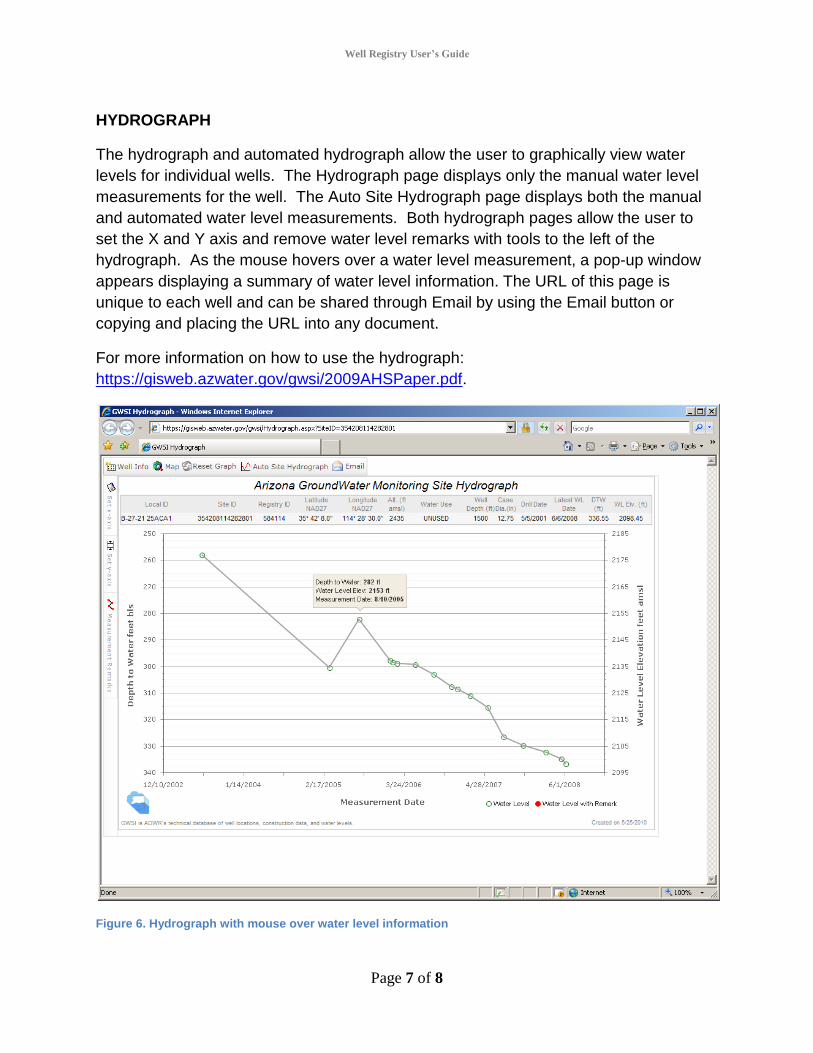
HYDROGRAPH
The hydrograph and automated hydrograph allow the user to graphically view water
levels for individual wells. The Hydrograph page displays only the manual water level
measurements for the well. The Auto Site Hydrograph page displays both the manual
and automated water level measurements. Both hydrograph pages allow the user to
set the X and Y axis and remove water level remarks with tools to the left of the
hydrograph. As the mouse hovers over a water level measurement, a pop-up window
appears displaying a summary of water level information. The URL of this page is
unique to each well and can be shared through Email by using the Email button or
copying and placing the URL into any document.
For more information on how to use the hydrograph:
https://gisweb.azwater.gov/gwsi/2009AHSPaper.pdf.
Figure 6. Hydrograph with mouse over water level information

Well Registry User’s Guide
Page 8 of 8
WELL DETAILS After a search from the Search Wizard has been completed, a well’s information can be viewed. First select the well in the grid and then click the Well Info button above the grid. A new web page will open displaying all of the well’s information. This information is throughout several tabs: General, Water Levels, Construction, Remark, Owner, Pump, Water Quality, Spring, and Photo. All of the data provided can be exported to MS Excel with the Data Export button located in the toolbar on the top of the page. The URL of this page is unique to each well and can be shared through Email by using the Email button or copying and placing the URL into any document.
Figure 7. Well Detail’s page