aqueous parts cleaners - northern tool aqueous parts cleaners fountain industries llc ... ep...
TRANSCRIPT
MODEL KT9400
INSTRUCTION AND OPERATION MANUAL
AQUEOUS PARTS CLEANERS
Fountain Industries LLC
922 East 14th St. Albert Lea, MN 56007
Tel: 800-328-3594 507-373-2351 Fax: 507-373-7404
Email: [email protected] Website: WWW.FOUNTAININDUSTRIES.COM

I. PRECAUTIONS/DANGERS
Read this entire manual before attempting to install your KleenTec jet washer. You will be less likely to make mistakes if you have a grasp of the “whole” picture.
DANGER 1. Your machine uses HIGH VOLTAGE electricity. Obtain the services of a qualified
electrician for all electric work. 2. Do not use any petroleum base chemical or solvent, or any flammable products in
your jet washer. 3. The heating element (s) will be ruined and the pump/motor may get damaged if
they are turned on when the holding tank is empty or has a low water level. Check the water level at least daily.
4. Cleaning will be poor and the heating element (s) and pump/motor may get
damaged if the machine is not cleaned according to instructions. 5. Your jet washer is made with mild steel and will rust unless you use the correct
detergent and follow the correct start-up procedure. If you are not using a KleenTec detergent, make sure the brand you are using is safe on mild steel and has an adequate concentration of rust inhibitors. When installing the unit, don’t fill
the tank with water unless you have the time needed to heat the water to 150-
170F, add the detergent, and run the wash cycle for at least two (2) hours to cat the steel with rust inhibitor. Again, read this entire manual before starting the installation so that you know what is involved. (see “chemical Selection”)
6. Since laws and regulations are forever changing, and since they often vary region
to region, the remarks in this section should only be construed as a general guideline. It is your responsibility to research, understand, and follow the exact environmental regulations of your region.
Protect your environment and protect your business from fines by handling your dirty cleaning solution according to federal, state, and local codes. According to federal regulations, which states have to adopt as minimum standards, the dirty
1

cleaning solutions in a spray washer generally are not “hazardous wastes”. To be considered a hazardous waste a hazardous waste by the U.S. Government, the solution has to have one or more of the following (4) characteristics: a. IGNITABILITY – A solid waste is a hazardous waste if it is a liquid and a
representative sample and has a flashpoint less than 140F. b. CORROSIVITY – A solid waste is a hazardous waste is it is an aqueous
solution and a representative sample, and if it has a pH less than or equal to 2 or grater than or equal to 12.5
c. REACTIVITY – A solid waste is a hazardous waste if a representative
sample reacts violently with water or releases cyanide or hydrogen sulfide when exposed to low pH solutions.
d. EP TOXICITY – A solid waste is a hazardous waste if a representative
sample leaches heavy metals in concentrations greater than 100 times primary drinking water standard concentrations. The two characteristics that you have to be most concerned about are CORROSIVITY and EP TOXICITY. Ask your detergent supplier if the pH of your solution is greater than 12.5 and if so, how it can be neutralized with acid. To check for EP Toxicity, you would need to have a sample tested by a laboratory. Assuming that your solution is not hazardous, or that with minor treatment (e.g., adding acid) the solution can be made non-hazardous, the EPA does not require special storage, documentation, transportation, and processing. Since your solution will have oils, however, you will probably not be able to dump the solution in the sewerage line (call your sewage treatment facility) and you certainly can’t dump the solution on the ground or in a storm drain. Given the above information, the best approach is to clean-up or filter the solution so that the water content can be continually re-used. A dirty solution separates into three (3) layers – oils rise to the top, sludge sits on the tank bottom, and the water layer is in the middle. The surface oils, which are skimmed off with the 9306 skimmer, can generally be stored with your other waste oils. The sludge, most of which is trapped in the “Purifier” section of the tank, is occasionally removed and stored as “hazardous” waste to be conservative.
2
II. CONTROLS/OPERATION

Your jet washer automatically cleans parts by spraying them with a hot, detergent and water solution that is recirculated. The operator loads parts into the basket, shuts the door (lid), and starts the cleaning cycle. During the cleaning cycle, the parts basket rotates through spray curtains, which are created by, spray nozzles located above, below, and outside the turntable. The force of the spray jets, in combination with the heat and the chemical action of the detergent will remove contaminants within minutes. Generally, any contaminant that can be removed, will be removed within 15 minutes. THE HEATING SYSTEM/WATER LEVEL
The wash solution is recirculated from a holding tank, which forms the base of the jet washer. The capacity of the rank is 65 gallons. The correct water depth is 11”. The holding tank is heated with electric heating elements that are controlled by a toggle switch adjustable thermostat. The thermostat is located on the right side, close to the floor. The black adjustment knob is mounted next to the heating element cover.
Most customers set the temperature between 140 and 160F. Below 140F,
many detergents will foam (consult you detergent supplier.) Above 180F, your pump may cavitate, resulting in lower pressure and poorer cleaning results. To turn the heating elements on and off, the Jet Washer has the standard toggle
switch. Allow 3-1/2 hours for a 100 - 110F temperature rise.
3

THE WASH CYCLE/FILTRATION
When the door is closed, the 0-60 minute “WASH” timer starts the wash cycle as soon as it is turned. Generally, a 20-minute wash cycle is more than sufficient to remove the contaminants. During the wash cycle, the solution hits the parts and then returns to the tank via a removable filter basket located beneath the turntable. A limit switch assures that the wash pump can only operate when the door is closed. The limit switch is for safety and is not to be used to purposely stop the cycle. Wait until the wash timer reaches zero before opening the door.
OIL SKIMMER
The skimmer has an 11 1/2” disc that is partially submerged. The floating oils adhere to the disc and subsequently get wiped off and run into a bucket. The skimmer is controlled by a push button switch on the control panel. The skimmer timer allows the skimmer to operate for 45 minutes. DO NOT operate the skimmer while the machine is washing parts
II. INSTALLATION DANGER This machine utilizes HIGH VOLTAGE. Have a certified electrician do
all electrical work. Always disconnect power when opening an electric box.
CAUTION The vibration en route could have loosened one or more wire
connections. Before connecting power, the electrician should check all screw connections in the control and junction boxes.
CAUTION The electrician must check rotation of all motors. CAUTION Don’t turn on the heaters until the tank is full. However, to avoid rust,
don’t fill the tank until you are ready for “start-up”.
4

1. SHIPPING DAMAGE: IF ANY DAMAGE IS FOUND, NOTIFY YOUR CARRIER IMMEDIATELY AND SAVE ALL CRATING MATERIALS FOR THE CARRIER’S INSPECTOR TO EXAMINE. FAILURE TO PROMPTLY REPORT DAMAGE COULD RESULT IN DENIAL OF YOUR CLAIM. A trucking companies procedure for handling damage claims is as follows:
1. Immediately send out an inspector. An inspection report is filled out on the spot, a copy of which is given to the customer;
2. The CUSTOMER has to call the carrier to request a claim form;
3. The customer mails in the claim form and; 4. The claim usually takes two (2) months to process.
IF A UNIT IS SERIOUSLY DAMAGED, YOUR DEALER MAY BE ABLE TO INTERVENE, REQUESTING THAT THE DAMAGED UNIT BE RETURNED AND A NEW UNIT DELIVERED.
2. UNPACKING: To prevent shipping damage some parts may have
been packed inside the machine.
Cut and remove any plastic ties connected to the turntable. 3. LOCATION: Consider the factors below when choosing a location:
If the unit is not vented with a blower, a considerable amount of steam will enter you plant. Make sure this steam will have no adverse affects in the surrounding area.
The process of removing wet parts from the machine will inevitably
result in some water or solution spilling onto the floor. Consider traction mats around the machine and avoid placing the machine next to a walkway.
Allow room for your utility connections and for service. You will
need 36” to unscrew the heating elements.
Make sure the site is level.
5

4. ELECTRICAL HOOK-UP: The voltage, phase, and amperage draw of
the machine are listed on the serial number plate. The wiring diagram is either with this manual or inside the control box (make sure the amperage draws listed on the siring diagram and serial number plate coincide). After the electrician connects power, he should check rotation of all motors. Hopefully, the electrician can be present for “start-up” in case a problem arises.
5. DRAIN CONNECTIONS: The unit has a 2” NPT coupler for draining
the tank.
6. WATER AVAILABILITY: Make sure that a water line is available so that you can add water to the tank on a daily basis.
III. CHEMICAL SELECTION CAUTION KleenTec’s detergents are characterized as “generally safe” on all
metals. This is not an absolute guarantee. If the parts are critical, it is the customer’s responsibility to perform any and all metallurgical tests.
CAUTION KleenTec does not warranty their product against rust. Rust will occur
if the wrong detergent is used, if the start-up procedure is not followed, or if the machine is not used on a regular basis (should oil the inside).
Using the correct detergent is critical to the performance and
longevity of your jet washer. The detergent must be formulated for a mild steel jet washer, meeting the following criteria:
1. The detergent must have rust inhibiting agents to protect the
mild steel machine and your steel parts. Once rusting starts, it can be hard to stop.
2. The detergent should be strong enough to remove the contaminants, but not so strong that it attacks the metal substrate.
6

3. The detergent should only leave an acceptable amount of residue on the parts. For new parts in particular, you may need a detergent that is “free rinsing”.
4. To be used in a jet washer, the detergent needs to be “low
foaming”.
To insure the satisfaction of our customers, KleenTec has developed its’ own line of detergents and additives.
IV. START-UP PROCEDURE CAUTION Do not start this procedure until you have read this manual in its’
entirety. CAUTION Do not fill the tank or start this procedure unless you can spend the 3-
4 hours necessary to heat the water, add detergent, and run the wash cycle for at least 2 hours. Otherwise, rusting may occur.
CAUTION Before turning on the electrical power, make sure the heat switch and
wash timer are off. If the heating elements go on when the tank is empty, they will promptly burn out.
When using your jet washer for the first time, follow the steps below:
1. Make sure the electrical power to the machine is off. 2. Verify that your electrician checked the rotation of all motors.
3. Make sure the heat switch and wash timer is off.
4. Fill the wash tack so that the water depth is 11” (1” below the
top edge of the filter basket.)
5. Turn on electrical power to the machine.
6. Set the thermostat between 150-180F (see “CONTROLS/OPERATION”)
7

7. Turn on the heating element by turning the heater toggle switch on.
Allow 11/2 hours for the water temperature to reach 150F.
8. Turn on the oil skimmer using the on/off switch.
9. When the water temperature has reached at least 140F, add detergent following the detergent manufacturers directions.
You can determine the water temperature by dialing the thermostat knob backward until you hear the heat contactor “clunk” open to shut-off the heating elements. You can pour the detergent directly in the tank, or you can simply pour it on the floor beneath the turntable. In the future, you may want to increase or decrease the detergent concentration depending on the cleaning results.
10. Close the door and run a 15 minute wash cycle to mix the
detergent in solution. 11. During the wash cycle, walk around the machine checking for
any leaks. Make sure the turntable drive motor is working.
12. At this point, you have checked every aspect of your machine. To thoroughly coat the inside of your machine with the rust inhibiting agents in the detergent, run at least two (2) hours worth of wash cycles at this time and for each of the next two (2) days. The more wash time you run, the more the cabinet gets coated with rust inhibitors.
IF YOU ENCOUNTERED ANY PROBLEMS DURING START-UP, CALL YOUR KLEENTEC DEALER.
8
V. MAINTENANCE Assign the responsibility for your jet washer to one person to avoid abuse and neglect. DAILY
1. Check the water depth which should be 11” (1” below the top edge of the filter basket);
2. Clean any spray holes that are clogged. 3. If any solution spilled onto the painted surfaces, wipe it off with fresh water. 4. Clean out the removable filter basket.
WEEKLY
1. Clean the oil skimmer, removing any build-up from the wiper blades and drainage canals.
2. Check your sludge clean-out schedule and remove the sludge if necessary. TANK CLEAN-OUT/SLUDGE REMOVAL Given the many different types and sizes of businesses that use KleenTec’s jet washers, it is not possible to recommend a time schedule for cleaning out your tank. For some businesses the tank needs to be cleaned at least once a week while others can go months before they need to clean out the tank. Obviously, the clean out schedule will be based on your cleaning volume, and on the amount of contamination on your parts. To prolong the clean out schedule in dirty rebuilding type applications, it often makes sense to scrape off caked on grease, dirt, etc… before putting the parts in the jet washer. The tank should be cleaned out after the tank has accumulated more than 1” of sludge. Clean the tank after the first week of operation to determine what your clean out schedule should be. To remove the sludge, follow these steps: 1. Disconnect power to the machine or make sure the pump and heat circuits are
off. 2. While the turntable does not have to be removed, the tank area is more
accessible when the turntable is taken out. To remove the turntable, back the
9

wirewheel away from the turntable rim by loosening the spring tension. Pull the turntable straight up until its’ shaft comes out of the bearing assembly.
3. Remove the front screen. 4. Pump the water (we recommended an air operated diaphragm pump) into one or
more drums. As stated earlier in this manual, you can normally re-use this water many times before disposal is required.
5. Scrape the sludge out of the tank and handle it according to governing
regulations. 6. Pump the water content back into the tank or fill the tank with fresh water so the
water depth is 11”. 7. If you have a problem with clogged spray holes, you may need to flush out the
spray pipes.
Remove any pipe caps. Run a brief 30 to 60 second – wash cycle to flush out the sediment. (CAUTION: Running a longer wash cycle could damage the pump motor.)
8. Replace the turntable and tighten the compression spring on the gear motor. 9. Adjust the detergent concentration, and replace the cover plates. MONTHY
1. Check all external hoses for leaks or weaknesses and replace if necessary. Check these hoses during a wash cycle to see if a bubble forms in the hose lining.
QUARTERLY 1. Check the drive wheel for wear and replace if necessary.
10

VI. TROUBLE SHOOTING GUIDE SYMPTOM Nothing works-heat or pump Cleaning is poor Solution won’t get hot Turntable is not rotating wheel is not working
PROBLEM/REMEDY 1. Breaker is off/on machine 2. Check all control fuses 3. If breaker keeps tripping, or control
fuses keep burning out consult your dealer
1. Wrong detergent, low detergent
concentration, or hard water 2. Clogged nozzles 3. Solution is too dirty 4. Turntable is not rotating (see below) 5. Solution is not hot (see below) 6. Low output from pump (see below) 7. Nozzle pattern needs
adjustment/consult factory 1. Heat contactors pull in, but there is
voltage to heaters. One or more heating elements are bad
2. Heat contactor pulls in, but NO voltage to heaters. Bad contactor or bad wire connections.
3. Heat contactor does NOT pull in but there is voltage going to coil of cantactor. Replace heat contactor.
4. Heat contactor does not pull in and there is NO voltage to coil of heat contactor. One of the switches is bad – heater toggle switch, thermostat, or liquid level sensor if your machine has one.
1. Gear motor which drives friction
wheel is worn-out or is slipping on gear motor shaft
2. Turntable is frozen, jammed, or tilted 3. Tighten spring
11

Pump motor comes on but not pumping or pumping very little Pump motor won’t go on, but gear motor works Pump & gear motor is not working Nozzles clogging frequently manifolds need to be cleaned Solution is foaming Getting rust inside the cabinet Oil skimmer is not working defective/check settings
12
1. Water level is too low 2. Pump is rotating backwards (see
arrow on motor) 3. Pump is broken 4. Solution is foaming 5. Spray manifolds or filters clogged
with dirt 6. Solution temperature is too
high/boiling 7. Something caught in pump 1. Pump motor has internal problems.
Call factory. 2. If motor doesn’t run check motor
contacts. 1. Defective motor starter 2. Defective wash timer 3. Defective door limit switch 1. Filter basket, tank, and/or spray more
often 1. Wrong detergent. Not designed for a
jet washer 2. Started wash cycle when solution
was cold 3. Concentration is too low. Add more
detergent 4. Water level is too low 5. Add defoamer 1. Wrong detergent. Remove rust and
use detergent with rust inhibitors 2. Did not use the machine enough in
the first couple of days/remove rust, charge with two times the normal detergent level, and run the pump continuously for 1-2 days
3. Machine is used too infrequently 1. On/Off switch is defective. 2. Small motor on the skimmer is
defective 3. Wiper blades too tight against disc

KT9400 REPLACEMENT PARTS LIST
PUMP & MOTOR 5133
SKIMMER MOTOR 7574
DRIVE MOTOR 5132
60 MINUTE TIMER 5135
12 HOUR TIMER 5165
RELAYS 9067
TOGGLE SWITCHES 8504
INDICATOR LIGHTS 7103-1
HEATER 5126
THERMOSTAT 5161
WIRE WHEEL 5136
FUSES 5154
13
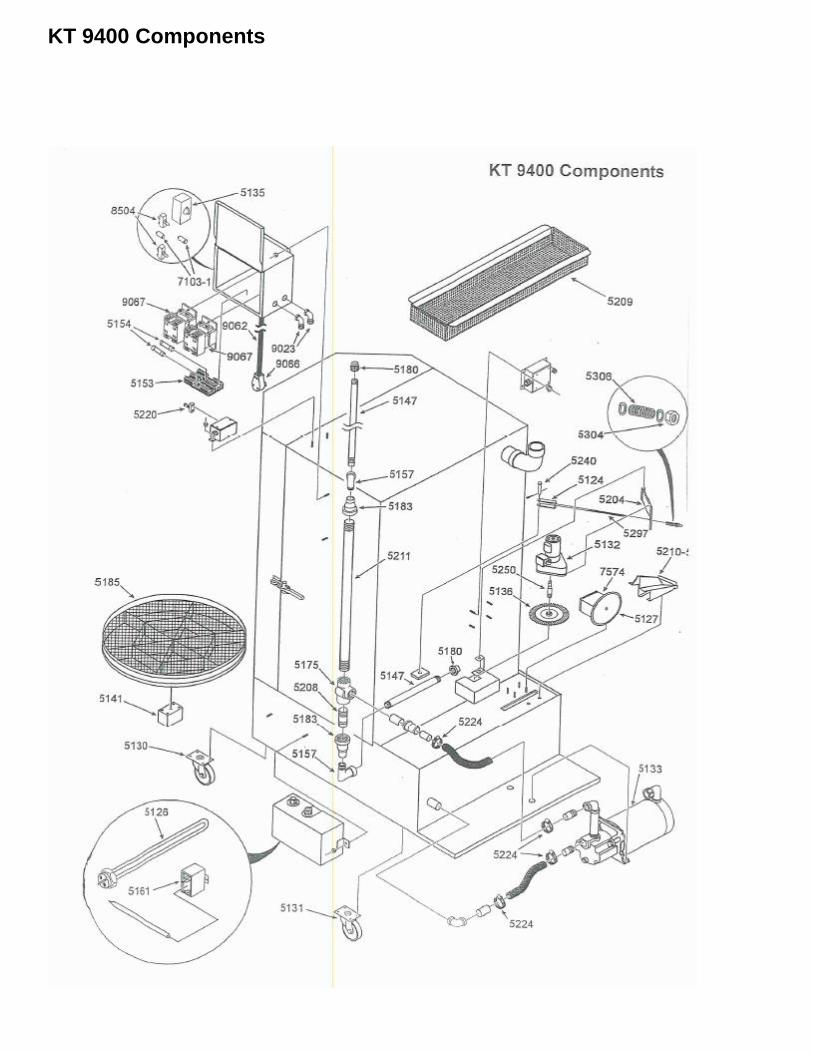
KT 9400 Components

TROUBLESHOOTING
PUMP MOTOR COMES ON BUT NOT PUMPING OR PUMPING VERY LITTLE.
WATER LEVEL IS TOO LOW
PUMP IS ROTATING BACKWARDS (SEE PUMP ARROW)
PUMP IS BROKEN
SOLUTION FOAMING
SPRAY MANIFOLDS OR FILTER CLOGGED
SOLUTION TEMPERATURE IS TOO HIGH
SOMETHING CAUGHT IS PUMP
SOULUTION: CLEAR ALL DEBRISS FROM PUMP FILTER, SUCTION PART OF PUMP BELOW THE FLUID SURFACE

KT 9400 Schematic

Warranty and Limitation of Remedies and Disclaimer
(1) Fountain warrants the Equipment to be free from defects in material and manufacture and to conform to specifications for the Equipment at the time of shipment. This warranty is applicable
only if the Equipment is installed, operated and maintained in accordance with factory recommendations and procedures. If any Equipment fails to conform to the specifications or samples or
any defect in material or manufacture appears within twelve (12) months from the date of shipment, Fountain’s entire liability, and Customer’s exclusive remedy, shall be, at Fountain’s option,
either to repair or replace such defective Equipment within a reasonable time after written notification thereof and return of the defective Equipment to Fountain.
(2) THIS WARRANTY IS MADE IN LIEU OF ALL OTHER WARRANTIES, EXPRESS OR IMPLIED, INCLUDING, BUT NOT LIMITED TO, THE IMPLIED WARRANTY OF
MERCHANTABILITY, THE IMPLIED WARRANTY OF FITNESS FOR A PARTICULAR PURPOSE, ANY IMPLIED WARRANTY ARISING OUT OF A COURSE OF DEALING OR
OF PERFORMANCE, CUSTOM OR USAGE OF TRADE EXCEPT OF TITLE AND AGAINST PATENT INFRINGEMENT.
(3) LIMITATION OF LIABILITIES; TIME LIMIT FOR FILING ACTION. NEITHER PARTY SHALL UNDER ANY CIRCUMSTANCES BE LIABLE TO EACH OTHER FOR
DAMAGES OF ANY KIND, INCLUDING, WITHOUT LIMITATION, DIRECT, INDIRECT, INCIDENTAL, SPECIAL OR CONSEQUENTIAL DAMAGES (INCLUDING, BUT NOT
LIMITED TO, LOSS OF PROFITS, REVENUE OR BUSINESS) RESULTING FROM OR IN ANY WAY RELATED TO THE EQUIPMENT, ANY OF CUSTOMER’S PURCHASE
ORDERS, THESE T’S AND C’S OR THE TERMINATION OR NONRENEWAL THEREOF.
FOUNTAIN’S LIABILITY ON ANY CLAIM OF ANY KIND (INCLUDING NEGLIGENCE) FOR ANY LOSS OR DAMAGE ARISING OUT OF OR RESULTING FROM THIS
AGREEMENT, OR FROM THE PREFORMANCE OR BREACH THEREOF, OR FROM THE EQUIPMENT FURNISHED HEREUNDER SHALL IN NO CASE EXCEED THE PRICE
OF THE SPECIFIC EQUIPMENT WHICH GIVES RISE TO THE CLAIM. ALL SUCH LIABILITY SHALLTERMINATE UPON THE EXPIRATION OF THE WARRANTY PERIOD AS
STATED.
This limitation applies of whether such damages are sought based on breach of contract, negligence, strict liability in tort or any other legal theory.
(4) Any action for breach of warranty or any other obligation under these T’s and C’s must be commenced within one year from the purported date of breach. (5) Each limitation on liability or
limited or exclusive remedy set forth in these T’s and C’s is independent of any other limitation or remedy and if any such limitation or remedy fails of its essential purpose or is otherwise held
to be unenforceable, that shall not affect the validity of any other such limitation or remedy.
Fountain assumes no liability for any claims for injury or damages to persons or property arising from any chemicals manufactured by Customer or by third party vendors for use in Fountain’s
equipment.
Terms or conditions contained in any Customer purchase order or other similar document that in any manner purport to alter, modify, change or suspend these terms shall be deemed excluded
from such purchase order and waivered by Customer.
Fountain Industries LLC. 922 East 14th St.
Albert Lea, MN 56007
Tel: 800-328-3594 507-373-2351 Fax: 507-373-7404
Email: [email protected] Website: WWW.FOUNTAININDUSTRIES.COM