aps powerclerk applicant user guide
TRANSCRIPT
APS POWERCLERK APPLICANT USER GUIDE
Table of Contents
A. Accessing PowerClerk ................................................................................................................ 2
B. FormSense ............................................................................................................................... 3
C. Initiating A New Application ........................................................................................................ 5
C.2. Contact & Site Specific Information ...................................................................................... 6
C.3. Technology & Equipment Information ................................................................................... 9
C.4. Rate Rider System Qualification ......................................................................................... 12
C.5. Document Submittal ......................................................................................................... 13
C.6. Authorization & Signatures ................................................................................................ 14
C.7. Submitting Application after DocuSign ................................................................................ 14
D. Granting Project Access ........................................................................................................... 16
E. Application - Revisions Required................................................................................................ 17
F. Application – Engineer Revisions Required .................................................................................. 21
G. Final Documents ..................................................................................................................... 22
H. Final Review – Corrections Needed ............................................................................................ 24
I. Inspection/Meter Set – Corrections Needed ................................................................................ 27
J. Amendment Request ............................................................................................................... 29
K. Withdraw Request ................................................................................................................... 30
APS POWERCLERK APPLICANT USER GUIDE
2
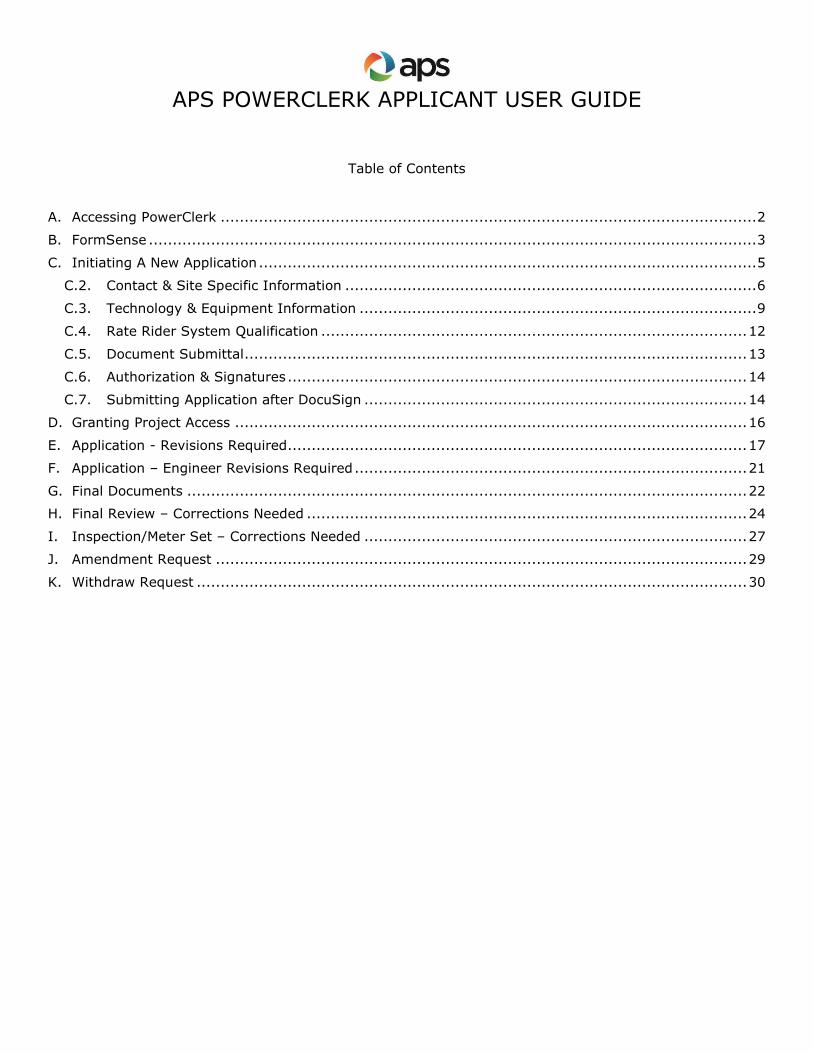
A. Accessing PowerClerk
The APS portal is located at apsint.powerclerk.com
APS Customers installing their own system can initiate an application by logging into aps.com and
selecting the ‘Interconnecting to the grid’ tab, then click ‘View existing applications’.
Instructions for new users on how to register can be found on the Login Page
The APS PowerClerk Home Page will appear as below
APS POWERCLERK APPLICANT USER GUIDE
3
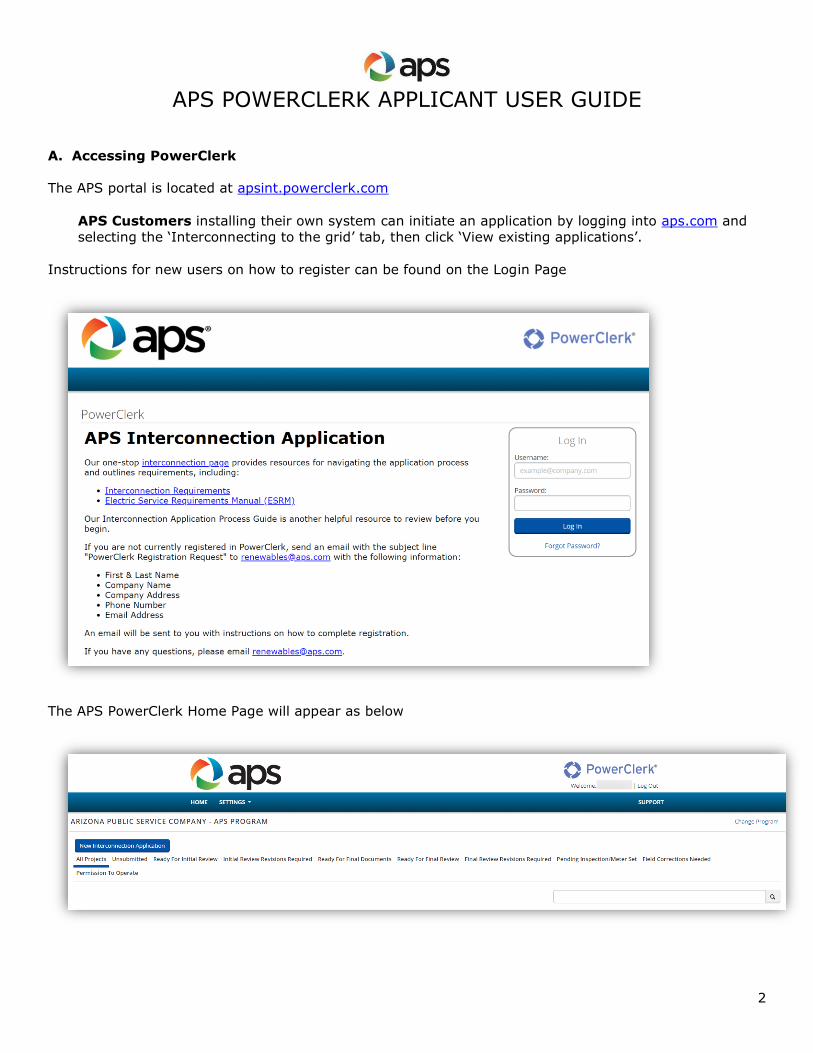
B. FormSense
The FormSense feature in PowerClerk allows you to save time submitting a new application by setting
default values to certain fields that are filled out frequently (e.g., Applicant name and contact, Company
address)
1. Click on the Settings menu
2. Select FormSense
3. Select the Application form from the dropdown list, then click on ‘Edit My Defaults’
APS POWERCLERK APPLICANT USER GUIDE
4
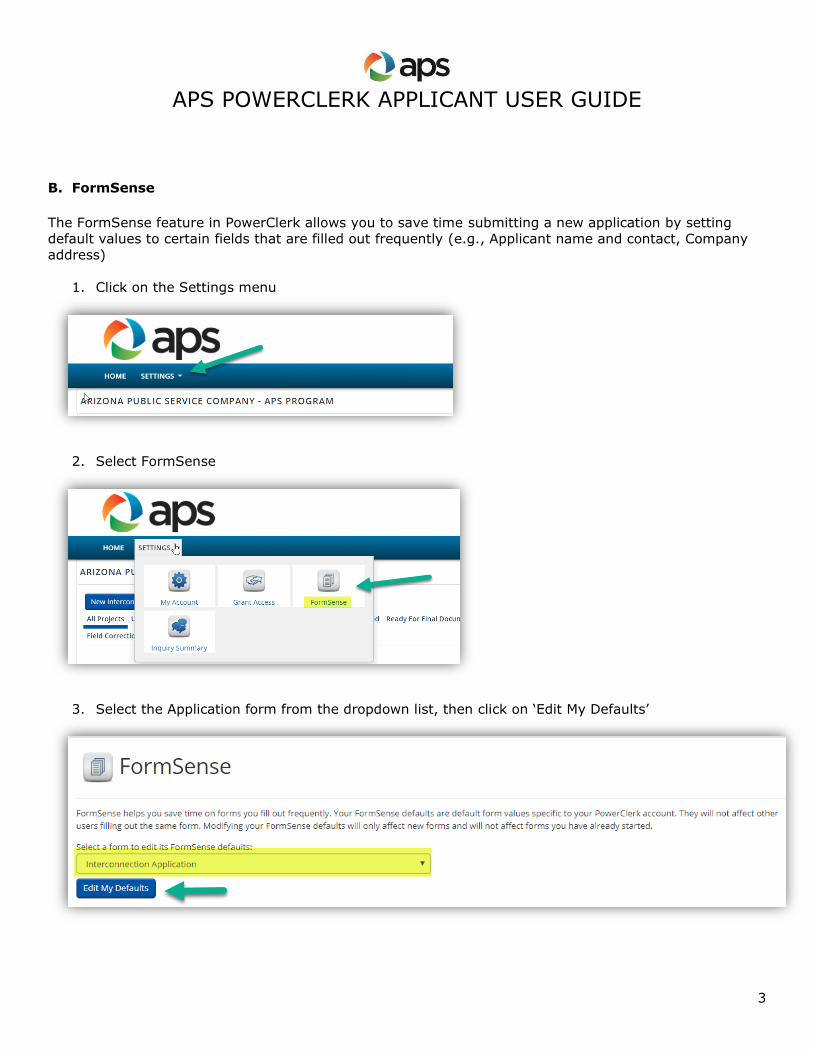
4. Fill out data fields in the form that would typically contain the same information every time (e.g.,
Installer contact information, company address). Please note: Gray fields cannot contain default
values
5. Save default values on each page by clicking ‘Save Form Sense Default’
6. Saved default values will be shown on the bottom of the FormSense List
APS POWERCLERK APPLICANT USER GUIDE
5
C. Initiating A New Application
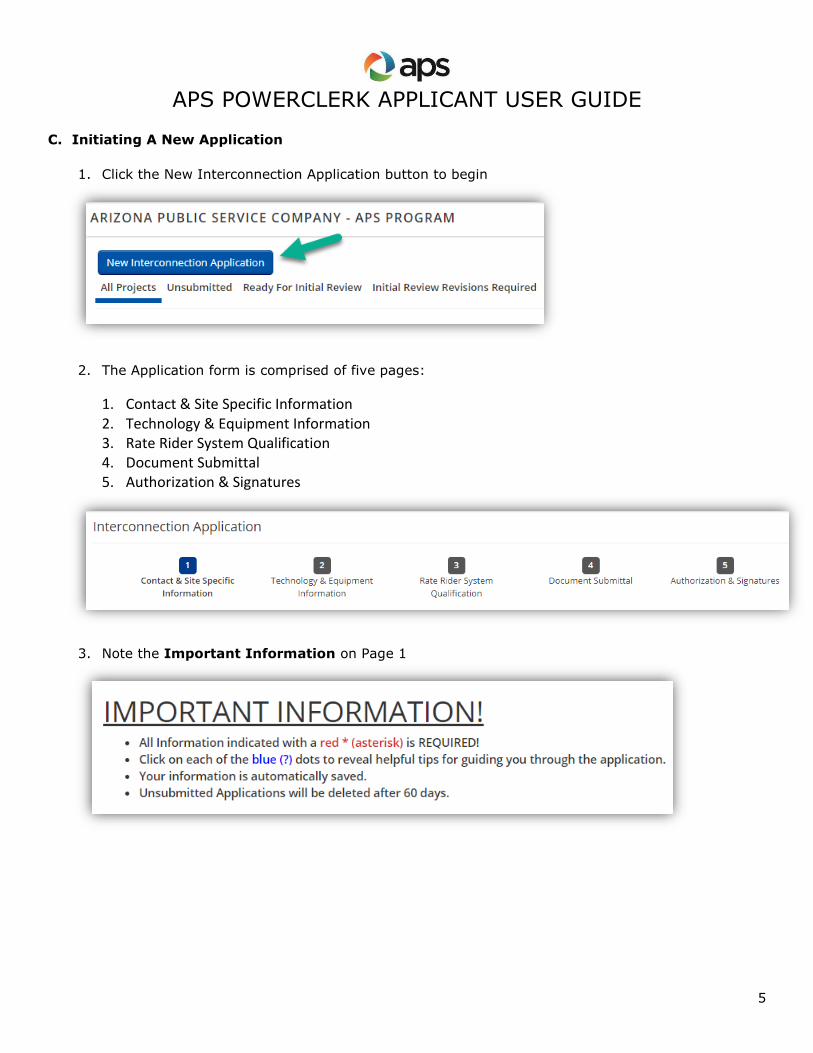
1. Click the New Interconnection Application button to begin
2. The Application form is comprised of five pages:
1. Contact & Site Specific Information 2. Technology & Equipment Information 3. Rate Rider System Qualification 4. Document Submittal 5. Authorization & Signatures
3. Note the Important Information on Page 1
APS POWERCLERK APPLICANT USER GUIDE
6
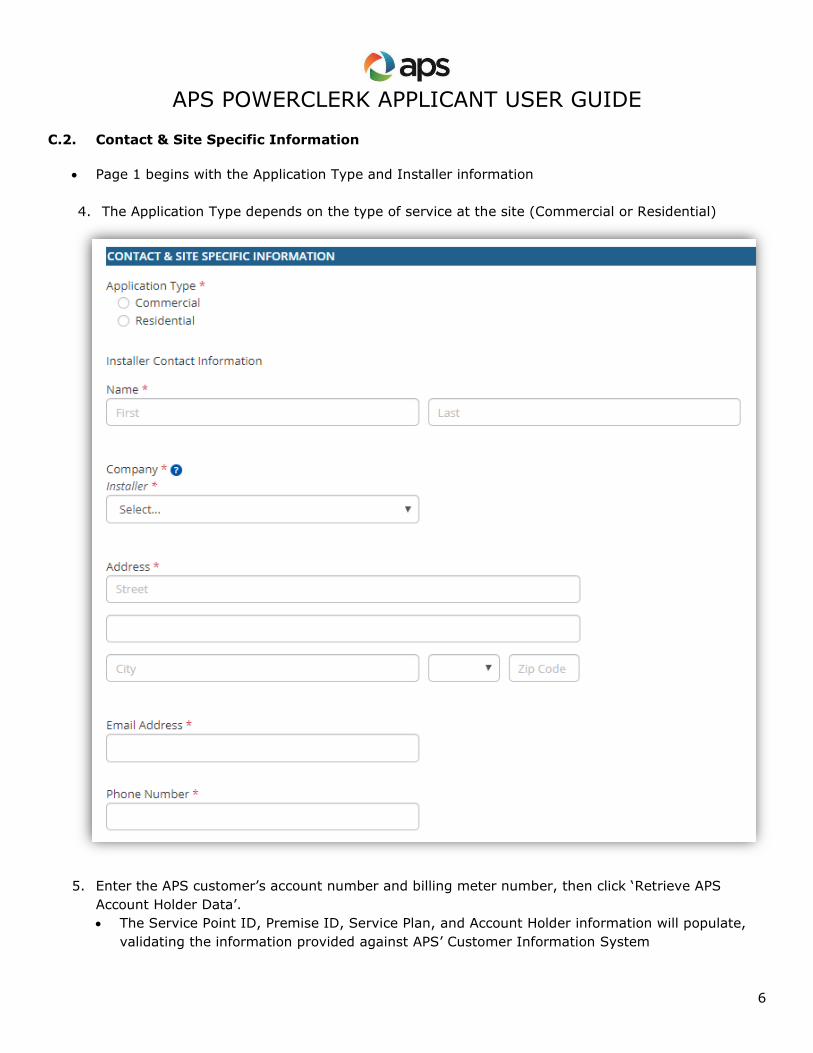
C.2. Contact & Site Specific Information
• Page 1 begins with the Application Type and Installer information
4. The Application Type depends on the type of service at the site (Commercial or Residential)
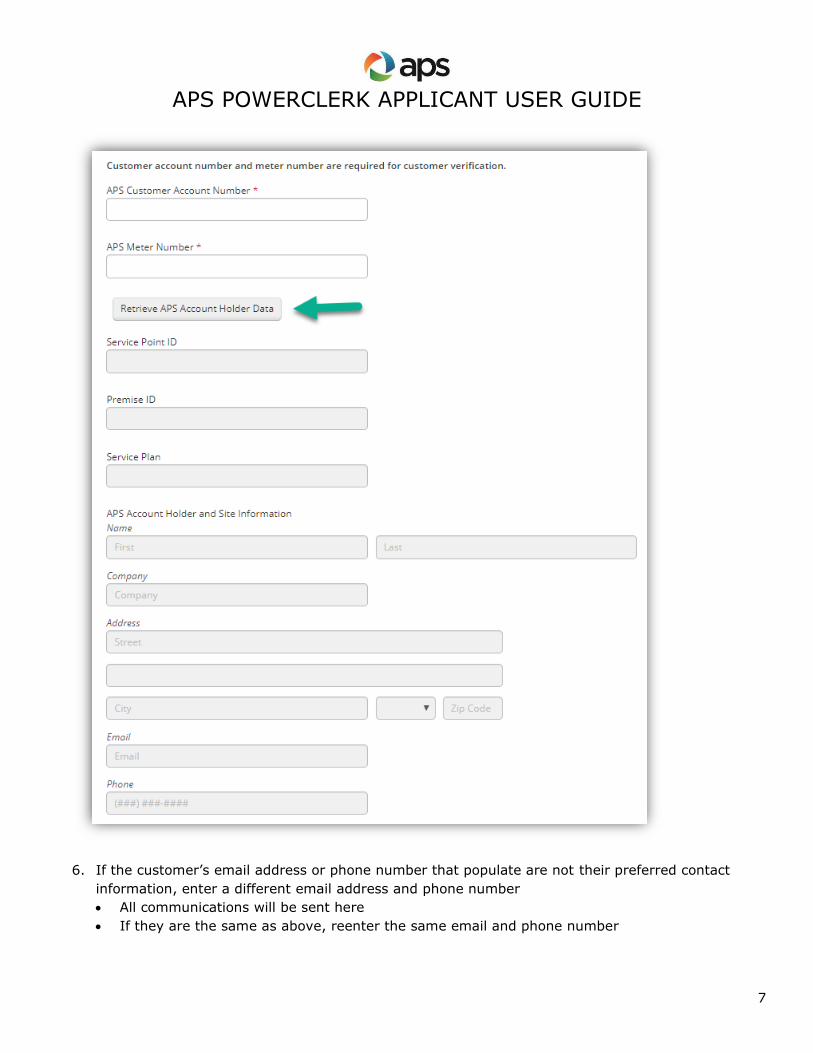
5. Enter the APS customer’s account number and billing meter number, then click ‘Retrieve APS
Account Holder Data’.
• The Service Point ID, Premise ID, Service Plan, and Account Holder information will populate,
validating the information provided against APS’ Customer Information System
APS POWERCLERK APPLICANT USER GUIDE
7
6. If the customer’s email address or phone number that populate are not their preferred contact
information, enter a different email address and phone number
• All communications will be sent here
• If they are the same as above, reenter the same email and phone number
APS POWERCLERK APPLICANT USER GUIDE
8
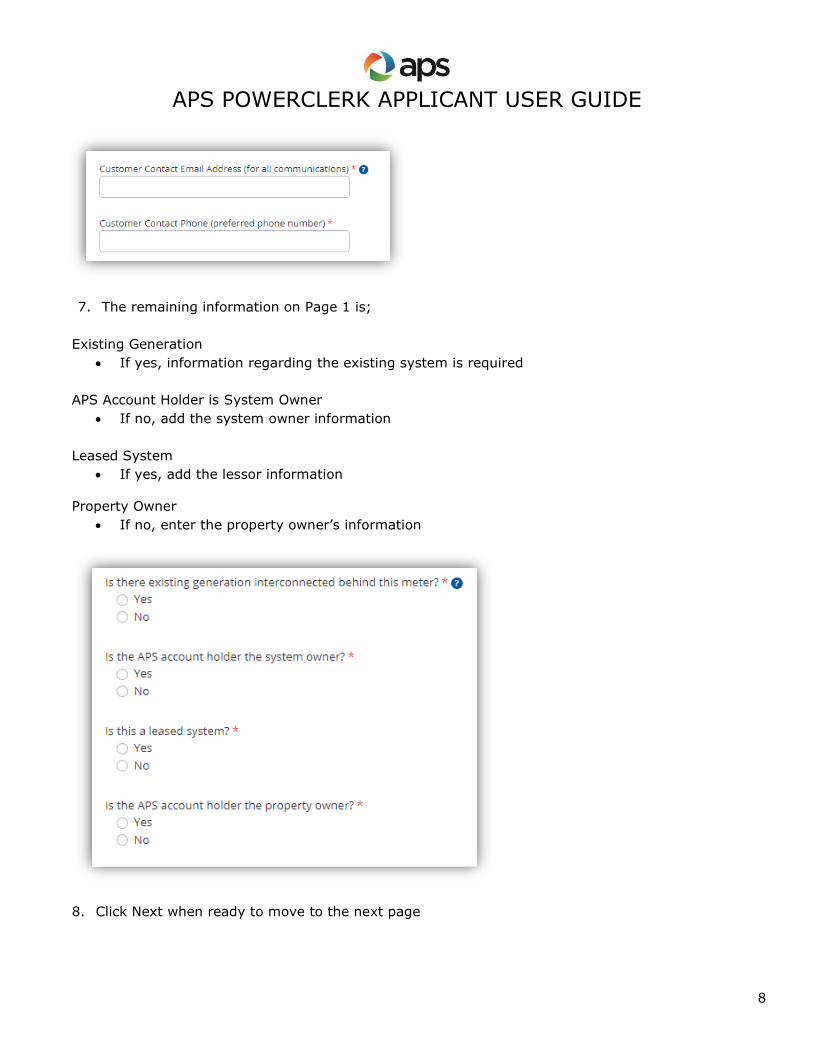
7. The remaining information on Page 1 is;
Existing Generation
• If yes, information regarding the existing system is required
APS Account Holder is System Owner
• If no, add the system owner information
Leased System
• If yes, add the lessor information
Property Owner
• If no, enter the property owner’s information
8. Click Next when ready to move to the next page
APS POWERCLERK APPLICANT USER GUIDE
9
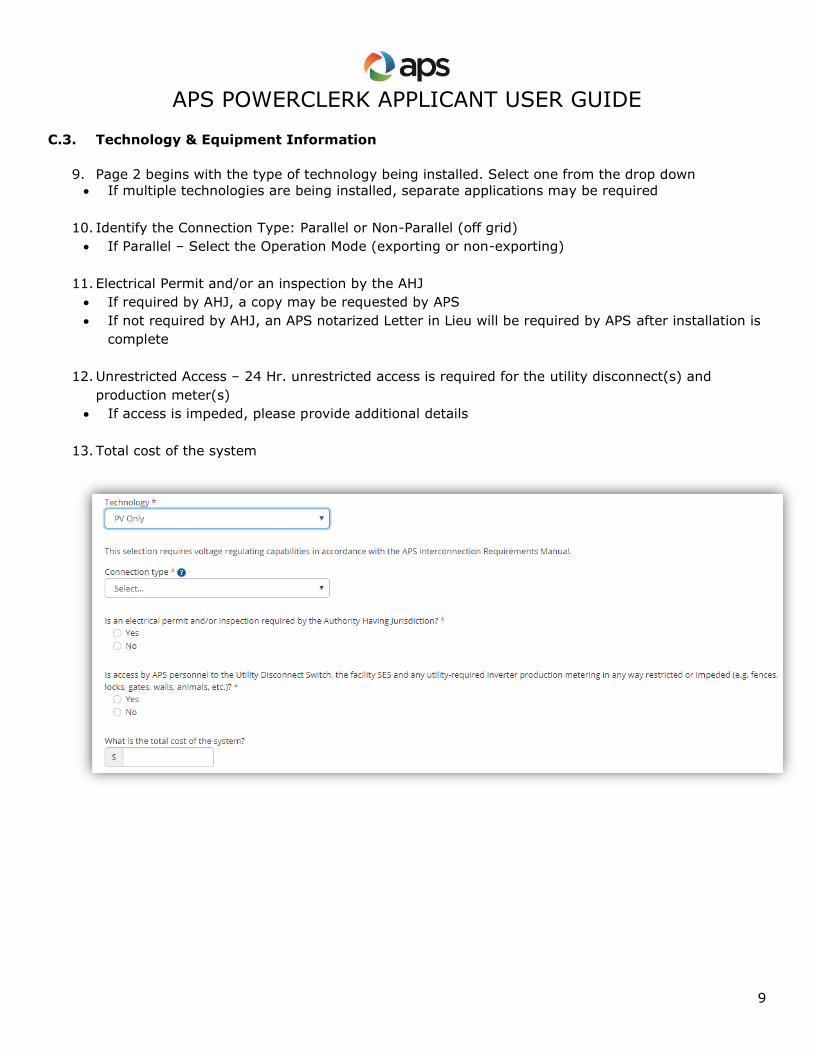
C.3. Technology & Equipment Information
9. Page 2 begins with the type of technology being installed. Select one from the drop down
• If multiple technologies are being installed, separate applications may be required
10. Identify the Connection Type: Parallel or Non-Parallel (off grid)
• If Parallel – Select the Operation Mode (exporting or non-exporting)
11. Electrical Permit and/or an inspection by the AHJ
• If required by AHJ, a copy may be requested by APS
• If not required by AHJ, an APS notarized Letter in Lieu will be required by APS after installation is
complete
12. Unrestricted Access – 24 Hr. unrestricted access is required for the utility disconnect(s) and
production meter(s)
• If access is impeded, please provide additional details
13. Total cost of the system
APS POWERCLERK APPLICANT USER GUIDE
10
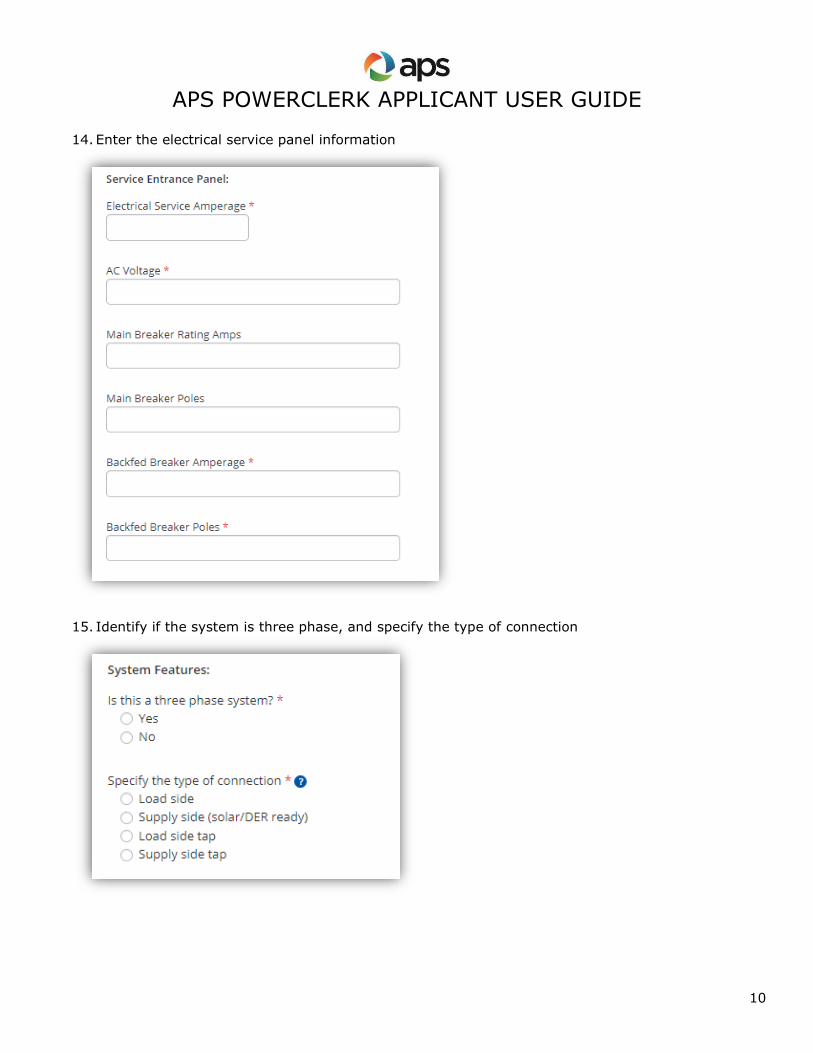
14. Enter the electrical service panel information
15. Identify if the system is three phase, and specify the type of connection

APS POWERCLERK APPLICANT USER GUIDE
11
16. Add the PV System Information
• Specify the Inverter: quantity, manufacturer and model
• Specify the PV Array: quantity, manufacturer and model
• Enter the Tilt, Azimuth, and Tracking of the array
• Tracking is fixed, single-axis or dual-axis
• Enter the Shading values for each month as a percentage of solar access, where blank or 100
specifies no shading
• If an additional inverter or array is needed, click on either Add Inverter or Add Array
• Press the Calculate button to determine the PV DC rating and Inverter AC rating
APS POWERCLERK APPLICANT USER GUIDE
12
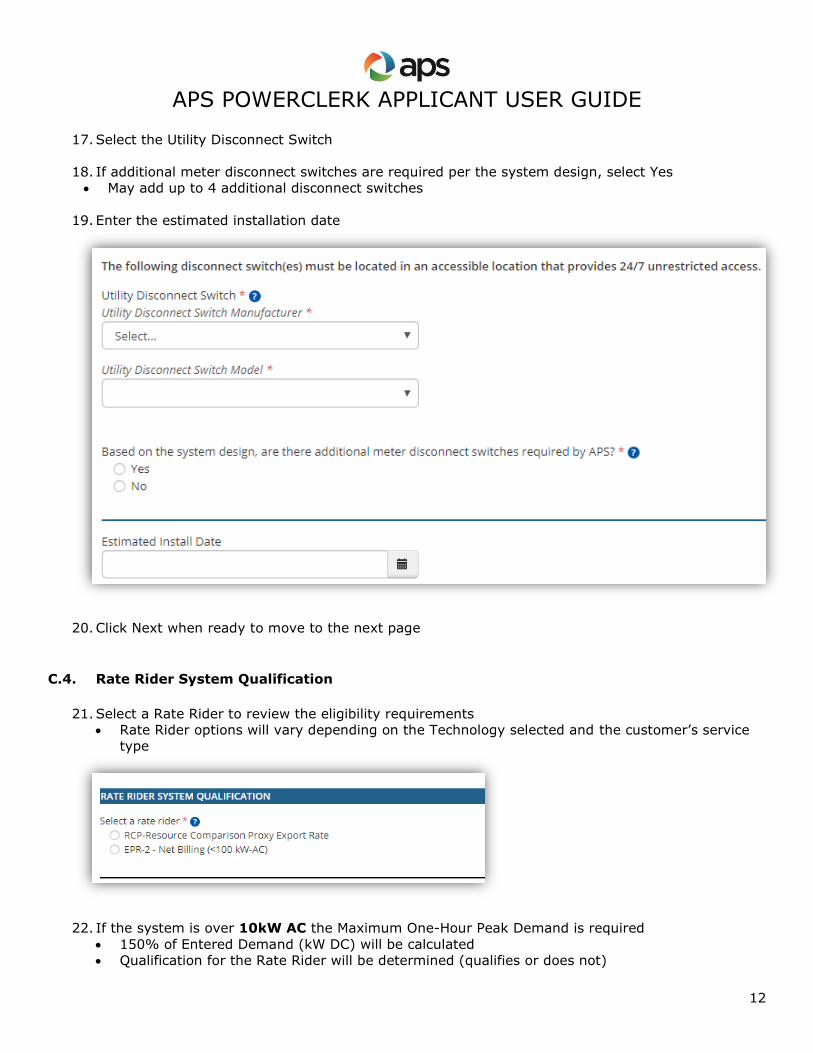
17. Select the Utility Disconnect Switch
18. If additional meter disconnect switches are required per the system design, select Yes
• May add up to 4 additional disconnect switches
19. Enter the estimated installation date
20. Click Next when ready to move to the next page
C.4. Rate Rider System Qualification
21. Select a Rate Rider to review the eligibility requirements
• Rate Rider options will vary depending on the Technology selected and the customer’s service
type
22. If the system is over 10kW AC the Maximum One-Hour Peak Demand is required
• 150% of Entered Demand (kW DC) will be calculated
• Qualification for the Rate Rider will be determined (qualifies or does not)
APS POWERCLERK APPLICANT USER GUIDE
13
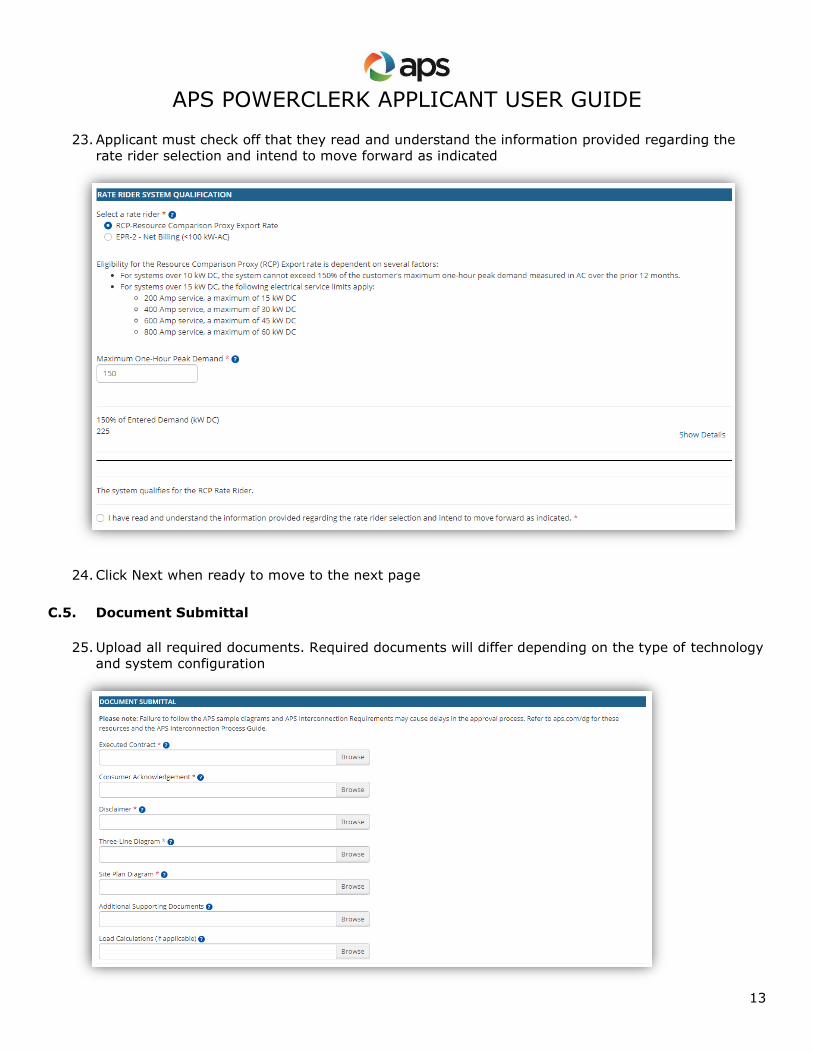
23. Applicant must check off that they read and understand the information provided regarding the
rate rider selection and intend to move forward as indicated
24. Click Next when ready to move to the next page
C.5. Document Submittal
25. Upload all required documents. Required documents will differ depending on the type of technology
and system configuration
APS POWERCLERK APPLICANT USER GUIDE
14
26. Click Next when ready to move to the next page
C.6. Authorization & Signatures
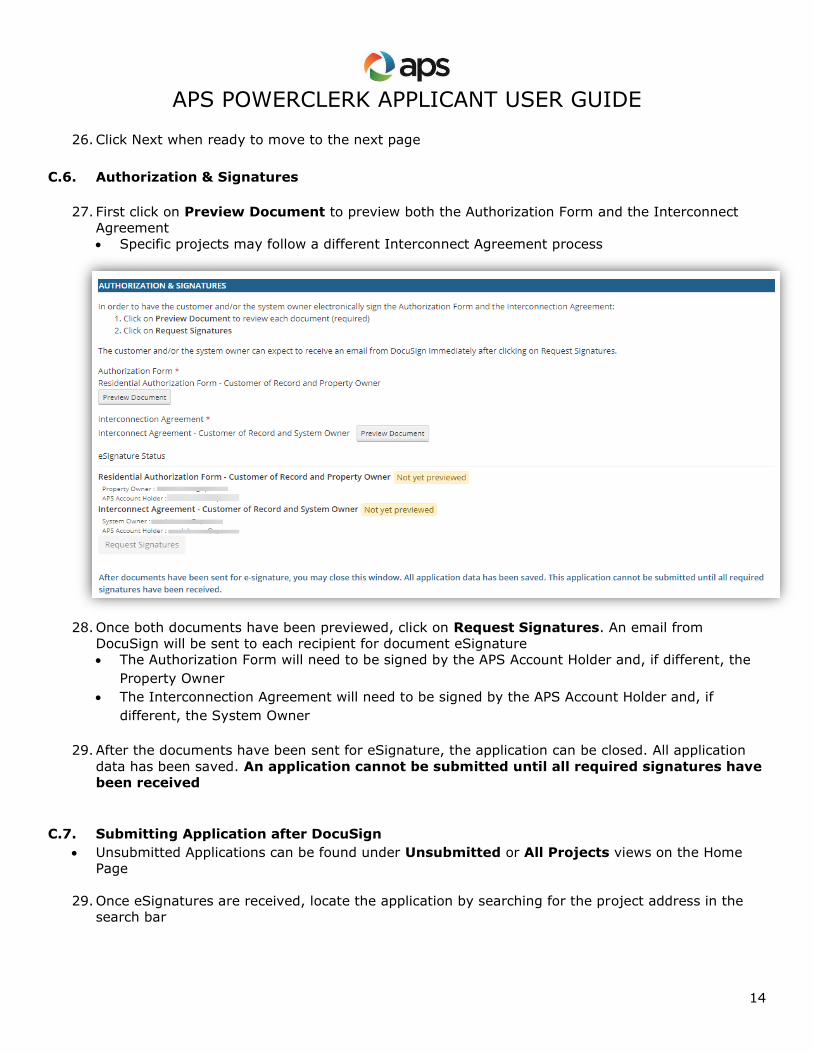
27. First click on Preview Document to preview both the Authorization Form and the Interconnect
Agreement
• Specific projects may follow a different Interconnect Agreement process
28. Once both documents have been previewed, click on Request Signatures. An email from
DocuSign will be sent to each recipient for document eSignature
• The Authorization Form will need to be signed by the APS Account Holder and, if different, the
Property Owner
• The Interconnection Agreement will need to be signed by the APS Account Holder and, if
different, the System Owner
29. After the documents have been sent for eSignature, the application can be closed. All application
data has been saved. An application cannot be submitted until all required signatures have
been received
C.7. Submitting Application after DocuSign
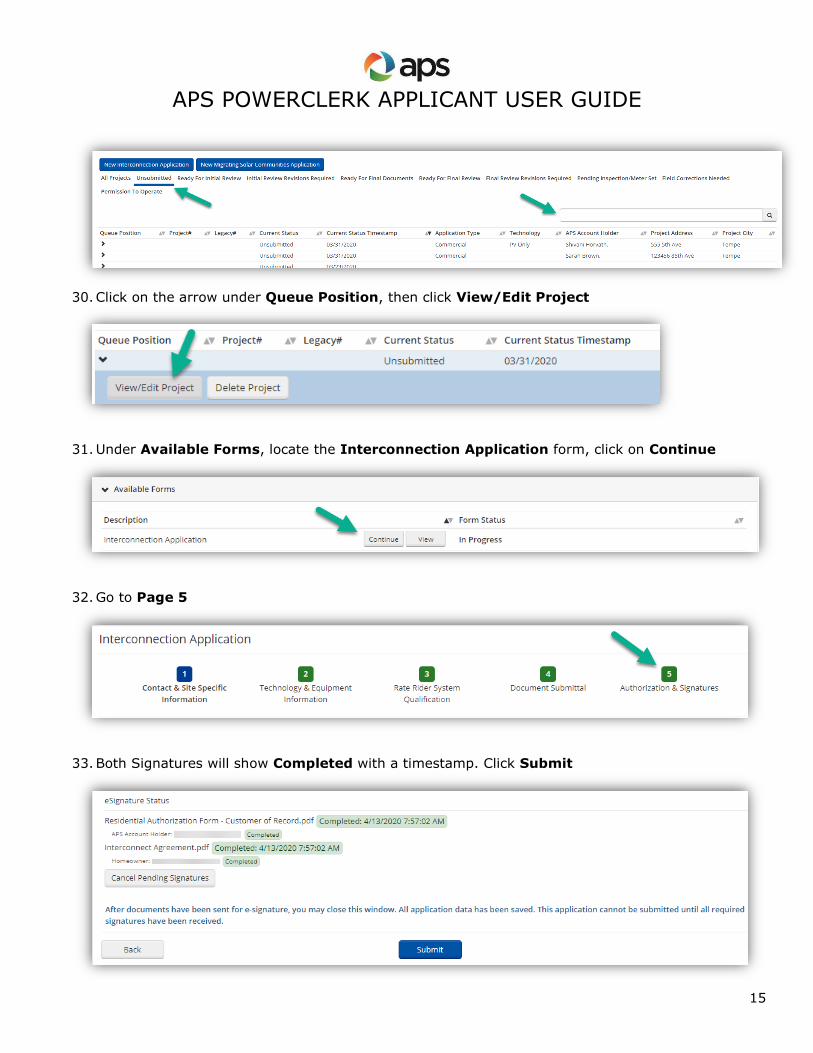
• Unsubmitted Applications can be found under Unsubmitted or All Projects views on the Home
Page
29. Once eSignatures are received, locate the application by searching for the project address in the
search bar
APS POWERCLERK APPLICANT USER GUIDE
15
30. Click on the arrow under Queue Position, then click View/Edit Project
31. Under Available Forms, locate the Interconnection Application form, click on Continue
32. Go to Page 5
33. Both Signatures will show Completed with a timestamp. Click Submit
APS POWERCLERK APPLICANT USER GUIDE
16
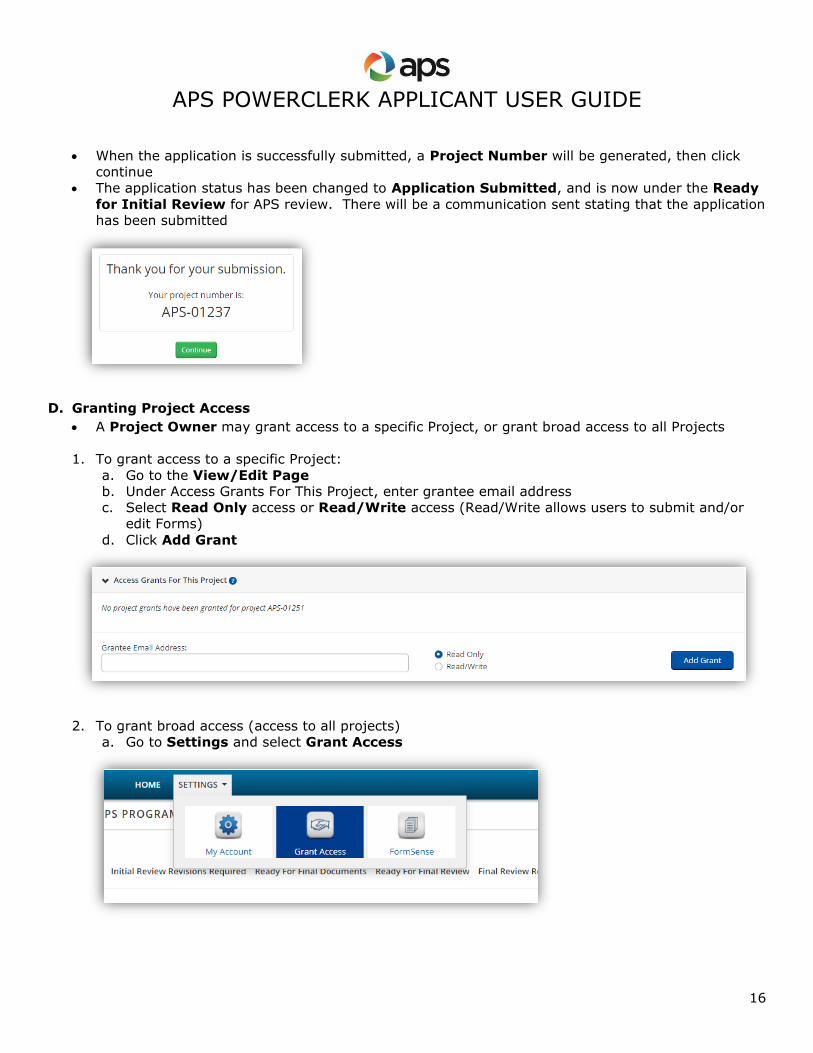
• When the application is successfully submitted, a Project Number will be generated, then click
continue
• The application status has been changed to Application Submitted, and is now under the Ready
for Initial Review for APS review. There will be a communication sent stating that the application
has been submitted
D. Granting Project Access
• A Project Owner may grant access to a specific Project, or grant broad access to all Projects
1. To grant access to a specific Project:
a. Go to the View/Edit Page
b. Under Access Grants For This Project, enter grantee email address
c. Select Read Only access or Read/Write access (Read/Write allows users to submit and/or
edit Forms)
d. Click Add Grant
2. To grant broad access (access to all projects)
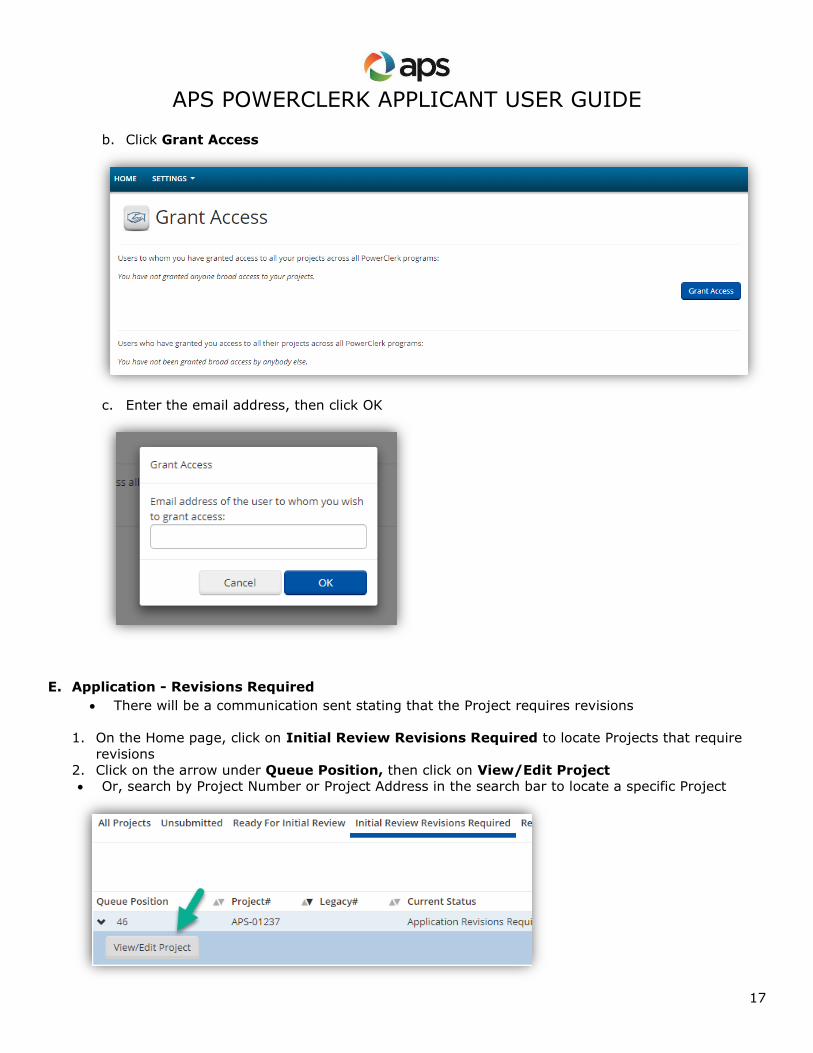
a. Go to Settings and select Grant Access
APS POWERCLERK APPLICANT USER GUIDE
17
b. Click Grant Access
c. Enter the email address, then click OK
E. Application - Revisions Required
• There will be a communication sent stating that the Project requires revisions
1. On the Home page, click on Initial Review Revisions Required to locate Projects that require
revisions
2. Click on the arrow under Queue Position, then click on View/Edit Project
• Or, search by Project Number or Project Address in the search bar to locate a specific Project

APS POWERCLERK APPLICANT USER GUIDE
18
3. Under Available Forms, locate the Application Corrections Needed form, then click Begin
4. There are 4 pages on this form:
• The revisions required are located on Page 1
• Pages 2-4 provide a summary of the application submitted for reference (if necessary)
• This form must be Submitted on Page 4
5. On Page 1, review the corrections needed located in the 1st box
6. If changes to information in the application are needed, note the changes in the 2nd box and APS
will update the application
7. Under the Attachments section, remove and replace deficient attachments (if necessary).
The correction needed will be noted next to the attachment, or, the note may refer Applicant to
view redlines on the attachment
APS POWERCLERK APPLICANT USER GUIDE
19
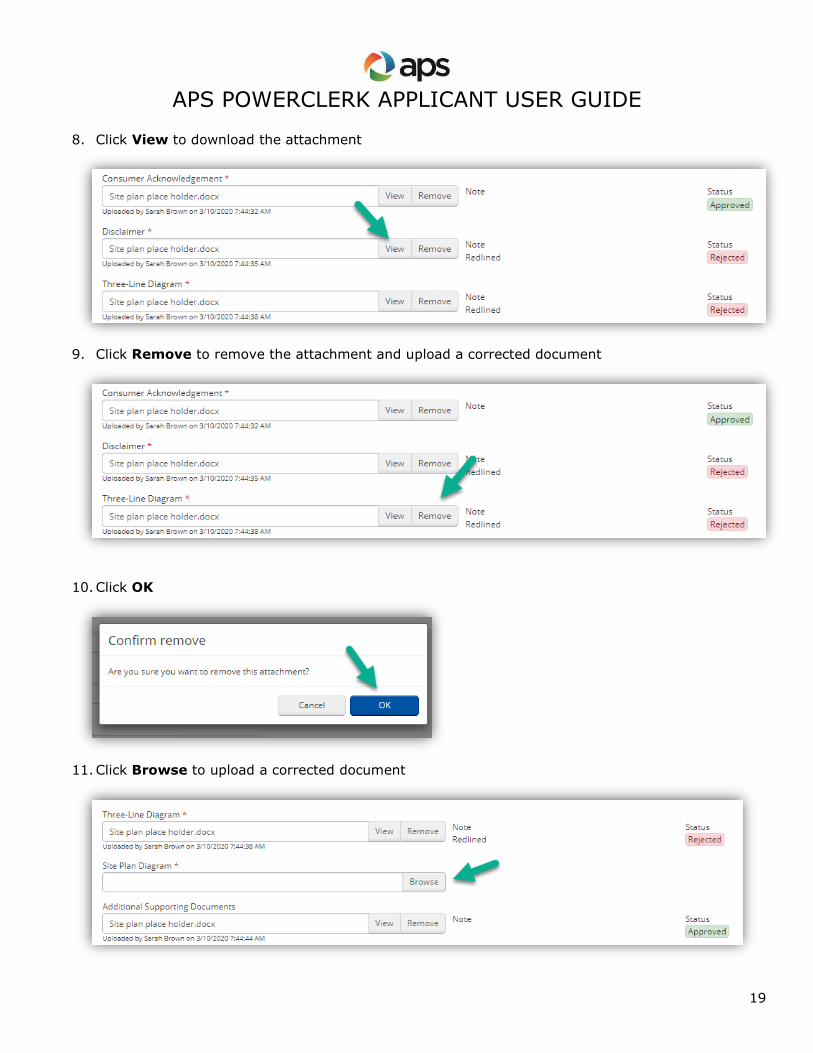
8. Click View to download the attachment
9. Click Remove to remove the attachment and upload a corrected document
10. Click OK
11. Click Browse to upload a corrected document
APS POWERCLERK APPLICANT USER GUIDE
20
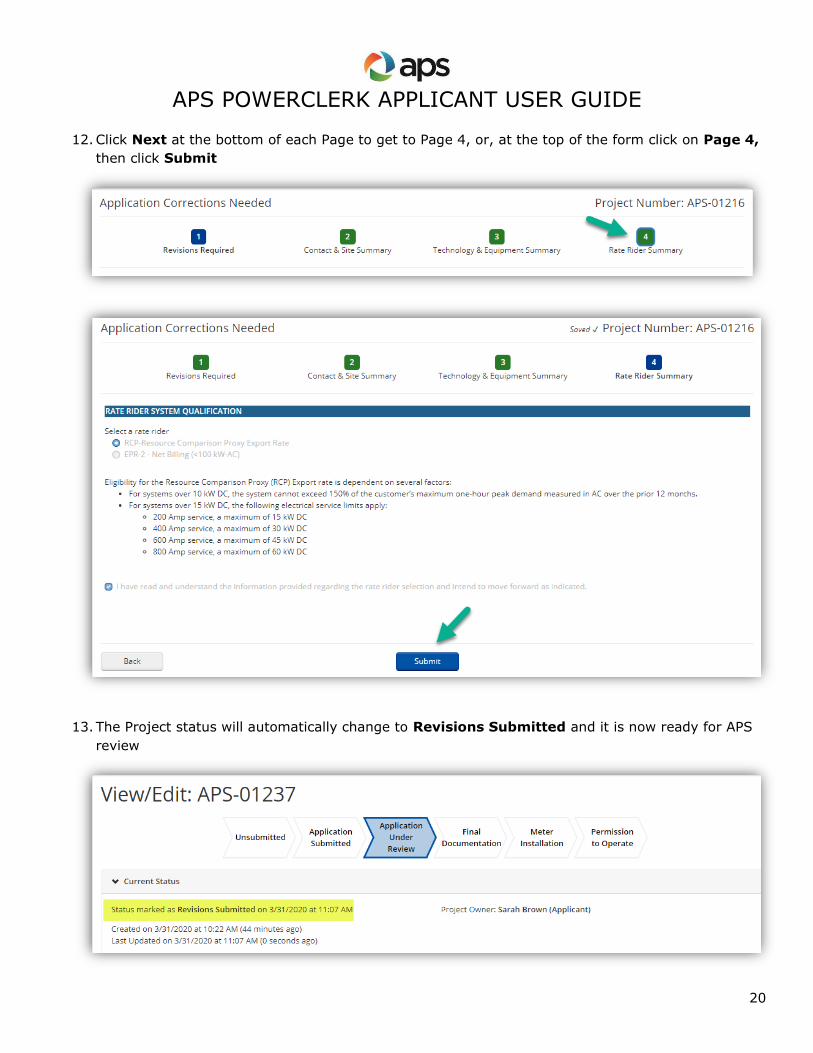
12. Click Next at the bottom of each Page to get to Page 4, or, at the top of the form click on Page 4,
then click Submit
13. The Project status will automatically change to Revisions Submitted and it is now ready for APS
review
APS POWERCLERK APPLICANT USER GUIDE
21
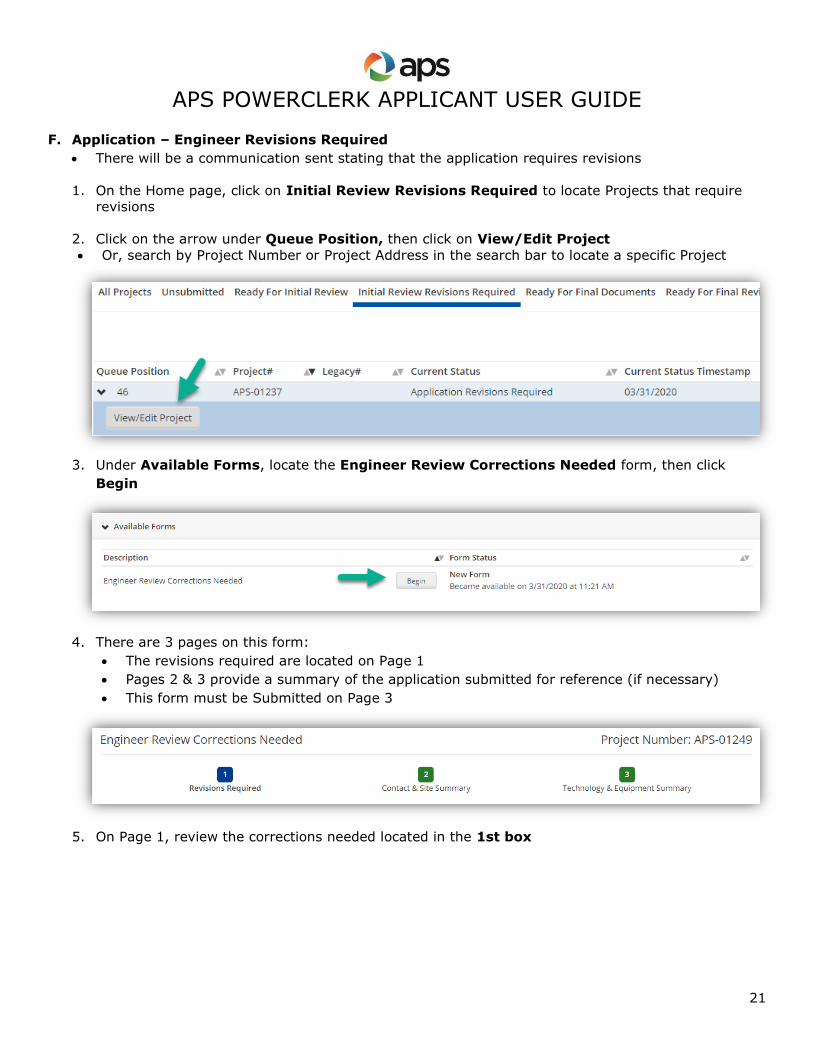
F. Application – Engineer Revisions Required
• There will be a communication sent stating that the application requires revisions
1. On the Home page, click on Initial Review Revisions Required to locate Projects that require
revisions
2. Click on the arrow under Queue Position, then click on View/Edit Project
• Or, search by Project Number or Project Address in the search bar to locate a specific Project
3. Under Available Forms, locate the Engineer Review Corrections Needed form, then click
Begin
4. There are 3 pages on this form:
• The revisions required are located on Page 1
• Pages 2 & 3 provide a summary of the application submitted for reference (if necessary)
• This form must be Submitted on Page 3
5. On Page 1, review the corrections needed located in the 1st box

APS POWERCLERK APPLICANT USER GUIDE
22
6. If changes to information in the application are needed, note the changes in the 2nd box and APS
will update the application
7. Follow steps 7-12 under Section E
8. The Project status will automatically change to Revisions Submitted and it is now ready for APS
review
G. Final Documents
• There will be a communication sent stating that the application has been approved and final
documents can be uploaded
1. On the Home page, click on Ready for Final Documents to locate Projects that are ready for final
documents
APS POWERCLERK APPLICANT USER GUIDE
23
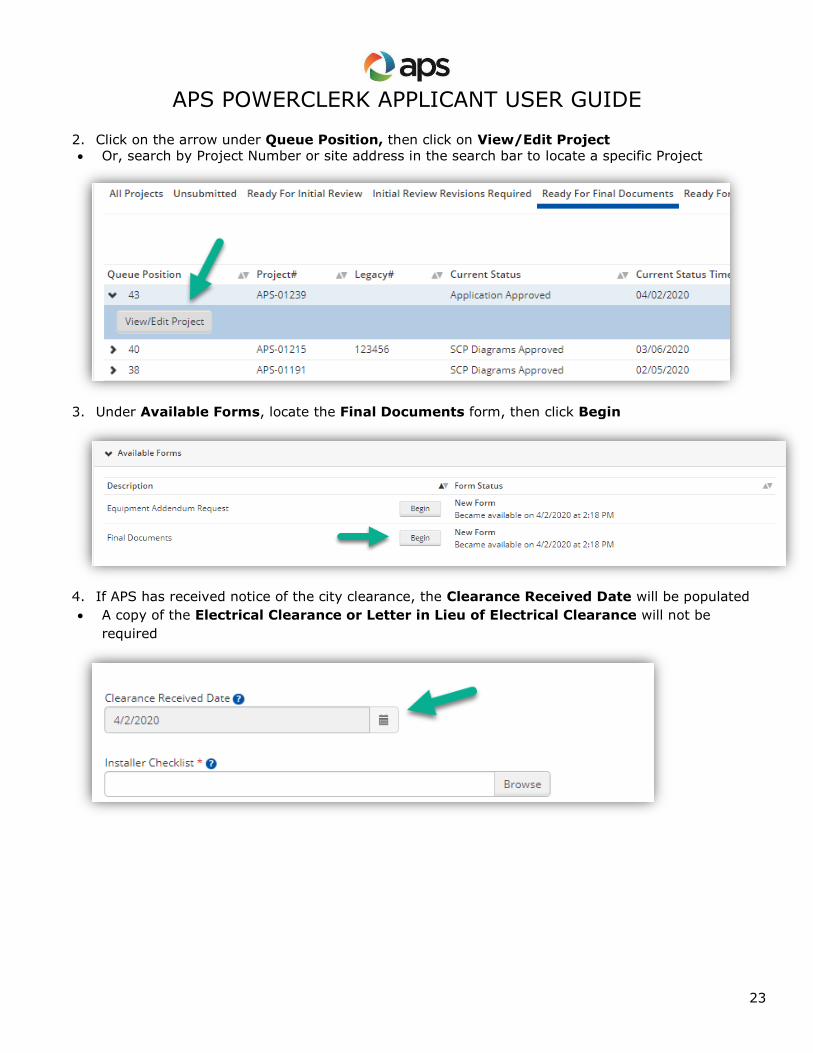
2. Click on the arrow under Queue Position, then click on View/Edit Project
• Or, search by Project Number or site address in the search bar to locate a specific Project
3. Under Available Forms, locate the Final Documents form, then click Begin
4. If APS has received notice of the city clearance, the Clearance Received Date will be populated
• A copy of the Electrical Clearance or Letter in Lieu of Electrical Clearance will not be
required
APS POWERCLERK APPLICANT USER GUIDE
24
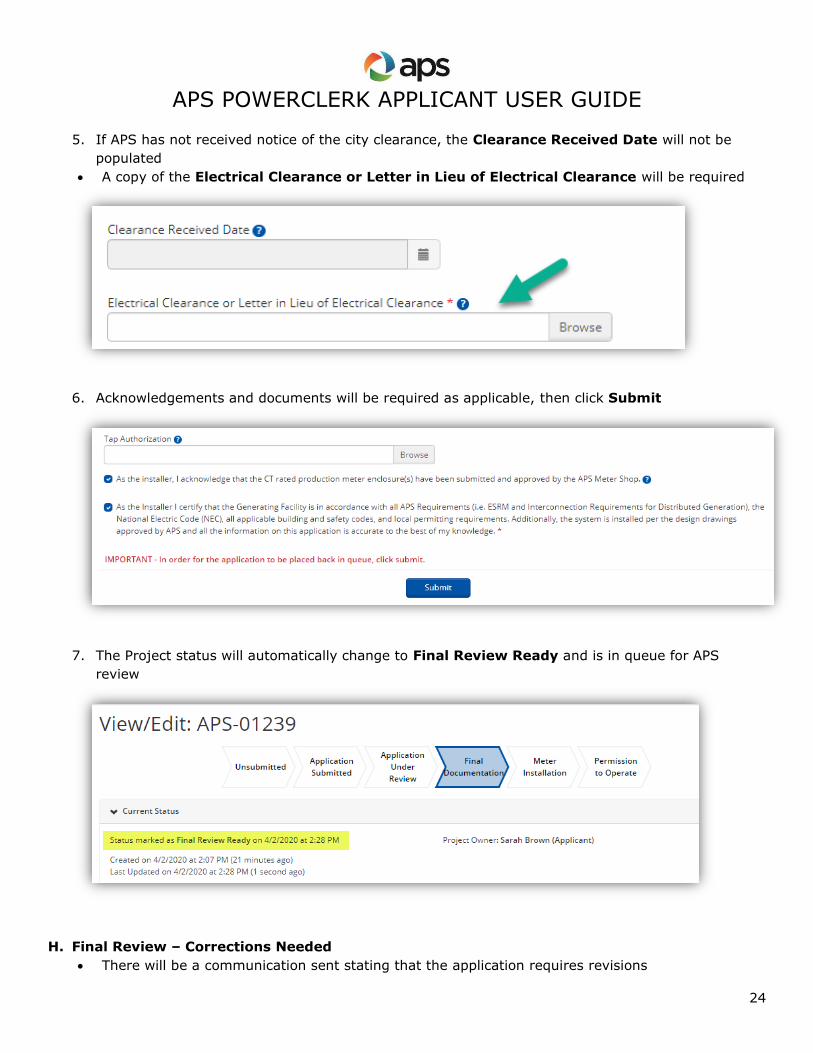
5. If APS has not received notice of the city clearance, the Clearance Received Date will not be
populated
• A copy of the Electrical Clearance or Letter in Lieu of Electrical Clearance will be required
6. Acknowledgements and documents will be required as applicable, then click Submit
7. The Project status will automatically change to Final Review Ready and is in queue for APS
review
H. Final Review – Corrections Needed
• There will be a communication sent stating that the application requires revisions
APS POWERCLERK APPLICANT USER GUIDE
25
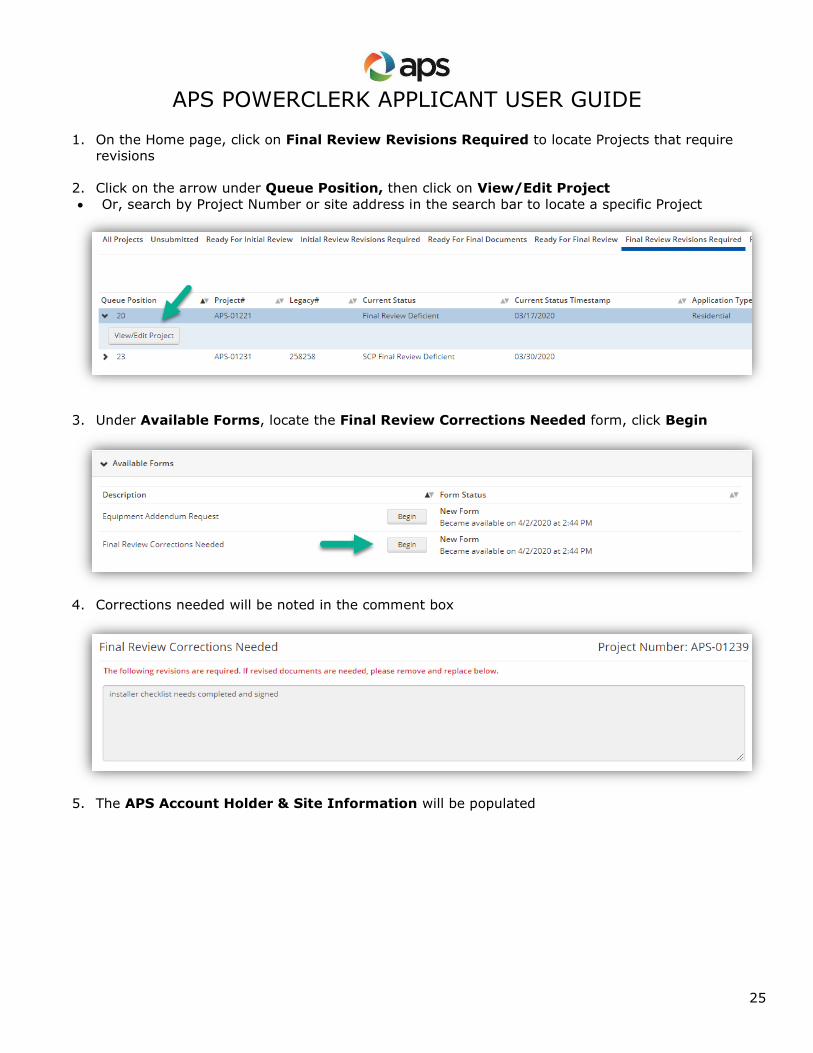
1. On the Home page, click on Final Review Revisions Required to locate Projects that require
revisions
2. Click on the arrow under Queue Position, then click on View/Edit Project
• Or, search by Project Number or site address in the search bar to locate a specific Project
3. Under Available Forms, locate the Final Review Corrections Needed form, click Begin
4. Corrections needed will be noted in the comment box
5. The APS Account Holder & Site Information will be populated
APS POWERCLERK APPLICANT USER GUIDE
26
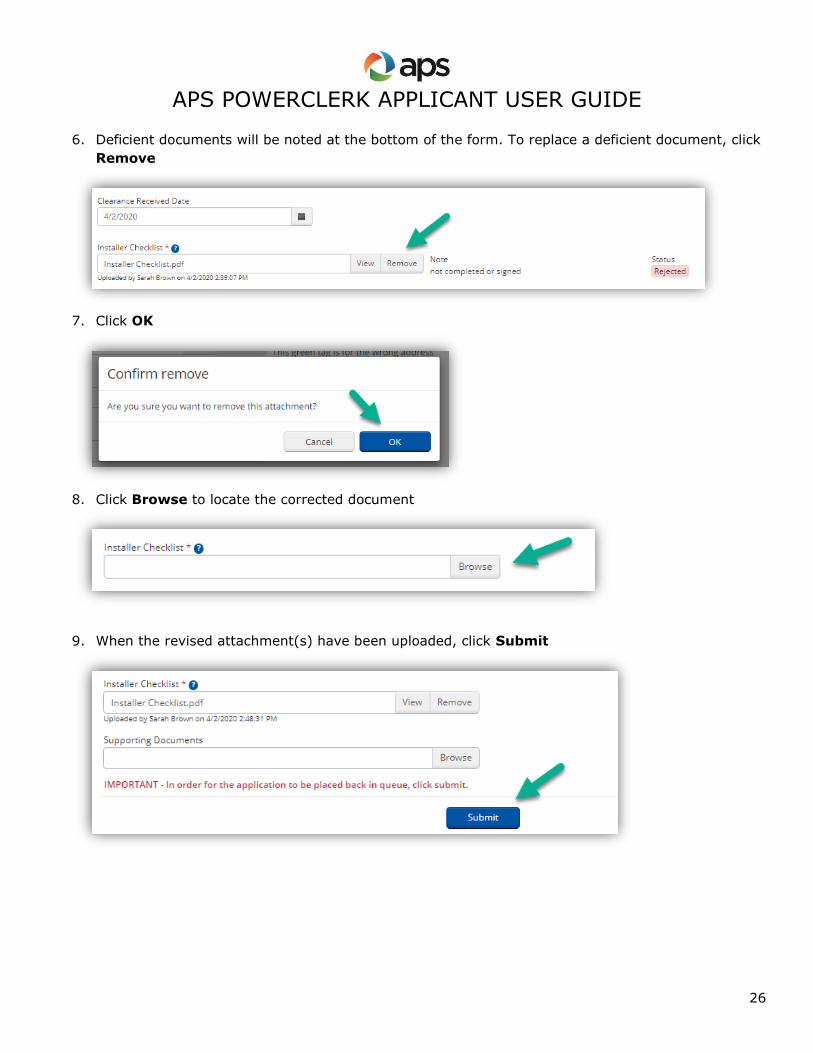
6. Deficient documents will be noted at the bottom of the form. To replace a deficient document, click
Remove
7. Click OK
8. Click Browse to locate the corrected document
9. When the revised attachment(s) have been uploaded, click Submit
APS POWERCLERK APPLICANT USER GUIDE
27
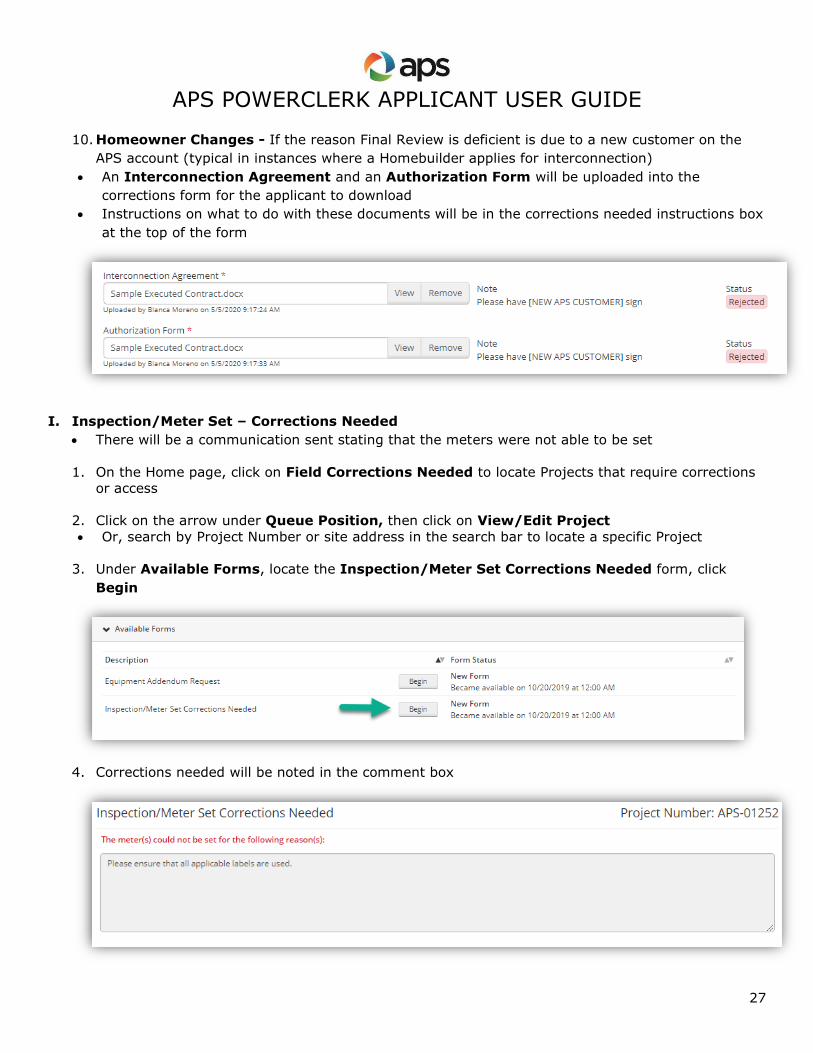
10. Homeowner Changes - If the reason Final Review is deficient is due to a new customer on the
APS account (typical in instances where a Homebuilder applies for interconnection)
• An Interconnection Agreement and an Authorization Form will be uploaded into the
corrections form for the applicant to download
• Instructions on what to do with these documents will be in the corrections needed instructions box
at the top of the form
I. Inspection/Meter Set – Corrections Needed
• There will be a communication sent stating that the meters were not able to be set
1. On the Home page, click on Field Corrections Needed to locate Projects that require corrections
or access
2. Click on the arrow under Queue Position, then click on View/Edit Project
• Or, search by Project Number or site address in the search bar to locate a specific Project
3. Under Available Forms, locate the Inspection/Meter Set Corrections Needed form, click
Begin
4. Corrections needed will be noted in the comment box
APS POWERCLERK APPLICANT USER GUIDE
28
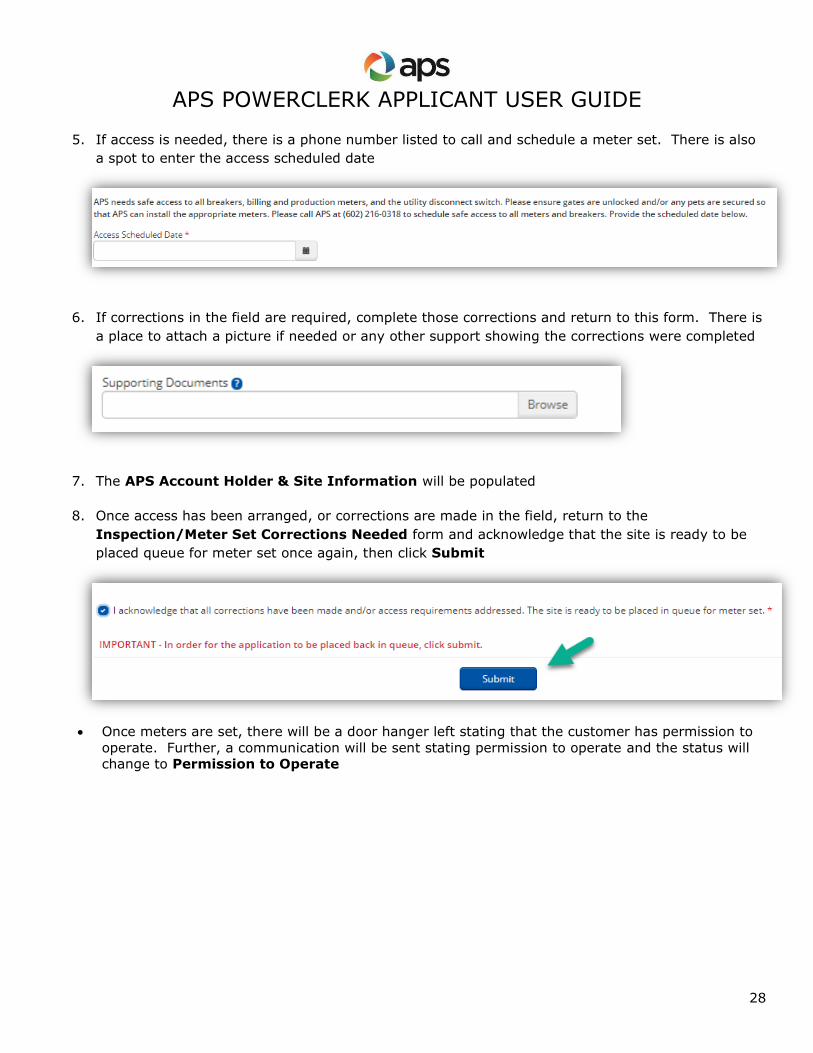
5. If access is needed, there is a phone number listed to call and schedule a meter set. There is also
a spot to enter the access scheduled date
6. If corrections in the field are required, complete those corrections and return to this form. There is
a place to attach a picture if needed or any other support showing the corrections were completed
7. The APS Account Holder & Site Information will be populated
8. Once access has been arranged, or corrections are made in the field, return to the
Inspection/Meter Set Corrections Needed form and acknowledge that the site is ready to be
placed queue for meter set once again, then click Submit
• Once meters are set, there will be a door hanger left stating that the customer has permission to
operate. Further, a communication will be sent stating permission to operate and the status will
change to Permission to Operate
APS POWERCLERK APPLICANT USER GUIDE
29
J. Amendment Request
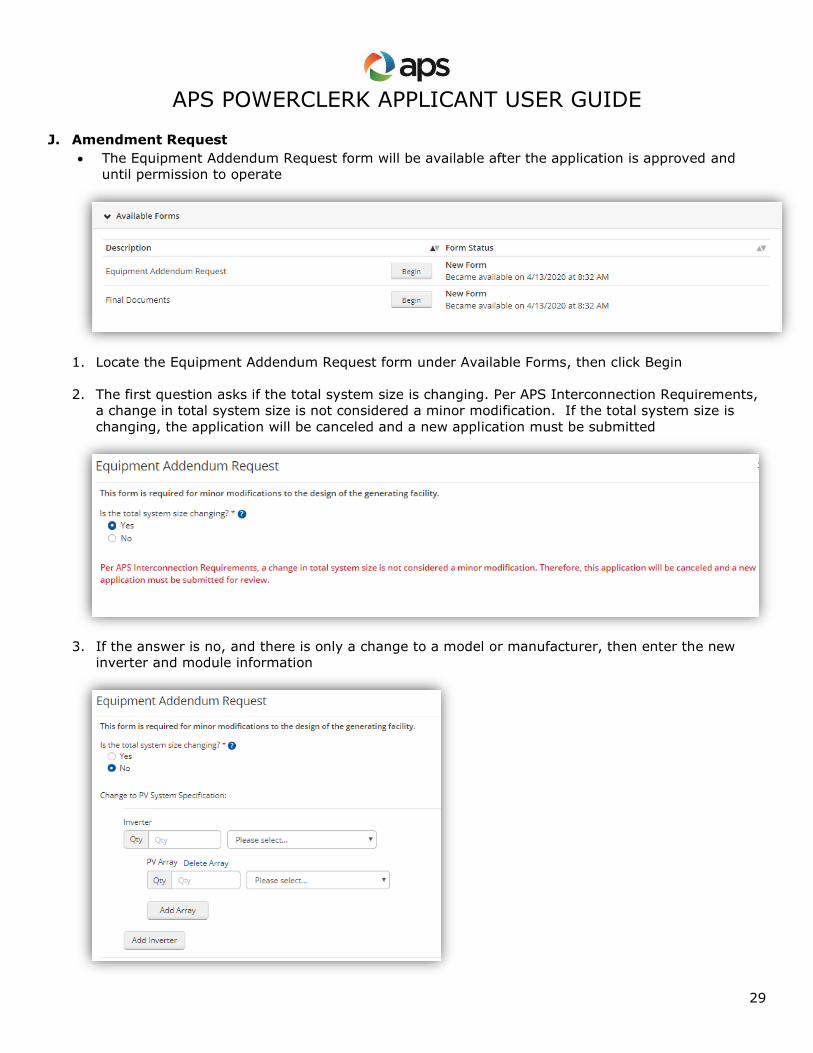
• The Equipment Addendum Request form will be available after the application is approved and
until permission to operate
1. Locate the Equipment Addendum Request form under Available Forms, then click Begin
2. The first question asks if the total system size is changing. Per APS Interconnection Requirements,
a change in total system size is not considered a minor modification. If the total system size is
changing, the application will be canceled and a new application must be submitted
3. If the answer is no, and there is only a change to a model or manufacturer, then enter the new
inverter and module information
APS POWERCLERK APPLICANT USER GUIDE
30
4. If there is a change to a battery model or manufacturer, enter that in the Change to Battery
System field
5. If there a change to any other equipment, for example, utility disconnect switches, enter in the
Additional changes to equipment field
6. Upload a new three-line diagram, one-line diagram, and site plan that shows these equipment
changes
7. Click Submit
• The status will change to Revisions Submitted and be back in APS queue for review
K. Withdraw Request
1. Withdrawal requests must be sent to [email protected]
2. Once a project is canceled, a communication will be sent to confirm