application server administration
TRANSCRIPT

PUBLIC SECTORAPPLICATION SERVER ADMINISTRATION

APPLICATION SERVER ADMINISTRATION 2
NOTICE
SUNGARD PUBLIC SECTOR BI-TECH LLC MAKES NO REPRESENTATIONS OR WARRANTIES, ORAL OR WRITTEN, EXPRESS OR IMPLIED, WITH RESPECT TO THE SYSTEM, SERVICES, SOFTWARE, DOCUMENTATION, OPERATING ENVIRONMENT, ANY OTHER SOFTWARE OR SERVICES PROVIDED HEREUNDER OR ANY OTHER MATTER ADDRESSED HEREUNDER, AND SUNGARD PUBLIC SECTOR BI-TECH LLC EXPLICITLY DISCLAIMS ALL OTHER WARRANTIES, EXPRESS OR IMPLIED, INCLUDING THE IMPLIED WARRANTIES OF TITLE, MERCHANTABILITY AND FITNESS FOR A SPECIFIC PURPOSE. SunGard Public Sector Bi-Tech LLC shall not be liable for errors contained herein or for incidental or consequential damages in connection with the furnishing, performance or use of this material. This documentation is proprietary and confidential information of SunGard Public Sector Bi-Tech LLC. Copying, reproduction or distribution is strictly prohibited. All rights reserved.
Copyright © 2008 by
SunGard Public Sector Bi-Tech LLC
890 Fortress Street
Chico, CA 95973
Should you wish to make a comment, or if you find an error in the text, please contact us via email:

APPLICATION SERVER ADMINISTRATION 3
Document Change Log
Version Date Change Description
7.9 March 2008 7.9 Version

APPLICATION SERVER ADMINISTRATION 4
Contents
1 Introduction........................................................................................................................ 6
2 Runtime Environment........................................................................................................ 9
2.1 Session Startup Scripts (ifas.start and ifas.start.config)........................................................... 9 2.1.1 ifas.start ......................................................................................................................................9 2.1.2 ifas.start.config..........................................................................................................................10
2.2 Environment Variables ........................................................................................................... 14 2.3 IFAS Directory Structure ........................................................................................................ 15
2.3.1 File Permissions .......................................................................................................................18 2.3.2 File System Maintenance..........................................................................................................19
2.4 IFAS Daemons Processes ..................................................................................................... 19 2.4.1 batchjob (Unix) and btchjobw (Windows)..................................................................................20 2.4.2 ilock (Unix) and ilockw (Windows) ............................................................................................20 2.4.3 Windows Service for Daemons.................................................................................................20
3 Setting Up IFAS Users....................................................................................................... 22
3.1 Set-up SQL Server users on Windows Application Servers................................................... 22
4 Print Methodologies .......................................................................................................... 25
5 SQL Query .......................................................................................................................... 27
5.1 Database Schema Panel ....................................................................................................... 29 5.2 Query Editor ........................................................................................................................... 31 5.3 Query Results ........................................................................................................................ 31
5.3.1 Copy Selection..........................................................................................................................31 5.4 Viewing Blobs......................................................................................................................... 31
Appendix A: Utility List.......................................................................................................... 34

APPLICATION SERVER ADMINISTRATION 5
Appendix B: IFAS Additional Work Environments ............................................................. 35
Creating an Additional IFAS Data environment............................................................................... 35 Maintaining a Test Environment...................................................................................................... 37
Copying a Subsystem Tables from Production to Test...................................................................................37 Multiple Daemons...........................................................................................................................................38 Installing IFAS/SQL........................................................................................................................................39
Appendix C: General IFAS Command Reference ............................................................... 41

APPLICATION SERVER ADMINISTRATION 6
1 Introduction The Application Server can be either a Unix Host or a Windows Server, depending on what Database platform is being used. If Informix or Oracle is the database platform, the Application Server is a Unix host. If SQL Server is the database platform, the Application Server is a Windows server.
The Application Server is responsible for running the back-end processes such as calculating, distributing and paying payroll, distributing transaction sets (batches), printing purchase orders, and running recompute utilities. As of release 7.9, the 7i server, with a few exceptions, now handles user interface screens.
Users who need access to classic IFAS masks to run payrolls, distribute batches, run utilities, etc, will generally be able to stay in the 7i interface. Since classic batchjobs can be launched from 7i, most of these tasks can be done without installing anything on the client PC. In these cases, the application server can be somewhat transparent to the user.
In some cases where users need to get into UI screens that are only available in classic IFAS, they will install and use our Insight product or a terminal emulator such as WRQ’s Reflection as the front-end user interface. From Insight, users can run 7i screens, Web Client screens, classic screens, classic processing masks, and CDD reports. When a user selects a mask, Insight launches the appropriate process. If a 7i screen is available for the mask, an Internet Explorer window is launched to run the screen. Otherwise, Insight launches the classic COBOL process.

APPLICATION SERVER ADMINISTRATION 7
Following is a diagram showing an overview of the IFAS Client-Server architecture:

APPLICATION SERVER ADMINISTRATION 8
The three Servers above can all be on one server (if SQL Server), any combination of two servers, or 3 or more servers in a Network Load Balancing (NLB) farm (for the 7i piece). Often in a Unix environment, there is a single Unix host that is both the Database Server and the Application Server. It simplifies user setup if the Windows Servers are in the same Domain.
This manual deals with the Application Server for Classic IFAS, highlighted in yellow above. For details on Database Administration, see your Database Vendor documentation. For details on the 7i Web Server, see the 7i Server Administration Guide. For information on initial setup, see the PC Install Guide.
Among the topics discussed in this document are the Runtime Environment, Setting up IFAS Users, how the Classic IFAS Server is structured, daemon processes (services) that run on the Application Server, and printing.

APPLICATION SERVER ADMINISTRATION 9
2 Runtime Environment The runtime environment for classic IFAS relies on a Unix Korn Shell running through telnet. For SQL Server clients using a Windows O.S. for the Application Server, this Korn Shell environment is provide by the MKS Toolkit. The MKS Toolkit is a 3rd party product required for SQL Server sites.
2.1 Session Startup Scripts (ifas.start and ifas.start.config) When a user logs into the Application Server through telnet (using Insight or a terminal emulator), a Korn shell process is initiated, which launches a script called .profile located in the user’s HOME directory. On Unix, HOME is configured when the user is added. On Windows, HOME defaults to C:\Documents and Settings\<username>. This .profile is used to setup the environment for the session.
For IFAS users, the .profile simply launches a script called ifas.start.
2.1.1 ifas.start The ifas.start file contains all the core IFAS environment settings, functions, and aliases. Because IFAS will not run correctly, if at all, without many of the IFAS environment settings configured correctly, ifas.start should be executed from your .profile. To avoid precedence problems with variables like $PATH, ifas.start should appear early in your .profile. The standard location for both ifas.start and ifas.start.config is /usr/local/scripts on Unix Application Servers, and C:\usr\local\scripts on Windows Application Servers. A minimal .profile might look something like this:
# Setup the core IFAS environment.
. /usr/local/scripts/ifas.start
ifas.start also accepts a parameter to pre-select a menu item if only one environment is desired for a particular user. The pre-selected menu item can be chosen either by menu position (1, 2, 3, etc.), environment name, or database name. The `newenv’ function operates this way, as well. Examples of pre-selecting an environment from a user’s .profile:
. /usr/local/scripts/ifas.start 1
. /usr/local/scripts/ifas.start ifas

APPLICATION SERVER ADMINISTRATION 10
The ifas.start script itself should need no configuration. In fact, ifas.start should never be customized, because any IFAS upgrade or service pack will overwrite the ifas.start script. All customizations must be setup in ifas.start.config. This config file is where all custom entries are held to configure classic IFAS for your environment.
2.1.2 ifas.start.config Much of the default ifas.start.config will contain empty functions that do nothing unless a need arises but two functions in particular do a great deal of the custom setup and are required while nearly all the other functions are optional (hence empty by default). These are 1) the config_SetupMenuItems function, which sets up the menu of environments to which to connect, and 2) config_SetupConnectionVariables, which sets up miscellaneous variables based on the menu item selected. A few of the other functions are discussed as well.
config_SetupMenuItems
This function sets up the core components of each environment – test, production, etc. There are two arrays of strings that need setup: gaAccountInfo and gaAliases.
The gaAccountInfo variable sets up such things as database name, location of the IFAS software, and which user class should have access to this account. An array of colon-separated strings is at the core. One of the strings is the concept of a “user class”, which is discussed in another section below. If the user logging in only has one displayable menu item, ifas.start will skip the menu display then selects and loads the menu item automatically.
Below is a complete run-down of all elements contained within a single menu item string.
Menu Item Format:
User class:Menu type:Description:Name:Database name:Database type:IFAS home:Admin home:xport directory
Format Meanings:
User class [optional] User classes that can view the menu item. Multiple user classes can have access to the same menu item by placing two classes together, separated by a comma. Leave empty if the item should seen by all user classes.
Menu type [required] Sets the “type” of menu item. Currently, valid options are:
H (hide) for menus that need to be present (headless 7i connections?) but should not be displayable menu items. Hidden items are still accessible by name, DB name, or number but are not displayed.
APPLICATION SERVER ADMINISTRATION 11
R (RAD) – reserved for future use
S (show) – show the menu
Description [required] Freeform description of the account.
Name [required] Name of the account. While this is a freeform name, it should be something very short but also descriptive. Typically it is a single word that closely matches the Database name. This name is also typically the name of the 7i connection and is selectable on the menu or with newenv.
Database name [required] The database name. This is used to setup $IMAGE_DBNAME (if Insight does not) but is also used to set $ORACLE_SID and $INFORMIXSERVER. The Database name can be used when selecting environments but “Name” is searched for first so be careful when using Database name for selecting environments if Name and Database name are not the same.
Database Type [required] The database type. The only valid options are:
I Informix
O Oracle
M MSSQL (SQL Server)
Ifas home [required] This sets the $IFAS_HOME variable, which triggers $BSI_HOME, $SRN_HOME, $DGWHOME, and if Admin Home and xport directory are not set, it triggers $MPE_HOME, and $XPORTDIR. If not set to a directory path, ifas.start will warn the user logging in and exit, rather than allowing an incorrect core variable and most likely aborting allowing the user shell access.
Admin home [optional] If set, this directs how $MPE_HOME is set. By default $MPE_HOME is triggered off $IFAS_HOME but setting <ap> allows this to be overridden.
xport directory [optional] If set, this directs how $XPORTDIR is set. By default $XPORTDIR is triggered off $IFAS_HOME but setting <xp> allows this to be overridden if the Transport software is not located in the default location: $IFAS_HOME/xport.
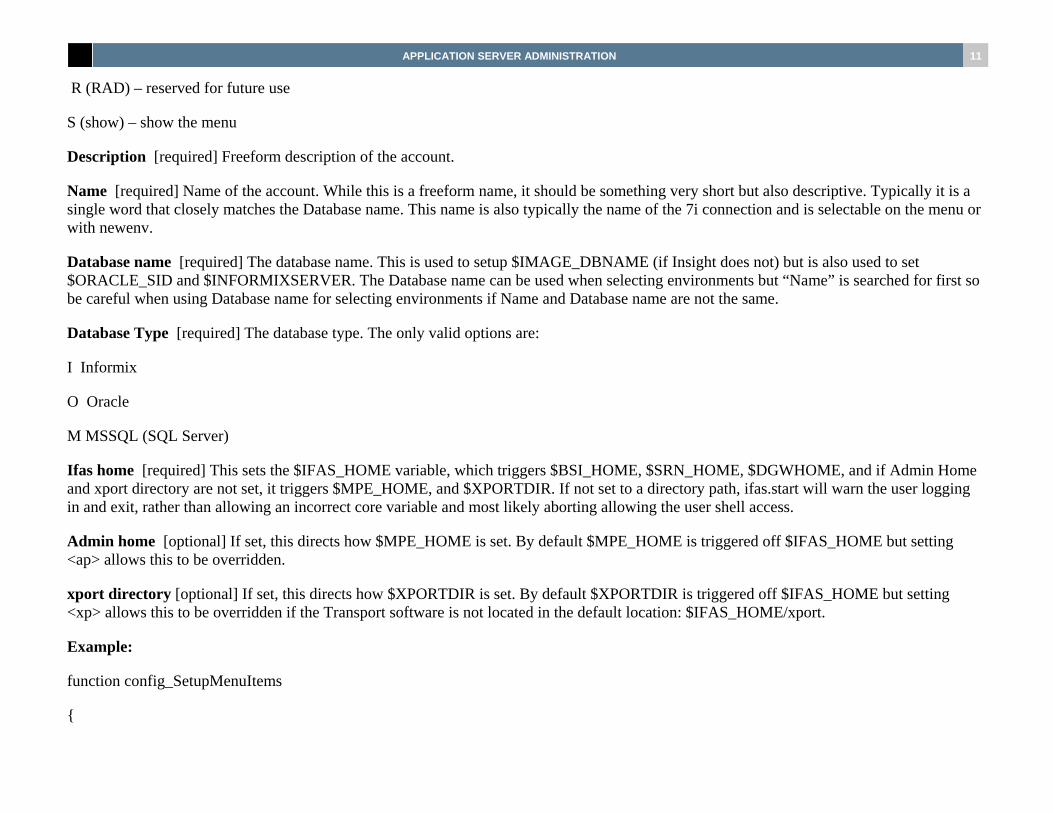
Example:
function config_SetupMenuItems
{

APPLICATION SERVER ADMINISTRATION 12
set -A gaAccountInfo \
":S:Oracle Production:ifasprod:ifasprod:O:/ifas/app:/ifas/admin:" \
"dev,pm:S:Informix Test:ifastest:ifastest:I:/ifastest/app:/ifastest/admin:" \
"dev,pm:S:Oracle Development (8.0):dev80:dev80:O:/dev/app:/dev/admin:" \
# Close the gaAccountsInfo variable (notice they all have a
# continuation character. This closes the "set -A" command.
….
}
The above example shows a setup with 3 environments pointing to 3 databases. The second and third are only seen by users in the dev or pm User Classes. The second is an Informix environment, and the first and third are Oracle.
config_SetupConnectionVariables
Each account will have a number of variables setup specifically for that one account that must not be setup the same for any other account. Variables such as $ORACLE_SID, $INFORMIXSERVER, and $DB_SERVER are often, if not always, unique to each account. Therefore, the foundation of config_SetupConnectionVariables is a case statement with one case for each $gsEnvName (see <dbn> in The Menu System (on page Error! Bookmark not defined.)). If the machine has only one IFAS account on it the case statement is a little superfluous but is necessary for machines with multiple IFAS accounts. An example case statement for a machine with only two (Informix) accounts, “test” and “production”:
Example:
# Generic IFAS connection examples.
case $gsEnvName in
ifas) # Configure for Informix database.

APPLICATION SERVER ADMINISTRATION 13
export DBSPACE=ifasdbs
export ONCONFIG=onconfig.ifas
export INFORMIXSERVER=ifas
;;
ifastest)# Configure for Informix database.
export DBSPACE=ifasdbs
export ONCONFIG=onconfig.ifastest
export INFORMIXSERVER=ifastest
;;
*)
;;
esac
config_Initialize
If a machine needs any initial configuration that should take place early in the login process rather than later config_Initialize is the place to do it. As an example, the user class should be set in this function. The user class is referenced somewhat early in the login process so the user class needs to be setup even earlier. config_Initialize can also be used to setup any hard-wired variables required by all accounts (i.e., $QUERIXDIR).
config_SetupExecutionPath
If any custom directories need to appear in $PATH, config_SetupExecutionPath is the place to set this up. For example, if “Generic University” has custom main programs

APPLICATION SERVER ADMINISTRATION 14
Remaining ifas.start.config Functions
The remaining functions in ifas.start.config are used in special circumstances.
User Classes
User classes are optional but can be employed to setup users to have more or less privilege than other users. For instance, an regular user should not have shell access where a developer or administrator may need it. User classes are primarily used as a means of driving the menu items available to users. However, user classes also determine which users immediately enter a nucleus menu. Because implementing user classes is optional their function can be ignored or even extended depending on the needs of the client. Depending on the setup, it is possible for a user to be denied access to all accounts, effectively banning the user from logging into the IFAS accounts. Imagine an update in progress. The user class settings can be used to keep all users out of the system during the update, including Insight users. The user class is assigned in config_Initialize ensuring the user class is set before the menu is calculated. Based on the user class and selection the user chooses at the menu, the account (or connection) variables are setup in config_SetupConnectionVariables.
2.2 Environment Variables Within the Korn Shell environment in which classic IFAS operates, there are a number of environment variables that are set by the Session Startup Scripts, ifas.start and ifas.start.config. They are customized to your architecture, and tell our software where to find files, databases, etc. Among the many variables setup, some of the key variables are the following:
IFAS_HOME: Location of the software. Typically /ifas/app.
HOME: Directory into which a user logs in, such as /ifas/admin.
IMAGE_DBNAME: Set to the name of the database.
DB_TYPE: Should be set to informix, oracle, or mssql, depending on the database type.
IFAS_CFG: Name of the IFAS.cfg file for an instance of batchjob, ilock, mpespooler. The file designated by IFAS_CFG environment variable must be located in $XPORTDIR.
PATH: what directories and in what order to search for executable programs and scripts.

APPLICATION SERVER ADMINISTRATION 15
MPE_TEMP: directory location for IFAS temporary files.
For SQL Server Clients, there are additional key environment variables:
DB_SERVER: Name of the SQL Server Database Server
SQLSERVER: name of an ODBC DSN for TRIAD programs to connect.
QUERIXDIR: location of Querix software, if TRIAD is being used
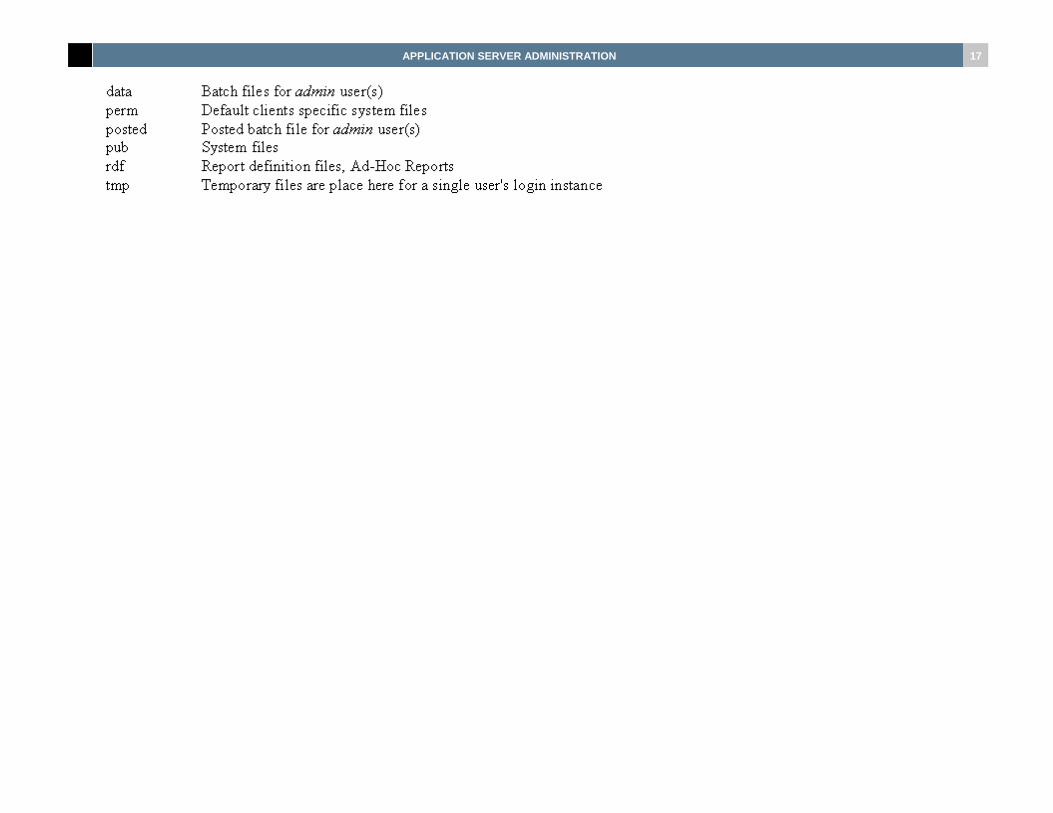
2.3 IFAS Directory Structure The main directories (Accounts) and their associated sub-directories (Groups):

APPLICATION SERVER ADMINISTRATION 16
app/ Maintained by SBI; all files should be owned by the bsi user/group
admindir/ Maintained by Client
APPLICATION SERVER ADMINISTRATION 17
APPLICATION SERVER ADMINISTRATION 18
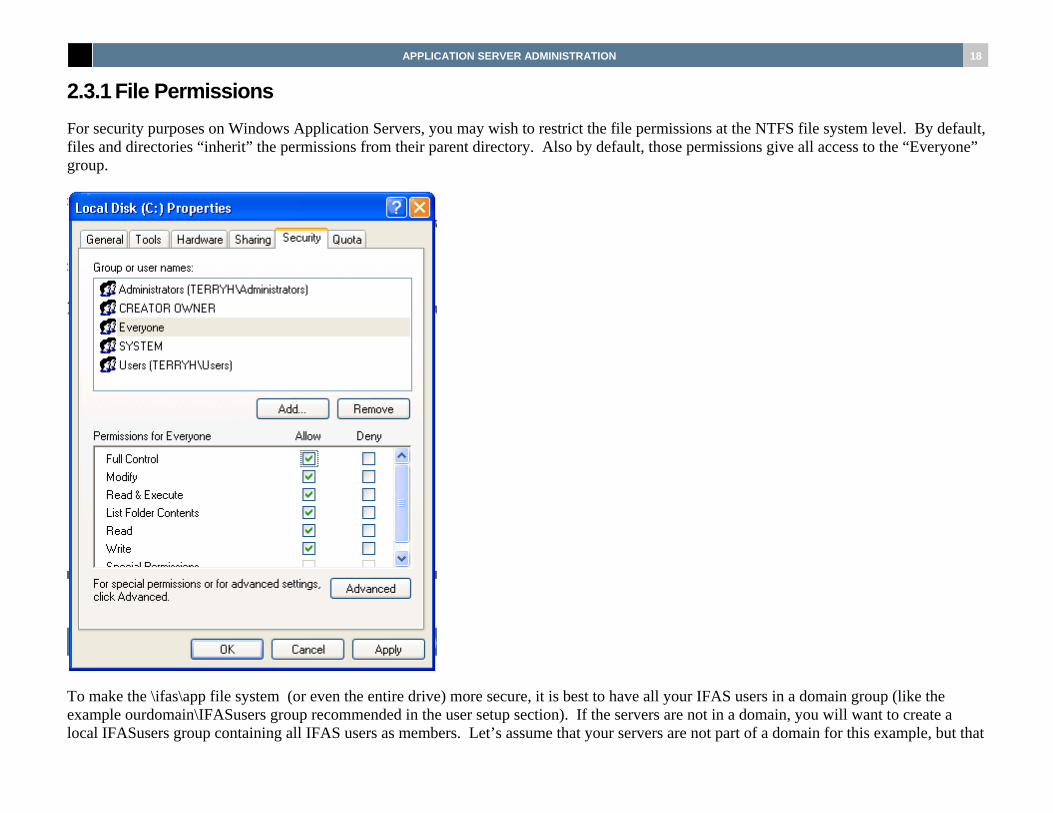
2.3.1 File Permissions For security purposes on Windows Application Servers, you may wish to restrict the file permissions at the NTFS file system level. By default, files and directories “inherit” the permissions from their parent directory. Also by default, those permissions give all access to the “Everyone” group.
To make the \ifas\app file system (or even the entire drive) more secure, it is best to have all your IFAS users in a domain group (like the example ourdomain\IFASusers group recommended in the user setup section). If the servers are not in a domain, you will want to create a local IFASusers group containing all IFAS users as members. Let’s assume that your servers are not part of a domain for this example, but that

APPLICATION SERVER ADMINISTRATION 19
you have created a local group called IFASusers that has all the IFAS users as members. Using the Windows Explorer, highlight the directory or drive, and right-click on it with your mouse. Choose Properties, then choose the Security tab, which will look something like this: After removing the “Everyone” group, and adding the IFAS users group, make sure that there are checks in the “Allow” column for each category.
2.3.2 File System Maintenance Periodically the file system in which the IFAS system resides requires maintenance. This maintenance will provide a clean operating environment for the users and the application to execute in. The files under the directory of \ifas\app\posted or \bi-tech\admin\posted are already posted to the database and can periodically be backed up and then deleted. Maintenance on the posted group can be done as frequently as a client would like, but most clients only cleanup the posted group once every six months. Periodically during the process of loading software updates and/or loading data into the database from the conversion process files are created to hold tables of information. These files usually are named xxBBBnnn, where ‘xx’ is the subsystem, and ‘nnn’ is the number of the data set or table within the subsystem. For example, GLBBB001 contains information from the first data set in the GL subsystem. The SunGard Bi-Tech programs sy970 and sy975 unload and load these files into the current directory from which they are run, normally \bi-tech\app\bbbdata. Generally speaking these file can be deleted after use. However, please use caution when deleting these files and consider whether a backup should be made prior to deletion. To locate these files do the following steps:
cd $HOME/..
findf BBB
IFAS creates temporary files for use by the user during their session of activity. These file should be removed by .logout or .klogout when the user exits the system. In some cases if the user does not exit properly these files are not removed. The files reside in the directory $HOME/tmp/$PGRP (e.g., /home/admin/tmp), where $PGRP is a uquie ID number for the user’s session. Temporary files are kept in $HOME/tmp/$PGRP/group/FILENAME, e.g., /u/admin/temp/6363/pub/USERID. These files are typically not very large, but can accumulate and cause problems. In order to handle this problem, these files should be removed upon reboot of the Classic IFAS server.
2.4 IFAS Daemons Processes Daemon is a (primarily) Unix term for describing server processes that run in the background and service requests. They are roughly analogous to Windows Services. IFAS employs three daemon processes on Unix, batchjob, mpespooler, and ilock. On Windows, only two daemons are employed: btchjobw and ilockw. The x_print_cmds script, described later in this document, controls all host printing on Windows Application Servers.

APPLICATION SERVER ADMINISTRATION 20
2.4.1 batchjob (Unix) and btchjobw (Windows) The batchjob daemon can be used to control the number of jobs executing at a time, schedule jobs, etc. It will log execution of jobs in the file /tmp/batchjob.log to give a status to the operator. Script commands can be place into the .batchrc file for execution when a individual job begins execution. Messages are passed from the user process to batchjob. batchjob creates three files in $XPORTDIR/.spool (unless SPOOLDIR is set to point to an alternate directory). Job initiation and completion are logged in \tmp\batchjob.log. There are four files created in .spool related to the job.
Jnnn Is an executable script that is initiated by the daemon. Where nnn is the batch job number.
JnnnI Is an input file to Jnnn. Where nnn is the batch job number
.Jnnn.info Is information used to recover the job if needed, for instance if batchjob dies. Where nnn is the batch job number.
JnnnO Once a job starts executing, this fourth file is created. This is the standard out, i.e., STDOUT for the job. Where nnn is the batch job number.
Note: Any changes made to queue configurations will automatically be restored whenever the batchjob process is restarted. This includes any LIMIT, JOBFENCE, and NICE settings that may have been issued for each queue. Settings are maintained in a file called $XPORTDIR/.batch_config. See Appendix C for supported Batchjob commands.
2.4.2 ilock (Unix) and ilockw (Windows) This daemon manages rowset database locks. Its use is normally transparent to the users. However, it is possible to check on outstanding database locks by using the command “dbutil”, followed by the sub-command “show”.
Ipc_daemon Handle semaphore and shared memory operations.
This daemon is transparent to users as well, but must be launched in a DOS window on the console. To start it, simply open a DOS window, and type in “ipc_daemon”.
2.4.3 Windows Service for Daemons Because our software makes use of Inter-process Communication in the form of semaphores and shared memory, a service called ipc_daemon must always be running in order for COBOL programs to run. If it is not running, you will get a message like the following: OpenSemaphore

APPLICATION SERVER ADMINISTRATION 21
(Global\MultiSemSem), Error: The system cannot find the file specified. ERROR! Please ensure ipc_daemon is running!!! If you get this error, make sure this service is running. ipc_daemon manages inter-process communication using semaphores and shared memory.

APPLICATION SERVER ADMINISTRATION 22
3 Setting Up IFAS Users You will be setting up several administrative users, as well as your end users. For administrative users, we usually set up a user called “bsi” for support purposes and a “bsidba” user for database administration. Users must be set up at several levels: In addition to the Client PC, Windows or Unix users must be set up on the Classic IFAS Server and the Database Server (if separate). The 7i Server is a web server, and therefore does not require user definitions.
In addition to these Operating System level users, an Database-level user may be required. Typically we configure the database user to be trusted, meaning the O.S user credentials are sent to the database upon connection. The database trusts any user with proper authentication on the host machine. Informix automatically supports this setup. Oracle does this through the use of an ops$username user. SQL Server allows trusted user setup as well.
In addition to the Operating System user and the Database user, an IFAS user is required at the application level. For more information on IFAS users and security setup, see the various Security guides.
3.1 Set-up SQL Server users on Windows Application Servers User setup is greatly simplified by having the Servers on a Domain, and using Domain Users for authentication to the servers and database. In many cases, domain users may already be defined for all users of the enterprise. Let’s assume that your servers are part of a domain called ourdomain. Further, assume you have domain users for bsi, bsidba, and several other users called user1 and user2. That means these users are already defined on your Classic IFAS and DB Servers, as ourdomain\bsi, ourdomain\user1, etc.

APPLICATION SERVER ADMINISTRATION 23
For SQL Server authentication, it is recommended to create a domain group called IFASusers (or, more accurately, ourdomain\IFASusers). Add the domain users as members to the IFASusers group.Now, using SQL Server’s Enterprise Manager tool, expand the Microsoft SQL Servers/SQL Server Group tree. Expand Security, right click on Logins, and select New Login. This will bring up the following dialog box. Set it up as follows:
APPLICATION SERVER ADMINISTRATION 24
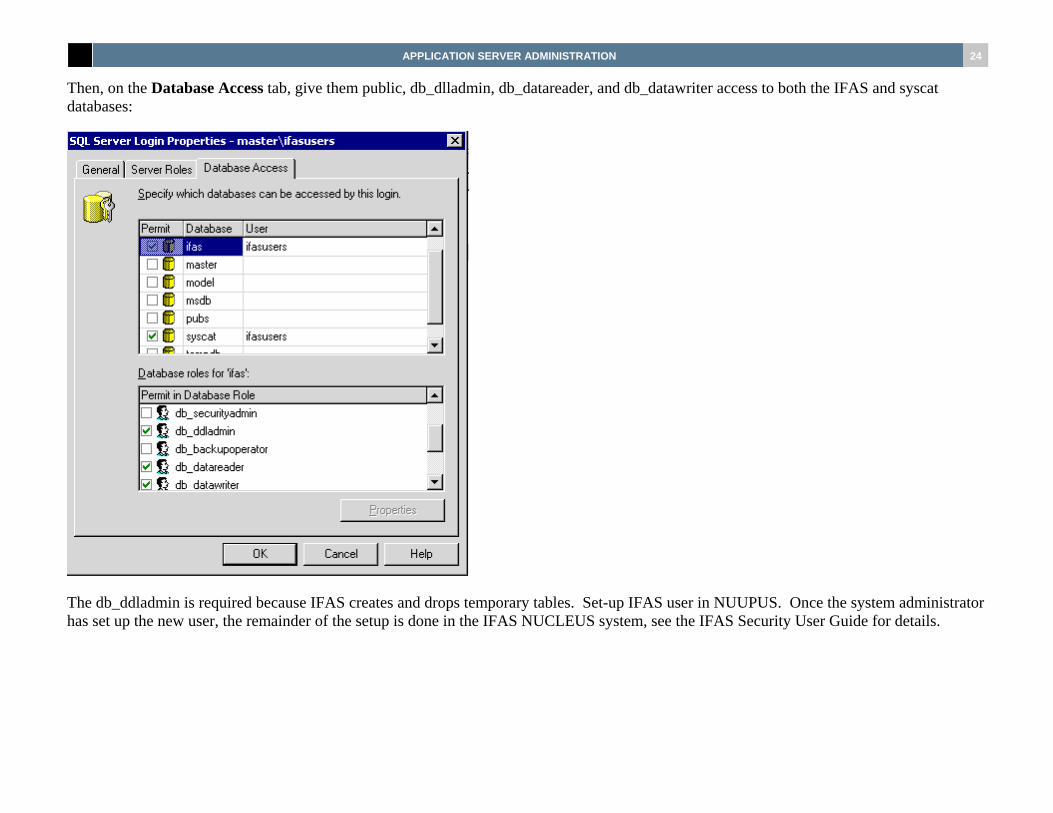
Then, on the Database Access tab, give them public, db_dlladmin, db_datareader, and db_datawriter access to both the IFAS and syscat databases:
The db_ddladmin is required because IFAS creates and drops temporary tables. Set-up IFAS user in NUUPUS. Once the system administrator has set up the new user, the remainder of the setup is done in the IFAS NUCLEUS system, see the IFAS Security User Guide for details.

APPLICATION SERVER ADMINISTRATION 25
4 Print Methodologies A script file allows the processing of printing requirements. The information associated with a given print request from IFAS is given to a Korn Shell script called $XPORTDIR/scripts/x_print_cmds. Based on the information received, the creator of this script can perform a multitude of tasks. For Windows Application Servers, the Windows lpd/lpr printing service must be enabled to allow command line printing. The following is an example of an x_print_cmds file that demonstrates various possibilities.
# This script directs information delivered by mpespooler to the UNIX
# device of choice.
#
# The parameters are passed in the following manner:
#
# $1 = Fully qualified file name to be printed
# $2 = The unix device name (printer) associated with the request
# ($2 = * means that no device was specified)
# $3 = The IFAS USER name associated with the request
# $4 = The number of copies reqested
# $5 = The file name (TITLE) of the file
# $6 = The priority of the print job
# $7 = The TTY number of the destination printer
# $8 = The IFAS job number assigned by Nucleus

APPLICATION SERVER ADMINISTRATION 26
#
…..(miscellaneous script setup here)
case $2
in
lp0) lpr -S $SERVERNAME -P HPLJ9000 $spoolfile ;;
lp1) lpr -S $SERVERNAME -P HPLJ9200 $spoolfile ;;
workflow) wfqueue -v -u $3 -m $5 -j $8 $1 >> $dir/wfqueue.log ;;
*) lpr -S $SERVERNAME -P $2 $spoolfile ;;
esac
x_print_cmds typically is set up in this way with a “case $2” to allow different commands, depending on the printer name. This printer name is initially set up in the long description of the NULP Common code.

APPLICATION SERVER ADMINISTRATION 27
5 SQL Query The SQL Query screen in the Admin Console provides the ability to Execute SQL statements directly against the System Connection (aka IFAS Database) or the Catalog Connection (aka System Catalog Database). To allow multiple screens to be running at the same time each new instance of the SQL Query screen will create a new connection to the database.

APPLICATION SERVER ADMINISTRATION 28
Note: There is no security or restrictions applied to the SQL Query Screen at all. Therefore, any user who has access to this screen can execute any statement against the database that is granted based on the user from the Database tab of the connection manager. In most cases this is DBA level permissions. Access to this screen should be extremely limited at any organization.
New: Creates a new CDD Query in the current window.
Open: Prompts to open an existing SQL Document (*.sql) on the local machine.
Save: Prompts to save the current SQL statement to a file.

APPLICATION SERVER ADMINISTRATION 29
5.1 Database Schema Panel The Database Schema Panel allows information about the System and Catalog connections to be browsed to help assist in the creation of SQL Statements. Each Connection provides groupings for User Table, System Tables, Views and Stored Procedures.

APPLICATION SERVER ADMINISTRATION 30
Show Properties – This button in the Schema Panel toolbar will toggle on or off the Properties window for the panel. When an item (Table, Column, etc.) is selected in the Panel its properties become visible in the Properties window toward the bottom of that Panel.
User Tables: Provides the ability to view the Non-System tables in the Database instance. Within each table the Columns and Indexes can also be expanded and within each index those columns referenced in that index.
System Tables: Provides the ability to view the System tables in the Database instance.
Views: Provides the ability to view information about the views in that instance.

APPLICATION SERVER ADMINISTRATION 31
Stored Procedures: Provides the ability to view information about the Stored Procedures in that instance.
5.2 Query Editor The query editor is made up of two parts. The top portion is used to create and edit SQL statements. The bottom shows the results of one or more SQL Statements. For those statements returning rows (Example: SELECT statements) the rows will be returned into a “Results” tab and shown in a Grid. For those statements that alter the database, the response from the DBMS instance is placed in the Messages tab.
5.3 Query Results Once an SQL Statement has been executed the results will appear in one or more tabs in the bottom portion of the screen. The horizontal divider in the middle of the screen allows the results panel to be increased by clicking and dragging it vertically.
5.3.1 Copy Selection The information from the results grid can be copied and pasted into other application by selecting some or all of the rows and copying (ctrl+C or right-click “Copy Selection”) them from the grid and pasting them into an application such as Notepad or Microsoft Excel. The data in the results grid cannot be edited in place and there is no mechanism for altering the data in the database from the results grid.
5.4 Viewing Blobs The SQL Query screen also limited support for viewing BLOB columns. IFAS stores information such as User Settings and Workflow Instance records in different tables in a binary data type. Querying these tables will return the column in the Results tab but due to their size the BLOB column contents are not shown in the cell. Instead, a link to the Blob Viewer is made available to the user to open a new window showing the BLOB contents. Not all BLOB data is viewable in the SQL Query plugin due to compression and storage differences but many types should be viewable by simply clicking on the “View Data” link. From the Blob Viewer the contents can be viewed or saved to a file.

APPLICATION SERVER ADMINISTRATION 32
Note: currently the Blob Viewer does not support Documents Online BLOB types. Please use the Document Viewer to view that information.

APPLICATION SERVER ADMINISTRATION 33

APPLICATION SERVER ADMINISTRATION 34
Appendix A: Utility List remlabel
All files created by IFAS contain an information block called a label at the beginning of the file. The size of this block varies depending on how the file was opened. In the normal operation of IFAS this allows much quicker and more accurate access to file information. However, IFAS does create certain flat files that must be sent as disc files to various other institutions. For example, payroll creates a P.E.R.S. report that must be sent to the state on disc in a very specific format. With the exception of the information block at the top of the file, this is not at all a problem. remlabel is a utility that was created to remove' all the descriptive information from the beginning of a file. The format for using remlabel from the Korn Shell prompt is:
remlabel filename
remlabl copies the original file to filenane.label, and then creates a new file filename with the file header removed.
pad
The files created by IFAS have an exact record length of each record of data in order to read properly. Frequently if files are created outside of IFAS and/or the file is edited this length is not correct. The utility pad will pad the file to the correct length. pad copies the original file to filenane.orig, and then creates a new file filename which is correctly padded. The format for using pad from the Korn Shell prompt is:
pad [reclen] filename [B]
where ‘reclen’ is the record length in bytes and ‘B’ indicates a BINARY pad, default is ASCII
xschema/xsql
The xschema and xsql programs are responsible for building and executing the SQL statements for building and altering IFAS tables within the database, respectively. Generally these tools are used automatically when a new version of IFAS is installed, but there may be times to use them between updates. One example is enabling Database Logging for selected columns. See the Database Logging section of the 7i Server Administration guide for more information.

APPLICATION SERVER ADMINISTRATION 35
Appendix B: IFAS Additional Work Environments In some circumstances it may be desirable to run multiple IFAS environments on a single Application Server. The IFAS environment can be broken up into two separate areas: 1) data and 2) software. The data area is considered the database and the directories and files under the /IFAS/admin directory. The software area is considered the directories and files under the /IFAS/app directory.
One of the most common reasons to create an additional environment is to have a training or test area for users to learn or test in without causing in adverse effects to the production environment. Another reason is a site has multiple entities, each of which require separate data. These reasons only require creation of an additional IFAS data environment. If a site is interesting in creating a test environment for loading software update into or development environment, then both an additional IFAS data and software environment should be created.
Before creating additional IFAS environments, a site should carefully consider effort involved in maintaining these environments. For example, when using a test software environment, the client must replicate all program changes that occur as a result of a HFS release to the production software environment.
Creating an Additional IFAS Data environment This data environment consists of two main components: a database and a directory structure to support the test users. The following steps describe the processes required to create the new IFAS environment.
Create duplicate SQL Server Database
The first step is to copy your IFAS database into a new database. For Informix and SQL Server, this can be in the same instance, or a separate instance can be setup. For Oracle, each database has its own instance. Refer to your database vendor documentation on how to clone a database. SQL Server is usually simple, involving a detach of an existing database, a copy of the database files, and a reattach of the original, and rename/attach of the copy. For Informix, several methods including onunload/onload and dbexport/dbimport exist. Oracle database can be cloned with scripts that are available.
Create New IFAS Directory Structure
Several directories are required to be located in a user’s IFAS “home”. The production directory will already contain these sub-directories. The process for creating a test directory structure includes:
1. Creating a “home” for users while they are in the test environment
APPLICATION SERVER ADMINISTRATION 36
2. Modifying the ifas.start.config to reflect the new environment. See the ifas.start.config section at the beginning of this guide for details.
3. Creating the sub-directories required to support IFAS activity
4. Copying any required or desired flat files from the production environment into the new test area.
The first step in creating the IFAS directory structure is to create a “home” for the test users. This directory must be parallel to the production “home” directory. For example, if the production “home” directory is /ifas/app/admin the new test “home” directory could be /ifas/app/test or perhaps /ifas/app/IFAStest. The naming limitations for this directory are the same as for all IFAS “home” and sub-directories; the names must be eight alphanumeric characters or less and begin with an alphabetic character.
Once the “home” directory is created, the login files (.profile, .logoutk and .batchrc) must be copied from the production “home”. There are several items in each of these files that must be modified to describe the new IFAS environment. Utilizing a text editor, such as notepad or vi, change all occurrences of the production “home” to the test “home”. The environment variable IMAGE_DBNAME will also have to be changed to match the database name created in step 1. Similar changes are required for the .batchrc file. This file gives instructions to the batchjob daemon regarding the user’s home.
At this point the sub-directories required for IFAS must be created. You can use the Windows Explorer to copy and paste to create all the same directories found in the production “home”. The following is a list of the recommended directories: data, posted, perm, rdf, pub, tmp. Once created, copy the file SYSPARM located in the production “home”/pub directory into the newly created pub directory. It will be necessary to modify this file to inform IFAS as to the whereabouts of various directories. The format of the file is ‘.’, ‘sub-directory’, ‘.’, ‘home’. For example, if the production “home” was /ifas/app/admin, one entry in the SYSPARM file would be .DATA.ADMIN, specifying that the data sub-directory is in the admin “account”. Using replace-mode only, as this file must remain padded to 80-characters, change all occurrences of the production “home” name to the new test “home” name in all uppercase characters. There are several files which may be useful in the new test environment. It is recommended that all files in the rdf and perm sub-directories be copied over into the test account.
Basic IFAS should now run in your test account. If you have a Unix Application Server and have subsystems using the TRIAD environment, you will have to recompile all modules with the synewmod command. This includes the “base” modules (syupdate, syadvanc, nuc, ff_util, report), and any subsystem modules. Do this logged in as “bsi”, and change the environment variable “IFASDBNAME” to point to your test database. See your TRIAD manual for more information on the synewmod program.
The test account is now ready to be used. Create an O.S. user with the same characteristics as a production user except that the home directory is the new test “home”.

APPLICATION SERVER ADMINISTRATION 37
Maintaining a Test Environment There are two ways of keeping a test environment in sync with the production environment. The first and the simplest is periodically copy the production database to the test database. The second is to move selected IFAS subsystems from production to test.
Copying a Subsystem Tables from Production to Test Copying individual subsystems from the production environment to the test environment makes sense in limited situations. It is more difficult to do than copying the entire database, and is not as complete. Since IFAS is highly integrated, it may be that several pieces from other subsystems are required. For example, the PE subsystem is use by AR, CK, AP, etc. Another example are the Common Codes that stored in the Nucleus subsystem, which contain Posting Preference, Posting Codes, etc. These instructions are included in case the need arises to bring only certain subsystems from one database to another.
1. Log on to the production account as follows:
login: bsi
password:
2. At the Korn Shell prompt type in the following commands:
export IMAGE_DBNAME=IFAS
cd tmp
run sy970
3. Unload the subsystem data: run sy970 Enter the Subsystem to Unload: XX
4. All of the database records for the subsystem should now reside in a series of files. The file names will all begin with XXBBB.
5. Change to the test environment. This can be accomplished by logging in to a bsitest account or by setting the database and data space correctly.
login: bsitest
password: or export IMAGE_DBNAME=IFAStest

APPLICATION SERVER ADMINISTRATION 38
6. Clear out any entries which already exist in the IFAStest database as follows: cd schema xschema xxdb xsql xxdb.sqlrm xxdb.sql
7. If the destination database resides on another machine, you may need to map a network drive or ftp them so they are visible on the destination machine.
8. To load the subsystem data into the test database, key in the following: run sy975 Enter Subsystem ID to LOAD: XX
Multiple Daemons As discussed in Appendix B: IFAS Additional Work Environments, it is possible to have multiple versions of the Classic IFAS software running on the same Application Server. In cases where it is necessary to have multiple software versions side by side on one server, there will be multiple versions of the batchjob and ilock daemon processes for Unix, and additional ipc_daemon service, btchjobw and ilockw daemons on Windows.
This section discusses the configuration needed to ensure that batchjobs and lock requests launched by a test user are serviced by the test versions of the batchjob and ilock daemon process.Introducing multiple sets of these daemons requires editing a file called IFAS.cfg under the xport directories of each environment ($XPORTDIR\IFAS.cfg).Two configurations are described below. The first is a single host configuration and the second is a two host client/server configuration. The differences are slight but significant for correct operation.
Modifications to $XPORTDIR\IFAS.cfg
If there is not an IFAS.cfg installed in the $XPORTDIR directory then defaults are being used by the system. Consider installing the IFAS.cfg file (generally stored in $XPORTDIR\scripts) into the $XPORTDIR directory. Having an IFAS.cfg file installed in each environment enhances consistency and maintenance to your system. The MSGMEM section of the IFAS.cfg file defines a memory key. These keys must be unique to each of the environments.
1. Assign the services to the test account.
[batchjob]
service=ts_batch # test environment batchjob service
[ilock]
service=ts_ilock # test environment ilock service
[msgmem]

APPLICATION SERVER ADMINISTRATION 39
key=B # test environment memory key
2. Assign the services to the production account.
[batchjob]
service=bt_csbatch #production environment batchjob service
[ilock]
service=bt_csilock #production environment ilock service
[msgmem] key=G # production environment memory key
Installing IFAS/SQL Run PC installer once required 3rd party products are installed.
After the installer completes, perform the following manual steps to complete the process.
The services batchjob and ilock utilize a port on the windows server. If there are 2 or more IFAS filesystems in use on a single windows server we need to specify which port these services will use. To do this, open the following windows file with notepad:
C:\windows\system32\drivers\etc\services
At the end of this file create service names and assign a port number that is not currently in use in the file to the service:
bt_batch75 8000/tcp #Production acct batchjob
bt_ilock75 8001/tcp #Production acct ilock
bt_batch76 8050/tcp #Test acct batchjob
bt_ilock76 8051/tcp #Test acct ilock
Edit the ifas.cfg file in the IFAS filesystem. This will tell IFAS which service/port to utilize. Each IFAS filesystem will need to be updated.

APPLICATION SERVER ADMINISTRATION 40
Check to ensure the ifas.cfg file exists in the app/xport directory. If not, copy the ifas.cfg.std file from the app/xport/scripts directory to app/xport and rename to ifas.cfg.
Edit this file and update the following sections with the correct service names created above:
[batchjob]
service=bt_batch76
[ilock]
service=bt_ilock76
Repeat this for each IFAS filesystem. Each filesystem should have a unique batchjob and ilock service name that is also defined in the windows services file with a unique port number.

APPLICATION SERVER ADMINISTRATION 41
Appendix C: General IFAS Command Reference Each of the commands described below begin with the name of the command, in all capital letters, followed by a description of the command. To perform one of these commands, simply key in a colon followed by the name of the command. The command names may be keyed in either upper, lower, or mixed case letters.
HELP
This command invokes the HELP facility which provides useful information about all system commands which may be used. Although not nearly as attractive or flexible as the SunGard Bi-Tech. HELP facility, this is also an indexed method of presenting helpful descriptive information.
TELL #Snnn
This command can be used to send a message to a particular session which is currently signed on and not QUIET. The general format of the command is TELL #Sxxx;message. After becoming familiar with the other users, it will be possible to identify who is currently signed on by using the SS command. Then, messages may be sent to other users on the system. For example, if Mary is signed on as session number 135, the following message may be sent: TELL #S135;Hey Mary, how about lunch today? A special form of the TELL command is TELLOP which allows users to send a message to the Computer Operator; for example; by typing in TELLOP Please mount tape number 20, this message would appear on the Computer Operator's terminal.
LISTF filespece[.group[.account]]
This command will list all files currently in a particular group and account. This command is handy for looking at the names of files. If a particular naming convention is used which starts all files with a user's initials, those files can be listed by entering LISTF followed by the user's initials and the 'at' sign, @. For example, if all files are named WS followed by up to six (6) more characters, entering :LISTF WS@ will display only those files beginning with WS. The '@' may be used to select characters in any part of file names. For example, entering :LISTF @CK@ will display all files which have the characters 'CK' anywhere in the file name. The user can use the menu SYSCLS to perform LISTF commands as well.
PURGE filespece[.group[.account]]
This command is used to remove a file from the computer. The general form of the command is as follows: :PURGE filename, where filename is the name of the file. For example, if a file named WSMYFILE was created and is no longer needed, key in the following to remove

APPLICATION SERVER ADMINISTRATION 42
the file: :PURGE WSMYFILE. It should be noted that this command should be used very carefully as purging files which are still needed can cause problems.
RENAME filename[.group[.account]]
This command is equivalent to the DOS command “move”, or using the Windows Explorer to rename or drag and drop a file. RENAME can be used from within IFAS to change the name of a file or to change the group in which a file resides. The general form of the command is as follows: :RENAME filename1,filename2 (where filename1 is the current name of the file and filename2 is the new name of the file). For example, a file named WSCHECK1 (in the user's group) is to be changed to WSCHECK3, key in :RENAME WSCHECK1,WSCHECK3 and the file would be renamed to WSCHECK3.
The RENAME command may also be used to move a file from one group to another group. To understand why this might be useful, the following review of the group and account structure used by SunGard Bi-Tech will be of assistance. When a batch file is posted to a permanent database or file, the file is automatically renamed from the data directory into the posted directory. To move the file back into the data directory for additional processing, the RENAME command may be used to effect this move. For example, to move a file named WSJE0101 located in the posted to the data directory, key in the following: :RENAME WSJE0101.POSTED,WSJE0101.DATA
This removes the file from the posted directory and place it in the data directory.
SHOWJOB [#Jnnn]
Is used to job the status of all batch jobs. A job may be executing, awaiting execution, or deferred. nnn is the batch job number.
SS
This command will show all sessions currently on the computer.
SJ
This command will show all jobs currently on the computer. The following is an example of what is shown on the terminal when SJ is typed:
JOBNUM STATE IPRI JIN JLIST INTRODUCED JOB NAME#J5423 EXEC 10S LP WED 9:00A PEFLSA,BATCHJOB.FIN
ALTJOB #Jnnn;PRI=n

APPLICATION SERVER ADMINISTRATION 43
Alters job priority (1-14). Where nnn is the batch job number.
ABORTJOB #Jnnn
Abort the job Jnnn. Where nnn is the batch job number.
LIMIT n [;QUEUE=queue name] [;NICE=nn]
The batchjob daemon can be used to control the number of jobs executing at a time. This is known as the job limit. It is generally accepted that a few jobs executing at a single time is better than many (e.g. a limit of 3). This command also allows the “nice” value to be set by scheduling queue. A nice value is used to lower the CPU priority of a batch job; the higher the nice value, the lower the CPU priority. Typically, a nice value of 5 or 10 is used, in order to run batch jobs at a lower priority than interactive jobs. It allows the queue to be specified when setting job limit to n. The first reference to a particular queue will establish the name for that queue. Additionally, a NICE value of nn may be given, causing jobs to execute with a lower CPU priority than other processes. This can be used to give long-term jobs a smaller percentage of the CPU, or to give batch jobs less CPU time than interactive jobs. Typically, a NICE value of 5 or 10 is used for batch jobs. The option “Q=“ can also be specified as “QUEUE=“ or “PRI=“. For example, the following commands might be used: LIMIT 1;Q=SHORT;NICE=5 LIMIT 2;Q=LONG;NICE=10
JOBFENCE n [;QUEUE=queue name]
Sets the job fence to the value specified by n, for the particular scheduling queue. The job fence keeps low priority jobs from executing. Any job with a priority less than or equal to the job fence value will remain in a deferred state and not execute until either the job fence or the job’s priority is changed. Allows the queue to be specified when setting jobfence to n.
For example, the command might be used: JOBFENCE 6;Q=LONG