application notes for configuring avaya proactive contact
TRANSCRIPT

AAA; Reviewed:
SPOC 8/5/2013
Solution & Interoperability Test Lab Application Notes
©2013 Avaya Inc. All Rights Reserved.
1 of 34
CallScripPC51HD
Avaya Solution & Interoperability Test Lab
Application Notes for configuring Avaya Proactive Contact
R5.1 with CallScripter R4.5 using Avaya PG230 Digital
Switch – Issue 1.0
Abstract
These Application Notes describe the configuration steps required for CallScripter R4.5 to
successfully interoperate with Avaya Proactive Contact R5.1 using Avaya PG230 Digital
Switch.
Information in these Application Notes has been obtained through DevConnect compliance
testing and additional technical discussions. Testing was conducted via the DevConnect
Program at the Avaya Solution and Interoperability Test Lab.

AAA; Reviewed:
SPOC 8/5/2013
Solution & Interoperability Test Lab Application Notes
©2013 Avaya Inc. All Rights Reserved.
2 of 34
CallScripPC51HD
1. Introduction These Application Notes describe a compliance tested configuration comprised of Avaya
Proactive Contact R5.1 using an Avaya PG230 Digital Switch (also known as hard dialer) and
CallScripter R4.5.
Avaya Proactive Contact R5.1 uses an Avaya PG230 Digital Switch to connect Avaya Proactive
Contact Agent headsets and connect outbound calls to Avaya Proactive Contact Agents via a Q-
Sig trunk with Avaya Aura® Communication Manager.
Avaya Proactive Contact Agents log into Proactive Contact using the intuitive CallScripter web
interface. The dialer selection, login credentials, job selection, tenant selection, agent state, call
control options and all other agent interactions are presented to the user by the
CallScripter.CTI.ProactiveContact.dll toolbar provider which communicates with the Avaya
Proactive Contact R5.1 Agent Application Programming Interface (API) via moagent32.dll.
The CallScripter Application can be used in either hard-dialer or soft-dialer Computer Telephony
Integration CTI environments and can identify the appropriate functionality to offer the agent
depending on the dialer environment capabilities. CallScripter can handle inbound, outbound,
blend and managed jobs, and is able to support multi-dialer, multi-tenant and multi-unit work list
configurations.
CallScripter is configured so that the appropriate pre-configured Script is presented to the agent
according to the job through which outbound calls are delivered to the agent. The script can be
fully customized according to customer needs and can present a variety of options and pages
through which the agent navigates during each outbound call transaction.
2. General Test Approach and Test Results The interoperability compliance testing evaluated the ability of CallScripter to carry out call
handling functions in a variety of scenarios through the API with Proactive Contact. The feature
test cases were performed automatically. Outbound calls were automatically placed and
delivered to CallScripter by Proactive Contact. Different types of jobs were exercised, along with
a variety of actions initiated from CallScripter, to verify proper generation and handling of
supported messages from Proactive Contact. The Proactive Contact Editor was used to start/stop
and configure jobs. The verification included checking the display of fields, options, and values
on CallScripter, and verification of the exchanged API events in the agentx_API.trans log files
was also performed. All test cases were executed.
DevConnect Compliance Testing is conducted jointly by Avaya and DevConnect members. The
jointly-defined test plan focuses on exercising APIs and/or standards-based interfaces pertinent
to the interoperability of the tested products and their functionalities. DevConnect Compliance
Testing is not intended to substitute full product performance or feature testing performed by
DevConnect members, nor is it to be construed as an endorsement by Avaya of the suitability or
completeness of a DevConnect member’s solution.

AAA; Reviewed:
SPOC 8/5/2013
Solution & Interoperability Test Lab Application Notes
©2013 Avaya Inc. All Rights Reserved.
3 of 34
CallScripPC51HD
2.1. Interoperability Compliance Testing
The feature testing focused on verifying successful login of Proactive Contact Agents using
CallScripter and the display of CallScripter Scripts with appropriate options, fields, and values
for the following scenarios:
• Outbound, inbound, blend and managed jobs
• Select dialer, select tenant, login, join job, select unit work list, go on/off break, change
job, leave job, and logoff
• Hold, retrieve, call transfer, NVDT forward work, conference, place manual call, place
managed call, cancel managed call, agent drop, release line, hang-up, and finish work
• Set recall and Agent Owned Recall and update customer fields
• Set completion codes
2.2. Test Results
All test cases were completed successfully with the following observations:
• During a blend job where an inbound call immediately follows an outbound call, the call
record for the outbound call remains on the Script the agent is using. This is resolved in
v.1.0.0.3 of CallScripter.CTI.ProactiveContact.dll
• Where a shadow job is used for recalls the correct script failed to pop. This was due to
the dynamic nature under which shadow jobs are created and the field used in the
AORNotify message to trigger the Script pop. e.g. Proactive Contact will send:
AGTAORNotify NAgent server shadowjob_2Allidoutbnd2 to the agent.
Where shadowjob_2 is the job dynamically created for the recalls and outbnd2 is the
original job which would be linked to a Script to pop.
CallScripter.CTI.ProactiveContact.dll v1.0.0.4 resolves this issue.
2.3. Support
Support for the CallScripter product can be obtained as follows:
• Website: http://www.callscripter.com
• Email: [email protected]
• Phone: +44 (0)844 544 8882

AAA; Reviewed:
SPOC 8/5/2013
Solution & Interoperability Test Lab Application Notes
©2013 Avaya Inc. All Rights Reserved.
4 of 34
CallScripPC51HD
Reference Configuration Figure 1 below shows the compliance tested configuration comprising of Avaya Aura®
Communication Manager hosted on an Avaya S8800 Media Server connected to an Avaya G450
Media Gateway. QSIG trunks from the Avaya G450 Media Gateway provide the path for calls to
the Avaya PG230 Digital Switch which is controlled by Avaya Proactive Contact R5.1. A further
PRI trunk provides access to a simulated PSTN. Avaya Proactive Contact Agents are logged into
Proactive Contact using the web based CallScripter interface and Avaya 96xx IP Deskphones
provide the agent headsets.
Figure 1: Avaya Proactive Contact with CallScripter Configuration
3. Equipment and Software Validated The following equipment and software were used for the sample configuration provided:
Equipment/Software Release/Version
Avaya Aura® Communication Manager
running on Avaya S8800 Server
R6.2 SP6
Avaya Proactive Contact Running on HP
DL360
R5.1.0.0.1802
Avaya 9630 IP Deskphone 3.2
Avaya PG230 Generic Software 15.3.1
CallScripter running on Windows Vista PC CallScripter Environment 4.5.24.5654
CallScripter.CTI.ProactiveContact.dll
1.0.0.0
AAA; Reviewed:
SPOC 8/5/2013
Solution & Interoperability Test Lab Application Notes
©2013 Avaya Inc. All Rights Reserved.
5 of 34
CallScripPC51HD
4. Configure Avaya Aura® Communication Manager This section provides the procedures for configuring Communication Manager to support the
PG230 integration. These application notes assume configuration of Communication Manager
with Proactive Contact has already been performed. For illustratative purposes the procedures
necessary for configuration includes the following area.
• Configure Trunks to Avaya PG230 Digital Switch
4.1. Configure Trunks to Avaya PG230 Digital Switch
A number of trunks are required for the purpose of communication between PG230 and
Communication Manager. One trunk for calls in each of the following categories
• Agent Headsets (Dialback)
• Outbound
• Inbound
• Transfer

AAA; Reviewed:
SPOC 8/5/2013
Solution & Interoperability Test Lab Application Notes
©2013 Avaya Inc. All Rights Reserved.
6 of 34
CallScripPC51HD
The physical connection is made between PG230 and the MM710 contained within the G450
Media Gateway. Enter the add ds1 xxxxx command, where xxxxx is the location of the DS1
media module pack. Configure the following
• Name set to any descriptive string value, in this case, it was CM-
PG230
• Bit Rate set to 2.048
• Line Coding set to hdb3
• Signaling Mode set to isdn-pri
• Connect set to pbx
• Interface set to peer-master
• Peer Protocol set to Q-SIG
• Interface Companding set to alaw
• Idle Code set to 01010100
add ds1 001v8 Page 1 of 1
DS1 CIRCUIT PACK
Location: 001v8 Name: CM-PG230
Bit Rate: 2.048 Line Coding: hdb3
Signaling Mode: isdn-pri
Connect: pbx Interface: peer-master
TN-C7 Long Timers? n Peer Protocol: Q-SIG
Interworking Message: PROGress Side: a
Interface Companding: alaw CRC? y
Idle Code: 01010100 Channel Numbering: timeslot
DCP/Analog Bearer Capability: 3.1kHz
T303 Timer(sec): 4
Disable Restarts? n
Slip Detection? y Near-end CSU Type: other
Echo Cancellation? n

AAA; Reviewed:
SPOC 8/5/2013
Solution & Interoperability Test Lab Application Notes
©2013 Avaya Inc. All Rights Reserved.
7 of 34
CallScripPC51HD
Configure a Signaling Group for the previously configured DS1 board 001v8. Enter the add
signaling-group n command, where n is an unused signaling group number. Configure the
following on Page 1.
• Group Type set to isdn-pri
• Primary D-Channel enter the DS1 board number followed by 16
• Trunk Group for Channel Selection enter the 1st trunk group number that was
configured for DS1 board 001v8; in this case
trunk group 7
• TSC Supplementary Service Protocol set to b
add signaling-group 7 Page 1 of 1
SIGNALING GROUP
Group Number: 7 Group Type: isdn-pri
Associated Signaling? y Max number of NCA TSC: 0
Primary D-Channel: 001V816 Max number of CA TSC: 0
Trunk Group for NCA TSC: 7
Trunk Group for Channel Selection: 7 X-Mobility/Wireless Type: NONE
TSC Supplementary Service Protocol: b Network Call Transfer? n

AAA; Reviewed:
SPOC 8/5/2013
Solution & Interoperability Test Lab Application Notes
©2013 Avaya Inc. All Rights Reserved.
8 of 34
CallScripPC51HD
Configure a trunk group used for inbound calls. Enter the add trunk-group n command, where
n is an available trunk group number. Configure the following on Page 1.
• Group Type set to isdn
• Group Name set to any descriptive string value, in this case, it was QSIG to PG230
- Headsets
• TAC enter a Trunk Access Code that is valid in the provisioned dial plan
• Dial Access set to y
• Service Type set to tie
add trunk-group 7 Page 1 of 21
TRUNK GROUP
Group Number: 7 Group Type: isdn CDR Reports: y
Group Name: QSIG to PG230 - Headsets COR: 1 TN: 1 TAC: 707
Direction: two-way Outgoing Display? y Carrier Medium:
PRI/BRI
Dial Access? y Busy Threshold: 255 Night Service:
Queue Length: 0
Service Type: tie Auth Code? n TestCall ITC: rest
Far End Test Line No:
TestCall BCC: 4
On Page 2 of the trunk group configuration, specify the following:
• Supplementary Service Protocol set to b
• Disconnect Supervision
o In set to y
o Out set to y
add trunk-group 7 Page 2 of 21
Group Type: isdn
TRUNK PARAMETERS
Codeset to Send Display: 6 Codeset to Send National IEs: 6
Max Message Size to Send: 260 Charge Advice: none
Supplementary Service Protocol: b Digit Handling (in/out):
enbloc/enbloc
Trunk Hunt: cyclical
Digital Loss Group: 13
Incoming Calling Number - Delete: Insert: Format:
Bit Rate: 1200 Synchronization: async Duplex: full
Disconnect Supervision - In? y Out? y
Answer Supervision Timeout: 0
Administer Timers? n CONNECT Reliable When Call Leaves ISDN? n
XOIP Treatment: auto Delay Call Setup When Accessed Via IGAR? n

AAA; Reviewed:
SPOC 8/5/2013
Solution & Interoperability Test Lab Application Notes
©2013 Avaya Inc. All Rights Reserved.
9 of 34
CallScripPC51HD
On Page 5, configure GROUP MEMBER ASSIGNMENTS as follows:
• Port enter the DS1 board number followed by the trunk member number. The
ports configured on Communication Manager must be mapped to the ports
configured on the PG230 Digital Switch.
• Sig Grp enter the number of the signaling group configured for the DS1 board 001v8,
in this case it is Signaling Group 7.
add trunk-group 7 Page 5 of 21
TRUNK GROUP
Administered Members (min/max): 1/5
GROUP MEMBER ASSIGNMENTS Total Administered Members: 5
Port Code Sfx Name Night Sig Grp
1: 001V801 MM710 7
2: 001V802 MM710 7
3: 001V803 MM710 7
4: 001V804 MM710 7
5: 001V805 MM710 7
Note: There is different port numbering between PG230 Digital Switch and Communication
Manager; therefore ports 2-6 on PG230 Digital Switch correspond to ports 1-5 on
Communication Manager.
Repeat the above configuration steps in order to configure remaining trunk groups for Outbound
Inbound and Transfer calls. For each trunk group make sure that the number of ports in GROUP
MEMBER ASSIGNMENTS is correctly mapped to the number of ports configured on the
PG230. Also, for every trunk group, configure each port with signaling group 7.

AAA; Reviewed:
SPOC 8/5/2013
Solution & Interoperability Test Lab Application Notes
©2013 Avaya Inc. All Rights Reserved.
10 of 34
CallScripPC51HD
Enter list trunk-group command, to list all trunk groups that were configured on the
Communication Manager. Below is the list of all trunk groups that were configured for the E1
QSIG trunk between Communication Manager and PG230 Digital Switch. In addition, note the
presence of the preconfigured Simulated PSTN trunk, the configuration of which is outside of
the scope of these Application Notes.
list trunk-group
TRUNK GROUPS
Grp No. Out Que
No. TAC Group Type Group Name Mem TN COR CDR Meas Dsp Len
2 702 isdn Simulated PSTN to CM6.0.1 8 1 1 r both n 0
7 707 isdn QSIG to PG230 - Headsets 5 1 1 y both y 0
8 708 isdn QSIG to PG230 - Outbound 10 1 1 y both n 0
9 709 isdn QSIG to PG230 - Inbound 5 1 1 y both n 0
10 710 isdn QSIG to PG230 - Transfer 5 1 1 y both n 0

AAA; Reviewed:
SPOC 8/5/2013
Solution & Interoperability Test Lab Application Notes
©2013 Avaya Inc. All Rights Reserved.
11 of 34
CallScripPC51HD
5. Configure Avaya Proactive Contact It is assumed a fully operating Proactive Contact has been implemented. If assistance is required
with Proactive Contact, please contact Avaya Professional Services or an Avaya Business
Partner. The following pages illustrate the configuration of Proactive Contact.
5.1. Configure dgswitch.cfg
Edit /opt/avaya/pds/config/dgswitch.cfg as shown below. The format used is based on the
location of the ports in the PG230 Digital Switch; therefore Proactive Contact is configured with
the same number of Inbound Ports as the number of inbound lines on the PG230 Digital Switch.
The inbound ports configured on Proactive Contact correspond to the ports of the inbound trunk
group configured on Communication Manager in Section 4.1, the same is true for Headset,
Outbound and Transfer trunk ports. Note the headset group 15 specified here as in opmon.cfg.
# Headset Ports
H:1:361:1::#H:15:1:1-1-21-4-2
H:2:362:1::#H:15:1:1-1-21-4-3
H:3:363:1::#H:15:1:1-1-21-4-4
H:4:364:1::#H:15:1:1-1-21-4-5
H:5:365:1::#H:15:1:1-1-21-4-6
# Normal Outbound Trunks
N:1:366:1::#O:10:1:1-1-21-4-7
N:2:367:1::#O:10:1:1-1-21-4-8
N:3:368:1::#O:10:1:1-1-21-4-9
N:4:369:1::#O:10:1:1-1-21-4-10
N:5:370:1::#O:10:1:1-1-21-4-11
N:6:371:1::#O:10:1:1-1-21-4-12
N:7:372:1::#O:10:1:1-1-21-4-13
N:8:373:1::#O:10:1:1-1-21-4-14
N:9:374:1::#O:10:1:1-1-21-4-15
N:10:375:1::#O:10:1:1-1-21-4-16
# Normal Inbound Trunks
N:11:377:1::#I:11:1:1-1-21-4-18
N:12:378:1::#I:11:1:1-1-21-4-19
N:13:379:1::#I:11:1:1-1-21-4-20
N:14:380:1::#I:11:1:1-1-21-4-21
N:15:381:1::#I:11:1:1-1-21-4-22
# Transfer-thru Trunks
T:1:382:1::#T:12:1:1-1-21-4-23
T:1:383:1::#T:12:1:1-1-21-4-23
T:1:384:1::#T:12:1:1-1-21-4-23
T:1:385:1::#T:12:1:1-1-21-4-23
T:1:386:1::#T:12:1:1-1-21-4-23

AAA; Reviewed:
SPOC 8/5/2013
Solution & Interoperability Test Lab Application Notes
©2013 Avaya Inc. All Rights Reserved.
12 of 34
CallScripPC51HD
Edit only the last 4 lines of /opt/avaya/pds/config/voicemsg.cfg, this file refers to the
announcements recorded on the PG230.
250:greeting:1027:Female:Folder4:Voice:Message27
251:inbound:1028:Female:Folder4:Voice:Message28
252:outbound:1029:Female:Folder4:Voice:Message29
253:notLoggedIn:1030:Female:Folder4:Voice:Message30
Navigate to the /opt/avaya/pds/scripts directory and copy the telephny_hd.spt file to the
telephny.spt file using the following command cp telephny_hd.spt telephny.spt. This file
defines Hard Dialer specific parameters.

AAA; Reviewed:
SPOC 8/5/2013
Solution & Interoperability Test Lab Application Notes
©2013 Avaya Inc. All Rights Reserved.
13 of 34
CallScripPC51HD
5.2. Configure master.cfg
Amendments to the master.cfg file, located in the /opt/avaya/pds/etc directory, were made as
follows:
DBKGROUP:15,1,1
DBSERVERIP:10.10.16.95
IICB_HOST:devconhd501
INBNDSYS:YES
LINEASSIGN:REG,O=1-10;INB,I=11-15
MULTI_UNIT_ACCESS:YES
NAMESERVICEHOST:devconhd501
OPERATORS:5
OPLIMIT:I=5,O=5,B=5,P=5,M=5
PORTS:15
PRIMARY:YES
SWITCHNAME:switch1
SWITCHTESTMODE:NO
SWITCHTYPE:DIGITAL
VISUAL_CPA:YES
WEBLMURL:http,//10.10.16.95,8080/WebLM/LicenseServer:
Note: MULTI_UNIT_ACCESS was configured as required according to the test case executed.
5.3. Configure number format
The /opt/avaya/pds/config/phonefmt.cfg file contains details of how Proactive Contact needs to
manipulate numbers in the calling list in order to successfully place them. The final line in the
file is configured as follows:
STD_TO_DIALFMT:(country code):(line type):(strip):(prefix):(suffix): \
# (description)
# where:
# country code - "Calling to" country code digits.
# line type - Line type (line assignment label), or ALLTYPES
# for all line types.
# strip - Number of digits to strip from the start of the
# standard phone number (before prefix applied).
# prefix - Characters to prefix to stripped phone number.
# (Max 12 chars.)
# suffix - Characters to suffix to phone number. (Max 12 chars.)
# description - Optional description.
STD_TO_DIALFMT:*:ALLTYPES:10:902075554022::
In this instance of the digits dialed, 10 are deleted and replaced with 902075554022 and the call
is routed over the outbound trunk. It is assumed Communication Manager has the necessary
configuration required to route the call accordingly, in this case, over the Simulated PSTN.
AAA; Reviewed:
SPOC 8/5/2013
Solution & Interoperability Test Lab Application Notes
©2013 Avaya Inc. All Rights Reserved.
14 of 34
CallScripPC51HD
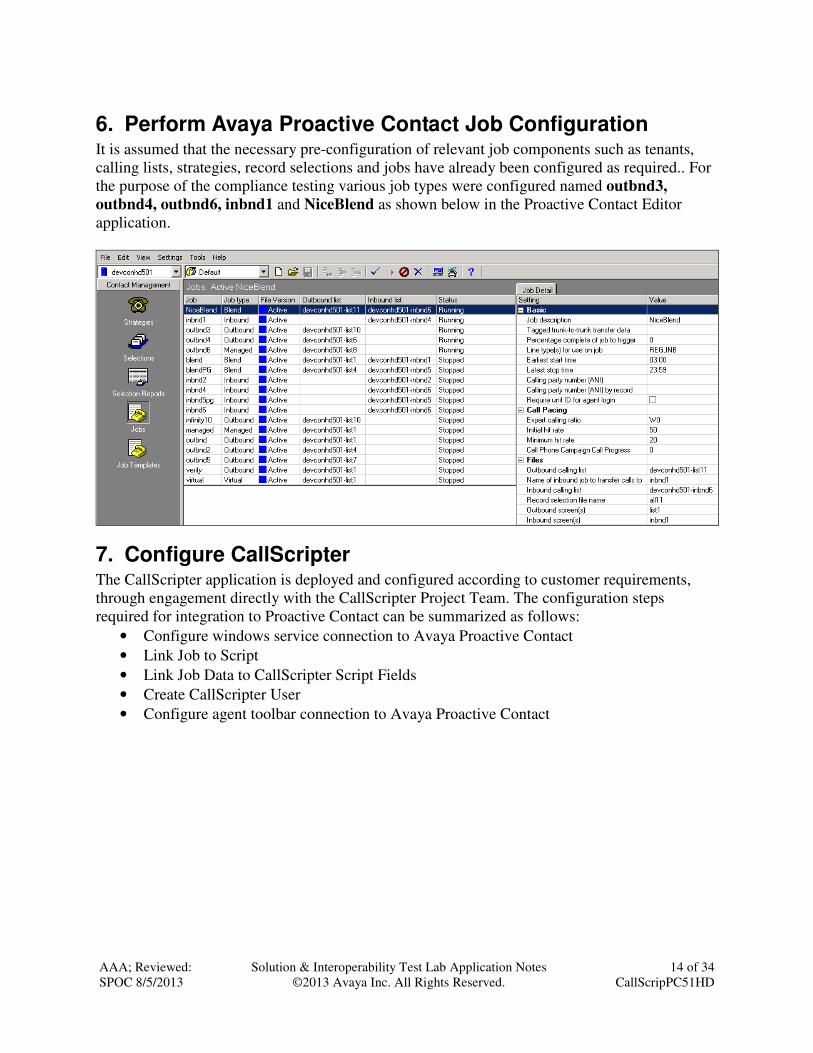
6. Perform Avaya Proactive Contact Job Configuration It is assumed that the necessary pre-configuration of relevant job components such as tenants,
calling lists, strategies, record selections and jobs have already been configured as required.. For
the purpose of the compliance testing various job types were configured named outbnd3,
outbnd4, outbnd6, inbnd1 and NiceBlend as shown below in the Proactive Contact Editor
application.
7. Configure CallScripter The CallScripter application is deployed and configured according to customer requirements,
through engagement directly with the CallScripter Project Team. The configuration steps
required for integration to Proactive Contact can be summarized as follows:
• Configure windows service connection to Avaya Proactive Contact
• Link Job to Script
• Link Job Data to CallScripter Script Fields
• Create CallScripter User
• Configure agent toolbar connection to Avaya Proactive Contact

AAA; Reviewed:
SPOC 8/5/2013
Solution & Interoperability Test Lab Application Notes
©2013 Avaya Inc. All Rights Reserved.
15 of 34
CallScripPC51HD
7.1. Configure Connection to Avaya Proactive Contact
The CallScripter application contains a Windows Service that polls the Avaya environment(s) to
retrieve a list of tenants, active jobs, data fields and outcomes (completion codes). This
information is stored locally within the CallScripter SQL database and used to connect the
CallScripter scripts to the relevant Jobs/Fields. All communication between CallScripter and the
Avaya Proactive Contact dialler is through the Avaya Agent API (moagent32.dll).
The windows service is part of the CallScripter installation process and is configurable via
configuration keys within the CallScripter system.
Navigate to the CallScripter installation directory and using an appropriate text editor open
CSEFProativeContactDataLoader.dll.config and edit the configuration keys as follows:
• MosaixPort – enter 22700 which is the default port used by the Proactive Contact Agent
API
• MosaixUserName – enter an appropriate Proactive Contact username in this case agent5
• MosaixPassword – enter a corresponding password
• MosaixRetryTime – enter an appropriate polling interval, in this case 1800000
<!--
Setting: MosaixPort
Valid values: positive whole number
Description: Port number to connect to proactive contact
-->
<add key="MosaixPort" value="22700"/>
<!--
Setting: MosaixUserName
Valid values: text
Description: valid user to connect to proactive contact with
permissions to read and connect to all jobs
-->
<add key="MosaixUserName" value="agent5"/>
<!--
Setting: MosaixPassword
Valid values: text
Description: password for above username
-->
<add key="MosaixPassword" value="05"/>
<!--
Setting: MosaixLogPath
Valid values: text
Description: log for framework to write text logs
-->
<add key="MosaixLogPath" value="C:\Program
Files\CallScripter\Utilities\EnterpriseFramework\logs"/>
<!--
Setting: MosaixRetryTime

AAA; Reviewed:
SPOC 8/5/2013
Solution & Interoperability Test Lab Application Notes
©2013 Avaya Inc. All Rights Reserved.
16 of 34
CallScripPC51HD
Valid values: positive whole number
Description: Thread sleep time in ms between sourcing data.
Typically 30 minutes : 1800000
-->
<add key="MosaixRetryTime" value="1800000"/>
7.2. Link Job to Script
After logging into the CallScripter application, users with the relevant licences applied to their
profiles will be able to gain access to the CallScripter script editor section of the main menu.

AAA; Reviewed:
SPOC 8/5/2013
Solution & Interoperability Test Lab Application Notes
©2013 Avaya Inc. All Rights Reserved.
17 of 34
CallScripPC51HD
Within the Script Editor admin screens, the user will choose a customer and a script to
administer (or create a new customer/script). In order for a Script to pop when a call is delivered
to an agent for a specific job, the Script and job must be linked within the CallScripter
application. Using the CallScripter Script Editor, select the appropriate job to link to in the
Campaign drop-down box (these drop downs will be populated by the windows service). The
user will need to drill down through dialer, tenant, job type and select the job they wish to link to
the script from the Campaigns drop down box. By clicking on the Add Link button and clicking
Save (not shown) the link will be established.

AAA; Reviewed:
SPOC 8/5/2013
Solution & Interoperability Test Lab Application Notes
©2013 Avaya Inc. All Rights Reserved.
18 of 34
CallScripPC51HD
Once the link has been created between the job name and the script the field which should be
used as the reference for the script pop must be configured This is usually set to ACCTNUM but
any field in the job can be used as a reference field providing it is unique for each record in the
calling list.
Note: The reference field chosen must be unique for each record in the call list.

AAA; Reviewed:
SPOC 8/5/2013
Solution & Interoperability Test Lab Application Notes
©2013 Avaya Inc. All Rights Reserved.
19 of 34
CallScripPC51HD
7.3. Link Job Data to CallScripter Script Fields
Once a Proactive Contact job has been linked to a CallScripter Script, a list of Calling List data
fields associated to the Proactive Contact job will be presented in the Script Editor, as an
attribute for each field in the script. The Proactive Contact Calling List data fields are linked to
fields within the Script so that on delivery of a call to the agent the appropriate script will pop
based on the link to the job, and the calling list detail will be displayed to the agent by the Script
in the relevant fields on the page. This link will act as a two-way communication between the
script field and the Proactive Contact Calling List data fields. If the agent updates information in
the script and transitions off the Script page (or closes the Script) the data for each field that is
linked will be automatically written back to the Proactive Contact Calling List data fields.
Multiple Script fields can be linked to the same Proactive Contact Calling List data field. If this
is the case, the last field to be rendered on the page will be the one that applies its data to the call
list on page transition.
The screenshot below displays the Script Avaya Outbound (2) in the Script Editor with the
Calling List data fields presented on the left hand side in the control attributes.

AAA; Reviewed:
SPOC 8/5/2013
Solution & Interoperability Test Lab Application Notes
©2013 Avaya Inc. All Rights Reserved.
20 of 34
CallScripPC51HD
Select the appropriate Field Name in this case Account Number and from the Field Link drop
down box select the field in the Calling List to link to, in this case ACCTNUM.

AAA; Reviewed:
SPOC 8/5/2013
Solution & Interoperability Test Lab Application Notes
©2013 Avaya Inc. All Rights Reserved.
21 of 34
CallScripPC51HD
7.4. Create CallScripter User
A user must be configured within the CallScripter application to allow an agent to log into
CallScripter and start taking/making calls using the Avaya Proactive Contact integration. The
username created in CallScripter doesn’t have to match the usernames in Proactive contact.
The user will access the CallScripter application via Internet explorer by navigating to the
CallScripter Main page in this case http://callscripwin7/?ra=true and login using the user
credentials (username and password). In order to add users to the application the user must login
using a profile that has the admin licence applied to it.
Note: If CallScripter is setup to run in windows authentication mode, the username within
CallScripter must match the windows username that the agents are logging onto the PC with.
AAA; Reviewed:
SPOC 8/5/2013
Solution & Interoperability Test Lab Application Notes
©2013 Avaya Inc. All Rights Reserved.
22 of 34
CallScripPC51HD
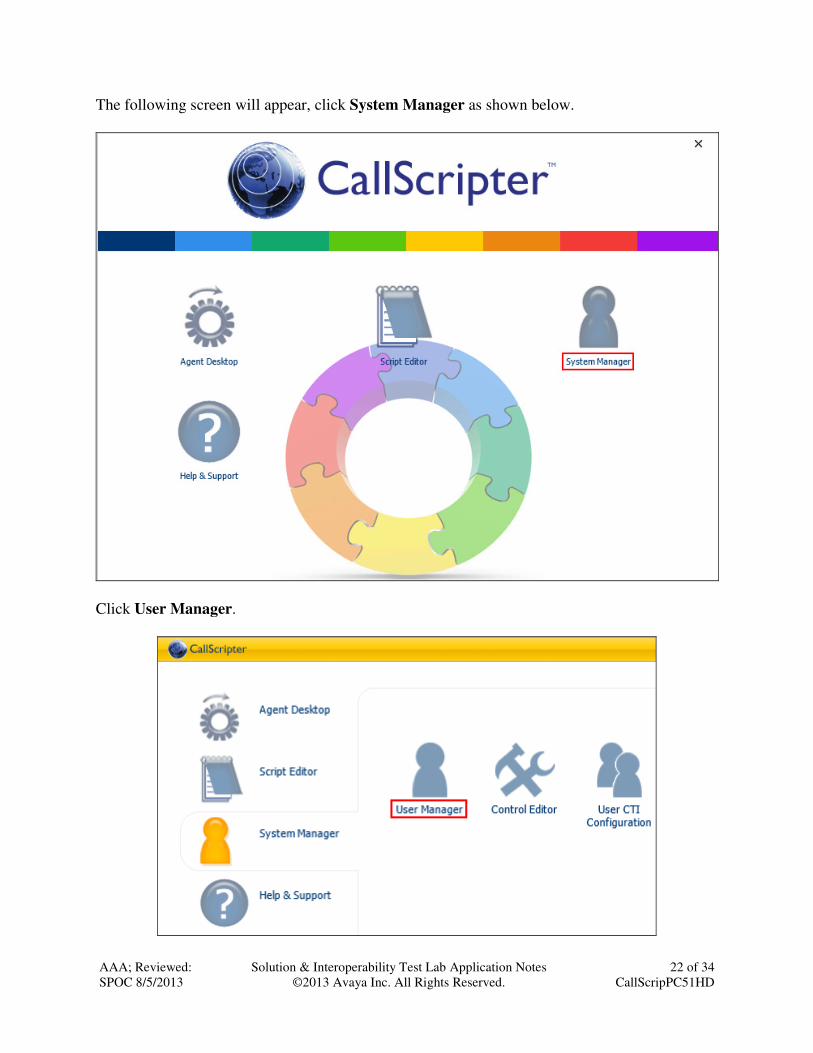
The following screen will appear, click System Manager as shown below.
Click User Manager.

AAA; Reviewed:
SPOC 8/5/2013
Solution & Interoperability Test Lab Application Notes
©2013 Avaya Inc. All Rights Reserved.
23 of 34
CallScripPC51HD
In the Add new: field, enter a new username and click Add.

AAA; Reviewed:
SPOC 8/5/2013
Solution & Interoperability Test Lab Application Notes
©2013 Avaya Inc. All Rights Reserved.
24 of 34
CallScripPC51HD
Enter a Password and click Save.
Once a user has been added to CallScripter they will automatically be given the licence to access
the Agent Desktop within CallScripter. Should additional licences be needed to allow the user to
access other parts of the application, they can be applied using the licensing tab in the top left
corner of the screen.
Note: If the user needs the ability to link Scripts to Proactive Contact jobs or amend Scripts they
will need to be assigned the Script Editor licence to see this part of the application.

AAA; Reviewed:
SPOC 8/5/2013
Solution & Interoperability Test Lab Application Notes
©2013 Avaya Inc. All Rights Reserved.
25 of 34
CallScripPC51HD
7.5. Login New CallScripter User
From the main login page login using the newly created CallScripter User.

AAA; Reviewed:
SPOC 8/5/2013
Solution & Interoperability Test Lab Application Notes
©2013 Avaya Inc. All Rights Reserved.
26 of 34
CallScripPC51HD
Click Agent Desktop.
And click Agent Desktop again.

AAA; Reviewed:
SPOC 8/5/2013
Solution & Interoperability Test Lab Application Notes
©2013 Avaya Inc. All Rights Reserved.
27 of 34
CallScripPC51HD
The following page will appear in the Toolbar, select the appropriate Host address, enter the
correct Tenant, Proactive Contact agent User Name and corresponding Password and the
Headset ID of the agent (in this case the agents desk phone) and click Login.
Proactive Contact will place a call on the Headset Trunk to Communication Manage to extension
6017, upon answering the call the user will head the familiar “Welcome to Avaya Proactive
Contact” message and the line will remain connected for the duration of the agent login session.
Once logged in successfully the user will be prompted to select a job type and job name from the
Toolbar.
If the job is configured to require unit ID for agent login, then the user will also be prompted to
select a unit name on the toolbar, else the user will be attached to the job without this step.
At this stage the agent can use the intuitive Toolbar to perform agent duties and call control as
usual.

AAA; Reviewed:
SPOC 8/5/2013
Solution & Interoperability Test Lab Application Notes
©2013 Avaya Inc. All Rights Reserved.
28 of 34
CallScripPC51HD
8. Verification Steps This section provides the tests that can be performed to verify the proper configuration of
CallScripter with Proactive Contact. Prior to verification, start an appropriate job on Proactive
Contact.
8.1. Verify Jobs and Call List Data are polled by CallScripter
Verify the CallScripter Proactive Contact windows service has started; load the Windows
Services snap-in and ensure CS_EF has a status of Started.

AAA; Reviewed:
SPOC 8/5/2013
Solution & Interoperability Test Lab Application Notes
©2013 Avaya Inc. All Rights Reserved.
29 of 34
CallScripPC51HD
The Service will begin to poll the Avaya servers for active jobs, fields and outcomes. To verify
that this service is working correctly the windows service log file can be analyzed for activity.
Navigate to the pre-configured logs directory and open the latest .log file, in this case
C:\Program Files\CallScripter\Utilities\EnterpriseFramework\logs\2013\07\03.log. Verify
that the log file displays events pertaining to the successful login to the relevant Proactive
Contact Server, the Tenant selection, the Active Job listing and Datafields and outcome codes
for that job.
05:00:02.878 - Sourcing campaign data
05:00:05.163 - Initialising Object
05:00:05.403 - Current Server: 10.10.16.95
05:00:05.405 - Current Tenant: Default
05:00:05.407 - LOGGING ON
05:00:06.975 - Active job: outbnd3
05:00:07.280 - 107 Datafields found for: outbnd3
05:00:07.866 - 13 outcome codes found for: outbnd3
05:00:18.165 - Detached from job
05:00:18.168 - Active job: outbnd4
05:00:18.474 - 107 Datafields found for: outbnd4
05:00:19.165 - 13 outcome codes found for: outbnd4
05:00:29.465 - Detached from job
05:00:29.466 - Active job: outbnd6
05:00:29.769 - 107 Datafields found for: outbnd6
05:00:30.065 - 13 outcome codes found for: outbnd6
05:00:40.401 - Detached from job
05:00:40.406 - LOGGING OFF
05:00:40.414 - Logged off Event:
05:00:40.417 - releasing MosServer....
05:00:40.423 - releasing DllConfig....
05:00:40.425 - releasing SerStart....
05:00:40.430 - Initialising Object
05:00:40.722 - LOGGING ON NEW TENANT - Ten01
05:00:42.065 - LOGGING OFF
05:00:42.070 - Logged off Event:
05:00:42.071 - releasing MosServer....
05:00:42.108 - releasing DllConfig....
05:00:42.144 - releasing SerStart....

AAA; Reviewed:
SPOC 8/5/2013
Solution & Interoperability Test Lab Application Notes
©2013 Avaya Inc. All Rights Reserved.
30 of 34
CallScripPC51HD
Once the service has successfully sourced the jobs, the relevant fields will begin to populate
these options within CallScripter Editor as demonstrated in Section 7.2.
AAA; Reviewed:
SPOC 8/5/2013
Solution & Interoperability Test Lab Application Notes
©2013 Avaya Inc. All Rights Reserved.
31 of 34
CallScripPC51HD
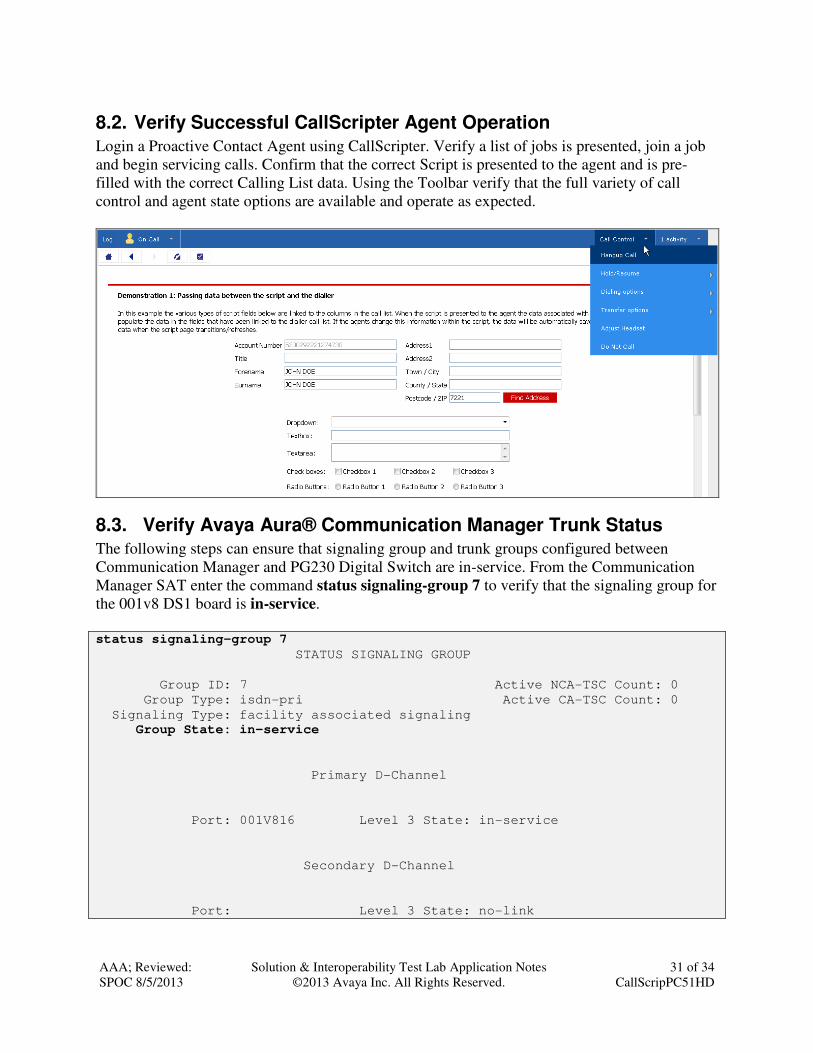
8.2. Verify Successful CallScripter Agent Operation
Login a Proactive Contact Agent using CallScripter. Verify a list of jobs is presented, join a job
and begin servicing calls. Confirm that the correct Script is presented to the agent and is pre-
filled with the correct Calling List data. Using the Toolbar verify that the full variety of call
control and agent state options are available and operate as expected.
8.3. Verify Avaya Aura® Communication Manager Trunk Status
The following steps can ensure that signaling group and trunk groups configured between
Communication Manager and PG230 Digital Switch are in-service. From the Communication
Manager SAT enter the command status signaling-group 7 to verify that the signaling group for
the 001v8 DS1 board is in-service.
status signaling-group 7
STATUS SIGNALING GROUP
Group ID: 7 Active NCA-TSC Count: 0
Group Type: isdn-pri Active CA-TSC Count: 0
Signaling Type: facility associated signaling
Group State: in-service
Primary D-Channel
Port: 001V816 Level 3 State: in-service
Secondary D-Channel
Port: Level 3 State: no-link

AAA; Reviewed:
SPOC 8/5/2013
Solution & Interoperability Test Lab Application Notes
©2013 Avaya Inc. All Rights Reserved.
32 of 34
CallScripPC51HD
Enter the command status trunk 7 to verify that the headset trunk group 7 is in-service and that
the number of active channels corresponds to the number of agents logged in.
status trunk 7
TRUNK GROUP STATUS
Member Port Service State Mtce Connected Ports
Busy
0021/001 001v801 in-service/idle no
0007/002 001V802 in-service/active no S00006
0021/003 001v803 in-service/idle no
0021/004 001v804 in-service/idle no
0021/005 001v805 in-service/idle no
8.4. Verify Avaya Proactive Contact Job Status
From Proactive Contact shell, type the command jobmon to verify agent is logged into the job
outbnd4 and handling a call.
[STANDARD] Job Activity
[ALLID]
Summary Statistics
Job: [outbnd4][1769]
Start time: 12.38.03 Current time: 15.45.26
Agent Activity Line Usage
----------------------------------- --------------------------------------
-
All Outb ACD PTP Outbound Lines Cur Avg Peak
Logged in: 1 1 0 0 Demand : 1 0 1
Assigned : 1 1 Available : 9
On Phone : 1 1 Total Lines : 10
Calling Activities
---------------------------------------------------------------------------
Outbound Phone Calls
Records Selected: 386
Phone Calls made: 4
Cur/Run Hit Rate: 65/1 %
Agent Connects : 0
Queue : 0
Recalls : 2
Phone Calls Left: 378
[ Job outbnd4 ready for calling ]

AAA; Reviewed:
SPOC 8/5/2013
Solution & Interoperability Test Lab Application Notes
©2013 Avaya Inc. All Rights Reserved.
33 of 34
CallScripPC51HD
9. Conclusion These Application Notes describe the configuration steps required for CallScripter to
successfully interoperate with Avaya Proactive Contact and Avaya PG230 Digital Switch. All
feature test cases were completed successfully with observations noted in Section 2.2.
10. Additional References This section references the product documentation relevant to these Application Notes.
1. Administering Avaya Proactive Contact, Release 5.1, April 2013, available at
http://support.avaya.com.

AAA; Reviewed:
SPOC 8/5/2013
Solution & Interoperability Test Lab Application Notes
©2013 Avaya Inc. All Rights Reserved.
34 of 34
CallScripPC51HD
©2013 Avaya Inc. All Rights Reserved.
Avaya and the Avaya Logo are trademarks of Avaya Inc. All trademarks identified by ® and
™ are registered trademarks or trademarks, respectively, of Avaya Inc. All other trademarks
are the property of their respective owners. The information provided in these Application
Notes is subject to change without notice. The configurations, technical data, and
recommendations provided in these Application Notes are believed to be accurate and
dependable, but are presented without express or implied warranty. Users are responsible for
their application of any products specified in these Application Notes.
Please e-mail any questions or comments pertaining to these Application Notes along with the
full title name and filename, located in the lower right corner, directly to the Avaya
DevConnect Program at [email protected].