application note electronic loads - … note electronic loads testing led drivers introduction led...
TRANSCRIPT

APPLICATION NOTE ELECTRONIC LOADS
Testing LED Drivers
IntroductionLED lighting is rapidly replacing older incandescent and fluorescent lighting technologies resulting in tremen-dous energy savings. Since LEDs operate on DC current, AC/DC power supplies, also known as LED drivers – are required to convert utility AC power input to a constant DC current output that drives one or more LED strings. Testing these LED drivers is faster and more rigorous when using a programmable DC load as a wide range of load and transient conditions can be applied to the LED driver under program or front panel control. This pro-vides far better design verification and quality testing than is possible with passive loads. In the case of testing LED drivers, additional advantages of using an electronic load over an actual string of LEDs are:
• The ability to test for a wide variety of LED types without needing to obtain a large number of rep-resentative samples of actual LEDs from various manufacturers
• Eliminate the need for bright light eye protection as DC Load replaces the actual LED strings
However, while simple electronic DC loads have been a common piece of test equipment used by power supply design and test engineers, they are not suitable for LED driver testing and development. LED impedance is a function of the voltage applied across the LED as well as the current and temperature of the LED die. An electronic DC load can be operated in constant current or constant resistive modes, but as explained in this application note, neither accurately simulate an LED load.After an initial primer on LED impedance characteristics and equivalent circuit simulation performed by a pro-grammable LED load like the APS 41D Series LED loads, we will see why regular loads are not suitable in these applications. We will also discuss how to determine the right settings for the LED load parameters that are part of programming an LED and review what tests can be sup-ported with an LED Load.
LED impedance characteristicsFirst, let’s review the electrical behavior of an LED or string of LEDs to see how an electronic DC load will have to function to simulate an LED.
LED Electrical CircuitAn LED is a special type diode device that has a low impedance in one direction (forward) and a high impedance in the reverse direction (reverse bias). When a current is applied to an LED in the forward direction as shown in figure 1, a voltage is developed across the forward series resistance (Rd) of the LED. Once this voltage reaches the turn on voltage (referred to as Vd), the LED starts emitting light. At this point, the voltage across the LED (referred to as Vo) will continue to rise as the current increases but with a much steeper slope. This is illustrated in the V/I diagram below. The slope of the impedance curve changes between Vd and V1. Once past this ‘knee’ point, the voltage rises only slowly as the current increases. This is essentially an exponential impedance curve.
Figure 1: Equivalent LED Electrical Circuit

Page 2 of 10 www.adaptivepower.com [email protected] Toll Free: 1.866.517-8400 Tel: +1.949.752-8400
APPLICATION NOTE
The actual LED current can be calculated using the formula:LED Current:
This is equivalent to the formula that calculates the forward voltage drop (Vo) across the LED:Forward Voltage:
The electrical equivalent circuit of an LED can be approximated using a series DC voltage source (equivalent to Vd) and forward series resistance (equivalent to Rd) as shown in figure 1.
Effect of LED Junction TemperatureAs the LED emits light, it dissipates power through its internal resistance Rd. This causes its junction temperature to rise. This in turn reduces the value of Vd which has a negative temperature coefficient. The value of this coefficient is typically found in the LED manufacturer’s data sheet. Values for high brightness LEDs generally are in the -2mV/°C to -4mV/°C range.As the LED heats up, Vd decreases and thus Vo decreases given a constant Io and Rd. (See formula for Vo above). For this reason and to improve durability and light output, it is important to properly cool a high brightness LED.
LED Driver Current RippleTurning to the LED driver design for a moment, most if not all LED drivers use switch mode design for optimal energy efficiency and have a current feedback loop. As such, the LED current will exhibit a fair amount of higher frequency ripple. This current ripple in Io will result in a voltage ripple (Vr) through Rd.Voltage Ripple:
A digital scope image (Figure 2) of the LED driver output voltage and current clearly shows this ripple on Vo (yellow trace) and Io (blue trace).LED Strings -SerialHigher lighting output is easily achieved as needed by using multiple LEDs rather than a single one. An obvious approach is to use a series string of cascading LEDs to multiply light output. Using our equivalent Vd+Rd series schematic, it is easy to see that a string of LEDs sums the individual Vd’s and Vo’s into a higher combined Vo and Rd value. Thus, a series string can easily be represented by the same schematic using higher values to represent the sum of string impedances. This is illustrated in figure 3 for the case of string consisting of three LEDs. In reality, strings are often larger than this.
Figure 2: LED driver output voltage and current waveforms
Figure 3: Equivalent LED Series String Electrical Circuit
www.adaptivepower.com [email protected] Toll Free: 1.866.517-8400 Tel: +1.949.752-8400 Page 3 of 10
APPLICATION NOTE
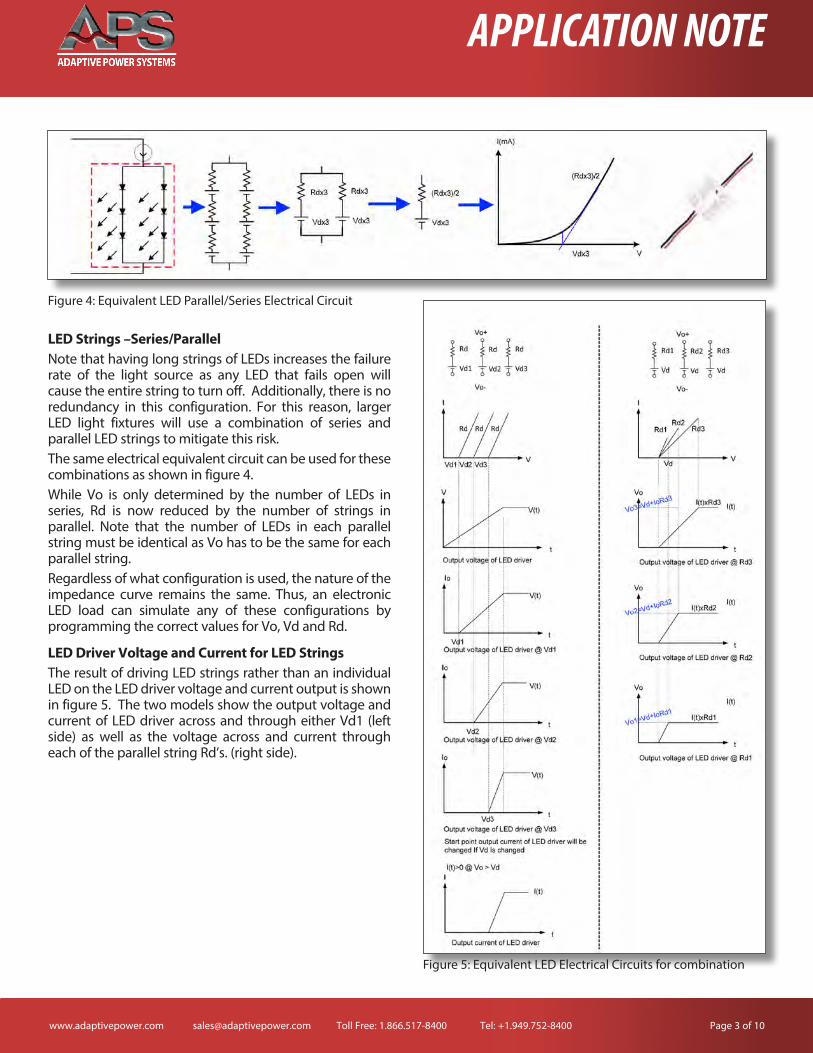
LED Strings –Series/ParallelNote that having long strings of LEDs increases the failure rate of the light source as any LED that fails open will cause the entire string to turn off. Additionally, there is no redundancy in this configuration. For this reason, larger LED light fixtures will use a combination of series and parallel LED strings to mitigate this risk.The same electrical equivalent circuit can be used for these combinations as shown in figure 4.While Vo is only determined by the number of LEDs in series, Rd is now reduced by the number of strings in parallel. Note that the number of LEDs in each parallel string must be identical as Vo has to be the same for each parallel string.Regardless of what configuration is used, the nature of the impedance curve remains the same. Thus, an electronic LED load can simulate any of these configurations by programming the correct values for Vo, Vd and Rd.
LED Driver Voltage and Current for LED StringsThe result of driving LED strings rather than an individual LED on the LED driver voltage and current output is shown in figure 5. The two models show the output voltage and current of LED driver across and through either Vd1 (left side) as well as the voltage across and current through each of the parallel string Rd’s. (right side).
Figure 4: Equivalent LED Parallel/Series Electrical Circuit
Figure 5: Equivalent LED Electrical Circuits for combination

Actual LED Loads versus an Electronic LoadLet’s take a closer look at the voltage and current output waveforms of an LED driver under test when loaded with an actual LED string and compare this to the same conditions created using an electronic Load like the Adaptive Power 41D3002.Real LED LoadThe LED used is a LED string consisting of ten LEDs, each with total output of 3W, a Vo of 3.85V, Vd of 2.58V and an Io of 700mA. The Vd for the string is thus 10 x 3.85 = 38.5V and the Vd = 10 x 2.58 = 25.8V.Rd can be calculating using the values for Vo, Vd and Io as follows:Rd Formula:
Thus:
The captured LED Driver turn on voltage and current waveforms are show in figure 6. The aforementioned ripple is clearly visible on the current and voltage.
Note that capturing the current requires the use of a shunt in series with the LED string. One of the advantages of using Adaptive Power electronic loads is that they have a current monitor output (BNC) that can be connected to a digital scope input so no external shunt is needed.
Electronic DC LoadOnce the manufacturer’s LED specifications are identified, the settings for the Adaptive Power LED load can be derived quickly. If no data sheet is available, the actual LED can be measured.Being able to set the load to simulate any make and model LED is very convenient as it allows an LED load driver design to be tested for a wide variety of load conditions. A further benefit is minimizing the need for bright light eye protection, since no actual LEDs are in use. This is particularly useful for high output industrial lighting applications.
Constant Resistance (CR) ModeA ‘regular’ electronic DC load is not capable of performing this task. This can be illustrated by using the Adaptive Power LED load in ‘normal’ mode. In CR mode, we could try to program the value of Rd. In the previous example, Rd could be calculated as Vo/Io or 38.5/0.7 = 55 Ohms. When power is applied to the LED driver AC input, the load, unaware of the Vd threshold requirement, will immediately sink current as the LED driver voltage increases. This is illustrated by the drawn purple line shown in the trace below (Figure 7). In some instances, this may prevent the LED driver from turning on completely as this behavior is abnormal for an LED.
Figure 6: Actual LED load voltage (blue) and current (red) Figure 7: Voltage (blue) and current (red) using CR mode
APPLICATION NOTE
Page 2 of 10 www.adaptivepower.com [email protected] Toll Free: 1.866.517-8400 Tel: +1.949.752-8400

Constant Voltage (CV) Mode?Using the constant voltage mode setting will also not accomplish the desired load condition. In CV mode, the DC load will not sink current until the input voltage reaches the Vo set point of 38.5V but since current does not flow between Vd (25.8V) and Vo, there will be a significant amount of current overshoot as the LED driver suddenly sees a low impedance at 38.5V. This will cause the voltage to overshoot which can damage the LED driver output stage.
Figure 8: Voltage (blue) and current (red) using CV mode
LED ModeThe LED mode setting of the Adaptive Power 41D series LED loads solves this problem by combining CV and CR modes. This allows it to closely mimic the actual behavior of an LED. Figure 9 shows the actual LED curve on the left and the DC load in LED mode on the right.
In this mode of operation, the LED load will now behave like an individual LED or an LED string. Parameters for Vo are set the 38.5V and Rd to 55 Ohms to obtain the scope traces shown below. This is the same result we got with actual LED string.
Figure 9: I-V Impedance curve for LED versus electronic DC Load in LED mode
Figure 10: Voltage (blue) and current (red) using LED mode
Determining LED Load Setting ValuesThis section explains how to obtain the relevant LED mode setting values from various possible sources of information.Obtaining LED Parameter ValuesThere are several ways to obtain the required Vo, Vd, Io and Rd parameter values needed to control the LED mode of operation for the Adaptive Power Systems DC loads that have this feature. The best way depends on what information is available to the user.
Known LED manufacturer and part numberIf the LED manufacturer and part number are known, you should be able to obtain the technical data sheet for the LED. This data sheet will typically contain all necessary information to set up the LED mode. Let’s look at an example for a Philips LUXEON Rebel LED1.The term forward voltage is commonly used instead of Vd so there will either be an electrical specification or an exponential I-V curve that shows the forward voltage at a specific temperature. You can opt to use the typical specs for Io = 700mA shown in the electrical specification table on page 6 of the data sheet or use the curve on page 13.
Note 1: Philips and LUXEON are trademarks of Philips International
APPLICATION NOTE
www.adaptivepower.com [email protected] Toll Free: 1.866.517-8400 Tel: +1.949.752-8400 Page 3 of 10

The Electrical specs show a typical forward voltage of 3.0 V.
The actual forward voltage curve can be found on page 13 of the data sheet.
Figure 11: Philips LUXEON Rebel LCMLWPx1-0 Spec. Table
Figure 12: Philips LUXEON Rebel forward voltage chart
By drawing the tangent line at the intersection of Io and the I-V curve, we can determine the values of Vd and Vo as shown in figure 13 (blue line).
Figure 13: Tangent of forward voltage curve
Once these parameters are known, Rd can be calculated as shown before.
For a string consisting of ten of these LEDs, the corresponding string values will be:
Vd = 29.0 VdcVo = 32.2 VdcRd = 4.56 OhmIo = 700 mA
Measuring Actual LED samplesThe parameters discussed can also be measured using an actual LED sample if no manufacturers’ data sheet is available. To do so, connect a DC power supply across the LED and raise the voltage gradually until the LED starts to light up. This will be Vd. Increase the voltage to the point where the LED reaches normal intensity. This will be Vo. Rd can then be calculated. This method is of course less reliable as having the actual data sheet but will be sufficient to test a given LED driver supply.
Using the LED Driver SpecificationIf no LED data or samples are available, you can use the LED driver that is to be tested. For Vo, use the LED drivers maximum voltage output specification. For Vd, assume that Vd is in the range from 70% to 90% of this maximum output voltage. A good initial value is 80% * Vo. For Io, assume it is close of the LED drivers maximum output current rating. Rd can be calculated from these values as before.Often these values are printed on the model label under output specifications so even in the absence of a data sheet for the LED driver; it is easy to obtain this information. Example:Make: Thomas Research1, model LED40W-036-C1100-XXOutput specifications:
Model Output Current Output Voltage Max. Power Efficiency
LED40W-36 275-1100 12V-36V 40W 86%
The recommended LED load settings for this LED driver specification would be:
Vo = 36 VdcVd = 0.8 * 36.0 = 28.8 VdcIo = 1000 mA
Note 1: Thomas Research is a trademark of Thomas Research Inc.
APPLICATION NOTE
Page 2 of 10 www.adaptivepower.com [email protected] Toll Free: 1.866.517-8400 Tel: +1.949.752-8400

Setting up the LED LoadOnce the LED electrical parameters are known, setting up the DC load in LED mode is easy. This section shows you how to move through the front panel controls and setup screens to set up the load for LED mode operation.
Front Panel Screens and KeysLet’s use the example for the 40W LED driver we used earlier. To select the LED mode, make sure the LOAD input is disabled (off) and the LED driver is turn off.
1. Press the blue “MODE” key until the display shows “LED”. The first parameter shown will be the number of LEDs. In our example, we are using the LED driver parameters which would apply to a string of LEDs so we will leave this value set to one.2. Press the yellow “Preset” key to select the next LED mode parameter Vo. Use the knob to scroll the value for Vo to 36.0. You can use the left and right cursors keys located below the knob to change the decimal position of the number being entered. 3. Press the yellow “Preset” key to select the next LED mode parameter Vd. Use the knob to scroll the value for Vd to 28.8.4. Press the yellow “Preset” key to select the next LED mode parameter Io. Use the knob to scroll the value for Io to 1.100.
Note: The LED mode data entry mode can be changed in the CONFIG menu to either allow entry of Io or Rd. This example assumes the load is configured to allow entry of Io. If configured for Rd data entry mode, the screen will show the Rd annunciator instead
5. Press the yellow “Preset” key to select the next LED mode parameter Rr. Leave this setting OFF as we will not use this feature.6. The load is now ready for use. Press the “LOAD” key and the DC load is ready to sink current.
Figure 14: Adaptive Power 41D Series front panel
APPLICATION NOTE
www.adaptivepower.com [email protected] Toll Free: 1.866.517-8400 Tel: +1.949.752-8400 Page 3 of 10

Test ExamplesThere are a number of tests that are commonly performed on LED drivers to verify performance and compliance with design specifications. Some of these are described next.
Vo and Io TestThis test is intended to verify the LED drive supply can deliver the Voltage, Current and Power maximum ratings under various ambient conditions. To do so, the LED load is programmed to maximum Vo and Io settings for the driver. With the load applied, the actual values for Vo, Io and Power can be read back from the DC load. Actuals are easily compared to excepted values for pass/fail determination.
Note: Since there will be a certain amount of AC ripple on the voltage and current, it is recommended to set the averaging mode of the DC load to 4 or 8 in the CONFIG menu.
Start Up TestStartup testing determines if the LED Driver comes up correctly into an LED load. To test startup mode, it is important the DC load is enabled first (LOAD on) before input power is applied to the LED driver supply. In an automatic test systems, this can be coordinated easily through test software that controls both the programmable AC or DC power supply and the DC load.
Note: For the case of PWM output LED driver supplies, the DC load used must be fast responding. Not all DC loads can support this output mode but the Adaptive Power Systems 41D and 42D LED loads respond faster than non-LED loads and support this type of supply.
The difference in output is shown in the figure below.
Note: Always turn on the LOAD first before you apply input power to the LED driver. Not doing so will result in the driver trying to drive current into an open circuit which means it will most likely not turn on.
Figure 15: Checking Vo and Io levels
Figure 16: Start-up test waveforms
Figure 17: Start-up delayed timebase zoom
Figure 18: Linear supply versus PWM supply
APPLICATION NOTE
Page 2 of 10 www.adaptivepower.com [email protected] Toll Free: 1.866.517-8400 Tel: +1.949.752-8400

Short Circuit ProtectionTesting the ability of any LED driver to withstand short circuit conditions is a key requirement to ensure protection mechanisms in place to limit the output current are fully functional. The LED DC load cannot be used to test this capability fully by programming a high current level as the lowest input impedance of an LED load is too high. Instead, the Adaptive Power LED loads use an external relay that shorts the output of the LED driver under test for a true short test. The relay is powered and controlled by the LED load under front panel or remote control. The shorting relay accessory plugs directly into the front of the LED load.Since an LED driver supply will not turn on into an open circuit (no-load) condition, a short circuit test can be applied only after the LED driver is at full voltage (Vo) by making sure the LED is on first.
Dimming TestLED Driver supplies capable of dimming operation come in several designs. The simplest ones rely on TRIAC dimming of the AC input. More modern designs used direct digital PWM input signal to allow for smoother dimming of the LEDs. The various approaches are illustrated below.
TRIAC dimmingTRIAC dimming has been used for decades to control incandescent and more recently fluorescent bulbs. By changing the phase angle of the TRIAC control, the AC voltage input to the LED driver supply can be adjusted to vary the output current and thus intensity of the LEDs. This method causes high harmonic distortion on the AC line and is generally inefficient.
PWM dimmingTo test PWM dimming, a PWM control signal is required to drive the dimming input terminals of the LED driver supply. PWM dimming frequencies are generally in excess of 100 Hz – beyond the perception speed of the human eye - to eliminate any light flicker. The Adaptive Power LED loads support a dimming range from 100 Hz to 1000 Hz and a duty cycle between 0.01 and 0.99 for full off to full on current modulation. This feature permits testing of PWM dimming capable LED drivers without the need for additional test equipment.A general purpose electronic DC load does not have sufficient bandwidth to support a dimming LED driver. The Adaptive Power Systems LED loads however have an enhanced 100 kHz bandwidth to support dimming supplies. They also feature a PWM generator output that can be used to directly drive the PWM dimming input of a digital LED driver supply under test.
Figure 19: LED Load with shorting relay option installed
Figure 20: Varioous dimming methods
APPLICATION NOTE
www.adaptivepower.com [email protected] Toll Free: 1.866.517-8400 Tel: +1.949.752-8400 Page 3 of 10

SummaryIn conclusion, this application note illustrates that using fully programmable special purpose electronic LED loads offer many advantages compared to using actual LEDs. Not only is it less irritating for the operator not to be surrounded by bright lights, it also allows for faster characterization and assessment of a unit under test to verify it can support a wide range of LED types. Doing so with actual LEDs is not only time consuming, it also limits the range of load conditions compared to using a programmable load.Adaptive Power Systems offers a wide range of LED loads, all capable of supporting up to 300W with paralleling for higher power. The 44M04 Series Modular DC load mainframe can support up to four LED loads with up to 2 channels for a total of 8 simultaneous LED driver tests per unit.For more information, refer to the 41D/42D Series on the Adaptive Power Systems website.
©2015 ADAPTIVE POWER SYSTEMS, Irvine, CA, U.S.A. Subject to change without notice. www.adaptivepower.com #10APS-AN-LED-TEST 0115
17711 Mitchell NorthIrvine, CA 92614
United StatesToll Free: 1.866.517-8400
Tel: +1.949.752-8400Fax: +1.949.756-0838
Service and Support Adaptive Power Systems’ customer support is second to none. Our Customer Support Program provides the training, repair, calibration, and technical support services that our customers value. So, in addition to receiving the right test equipment, our customers can also count on excellent support before, during and after the sale. With company owned support and service centers around the world, support is never far away.New Product Warranty: AC Sources & Loads: 1 year, DC Power Supplies: 2 years.Complete calibration and repair services are offered at our US, European and Chinese manufacturing facilities (see con-tact info below). Calibrations are to original factory specifications and are traceable to NIST (National Institute of Stan-dards and Technology).NORTH AMERICAAdaptive Power SystemsIrvine, USAPhone: +1(949) 752-8400Fax: +1 (949) 756-0838Email: [email protected]
EUROPECaltest Instruments Ltd.Guildford, United KingdomPhone: +44(0)1483 302 700Fax: +44(0)1483 300 562Email: [email protected]
CHINAPPST Shanghai Co. Ltd.Shanghai, ChinaPhone: +86-21-6763-9223Fax: +86-21-5763-8240Email: [email protected]
Proudly Represented by:
APPLICATION NOTE
MODEL 41D3024 41D5012 41D5024 42D5006
OPERATING RANGES
Power Ranges 0-300 W 0-300 W 0-300 W 0-150 W 0-150 W
Current Ranges 6 A 24 A 3 A 12 A 6 A 24 A 1.5 A 6.0 A 1.5 A 6.0 A
Voltage Range 0 - 300 V 0 - 500 V 0 - 500 V 0 - 500 V 0 - 500 V
Minimum Voltage 3 V @ 24 A 6 V @ 12 A 6 V @ 24 A 4 V @ 6 A 4 V @ 6 A
OPERATING MODES LED, Constant Current (CC), Constant Resistance (CR), Constant Voltage (CV), Constant Power (CP)
LED, CC, CR, CV
PROTECTION Over Power (OP), Over Current (OC), Over Voltage (OV), Over Temperature (OT)
DYNAMIC OPERATION
T high & T low 0.050 ~ 9.999 / 99.99 / 999.9 / 9999ms (20 kHz) N/A
METERING
Voltage Ranges 30V / 150V / 300V
60V / 300V / 500V
60V / 300V / 500V
60V / 300V / 500V
Current Ranges 6 A 24 A 3 A 12 A 6 A 24 A 1.5A 6.0A 1.5A 6.0A
Power Range 0 - 150.0 W 0 - 300.0 W 0 - 300.0 W 0-120W 0-120W
DIMMING CONTROL Range: 0 - 12 V / Freq Range: DC - 1KHz / Duty Cycle: 1%-99%
SHORT SIGNAL OUTPUT
12 V / 100 mA max
Available LED Load Models