application note 43 june 1990 bridge circuits
TRANSCRIPT

Application Note 43
Bridge Circuits Marrying Gain and Balance
Jim Williams
Bridge circuits are among the most elemental and powerful electrical tools. They are found in measurement, switch-ing, oscillator and transducer circuits. Additionally, bridge techniques are broadband, serving from DC to bandwidths well into the GHz range. The electrical analog of the me-chanical beam balance, they are also the progenitor of all electrical differential techniques.
Resistance Bridges
Figure 1 shows a basic resistor bridge. The circuit is usually credited to Charles Wheatstone, although S. H. Christie, who demonstrated it in 1833, almost certainly preceded him.1 If all resistor values are equal (or the two sides ratios are equal) the differential voltage is zero. The excitation voltage does not alter this, as it affects both sides equally. When the bridge is operating off null, the excitation’s magnitude sets output sensitivity. The bridge output is nonlinear for a single variable resistor. Similarly, two variable arms (e.g., RC and RB both variable) produce nonlinear output, although sensitivity doubles. Linear outputs are possible by complementary resistance swings in one or both sides of the bridge.
A great deal of attention has been directed towards this circuit. An almost uncountable number of tricks and tech-niques have been applied to enhance linearity, sensitivity
DIFFERENTIAL OUTPUT VOLTAGE +
EXCITATION VOLTAGE
RA
RB
RC
RD
AN43 F01
Figure 1. The Basic Wheatstone Bridge, Invented by S. H. Christie
June 1990
and stability of the basic configuration. In particular, trans-ducer manufacturers are quite adept at adapting the bridge to their needs (see Appendix A, “Strain Gauge Bridges”). Careful matching of the transducer’s mechanical charac-teristics to the bridge’s electrical response can provide a trimmed, calibrated output. Similarly, circuit designers have altered performance by adding active elements (e.g., amplifiers) to the bridge, excitation source or both.
Bridge Output Amplifiers
A primary concern is the accurate determination of the differential output voltage. In bridges operating at null the absolute scale factor of the readout device is normally less important than its sensitivity and zero point stability. An off-null bridge measurement usually requires a well calibrated scale factor readout in addition to zero point stability. Because of their importance, bridge readout mechanisms have a long and glorious history (see Ap-pendix B, “Bridge Readout—Then and Now”). Today’s investigator has a variety of powerful electronic techniques available to obtain highly accurate bridge readouts. Bridge amplifiers are designed to accurately extract the bridges differential output from its common mode level. The ability to reject common mode signal is quite critical. A typical 10V powered strain gauge transducer produces only 30mV of signal “riding” on 5V of common mode level. 12-bit readout resolution calls for an LSB of only 7.3μV…..almost 120dB below the common mode signal! Other significant error terms include offset voltage, and its shift with temperature and time, bias current and gain stability. Figure 2 shows an “Instrumentation Amplifier,” which makes a very good bridge amplifier. These devices are usually the first choice for bridge measurement, and bring adequate performance to most applications.
Note 1: Wheatstone had a better public relations agency, namely himself. For fascinating details, see reference 19. L, LT, LTC, LTM, Linear Technology and the Linear logo are registered trademarks of Linear Technology Corporation. All other trademarks are the property of their respective owners.
an43f
AN43-1

Application Note 43
In general, instrumentation amps feature fully differential inputs and internally determined stable gain. The absence of a feedback network means the inputs are essentially pas-sive, and no significant bridge loading occurs. Instrumenta-tion amplifiers meet most bridge requirements. Figure 3 lists performance data for some specific instrumentation amplifiers. Figure 4’s table summarizes some options for DC bridge signal conditioning. Various approaches are presented, with pertinent characteristics noted. The constraints, freedoms and performance requirements of any particular application define the best approach.
–
+
-NO FEEDBACK RESISTORS USED -GAIN FIXED INTERNALLY (TYP 10 OR 100)
OR SOMETIMES RESISTOR PROGRAMMABLE -BALANCED, PASSIVE INPUTS AN43 F02
Figure 2. Conceptual Instrumentation Amplifier
DC Bridge Circuit Applications
Figure 5, a typical bridge application, details signal con-ditioning for a 350Ω transducer bridge. The specified strain gauge pressure transducer produces 3mV output per volt of bridge excitation (various types of strain-based transducers are reviewed in Appendix A, “Strain Gauge Bridges”). The LT®1021 reference, buffered by A1A and A2, drives the bridge. This potential also supplies the circuits ratio output, permitting ratiometric operation of a monitoring A/D converter. Instrumentation amplifier A3 extracts the bridge’s differential output at a gain of
PARAMETER
Offset Offset Drift Bias Current Noise (0.1Hz to 10Hz) Gain Gain Error Gain Drift Gain Nonlinearity CMRR Power Supply Supply Current Slew Rate Bandwidth
LTC1100 LT1101
10μV 160μV 100nV/°C 2μV/°C 50pA 8nA
0.9μV 2μVP-P 100 10,100 0.03% 0.03% 4ppm/°C 4ppm/°C 8ppm 8ppm 104dB 100dB Single or Dual, 16V Max Single or Dual, 44V Max 2.2mA 105μA 1.5V/μs 0.07V/μs 8kHz 33kHz
100, with additional trimmed gain supplied by A1B. The configuration shown may be adjusted for a precise 10V output at full-scale pressure. The trim at the bridge sets the zero pressure scale point. The RC combination at A1B’s input filters noise. The time constant should be selected for the system’s desired lowpass cutoff. “Noise” may originate as residual RF/line pick-up or true transducer responses to pressure variations. In cases where noise is relatively high it may be desirable to filter ahead of A3. This prevents any possible signal infidelity due to nonlinear A3 operation. Such undesirable outputs can be produced by saturation, slew rate components, or rectification effects. When filtering ahead of the circuits gain blocks remember to allow for the effects of bias current induced errors caused by the filter’s series resistance. This can be a significant consideration because large value capacitors, particularly electrolytics, are not practical. If bias current induced errors rise to appreciable levels FET or MOS input amplifiers may be required (see Figure 3).
To trim this circuit apply zero pressure to the transducer and adjust the 10k potentiometer until the output just comes off 0V. Next, apply full-scale pressure and trim the 1k adjustment. Repeat this procedure until both points are fixed.
Common Mode Suppression Techniques
Figure 6 shows a way to reduce errors due to the bridges common mode output voltage. A1 biases Q1 to servo the bridges left mid-point to zero under all operating condi-tions. The 350Ω resistor ensures that A1 will find a stable operating point with 10V of drive delivered to the bridge. This allows A2 to take a single-ended measurement,
LT1102
500μV 2.5μV/°C 50pA 2.8μV 10,100 0.05% 5ppm/°C 10ppm 100dB Dual, 44V Max 5mA 25V/μs 220kHz
LTC1043 (USING LTC1050 AMPLIFIER)
0.5μV 50nV/°C 10pA 1.6μV Resistor Programmable Resistor Limited 0.001% Possible Resistor Limited <1ppm/°C Possible Resistor Limited 1ppm Possible 160dB Single, Dual 18V Max 2mA 1mV/ms 10Hz
Figure 3. Comparison of Some IC Instrumentation Amplifiers an43f
AN43-2

Application Note 43
CONFIGURATION ADVANTAGES DISADVANTAGES
+V
RATIO OUT
+ OUT
–
INSTRUMENTATION AMPLIFIER
Best general choice. Simple, straightforward. CMRR typically >110dB, drift 0.05μV/°C to 2μV/°C, gain accuracy 0.03%, gain drift 4ppm/°C, noise 10nV√Hz – 1.5μV for chopper-stabilized types. Direct ratiometric output.
CMRR, drift and gain stability may not be adequate in highest precision applications. May require second stage to trim gain.
AN43 F04a
+V
RATIO OUT
+ OUT
–
OP AMP
AN43 F04b
CMRR > 120dB, drift 0.05μV/°C. Gain accuracy 0.001% possible. Gain drift 1ppm with appropriate resistors. Noise 10nV√Hz – 1.5μV for chopper-stabilized types. Direct ratiometric output. Simple gain trim. Flying capacitor commutation provides lowpass filtering. Good choice for very high performance— monolithic versions (LTC1043) available.
Multi-package—moderately complex. Limited bandwidth. Requires feedback resistors to set gain.
+
+ OUT
–
CMRR > 160dB, drift 0.05μV/°C to 0.25μV/°C, gain accuracy 0.001% possible, gain drift 1ppm/°C with appropriate resistors plus floating supply error, simple gain trim, Noise 1nV√Hz possible.
Requires floating supply. No direct ratiometric output. Floating supply drift is a gain term. Requires feedback resistors to set gain.
AN43 F04c OP AMP
+V
+ OUT
–
CMRR ≈ 140dB, drift 0.05μV/°C to 0.25μV/°C, gain accuracy 0.001% possible, gain drift 1ppm/°C with appropriate resistors plus floating supply error, simple gain trim, noise 1nV√Hz possible.
No direct ratiometric output. Zener supply is a gain and offset term error generator. Requires feedback resistors to set gain. Low impedance bridges require substantial current from shunt regulator or circuitry which simulates it. Usually poor choice if precision is required.
–V
AN43 F04d OP AMP
Figure 4. Some Signal Conditioning Methods for Bridges
an43f
AN43-3

Application Note 43
CONFIGURATION ADVANTAGES DISADVANTAGES
+V
+
–
OP AMP
RATIO OUT
OUT
AN43 F04e
+
+
CMRR > 160dB, drift 0.05μV/°C to 0.25μV/°C, gain accuracy 0.001% possible, gain drift 1ppm/°C with appropriate resistors, simple gain trim, ratiometric output, noise 1nV√Hz possible.
Requires precision analog level shift, usually with isolation amplifier. Requires feedback resistors to set gain.
+V
+
–
RATIO OUT
OUT
CMRR ≈ 120dB to 140dB, drift 0.05μV/°C to 0.25μV/°C, gain accuracy 0.001% possible, gain drift 1ppm/°C with appropriate resistors, simple gain trim, direct ratiometric output, noise 1nV√Hz possible.
Requires tracking supplies. Assumes high degree of bridge symmetry to achieve best CMRR. Requires feedback resistors to set gain.
–V OP AMP
AN43 F04f
–
+
+V
+
–
OP AMP
RATIO OUT
OUT
AN43 F04g
CMRR = 160dB, drift 0.05μV/°C to 0.25μV/°C, gain accuracy 0.001% possible, gain drift 1ppm/°C, simple gain trim, direct ratiometric output, noise 1nV√Hz possible.
Practical realization requires two amplifiers plus various discrete components. Negative supply necessary.
Figure 4. Some Signal Conditioning Methods for Bridges (Continued)
eliminating all common mode voltage errors. This approach works well, and is often a good choice in high precision work. The amplifiers in this example, CMOS chopper-sta-bilized units, essentially eliminate offset drift with time and temperature. Trade-offs compared to an instrumentation amplifier approach include complexity and the require-ment for a negative supply. Figure 7 is similar, except that low noise bipolar amplifiers are used. This circuit trades slightly higher DC offset drift for lower noise and is a good candidate for stable resolution of small, slowly varying measurands. Figure 8 employs chopper-stabilized A1 to
reduce Figure 7’s already small offset error. A1 measures the DC error at A2’s inputs and biases A1’s offset pins to force offset to a few microvolts. The offset pin biasing at A2 is arranged so A1 will always be able to find the servo point. The 0.01μF capacitor rolls off A1 at low frequency, with A2 handling high frequency signals. Returning A2’s feedback string to the bridges mid-point eliminates A4’s offset contribution. If this was not done A4 would require a similar offset correction loop. Although complex, this approach achieves less than 0.05μV/°C drift, 1nV√Hz noise and CMRR exceeding 160dB.
an43f
AN43-4

Application Note 43
15V
10V RATIO OUTPUT
10k ZERO
OUTPUT 0V TO 10V = 0 TO 250 PSI
15V 15V
–
+
–
+
–
+ A3
LT1101 A = 100
301k*
A1B 1/2 LT1078
A2 LT1010
A1A 1/2 LT1078
100k
15V
350Ω STRAIN GAGE PRESSURE TRANSDUCER
*1% FILM RESISTOR PRESSURE TRANSDUCER = BLH #DHF-350—3MV/VOLT GAIN FACTOR
0.33
10k*
3.65k*
1k – GAIN
AN43 F05
LT1021 10V
Figure 5. A Practical Instrumentation Amplifier-Based Bridge Circuit
350Ω 1/2W
+
350Ω STRAIN GAUGE BRIDGE 3MV/V TYPE
100k
15V
250* 100k*
+
AN43 F06
10μF
OUTPUT TRIM 100Ω
0.02
1k
–15V
*1% FILM RESISTOR
Q1 2N2905
–
+
A1 LTC1150
– A2
LTC1150
RATIO OUTPUT
OUTPUT 0V TO 10V
Figure 6. Servo Controlling Bridge Drive Eliminates Common Mode Voltage
Single Supply Common Mode Suppression Circuits
The common mode suppression circuits shown require a negative power supply. Often, such circuits must function in systems where only a positive rail is available. Figure 9 shows a way to do this. A2 biases the LTC®1044 positive-to-negative converter. The LTC1044’s output pulls the bridge’s output negative, causing A1’s input to balance at 0V. This local loop permits a single-ended amplifier (A2)
to extract the bridge’s output signal. The 100k-0.33μF RC filters noise and A2’s gain is set to provide the desired output scale factor. Because bridge drive is derived from the LT1034 reference, A2’s output is not affected by supply shifts. The LT1034’s output is available for ratio operation. Although this circuit works nicely from a single 5V rail the transducer sees only 2.4V of drive. This reduced drive
an43f
AN43-5

Application Note 43
15V
–
+
–
+ A1
LT1007
3
2
5V
350Ω BRIDGE
7
4
–15V
6 LT1021-5
301k*
330Ω
3
2 4 1μF
*1% FILM RESISTOR
49.9Ω*
AN43 F07
30.1k*
5k GAIN TRIM
7
15V
–15V
6A3 LT1028
–
+
2
3 4
7
15V
–15V
6A3 LT1028
10k ZERO TRIM
RATIO REFERENCE OUT
330Ω
0V TO 10V OUTPUT
Figure 7. Low Noise Bridge Amplifier with Common Mode Suppression
15V
–
+
–
+ A3
LT1007
3
2
5V
350Ω BRIDGE
7
4
–15V
6 LT1021-5
301k*
330Ω
*1% FILM RESISTOR AN43 F08
0.01
15V
130Ω100k 30k
30.1k*
49.9Ω*
(A = 1000) 5k GAIN TRIM
15V
OUTPUT
68Ω
–15V
1 7
8
4
A1 LTC1150
–
+ A2
LT1028
–
+
2
3 4
7
15V
–15V
6A4 LT1028
10k ZERO TRIM
REFERENCE OUT
330Ω
Figure 8. Low Noise, Chopper-Stabilized Bridge Amplifier with Common Mode Suppression an43f
AN43-6

Application Note 43
1.2V REFERENCE OUTPUT5V
+
D
E A
C 2.4V 100k
46k*
100Ω*
AN43 F09
2k
*1% FILM RESISTOR PRESSURE TRANSDUCER-BLH/DHF-350 CIRCLED LETTER IS PIN NUMBER ZIN = 350Ω
0.33μF
0.047μF
301k
10k ZERO TRIM
TO A/D CONVERTER FOR RATIOMETRIC OPERATION. 0.1mA MAXIMUM PRESSURE
TRANSDUCER 350Ω
LT1034 1.2V
220
39k
0.1μF
8
5
64100μF
+ 100μF
2
3
– +
A1 1/2 LT1078
V+
CAP+
LTC1044 CAP– LV GND
VOUT
–
+ A2
1/2 LT1078
OUTPUT 0V TO 3.5V = 0 TO 350 PSI
GAIN TRIM
Figure 9. Single Supply Bridge Amplifier with Common Mode Suppression
5V
100μF
+
350Ω STRAIN GAUGE BRIDGE 3mV/V TYPE
100k
40Ω 5k*
10k
1M*
1μF AN43 F10
10μF
5k OUTPUT TRIM
0.02
200k
100μF SOLID TANTALUM
100k
3k
*1% FILM RESISTOR
Q2 2N2222
–
+
–
+ A2
1/2 LT1078
A1 1/2 LT1078
8V
+ +
+
4
2
1
8 5V
5
3
FB/SD
LT1054 CAP+ V+
GND
CAP– VOUT
OUTPUT 0V TO 3V
10μF
Figure 10. High Resolution Version of Figure 9. Bipolar Voltage Converter Gives Greater Bridge Drive, Increasing Output Signal
results in lower transducer outputs for a given measurand lower output impedance. The biasing used permits 8V to value, effectively magnifying amplifier offset drift terms. appear across the bridge, requiring the 100mA capability The limit on available bridge drive is set by the CMOS LT1054 to sink about 24mA. This increased drive results LTC1044’s output impedance. Figure 10’s circuit employs in a more favorable transducer gain slope, increasing a bipolar positive-to-negative converter which has much signal-to-noise ratio.
an43f
AN43-7

Application Note 43
Switched-Capacitor Based Instrumentation Amplifiers
Switched-capacitor methods are another way to signal condition bridge outputs. Figure 11 uses a flying capacitor configuration in a very high precision-scale application. This design, intended for weighing human subjects, will resolve 0.01 pound at 300.00 pounds full scale. The strain gauge based transducer platform is excited at 10V by the LT1021 reference, A1 and A2. The LTC1043 switched-capacitor building block combines with A3, forming a differential input chopper-stabilized amplifier. The LTC1043 alternately connects the 1μF flying capacitor between the strain gauge bridge output and A3’s input. A second 1μF unit stores the LTC1043 output, maintaining A3’s input at DC. The LTC1043’s low charge injection maintains differential to single-ended transfer accuracy of about 1ppm at DC and low frequency. The commutation rate, set by the 0.01μF capacitor, is about 400Hz. A3 takes scaled gain, providing 3.0000V for 300.00 pounds full-scale output.
The extremely high resolution of this scale requires filtering to produce useful results. Very slight body movement acting on the platform can cause significant noise in A3’s output. This is dramatically apparent in Figure 12’s tracings. The total force on the platform is equal to gravity pulling on the body (the “weight”) plus any additional accelerations within or acting upon the body. Figure 12 (Trace B) clearly shows that each time the heart pumps, the acceleration due to the blood (mass) moving in the arteries shows up as “weight”. To prove this, the subject gets off the scale and runs in place for 15 seconds. When the subject returns to the platform the heart should work harder. Trace A confirms this nicely. The exercise causes the heart to work harder, forcing a greater acceleration-per-stroke.2
Note 2: Cardiology aficionados will recognize this as a form of Ballistocardiograph (from the Greek “ballein”—to throw, hurl or eject and “kardia,” heart). A significant amount of effort was expended in attempts to reliably characterize heart conditions via acceleration detection methods. These efforts were largely unsuccessful when compared against the reliability of EKG produced data. See references for further discussion.
10V RATIO OUTPUT
HEARTBEAT OUTPUT
WEIGHT OUTPUT 0V TO 3.0000V = 0LB TO 300.00LB
–
+
–
+
16 17
8
4
14
12
11
1μF
LTC1043
15V
1μF
0.68μF
15V 80k*
15k
25Ω
135k* 1k
10k 1% FILM 1k* 100k
39k 2μF
680k
2k 15V
AN43 F11
50k GAIN
2.5k ZERO
5.8k*
A3 LTC1150
–
+
A5B 1/2 LT1018
–
+
A5A 1/2 LT1018
15V
15V
–
+
A4 LT1012
301k 1% FILM
A2 LT1010
A1 LT1012
7
13
LT1021 10V
15V
RC FILTER
0.68/2μF = POLYSTYRENE 0.01 * = ULTRONIX 105A RESISTOR STRAIN BRIDGE PLATFORM = NCI 3224
= HEWLETT-PACKARD HSSR-8200
Figure 11. High Precision Scale for Human Subjects
an43f
AN43-8

Application Note 43
A = 0.45LB/FULL SCALE
B = 0.45LB/FULL SCALE
AN43 F12HORIZ = 1s/INCH
Figure 12. High Precision Scale’s Heartbeat Output. Trace B Shows Subject at Rest; Trace A After Exercise. Discontinuous Components in Waveforms Leading Edges Are Due to XY Recorder Slew Limitations
Another source of noise is due to body motion. As the body moves around, its mass doesn’t change but the instantaneous accelerations are picked up by the platform and read as “weight” shifts.
All this seems to make a 0.01 pound measurement mean-ingless. However, filtering the noise out gives a time aver-aged value. A simple RC lowpass will work, but requires excessively long settling times to filter noise fundamentals in the 1Hz region. Another approach is needed.
A4, A5 and associated components form a filter which switches its time constant from short to long when the output has nearly arrived at the final value. With no weight on the platform A3’s output is zero. A4’s output is also zero, A5B’s output is indeterminate and A5A’s output is low. The MOSFET opto-couplers LED comes on, putting the RC filter into short time constant mode. When someone gets on the scale A3’s output rises rapidly. A5A goes high, but A5B trips low, maintaining the RC filter in its short time constant mode. The 2μF capacitor charges rapidly, and A4 quickly settles to final value ± body motion and heartbeat noise. A5B’s negative input sees 1% attenuation from A3; its positive input does not. This causes A5B to switch high when A4’s output arrives within 1% of final value. The opto-coupler goes off and the filter switches into long time constant mode, eliminating noise in A4’s output. The 39k resistor prevents overshoot, ensuring monotonic A4 outputs. When the subject steps off the scale A3 quickly returns to zero. A5A goes immediately low, turning on the opto-coupler. This quickly discharges
the 2μF capacitor, returning A4’s output rapidly to zero. The bias string at A5A’s input maintains the scale in fast time constant mode for weights below 0.50 pounds. This permits rapid response when small objects (or persons) are placed on the platform. To trim this circuit, adjust the zero potentiometer for 0V out with no weight on the platform. Next, set the gain adjustment for 3.0000V out for a 300.00 pound platform weight. Repeat this procedure until both points are fixed.
Optically Coupled Switched-Capacitor Instrumentation Amplifier
Figure 13 also uses optical techniques for performance enhancement. This switched-capacitor based instru-mentation amplifier is applicable to transducer signal conditioning where high common mode voltages exist. The circuit has the low offset and drift of the LTC1150 but also incorporates a novel switched-capacitor “front end” to achieve some specifications not available in a conventional instrumentation amplifier.
Common mode rejection ratio at DC for the front end exceeds 160dB. The amplifier will operate over a ±200V common mode range and gain accuracy and stability are limited only by external resistors. A1, a chopper stabilized unit, sets offset drift at 0.05μV/°C. The high common mode voltage capability of the design allows it to with-stand transient and fault conditions often encountered in industrial environments.
an43f
AN43-9

Application Note 43
2k 2kC1 1μF
C2 1μF 100k*
CLK OUT
100Ω*
AN43 F13
0.33
15V
10k
15V
–15V
S1
+
–
+E BRIDGE
10k
0.05
S2
= HEWLETT-PACKARD HSSR-8200
= 1/6 74C04
= 1/4 74C02
* = 1% FILM RESISTOR
S4
S3
READ
–
+ A1
LTC1150
100pF
2N3904
10k
15V
ACQUIRE
0.05 Q
Q
15V
15V
D CK 74C74 ÷ 4
10k
OUTPUT
Figure 13. Floating Input Bridge Instrumentation Amplifier with 200V Common Mode Range
The circuit’s inputs are fed to LED-driven optically-coupled MOSFET switches, S1 and S2. Two similar switches, S3 and S4, are in series with S1 and S2. CMOS logic func-tions, clocked from A1’s internal oscillator, generate non-overlapping clock outputs which drive the switch’s LEDs. When the “acquire pulse” is high, S1 and S2 are on and C2 acquires the differential voltage at the bridge’s output. During this interval, S3 and S4 are off. When the acquire pulse falls, S1 and S2 begin to go off. After a delay to allow S1 and S2 to fully open, the “read pulse” goes high, turn-ing on S3 and S4. Now C1 appears as a ground-referred voltage source which is read by A1. C2 allows A1’s input to retain C1’s value when the circuit returns to the acquire mode. A1 provides the circuit’s output. Its gain is set in normal fashion by feedback resistors. The 0.33μF feedback capacitor sets roll-off. The differential-to-single-ended transition performed by the switches and capacitors means that A1 never sees the input’s common mode signal. The
breakdown specification of the optically-driven MOSFET switch allows the circuit to withstand and operate at com-mon mode levels of ±200V. In addition, the optical drive to the MOSFETs eliminates the charge injection problems common to FET switched-capacitive networks.
Platinum RTD Resistance Bridge Circuits
Platinum RTDs are frequently used in bridge configura-tions for temperature measurement. Figure 14’s circuit is highly accurate and features a ground referred RTD. The ground connection is highly desirable for noise rejection. The bridges RTD leg is driven by a current source while the opposing bridge branch is voltage biased. The current drive allows the voltage across the RTD to vary directly with its temperature induced resistance shift. The difference between this potential and that of the opposing bridge leg forms the bridges output.
an43f
AN43-10

Application Note 43
15V
–
+
–
+
0.1μF
10k*
2k
27k
8.25k*
5k LINEARITY
50k ZERO
RP 100Ω AT 0°C RTD * = 1% FILM RESISTOR
RP = ROSEMOUNT 118MFRTD
A1A 1/2 LT1078
–
+ A1B
1/2 LT1078
–
+
15V
A2 LT1101 A = 10
A3 LT1101 A = 10
LT1009 2.5V
274k*
15V
88.7Ω*
250k*
2k GAIN
0V TO 10VOUT = 0°C TO 400°C ±0.05°C
13k*
10k*
AN43 F14
Figure 14. Linearized Platinum RTD Bridge. Feedback to Bridge from A3 Linearizes the Circuit
A1A and instrumentation amplifier A2 form a voltage-con-trolled current source. A1A, biased by the LT1009 refer-ence, drives current through the 88.7Ω resistor and the RTD. A2, sensing differentially across the 88.7Ω resistor, closes a loop back to A1A. the 2k-0.1μF combination sets amplifier roll-off, and the configuration is stable. Because A1A’s loop forces a fixed voltage across the 88.7Ω resistor, the current through RP is constant. A1’s operating point is primarily fixed by the 2.5V LT1009 voltage reference.
The RTD’s constant current forces the voltage across it to vary with its resistance, which has a nearly linear posi-tive temperature coefficient. The nonlinearity could cause several degrees of error over the circuit’s 0°C to 400°C operating range. The bridges output is fed to instrumenta-tion amplifier A3, which provides differential gain while simultaneously supplying nonlinearity correction. The correction is implemented by feeding a portion of A3’s output back to A1’s input via the 10k-250k divider. This causes the current supplied to RP to slightly shift with its operating point, compensating sensor nonlinearity to
within ±0.05°C. A1B, providing additional scaled gain, furnishes the circuit output.
To calibrate this circuit, substitute a precision decade box (e.g., General Radio 1432k) for RP. Set the box to the 0°C value (100.00Ω) and adjust the offset trim for a 0.00V output. Next, set the decade box for a 140°C output (154.26Ω) and adjust the gain trim for a 3.500V output reading. Finally, set the box to 249.0Ω (400.00°C) and trim the linearity adjustment for a 10.000V output. Repeat this sequence until all three points are fixed. Total error over the entire range will be within ±0.05°C. The resistance values given are for a nominal 100.00Ω (0°C) sensor. Sensors deviating from this nominal value can be used by factoring in the deviation from 100.00Ω. This devia-tion, which is manufacturer specified for each individual sensor, is an offset term due to winding tolerances during fabrication of the RTD. The gain slope of the platinum is primarily fixed by the purity of the material and has a very small error term.
an43f
AN43-11

Application Note 43
Figure 15 is functionally identical to Figure 14, except that A2 and A3 are replaced with an LTC1043 switched-capacitor building block. The LTC1043 performs the differential-to-single-ended transitions in the current source and bridge output amplifier. Value shifts in the current source and output stage reflect the LTC1043’s lack of gain. The primary trade-off between the two circuits is component count versus cost.
Digitally Corrected Platinum Resistance Bridge
The previous examples rely on analog techniques to achieve a precise, linear output from the platinum RTD bridge. Figure 16 uses digital corrections to obtain simi-lar results. A processor is used to correct residual RTD
15V
nonlinearities. The bridges inherent nonlinear output is also accommodated by the processor.
The LT1027 drives the bridge with 5V. The bridge differential output is extracted by instrumentation amplifier A1. A1’s output, via gain scaling stage A2, is fed to the LTC1290 12-bit A/D. The LTC1290’s raw output codes reflect the bridges nonlinear output versus temperature. The pro-cessor corrects the A/D output and presents linearized, calibrated data out. RTD and resistor tolerances mandate zero and full-scale trims, but no linearity correction is necessary. A2’s analog output is available for feedback control applications. The complete software code for the 68HC05 processor, developed by Guy M. Hoover, appears in Figure 17.
250k* –
+
8
4
14
12
11
1μF
7
13
6
4
18
2
3
1μF
1/2 LTC1043
15V
5
15
1716
0.01μF
1μF
RP 100Ω AT 0°C
8.25k*
274k*
13k*
619Ω*
AN43 F15
* = 1% FILM RESISTOR RP = ROSEMOUNT 118MFRTD
887Ω*
2k
50k ZERO
15V
15V
0.1μF
1/2 LT1078
–
+ 1/2 LT1078
10k*
27k
LT1009 2.5V
2k GAIN
ADJUST
5k LINEARITY
0V TO 10VOUT = 0°C TO 400°C ±0.05°C
1μF
5
6
7
Figure 15. Switched-Capacitor-Based Version of Figure 14
an43f
AN43-12

Application Note 43
Thermistor Bridge
Figure 18, another temperature measuring bridge, uses a thermistor as a sensor. The LT1034 furnishes bridge excitation. The 3.2k and 6250Ω resistors are supplied with the thermistor sensor. The networks overall response is linearly related to the thermistor’s sensed temperature. The network forms one leg of a bridge with resistors fur-nishing the opposing leg. A trim in this opposing leg sets bridge output to zero at 0°C. Instrumentation amplifier A1 takes gain with A2 providing additional trimmed gain to furnish a calibrated output. Calibration is accomplished in similar fashion to the platinum RTD circuits, with the linearity trim deleted.
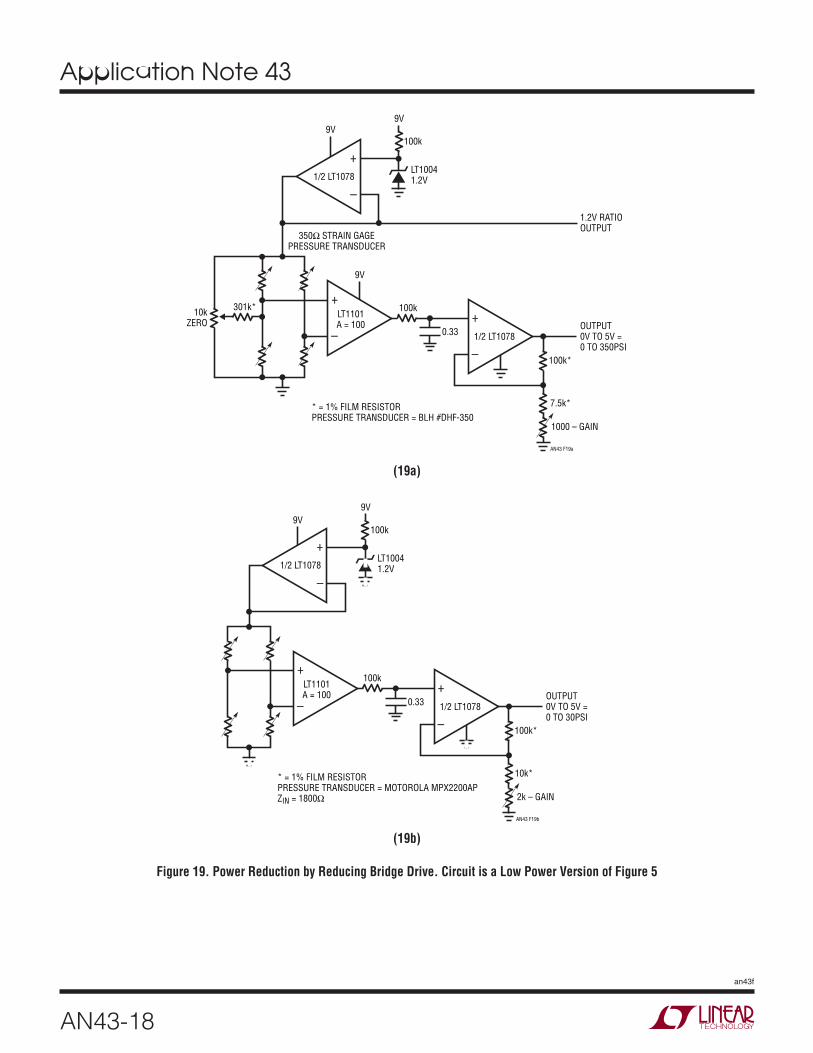
Low Power Bridge Circuits
Low power operation of bridge circuits is becoming increas-ingly common. Many bridge-based transducers are low impedance devices, complicating low power design. The most obvious way to minimize bridge power consumption is to restrict drive to the bridge. Figure 19a is identical to
15V
Figure 5, except that the bridge excitation has been re-duced to 1.2V. This cuts bridge current from nearly 30mA to about 3.5mA. The remaining circuit elements consume negligible power compared to this amount. The trade-off is the sacrifice in bridge output signal. The reduced drive causes commensurately lowered bridge outputs, making the noise and drift floor a greater percentage of the signal. More specifically, a 0.01% reading of a 10V powered 350Ω strain gauge bridge requires 3μV of stable resolution. At 1.2V drive, this number shrinks to a scary 360nV.
Figure 19b is similar, although bridge current is reduced below 700μA. This is accomplished by using a semi-conductor-based bridge transducer. These devices have significantly higher input resistance, minimizing power dissipation. Semiconductor-based pressure transducers have major cost advantages over bonded strain gauge types, although accuracy and stability are reduced. Ap-pendix A, “Strain Gauge Bridges,” discusses trade-offs and theory of both technologies.
SERIAL OUT TO 68HC05 PROCESSOR
15V
+
–
+
–
+
15V
10μF
A1 LT1101 A = 10 A2
LT1006
1μF
500k ZERO°C TRIM
500k 400°C TRIM
RPLAT
*TRW-IRC MAR-6 RESISTOR—0.1% **1% FILM RESISTOR RPLAT = 1kΩ AT 0°C—ROSEMOUNT #118MF
12.5k*
5VOUT
30.1k** 15V
3.92M**
AN43 F16
12k*
1k*
LTC1290
VREF
LT1027
+V
Figure 16. Digitally Linearized Platinum RTD Signal Conditioner
an43f
AN43-13

Application Note 43
* PLATINUM RTD LINEARIZATION PROGRAM (0.0 TO 400.0 DEGREES C) * WRITTEN BY GUY HOOVER LINEAR TECHNOLOGY CORPORATION * 3/14/90 * N IS THE NUMBER OF SEGMENTS THAT RTD RESPONSE IS DIVIDED INTO * TEMPERATURE (DEG. C*10)=M*X+B * M IS SLOPE OF RTD RESPONSE FOR A GIVEN SEGMENT * X IS A/D OUTPUT MINUS SEGMENT END POINT * B IS SEGMENT START POINT IN DEGREES C *10. * ***************************************************************************************** * LOOK UP TABLES * ORG $1000 * TABLE FOR SEGMENT END POINTS IN DECIMAL * X IS FORMED BY SUBTRACTING PROPER SEGMENT END POINT FROM A/D OUTPUT FDB 60,296,527,753,976,1195,1410,1621,1829,2032 FDB 2233,2430,2623,2813,3000,3184,3365,3543,3718,3890 ORG $1030 * TABLE FOR M IN DECIMAL * M IS SLOPE OF RTD OVER A GIVEN TEMPERATURE RANGE FDB 3486,3535,3585,3685,3735,3784,3884,3934,3984,4083 FDB 4133,4232,4282,4382,4432,4531,4581,4681,4730,4830 ORG $1060 * TABLE FOR B IN DECIMAL * B IS DEGREES C TIMES TEN FDB 0,200,400,600,800,1000,1200,1400,1600,1800 FDB 2000,2200,2400,2600,2800,3000,3200,3400,3600,3800 ORG $10FF
FCB 39 (N*2)-1 IN DECIMAL * * END LOOK UP TABLES ***************************************************************************************** * BEGIN MAIN PROGRAM * ORG $0100
LDA #$F7 CONFIGURATION DATA FOR PORT C DDR STA $06 LOAD CONFIGURATION DATA INTO PORT C BSET 0,$02 INITIALIZE B0 PORT C
MES90L NOP LDA #$2F DIN WORD FOR 1290 CH4 WITH RESPECT
* TO CH5, MSB FIRST, UNIPOLAR, 16 BITS STA $50 STORE DIN WORD IN DIN BUFFER JSR READ90 CALL READ90 SUBROUTINE (DUMMY READ) JSR READ90 CALL READ90 SUBROUTINE (MSBS IN $61 LSBS IN $62) LDX $10FF LOAD SEGMENT COUNTER INTO X \ FOR N=20 TO 1
DOAGAIN LDA $1000,X LOAD LSBS OF SEGMENT N \ STA $55 STORE LSBS IN $55 \ DECX DECREMENT X \ LDA $1000,X LOAD MSBS OF SEGMENT N \ STA $54 STORE MSBS IN $54 \ FIND B JSR SUBTRCT CALL SUBTRCT SUBROUTINE / BPL SEGMENT IF RESULT IS PLUS GOTO SEGMENT / JSR ADDB CALL ADDB SUBROUTINE / DECX DECREMENT X / JMP DOAGAIN GOTO CODE AT LABEL DOAGAIN / NEXT N
Figure 17. Software Code for 68HC05 Processor-Based RTD Linearization
an43f
AN43-14

Application Note 43
* * * * * SEGMENT LDA $1030,X LOAD MSBS OF SLOPE \
STA $54 STORE MSBS IN $54 \ INCX INCREMENT X \ M*X LDA $1030,X LOAD LSBS OF SLOPE / STA $55 STORE LSBS IN $55 / JSR TBMULT CALL TBMULT SUBROUTINE / LDA $1060,X LOAD LSBS OF BASE TEMP \ STA $55 STORE LSBS IN $55 \ DECX DECREMENT X > B ADDED TO M*X LDA $1060,X LOAD MSBS OF BASE TEMP / STA $54 STORE MSBS IN $54 / JSR ADDB CALL ADDB SUBROUTINE
* TEMPERATURE IN DEGREES C * 10 IS IN $61 AND $62 * END MAIN PROGRAM ***************************************************************************************** * *
JMP MES90L RUN MAIN PROGRAM IN CONTINUOUS LOOP * ***************************************************************************************** * SUBROUTINES BEGIN HERE * ***************************************************************************************** * READ90 READS THE LTC1290 AND STORES THE RESULT IN $61 AND $62 * READ90 LDA #$50 CONFIGURATION DATA FOR SPCR \
STA $0A LOAD CONFIGURATION DATA > CONFIGURE PROCESSOR LDA $50 LOAD DIN WORD INTO THE ACC / BCLR 0,$02 BIT 0 PORT C GOES LOW (CS GOES LOW) \ STA $0C LOAD DIN INTO SPI DATA REG. START TRANSFER. |
BACK90 TST $0B TEST STATUS OF SPIF | BPL BACK90 LOOP TO PREVIOUS INSTRUCTION IF NOT DONE | LDA $0C LOAD CONTENTS OF SPI DATA REG. INTO ACC | STA $0C START NEXT CYCLE | STA $61 STORE MSBS IN $61 | XFER
BACK92 TST $0B TEST STATUS OF SPIF | DATA BPL BACK92 LOOP TO PREVIOUS INSTRUCTION IF NOT DONE | BSET 0,$02 SET BIT 0 PORT C (CS GOES HIGH) | LDA $0C LOAD CONTENTS OF SPI DATA REG INTO ACC | STA $62 STORE LSBS IN $62 / LDA #$04 LOAD COUNTER WITH NUMBER OF SHIFTS \
SHIFT CLC CLEAR CARRY \ ROR $61 ROTATE MSBS RIGHT THROUGH CARRY \ RIGHT ROR $62 ROTATE LSBS RIGHT THROUGH CARRY / JUSTIFY DECA DECREMENT COUNTER / DATA BNE SHIFT IF NOT DONE SHIFTING THEN REPEAT LOOP / RTS RETURN TO MAIN PROGRAM
* * END READ90 *****************************************************************************************
Figure 17. Software Code for 68HC05 Processor-Based RTD Linearization (Continued)
an43f
AN43-15

Application Note 43
***************************************************************************************** * * SUBTRCT SUBTRACTS $54 AND $55 FROM $61 AND $62. RESULTS IN $61 AND $62 * SUBTRCT LDA $62 LOAD LSBS SUB $55 SUBTRACT LSBS STA $62 STORE REMAINDER LDA $61 LOAD MSBS
SBC $54 SUBTRACT W/CARRY MSBS STA $61 STORE REMAINDER
RTS RETURN TO MAIN PROGRAM * * END SUBTRCT ***************************************************************************************** ***************************************************************************************** * *ADDB RESTORES $61 AND $62 TO ORIGINAL VALUES AFTER SUBTRCT HAS BEEN PERFORMED * ADDB LDA $62 LOAD LSBS ADD $55 ADD LSBS STA $62 STORE SUM LDA $61 LOAD MSBS
ADC $54 ADD W/CARRY MSBS STA $61 STORE SUM
RTS RETURN TO MAIN PROGRAM * * END ADDB ***************************************************************************************** ***************************************************************************************** * *TBMULT MULTIPLIES CONTENTS OF $61 AND $62 BY CONTENTS OF $54 AND $55. *16 MSBS OF RESULT ARE PLACED IN $61 AND $62 * TBMULT CLR $68 CLEAR CONTENTS OF $68 \
CLR $69 CLEAR CONTENTS OF $69 \ RESET TEMPORARY CLR $6A CLEAR CONTENTS OF $6A / RESULT REGISTERS CLR $6B CLEAR CONTENTS OF $6B / STX $58 STORE CONTENTS OF X IN $58. TEMPORARY HOLD REG. FOR X LSL $62 MULTIPLY LSBS BY 2 \ ROL $61 MULTIPLY MSBS BY 2 \ LSL $62 MULTIPLY LSBS BY 2 \ ROL $61 MULTIPLY MSBS BY 2 \ MULTIPLY $61 AND $62 BY 16 LSL $62 MULTIPLY LSBS BY 2 / FOR SCALING PURPOSES ROL $61 MULTIPLY MSBS BY 2 / LSL $62 MULTIPLY LSBS BY 2 / ROL $61 MULTIPLY MSBS BY 2 / LDA $62 LOAD LSBS OF 1290 INTO ACC LDX $55 LOAD LSBS OF M INTO X MUL MULTIPLY CONTENTS OF $55 BY CONTENTS OF $62 STA $6B STORE LSBS IN $6B STX $6A STORE MSBS IN $6A LDA $62 LOAD LSBS OF 1290 INTO ACC LDX $54 LOAD MSBS OF M INTO X MUL MULTIPLY CONTENTS OF $54 BY CONTENTS OF $62 ADD $6A LSBS OF MULTIPLY ADDED TO $6A
STA $6A STORE BYTE TXA TRANSFER X TO ACC
Figure 17. Software Code for 68HC05 Processor-Based RTD Linearization (Continued) an43f
AN43-16

Application Note 43
ADC $69 ADD NEXT BYTE STA $69 STORE BYTE
LDA $61 LOAD MSBS OF 1290 INTO ACC LDX $55 LOAD LSBS OF M INTO X MUL MULTIPLY CONTENTS OF $55 BY CONTENTS OF $61 ADD $6A ADD NEXT BYTE
STA $6A STORE BYTE TXA TRANSFER X TO ACC ADC $69 ADD NEXT BYTE
STA $69 STORE BYTE LDA $61 LOAD MSBS OF 1290 INTO ACC LDX $54 LOAD MSBS OF M INTO X MUL MULTIPLY CONTENTS OF $54 BY CONTENTS OF $61 ADD $69 ADD NEXT BYTE
STA $69 STORE BYTE TXA TRANSFER X TO ACC ADC $68 ADD NEXT BYTE
STA $68 STORE BYTE LDA $6A LOAD CONTENTS OF $6A INTO ACC BPL NNN IF NO CARRY FROM $6A GOTO LABEL NNN LDA $69 LOAD CONTENTS OF $69 INTO ACC ADD #$01 ADD 1 TO ACC STA $69 STORE IN $69 LDA $68 LOAD CONTENTS OF $68 INTO ACC ADC #$00 FLOW THROUGH CARRY STA $68 STORE IN $68
NNN LDA $68 LOAD CONTENTS OF $68 INTO ACC STA $61 STORE MSBS IN $61 LDA $69 LOAD CONTENTS OF $69 INTO ACC STA $62 STORE IN $62 LDX $58 RESTORE X REGISTER FROM $58 RTS RETURN TO MAIN PROGRAM
* * END TBMULT ***************************************************************************************** * * END *****************************************************************************************
Figure 17. Software Code for 68HC05 Processor-Based RTD Linearization (Continued)
33k 15V
15V
–
+ –
+ 15V
A1 LT1101 A = 10 A2
LT1006
1k 0°C TRIM
500Ω 100°C TRIM
T1 = YELLOW SPRINGS #44201 * = 1% FILM RESISTOR
107k*
6250Ω
THERMISTOR
16.2k*
51.1k*
100k*
AN43 F18
3.2k
LT1034 1.235V
T1
0V TO 10V = 0°C TO 100.0°C ±0.25°C
Figure 18. Linear Output Thermistor Bridge. Thermistor Network Provides Linear Bridge Output an43f
AN43-17
Application Note 43
9V
–
+ –
+
–
+
9V
9V
100k
0.33
* = 1% FILM RESISTOR PRESSURE TRANSDUCER = BLH #DHF-350
LT1101 A = 100
1/2 LT1078
1/2 LT1078
1000 – GAIN
100k*
OUTPUT 0V TO 5V = 0 TO 350PSI
1.2V RATIO OUTPUT
7.5k*
AN43 F19a
301k*10k ZERO
LT1004 1.2V
100k
350Ω STRAIN GAGE PRESSURE TRANSDUCER
(19a)
9V 9V
–
+ –
+
–
+
100k
0.33
* = 1% FILM RESISTOR PRESSURE TRANSDUCER = MOTOROLA MPX2200AP ZIN = 1800Ω
LT1101 A = 100
1/2 LT1078
1/2 LT1078
2k – GAIN
100k*
OUTPUT 0V TO 5V = 0 TO 30PSI
10k*
AN43 F19b
LT1004 1.2V
100k
(19b)
Figure 19. Power Reduction by Reducing Bridge Drive. Circuit is a Low Power Version of Figure 5
an43f
AN43-18

Application Note 43
Strobed Power Bridge Drive
Figure 20, derived directly from Figure 10, is a simple way to reduce power without sacrificing bridge signal output level. The technique is applicable where continuous out-put is not a requirement. This circuit is designed to sit in the quiescent state for long periods with relatively brief on-times. A typical application would be remote weight information in storage tanks where weekly readings are sufficient. Quiescent current is about 150μA with on-state current typically 50mA. Bridge power is conserved by simply turning it off.
With Q1’s base unbiased, all circuitry is off except the LT1054 plus-to-minus voltage converter, which draws a 150μA quiescent current. When Q1’s base is pulled low, its collector supplies power to A1 and A2. A1’s output goes high, turning on the LT1054. the LT1054’s output (Pin 5) heads toward –5V and Q2 comes on, permitting bridge current to flow. To balance its inputs, A1 servo controls the LT1054 to force the bridge’s midpoint to 0V. The bridge ends up with about 8V across it, requiring the 100mA capability LT1054 to sink about 24mA. The 0.02μF capacitor stabilizes the loop. The A1-LT1054 loop’s negative output sets the bridge’s common mode voltage to zero,
5V
100μF
+
350Ω STRAIN GAUGE BRIDGE 3mV/V TYPE
100k
10k
10k
Q1 2N2907
+V
SAMPLE COMMAND
40Ω 10μF
0.02
200k
100μF SOLID TANTALUM
100k
3k
* = 1% FILM RESISTOR
Q2 2N2222
–
+
A1 1/2 LT1078
+ +
+
4
2
1
8 5V
5
3
FB/SD
LT1054 CAP+
GND
CAP– VOUT
V+
10μF
allowing A2 to take a simple single-ended measurement. The “output trim” scales the circuit for 3mV/V type strain bridge transducers, and the 100k-0.1μF combination provides noise filtering.
Sampled Output Bridge Signal Conditioner
Figure 21, an obvious extension of Figure 20, automates the strobing into a clocked sequence. Circuit on-time is restricted to 250μs, at a clock rate of about 2Hz. This keeps average power consumption down to about 200μA. Oscillator A1A produces a 250μs clock pulse every 500ms (Trace A, Figure 22). A filtered version of this pulse is fed to Q1, whose emitter (Trace B) provides slew limited bridge drive. A1A’s output also triggers a delayed pulse produced by the 74C221 one-shot output (Trace C). The timing is arranged so the pulse occurs well after the A1B-A2 bridge amplifier output (Trace D) settles. A monitoring A/D converter, triggered by this pulse, can acquire A1B’s output.
The slew limited bridge drive prevents the strain gauge bridge from seeing a fast rise pulse, which could cause long term transducer degradation. To calibrate this circuit trim zero and gain for appropriate outputs.
5V 50k
OUTPUT TRIM
49.9k* 10M*
–
+ A2
1/2 LT1078 OUTPUT PULSE
100k 0V TO 3V
0.1μF AN43 F20
Figure 20. Strobed Power Strain Gauge Bridge Signal Conditioner
an43f
AN43-19

Application Note 43
15k 9V
TO A/D
200Ω GAIN TRIM
750Ω*
AN43 F21TO A/D CONVERT COMMAND
–
+ A1A
1/2 LT1078
9V
9V
9V
4.7k 330Ω
2
47μF
0.068
0.068
4 1N4148 22M
100k
100k
10k 1
5
15 13
9
15k
14
73k
100k
Q1 2N2219
350Ω STRAIN GAGE
BRIDGE
TO A/D RATIO REFERENCE
0.01
301k*
* = 1% FILM RESISTOR
1
11 3
0.068
2k*74C221
6
–
+ A2
LT1101 A = 100
–
+ A1B
1/2 LT1078
Figure 21. Sampled Output Bridge Signal Conditioner Uses Pulsed Excitation to Save Power
A = 10V/DIV
B = 5V/DIV
C = 10V/DIV
D = 2V/DIV
AN43 F22HORIZ = 50μs/DIV
Figure 22. Figure 21’s Waveforms. Trace C’s Delayed Pulse Ensures A/D Converter Sees Settled Output Waveform (Trace D)
an43f
AN43-20

Application Note 43
Continuous Output Sampled Bridge Signal Conditioner
Figure 23 extends the sampling approach to include a continuous output. This is accomplished by adding a sample-hold stage at the circuit output. In this circuit, Q2 is off when the “sample command” is low. Under these conditions only A2 and S1 receive power, and current drain is inside 60μA. When the sample command is pulsed high, Q2’s collector (Trace A, Figure 24) goes high, providing
47μF
power to all other circuit elements. The 10Ω-1μF RC at the LT1021 prevents the strain bridge from seeing a fast rise pulse, which could cause long term transducer degrada-tion. The LT1021-5 reference output (Trace B) drives the strain bridge, and instrumentation amplifier A1 output responds (Trace C). Simultaneously, S1’s switch control input (Trace D) ramps toward Q2’s collector.
OUTPUT
0V TO 5V OUTPUT
10Hz SAMPLE
COMMAND
+
+ 10k
10k
10Ω
1μF
1N4148
200k
200Ω
* = 1% METAL FILM RESISTOR ** = POLYSTYRENE
1M
6.5V TO 10V = +V
0.003
1M
1M
TRIM
S1 1/4 CD4016
OUT AN43 F23
+V
C1 1μF**
IN
3mV/V TYPE
350Ω STRAIN GAUGE BRIDGE
10k
Q2 2N3906
V+
6.5V TO 10V
SOLID TANTALUM
Q1 2N3904
LT1021 5V
LT1101
–
+ A1
A = 100
–
+
A2 LT1077
Figure 23. Pulsed Excitation Bridge Signal Conditioner. Sample-Hold Stage Gives DC Output
A = 20V/DIV
B = 4V/DIV
C = 0.5V/DIV
D = 2V/DIV
AN43 F24HORIZ = 200μs/DIV
Figure 24. Waveforms for Figure 23’s Sampled Strain Gauge Signal Conditioner
an43f
AN43-21

Application Note 43
At about one-half Q2’s collector voltage (in this case just before mid-screen) S1 turns on, and A1’s output is stored in C1. When the sample command drops low, Q2’s collec-tor falls, the bridge and its associated circuitry shut down and S1 goes off. C1’s stored value appears at gain scaled A2’s output. The RC delay at S1’s control input ensures glitch-free operation by preventing C1 from updating until A1 has settled. During the 1ms sampling phase, supply current approaches 20mA but a 10Hz sampling rate cuts effective drain below 250μA. Slower sampling rates will further reduce drain, but C1’s droop rate (about 1mV/100ms) sets an accuracy constraint. The 10Hz rate provides adequate bandwidth for most transducers. For 3mV/V slope factor transducers the gain trim shown al-lows calibration. It should be rescaled for other types. This circuit’s effective current drain is about 250μA, and A2’s output is accurate enough for 12-bit systems.
It is important to remember that this circuit is a sampled system. Although the output is continuous, information is being collected at a 10Hz rate. As such, the Nyquist limit applies, and must be kept in mind when interpreting results.
High Resolution Continuous Output Sampled Bridge Signal Conditioner
Figure 25 is a special case of sampled bridge drive. It is intended for applications requiring extremely high resolu-tion outputs from a bridge transducer. This circuit puts 100V across a 10V, 350Ω strain gauge bridge for short periods of time. The high pulsed voltage drive increases bridge output proportionally, without forcing excessive dissipation. In fact, although this circuit is not intended for power reduction, average bridge power is far below the normal 29mA obtained with 10VDC excitation.
Combining the 10× higher bridge gain (300mV full scale versus the normal 30mV) with a chopper-stabilized ampli-fier in the sample-hold output stage is the key to the high resolution obtainable with this circuit.
When oscillator A1A’s output is high Q6 is turned on and A2’s negative input is pulled above ground. A2’s output goes negative, turning on Q1. Q1’s collector goes low,
robbing Q3’s base drive and cutting it off. Simultane-ously, A3 enforces it’s loop by biasing Q2 into conduction, softly turning on Q4. Under these conditions the voltage across the bridge is essentially zero. When A1A oscillates low (Trace A, Figure 26) RC filter driven Q6 responds by cutting off slowly. Now, A2’s negative input sees current only through the 3.6k resistor. The input begins to head negative, causing A2’s output to rise. Q1 comes out of saturation, and Q3’s emitter (Trace B) rises. Initially this action is rapid (fast rise slewing is just visible at the start of Q3’s ascent), but feedback to A2’s negative input closes a control loop, with the 1000pF capacitor restricting rise time. The 72k resistor sets A2’s gain at 20 with respect to the LT1004 2.5V reference, and Q3’s emitter servo controls to 50V.
Simultaneously, A3 responds to the bridges biasing by moving its output negatively. Q2 tends towards cut-off, increasing Q4’s conduction. A3 biases its loop to maintain the bridge midpoint at zero. To do this, it must produce a complimentary output to A2’s loop, which Trace C shows to be the case. Note that A3’s loop roll-off is considerably faster than A2’s, ensuring that it will faithfully track A2’s loop action. Similarly, A3’s loop is slaved to A2’s loop output, and produces no other outputs.
Under these conditions the bridge sees 100V drive across it for the 1ms duration of the clock pulse.
A1A’s clock output also triggers the 74C221 one-shot. The one-shot delivers a delayed pulse (Trace D) to Q5. Q5 comes on, charging the 1μF capacitor to the bridges output voltage. With A3 forcing the bridges left side midpoint to zero, Q5, the 1μF capacitor and A4 see a single-ended, low voltage signal. High transient common mode voltages are avoided by the control loops complimentary controlled rise times. A4 takes gain and provides the circuit output. The 74C221’s pulse width ends during the bridge’s on-time, preserving sampled data integrity. When the A1A oscillator goes high the control loops remove bridge drive, returning the circuit to quiescence. A4’s output is maintained at DC by the 1μF capacitor. A1A’s 1Hz clock rate is adequate to prevent deleterious droop of the 1μF capacitor, but slow enough to limit bridge power dissipation. The controlled
an43f
AN43-22

Application Note 43
4.7k
–15V
–
+
15V
–15V
–
+
15V
–15V
A3 LT1007
A2 LT1012
Q2 MPSA92 Q4
MJE350
50k ZERO
Q5 2N4391
Q3 MJE344
350Ω BRIDGE
68pF
1μF
0.002
0.33 1k
15V
–15V
100pF
1M
10M
4.7k
* = 1% FILM RESISTOR
= 1N4148 R2 C2 A2
Q1 MPSA42
68pF
10k
4.7k
2.7M
15V
4.7k
2.7M
55V 15V 15V 15V
2.7M
72k
2k Q6
2N3904
1000pF
4.7k
3.6k
LT1004 2.5V
2.7k
10k
–55V
12k 10k –15V
33k*
100Ω*
10k 0.05
0.05
15V
15V
3k
15V
AN43 F25
15V
–
+
–
+
A4 LTC1150
C2 R1 C1 Q1 B1
74C221 Q2
A1
B1
C1
A1A 1/2 LT1018
2.7M
OUTPUT
15V
Figure 25. High Resolution Pulsed Excitation Bridge Signal Conditioner. Complementary 50V Drive Increases Bridge Output Signal
rise and fall times across the bridge prevent possible long-term transducer degradation by eliminating high ΔV/ΔT induced effects.
When using this circuit it is important to remember that it is a sampled system. Although the output is continuous, information is being collected at a 1Hz rate. As such, the Nyquist limit applies, and must be kept in mind when interpreting results.
A = 20V/DIV
B = 50V/DIV
C = 50V/DIV
D = 20V/DIV
AN43 F26HORIZ = 200μs/DIV
Figure 26. Figure 25’s Waveforms. Drive Shaping Results in Controlled, Complementary Bridge Drive Waveforms. Bridge Power is Low Despite 100V Excitation
an43f
AN43-23

Application Note 43
AC Driven Bridge/Synchronous Demodulator
Figure 27, an extension of pulse excited bridges, uses synchronous demodulation to obtain very high noise rejection capability. An AC carrier excites the bridge and synchronizes the gain stage demodulator. In this ap-plication, the signal source is a thermistor bridge which detects extremely small temperature shifts in a biochemical microcalorimetry reaction chamber.
The 500Hz carrier is applied at T1’s input (Trace A, Fig-ure 28). T1’s floating output drives the thermistor bridge, which presents a single-ended output to A1. A1 operates at an AC gain of 1000. A 60Hz broadband noise source is also deliberately injected into A1’s input (Trace B). The carrier’s zero crossings are detected by C1. C1’s output clocks the LTC1043 (Trace C). A1’s output (Trace D) shows the desired 500Hz signal buried within the 60Hz noise source. The LTC1043’s zero-cross-synchronized switching at A2’s positive input (Trace E) causes A2’s gain to alternate between plus and minus one. As a result, A1’s output is
THERMISTOR BRIDGE IS THE SIGNAL SOURCE TEST
500Hz SINE DRIVE
synchronously demodulated by A2. A2’s output (Trace F) consists of demodulated carrier signal and non-coherent components. The desired carrier amplitude and polarity information is discernible in A2’s output and is extracted by filter-averaging at A3. To trim this circuit, adjust the phase potentiometer so that C1 switches when the carrier crosses through zero.
A = 2V/DIV
B = 2V/DIV
C = 50V/DIV
D = 5V/DIV
E = 5V/DIV
F = 5V/DIV
AN43 F28HORIZ = 5ms/DIV
Figure 28. Details of Lock-In Amplifier Operation. Narrowband Synchronous Detection Permits Extraction of Coherent Signals Over 120dB Down
SYNCHRONOUS DEMODULATOR
10k* 10k*
VOUT = 1000 . DCBRIDGE SIGNAL
5V
–5V
+
–
+ A1
LT1007
–
+ LT1011
5V
POINT A
6
3 6.19k1
3
4
2
T1 6.19k
6.19kRT 2
–5V
100k 1M
1/4 LTC1043
5V
2
3
2
3 –5V
100Ω
1k
AN43 F27
7
4
8
PHASE TRIM
2
50k 10k
3
1
5V5V
–5V
ZERO CROSSING DETECTOR
47μF0.01
1μF
C1 0.002
13 12
14 16
–
+ A2
1/2 LT1057 –
+ A3
1/2 LT1057
T1 = TF5SX17ZZ, TOROTEL RT = YSI THERMISTOR 44006
≈ 6.19k AT 37.5°C * = MATCH 0.05% 6.19k = VISHAY S-102 OPERATE LTC1043 WITH ±5V SUPPLIES
Figure 27. “Lock-In” Bridge Amplifier. Synchronous Detection Achieves Extremely Narrow Band Gain, Providing Very High Noise Rejection
an43f
AN43-24

Application Note 43
AC Driven Bridge for Level Transduction
Level transducers which measure angle from ideal level are employed in road construction, machine tools, inertial navigation systems and other applications requiring a gravity reference. One of the most elegantly simple level transducers is a small tube nearly filled with a partially conductive liquid. Figure 29a shows such a device. If the tube is level with respect to gravity, the bubble resides in the tube’s center and the electrode resistances to com-mon are identical. As the tube shifts away from level, the resistances increase and decrease proportionally. By controlling the tube’s shape at manufacture it is possible to obtain a linear output signal when the transducer is incorporated in a bridge circuit.
PARTIALLY CONDUCTIVE LIQUID IN SEALED
GLASS TUBE
ELECTRODE BUBBLE
AN43 F29a
ELECTRODE
COMMON ELECTRODE
Figure 29a. Bubble-Based Level Transducer
Transducers of this type must be excited with an AC wave-form to avoid damage to the partially conductive liquid inside the tube. Signal conditioning involves generating this excitation as well as extracting angle information and polarity determination (e.g., which side of level the tube is on). Figure 29b shows a circuit which does this, directly producing a calibrated frequency output corresponding to level. A sign bit, also supplied at the output, gives polarity information.
The level transducer is configured with a pair of 2kΩ resis-tors to form a bridge. The required AC bridge excitation is developed at C1A, which is configured as a multivibrator. C1A biases Q1, which switches the LT1009’s 2.5V potential
through the 100μF capacitor to provide the AC bridge drive. The bridge differential output AC signal is converted to a current by A1, operating as a Howland current pump. This current, whose polarity reverses as bridge drive polarity switches, is rectified by the diode bridge. Thus, the 0.03μF capacitor receives unipolar charge. Instrumentation am-plifier A2 measures the voltage across the capacitor and presents its single-ended output to C1B. When the voltage across the 0.03μF capacitor becomes high enough, C1B’s output goes high, turning on the LTC201A switch. This discharges the capacitor. When C1B’s AC positive feedback ceases, C1B’s output goes low and the switch goes off. The 0.03μF unit again receives constant current charging and the entire cycle repeats. The frequency of this oscillation is determined by the magnitude of the constant current delivered to the bridge-capacitor configuration. This cur-rent’s magnitude is set by the transducer bridge’s offset, which is level related.
Figure 30 shows circuit waveforms. Trace A is the AC bridge drive, while Trace B is A1’s output. Observe that when the bridge drive changes polarity, A1’s output flips sign rapidly to maintain a constant current into the bridge-capacitor configuration. A2’s output (Trace C) is a unipolar, ground-referred ramp. Trace D is C1B’s output pulse and the circuit’s output. The diodes at C1B’s positive input provide temperature compensation for the sensor’s posi-tive tempco, allowing C1B’s trip voltage to ratiometrically track bridge output over temperature.
A3, operating open loop, determines polarity by compar-ing the rectified and filtered bridge output signals with respect to ground.
To calibrate this circuit, place the level transducer at a known 40 arc-minute angle and adjust the 5kΩ trimmer at C1B for a 400Hz output. Circuit accuracy is limited by the transducer to about 2.5%.
an43f
AN43-25

Application Note 43
5V
–
+
–
+
C1A 1/2 LT1018
A1 1/2 LT1057
–
+ A3
1/2 LT1057
–
+
A2 LT1102 A = 10
LEVEL TRANSDUCER
5V
0.01μF
220pF
0.1
3.01k
5V
5k CALIBRATE
330Ω
1.3k
220k
47pF
AN43 F29b
LT1009 2.5V
* = 1% RESISTOR LEVEL TRANSDUCER = FREDERICKS #7630
1N4148
1N4148
2M10k
10μF 10k
10k
499k*
499k*
IK
0.03
1N4148 x4
1/4 LTC201A
Q1 2N3906
200k
200k
10k*
10k*
10M
SIGN BIT + OR – FOR EITHER SIDE OF LEVEL
0.1 10M
2k*2k*
–5V
+
100μF +
1N4148
1k
5V
–
+ C1B
1/2 LT1018
FREQUENCY OUT 0 TO 40 ARC MINUTES = 0Hz TO 400Hz
Figure 29b. Level Transducer Digitizer Uses AC Bridge Technique
A = 5V/DIV
B = 1V/DIV
C = 2V/DIV
D = 20V/DIV
AN43 F30HORIZ = 20ms/DIV
Figure 30. Level Transducer Bridge Circuit’s Waveforms
Time Domain Bridge
Figure 31 is another AC-based bridge, but works in the time domain. This circuit is particularly applicable to capacitance measurement. Operation is straightforward. With S1 closed the comparators output is high. When S1 opens, capacitor CX charges. When CX’s potential crosses the voltage established by the bridge’s left side resistors the comparator trips low. The elapsed time between the switch opening and the comparator going low is proportion-ate to CX’s value. This circuit is insensitive to supply and
an43f
AN43-26

Application Note 43
15V
10k* 15V
1k –
+ LT1011
10k*
20k*
CX
OUTPUT
LTC201A
INPUT
AN43 F31
* = 1% FILM RESISTOR
Figure 31. Time Domain Bridge
repetition rate variations and can provide good accuracy if time constants are kept much larger than comparator and switch delays. For example, the LT1011’s delay is about 200ns and the LTC201A contributes 450ns. To ensure 1% accuracy the bridges right side time constant should not drop below 65μs. Extremely low values of capacitance may be influenced by switch charge injection. In such cases switching should be implemented by alternating the bridge drive between ground and +15.
Bridge Oscillator—Square Wave Output
Only an inattentive outlook could resist folding Figure 31’s bridge back upon itself to make an oscillator. Figure 32 does this, forming a bridge oscillator. This circuit will also be recognized as the classic op amp multivibrator. In this version the 10k to 20k bridge leg provides switching point hysteresis with CX charged via the remaining 10k resistor. When CX reaches the switching point the amplifier’s output changes state, abruptly reversing the sign of its positive input voltage. CX’s charging direction also reverses, and
AN43 F32
20k* –15V
* = 1% FILM RESISTOR
–
CX + LT1056
10k* 15V10k*
Figure 32. “Bridge Oscillator” (Good Old Op Amp Multivibrator with a Fancy Name)
oscillations continue. At frequencies that are low compared to amplifier delays output frequency is almost entirely dependent on the bridge components. Amplifier input errors tend to ratiometrically cancel, and supply shifts are similarly rejected. The duty cycle is influenced by output saturation and supply asymmetrys.
Quartz Stabilized Bridge Oscillator
Figure 33, generically similar to Figure 32, replaces one of the bridge arms with a resonant element. With the crystal removed the circuit is a familiar noninverting gain of 2 with a grounded input. Inserting the crystal closes a positive feedback path at the crystal’s resonant frequency. The amplifier output (Trace A, Figure 34) swings in an attempt to maintain input balance. Excessive circuit gain prevents linear operation, and oscillations commence as the amplifier repeatedly overshoots in its attempts to null the bridge. The crystal’s high Q is evident in the filtered waveform (Trace B) at the amplifiers positive input.
CRYSTAL 20kHz NT CUT
100Ω
100Ω AN43 F33100k
–
+ LT1056
Figure 33. Bridge-Based Crystal Oscillator
A = 10V/DIV
B = 5V/DIV
AN43 F34HORIZ = 20μs/DIV
Figure 34. Bridge-Based Crystal Oscillator’s Waveforms. Excessive Gain Causes Output Saturation Limiting
an43f
AN43-27

Application Note 43
Sine Wave Output Quartz Stabilized Bridge Oscillator
Figure 35 takes the previous circuit into the linear region to produce a sine wave output. It does this by continuously controlling the gain to maintain linear operation. This arrangement uses a classic technique first described by Meacham in 1938 (see References).
In any oscillator it is necessary to control the gain as well as the phase shift at the frequency of interest. If gain is too low, oscillation will not occur. Conversely, too much gain produces saturation limiting, as in Figure 33. Here, gain control comes from the positive temperature coefficient of the lamp. When power is applied, the lamp is at a low resistance value, gain is high and oscillation amplitude builds. As amplitude builds, the lamp current increases, heating occurs and its resistance goes up. This causes a reduction in amplifier gain and the circuit finds a stable operating point. The 15pF capacitor suppresses spurious oscillation.
CRYSTAL 20kHz NT CUT
100Ω
#327 LAMP
1VRMS OUT 20kHzAN43 F35100k
15pF
–
+ LT1056
OSCILLATOR
Figure 35. Figure 33 with Lamp Added for Gain Stabilization
CRYSTAL 20kHz NT CUT
100Ω 0.005
#327 LAMP
1VRMS OUT 20kHzAN43 F37100k
COMMON MODE SUPRESSION
15pF
–
+ 1/2 LT1057
–
+ 1/2 LT1057
OSCILLATOR
Figure 37. Common Mode Suppression for Quartz Oscillator Lowers Distortion
Operating waveforms appear in Figure 36. The amplifiers output (Trace A, Figure 36) is a sine wave, with about 1.5% distortion (Trace B). The relatively high distortion content is almost entirely due to the common mode swing seen by the amplifier. Op amp common mode rejection suffers at high frequency, producing output distortion. Figure 37 eliminates the common mode swing by using a second amplifier to force the bridge’s midpoint to virtual ground.3 It does this by measuring the midpoint value, comparing it to ground and controlling the formerly grounded end of the bridge to maintain its inputs at zero. Because the bridge drive is complementary the oscillator amplifier now sees no common mode swing, dramatically reducing distortion. Figure 38 shows less than 0.005% distortion (Trace B) in the output (Trace A) waveform. Note 3: Sharp-eyed readers will recognize this as an AC version of the DC common mode suppression technique introduced back in Figure 6.
A = 2V/DIV
B = 0.1V/DIV (1.5% DISTORTION)
AN43 F36HORIZ = 20μs/DIV
Figure 36. Lamp-Based Amplitude Stabilization Produces Sine Wave Output
A = 2V/DIV
B = 0.2V/DIV (0.005% DISTORTION)
AN43 F38HORIZ = 20μs/DIV
Figure 38. Distortion Measurements for Figure 37. Common Mode Suppression Permits 0.005% Distortion
an43f
AN43-28

Application Note 43
Wien Bridge-Based Oscillators
Crystals are not the only resonant elements that can be stabilized in a gain-controlled bridge. Figure 39 is a Wien bridge (see References) based oscillator. The configuration shown was originally developed for telephony applications. The circuit is a modern adaptation of one described by a Stanford University student, William R. Hewlett,4 in his 1939 masters thesis (see Appendix C, “The Wien Bridge and Mr. Hewlett”).
The Wien network provides phase shift governed by the equation listed, and the lamp regulates amplitude in accor-dance with Figure 35’s description. Figure 40 is a variable frequency version of the basic circuit. Output frequency range spans 20Hz to 20kHz in three decade ranges, with 0.25dB amplitude flatness. Note 4: History records that Hewlett and his friend David Packard made a number of these type oscillators. Then they built some other kinds of instruments.
430Ω
–
+ LT1037
6
2
3
1.6k
1.6k
#327 LAMP
0.1μF
0.1μF
AN43 F39
OUTPUT FREQUENCY = 1.000kHz FOR VALUES GIVEN
OUTPUT
1 2πRC
f =
Figure 39. Wien Bridge-Based Sine Wave Oscillator. Simple, Modern Version of an Old Circuit Has 0.0025% Distortion
100Ω
L1 #327
L2 TO L5 #1891
LOW FREQ (<50Hz) LOW DISTORTION MODE 430Ω
OUTPUT
0.82
NORMAL MODE –
+
0.082 0.0082
* = 1% FILM RESISTOR 10k DUAL POTENTIOMETER— MATCH TRACKING 0.1% MATCH ALL LIKE CAPACITOR VALUES 0.1%
0.82
953*
10k
953*
10k
AN43 F40
20Hz TO 200Hz 200Hz TO 2kHz 2kHz TO 20kHz
0.082 0.0082
LT1037
Figure 40. Multirange Wien Bridge-Based Oscillator. Multiple Lamps Provide Lowered Distortion at Low Frequencies
an43f
AN43-29

Application Note 43
The smooth, limiting nature of the lamp’s operation, in combination with its simplicity, gives good results. Trace A, Figure 41, shows circuit output at 10kHz. Harmonic distor-tion, shown in Trace B, is below 0.003%. The trace shows that most of the distortion is due to second harmonic content and some crossover disturbance is noticeable. The low resistance values in the Wien network and the 3.8nV√Hz noise specification of the LT1037 eliminate amplifier noise as an error term.
A = 10V/DIV
B = 0.01V/DIV (0.003% DISTORTION)
AN43 F41HORIZ = 20μs/DIV
Figure 41. Figure 40’s Distortion Characteristic at 10kHz
PERC
ENT DIST
ORTION
0.050
0.045
0.040
0.035
0.030
0.025
0.020
0.015
0.010
0.005
0
NORMAL MODE
LOW FREQ LOW DIST
UENCY
MO ORTION DE
0 20 200 2k 20k FREQUENCY (Hz)
AN43 F42
Figure 42. Figure 40’s Distortion vs Frequency
At low frequencies, the thermal time constant of the small normal mode lamp begins to introduce distortion levels above 0.01%. This is due to “hunting” as the oscillator’s frequency approaches the lamp thermal time constant. This effect can be eliminated, at the expense of reduced output amplitude and longer amplitude settling time, by switching to the low frequency, low distortion mode. The four large lamps give a longer thermal time constant and distortion is reduced. Figure 42 plots distortion versus frequency for the circuit.
Figure 43’s version replaces the lamp with an electronic amplitude stabilization loop. The LT1055 compares the oscillators positive output peaks with a DC reference. The diode in series with the LT1004 reference provides temperature compensation for the rectifier diode. The op amp biases Q1, controlling its channel resistance. This influences loop gain, which is reflected in oscillator output amplitude. Loop closure around the LT1055 occurs, sta-bilizing oscillator amplitude. The 15μF capacitor stabilizes the loop, with the 22k resistor settling its gain.
C1 C2
–
+
–
+
LT1115
LT1055
2k 0.047
200
5.6k2.4k
200Ω
2k
R1
R2
10pF 22k
4.7k
LT1004-1.2V
MOUNT 1N4148s IN CLOSE PROXIMITY
560Ω
10k
AN43 F43
Q1 2N4338
15μF
D
S
0.047
+
1VRMS OUTPUT 1.5kHz TO 15kHz
WHERE R1C1 = R2C2
1 2πRC
()=
15V
Figure 43. Replacing the Lamp with an Electronic Equivalent
an43f
AN43-30

Application Note 43
Distortion performance for this circuit is quite disappoint-ing. Figure 44 shows 0.15% 2f distortion (Trace B) in the output (Trace A), a huge increase over the lamp-based approach.5 This distortion does not correlate with the rectifier peaking residue present at Q1’s gate (Trace C). Where is the villain in this scheme?
A = 2V/DIV
B = 0.01V/DIV (0.15% DISTORTION)
C = 1V/DIV (AC-COUPLED)
AN43 F44HORIZ = 200μs/DIV
Figure 44. Figure 43 Produces Excessive Distortion Due to Q1’s Channel Resistance Modulation
The culprit turns out to be Q1. In a FET, gate voltage theo-retically sets channel resistance. In fact, channel voltage also slightly modulates channel resistance. In this circuit Q1’s channel sees large swings at the fundamental. This swing combines with the channel voltage-resistance modulation effect, producing distortion.
The cure for this difficulty is local feedback around Q1. Properly scaled, this feedback nicely cancels out the
C1
parasitic. Figure 45 shows the circuit redrawn with the inclusion of Q1’s local loop. The 20k trimmer allows ad-justment to optimize distortion performance. Figure 46 shows results. Distortion (Trace B) drops to 0.0018% and is composed of 2f, some gain loop rectification artifacts and noise. For reference the circuit’s output (Trace A) and the LT1055 output (Trace C) are shown.
Figure 47 eliminates the trim, provides increased voltage and current output, and slightly reduces distortion. Q1 is replaced with an optically driven CdS photocell. This device has no parasitic resistance modulation effects. The LT1055 has been replaced with a ground sensing op amp
Note 5: What else should be expected when trying to replace a single light bulb with a bunch of electronic components? I can hear Figure 39’s #327 lamp laughing.
A = 2V/DIV
B = 0.01V/DIV (0.0018% DISTORTION)
C = 1V/DIV (AC-COUPLED)
AN43 F46HORIZ = 200μs/DIV
Figure 46. Figure 45’s 0.0018% Distortion Characteristic
C2
–
+
–
+
LT1115
LT1055
2k 0.047
200
5.6k
100k
2.4k
200Ω
2k
R1
R2
10pF 22k
4.7k 15V
LT1004-1.2V
MOUNT 1N4148s IN CLOSE PROXIMITY
560Ω
10k
10k
20k TRIM FOR LOWEST DISTORTION
AN43 F45
Q1 2N4338
15pF
D
S
0.047
+
1VRMS OUTPUT 1.5kHz TO 15kHz
WHERE R1C1 = R2C2
1 2πRC
()=
Figure 45. Local Feedback Around Q1 Cures Channel Resistance Modulation, Reducing Distortion to 0.0018%
an43f
AN43-31

Application Note 43
C1
+
–
+
LT1006
1μF 10k* 14k*
AN43 F47
5V LT1029
MOUNT 1N4148s IN CLOSE PROXIMITY
+
10μF
10pF
120k
1k
5.6k
15V
–15V –15V
RBOOST 49.9Ω
2.4k
100
200* 2k
200*
OSCILLATOR FREQ SET
0.1μF FILM 2k
500 DISTORTION
TRIM
* = 1% FILM RESISTOR ** = VACTEC VTL5C10 OR CLAREX CLM410 LT1115, LT1010 = ±15V SUPPLY LT1006 = 15V SUPPLY
R2
4.7k
AGC LOOP
–
+ LT1115 LT1010
4
2 C2 0.1μF FILM
15V R1
**
20VP-P OUTPUT 1.5kHz TO 15kHz
–15V
Figure 47. Replacing Q1 with an Optically Driven CdS Photocell Eliminates Resistance Modulation Trim
running in single supply mode. This permits true integrator operation and eliminates any possibility of reverse biasing the (downsized) feedback capacitor. Additional feedback components aid step response.6 Distortion performance improves slightly to 0.0015%.
The last Wien bridge-based circuit borrows Figure 37’s common mode suppression technique (which is simply an AC version of Figure 6’s DC common mode suppres-sion loop) to reduce distortion to vanishingly small levels. The LT1022 amplifier appears in Figure 48. This amplifier forces the midpoint of the bridge to virtual ground by servo biasing the formerly grounded bridge legs. As in Figure 37, common mode swing is eliminated, reducing distortion. The circuit’s output (Trace A, Figure 49) contains less than 0.0003% (3ppm) distortion (Trace B), with no
visible correlation to gain loop ripple residue (Trace C). This level of distortion is below the uncertainty floor of most distortion analyzers, requiring specialized equipment for meaningful measurement. (See Appendix D, guest written by Bruce Hofer of Audio Precision, Inc., for a discussion on distortion measurement considerations.)
Diode Bridge-Based 2.5MHz Precision Rectifier/AC Voltmeter
A final circuit shows a way to achieve low AC error switching with diode bridge techniques. Diode bridges provide faster, cleaner signal switching than any other technique.
Note 6: A much better scheme for a low ripple, fast response gain control loop is nicely detailed in the operating and service manual supplied with the Hewlett-Packard HP339A Distortion Analyzer.
an43f
AN43-32

Application Note 43
C1
+
–
+
LT1006
–
+
LT1022
1μF 10k* 14k*
AN43 F48
5V LT1029
MOUNT 1N4148s IN CLOSE PROXIMITY
+
10μF
10pF
120k
1k
5.6k
RBOOST 49.9Ω
2.4k
100
200* 2k
200*
OSCILLATOR FREQ SET
0.1μF FILM 2k
500 DISTORTION
TRIM
* = 1% FILM RESISTOR ** = VACTEC VTL5C10 OR CLAREX CLM410 LT1022, LT1115, LT1010 = ±15V SUPPLY LT1006 = 15V SUPPLY
R2 COMMON MODE SUPPRESSION
4.7k
–
+ LT1115 LT1010
4
2 C2 0.1μF FILM
15V R1
**
AGC LOOP
20VPP OUTPUT 1.5kHz TO 15kHz
–15V
Figure 48. Adding Common Mode Suppression Lowers Distortion to 0.0003%
A = 2V/DIV
B = 1V/DIV (0.0009% DISTORTION) INDICATED—0.0003%
ACTUAL)
C = 0.1V/DIV (AC-COUPLED)
Figure 49. Figure 48’s 3ppm Distortion is Below the Noise Floor of Most Analyzers
Most precision rectifier circuits rely on operational am-plifiers to correct for diode drops. Although this scheme works well, bandwidth limitations usually restrict these circuits to operation below 100kHz. Figure 50 shows the LT1016 comparator in an open-loop, synchronous
AN43 F49HORIZ = 200μs/DIV
rectifier configuration which has high accuracy out to 2.5MHz. An input 1MHz sine wave (Trace A, Figure 51) is zero cross detected by C1. Both of C1’s outputs drive identical level shifters with fast (delay = 2ns to 3ns), ±5V outputs. These outputs bias a Schottky diode switching bridge (Traces B and C are the switched corners of the bridge). The input signal is fed to the left midsection of the bridge. Because C1 drives the bridge synchronously with the input signal, a half-wave rectified sine appears at the AC output (Trace D). The RMS value appears at the DC output. The Schottky bridge gives fast switching without charge pump-through. This is evident in Trace E, which is an expanded version of Trace D. The waveform is clean with the exception of very small disturbances where bridge switching occurs. To calibrate this circuit, apply a 1MHz to 2MHz 1VP-P sine wave and adjust the
an43f
AN43-33

Application Note 43
5V
0VRMS TO 1.5VRMS
DC OUTPUT 0VDC TO 1.5VDC
–
+ C1
LT1016
–
+ LT1012
100
2000pF
2k DELAY COMP
* = 1% FILM RESISTOR PNP = 2N2907A NPN = 2N2369
INPUT
820pF
820 820
4.7k 430 180
180
750
750
2k
4k*
2k GAIN TRIM
AN43 F50
1
100k
9.1k*
AC OUTPUT
–5V
500 SKEW COMP
0.1
1N4148
820pF= HP5082-2810
820 820
4.7k 430
5V
–5V
500 SKEW COMP
0.1
Figure 50. Fast, Bridge-Switched Synchronous Rectifier-Based AC/DC Converter
A = 5V/DIV
B = 10V/DIV
C = 10V/DIV
D = 2V/DIV
E = 1V/DIV
E HORIZONTAL = 50ns/DIV (UNCALIBRATED)
Figure 51. Fast AC/DC Converter Operating at 1MHz. Clean Switching is Due to Bridge Symmetry and Compensations for Delay and Switching Skew
A, B, C, D HORIZONTAL = 500ns/DIV AN43 F51
delay compensation so bridge switching occurs when the sine crosses zero. The adjustment corrects for the small delays through the LT1016 and the level shifters. Next, adjust the skew compensation potentiometers for minimum aberrations in the AC output signal. These trims slightly shift the phase of the rising output edge of their respective level shifter. This allows skew in the complementary bridge drive signals to be kept within 1ns to 2ns, minimizing output disturbances when switching occurs. A 100mV sine input will produce a clean output with a DC output accuracy of better than 0.25%.
Note: This application note was derived from a manuscript originally prepared for publication in EDN magazine.
an43f
AN43-34

Application Note 43
REFERENCES
1. Sheingold, D.H., “Transducer Interfacing Handbook,” Analog Devices Inc., 1980
2. Arthur, K., “Transducer Measurements,” Tektronix Inc., Concept Series, 1971
3. Parry, C.H., “Diseases of the Heart,” Vol. 2, London, Underwoods, p. 111, 1825
4. Gordon, J.W., “On Certain Motor Movements of the Human Body Produced by the Circulation,” J. Anatomy Physiology, 11:553-559, 1877
5. Starr, I. and Noordegraff. A., “Ballistocardiography in Cardiovascular Research,” Lippincott, 1967
6. Weissler, A.M., “Non-Invasive Cardiology,” Grune and Stratton, 1974
7. Meade, M.L., “Lock-In Amplifiers and Applications,” London: P. Peregrinus, Ltd.
8. Wien, Max, “Measung der induction constanten mit dern Optischen Telephon, “ Ann. der Phys., Vol. 44, 1891, p. 704-7
9. Meacham, L.A., “The Bridge Stabilized Oscillator,” Bell System Technical Journal, Vol. 17, p. 574, Oct. 1938
10. Hewlett, William R., “A New Type Resistance-Capacity Oscillator,” M.S. Thesis, Stanford University, Palo Alto, California 1939
11. Hewlett, William R., U.S. Patent No. 2,768,872, Jan. 6, 1942
12. Bauer, Brunton, “Design Notes on the Resistance-Capacity Oscillator Circuit,” Parts I and II, Hewlett-Packard Journal, Nov., Dec., 1949. Hewlett-Packard Company
13. Williams, Jim, “Thermal Techniques in Measurement and Control Circuitry,” Linear Technology Corporation Application Note 5, Linear Technology Corporation, Milpitas, California 1984
14. Mattheys, R.L., “Crystal Oscillator Circuits,” Wiley, New York, 1983
15. Hewlett-Packard, “Schottky Diodes for High-Volume, Low Cost Applications,” Application Note 942, Hewlett-Packard Company, 1973
16. Tektronix, Inc., “Type 1S1 Sampling Plug-In Operating and Service Manual,” Tektronix, Inc., 1965
17. Mulvey, J., “Sampling Oscilloscope Circuits,” Tektronix, Inc., Concept Series, 1970
18. Hill, W. and Horowitz, P., “The Art of Electronics,” Cambridge University Press, Cambridge, England 1989
19. Bowers, B., “Sir Charles Wheatstone,” Science Museum, London, England 1975
20. Nahin, Paul J., “Oliver Heaviside: Sage in Solitude,” IEEE Press, 1988
21. Wilkinson, D.H., “A Stable Ninety-Nine Channel Pulse Amplitude Analyser for Slow Counting,” Proceedings of the Cambridge Philosophical Society, Cambridge England, 46,508. 1950
an43f
AN43-35

Application Note 43
APPENDIX A
STRAIN GAUGE BRIDGES
In 1856 Lord Kelvin discovered that applying strain to a wire shifted its resistance. This effect is repeatable, and is the basis for electrical output strain measurement. Early devices were simply wires suspended between two insulated points (Figure A1). The force to be measured mechanically biased the wire, changing its resistance. Modern devices utilize foil-based designs. The conductive material is deposited on an insulated carrier (Figure A2). Physically they take many forms, allowing for a variety of applications. The gages1 are usually configured in a bridge and mounted on a beam (Figure A3), forming a transducer.
MECHANICAL FORCE
TAUT WIRE
INSULATING POSTS AN43 FA1
Figure A1. A Very Basic Strain Gage
A useful transducer must be trimmed for zero and gain, and compensated for temperature sensitivity. Figure A4 shows a typical arrangement. Zero is set with a parallel trim, with similar treatment used to set gain. The gain trims include modulus gages to compensate beam material temperature sensitivity. Arranging these trims and completing the mechanical integration involves a fair amount of artistry, and is usually best left to specialists.2
Note 1: The correct spelling is gauge, but prolonged grammatical assaults have assassinated the “u.” Hence, “gage” assumes a claim to legitimacy. Note 2: Those finding their sense of engineering prowess unalterably offended are referred to “SR-4 Strain Gage Handbook,” available from BLH Electronics, Canton, Massachusetts. Have fun.
X
ACTUAL SIZE AN43 FA2
Y
Figure A2. A Conceptual Strain Gage. Maximum Device Sensitivity is with Y-Axis Flexing Into the Page. Practical Devices Utilize Denser Patterns with Optimized Distribution of Conductive Material
+EXCITATION
–EXCITATION
ZERO TRIM
AN43 FA4
GAIN TRIM/ MODULUS GAGE
GAIN TRIM/ MODULUS GAGE
Figure A3. A Conceptual Strain Gage Transducer. Bending Force On the Beam Causes Resistance Shifts
BEAM
GAGES
BEAM FIXED HERE
GAGES
AN43 FA3
OUTPUT
Figure A4. Simplified Strain Gage Transducer Schematic
an43f
AN43-36

Application Note 43
Semiconductor-based strain gage transducers utilize re-sistive shift in semiconducting materials. These devices, built in monolithic IC form, are considerably less expensive than manually assembled foil-based strain gage transduc-ers. They have over ten times the sensitivity of foil-based devices, but are more sensitive to temperature and other effects. As such, they are best suited to somewhat less demanding applications than foil-based gages. Their monolithic construction and small size offer price and convenience advantages in many applications. Electri-cal form is similar to foil-based designs (e.g., a bridge configuration), although impedance levels are about ten times higher. The following guest written section details their characteristics.
SEMICONDUCTOR BASED STRAIN GAGES
Daniel A. Artusi Randy K. Frank Motorola Semiconductor Products Sector Discrete and Special Technologies Group
Strain gage technology, while based on a phenomena which dates back to the nineteenth century, has been of major importance in the areas of stress analysis, structural testing and transducer fabrication for more than 40 years.
First reports on semiconductor piezoresistive technology dates back to the observation by C.S. Smith3 in the early 1950’s of large piezoresistive coefficients in Silicon and Germanium.
There are several advantages to implementing strain gages using semiconductor technology. The immediate one is the very high gage factors of approximately two orders of magnitude higher than metallic gages. These higher gage factors allow improved signal-to-noise ratios for the measurement of small dynamic stresses and simplifies the signal conditioning circuitry.
Another advantage is the precise control of the piezore-sistive coefficients including magnitude, sign, and the possibility of transverse and shear responses. Additional advantages are low cost, small size, and compatibility with semiconductor processing technology which allows for integration of additional circuit elements (i.e., operational
amplifiers) on the same chip. The first phase of integration for silicon pressure sensors occurred when the strain gage and the diaphragm were combined into one monolithic structure. This was accomplished using the piezoresistive effect in semiconductors. A strain gage can be diffused or ion-implanted into a thin silicon diaphragm which has been chemically etched into a silicon substrate.
Piezoresistivity
In order to understand the implementation in silicon of strain gages, it is necessary to review the piezoresistive effect in silicon.
The analytic description of the piezoresistive effect in cubic silicon can be reduced to two equations which demonstrate the first order effects.
ΔE1 = PO I1(π11X1 + π12X2) (1)
ΔE2 = PO I2π44X6 (2)
where ΔE1 and ΔE2 are electric field flux density, PO is the unstressed bulk resistivity of silicon, Is are the excitation current density, πs are piezoresistive coefficients and Xs are stress tensors due to the applied force.
The effect described by equation (1) is that utilized in a pressure transducer of the Wheatstone bridge type. Regardless of whether the designer chooses N-type or P-type layers for the diffused sensing element, the piezoresistive coefficients π11 and π12 equation (1) will be oppose in sign.
This implies that through careful placement, and orienta-tion with respect to the crystallographic axis, as well as a sufficiently large aspect ratio for the resistors themselves, it is possible to fabricate resistors on the same diaphragm which both increase and decrease respectively from their nominal values with the application of stress.
The effect described by equation (2) is typically neglected as a parasitic in the design of a Wheatstone bridge device. A closer look at its form, however, reveals that the incremental electrical field flux density, ΔE2, due to the applied stress, X6, is monotonically increasing for increasing X6.
Note 3: Smith C.S., “Piezoresistance Effect in Germanium and Silicon,” Physical Review, Volume 94, November 1, 1954 Pages 42-49.
an43f
AN43-37

Application Note 43
In fact, equation (2) predicts an extremely linear output since it depends on only one piezoresistive coefficient and one applied stress. Furthermore, the incremental electric field can be measured by a single stress sensitive element. This forms the theoretical basis for the design of the transverse voltage or shear stress piezoresistive strain gage.
Shear Stress Strain Gage
Figure A5 shows the construction of a device which optimizes the piezoresistive effect of equation (2).4 The diaphragm is anisotropically etched from a silicon sub-strate. The piezoresistive element is a single, 4-terminal strain gage that is located at the midpoint of the edge of the square diaphragm at an angle of 45 degrees as shown in Figure A5. The orientation of 45 degrees and location at the center of the edge of the diaphragm maximizes the sensitivity to shear stress, X6, and the shear stress being sensed by the transducer by maximizing the piezoresistive coefficient, π44.
Excitation current is passed longitudinally through the resistor (Pins 1 and 3) and the pressure that stresses
ACTIVE
ETCHED DIAPHRAGM
BOUNDARY
TRANSVERSE VOLTAGE
STRAIN GAUGE
VOUT+ +
NORMAL STRESS FORCE ONTO DIE
ELEMENT
VOLTAGE TAPS
S–
S+
VOUT –
VSUPPLY
AN43 FA5
the diaphragm is applied at a right angle to the current flow. The stress establishes a transverse electric field in the resistor that is sensed as an output voltage at Pins 2 and 4, which are the taps located at the midpoint of the resistor. The single element shear-stress strain gage can be viewed as the mechanical analog of a Hall effect device. Figure A6 shows a cross section of a pressure transducer implemented in silicon and using the technique described. A differential pressure sensor chip is accomplished by opening the back side of the wafer.
Temperature Compensation and Calibration
The transverse voltage shear stress piezoresistive pressure transducer has been shown to present certain advantages over the Wheatstone bridge configuration. Specifically, im-proved linearity, and a more consistent reproducible offset (since it is defined by a single photolithographic step), as well as the added advantage of integrating stresses over a smaller percentage of the flexural element.
Very predictably, the transducer exhibits a negative temperature coefficient of span with a nominal value of 0.19%/°C, as well as a temperature coefficient of offset that can be in the range of ±15μV/°C or slightly larger before compensation. TC of span is due to the decrease of the piezoresistive coefficients with temperature due to increased thermal scattering in the lattice structure. Note 4: J.E. Gragg, U.S. Patent 4,317,126
THERMAL OXIDE DIFFUSED PASSIVATION STRAIN GAUGE METALLIZATION
SILICON WAFER
SILICON CONSTRAINT WAFER
OPTIONAL PRESSURE PORT FOR DIFFERENTIAL SENSORS
ETCHED DIAPHRAGM (±0.0001" TYP)
ENHANCEMENT DIFFUSION
GLASS FRIT SEAL
AN43 FA6
Figure A5. Basic Sensor Element—Top View Figure A6. Cross Section of Pressure Transducer
an43f
AN43-38

Application Note 43
First let’s consider the relationship of output voltage, ΔVO, with excitation voltage, VEX, as predicted by equa-tion (2).
ΔVO = w/I (π44X6) VEX (3)
It is apparent that the output voltage varies directly with excitation, by a factor w/I(π44X6), or conversely that the output is ratiometric to the excitation, VEX.
A typical output characteristic for an uncompensated transducer with a constant VEX applied is shown in Figure A7. Hence, it is apparent that by increasing the supply voltage at the same rate that the full-scale span is decreasing, the undesired temperature dependence of span may be eliminated. This is accomplished by means of a very low TCR resistor placed in series with the transducer excitation legs which, by design, have a TCR of 0.24%/°C (Figure A8). If the value of the zero-TCR span resistor is appropriately chosen, it will decrease the “net” TCR of the combination to the ideal +0.19%/°C required to exactly compensate the negative TC of SPAN. This technique is known as “self-compensation,” and can be utilized in the described manner or with a constant current excitation and a parallel TC span compensation resistor.
The passive circuit utilized to achieve calibration and temperature compensation is shown in Figure A8. Since the single element design uses only one resistor for both the input and the output, a self-compensation scheme can be employed. This technique utilizes the temperature
OUTPUT VS PRESSURE DIFFERENTIAL
OFFSET
SPAN
5 10
“PIVOT POINT”
15PRESSURE (PSI)
(TYPICAL)
125°C
25°C
–40°C
MEASURED AT 3VDC EXCITATION 70
60
50
40
30
20
10
0
OUTP
UT (m
V DC)
0 20 40 60 80 100 120 PRESSURE (KPA) AN43 FA7
Figure A7. Output Span for Uncompensated Transducer
coefficient of the input resistance (TCR) to generate a temperature dependent voltage. The TCR of the strain gage has been specifically designed to be greater in ab-solute value than the temperature coefficient of the span, so placing additional passive resistive elements in series with the strain gage modifies the effective TCR and allows temperature compensation based on the input resistance value at room temperature. A constant voltage source is all that is necessary external to the device to ensure accurate operation over a wide temperature range.
The self-compensation technique eliminates the require-ment for thermistors which are used in most externally compensated Wheatstone bridge pressure sensors. In addition to the cost and nonlinearity characteristics of thermistors, their negative temperature coefficient pre-cludes their integration on silicon. Thin film resistors, on the other hand, are easily deposited on the strain gage substrate using techniques similar to those required for the metallization of wire bond pads used to make con-nection to external leads. The laser trimming technique is similar to that used in the manufacturing of high accuracy, monolithic, 16-bit analog-to-digital and digital-to-analog data converters, except that in the case of a pressure transducer, the silicon diaphragm is exercised over the pressure range during the trimming procedure.
+VS
+VOUT
RP*
–VOUT
INPUT RESISTANCE = RX RTCOFF1* PIN 2
PIN 1
PIN 3
RS2*
RS1*
GND
ROFF1*
RTCOFF2*
AN43 FA8
PIN 4
THERMISTOR
*LASER-TRIMMED ON CHIP
Figure A8. On-Chip Temperature Compensation and Calibration
an43f
AN43-39

Application Note 43
Four separate functions are accomplished by the laser trimming operation:
1) Zero calibration
2) Zero temperature compensation
3) Full-scale span temperature compensation
4) Full-scale span calibration
The sequence in which the trimming operation is performed is important to avoid interaction of components and the addition of several iterations to the trimming process. The main factor that allows high volume manufacturing techniques, however, is the ability to achieve temperature compensation in the single element sensor without the necessity to change the temperature during the trim opera-tion. Measurements of the sensor parameters are made prior to the laser trim operation. Computer calculations determine which resistors must be trimmed and the amount of trimming required. Resistor ROFF1 and ROFF2 act as a part of a voltage divider used to calibrate the offset. The output voltage is set to zero with zero pressure applied by trimming either offset resistor ROFF1 or ROFF2.
To temperature compensate the offset, thermistors RTCOFF1 and RTCOFF2, a series of diffused silicon resistors with positive temperature coefficient and different values, are added as required to the circuit by cutting aluminum shorting links.
Full-scale span temperature compensation is accomplished by utilizing self temperature compensation—the addition of a single, series resistor to the input circuit when a constant voltage supply is used. The resistor is adjusted to compensate for changes in span with temperature by adjusting the magnitude of the excitation voltage applied to the active element. In order to minimize common mode errors, the “resistor” is actually split between the supply and ground side of the input so that RS1 = RS2. The span is adjusted to meet the specification by trimming resistor RP, which is in parallel with the input resistance of the active element. The parallel resistor actually interacts with the series self-compensation network to provide a series-parallel temperature compensation which enhances the performance over the temperature range.
Performance of Compensated Sensors
The specification for key parameters of a 30PSI on-chip temperature compensated pressure sensor is shown in Figure A9. The excellent linearity is a result of the small active area of the single element strain gage—essentially a point condition. The temperature compensation which is achieved over 0°C to 85°C can be compared to commonly available alternatives.
PARAMETER
Pressure Range (in kPA)
Full-Scale Span (in mV)
Zero Pressure Offset (in mV)
Sensitivity (mV/PSI)
Linearity (% FS)
MIN TYP MAX
— — 100
38.5 40 41.5
— +0.05 +1.0
— 1.38 —
— +0.1 +0.25
TEMPERATURE EFFECT FOR 0°C TO 85°C
Full-Scale Span (% FS) — +0.5 +1.0
Offset (in mV) — +0.5 +1.0
Figure A9. Specifications for a Typical Pressure Transducer
an43f
AN43-40

Application Note 43
APPENDIX B
BRIDGE READOUT—THEN AND NOW
The contemporary monolithic components used to read bridge signals are the beneficiaries of almost 150 years of dedicated work in bridge readout mechanisms. Some early schemes made fiendishly ingenious use of available technology to achieve remarkable performance. Figure B1 shows a light beam galvanometer. This device easily re-solved currents in the nanoampere range. The unknown current passed through a coil, producing a magnetic field. The coil is mounted within a static magnetic field. The two field’s interactions mechanically biased a small mirror, which was centrally mounted on a tautly suspended wire. The mirror may be thought of as the elastically constrained shaft of a DC motor. The amplitude and sign of the coil current produced corresponding torque—like mirror movements. A collimated light source was bounced off the mirror, and its reflection collected on a surface equipped with calibrated markings. The instruments high inherent sensitivity, combined with the gain in the optical angle, provided excellent results.
The tangent galvanometer (Figure B2) achieved similar nanoampere resolution. The actual meter movement was a compass, centrally mounted within a circular coil. Coil
current is measured by noting compass deflection from the earths magnetic north. Current flow is proportional to the tangent of the measured deflection angle.
These and similar devices were referred to as “null detec-tors.” This nomenclature was well chosen, and reflected the fact that bridges were almost always read at null. This was so because the only technology available to accurately digitize electrical measurements was passive. “Bridge balances,” including variable resistors, resistance decade boxes and Kelvin-Varley dividers, were cornerstones of absolute measurements. No source of stable, calibrated gain was available; although the null detectors provided high sensitivity. As such, bridge measurement depended on highly accurate balancing technology and sensitive null detectors.
Lee DeForest’s triode (1908) began the era of electronic gain. Harold S. Black attempted to patent negative feed-back in 1928, but the U.S. Patent Office, in their govern-mental wisdom, treated him as a crackpot. Black published in the 1930s, and the notion of feedback stabilized gain was immediately utilized by more enlightened types.
Figure B2. A Tangent Galvanometer Measures Small Currents Figure B1. The Light Beam Galvanometer is Essentially a by Indicating the Interaction Between Applied Current and the Sensitive Meter Movement. It Takes Gain in the Optical Angle of Earth’s Magnetic Field. Absolute Current Value is Proportional to a Mirror Reflected, Collimated Light Source (Courtesy the J. M. the Tangent of the Compass Deflection Angle (Courtesy the J. M. Williams Collection) Williams Collection)
an43f
AN43-41

Application Note 43
The technology of the day did not permit development of feedback-based amplifiers which could challenge conventional bridge techniques. While Hewlett could use feedback to build a dandy sinewave oscillator, it simply was not good enough to replace Kelvin-Varley dividers and null detectors. Doing so required amplifiers with very high open-loop gains and low zero drift. The second requirement was notably difficult and elusive.
E.A. Goldberg invented the chopper-stabilized amplifier in 1948, finally making stable zero performance practi-cal. Electronic analog computers quickly followed, and historic George A. Philbrick Researches produced the first commercially available general purpose op amps in the 1950s.
Null detectors were the first bridge components to feel the impact of all this. A number of notable chopper-stabilized bridge null detectors were produced during the 1950s and 1960s. All of these were essentially chopper-based operational amplifiers configured as complete instruments. Notable among these was the Julie Research Laborato-ries sub-microvolt sensitivity ND-103, which featured a 93Hz mechanical chopper (to avoid any interaction with 60Hz noise components). The Hewlett-Packard HP-425 had similar sensitivity, and used a small synchronous clock motor, photocells and incandescent lamps1 in an elegantly simple photo-chopping scheme. Latter versions of this instrument (the HP-419A) were completely solid
state, although retaining a neon lamp-photocell chopping arrangement. Battery operation permitted floating the instrument across the bridge.
Concurrent to all this was the development of rackmount-ing-based devices called “instrumentation amplifiers.” These devices, designed to be applied at the system level, featured settable gain and bandwidth, differential inputs, and good zero point stability. Some were chopper stabilized while others utilized transistorized differential connections. Sold by a number of concerns, they were quite popular for transducer signal conditioning. These devices were the forerunners of modern IC instrumentation amplifiers. Their ability to supply low errors at zero and stable gain made accurate off-null bridge measurement possible.
The development of analog-digital converters during the 1960s2 provided the last ingredient necessary for practi-cal digitized output off-null bridge measurement. It had required over 100 years of technological progress to replace the null detectors and bridge balances. This is something to think about when soldering in IC instrumentation amps and A/D converters. What Lord Kelvin would have given for a single mini-DIP! Note 1: The Hewlett-Packard Company and light bulbs have had a long and successful association. Note 2: The first fully electronic analog-digital converter was developed by D.H. Wilkinson in 1949 (see References). The first analog-digital converters available as standard product were probably those produced by Pastoriza Electronics in the late 1960s.
an43f
AN43-42

Application Note 43
APPENDIX C
THE WIEN BRIDGE AND MR. HEWLETT
The Wien bridge is easily the most popular basis for constructing sinewave oscillators. Circuits constructed around the Wien network offer wide dynamic range, ease of tuning, amplitude stability, low distortion and simplicity. Wien described his network (Figure C1) in 1891. Unfortu-nately, he had no source of electronic gain available, and couldn’t have made it oscillate even if he wanted to. Wien developed the network for AC bridge measurement, and went off and used it for that.
Forty-eight years later William R. Hewlett combined Wien’s network with controlled electronic gain in his masters thesis. The results were the now familiar “Wien bridge oscillator” architecture and the Hewlett-Packard Company. Hewlett’s circuit (Figure C2) utilized the relatively new tools of feedback theory (see References) to support stable oscil-lation. Two loops were required. A positive feedback loop
1f = 2πRC
AN43 FC1
Figure C1. Wiens Network
from the amplifier’s output (6F6 plate) back to its positive input (6J7 first grid) via the Wien bridge provided oscil-lation. Oscillation amplitude was stabilized by a second, negative, feedback loop. This loop was closed from the output (again, the 6F6 plate) back to the amplifiers negative input (the 6J7 cathode). The now famous lamp supplied a slight positive temperature coefficient to maintain gain at the proper value. For reference in interpreting the vacuum tube1 configuration, a modern version (text Figure 39) of Hewlett’s circuit appears as an insert.
Contemporary oscillators usually replace the lamps action with electronic equivalents to control loop settling time (see text). Note 1: For those tender in years, “vacuum tubes” are thermionically activated FETs, descended from Lee DeForest.
430Ω
0.1μF
#327 LAMP
1.6k
1.6k
–
+ LT1037
0.1μF
AN43 FC2
Figure C2. A Copy of Hewletts Thesis “Figure 3” Showing His Original Circuit. Modern Version Shown for Reference (Hewlett’s Figure Courtesy Stanford University Archives)
an43f
AN43-43

Application Note 43
APPENDIX D
UNDERSTANDING DISTORTION MEASUREMENTS
Bruce E. Hofer Audio Precision, Inc.
Introduction
Analog signal distortion is unavoidable in the real world. It can be defined as any effect or process that causes the signal to deviate from ideal. Because “distortion” means significantly different things to different people let us distinguish between two general categories based upon frequency domain effect.
A linear distortion changes the amplitude and phase relationship between the existing spectral components of a signal without adding new ones. Frequency and phase response errors are the most common examples. Both can cause significant alteration of the time domain waveform.
A nonlinear distortion adds frequency components to the signal that were never there, nor should be to begin with. Nonlinear distortion alters both the time and frequency domain representations of a signal. Noise can be considered a form of nonlinear distortion in some applications.
Nonlinear distortion is generally considered to be more serious than linear distortion because it is impossible to determine if a specific frequency component in the output signal was present in the input. This brief discussion will focus on the measurement and meaning of nonlinear distortion only. The word “distortion” shall hereinafter be used accordingly.
Measures of Distortion
One of the best and oldest methods of quantifying distor-tion is to excite a circuit or system with a relatively pure sinewave and analyze the output for the presence of signal components at frequencies other than the input sinewave. The sinewave is an ideal test signal for measuring nonlinear distortion because it is virtually immune to linear forms of distortions. With the exception of a perfectly tuned notch filter, the output of any linear distortion process will still be a sinewave!
“N-th” harmonic distortion is defined as the amplitude of any output signal at exactly N times the sinewave fundamental frequency. If the input sinewave is 400Hz any second harmonic distortion will show up at 800Hz, third harmonic at 1200Hz, etc. Spectrum analyzers, wave analyzers, and FFT analyzers are the typical instruments used to measure harmonic distortion. These instruments function by acting as highly selective voltmeters measur-ing the signal amplitude over a very narrow bandwidth centered at a specific frequency.
“THD” or Total Harmonic Distortion is defined as the RMS summation of the amplitudes of all possible harmonics, although it is often simplified to include only the second through the fifth (or somewhat higher) harmonics. The assumption that higher order harmonic content is insig-nificant in the computation of THD can be quite invalid. The sinewave distortion of many function generators is usually dominated by high order harmonic products with only relatively small amounts of products below the fifth harmonic. The crossover distortion characteristic of class AB and B amplifiers can often exhibit significantly high harmonic content above the fifth order.
A far better definition of THD is to include all harmonics up to some prescribed frequency limit. Usually the specific ap-plication will suggest a relevant upper harmonic frequency limit. In audio circuits a justifiable upper frequency limit might be 20kHz to 25kHz because few people can perceive signals above that range. In practice it has proven desirable to use a somewhat higher limit (typically 80kHz) because nonlinear distortion products above 20kHz can provoke intermodulation problems in subsequent audio stages. In the world of FM and TV broadcast measurements it is common practice to use a 30kHz bandwidth limit even though the signals are inherently limited to 15kHz.
an43f
AN43-44

Application Note 43
“THD+N” or Total Harmonic Distortion plus Noise is defined as the RMS summation of all signal components, excluding the fundamental, over some prescribed bandwidth. Distor-tion analyzers perform this measurement by removing the fundamental sinewave with a notch filter and measuring the leftover signal. Unfortunately some popular analyzers have excessive measurement bandwidth (>1MHz) with no provision for limiting. For the vast majority of applications a measurement bandwidth of >500kHz serves little purpose other than to increase noise contribution and sensitivity to AM radio stations. Today’s better distortion analyzers offer a selection of measurement bandwidths typically including 20kHz to 22kHz, 30kHz, 80kHz, and wideband (300kHz to 500kHz).
At first glance it might appear that THD+N measure-ments are inferior to THD only measurements because of the sensitivity to wideband noise. Even with their noise contribution today’s distortion analyzers offer the lowest residual distortion, hence the most accuracy in making ultralow distortion measurements. The typical residual contribution of spectrum analyzers is usually limited by their internal mixer stages to about 0.003% (–90dB). FFT analyzers do not fare much better due to A/D converter nonlinearities. The very best 16-bit converters available today do not guarantee residual distortion below about 0.002% although future developments promise to improve this situation. Distortion analyzers offer the lowest residual performance with at least one manufacturer claiming 0.0001% (typical).
“IMD” or InterModulation Distortion is yet another tech-nique for quantifying nonlinearity. It is a much more spe-cialized form of testing requiring a multi-tone test signal. IMD tests can be more sensitive than THD or THD+N tests because the specific test frequencies, ratios, and analyzer measurement technique can be chosen to optimize re-sponse to only certain forms of nonlinearity. Unfortunately this is also one of the biggest disadvantages of IMD testing because there are so many tests that have been suggested: SMPTE, CCIF, TIM, DIM, MTM, to name a few.
Distortion Measurement Accuracy
Nonlinear distortion is not a traceable characteristic in the sense that an unbroken chain of comparisons can be made to a truly distortion-less standard. Such a standard does not exist! Real world distortion measurements will always include the non-zero contributions from both the sinewave source and the analyzer.
It is a truly challenging task to accurately measure dis-tortion below about 0.01% (–80dB). Indeed, distortion measurement errors can become quite large near residual levels. Harmonic contributions from the original sinewave and the analyzer can add algebraically, vectorially, or even cancel depending upon their relative phase. There are no general assumptions that can be made regarding how two residual contributions will add or subtract.
In the following equation let “M” be the measured value of the N-th harmonic, let “X” be the magnitude of the distortion contributed by the analyzer, and let “D” be the true distortion magnitude of some signal. The measured distortion will be influenced by the residual analyzer contribution:
M • sin(2πNft+φ) = D • sin(2πNft) + X • sin(2πNft+θ)
⎧(D + X) if θ = 0° ⎪ 1/2 ⎪M = ⎨(D2 + X2 ) if θ = ±90° (4) ⎪ ⎪(D– X) if θ = 180° ⎩
Depending upon the relative phase between the distortion components (θ) a true distortion factor (D) of 0.0040% could be read as anything between 0.0025% to 0.0055% if the analyzer’s internal distortion contribution (X) was 0.0015%. Conversely a 0.0040% reading could have resulted from a true distortion factor of anything from 0.0025% to 0.0055% with the same 0.0015% analyzer contribution.
It is very important to understand this concept when mak-ing distortion readings near the specified residual levels of the test equipment. A lower reading may not always signify lower distortion. A low reading could be the result of a fortuitous cancellation of two larger contributions. It is also illogical to conclude that the true value of distor-tion is always less than the reading because the non-zero residual contributions of the analyzer and sinewave. The
an43f
AN43-45

Application Note 43
service manual of one test equipment manufacturer incred-ibly states that a 0.0040% reading verifies their residual distortion guarantee of 0.0020% for both oscillator and analyzer!
All of the distortion measurement techniques give 0.5dB to 1.0dB (5% to 10%) reading accuracies at higher read-ing levels. Some distortion analyzers additionally provide average versus true RMS detection. Average detection is a carryover from the past and should be avoided because it will give erroneously low readings when multiple harmon-ics are present.
The Ultimate Meaning of THD and THD+N Measurements
Both THD and THD+N are measures of signal impurity. Distortion analyzers measure THD+N, not THD. Spectrum, wave, and FFT analyzers measure individual harmonic distortion from which THD can be calculated, but not THD+N. Is one better than the other?
For most applications THD+N is the more meaningful measurement because it quantifies total signal impurity. Particularly as we enter the age of A/D and D/A based
systems (for example, digital audio) the engineer is increasingly confronted with effects and imperfections that introduce non-harmonic components to a signal. Wideband noise itself can be viewed as an imperfec-tion to be minimized. It is truly myopic to exclude other potentially serious and undesirable signal components in the determination of signal quality just because they do not happen to be a harmonic of the test signal. Why should a 60Hz component be acceptable in the calculation of 20Hz THD but be excluded when testing with a 1kHz fundamental?
On the other hand THD measurements are distinctly better than THD+N measurements if the application is to quantify a simple transfer function nonlinearity. Noise, hum, and other interference products are not introduced by these simple forms of nonlinearity and should not influence the measurement. Examples include the distortion due to component voltage coefficient effects and non-ohmic contact behavior.
Given that all real signals contain some distortion, how much THD or THD+N is acceptable? Only the designer can make that determination.
APPENDIX E
SOME PRACTICAL CONSIDERATIONS FOR BRIDGE INTERFACES
It is often desirable to route bridge outputs over con-siderable cable lengths. Cable driving should always be approached with caution. Even shielded cables are sus-ceptible to noise pick-up, and input protection is often in order. Figure E1 shows some options. Simple RC filters often suffice for filtering. The upper limit on resistor value is set by amplifier bias current. FET input amplifiers allow large values, useful for minimizing capacitance size and input protection. Leakage eliminates electrolytic capacitors as candidates, and the largest practical non-electrolytic devices are about 1μF. Often, a single capacitor (dashed lines) is all that is required. Diode clamps prevent high
voltage spikes or faults (common in industrial environ-ments) from damaging the amplifier. Figure E2 summarizes some clamp alternatives.
–
+CABLE
AN43 FE1
Figure E1. RC Filter Alternatives
an43f
AN43-46

Application Note 43
LEAKAGE FORWARD AT 25°C
CLAMP TYPE DROP (15V REVERSE)
1N4148
≈0.6V ≈10–9A
HP5082-2810
≈400mV ≈10–7A
2N2222 ≈0.6V ≈10–11A
2N4393
Figure E2. Various Devices Offer Different Clamp Characteristics
Figure E3 shows a high order switched-capacitor based filter. The LTC1062 has no DC error, and offers much bet-ter roll-off characteristics than the simple RC types. LTC Application Note 20, “Application Considerations for an Instrumentation Lowpass Filter,” presents details.
Figure E4 shows a pre-amplifier used ahead of the remotely located instrumentation amplifier. The pre-amp raises cable signal level while lowering drive impedance. The asym-metrical bridge loading should be evaluated when using this circuit. Usually, the amplifiers input resistor can be made large enough to minimize its effect.
7
6
5
1
4
LTC1062 DC ACCURATE
FILTER +V
CLOCK
7
6
5
1
4
LTC1062 DC ACCURATE
FILTER +V
CLOCK
–
+
AN43 FE3
Figure E3. Switched-Capacitor Techniques Permit a DC Accurate 5th Order Lowpass Filter
+V
CABLE
AN43 FE4
–
+ –
+
OUTPUT
Figure E4. Pre-Amplifer Provides Gain and Low Impedance Drive to Cable
an43f
Information furnished by Linear Technology Corporation is believed to be accurate and reliable. However, no responsibility is assumed for its use. Linear Technology Corporation makes no representa-tion that the interconnection of its circuits as described herein will not infringe on existing patent rights. AN43-47

Application Note 43
an43f
BA/GP 790 10K • PRINTED IN USA Linear Technology Corporation AN43-48 1630 McCarthy Blvd., Milpitas, CA 95035-7417
(408) 432-1900 ● FAX: (408) 434-0507 ● www.linear.com © LINEAR TECHNOLOGY CORPORATION 1990