application development toolset for as/400 source entry utility
TRANSCRIPT

AS/400 ÉÂÔ
Application Development ToolSetfor AS/400Source Entry UtilityVersion 4
SC09-2605-00


AS/400 ÉÂÔ
Application Development ToolSetfor AS/400Source Entry UtilityVersion 4
SC09-2605-00

Note!
Before using this information and the product it supports, be sure to read the general information under “Notices”on page vii.
First Edition (February 1998)
This edition applies to Version 4, Release 2, Modification Level 0, of IBM Application Development ToolSet for AS/400 (Program5769-PW1) and to all subsequent releases and modifications until otherwise indicated in new editions. Make sure you are using thecorrect edition for the level of the product.
Order publications through your IBM representative or the IBM branch office serving your locality. Publications are not stocked at theaddress given below.
A form for readers’ comments is provided at the back of this publication. If the form has been removed, address your comments to:
IBM Canada Ltd. LaboratoryInformation Development2G/345/1150/TOR1150 Eglinton Avenue EastNorth York, Ontario, Canada. M3C 1H7
You can also send your comments by facsimile (attention: RCF Coordinator), or you can send your comments electronically to IBM.See “Communicating Your Comments to IBM” for a description of the methods. This page immediately precedes the Readers’Comment Form at the back of this publication.
When you send information to IBM, you grant IBM a nonexclusive right to use or distribute the information in any way it believesappropriate without incurring any obligation to you.
Copyright International Business Machines Corporation 1994, 1998. All rights reserved.Note to U.S. Government Users — Documentation related to restricted rights — Use, duplication or disclosure is subject torestrictions set forth in GSA ADP Schedule Contract with IBM Corp.

Contents
Notices . . . . . . . . . . . . . . . . . . . . . . . . . . . . . . . . . . . . . . . . . viiTrademarks and Service Marks . . . . . . . . . . . . . . . . . . . . . . . . . . . vii
About This Book . . . . . . . . . . . . . . . . . . . . . . . . . . . . . . . . . . . . ixWho Should Use This Book . . . . . . . . . . . . . . . . . . . . . . . . . . . . . . . ixSummary of Changes . . . . . . . . . . . . . . . . . . . . . . . . . . . . . . . . . . ix
Chapter 1. Source Entry Utility Overview . . . . . . . . . . . . . . . . . . . . . 1Summary of Features . . . . . . . . . . . . . . . . . . . . . . . . . . . . . . . . . . 1Authority Requirements . . . . . . . . . . . . . . . . . . . . . . . . . . . . . . . . . 3
Chapter 2. Starting the Source Entry Utility . . . . . . . . . . . . . . . . . . . 5Starting SEU from the Programming Development Manager . . . . . . . . . . . . 5Starting SEU from the Programmer Menu . . . . . . . . . . . . . . . . . . . . . . 5Starting SEU from the Screen Design Aid . . . . . . . . . . . . . . . . . . . . . . 5Starting SEU from the Command Line . . . . . . . . . . . . . . . . . . . . . . . . 5
STRSEU Command Syntax . . . . . . . . . . . . . . . . . . . . . . . . . . . . . 6Default File, Library, and Member Values for the STRSEU Command . . . . 8Default Type and Option Values for the STRSEU Command . . . . . . . . . . 8Default New Member Values for the STRSEU Command . . . . . . . . . . . . 8Using the STRSEU Command with Parameters . . . . . . . . . . . . . . . . . 9Using the STRSEU Command with Command Prompts . . . . . . . . . . . . . 9
Chapter 3. Working with Members . . . . . . . . . . . . . . . . . . . . . . . . 11Viewing a List of Members . . . . . . . . . . . . . . . . . . . . . . . . . . . . . . 11Changing the List of Members . . . . . . . . . . . . . . . . . . . . . . . . . . . . 11Creating a Member . . . . . . . . . . . . . . . . . . . . . . . . . . . . . . . . . . . 12Browsing Members . . . . . . . . . . . . . . . . . . . . . . . . . . . . . . . . . . . 15
Changing the Browse Session Environment . . . . . . . . . . . . . . . . . . . 15Browsing in Full Screen Mode . . . . . . . . . . . . . . . . . . . . . . . . . . . 15Splitting the Browse Display . . . . . . . . . . . . . . . . . . . . . . . . . . . . 16
Editing a Member . . . . . . . . . . . . . . . . . . . . . . . . . . . . . . . . . . . . 17Special Records in the Record Field . . . . . . . . . . . . . . . . . . . . . . . 17Editing DDS Comments . . . . . . . . . . . . . . . . . . . . . . . . . . . . . . 18Splitting the Edit Display . . . . . . . . . . . . . . . . . . . . . . . . . . . . . . 19
Printing a Member . . . . . . . . . . . . . . . . . . . . . . . . . . . . . . . . . . . 20Deleting a Member . . . . . . . . . . . . . . . . . . . . . . . . . . . . . . . . . . . 20How the Work with Members Using SEU Display is Processed . . . . . . . . . 20How the Edit Display is Processed . . . . . . . . . . . . . . . . . . . . . . . . . . 21How an Edit Session Works . . . . . . . . . . . . . . . . . . . . . . . . . . . . . 23
Chapter 4. Changing the Edit Session Environment . . . . . . . . . . . . . 25Changing the Default Case for a Member Type . . . . . . . . . . . . . . . . . . 26Editing in Full Screen Mode . . . . . . . . . . . . . . . . . . . . . . . . . . . . . . 26
Chapter 5. Using Syntax Checking . . . . . . . . . . . . . . . . . . . . . . . . 27Finding and Flagging Syntax Errors . . . . . . . . . . . . . . . . . . . . . . . . . 27Using Syntax Checking When Inserting or Changing Records . . . . . . . . . . 28Syntax Checkers for AS/400 Source Types . . . . . . . . . . . . . . . . . . . . . 29Syntax Checkers for System/36 Source Types . . . . . . . . . . . . . . . . . . . 29
Copyright IBM Corp. 1994, 1998 iii

Syntax Checkers for System/38 Source Types . . . . . . . . . . . . . . . . . . . 30
Chapter 6. Finding and Changing Character Strings . . . . . . . . . . . . . 31Finding and Changing Strings . . . . . . . . . . . . . . . . . . . . . . . . . . . . 31Finding Records by Date . . . . . . . . . . . . . . . . . . . . . . . . . . . . . . . 32Finding Syntax Errors . . . . . . . . . . . . . . . . . . . . . . . . . . . . . . . . . 32Finding a String in a List of Members Using PDM . . . . . . . . . . . . . . . . . 33
Changing Strings . . . . . . . . . . . . . . . . . . . . . . . . . . . . . . . . . . 33Exiting from SEU after Using Find String . . . . . . . . . . . . . . . . . . . . 34
Chapter 7. Using Line Commands . . . . . . . . . . . . . . . . . . . . . . . . 35Sequence Numbers for Records . . . . . . . . . . . . . . . . . . . . . . . . . . . 35Changing the Increment Used for Sequence Numbers . . . . . . . . . . . . . . 36Copying, Deleting, Inserting, Moving, and Printing Records . . . . . . . . . . . 36
Specifying Targets . . . . . . . . . . . . . . . . . . . . . . . . . . . . . . . . . 36Copying Records . . . . . . . . . . . . . . . . . . . . . . . . . . . . . . . . . . 37Copying Records Repeatedly . . . . . . . . . . . . . . . . . . . . . . . . . . . 37Deleting Records . . . . . . . . . . . . . . . . . . . . . . . . . . . . . . . . . . 38Inserting Blank Records . . . . . . . . . . . . . . . . . . . . . . . . . . . . . . 38Moving Records . . . . . . . . . . . . . . . . . . . . . . . . . . . . . . . . . . . 39Repeating Records . . . . . . . . . . . . . . . . . . . . . . . . . . . . . . . . . 39Printing Records . . . . . . . . . . . . . . . . . . . . . . . . . . . . . . . . . . . 39
Entering Data . . . . . . . . . . . . . . . . . . . . . . . . . . . . . . . . . . . . . . 40Displaying a Columns Line . . . . . . . . . . . . . . . . . . . . . . . . . . . . . 40Creating Prompts . . . . . . . . . . . . . . . . . . . . . . . . . . . . . . . . . . 40Using Prompts for New Records – Example . . . . . . . . . . . . . . . . . . . 41Using Prompts for Embedded SQL Statements – Example . . . . . . . . . . 42Displaying Format Lines . . . . . . . . . . . . . . . . . . . . . . . . . . . . . . 44Inserting a Format Line – Example . . . . . . . . . . . . . . . . . . . . . . . . 45Inserting Blank Lines with a Format Line – Example . . . . . . . . . . . . . . 46Defining and Inserting Skeleton Lines . . . . . . . . . . . . . . . . . . . . . . 47Displaying Tabs . . . . . . . . . . . . . . . . . . . . . . . . . . . . . . . . . . . 48Inserting a Tabs Line – Example . . . . . . . . . . . . . . . . . . . . . . . . . 48
Changing the Display . . . . . . . . . . . . . . . . . . . . . . . . . . . . . . . . . 50Positioning Records on the Display . . . . . . . . . . . . . . . . . . . . . . . . 50Excluding Records from the Display . . . . . . . . . . . . . . . . . . . . . . . 50Excluding Records – Example . . . . . . . . . . . . . . . . . . . . . . . . . . . 51Showing Excluded Records . . . . . . . . . . . . . . . . . . . . . . . . . . . . 51Showing Excluded Records – Example . . . . . . . . . . . . . . . . . . . . . 52Rolling the Member Forward or Backward . . . . . . . . . . . . . . . . . . . . 52Shifting the Data in Records . . . . . . . . . . . . . . . . . . . . . . . . . . . . 52Shifting a Block of Records – Example . . . . . . . . . . . . . . . . . . . . . . 53Shifting and Truncating the Data in Records . . . . . . . . . . . . . . . . . . 53Controlling the Window Position . . . . . . . . . . . . . . . . . . . . . . . . . . 54Changing the Horizontal Position – Example . . . . . . . . . . . . . . . . . . 54
Rules for Entering Line Commands . . . . . . . . . . . . . . . . . . . . . . . . . 55Performing More Than One Operation . . . . . . . . . . . . . . . . . . . . . . 55Overlapping Commands . . . . . . . . . . . . . . . . . . . . . . . . . . . . . . 55Pending Operations . . . . . . . . . . . . . . . . . . . . . . . . . . . . . . . . . 56Using Line Commands during Pending Operations . . . . . . . . . . . . . . . 56Line Command during Pending Operation – Example . . . . . . . . . . . . . 56Using Line Commands on Split Displays . . . . . . . . . . . . . . . . . . . . . 57Identifying Line Commands . . . . . . . . . . . . . . . . . . . . . . . . . . . . 58
Summary of Line Commands . . . . . . . . . . . . . . . . . . . . . . . . . . . . . 59
iv Source Entry Utility (SEU)
| Chapter 8. User-Defined Line Commands . . . . . . . . . . . . . . . . . . . . 61| Identifying Parameters passed to the User-Defined Line Command Program . 61| Specifying which User-Defined Line Command Programs to Use . . . . . . . . 62| Accessing the SEU Exit Point . . . . . . . . . . . . . . . . . . . . . . . . . . . 63| Adding Programs to the SEU Exit Point . . . . . . . . . . . . . . . . . . . . . 63| Removing Programs from the Exit Point . . . . . . . . . . . . . . . . . . . . . 65| Replacing Programs in the Exit Point . . . . . . . . . . . . . . . . . . . . . . . 65| Displaying Program Information . . . . . . . . . . . . . . . . . . . . . . . . . . 65| Using User-Defined Line Commands . . . . . . . . . . . . . . . . . . . . . . . . 65| Returning to SEU from the User-Defined Line Command Program . . . . . 67| Split Sessions . . . . . . . . . . . . . . . . . . . . . . . . . . . . . . . . . . . . 67| Conflicts between SEU line commands and User-Defined Line Commands 67
Chapter 9. Using Source Entry Utility Commands . . . . . . . . . . . . . . 69Entering SEU Commands on a Split Display . . . . . . . . . . . . . . . . . . . . 69HIDE Command . . . . . . . . . . . . . . . . . . . . . . . . . . . . . . . . . . . . 71FIND Command . . . . . . . . . . . . . . . . . . . . . . . . . . . . . . . . . . . . 72CHANGE Command . . . . . . . . . . . . . . . . . . . . . . . . . . . . . . . . . . 73SET Command . . . . . . . . . . . . . . . . . . . . . . . . . . . . . . . . . . . . . 75TOP Command . . . . . . . . . . . . . . . . . . . . . . . . . . . . . . . . . . . . . 76BOTTOM Command . . . . . . . . . . . . . . . . . . . . . . . . . . . . . . . . . . 77SAVE Command . . . . . . . . . . . . . . . . . . . . . . . . . . . . . . . . . . . . 77FILE Command . . . . . . . . . . . . . . . . . . . . . . . . . . . . . . . . . . . . . 78CANCEL Command . . . . . . . . . . . . . . . . . . . . . . . . . . . . . . . . . . 78
Chapter 10. Editing with Prompts and Format Lines . . . . . . . . . . . . . 81Command Prompts . . . . . . . . . . . . . . . . . . . . . . . . . . . . . . . . . . . 81Selecting Prompts . . . . . . . . . . . . . . . . . . . . . . . . . . . . . . . . . . . 81Selecting a High-Level-Language Prompt . . . . . . . . . . . . . . . . . . . . . . 82Canceling a Prompt . . . . . . . . . . . . . . . . . . . . . . . . . . . . . . . . . . 83Format Lines . . . . . . . . . . . . . . . . . . . . . . . . . . . . . . . . . . . . . . 84Selecting a Format Line . . . . . . . . . . . . . . . . . . . . . . . . . . . . . . . . 85
Chapter 11. Creating Prompts . . . . . . . . . . . . . . . . . . . . . . . . . . . 87Creating a Prompt . . . . . . . . . . . . . . . . . . . . . . . . . . . . . . . . . . . 87Changing a User-Defined Prompt . . . . . . . . . . . . . . . . . . . . . . . . . . 88Selecting a User-Defined Prompt . . . . . . . . . . . . . . . . . . . . . . . . . . 88Defaults for Storage and Retrieval of User-Defined Prompts . . . . . . . . . . . 89Restricting Access to Your User-Defined Prompts . . . . . . . . . . . . . . . . . 89Creating Additional User-Defined Prompt Files . . . . . . . . . . . . . . . . . . . 90
Chapter 12. Exiting from Source Entry Utility . . . . . . . . . . . . . . . . . 91
Chapter 13. Creating a Source Member – Tutorial . . . . . . . . . . . . . . 93Starting a Session with the STRSEU Command . . . . . . . . . . . . . . . . . . 93Inserting Source Statements with the Insert Command . . . . . . . . . . . . . . 94Inserting Source Statements with a Format Line . . . . . . . . . . . . . . . . . . 95Inserting Source Statements with a Prompt . . . . . . . . . . . . . . . . . . . . . 96Saving the Member . . . . . . . . . . . . . . . . . . . . . . . . . . . . . . . . . . 98
Chapter 14. Changing a Source Member – Tutorial . . . . . . . . . . . . . . 99Starting a Session from the Work with Members Using PDM Display . . . . . 100Changing Records Directly . . . . . . . . . . . . . . . . . . . . . . . . . . . . . 100Changing Records with a Format Line . . . . . . . . . . . . . . . . . . . . . . 101
Contents v

Changing Records with the SEU FIND Command . . . . . . . . . . . . . . . . 102Copying Records with the Split Edit/Browse Display . . . . . . . . . . . . . . 102Changing Records with a Prompt . . . . . . . . . . . . . . . . . . . . . . . . . 105Saving the Changes . . . . . . . . . . . . . . . . . . . . . . . . . . . . . . . . . 106
Chapter 15. Creating a User-Defined Prompt – Tutorial . . . . . . . . . . 107Defining a Prompt Code . . . . . . . . . . . . . . . . . . . . . . . . . . . . . . . 107Creating a Field for the Prompt . . . . . . . . . . . . . . . . . . . . . . . . . . . 108Displaying and Saving the Prompt . . . . . . . . . . . . . . . . . . . . . . . . . 109
Appendix A. SEU in the System/36 Environment . . . . . . . . . . . . . . 111The DSU Procedure . . . . . . . . . . . . . . . . . . . . . . . . . . . . . . . . . 111How DSU Procedure Parameters Map to STRSEU Parameters . . . . . . . . 112The SEU Procedure . . . . . . . . . . . . . . . . . . . . . . . . . . . . . . . . . 112How SEU Procedure Parameters Map to STRSEU Parameters . . . . . . . . 113
Appendix B. SEU in the System/38 Environment . . . . . . . . . . . . . . 115The EDTSRC Command . . . . . . . . . . . . . . . . . . . . . . . . . . . . . . 115
Appendix C. Double-Byte Character Sets . . . . . . . . . . . . . . . . . . . 117Enabling DBCS for SEU . . . . . . . . . . . . . . . . . . . . . . . . . . . . . . . 117Using DBCS with SEU Displays . . . . . . . . . . . . . . . . . . . . . . . . . . 117Displays That Accept DBCS Data . . . . . . . . . . . . . . . . . . . . . . . . . 118AS/400 Prompts and Fields That Accept DBCS Data . . . . . . . . . . . . . . 118System/36 Prompts and Fields That Accept DBCS Data . . . . . . . . . . . . 118System/38 and AS/400 Prompts and Fields That Accept DBCS Data . . . . 119Considerations for Using DBCS on SEU Displays . . . . . . . . . . . . . . . . 120DBCS in Split Displays . . . . . . . . . . . . . . . . . . . . . . . . . . . . . . . 121Using DBCS with SEU Commands and Functions . . . . . . . . . . . . . . . . 122
Finding and Changing DBCS Strings . . . . . . . . . . . . . . . . . . . . . . 122Printing DBCS Source Data . . . . . . . . . . . . . . . . . . . . . . . . . . . 122Considerations for Using DBCS with SEU Commands . . . . . . . . . . . . 122
DBCS Conversion in SEU . . . . . . . . . . . . . . . . . . . . . . . . . . . . . . 123When to Use DBCS Conversion with SEU . . . . . . . . . . . . . . . . . . 123Considerations for Using DBCS Conversion . . . . . . . . . . . . . . . . . . 123
Appendix D. Recovering from Errors . . . . . . . . . . . . . . . . . . . . . 125
| Appendix E. Referencing the User Space for User-Defined Line| Command Programs . . . . . . . . . . . . . . . . . . . . . . . . . . . . . . . 127| Format of the User Space . . . . . . . . . . . . . . . . . . . . . . . . . . . . . . 127| The User Space as a Single Block . . . . . . . . . . . . . . . . . . . . . . . 127| The User Space as Three Blocks of Information . . . . . . . . . . . . . . . 130| Referencing the User Space—Examples . . . . . . . . . . . . . . . . . . . . . 133| ILE RPG Example without Pointers . . . . . . . . . . . . . . . . . . . . . . . 133| ILE RPG Example using Pointers . . . . . . . . . . . . . . . . . . . . . . . . 138| C Example using Pointers . . . . . . . . . . . . . . . . . . . . . . . . . . . . 142| PLI Example using Pointers . . . . . . . . . . . . . . . . . . . . . . . . . . . 143| ILE COBOL Example using Pointers . . . . . . . . . . . . . . . . . . . . . . 143
Bibliography . . . . . . . . . . . . . . . . . . . . . . . . . . . . . . . . . . . . . 145
Index . . . . . . . . . . . . . . . . . . . . . . . . . . . . . . . . . . . . . . . . . . 147
vi Source Entry Utility (SEU)

Notices
References in this publication to IBM products, programs, or services do not implythat IBM intends to make these available in all countries in which IBM operates.Any reference to an IBM licensed program in this publication is not intended tostate or imply that only IBM’s licensed program may be used. Any functionallyequivalent product, program or service that does not infringe any of IBM’s intellec-tual property rights may be used instead of the IBM product, program, or service.Evaluation and verification of operation in conjunction with other products, exceptthose expressly designated by IBM, is the user’s responsibility.
IBM may have patents or pending patent applications covering subject matter inthis document. The furnishing of this document does not give you any license tothese patents. You can send license inquiries, in writing, to the IBM Director ofLicensing, IBM Corporation, 208 Harbor Drive, Stamford, Connecticut, USA06904-2501.
This publication contains examples of data and reports used in daily business oper-ations. To illustrate them as completely as possible, the examples include thenames of individuals, companies, brands, and products. All of these names arefictitious and any similarity to the names and addresses used by an actual businessenterprise is entirely coincidental.
At the time of printing, this book contains references to products that areannounced, but may not yet be available. These products will be available later inthis release.
Trademarks and Service MarksThe following terms, denoted by an asterisk (*), used in this publication, are trade-marks or service marks of International Business Machines Corporation in theUnited States or other countries:
The following terms, denoted by a double asterisk (**), used in this publication, aretrademarks of other companies as follows:
RM/COBOL Ryan McFarland Corporation
Application System/400 IBMLinkAS/400 ILECICS Integrated Language EnvironmentCICS/400 OS/400FORTRAN/400 PROFSIBM SQL/400
400
Copyright IBM Corp. 1994, 1998 vii

viii Source Entry Utility (SEU)

About This Book
This book contains tutorials, instructions, and reference information that show appli-cation programmers and system programmers how to use the source entry utility(SEU). SEU is a full screen editor that you use to create and update the sourcemembers of a source file. This book contains information on:
¹ Starting an SEU session
¹ Creating, editing, browsing, and saving members using line commands, SEUcommands, and the SEU displays
¹ Creating and using user-defined line commands.
¹ Using prompts and format lines to create your own prompt
¹ Using the System/36 and System/38 environments, and double-byte characterstrings
This book also contains examples of creating and changing a source member.This book does not describe all of the functions of SEU.
You may need to refer to other IBM* publications for more specific informationabout a topic. The Publications Reference, SC41-5003, provides information on allthe publications in the Application System/400* (AS/400*) library.
For a list of related publications, see the “Bibliography” on page 145.
Who Should Use This BookThis book is intended for application programmers and system programmers whowork in an AS/400 environment. To use this book effectively, you must know howto use your workstation, understand and use messages, and have a general know-ledge of the AS/400 system.
If you are unfamiliar with your workstation, refer to the specific book for it.
The user (described as you in this book) refers to the programmer working withsource members in SEU.
Summary of ChangesSEU now supports the following Integrated Language Environment* (ILE*) sourcetypes:
¹ CBLLE (ILE COBOL). If the source file QCBLLESRC is specified, the default isCBLLE.
¹ CICSC (CICS C).
¹ CICSCBLLE (ILE COBOL with embedded CICS/400* statements or SQL state-ments).
¹ CLLE (ILE CL).
¹ RPGLE (ILE RPG). If the source file QRPGLESRC is specified, the default isRPGLE.
Copyright IBM Corp. 1994, 1998 ix

¹ SQLCBLLE (ILE COBOL with embedded SQL/400* statements).
¹ SQLRPGLE (ILE RPG with embedded SQL/400 statements).
The default case for these ILE source types is mixed. Except for CICSC, bothsyntax checking and prompting are supported for these source types. Except forCLLE, format lines are supported for these source types.
Margin defaults are provided for ILE RPG source types. The default left marginis 6, and the default right margin is 80.
SEU does not indicate in the sequence number area any CICS* or SQL statementsthat are embedded in ILE source.
You can now create user-defined line commands to add to the functionality pro-vided by the standard SEU line commands.
x Source Entry Utility (SEU)

Chapter 1. Source Entry Utility Overview
You can use the source entry utility (SEU) to work with source members in sourcephysical files, and the records contained in source members.
With SEU, you can do operations such as:
¹ Create members ¹ Edit members ¹ Print members¹ Copy records into a member from another member or spooled file
Summary of FeaturesSEU has the following features:
CommandsYou can use SEU commands to work with the SEU environment, members,and records. You can tailor your edit session, hide records shown on thedisplay, and save, file, or cancel changes to a member.
Format LinesYou can use format lines to verify the position of statements in high-level-language source statements. SEU provides predefined format lines for high-level languages and for AS/400 control language (CL) commands.
Full Screen ModeYou can use full screen mode on the Edit and Browse displays to removefunction keys from the SEU display, providing four more lines of source.
Function KeysEach SEU display supports a set of function keys that you use to performspecific tasks. For example, you can press F12 (Cancel) to cancel thecurrent operation and return to the previous display. The function keys arelisted at the bottom of each display. If F24 (More keys) is shown, press thiskey to see additional function keys for the display.
Except for F1 (Help), which is not displayed but is always valid, a function keyis valid on a specific display only if it is listed at the bottom of the display. Afunction key may perform differently depending on the operation you aredoing. If you are using SEU in full screen mode, you can use all of the func-tion keys for that display, even though they are not shown.
You can find detailed information on function keys in the online help informa-tion for the AS/400 system. If you place the cursor on the function keyssection of any display and press Help, detailed information appears.
Language and Command PromptsYou can use the SEU high-level-language or command prompts to createerror-free records. When you request a language or command prompt, youcan type the data for a record one field at a time. You can use theSEU-supplied prompts, or define your own.
Line CommandsYou can use line commands in SEU to do many operations, such as insertblank records, copy records, and request language and command prompts.
Copyright IBM Corp. 1994, 1998 1

You can create user-defined line commands to add to the functionality pro-vided by the standard SEU line commands.
List DisplaysYou can use SEU list displays to view different types of lists, as follows:
Member list Shows all members in a specified file. Use the memberlist to select a member to edit, browse, print, or delete.
File list Shows all files in a specified library. Use the file list toselect a file with members that you want to edit,browse, print, or delete.
Spooled file list Shows all spooled files for a specified user. Use thespooled file list to select a spooled file that you want tobrowse or copy.
User list Shows all jobs run under all IDs. Use the user list toselect the user ID from which you want to browse orcopy a job. You can only access the spooled files andyou may require authorization.
Maximum Number and Length of RecordsSEU allows a maximum number of 32 764 records in a source member. Themaximum record length SEU allows is 240 characters, which includes 6 char-acters for the sequence number and 6 characters for the date.
Options DisplaysYou can use options displays to control the SEU environment and do oper-ations on file members and spooled files. The following options displays areused frequently in SEU:
¹ Change Session Defaults
Use the Change Session Defaults display to specify the characteristics ofyour edit or browse session.
¹ Browse/Copy Options
Use the Browse/Copy Options display while editing a member to look atanother member or spooled file, copy another member or spooled file intothe member you are editing, or copy specific records from anothermember or spooled file into the member you are editing.
¹ Find/Change Options
Use the Find/Change Options display to search for a specified string insome or all records, change a specified string in some or all records, orsearch for records that contain syntax errors.
Split Session Editing and BrowsingYou can use split session editing and browsing to edit one member andbrowse another on the work display at the same time. You can also browsetwo members at the same time, but you cannot edit two members on the workdisplay at the same time. If you access the Browse/Copy Options displayfrom a split session, you can copy records from one of the members shownon the display to another member that you are editing.
Syntax CheckingYou can use SEU syntax checking to verify the source statements for severalhigh-level languages, including BASIC, PL/I, COBOL, FORTRAN, and RPG,as well as AS/400 CL programs.
2 Source Entry Utility (SEU)

System Command WindowYou can enter AS/400 system commands while working on the SEU Editdisplay. To display the System Command window, press F21 (Systemcommand).
The System Command window avoids overlaying the cursor, so depending onthe cursor location, the System Command window may appear in the topportion or in the bottom portion of the display. You cannot enter data on theSEU Edit display while the System Command window is displayed.
You cannot enter System/36 and System/38 commands in the SystemCommand window, but you can access the Command Entry display throughthe Attention key.
Note: System commands such as SIGNOFF (in the AS/400 system) orENDS36 (in the System/36 environment) end the SEU session abnor-mally. When you reaccess the member that you were editing, theRecover SEU Member display appears. See Appendix D, “Recov-ering from Errors” on page 125 for information about using thisdisplay.
Authority RequirementsThe following table shows the minimum authority you need for a file before you canperform SEU operations on a file member. To add a member to a file, you musthave Add authority for the library containing the file.
Operation
Object Authority Data Authority
ObjectOperationalAuthority
ObjectManagementAuthority
ObjectExistenceAuthority Read Add Update Delete Execute
Edit a member X X X X X X
Browse a member X X X
Add a member X X X X X X
Remove a member X X X X
Revise type or textof member
X X X X
For some SEU functions, you also require the authority to use CL commands suchas Work with Output Queue (WRKOUTQ), Create Physical File (CRTPF), or Workwith Spooled Files (WRKSPLF). If you change or replace the version of thesecommands that is supplied by IBM, specify the values *INTERACT and *EXEC forthe new version on the ALLOW parameter of the Create Command (CRTCMD) orChange Command (CHGCMD) commands.
For further information on object authority, see Security – Reference, SC41-5302.
Chapter 1. Source Entry Utility Overview 3

4 Source Entry Utility (SEU)

Chapter 2. Starting the Source Entry Utility
You can start SEU from:
¹ The programming development manager (PDM)¹ The Programmer menu¹ The Screen Design Aid (SDA)¹ The AS/400 command line
Starting SEU from the Programming Development ManagerTo start SEU from the programming development manager (PDM), select option 2(Edit) or option 5 (Display) on the Work with Members Using PDM display.
Starting SEU from the Programmer MenuTo start SEU from the Programmer menu, select option 8 (Edit a source filemember). Alternatively, select option 5 (Run a command), and select the STRSEUcommand from one of the lists of commands.
Starting SEU from the Screen Design AidTo start SEU from the screen design aid (SDA), select option 2 (Edit comments) onthe Work with Display Records display.
Starting SEU from the Command LineTo create, change, show, or print a source member, type the Start SEU (STRSEU)command on the AS/400 command line or on the Command Entry display.
You can use the STRSEU command to create a source member, but not to createa source file that contains source members. Use the Create Source Physical File(CRTSRCPF) command to create a source file. If you do not have a library for thesource file, use the Create Library (CRTLIB) command to create one. For informa-tion about creating source files and libraries, see the CL Reference, SC41-5722.
You can use command prompting to enter the parameters for the STRSEUcommand. After typing only the STRSEU command name, or after typing thecommand name and some parameter values, press F4 (Prompt). The Start SourceEntry Utility (STRSEU) display appears, in which you can type the remainingparameters. Press Enter to accept the default values, or type new values andpress Enter to process the command.
Copyright IBM Corp. 1994, 1998 5

STRSEU Command Syntax
Job: I Pgm: I REXX: I Exec
55──STRSEU─ ──┬ ┬──────────────────────────────────────────────────────── ────────────────────5 │ │┌ ┐─*PRV──────────────────────────────── │ ││ │┌ ┐─*LIBL/──────── └ ┘ ─SRCFILE──(─ ──┴ ┴──┼ ┼─────────────── ─source-file-name─ ─)─ ├ ┤─*CURLIB/────── └ ┘─library-name/─
5─ ──┬ ┬─────────────────────────────────────────── ──┬ ┬─────────────────────── ───────────────5 │ │┌ ┐─*PRV──────────────────── │ │┌ ┐─*SAME─ │ │├ ┤─*SELECT───────────────── └ ┘ ─TYPE──(─ ──┴ ┴─type── ─)─ └ ┘ ─SRCMBR──(─ ──┴ ┴─source-file-member-name─ ─)─
5─ ──(P)──┬ ┬────────────────────────── ──┬ ┬─────────────────────────────── ─────────────────────5% │ │┌ ┐─*BLANK─ │ │┌ ┐─*BLANK──────── │ │├ ┤─2────── └ ┘ ─TEXT──(─ ──┴ ┴─'description'─ ─)─ └ ┘ ─OPTION──(─ ──┼ ┼─5────── ─)─ └ ┘─6──────
Note:P All parameters preceding this point can be specified using positional coding, as described in “Using
the STRSEU Command with Parameters” on page 9.
Note: Online help information is available to helpyou interpret the syntax diagram.
SRCFILE: Specifies the qualified name of thesource physical file that contains the memberbeing edited or created.
*PRV: The previously specified qualifiedsource physical file name is used.
The possible library values are:
*LIBL: The library list is used to locatethe source file.
*CURLIB: The current library for the jobis used to locate the source file. If nolibrary is specified as the current library forthe job, the QGPL library is used.
library-name: Specify the name of thelibrary in which the source file is located.
source-file-name: Specify the name of anexisting source physical file.
SRCMBR: Specifies the names of the sourcephysical file members being edited or created.The default value for this parameter depends onwhether the SRCFILE parameter is specified.
*PRV: The previously specified sourcemember name is used. This is the defaultvalue if *PRV is specified for the SRCFILEparameter.
*SELECT: The SEU shows a list of membersfrom which the user selects one to edit, show,print, or delete. This is the default value if avalue other than *PRV is specified for theSRCFILE parameter.
source-file-member-name: Specify the nameof the source physical file member beingcreated or edited.
6 Source Entry Utility (SEU)

TYPE: Specifies the type of source physical filemember being edited or created.
*SAME: For members that already exist, thisvalue indicates that the member type does notchange. For members being created, thisvalue indicates that the member type isassigned the default associated with the nameof the source physical file. For the defaultmember types for specific source file names,see “Default New Member Values for theSTRSEU Command” on page 8.
type: Specify the type of source physical filemember to edit. This can be any combinationof up to 10 characters, or one of the followingtypes supported by the SEU:
¹ AS/400 types: BAS, BASP, BND, C, CBL,CBLLE, CICSC, CICSCBL, CICSCBLLE,CICSMAP, CICSSQLCBL, CL, CLD,CLLE, CLP, CMD, DFU, DSPF, FTN,ICFF, LF, MENU, MNU, MNUCMD,MNUDDS, PAS, PF, PLI, PNLGRP,PRTF, QRY, REXX, RMC, RPG, RPGLE,RPT, SPADCT, SQLC, SQLCBL,SQLCBLLE, SQLCLE, SQLFTN, SQLPLI,SQLRPG, SQLRPGLE, SRT, TBL, or TXT
¹ System/38 types: BAS38, BASP38,BSCF38, CBL38, CL38, CLP38, CMD38,CMNF38, DFU38, DSPF38, LF38,MXDF38, PF38, PLI38, PRTF38, QRY38,RPG38, RPT38, SRT38, or TXT38
¹ System/36 types: ARS36, ASM36, BAS36,BASP36, BGC36, BGD36, BGF36,CBL36, DFU36, DSPF36, DTA36, FOR36,MNU36, MSGF36, OCL36, PHL36,RPG36, RPT36, SRT36, TXT36, UNS36,or WSU36
OPTION: Specifies the function to perform onthe selected member. The default value dependson whether the member name is specified.
*BLANK: This is the default value if amember name is not specified. *BLANK spec-ifies no action; instead, a member list is
shown from which the user can specify one ofthe following options:
2: A member is to be edited. Option 2 is thedefault value if a member name is specified.
5: A member is to be displayed.
6: A member is to be printed.
TEXT: Specifies text that describes themember. This text is stored in the text field for themember. For an expanded description of thisparameter, see the CL Reference.
*BLANK: This is the default for a newmember. This value directs SEU to specifyblanks in the text field of the member. For anexisting member, this value does not changethe text field of the member.
'description': Specify no more than 50 char-acters of text, enclosed in apostrophes.
Example:STRSEU SRCFILE(QGPL/FILE1) SRCMBR(TELEDIR)
TYPE(CLP) TEXT('CL program to create office
telephone directory')
This command starts SEU by using the sourcemember TELEDIR in source file FILE1, which islocated in the QGPL library. The TYPE(CLP)parameter indicates that this member is thesource for a CL program. The TEXT parametersupplies a description of the member.
If the member exists, SEU starts an Edit sessionfor the member. If the member does not exist,SEU creates a member with the name, type, andtext specified in the command, and starts an Editsession for the member. When you create asource physical file using the CRTSRCPFcommand, the initial default source file isQTXTSRC. For information about creating sourcefiles and libraries, see the CL Reference.
Chapter 2. Starting the Source Entry Utility 7

Default File, Library, and Member Values for the STRSEU CommandThe default values for the source file, library, and member are interdependent. Thefollowing default values are used:
File IsSpecified?
Library IsSpecified?
Member IsSpecified?
Default forFile
Default forLibrary
Default forMember
Yes Yes Yes Supplied Supplied Supplied
Yes Yes No Supplied Supplied *SELECT
Yes No Yes Supplied *PRV Supplied
Yes No No Supplied *PRV *SELECT
No Yes Yes *PRV Supplied Supplied
No Yes No *PRV Supplied *SELECT
No No Yes *PRV *PRV Supplied
No No No *PRV *PRV *PRV
Default Type and Option Values for the STRSEU CommandThe defaults for the TYPE and OPTION parameters depend on whether or not youspecify a member name. The following default values are used:
Member IsSpecified?
Type IsSpecified?
Option IsSpecified?
Default forType
Default forOption
Yes Yes Yes Supplied Supplied
Yes Yes No Supplied 2 (Edit)
Yes No Yes *SAME Supplied
Yes No No *SAME 2 (Edit)
No Yes Yes Supplied Supplied
No Yes No Supplied *BLANK
No No Yes *SAME Supplied
No No No Supplied *BLANK
Default New Member Values for the STRSEU CommandWhen you create a new member, the default for the TYPE parameter depends onthe name of the source file in which the new member is located. The followingdefault values are used:
Source File Name Default for Type
QBASSRC BAS
QCBLLESRC CBLLE
QCLSRC CLP
QCMDSRC CMD
QCSRC C
QDDSSRC PF
QFTNSRC FTN
8 Source Entry Utility (SEU)

Source File Name Default for Type
QLBLSRC CBL
QMAPSRC CICSMAP
QMENUSRC MNUDDS
QMNUSRC MENU
QPASSRC PAS
QPLISRC PLI
QPNLSRC PNLGRP
QREXSRC REXX
QRMCSRC RMC
QRPGLESRC RPGLE
QRPGSRC RPG
QS36PRC OCL36
QS36SRC UNS36
QSRVSRC BND
QTBLSRC TBL
QTXTSRC TXT
QUDSSRC QRY38
All Others TXT
Using the STRSEU Command with ParametersIf you know all the parameters and values for the STRSEU command, type theentire command on the Command Entry display or the command line as in the fol-lowing example and press Enter:
STRSEU SRCFILE(LIBRNAME01/FILENAME01) SRCMBR(MEMBNAME05) TYPE(TXT)
OPTION(2) TEXT('Customer data file for mailing list')
If you specify the values in the correct order, you do not have to type the names ofthe first four parameters. You can type the STRSEU command as in the followingexample:
STRSEU LIBRNAME01/FILENAME01 MEMBNAME05 TXT 2
TEXT('Customer data file for mailing list')
This is called positional coding and is described in detail in the CL Reference. Formore information on the Command Entry display, view the online help informationfor the display.
Using the STRSEU Command with Command PromptsYou can use command prompts to enter the parameters for the STRSEUcommand. After typing only the STRSEU command name, or after typing thecommand name and some parameter values, press F4 (Prompt). The Start SourceEntry Utility (STRSEU) display appears.
The display lists the parameters and supplies the default values. Press Enter toaccept the default values, or type values for the parameters and press Enter toprocess the command.
Chapter 2. Starting the Source Entry Utility 9

10 Source Entry Utility (SEU)

Chapter 3. Working with Members
You can do the following with members:
¹ View a list of members¹ Change a list of members¹ Create a member¹ Browse a member¹ Edit a member¹ Print a member¹ Delete a member
Viewing a List of MembersTo view a list of members using the STRSEU command, do one of the following:
¹ Specify a source file for the SRCFILE parameter but do not specify a memberfor the SRCMBR parameter.
¹ Specify the value *SELECT for the SRCMBR parameter.
¹ Enter the STRSEU command without any parameters if the Work with MembersUsing SEU display was chosen in the previous session.
The Work with Members Using SEU display appears. The display contains theinformation you entered for the source file and library name, the informationrequired to create a new member, and the list of members with the specification ofthe list position (Bottom or More) in the bottom right-hand corner of the display.
Changing the List of MembersYou can change the list of members that appears on the Work with Members UsingSEU display so that only members that meet certain criteria are included. You canchange the list so it shows only members that have the same:
¹ Partial name ¹ Member type¹ Date of creation or last change¹ Text or partial text
To change the list of members:
1. Press F17 (Subset). The Subset Member List display appears.
2. Specify the criteria for the members that you want to be in the list and pressEnter. The changed list of members is displayed.
Press F1 (Help) to view the online help information about the prompts in the SubsetMember List display.
Copyright IBM Corp. 1994, 1998 11

Creating a MemberTo create a member, do one of the following:
¹ From the command line, or by using command prompting, specify the name ofthe member to be created for the SRCMBR parameter of the STRSEUcommand. If you use command prompting, type a valid source type in theSource type prompt. If you do not, the default is used.
¹ On the Work with Members Using SEU display, type the name of the memberto be created in the New member prompt, type the source type in the Type fornew member prompt, and press Enter.
You can access the Work with Members Using SEU display by specifying*SELECT for the SRCMBR parameter of the STRSEU command.
The Edit display appears in which you can start entering source.
The following AS/400 source types are supported:
Description Source Type
Auto report RPT
BASIC BAS
BASIC program BASP
Binder Language BND
C C
C with embedded SQL SQLC
C locale description CLD
CICS C CICSC
CICS maps CICSMAP
CL CL
CL program CLP
COBOL CBL
COBOL with embedded CICS/400*statements
CICSCBL
COBOL with embedded SQL SQLCBL
COBOL with embedded SQL and CICS/400statements
CICSSQLCBL
Command definition CMD
DFU DFU
Display DSPF
FORTRAN/400* member FTN
FORTRAN/400 member with embeddedSQL
SQLFTN
ICF ICFF
ILE C C
ILE C with embedded SQL SQLC
ILE CL CLLE
12 Source Entry Utility (SEU)

The following System/36 source types are supported:
Description Source Type
ILE COBOL CBLLE
ILE COBOL with embedded CICS/400statements
CICSCBLLE
ILE COBOL with embedded SQL| SQLCBLLE
ILE RPG RPGLE
ILE RPG with embedded SQL SQLRPGLE
Logical file LF
Menu MNU
Menu (UIM) MENU
Menu command source MNUCMD
Menu DDS source MNUDDS
Panel group source PNLGRP
Pascal PAS
Physical file PF
PL/I PLI
PL/I with embedded SQL SQLPLI
Printer PRTF
Query QRY
REXX REXX
RM/COBOL** member RMC
RPG RPG
RPG with embedded SQL SQLRPG
Sort SRT
Spelling dictionary SPADCT
Table TBL
Text TXT
Description Source Type
Assembler ASM36
Auto report RPT36
Auto response ARS36
BASIC BAS36
BASIC program BASP36
BGU chart BGC36
BGU data BGD36
BGU format BGF36
COBOL CBL36
Chapter 3. Working with Members 13

The following System/38 source types are supported:
Description Source Type
Data DTA36
DFU DFU36
Fortran FOR36
Menu MNU36
Message source MSGF36
Operator control language OCL36
Phone list PHL36
RPG RPG36
SFGR format source DSPF36
Sort SRT36
Unspecified UNS36
Work Station Utility WSU36
Description Source Type
Auto report RPT38
BASIC BAS38
BASIC program BASP38
Binary synchronous communications BSCF38
Command definition CMD38
Communication CMNF38
CL CL38
CL program CLP38
COBOL CBL38
DFU/38 DFU38
Display DSPF38
Logical file LF38
Mixed MXDF38
Physical file PF38
PL/I PLI38
Printer PRTF38
Query/38 QRY38
RPG RPG38
Sort SRT38
Text TXT38
14 Source Entry Utility (SEU)
Browsing MembersYou use the Browse display to view a member without the risk of accidentallychanging it. You can use the scanning and positioning operations (such as PageDown and Page Up), but you cannot perform any operations that alter the member(such as adding, deleting, changing, or moving records).
To browse a member, do one of the following:
¹ Specify 5 (Browse) for the Option parameter on the STRSEU command.¹ Select option 5 (Browse) on the Work with Members Using SEU display.
The Browse display appears containing the member that you selected.
Changing the Browse Session EnvironmentYou can specify parameters to change the browse session environment (such assetting the amount to roll the display or forcing uppercase input) by using theChange Session Defaults display. Press F13 (Change session defaults) on theBrowse display to access the Change Session Defaults display.
You can also change your browse session by using the SEU SET command. Formore information, see “SET Command” on page 75.
Browsing in Full Screen ModeFull screen mode lets you remove the format line from the top and the function keylist from the bottom of the Browse display, giving you four additional Browserecords to work with.
Note: The function keys are still valid for the Browse display in full screen mode,even though they are not shown.
You can use the full screen mode while browsing members or while browsingspooled files. To switch to full screen mode:
1. On the Browse display, press F13 (Change session defaults). The ChangeSession Defaults display appears.
2. Type Y in the Full screen mode prompt and press Enter. The Browse displaychanges to full screen mode.
To cancel full screen mode and return to the normal mode of operation:
1. On the Browse display, press F13 (Change session defaults). The ChangeSession Defaults display appears.
2. Type N in the Full screen mode prompt and press Enter. The normal Browsedisplay appears.
Chapter 3. Working with Members 15

Splitting the Browse DisplayWhile browsing a member, you can split the browse display to browse anothermember or a spooled file. To split the Browse display:
1. Press F15 (Browse options). The Browse Options display appears.
2. Do one of the following:
¹ To browse another member in the same file, type the member name in theBrowse member prompt, and press Enter.
¹ To browse another member in a different file, type the file name in the Fileprompt, type the member name in the Browse member prompt, and pressEnter.
¹ To browse a spooled file, type the spooled file name in the Browse spoolfile prompt.
¹ To browse another user’s spooled file, type the user name in the Userprompt, type the spooled file name in the Browse spool file prompt, andpress Enter.
A split line (the line separating the two browse sessions) is placed in the middleof the Browse display, and you can view the additional member or spooled file.You can move the split line by using F6 (Move split line).
Line 24 on the display contains messages for both sessions. The remainingprompts in each session of the display are the same as those on the Browsedisplay.
Notes:
1. When you request the Browse Options display or the Find Options display froma split display, the split display is temporarily suspended. The options displaythat appears depends on which session the cursor is in when you press thefunction key.
2. For information on using SEU commands with split displays, see “Entering SEUCommands on a Split Display” on page 69.
16 Source Entry Utility (SEU)
Editing a MemberTo edit a member, do one of the following:
¹ Specify 2 (Edit) for the OPTION parameter of the STRSEU command.
¹ Specify option 2 (Edit) in the Opt prompt on the Work with Members Using SEUdisplay.
¹ Specify option 2 (Edit) on the Work with Members Using PDM display.
¹ Specify option 2 (Edit comments) on the Work with Display Records display inSDA.
The Edit display appears, containing the member you specified.
With the Edit display, you perform many operations, such as view the records in amember, edit the records, change the display of the member, and specify editsession defaults.
You can perform these operations by using line commands, SEU commands, oroptions displays. For details on using line commands to edit members, seeChapter 7, “Using Line Commands” on page 35 and Chapter 8, “User-DefinedLine Commands” on page 61. For details on using SEU commands to editmembers, see Chapter 9, “Using Source Entry Utility Commands” on page 69.
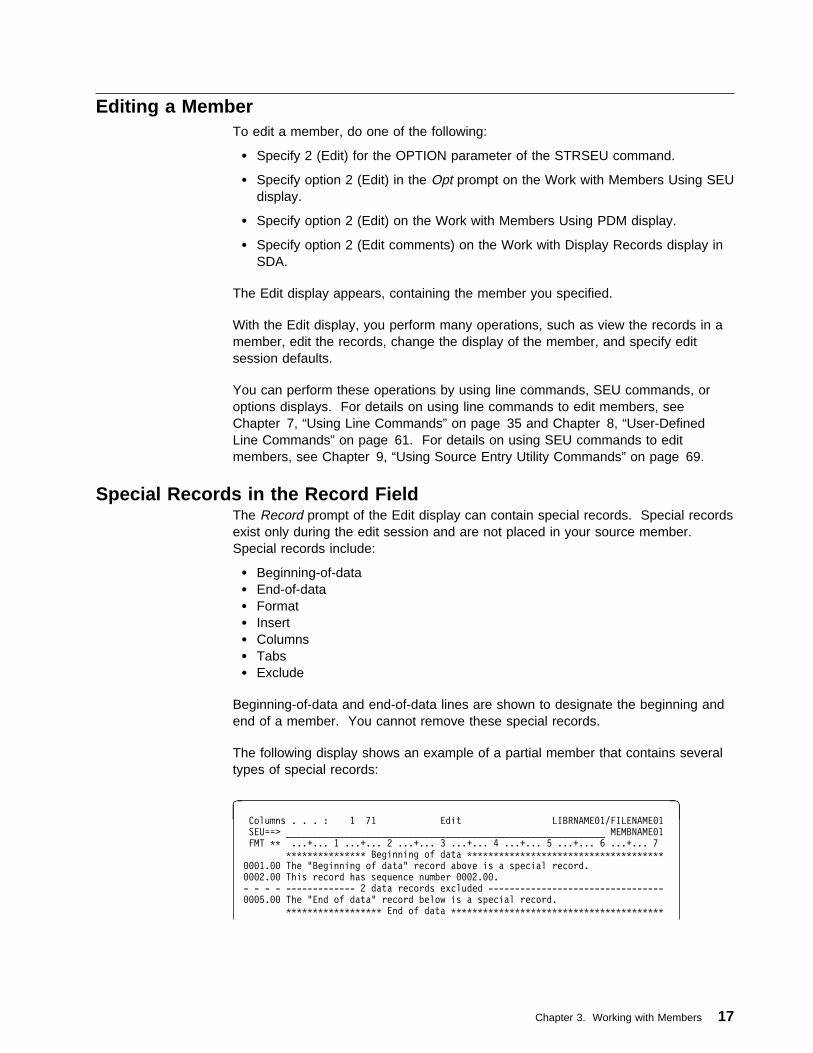
Special Records in the Record FieldThe Record prompt of the Edit display can contain special records. Special recordsexist only during the edit session and are not placed in your source member.Special records include:
¹ Beginning-of-data ¹ End-of-data ¹ Format ¹ Insert ¹ Columns ¹ Tabs ¹ Exclude
Beginning-of-data and end-of-data lines are shown to designate the beginning andend of a member. You cannot remove these special records.
The following display shows an example of a partial member that contains severaltypes of special records:
� � Columns . . . : 1 71 Edit LIBRNAME01/FILENAME01 SEU==> ____________________________________________________________ MEMBNAME01 FMT ** ...+... 1 ...+... 2 ...+... 3 ...+... 4 ...+... 5 ...+... 6 ...+... 7
*************** Beginning of data *************************************0001.00 The "Beginning of data" record above is a special record.0002.00 This record has sequence number 0002.00.- - - - ------------- 2 data records excluded ---------------------------------0005.00 The "End of data" record below is a special record.
****************** End of data ****************************************
Chapter 3. Working with Members 17

Editing DDS CommentsYou can use the Edit comments feature (option 2 on the Work with DisplayRecords display) in the screen design aid (SDA) to edit record comments in displayfile source. Press F15 (File-level comments) to edit the file-level comments. Whenyou specify option 2 (Edit comments) or press F15, SDA calls SEU to edit the com-ments.
For more information on working with display records, see ADTS for AS/400:Screen Design Aid, SC09-2604.
To edit DDS comments for a specific record, do the following:
1. Type 2 (Edit comments) in the Opt prompt of the Work with Display Recordsdisplay and press Enter to edit record-level comments. If you want to edit file-level comments, press F15 (File-level comments) instead of pressing Enter.SDA calls SEU to edit the comments, and you see the SEU Edit display.
The prompt on the right side of the title line on the SEU Edit display shows thetype of DDS comment you are editing:
¹ Record comments. Displays when record-level comments are being edited.The Record format name is displayed in the prompt directly below.
¹ File comments. Displays when file-level comments are being edited.
2. Add, change, or delete file-level or record-level comments as required.
3. Save, file, or cancel your changes. You can save your changes in one of threeways:
¹ Type SAVE on the SEU command line and press a positional function key(such as Enter, Page Up, Page Down, F19 (Left), or F20 (Right)) to saveyour changes and continue editing.
¹ Type FILE on the SEU command line and press Enter to file your changesand return the Work with Display Records display in SDA.
¹ Press F3 (Exit) to access the Exit display.
Type Y (Yes) in the Save comments prompt to have SDA save your com-ments made during the edit session. Type N (No) to have SDA discardany comments you made during the edit session. When you press Enter,you return to the Work with Display Records display in SDA.
The default for this prompt is Y if you made changes to the file-level com-ments or record-level comments, or N if you did not. You made changes ifyou changed, added, copied, or deleted a comment.
Note: Your comments are stored temporarily by SDA in the SDA workspace when you exit the Edit comments session. The commentsare not saved to the source member until you save the DDS sourcewhile exiting from SDA.
4. To cancel your changes, type CANCEL or CAN on the SEU command line, or typeN in the Save comments prompt on the Exit display and press Enter. TheWork with Display Records display is shown.
18 Source Entry Utility (SEU)

Splitting the Edit DisplayWhile editing a member, you can split the Edit display to browse another member,a spooled file, or an output queue. You can also copy a member or spooled fileinto the member you are editing.
To split the Edit display:
1. Press F15 (Browse/Copy options). The Browse/Copy Options display appears.
2. Do one of the following:
¹ To browse or copy another member in the same file, type the membername in the Browse/copy member prompt.
¹ To browse or copy another member in a different file, type the file name inthe File prompt and type the member name in the Browse/copy memberprompt.
¹ To browse or copy a spooled file, type the spooled file name in theBrowse/copy spool file prompt.
¹ To browse or copy another user’s spooled file, type the user name in theUser prompt and type the spooled file name in the Browse/copy spool fileprompt.
3. If you want to copy the member or spooled file, type Y in the Copy all recordsprompt.
4. Press Enter. One of the following occurs:
¹ If you are browsing the member, a split line (the line separating the twosessions) is placed in the middle of the Edit display, and you can view theadditional member or spooled file.
¹ If you are copying the member and you specified a target in the memberyou are editing, the member or spool file is copied into the member you areediting, but a split session is not started.
Note: See “Copying Records” on page 37 for information about copyingrecords with line commands.
¹ If you are copying the member but you did not specify a target in themember you are editing, the Edit display is split, and a Block Copy (CC)line command is placed on the first and last record of the member or spoolfile that you are browsing. You can then specify a target in the memberyou are editing. Press F12 (Cancel) to exit from the split session.
You can move the split line on a split Edit/Browse display by using F6 (Move splitline).
Line 24 on the display contains messages for both sessions. The remainingprompts in each session of the display are the same as those on the Edit orBrowse display.
Chapter 3. Working with Members 19

Notes:
1. When you request a Browse/Copy display or a Find/Change display from a splitdisplay, the split display is temporarily suspended. The options display thatappears depends on which session the cursor is in when you press the functionkey.
2. For information on using SEU commands with split displays, see “Entering SEUCommands on a Split Display” on page 69.
Printing a MemberTo print a member, do one of the following:
¹ Specify 6 (Print) for the OPTION parameter of the STRSEU command.
¹ Select option 6 (Print) on the Work with Members Using SEU display.
¹ When you exit from an edit session, type Y in the Print member prompt on theExit display.
¹ When you browse or edit a member, use the Line Print line command. See“Printing Records” on page 39 for more information on the Line Print linecommand.
Note: When you print a member with a large logical record length, it is not printedwith triple spacing.
To print a member with triple spacing, ensure that the actual record lengthis greater than 100 characters, and that the logical record length is equal tothe record length of the file minus 12. For example, if the record length ofthe file is 132, set the logical record length to 120. Otherwise, the memberis printed using the actual record length.
Change the logical record length using either the Edit System/36 SourceAttribute (EDTS36SRCA) or the Edit System/36 Procedure Attribute(EDTS36PRCA) command.
Deleting a MemberTo delete a member, select option 4 (Delete) on the Work with Members UsingSEU display.
The Confirm Delete of Members display appears, which lists all the members thatyou marked to be deleted. Check the list carefully to ensure that you are deletingthe correct members.
How the Work with Members Using SEU Display is ProcessedSEU processes the Work with Members Using SEU display as follows:
1. When you press the Page Up or Page Down keys, or perform a repositionrequest, SEU begins processing by checking the display for errors.
If errors exist, SEU highlights them and lists the appropriate error messages. Ifno errors occur, SEU processes the page or reposition request.
20 Source Entry Utility (SEU)
2. When you press Enter, SEU checks for errors. If no errors occur, SEU beginsprocessing the options on the display.
a. If you have changed the source file or library name, SEU checks forpending options in the list and for a new member name.
If there are no pending options, or if a new member name has not beenspecified, SEU changes the list to show the members in the new source fileor library. If there are pending options, or if a new member name is speci-fied, SEU issues an error message.
b. If you did not change the source file or library name, SEU checks the Posi-tion to prompt.
If you specified a value for this prompt, SEU repositions the list asrequested, then processes any options you specified.
c. SEU begins processing all options on the display in the order they occur.When it finds a delete option, SEU shows the Confirm Delete of Membersdisplay. This display lists all members marked for deletion on the Workwith Members Using SEU display. Confirm that each delete choice iscorrect, or return to the Work with Members Using SEU display to changeyour choices.
If you confirm all delete choices, SEU returns the Work with MembersUsing SEU display and performs the delete choices. It then continues toprocess the remaining options on the display in the order they occur.
d. If you press F17 (Subset), SEU checks for pending operations in themember list. If there are pending operations, SEU issues an errormessage.
How the Edit Display is ProcessedSEU processes the Edit display in the following order:
1. Processes Clear and Home operations: this removes all input typed in since thelast key was pressed, and immediately shows the Edit display.
2. Refreshes the display (F5): this immediately shows the Edit display without aprompt, temporary lines, pending line commands, or SEU commands, andremoves all input typed in since the last key was pressed.
3. Shows additional function keys (F24).
4. Enters changes to records.
5. Enters changes to prompts in a prompt.
6. Enters changes to insert lines.
7. Performs syntax checking on the data records.
8. Parses line commands and SEU commands: severe line commands or SEUcommand errors cause the display to be shown again without further proc-essing of this list.
9. Processes continuous insert.
10. Processes all line commands.
11. Processes all SEU commands.
12. Starts a prompt (F4).
Chapter 3. Working with Members 21

13. If a prompt is active and a prompt line command is not entered:
¹ Places the next record in a prompt when you press Enter.¹ Places the previous record in a prompt (F11).
14. If a prompt is active:
¹ Presents the Select Prompt display (F23).¹ Cancels the prompt (F12).
15. Removes the split display (F12).
16. Processes the Page Up, Page Down, F19 (Left), and F20 (Right) keys.
17. Sets the new starting position of the find and change operation, if required.
18. Processes the F13 (Change session defaults), F14 (Find/Change options), andF15 (Browse/Copy options) keys.
19. Performs any F16 (Repeat find) and F17 (Repeat change) operations.
20. Repositions the display to show the result of the find and change operation.
21. If the display has not been repositioned:
¹ Repositions for continuous inserting, if required.
¹ Repositions for continuous prompting. If the record is no longer on thescreen, SEU removes the prompt, if required.
22. Determines whether a prompt is still shown.
23. Quits the SEU session (F3).
System/38 commands and System/36 commands are not performed in SEU, butyou can access the Command Entry display by using the Attn key to enter thesecommands.
Errors are placed in a list in the order in which they are encountered, with theexception of syntax errors. Syntax errors are placed last on the list.
In situations where different items affect the same function, SEU processes the lastitem on the list. For example, if all the following are in effect, only the Page keytakes effect:
¹ The display must roll to show the next line for the prompt¹ You enter a line command to position the display¹ You press Page Up or Page Down
The other functions are preempted.
22 Source Entry Utility (SEU)

How an Edit Session WorksThe following diagram shows the steps that SEU uses to process data when youare editing source members:
Library
Member
SEUProgram
WorkSpace
SyntaxCheckingProgram
File
QSU3003
54
1
.1/ A copy of the member is placed in a work space when an edit session isstarted.
.2/ The records are displayed at the workstation so you can add new sourcerecords and change existing source records.
.3/ New and changed source records are optionally checked by a syntax-checking program.
.4/ The new or changed records are placed in the work space.
.5/ The records are optionally resequenced, and are transferred from the workspace to the source member when you exit from editing.
Chapter 3. Working with Members 23

24 Source Entry Utility (SEU)

Chapter 4. Changing the Edit Session Environment
You can change the edit session environment by using the Change SessionDefaults display or the SEU SET command.
To change the edit session environment using the Change Session Defaultsdisplay, press F13 (Change session defaults) on the Edit display. The ChangeSession Defaults display appears.
You can do the following using the Change Session Defaults display:
¹ Specify the amount by which the data is rolled¹ Specify uppercase only or mixed-case input¹ Turn tabs on or off¹ Specify the amount to increment sequence numbers for inserted records¹ Turn full screen mode on or off¹ Specify the screen size (for 27 row X 132 column displays only)¹ Specify the type of the source member that you are editing¹ Turn syntax checking on or off¹ Specify syntax checking for a range of statements
¹ Set margins¹ Set all existing records to a specific date¹ Set the resequence member default¹ Change the default input case for a source type¹ Specify whether you are using user-defined line commands
Some default values are dependent on the source type of the member, while othersare dependent on the value you entered and used during the last edit session. Ifthere is an error in the input, the incorrect input is highlighted. You must correctthe error before you can save the prompts.
Each of the preceding tasks corresponds to a prompt on the Change SessionDefaults display. For information on each prompt, press F1 (Help) to see the onlinehelp information for the Change Session Defaults display.
You can use the SEU SET command to change some session defaults. Optionsentered through the SET command appear in the corresponding prompts on theChange Session Defaults display. You can use the SET command to do the fol-lowing for the edit session:
¹ Specify the amount by which the display is rolled¹ Specify uppercase only or mixed-case input¹ Turn tabs on or off¹ Turn full screen mode on or off
For more information on the SET command, see Chapter 9, “Using Source EntryUtility Commands” on page 69 and “SET Command” on page 75.
Copyright IBM Corp. 1994, 1998 25

Changing the Default Case for a Member TypeThe default case used depends on the source type. To change the default casesetting for a member type, do the following:
1. Edit a member of the type that you want to change.
2. Press F13 (Change session defaults).
3. Press the Page Down key to access the second part of the Change SessionDefaults display.
4. Type either of the following in the Default to uppercase input for this sourcetype prompt:
¹ Y (Yes) to assign the current source member type an uppercase inputdefault for the current and subsequent edit sessions
¹ N (No) to assign the current source member type a mixed-case inputdefault for the current and subsequent edit sessions
Editing in Full Screen ModeWith full screen mode, you can remove the format line from the top and the func-tion key list from the bottom of the Edit display, providing four additional Editrecords with which to work. If you use SEU language prompts, they are displayedin an abbreviated form. For example, the Prompt type prompt is shown as the Pmtprompt.
Note: The function keys are still valid for the Edit display in full screen mode, eventhough they are not shown.
To switch to full screen mode, press F13 (Change session defaults) on the Editdisplay to access the Change Session Defaults display, and type Y in the Fullscreen mode prompt.
To cancel full screen mode and return to the normal mode of operation in SEU,press F13 (Change session defaults) to access the Change Session Defaultsdisplay, type N in the Full screen mode prompt, and press Enter. SEU returns thenormal Edit display. If you use SEU language prompts, full language promptsappear.
For information on how to use the SET command to switch to full screen mode, see“SET Command” on page 75.
26 Source Entry Utility (SEU)

Chapter 5. Using Syntax Checking
You can do syntax checking of high-level-language (HLL) and control language(CL) source statements to help you create source members free of syntax errors.
You can use the syntax checking feature of SEU in two ways:
¹ To find syntax errors in a range of records
¹ To check records for syntax errors as you insert or change them
When a syntax error is found in a line, SEU flags it by displaying the line in reverseimage, and issues an error message. The source type of the member you areediting determines the syntax checker that is used.
Note: Syntax checking performed by SEU is not meant to replace the more com-prehensive syntax checking performed by language processors. The scopeof a source member that is syntax checked is limited to single records orstatements only. Errors in identifier references or procedure calls are exam-ples of syntax-related issues that are not dealt with by the syntax checker inSEU.
You can also search for records added or changed that contain syntax errors. Forinformation, see “Finding Syntax Errors” on page 32.
Finding and Flagging Syntax ErrorsTo find and flag syntax errors in a member, do the following:
1. Start an SEU edit session with the member you want to check.
2. Press F13 (Change session defaults) to access the Change Session Defaultsdisplay.
3. Verify that a syntax checker exists for the source type of the member you areediting. If the source type shown in the Source type prompt does not have asyntax checker, you cannot perform this function.
4. Specify two sequence numbers in the From sequence and To sequenceprompts as a range of records to check. When you specify the starting andending sequence numbers, SEU checks the syntax of all records in themember you are editing within the range specified by the two sequencenumbers. If you specify 0 for the From sequence prompt, 9999.99 for the Tosequence prompt, or a line number greater than the member size for the Tosequence prompt, SEU checks all records in the member for syntax errors.
5. Verify the default values for the portion of each record to check in the Leftmargin and Right margin prompts if you are editing a PL/I member. PressEnter.
SEU checks all lines within the range you specified on the Change SessionDefaults display. If there is a syntax error in a line, SEU flags the error bydisplaying the line in reverse image, and issues an error message. If there ismore than one error in a line, SEU deals with each error, moving from left toright across the line.
Copyright IBM Corp. 1994, 1998 27

Using Syntax Checking When Inserting or Changing RecordsTo use the syntax-checking feature of SEU when inserting or changing records in amember, do the following:
1. Start an SEU edit session with a new or an existing member.
2. Press F13 (Change session defaults) to access the Change Session Defaultsdisplay.
3. Verify that a syntax checker exists for the source type of the member you areediting. If the source type shown in the Source type prompt does not have asyntax checker, SEU displays an error message and you cannot perform thisfunction.
4. Type Y (Yes) in the When added/modified prompt in the Syntax Checkingsection of the display to have SEU check each line for syntax errors as youadd or change it.
5. Verify the default values for the portion of each record to check in the Leftmargin and Right margin prompts if you are editing a PL/I, C, SQLC, orSQLPLI member. Press Enter to return to the Edit display.
6. Insert a new record by using the Insert (I) or Insert-with-Prompt (IP) line com-mands, or make changes to an existing record. Press Enter.
SEU checks the line you added or modified for syntax errors. If there is asyntax error in the line, SEU flags the error by displaying the line in reverseimage, and issues an error message. If there is more than one error in a line,SEU deals with each error, moving from left to right across the line.
If you type Y (Yes) in the When added/modified prompt, errors are flagged only onlines that you add or change in the current edit session. If you edit a member thatwas saved in a previous edit session, lines that contained syntax errors from thatsession are flagged only if:
¹ They are changed in the current session.
¹ You specify a range of records to check on the Change Session Defaultsdisplay.
¹ A modified record affects its surrounding records.
Note: Depending on the programming language you are using, a modifiedrecord may cause the syntax checker to check all statements that arelogically complete. See the applicable language manual for details onhow syntax checking is done for the language you are using.
You can syntax-check records while you are using a prompt or a format line. If youare using a prompt, SEU checks for syntax errors while the record is in the prompt.If there are errors, the record is retained in the prompt, and a message is issued.You can correct the error at this time, or press Enter to tell SEU to insert the recordinto the member anyway.
28 Source Entry Utility (SEU)

Syntax Checkers for AS/400 Source TypesSyntax checkers for the following AS/400 source types are provided by IBM inlibrary QSYS:
The following AS/400 source types do not have syntax checkers:
BAS CL LF RPGLE
BASP CLLE MNU RPT
BND CLP MNUDDS SQLCBL
CBL CMD PF SQLCBLLE
CBLLE DFU PLI SQLFTN
CICSCBL DSPF PRTF SQLPLI
CICSCBLLE FTN QRY SQLRPG
CICSSQLCBL ICFF RPG SQLRPGLE
C MENU REXX SQLCLE
CICSC MNUCMD RMC SRT
CICSMAP PAS SPADCT TBL
CLD PNLGRP SQLC TXT
Syntax Checkers for System/36 Source TypesSyntax checkers for the following System/36 source types are provided by IBM inlibrary QSYS: CBL36, RPG36, and RPT36.
The following System/36 source types do not have syntax checkers:
ASM36 BGD36 FOR36 SRT36
ARS36 BGF36 MNU36 UNS36
BAS36 DFU36 MSGF36 WSU36
BASP36 DSPF36 OCL36
BGC36 DTA36 PHL36
Chapter 5. Using Syntax Checking 29

Syntax Checkers for System/38 Source TypesSyntax checkers for the following System/38 source types are provided by IBM inlibrary QSYS:
The following System/38 source types do not have syntax checkers: SRT38 andTXT38.
BAS38 CLP38 LF38 QRY38
BASP38 CMD38 MXDF38 RPG38
BSCF38 CMNF38 PF38 RPT38
CBL38 DFU38 PLI38
CL38 DSPF38 PRTF38
30 Source Entry Utility (SEU)
Chapter 6. Finding and Changing Character Strings
During an edit session, you can search a member for a string of characters, andoptionally change that string to a new string, by using the Find/Change Optionsdisplay.
To access the Find/Change Options display, press F14 (Find/Change options) whileon the Edit display. You can do the following on the Find/Change Options display:
¹ Find a specified string¹ Change a specified string¹ Find records with a specified date¹ Find syntax errors
During a browse session, you can search for a string of characters by using theFind Options display. The Find Options display is similar to the Find/ChangeOptions display. You cannot change a member using the Find Options display, andyou cannot find syntax errors, except in a spooled file.
You can perform most of the functions on the Find/Change Options display and theFind Options display by using the SEU FIND, CHANGE, and SET commands. SeeChapter 9, “Using Source Entry Utility Commands” on page 69 for information onthe SEU FIND, CHANGE, and SET commands.
To save the values you enter for the Find prompt and the Change prompt, pressEnter, F16 (Find), or F17 (Change). If the input contains no errors, the values forall prompts are saved, except for the Occurrences to process prompt, and thevalues are displayed the next time you call the Find/Change Options display.
Finding and Changing StringsTo find a string:
1. Type the string you want to find in the Find prompt of the Find Options displayor the Find/Change Options display.
2. Change the other prompts, if necessary.
3. Press F16 (Find). The string is found.
To find and change a string:
1. Type the string you want to change in the Find prompt of the Find/ChangeOptions display.
2. Type the string you want to replace it with in the Change prompt.
3. Change the other prompts, if necessary.
4. Press F17 (Change). The occurrences of the string that you specified arechanged.
Note: For help on any of the prompts on the display, press F1 (Help) to displaythe online help information.
If the string you type for the Find or Change prompt is enclosed in quotation marksor apostrophes, the quotation marks and apostrophes are ignored for the search.
Copyright IBM Corp. 1994, 1998 31

Otherwise, the string begins in the first position and includes all characters up toand including the last nonblank character. Enclose the string in quotation marks orapostrophes to include beginning and ending quotation marks, apostrophes, andtrailing blanks. Two quotation marks adjacent to each other define the null string.
The following table shows how to find strings, including strings with quotationmarks, apostrophes, and blanks.
To search for an asterisk (*) character in a member, enclose it in quotation markswhen you type it as the find string. Otherwise, SEU interprets the asterisk as arequest to search for the previous find string. This is only valid for the SEU FINDand CHANGE commands if strings were entered previously.
To Find This String Specify This String
ABC ABC or 'ABC' or "ABC"
'ABC' ''ABC'' or "'ABC'"
'ABC 'ABC or ''ABC' or "'ABC"
ABC' ABC'
Ï'ABC'Ï 'Ï'ABC'Ï' or "Ï'ABC'Ï"
O'NEIL O'NEIL or 'O'NEIL' or "O'NEIL"
ÏÏÏÏABC ÏÏÏÏABC
ABCÏÏÏÏ 'ABCÏÏÏÏ' or "ABCÏÏÏÏ"
ABCÏDEF ABCÏDEF or 'ABCÏDEF' or "ABCÏDEF"
*ERR '*ERR' or "*ERR"
* '*' or "*"
Note: Ï=blank
Finding Records by DateTo find a record last changed on a specified date:
1. Press F14 (Find options) to access the Find Options display.
2. Specify the date in the Search on date prompt.
3. Specify 1, 2, or 3 in the Compare prompt.
4. Press F16 (Find). The record with the specified date is found. Use F16(Repeat find) to find the next record with the specified date.
Searching for a date and searching for the find string are mutually exclusive. TheCompare prompt determines which type of find is performed when you press F16(Find). If the Compare prompt is blank, SEU searches for the find string. If thecompare prompt is not blank, SEU searches for the date.
Finding Syntax ErrorsYou can use the find operation to locate syntax errors detected in a source memberby an SEU syntax checker. To find syntax errors, type *ERR in the Find prompt,leaving the remainder of the prompt blank. When you press F16 (Find), SEUlocates any syntax errors found by the syntax checker.
32 Source Entry Utility (SEU)

Note: To search for the string *ERR in a member, enclose it in quotation markswhen you type it as the find string. Otherwise, SEU interprets the asteriskas a request to search for syntax errors.
When searching for syntax errors, the find parameters (Occurrences to process andRecords to search prompts) function the same as for a normal find. You cannotperform a change operation with a find operation that specifies syntax errors.
See Chapter 5, “Using Syntax Checking” on page 27 for details on how to set upsyntax checking in your edit session.
For information on using the FIND command to locate syntax errors, see “FINDCommand” on page 72.
Finding a String in a List of Members Using PDMYou can use the find string function (option 25 on the Work with Members UsingPDM display) of the programming development manager (PDM) to search selectedmembers in a list or a subset of a list for a character string. You can use an optionof the find string function to use SEU for editing members that contain the stringyou specify. For more information on using the find string function of PDM, refer tothe ADTS/400: Programming Development Manager, SC09-1771.
If you specify 2 (Edit) for the Option prompt on the PDM Find String display, PDMcalls SEU to edit the selected members in the list that contain the string youspecify. Also, PDM passes the values for the Find Columns to search and Kind ofMatch prompts to the Find/Change Options display of SEU each time it calls SEU.
When SEU starts, the cursor is positioned on the first occurrence of the find string.Press F16 (Find) to find each subsequent occurrence.
Changing StringsYou can use SEU to replace the string you specified in the Find prompt withanother string. To change strings located with the PDM find string function, do thefollowing:
1. Select the members you want to search by using option 25 (Find string) on thePDM member list and press Enter. The Find String display is shown.
2. Specify values for the Find, From column number, To column number and Kindof match prompts. These values are used for each member selected for thesearch.
You may also specify values for the print options. These allow you to printeither the list of members which contain the find string, or the records in themember which contain the match. For more information on the print options,refer to ADTS/400: Programming Development Manager.
3. Type 2 in the Option prompt, and press Enter. PDM searches the membersyou selected for the string specified in the Find prompt. If PDM finds the string,it calls SEU to edit the member. SEU positions the member so that the cursoris under the first occurrence of the string.
4. Press F14 (Find/Change options) to access the Find/Change Options display.
Chapter 6. Finding and Changing Character Strings 33

Use the Find/Change Options display to specify the options for the changeoperation.
Note: The Find, From column number, To column number, and Kind of matchprompts are already filled in with the values you specified on the FindString display.
5. Press F17 (Change) to perform the change operation.
If you specified 2 (All) for the Occurrences to process prompt, SEU changes allof the strings in the member to the one you specified. If you specified 1 (Next)or 3 (Previous), press F17 to change following or previous strings one at atime.
6. Press F3 (Exit) to access the Exit display when you finish changing themember. Type Y in the Create/Change member prompt, then press Enter tosave the changes.
The programming development manager (PDM) continues to search theremaining members you selected for the find string.
Notes:
1. All of the values you specified on the PDM Find String display are retained foreach of the members searched. For example, the value you type in the Findprompt is used to search all of the members that you select.
2. The value you specify for the Change prompt on the SEU Find/Change Optionsdisplay is retained from the first change operation you perform. When PDMcalls SEU for another member that contains the Find string, you can press F17(Repeat change) to perform the same type of change as you did for the pre-vious member.
If you specify 2 (All) for the Occurrences to process prompt, this value is alsoretained for subsequent change operations. If you specify any other value forthe Occurrences to process prompt, this prompt assumes the value 1 (Next) foreach subsequent member.
3. The value you specify for the Allow data shift prompt on the Find/ChangeOptions display in SEU is not retained for future edit sessions when you usethe Find String function. The default for this value depends on the type of thesource member being edited.
Exiting from SEU after Using Find StringWhen you exit from an edit session, you can continue searching the remainingmembers you selected on the Work with Members Using PDM display, or you cancancel the search and return to the Work with Members Using PDM display.
To exit from SEU while in an edit session, press F3 (Exit). If you want to continuesearching members for the find string, type N in the Cancel PDM Find Stringprompt, then press Enter. If you want to cancel the search for the find string, typeY in this prompt. N is the default for this prompt.
You can also press F3 (Exit) twice to cancel the search for the find string. Anychanges you made to the member are discarded.
34 Source Entry Utility (SEU)

Chapter 7. Using Line Commands
You can use SEU line commands to perform various functions on the records in amember. You can use line commands to:
¹ Copy, delete, insert, move, or print records¹ Help you enter and format data for new records¹ Change which records you see on the display
You type line commands in the Sequence number field for a record. For example,type the D (delete) line command in the sequence number of a record to delete thatrecord. Type the D3 line command to delete three records.
You can type these commands in uppercase or lowercase. SEU automatically con-verts the commands to uppercase.
After typing or changing your line commands, press one of the following keys to runthe commands:
¹ Enter¹ A valid function key¹ Page Up or Page Down
You can also create your own line commands to perform editing functions that arenot covered by the SEU line commands. For more information refer to Chapter 8,“User-Defined Line Commands” on page 61.
Sequence Numbers for RecordsAs you enter source statements into a member, SEU assigns a unique sequencenumber to each record.
When you create a new source member or add records to the end of an existingmember, SEU uses a 1.00 increment to assign sequence numbers. For example,SEU numbers the first records in a new source member as follows:
0001.00 0002.00 0003.00 . . . 000n.00
When you copy, move, or insert records, SEU uses 0.01 increments. For example,if you insert three records between records 0003.00 and 0004.00, SEU assignssequence numbers 0003.01, 0003.02, and 0003.03 to the inserted records.
Copyright IBM Corp. 1994, 1998 35
Changing the Increment Used for Sequence NumbersTo change the increment SEU uses for inserted records, specify the increment youwant on the Increment of insert record field on the Change Session Defaultsdisplay.
If you specify an increment greater than 1.00, the sequence number for eachrecord inserted is incremented by that amount.
If you specify an increment less than 1.00, the sequence numbers for the recordsinserted before the end of the member are incremented by that amount, while thoseadded to the end of the member are incremented by 1.00.
SEU resequences the records when you add a record between two consecutivelynumbered records (for example, between records 1.01 and 1.02). SEU also rese-quences the records if you copy or move a group of records to a target locationthat cannot receive all the records.
Copying, Deleting, Inserting, Moving, and Printing RecordsTo copy, delete, insert, move, or print records in a member, use the following typesof line commands:
¹ After, Before, and Overlay (target commands) ¹ Copy ¹ Copy Repeat ¹ Delete ¹ Insert ¹ Move ¹ Repeat ¹ Line Print
Specifying TargetsThe After (A), Before (B), and Overlay (O) commands are target commands. Youspecify the After, Before, or Overlay command as a target for a Copy (C), CopyRepeat (CR), Move (M), or block (MM, CC) command.
The Overlay command replaces blank data in a selected line with nonblank datafrom another line. The Overlay command selects the target, or the line whoseblanks are replaced. The Copy, Copy Repeat, and Move commands select the linethat replaces the blanks.
Use the following line commands to specify a target:
Command Description
A Move, copy, or insert the specified records after this record.
An Move, copy, or insert the specified records after this record andrepeat the lines n-1 times.
B Move, copy, or insert the specified records before this record.
Bn Move, copy, or insert the specified records before this record andrepeat the lines n-1 times.
36 Source Entry Utility (SEU)

O Overlay this record with the first record specified by the Copy, CopyRepeat, or Move line command.
On Overlay this record and the next n-1 lines with the records specifiedby the Copy, Copy Repeat, or Move line command.
OO Overlay all records in this block (defined by a pair of OO com-mands) with the records defined by the Copy, Copy Repeat, orMove line commands.
Note: When you use the Overlay line commands, keep the following in mind:
¹ If you specify more records to overlay than you are copying or moving,SEU reuses the moved or copied records to complete the overlay.
¹ The records to be moved are deleted from their original location afterthe overlay is performed, unless one of the following is true:
– There are more records to overlay than to move.
– Not all nonblank characters from the move records are copied tothe overlay records.
In either situation, SEU retains the records in their original position andissues a message.
For examples of using the target commands, see “Copying Records,” “CopyingRecords Repeatedly,” and “Moving Records” on page 39.
Copying RecordsYou can copy a record or block of records to another location in a member or toanother member with the following line commands:
Command Description
C Copy this record to the target specified by A, B, O, or OO.
CC Copy this block of records (defined by a pair of CC commands) tothe target specified by A, B, O, or OO.
Cn Copy n records, starting with this record, to the target specified byA, B, O, or OO.
You can type the line commands for a copy operation in any order. For example,you can type the target (A, B, or O) line command before or after typing the CCand CC line commands that identify the block of records to be copied, but thetarget must be outside the range of the block command. For more information, see“Rules for Entering Line Commands” on page 55.
Copying Records RepeatedlyYou can repeatedly copy a record or block of records to one or more locations byusing the Copy Repeat (CR) command. This command is used with the targetcommands, similar to the way you use the Copy command. After processing theoperation, SEU removes the target commands but retains the CR command on thedisplay. Enter the new target for the records to repeat the copy operation as manytimes as you need. To cancel the command, type over it or press F5 (Refresh).
Use the following line commands to repeatedly copy the same records:
Chapter 7. Using Line Commands 37

Command Description
CR Copy this record to the targets specified by A, B, O, or OO, andretain this command.
CRn Copy n records, starting with this record, to the targets specified byA, B, O, or OO, and retain this command.
CCR Copy this block of records (defined by a pair of CCR commands) tothe targets specified by A, B, O, or OO, and retain these com-mands.
When you use the Copy Repeat commands, keep the following in mind:
¹ Do not use the Copy Repeat line command in conjunction with the Copy orMove line commands. If you do, SEU issues an error message.
¹ Specify only one block of records to be copied. If you specify more than oneblock of records, SEU issues an error message.
Deleting RecordsYou can delete a record or a block of records from a member by using the fol-lowing Delete line commands:
Command Description
D Delete this record.
DD Delete this block of records (defined by a pair of DD commands).
Dn Delete n records, starting with this record.
When you use the Delete command, keep the following in mind:
¹ To delete all the records following (and including) the record where the Dn linecommand is typed, use a large value for n in a Dn line command.
¹ You can process more than one Delete line command at the same time.
Inserting Blank RecordsYou can insert blank lines in a member to add new records. You can add one ormore blank lines by using the following line commands:
Command Description
I Insert a blank line below this record. Each time you type data onthe blank line and press Enter, SEU inserts another blank line.
In Insert n blank lines below this record. When you type data on thelast inserted line and press Enter, SEU inserts another blank line.
Note: Other Insert line commands are described in the sections “DisplayingFormat Lines” on page 44, “Creating Prompts” on page 40, and “Definingand Inserting Skeleton Lines” on page 47.
When you use the Insert commands, keep the following in mind:
¹ The I line commands are repeating commands. Each time you type data(including a blank) on the blank line of an I line command, or the last blank lineof an In command, and press Enter, SEU inserts another blank line. This con-tinues until you:
38 Source Entry Utility (SEU)
– Press F5 (Refresh).– Press Enter without changing the newly inserted line.– Move the cursor off the line.
¹ If the value of n in an In line command is greater than the number of spacesbelow the In line command, SEU supplies only the number of blank lines thatcan fit on the display.
¹ If you press F19 (Left) or F20 (Right), SEU shifts the display left or right, butdoes not insert a new line until you press Enter.
Moving RecordsYou can move a record or block of records to another location in a member or toanother member by using the following line commands:
Command Description
M Move this record to the target specified by A, B, O, or OO.
MM Move this block of records (defined by a pair of MM commands) tothe target specified by A, B, O, or OO.
Mn Move n records, starting with this record, to the target specified byA, B, O, or OO.
You can type the line commands for a move operation in any order. For example,you can type the target (A, B, O, or OO) line command before or after typing theMM and MM line commands that identify the records to be moved.
Repeating RecordsYou can repeat a record or block of records on the display one or more times. TheRepeat command is similar to the Copy command, but does not require a targetcommand (A, B, O, or OO). The Repeat command automatically repeats therecord or block of records immediately below the original record or records.
Use the following line commands to repeat a record on the display:
Command Description
RP Repeat this record immediately below this record.
RPn Repeat this record immediately below this record n times.
RPP Repeat a block of records (defined by a pair of RPP commands)immediately below this block.
RPPn Repeat a block of records (defined by a pair of RPP commands) ntimes immediately below this block.
Printing RecordsYou can use a line command to print records during an edit session or a full-displaybrowse session by using the following Line Print commands:
Command Description
LP Prints one record.
LPn Prints the next n records, starting with this record.
LLP Prints a block of records (defined by a pair of LLP commands).
Chapter 7. Using Line Commands 39

When you use the Line Print command, keep the following in mind:
¹ Lines already selected with the Exclude command are not printed but remain inthe member as a special record. The special record prints with a messagestating how many records are excluded.
¹ Lines already selected with the Hide command are not printed in the full screenbrowse session.
Entering DataSEU supports a variety of commands that make it easier to enter new data byinserting lines or prompts that can be used as templates for the new data. Thesecommands are:
¹ Columns¹ Prompt, Insert with Prompt¹ Format, Insert with Format¹ Skeleton, Insert Skeleton
¹ Tabs
Displaying a Columns LineYou can request a columns line on the display to make it easier to insert or editsource. The columns line numbers the columns across the display, even if youshift the display to the left or right by using the F19 (Left) and F20 (Right) keys.
Use the following line command to request SEU to show a free-format columnsline:
Command Description
COLS Insert a columns line above this record.
Creating PromptsYou can request a prompt for any data record. A prompt separates and labelseach field in a record, and is shown at the bottom of the current display. You canspecify the prompt type with the Prompt command, or you can select the type byusing the Select Prompt display command. For more information on using promptsand the Select Prompt display, see Chapter 10, “Editing with Prompts and FormatLines” on page 81.
Use the following line commands to place an existing record in a prompt:
Command Description
P Place this record in a prompt that has the same format as thisrecord.
P? Show the Select Prompt display to select a prompt type. Place thisrecord in the prompt selected from that display.
Pxx Place this record in a prompt that has specified format xx. Forexample, type the PCB line command to place this record in aCOBOL prompt.
You can also request a prompt for a new record. SEU inserts a blank line into themember, and then places the blank line in a prompt at the bottom of the display.
40 Source Entry Utility (SEU)

Use the following line commands to insert a blank line and place it in a prompt:
Command Description
IP Insert a blank line after this record, and place the blank record in aprompt with the format of this record.
IP? Show the Select Prompt display to select a prompt type. Insert ablank line after this record, and place the blank line in the promptselected from that display.
IPxx Insert a blank line after this record, and place the blank record in aprompt with the specified format xx. For example, type the IPCBline command to insert a blank line after this record, and to placethe record in a COBOL prompt.
When you use the Prompt line commands, keep the following in mind:
¹ The xx is the 1-character or 2-character code for the prompt type.
¹ When you use the P line command, SEU checks positions of the record todetermine its prompt type based on the source type you are using.
¹ When you use the P line command (or press F4) to edit CL commands ofsource type BND, CL, CL38, CLLE, CLP, CLP38, CMD, or CMD38, SEUrequests a command prompt. The command prompt shows the values youentered on the Edit display and default values for the command.
¹ The prompt command is a repeating operation:
– For the P and Pxx commands, SEU places the next record in the prompteach time you press Enter.
– For the IP and IPxx line commands, SEU inserts another blank line for theprompt each time you press Enter. SEU stops inserting blank lines andremoves the IP command if you press Enter without entering any data inthe current prompt.
¹ SEU continues to place records in the prompt until you:
– Reposition the Edit display so the line in the prompt is not on the display.– Press F5 (Refresh) or F12 (Cancel).– Reach the end of the member.– Reach the beginning of the member by using F11 (Previous record) or the
TOP command.
Notes:
1. You can type line commands under the field label Sequence number in theprompt just as you would type line commands in the Sequence-number field ofthe records being shown.
2. You can also request a prompt by positioning the cursor on the record youwant to place in a prompt, and pressing F4 (Prompt).
Using Prompts for New Records – ExampleYou can use the IPxx line command to insert a blank line into the member andplace a blank record in a prompt with the specified format xx.
Type the IPC line command in sequence number 0004.00, as shown in the fol-lowing display. The format code for the RPG calculation prompt is C.
Chapter 7. Using Line Commands 41

Note: In this example, the line commands shown in the Sequence number fieldare followed by blanks to make them easier to read. You do not have totype the blanks.
� � Columns . . . : 6 76 Edit LIBRNAME01/FILENAME01 SEU==> ____________________________________________________________ MEMBNAME01 FMT F FFilenameIPEAF....RlenLK1AIOvKlocEDevice+......KExit++Entry+A....U1....
*************** Beginning of data *************************************0001.00 F* SAMPLE PROGRAM 50002.00 F*0003.00 FCUSMINQ CF E WORKSTNIPC FCUSMSTL IF K DISK
****************** End of data ****************************************
Press Enter. The following display shows that SEU inserts a blank line into themember after sequence number 0004.00, and places a blank record in the promptwith the specified RPG calculation format.
� � Columns . . . : 6 76 Edit LIBRNAME01/FILENAME01 SEU==> ____________________________________________________________ MEMBNAME01 FMT F FFilenameIPEAF....RlenLK1AIOvKlocEDevice+......KExit++Entry+A....U1....
*************** Beginning of data *************************************0001.00 F* SAMPLE PROGRAM 50002.00 F*0003.00 FCUSMINQ CF E WORKSTN0004.00 FCUSMSTL IF K DISK'''''''
****************** End of data ****************************************
Prompt type . . . C Sequence number . . . '''''''
Level N01N02N03 Factor 1 Operation Factor 2 Result ___ _________ __________ _____ __________ ______ DecimalLength Positions H/N/P HI LO EQ Comment___ _ _ __ __ __ _______________
F3=Exit F4=Prompt F5=Refresh F11=Previous record F12=Cancel F23=Select prompt F24=More keys
� �
Using Prompts for Embedded SQL Statements – ExampleIf you use the P line command (or press F4) when you are editing an embeddedSQL statement in source types CICSSQLCBL, SQLCBL, SQLCBLLE, SQLRPG,SQLRPGLE, and SQLFTN, SEU requests an SQL prompt.
For example, the following display shows an embedded SQL statement in aCOBOL member.
42 Source Entry Utility (SEU)

� � Columns . . . : 1 71 Edit LIBRNAME01/FILENAME01 SEU==> ____________________________________________________________ MEMBNAME01 FMT CB ......-A+++B+++++++++++++++++++++++++++++++++++++++++++++++++++++++++++
*************** Beginning of data *************************************0001.00 MOVE A TO B.SQL EXEC SQLSQL CREATE COLLECTION ABCSQL END-EXEC.0005.00 MOVE A TO B.SQL EXEC SQL
****************** End of data ****************************************
If you use the P command or press F4 (Prompt) in sequence numbers 0001.00,0002.00, 0004.00, or 0005.00, SEU calls COBOL prompting for these lines. An IPcommand in sequence numbers 0001.00, 0003.00, 0004.00, or 0005.00 insertslines with COBOL prompting being performed after that line. An IP command insequence number 0003.00 will result in an improper SQL statement if you enter aregular COBOL statement during prompting.
If you use the P command or press F4 (Prompt) in sequence number 0003.00,SEU calls SQL prompting on that line. An IP command in sequence number0006.00 calls SQL prompting. If a valid SQL statement is then entered in theprompt, the member is returned as shown in the following display.
� � Columns . . . : 1 71 Edit LIBRNAME01/FILENAME01 SEU==> ____________________________________________________________ MEMBNAME01 FMT CB ......-A+++B+++++++++++++++++++++++++++++++++++++++++++++++++++++++++++
*************** Beginning of data *************************************0001.00 MOVE A TO B.SQL EXEC SQLSQL CREATE COLLECTION ABCSQL END-EXEC.0005.00 MOVE A TO B.SQL EXEC SQLSQL CLOSE DEFSQL END-EXEC
****************** End of data ****************************************
If the inserted line follows an EXEC SQL line, a blank line is passed to the SQLprompter instead of performing COBOL prompting. If a new SQL statement isreturned to SEU, that new statement is inserted after the EXEC SQL line and anew END-EXEC is added by SEU if one does not already exist (record 0008.00)after the inserted line. The cursor is placed in the line command area of theEND-EXEC line.
Notes:
1. SQL FORTRAN does not have closing delimiters, so none will be added in SQLFORTRAN.
2. Multiple statements cannot be entered between SQL delimiters.
3. Members of type CICSSQLCBL can have embedded CICS and SQL state-ments in the COBOL source. The lines that contain CICS statements mustbegin with EXEC CICS, and end with END-EXEC.
The SQL prompting is done for SQL statements only. Statements that areCICS or AS/400 COBOL receive COBOL prompting. If an SQL statement is in
Chapter 7. Using Line Commands 43

a CICS statement, the SQL statement is invalid and will receive COBOLprompting.
Because SQL only allows one SQL statement between a pair of SQL delimiters,SEU will treat all data between these lines as one SQL statement and will viewdata returned by the SQL prompter as one SQL statement.
Because SQL prompting takes you to a new display, SEU follows the same con-ventions as for CL and BASIC and prompting ends after the SQL prompt is dis-played.
SQL statements in host language programs are identified as follows:
¹ SQLCBL and CICSSQLCBL. Each SQL statement is preceded by an EXECSQL delimiter and followed by an END-EXEC delimiter. These SQL delimitersmust be the only entry on the line in which they occur or SEU will not recognizethem.
¹ SQLFTN. Each SQL statement is preceded by an EXEC SQL delimiter. Thisdelimiter must be the only entry on the line in which it occurs or SEU will notrecognize it as a delimiter. SQL FORTRAN statements do not have closingSQL delimiters.
¹ SQLRPG. Each SQL statement is preceded by a C/EXEC SQL delimiter andfollowed by a C/END-EXEC delimiter. Each line between the SQL delimitershas a C+ in columns 6 and 7. The C/END-EXEC delimiter must be the onlyentry on the line in which it occurs.
Displaying Format LinesYou can insert a format line on the display to help you type or edit records in themember. A format line is shown immediately above the record you are editing orcreating, and labels the fields in the record according to the source type. You canspecify the source type with the Format command, or you can select the type byusing the Select Format display. For more information on using format lines andthe Select Format display, see “Format Lines” on page 84.
Use the following line commands to request SEU to show a format line. The formatline appears above the line with the Format command.
Command Description
F Insert a format line above this record with the same format as therecord.
F? Show the Select Format display. Insert a format line above thisrecord with the format type selected from that display.
Fxx Insert a format line above this record that has the specified formatxx. For example, type the FCB line command to insert a COBOLformat line above this record.
You can also request SEU to insert a format line followed by one or more blanklines for new records.
Use the following Insert-with-Format commands to insert a format line and one ormore blank lines. The format line and blank lines are inserted after the line with theInsert-with-Format command.
44 Source Entry Utility (SEU)

Command Description
IF Insert a format line and one blank line below this record. Theformat line has the format of this record. Each time you type dataon the blank line and press Enter, SEU inserts another blank line.
IFn Insert a format line and n blank lines below this record. The formatline has the format of this record.
IF? Show the Select Format display to select a specific format. Insert aformat line below this record with the format selected from thatdisplay. Insert a blank line below the format line.
IFxx Insert a format line and one blank line below this record. Theformat line has the specified format xx. Each time you type dataon the blank line and press Enter, SEU inserts another blank line.For example, type the IFCB line command to insert a COBOLformat line, and a blank record below it.
IFxxn Insert a format line and n blank lines below this record. The formatline has the specified format xx.
When you use the Format or Insert-with-Format line commands, keep the followingin mind:
¹ The code xx is a 1-character or 2-character format identifier of the format to bedisplayed. When you do not specify a format identifier, SEU examines therecord and determines the format based on the source type you are using.
¹ The format lines are only temporary records and are not part of the sourcemember. Use the D line command or press F5 (Refresh) to delete them whilein the edit session. SEU ignores remaining format lines when it saves thechanged member. (A Dn command will do the same as a D command whenspecified on a format line.)
¹ The third line of the Edit display is an automatic format line. SEU automaticallyshows this format line based on the member source type and the type of thefirst data record below it.
¹ The IF and IFxx line commands are repeating commands. Each time you typedata on the blank line and press Enter, SEU inserts a blank line. This con-tinues until you end the edit session, press F5 (Refresh), or move the cursor offthe insert line and press any key.
Inserting a Format Line – ExampleIn the C program segment shown in the following display, type the F line commandin sequence number 0023.00.
Note: In this example, the line commands shown in the Sequence number fieldare followed by blanks to make them easier to read. You do not have totype the blanks.
Chapter 7. Using Line Commands 45
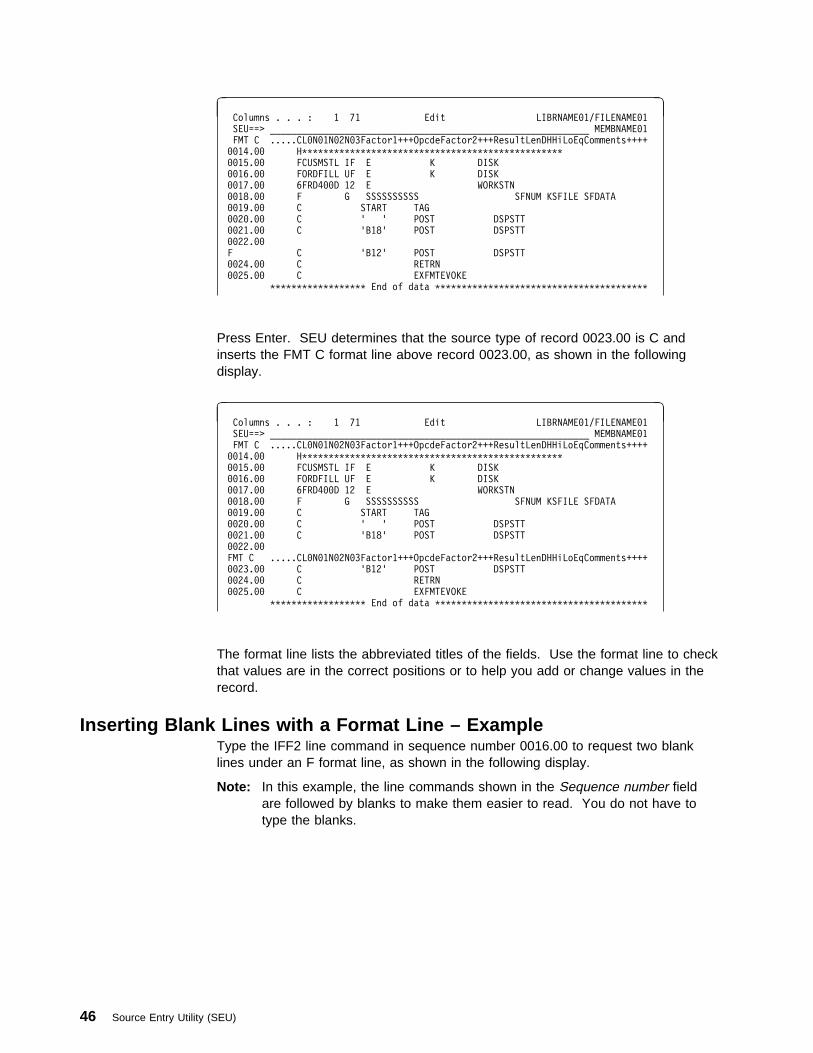
� � Columns . . . : 1 71 Edit LIBRNAME01/FILENAME01 SEU==> ____________________________________________________________ MEMBNAME01 FMT C .....CL0N01N02N03Factor1+++OpcdeFactor2+++ResultLenDHHiLoEqComments++++0014.00 H*************************************************0015.00 FCUSMSTL IF E K DISK0016.00 FORDFILL UF E K DISK0017.00 6FRD400D 12 E WORKSTN0018.00 F G SSSSSSSSSS SFNUM KSFILE SFDATA0019.00 C START TAG0020.00 C ' ' POST DSPSTT0021.00 C 'B18' POST DSPSTT0022.00F C 'B12' POST DSPSTT0024.00 C RETRN0025.00 C EXFMTEVOKE
****************** End of data ****************************************
Press Enter. SEU determines that the source type of record 0023.00 is C andinserts the FMT C format line above record 0023.00, as shown in the followingdisplay.
� � Columns . . . : 1 71 Edit LIBRNAME01/FILENAME01 SEU==> ____________________________________________________________ MEMBNAME01 FMT C .....CL0N01N02N03Factor1+++OpcdeFactor2+++ResultLenDHHiLoEqComments++++0014.00 H*************************************************0015.00 FCUSMSTL IF E K DISK0016.00 FORDFILL UF E K DISK0017.00 6FRD400D 12 E WORKSTN0018.00 F G SSSSSSSSSS SFNUM KSFILE SFDATA0019.00 C START TAG0020.00 C ' ' POST DSPSTT0021.00 C 'B18' POST DSPSTT0022.00FMT C .....CL0N01N02N03Factor1+++OpcdeFactor2+++ResultLenDHHiLoEqComments++++0023.00 C 'B12' POST DSPSTT0024.00 C RETRN0025.00 C EXFMTEVOKE
****************** End of data ****************************************
The format line lists the abbreviated titles of the fields. Use the format line to checkthat values are in the correct positions or to help you add or change values in therecord.
Inserting Blank Lines with a Format Line – ExampleType the IFF2 line command in sequence number 0016.00 to request two blanklines under an F format line, as shown in the following display.
Note: In this example, the line commands shown in the Sequence number fieldare followed by blanks to make them easier to read. You do not have totype the blanks.
46 Source Entry Utility (SEU)

� � Columns . . . : 1 71 Edit LIBRNAME01/FILENAME01 SEU==> ____________________________________________________________ MEMBNAME01 FMT C .....CL0N01N02N03Factor1+++OpcdeFactor2+++ResultLenDHHiLoEqComments++++0014.00 H*************************************************0015.00 FCUSMSTL IF E K DISKIFF2 FORDFILL UF E K DISK0017.00 6FRD400D 12 E WORKSTN0018.00 F G SSSSSSSSSS SFNUM KSFILE SFDATA0019.00 C START TAG0020.00 C ' ' POST DSPSTT0021.00 C 'B18' POST DSPSTT0022.00FMT C .....CL0N01N02N03Factor1+++OpcdeFactor2+++ResultLenDHHiLoEqComments++++0023.00 C 'B12' POST DSPSTT0024.00 C RETRN0025.00 C EXFMTEVOKE
****************** End of data ****************************************
Press Enter. SEU inserts the F format line followed by two blank lines, as shown inthe following display.
� � Columns . . . : 1 71 Edit LIBRNAME01/FILENAME01 SEU==> ____________________________________________________________ MEMBNAME01 FMT C .....CL0N01N02N03Factor1+++OpcdeFactor2+++ResultLenDHHiLoEqComments++++0014.00 H*************************************************0015.00 FCUSMSTL IF E K DISK0016.00 FORDFILL UF E K DISKFMT F .....FFilenameIPEAF....RlenLK1AIOvKlocEDevice+......KExit++Entry+A....U''''''''''''''0017.00 6FRD400D 12 E WORKSTN0018.00 F G SSSSSSSSSS SFNUM KSFILE SFDATA0019.00 C START TAG0020.00 C ' ' POST DSPSTT0021.00 C 'B18' POST DSPSTT0022.00FMT C .....CL0N01N02N03Factor1+++OpcdeFactor2+++ResultLenDHHiLoEqComments++++0023.00 C 'B12' POST DSPSTT0024.00 C RETRN
Defining and Inserting Skeleton LinesYou can define a line of data you type repeatedly as a skeleton line. Once the lineis defined as a skeleton line, it can be inserted into the member as needed. Youcan keep the same data or use the line as a template to enter new data.
Use the following line commands to create and insert skeleton lines:
Command Description
S Define the contents of this line as the skeleton line.
IS Insert the current skeleton line below this record.
ISn Insert the current skeleton line n times below this line.
When you use the Skeleton line command, keep the following in mind:
¹ After you have selected a line as the skeleton line, SEU keeps it as the skel-eton line until you specify another line.
¹ You must type data (or a blank) on an inserted skeleton line and press Enter tomake it part of the member.
Chapter 7. Using Line Commands 47

¹ If you type the S line command in a sequence number and then move thecursor to any column position of the record in the same line before you pressEnter, SEU remembers the cursor position in the record for all subsequentInsert Skeleton commands with that skeleton line.
¹ If the sequence number area already contains the characters SQL or SOSI,you must type the S line command in the first column and follow it with at leastone blank.
Displaying TabsYou can show a line on the display that indicates the current tab settings by usingthe following line command:
Command Description
TABS Set and show the tabs for the display.
When you use the Tabs command, keep the following in mind:
¹ To set tabs, type any characters in the columns where you want them. SEUconverts each character to a dash (–) when it creates the tabs line.
¹ SEU does not create tabs for two consecutive columns.
¹ You must specify Y (Yes) for the Tabs on prompt on the Change SessionDefaults display to use the tabs you set. After you have set the tabs, theyremain on the Edit display until you clear them, reset them, or turn them off,even if you exit from SEU.
¹ To clear tabs, blank out the characters (–) indicating their positions, and pressEnter.
¹ To set new tabs, type characters in the new positions.
¹ To temporarily turn the tabs off, specify N (No) for the Tabs on prompt on theChange Session Defaults display.
Note: You can type SET TABS ON or SET TABS OFF on the SEU commandline instead of using the Change Session Defaults display. See “SETCommand” on page 75 for more details.
¹ To move the cursor from one tab position to the next tab position, press Enter.
¹ To remove the tabs line from the display, press F5 (Refresh) or use the D linecommand. To show the tabs line again, type TABS and press a positionalfunction key.
Inserting a Tabs Line – ExampleType the TABS command in sequence number 0016.00, as shown in the followingdisplay.
Note: In this example, the line commands shown in the Sequence number fieldare followed by blanks to make them easier to read. You do not have totype the blanks.
48 Source Entry Utility (SEU)

� � Columns . . . : 1 71 Edit LIBRNAME01/FILENAME01 SEU==> ____________________________________________________________ MEMBNAME01 FMT ** ...+... 1 ...+... 2 ...+... 3 ...+... 4 ...+... 5 ...+... 6 ...+... 70014.00 This is a record0015.00 This is a recordTABS This is a record0017.00 This is a record0018.00 This is a record0019.00 This is a record
****************** End of data ****************************************
Press Enter. SEU displays a blank tabs line, as shown in the following display.
� � Columns . . . : 1 71 Edit LIBRNAME01/FILENAME01 SEU==> ____________________________________________________________ MEMBNAME01 FMT ** ...+... 1 ...+... 2 ...+... 3 ...+... 4 ...+... 5 ...+... 6 ...+... 70014.00 This is a record0015.00 This is a recordTABS0016.00 This is a record0017.00 This is a record0018.00 This is a record0019.00 This is a record
****************** End of data ****************************************
Type a character for each tab setting you want on the tabs line, as shown in thefollowing display. You can type any character or combination of characters.
� � Columns . . . : 1 71 Edit LIBRNAME01/FILENAME01 SEU==> ____________________________________________________________ MEMBNAME01 FMT ** ...+... 1 ...+... 2 ...+... 3 ...+... 4 ...+... 5 ...+... 6 ...+... 70014.00 This is a record0015.00 This is a recordTABS $$$ & * 60016.00 This is a record0017.00 This is a record0018.00 This is a record0019.00 This is a record
****************** End of data ****************************************
Press Enter. SEU replaces each character you typed with a dash (–) to create atabs line, as shown in the following display.
� � Columns . . . : 1 71 Edit LIBRNAME01/FILENAME01 SEU==> ____________________________________________________________ MEMBNAME01 FMT ** ...+... 1 ...+... 2 ...+... 3 ...+... 4 ...+... 5 ...+... 6 ...+... 70014.00 This is a record0015.00 This is a recordTABS - - - - -0016.00 This is a record0017.00 This is a record0018.00 This is a record0019.00 This is a record
****************** End of data ****************************************
In this example, you typed tabs in columns 10, 11, and 12. Because SEU does notset tabs for consecutive columns, SEU sets tabs only for columns 10 and 12.
Chapter 7. Using Line Commands 49

These tab settings remain in effect until you reset them or turn them off by usingthe SET TABS OFF command or by using the Change Session Defaults display.Press Enter to move from one tab position to the next.
Changing the DisplayYou can change which records or which part of the records you see on the displayby using the following line commands:
¹ Absolute position ¹ Exclude ¹ Show ¹ Shift ¹ Shift-with-truncate ¹ Relative position ¹ Window
Positioning Records on the DisplayYou can reposition the records in the member to show the section you want to editor browse. Use the following line commands to cause the next display to beginwith the specified record:
Command Description
n Position record n.00 as the first record on the display.
.n Position record 0.n as the first record on the display.
n.n Position record n.n as the first record on the display.
If the member does not contain a record with the exact sequence number youspecify, SEU positions the record with the next smallest sequence number as thefirst record on the display. If no record has a lower sequence number, SEU showsthe beginning of the member, with the beginning-of-data record positioned as thefirst record on the display.
Notes:
1. If a blank appears in an Absolute Positioning command, SEU uses only thenumbers to the left of the first blank to reposition the display.
2. Absolute Positioning commands cannot be entered in a sequence number thatcontains another type of line command.
3. When you use an Absolute Positioning command to position a record, you mustpress Field Exit to clear the remaining digits or insert a blank following thecommand. If you do not do this, all the digits following the command are inter-preted as part of the positioning number.
Excluding Records from the DisplayYou can exclude one or more records from appearing on the display with theExclude command. The selected records are not shown on the display, but remainin the member. A special record appears with a message stating how manyrecords are excluded from the display.
Use the following line commands to exclude records from the display:
50 Source Entry Utility (SEU)

Command Description
X Excludes this record from the display.
Xn Excludes this and the next n records from the display.
XX Excludes this block of records (defined by a pair of XX commands)from the display.
When you use the Exclude command, keep the following in mind:
¹ You can use the Exclude line command with the Find/Change Options displayto search only parts of a member.
¹ Press F5 (Refresh) to show all excluded records. This will also show all hiddenrecords.
¹ Line commands consider a group of excluded records as one record.
¹ Syntax checking is not affected by the Exclude line command. If you specify arange of lines on the Change Session Defaults display, all lines in the rangeare checked, including any lines you excluded. If any of the excluded lineshave errors, SEU includes the lines again and lists the errors.
Excluding Records – ExampleType the X4 line command in the sequence number. Press Enter. SEU excludesthe records and inserts the data-records-excluded special record, as shown in thefollowing display:
� � Columns . . . : 1 71 Edit LIBRNAME01/FILENAME01 SEU==> ____________________________________________________________ MEMBNAME01 FMT ** ...+... 1 ...+... 2 ...+... 3 ...+... 4 ...+... 5 ...+... 6 ...+... 70012.00 This is a record- - - - ------------- 4 data records excluded ---------------------------------0017.00 This is a record0018.00 This is a record0019.00 This is a record
****************** End of data ****************************************
Showing Excluded RecordsTo display records that you previously excluded by using the EXCLUDE commandor hid by using the HIDE command, use the following Show commands:
Command Description
SF Shows the first record in the group of excluded or hidden records.
SFn Shows the first n records in the group of excluded or hiddenrecords.
SL Shows the last record in the group of excluded or hidden records.
SLn Shows the last n records in the group of excluded or hiddenrecords.
Note: You must type the Show line commands on special records.
For information on using the HIDE command, see “HIDE Command” on page 71.
Chapter 7. Using Line Commands 51

Showing Excluded Records – ExampleAssume that four records are excluded from the display. Type the SF2 commandon the data-records-excluded line, and press Enter. SEU shows the first twoexcluded records, as shown in the following display.
� � Columns . . . : 1 71 Edit LIBRNAME01/FILENAME01 SEU==> ____________________________________________________________ MEMBNAME01 FMT ** ...+... 1 ...+... 2 ...+... 3 ...+... 4 ...+... 5 ...+... 6 ...+... 70012.00 This is a record0013.00 This is the first record to be excluded0014.00 This is the second record to be excluded- - - - ------------- 2 data records excluded ---------------------------------0017.00 This is a record0018.00 This is a record0019.00 This is a record
****************** End of data ****************************************
To show all excluded records, press F5 (Refresh).
Rolling the Member Forward or BackwardYou can roll the member to edit or browse another portion of the member by usingthe following line commands:
Command Description
+ Roll the member forward one line on the display.
+n Roll the member forward n lines on the display.
− Roll the member backward one line on the display.
−n Roll the member backward n lines on the display.
You can also use the Page Up and Page Down keys to position the records.
Shifting the Data in RecordsYou can shift the data in a record or block of records right or left. Use the Shiftcommand if you want to shift the data but do not want to truncate it.
Use the following line commands to shift data without truncating it:
Command Description
L Shift the data in this record left one position.
Ln Shift the data in this record left n positions.
LL Shift the data in this block of records (defined by a pair of LL com-mands) left one position.
LLn Shift the data in this block of records (defined by a pair of LL com-mands) left n positions.
R Shift the data in this record right one position.
Rn Shift the data in this record right n positions.
RR Shift the data in this block of records (defined by a pair of RR com-mands) right one position.
52 Source Entry Utility (SEU)

RRn Shift the data in this block of records (defined by a pair of RR com-mands) right n positions.
When you use the Shift line command, keep the following in mind:
¹ If you request a shift value that would shift data off the end of the record, SEUshifts the data as far as possible and places the word SHIFT in the Sequence-number prompt of the record or records that it could not completely shift.
¹ For a block shift, you can type the n on either block command.
Shifting a Block of Records – ExampleType the RR line command in the sequence number area to indicate the beginningof the block. Type the RR5 line command in the sequence number area of a fol-lowing record to indicate both the end of the block, and that you want the data tobe shifted 5 positions to the right. Press Enter. SEU shifts the block of records, asshown in the following display:
� � Columns . . . : 1 71 Edit LIBRNAME01/FILENAME01 SEU==> ____________________________________________________________ MEMBNAME01 FMT ** ...+... 1 ...+... 2 ...+... 3 ...+... 4 ...+... 5 ...+... 6 ...+... 70025.00 This is record number 250026.00 This record has the first RR command0027.00 This is record number 270028.00 This is record number 280029.00 This record has the second RR command0030.00 This is record number 30
****************** End of data ****************************************
Shifting and Truncating the Data in RecordsYou can shift data right or left in the records and allow data to be truncated if nec-essary. Use the following Shift-with-Truncate line commands to perform theseoperations:
Command Description
LT Shift the data in this record one position to the left, possibly losingdata off the beginning of the record.
LTn Shift the data in this record n positions to the left, possibly losingdata off the beginning of the record.
LLT Shift the data in the block of records (defined by a pair of LLT com-mands) one position to the left, possibly losing data off the begin-ning of the record.
LLTn Shift the data in the block of records (defined by a pair of LLT com-mands) n positions to the left, possibly losing data off the beginningof the record.
RT Shift the data in this record one position to the right, possibly losingdata off the end of the record.
RTn Shift the data in this record n positions to the right, possibly losingdata off the end of the record.
Chapter 7. Using Line Commands 53

RRT Shift the data in the block of records (defined by a pair of RRTcommands) one position to the right, possibly losing data off theend of the record.
RRTn Shift the data in the block of records (defined by a pair of RRTcommands) n positions to the right, possibly losing data off the endof the record.
A pair of block commands must have matching suffixes. If the suffixes do notmatch, SEU issues an error message. The following examples illustrate correctand incorrect block commands:
Valid Valid Valid Valid Invalid
LL01.00 LL66 LL01.00 LL23 LL66
0002.00 0002.00 0002.00 0002.00 0002.00
0003.00 0003.00 0003.00 0003.00 0003.00
0004.00 0004.00 0004.00 0004.00 0004.00
LL05.00 LL05.00 LL34 LL23 LL34
Controlling the Window PositionYou can control the horizontal position of the data on the display, allowing you toview different sections of a record. Use the following Window line commands toperform this operation:
Command Description
W Show data position 1 of the records as the first position of thedisplay.
Wn Show data position n of the records as the first position of thedisplay.
In addition to the Window line commands, you can also press F19 (Left) and F20(Right) to move the display horizontally.
If you specify an n that is larger than the total number of positions in your record,SEU shows the last position in the record, which includes the date.
Changing the Horizontal Position – ExampleType the W6 line command in the sequence number area, and press Enter. SEUrepositions the display so that data in column 6 appears as the first position, asshown in the following display:
� � Columns . . . : 6 76 Edit LIBRNAME01/FILENAME01 SEU==> ____________________________________________________________ MEMBNAME01 FMT ** ... 1 ...+... 2 ...+... 3 ...+... 4 ...+... 5 ...+... 6 ...+... 7 ... + .0022.00 678900000000002000000000300000000040000000005000000000600000000070023.00 678900000000002000000000300000000040000000005000000000600000000070024.00 67890000000000200000000030000000004000000000500000000060000000007
****************** End of data ****************************************
54 Source Entry Utility (SEU)
Rules for Entering Line CommandsFollow these rules when entering line commands:
¹ Type the line command anywhere in the Sequence-number prompt.
If the sequence number area does not contain a sequence number, however,type the line command starting in the first position of the sequence numberarea followed by a blank.
¹ Type suffixes (numbers or format identifiers) immediately after the command.Do not type a blank between the code and the suffix. For example, type D3(not DÏ3) or FP (not FÏP).
¹ Use only the following line commands on a format or tabs line: D, Wn, +n, –n,and n.
¹ Use only the following line commands on the beginning-of-data display line: A,An, Wn, +n, –n, n, I, In, IP, IPxx, IF, IFn, IFxx, IFxxn, IS, and ISn.
¹ Use only the following line commands on the end-of-data display line: B, Bn,Wn, +n, –n, and n.
SEU issues an error message if you enter an invalid line command. To continueprocessing, you must correct the error, type over it to blank it out, or press F5(Refresh).
For a list of the valid line commands for each display, see “Summary of LineCommands” on page 59.
Performing More Than One OperationYou can perform more than one operation at the same time if the line commandsyou type do not conflict. For example, you can type a Delete (D) line command, aBlock Move (MM MM) and Before (B) target line commands, and a Relative Posi-tion (+n) line command on the same display. SEU performs all three operationswhen you press any positional function key such as Enter, Page Up, Page Down,F19 (Left), or F20 (Right).
Overlapping CommandsOverlapping occurs when two or more line commands affect the same line on thedisplay. Most line commands cannot overlap. You can, however, overlap the fol-lowing line commands:
Window W, Wn
Columns COLS
Tabs TABS
Skeleton S, IS, ISn
Format F, F?, Fxx
Relative Positioning +, +n, −, −n
Chapter 7. Using Line Commands 55
Pending OperationsAn operation is called pending when only some of the necessary line commandshave been entered. For example, the Block Move operation requires two MM linecommands to define the block of records to be moved and a target line command(A, B, or O). The Block Move operation is pending if you enter only the first MMline command and a target line command, or two MM line commands and no targetline command.
The first pending operation appears in the Pending status message prompt in theupper right corner of the Edit display.
To cancel a pending operation, blank out or type over the current line command inthe Sequence-number prompt.
To cancel all pending operations, press F5 (Refresh).
Using Line Commands during Pending OperationsYou can specify new line commands while previous line commands are pendingcompletion.
When using line commands during pending operations, keep the following in mind:
¹ Conflicting line commands must be resolved before you can continue with apending operation.
¹ Conflicting line commands must be resolved before SEU can process any otherline commands on the display.
¹ Line commands are processed in a top-down order on the edit display. Linecommands that require a target command (Copy, Move, Copy Repeat) mustnot be separated from the target command by another line command thatrequires a target command.
¹ Some line commands cannot overlap. For more information on overlapping linecommands, see “Overlapping Commands” on page 55.
Line Command during Pending Operation – ExampleTo see an example of how conflicting line commands work with a pending opera-tion, do the following:
1. Type the line commands on the Edit display as shown in the following example,and press Enter.
Note: In this example, the line commands shown in the Sequence numberfield are followed by blanks to make them easier to read. You do nothave to type the blanks.
56 Source Entry Utility (SEU)

� � Columns . . . : 1 71 Edit LIBRNAME01/FILENAME01 SEU==> ____________________________________________________________ MEMBNAME01 FMT ** ...+... 1 ...+... 2 ...+... 3 ...+... 4 ...+... 5 ...+... 6 ...+... 7
*************** Beginning of data *************************************0001.00 Line 1C Line 20003.00 Line 30004.00 Line 4C Line 5A Line 60007.00 Line 70008.00 Line 80009.00 Line 9M Line 100011.00 Line 110012.00 Line 12
No line commands are processed and the following error message appears atthe bottom of the display:
Command conflict.
The command conflict in this example is that the Copy (C) command insequence number 002.00 and the Copy (C) command in sequence number0005.00 are two line commands that require a target command. The After (A)target command follows the C command in sequence number 0005.00. Notarget command follows the C command in sequence number 0002.00.
2. To resolve the conflict, type the After (A) command in sequence number0003.00, and press Enter. The command conflict is resolved. SEU processesthe line commands in a top-down order by:
a. Matching the Copy (C) command in sequence number 0002.00 with theAfter (A) target command in sequence number 0003.00.
b. Matching the Copy (C) command in sequence number 0005.00 with theAfter (A) command in sequence number 0006.00.
c. Showing the Move (M) command in sequence number 0010.00 as apending operation.
Using Line Commands on Split DisplaysYou can use a split Edit/Browse display to copy records from one member intoanother member. If you use the Copy (C), Multiple Copy (Cn), or Block Copy (CC)line command to perform this operation, you must specify exactly one target andthe target must be in the edit session. If you use the Multiple Copy Repeated(CRn) or the Block Copy Repeated (CCR) line command, you must specify at leastone target in the edit session.
The Columns (COLS) and Format (F) line commands function differently in abottom browse session on either split display than they do on the Browse display.The initial bottom browse session of a split display does not contain a format line.When you enter an F or COLS line command, the format or columns line is shownon the third line of the bottom session. Each format line command you requestreplaces the previous format, so that only one format line is shown at any time.
Chapter 7. Using Line Commands 57

Identifying Line CommandsWhen a sequence number has been altered and contains a character other than adigit (0 through 9), period, or blank, SEU identifies the contents of the fieldaccording to the following rules. (For these examples, the original sequencenumber is 0123.45, and Ï is a blank.)
¹ Leading digits, periods, and blanks are ignored. For example, if you changethe sequence number to 012C.45, SEU recognizes the C line command. If youchange the sequence number to 99ÏCC45, SEU recognizes the CC linecommand.
¹ The last blank or last changed digit ends the line command. For example, ifyou change the sequence number to C123Ï4, SEU recognizes the C123 linecommand. If you change the sequence number to C124, SEU recognizes theC124 line command. If you change the sequence number to C1Ï3, SEU recog-nizes it as the C1 line command.
Note: If the sequence number area does not contain a sequence number,enter line commands in the first column of the sequence number areafollowed by at least one blank to ensure the command will be proc-essed.
When a sequence number has been altered and contains only digits (0 through 9),periods, or blanks, SEU interprets the sequence number as an Absolute Positioncommand. The following rules apply to this type of altered sequence number. (Forthese examples, the original sequence number is 0123.45, and Ï is a blank.)
¹ No line command is recognized if:
– The first character is a blank. For example, the sequence number Ï555Ï45is not recognized as a line command, and the sequence number is reset toits original value.
– The only change you make is to replace digits with blanks. For example,the sequence number 0Ï2Ï.Ï5 is not recognized as a line command, andthe sequence number is reset to its original value.
¹ Only two digits are allowed after the decimal place. For example, sequencenumber 77.8888 is not a valid line command.
¹ The last blank or changed character ends the command. For example, if youchange the sequence number to 013Ï.45, SEU recognizes the Absolute Posi-tioning line command 13. If you change the sequence number to 2.2Ï.45, SEUrecognizes the Absolute Positioning line command 2.2. If you change thesequence number to 9Ï3Ï.45, SEU recognizes the Absolute Positioning linecommand 9.
58 Source Entry Utility (SEU)
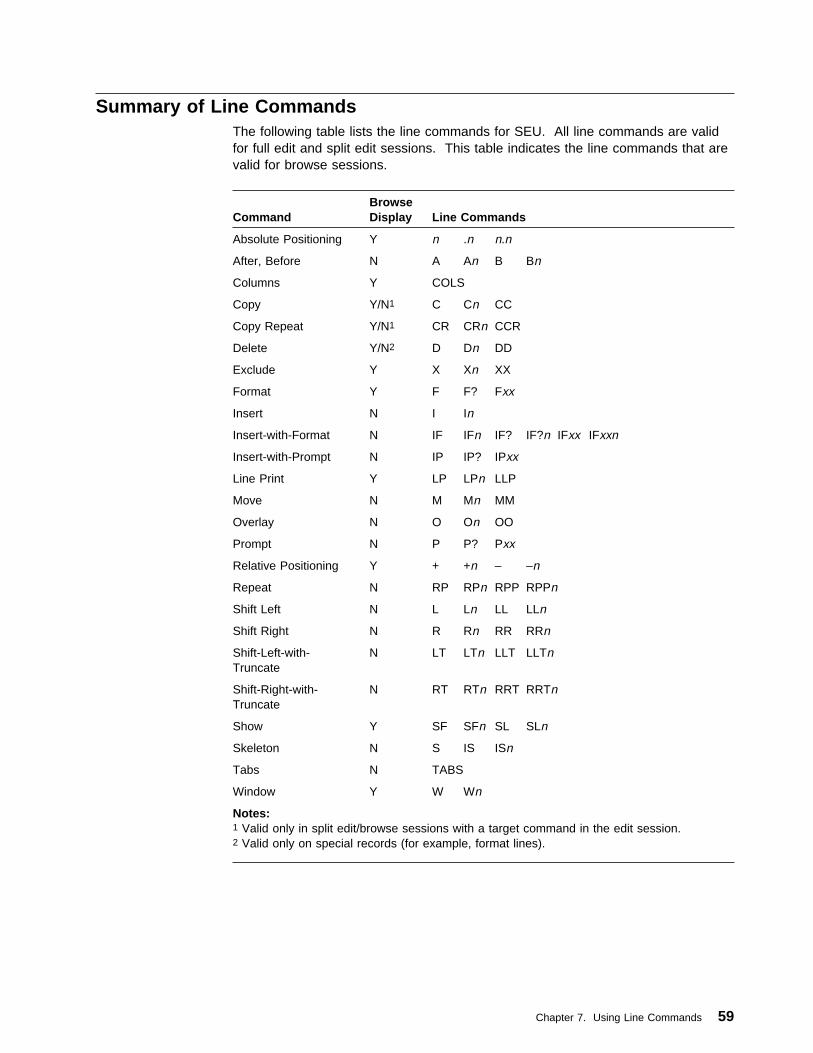
Summary of Line CommandsThe following table lists the line commands for SEU. All line commands are validfor full edit and split edit sessions. This table indicates the line commands that arevalid for browse sessions.
CommandBrowseDisplay Line Commands
Absolute Positioning Y n .n n.n
After, Before N A An B Bn
Columns Y COLS
Copy Y/N1 C Cn CC
Copy Repeat Y/N1 CR CRn CCR
Delete Y/N2 D Dn DD
Exclude Y X Xn XX
Format Y F F? Fxx
Insert N I In
Insert-with-Format N IF IFn IF? IF?n IFxx IFxxn
Insert-with-Prompt N IP IP? IPxx
Line Print Y LP LPn LLP
Move N M Mn MM
Overlay N O On OO
Prompt N P P? Pxx
Relative Positioning Y + +n – –n
Repeat N RP RPn RPP RPPn
Shift Left N L Ln LL LLn
Shift Right N R Rn RR RRn
Shift-Left-with-Truncate
N LT LTn LLT LLTn
Shift-Right-with-Truncate
N RT RTn RRT RRTn
Show Y SF SFn SL SLn
Skeleton N S IS ISn
Tabs N TABS
Window Y W Wn
Notes: 1 Valid only in split edit/browse sessions with a target command in the edit session.2 Valid only on special records (for example, format lines).
Chapter 7. Using Line Commands 59

60 Source Entry Utility (SEU)

| Chapter 8. User-Defined Line Commands
| You can create your own line commands (known as user-defined line commands)| to add to the functionality provided by existing SEU line commands. SEU treats| any text (less than eight characters long) that is typed on a sequence number and| that is not an SEU line command as a user-defined line command. In addition, the| two function keys F7 and F8 are also treated as user-defined line command keys.
| Examples of user-defined line command functions that you can create include:
| ¹ Copy and paste commands to copy text from one AS/400 session to another.
| ¹ Split-join commands using the F7 or F8 key.
| ¹ User-defined syntax checking.
| ¹ Convert a block of text to upper or lower case.
| To create a user-defined line command, you must first write a program to perform| your specific function (for example, a program to execute a split/join function).| Next, you must tell SEU where to locate the program which will execute the user-| defined line command you have created. This is known as an exit point –the point| at which SEU relinquishes control to another program which is called the exit| program (for example, your user-defined line command programs). The term exit| program is used in this chapter to refer to the user-defined line command programs| you have created.
| If you will be using only one exit program, you can specify its exact location; if you| will be using several programs, you can specify an exit point that lists all these| programs. When SEU encounters an unknown line command, or the F7 or F8 key| is pressed, SEU will call the user-defined line command program based on the| information you have provided in the Change Session Default display.
| This chapter covers the following steps, which are involved in creating and using| user-defined line commands:
| 1. Identifying Parameters passed to the User-Defined Line Command Program
| 2. Specifying which User-Defined Line Command Programs to Use
| 3. Using User-Defined Line Commands
| If you have not yet written any user-defined line command programs you must read| all three sections in the order that they appear. If you have already written the| programs and you need information on specifying their location, or you need to| know how to use user-defined line commands, you can skip the section titled “Iden-| tifying Parameters passed to the User-Defined Line Command Program.”
| Identifying Parameters passed to the User-Defined Line Command| Program| SEU must have a means of routing data from SEU to the user-defined line| command program, and from the user-defined line command program back to SEU.| To do this, SEU creates a user space (QSUSPC) in library QTEMP when SEU| encounters an unknown line command, or F7 or F8 is pressed. This user space is| made up of three blocks of information, the first block contains information about
Copyright IBM Corp. 1994, 1998 61

| the input that SEU is providing to your program; the second block contains informa-| tion about the output that SEU is expecting back from your program; and the third| block contains the source text.
| SEU passes the following three parameters to your user-defined line command| program:
| 1. A pointer to the block in the user space that contains input information.
| 2. A pointer to the block in the user space that contains output information.
| 3. A pointer to the block in the user space that contains the source text.
| These parameters enable your program to manipulate data in the user space. It is| important that you reference the format of the user space when you write your| program. See Appendix E, “Referencing the User Space for User-Defined Line| Command Programs” on page 127 for detailed information about the format of the| user space and examples of referencing the parameters passed to your exit| program.
| Specifying which User-Defined Line Command Programs to Use| The Change Session Default display allows you to specify where SEU will look for| user-defined line command programs. The options you select depend on whether| you want SEU to call one program, several programs, or none.
| To access the Change Session Default display:
| 1. Press F13 (Change session default) while editing or browsing a source| member. If you press F13 while in an edit session, you must press Page Down| to access the second panel.
| 2. Select one of the three options for the User exit program prompt (*REGFAC,| *NONE, Name):
| *REGFAC| Select *REGFAC if you want to use several different user-defined line| command programs. *REGFAC tells SEU to call several user-defined line| command programs from those listed at the SEU exit point| (QIBM_QSU_LCMD) which is created the first time SEU runs.
| Note: The *REGFAC option only directs SEU to the SEU exit point. You| must add your user-defined line command programs to this exit| point so that SEU will be able to locate your programs.
| Selecting the *REGFAC option displays a second prompt called Program| selection filter. Select one of the three options:
| *ALL| SEU selects all exit programs listed in the SEU exit point.
| *USRPRF| SEU uses the current user profile as the selection criteria for selecting| the exit programs. The method of selecting these exit programs is the| same as the String option below.
| String| You can enter a string of up to ten characters long. SEU selects the| exit programs based on a match between the text string and the data
62 Source Entry Utility (SEU)
| string you enter for each exit program when you add it to the default| exit point.
| Note: If you select the *REGFAC option, you must follow the steps| described under “Accessing the SEU Exit Point.” These steps| describe how to access the SEU exit point| (QIBM_QSU_LCMD); how to add programs to the exit point;| how to display information about the programs; and how to| replace programs.
| *NONE| No exit programs are to be called. Use this option if you do not want to| use any user-defined line commands.
| Name| Use this option if you want SEU to call only one user-defined line command| program. Type the name of the user-defined line command program that| you want SEU to use, and press Enter. A second prompt called Library| appears, requiring you to specify the library in which the exit program is| located.
| Accessing the SEU Exit Point| Note: If you have chosen the *REGFAC option in the Change Session Default| display, you must follow the steps outlined below. If you have chosen| *None or entered the name and library of a specific user-defined line| command program, you can skip this section and proceed to “Using User-| Defined Line Commands.”
| To work with the SEU exit point for user-defined line commands:
| 1. On an AS/400 command line, enter the WRKREGINF (Work with Registration| Information) command. The Work with Registration Information display| appears. Several exit points may be listed.
| 2. If necessary, press Page Down to locate the QIBM_QSU_LCMD exit point.
| Once you have located the SEU exit point on the Work with Registration Informa-| tion display, you have two options. You can display the exit point (option 5), which| provides you with information about the exit point, or you can work with exit pro-| grams (option 8), which allows you to add, remove, display, or replace user-defined| line command programs.
| Adding Programs to the SEU Exit Point| To add user-defined line command programs to the SEU exit point, enter option 1| (Add program) in the Option prompt. The Add Exit Program display appears as| shown in the following example.
Chapter 8. User-Defined Line Commands 63
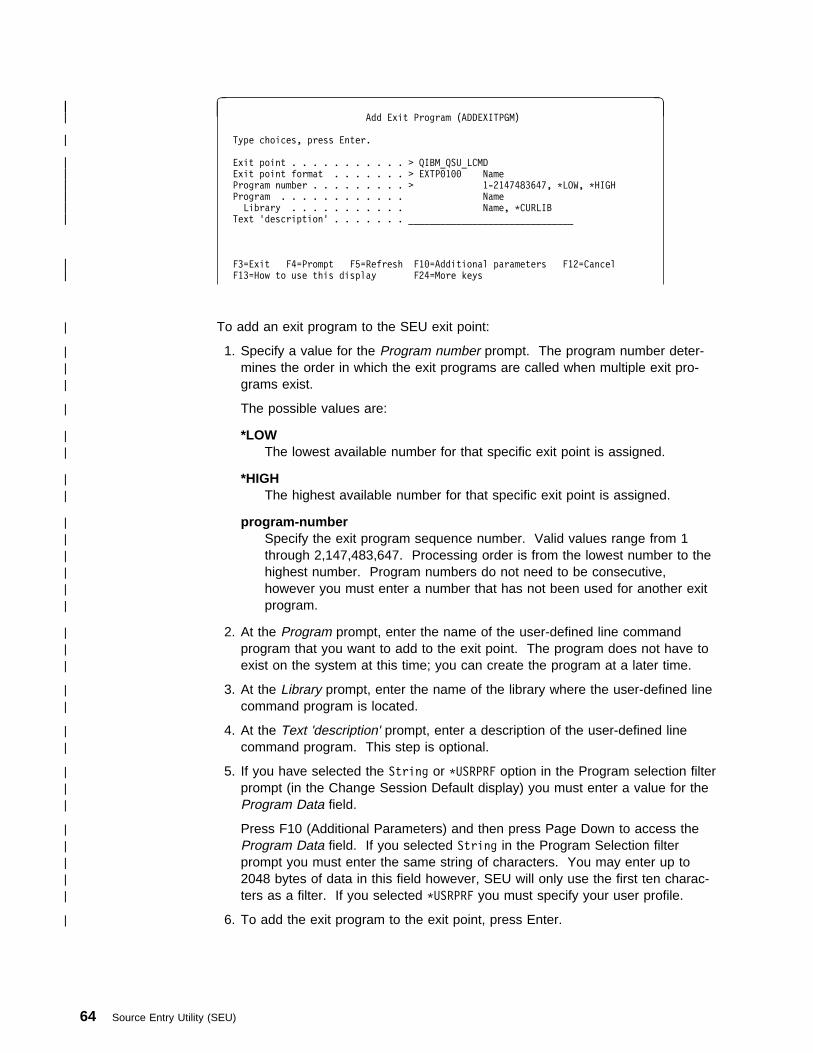
| �| �| Add Exit Program (ADDEXITPGM)
| Type choices, press Enter.
| Exit point . . . . . . . . . . . > QIBM_QSU_LCMD| Exit point format . . . . . . . > EXTP0100 Name| Program number . . . . . . . . . > 1-2147483647, *LOW, *HIGH| Program . . . . . . . . . . . . Name| Library . . . . . . . . . . . Name, *CURLIB| Text 'description' . . . . . . . _______________________________
| F3=Exit F4=Prompt F5=Refresh F10=Additional parameters F12=Cancel| F13=How to use this display F24=More keys
| To add an exit program to the SEU exit point:
| 1. Specify a value for the Program number prompt. The program number deter-| mines the order in which the exit programs are called when multiple exit pro-| grams exist.
| The possible values are:
| *LOW| The lowest available number for that specific exit point is assigned.
| *HIGH| The highest available number for that specific exit point is assigned.
| program-number| Specify the exit program sequence number. Valid values range from 1| through 2,147,483,647. Processing order is from the lowest number to the| highest number. Program numbers do not need to be consecutive,| however you must enter a number that has not been used for another exit| program.
| 2. At the Program prompt, enter the name of the user-defined line command| program that you want to add to the exit point. The program does not have to| exist on the system at this time; you can create the program at a later time.
| 3. At the Library prompt, enter the name of the library where the user-defined line| command program is located.
| 4. At the Text 'description' prompt, enter a description of the user-defined line| command program. This step is optional.
| 5. If you have selected the String or *USRPRF option in the Program selection filter| prompt (in the Change Session Default display) you must enter a value for the| Program Data field.
| Press F10 (Additional Parameters) and then press Page Down to access the| Program Data field. If you selected String in the Program Selection filter| prompt you must enter the same string of characters. You may enter up to| 2048 bytes of data in this field however, SEU will only use the first ten charac-| ters as a filter. If you selected *USRPRF you must specify your user profile.
| 6. To add the exit program to the exit point, press Enter.
64 Source Entry Utility (SEU)

| Removing Programs from the Exit Point| To delete a program from the exit point, type 4 (Remove) in the Option column| beside the program you want to remove and press Enter. Press Enter again to| confirm that you want to remove the program, or press F12 (Cancel) to return to| the Work with Exit Programs display.
| Replacing Programs in the Exit Point| After you add a program to the exit point, the only information that you can update| for the program listing is the text description and the program data.
| If you have changed the program and want to update the description and the| program data to reflect the new functionality of the program:
| 1. Type 10 (Replace) in the Option column beside the program you want to| update.
| 2. Type the new text description in the Text 'description' field.
| 3. To change the program data, press F10 (Additional parameters) and then press| Page Down; enter the new data string in the Program data field.
| Displaying Program Information| To view information about a particular exit program that is listed in the exit point,| type option 5 (Display) in the Option prompt beside the exit program and press| Enter. This display shows the program number, name, library, text description, and| the program data.
| Using User-Defined Line Commands| When SEU encounters an unknown line command, or when the function key F7 or| F8 is pressed, SEU calls the user-defined line command programs according to the| values specified in the Change Session Default display.
| SEU processes user-defined line commands in the following order:
| 1. SEU scans for line commands from the top of the screen to the bottom, and| executes them in this order. If a conflict between SEU and a user-defined line| command occurs, SEU will display an error message.
| 2. If you have entered any user-defined line commands or pressed F7 or F8, the| exit program is called (based on the information you provided in the Change| Session Default display).
| 3. When the exit program is finished running, SEU checks the return code. If the| return code is 0 or 2 your source is updated. For more information about| return codes, see Appendix E, “Referencing the User Space for User-Defined| Line Command Programs” on page 127.
| 4. Syntax checking is performed on any line you have updated, or that has been| updated by the exit program, if you have specified this option in the Change| Session Default display.
| 5. SEU displays any messages that your exit program sends to SEU.
| When SEU encounters a user-defined line command it copies X+1 lines of source| text to the user space, where X is the number of lines from the first unknown line
Chapter 8. User-Defined Line Commands 65

| command to the last unknown line command. These are the lines of source text| that will be updated by your user-defined line command program. The user space| is large enough to hold all data passed to the exit program. If the exit program| inserts many more lines than were passed to it, the exit program may need to| change the size of the user space. For more information about how modified text| can be inserted in SEU, see Appendix E, “Referencing the User Space for User-| Defined Line Command Programs” on page 127.
| Examples: The following examples show how to use your user-defined line com-| mands to select the desired number of line of source text.
| If you enter the line command ZZ on line 22, as shown in the following sample| source member, and then press Enter, X is equal to 1. Therefore, two lines (lines| 22 & 23) would be copied to the user space.
| �| �| Columns . . . : 6 76 Edit| SEU==> ____________________________________________________________| FMT ** ...+...1...+...2...+...3...+...4...+...5...| ZZ22.00 This is line number 22.| 0023.00 This is line number 23.| 0024.00 This is line number 24.| 0025.00 This is line number 25.| 0026.00 This is line number 26.
| If you enter the line command ZZ on line 22 and the line command YY on line 24| and then press Enter, four lines (lines 22, 23, 24 and 25) would be copied to the| user space.
| �| �| Columns . . . : 6 76 Edit| SEU==> ____________________________________________________________| FMT ** ...+...1...+...2...+...3...+...4...+...5...| ZZ22.00 This is line number 22.| 0023.00 This is line number 23.| YY24.00 This is line number 24.| 0025.00 This is line number 25.| 0026.00 This is line number 26.
| If you place the cursor under the 4 of the text "This is line number 24" in the| example below, and press F7 or F8, then two lines (lines 24 and 25) would be| copied to the user space.
| �| �| Columns . . . : 6 76 Edit| SEU==> ____________________________________________________________| FMT ** ...+...1...+...2...+...3...+...4...+...5...| 0022.00 This is line number 22.| 0023.00 This is line number 23.| 0024.00 This is line number 24.| 0025.00 This is line number 25.| 0026.00 This is line number 26.
| If you enter the line command ZZ on line 22, then move the cursor to anywhere on| line 24 and press F7 or F8, four lines (22, 23, 24, and 25) would be copied to the| user space.
66 Source Entry Utility (SEU)

| �| �| Columns . . . : 6 76 Edit| SEU==> ____________________________________________________________| FMT ** ...+...1...+...2...+...3...+...4...+...5...| ZZ22.00 This is line number 22.| 0023.00 This is line number 23.| 0024.00 This is line number 24.| 0025.00 This is line number 25.| 0026.00 This is line number 26.
| If the (X+1)th line is the end of the data line, then the corresponding record in the| user space is filled with blanks.
| Hidden records are also copied if they are within the user line command block. If| you enter a user-defined line command on an exclude block, the line command is| considered to be entered on the first hidden line of the exclude block.
| Note:
| 1. User-defined line commands are not allowed on Tabs and Format| records. If one of these records is within a user-defined line command| block, it is ignored.
| 2. If the cursor is not on a source line, and the F7 or F8 key is pressed| with no other user-defined line commands on the screen, the exit| program is still called, passing zero source lines.
| Returning to SEU from the User-Defined Line Command Program| SEU updates the source text based on the data in the user space upon returning to| SEU. Any message sent by the user-defined line command program is displayed| at this time. The data is not updated by SEU until the return code in the user| space is set to 0, or until all exit programs have been called and the return code is| set to 2. If the return code is 1, SEU will not perform any updates, but will process| each line record for errors. If the return code is 3 after all exit programs have been| called, then all data in user space is ignored by SEU, and no changes are made to| the source text.
| Split Sessions| If SEU is in a split screen, and there are user-defined line commands in both the| browse and edit portions of the screen, then SEU calls all of your exit programs for| the browse section first, and then it calls your exit programs for the edit section.
| Note: If you are using MRGSRC, the user-defined line commands are treated the| same as an SEU user-defined line command in edit mode.
| Conflicts between SEU line commands and User-Defined Line| Commands| SEU and user-defined line commands may be used together as long as they do not| conflict with each other.
| A conflict arises if you have placed an SEU line command on a line that will be| passed to the exit program, as shown in the following example:
Chapter 8. User-Defined Line Commands 67

| �| �| Columns . . . : 6 76 Edit| SEU==> ____________________________________________________________| FMT ** ...+...1...+...2...+...3...+...4...+...5...| ZZ22.00 This is line number 22.| D023.00 This is line number 23.| 0024.00 This is line number 24.| YY25.00 This is line number 25.| 0026.00 This is line number 26.
| A conflict also arises if an SEU block line command spans one or more user-| defined line commands, as shown in the following example:
| �| �| Columns . . . : 6 76 Edit| SEU==> ____________________________________________________________| FMT ** ...+...1...+...2...+...3...+...4...+...5...| DD22.00 This is line number 22.| 0023.00 This is line number 23.| ZZ24.00 This is line number 24.| DD25.00 This is line number 25.| 0026.00 This is line number 26.
| Note: The F7 and F8 keys are also considered to be user-defined line commands.| A conflict also results if the cursor is positioned between an SEU block| command, and the F7 or F8 key is pressed.
68 Source Entry Utility (SEU)

Chapter 9. Using Source Entry Utility Commands
You can use SEU commands to perform find/change operations, to exit from yoursession, and to tailor your session defaults. The commands provide a fast path forthese operations, which can also be accessed through options displays. Valuesentered through SEU commands appear on these options displays.
You type SEU commands on the SEU command line. You can retrieve previouscommands entered in the SEU command line by pressing F9 (Retrieve). You canmove your cursor from the data area to the SEU command line and back to thedata area by pressing F10 (Cursor).
You can use SEU commands to:
¹ Find records that contain a specific character string using the FIND command¹ Hide records that contain a specific character string using the HIDE command¹ Find and change character strings using the CHANGE command¹ Tailor your edit session and tailor the find and change functions using the SET
command¹ Reposition the display using the TOP command and the BOTTOM command¹ Save, file, or cancel changes to a member using the SAVE, FILE, and
CANCEL commands
Entering SEU Commands on a Split DisplayEach split display contains one command line for each session. You can enterSEU commands in the sessions that currently support equivalent function. Com-mands for split displays can be one of two types:
Session-dependent commandsPerform their function only in one session. If a session-dependent commandis entered on the top session, it affects only the top session. If it is enteredon the bottom session, it affects only the bottom session.
For example, if the FIND command is entered in the top SEU command line,SEU searches only the top session for the string.
Session-independent commandsPerform their function in both sessions, regardless of which session containsthe cursor.
For example, if the SET ROLL command is entered in either session of a splitdisplay, the amount to roll for both sessions is affected.
When you use either a session-dependent command or a session-independentcommand, the following additional processing occurs in both sessions:
¹ Lines in the edit session that have been changed are updated and checked forsyntax errors.
¹ All line commands are run before an SEU command is processed. Forexample, if you enter a FIND command, SEU processes all unprocessed linecommands before finding the string in the appropriate session.
Copyright IBM Corp. 1994, 1998 69

The following table shows the commands for each type of session on split displays.A Y indicates that the command is valid in that type of session. A Y is also used toindicate session-dependent commands. For example, the FIND command issession dependent: it finds only strings in the session containing the cursor.
Command
Function
EditSession
BrowseSession
Session-Dependent
FIND or F Find a string of characters in amember.
Y Y Y
HIDE or H Hide records that contain a speci-fied string from the display.
Y Y Y
CHANGEor C
Find a string of characters in amember and change it to anotherstring.
Y N Y
SET or SMATCH
Match the string of a memberduring the find operation.
Y Y Y
SET or SSHIFT
Shift data over when replacing astring during the change operation.
Y N Y
SET or SCAPS
Set the type of data input to upper-case or mixed case.
Y Y N
SET or STABS
Use predefined tab positions. Y N Y
SET or SROLL
Set the amount the display movesup, down, left, and right.
Y Y N
SET or SEXPERT
Set the display to full screen mode. Y Y N
TOP or T Reposition the work screen to thefirst page of data.
Y Y Y
BOTTOMor BOT orB
Reposition the work screen to thelast page of data.
Y Y Y
CANCELor CAN
Cancel the session and exit orremove the bottom split browsesession. CANCEL in the topsession exits both sessions.
Y Y Y
SAVE Save changes made to the memberand continue editing.
Y N Y
FILE Save changes made to the memberand exit.
Y N Y
70 Source Entry Utility (SEU)

HIDE CommandHides records that contain a particular character string. The short form for theHIDE command is H.
The HIDE command is session dependent on split displays. For example, if youenter the HIDE command on the command line of the top session, only themember in the top session is affected.
The HIDE command in the bottom session of a split display can hide up to 100blocks of records only. A HIDE request beyond this limit is ignored.
In an Edit session, a special record is displayed with a message that states thenumber of records that are hidden from the display. In a Browse session, thespecial record is not displayed; however, a message is displayed once to show thenumber of hidden records.
You cannot use the HIDE command in a session in which:
¹ A line command is pending¹ Line command errors are present¹ A Copy Repeat command is in the sequence number area
To show hidden records, use the Show line commands, as described in “ShowingExcluded Records” on page 51.
Command Syntax
55──HIDE──string───(1) ──┬ ┬───────────── ──┬ ┬────────── ────────────────────────────────────────5%└ ┘─┤ columns ├─ └ ┘─┤ area ├─
columns:├──startcolumn─ ──┬ ┬─────────── ─────────────────────────────────────────────────────────────┤ └ ┘─endcolumn─
area: ┌ ┐─ALL────├─ ──┼ ┼─TOP──── ─────────────────────────────────────────────────────────────────────────────┤ └ ┘─BOTTOM─
Note:1 You can specify the parameters after this point in any order.
stringThe character string that you want to hide. Ifthe string includes leading, embedded, ortrailing blanks, apostrophes, or quotationmarks, enclose the string in apostrophes orquotation marks.
columnsThe column range in which you want tosearch. Type a number for the startingcolumn and another number for the endingcolumn, separated by a blank. If you type
only one number, it is assumed to be thestarting column.
If you do not specify the columns parameter,all columns are searched.
areaThe area of the member in which records arehidden. The possible values are:
ALL or AHides all the records that contain thestring.
Chapter 9. Using Source Entry Utility Commands 71

TOP or THides all the records that contain thestring from the line where the cursor ispositioned to the top of the member.
BOTTOM or BHides all the records that contain thestring from the line where the cursor ispositioned to the bottom of the member.
Examples: The following example hides allrecords in the member that contain * in column 7:
HIDE * 7 7 A
The following example hides all records from thecursor position to the top of the member thatcontain '*%%' in any columns:
H '*%%' T
FIND CommandFinds occurrences of a string. The short form for the FIND command is F.
The FIND command is session-dependent on split displays. For example, if youenter the FIND command on the top session, only the member in the top memberis searched for the string.
After typing a FIND command on the command line, you can press F16 (Repeatfind) to begin a search or to find subsequent occurrences of a string.
If you use F16 (Repeat find) to begin a search, you only have to type the string thatyou want to find on the command line. For example, to find the string ABCD, typeABCD on the command line and press F16. If you want to find the string CHANGE,C, FIND, or F, delimit the string with single quotation marks. For example, to findthe string CHANGE, type 'CHANGE' and press F16.
Command Syntax
55──FIND──string───(1) ──┬ ┬─────────────── ──┬ ┬──────────── ──┬ ┬───────────── ───────────────────5%└ ┘─┤ direction ├─ └ ┘─┤ search ├─ └ ┘─┤ columns ├─
direction: ┌ ┐─NEXT──├─ ──┼ ┼─PREV── ──────────────────────────────────────────────────────────────────────────────┤ ├ ┤─FIRST─ ├ ┤─LAST── └ ┘─ALL───
search:├─ ──┬ ┬─X── ─────────────────────────────────────────────────────────────────────────────────┤ └ ┘─NX─
columns:├──startcolumn─ ──┬ ┬─────────── ─────────────────────────────────────────────────────────────┤ └ ┘─endcolumn─
Note:1 You can specify the parameters after this point in any order.
stringThe character string you want to find.Enclose the string in quotation marks if it con-tains leading, imbedded, or trailing blanks,
special values, apostrophes, or quotationmarks. Type an asterisk to use a string youused in the previous FIND operation. Type*ERR to find syntax errors.
72 Source Entry Utility (SEU)

directionThe direction you want to search. The pos-sible values are:
NEXT or NFinds the next occurrence of the string,starting at the position of the cursor. Thefind wraps to the beginning of the memberwhen the end of the member is reached.
PREV or PFinds the previous occurrence of thestring, starting at the position of thecursor. The find wraps to the end of themember when the beginning of themember is reached.
After typing a FIND command with thePREV option, you must move the cursorback to the position in the data area fromwhich you want the search to begin. Todo so, press F10 (Cursor) after you typethe command and then press Enter.
FIRST or FFinds the first occurrence of the string.
LAST or LFinds the last occurrence of the string.
ALL or AFinds all occurrences of the string.
searchThe lines you want to search. The possiblevalues are:
X Searches only excluded lines.
NXSearches only nonexcluded lines.
If you do not specify the search parameter, allrecords are searched.
columnsThe column range in which you want tosearch.
Type a number for the starting column andanother number for the ending column, sepa-rated by a blank. If you type only onenumber, it is assumed to be the startingcolumn.
If you do not specify the columns parameter,all columns are searched.
Note: The parameters that you enter for theFIND command also appear in the corre-sponding prompts of the Find/ChangeOptions display.
Examples: The following example finds theprevious occurrence of the string that was previ-ously searched for in all records and in allcolumns of the member:
F * P
The following example finds syntax errors in allrecords of the member:
FIND *ERR A
The following example finds the previous occur-rence of the string _abc in all excluded recordsstarting in column 15:
F "_abc' P X 15
The following example finds all occurrences of thestring 'abc' in all nonexcluded records in allcolumns of the member:
FIND "'abc'" A NX
CHANGE CommandFinds occurrences of a string and changes them to another string. The short formfor the CHANGE command is C.
After you type a CHANGE command, you can press F16 (Repeat find) to find thefirst occurrence of the string without changing it. You can then press F17 (Repeatchange) to change the string.
You can also press F17 (Repeat change) to both find and change a string after youtype a CHANGE command.
Chapter 9. Using Source Entry Utility Commands 73

Command Syntax
55──CHANGE──fstring──cstring───(1) ──┬ ┬─────────────── ──┬ ┬──────────── ──┬ ┬───────────── ───────5%└ ┘─┤ direction ├─ └ ┘─┤ search ├─ └ ┘─┤ columns ├─
direction: ┌ ┐─NEXT──├─ ──┼ ┼─PREV── ──────────────────────────────────────────────────────────────────────────────┤ ├ ┤─FIRST─ ├ ┤─LAST── └ ┘─ALL───
search:├─ ──┬ ┬─X── ─────────────────────────────────────────────────────────────────────────────────┤ └ ┘─NX─
columns:├──startcolumn─ ──┬ ┬─────────── ─────────────────────────────────────────────────────────────┤ └ ┘─endcolumn─
Note:1 You can specify the parameters after this point in any order.
fstringThe character string you want to find.Enclose the string in quotation marks if it con-tains leading, imbedded, or trailing blanks,special values, apostrophes, or quotationmarks. Type an asterisk to use a string youused in the previous CHANGE operation.Type *ERR to find syntax errors.
cstringThe character string that replaces the findstring. Enclose the string in quotation marks ifit contains leading, imbedded, or trailingblanks, special values, apostrophes, or quota-tion marks. Type an asterisk to use a stringyou used in the previous CHANGE operation.
directionThe direction you want to search. The pos-sible values are:
NEXT or NFinds the next occurrence of the string,starting at the position of the cursor. Thefind wraps to the beginning of the memberwhen the end of the member is reached.
PREV or PFinds the previous occurrence of thestring, starting at the position of thecursor. The find wraps to the end of themember when the beginning of themember is reached.
After typing a CHANGE command with thePREV option, you must move the cursorback to the position in the data area fromwhich you want the search to begin. Todo so, press F10 (Cursor) after you typethe command and then press Enter.
FIRST or FFinds the first occurrence of the string.
LAST or LFinds the last occurrence of the string.
ALL or AFinds all occurrences of the string.
searchThe lines you want to search. The possiblevalues are:
X Searches only excluded lines.
NXSearches only nonexcluded lines.
If you do not specify the search parameter, allrecords are searched.
columnsThe column range in which you want tosearch.
Type a number for the starting column andanother number for the ending column, sepa-rated by a blank. If you type only one
74 Source Entry Utility (SEU)

number, it is assumed to be the startingcolumn.
If you do not specify the columns parameter,all columns are searched.
Note: The parameters that you enter for theCHANGE command also appear in thecorresponding prompts of the Find/ChangeOptions display.
Examples: The following example finds thenext occurrence of the string _abc, searching allcolumns in all records, and changes it to a_bc:
CHANGE '_abc' 'a_bc'
The following example finds all occurrences of theasterisk character in all nonexcluded recordsstarting in column 1 and ending in column 2, andchanges them to the ampersand character:
C '*' '&' A NX 1 2
The following example finds the first occurrence ofthe string ab'_c in all excluded records starting incolumn 20, and changes it to 'abc':
C "ab'_c" ''abc'' F X 20
SET CommandTailors find and change operations and session defaults. The short form for theSET command is S.
Command Syntax
┌ ┐─ON──55──SET─ ──┬ ┬──CAPS ──┴ ┴─OFF─ ── ─────────────────────────────────────────────────────────────5% │ │┌ ┐─ON── ├ ┤──TABS ──┴ ┴─OFF─ ── │ │┌ ┐─ON── ├ ┤──EXPERT ──┴ ┴─OFF─ │ │┌ ┐─FULL─ ├ ┤──ROLL ──┼ ┼─HALF─ ─ │ │├ ┤─CSR── │ │├ ┤─DATA─ │ │└ ┘─nnn── │ │┌ ┐─ON── ├ ┤──MATCH ──┴ ┴─OFF─ ─ │ │┌ ┐─ON── └ ┘──SHIFT ──┴ ┴─OFF─ ─
CAPSSpecifies whether the source text, find string,and change string that you enter are in upper-case only or in mixed case. The initial valuedepends on the source member type and youruser profile. In a Browse display, the initialvalue is OFF.
The possible values are:
ONSpecifies uppercase.
OFFSpecifies mixed case.
TABSSpecifies whether the tabs you set with theTabs line command are active. The initialvalue depends on your user profile.
The possible values are:
ONSpecifies that tabs are active.
OFFSpecifies that tabs are not active.
EXPERTSpecifies the mode of your edit or browsesession. The initial value depends on youruser profile.
Chapter 9. Using Source Entry Utility Commands 75

The possible values are:
ONSpecifies normal mode.
OFFSpecifies full screen mode.
ROLLSpecifies the number of lines or columns thatmove on the display at one time when youpress the Page Up key, Page Down key, F19(Left), or F20 (Right). The initial valuedepends on your user profile.
The possible values are:
FULL or FSpecifies that the display moves one fulldisplay.
HALF or HSpecifies that the display moves one halfof a display.
CSR or CSpecifies that the display moves by theposition of the cursor.
DATA or DSpecifies that the display moves one fulldisplay minus one line or column.
nnnSpecifies that the display moves by 1 to999 number of lines or columns.
MATCHSpecifies whether the case of the letters mustmatch in a search string. The initial value isOFF.
The possible values are:
ONSpecifies that uppercase and lowercaseletters must match.
OFFSpecifies that uppercase and lowercaseletter do not have to match.
SHIFTSpecifies whether data is shifted when a stringis replaced. The initial value depends on thesource member type.
The possible values are:
ONSpecifies that data is shifted.
OFFSpecifies that data is not shifted.
Note: The parameters that you enter for the SETcommand (except for TABS) also appearin the corresponding prompts of theChange Session Defaults display.
TOP CommandRepositions the work screen to the first page of data, which starts on the beginning-of-data line. The short form for the TOP command is T.
Command Syntax
55──TOP───────────────────────────────────────────────────────────────────────────────────5%
The TOP command has no parameters.
76 Source Entry Utility (SEU)

BOTTOM CommandRepositions the work screen to the last page of data, which ends on the end-of-data line. The short form for the BOTTOM command is B.
Command Syntax
55──BOTTOM────────────────────────────────────────────────────────────────────────────────5%
The BOTTOM command has no parameters.
SAVE CommandSaves changes to a member without exiting. You can use the SAVE commandonly on the Edit display and in the top command line on a split Edit/Browse display.
Command Syntax
55──SAVE─ ──┬ ┬────────── ──┬ ┬────── ──┬ ┬──────── ─────────────────────────────────────────────5% └ ┘─library/─ └ ┘─file─ └ ┘─member─
libraryThe library in which you want to save the filethat contains the member. Follow the libraryname with a / character. If you specify alibrary, you must also specify a file. Thedefault is the current library containing themember.
file The file in which you want to save themember. If a library is specified, the file namemust immediately follow the / character. Thedefault is the current file containing themember.
memberThe member in which you want to save thechanged member. If a file is specified, themember name must immediately follow the filename, separated by a blank.
Notes:
1. The parameters that you enter for the SAVEcommand also appear in the correspondingprompts of the Exit display.
2. The System/38 terminology (FILE.LIBRARY)is not supported.
3. The parameters cannot be specified if you areediting DDS comments from SDA.
Examples: The following example saves themember RPGMEM in the file RPGSRC in thecurrent library:
SAVE RPGSRC RPGMEM
The following example saves the memberCBLMEM in the file CBLSRC in the libraryCBLLIB:
SAVE CBLLIB/CBLSRC CBLMEM
The following example saves the member in thecurrent library and the current file:
SAVE
Chapter 9. Using Source Entry Utility Commands 77

FILE CommandSaves changes to a member and exits from an edit session. You can use the FILEcommand only on the Edit display and in the top command line on a splitEdit/Browse display. If you use the command on a split Edit/Browse display, youexit from both sessions.
Command Syntax
55──FILE─ ──┬ ┬────────── ──┬ ┬────── ──┬ ┬──────── ─────────────────────────────────────────────5% └ ┘─library/─ └ ┘─file─ └ ┘─member─
libraryThe library in which you want to save the filethat contains the member. Follow the libraryname with a / character. If you specify alibrary, you must also specify a file. Thedefault is the current library containing themember.
file The file in which you want to save themember. If a library is specified, the file namemust immediately follow the / character. Thedefault is the current file containing themember.
memberThe member in which you want to save thechanged member. If a file is specified, themember name must immediately follow the filename, separated by a blank.
Notes:
1. The parameters that you enter for the FILEcommand also appear in the correspondingprompts of the Exit display.
2. The System/38 terminology (FILE.LIBRARY)is not supported.
3. The parameters cannot be specified if you areediting DDS comments from SDA.
Examples: The following example saves themember RPGMEM in the file RPGSRC in thecurrent library, and exits from the edit session:
FILE RPGSRC RPGMEM
The following example saves the memberCBLMEM in the file CBLSRC in the libraryCBLLIB, and exits from the edit session:
FILE CBLLIB/CBLSRC CBLMEM
The following example saves the member in thecurrent library and the current file, and exits fromthe edit session:
FILE
CANCEL CommandCancels your edit or browse session and exits from it. The short form for theCANCEL command is CAN.
If you enter the CANCEL command in the top session of a split display, both ses-sions are canceled. If you enter it in the bottom session of a split display, only thebottom session is canceled.
If you change a member and then enter CANCEL, you are prompted to press Enterto confirm that you want to lose the changes. If you do not want to lose thechanges, press F12 (Cancel) to continue editing.
78 Source Entry Utility (SEU)

Command Syntax
55──CANCEL────────────────────────────────────────────────────────────────────────────────5%
The CANCEL command has no parameters.
Chapter 9. Using Source Entry Utility Commands 79

80 Source Entry Utility (SEU)

Chapter 10. Editing with Prompts and Format Lines
Prompts and format lines help you create error-free records when you are workingwith members that contain fixed-format CL or HLL statements. A prompt separatesand labels each field in a record, and is shown at the bottom of the Edit display. Aformat line is shown immediately above the record you are editing and labels thefields in the record according to the source type.
Command PromptsYou can use command prompts that are supported by the AS/400 system withSEU. When you select a command prompt, SEU calls the AS/400 system to showthe command prompts.
When you request a prompt for a record, SEU passes the record to the commandprompt. The command prompt determines which prompt to show. If the record isblank or an inserted line, the Major Command Group menu is shown. If the recordis not blank or an inserted line, the system tries to find a prompt for the command.If a prompt for the command does not exist, SEU takes control and sends an errormessage from the system. For BASIC types, the BASIC Help Facility Menu isshown. For SQL types, SQL displays are shown.
For detailed information on command prompts, see the CL Programming,SC41-5721.
SEU does not support format lines that correspond to the command, BASIC, SQL,or user-defined prompts.
Selecting PromptsTo request a prompt, press F4 (Prompt) or F23 (Select prompt), or type the P, P?,Pxx, IP, IP?, or IPxx line command on the Edit display. Depending on the sourcetype you are using, you obtain either a command prompt or a high-level-languageprompt:
¹ A command prompt is displayed if you are using BND, CL38, CLLE, CLP,CLP38, CMD, or CMD38.
¹ An SQL prompt is displayed if you are using CICSSQLCBL, SQLCBL,SQLFTN, SQLRPG, or SQLRPGLE, and the line is valid SQL.
¹ Online information for BASIC is displayed if the source type of the member youare editing is BAS, BAS38, BASP, or BASP38.
¹ A high-level-language prompt is displayed if you are using any other sourcetype.
Copyright IBM Corp. 1994, 1998 81

Selecting a High-Level-Language PromptYou can select the prompt used for the Edit display by using the Select Promptdisplay. One of four Select Prompt displays appears, depending on whether youare editing a System/36, System/38, AS/400, or ILE member type.
To access a Select Prompt display, request a prompt with the P? or IP? linecommand, or with F23 (Select prompt) on the Edit display. The cursor position isused to determine which record to prompt. You do not need to have a promptshowing to request the Select Prompt display. Pressing F23 does not update thefields you have changed in the prompt, but it does process line commands andupdates to lines in the edit session of the display.
When you request a high-level-language prompt on an Edit display, SEU inserts theprompt in the bottom part of the display. The record remains in both the editsession and the prompt. If the prompt overlays the record, SEU repositions thedisplay to show the record in the prompt as the first record on the display. You cantype data in both the record and the prompt. When both the record and a promptexist, data from the prompt replaces data entered in the record.
The prompt separates and labels each field in the record you selected according tothe source type. Prompts make it easier to enter source information for column-oriented languages such as RPG.
You can type line commands in the Sequence-number field for the prompt in thesame way as you type them in the Sequence-number field for the record. After youtype the source information and press Enter, SEU makes the changes to the recordfrom the fields in the prompt.
The following shows an example of the Edit display with a high-level-languageprompt:
� � Columns . . . : 1 71 Edit QRPGSRC/EDIT SEU==> ____________________________________________________________ POSTOP FMT C .....CL0N01N02N03Factor1+++OpcdeFactor2+++ResultLenDHHiLoEqComments++++0002.00 C ' ' POST DSPSTT0003.00 C 'B18' POST DSPSTT'''''''0004.00 C 'B12' POST DSPSTT0005.00 C RETRN0006.00 C EXFMTEVOKE0007.00 C EXFMTOUTREC0008.00 C EXFMTEVOKE
***************** End of data *****************************************
Prompt type . . . C Sequence number . . . '''''''
Level N01N02N03 Factor 1 Operation Factor 2 Result __ _________ __________ _____ __________ ______ DecimalLength Positions H/N/P HI LO EQ Comment___ _ _ __ __ __ _______________
F3=Exit F4=Prompt F5=Refresh F11=Previous record F12=Cancel F23=Select prompt F24=More keys
� �
If you use prompts in full screen mode, the prompts are abbreviated.
82 Source Entry Utility (SEU)

The following display shows an example of the Edit display in full screen mode withan abbreviated high-level-language prompt.
� � Columns . . . : 1 71 Edit QRPGSRC/EDIT SEU==> ____________________________________________________________ POSTOP0002.00 C ' ' POST DSPSTT0003.00 C 'B18' POST DSPSTT'''''''0004.00 C 'B12' POST DSPSTT0005.00 C RETRN0006.00 C EXFMTEVOKE0007.00 C EXFMTOUTREC0008.00 C EXFMTEVOKE0009.00 C 'B14' POST DSPSTT0010.00 C RETRN0011.00 C EXFMTEVOKE0012.00 C EXFMTOUTREC0013.00 C EXFMTEVOKE0014.00 *C0015.00 *C
Pmt SeqNbr Lvl N01N02N03 Factor1 Opcode Factor2 ResultC '''''' __ _________ _________ _____ __________ ______
Len Dec H/N/P Hi Lo Eq Comment ___ _ _ __ __ __ ______________
� �
Canceling a PromptIf you use the IP, IPxx, or IP? line commands to insert new records with a prompt,SEU shows you a prompt to insert a record each time you press Enter. SEU con-tinues to do so until you do one of the following:
¹ Press F5 (Refresh) or F12 (Cancel).
If you have any data entered in a prompt and you press F5 (Refresh), the datais deleted before the refresh command is run and the insert or change promptfunction is canceled. In all other situations, the data is put into the memberbefore the insert or change prompt function is canceled.
¹ Enter a line command or press a positional function key (Enter, Page Up, PageDown, F19, or F20) that moves the record in the prompt off the display. If therecord is moved beneath the prompt, the prompt is removed but the recordappears on the next display.
¹ Press F11 (Previous record) to place the previous record in a prompt when youare at the beginning of the member.
¹ Request an insert with a prompt, and then do not change any fields in theprompt. The prompt is removed and the insert record is deleted when youpress Enter.
¹ Start a split session.
Chapter 10. Editing with Prompts and Format Lines 83

If you use the P, Pxx, or P? line commands to change existing records with aprompt, SEU places the record in a prompt each time you press Enter. SEU con-tinues to do so until you do one of the following:
¹ Press F5 (Refresh) or F12 (Cancel).
¹ Enter a line command or press a positional function key (Enter, Page Up, PageDown, F19, or F20) that moves the record in the prompt off the display. If therecord is moved beneath the prompt, the prompt is removed but the recordappears with the next display.
¹ Press Enter to place the next record in a prompt when you are at the end ofthe member.
¹ Press F11 (Previous record) to place the previous record in a prompt when youare at the beginning of the member.
¹ Request a prompt, and then do not change any fields in the prompt. Theprompt is removed and the insert record is deleted when you press Enter.
¹ Start a split session.
SEU puts the next record in a prompt in all situations except those mentionedabove, and except when:
¹ You press F11 (Previous record)¹ You press F23 (Select prompt)¹ A changed record in the prompt contains a syntax error
Format LinesFormat lines are specialized scale lines that appear immediately above any lines onthe Edit display. You can use format lines to find the start and end points of fieldsin column-oriented language statements.
SEU supports a format line for each high-level-language prompt supported. Formatlines for the AS/400 source languages help you enter new source members andchange existing source members.
On the Edit display, line 3 is an automatic format line that is always shown. Theformat line that appears is based on the source type of the member you are editing.You can also insert a format line above any record in the member, as shown in thefollowing display.
� � Columns . . . : 1 71 Edit QRPGSRC/EDIT SEU==> ____________________________________________________________ POSTOP FMT C .....CL0N01N02N03Factor1+++OpcdeFactor2+++ResultLenDHHiLoEqComments++++
*************** Beginning of data *************************************0002.00 C ' ' POST DSPSTT0003.00 C 'B18' POST DSPSTT0004.00 C 'B12' POST DSPSTT0005.00 C RETRNFMT C .....CL0N01N02N03Factor1+++OpcdeFactor2+++ResultLenDHHiLoEqComments++++0006.00 C EXFMTEVOKE0007.00 C EXFMTOUTREC0008.00 C EXFMTEVOKE
****************** End of data ****************************************
84 Source Entry Utility (SEU)

To remove a format line, press F5 (Refresh) or type a D (Delete) line command inthe sequence number area of the format line.
Selecting a Format LineYou can select which format line SEU uses on the display by using the SelectFormat display. One of four Select Format displays appears, depending onwhether you are editing a System/36, System/38, AS/400, or ILE member type.
You request a format line by specifying the F, F?, Fxx, IF, IF?, or Ixx line commandon the Edit display.
To access a Select Format display, request a format line with the IF? or F? linecommand.
Chapter 10. Editing with Prompts and Format Lines 85

86 Source Entry Utility (SEU)

Chapter 11. Creating Prompts
In addition to the IBM supplied prompts, you can create your own prompts for usewith SEU. The IBM supplied prompts are the AS/400 command prompts supportedby SEU, and the SEU high-level-language (HLL) prompts. User-defined promptsare prompts you can create and define to fit your specific requirements. If an IBMsupplied prompt does not meet your requirements, you can create a user-definedprompt containing only the fields you want.
For an example of creating a prompt, refer to Chapter 15, “Creating a User-DefinedPrompt – Tutorial” on page 107.
Creating a PromptTo create a prompt, do the following:
1. From the Edit display, type the P? or IP? line command, or press F23 (Selectprompt). The Select Prompt display appears.
2. Press F23 (Select user prompt). The Select User-Defined Prompt displayappears.
The following is an example of the Select User-Defined Prompt display with twopreviously created user-defined prompts:
� �Select User-Defined Prompt
Type information, press Enter.Position to . . . . . . . . . . . . . . . . . . . . . . . . . . . . . __Create a prompt . . . . . . . . . . . . . . . . . . . . . . . . . . . __
Type options, press Enter.1=Select 2=Change 4=Delete
Opt Code Prompt Text _ CD Customer Information _ AB Test Prompt
3. Type a prompt code in the Create a prompt prompt and press Enter. The Workwith User-Defined Prompt Definition display appears.
You must identify each prompt that you create with a 1-character or 2-characteralphabetic prompt code. You can use any combination of alphabetical charac-ters, but if you create a user-defined prompt with the same prompt code as anIBM supplied prompt, your user-defined prompt will always appear when yourequest the prompt. You will not be able to access the IBM supplied promptwith the same prompt code.
4. Complete the New field prompt and the Prompt text prompt and press Enter.The User Prompt Field Description display appears, in which you can enterinformation about the title that SEU displays above the prompt.
5. Complete the fields on the User Prompt Field Description display and pressEnter. The User Prompt Field Attribute display appears, on which you canenter information about the input field you are creating for the prompt.
6. Complete the fields on the User Prompt Field Attribute display and press Enter.The Work with User-Defined Prompt Definition display appears.
Copyright IBM Corp. 1994, 1998 87

7. Press F10 (Save) to save the prompt.
To show a prompt while you are creating it, press F11 (Display prompt) on any ofthe user prompt displays. The following shows an example of the Display Promptdisplay.
� � Columns . . . : 1 71 Display Prompt LIBRNAME01/FILENAME01 SEU==> ____________________________________________________________ MEMBNAME01 FMT ** ...+... 1 ...+... 2 ...+... 3 ...+... 4 ...+... 5 ...+... 6 ...+... 7
************** Beginning of data **************************************0001.00 This is a sample edit line.0002.00 This is a sample edit line.0003.00 This is a sample edit line.0004.00 This is a sample edit line.0005.00 This is a sample edit line.Cust. Name - 24 chars.________________________Cust. Address - 20 chars.____________________Cust. City - 20 chars.____________________Cust. Postal Code - 7 chars._______
You cannot type data on the Display Prompt display. Press any positional functionkey (Enter, Page Up, Page Down, F19, or F20) to return the user prompt displayyou were working on when you pressed F11 (Display prompt).
Changing a User-Defined PromptTo change a user-defined prompt, do the following:
1. From the Edit display, type the P? or IP? line command, or press F23 (Selectprompt). The Select Prompt display appears.
2. Press F23 (Select user prompt). The Select User-Defined Prompt displayappears.
3. Type 2 (Change) in the Opt prompt beside the prompt you want to change, andpress Enter. The Work with User-Defined Prompt Definition display appears.
4. Change the text in the Prompt text prompt, the prompt description, and theprompt attributes, and then press F10 (Save).
Selecting a User-Defined PromptAfter a user-defined prompt is created, you can select it by:
¹ Specifying the Pxx or IPxx line command on the Edit display. For example, toinsert a new record using a user-defined prompt called CD, type IPCD in thesequence number area of the Edit display.
¹ Specifying the user-defined prompt code on the Select Prompt display. Forexample, to select the user-defined prompt CD using the Select Prompt display,type CD in the Prompt type prompt.
¹ Selecting the prompt from the Select User-Defined Prompt display. Forexample, to select the user-defined prompt CD, type 1 next to this prompt onthe Select User-Defined Prompt display.
88 Source Entry Utility (SEU)

Defaults for Storage and Retrieval of User-Defined PromptsSEU provides two files for storing prompts:
¹ The QASUPMT file contains all IBM supplied high-level-language (HLL)prompts
¹ The QASUUSRPMT file contains user-defined prompts
When you create a user-defined prompt, SEU looks in your library list for the fileQASUUSRPMT and the member QASUUSRPMT, and stores the prompt definitionin this member. Prompts stored in this member can be shared by other users.
If you create a member in file QASUUSRPMT with the same name as your user ID,SEU will store the prompt definition there instead of in member QASUUSRPMT.No other user has access to prompts stored under your user ID.
If the file QASUUSRPMT is not found when you try to save or create a user-defined prompt, SEU issues the following error message:
Cannot find prompt file *LIBL/QASUUSRPMT.
Initially, the member QASUUSRPMT is empty, and is stored in the fileQGPL/QASUUSRPMT. You can, however, move or duplicate it to any library inyour library list. Member QASUPMT is stored in the file QPDA/QASUPMT. Itcannot be moved to another file.
When you request a prompt on the Edit display, SEU searches the members of thefiles in the library list for the prompt in the following order:
1. *LIBL/QASUUSRPMT userid 2. *LIBL/QASUUSRPMT QASUUSRPMT 3. QPDA/QASUPMT QASUPMT
If, after searching the prompt members, the prompt is still not found, SEU issuesthe following message:
Prompt or format not correct, or does not exist.
Restricting Access to Your User-Defined PromptsInitially, SEU stores prompts that you create in the member QASUUSRPMT inQGPL/QASUUSRPMT. Prompts stored in this member can be displayed andchanged by other users.
To restrict access to the prompts you defined, use the Add Physical File Member(ADDPFM) command to create a member in the file QASUUSRPMT with the samename as your user ID. When you store or display prompts, SEU will always lookfor this member first before looking anywhere else for a place in which to store orretrieve prompts.
Chapter 11. Creating Prompts 89

Creating Additional User-Defined Prompt FilesYou can create additional QASUUSRPMT files to store your user-defined promptsin libraries other than the initial default library QGPL.
To create another QASUUSRPMT file, use the Create Duplicate Object(CRTDUPOBJ) command to create a copy of QGPL/QASUUSRPMT in the libraryof your choice.
If you want to copy the existing members in QASUUSRPMT that contain user-defined prompts to the new prompt file, specify *YES for Duplicate data. Other-wise, specify *NO.
If you specify *NO for the Duplicate data parameter, you must use the Add PhysicalFile Member (ADDPFM) command to add new members to the new file.
90 Source Entry Utility (SEU)

Chapter 12. Exiting from Source Entry Utility
You can exit from SEU by using the Exit display. To access the Exit display, pressF3 (Exit) on the Edit display or on any split display. You can use the Exit display toperform the following operations on the member you are editing:
¹ Exit and create a new member¹ Exit without creating the member¹ Exit and save an existing member with the changes you entered¹ Exit without saving the changes to an existing member¹ Resequence the member you edited¹ Print the member¹ Go to the member list (Work with Members Using SEU display)¹ Return to editing¹ Log Operation Control Language (OCL) statements¹ Cancel the PDM find string function
For details on the prompts of the Exit display, press F1 (Help) to see the onlinehelp information.
Copyright IBM Corp. 1994, 1998 91

92 Source Entry Utility (SEU)
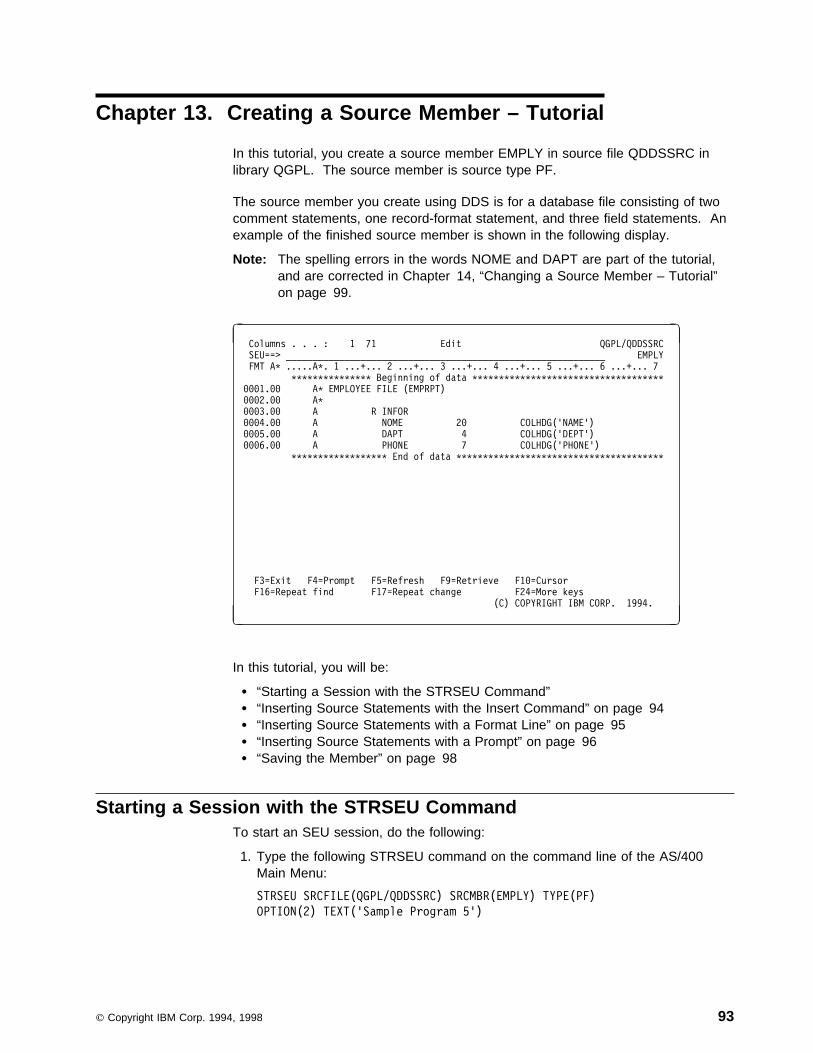
Chapter 13. Creating a Source Member – Tutorial
In this tutorial, you create a source member EMPLY in source file QDDSSRC inlibrary QGPL. The source member is source type PF.
The source member you create using DDS is for a database file consisting of twocomment statements, one record-format statement, and three field statements. Anexample of the finished source member is shown in the following display.
Note: The spelling errors in the words NOME and DAPT are part of the tutorial,and are corrected in Chapter 14, “Changing a Source Member – Tutorial”on page 99.
� � Columns . . . : 1 71 Edit QGPL/QDDSSRC SEU==> ____________________________________________________________ EMPLY FMT A* .....A*. 1 ...+... 2 ...+... 3 ...+... 4 ...+... 5 ...+... 6 ...+... 7
*************** Beginning of data ************************************0001.00 A* EMPLOYEE FILE (EMPRPT)0002.00 A*0003.00 A R INFOR0004.00 A NOME 20 COLHDG('NAME')0005.00 A DAPT 4 COLHDG('DEPT')0006.00 A PHONE 7 COLHDG('PHONE')
****************** End of data ***************************************
F3=Exit F4=Prompt F5=Refresh F9=Retrieve F10=Cursor F16=Repeat find F17=Repeat change F24=More keys
(C) COPYRIGHT IBM CORP. 1994.
� �
In this tutorial, you will be:
¹ “Starting a Session with the STRSEU Command”¹ “Inserting Source Statements with the Insert Command” on page 94¹ “Inserting Source Statements with a Format Line” on page 95¹ “Inserting Source Statements with a Prompt” on page 96¹ “Saving the Member” on page 98
Starting a Session with the STRSEU CommandTo start an SEU session, do the following:
1. Type the following STRSEU command on the command line of the AS/400Main Menu:
STRSEU SRCFILE(QGPL/QDDSSRC) SRCMBR(EMPLY) TYPE(PF)
OPTION(2) TEXT('Sample Program 5')
Copyright IBM Corp. 1994, 1998 93

2. Press Enter. The Edit display appears.
The following message at the bottom of the display indicates that SEU addedthe new member to the file you specified:
Member EMPLY added to file QGPL/QDDSSRC.
3. The Edit display has blank lines because you are creating a new member. Toremove the blank lines, press Enter.
Inserting Source Statements with the Insert CommandTo insert source statements into a member, do the following:
1. Using the Insert (I) line command, type I2 on the left-hand side of thebeginning-of-data line and press Enter, as shown in the following display:
� � Columns . . . : 1 71 Edit QGPL/QDDSSRC SEU==> ____________________________________________________________ EMPLY FMT PF .....A..........T.Name++++++RLen++TDpB......Functions++++++++++++++++++I2 *************** Beginning of data *************************************
****************** End of data ****************************************
Two blank lines are inserted, as shown in the following display:
� � Columns . . . : 1 71 Edit QGPL/QDDSSRC SEU==> ____________________________________________________________ EMPLY FMT PF .....A..........T.Name++++++RLen++TDpB......Functions+++++++++++++
*************** Beginning of data *************************************''''''''''''''
****************** End of data ****************************************
2. Starting in column 6, which is under the A in the format line, type the first twostatements of the source member, which are the comment statements, in theblank insert lines as shown in the following display.
� � Columns . . . : 1 71 Edit QGPL/QDDSSRC SEU==> ____________________________________________________________ EMPLY FMT PF .....A..........T.Name++++++RLen++TDpB......Functions+++++++++++++
*************** Beginning of data *************************************''''''' A* EMPLOYEE FILE (EMPRPT)''''''' A*
****************** End of data ****************************************
3. Press Enter. SEU inserts the statements in the member, assigns sequencenumbers to them, and inserts a blank line after the last statement.
4. To remove the blank line that SEU inserted, press Enter again.
94 Source Entry Utility (SEU)

Inserting Source Statements with a Format LineTo insert source statements using a format line, do the following:
1. Using the Insert-with-Format (IF) command, type IFPF2 in sequence number0002.00, as shown in the following display, and press Enter:
� � Columns . . . : 1 71 Edit QGPL/QDDSSRC SEU==> ____________________________________________________________ EMPLY FMT A* .....A*. 1 ...+... 2 ...+... 3 ...+... 4 ...+... 5 ...+... 6 ...+... 7.
*************** Beginning of data *************************************0001.00 A* EMPLOYEE FILE (EMPRPT)IFPF2 A*
****************** End of data ****************************************
The IFPF2 command inserts the PF format line and two blank lines as shown inthe following display:
� � Columns . . . : 1 71 Edit QGPL/QDDSSRC SEU==> ____________________________________________________________ EMPLY FMT A* .....A*. 1 ...+... 2 ...+... 3 ...+... 4 ...+... 5 ...+... 6 ...+... 7
*************** Beginning of data *************************************0001.00 A* EMPLOYEE FILE (EMPRPT)0002.00 A*FMT PF .....A..........T.Name++++++RLen++TDpB......Functions+++++++++++++''''''''''''''
****************** End of data ****************************************
2. Using the format line as a guide, type the next two source statements, whichare the record format statement and the first field statement, in the blank linesas shown in the following display.
Note: Type NOME as indicated. This spelling error is corrected inChapter 14, “Changing a Source Member – Tutorial” on page 99.
� � Columns . . . : 1 71 Edit QGPL/QDDSSRC SEU==> ____________________________________________________________ EMPLY FMT A* .....A*. 1 ...+... 2 ...+... 3 ...+... 4 ...+... 5 ...+... 6 ...+... 7
*************** Beginning of data *************************************0001.00 A* EMPLOYEE FILE (EMPRPT)0002.00 A*FMT PF .....A..........T.Name++++++RLen++TDpB......Functions+++++++++++++''''''' A R INFOR''''''' A NOME 20 COLHDG('NAME')
****************** End of data ****************************************
3. With the cursor at the end of the second insert line, press Enter. SEU insertsthe records in the member, assigns sequence numbers to them, and insertsanother blank line.
4. Press F5 (Refresh) to remove the format line and the blank line.
Chapter 13. Creating a Source Member – Tutorial 95

Inserting Source Statements with a PromptTo insert source statements with a prompt, do the following:
1. Type SET EXPERT on the SEU command line, as shown in the following display,and press any positional function key such as Enter, Page Up, Page Down,F19 (Left), or F20 (Right). This sets the Edit display to full screen mode, whichprovides 4 more edit lines and displays short forms for most of the SEU lan-guage prompts.
� � Columns . . . : 1 71 Edit QGPL/QDDSSRC SEU==> SET EXPERT__________________________________________________ EMPLY FMT A* .....A*. 1 ...+... 2 ...+... 3 ...+... 4 ...+... 5 ...+... 6 ...+... 7
*************** Beginning of data *************************************0001.00 A* EMPLOYEE FILE (EMPRPT)0002.00 A*0003.00 A R INFOR0004.00 A NOME 20 COLHDG('NAME')
****************** End of data ****************************************
2. Using the Insert-with-Prompt (IP) line command, type IPPF in sequence number0004.00, as shown in the following display, and press Enter:
� � Columns . . . : 1 71 Edit QGPL/QDDSSRC SEU==> ____________________________________________________________ EMPLY
*************** Beginning of data *************************************0001.00 A* EMPLOYEE FILE (EMPRPT)0002.00 A*0003.00 A R INFORIPPF A NOME 20 COLHDG('NAME')
****************** End of data ****************************************
SEU inserts the PF prompt at the bottom of the display. The fields of theprompt are separated and labeled, as shown in the following display.
� � Columns . . . : 1 71 Edit QGPL/QDDSSRC SEU==> ____________________________________________________________ EMPLY
*************** Beginning of data *************************************0001.00 A* EMPLOYEE FILE (EMPRPT)0002.00 A*0003.00 A R INFOR0004.00 A NOME 20 COLHDG('NAME')'''''''
****************** End of data ****************************************
Pmt SeqNbr NameType Name Ref Len DataType Dec UsePF ''''''' _ __________ _ ____ _ __ _
Functions ___________________________________
� �
96 Source Entry Utility (SEU)

3. Type DAPT under the Name column, type 4 under the Len column, (press FieldExit to right-adjust the value), and type COLHDG('DEPT') under the Functioncolumn, as shown in the following display, and press Enter.
Note: Type DAPT as indicated. This spelling error is corrected in Chapter 14,“Changing a Source Member – Tutorial” on page 99.
Pmt SeqNbr NameType Name Ref Len DataType Dec UsePF ''''''' _ DAPT______ _ ___4 _ __ _
Functions COLHDG('DEPT')_____________________
� �
SEU enters the record into the member and assigns a sequence number, asshown in the following display:
� � Columns . . . : 1 71 Edit QGPL/QDDSSRC SEU==> ____________________________________________________________ EMPLY
*************** Beginning of data *************************************0001.00 A* EMPLOYEE FILE (EMPRPT)0002.00 A*0003.00 A R INFOR0004.00 A NOME 20 COLHDG('NAME')0005.00 A DAPT 4 COLHDG('DEPT')'''''''
****************** End of data ****************************************
Pmt SeqNbr NameType Name Ref Len DataType Dec UsePF ''''''' _ __________ _ ____ _ __ _
Functions ___________________________________
� �
4. Type the last source statement in the prompt, and press Enter. The Editdisplay appears as shown in the following display.
Chapter 13. Creating a Source Member – Tutorial 97

� � Columns . . . : 1 71 Edit QGPL/QDDSSRC SEU==> ____________________________________________________________ EMPLY
*************** Beginning of data *************************************0001.00 A* EMPLOYEE FILE (EMPRPT)0002.00 A*0003.00 A R INFOR0004.00 A NOME 20 COLHDG('NAME')0005.00 A DAPT 4 COLHDG('DEPT')0006.00 A PHONE 7 COLHDG('PHONE')'''''''
****************** End of data ****************************************
Pmt SeqNbr NameType Name Ref Len DataType Dec UsePF ''''''' _ __________ _ ____ _ __ _
Functions ___________________________________
� �
5. Press F5 (Refresh) to remove the prompt and blank line.
6. Press F10 (Cursor) to move the cursor from the data area to the SEUcommand line.
7. Type SET EXPERT OFF and press Enter to remove full screen mode.
Saving the MemberTo save the member you created, type FILE on the SEU command line as shown inthe following display, and press Enter:
� � Columns . . . : 1 71 Edit QGPL/QDDSSRC SEU==> FILE________________________________________________________ EMPLY FMT A* .....A*. 1 ...+... 2 ...+... 3 ...+... 4 ...+... 5 ...+... 6 ...+... 7
*************** Beginning of data *************************************0001.00 A* EMPLOYEE FILE (EMPRPT)0002.00 A*0003.00 A R INFOR0004.00 A NOME 20 COLHDG('NAME')0005.00 A DAPT 4 COLHDG('DEPT')0006.00 A PHONE 7 COLHDG('PHONE')
****************** End of data ****************************************
The member is saved in the current library and file. The following messageappears at the bottom of the display:
Member is being saved.
You exit from SEU, the AS/400 Main Menu is returned, and the following messageis displayed:
Member EMPLY added to file QGPL/QDDSSRC.
Source member EMPLY is created and ready for use in Chapter 14, “Changing aSource Member – Tutorial” on page 99.
98 Source Entry Utility (SEU)

Chapter 14. Changing a Source Member – Tutorial
In this tutorial, you change the DDS statements in the source member created inChapter 13, “Creating a Source Member – Tutorial” on page 93. The sourcemember is EMPLY in source file QDDSSRC in library QGPL. Following is the SEUsource listing for this member. The highlighted numbers in the source listing indi-cate areas of the source member that you will change.
5763PW1 V3R1M0 941105 SEU SOURCE LISTING
SOURCE FILE . . . . . . . QGPL/QDDSSRC
MEMBER . . . . . . . . . EMPLY
SEQNBR*...+... 1 ...+... 2 ...+... 3 ...+... 4 ...+... 5 ...+... 6 ...+...
100 A* EMPLOYEE FILE (EMPRPT)
200 A*.1/ 300 A INFOR
400 A .2/ NOME 20 COLHDG('NAME')
500 A .3/ DAPT 4 COLHDG('DEPT')
600 A PHONE .4/7 COLHDG('PHONE')
.5/ * * * * E N D O F S O U R C E * * * *
The list of items in the following table shows the changes to make to the sourcemember EMPLY. Each number in the list corresponds to a number on the pre-ceding SEU source listing.
In this tutorial, you will be:
¹ “Starting a Session from the Work with Members Using PDM Display” onpage 100
¹ “Changing Records Directly” on page 100¹ “Changing Records with a Format Line” on page 101¹ “Changing Records with the SEU FIND Command” on page 102¹ “Copying Records with the Split Edit/Browse Display” on page 102¹ “Changing Records with a Prompt” on page 105¹ “Saving the Changes” on page 106
An example of the source member as it appears on the Edit display after allchanges are done is shown in the following display.
Item Changes to the Source Member
.1/ Add the comment: CORRECTIONS MADE BY J.A.H. 09/07/94
.2/ Change NOME to NAME
.3/ Change DAPT to DEPT
.4/ Change 7 to 5
.5/ Copy a record in a split Edit/Browse session
Copyright IBM Corp. 1994, 1998 99

� � Columns . . . : 1 71 Edit QGPL/QDDSSRC SEU==> ____________________________________________________________ EMPLY FMT A* .....A*. 1 ...+... 2 ...+... 3 ...+... 4 ...+... 5 ...+... 6 ...+... 7
*************** Beginning of data *************************************0001.00 A* EMPLOYEE FILE (EMPRPT)0002.00 A* CORRECTIONS MADE BY J.A.H. 09/07/940003.00 A R INFOR0004.00 A NAME 20 COLHDG('NAME')0005.00 A DEPT 4 COLHDG('DEPT')0006.00 A PHONE 5 COLHDG('PHONE')0007.00 A MLADDR 20 COLHDG('ADDR')
****************** End of data ****************************************
Starting a Session from the Work with Members Using PDM DisplayTo start an SEU session from the Work with Members Using PDM display, do thefollowing:
1. Type the STRPDM (Start PDM) command on the command line of the AS/400Main Menu. Press Enter, and the AS/400 Programming Development Manager(PDM) display appears.
2. Select option 3 (Work with members) and press Enter. The Specify Membersto Work With display appears.
3. Specify that you want to work with the source file QDDSSRC in library QGPL,with source member EMPLY, and with type *ALL, and press Enter. The Workwith Members Using PDM display appears.
4. Type option 2 (Edit) in the Opt prompt next to the member EMPLY, and pressEnter. The programming development manager (PDM) calls SEU, SEU callsthe Edit display, and you see the source member EMPLY.
For more information on using PDM, see ADTS/400: Programming Develop-ment Manager.
Changing Records DirectlyTo add CORRECTIONS MADE BY J.A.H. 09/07/94 to record 0002.00, Move the cursorto record 0002.00, type the change shown in the following display, and press Enter.
� � Columns . . . : 1 71 Edit QGPL/QDDSSRC SEU==> ____________________________________________________________ EMPLY FMT A* .....A*. 1 ...+... 2 ...+... 3 ...+... 4 ...+... 5 ...+... 6 ...+... 7
*************** Beginning of data *************************************0001.00 A* EMPLOYEE FILE (EMPRPT)0002.00 A* CORRECTIONS MADE BY J.A.H. 09/07/940003.00 A R INFOR0004.00 A NOME 20 COLHDG('NAME')0005.00 A DAPT 4 COLHDG('DEPT')0006.00 A PHONE 7 COLHDG('PHONE')
****************** End of data ****************************************
The record is changed.
100 Source Entry Utility (SEU)

Changing Records with a Format LineTo change a record with a format line, do the following:
1. To change NOME to NAME using the Format (F) line command, type F insequence number 0004.00 and press Enter. The PF format line is insertedabove record 0004.00 as shown in the following display.
� � Columns . . . : 1 71 Edit QGPL/QDDSSRC SEU==> ____________________________________________________________ EMPLY FMT A* .....A*. 1 ...+... 2 ...+... 3 ...+... 4 ...+... 5 ...+... 6 ...+... 7
*************** Beginning of data *************************************0001.00 A* EMPLOYEE FILE (EMPRPT)0002.00 A* CORRECTIONS MADE BY J.A.H. 09/07/940003.00 A R INFORFMT PF .....A..........T.Name++++++RLen++TDpB......Functions+++++++++++++0004.00 A NOME 20 COLHDG('NAME')0005.00 A DAPT 4 COLHDG('DEPT')0006.00 A PHONE 7 COLHDG('PHONE')
****************** End of data ****************************************
Note: In this tutorial, SEU operations are requested one at a time so that youcan see the result of each operation. You can, however, type thechange on record 0002.00, and type the Format (F) line command, andthen press Enter. Both operations are done at the same time.
2. On record 0004.00, under the Name field on the format line, type A over the Oin NOME to correct the spelling.
The spelling is changed and the format line remains as shown in the followingdisplay:
� � Columns . . . : 1 71 Edit QGPL/QDDSSRC SEU==> ____________________________________________________________ EMPLY FMT A* .....A*. 1 ...+... 2 ...+... 3 ...+... 4 ...+... 5 ...+... 6 ...+... 7
*************** Beginning of data *************************************0001.00 A* EMPLOYEE FILE (EMPRPT)0002.00 A* CORRECTIONS MADE BY J.A.H. 09/07/940003.00 A R INFORFMT PF .....A..........T.Name++++++RLen++TDpB......Functions+++++++++++++0004.00 A NAME 20 COLHDG('NAME')0005.00 A DAPT 4 COLHDG('DEPT')0006.00 A PHONE 7 COLHDG('PHONE')
****************** End of data ****************************************
3. Press F5 (Refresh) to remove the format line.
Note: The format line is removed when you exit from editing. You can alsoremove the format line by pressing F5 (Refresh) or by using the D(Delete) line command.
Chapter 14. Changing a Source Member – Tutorial 101

Changing Records with the SEU FIND CommandTo use the SEU FIND command to find the string DAPT and change it to DEPT, dothe following:
1. Press F10 (Cursor) to move the cursor from the data area to the SEUcommand line.
2. Type SET MATCH, and press Enter. The SET MATCH command is used to findonly the character string that matches the case in the find string.
3. Type F 'DAPT' on the SEU command line, as shown in the following display:
� � Columns . . . : 1 71 Edit QGPL/QDDSSRC SEU==> F 'DAPT'____________________________________________________ EMPLY FMT A* .....A*. 1 ...+... 2 ...+... 3 ...+... 4 ...+... 5 ...+... 6 ...+... 7
*************** Beginning of data *************************************0001.00 A* EMPLOYEE FILE (EMPRPT)0002.00 A* CORRECTIONS MADE BY J.A.H. 09/07/940003.00 A R INFOR0004.00 A NAME 20 COLHDG('NAME')0005.00 A DAPT 4 COLHDG('DEPT')0006.00 A PHONE 7 COLHDG('PHONE')
****************** End of data ****************************************
4. Press Enter or F16 (Repeat find). The cursor is moved to the first occurrenceof the string.
5. Type E over the A in DAPT to correct the spelling error.
Note: You can also position the display to the record if you know the recordsequence number. In this example, it is record 0005.00. If you type 5Ï(5 and a space) in any Sequence number field and press Enter, record0005.00 becomes the first record.
Copying Records with the Split Edit/Browse DisplayWhile editing a member, you can copy records from a browse member into the editmember using the split Edit/Browse display.
To copy a record from a browse member, do the following:
1. Press F15 (Browse/Copy options). The Browse/Copy Options display appears.
2. Select option 1 (Member) for the Selection prompt and N (No) for the Copy allrecords prompt. Specify that you want to work with browse/copy memberMLGREFP in file QATTDDS in library QUSRTOOL.
Note: Source member MLGREFP in file QATTDDS in library QUSRTOOL ispart of the Operating System/400* (OS/400*) system.
3. Press Enter. The split Edit/Browse display appears, with EMPLY in the editsession and MLGREFP in the browse session, as shown in the followingdisplay.
102 Source Entry Utility (SEU)

� � Columns . . . : 1 71 Edit QGPL/QDDSSRC SEU==> EMPLY FMT A* .....A*. 1 ...+... 2 ...+... 3 ...+... 4 ...+... 5 ...+... 6 ...+...
*************** Beginning of data **********************************0001.00 A* EMPLOYEE FILE (EMPRPT)0002.00 A* CORRECTIONS MADE BY J.A.H. 09/07/940003.00 A R INFOR0004.00 A NAME 20 COLHDG('NAME')0005.00 A DEPT 4 COLHDG('DEPT')0006.00 A PHONE 7 COLHDG('PHONE')
****************** End of data ************************************_______________________________________________________________________________ Columns . . . : 1 71 Browse QUSRTOOL/QATTDDS SEU==> MLGREFP
*************** Beginning of data ************************************0001.00 A* MLGREFP - Mailing list field reference file0002.00 A R MLGREFR TEXT('Mailing list ref')0003.00 A MLACCT 5 0 COLHDG('Account' +0004.00 A 'number')0005.00 A EDTCDE(X)
F3=Exit F5=Refresh F9=Retrieve F10=Cursor F12=Cancel F16=Repeat find F17=Repeat change F24=More keys
� �
4. Move the cursor to the SEU command line of the browse session, type SETMATCH, and press Enter.
5. Type F 'MLADDR' on the SEU command line, and press Enter. The first occur-rence of the string is found in record 0016.00 in the browse session, as shownin the following display.
_______________________________________________________________________________ Columns . . . : 1 71 Browse QUSRTOOL/QATTDDS SEU==> MLGREFP
*************** Beginning of data ************************************0015.00 A name search')0016.00 A MLADDR 20 COLHDG('Addr')0017.00 A MLCITY 20 COLHDG('City')0018.00 A MLSTAT 2 COLHDG('State')0019.00 A VALUES('AL' 'AK' 'AZ' +
F3=Exit F5=Refresh F9=Retrieve F10=Cursor F12=Cancel F16=Repeat find F17=Repeat change F24=More keysString 'MLADDR' found.
� �
6. Use the Copy (C) line command to copy the record from the browse session tothe edit session. Move the cursor to the sequence number area of record0016.00 in the browse session (MLGLEFD), and type C.
7. Use the After Target line command, A, to insert the new record in the editsession. Move the cursor to the sequence number area of record 0006.00 inthe edit session (EMPLY), and type A. The commands are shown in the fol-lowing display.
Chapter 14. Changing a Source Member – Tutorial 103
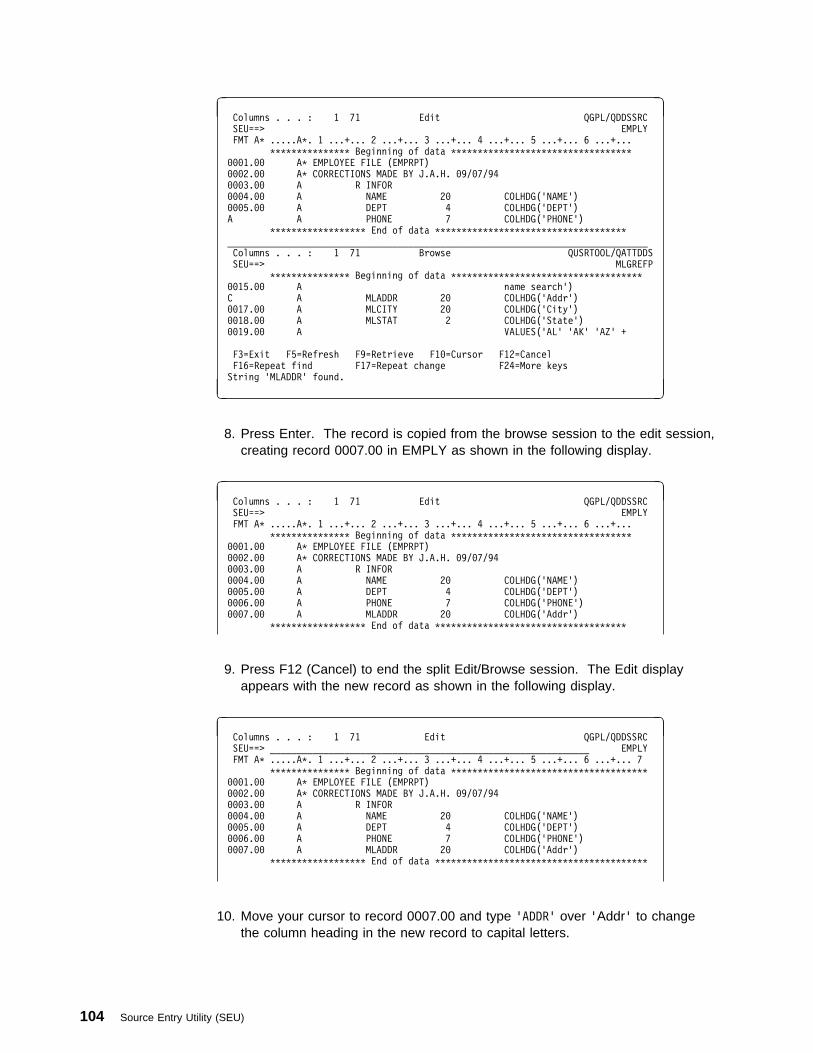
� � Columns . . . : 1 71 Edit QGPL/QDDSSRC SEU==> EMPLY FMT A* .....A*. 1 ...+... 2 ...+... 3 ...+... 4 ...+... 5 ...+... 6 ...+...
*************** Beginning of data **********************************0001.00 A* EMPLOYEE FILE (EMPRPT)0002.00 A* CORRECTIONS MADE BY J.A.H. 09/07/940003.00 A R INFOR0004.00 A NAME 20 COLHDG('NAME')0005.00 A DEPT 4 COLHDG('DEPT')A A PHONE 7 COLHDG('PHONE')
****************** End of data ************************************_______________________________________________________________________________ Columns . . . : 1 71 Browse QUSRTOOL/QATTDDS SEU==> MLGREFP
*************** Beginning of data ************************************0015.00 A name search')C A MLADDR 20 COLHDG('Addr')0017.00 A MLCITY 20 COLHDG('City')0018.00 A MLSTAT 2 COLHDG('State')0019.00 A VALUES('AL' 'AK' 'AZ' +
F3=Exit F5=Refresh F9=Retrieve F10=Cursor F12=Cancel F16=Repeat find F17=Repeat change F24=More keysString 'MLADDR' found.
� �
8. Press Enter. The record is copied from the browse session to the edit session,creating record 0007.00 in EMPLY as shown in the following display.
� � Columns . . . : 1 71 Edit QGPL/QDDSSRC SEU==> EMPLY FMT A* .....A*. 1 ...+... 2 ...+... 3 ...+... 4 ...+... 5 ...+... 6 ...+...
*************** Beginning of data **********************************0001.00 A* EMPLOYEE FILE (EMPRPT)0002.00 A* CORRECTIONS MADE BY J.A.H. 09/07/940003.00 A R INFOR0004.00 A NAME 20 COLHDG('NAME')0005.00 A DEPT 4 COLHDG('DEPT')0006.00 A PHONE 7 COLHDG('PHONE')0007.00 A MLADDR 20 COLHDG('Addr')
****************** End of data ************************************
9. Press F12 (Cancel) to end the split Edit/Browse session. The Edit displayappears with the new record as shown in the following display.
� � Columns . . . : 1 71 Edit QGPL/QDDSSRC SEU==> ____________________________________________________________ EMPLY FMT A* .....A*. 1 ...+... 2 ...+... 3 ...+... 4 ...+... 5 ...+... 6 ...+... 7
*************** Beginning of data *************************************0001.00 A* EMPLOYEE FILE (EMPRPT)0002.00 A* CORRECTIONS MADE BY J.A.H. 09/07/940003.00 A R INFOR0004.00 A NAME 20 COLHDG('NAME')0005.00 A DEPT 4 COLHDG('DEPT')0006.00 A PHONE 7 COLHDG('PHONE')0007.00 A MLADDR 20 COLHDG('Addr')
****************** End of data ****************************************
10. Move your cursor to record 0007.00 and type 'ADDR' over 'Addr' to changethe column heading in the new record to capital letters.
104 Source Entry Utility (SEU)

Changing Records with a PromptTo make changes with a prompt, do the following:
1. Type a P in sequence number 0006.00, and press Enter. Record 0006.00 ischecked for the prompt type, and the contents of record 0006.00 are inserted ina prompt at the bottom of the display, as shown in the following display:
� � Columns . . . : 1 71 Edit QGPL/QDDSSRC SEU==> ____________________________________________________________ EMPLY FMT A* .....A*. 1 ...+... 2 ...+... 3 ...+... 4 ...+... 5 ...+... 6 ...+... 7
*************** Beginning of data *************************************0001.00 A* EMPLOYEE FILE (EMPRPT)0002.00 A* CORRECTIONS MADE BY J.A.H. 09/07/940003.00 A R INFOR0004.00 A NAME 20 COLHDG('NAME')0005.00 A DEPT 4 COLHDG('DEPT')0006.00 A PHONE 7 COLHDG('PHONE')0007.00 A MLADDR 20 COLHDG('ADDR')
****************** End of data ****************************************
Prompt type . . . PF Sequence number . . . 0006.00
Name Data Decimal Type Name Ref Length Type Positions Use _ PHONE_____ _ ___7 _ __ _ Functions COLHDG('PHONE')___________________
F3=Exit F4=Prompt F5=Refresh F9=Retrieve F10=Cursor F16=Repeat find F17=Repeat change F24=More keys
� �
2. Type 5 under the Length field, and press Field Exit to right-adjust the value.The prompt appears as shown in the following display:
Prompt type . . . PF Sequence number . . . 0006.00
Name Data Decimal Type Name Ref Length Type Positions Use _ PHONE_____ _ ___5 _ __ _ Functions COLHDG('PHONE')___________________
F3=Exit F4=Prompt F5=Refresh F9=Retrieve F10=Cursor F16=Repeat find F17=Repeat change F24=More keys
� �
3. Press Enter. The record is changed. The prompt operation is a repeatingoperation, so the next record is inserted in the prompt as shown in the followingdisplay.
Chapter 14. Changing a Source Member – Tutorial 105

� � Columns . . . : 1 71 Edit QGPL/QDDSSRC SEU==> ____________________________________________________________ EMPLY FMT A* .....A*. 1 ...+... 2 ...+... 3 ...+... 4 ...+... 5 ...+... 6 ...+... 7
*************** Beginning of data *************************************0001.00 A* EMPLOYEE FILE (EMPRPT)0002.00 A* CORRECTIONS MADE BY J.A.H. 09/07/940003.00 A R INFOR0004.00 A NAME 20 COLHDG('NAME')0005.00 A DEPT 4 COLHDG('DEPT')0006.00 A PHONE 5 COLHDG('PHONE')0007.00 A MLADDR 20 COLHDG('ADDR')
****************** End of data ****************************************
Prompt type . . . PF Sequence number . . . 0007.00
Name Data Decimal Type Name Ref Length Type Positions Use _ MLADDR____ _ __20 _ __ _ Functions COLHDG('ADDR')____________________
F3=Exit F4=Prompt F5=Refresh F9=Retrieve F10=Cursor F16=Repeat find F17=Repeat change F24=More keys
� �
4. Press F5 (Refresh) to remove the prompt.
Saving the ChangesTo save the changes to member EMPLY, do the following:
1. Press F3 (Exit) to show the Exit display. Because you made changes to thesource member, a Y (Yes) is displayed in the Change/create member promptas shown in the following display.
� � Exit
Type choices, press Enter.Change/create member . . . . . . . Y Y=Yes, N=NoMember . . . . . . . . . . . . . EMPLY_____ Name, F4 for listFile . . . . . . . . . . . . . . QDDSSRC___ Name, F4 for listLibrary name . . . . . . . . . QGPL______ Name
Text . . . . . . . . . . . . . . __________________________________________________
Resequence member . . . . . . . . Y Y=Yes, N=NoStart . . . . . . . . . . . . . 0001.00 0000.01-9999.99Increment . . . . . . . . . . . 01.00 0.01-99.99
Print member . . . . . . . . . . . N Y=Yes, N=No
Return to editing . . . . . . . . . N Y=Yes, N=No
Go to member list . . . . . . . . . N Y=Yes, N=No
F3=Exit F4=Prompt F5=Refresh F12=Cancel
� �
Note: To bypass the Exit display, type FILE on the SEU command line, andpress Enter.
2. Press Enter to process the changes to the member, exit from SEU, and returnto the Work with Members Using PDM display.
106 Source Entry Utility (SEU)

Chapter 15. Creating a User-Defined Prompt – Tutorial
The following tutorial shows how to create a user-defined prompt for a databasethat consists of customer names and addresses.
In this tutorial, a user-defined prompt called CD (customer data) is created, andthen the following fields for the CD prompt are created:
¹ CUSTNAME ¹ CUSTADDRES ¹ CUSTCITY ¹ CUSTPOSTAL
The following display shows what the prompt looks like when you are finished:
� � Columns . . . : 1 71 Display Prompt LIBRNAME01/FILENAME01 SEU==> ____________________________________________________________ MEMBNAME01 ...+... 1 ...+... 2 ...+... 3 ...+... 4 ...+... 5 ...+... 6 ...+... 7 ...+...
*************** Beginning of data *************************************0001.00 This is a sample edit line.0002.00 This is a sample edit line.0003.00 This is a sample edit line.0004.00 This is a sample edit line.0005.00 This is a sample edit line.0006.00 This is a sample edit line.0007.00 This is a sample edit line.0008.00 This is a sample edit line.Cust. Name - 24 chars.________________________Cust. Address - 20 chars.____________________Cust. City, Country - 20 chars____________________Cust. Postal Code - 7 chars._______
F3=Exit F4=Prompt F5=Refresh F11=Previous record F12=Cancel F23=Select prompt F24=More keysPress any function key to return to the User-Defined Prompt Definition display.
� �
In this tutorial, you will be:
¹ “Defining a Prompt Code”¹ “Creating a Field for the Prompt” on page 108¹ “Displaying and Saving the Prompt” on page 109
Defining a Prompt Code1. To define a user-defined prompt, type the P? or IP? line command, or press
F23 (Select prompt) on the Edit display. You see the Select Prompt display forAS/400 member types.
2. Press F23. You see the Select User-Defined Prompt display.
3. Type CD in the Create a prompt prompt to specify the prompt code you want todefine, and press Enter.
You see the Work with User-Defined Prompt Definition display.
Copyright IBM Corp. 1994, 1998 107

4. Because this is a new prompt, specify text for the CD prompt code you justcreated. You can specify up to 50 characters to describe the prompt code.Type Customer Information in the Prompt text prompt.
Note: If you press Enter without typing information in any of the prompts onthe Work with User-Defined Prompt Definition display, SEU returns tothe Select User-Defined Prompt display.
Creating a Field for the Prompt1. To create a field for customer names, type CUSTNAME in the New field field of the
Work with User-Defined Prompt Definition display, and press Enter. You seethe User Prompt Field Description display, which is used for defining a fielddescription appears. A field description is the title SEU shows above an inputfield in the prompt.
The Prompt code, Prompt text, and Field name fields display the informationyou enter. The other fields on the display show the default values that you canchange.
2. Type the following:
a. Cust. Name - 24 chars. in the Field text prompt
b. 13 in the Line on display prompt
c. 1 in the Column on display prompt
When SEU shows the prompt, the CUSTNAME heading appears on line 13,starting in column 1.
3. Press Enter. You see the User Prompt Field Attribute display which is used fordefining an input field. Field attributes describe the input field you are creatingfor the prompt.
4. Type the following:
a. 14 in the Line on display prompt
b. 01 in the Column on display prompt
c. 1 in the Data type prompt
d. 24 in the Length prompt
e. 001 in the Column in source record prompt
f. Y in the Highlight prompt
g. N in the Reverse Image prompt
h. N in the Column Separator prompt
i. Y in the Underline prompt
This is the first input field for the prompt you are creating, and it appears onthe Edit display immediately below the CUSTNAME heading.
5. Press Enter. SEU saves the new field and returns to the Work with User-Defined Prompt Definition display.
From the Work with User-Defined Prompt Definition display you can change ordelete the existing field (CUSTNAME), define another field for the prompt, or returnto the Select Prompt display.
108 Source Entry Utility (SEU)

Note: If you want to return the Edit display without creating any more promptfields, press F10 (Save) to save the prompt field definitions you havecreated so far.
To define the three remaining fields for the CD prompt, repeat the steps in “Cre-ating a Field for the Prompt” on page 108, using the field information shown in thefollowing table.
FieldName
FieldText
LineonDisplay
ColumnonDisplay
DataType Length
ColumninSourceRecord
CUSTADDRES Cust. Address - 20 chars. 15 1 Alphameric 20 25
CUSTCITY Cust. City, Country - 20 chars. 17 1 Alphameric 20 45
CUSTPOSTAL Cust. Postal Code - 7 chars. 19 1 Alphabetic 7 65
When you finish adding the fields for the CD prompt, you see the prompt and allthe defined fields on the Work with User-Defined Prompt Definition display, asshown in the following display:
� �Work with User-Defined Prompt Definition
Prompt code . . . . . . . . . . . : CD
Type information, press Enter.Position to . . . . . . . . . . . __________ NameNew field . . . . . . . . . . . . __________ Name, SEQUENCEPrompt text . . . . Customer Information______________________________
Type options, press Enter. 1=Define description 2=Define attribute 4=Delete Opt Field Name Field Text_ CUSTNAME Cust. Name - 24 chars._ CUSTADDRES Cust. Address - 20 chars._ CUSTCITY Cust. City, Country - 20 chars._ CUSTPOSTAL Cust. Postal Code - 7 chars.
BottomF3=Exit F5=Refresh F10=Save F11=Display prompt F12=Cancel
� �
Displaying and Saving the PromptTo display and save a prompt, do the following:
1. Press F11 (Display prompt) on the Work with User-Defined Prompt Definitiondisplay. You see what the prompt looks like on the Edit display, as shown inthe following display.
Chapter 15. Creating a User-Defined Prompt – Tutorial 109

� � Columns . . . : 1 71 Display Prompt LIBRNAME01/FILENAME01 SEU==> ____________________________________________________________ MEMBNAME01 ...+... 1 ...+... 2 ...+... 3 ...+... 4 ...+... 5 ...+... 6 ...+... 7 ...+...
*************** Beginning of data *************************************0001.00 This is a sample edit line.0002.00 This is a sample edit line.0003.00 This is a sample edit line.0004.00 This is a sample edit line.0005.00 This is a sample edit line.0006.00 This is a sample edit line.0007.00 This is a sample edit line.0008.00 This is a sample edit line.Cust. Name - 24 chars.________________________Cust. Address - 20 chars.____________________Cust. City, Country - 20 chars____________________Cust. Postal Code - 7 chars._______
F3=Exit F4=Prompt F5=Refresh F11=Previous record F12=Cancel F23=Select prompt F24=More keysPress any function key to return to the User-Defined Prompt Definition display.
� �
2. Press any function key to return the Work with User-Defined Prompt Definitiondisplay.
3. From the Work with User-Defined Prompt Definition display, press F10 (Save)and then F12 (Cancel) to return to the Select User-Defined Prompt display.
Note: If you do not want to return to the Select User-Defined Prompt display,press F10 (Save), then F3 (Exit).
110 Source Entry Utility (SEU)

Appendix A. SEU in the System/36 Environment
You can use AS/400 SEU in the System/36 environment with either the develop-ment support utility (DSU) or the SEU procedure.
The DSU ProcedureIf you are running in the System/36 environment, you can call AS/400 SEU byusing the System/36 DSU procedure. The parameters of the DSU procedure areinterpreted to call AS/400 SEU in a predictable manner.
Syntax
55──DSU─ ──(1)──┬ ┬ ─LIBRARY──,─ ──┬ ┬────────────── ─,─ ──┬ ┬────── ─────────────────── ──────────────5%│ │└ ┘─library-name─ └ ┘─type─
└ ┘ ─EDIT──,─ ──┬ ┬───────────── ─,─ ──┬ ┬────── ─,,,─ ──┬ ┬──────────────└ ┘─member-name─ └ ┘─type─ └ ┘─library-name─
Note:1 The function parameters are optional. When parameters are omitted, commas must be entered to
indicate the position of the omitted parameter when one or more additional parameters are enteredin positions that follow the omitted parameter.
Specify the function AS/400 SEU performs. Thisis a required parameter. The possible parametersare:
LIBRARYCalls the Work with Members Using SEUdisplay.
You can specify the following parameters:
library-nameThe library that contains the librarymembers to be edited or created. Thedefault is the current library (*CURLIB).
typeThe member type to be listed. The pos-sible parameters are:
SOURCE or SSource type. A list of sourcemembers from file QS36SRC isshown.
PROC or PProcedure type. A list of proceduremembers from file QS36PRC isshown.
EDITCalls the Edit display for the member. Youcan specify the following parameters:
member-nameThe name of the source member or proce-dure member to be edited or created.
typeThe member type to be edited or created.The possible parameters are:
SOURCE or SSource type. An edit session with themember in the source physical fileQS36SRC is started.
PROC or PProcedure type. An edit session withthe member in the source physical fileQS36PRC is started.
A The source member contains RPGauto-report specifications. An editsession with the member in the sourcephysical file QS36SRC is started.
Copyright IBM Corp. 1994, 1998 111

F The source member contains $SFGRdisplay format S, H, and D specifica-tions. An edit session with themember in the source physical fileQS36SRC is started.
R The source member contains an RPGII program. An edit session with themember in the source physical fileQS36SRC is started.
T A message source member. An editsession with the member in the sourcephysical file QS36SRC is started.
W The source member contains WorkStations Utility (WSU) statements. Anedit session with the member in thesource physical file QS36SRC isstarted.
library-nameThe library that contains the librarymembers to be edited or created. Thedefault is the current library (*CURLIB).
How DSU Procedure Parameters Map to STRSEU ParametersThe following table summarizes how the DSU procedure parameters map to theAS/400 STRSEU command parameters.
DSU Parameter AS/400 STRSEU Parameter
Function ¹ Function=LIBRARY causes the OPTION parameter ofAS/400 SEU to be set to *SELECT.
¹ Function=EDIT causes the OPTION parameter to beset to 2 (Edit).
Library Maps to the library name of SRCFILE
Type Maps the file of SRCFILE to QS36SRC or QS36PRC
Member name Maps to the member name of SRCMBR
Format member Not used by AS/400 SEU
Statement length Not used by AS/400 SEU
Diagnosed source file Not used by AS/400 SEU
Display size Not used by AS/400 SEU
The SEU ProcedureIf you are running the System/36 environment, you can call AS/400 SEU by usingthe System/36 SEU procedure. The parameters of the System/36 SEU procedureare interpreted to call AS/400 SEU correctly.
Syntax
55──SEU──member-name───(1) ─,─ ──┬ ┬────── ─,,,─ ──┬ ┬────────────── ───────────────────────────────5% └ ┘─type─ └ ┘─library-name─
Note:1 The remaining parameters are optional. When parameters are omitted, commas must be entered to
indicate the position of the omitted parameter when one or more additional parameters are enteredin positions that follow the omitted parameter.
112 Source Entry Utility (SEU)

member-nameName of the source or procedure member tobe edited or created.
typeThe member type to be edited or created.The possible values are:
SOURCE or SSource type. An edit session with amember in the source physical fileQS36SRC is started.
PROC or PProcedure type. An edit session with amember in the source physical fileQS36PRC is started.
A The source member contains RPG auto-report specifications. An edit session witha member in the source physical fileQS36SRC is started.
F The source member contains $SFGRdisplay format S, H, and D specifications.An edit session with a member in thesource physical file QS36SRC is started.
R The source member contains an RPG IIprogram. An edit session with a memberin the source physical file QS36SRC isstarted.
T A message source member. An editsession with a member in the sourcephysical file QS36SRC is started.
W The source member contains WorkStation Utility (WSU) statements. An editsession with a member in the sourcephysical file QS36SRC is started.
library-nameThe library that contains the library member tobe edited or created. The default is thecurrent library (*CURLIB).
How SEU Procedure Parameters Map to STRSEU ParametersThe following table summarizes how the System/36 SEU procedure parametersmap to AS/400 STRSEU command parameters.
System/36SEU Parameter
AS/400 STRSEU Parameter
Member name Maps to the member name of SRCMBR
Type Maps the file of SRCFILE to QS36SRC or QS36PRC
Format member Not used by AS/400 SEU
Statement length Not used by AS/400 SEU
Library Maps to the library name of SRCFILE
Diagnosed source file Not used by AS/400 SEU
Appendix A. SEU in the System/36 Environment 113

114 Source Entry Utility (SEU)

Appendix B. SEU in the System/38 Environment
You can use the EDTSRC command to use SEU in the System/38 environment.
The EDTSRC CommandTo call SEU, type the EDTSRC command.
Syntax
55──EDTSRC─ ──┬ ┬────────────────────────────────────── ──┬ ┬─────────────────────────────── ───5 │ │┌ ┐─QTXTSRC.*LIBL───(1) ── │ │┌ ┐─*SELECT───── └ ┘ ─SRCFILE──(─ ──┼ ┼─source-file-name.─ ─)─ └ ┘ ─SRCMBR──(─ ──┴ ┴─member-name─ ─)─ │ │┌ ┐─.*LIBL──────── └ ┘──┼ ┼─────────────── └ ┘─.library-name─
5─ ──┬ ┬───────────────────────── ──┬ ┬─────────────────────────────── ────────────────────────5% │ │┌ ┐─*SAME───(2) │ │┌ ┐─*BLANK──────── └ ┘ ─TYPE──(─ ──┴ ┴─type───(3) ─ ─)─ └ ┘ ─TEXT──(─ ──┴ ┴─'description'─ ─)─
Notes:1 If no TYPE parameter is specified, the default source file is QTXTSRC. However, if a TYPE is
specified, the default source file is the file related to the specified TYPE. For example, ifTYPE(*RPG38) is specified, the default file is QRPGSRC. See the TYPE parameter description fora list of default source file names.
2 If no TYPE parameter is specified, the default is the same type used when this member was lastedited. For a new member: the TYPE defaults to the TYPE related to the source file being used; ifno source file is specified, the TYPE defaults to *TXT.
3 System/38 types: *RPG, *CBL, *LF,*PF, *CMNF, *BSCF, *DSPF, *MXDF, *PRTF, *CL, *CLP, *CMD,*BASP, *PLI, *DFU, *QRY, *SRT, and *TXT.
SRCFILE: Specify the name of the sourcephysical file that contains the member to be editedor created.
QTXTSRCThis default value specifies QTXTSRC as thedefault source physical file if you do notspecify a TYPE parameter. If you specify aTYPE parameter, the default value specifiesthe file related to the specified TYPE as thesource file. For example, if you specify Type(*RPG), the default source file is QRPGSRC.See the TYPE parameter description for a listof default source files.
source-file-nameThis value allows you to specify the name ofan existing source physical file. Optionally,you can qualify the source file name with thename of the library that contains the file. If
you do not qualify the source file name, SEUuses the library list (*LIBL) to find the file.
SRCMBR: Specify the name of the source filemember to be edited or created.
*SELECTThis default value directs SEU to display a listof all members in the file for you to edit,browse, print, or delete. On the list ofmembers, you type the name of a member tobe created or edited, search for a membername, change the type and text of an existingmember, or change the TYPE and TEXTparameters for new members.
member-nameThis value allows you to specify a name forthe member you want to create or edit.
Copyright IBM Corp. 1994, 1998 115

TYPE: Specify the type of source to be editedor created.
Notes:
1. While type names in System/38 commandsmust be prefixed by an asterisk (*), theOS/400 system requires that the first char-acter of a type name be alphanumeric. TheOS/400 system converts System/38-style typenames to ones that are valid for the AS/400system by removing the asterisk andappending 38 to the type name.
If you specify *SAME for the member type, theconversion described above is done implicitly.For example, if you use the EDTSRCcommand to edit a member with a type ofCLP and specify *SAME for the type, theOS/400 system does an implicit substitution of*CLP for *SAME, and then converts the typeto CLP38.
2. On the EDTSRC command, the TYPE valuebegins with an asterisk (for example, *RPG or*DSPF). On the options displays, Work withMembers Using SEU display, and Pro-grammer menu, the asterisk is not used (forexample, RPG or DSPF).
*SAMEThis default value directs SEU to use thesame type as that used when this memberwas last edited. For a new member, thedefault value is the type related to the sourcefile you are using. If a source file is not speci-fied, the default value is *TXT.
typeThis value allows you to specify the type ofsource to use. The following table lists thepossible values you can specify as the type.It also lists the default source (the source fileused if you do not specify a value forSRCFILE) and the source language for whichthe type is used.
TEXT: Specify a character string to be stored inthe text field of a member.
*BLANKFor a new member, this default value directsSEU to enter blanks in the Text field of themember. For an existing member, this defaultvalue does not change the Text field of themember.
descriptionThis value allows you to specify a characterstring that describes a member. You canspecify a maximum of 50 characters. Enclosethe string in apostrophes to use leading ortrailing blanks.
TypeSpecified
DefaultSourceFile
Source Language
*CMD QCMDSRC CL Command Definition
*PF QDDSSRC DDS Physical File
*LF QDDSSRC DDS Logical File
*CMNF QDDDSRC DDS CommunicationsFile
*BSCF QDDSSRC DDS Binary SynchronousCommunications File
*DSPF QDDSSRC DDS Display Device File
*MXDF QDDSSRC DDS Mixed File
*PRTF QDDSSRC DDS Printer Device File
*RPG QRPGSRC RPG III
*CBL QCBLSRC COBOL
*BAS QBASSRC BASIC
*BASP QBASSRC BASIC Procedure
*PLI QPLISRC PL/I
*DFU QUDSSRC UDS Data File Utility
*QRY QUDSSRC UDS Query Utility
TypeSpecified
DefaultSourceFile
Source Language
*TXT QTXTSRC 80-position free-form text
*SRT QTXTSRC Reformat
*CL QCLSRC Control Language (CL)
*CLP QCLSRC CL Program
116 Source Entry Utility (SEU)

Appendix C. Double-Byte Character Sets
You can use SEU to enter and modify double-byte character set (DBCS) strings.
The following sections deal only with the aspects of DBCS that are specific to SEU.For more information on working with DBCS data, refer to Data Management,SC41-5710.
Enabling DBCS for SEUTo enter DBCS in source members in SEU:
¹ You must be using a DBCS-capable workstation.
¹ Ensure that the source file in which the member is located specifically allowsDBCS data.
When you create a source physical file by using the CRTSRCPF command,you must specify the IGCDTA(*YES) parameter to indicate that the file willcontain members with DBCS data.
Note: If you open a member in an IGCDTA(*YES) source file on anon-DBCS-capable workstation, the DBCS data will be illegible. Anyattempt to alter the DBCS data can lead to data corruption.
For more information about AS/400 commands, see the CL Reference. For moreinformation about creating DBCS-capable source files, see Data Management.
Using DBCS with SEU DisplaysYou can enter DBCS data in certain prompts in several of the SEU displays. SEUperforms special processing on DBCS data to maintain the appropriate placementof shift-out and shift-in characters.
Double-byte characters are physically larger than alphanumeric characters. Insystem displays, double-byte characters are twice as wide as alphanumeric charac-ters.
Consider the width of double-byte characters when you calculate the length of adouble-byte data field, because field lengths are still identified as the number ofalphanumeric character positions used. DBCS-graphic character fields are theexception to this rule. The length of these fields is the number of double-byte char-acters, not the number of bytes.
When using DBCS on SEU displays, keep in mind that if the member that you areediting or browsing is not contained in a source file that allows DBCS characters,then you cannot enter DBCS characters on any of the SEU displays while editing orbrowsing members with the Edit or Browse displays, or when saving your files withthe Exit display.
Copyright IBM Corp. 1994, 1998 117
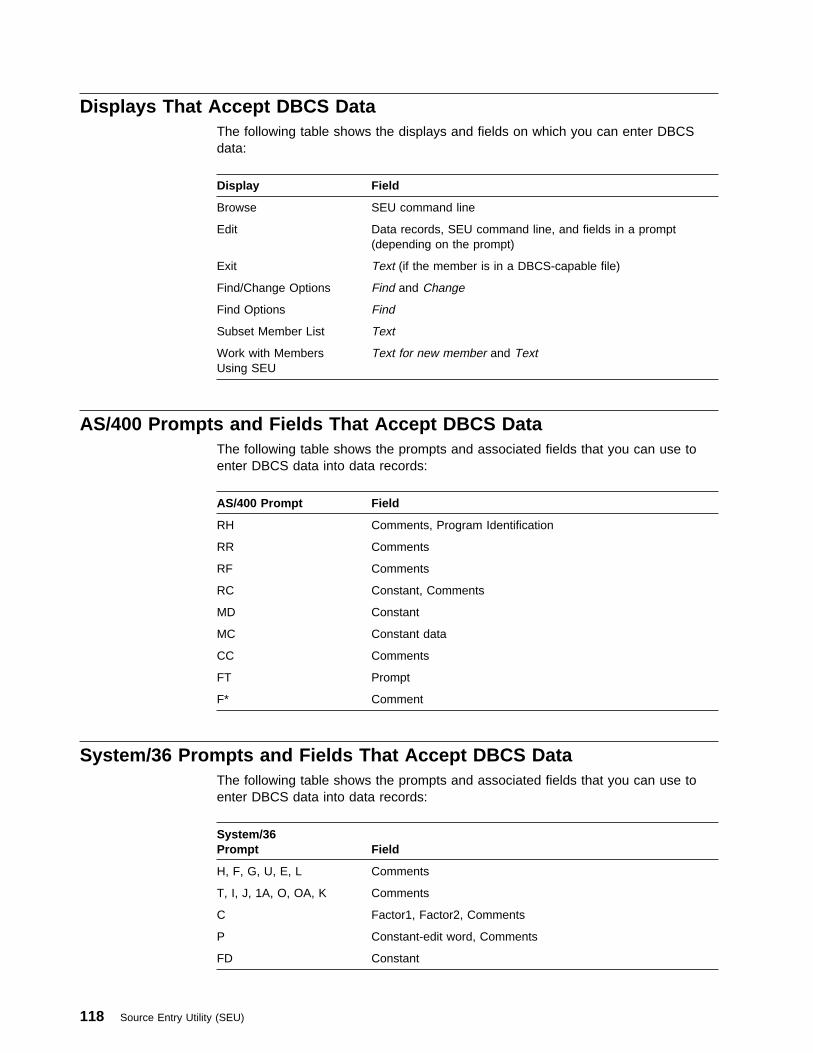
Displays That Accept DBCS DataThe following table shows the displays and fields on which you can enter DBCSdata:
Display Field
Browse SEU command line
Edit Data records, SEU command line, and fields in a prompt(depending on the prompt)
Exit Text (if the member is in a DBCS-capable file)
Find/Change Options Find and Change
Find Options Find
Subset Member List Text
Work with MembersUsing SEU
Text for new member and Text
AS/400 Prompts and Fields That Accept DBCS DataThe following table shows the prompts and associated fields that you can use toenter DBCS data into data records:
AS/400 Prompt Field
RH Comments, Program Identification
RR Comments
RF Comments
RC Constant, Comments
MD Constant
MC Constant data
CC Comments
FT Prompt
F* Comment
System/36 Prompts and Fields That Accept DBCS DataThe following table shows the prompts and associated fields that you can use toenter DBCS data into data records:
System/36Prompt
Field
H, F, G, U, E, L Comments
T, I, J, 1A, O, OA, K Comments
C Factor1, Factor2, Comments
P Constant-edit word, Comments
FD Constant
118 Source Entry Utility (SEU)

Note: In source physical files marked IGCDTA(*YES), the insert prompts andformats for the RPG II control specifications show a field for column 57 (thetransparent literal field).
System/36Prompt
Field
FC Constant data
CO Area A, Area B, Comments
SH, SR, SF, AU, CC,FO
Comments
SC Constant, Comments
AS Both Comment fields
FF Column counter (unlabeled input field)
MS Message text
MH User comments
C* Column counter (unlabeled input field)
System/38 and AS/400 Prompts and Fields That Accept DBCS DataThe following table shows the prompts and associated fields that you can use toenter DBCS data into data records:
System/38 andAS/400 Prompt
Field
** Columns counter (unlabeled input field)
E Comment
C Factor1, Factor2, Comment
P Constant-edit word
* Comment (unlabeled input field)
A* Comment (unlabeled input field)
LF Functions
PF Functions
DP Functions
BC Functions
CB Area-A, Area-B
C* Comment (unlabeled input field)
RH Comments, Statement Set name
RF Comments, Statement Set name
RR Comments, Statement Set name
NC Column Counter (unlabeled input field)
Appendix C. Double-Byte Character Sets 119

Considerations for Using DBCS on SEU DisplaysWhen SEU shows parts of a string of DBCS data (such as when DBCS datastretches beyond the length of a line on the display), SEU inserts temporaryshift-out (0E) or shift-in (0F) characters and, if necessary, inserts a temporary DUP(*) character as a filler character. SOSI is shown in the sequence number area toremind you that the entire string of DBCS data can be viewed by using F19 (Left)and F20 (Right) keys. For example, the DBCS string 0EK1K2K30F is shown asfollows when the edge of the display (indicated by |) comes between two double-byte characters (K2 and K3):
0EK1K2K30F0EK10F|
When the edge of the display comes between the first and second byte of adouble-byte character (for example, K2), both a temporary shift-in and a temporaryDUP character (indicated here by *) are inserted as shown:
0EK1K2K30F0EK10F*|
Do not move or delete these temporary characters or any control character thatappears at the edge of the source field. If you do, SEU shows the line againwithout the changes you requested and indicates that you made an error. Theseconsiderations also apply to DBCS strings that are designated as DBCS-graphic.In source code shown by SEU, the shift characters are required.
Note: The rules for processing DBCS data across multiple lines in prompts (toallow entering one continuous DBCS character string) are the same asthose adopted by the Interactive SQL Utility. Each line must contain asmany shift-in characters as shift-out characters. If during formatting,however, the prompter finds that the very last column on a line contains ashift-in and the very first column of the next line contains a shift-out, theshift-in and shift-out characters are removed by the prompter when the twolines are assembled. Also, if the last two columns of a line contain a shift-incharacter followed by a single-byte blank, and the very first column of thenext line contains a shift-out character, the shift-in, blank, and shift-outsequence is removed by the prompter when the two lines are assembled.
An unavoidable situation can arise as a result of the rules above. When aDBCS character string must be continued on more than one source line,additional shift-out and shift-in characters may be inserted by the prompter.
120 Source Entry Utility (SEU)

DBCS in Split DisplaysWhen you are using DBCS in a split display, whether the options displays areDBCS-capable is dependent on the member in the top session. The options dis-plays for both sessions are DBCS-capable if the member in the top session isDBCS-capable; if the member in the top session is not DBCS-capable, the optionsdisplays for both sessions are not DBCS-capable.
When you use the split Edit/Browse display to edit a member of a source file that isDBCS-capable, you can enter DBCS characters in the following fields:
¹ Data record field of the edit session of the split display
¹ Find parameters for the SEU FIND and CHANGE commands for the editsession of a split display
¹ Find parameters for the SEU FIND command for the browse session of a splitdisplay
You can copy records from the browse member to the edit member. If SEU musttruncate the copied records, SEU adds any required shift-in control characters.
If you edit a member from a source file that does not allow DBCS data, you can stillbrowse a member, spooled file, or database file that contains DBCS data. SEUindicates possible errors if you copy records from the member with DBCS data intothe member that does not allow DBCS data.
Note: SEU does not prevent you from copying records from a member that allowsDBCS characters to a member that does not allow DBCS characters whenyou are in a split Edit/Browse display. SEU will do such copy operations asthey are specified, and will allow you to save the member in anon-DBCS-capable file. The OS/400 system, however, will not recognizethe data as DBCS. You may encounter difficulties the next time you try towork with a member in a non-DBCS-capable file that contains recordscopied from a DBCS-capable member.
When you use either split display to browse a spooled file, data base file, or sourcefile member that contains DBCS data, SEU can show DBCS data in the Recordfield.
If the member displayed in the top session is contained in a DBCS-capable file, youcan do the following:
¹ You can enter DBCS data in the Find field on the Find Options display
¹ You can enter DBCS data in the Find and Change fields on the Find/ChangeOptions display
For more information on working with split displays, see “Splitting the BrowseDisplay” on page 16 and “Splitting the Edit Display” on page 19.
Appendix C. Double-Byte Character Sets 121

Using DBCS with SEU Commands and FunctionsYou can use double-byte characters with the following SEU functions:
¹ Find and change operations ¹ Saving members ¹ Printing
Finding and Changing DBCS StringsYou can use DBCS data in the Find and Change fields of the Edit, Browse, FindOptions, Find/Change Options displays and the Find and Change parameters of theSEU FIND and CHANGE commands. SEU processes the shift-control charactersas follows:
¹ If the first character in the string to be found is a shift-out character, SEUremoves that character from the string. If the last character in the string to befound (other than a blank) is a shift-in character, SEU removes that characterfrom the Find string. SEU, however, matches this string only to characters thatare enclosed within shift-control characters, or that are part of a longer string ofcharacters enclosed by shift-control characters.
¹ If you want to search for a string that begins with a shift-out character or thatends with a shift-in character, enclose the string in apostrophes (') or quotationmarks ("). In other cases, SEU searches for the string entered in the Find fieldor in the Find parameter.
¹ SEU treats shift-control characters in the change string the same ways as ittreats them in the find string. If the find string begins or ends with shift-controlcharacters, the change string must also begin or end with shift-control charac-ters.
The following table shows how to find DBCS strings.
To Find This String Specify This String
K1K2 0EK1K20F
0EK1K20F '0EK1K20F'
K20FAB 0EK20FAB
AB0EK1 AB0EK10F
Printing DBCS Source DataOn the Work with Members Using SEU and Exit displays, you can request theprinting of a source member. When the source member contains DBCS data, printthe data on a DBCS printer.
Considerations for Using DBCS with SEU CommandsConsider the following when using DBCS data with SEU:
¹ On the Exit display, you can specify the name of the member, file, and libraryin which your edited member is to be stored. However, you cannot storechanges you have made to a DBCS-capable file member in anon-DBCS-capable file member.
¹ If SEU truncates the stored records, it adds any required shift-in characters.
122 Source Entry Utility (SEU)

¹ On the Change Session Defaults display, the Uppercase input only field doesnot apply to DBCS data. Unlike many languages, where an A is consideredfunctionally equivalent to an a, an uppercase DBCS Roman letter is alwaystreated as a distinct character from the corresponding lowercase DBCS Romanletter.
DBCS Conversion in SEUYou can use DBCS conversion to enter DBCS data in SEU. DBCS conversion isan alternative to directly typing double-byte data. It lets you type an alphanumericentry or double-byte character code and convert the entry or code to its relateddouble-byte word. DBCS conversion is intended for Japanese character sets andits use is limited for application to other double-byte character sets.
To do DBCS conversion:
1. Position the cursor in a DBCS-capable field of the display.
2. Place the cursor under a double-byte character, the shift-in character, or in ablank area between the shift-control characters, and press F18 (DBCS Conver-sion).
The system displays a prompt that allows you to insert or replace double-bytecharacters by typing a string of alphanumeric characters to be converted, the4-character DBCS-code of a double-byte character, the 2- to 5-digit DBCSnumber of a double-byte character, or by selecting from a set of double-bytewords.
3. To exit from DBCS conversion, press F18.
For a complete description of how to perform DBCS conversion, see Data Man-agement.
When to Use DBCS Conversion with SEUYou can use DBCS conversion in SEU anywhere that DBCS data can be entered,except:
¹ When SEU is showing a prompt.
¹ On the split Edit/Browse or Browse/Browse displays.
You can, however, use DBCS conversion on the Find and Change parametersof the SEU FIND and CHANGE commands and the Find and Change fields ofthe Find/Change or Find Options display that is reached from a splitEdit/Browse or a split Browse/Browse display, whichever is applicable.
For more information, see “Using DBCS with SEU Displays” on page 117 and“Using DBCS with SEU Commands and Functions” on page 122.
Considerations for Using DBCS ConversionYou can use DBCS conversion if the line has sufficient space available to:
¹ Insert characters equal to the number of characters from the last character thatis on the line (that is not blank) to the right edge of the display.
¹ Replace characters equal to the number of characters from the cursor position(including the character marked by the cursor) to the end of the DBCS portionof the field.
Appendix C. Double-Byte Character Sets 123

If you try to insert or replace a string of characters when you do not have sufficientspace on a line, SEU sends a message. If you ignore the message and pressEnter again, SEU truncates characters from the right side of the string.
124 Source Entry Utility (SEU)

Appendix D. Recovering from Errors
Do one of the following to recover from problems:
¹ Cancel the edit. If you change the wrong records or have other problems,press F3 (Exit) to reach the Exit display. On the Exit display, type N (No) forthe Change/create prompt, or press F3 (Exit) to leave SEU. SEU does notsave the changes.
¹ Get a fresh copy of specified records. If you delete or change the wrongrecords, use the Browse/Copy Options display to copy the original records fromthe source member to the edit member.
¹ Remove changes you have typed in but have not entered. Press F5 (Refresh)or Clear on the Edit display to remove these changes.
¹ Recover from system failure. If a system failure occurs when you are usingSEU, the next time you edit the source member, SEU presents the RecoverSEU Member display.
Select option 1 (Recover changes) and the Edit display appears with the recov-ered member.
Note: Although SEU always attempts to recover the member after a systemfailure, after certain situations, such as power failures, the member maynot be recoverable.
Select option 2 (Discard changes) and SEU discards the interrupted editsession. The Edit display appears with the member loaded from the library file.Press F12 (Cancel) to return to the previous display.
Copyright IBM Corp. 1994, 1998 125

126 Source Entry Utility (SEU)

| Appendix E. Referencing the User Space for User-Defined| Line Command Programs
| When you write a user-defined line command program, you must reference the| format of the user space that SEU creates. SEU uses the user space as the| primary means of passing information between SEU and your user-defined line| command program.
| This section details the format of the user space and then provides examples of| how to reference the user space for programs written in the following languages:
| ¹ ILE RPG| ¹ C| ¹ PLI| ¹ COBOL
| Format of the User Space| The user space is made up of three blocks of information. When you write your| user-defined line command program, you can reference the user space in one of| two ways:
| ¹ You can reference the user space (QSUSPC) as a single structure using the| API program QUSRTVUS.
| ¹ You can use the three parameters that SEU passes to your program to refer-| ence each block of the user space separately.
| Note: If you use a compiler that does not support pointers, you can still use the| system user space APIs to manipulate data in the user space. Your| program still requires three parameters to allow SEU to invoke it properly.
| The User Space as a Single Block| The following table details the format of the entire user space. To reference the| user space as a single structure, using the offsets listed in this table.
| Figure 1 (Page 1 of 3). Format of the user space
| Offset| Use| Type| Field
| Dec| Hex
| 0| 0| INPUT| BINARY (4)| Record length
| 4| 4| INPUT| BINARY (4)| Cursor's relative record number
| The number of the record in QSUSPC where| the cursor is located when Enter or a function| key is pressed. If the cursor is not on a record| being passed in the user space, then this| equals 0.
Copyright IBM Corp. 1994, 1998 127

| Figure 1 (Page 2 of 3). Format of the user space
| Offset| Use| Type| Field
| Dec| Hex
| 8| 8| INPUT| BINARY (4)| Cursor position.
| This field contains the number of the cursor| column relative to the first character of the| source text. If the relative record number is 0,| or if the cursor is not in the text portion of the| relative record, then this equals 0.
| 12| C| INPUT| BINARY (4)| CCSID of source file
| 16| 10| INPUT| BINARY (4)| Number of records input.
| 20| 14| INPUT| CHAR (10)| Member name
| 30| 1E| INPUT| CHAR (10)| File name
| 40| 28| INPUT| CHAR (10)| Library name
| 50| 32| INPUT| CHAR (10)| Member type
| 60| 3C| INPUT| CHAR (1)| Function key pressed
| 7=F7, 8=F8, 0=all others
| 61| 3D| INPUT| CHAR (1)| MODE
| U=Update| B=Browse| M=MRGSRC
| 62| 3E| INPUT| CHAR (1)| Split session
| 1=Yes| 0=No
| 63| 3F| INPUT| CHAR (1)| Reserved
| 64| 40| OUTPUT| CHAR (1)| Return code. The default setting is 3.
| 0=All data processed. No more exit programs| are called. SEU updates according to the| output sequence number value.
| 1=All data processed. No more exit programs| are called. SEU does not update the source.| However, SEU processes the Line command| field and Line return code field of each record.| The Number of records output field and the| output sequence number value are ignored.
| 2=Data has been processed, but some line| commands are still unresolved. SEU calls| another exit program if one exists. If no other| exit program exists, SEU updates the data from| all output fields and issues an error message for| any unresolved line command.
| 3=No data processed. SEU calls another exit| program if one exists. If no other exit program| exists, SEU ignores all output fields and issues| an error message.
| 65| 41| OUTPUT| CHAR (3)| Reserved
| 68| 44| OUTPUT| BINARY (4)| Number of records output
128 Source Entry Utility (SEU)

| Figure 1 (Page 3 of 3). Format of the user space
| Offset| Use| Type| Field
| Dec| Hex
| 72| 48| OUTPUT| CHAR (7)| Sequence number to perform insert.
| The last six characters should be set to a valid| sequence number that is within the range of| sequence numbers that was passed to the exit| program. Upon return, SEU checks this value| to see if it matches any of the ones that are| passed to the exit program. If a match is found,| SEU checks the first character of this field to| determine how the insert should be performed.| The letter B means SEU performs the insert| before this line. Anything else means SEU per-| forms the insert of the records from the user| space after this line.
| If an invalid sequence number is found then| SEU replaces the source data passed to the| user-defined line command program with the| new data from the user space. Before calling| the exit program, this field is set to 0000000 indi-| cating that the default is for SEU to perform a| generic cut and past of X lines. You can set the| cut and paste to X + 1 lines by setting the first| character in this field to any value except the| default of 0.
| Note: This output field is ignored if the return| code is set to a value that indicates no| update is to be done.
| 79| 4F| OUTPUT| CHAR (21)| Reserved
| 100| 65| I/O| CHAR (*)| Text area:
| The first source line sub-structure is found at decimal offset 100 of the user space.| If the record length (found at decimal offset 0) is 104 for example, the second| source line is found at decimal offset 204 (100 + 104) of the user space.
| The following sub-structure defines the text area from the structure above, and is| repeated for each source line in the user space.
| Figure 2 (Page 1 of 2). Substructure defining the text area
| Offset| Use| Type| Field
| Dec| Hex
| 0| 0| I/O| CHAR (7)| Line Command
| If the line command is not blank upon return to| SEU then SEU will highlight the line command| and issue an error message.
| 7| 7| I/O| CHAR (1)| Line return code
| 0=no errors on this line| 1=error on this line. SEU reverses the| image of this line.
Appendix E. Referencing the User Space for User-Defined Line Command Programs 129

| Figure 2 (Page 2 of 2). Substructure defining the text area
| Offset| Use| Type| Field
| Dec| Hex
| 8| 8| INPUT| CHAR (6)| Source line sequence number
| 14| E| INPUT| CHAR (6)| Source line change date
| 20| 14| I/O| CHAR (*)| Source text
| The User Space as Three Blocks of Information| SEU passes the following three parameters to your user-defined line command pro-| grams. Each parameter is a pointer to a separate block in the user space.
| The first parameter passed to the user-defined line command program is a pointer| to the block in the user space which contains input information.
| The first pointer references the following format:
| Figure 3 (Page 1 of 2). Input information referenced by the first pointer
| Offset| Use| Type| Field
| Dec| Hex
| 0| 0| INPUT| BINARY (4)| Record length
| 4| 4| INPUT| BINARY (4)| Cursor's relative record number
| The number of the record in QSUSPC where| the cursor is located when Enter or a function| key is pressed. If the cursor is not on a record| being passed in the user space, then this| equals 0.
| 8| 8| INPUT| BINARY (4)| Cursor position
| This field contains the number of the cursor| column relative to the first character of the| source text. If the relative record number is 0,| or if the cursor is not in the text portion of the| relative record, then this equals 0.
| 12| C| INPUT| BINARY (4)| CCSID of source file
| 16| 10| INPUT| BINARY (4)| Number of records input.
| 20| 14| INPUT| CHAR (10)| Member name
| 30| 1E| INPUT| CHAR (10)| File name
| 40| 28| INPUT| CHAR (10)| Library name
| 50| 32| INPUT| CHAR (10)| Member type
| 60| 3C| INPUT| CHAR (1)| Function key pressed
| 7=F7, 8=F8, 0=all others
| 61| 3D| INPUT| CHAR (1)| MODE
| U=Update| B=Browse| M=MRGSRC
130 Source Entry Utility (SEU)

| Figure 3 (Page 2 of 2). Input information referenced by the first pointer
| Offset| Use| Type| Field
| Dec| Hex
| 62| 3E| INPUT| CHAR (1)| Split session
| 1=Yes| 0=No
| 63| 3F| INPUT| CHAR (1)| Reserved
| The second parameter passed to the user-defined line command program is a| pointer to the block in the user space that contains output information.
| The second pointer references the following format:
| Figure 4 (Page 1 of 2). Output information referenced by second pointer
| Offset| Use| Type| Field
| Dec| Hex
| 0| 0| OUTPUT| CHAR (1)| Return code. The default setting is 3.
| 0=All data processed. No more exit programs| are called. SEU updates according to the| output sequence number value.
| 1=All data processed. No more exit programs| are called. SEU does not update the source.| However, SEU processes the Line command| field and Line return code field of each record.| The Number of records output field and the| output sequence number value are ignored.
| 2=Data has been processed, but some line| commands are still unresolved. SEU calls| another exit program if one exists. If no other| exit program exists, SEU updates the data from| all output fields and issues an error message for| any unresolved line command.
| 3=No data processed. SEU calls another exit| program if one exists. If no other exit program| exists, SEU ignores all output fields and issues| an error message.
| 1| 1| OUTPUT| CHAR (3)| Reserved
| 4| 4| OUTPUT| BINARY (4)| Number of records output
Appendix E. Referencing the User Space for User-Defined Line Command Programs 131

| Figure 4 (Page 2 of 2). Output information referenced by second pointer
| Offset| Use| Type| Field
| Dec| Hex
| 8| 8| OUTPUT| CHAR (7)| Sequence number to perform insert.
| The last six characters should be set to a valid| sequence number that is within the range of| sequence numbers that was passed to the exit| program. Upon return, SEU checks this value| to see if it matches any of the ones that are| passed to the exit program. If a match is found,| SEU checks the first character of this field to| determine how the insert should be performed.| The letter B means SEU performs the insert| before this line. Anything else means SEU per-| forms the insert of the records from the user| space after this line.
| If an invalid sequence number is found then| SEU replaces the source data passed to the| user-defined line command program with the| new data from the user space. Before calling| the exit program, this field is set to 0000000 indi-| cating that the default is for SEU to perform a| generic cut and past of X lines. You can set the| cut and paste to X + 1 lines by setting the first| character in this field to any value except the| default of 0.
| Note: This output field is ignored if the return| code is set to a value that indicates no| update is to be done.
| 15| F| OUTPUT| CHAR (22)| Reserved
| The third parameter passed to the user-defined line command program is a pointer| to the block in the user space that contains the source text.
| The third pointer references the following format:
| Figure 5. Source text referenced by the third pointer
| Offset| Use| Type| Field
| Dec| Hex
| 0| 0| I/O| CHAR (*)| Text area:
| The following substructure defines the text area referenced by the third parameter,| and will be repeated for each source line passed in QSUSPC.
132 Source Entry Utility (SEU)

| Figure 6. Substructure defining the text area referenced by third pointer
| Offset| Use| Type| Field
| Dec| Hex
| 0| 0| I/O| CHAR (7)| Line Command
| If the line command is not blank upon return to| SEU then SEU will highlight the line command| and issue an error message.
| 7| 7| I/O| CHAR (1)| Line return code
| 0=no errors on this line| 1=error on this line. SEU reverses the| image of this line.
| 8| 8| INPUT| CHAR (6)| Source sequence number
| 14| E| INPUT| CHAR (6)| Source line change date
| 20| 14| I/O| CHAR (*)| Source text
| Referencing the User Space—Examples| The following section provides you with two example user-defined line command| programs, written in ILE RPG. The first program references the entire user space,| without using the three pointers. The second program uses the pointers to refer-| ence each block of the user space individually. In addition to the example pro-| grams, templates are included to provide examples of referencing the pointers to| the user space when writing programs in C, PLI and COBOL languages.
| ILE RPG Example without Pointers| The following user-defined line command program, written in ILE RPG, uses a ZZ| block command to syntax check field names. This program illustrates how the user| space is referenced as a single block, without using the three pointers provided by| SEU. Instead, the system-supplied user space APIs are used to manipulate data in| the SEU user space.
Appendix E. Referencing the User Space for User-Defined Line Command Programs 133

| SEU==>
| FMT * *. 1 ...+... 2 ...+... 3 ...+... 4 ...+... 5 ...+... 6 ...+... 7 ...+... 8 ...+... 9 ...+... 0 .
| *************** Beginning of data ***************************************************************
| 0001.00 *****************************************************************
| 0002.00 * PROGRAM : SEU002 DATE: 06/11/97 *
| 0003.00 * *
| 0004.00 * FUNCTION : SEU USER DEF. OPT.- LINE CMD 'ZZ' = SYNTAX CHECK *
| 0005.00 * *
| 0006.00 * DESCRIPTION: THIS EXIT PROGRAM WILL SYNTAX CHECK FIELD NAMES *
| 0007.00 * IN A BLOCK OF CODE IDENTIFIED BY 'ZZ' AT THE *
| 0008.00 * START AND END OF THE BLOCK. IT WILL CHECK FOR *
| 0009.00 * THE CHARACTER 'A' IN THE FIRST POSITION OF ALL *
| 0010.00 * FIELD NAMES IN THE E,I,C AND O SPECIFICATIONS. *
| 0011.00 * IF AN ERROR IS DETECTED THE LINE WITH THE ERROR *
| 0012.00 * WILL BE HIGHLIGHTED UNTIL IT IS CORRECTED. *
| 0013.00 * *
| 0014.00 * *
| 0015.00 ***************************************************************** INPUT DATA ARRAY
| 0016.00 D AROP S 3 DIM(21) CTDATA PERRCD(7) .1/ OPP. CODE ARRAY
| 0017.00 D HEADER DS DATA STRUCTURE
| 0018.00 D HRLEN 1 4B 0 .2/ RECORD LENGTH
| 0019.00 D HCRRN 5 8B 0 CURSOR RRN
| 0020.00 D HCPOS 9 12B 0 CURSOR POSITION
| 0021.00 D HCCSID 13 16B 0 CODED CHAR. SET ID
| 0022.00 D HRECI 17 20B 0 NOS RECORDS INPUT
| 0023.00 D HMNAM 21 30 MEMBER NAME
| 0024.00 D HFNAM 31 40 FILE NAME
| 0025.00 D HLNAM 41 50 LIBRARY NAME
| 0026.00 D HMTYP 51 60 MEMBER TYPE
| 0027.00 D HFKEY 61 61 FUNCTION KEY PRESSED
| 0028.00 D HMODE 62 62 MODE - U, B, R, M.
| 0029.00 D HSSES 63 63 SPLIT SESS. 1=Y, 0=N
| 0030.00 D HRSV1 64 64 RESERVED
| 0031.00 D HRETC 65 65 RETURN CODE 0,1,2,3
| 0032.00 D HRSV2 66 68 RESERVED
| 0033.00 D HRECO 69 72B 0 NOS RECORDS OUTPUT
| 0034.00 D HSEQN 73 79 SEQ. NUM. TO INSERT
| 0035.00 D HRSV3 80 100 RESERVED
| 0036.00 D HLCMD 101 107 LINE COMMAND
| 0037.00 D LINE DS LINE DATA STRUCTURE
| 0038.00 D LCMD 1 7 .3/ LINE COMMAND
| 0039.00 D LRETC 8 8 LINE RETURN CODE
| 0040.00 D LSEQN 9 14 LINE SEQUENCE NUMBER
| 0041.00 D LDATE 15 20 LINE CHANGE DATE
| 0042.00 D LOPP 48 50 LINE C/SPEC OPP CODE
| 0043.00 D LIN 21 100 LINE TEXT ARRAY
| 0044.00 D DIM(80)
| 0045.00 * PARMS TO RTV/CHG USER SPACE.
| 0046.00 D DS
| 0047.00 D USPNL 1 20 .4/ NAME & LIBRARY
| 0048.00 D USPNAM 1 10 INZ('QSUSPC') NAME
| 0049.00 D USPLIB 11 20 INZ('QTEMP') LIBRARY
| 0050.00 D USPSTR 21 24B 0 INZ(1) STARTING POSITION
| 0051.00 D USPLEN 25 28B 0 INZ(107) LENGTH OF DATA
| 0052.00 D USPFRC 29 29 INZ('0') FORCE CHG TO AUX STG
| 0053.00 D USPERR 30 53 ERROR CODE
| 0054.00 * PARMS TO SEND MESSAGES.
| 0055.00 D DS
| 0056.00 D MSGID 1 7 INZ(' ') .5/ MESSAGE IDENTIFIER
| 0057.00 D MSGF 8 27 INZ('USRMSGF USRLIB ') MESSAGE FILE NAME
| 0058.00 D MSGDTA 28 28 INZ(' ') MESSAGE DATA
| 0059.00 D MSGLEN 29 32B 0 INZ(1) LENGTH OF MSG DATA
| 0060.00 D MSGTYP 33 42 INZ('*INFO') MESSAGE TYPE
| 0061.00 D MSGENT 43 52 INZ('*') CALL STACK ENTRY
| 0062.00 D MSGCNT 53 56B 0 INZ(2) CALL STACK COUNTER
| 0063.00 D MSGKEY 57 60 MESSAGE KEY
| 0064.00 D MSGERR 61 84 ERROR CODE
| 0065.00 *
| Figure 7 (Part 1 of 4). Example program, referencing the user space as a single block.
134 Source Entry Utility (SEU)

| 0066.00 D DS
| 0067.00 D ALPHA 1 26 INZ('ABCDEFGHIJKLMNOPQRSTUVWXYZ') ALPHABETS .6/| 0068.00 D SPECS 27 30 INZ('EICO') RPG SPECIFICATIONS
| 0069.00 *
| 0070.00 ********************
| 0071.00 * MAIN LINE *
| 0072.00 ********************
| 0073.00 C *ENTRY PLIST
| 0074.00 C PARM P1 4 0
| 0075.00 C PARM P2 4 0
| 0076.00 C PARM P3 4 0
| 0077.00 *
| 0078.00 C EXSR RTVSPC
| 0079.00 C EXSR PROCES
| 0080.00 C EXSR CHGSPC
| 0081.00 * EOJ
| 0082.00 C EXSR $EXIT
| 0083.00 *
| 0084.00 ********************
| 0085.00 * PROCESS LINES *
| 0086.00 ********************
| 0087.00 C PROCES BEGSR
| 0088.00 C *LIKE DEFINE *INLR ERRMSG ERROR MESSAGE FLAG
| 0089.00 C MOVEL USPDTA HEADER LOAD STRUCTURE
| 0090.00 * VALIDATE PFKEY.
| 0091.00 C HFKEY CASNE '0' $EXIT .7/ INVALID PF KEY
| 0092.00 C ENDCS END PROGRAM
| 0093.00 * VALIDATE LINE CMD's.
| 0094.00 C Z-ADD 1 LOOP .8/ 4 0
| 0095.00 C Z-ADD 1 USPSTR
| 0096.00 C Z-ADD 100 USPLEN
| 0097.00 C LOOP DOUEQ HRECI NOS RECORDS INPUT
| 0098.00 C ADD 1 LOOP
| 0099.00 C ADD 100 USPSTR START OF DATA
| 0100.00 C EXSR RTVSPC
| 0101.00 C LCMD IFGT *BLANK
| 0102.00 C LCMD ANDNE 'ZZ'
| 0103.00 C MOVE 'USR1009' MSGID ERROR
| 0104.00 C EXSR SNDMSG INVALID LINE COMMAND
| 0105.00 C EXSR $EXIT
| 0106.00 C ENDIF END PGM
| 0107.00 C ENDDO
| 0108.00 * SYNTAX CHECK - FIELDS NAMES.
| 0109.00 C Z-ADD 1 LOOP .9/ 4 0
| 0110.00 C Z-ADD 1 USPSTR
| 0111.00 C Z-ADD 100 USPLEN
| 0112.00 C LOOP DOUEQ HRECI NOS RECORDS INPUT
| 0113.00 C ADD 1 LOOP
| 0114.00 C ADD 100 USPSTR START OF DATA
| 0115.00 C EXSR RTVSPC
| 0116.00 C MOVEL USPDTA LINE
| 0117.00 C EXSR VALFLD VALIDATE FIELD NAMES
| 0118.00 * SET LINE RETURN CODE.
| 0119.00 C *IN80 IFEQ *OFF .10/ NO ERRORS
| 0120.00 C MOVE '0' LRETC UPDATE LINE
| 0121.00 C ELSE
| 0122.00 C MOVE *ON ERRMSG ERROR MSG FLAG
| 0123.00 C MOVE '1' LRETC NO UPDATES
| 0124.00 C ENDIF
| 0125.00 * CLEAR LINE CMD.
| 0126.00 C LOOP IFEQ HRECI .11/ LAST RECORD
| 0127.00 C ERRMSG ANDEQ *OFF NO ERRORS
| 0128.00 C MOVE *BLANKS HLCMD START LINE CMD
| 0129.00 C MOVE *BLANKS LCMD END LINE CMD
| 0130.00 C ENDIF
| 0131.00 * UPDATE LINE.
| 0132.00 C MOVEL(P) LINE USPDTA .12/| 0133.00 C EXSR CHGSPC
| 0134.00 C ENDDO
| Figure 7 (Part 2 of 4). Example program, referencing the user space as a single block.
Appendix E. Referencing the User Space for User-Defined Line Command Programs 135

| 0135.00 * UPDATE HEADER.
| 0136.00 C MOVE '1' HRETC .13/ RETURN CODE
| 0137.00 C MOVE 'B' HMODE BROWSE MODE
| 0138.00 C Z-ADD 1 USPSTR START OF USER SPACE
| 0139.00 C MOVEA HEADER USPDTA
| 0140.00 C Z-ADD 107 USPLEN
| 0141.00 * DISPLAY MSG.
| 0142.00 C ERRMSG IFEQ *ON .14/| 0143.00 C MOVE 'USR1011' MSGID ERROR
| 0144.00 C ELSE
| 0145.00 C MOVE 'USR1010' MSGID NO ERROR
| 0146.00 C ENDIF
| 0147.00 C EXSR SNDMSG
| 0148.00 *
| 0149.00 C ENDSR
| 0150.00 ************************
| 0151.00 * VALIDATE FIELD NAMES *
| 0152.00 ************************
| 0153.00 C VALFLD BEGSR .15/| 0154.00 C MOVE *OFF *IN80 ERROR IND
| 0155.00 C MOVE *OFF *IN75 SCAN RESULT IND
| 0156.00 * OMIT COMMENTS.
| 0157.00 C LIN(7) CABEQ '*' VALEXT
| 0158.00 * ACCEPT E, I, C AND O SPECS.
| 0159.00 C LIN(6) SCAN SPECS:1 75
| 0160.00 C *IN75 CABEQ *OFF VALEXT
| 0161.00 * SELECT SPECS.
| 0162.00 C SELECT
| 0163.00 * EXTENTION SPEC.
| 0164.00 C LIN(6) WHENEQ 'E'
| 0165.00 C LIN(11) SCAN ALPHA:1 75 CHECK FOR ALPHABETS
| 0166.00 C 75LIN(11) COMP 'A' 8080 ERROR - NOT 'A'
| 0167.00 C *IN80 IFEQ *OFF
| 0168.00 C LIN(19) SCAN ALPHA:1 75
| 0169.00 C 75LIN(19) COMP 'A' 8080
| 0170.00 C ENDIF
| 0171.00 C *IN80 IFEQ *OFF
| 0172.00 C LIN(27) SCAN ALPHA:1 75
| 0173.00 C 75LIN(27) COMP 'A' 8080
| 0174.00 C ENDIF
| 0175.00 C *IN80 IFEQ *OFF
| 0176.00 C LIN(53) SCAN ALPHA:1 75
| 0177.00 C 75LIN(53) COMP 'A' 8080
| 0178.00 C ENDIF
| 0179.00 * INPUT SPEC.
| 0180.00 C LIN(6) WHENEQ 'I'
| 0181.00 C LIN(7) SCAN ALPHA:1 75 CHECK FOR ALPHABETS
| 0182.00 C 75LIN(7) COMP 'A' 8080 ERROR - NOT 'A'
| 0183.00 C *IN80 IFEQ *OFF
| 0184.00 C LIN(21) SCAN ALPHA:1 75
| 0185.00 C 75LIN(21) COMP 'A' 8080
| 0186.00 C ENDIF
| 0187.00 C *IN80 IFEQ *OFF
| 0188.00 C LIN(53) SCAN ALPHA:1
| 0189.00 C 75LIN(53) COMP 'A'
| 0190.00 C ENDIF
| 0191.00 * CALCULATION SPEC.
| 0192.00 C LIN(6) WHENEQ 'C'
| 0193.00 * OMIT OPP CODES IN TABLE.
| 0194.00 C LOPP LOOKUP AROP 41 FOUND IN TABLE.
| 0195.00 C *IN41 CABEQ *ON VALEXT OMIT THESE OPP CODES.
| 0196.00 *
| 0197.00 C LIN(18) SCAN ALPHA:1 75 CHECK FOR ALPHABETS
| 0198.00 C 75LIN(18) COMP 'A' 8080 ERROR - NOT 'A'
| 0199.00 C *IN80 IFEQ *OFF
| 0200.00 C LIN(33) SCAN ALPHA:1 75
| Figure 7 (Part 3 of 4). Example program, referencing the user space as a single block.
136 Source Entry Utility (SEU)

| 0201.00 C 75LIN(33) COMP 'A' 8080
| 0202.00 C ENDIF
| 0203.00 C *IN80 IFEQ *OFF
| 0204.00 C LIN(43) SCAN ALPHA:1 75
| 0205.00 C 75LIN(43) COMP 'A' 8080
| 0206.00 C ENDIF
| 0207.00 * OUTPUT SPEC.
| 0208.00 C LIN(6) WHENEQ 'O'
| 0209.00 C LIN(7) SCAN ALPHA:1 75 CHECK FOR ALPHABETS
| 0210.00 C 75LIN(7) COMP 'A' 8080 ERROR - NOT 'A'
| 0211.00 C *IN80 IFEQ *OFF
| 0212.00 C LIN(32) SCAN ALPHA:1 75
| 0213.00 C 75LIN(32) COMP 'A' 8080
| 0214.00 C ENDIF
| 0215.00 C *IN80 IFEQ *OFF
| 0216.00 C LIN(43) SCAN ALPHA:1 75
| 0217.00 C 75LIN(43) COMP 'A' 8080
| 0218.00 C ENDIF
| 0219.00 C ENDSL
| 0220.00 *
| 0221.00 C VALEXT ENDSR
| 0222.00 *
| 0223.00 ********************
| 0224.00 * RETRIEVE SPACE *
| 0225.00 ********************
| 0226.00 C RTVSPC BEGSR .16/| 0227.00 C CALL 'QUSRTVUS'
| 0228.00 C PARM USPNL SPACE NAME AND LIB
| 0229.00 C PARM USPSTR STARTING POSITION
| 0230.00 C PARM USPLEN LENGTH OF DATA
| 0231.00 C PARM USPDTA INPUT DATA
| 0232.00 C ENDSR
| 0233.00 ********************
| 0234.00 * CHANGE SPACE *
| 0235.00 ********************
| 0236.00 C CHGSPC BEGSR .17/| 0237.00 C CALL 'QUSCHGUS'
| 0238.00 C PARM USPNL SPACE NAME AND LIB
| 0239.00 C PARM USPSTR STARTING POSITION
| 0240.00 C PARM USPLEN LENGTH OF DATA
| 0241.00 C PARM USPDTA INPUT DATA
| 0242.00 C PARM USPFRC FORCE CHG TO AUX STG
| 0243.00 C PARM USPERR ERROR CODE
| 0244.00 C ENDSR
| 0245.00 ********************
| 0246.00 * SEND MESSAGE *
| 0247.00 ********************
| 0248.00 C SNDMSG BEGSR .18/| 0249.00 C CALL 'QMHSNDPM'
| 0250.00 C PARM MSGID
| 0251.00 C PARM MSGF
| 0252.00 C PARM MSGDTA
| 0253.00 C PARM MSGLEN
| 0254.00 C PARM MSGTYP
| 0255.00 C PARM MSGENT
| 0256.00 C PARM MSGCNT
| 0257.00 C PARM MSGKEY
| 0258.00 C PARM MSGERR
| 0259.00 C ENDSR
| 0260.00 ********************
| 0261.00 * EXIT PROGRAM *
| 0262.00 ********************
| 0263.00 C $EXIT BEGSR
| 0264.00 C MOVE *ON *INLR
| 0265.00 C RETURN
| 0266.00 C ENDSR
| 0267.00 **
| 0268.00 CASCABEXSBEGENDRETPLI .19/| 0269.00 ****************** End of data **********************************
| Figure 7 (Part 4 of 4). Example program, referencing the user space as a single block.
Appendix E. Referencing the User Space for User-Defined Line Command Programs 137

| .1/This array contains the RPG operation codes to be omitted from the syntax| check.
| .2/Lines 18 to 36 map the user space from decimal offset 0 to 106.
| .3/Lines 38 to 53 map the user space from decimal offset 100 to 199.
| .4/Lines 48 to 53 define the parameters to call the system APIs to manipulate| the data in the user space.
| .5/Lines 56 to 64 define the parameters to call the system API to send| program messages.
| .6/Lines 67 and 68 define the constants.
| .7/Lines 91 and 92 validate that a function key was not pressed.
| .8/Lines 94 to 107 validate that line commands ZZ are used to denote the start| and end of a block.
| .9/Lines 109 to 117 perform a loop through each line in the user space and| perform the Validate field sub-routine.
| .10/Lines 119 to 124 indicate that if an error is found, the line with the error is| highlighted and an error message is sent to SEU.
| .11/Lines 126 to 130 indicate that if there are no errors found, the line com-| mands are cleared.
| .12/Lines 132 to 134 update each line's return code.
| .13/Lines 136 to 140 update the header information at the end of the loop.
| .14/Lines 142 to 149 call a system API to send an error or completion| message to SEU.
| .15/Lines 153 to 221 validate that all field names start with the character A in| the E, I, C and O RPG specifications.
| .16/Lines 226 to 232 call a system API to retrieve data from the user space.
| .17/Lines 236 to 259 call a system API to update data in the user space.
| .18/Lines 248 to 259 call a system API to send program messages to SEU.
| .19/This represents the OP/CODES loaded into array AROP.
| ILE RPG Example using Pointers| The following user-defined line command program allows you to split or join a line| in an SEU edit session. This program (written in ILE RPG) illustrates how the user| space is referenced using the three pointers that are passed to the user-defined| line command program.
| The split-join program uses F7 as the user-defined line command key to invoke the| split-join function. If data exists beyond the cursor position in the text when you| press F7, the line is split from the cursor position by inserting a new line. If the line| is blank after cursor position, then the data from the next line is joined to the data| in the line where the cursor is positioned.
138 Source Entry Utility (SEU)

| SEU==>
| FMT * *. 1 ...+... 2 ...+... 3 ...+... 4 ...+... 5 ...+... 6 ...+... 7
| *************** Beginning of data *******************************
| 0001.00 ****************************************************************
| 0002.00 * PROGRAM : SEU001 DATE: 06/10/97
| 0003.00 *
| 0004.00 * FUNCTION : SEU USER-DEFINED OPTION - PF7 SPLIT-JOIN.
| 0005.00 *
| 0006.00 * DESCRIPTION: THIS EXIT PROGRAM WILL ALLOW A USER TO SPLIT
| 0007.00 * OR JOIN A LINE WHILE USING SEU TO EDIT A TEXT
| 0008.00 * MEMBER IN A QTXTSRC FILE WITH RECORD LENGTH 92.
| 0009.00 * THE USER INVOKES THIS PROGRAM WITH PF7. IF DATA
| 0010.00 * EXISTS BEYOND THE CURSOR POSITION IN THE TEXT,
| 0011.00 * THE LINE IS SPLIT FROM THE CURSOR POSITION BY
| 0012.00 * INSERTING A NEW LINE, ELSE THE DATA FROM THE
| 0013.00 * NEXT LINE IS JOINED TO THE DATA IN THE LINE
| 0014.00 * WHERE THE CURSOR IS POSITIONED.
| 0015.00 ****************************************************************
| 0016.00 * POINTERS.
| 0017.00 D P1@ S *.1/ PTR1 - HEADER INFO
| 0018.00 D P2@ S * PTR2 - RETURN CODE
| 0019.00 D P3@ S * LINE CMD/TEXT INFO
| 0020.00 D DSPTR@ S * LINE CMD POINTER
| 0021.00 * LINE ARRAY.
| 0022.00 D AR S 1 DIM(80).2/ LINE ARRAY
| 0023.00 * HEADER INFO.
| 0024.00 D HEDINF DS BASED(P1@).3/| 0025.00 D HRLEN 1 4B 0 RECORD LENGTH
| 0026.00 D HCRRN 5 8B 0 CURSOR RRN
| 0027.00 D HCPOS 9 12B 0 CURSOR POSITION
| 0028.00 D HCCSID 13 16B 0 CODED CHAR. SET ID
| 0029.00 D HRECI 17 20B 0 NOS RECORDS INPUT
| 0030.00 D HMNAM 21 30 MEMBER NAME
| 0031.00 D HFNAM 31 40 FILE NAME
| 0032.00 D HLNAM 41 50 LIBRARY NAME
| 0033.00 D HMTYP 51 60 MEMBER TYPE
| 0034.00 D HFKEY 61 61 FUNCTION KEY PRESSED
| 0035.00 D HMODE 62 62 MODE - U,B,M.
| 0036.00 D HSSES 63 63 SPLIT SESSN 1=Y, 0=N
| 0037.00 D HRSV1 64 64 RESERVED
| 0038.00 * RETURN CODES/INFO.
| 0039.00 D RETINF DS BASED(P2@).4/| 0040.00 D RRETC 1 1 RETURN CODE 0,1,2,3
| 0041.00 D RRSV2 2 4 RESERVED
| 0042.00 D RRECO 5 8B 0 NOS RECORDS OUTPUT
| 0043.00 D RSEQN 9 15 SEQ. NUM. TO INSERT
| 0044.00 D RRSV3 16 37 RESERVED
| 0045.00 * LINE CMD/TEXT.
| 0046.00 D LININF DS BASED(P3@).5/| 0047.00 D LCMD1 1 7 LINE 1 COMMAND
| 0048.00 D LRET1 8 20 LINE 1 RETCD/SEQ/DAT
| 0049.00 D LTXT1 21 100 LINE 1 TEXT
| 0050.00 D LCMD2 101 107 LINE 2 COMMAND
| 0051.00 D LRET2 108 120 LINE 2 RETCD/SEQ/DAT
| 0052.00 D LTXT2 121 200 LINE 2 TEXT
| 0053.00 * LINE CMD.
| 0054.00 D LINE DS BASED(DSPTR@)
| 0055.00 D LCMD 1 7 LINE COMMAND
| 0056.00 * PARMS TO SEND MESSAGES.
| 0057.00 D DS
| 0058.00 D MSGID 1 7 INZ(' ') MESSAGE IDENTIFIER
| 0059.00 D MSGF 8 27 INZ('USRMSGF USRLIB ') MESSAGE FILE NAME
| 0060.00 D MSGDTA 28 28 INZ(' ') MESSAGE DATA
| 0061.00 D MSGLEN 29 32B 0 INZ(1) LENGTH OF MSG DATA
| 0062.00 D MSGTYP 33 42 INZ('*INFO') MESSAGE TYPE
| 0063.00 D MSGENT 43 52 INZ('*') CALL STACK ENTRY
| 0064.00 D MSGCNT 53 56B 0 INZ(2) CALL STACK COUNTER
| 0065.00 D MSGKEY 57 60 MESSAGE KEY
| 0066.00 D MSGERR 61 84 ERROR CODE
| Figure 8 (Part 1 of 3). Sample split-join program written in ILE RPG
Appendix E. Referencing the User Space for User-Defined Line Command Programs 139

| 0067.00 ********************
| 0068.00 * MAIN LINE *
| 0069.00 ********************
| 0070.00 C *ENTRY PLIST .6/| 0071.00 C PARM P1@ PTR1 - HEADER INFO
| 0072.00 C PARM P2@ PTR2 - RETURN CODE
| 0073.00 C PARM P3@ PTR3 - LINE INFO
| 0074.00 *
| 0075.00 C EXSR PROCES PROCESS
| 0076.00 * EOJ
| 0077.00 C EXSR $EXIT EXIT PROGRAM
| 0078.00 ******************
| 0079.00 * PROCESS * .7/| 0080.00 ******************
| 0081.00 C PROCES BEGSR
| 0082.00 * VALIDATE PFKEY-7.
| 0083.00 C HFKEY CABNE '7' PREXIT INVALID PF KEY
| 0084.00 * VALIDATE CURSOR POS.
| 0085.00 C HCPOS IFEQ *ZERO INVALID CURSOR POSN
| 0086.00 C MOVE 'USR1018' MSGID ERROR MSG
| 0087.00 C EXSR SNDMSG
| 0088.00 C ENDIF
| 0089.00 C HCPOS CABEQ *ZERO PREXIT INVALID CURSOR POSN
| 0090.00 * VALIDATE ALL LINE CMDS.
| 0091.00 C Z-ADD 1 LOOP 4 0
| 0092.00 C EVAL DSPTR@ = P3@
| 0093.00 C LOOP DOUEQ HRECI
| 0094.00 C LCMD CABNE *BLANKS PREXIT INVALID LINE COMMAND
| 0095.00 C ADD 1 LOOP
| 0096.00 C EVAL DSPTR@ = DSPTR@ + 100 GET NEXT LINE
| 0097.00 C ENDDO
| 0098.00 * GET LINE1 TEXT. .8/| 0099.00 C MOVEA LTXT1 AR
| 0100.00 C Z-ADD HCPOS CP 3 0 CURSOR POSITION
| 0101.00 C ' ' CHECK LTXT1:1 SL1 3 0 START OF LINE 1
| 0102.00 * SELECT SPLIT/JOIN. .
| 0103.00 C ' ' CHECK LTXT1:CP CHECK FOR BLANKS
| 0104.00 C *IN40 IFEQ *ON
| 0105.00 C EXSR SPLIT SPLIT THE LINE
| 0106.00 C ELSE
| 0107.00 C EXSR JOIN JOIN LINES
| 0108.00 C ENDIF
| 0109.00 * DATA PROCESSED.
| 0110.00 C MOVE '0' RRETC .9/ SEU - UPDATE RECORDS
| 0111.00 C PREXIT ENDSR
| 0112.00 ********************
| 0113.00 * SPLIT LINE *
| 0114.00 ********************
| 0115.00 C SPLIT BEGSR .10/| 0116.00 C SUBST(P) LTXT1:CPHLDL 80
| 0117.00 C MOVEA HLDL AR(1)
| 0118.00 C MOVEA AR LTXT2
| 0119.00 C SUB 1 CP
| 0120.00 C CP IFGT *ZERO
| 0121.00 C CP SUBST(P) LTXT1:1 HLDL
| 0122.00 C MOVE HLDL LTXT1
| 0123.00 C ELSE
| 0124.00 C MOVE *BLANKS LTXT1
| 0125.00 C ENDIF
| 0126.00 C Z-ADD 2 RRECO UPDATE 2 RECORDS.
| 0127.00 C MOVE 'USR1016' MSGID Split...
| 0128.00 C EXSR SNDMSG
| 0129.00 C ENDSR
| Figure 8 (Part 2 of 3). Sample split-join program written in ILE RPG
140 Source Entry Utility (SEU)

| 0130.00 ********************
| 0131.00 * JOIN LINE *
| 0132.00 ********************
| 0133.00 C JOIN BEGSR
| 0134.00 *
| 0135.00 C LTXT2 IFGT *BLANKS .11/| 0136.00 C 80 SUB CP CPR 3 0
| 0137.00 C ADD 1 CPR
| 0138.00 C CPR SUBST(P) LTXT2:1 HLDL
| 0139.00 C MOVEA HLDL AR(CP)
| 0140.00 C MOVEA AR LTXT1
| 0141.00 C ADD 1 CPR
| 0142.00 C CPR IFLE 80
| 0143.00 C SUBST(P) LTXT2:CPR LTXT2
| 0144.00 C Z-ADD 2 RRECO UPDATE 2 RECORDS
| 0145.00 C ELSE CPR > 80
| 0146.00 C MOVE *BLANKS LTXT2 CLEAR LINE 2
| 0147.00 C ENDIF
| 0148.00 C ENDIF
| 0149.00 C LTXT2 IFEQ *BLANKS
| 0150.00 C Z-ADD 1 RRECO UPDATE 1 RECORD
| 0151.00 C ENDIF
| 0152.00 C MOVE '1000000' RSEQN
| 0153.00 C MOVE 'USR1017' MSGID Join...
| 0154.00 C EXSR SNDMSG
| 0155.00 C ENDSR
| 0156.00 ********************
| 0157.00 * SEND MESSAGE API *
| 0158.00 ********************
| 0159.00 C SNDMSG BEGSR
| 0160.00 C CALL 'QMHSNDPM' .12/| 0161.00 C PARM MSGID
| 0162.00 C PARM MSGF
| 0163.00 C PARM MSGDTA
| 0164.00 C PARM MSGLEN
| 0165.00 C PARM MSGTYP
| 0166.00 C PARM MSGENT
| 0167.00 C PARM MSGCNT
| 0168.00 C PARM MSGKEY
| 0169.00 C PARM MSGERR
| 0170.00 C ENDSR
| 0171.00 ********************
| 0172.00 * EXIT PROGRAM *
| 0173.00 ********************
| 0174.00 C $EXIT BEGSR
| 0175.00 C MOVE *ON *INLR
| 0176.00 C RETURN
| 0177.00 C ENDSR
| 0178.00 *
| ****************** End of data **********************************
| Figure 8 (Part 3 of 3). Sample split-join program written in ILE RPG
| .1/Lines 17 to 20 are pointer definitions of the three parameters passed by| SEU to the user-defined line command program.
| .2/Line 22 defines the pointer for use in the line command validation.
| .3/Lines 24 to 37 indicate the format referenced by the first pointer.
| .4/Lines 39 to 44 indicate the format referenced by the second pointer.
| .5/Lines 46 to 52 indicate the format referenced by the third pointer.
| .6/Lines 70 to 73 list the parameters that contain the addresses to the three| blocks in the user space.
| .7/Lines 81 to 97 validate the input.
Appendix E. Referencing the User Space for User-Defined Line Command Programs 141

| .8/Lines 99 to 108 process the text in line 1 of the source text and check if the| line is to be split or joined.
| .9/Lines 110 to 111 provide a return code of 0, indicating that all data has| been processed. SEU updates the source text according to the output| sequence number value.
| .10/Lines 115 to 129 are a routine which splits line one of the source text and| moves the split data to a new line. Two lines are returned to SEU. SEU| deletes Line one in the source member and inserts two lines in its place.
| .11/Lines 135 to 155 are a routine which joins the data from line two of the| source text to the data in line one. If data is left in line two after the join, it is| moved to the start of line two, otherwise line two is cleared. If line two is blank| after the join, only line one is returned to SEU.
| .12/Lines 160 to 170 are a routine which calls a system API to send program| messages.
| C Example using Pointers| The following example illustrates how to reference the three parameters that SEU| passes to your user-defined line command program, if you are writing your program| in C.
| typedef struct Input /*Input structure .1/ */
| {
| long int lcrecl; /*record length */
| long int lccurrec; /*relative cursor rec. num. */
| /*declare the rest of member variables. */
| } Input;
| typedef struct Output /*Output stucture .2/ */
| {
| char lcrtncde; /*return code */
| /*declare the rest of member variables. */
| } Output;
| typedef struct Text /*Structure for each line.3/*/| {
| char lccmd[7]; /*line command */
| /*declare the rest of member variables. */
| } Text;
| int main(int argc, char **argv[])
| {
| Input *pInput; /*Pointer to Input structure.4/ */
| Output *pOutput; /*Pointer to Output structure */
| Text *pText; /*Pointer to source line structure */
| /*More declares.... */
| pInput =(Input *)(*argv[1]); /*Retrieve pointer */ .5/| pOutput=(Output *)(*argv[2]);
| pText =(Text *)(*argv[3]);
| /*Program body... */
| }
142 Source Entry Utility (SEU)

| .1/This section declares the Input structure that is being referenced and| defines the format of the Input block of the user space.
| .2/This section declares the Output structure that is being referenced and| defines the format of the Output block of the user space.
| .3/This section declares the Text structure that is being referenced and defines| the format of the Text block of the user space.
| .4/This section declares the pointers which receive the parameters that SEU| passes to your program.
| .5/These statements retrieve the pointers to the input, output and text blocks.
| PLI Example using Pointers| The following example illustrates how to reference the three parameters that SEU| passes to your user-defined line command program, if you are writing a PLI| program.
| PLIPGM: PROC(PINPUT, POUTPUT, PTEXT); .1/| DECLARE PINPUT POINTER;
| DECLARE POUTPUT POINTER;
| DECLARE PTEXT POINTER;
| DECLARE 1 INPUT BASED(PINPUT), .2/| 3 LCRECL BINARY(31), /*record length */
| 3 LCCURREC BINARY(31), /*relative cur. rec # */
| /*declare the rest of the structure variables.*/
| DECLARE 1 OUTPUT BASED(POUTPUT), .3/| 3 LCRTNCDE CHAR(1), /*return code */
| /*declare the rest of the structure variables.*/
| DECLARE 1 TEXT BASED(PTEXT), .4/| 3 LCCMD CHAR(7), /*line command */
| /*Program Body..... */
| END PLIPGM;
| .1/This section declares the pointers to receive the parameters that SEU| passes to your PLI program.
| .2/This section indicates the format referenced by the pointer to the Input block| of the user space.
| .3/This section indicates the format referenced by the pointer to the Output| block of the user space.
| .4/This section indicates the format referenced by the pointer to the Text block| of the user space.
| ILE COBOL Example using Pointers| The following example illustrates how to reference the three parameters that SEU| passes to your user-defined line command program, if you are writing a program in| ILE COBOL.
Appendix E. Referencing the User Space for User-Defined Line Command Programs 143

| LINKAGE SECTION
| 01 P1 .1/ USAGE IS POINTER.
| 01 P2 .2/ USAGE IS POINTER.
| 01 P3 .3/ USAGE IS POINTER.
| 01 XXXXX PIC 9(9) BINARY.
| PROCEDURE DIVISION USING P1
| P2
| P3
| SET ADDRESS OF XXXXX TO P1.
| .1/Pointer to the input block of the user space.
| .2/Pointer to the output block of the user space.
| .3/Pointer to the source text block of the user space.
144 Source Entry Utility (SEU)

Bibliography
The following publications are listed with their full titlesand base order numbers.
The related Application Development ToolSet forAS/400 publications are:
¹ ADTS/400: Advanced Printer Function, SC09-1766
¹ ADTS/400: Character Generator Utility, SC09-1769
¹ ADTS/400: Data File Utility, SC09-1773
¹ ADTS/400: File Compare and Merge Utility,SC09-1772
¹ ADTS/400: Interactive Source Debugger,SC09-1897
¹ ADTS/400: Programming Development Manager,SC09-1771
¹ &db2635., &db2635n.
¹ ADTS for AS/400: Screen Design Aid, SC09-2604
¹ ADTS/400: Screen Design Aid for the System/36Environment, SC09-1893
¹ Introducing Application Development ToolSet/400and the AS/400 Server Access Programs,SC09-1939
The orderable features of 5763-PW1 are:
¹ ADTS/400: Application Development Manager Intro-duction and Planning Guide, GC09-1807
¹ ADTS/400: Application Development ManagerUser’s Guide, SC09-2133
¹ ADTS/400: Application Dictionary Services Self-Study, SC09-1904
¹ ADTS/400: Application Dictionary Services User’sGuide, SC09-2087
The related IBM AS/400 publications are:
¹ CL Programming, SC41-5721
¹ CL Reference, SC41-5722
¹ Data Management, SC41-5710
¹ DDS Reference, SC41-5712
¹ Publications Reference, SC41-5003
¹ Security – Reference, SC41-5302
Copyright IBM Corp. 1994, 1998 145

146 Source Entry Utility (SEU)

Index
AAbsolute Positioning line command 50Add Physical File Member (ADDPFM) command 89ADDPFM (Add Physical File Member) command 89After line command 36authority requirements 3automatic format line 84
BBefore line command 36beginning-of-data line 17BOTTOM command (SEU) 77Browse display
accessing 15browsing second member 16DBCS data 118description 15full screen mode 15selecting
file 16member 16
Browse Options displayaccessing 16description 16splitting 16
Browse/Copy Options displayaccessing 20purpose 2, 20
browsingchanging environment 15full screen mode 15member 15
CCANCEL command (SEU) 78canceling
changes to source member 78Copy Repeat line command 37pending operations 56prompt 83
CAPS option 76Change Command (CHGCMD) command 3CHANGE command (SEU) 73Change Session Defaults display
changing default case for a member type 26changing the edit session environment 25—26DBCS data 122purpose 2specifying exit programs 62syntax checkers for SEU source types 27
Change Session Defaults display (continued)Tabs line command 48uppercase data
changing a source memberdirectly 100saving changes 106with FIND command 102with format line 101with prompt 105with split Edit/Browse display 102
changing a stringdescription 31from Programming Development Manager
(PDM) 33changing the edit session environment 25CHGCMD (Change Command) command 3CL command
See control language (CL) commandclearing tabs 48Columns line command
description 40split displays 57
commandSee control language (CL) commandSee display commandSee line command
Command Entry display 9Command Group menu 81command prompt
accessing 81Command Group menu 81description 81embedded SQL statements 42ending 41Prompt line command 41requesting 81STRSEU command 9
comments, DDS 18control language (CL) command
Add Physical File Member (ADDPFM) 89Change Command (CHGCMD) 3Create Command (CRTCMD) 3Create Duplicate Object (CRTDUPOBJ) 90Create Library (CRTLIB) 5Create Physical File (CRTPF) 3Create Source Physical File (CRTSRCF) 5Edit Source (EDTSRC) 115Start SEU (STRSEU) 5Work with Output Queue (WRKOUTQ) 3Work with Spooled Files (WRKSPLF) 3
converting DBCS data 123
Copyright IBM Corp. 1994, 1998 147

Copy line command 37Copy Repeat line command 37Copy Spooled File (CPYSPLF) command 3copying
records 37repeatedly 37
CPYSPLF (Copy Spooled File) command 3Create Command (CRTCMD) command 3Create Duplicate Object (CRTDUPOBJ)
command 90Create Library (CRTLIB) command 5Create Physical File (CRTPF) command 3Create Source Physical File (CRTSRCPF)
command 5creating a source member
inserting recordswith format line 95with insert command 94with prompt 96
procedure 12saving the member 98syntax checking 28
CRTCMD (Create Command) command 3CRTDUPOBJ (Create Duplicate Object)
command 90CRTLIB (Create Library) command 5CRTPF (Create Physical File) command 3
Ddata
authorization required 3shifting 52truncating 53
data description specifications (DDS) commentsediting 18saving 18
DBCSSee double-byte character set (DBCS)
DDS commentsediting 18saving 18
defaultsSee Change Session Defaults display
defining a prompt 87Delete line command 38deleting
records 38source member 20
Development Source Utility (DSU) command(System/36) 111 —112
displayBrowse 15Browse Options 16Browse/Copy Options 20Change Session Defaults 15, 25
display (continued)Command Entry 9Command Group menu 81Display Prompt 88Edit 17Exit 91Find/Change Options 31Select File Using SEU 16Select Format 85Select Member Using SEU 16Select Prompt 82Select Spooled File Using SEU 16Select User-Defined Prompt 87split 1Subset Member List 11Work with User-Defined Prompt Definition 87
display commandBOTTOM 77CANCEL 78CHANGE 73entering 69FILE 78FIND 72HIDE 71purpose 1, 69SAVE 77session-dependent 69session-independent 69SET
options 76syntax 76
split display 69TOP 76
Display Output Queues (DSPOUTQ) command 3Display Prompt display 88double-byte character set (DBCS)
changing strings 122character size 117conversion 123, 124enabling for SEU 117entering data on SEU displays 117finding strings 122prompts and fields on Edit display for
entering 118—120uppercase and lowercase double-byte data 122
DSPOUTQ commandSee Display Output Queues (DSPOUTQ) command
DSU (Development Source Utility) command(System/36) 111 —112
EEdit display
accessing 17automatic format line 45canceling pending operations 56
148 Source Entry Utility (SEU)

Edit display (continued)DBCS data 118excluding records 50field descriptions 18format lines 84full screen mode 26hiding records 71inserting
format line 45tabs line 48
line commands 17pending operations 56processing 21purpose 17selectingshowing excluded records 51special records 17using 17with prompt 82
Edit Source (EDTSRC) command(System/38) 115 —116
editing a source member 17editing DDS comments 18EDTSRC command
See Edit Source (EDTSRC) command (System/38)end-of-data line 17error recovery 125Exclude line command 50 —52Exit display
accessing 91DBCS data 118DDS comments 18field descriptions 18using 91
exitingCANCEL command 78description 91Exit display 91FILE command 78SAVE command 77
exiting SEU 34EXPERT option 75
Ffile
See physical fileFILE command (SEU) 78file list
purpose 2Select File Using SEU display 16Select Spooled File Using SEU display 16
FIND command (SEU) 72Find/Change Options display
accessing 31asterisk (*) character 32
Find/Change Options display (continued)DBCS data 118, 121description 31Exclude line command 51finding
apostrophes 31blanks 31quotation marks 31records by date 32syntax errors 32
purpose 2, 31syntax errors 27
findingapostrophes 31blanks 31character strings 31character strings in a list of members 33DBCS data 122Programming Development Manager (PDM) find
string function 33quotation marks 31syntax errors 32
formatidentifier (xx) 41, 45lines
automatic 45, 84blank lines 46deleting 45description 84inserting with Format line command 45requesting 81selecting 85showing on Edit display 44
purpose 1syntax checking 28
Format line commanddescription 44example 45format identifier 45inserting blank lines 44split displays 57
full screen modeBrowse display 15Edit display 26setting
Change Session Defaults display 15, 26SET EXPERT command 15, 26
function keysoverview 1positional 69
HHIDE command (SEU) 71hiding records 71
Index 149

high-level-language promptcanceling 83DBCS with RPG II 119description 82determining type for Prompt command 41ending 41example 82for new records 41Prompt line command 41purpose 1search path 89selecting 82storage considerations 89syntax checking 28
IInsert line command
using 38with prompt 40
Insert-with-Format line command 44 —47Insert-with-Prompt line command 40, 41inserting
records 38source statements 94with format line 95with prompt 96
Lleaving SEU 34library
creating for source files 7specifying in Start SEU (STRSEU) command 7
line commandAbsolute Positioning 50After 36Before 36canceling pending operations 56Columns Line 40Copy 37Delete 38editing members 17entering 35, 55Exclude 50Format Line 44identifying 58Insert 38Insert-with-Format 44Insert-with-Prompt 40matching suffixes 54Move 39overlapping commands 55Overlay 37pending operations 56performing more than one operation 55
line command (continued)Print Source Records 39processing 35Prompt 40purpose 1Relative Positioning 52Repeat 39rolling 52rules for entering 55sequence number 35Shift 52Shift-with-Truncate 53Show 51Skeleton Line 47split displays 57Tabs 48target 36user-defined 61Window 54
MMATCH option 76maximum length of records 2maximum number of records 2member
See source membermember list
changing 11purpose 2Select Member Using SEU display 16subset 11viewing 11
Move line command 39moving records 39
Oobject authority 3options displays
Browse Options 16Browse/Copy Options 2, 20Change Session Defaults
changing browse session 15changing edit session 25
Find/Change Options 2, 31purpose 2
options for SET commandCAPS 76EXPERT 75MATCH 76ROLL 76SHIFT 76TABS 75
order of processingEdit display 21
150 Source Entry Utility (SEU)

order of processing (continued)user-defined line commands 65Work with Members Using SEU display 20
output queue browsing 20overlapping line commands 55Overlay line command 37
Pparameters
Development Source Utility (DSU) procedure 111Edit Source (EDTSRC) command 115SEU CANCEL command 78SEU CHANGE command 73SEU FILE command 78SEU FIND command 72SEU HIDE command 71SEU SAVE command 77SEU SET command
changing session defaults 76find and change operations 76
Source Entry Utility (SEU) procedure 113Start SEU (STRSEU) command 5
PDMSee Programming Development Manager (PDM)
pending operations 56physical file
comments 18DBCS data 117
positional coding 9positional function key 69positioning records on the display 50Print Source Records line command 39printing
DBCS data 122records 39source member 20triple spacing 20
processing orderEdit display 21line commands 35user-defined line commands 65Work with Members Using SEU display 20
Programmer menu, starting Source Entry Utility(SEU) 5
Programming Development Manager (PDM)finding character string 33starting Source Entry Utility (SEU) 5Work with Members Using PDM display 100
promptSee command promptSee high-level-language promptSee user-defined prompt
Prompt line commandaccessing Select Prompt display 82split display 41
Prompt line command (continued)using 41
publications, list of 145
Qquitting SEU
See exiting SEU
Rrecords
See also special recordschanging 17comments 18copying 37deleting 38excluding from display 50hiding on display 71inserting 38maximum for member 2maximum length 2moving 39overlaying 37placing in a prompt 40positioning on display
absolute positioning 50relative positioning 52window commands 54
printing 39repeating 39searching 31sequence number 35shifting data 52showing excluded records 51truncating data 53
recovering from errors 125related printed information 145Relative Positioning line command 52Repeat line command 39repeating operations
Insert 38Insert-with-Format 45Insert-with-Prompt 41Prompt 41
repositioning records on the display 50ROLL option 76rolling a member on the display 52
SSAVE command (SEU) 77saving source member 98Screen Design AID (SDA), starting SEU 5searching records 31
Index 151

Select File Using SEU display 16Select User-Defined Prompt display 87selecting
file 16format line 85member 16prompt 82prompt code 87source member 11spooled file 16
sequence numberline commands 35user defined line commands 61
SET command 75SET command (SEU)
changing edit session 25changing session defaults 76description 76
setting tabs 48SEU
See Source Entry Utility (SEU)SEU command
See display commandSee line command
SHIFT indicator 53Shift line command 52, 53SHIFT option 76Shift-with-Truncate line command 53shifting
block of records 53data in records 52
Show line command 51, 52Skeleton line command 47Source Entry Utility (SEU)
calling withSystem/36 DSU procedure 111System/36 SEU procedure 112System/38 EDTSRC command 115
commandsSee display commandSee line commandSee user-defined line command
DBCS data 117examples 93function keys 1identifying line commands 58overview 1recovering from errors 125required authorization 3source member types supported 7starting 5
Source Entry Utility (SEU) command(System/36) 112, 113
source memberbrowsing 15changing
directly 100
source member (continued)changing (continued)
example 99with FIND command 102with format line 101with prompt 105with split Edit/Browse display 102
creatingexample 93Exit display 18STRSEU command 7
default types 8deleting 20deleting records 38editing 17excluding records 50hiding records 71inserting
blank lines 38records 38
maximum number of records 2moving records 39positioning records
absolute positioning 50relative positioning 52window commands 54
printing 20record sequence number 35repeating records 39required authorization 3saving 98selecting
Browse display 16Work with Members Using SEU display 11
selecting type 7shifting data in records 52showing excluded records 51specifying 7syntax checking 27, 28truncating data in record 53types supported 7updating 18viewing member list 11
special recordsbeginning-of-data line 17Data-records-excluded line 50description 17Edit display 17end-of-data line 17format line 44prompt 40tabs line 48
split Browse/Browse displaydisplay commands 69procedure 16purpose 2
152 Source Entry Utility (SEU)

split Edit/Browse displayDBCS data 121display commands 69example 102procedure 19purpose 2
splitting the Edit display 19spooled file list
browsing 15purpose 2
SQL statementsSee Structured Query Language (SQL) statements
Start Source Entry Utility (STRSEU) commanddefault values 8description 5entering
Command Entry display 9command prompts 9
names 7parameters 7positional coding 9syntax 5
starting Source Entry Utility (SEU)command line 5Programmer menu 5Programming Development Manager (PDM) 5Screen Design Aid (SDA) 5STRSEU command 5
STRSEU commandSee Start Source Entry Utility (STRSEU) command
Structured Query Language (SQL) statementsidentifying 44prompts for embedded 42
Subset Member List displayDBCS data 118using 11
suffixes on block commands 54syntax checking
AS/400 source types 29asterisk (*) character 32Change Session Defaults display 25effect of the Exclude line command 51existing members 27finding and flagging errors 27finding flagged errors 32format lines and prompts 28limitations 27methods 27prompts and format lines 28purpose 2System/36 source types 29System/38 source types 30
system commandSee control language (CL) command
System Command window 3
TTab line command 48TABS option 75target commands 36TOP command (SEU) 76truncating data 53tutorial
changing a source member 99creating a source member 93creating a user-defined prompt 107
Uuser list 2user space
format of 127referencing 127
C example using pointers 142ILE COBOL example using pointers 143ILE RPG example using pointers 138ILE RPG example without pointers 133PLI example using pointers 143
referencing as a single block 127referencing with pointers 130
user-defined line commandconflicts 67examples 133
C, using pointers 142ILE COBOL, using pointers 143ILE RPG, using pointers 138ILE RPG, without pointers 133PLI, using pointers 143
number of lines copied 65overview 61processing order 65program, parameters passed to 61returning to SEU 67sample program 127specifying exit program 62split sessions 67structure of user space 127using 65
user-defined line command programadding to SEU exit point 63C example using pointers 142calling, in a split session 67ILE COBOL example using pointers 143ILE RPG example using pointers 138ILE RPG example without pointers 133parameters passed to 61PLI example using pointers 143removing from SEU exit point 65replacing in SEU exit point 65SEU exit point 63
accessing 63adding programs to 63
Index 153

user-defined line command program (continued)SEU exit point (continued)
displaying program information 65removing program from 65replacing programs 65
specifying location of 62using 61viewing information about 65
user-defined promptchanging 87controlling access 89creating 87creating additional prompt files 90default storage and retrieval 89defining 87description 87displaying 88example 107restricting access by users 89search path 89selecting 88selecting a prompt code 87sharing with other users 89
WWindow line command 54Work with Members Using PDM display, starting
Source Entry Utility (SEU) 5Work with Members Using SEU display
changing member list 11DBCS data 118processing order 20
Work with User-Defined Prompt Definitiondisplay 87
154 Source Entry Utility (SEU)

Communicating Your Comments to IBM
AS/400Application Development ToolSetfor AS/400Source Entry UtilityUser’s Guide and ReferenceVersion 4
Publication No. SC09-2605-00
If there is something you like—or dislike—about this book, please let us know. You can useone of the methods listed below to send your comments to IBM. If you want a reply, includeyour name, address, and telephone number. If you are communicating electronically, includethe book title, publication number, page number, or topic you are commenting on.
The comments you send should only pertain to the information in this book and its presenta-tion. To request additional publications or to ask questions or make comments about thefunctions of IBM products or systems, you should talk to your IBM representative or to yourIBM authorized remarketer.
When you send comments to IBM, you grant IBM a nonexclusive right to use or distributeyour comments in any way it believes appropriate without incurring any obligation to you.
If you are mailing a readers’ comment form (RCF) from a country other than the UnitedStates, you can give it to the local IBM branch office or IBM representative for postage-paidmailing.
¹ If you prefer to send comments by mail, use the RCF at the back of this book.
¹ If you prefer to send comments by FAX, use this number:
– United States and Canada: 416-448-6161
– Other countries: (+1)-416-448-6161
¹ If you prefer to send comments electronically, use the network ID listed below. Be sureto include your entire network address if you wish a reply.
– Internet: [email protected] – IBMLink: toribm(torrcf) – IBM/PROFS: torolab4(torrcf) – IBMMAIL: ibmmail(caibmwt9)

Readers' Comments — We'd Like to Hear from You
AS/400Application Development ToolSetfor AS/400Source Entry UtilityUser’s Guide and ReferenceVersion 4
Publication No. SC09-2605-00
Overall, how satisfied are you with the information in this book?
How satisfied are you that the information in this book is:
Please tell us how we can improve this book:
Thank you for your responses. May we contact you? Ø Yes Ø No
When you send comments to IBM, you grant IBM a nonexclusive right to use or distribute your commentsin any way it believes appropriate without incurring any obligation to you.
Name Address
Company or Organization
Phone No.
Very
Satisfied Satisfied Neutral DissatisfiedVery
Dissatisfied
Overall satisfaction Ø Ø Ø Ø Ø
Very
Satisfied Satisfied Neutral DissatisfiedVery
Dissatisfied
Accurate Ø Ø Ø Ø ØComplete Ø Ø Ø Ø ØEasy to find Ø Ø Ø Ø ØEasy to understand Ø Ø Ø Ø ØWell organized Ø Ø Ø Ø ØApplicable to your tasks Ø Ø Ø Ø Ø

Cut or FoldAlong Line
Cut or FoldAlong Line
Readers' Comments — We'd Like to Hear from YouSC09-2605-00 ÉÂÔÙ
Fold and Tape Please do not staple Fold and Tape
PLACEPOSTAGESTAMPHERE
IBM Canada Ltd. LaboratoryInformation Development2G/345/1150/TOR1150 EGLINTON AVENUE EASTNORTH YORK ONTARIO CANADA M3C 1H7
Fold and Tape Please do not staple Fold and Tape
SC09-2605-00


ÉÂÔÙ
Program Number: 5769-PW1
Printed in the United States of Americaon recycled paper containing 10%recovered post-consumer fiber.
SC09-2605-00