appendix n - dwd.wisconsin.gov
TRANSCRIPT
Appendix N
MANUFACTURING YOUTH APPRENTICESHIP
PRODUCTION PATHWAY
WELDING (UNIT 7)
Manufacturing – Appendix N Production Pathway: Welding (Unit 7) PAGE 1 OF 26
Unit 7: Production Pathway Welding Competency
1. Read welding technical drawings and work orders Performance Standard Condition
Competence will be demonstrated at the worksite
Performance Standard Criteria
Performance will be successful when learners: Review technical drawing Gather reference materials as needed Determine type of required weld Determine location of required weld Determine filler metal required Determine welding process to be used Analyze supplementary data Determine product or job instructions and specifications Interpret welding symbols and procedure
Learning Objectives Explain the need for technical drawings, also known as blueprints, schematics, part prints,
or engineering drawings Explain how technical drawings detail work piece design parameters, lay out and
specifications Explain how product design and production are related Discuss different types of technical drawings Identify terminology related to technical drawings Describe how to interpret views, projections and elements from a technical drawing Identify terms, components, revisions, symbols, assembly sequence, dimensions,
tolerances, scale, and list of materials from technical drawings or work orders
Comments:
Manufacturing – Appendix N Production Pathway: Welding (Unit 7) PAGE 2 OF 26
Unit 7: Production Pathway Welding Competency
2. Interpret welding symbols and procedures Performance Standard Condition
Competence will be demonstrated at the worksite
Performance Standard Criteria
Performance will be successful when learners: Interpret technical drawings accurately as needed for job task Use appropriate terminology Identify lines, views, symbols, and representations on the drawings Interpret dimensions, tolerances, and scale on the drawings Interpret the welding process plan from a technical drawing which includes tools,
equipment, speeds, feeds, fixtures and holders as applicable
Learning Objectives Define and explain the use of lines, views, symbols, dimensions, scale, and tolerances on
technical drawings Identify different lines by name, type, order of usage, and application such as object, hidden,
center, section, dimension, extension, cutting plane, short break, long break, phantom Demonstrate standard view placement practices Compare pictorial format, orthographic projection, sectional views, and detail schedules Compare characteristics, advantages and limitations of welding, brazing, and soldering Identify common welding symbols and their meanings on technical drawings Explain how weld types are indicated on technical drawings Explain how weld positions are indicated on technical drawings List supplementary data commonly found on welding drawings Discuss how weld testing requirements and procedures are indicated on the technical
drawing Determine procedure number cross-references to technical drawings
Comments:
Manufacturing – Appendix N Production Pathway: Welding (Unit 7) PAGE 3 OF 26

Unit 7: Production Pathway Welding Competency
3. Layout and plan work Performance Standard Condition
Competence will be demonstrated at the worksite
Performance Standard Criteria
Performance will be successful when learners: Read welding technical drawings and work orders
Interpret welding symbols and procedure Review appropriate welding, cutting and/or fabricating procedures Determine equipment, work pieces, and supplies needed Determine metal type, electrode type, welding position, and metal thickness Select jigs, holding fixtures, guides and stops if applicable Obtain materials for work to be completed Measure and mark weld or cut points and positions of components on work pieces,
using rules, squares, templates, and scribes Plan sequencing of work to be completed Document measurements and layout
Learning Objectives Describe how a work plan is developed from a technical drawing for process, equipment,
tools, and holders Explain the lay out process in metal fabrication Describe tools used in the layout process Covert measurements between US Standard and metric systems Convert measurements from fractions to decimals and vice versa Use estimation to verify reasonableness of calculated results Explain how to measure with tape measures, rulers, and protractors Demonstrate how to use precision measuring tools like micrometers Discuss how parts are prepared using the principles of geometry, functions of angles and
parts of a circle Demonstrate the proper use of and interpretation of measuring devices to determine size,
length, angle, and distance
Comments:
Manufacturing – Appendix N Production Pathway: Welding (Unit 7) PAGE 4 OF 26
Unit 7: Production Pathway Welding Competency
4. Perform safety checks Performance Standard Condition
Competence will be demonstrated at the worksite
Performance Standard Criteria
Performance will be successful when learners: Review welding procedure to be used Review safety requirements of procedure Verify safety equipment and any Personal Protective Equipment (PPE) needed for
welding process Verify equipment is available for use and in working order Verify equipment is current for preventative maintenance and/or calibration Conduct required safety checks prior to performing procedure
o Ensure area is dry and facilitates circulation of clean air o Ensure workspace is clear and free from paints, solvents, chemicals and other
flammable materials o Assure safety equipment is close by and operational o Check valves, valve protection, thread type and wrenches for equipment to be used o Check grounding, cables, voltage/current transformation components o Check ventilation and fume reduction requirements
Handle compressed gases safely o Ensure protector cap is secure when moving cylinder o Secure cylinder in vertical position o Inspect valve, regulator and gauges for damage o Connect and adjust tank pressure according to manufacturer
Report any wear, damage or failure of safety checks to worksite professional immediately
Learning Objectives List the various tools and equipment used in layout, cutting and welding Outline applications of common welding tools and equipment Describe and demonstrate the safety requirements and safeguards of common welding
tools and equipment List the types of labeling used on tools and equipment at your facility to indicate whether a
tool or piece of equipment is functional and safe to use AND/OR is not operational and not safe to use.
List the situations which require you to obtain help to resolve problems with equipment or production
Describe the common types of shielding for welding processes Discuss smoke/fume, light/radiation and other hazards associated with common welding
processes Discuss electrical hazards and how to avoid electric shock Demonstrate proper inspection and use of ventilation equipment to avoid welding fumes
Manufacturing – Appendix N Production Pathway: Welding (Unit 7) PAGE 5 OF 26
Explain specific eye and face hazards associated with welding List precautions necessary when welding different types of metals List precautions necessary when welding in different positions Compare safety precautions necessary when using different welding processes
Comments:
Manufacturing – Appendix N Production Pathway: Welding (Unit 7) PAGE 6 OF 26

Unit 7: Production Pathway Welding Competency
5. Prepare base metal Performance Standard Condition
Competence will be demonstrated at the worksite
Performance Standard Criteria
Performance will be successful when learners: Review procedures Determine base metal or work piece preparation requirements Obtain correct base metal type and thickness Prepare base metal surfaces as required Use cleaning solutions if needed Examine edges of prepared base metal parts Grind base carbon steel metal to bevel and/or remove surface irregularities Check uniformity, proper fit-up, and base metal preparation Pre-heat as applicable Parts fit up and are preheated as needed
Learning Objectives Explain the importance of materials meeting specifications prior to processing Discuss common metallurgic principles that make metals ideal for welding Compare types of metals and their qualities Define alloy Discuss common sources of metals Compare common metal working processes used in welding Explain the factors that limit or enhance the weldability of materials Compare and contrast different metal preparation requirements Explain use and safety restrictions for use of grinders to prepare base metal Discuss cleaning solutions used to prepare commonly welded metals such as carbon steel,
stainless steel and aluminum Explain any safety restrictions of cleaning solutions for metals to be fabricated Describe the fit-up process Explain the need for pre-heating in some procedures
Comments:
Manufacturing – Appendix N Production Pathway: Welding (Unit 7) PAGE 7 OF 26
Unit 7: Production Pathway Welding Competency
6. Set up to fabricate base metal Performance Standard Condition
Competence will be demonstrated at the worksite
Performance Standard Criteria
Performance will be successful when learners: GENERAL SET UP Layout and plan work Perform safety checks Assemble tools and equipment as required Place parts and assemblies into fixtures Set up equipment for fabrication Document set up procedure if required FIXTURE SET UP Locate parts or subassemblies needed Determine the order for the part or subassembly placement Position, align, and bolt jigs, holding fixtures, guides, and stops onto machines Position, align and/or clamp work pieces into jigs and/or holding fixtures Tighten all holding and positioning clamps Inspect assembly CUTTING SET UP Select torch tips, alloys, flux, coil, tubing, and wire, according to metal types and
thicknesses Dress electrodes with tip dressers, files, emery cloths, or dressing wheels Move switch to correct polarity OR change electrode and ground cable positions Adjust voltage and/or amperage per procedure Select appropriate program if required Set wire feed rate OR shielding gas flow/pressure at correct value Sawing
o Adjust safety guards o Adjust holding device as needed o Place material in holding device o Adjust blade velocity
Manual Oxy-fuel Cutting o Select correct tip size and type o Set regulator for tip, fuel gas and material o Adjust pressures for steel thickness
Machine Oxy-fuel Cutting o Select correct tip size and type o Set regulator for tip, fuel gas and material o Measure corner and align track mechanism o Set appropriate travel speed
Manufacturing – Appendix N Production Pathway: Welding (Unit 7) PAGE 8 OF 26
Air Carbon Arc Cutting o Choose adequate power source selection o Choose correct carbon electrode diameter o Turn on air line and check air flow direction o Adjust air pressure for material thickness o Adjust amperage and current type for electrode diameter and material thickness
Manual Plasma Arc Cutting o Select appropriate tip o Set regulator for appropriate plasma gas o Adjust amperage for material thickness
WELDING SET UP Select torch tips, alloys, flux, coil, tubing, and wire, according to metal types and
thicknesses, data charts, and records Dress electrodes with tip dressers, files, emery cloths, or dressing wheels Move switch to correct polarity OR change electrode and ground cable positions Adjust voltage and/or amperage per procedure Select appropriate program if required Set wire feed rate OR shielding gas flow/pressure at correct value Fill hoppers and position spouts to direct flow of flux or complete manually Review technique and weld bead sequence Determine joint requirements Determine pre-heat and post-heat requirements Shielded metal arc welding (SMAW)
o Select appropriate base and filler metal o Adjust amperage and polarity
Gas metal arc welding (GMAW) and Flux-cored arc welding (FCAW) o Select and install appropriate filler wire o Set voltage o Set wire speed (amperage) o Set proper gas flow rate
Gas tungsten arc welding (GTAW) o Select appropriate filler wire o Select appropriate electrode and gas o Set amperage and polarity o Set proper gas flow rate
Learning Objectives List the types of labeling used on tools and equipment at your facility to indicate whether a
tool or piece of equipment is functional and safe to use Explain the purpose of holding devices and subassemblies in welding List typical work holding devices for each equipment type you use Compare basic holding devices List cutting processes such as shearing, sawing, Oxy-fuel, Arc, Plasma, and Laser and
when each is used List welding processes such as SMAW, GMAW, GTAW, FCAW, and Submerged arc
welding (SAW), and when each is used Identify the major components of equipment used in your welding and cutting processes and
their functions List common metals and materials used with each type of cutting and welding process
Manufacturing – Appendix N Production Pathway: Welding (Unit 7) PAGE 9 OF 26
Compare cutting and welding techniques to complete fabrication Identify variables that impact cutting and welding equipment settings Define how variables such as current, voltage, polarity, arc length, speed, flux, flow rates,
material, piece thickness, etc., affect a weld Discuss the fundamental use of polarity with respect to equipment set up for process used Define repeatability Describe the importance of repeatability in manufacturing
Comments:
Manufacturing – Appendix N Production Pathway: Welding (Unit 7) PAGE 10 OF 26
Unit 7: Production Pathway Welding Competency
7. Fabricate base metal Performance Standard Condition
Competence will be demonstrated at the worksite
Performance Standard Criteria
Performance will be successful when learners: Prepare base metal Set up to fabricate base metal Add or adjust safety guards Verify machine settings for material Verify blades, shears, dies, etc., appropriate for metal fabrication to be completed Perform equipment pre-check Make test cuts Adjust holding devices, blade speeds, and metal positions safely as needed Operate tools and equipment safely Fabricate base metal
o Use hand tools such as brakes and hammers o Use equipment such as such as grinders, saws, drills, drill presses, or brakes
Complete cuts Inspect, measure, or test completed metal pieces Shut down and secure equipment Clean up Report any discrepancies or equipment concerns to worksite professional immediately Document cutting process if required
Learning Objectives Compare and contrast different metal preparation and mechanical cutting methods Outline applications and use for common hand tool and shearing, shaping and sawing
equipment Identify hand tools used in welding operations Describe and demonstrate the safety requirements and safeguards for common hand tools
and shearing, shaping and sawing equipment
Comments:
Manufacturing – Appendix N Production Pathway: Welding (Unit 7) PAGE 11 OF 26

Unit 7: Production Pathway Welding Competency
8. Thermally/chemically cut metal Performance Standard Condition
Competence will be demonstrated at the worksite
Performance Standard Criteria
Performance will be successful when learners: Prepare base metal Set up to fabricate base metal Adjust voltage and/or amperage per procedure Select appropriate program if required Set wire feed rate OR shielding gas flow/pressure at correct value Make test cuts Adjust pressures, amperage, voltage, flow rates, torch angles, flame sizes, travel speed,
etc. safely as needed Operate tools and equipment safely Manual Oxy-fuel Cutting
o Light and adjust flame to correct size o Adjust pressures and torch angles as needed o Cuts- straight/square edge and shape/square edge and straight/bevel edge in flat
position; scarfing and gouging in flat and horizontal position o On carbon steel
Machine Oxy-fuel Cutting o Control gas flow and flame size o Monitor travel speed o Cuts- straight/square edge and straight/bevel edge in flat position o On carbon steel
Manual Plasma Arc Cutting o Adjust amperage for material thickness o Adjust amperage and torch angles as needed o Protect surroundings from spray o Cuts- straight/square edge and shape/square edge in flat position o On carbon steel, aluminum, and stainless steel
Air Carbon Arc Cutting o Adjust amperage and torch angles as needed o Cuts- Scarfing and gouging in flat and horizontal position o On carbon steel
Complete cuts Remove any slag or residue Inspect, measure, or test completed metal pieces Shut down and secure equipment Clean up Report any discrepancies or equipment concerns to worksite professional immediately
Manufacturing – Appendix N Production Pathway: Welding (Unit 7) PAGE 12 OF 26
Document cutting process if required
Learning Objectives Compare and contrast different metal preparation and thermal/chemical cutting methods Discuss the advantages and disadvantages of one type of thermal/chemical cutting method
over another Outline applications and use of common thermal/chemical cutting equipment Describe and demonstrate the safety requirements and safeguards of common
thermal/cutting equipment
Comments:
Manufacturing – Appendix N Production Pathway: Welding (Unit 7) PAGE 13 OF 26

Unit 7: Production Pathway Welding Competency
9. Tack work pieces Performance Standard Condition
Competence will be demonstrated at the worksite
Performance Standard Criteria
Performance will be successful when learners: Position the work pieces Tack-weld them together lightly Weld just enough to pin the work pieces together Adjust and re-align assemblies as needed to keep pieces positioned Remove slag or other material Check that all required work pieces are tacked before attempting full welds Check the pieces for appropriate geometry by measuring
Learning Objectives Define tack Explain the purpose of a tack Compare welding techniques to bond pieces versus welding techniques to tack pieces Explain how to measure with tape measures, rulers, and protractors Demonstrate how to use precision measuring tools like micrometers Discuss how parts are prepared using the principles of geometry, functions of angles and
parts of a circle Demonstrate the proper use of and interpretation of measuring devices to determine size,
length, angle, and distance
Comments:
Manufacturing – Appendix N Production Pathway: Welding (Unit 7) PAGE 14 OF 26
Unit 7: Production Pathway Welding Competency
10. Weld metal Performance Standard Condition
Competence will be demonstrated at the worksite
Performance Standard Criteria
Performance will be successful when learners: Prepare base metal Set up to fabricate base metal Verify and adjust settings for required process Select appropriate program if required Make test welds Adjust pressures, amperage, voltage, flow rates, torch angles, flame sizes, travel speed,
etc. safely as needed Hold the welding gun appropriately to prevent weld wandering Operate tools and equipment safely Make fillet welds on plain carbon steel, stainless steel or aluminum in required positions Make groove welds on plain carbon steel, stainless steel or aluminum in required
positions Monitor metal for appropriate welds Flux-cored arc welding (FCAW)-gas
o Fillet welds in all positions on carbon steel o Groove welds in all positions on carbon steel
FCAW- self-shielded o Fillet welds in all positions on carbon steel o Groove welds in all positions on carbon steel
Gas metal arc welding (GMAW)-S o Fillet welds in all positions on carbon steel o Groove welds in all positions on carbon steel
GMAW-Spray o Fillet welds in 1F and 2F position on carbon steel o Groove welds in 1G position on carbon steel o Fillet welds in all positions on aluminum o Groove welds in all positions on aluminum
GMAW-P (pulse) o Fillet welds in all positions on carbon steel o Groove welds in all positions on carbon steel
Gas tungsten arc welding (GTAW)- Carbon Steel o Fillet welds in all positions o Groove welds in all positions
GTAW- Stainless Steel o Fillet welds in all positions o Groove welds in all positions
Manufacturing – Appendix N Production Pathway: Welding (Unit 7) PAGE 15 OF 26
GTAW- Aluminum o Fillet welds in all positions o Groove welds in all positions
Shielded metal arc welding (SMAW) o Fillet weld all positions on carbon steel o Groove weld in all positions on carbon steel
MECHANIZED WELDING o Adjust pressures, amperage, voltage, flow rates, travel speed, etc. safely as needed o Load or feed work pieces into welding machines to join or bond components if
applicable o Observe meters, gauges, and machine operations to ensure that processes meet
specifications o Monitor metal for appropriate welds o Adjust equipment to correct for problems o Turn and press knobs and buttons or enter operating instructions into computers to
start and adjust welding machines o Monitor, and adjust robotic welding production lines if applicable o Remove completed work pieces and parts from machinery o Add chemicals or materials to machine to cool or facilitate bonding OR immerse
completed work pieces into water or acid baths to cool and clean components as required by procedure
Complete welds Remove any slag or residue Inspect, measure, or test completed metal pieces Shut down and secure equipment Clean up Report any discrepancies or equipment concerns to worksite professional immediately Document welding process if required
Learning Objectives Identify how the welding process is used in production to make pieces and products Compare and contrast common welding processes such as FCAW, GMAW, GTAW and
SMAW Discuss the advantages and disadvantages of one type of welding process over another Compare different types of welding joints such as fillet, groove, T, Lap, Butt, etc. Compare the different welding positions- Flat, Horizontal, Vertical, Overhead Compare features of the common metals used in welding such as Carbon Steel, Stainless
Steel and Aluminum Define constant current (CC) and constant voltage (CV) Demonstrate how GTAW current changes, electrode tip prep, torch angles and weld
distance effect weld bead profiles and penetration Discuss how FCAW and GMAW arc voltage changes affect weld bead profile Explain how FCAW and GMAW tip to work distance affects amperage in CV applications Describe and demonstrate the safety requirements and safeguards for common welding
equipment Describe methods of puddle control Demonstrate different techniques for manual welding Compare and contrast manual welding processes with automated welding processes List the quality checks performed as part of the automated welding production process
Manufacturing – Appendix N Production Pathway: Welding (Unit 7) PAGE 16 OF 26

Comments:
Manufacturing – Appendix N Production Pathway: Welding (Unit 7) PAGE 17 OF 26

Unit 7: Production Pathway Welding Competency
11. Monitor product and process Performance Standard Condition
Competence will be demonstrated at the worksite
Performance Standard Criteria
Performance will be successful when learners: Monitor piece/product produced for specification Recheck type of metal to be welded Monitor the process and equipment for performance Recheck required positioning of the weld gun or torch Adjust the process for quality and/or productivity as needed Take corrective actions to resolve problems as they occur Replenish processing materials as needed Label pieces/products for compliance or non-compliance Document quality control checks Pieces are fabricated to specified tolerances
Learning Objectives List the quality checks performed as part of the welding process Explain why products are tested for quality and function List the situations which require you to obtain help to resolve problems with equipment or
production Explain why labeling and documentation are part of the quality check Explain the purpose of welding procedures, procedure qualification and welder qualifications
to produce a welded piece
Comments:
Manufacturing – Appendix N Production Pathway: Welding (Unit 7) PAGE 18 OF 26
Unit 7: Production Pathway Welding Competency
12. Assist to inspect, measure, and/or test completed metal pieces Performance Standard Condition
Competence will be demonstrated at the worksite while assisting a worksite professional
Performance Standard Criteria
Performance will be successful when learners: Ensure conformance to specifications, using visual inspection, measuring and testing
devices Examine edges and geometry of cut pieces Examine tacks, root passes, intermediate layers, and completed welds Check for weld discontinuity and defects visually Check for proper weld size Perform destructive or non-destructive checks as required Label pieces/products for compliance or non-compliance Document inspection and testing as required
Learning Objectives Explain why welded products are tested for quality and function Compare different welding standards and compliance codes Determine features of good welds versus bad welds Discuss common causes of bad welding Describe causes of welding problems such as crater cracks, cold cracks, pinholes, porosity
in welds Discuss preventive measures taken to avoid bad welds Discuss problems associated with weld contaminants Compare destructive and non-destructive testing requirements for welds Discuss the consequences of bad welds to a product or structure Explain why labeling and documentation are part of the quality check Compare common metal finishing processes such as annealing, grinding, buffing, polishing,
sand blasting, priming, painting, heat treating, coating, plating, anodizing and galvanizing Describe the purpose of metal finishing
Comments:
Manufacturing – Appendix N Production Pathway: Welding (Unit 7) PAGE 19 OF 26

Unit 7: Production Pathway Welding Competency
13. Process production documents Performance Standard Condition
Competence will be demonstrated at the worksite
Performance Standard Criteria
Performance will be successful when learners: Document processing data on items such as labor, quality, quantity, and time Verify fabrication and welding documentation is completed Documentation is legible Documentation is complete Documentation is in appropriate format Documentation is stored or forwarded as required
Learning Objectives Describe the uses of production data Describe the importance of documenting the production process
Comments:
Manufacturing – Appendix N Production Pathway: Welding (Unit 7) PAGE 20 OF 26
Unit 7: Production Pathway Welding Competency
14. Clean up Performance Standard Condition
Competence will be demonstrated at the worksite
Performance Standard Criteria
Performance will be successful when learners: Select appropriate cleaning tools and equipment Clean tools/equipment as required Clean work area as required Store tools safely in proper location Store materials in safe manner Identify unsafe conditions and report them promptly Take corrective action to correct unsafe conditions Ensure that workstation is clean and clear of safety hazards Ensure workstation is organized for efficiency Dispose of waste appropriately as required
Learning Objectives Describe the cleaning procedures and materials used for the specific processes you perform Discuss cleaning solutions used to clean welded metals such as carbon steel, stainless
steel and aluminum Explain any safety restrictions of cleaning solutions for welded metals
Comments:
Manufacturing – Appendix N Production Pathway: Welding (Unit 7) PAGE 21 OF 26

Unit 7: Production Pathway Welding Competency
15. Monitor equipment for correct operation Performance Standard Condition
Competence will be demonstrated at the worksite
Performance Standard Criteria
Performance will be successful when learners: Review equipment quality measures for trends and problems as required Compare current equipment performance to optimal equipment operations on a regular
basis Report any noted deviations from expected performance Assist worksite professional to investigate abnormal equipment conditions in a timely
manner Assist worksite professional to follow up on repaired equipment to ensure that corrective
action solved the problem Document all monitoring activities
Learning Objectives Identify basic approaches to maintenance Explain how to read and review repair history records Describe how trends for malfunctioning equipment might appear in production records List the tools and equipment at your facility that must be monitored and maintained Define Total Productive Maintenance (TPM)
Comments:
Manufacturing – Appendix N Production Pathway: Welding (Unit 7) PAGE 22 OF 26
Unit 7: Production Pathway Welding Competency
16. Perform routine preventive maintenance (PM) Performance Standard Condition
Competence will be demonstrated at the worksite
Performance Standard Criteria
Performance will be successful when learners: Perform preventative maintenance (PM) according to facility schedule Communicate PM to production Assure that alternative equipment is available if needed by production Gather supplies to perform PM Ensure that equipment is properly labeled and pulled from production use Follow appropriate Lock Out/Tag Out procedures prior to performing PM Follow all safety requirements and wears appropriate Personal Protective Equipment
(PPE) as required Assist worksite professional to follow PM schedule to calibrate and maintain equipment,
tools and workstations o Inspect lines, tank valves, regulators, gauges, fittings and connections on oxy-fuel
equipment o Inspect, clean, adjust, and replace (if needed) torch tips and torch nuts on oxy-fuel
torches o Inspect, clean, adjust, and replace (if needed) electrodes, ground cables,
connections, fasteners, holders, clamps, switches and knobs on shielded arc welding equipment
o Inspect, clean, adjust, and replace (if needed) wire feeder, connections, fasteners, ground cable, gun assembly, gun nozzle, gas diffuser, contact tip, coil mounting, coil break, wire de-reeler, flowmeter, wire guides, and drive rollers on gas metal arc and flux core welding equipment.
o Remove weld spatter and foreign material from guns, torches, and/or electrode holders
o Inspect hand tools, fixtures, and/or tables o Mount wire electrode coils if applicable
Inspect and clean work areas Report any damage, wear, or missing safety equipment to worksite professional Re-qualify equipment for operation Document PM and preventative actions taken
Learning Objectives Explain the purpose and importance of preventative maintenance and calibration Describe how diagrams schematics, equipment manuals, and equipment specifications to
determine the schedule and process for PM List the situations which require you to obtain help to resolve problems with equipment or
production Manufacturing – Appendix N Production Pathway: Welding (Unit 7) PAGE 23 OF 26
Explain routine maintenance procedures for common welding equipment Explain how to change a liner on a GTAW, GMAW and/or FCAW gun if used at your
worksite
Comments:
Manufacturing – Appendix N Production Pathway: Welding (Unit 7) PAGE 24 OF 26
Unit 7: Production Pathway Welding Competency
17. Document equipment use, PM, and/or operational problems Performance Standard Condition
Competence will be demonstrated at the worksite
Performance Standard Criteria
Performance will be successful when learners: Verify all internal and external communication with appropriate parties in a timely
manner Communicate maintenance and repair needs clearly Use the correct reporting formats for communication Document use, maintenance, and repair activities accurately Report back and document any maintenance and repair issues in a timely manner Maintenance communication is timely and accurate Maintenance communication is documented
Learning Objectives Explain the uses of equipment data Discuss how to schedule repair and maintenance functions with respect to production
requirements and production levels Explain how communication for repair and maintenance issues demonstrates a knowledge
of customer and business needs List the parties that need to be involved of repair and maintenance issues Describe the importance of documenting communications
Comments:
Manufacturing – Appendix N Production Pathway: Welding (Unit 7) PAGE 25 OF 26
Manufacturing – Appendix N Production Pathway: Welding (Unit 7) PAGE 26 OF 26
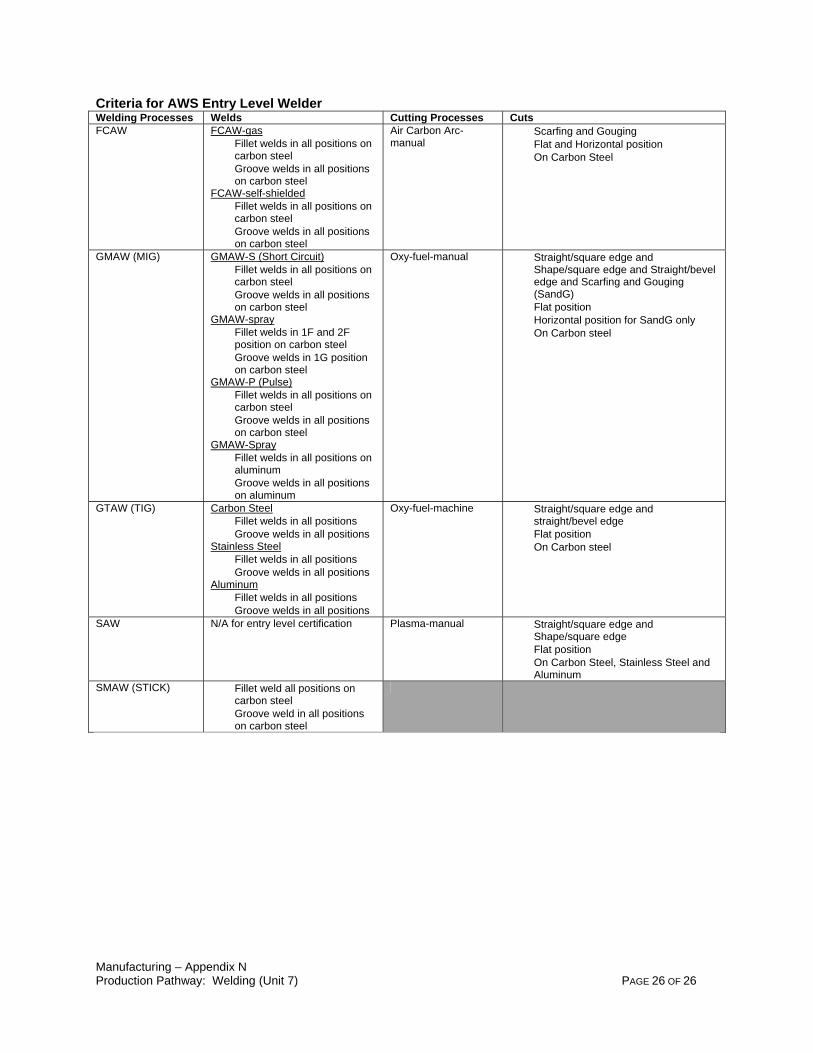
Criteria for AWS Entry Level Welder Welding Processes Welds Cutting Processes Cuts FCAW FCAW-gas
Fillet welds in all positions on carbon steel
Groove welds in all positions on carbon steel
FCAW-self-shielded Fillet welds in all positions on
carbon steel Groove welds in all positions
on carbon steel
Air Carbon Arc-manual
Scarfing and Gouging Flat and Horizontal position On Carbon Steel
GMAW (MIG) GMAW-S (Short Circuit) Fillet welds in all positions on
carbon steel Groove welds in all positions
on carbon steel GMAW-spray Fillet welds in 1F and 2F
position on carbon steel Groove welds in 1G position
on carbon steel GMAW-P (Pulse) Fillet welds in all positions on
carbon steel Groove welds in all positions
on carbon steel GMAW-Spray Fillet welds in all positions on
aluminum Groove welds in all positions
on aluminum
Oxy-fuel-manual Straight/square edge and Shape/square edge and Straight/bevel edge and Scarfing and Gouging (SandG)
Flat position Horizontal position for SandG only On Carbon steel
GTAW (TIG) Carbon Steel Fillet welds in all positions Groove welds in all positions Stainless Steel Fillet welds in all positions Groove welds in all positions Aluminum Fillet welds in all positions Groove welds in all positions
Oxy-fuel-machine Straight/square edge and straight/bevel edge
Flat position On Carbon steel
SAW N/A for entry level certification Plasma-manual Straight/square edge and Shape/square edge
Flat position On Carbon Steel, Stainless Steel and
Aluminum SMAW (STICK) Fillet weld all positions on
carbon steel Groove weld in all positions
on carbon steel