appendix d apa research paper — chapter 2 supplement · appendix d apa research paper — chapter...
TRANSCRIPT

Microsoft Offi ce 2010Microsoft Word 2010
Appendix D
APA Research Paper — Chapter 2 SupplementProject — Research Paper Based on APA Documentation StyleAs described in Chapter 2, two popular documentation styles for research papers are the Modern Language Association of America (MLA) and American Psychological Association (APA). This appendix creates the same research paper shown in Chapter 2, except it uses the APA documentation style instead of the MLA documentation style (Figure D – 1 on the next page).
This appendix is intended as a supplement for Chapter 2. It assumes you have completed the Chapter 2 project and thus presents only the steps required to create the research paper following the APA guidelines. That is, this appendix does not repeat background, explanations, boxes, or steps from Chapter 2 that are not required specifi cally to create the APA version of the research paper. For example, this appendix does not present proofi ng tools, citation placeholders, footnotes, copy and paste, Research task pane, etc. You should know the material presented in Chapter 2 because it will help you to complete later chapters in the book successfully and if you intend to take the Word Certifi cation exam.
APA Documentation StyleThe research paper in this appendix follows the guidelines presented by the APA.
To follow the APA documentation style, format the text to 12-point Times New Roman or a similar font. Double-space text on all pages of the paper using one-inch top, bottom, left, and right margins. Indent the fi rst word of each paragraph in the body of the paper, and in footnotes if they are used, one-half inch from the left margin. At the top of each page, place a left-aligned running head and a right-aligned page number. The running head consists of the text, Running head:, followed by an abbreviated paper title (no more than 50 characters) in all capital letters.
The APA documentation style requires a title page. In addition to the running head and page number at the top of the page, the title page contains the complete paper title, author name, and institutional affi liation, all centered on separate lines in the upper-half of the page. The paper title should not exceed 12 words and should be written so that it easily can be shortened to an abbreviated title for the running head. The author name, also
Copyright 2010 Cengage Learning. All Rights Reserved. May not be copied, scanned, or duplicated, in whole or in part. Due to electronic rights, some third party content may be suppressed from the eBook and/or eChapter(s).
Editorial review has deemed that any suppressed content does not materially affect the overall learning experience. Cengage Learning reserves the right to remove additional content at any time if subsequent rights restrictions require it.

APP 14 Appendix D APA Research Paper — Chapter 2 Supplement
Figure D – 1
title page references
running head
abstract
citation
research paper body
Copyright 2010 Cengage Learning. All Rights Reserved. May not be copied, scanned, or duplicated, in whole or in part. Due to electronic rights, some third party content may be suppressed from the eBook and/or eChapter(s).
Editorial review has deemed that any suppressed content does not materially affect the overall learning experience. Cengage Learning reserves the right to remove additional content at any time if subsequent rights restrictions require it.

Ap
pen
dix
D
APA Research Paper — Chapter 2 Supplement Appendix D APP 15
called an author byline, should not contain any title (e.g., Professor) or degrees (e.g., PhD). If the author is not affi liated with an institution, list the author’s city and state of residence. The title page also can include an author note centered at the bottom of the page, which can contain separate paragraphs identifying the author’s departmental affi liation, changes in affi liation during research, acknowledgments, and contact information. If the title page contains an author note, the text, Author Note, should be centered above the notes.
Research papers that follow the APA documentation style include an abstract. The abstract is a one-paragraph summary (usually 250 words or fewer) of the most important topics in the paper. The abstract appears after the title page on its own numbered page, which includes the running head. The title, Abstract, is centered above a single paragraph that is double-spaced and not indented.
The APA documentation style cites references in the text of the paper, called citations, instead of noting each source at the bottom of the page or at the end of the paper. This documentation style uses the term, references, to refer to the bibliographic list of sources at the end of the paper. The references page alphabetically lists sources that are cited in the paper. Place the list of sources on a separate numbered page. Center the title, References, one inch from the top margin. Double-space all entries and format them with a hanging indent, in which the fi rst line of a paragraph begins at the left margin and subsequent lines in the same paragraph are indented. The APA guidelines specify the hanging indent should be one-half inch from the left margin. List each source by the author’s last name, or, if the author’s name is not available, by the title of the source. Capitalize only the fi rst letter of the fi rst word in a title, along with any proper nouns.
To Start Word
If you are using a computer to step through the project in this appendix and you want your screens to match the fi gures in this appendix, you should change your screen’s resolution to 1024 × 768. For information about how to change a computer’s resolution, refer to the Offi ce 2010 and Windows 7 chapter at the beginning of this book.
The following steps, which assume Windows 7 is running, start Word based on a typical installation. You may need to ask your instructor how to start Word for your computer.
Click the Start button on the Windows 7 taskbar to display the Start menu.
Type Microsoft Word as the search text in the ‘Search programs and fi les’ text box and watch the search results appear on the Start menu.
Click Microsoft Word 2010 in the search results on the Start menu to start Word and display a new blank document in the Word window.
If the Word window is not maximized, click the Maximize button next to the Close button on its title bar to maximize the window.
If the Print Layout button on the status bar is not selected (shown in Figure D – 2 on the next page), click it so that your screen is in Print Layout view.
If Normal (Home tab | Styles group) is not selected in the Quick Style gallery (shown in Figure D – 2), click it so that your document uses the Normal style.
If your zoom percent is not 100, click the Zoom Out or Zoom In button on the status bar as many times as necessary until the Zoom button displays 100% on its face (shown in Figure D – 2).
1
2
3
4
5
6
7
Copyright 2010 Cengage Learning. All Rights Reserved. May not be copied, scanned, or duplicated, in whole or in part. Due to electronic rights, some third party content may be suppressed from the eBook and/or eChapter(s).
Editorial review has deemed that any suppressed content does not materially affect the overall learning experience. Cengage Learning reserves the right to remove additional content at any time if subsequent rights restrictions require it.

APP 16 Appendix D APA Research Paper — Chapter 2 Supplement
To Display Formatting Marks
As discussed in Chapter 1, it is helpful to display formatting marks that indicate where in the document you press the enter key, spacebar, and other keys. The following steps display formatting marks.
If the Home tab is not the active tab, click Home on the Ribbon to display the Home tab.
If the Show/Hide ¶ button (Home tab | Paragraph group) is not selected already, click it to display formatting marks on the screen.
1
2
To Modify the Normal Style for the Current Document
The APA documentation style requires that all text in the research paper use 12-point Times New Roman, or a similar, font. If you change the font and font size using buttons on the Ribbon, you may need to make the change many times during the course of creating the paper because Word formats different areas of a document using the Normal style, which uses 11-point Calibri font. By changing the Normal style, you ensure that all text in the document will use the format required by the APA. The following steps change the Normal style.
Right-click Normal in • the Quick Style gallery (Home tab | Styles group) to display a shortcut menu (Figure D – 2).
1
Figure D – 2
Note: To help you locate screen elements that are referenced in the step instructions, such as buttons and commands, this book uses red boxes to point to these screen elements.
zoom percent
Print Layout button
Home tab
Show/Hide ¶ button selected
Normal style selected and right-clicked
Quick Style gallery
Modify command
shortcut menu
Styles groupParagraph group
current font and font size for Normal style
Copyright 2010 Cengage Learning. All Rights Reserved. May not be copied, scanned, or duplicated, in whole or in part. Due to electronic rights, some third party content may be suppressed from the eBook and/or eChapter(s).
Editorial review has deemed that any suppressed content does not materially affect the overall learning experience. Cengage Learning reserves the right to remove additional content at any time if subsequent rights restrictions require it.
Ap
pen
dix
D
APA Research Paper — Chapter 2 Supplement Appendix D APP 17
To Change Line Spacing to Double
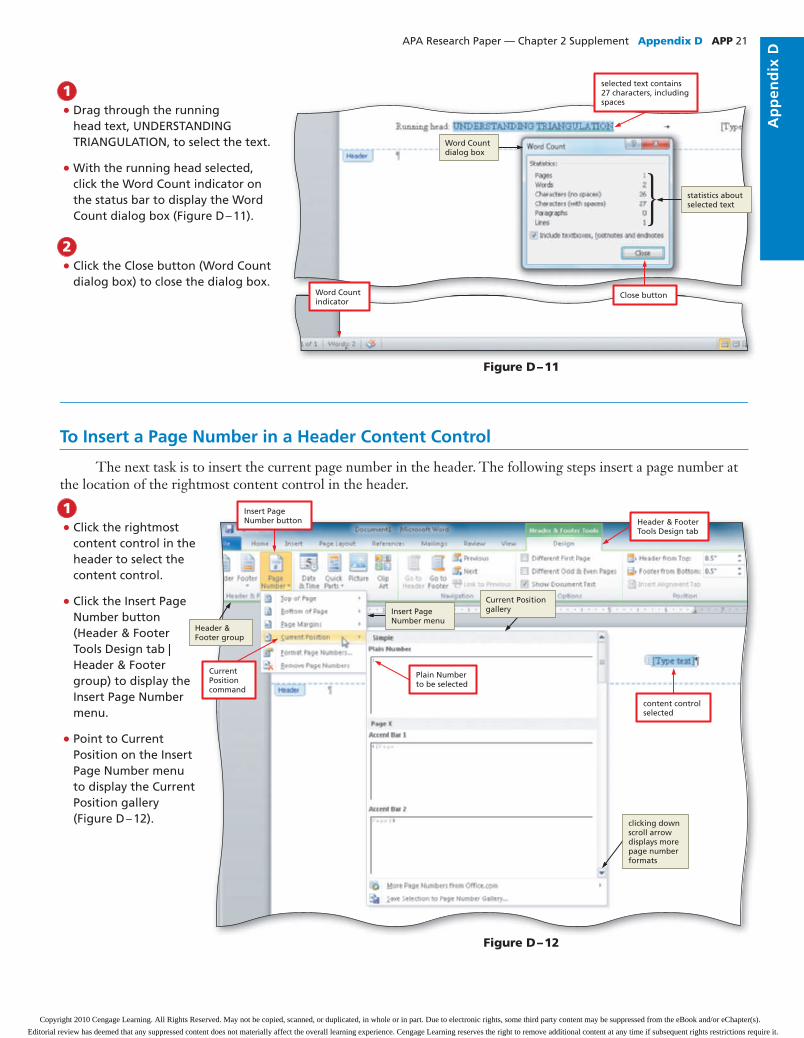
The APA documentation style requires that you double-space the entire research paper. That is, the amount of vertical space between each line of text and above and below paragraphs should be equal to one blank line. The following steps change the line spacing to 2.0, which double-spaces the lines in the research paper.
Figure D – 3
Figure D – 4
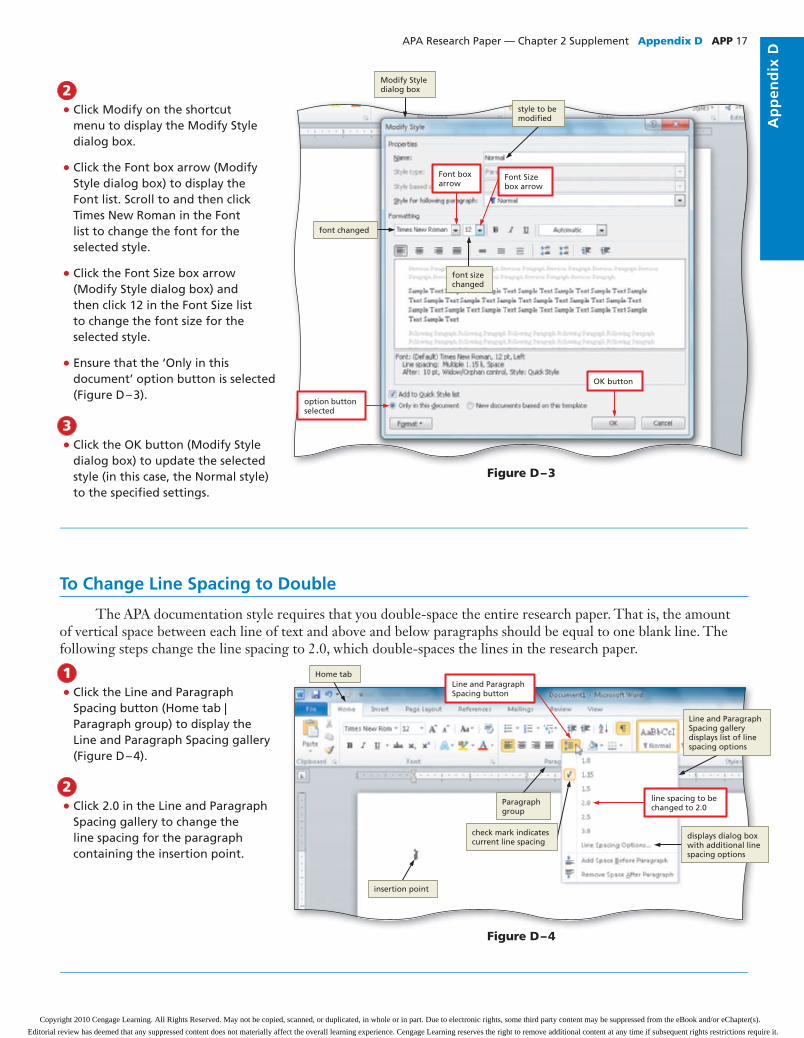
Click Modify on the shortcut • menu to display the Modify Style dialog box.
Click the Font box arrow (Modify • Style dialog box) to display the Font list. Scroll to and then click Times New Roman in the Font list to change the font for the selected style.
Click the Font Size box arrow • (Modify Style dialog box) and then click 12 in the Font Size list to change the font size for the selected style.
Ensure that the ‘Only in this • document’ option button is selected (Figure D – 3).
Click the OK button (Modify Style • dialog box) to update the selected style (in this case, the Normal style) to the specifi ed settings.
2
3
Click the Line and Paragraph • Spacing button (Home tab | Paragraph group) to display the Line and Paragraph Spacing gallery (Figure D – 4).
Click 2.0 in the Line and Paragraph • Spacing gallery to change the line spacing for the paragraph containing the insertion point.
1
2
Modify Style dialog box
style to be modifi ed
Font box arrow
Font Size box arrow
font changed
font size changed
option button selected
OK button
Home tabLine and Paragraph Spacing button
Paragraph group
check mark indicates current line spacing
Line and Paragraph Spacing gallery displays list of line spacing options
line spacing to be changed to 2.0
displays dialog box with additional line spacing options
insertion point
Copyright 2010 Cengage Learning. All Rights Reserved. May not be copied, scanned, or duplicated, in whole or in part. Due to electronic rights, some third party content may be suppressed from the eBook and/or eChapter(s).
Editorial review has deemed that any suppressed content does not materially affect the overall learning experience. Cengage Learning reserves the right to remove additional content at any time if subsequent rights restrictions require it.

APP 18 Appendix D APA Research Paper — Chapter 2 Supplement
To Remove Space after a Paragraph
The research paper should not have additional blank space after each paragraph. The following steps remove the blank space after a paragraph.
To Update a Style to Match a Selection
To ensure that all paragraphs in the paper will be double-spaced and do not have space after the paragraphs, you want the Normal style to include the line and paragraph spacing changes made in the previous two sets of steps. Because no text has yet been typed in the research paper, you do not need to select text prior to updating the Normal style. The following steps update the Normal style.
Click the Line and Paragraph • Spacing button (Home tab | Paragraph group) to display the Line and Paragraph Spacing gallery (Figure D – 5).
Click Remove Space After Paragraph • in the Line and Paragraph Spacing gallery so that no blank space appears after paragraphs.
1
2
Figure D – 5
Figure D – 6
Right-click Normal in the Quick • Style gallery (Home tab | Styles group) to display a shortcut menu (Figure D – 6).
Click Update Normal to Match • Selection on the shortcut menu to update the current style to refl ect the settings at the location of the insertion point.
1
2
Home tabLine and Paragraph Spacing button
Line and Paragraph Spacing gallery
Paragraph group
line spacing changed to double
insertion point
once you select Remove Space After Paragraph command, it changes to Add Space After Paragraph command
Home tab Normal style right-clicked
Styles group
shortcut menu
Update Normal to Match Selection command
insertion point
Copyright 2010 Cengage Learning. All Rights Reserved. May not be copied, scanned, or duplicated, in whole or in part. Due to electronic rights, some third party content may be suppressed from the eBook and/or eChapter(s).
Editorial review has deemed that any suppressed content does not materially affect the overall learning experience. Cengage Learning reserves the right to remove additional content at any time if subsequent rights restrictions require it.

Ap
pen
dix
D
APA Research Paper — Chapter 2 Supplement Appendix D APP 19
Click Blank (Three • Columns) in the Header gallery to insert the selected header design in the document and switch from the document text to the header, which allows you to edit the contents of the header (Figure D – 8).
2
Figure D – 8
Figure D – 7
To Insert a Formatted Header and Switch to the Header
In this research paper, the running head is to be placed at the left margin and the page number at the right margin, both on the same line one-half inch from the top of each page. Because the APA documentation style requires text at both the left and right margins, you can insert a formatted header that contains placeholders for text at the left, center, and right locations of the header. The following steps insert a formatted header and then switch from editing the document text to editing the header.
Click Insert on the • Ribbon to display the Insert tab.
Click the Header • button (Insert tab |Header & Footer group) to display the Header gallery (Figure D – 7).
1 Header buttonInsert tab Header & Footer group
Header gallery
Blank (Three Columns) header
list of built-in (predefi ned) headers
Remove Header command deletes header contents from entire document
clicking down scroll arrow displays more built-in headers
header
indicates header is being edited
document text is dimmed while you edit header content controls automatically
placed in header when you selected built-in header
bottom of header
Header & Footer Tools Design tab automatically appears because you are editing the header
Copyright 2010 Cengage Learning. All Rights Reserved. May not be copied, scanned, or duplicated, in whole or in part. Due to electronic rights, some third party content may be suppressed from the eBook and/or eChapter(s).
Editorial review has deemed that any suppressed content does not materially affect the overall learning experience. Cengage Learning reserves the right to remove additional content at any time if subsequent rights restrictions require it.

APP 20 Appendix D APA Research Paper — Chapter 2 Supplement
To Count Characters
The running head should be no more than 50 characters, according to the APA documentation style. The next steps count the characters in the running head.
To Enter Text in a Header Content Control
The formatted header contains three content controls (one at the left margin, one centered, and one at the right margin) with a tab character between each content control. A content control contains instructions for fi lling areas of text or graphics. The tab characters, which are formatting marks that indicate the tab key has been pressed, are displayed because Word uses tab stops to align these content controls. Chapter 3 discusses tab stops in more depth.
To select a content control, you click it. As soon as you begin typing in a selected content control, the text you type replaces the instruction in the control. For this reason, you do not need to delete the selection unless you wish to remove the content control and not enter any replacement text. The following steps delete the centered content control and then enter the running head at the location of the leftmost content control in the header.
Click the centered • content control in the header to select the content control.
Press the • DELETE key to delete the selected content control.
Click the leftmost • content control in the header to select the content control (Figure D – 9).
1
Figure D – 9
Figure D – 10
Type • Running head: UNDERSTANDING TRIANGULATION as the text in the leftmost content control and then press the DELETE key twice to remove one of the tab characters so that the running head text fi ts on the same line as the rightmost content control, which will contain the page number (Figure D – 10).
2
content control selected
centered content control deleted
tab charactertab character
running head text entered
only one tab character remains
Copyright 2010 Cengage Learning. All Rights Reserved. May not be copied, scanned, or duplicated, in whole or in part. Due to electronic rights, some third party content may be suppressed from the eBook and/or eChapter(s).
Editorial review has deemed that any suppressed content does not materially affect the overall learning experience. Cengage Learning reserves the right to remove additional content at any time if subsequent rights restrictions require it.
Ap
pen
dix
D
APA Research Paper — Chapter 2 Supplement Appendix D APP 21
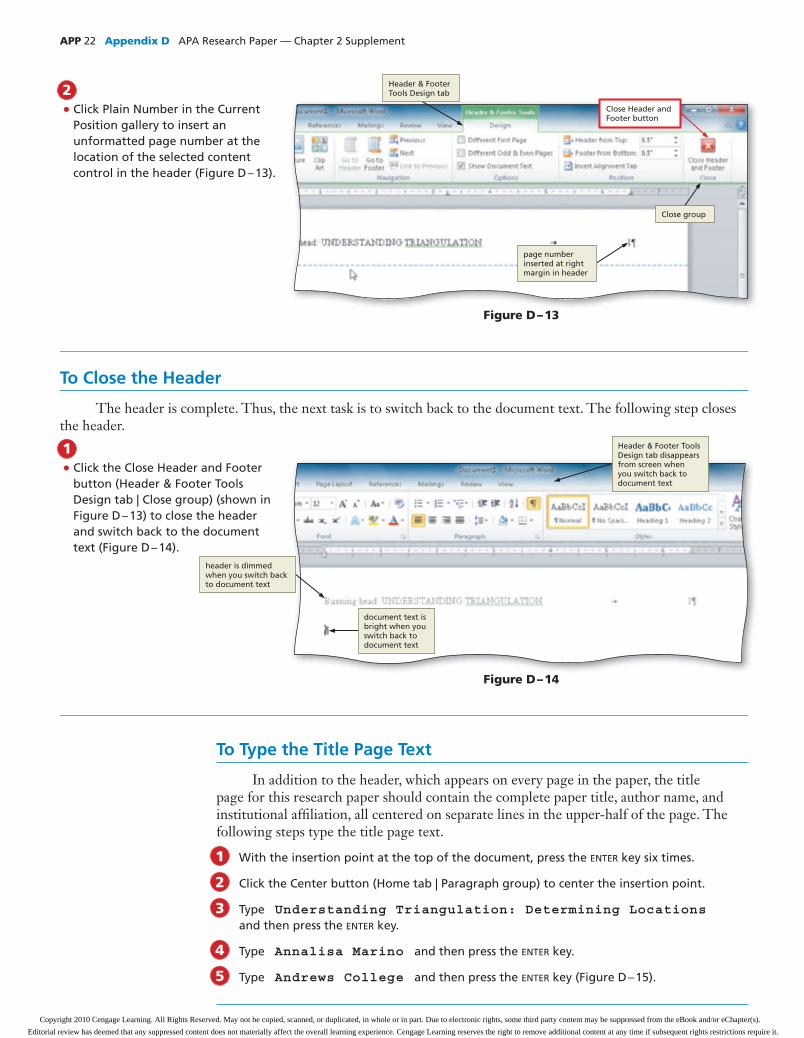
Click the rightmost • content control in the header to select the content control.
Click the Insert Page • Number button (Header & Footer Tools Design tab | Header & Footer group) to display the Insert Page Number menu.
Point to Current • Position on the Insert Page Number menu to display the Current Position gallery (Figure D – 12).
1
Figure D – 11
Figure D – 12
Drag through the running • head text, UNDERSTANDING TRIANGULATION, to select the text.
With the running head selected, • click the Word Count indicator on the status bar to display the Word Count dialog box (Figure D – 11).
Click the Close button (Word Count • dialog box) to close the dialog box.
1
2
To Insert a Page Number in a Header Content Control
The next task is to insert the current page number in the header. The following steps insert a page number at the location of the rightmost content control in the header.
Word Count indicator
Close button
Word Count dialog box
selected text con tains 27 characters, including spaces
statistics about selected text
Insert Page Number button
Header & Footer group
Current Position command
Insert Page Number menu
Current Position gallery
Plain Number to be selected
content control selected
clicking down scroll arrow displays more page number formats
Header & Footer Tools Design tab
Copyright 2010 Cengage Learning. All Rights Reserved. May not be copied, scanned, or duplicated, in whole or in part. Due to electronic rights, some third party content may be suppressed from the eBook and/or eChapter(s).
Editorial review has deemed that any suppressed content does not materially affect the overall learning experience. Cengage Learning reserves the right to remove additional content at any time if subsequent rights restrictions require it.
APP 22 Appendix D APA Research Paper — Chapter 2 Supplement
To Type the Title Page Text
In addition to the header, which appears on every page in the paper, the title page for this research paper should contain the complete paper title, author name, and institutional affi liation, all centered on separate lines in the upper-half of the page. The following steps type the title page text.
With the insertion point at the top of the document, press the ENTER key six times.
Click the Center button (Home tab | Paragraph group) to center the insertion point.
Type Understanding Triangulation: Determining Locations and then press the ENTER key.
Type Annalisa Marino and then press the ENTER key.
Type Andrews College and then press the ENTER key (Figure D – 15).
1
2
3
4
5
Click Plain Number in the Current • Position gallery to insert an unformatted page number at the location of the selected content control in the header (Figure D – 13).
2
Figure D – 13
Figure D – 14
To Close the Header
The header is complete. Thus, the next task is to switch back to the document text. The following step closes the header.
Click the Close Header and Footer • button (Header & Footer Tools Design tab | Close group) (shown in Figure D – 13) to close the header and switch back to the document text (Figure D – 14).
1
Header & Footer Tools Design tab
Close Header and Footer button
page number inserted at right margin in header
Close group
header is dimmed when you switch back to document text
document text is bright when you switch back to document text
Header & Footer Tools Design tab disappears from screen when you switch back to document text
Copyright 2010 Cengage Learning. All Rights Reserved. May not be copied, scanned, or duplicated, in whole or in part. Due to electronic rights, some third party content may be suppressed from the eBook and/or eChapter(s).
Editorial review has deemed that any suppressed content does not materially affect the overall learning experience. Cengage Learning reserves the right to remove additional content at any time if subsequent rights restrictions require it.

Ap
pen
dix
D
APA Research Paper — Chapter 2 Supplement Appendix D APP 23
To Page Break Manually
The title page is complete, and the abstract for the research paper will begin on a new page. To move the insertion point to the next page, you insert a manual page break. A manual page break, or hard page break, is one that you force into the document at a specifi c location.
Word never moves or adjusts manual page breaks; however, Word adjusts any automatic page breaks that follow a manual page break. Word inserts manual page breaks immediately above or to the left of the location of the insertion point. The following step inserts a manual page break after the title page.
Figure D – 15Figure D–15
Home tab
Center button Paragraph group
six blank linesentered betweentop of page and rest of title page text
text is centered on top half of page per APA guidelines
institutional affi liation entered
author name entered
complete paper title entered
insertion point
Insert tab
Pages group Page Break button
Figure D – 16
Verify the insertion • point is positioned below the college name on the title page (shown in Figure D – 15),which is the location for the page break.
Click Insert on the • Ribbon to display the Insert tab.
Click the Page Break • button (Insert tab | Pages group) to insert a manual page break immediately to the left of the insertion point and position the insertion point immediately below the manual page break (Figure D – 16).
1
page break
bottom of page 1
insertion point on page 2 paragraph is centered
because last line on previous page was centered
correct page number automatically appears in header
Copyright 2010 Cengage Learning. All Rights Reserved. May not be copied, scanned, or duplicated, in whole or in part. Due to electronic rights, some third party content may be suppressed from the eBook and/or eChapter(s).
Editorial review has deemed that any suppressed content does not materially affect the overall learning experience. Cengage Learning reserves the right to remove additional content at any time if subsequent rights restrictions require it.

APP 24 Appendix D APA Research Paper — Chapter 2 Supplement
To Type the Abstract
The abstract is a one-page summary of the most important points in the research paper. The title should be centered, and the paragraph below the title should be left-aligned. The following steps type the title centered, left-align a paragraph, and then type the abstract in the research paper.
Type Abstract and then press the ENTER key to enter the title for the page containing the abstract.
Press CTRL+L to left-align the current paragraph, that is, the paragraph containing the insertion point. (Recall from Chapter 1 that a notation such as CTRL+L means to press the letter L on the keyboard while holding down the CTRL key.)
Type the abstract text as shown in Figure D – 17.
1
2
3
Figure D – 17
To Count Words
When you write papers, you often are required to compose the papers with a minimum number of words. In addition, the APA documentation style specifi es that the abstract in a research paper should contain no more than 250 words, sometimes no more than 150 words. The next steps verify the number of words in the abstract.
title centered and entered
abstract left-aligned and entered
Copyright 2010 Cengage Learning. All Rights Reserved. May not be copied, scanned, or duplicated, in whole or in part. Due to electronic rights, some third party content may be suppressed from the eBook and/or eChapter(s).
Editorial review has deemed that any suppressed content does not materially affect the overall learning experience. Cengage Learning reserves the right to remove additional content at any time if subsequent rights restrictions require it.

Ap
pen
dix
D
APA Research Paper — Chapter 2 Supplement Appendix D APP 25
To Page Break Manually
The abstract is complete, and the text for the research paper should begin on a new page. The following steps insert a manual page break after the abstract.
Press CTRL+END to position the insertion point at the end of the document, which is the end of the abstract in this case.
Click the Page Break button (Insert tab | Pages group) to insert a manual page break immediately to the left of the insertion point and position the insertion point immediately below the manual page break.
To Enter the Paper Title
The following steps enter the title of the research paper centered between the page margins.
1
2
Figure D – 18
Figure D – 19
Position the mouse pointer in the • paragraph containing the abstract and then triple-click to select the paragraph.
Verify the number of words in the • selected text by looking at the Word Count indicator on the status bar (Figure D – 18).
Click anywhere in the abstract to • remove the selection from the text.
1
2
paragraph selected
selected text contains142 words
document contains a total of 151 words
paragraph mark and insertion point are centered because formatting specifi ed in previous paragraph carried forward when you pressed ENTER key
Insert tab
Pages group Page Break button
paper title entered, centered between left and right margins
correct page number automatically appears in header
Center the insertion point.
Type Under standing Triangulation: Determining Locations and then press the ENTER key to enter the title of the paper (Figure D – 19).
1
2
Copyright 2010 Cengage Learning. All Rights Reserved. May not be copied, scanned, or duplicated, in whole or in part. Due to electronic rights, some third party content may be suppressed from the eBook and/or eChapter(s).
Editorial review has deemed that any suppressed content does not materially affect the overall learning experience. Cengage Learning reserves the right to remove additional content at any time if subsequent rights restrictions require it.

APP 26 Appendix D APA Research Paper — Chapter 2 Supplement
To Format Text
The paragraphs below the paper title should be left-aligned, instead of centered. Thus, the following step left-aligns the paragraph below the paper title.
Press CTRL+L to left-align the current paragraph, that is, the paragraph containing the insertion point.
1
To First-Line Indent Paragraphs
The fi rst line of each paragraph in the research paper is to be indented one-half inch from the left margin. You can use the horizontal ruler, usually simply called the ruler, to indent just the fi rst line of a paragraph, which is called a fi rst-line indent.
The left margin on the ruler contains two triangles above a square. The First Line Indent marker is the top triangle at the 0" mark on the ruler (Figure D – 20). The small square at the 0" mark is the Left Indent marker. The Left Indent marker allows you to change the entire left margin, whereas the First Line Indent marker indents only the fi rst line of the paragraph. The following steps fi rst-line indent paragraphs in the research paper.
If the rulers are not • displayed, click the View Ruler buttonon the vertical scroll bar to display the horizontal and vertical rulers on the screen.
With the insertion • point on the paragraph mark below the research paper title, point to the First Line Indent marker on the ruler (Figure D – 20).
1
Figure D – 20
Figure D – 21
Drag the First Line • Indent marker to the .5" mark on the ruler to display a vertical dotted line in the document window, which indicates the proposed location of the fi rst line of the paragraph (Figure D – 21).
2
Left Indent Marker
First Line Indent marker
ruler
View Ruler button
insertion point
paragraph left-aligned
as you drag marker on ruler, vertical dotted line indicates proposed location of indent
First Line Indent marker at .5" mark on ruler
Copyright 2010 Cengage Learning. All Rights Reserved. May not be copied, scanned, or duplicated, in whole or in part. Due to electronic rights, some third party content may be suppressed from the eBook and/or eChapter(s).
Editorial review has deemed that any suppressed content does not materially affect the overall learning experience. Cengage Learning reserves the right to remove additional content at any time if subsequent rights restrictions require it.

Ap
pen
dix
D
APA Research Paper — Chapter 2 Supplement Appendix D APP 27
To Type the First and Second Paragraphs
The following steps type the fi rst and second paragraphs of the research paper.
Type the fi rst paragraph of the research paper as shown in Figure D – 23 and then press the ENTER key.
Type the second paragraph of the research paper as shown in Figure D – 23.
1
2
Figure D – 22
Release the mouse button to place • the First Line Indent marker at the .5" mark on the ruler, or one-half inch from the left margin (Figure D – 22).
3
Figure D – 23
paragraph mark containing insertion point indented one-half inch from left margin
First Line Indent marker .5" from left margin
fi rst line of paragraphs indented one-half inch
fi rst paragraph entered
second paragraph entered
Copyright 2010 Cengage Learning. All Rights Reserved. May not be copied, scanned, or duplicated, in whole or in part. Due to electronic rights, some third party content may be suppressed from the eBook and/or eChapter(s).
Editorial review has deemed that any suppressed content does not materially affect the overall learning experience. Cengage Learning reserves the right to remove additional content at any time if subsequent rights restrictions require it.

APP 28 Appendix D APA Research Paper — Chapter 2 Supplement
To Save a Document
You have performed several tasks while creating this research paper and do not want to risk losing work completed thus far. Accordingly, you should save the document. The following steps save the document on a USB fl ash drive using the fi le name, Triangulation Paper.
With a USB fl ash drive connected to one of the computer’s USB ports, click the Save button on the Quick Access Toolbar to display the Save As dialog box.
Type Triangulation Paper in the File name text box to change the fi le name. Do not press the ENTER key after typing the fi le name because you do not want to close the dialog box at this time.
Navigate to the desired save location (in this case, the Word folder in the CIS 101 folder [or your class folder] on the USB fl ash drive). For a detailed example of this procedure, refer to Steps 3a – 3c in the To Save a File in a Folder section in the Offi ce 2010 and Windows 7 chapter at the beginning of this book.
Click the Save button (Save As dialog box) to save the document in the selected folder on the selected drive with the entered fi le name.
1
2
3
4
To Change the Bibliography Style
The APA guidelines suggest the use of in-text citations instead of footnoting each source of material in a paper. These parenthetical acknowledgments guide the reader to the end of the paper for complete information about the source.
The fi rst step in inserting a citation is to be sure the citations and sources will be formatted using the correct documentation style, called the bibliography style in Word. The following steps change the specifi ed documentation style.
Click References on the Ribbon • to display the References tab.
Click the Bibliography Style • box arrow (References tab | Citations & Bibliography group) to display a gallery of predefi ned documentation styles (Figure D – 24).
Click APA Fifth Edition in the • Bibliography Style gallery to change the documentation style to APA.
1
2
Figure D – 24
APA Fifth Edition to be selected
References tab
Citations & Bibliography group
Bibliography Style gallery lists predefi ned documentation styles
Bibliography Style box arrow
Copyright 2010 Cengage Learning. All Rights Reserved. May not be copied, scanned, or duplicated, in whole or in part. Due to electronic rights, some third party content may be suppressed from the eBook and/or eChapter(s).
Editorial review has deemed that any suppressed content does not materially affect the overall learning experience. Cengage Learning reserves the right to remove additional content at any time if subsequent rights restrictions require it.

Ap
pen
dix
D
APA Research Paper — Chapter 2 Supplement Appendix D APP 29
Figure D – 25
Figure D – 26
To Insert a Citation and Create Its Source
With the documentation style selected, the next task is to insert a citation placeholder and enter the source information. You can accomplish these steps at once by instructing Word to add a new source. The following steps add a new source for a magazine (periodical) article.
Position the insertion point to the • right of the word, line, at the end of the second sentence in the second paragraph, before the period, and then press the SPACEBAR because you want a space between the end of the sentence and the citation.
Click the Insert Citation button • (References tab | Citations & Bibliography group) to display the Insert Citation menu (Figure D – 25).
1
Click Add New Source on the Insert • Citation menu to display the Create Source dialog box (Figure D – 26).
2
Insert Citation button
Citations & Bibliography group
References tab
style changed to APA Fifth Edition
Add New Source command
insertion point at end of second sentence in second paragraph
space inserted
Insert Citation menu
Create Source dialog box
list of Bibliography Fields changes, depending on source selected in Type of Source box
Type of Source box arrow
source displayed in Type of Source box controls which fi elds are displayed in dialog box — your source may differ
Copyright 2010 Cengage Learning. All Rights Reserved. May not be copied, scanned, or duplicated, in whole or in part. Due to electronic rights, some third party content may be suppressed from the eBook and/or eChapter(s).
Editorial review has deemed that any suppressed content does not materially affect the overall learning experience. Cengage Learning reserves the right to remove additional content at any time if subsequent rights restrictions require it.
APP 30 Appendix D APA Research Paper — Chapter 2 Supplement
To Insert Another Citation and Create Its Source
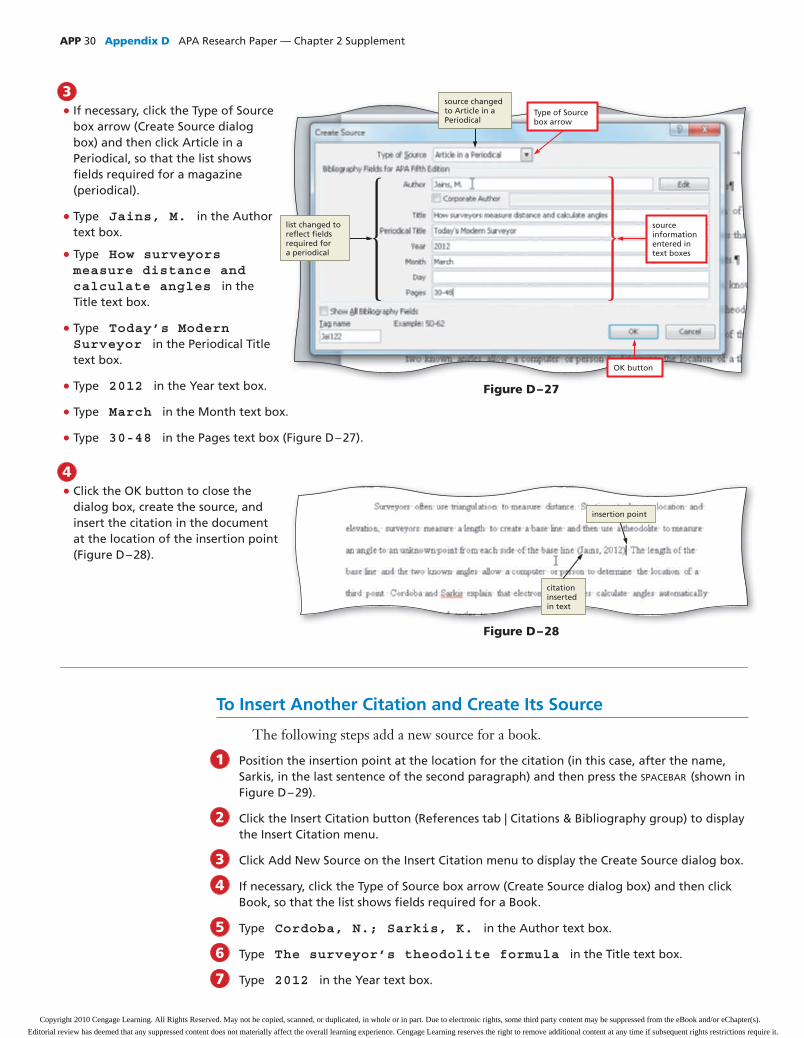
The following steps add a new source for a book.
Position the insertion point at the location for the citation (in this case, after the name, Sarkis, in the last sentence of the second paragraph) and then press the SPACEBAR (shown in Figure D – 29).
Click the Insert Citation button (References tab | Citations & Bibliography group) to display the Insert Citation menu.
Click Add New Source on the Insert Citation menu to display the Create Source dialog box.
If necessary, click the Type of Source box arrow (Create Source dialog box) and then click Book, so that the list shows fi elds required for a Book.
Type Cordoba, N.; Sarkis, K. in the Author text box.
Type The surveyor’s theodolite formula in the Title text box.
Type 2012 in the Year text box.
1
2
3
4
5
6
7
If necessary, click the Type of Source • box arrow (Create Source dialog box) and then click Article in a Periodical, so that the list shows fi elds required for a magazine (periodical).
Type • Jains, M. in the Author text box.
Type • How surveyors measure distance and calculate angles in the Title text box.
Type • Today’s Modern Surveyor in the Periodical Title text box.
Type • 2012 in the Year text box.
Type • March in the Month text box.
Type • 30-48 in the Pages text box (Figure D – 27).
3
Figure D – 27
Figure D – 28
Click the OK button to close the • dialog box, create the source, and insert the citation in the document at the location of the insertion point (Figure D – 28).
4
source information entered in text boxes
OK button
source changed to Article in a Periodical
Type of Source box arrow
list changed to refl ect fi elds required fora periodical
insertion point
citation inserted in text
Copyright 2010 Cengage Learning. All Rights Reserved. May not be copied, scanned, or duplicated, in whole or in part. Due to electronic rights, some third party content may be suppressed from the eBook and/or eChapter(s).
Editorial review has deemed that any suppressed content does not materially affect the overall learning experience. Cengage Learning reserves the right to remove additional content at any time if subsequent rights restrictions require it.
Ap
pen
dix
D
APA Research Paper — Chapter 2 Supplement Appendix D APP 31
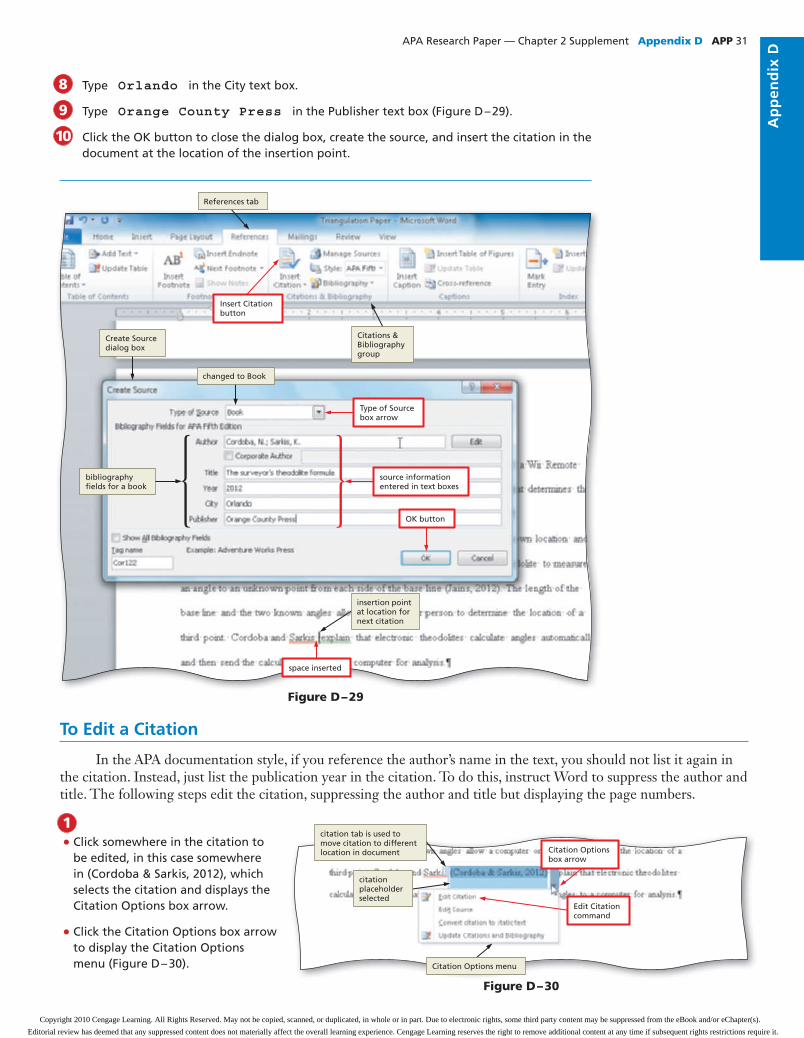
Type Orlando in the City text box.
Type Orange County Press in the Publisher text box (Figure D – 29).
Click the OK button to close the dialog box, create the source, and insert the citation in the document at the location of the insertion point.
8
9
10
Figure D – 29
Figure D – 30
To Edit a Citation
In the APA documentation style, if you reference the author’s name in the text, you should not list it again in the citation. Instead, just list the publication year in the citation. To do this, instruct Word to suppress the author and title. The following steps edit the citation, suppressing the author and title but displaying the page numbers.
Click somewhere in the citation to • be edited, in this case somewhere in (Cordoba & Sarkis, 2012), which selects the citation and displays the Citation Options box arrow.
Click the Citation Options box arrow • to display the Citation Options menu (Figure D – 30).
1
References tab
Create Source dialog box
changed to Book
Citations & Bibliography group
Insert Citation button
Type of Source box arrow
bibliography fi elds for a book
source information entered in text boxes
OK button
space inserted
insertion point at location for next citation
citation placeholder selected
citation tab is used to move citation to different location in document
Citation Options menu
Edit Citation command
Citation Options box arrow
Copyright 2010 Cengage Learning. All Rights Reserved. May not be copied, scanned, or duplicated, in whole or in part. Due to electronic rights, some third party content may be suppressed from the eBook and/or eChapter(s).
Editorial review has deemed that any suppressed content does not materially affect the overall learning experience. Cengage Learning reserves the right to remove additional content at any time if subsequent rights restrictions require it.

APP 32 Appendix D APA Research Paper — Chapter 2 Supplement
To Type the Third and Fourth Paragraphs
The following steps continue typing text in the research paper.
With the insertion point positioned as shown in Figure D-32, press the ENTER key and then type the third paragraph of the research paper as shown in Figure D – 33.
Press the ENTER key and then type the fourth paragraph of the research paper as shown in Figure D – 33.
1
2
Click Edit Citation on the Citation • Options menu to display the Edit Citation dialog box.
In the Suppress area (Edit Citation • dialog box), click the Author check box to place a check mark in it.
In the Suppress area, click the Title • check box to place a check mark in it (Figure D – 31).
2
Figure D – 31
Click the OK button to close the • dialog box, remove the author name from the citation, and suppress the title from showing.
Press • CTRL+END to move the insertion point to the end of the document, which also removes the selection from the citation (Figure D – 32).
3
Figure D – 32
Figure D – 33
check boxes selected so that author name and title do not appear in citation
Edit Citation dialog box
Suppress area
OK button
author name removed from citation because author name is referenced in text
insertion point at end of document
third paragraph entered
fourth paragraph entered
Copyright 2010 Cengage Learning. All Rights Reserved. May not be copied, scanned, or duplicated, in whole or in part. Due to electronic rights, some third party content may be suppressed from the eBook and/or eChapter(s).
Editorial review has deemed that any suppressed content does not materially affect the overall learning experience. Cengage Learning reserves the right to remove additional content at any time if subsequent rights restrictions require it.

Ap
pen
dix
D
APA Research Paper — Chapter 2 Supplement Appendix D APP 33
To Insert Another Citation and Create Its Source
The following steps add a new source for a Web site.
Position the insertion point at the location for the citation (in this case, after the name, Sanders, in the last sentence of the fourth paragraph) and then press the SPACEBAR to insert a space before the comma.Click the Insert Citation button (References tab | Citations & Bibliography group) to display the Insert Citation menu.
Click Add New Source on the Insert Citation menu to display the Create Source dialog box.
If necessary, click the Type of Source box arrow (Create Source dialog box) and then click Web site, so that the list shows fi elds required for a Web site.
Type Sanders, G. in the Author text box.
Type Understanding satellites and global positioning systems in the Name of Web Page text box.
Type 2012 in the Year text box.
Type February in the Month text box.
Type 27 in the Day text box.
Type http://www.scsite.com in the URL text box (Figure D – 34).
Click the OK button to close the dialog box, create the source, and insert the citation in the document at the location of the insertion point.
1
2
3
4
5
6
7
8
9
10
11
Figure D – 34
References tab Insert Citation button
Citations & Bibliography group
Create Source dialog box
changed to Web site
Type of Source box arrow
source information entered for Web site
bibliography fi elds for Web site source
Show All Bibliography Fields check box not selected
OK button
space inserted
insertion point at location for next citation
Copyright 2010 Cengage Learning. All Rights Reserved. May not be copied, scanned, or duplicated, in whole or in part. Due to electronic rights, some third party content may be suppressed from the eBook and/or eChapter(s).
Editorial review has deemed that any suppressed content does not materially affect the overall learning experience. Cengage Learning reserves the right to remove additional content at any time if subsequent rights restrictions require it.

APP 34 Appendix D APA Research Paper — Chapter 2 Supplement
To Edit a Citation
As previously mentioned, if you reference the author’s name in the text, you should not list it again in the citation. Instead, just list the page number in the citation. The following steps edit the citation, suppressing the author but displaying the year.
If necessary, click somewhere in the citation to be edited, in this case somewhere in (Sanders, 2012), to select the citation and display the Citation Options box arrow.
Click the Citation Options box arrow to display the Citation Options menu.
1
2
To Type the Fifth Paragraph
The following steps type the last paragraph in the research paper.
Press CTRL+END to move the insertion point to the end of the last paragraph and then press the ENTER key.
1
Figure D – 35
Figure D – 36
Edit Citation dialog box
OK button
citation selected and inserted
Citation Options box arrow
citation displays only year because author name is referenced in text
page break
insertion point on page 4
correct page number automatically appears in header
fi fth paragraph entered
check boxes selected so that author name and title do not appear in citation
Click Edit Citation on the Citation Options menu to display the Edit Citation dialog box.
In the Suppress area (Edit Citation dialog box), click the Author check box to place a check mark in it.
In the Suppress area, click the Title check box to place a check mark in it (Figure D – 35).
Click the OK button to close the dialog box and remove the author name from the citation.
3
4
5
6
Type the fi fth paragraph of the research paper as shown in Figure D – 36.
2
Copyright 2010 Cengage Learning. All Rights Reserved. May not be copied, scanned, or duplicated, in whole or in part. Due to electronic rights, some third party content may be suppressed from the eBook and/or eChapter(s).
Editorial review has deemed that any suppressed content does not materially affect the overall learning experience. Cengage Learning reserves the right to remove additional content at any time if subsequent rights restrictions require it.

Ap
pen
dix
D
APA Research Paper — Chapter 2 Supplement Appendix D APP 35
To Save an Existing Document with the Same File Name
You have made several modifi cations to the research paper since you last saved it. Thus, you should save it again. The following step saves the document again.
Click the Save button on the Quick Access Toolbar to overwrite the previously saved fi le.
To Page Break Manually
The research paper text is complete. The next step is to create the references on a separate numbered page. The following steps insert a manual page break.
Click Insert on the Ribbon to display the Insert tab.
Click the Page Break button (Insert tab | Pages group) to insert a manual page break immediately to the left of the insertion point and position the insertion point immediately below the manual page break (shown in Figure D – 37).
1
1
2
Figure D – 37
To Apply the Normal Style
The references title is to be centered between the margins of the paper. If you simply issue the Center command, the title will not be centered properly. Instead, it will be one-half inch to the right of the center point because earlier you set the fi rst-line indent for paragraphs to one-half inch from the left margin.
So that you can properly center the title of the reference page, you will apply the Normal style to the location of the insertion point. Recall that you modifi ed the Normal style for this document to 12-point Times New Roman with double-spaced, left-aligned paragraphs that have no space after the paragraphs.
To apply a style to a paragraph, fi rst position the insertion point in the paragraph and then apply the style. The following step applies the modifi ed Normal style to the location of the insertion point.
Click Home on the • Ribbon to display the Home tab.
With the insertion • point on the paragraph mark at the top of page 5, as shown in Figure D – 37, even if Normal is selected, click Normal in the Quick Style gallery (Home tab | Styles group) to apply the selected style to the paragraph containing the insertion point (Figure D – 37).
1
page break
Home tab
First Line Indent marker returned to left margin
Normal selectedStyles group
correct page number automatically appears in header
Normal style applied to paragraph, removing fi rst-line indent
insertion point
Copyright 2010 Cengage Learning. All Rights Reserved. May not be copied, scanned, or duplicated, in whole or in part. Due to electronic rights, some third party content may be suppressed from the eBook and/or eChapter(s).
Editorial review has deemed that any suppressed content does not materially affect the overall learning experience. Cengage Learning reserves the right to remove additional content at any time if subsequent rights restrictions require it.

APP 36 Appendix D APA Research Paper — Chapter 2 Supplement
To Enter the References Page Title
The next step is to enter the title, References, centered between the margins of the paper. The following steps use shortcut keys to format the title.
Press CTRL+E to center the paragraph mark.
Type References as the title.
Press the ENTER key.
Press CTRL+L to left-align the paragraph mark (shown in Figure D – 38).
1
2
3
4
To Create the Bibliographical List
While typing the research paper, you created several citations and their sources. Word can format the list of sources and alphabetize them in a bibliographical list, which spares you the task of looking up style guidelines. That is, Word will create a bibliographical list with each element of the source placed in its correct position with proper punctuation, according to the specifi ed style. For example, in this research paper, the book source will list, in this order, the author name(s), publication year, book title, publisher city, and publishing company name with the book title italicized and the correct punctuation between each element according to the specifi ed APA documentation style. The following steps create an APA-styled bibliographical list from the sources previously entered.
Click References on • the Ribbon to display the References tab.
With the insertion • point positioned as shown in Figure D – 38, click the Bibliography button (References tab | Citations & Bibliography group) to display the Bibliography gallery (Figure D – 38).
1
Figure D – 38
References tab
Bibliography button
Citations & Bibliography group
Bibliography gallery
Insert Bibliography command
title centered and typed
insertion point
paragraph left-aligned
Copyright 2010 Cengage Learning. All Rights Reserved. May not be copied, scanned, or duplicated, in whole or in part. Due to electronic rights, some third party content may be suppressed from the eBook and/or eChapter(s).
Editorial review has deemed that any suppressed content does not materially affect the overall learning experience. Cengage Learning reserves the right to remove additional content at any time if subsequent rights restrictions require it.

Ap
pen
dix
D
APA Research Paper — Chapter 2 Supplement Appendix D APP 37
To Convert a Field to Regular Text
Word may use an earlier version of the APA documentation style to format the bibliography. The latest guidelines for the APA documentation style, for example, state that the page number in magazine articles should not be preceded with the pp. notation. If you edit the bibliography, Word automatically will change it back to the Bibliography style’s predetermined text and formats when the bibliography fi eld is updated. To preserve modifi cations you make to the format of the bibliography, you can convert the bibliography fi eld to regular text. Keep in mind, though, once you convert the fi eld to regular text, it no longer is a fi eld that can be updated. The following step converts a fi eld to regular text.
Figure D – 39
Figure D – 40
Click Insert • Bibliography in the Bibliography gallery to insert a list of sources at the location of the insertion point.
If necessary, scroll • to display the entire list of sources in the document window (Figure D – 39).
2
Click somewhere in • the fi eld to select it, in this case, somewhere in the bibliography (Figure D – 40).
Press • CTRL+SHIFT+F9 to convert the selected fi eld to regular text.
Click anywhere in the • document to remove the selection from the text.
1
2
names automatically separated with correct punctuation
second line in paragraphs indented one-half inch
phrase, Retrieved from, automatically inserted
alphabetical list of sources automatically generated by Word
bibliography fi eld shaded gray because fi eld is selected
insertion point
Copyright 2010 Cengage Learning. All Rights Reserved. May not be copied, scanned, or duplicated, in whole or in part. Due to electronic rights, some third party content may be suppressed from the eBook and/or eChapter(s).
Editorial review has deemed that any suppressed content does not materially affect the overall learning experience. Cengage Learning reserves the right to remove additional content at any time if subsequent rights restrictions require it.

APP 38 Appendix D APA Research Paper — Chapter 2 Supplement
To Format the References as Specifi ed by the Latest APA Documentation Style
The following steps remove the pp. notation in front of the page number, as specifi ed by the latest APA guidelines.
Drag through the pp. notation in the magazine entry to select it.
Press the DELETE key to delete the selected text (Figure D – 41).
1
2
To Change Document Properties
Before saving the research paper again, you will add your name, course information, and some keywords as document properties. The following steps use the Document Information Panel to change document properties.
Click File on the Ribbon to open the Backstage view and, if necessary, select the Info tab.
Click the Properties button in the right pane of the Info gallery to display the Properties menu and then click Show Document Panel on the Properties menu to close the Backstage view and display the Document Information Panel in the Word document window.
Click the Author text box, if necessary, and then type your name as the Author property. If a name already is displayed in the Author text box, delete it before typing your name.
Click the Subject text box, if necessary delete any existing text, and then type your course and section as the Subject property.
Click the Keywords text box, if necessary delete any existing text, and then type surveyor, Wii, GPS as the Keywords property.
Click the Close the Document Information Panel button so that the Document Information Panel no longer is displayed.
To Save an Existing Document, Print the Document,and Quit Word
The document now is complete. You should save the research paper again before quitting Word. The next steps save the document again and then quit Word.
1
2
3
4
5
6
Figure D – 41
pp. notation removed
insertion point
Copyright 2010 Cengage Learning. All Rights Reserved. May not be copied, scanned, or duplicated, in whole or in part. Due to electronic rights, some third party content may be suppressed from the eBook and/or eChapter(s).
Editorial review has deemed that any suppressed content does not materially affect the overall learning experience. Cengage Learning reserves the right to remove additional content at any time if subsequent rights restrictions require it.

Ap
pen
dix
D
APA Research Paper — Chapter 2 Supplement Appendix D APP 39
Click the Save button on the Quick Access Toolbar to overwrite the previously saved fi le.
Click File on the Ribbon to open the Backstage view and then click the Print tab in the Backstage view to display the Print gallery.
Verify the printer name that appears on the Printer Status button will print a hard copy of the document. If necessary, click the Printer Status button to display a list of available printer options and then click the desired printer to change the currently selected printer.
Click the Print button in the Print gallery to print the research paper on the currently selected printer (shown in Figure D – 1 on page APP 14).
If you have one Word document open, click the Close button on the right side of the title bar to close the document and quit Word; or if you have multiple Word documents open, click File on the Ribbon to open the Backstage view and then click Exit in the Backstage view to close all open documents and quit Word.
If a Microsoft Word dialog box appears, click the Save button to save any changes made to the document since the last save.
1
2
3
4
5
6
Appendix SummaryIn this appendix, you have learned how to create the same research paper as the one shown in Chapter 2, except you used the APA documentation style instead of the MLA documentation style. This appendix presented only the steps required to create this research paper.
Learn It Online
Test your knowledge of chapter content and key terms.
Instructions: To complete the Learn It Online exercises, start your browser, click the Address bar, and then enter the Web address scsite.com/wd2010/learn. When the Word 2010 Learn It Online page is displayed, click the link for the exercise you want to complete and then read the instructions.
Chapter Reinforcement TF, MC, and SAA series of true/false, multiple choice, and short answer questions that test your knowledge of the chapter content.
Flash CardsAn interactive learning environment where you identify chapter key terms associated with displayed defi nitions.
Practice TestA series of multiple choice questions that test your knowledge of chapter content and key terms.
Who Wants To Be a Computer Genius?An interactive game that challenges your knowledge of chapter content in the style of a television quiz show.
Wheel of TermsAn interactive game that challenges your knowledge of chapter key terms in the style of the television show Wheel of Fortune.
Crossword Puzzle ChallengeA crossword puzzle that challenges your knowledge of key terms presented in the chapter.
Copyright 2010 Cengage Learning. All Rights Reserved. May not be copied, scanned, or duplicated, in whole or in part. Due to electronic rights, some third party content may be suppressed from the eBook and/or eChapter(s).
Editorial review has deemed that any suppressed content does not materially affect the overall learning experience. Cengage Learning reserves the right to remove additional content at any time if subsequent rights restrictions require it.

APP 40 Appendix D APA Research Paper — Chapter 2 SupplementS
TU
DE
NT
AS
SIG
NM
EN
TS
Apply Your Knowledge
Reinforce the skills and apply the concepts you learned in Chapter 2.
Revising Text and Paragraphs in a DocumentNote: This exercise covers tasks presented in Chapter 2 and assumes you completed the Chapter 2 project. To complete this assignment, you will be required to use the Data Files for Students. See the inside back cover of this book for instructions on downloading the Data Files for Students, or contact your instructor for information about accessing the required fi les.
Instructions: Start Word. Open the document, Apply D-1 Space Paragraph Draft, from the Data Files for Students. The document you open contains a paragraph of text. You are to revise the document as follows: move a word, move another word and change the format of the moved word, change paragraph indentation, change line spacing, fi nd all occurrences of a word, replace all occurrences of a word with another word, locate a synonym, and edit the header.
Perform the following tasks:
1. Copy the word, exploration, from the fi rst sentence and paste it in the last sentence after the word, space, so that it is the eighth word in the sentence.
2. Select the underlined word, safe, in the paragraph. Use drag-and-drop editing to move the selected word, safe, so that it is before the word, mission, in the same sentence. Click the Paste Options button that displays to the right of the moved word, safe. Remove the underline format from the moved sentence by clicking the Keep Text Only button on the Paste Options menu.
3. Display the ruler, if necessary. Use the ruler to indent the fi rst line of the paragraph one-half inch.
4. Change the line spacing of the paragraph to double.
5. Use the Navigation Pane to fi nd all occurrences of the word, sensors. How many are there?
6. Use the Find and Replace dialog box to replace all occurrences of the word, issues, with the word, problems. How many replacements were made?
7. Use Word to fi nd the word, height. Use Word’s thesaurus to change the word, height, to the word, altitude.
8. Switch to the header so that you can edit it. In the fi rst line of the header, change the word, Draft, to the word, Modifi ed, so that it reads: Space Paragraph Modifi ed.
9. In the second line of the header, insert the page number (with no formatting) one space after the word, Page.
10. Change the alignment of both lines of text in the header from left-aligned to right-aligned. Switch back to the document text.
11. Change the document properties, as specifi ed by your instructor.
12. Click File on the Ribbon and then click Save As. Save the document using the fi le name, Apply D-1 Space Paragraph Modifi ed.
13. Print the document properties and then print the revised document, shown in Figure D – 42.
14. Use the Research task pane to look up the defi nition of the word, NASA, in the paragraph. Handwrite the defi nition of the word on your printout.
15. Change the Search for box to All Research Sites. Print an article from one of the sites.
16. Display the Research Options dialog box and, on your printout, handwrite the currently active Reference Books, Research Sites, and Business and Financial Sites. If your instructor approves, activate one of the services.
Copyright 2010 Cengage Learning. All Rights Reserved. May not be copied, scanned, or duplicated, in whole or in part. Due to electronic rights, some third party content may be suppressed from the eBook and/or eChapter(s).
Editorial review has deemed that any suppressed content does not materially affect the overall learning experience. Cengage Learning reserves the right to remove additional content at any time if subsequent rights restrictions require it.

APA Research Paper — Chapter 2 Supplement Appendix D APP 41
STU
DE
NT
AS
SIG
NM
EN
TS
Ap
pen
dix
D
Extend Your Knowledge
Extend the skills you learned in Chapter 2 and Appendix D, and experiment with new skills. You may need to use Help to complete the assignment.
Working with References and Proofi ng ToolsNote: To complete this assignment, you will be required to use the Data Files for Students. See the inside back cover of this book for instructions on downloading the Data Files for Students, or contact your instructor for information about accessing the required fi les.
Instructions: Start Word. Open the document, Extend D-1 Digital Camera Paper Draft, from the Data Files for Students. You will add a footnote, convert the footnote to an endnote, modify the Endnote Text style, use the thesaurus, and translate the document to another language.
Perform the following tasks:
1. Use Help to learn more about footers, footnotes and endnotes, bibliography styles, AutoCorrect, and the Mini Translator.
2. Delete the footer from the document.
3. Determine the APA guidelines for footnotes. Insert the following footnote at an appropriate place in the research paper: For instance, Cass states that digital cameras can last well beyond fi ve years if maintained properly, so consider this a longer-term investment that will create memories lasting you a lifetime.
4. Insert this second footnote at an appropriate place in the research paper: For instance, Adams states that you may be able to crop photos, change the brightness, or remove red eye effects.
Figure D – 42
Continued >
fi rst line of paragraph indented one-half inch header paragraphs
right-aligned
paragraph double-spaced
word copied word moved
page number inserted
Copyright 2010 Cengage Learning. All Rights Reserved. May not be copied, scanned, or duplicated, in whole or in part. Due to electronic rights, some third party content may be suppressed from the eBook and/or eChapter(s).
Editorial review has deemed that any suppressed content does not materially affect the overall learning experience. Cengage Learning reserves the right to remove additional content at any time if subsequent rights restrictions require it.

APP 42 Appendix D APA Research Paper — Chapter 2 SupplementS
TU
DE
NT
AS
SIG
NM
EN
TS
5. Convert the footnotes to endnotes, so that the footnotes are on a separate numbered page after the references. Place the title, Footnotes, at the top of the page.
6. Modify the Endnote Text style to 12-point Times New Roman font, double-spaced text with a hanging indent.
7. Use the Find and Replace dialog box to fi nd the word, small, in the document and then replace it with a word of your choice.
8. Add an AutoCorrect entry that replaces the word, camora, with the word, camera. Add this sentence, A fi eld camora usually is more than suffi cient for most users., to the end of the second paragraph, misspelling the word camera as written to test the AutoCorrect entry. Delete the AutoCorrect entry just added that replaces camora with the word, camera.
9. Display readability statistics. What are the Flesch-Kincaid Grade Level, the Flesch Reading Ease score, and the percent of passive sentences?
10. Save the document with a new fi le name and then print it. On the printout, write the number of words, characters without spaces, characters with spaces, paragraphs, and lines in the document. Be sure to include footnote text in the statistics.
11. If you have an Internet connection, translate the research paper into a language of your choice using the Translate button (Review tab | Language group). Figure D – 43 shows a sample translated document. Print the translated document. Use the Mini Translator to hear how to pronounce three words in your paper.
Extend Your Knowledge continued
Figure D – 43
research paper translated from English to German
Copyright 2010 Cengage Learning. All Rights Reserved. May not be copied, scanned, or duplicated, in whole or in part. Due to electronic rights, some third party content may be suppressed from the eBook and/or eChapter(s).
Editorial review has deemed that any suppressed content does not materially affect the overall learning experience. Cengage Learning reserves the right to remove additional content at any time if subsequent rights restrictions require it.

APA Research Paper — Chapter 2 Supplement Appendix D APP 43
STU
DE
NT
AS
SIG
NM
EN
TS
Ap
pen
dix
D
citation placeholder
source information to be fi lled in
Figure D – 44
Make It Right
Analyze a document and correct all errors and/or improve the design.
Inserting Missing Elements in an APA-Styled Research PaperNote: To complete this assignment, you will be required to use the Data Files for Students. See the inside back cover of this book for instructions on downloading the Data Files for Students, or contact your instructor for information about accessing the required fi les.
Instructions: Start Word. Open the document, Make It Right D-1 Biometrics Paper Draft, from the Data Files for Students. The document is a research paper that is missing several elements. You are to insert these missing elements, all formatted according to the APA documentation style: title page, header with a running head and page number, manual page breaks, paper title, citations, and source information for the citations.
Perform the following tasks:
1. Insert a header with a running head (Running head: BIOMETRIC TECHNOLOGY) and a page number, formatted according to the APA documentation style.
2. Insert a title page that contains the header, along with the complete paper title (Biometric Technology: No Two the Same), author name (use your name), and school affi liation (use your school). If necessary, insert a manual page break after the end of the title page.
3. On the Abstract page, center the title and then remove the fi rst-line indent from the paragraph below the title.
4. On the fi rst page of the body of the paper, type and center the research paper title above the fi rst paragraph.
5. The Jenkins placeholder (tag name) is missing its source information (Figure D – 44). Use the following source information to edit the source: magazine article titled “Fingerprint Readers” written by A. D. Jenkins and M. K. Weavers, magazine name is Security Today, publication date is February 2012, article is on pages 55 – 60. The citation should display the author name and publication year.
6. Modify the source of the book authored by Carolina Doe, so that the publisher city is Chicago instead of Dallas.
7. Use the Navigation Pane to display page 5. Use Word to insert the bibliographical list (bibliography). Convert the works cited to regular text. Remove the pp. notation from the magazine entry.
8. Change the document properties, as specifi ed by your instructor. Save the revised document with the fi le name, Make It Right D-1 Biometrics Paper Modifi ed, and then submit it in the format specifi ed by your instructor.
Copyright 2010 Cengage Learning. All Rights Reserved. May not be copied, scanned, or duplicated, in whole or in part. Due to electronic rights, some third party content may be suppressed from the eBook and/or eChapter(s).
Editorial review has deemed that any suppressed content does not materially affect the overall learning experience. Cengage Learning reserves the right to remove additional content at any time if subsequent rights restrictions require it.

APP 44 Appendix D APA Research Paper — Chapter 2 SupplementS
TU
DE
NT
AS
SIG
NM
EN
TS
In the Lab
Design and/or create a document using the guidelines, concepts, and skills presented in this appendix. Labs are listed in order of increasing diffi culty.
Lab 1: Preparing a Short Research PaperProblem: You are a college student currently enrolled in an introductory business class. Your assignment is to prepare a short research paper (275 – 300 words) about video or computer games. The requirements are that the paper be presented according to the APA documentation style and have three references. One of the three references must be from the Web. You prepare the paper shown in Figure D – 45 on pages APP 45 – APP 47, which discusses game controllers.
Instructions: Perform the following tasks:
1. Start Word. If necessary, display formatting marks on the screen.
2. Modify the Normal style to 12-point Times New Roman font.
3. Adjust line spacing to double.
4. Remove space below (after) paragraphs.
5. Update the Normal style to refl ect the adjusted line and paragraph spacing.
6. Create a header that includes the running head (Running head: GAME CONTROLLERS) at the left margin and the page number at the right margin.
7. Insert the title page as shown in Figure D – 45a, ensuring it includes a header, along with the complete paper title (Game Controllers: Enriching the Gaming Experience), author name, and school affi liation. Insert a manual page break after the last line on the title page.
8. Type the Abstract as shown in Figure D – 45b. Insert a manual page break after the last line of the abstract.
9. Set a fi rst-line indent to one-half inch for paragraphs in the body of the research paper.
10. Type the research paper as shown in Figure D – 45c on page APP 46. Change the bibliography style to APA. As you insert citations, enter their source information (shown in Figure D – 45d on page APP 47). If necessary, edit the citations so that they appear as shown in Figure D – 45c.
11. At the end of the research paper text, insert a manual page break so that the References page begins on a new page. Enter and format the references title (Figure D – 45d). Use Word to insert the references list (bibliography). Convert the bibliography fi eld to text. Remove the pp. notation from the page numbers in the magazine article entry (shown in Figure D – 45d).
12. Check the spelling and grammar of the paper at once.
13. Change the document properties, as specifi ed by your instructor. Save the document using Lab D-1 Game Controllers Paper as the fi le name.
14. Print the research paper. Handwrite the number of words, paragraphs, and characters in the research paper above the title of your printed research paper.
Copyright 2010 Cengage Learning. All Rights Reserved. May not be copied, scanned, or duplicated, in whole or in part. Due to electronic rights, some third party content may be suppressed from the eBook and/or eChapter(s).
Editorial review has deemed that any suppressed content does not materially affect the overall learning experience. Cengage Learning reserves the right to remove additional content at any time if subsequent rights restrictions require it.

APA Research Paper — Chapter 2 Supplement Appendix D APP 45
STU
DE
NT
AS
SIG
NM
EN
TS
Ap
pen
dix
D
Figure D – 45 (a) Page 1
Figure D – 45 (b) Page 2
Continued >
Copyright 2010 Cengage Learning. All Rights Reserved. May not be copied, scanned, or duplicated, in whole or in part. Due to electronic rights, some third party content may be suppressed from the eBook and/or eChapter(s).
Editorial review has deemed that any suppressed content does not materially affect the overall learning experience. Cengage Learning reserves the right to remove additional content at any time if subsequent rights restrictions require it.

APP 46 Appendix D APA Research Paper — Chapter 2 SupplementS
TU
DE
NT
AS
SIG
NM
EN
TS
Figure D – 45 (c) Page 3
In the Lab continued
Copyright 2010 Cengage Learning. All Rights Reserved. May not be copied, scanned, or duplicated, in whole or in part. Due to electronic rights, some third party content may be suppressed from the eBook and/or eChapter(s).
Editorial review has deemed that any suppressed content does not materially affect the overall learning experience. Cengage Learning reserves the right to remove additional content at any time if subsequent rights restrictions require it.

APA Research Paper — Chapter 2 Supplement Appendix D APP 47
STU
DE
NT
AS
SIG
NM
EN
TS
Ap
pen
dix
D
Figure D – 45 (d) Page 4
Copyright 2010 Cengage Learning. All Rights Reserved. May not be copied, scanned, or duplicated, in whole or in part. Due to electronic rights, some third party content may be suppressed from the eBook and/or eChapter(s).
Editorial review has deemed that any suppressed content does not materially affect the overall learning experience. Cengage Learning reserves the right to remove additional content at any time if subsequent rights restrictions require it.

APP 48 Appendix D APA Research Paper — Chapter 2 SupplementS
TU
DE
NT
AS
SIG
NM
EN
TS
In the Lab
Lab 2: Preparing a Research PaperProblem: You are a college student enrolled in an introductory English class. Your assignment is to prepare a short research paper in any area of interest to you. The requirements are that the paper be presented according to the APA documentation style and have three references. One of the three references must be from the Internet. You prepare a paper about trends in agriculture. The abstract and body of the research paper, the second and third pages, are shown in Figure D – 46.
Figure D – 46 (a) Abstract
Instructions: Perform the following tasks:
1. Start Word. Modify the Normal style to 12-point Times New Roman font. Adjust line spacing to double and remove space below (after) paragraphs. Update the Normal style to include the adjusted line and paragraph spacing. Create a header that includes the running head (Running head: COMPUTERS IN AGRICULTURE) at the left margin and the page number at the right margin. Create an appropriate title page (page 1). Create the abstract (page 2) as shown in Figure D – 46a. Center and type the title. Set a fi rst-line indent for paragraphs in the body of the research paper.
2. Type the research paper (page 3) as shown in Figure D – 46b. Change the bibliography style to APA. As you insert citations, use the source information on page APP 50, making certain you enter them properly formatted according to the APA guidelines.
Copyright 2010 Cengage Learning. All Rights Reserved. May not be copied, scanned, or duplicated, in whole or in part. Due to electronic rights, some third party content may be suppressed from the eBook and/or eChapter(s).
Editorial review has deemed that any suppressed content does not materially affect the overall learning experience. Cengage Learning reserves the right to remove additional content at any time if subsequent rights restrictions require it.

APA Research Paper — Chapter 2 Supplement Appendix D APP 49
STU
DE
NT
AS
SIG
NM
EN
TS
Ap
pen
dix
D
Figure D – 46 (b) Body of Research Paper
Continued >
Copyright 2010 Cengage Learning. All Rights Reserved. May not be copied, scanned, or duplicated, in whole or in part. Due to electronic rights, some third party content may be suppressed from the eBook and/or eChapter(s).
Editorial review has deemed that any suppressed content does not materially affect the overall learning experience. Cengage Learning reserves the right to remove additional content at any time if subsequent rights restrictions require it.

APP 50 Appendix D APA Research Paper — Chapter 2 SupplementS
TU
DE
NT
AS
SIG
NM
EN
TS
a. Type of Source: Article in a Periodical
Author: B. Barton
Title: Computers in Agriculture
Periodical Title: Agriculture Today and Tomorrow
Year: 2012
Month: Feb.
Pages: 53 – 86
b. Type of Source: Book
Authors: A. Newman and C. Ruiz
Title: The Agricultural Industry Today
Year: 2012
City: New York
Publisher: Alabama Press
c. Type of Source: Web site
Author: L. Brewster
Name of Web page: Agriculture: Expanding and Growing
Year: 2012
Month: January
Day: 3
Web site: http://www.scsite.com
3. At the end of the research paper text, press the enter key once and insert a manual page break so that the References page begins on a new page (page 4). Enter and format the references title. Use Word to insert the bibliographical list. Convert the bibliography fi eld to text. Remove the pp. notation from the page numbers in the magazine article entry.
4. Check the spelling and grammar of the paper.
5. Save the document using Lab D-2 Agriculture Paper as the fi le name.
6. Print the research paper. Handwrite the number of words in the research paper above the title of your printed research paper.
In the Lab
Lab 3: Composing a Research Paper from NotesProblem: You have drafted the notes shown in Figure D – 47. Your assignment is to prepare a short research paper from these notes.
Instructions: Perform the following tasks: 1. Start Word. Review the notes in Figure D – 47 and then rearrange and reword them. Embellish the
paper as you deem necessary. Present the paper according to the APA documentation style. Create an AutoCorrect entry that automatically corrects the spelling of the misspelled word, digtal, to the correct spelling, digital. Be sure to add a title page and abstract page. Enter citations and their sources as shown, ensuring they are formatted according to the APA documentation style. Create the references page (bibliography) from the listed sources. Convert the bibliography fi eld to text. Remove the pp. notation from the page numbers in the magazine article entry.
In the Lab continued
Copyright 2010 Cengage Learning. All Rights Reserved. May not be copied, scanned, or duplicated, in whole or in part. Due to electronic rights, some third party content may be suppressed from the eBook and/or eChapter(s).
Editorial review has deemed that any suppressed content does not materially affect the overall learning experience. Cengage Learning reserves the right to remove additional content at any time if subsequent rights restrictions require it.

APA Research Paper — Chapter 2 Supplement Appendix D APP 51
STU
DE
NT
AS
SIG
NM
EN
TS
Ap
pen
dix
D
2. If necessary, set the default dictionary. Add the word, Flickr, to the dictionary. Check the spelling and grammar of the paper.
3. Use the Research task pane to look up a defi nition of a word in the paper. Copy and insert the defi nition into the document. Be sure to quote the defi nition and cite the source.
4. Save the document using Lab D-3 Cloud Storage Paper as the fi le name. Print the research paper. Handwrite the number of words, including the footnotes, in the research paper above the title of the printed research paper.
Figure D – 47
Copyright 2010 Cengage Learning. All Rights Reserved. May not be copied, scanned, or duplicated, in whole or in part. Due to electronic rights, some third party content may be suppressed from the eBook and/or eChapter(s).
Editorial review has deemed that any suppressed content does not materially affect the overall learning experience. Cengage Learning reserves the right to remove additional content at any time if subsequent rights restrictions require it.

APP 52 Appendix D APA Research Paper — Chapter 2 SupplementS
TU
DE
NT
AS
SIG
NM
EN
TS
Cases and Places
Apply your creative thinking and problem solving skills to design and implement a solution.
Note: To complete these assignments, you may be required to use the Data Files for Students. See the inside back cover of this book for instructions on downloading the Data Files for Students, or contact your instructor for information about accessing the required fi les.
1: Create a Research Paper about Preparing for a Career in the Computer Industry
AcademicAs a student in an introductory computer class, your instructor has assigned a research paper that discusses educational options available for students pursuing a career in the computer industry. The source for the text in your research paper is in a fi le called Preparing for a Career in the Computer Industry, which is located on the Data Files for Students. In addition to this source, if your instructor requests, use the Research task pane to obtain information from another source. Add an AutoCorrect entry to correct a word you commonly mistype.
Using the concepts and techniques presented in Chapter 2 and this appendix, along with the text in the fi le on the Data Files for Students, create and format this research paper according to the APA documentation style. Be sure to check spelling and grammar of the fi nished paper. Submit your assignment in the format specifi ed by your instructor.
2: Create a Research Paper about Computer Viruses
PersonalThe computer you recently purchased included an antivirus program. Because you need practice writing research papers and you want to learn more about computer viruses, you decide to write a paper about computer viruses. The source for the text in your research paper is in a fi le called Computer Viruses, which is located on the Data Files for Students. In addition to this source, if your instructor requests, use the Research task pane to obtain information from another source. Add an AutoCorrect entry to correct a word you commonly mistype.
Using the concepts and techniques presented in Chapter 2 and this appendix, along with the text in the fi le on the Data Files for Students, create and format this research paper according to the APA documentation style. Be sure to check spelling and grammar of the fi nished paper. Submit your assignment in the format specifi ed by your instructor.
3: Create a Research Paper about a Disaster Recovery Plan
ProfessionalYour boss has asked you to research the components of a disaster recovery plan. Because you learned in college how to write research papers, you decide to present your fi ndings in a research paper. The source for the text in your research paper is in a fi le called Disaster Recovery Plan, which is located on the Data Files for Students. In addition to this source, if your instructor requests, use the Research task pane to obtain information from another source. Add an AutoCorrect entry to correct a word you commonly mistype.
Using the concepts and techniques presented in Chapter 2 and this appendix, along with the text in the fi le on the Data Files for Students, create and format this research paper according to the APA documentation style. Be sure to check spelling and grammar of the fi nished paper. Submit your assignment in the format specifi ed by your instructor.
Copyright 2010 Cengage Learning. All Rights Reserved. May not be copied, scanned, or duplicated, in whole or in part. Due to electronic rights, some third party content may be suppressed from the eBook and/or eChapter(s).
Editorial review has deemed that any suppressed content does not materially affect the overall learning experience. Cengage Learning reserves the right to remove additional content at any time if subsequent rights restrictions require it.