appendix 1: sample title page - · pdf fileappendix 1: sample title page project title by ......
TRANSCRIPT


APPENDIX 1: SAMPLE TITLE PAGE
PROJECT TITLE
by
Student’s Full Name
Under Guidance
of
Counsellor’s Full Name
Submitted to the School of Computer and Information Sciences
in partial fulfilment of the requirements
for the degree of
Masters
of
Computer Applications
Indira Gandhi National Open University Maidan Garhi
New Delhi – 110068.

APPENDIX 2: PROFORMA OF PROJECT PROPOSAL
SCHOOL OF COMPUTER AND INFORMATION SCIENCES
IGNOU, MAIDAN GARHI, NEW DELHI – 110 068
PROFORMA FOR SUGGESTIONS OF MCS-044 PROJECT PROPOSAL
(Note: All entries of the proforma of suggestions should be filled in with appropriate and
complete information. Incomplete proforma of suggestions in any respect will be summarily
rejected.)
Enrolment No.: ………………………
Study Centre: ……………….……….
Regional Centre:……… RCCode:….
E-mail: ………….………..…………...
Telephone No.: ………………………
1. Name and Address of the student ………………………..…………………………………….
2. Title of the Project ……………..………..…………………………………………………….
3. Name and Address of the Counsellor……..…………………………………………………….
Ph.D* M.Tech.* B.E*/B.Tech.* MCA M.Sc.*
4. Educational Qualification of the Counsellor
(Attach bio-data also)
(*in Computer Science / IT only)
5. Working / Teaching experience of the Counsellor** ….………………………………………
6. Software used in the Project…………….. ……………………………………………………...
Signature of the Student Signature of the Counsellor
Date: ………………… Date: …………………….
Suggestions for improving the Project:

APPENDIX 3: CERTIFICATE OF AUTHENTICATED WORK
This is to certify that the project report entitled _________________________ submitted to
Indira Gandhi National Open University in partial fulfilment of the requirement for the award
of the degree of MASTER OF COMPUTER APPLICATIONS (MCA) is an original work
carried out by Mr./ Ms._______________________ enrolment no. _____________ under my
guidance. The matter embodied in this project is authentic and is genuine work done by the
student and has not been submitted whether to this University or to any other University /
Institute for the fulfilment of the requirement of any course of study.
………………………. ...………………………………….
Signature of the Student: Signature of the Counsellor
Date: ……………….. Date: …………………
Name and Address Name, Designation
of the student and Address of the Counsellor
……………………….. ……………………………………
……………………….. …………………………………….
……………………….. ……………………………………..
Enrolment No…………
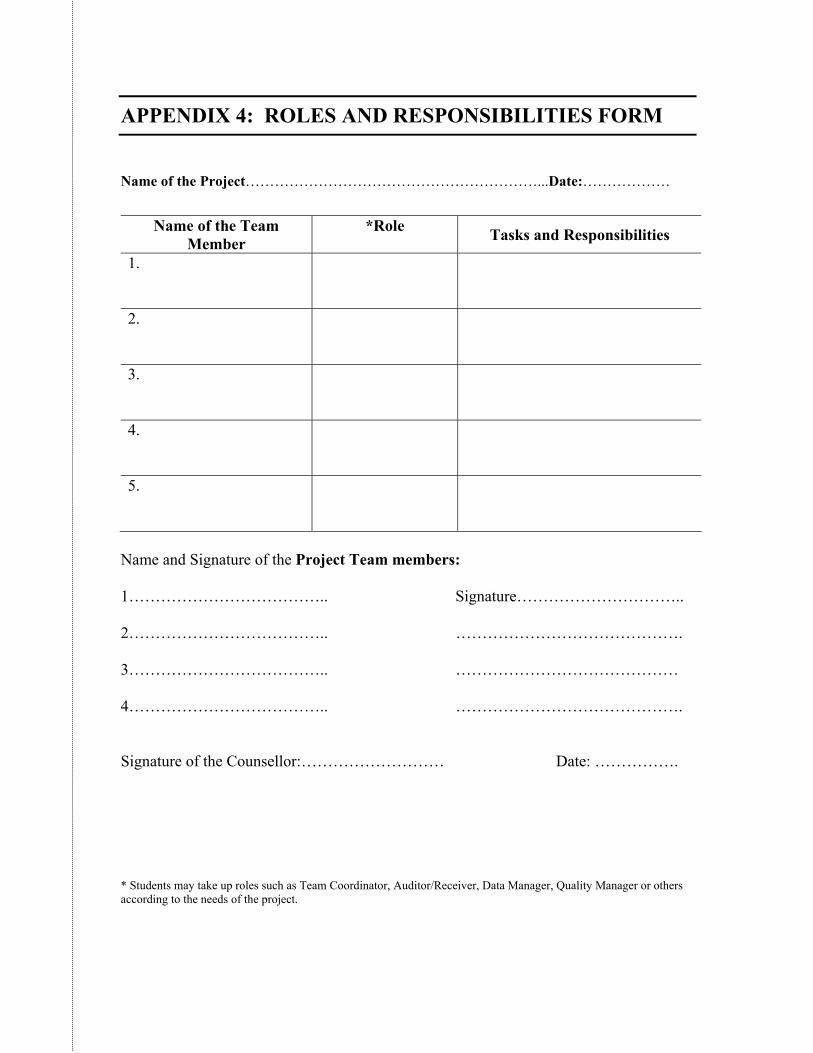
APPENDIX 4: ROLES AND RESPONSIBILITIES FORM
Name of the Project……………………………………………………...Date:………………
Name of the Team
Member
*RoleTasks and Responsibilities
1.
2.
3.
4.
5.
Name and Signature of the Project Team members:
1……………………………….. Signature…………………………..
2……………………………….. …………………………………….
3……………………………….. ……………………………………
4……………………………….. …………………………………….
Signature of the Counsellor:……………………… Date: …………….
* Students may take up roles such as Team Coordinator, Auditor/Receiver, Data Manager, Quality Manager or others
according to the needs of the project.

MCS-044 Mini Project
Indira Gandhi
National Open University
School of Computer and
Information Sciences
ELEMENTS OF PROJECT DEVELOPMENT
UNIT 1
Project Structure 5
UNIT 2
Guidelines and Suggestions 13
UNIT 3
Software Engineering Concepts and Standards 29
UNIT 4
Category-wise Problem Definition 57

Programme / Course Design Committee
Prof. Sanjeev K. Aggarwal,
IIT, Kanpur
Shri Navneet Aggarwal
Trinity BPM, New Delhi
Prof. M. Balakrishnan,
IIT, Delhi
Prof. Pandurangan, C.,
IIT, Madras
Ms. Bhoomi Gupta
Sirifort College of Computer and
Technology Management, New Delhi
Shri Manoj Kumar Gupta
Keane India Ltd., New Delhi
Shri Sachin Gupta
Delhi Institute of Advanced Studies
New Delhi
Prof. Harish Karnick,
IIT, Kanpur
Shri Anil Kumar
Amity School of Engineering and
Technology, New Delhi
Shri Anil Kumar,
IIMT, Meerut
Shri Sachin Kumar
CCS University, Meerut
Ms. Manjulata
Amity School of Engineering and
Technology, New Delhi
Shri Ajay Rana
Amity School of Computer Sciences,
Noida
Ms. Divya Sharma
B.R. Ambedkar College, Delhi
Shri Neeraj Sharma
Havard Institute of Management
Technology, Noida
Shri Sanjeev Thakur
Amity School of Computer Sciences,
Noida
Shri Amrit Nath Thulal
Amity School of Engineering and
Technology, New Delhi
Dr. Om Vikas, Sr. Director
Ministry of ICT, Delhi
Shri V.P. Vishwakarma
Amity School of Engineering and
Technology, New Delhi
Faculty of School of Computer and
Information Sciences
Shri Shashi Bhushan
Shri Akshay Kumar
Shri Naveen Kumar
Prof. Manohar Lal
Shri M.P. Mishra
Prof. Parvin Sinclair (Director)
Shri V.V. Subrahmanyam
Shri P.Venkata Suresh
Block Preparation Team
Dr. P. R. Gupta (Editor)
CDAC, Noida
Ms. Pema Eden Sandup (Language Editor)
School of Humanities, IGNOU
Sh. Naveen Kumar
SOCIS, IGNOU
Course Coordinator: Sh.Naveen Kumar
Block Production Team
Shri Tilak Raj, Section Officer (Publication.) & Shri H.K. Som, Consultant
July, 2006
Indira Gandhi National Open University, 2006
ISBN – 266-2493-0
All rights are reserved. No part of this work may be reproduced in any form, by mimeograph
or any other means, without permission in writing from the Indira Gandhi National Open
University.
Further information on the Indira Gandhi National Open University courses may be obtained
from the University’s office at Maidan Garhi, New Delhi-110 068.
Printed and published on behalf of the Indira Gandhi National Open University, New Delhi by
the Director, SOCIS. “Paper used: Agro based environment friendly”.

COURSE INTRODUCTION
The mini project is designed to help students develop practical ability and
knowledge about practical tools/techniques in order to solve real life problems
related to the industry, academic institutions and computer science research. The
course Mini Project is one that involves practical work for understanding and
solving problems in the field of computing. Any computer science project usually
consists of the following: analysis, design, coding/implementation and testing of
some information system or subsystem, such as, a piece of software. The
subsystem does not have to be a computer program; a design document might be
the appropriate output from a design study. The design and development of
hardware system/subsystem would also be an appropriate project, however, in this
course we expect a software system or subsystem. This course will also develop
your investigative, research and report writing skills and will provide an
opportunity for you, to investigate a chosen topic in considerable depth.
Mini Project provides the opportunity for students to demonstrate the application
of their programming and research skills, and to apply their knowledge to
complex computing problems. It contains one Block: Elements of Project
Development.

BLOCK INTRODUCTION
Project development has always been the best practical exercise for students of
computer and information science. There is a general propensity among students to
consider the report writing as a tedious job that interferes with giving the final
touches to the software application itself. However, the report is an important part
of the project. The Mini Project is an important element of the MCA programme
that provides higher-level skills and understanding, which have been acquired from
the theoretical framework of the previous courses. Mini Projects cover a wide
range of computer areas, and may involve the investigation of a problem and the
specification and implementation of a solution. The Mini Project is then, to
promote a collaborative work culture, which is common in most of the software
development companies. Students will therefore, get an opportunity to work in
similar roles and fulfil similar responsibilities. This Block: Elements of Project
Development cover all the necessary details required for the development of a
software project and its documentation using software engineering approach. It
contains four units:
Unit1: Project Structure covering required information about standard contents
and format that should be used during the development of the project report.
Unit 2: Guidelines and Suggestions provide some guidelines and suggestions for
the development of the project and for the preparation of your final year project
report.
Unit 3: Software Engineering Concepts and Standards, contains the basic concepts
and standards essential for software development, with, useful examples.
Unit 4: Category-wise Problem Definition provides the description of different
project problems and ideas in different areas of computer science.
To successfully complete this course, the learner should have the following
knowledge and skills prior to starting the unit. S/he must have:
studied the corresponding course material of previous courses and completed
the assignments,
proficiency in working with some programming tools and languages, and
proficiency in working with operating system like Windows, Unix or Linux.

5
Project Structure
UNIT 1 PROJECT STRUCTURE
Structure Page Nos.
1.0 Introduction 5
1.1 Objectives 5
1.2 Importance of the Mini Project 5
1.3 Mini Project: Table of Contents 6
1.4 Explanation of Contents 7
1.5 Summary 12
1.6 Further Readings 12
1.0 INTRODUCTION
The project report should be documented with an engineering approach to the solution
of the problem that you have sought to address. The project report should be prepared
in order to solve the problem in a methodical and professional manner, making due
references to appropriate techniques, technologies and professional standards. You
should start the documentation process from the first step of software development so
that you can easily identify the issues to be focused upon in the ultimate project
report. You should also include the details from your project notebook, in which you
would have recorded the progress of your project throughout the course. The project
report should contain enough details to enable examiners to evaluate your work. The
details, however, should not render your project report as boring and tedious. The
important points should be highlighted in the body of the report, with details often
relegated to appendices. This unit covers all the details on the structure of mini project
report contents; it also contains detailed explanations on each of these contents.
1.1 OBJECTIVES
After going through this unit, you should be able to:
demonstrate a systematic understanding of project contents;
understand methodologies and professional way of documentation;
know the meaning of different project contents, and
understand established techniques of project report development.
1.2 IMPORTANCE OF THE MINI PROJECT
The Mini Project is not only a part of the coursework, but also a mechanism to
demonstrate your abilities and specialisation. It provides the opportunity for you to
demonstrate originality, teamwork, inspiration, planning and organisation in a
software project, and to put into practice some of the techniques you have been taught
throughout the previous courses. The Mini Project is important for a number of
reasons. It provides students with:
opportunity to specialise in specific areas of computer science;
future employers will most likely ask you about your project at interview;
opportunity to demonstrate a wide range of skills and knowledge learned, and
encourages integration of knowledge gained in the previous course units.
The project report is an extremely important aspect of the project. It serves to show
what you have achieved and should demonstrate that:

6
Elements of Project
DevelopmentYou understand the wider context of computing by relating your choice of the
project, and the approach you take, to existing products or research.
You can apply the theoretical and practical techniques taught in the course to
the problem you are addressing and that you understand their relevance to the
wider world of computing.
You are capable of objectively criticising your own work and making
constructive suggestions for improvements or further work based on your
experiences so far.
You can explain your thinking and working processes clearly and concisely to
others through your project report.
1.3 MINI PROJECT: TABLE OF CONTENTS
The project report should contain a full and coherent account of your work. Although
there will be an opportunity to present your work verbally, and demonstrate the
software, the major part of the assessment will be based on the written material in
your project report. You can expect help and feedback from your MCS-044 course
counsellor, but ultimately it’s your own responsibility. The suggestive structure of a
project report should be as given below; however, you should be guided by your
counsellor in selecting the most appropriate format for your project.
Title Page
Original Copy of the Approved Proforma of the Project Proposal
Certificate of Authenticated work
Role and Responsibility Form
Abstract
Acknowledgement
Table of Contents
Table of Figures
CHAPTER 1: INTRODUCTION
1.1 Background
1.2 Objectives
1.3 Purpose, Scope, and Applicability
1.3.1 Purpose
1.3.2 Scope
1.3.3 Applicability
1.4 Achievements
1.5 Organisation of Report
CHAPTER 2: SURVEY OF TECHNOLOGIES
CHAPTER 3: REQUIREMENTS AND ANALYSIS
3.1 Problem Definition
3.2 Requirements Specification
3.3 Planning and Scheduling
3.4 Software and Hardware Requirements
3.5 Preliminary Product Description
3.6 Conceptual Models
CHAPTER 4: SYSTEM DESIGN
4.1 Basic Modules

7
Project Structure 4.2 Data Design
4.2.1 Schema Design
4.2.2 Data Integrity and Constraints
4.3 Procedural Design
4.3.1 Logic Diagrams
4.3.2 Data Structures
4.3.3 Algorithms Design
4.4 User interface design
4.5 Security Issues
4.6 Test Cases Design
CHAPTER 5: IMPLEMENTATION AND TESTING
5.1 Implementation Approaches
5.2 Coding Details and Code Efficiency
5.2.1 Code Efficiency
5.3 Testing Approach
5.3.1 Unit Testing
5.3.2 Integrated Testing
5.4 Modifications and Improvements
CHAPTER 6: RESULTS AND DISCUSSION
6.1 Test Reports
6.2 User Documentation
CHAPTER 7: CONCLUSIONS
7.1 Conclusion
7.2 Limitations of the System
7.3 Future Scope of the Project
REFERENCES
GLOSSARY
APPENDIX A
APPENDIX B
1.4 EXPLANATION OF CONTENTS
Title Page
Sample format of Title page is given in Appendix 1 of this block. Students should
follow the given format.
Original Copy of the Approved Proforma of the Project Proposal
Sample Proforma of Project Proposal is given in Appendix 2 of this block. Students
should follow the given format.
Certificate of Authenticated work
Sample format of Certificate of Authenticated work is given in Appendix 3 of this
block. Students should follow the given format.
Role and Responsibility Form
Sample format for Role and Responsibility Form is given in Appendix 4 of this block.
Students should follow the given format.

8
Elements of Project
DevelopmentAbstract
This should be one/two short paragraphs (100-150 words total), summarising the
project work. It is important that this is not just a re-statement of the original project
outline. A suggested flow is background, project aims and main achievements. From
the abstract, a reader should be able to ascertain if the project is of interest to them
and, it should present results of which they may wish to know more details.
Acknowledgements
This should express your gratitude to those who have helped you in the preparation of
your project.
Table of Contents: The table of contents gives the readers a view of the detailed
structure of the report. You would need to provide section and subsection headings
with associated pages. The formatting details of these sections and subsections you
will find in unit 2 of this block.
Table of Figures: List of all Figures, Tables, Graphs, Charts etc. along with their
page numbers in a table of figures.
Chapter 1: Introduction
The introduction has several parts as given below:
Background: A description of the background and context of the project and its
relation to work already done in the area. Summarise existing work in the area
concerned with your project work.
Objectives: Concise statement of the aims and objectives of the project. Define
exactly what you are going to do in the project; the objectives should be about 30 /40
words.
Purpose, Scope and Applicability: The description of Purpose, Scope, and
Applicability are given below:
Purpose: Description of the topic of your project that answers questions on
why you are doing this project. How your project could improve the system
its significance and theoretical framework.
Scope: A brief overview of the methodology, assumptions and limitations.
You should answer the question: What are the main issues you are covering in
your project? What are the main functions of your project?
Applicability: You should explain the direct and indirect applications of your
work. Briefly discuss how this project will serve the computer world and
people.
Achievements: Explain what knowledge you achieved after the completion of your
work. What contributions has your project made to the chosen area? Goals achieved -
describes the degree to which the findings support the original objectives laid out by
the project. The goals may be partially or fully achieved, or exceeded.
Organisation of Report: Summarising the remaining chapters of the project report,
in effect, giving the reader an overview of what is to come in the project report.

9
Project Structure Chapter 2: Survey of Technologies
In this chapter Survey of Technologies you should demonstrate your awareness and
understanding of Available Technologies related to the topic of your project. You
should give the detail of all the related technologies that are necessary to complete
your project. You should describe the technologies available in your chosen area and
present a comparative study of all those Available Technologies. Explain why you
selected the one technology for the completion of the objectives of your project.
Chapter 3: Requirements and Analysis
Problem Definition: Define the problem on which you are working in the project.
Provide details of the overall problem and then divide the problem in to sub-problems.
Define each sub-problem clearly.
Requirements Specification: In this phase you should define the requirements of the
system, independent of how these requirements will be accomplished. The
Requirements Specification describes the things in the system and the actions that can
be done on these things. Identify the operation and problems of the existing system.
Planning and Scheduling: Planning and scheduling is a complicated part of software
development. Planning, for our purposes, can be thought of as determining all the
small tasks that must be carried out in order to accomplish the goal. Planning also
takes into account, rules, known as constraints, which, control when certain tasks can
or cannot happen. Scheduling can be thought of as determining whether adequate
resources are available to carry out the plan. You should show the Gantt chart and
Program Evaluation Review Technique (PERT).
Software and Hardware Requirements: Define the details of all the software and
hardware needed for the development and implementation of your project.
Hardware Requirement: In this section, the equipment, graphics card,
numeric co-processor, mouse, disk capacity, RAM capacity etc. necessary to
run the software must be noted.
Software Requirements: In this section, the operating system, the compiler,
testing tools, linker, and the libraries etc. necessary to compile, link and install
the software must be listed.
Preliminary Product Description: Identify the requirements and objectives of the
new system. Define the functions and operation of the application/system you are
developing as your project.
Conceptual Models: You should understand the problem domain and produce a
model of the system, which describes operations that can be performed on the system,
and the allowable sequences of those operations. Conceptual Models could consist of
complete Data Flow Diagrams, ER diagrams, Object-oriented diagrams, System
Flowcharts etc.
Chapter 4: System Design
Describes desired features and operations in detail, including screen layouts, business
rules, process diagrams, pseudocode and other documentation.
Basic Modules: You should follow the divide and conquer theory, so divide the
overall problem into more manageable parts and develop each part or module
separately. When all modules are ready, you should integrate all the modules into one
system. In this phase, you should briefly describe all the modules and the functionality
of these modules.

10
Elements of Project
Development Data Design: Data design will consist of how you organise, managing and manipulate
the data.
Schema Design: Define the structure and explanation of schemas used in your
project.
Data Integrity and Constraints: Define and explain all the validity checks and
constraints you are providing to maintain data integrity.
Procedural Design: Procedural design is a systematic way for developing algorithms
or procedurals.
Logic Diagrams: Define the systematical flow of procedure that improves its
comprehension and helps the programmer during implementation. e.g.,
Control Flow Chart, Process Diagrams etc.
Data Structures: Create and define the data structure used in your procedures.
Algorithms Design: With proper explanations of input data, output data, logic
of processes, design and explain the working of algorithms.
User Interface Design: Define user, task, environment analysis and how you intend
to map those requirements in order to develop a “User Interface”. Describe the
external and internal components and the architecture of your user interface. Show
some rough pictorial views of the user interface and its components.
Security Issues: Discuss Real-time considerations and Security issues related to your
project and explain how you intend avoiding those security problems. What are your
security policy plans and architecture?
Test Cases Design: Define test cases, which will provide easy detection of errors and
mistakes with in a minimum period of time and with the least effort. Explain the
different conditions in which you wish to ensure the correct working of your software.
Chapter 5: Implementation and Testing
Implementation Approaches: Define the plan of implementation, and the standards
you have used in the implementation.
Coding Details and Code Efficiency: Students not need include full source code,
instead, include only the important codes (algorithms, applets code, forms code etc).
The program code should contain comments needed for explaining the work a piece of
code does. Comments may be needed to explain why it does it, or, why it does a
particular way.
You can explain the function of the code with a shot of the output screen of that
program code.
Code Efficiency: You should explain how your code is efficient and how you
have handled code optimisation.
Testing Approach: Testing should be according to the scheme presented in the
system design chapter and should follow some suitable model – e.g., category
partition, state machine-based. Both functional testing and user-acceptance testing are
appropriate. Explain your approach of testing.

11
Project Structure Unit Testing: Unit testing deals with testing a unit or module as a whole. This
would test the interaction of many functions but, do confine the test within
one module.
Integrated Testing: Brings all the modules together into a special testing
environment, then checks for errors, bugs and interoperability. It deals with
tests for the entire application. Application limits and features are tested here.
Modifications and Improvements: Once you finish the testing you are bound to be
faced with bugs, errors and you will need to modify your source code to improve the
system. Define what modification you implemented in the system and how it
improved your system.
Chapter 6: Results and Discussion
Test Reports: Explain the test results and reports based on your test cases, which
should show that your software is capable of facing any problematic situation and that
it works fine in different conditions. Take the different sample inputs and show the
outputs.
User Documentation: Define the working of the software; explain its different
functions, components with screen shots. The user document should provide all the
details of your product in such a way that any user reading the manual, is able to
understand the working and functionality of the document.
Chapter 7: Conclusions
Conclusion: The conclusions can be summarised in a fairly short chapter (2 or 3
pages). This chapter brings together many of the points that you would have made in
the other chapters.
Limitations of the System: Explain the limitations you encounterd during the testing
of your software that you were not able to modify. List the criticisms you accepted
during the demonstrations of your software.
Future Scope of the Project describes two things: firstly, new areas of investigation
prompted by developments in this project, and secondly, parts of the current work that
were not completed due to time constraints and/or problems encountered.
REFERENCES
It is very important that you acknowledge the work of others that you have used or
adapted in your own work, or that provides the essential background or context to
your project. The use of references is the standard way to do this. Please follow the
given standard for the references for books, journals, and online material.
GLOSSARY
If you use any acronyms, abbreviations, symbols, or uncommon terms in the project
report then their meaning should be explained where they first occur. If you go on to
use any of them extensively then it is helpful to list them in this section and define the
meaning.
APPENDICES
These may be provided to include further details of results, mathematical derivations,
certain illustrative parts of the program code (e.g., class interfaces), user
documentation etc.

12
Elements of Project
DevelopmentIn particular, if there are technical details of the work done that might be useful to
others who wish to build on this work, but that are not sufficiently important to the
project as a whole to justify being discussed in the main body of the project, then they
should be included as appendices.
1.5 SUMMARY
Project development usually involves an engineering approach to the design and
development of a software system that fulfils a practical need. Projects also often form
an important focus for discussion at interviews with future employers as they provide
a detailed example of what you are capable of achieving. In this course you can
choose your project topic from the lists supplied in Unit 4: Category-wise Problem
Definition. The next Unit Guidelines and Suggestions will provide you detailed
guidelines and suggestions, which will be useful for you during project development
and the preparation of the report.
1.6 FURTHER READINGS
1. Modern Systems Analysis and Design; Jeffrey A. Hoffer, Joey F. George, Joseph
S. Valacich; Pearson Education; Third Edition; 2002.
2. ISO/IEC 12207: Software Life Cycle Process
(http://www.software.org/quagmire/descriptions/iso-iec12207.asp).
3. IEEE 1063: Software User Documentation (http://ieeexplore.ieee.org).
4. ISO/IEC: 18019: Guidelines for the Design and Preparation of User
Documentation for Application Software.
5. http://www.sce.carleton.ca/squall.
6. http://en.tldp.org/HOWTO/Software-Release-Practice-
HOWTO/documentation.html.
7. http://www.sei.cmu.edu/cmm/

13
Guidelines and
Suggestions UNIT 2 GUIDELINES AND SUGGESTIONS
Structure Page Nos.
2.0 Introduction 13
2.1 Objectives 13
2.2 Key Features of the Project 13
2.3 Roles and Responsibilities 14 2.3.1 Counsellor
2.3.2 Project Team/ Student
2.4 Steps of the Mini Project 16 2.4.1 Selection of Topic Area
2.4.2 Project Report Planning
2.4.3 Project Proposal Report
2.4.4 Project Final Report
2.4.5 Project Assessment
2.5 Guidelines for the Project Proposal 17
2.6 Guidelines for the Project Report 18
2.7 Evaluation Scheme 23
2.8 Assessment Guidelines 24
2.9 Pitfalls and Some Tips 26
2.10 Schedule of Practical Sessions 28
2.11 Summary 28
2.12 Further Readings 28
2.0 INTRODUCTION
The purpose of this unit is to provide some guidelines and suggestion for the
development of the project and the preparation of your final year project report. This
unit covers the format and contents of the report, some rules for the layout and
presentation, some suggestions on style and language that might be helpful and some
recommendations for further reading. The project report in brief should start with a
short introductory chapter to cover the background to the project, or state the problem,
or possibly mention the motivation for your working on this particular project. Use the
main body of the report to describe objectively what you have done in the project, to
justify your design decisions, the problems you faced and what you achieved in
solving them. The final chapter should sum up what you have achieved in the project
and, possibly, outline the scope for future work.
2.1 OBJECTIVES
After going through this unit you should be able to:
understand the key activities of the Mini Project,
know your Roles and Responsibilities,
understand how to select a project topic,
understand how to start the project,
know the guidelines for proposal and report preparation,
know the Evaluation Scheme, and
know the Assessment Guidelines.
2.2 KEY FEATURES OF THE PROJECT
While preparing the project students learn and practice different activities, which help
them to develop the ability to solve real life problems related to software development.

14
Elements of Project
DevelopmentThere are different activities (including the details given in unit 1 and unit 2) in each
phase of software development; however, some of the key activities of the project
work are given below:
Analysis
Framing the Systems Development Life Cycle (SDLC) Model for the related
project,
Understanding and evaluating the specific problem,
Analysing and evaluating the systems requirements,
Cost-benefit analysis,
Performing technical feasibility, time feasibility and Operational feasibility for
the project,
Scheduling projects using both GANTT and PERT charts,
Deciding the S/W requirement specifications and H/W requirement
specifications, and
Designing and constructing the entity-relationship (ER) diagram (for RDBMS
related projects), data flow diagrams (level 0,1,2) (OR Object-oriented diagrams,
System Flowcharts etc.) and data dictionary.
Design
Plan the systems design phase and distinguish between logical and physical
design requirements,
Create the systems flow charts and state transition diagrams,
Describe all the modules and the functionality of modules,
Design and evaluate system inputs and outputs,
Design and evaluate user interfaces for input, and validity checks for input data,
Perform normalisation for the unnormalised tables for RDBMS related projects,
Design various test cases for different testing techniques/strategies, and
Decide various data structures.
Coding
Performing coding according to the requirement and design document,
Writing comments and description in coding,
Using of naming convention of variable and functions,
Explaining the exceptions handling and conditional checking, and
Maintaining security.
Testing
Performing various system testing techniques/strategies to include the different
phases of testing,
Identifying key problems with the software and re-implementation with logical
justification, and
Generating various test reports.
2.3 ROLES AND RESPONSIBILITIES
The key of making a group project successful is ensuring that each member of the
team understands and accepts his or her roles and responsibilities within the team.
Students may be given roles such as Team Coordinator, Auditor/Reviewer: Data
Manager, Quality Manager or others according to the needs of the project. Each

15
Guidelines and
Suggestions student should be involved in each and every phase of software development, however,
the role is an additional responsibility of the students. The domain of these roles are as
given below:
Team Coordinator: Conducting meetings, coordinating the team, maintaining
milestones and regulations related to the project work,
Auditor/Reviewer: Inspecting and verifying whether the meetings and
discussions are being held regularly. Also s/he will check if the project and
management related documents are maintained properly and whether all team
members are updated with latest information of the project.
Data Manager: Maintaining records and information related to meetings and
discussions related to the project, and
Quality Manager: Maintaining records and information related to quality
assurance in the project.
Clarifying this understanding explicitly at the beginning of the process, and reviewing
it periodically throughout the duration of the project, can help avoid a great deal of
confusion and frustration and increase the efficiency and effectiveness of the team.
Students can select these projects in a group or individually according to their interest
and the complexity of the project.
2.3.1 Counsellor
The MCS-044 Mini-project counsellor is the person who motivates and helps students
during the development of the project. The counsellor should take responsibility for
guiding and approving different project processes, including Analysis, Design, Coding,
Testing, and also the editing of project reports. Moreover, the main responsibilities of a
counsellor are:
Dedicating adequate time to the student for providing effective supervision and
encouragement,
Making sure that the student chooses a manageable project topic,
Providing critical comments on the student’s work and progress,
Ensuring the student has access to necessary data,
Encouraging the student to proceed in the intended direction and to agreed time
limits, and
Making sure that the project is the student’s own work.
2.3.2 Project Team / Student
The project team should be organised and determined towards the fulfilment of their
projects’ objectives and tasks. A maximum of four students should work on a project,
however, an individual student can also undertake the project on his/her own. The
main responsibilities of the project team/student are to:
Ensure that an appropriate amount of time and effort is applied to the project,
Ensure that they are responsive to the guidance of their counsellor,
Acknowledge the text, material and ideas of others properly,
Meet all milestones and regulations related to the work, and
To communicate any problems that are likely to prejudice the quality or time
lines of the work to the counsellor as and when such problems arise.

16
Elements of Project
Development 2.4 STEPS OF THE MINI PROJECT
We have listed here five general steps in your Mini Project, which may help you to
determine the milestones and regulations related to project work.
Selection of Topic Area,
Project Report Planning,
Project Proposal Report,
Project Final Report, and
Project Assessment
2.4.1 Selection of Topic Area
The choice of the topic for the project has great importance so it should be discussed
with your counsellor in detail. The topic needs to integrate the interests of the student
with the specialised expertise of the counsellor, and be of the appropriate level of
difficulty. Students are encouraged to think about the areas of their interest in which
they would like to undertake a project, and in consultation with a counsellor, an initial
topic can be identified.
2.4.2 Project Report Planning
You should provide an overall aim for your project, which is a declaration of what you
would like to achieve at the end of the project. This should be followed by a number of
objectives, which act as clearly defined stages that make up your project.
Project Plan
A project plan should be included which provides an estimate of the time that you
think you will require in order to work and meet each of your objectives. In your
project plan avoid scheduling tasks linearly, try to overlap and tackle more than one
task at any point of time.
You should begin planning your report from the day you begin your Mini-project. The
report is one of the products of your work, in the same way as a program is a product.
You should discuss with your counsellor the way in which your work will be reported.
You can produce an outline plan of your report after your first meeting with your
counsellor. This plan will not be detailed, but you can gradually increase the amount of
detail in the plan until it forms the complete basis for writing the report.
The process of planning can help you sort out your ideas, make vague ideas precise
and sequential. One common mistake students make is, to believe that a plan cannot be
changed or that it is a sign of weakness to change a plan. A plan is another tool to be
used to get work completed according to a satisfactory standard. It needs to be treated
with as much respect as any other tool. At first, the plan might be in the list of chapter
analyse headings. Next, one or more of the chapters can be broken down into sections,
then the sections into subsections, and so on until a whole chapter is ready to be
written. You may decide to split a chapter into two or more chapters or to merge two
or more chapters into one. This means that you can use your plan to decide when to
strengthen your report with some extra work, or when to move on to some new work.
A less common mistake that students make is to think that their report has to be written
in order, from the first page to the last. It is wise not to begin writing until you have
some level of plan for the whole report, but you can write parts as you go along. For
instance, when you have the material for your review of previous work, you can write
that chapter. It is quite usual to write the inner chapters before the last chapter and then
to write the introductory chapter as the last part you write.

17
Guidelines and
Suggestions 2.4.3 Project Proposal Report
Project proposal should be presented to, reviewed by and agreed upon in consultation
with the project counsellor to provide constructive feedback on the proposal and
planned programme of the project work. Further, in this section, you can present
details regarding the preparation of the project proposal. The preparation of the Project
proposal report may be taken to be an opportunity for students to practice their report
writing skills. It is expected that this report will contain an overall structure for the
project analysis along with a substantial part of the survey of technologies. The survey
of technologies, and associated list of cited references, would be complete at this stage.
The project proposal should contribute to some of the content of the final report. It
also provides the counsellor with an opportunity to make constructive comments on
the written work completed at this stage.
2.4.4 Project Final Report
The final report will contribute to the assessment and your marks. The format of this
report will follow the format, guidelines and suggestions given in this block, but
details should also be discussed with your counsellor. The final reports of students
doing the project in a group should not be identical. Each student should emphasise on
his/her role and responsibilities in the project work.
2.4.5 Project Assessment
The project presentation and viva voce also contribute to the final assessment. The
presentation will provide an opportunity for the student to set the work done into
context and to identify the main features of the work. Student should have good
understanding and knowledge of each and every phase of software development either
it’s a group or individual project. In addition, the student will be expected to defend
successfully the conclusions put forward in the report. The examiners will be looking
for clear evidence that the student has a depth of understanding of the subject areas.
2.5 GUIDELINES FOR THE PROJECT PROPOSAL
These guidelines on report preparation gives simple and practical recommendation on
the problems of getting started, getting organised, dividing the vast task into less
difficult pieces and working on those pieces. It includes a suggested structure and a
guide to what should go in each section of the project proposal and the project report.
Project Proposal
As we have discussed earlier the project proposal should be prepared in consultation
with your counsellor during the counselling sessions. The project proposal should
clearly state the objectives of the project. The project work should compulsorily
include the analysis phase of the software development.
Front page
The front page of the proposal should contain the project title, followed by your name
and your counsellor’s name. The contents of this proposal report should contain the
following:
Structure
1. INTRODUCTION
1.1 Background
1.2 Objectives
1.3 Purpose and Scope
1.3.1 Purpose
1.3.2 Scope

18
Elements of Project
Development 2. SURVEY OF TECHNOLOGIES
3. REQUIREMENTS AND ANALYSIS
Problem Definition
Requirements Specification
Planning and Scheduling
Software and Hardware Requirements
Preliminary Product Description
Conceptual Models.
4. REFERENCES
The description of these topics are already explained in the previous unit, however, the
references at this stage of the project proposal may be different from the references of
the project report, so you should provide here a list of reference which is related to
your project topic: literary and the review, survey of technologies that acts as a good
reference to your work. This will demonstrate that your project is current and it is
supported by articles, papers or books, which are accessible. (Refer to the reference in
further sections). After finalising the proposal report, students should submit the
project proposal report along with the proforma.
2.6 GUIDELINES FOR THE PROJECT REPORT
When you are about to begin writing the project report, it seems a lengthy, complicated
job. It will seem less discouraging if you write continuously and prepare the
documentation of each phase from the start of the project. However, in this case,
towards the conclusion, you will even find, an enjoyment, satisfaction in the sense of
achievement and pleasure in the enhancement of your technical writing. Let us look at
how you should make a start.
Before writing your project report, first write the report outlines containing chapter
headings, sub-headings, some figure titles and perhaps some other details, notes and
comments. The report should contain a full and coherent account of your work.
Although there will be an opportunity to present your work verbally, and demonstrate
any software, the major part of the assessment will be based on the written material in
your project report.
Project Report Format
The project report documentation should contain 80 to 100 pages for analysis, design,
and testing phases, however, the size of complete report may vary depending upon the
size of coding /implementation and appendices. The project documentation details
should not be too generic in nature. To be more specific, whatever theory in respect of
these topics is available in reference books should be avoided as far as possible. The
project documentation should be in respect of your project only. You should make
sensible use of appendices. For example, software user instructions, detailed code
listings, correspondence may be relegated to appendices. Note that spiral bindings are
not suitable for handing in the project report.
Project Report Layout
Project report should contain all the details and text should be short and concise,
lengthy reports may not be qualitative, and care should be taken to edit the material
sensibly. The project report should normally be printed with single line spacing on A4
paper (one side only). Figures should be clearly drawn and all material should be
reproducible by normal photocopy. All pages, tables and figures must be numbered

19
Guidelines and
Suggestions and figures should have titles. Detailed information about the layout for the project
proposal and report are also listed below:
Font size and margin
1. The report is to be bound with a clear front cover.
2. The text is in 12-point Times New Roman font.
3. The pages are of A4 size, with margins as given below, except for the front
cover, which has a specific format given in unit 1. Margins of pages should
follow the following specifications.
a. Left margin - 2 inch. from edge of paper.
b. Right margin - 1 inch. from edge of paper.
c. Top margin - 1 inch. from edge of paper.
d. Bottom margin - 1 inch. from edge of paper.
4. The above margins shall be observed on charts, graphs, tables, and drawings.
Folded papers or large size paper will not be accepted unless there is absolutely
no other way for the material to be presented.
Heading
1. Headings used in the project report should follow the following convention:
2. Main Headings or Chapter Headings
a. Times Roman, 16 Font size (1,2,3 etc.) numerals.
b. Capital and Bold.
c. Must begin a new page and be centered.
d. Main headings are to be titled names that reflect content of the text that
follows. Main headings are not to be identified as chapters.
e. The number of the headings shall be followed by a period and two spaces.
f. Must precede the following text material by second heading by three
spaces.
3. Second Headings
a. Times Roman, 14 Font size, Bold, 2.1, 2.2, 2.3, etc.
b. Must be centered and be typed in capital and lower case (sentence case)
letters; i.e., the first letter of each word except conjunctions, prepositions,
and articles must be a capital letter. Omit period at the end of the heading.
c. The letter designation of the heading shall be followed by a period and
two spaces.
d. Must be four spaces below preceding text and three spaces ahead of
succeeding text.
4. First sub-headings
a. Times Roman, 12 Font size, Bold, 2.2.1, 2.2.2, etc.
b. Must be typed on separate lines beginning at the left margin line of the
text, but need not begin on a new page.
c. Must be typed in capitals and lower case letters except conjunctions,
prepositions, and articles.
d. The number designation of the heading shall be followed by a period and
two spaces. Omit period at the end of the heading.
e. Must be separated from the succeeding text by three spaces.
5. Second sub-headings (second sub-headings should be avoided if possible).
a. Times Roman, 12 Font size, Bold.
b. Must be typed on the same line as the text it introduces beginning at the
left margin line of the text.

20
Elements of Project
Developmentc. Must be typed in sentence case.
d. Must be followed by a period at the end of the heading and must be
underscored by a line.
e. The letter designation shall be followed by a period and two spaces.
Appendices re-start the section numbering, using capital letters as section labels
and Arabic numerals as sub-section labels (i.e., A.1, A.2,); appendix
headers are in decreasing-sized fonts.
If a section is divided into sub-sections, it has at least two subsections. Similarly
for subsections divided into sub sub-sections, and so on.
The font matter, Conclusions, Recommendations, Glossary, Acknowledgements,
and References sections are not divided into sub-sections. (Include in Main
Heading or Chapter Heading).
Figure and Tables
Each figure has a number and a caption below the figure. As given in the example of a Figure.
Each table has a number and a title above the table. As given in the
example of a Table.
Figure 1: A typical computer network
Table 1: Comparison of various data structures
Operation Sequential
List
Linked List AVL-Tree
Search O(log n) O(n) O(log n)
Delete O(n) O(1) O(log n)
Insert O(n) O(1) O(log n)
Figure and table numbering restarts at the beginning of each appendix, using a
combination of the appendix label and figure/table number within the appendix
(e.g., A-1, A-2).
Each figure and table is cited (referred to by number) in the report text, either on
the same page as the figure/table or on the preceding page.
Figures and tables are legible.

21
Guidelines and
Suggestions Paragraphs
Paragraph indentations must be uniformly eight letter spaces long. Series of paragraph
items which are to be listed without headings under any of the regular headings may,
for clarity be designated as follows: (A), (B), (C). No period is necessary between the
parenthesis and the first sentence. Series of items listed in the interior of a paragraph
may be designated as follows: (a), (b), (c). A period must not follow the parenthesis.
Each item must begin with a lower case letter and must end with a semi-colon, unless
it is a complete sentence. A new paragraph must not begin at the bottom of a page if
there is not sufficient space for at least two lines.
Footnotes
Footnotes should be used only if absolutely necessary.
Footnote references shall be indicated in the text by an Arabic number placed
superior to the text and immediately following the word phrase or sentence, on
which the footnote is to be appended.
Footnotes shall be sequential for each page and for the entire report.
Footnotes shall be placed at the bottom of the page on which they are indicated.
They shall be indented from the margin line of the text by eight spaces and
placed under a broken line made of 15 dashes.
Footnotes shall be single spaced typing.
Pagination
Each page in the report is expected to bear a number. Only one side of the paper may
be used. The following plan should be used exclusively:
a. The preliminary section, including the title page; copyright page, if any;
foreword, preface, or acknowledgements; table of contents; etc., should be
numbered, using lower case Roman Numerals, e.g., i, ii, iii, etc. The title page
counts as Page i, but the number does not appear. The sequence of the
preliminary section is as follows:
Introduction ................................................... Page i - number does not appear
Survey of Technologies……………………. Page ii, iii, as necessary
Requirements and Analysis .......................... Page iii, iv, as necessary
References ........................................………. Page v, vi, as necessary
For the remainder of the report Times numbers are used. Each page must be
numbered. Page numbers are to be placed two centimeters from the top and right
hand margins on the pages. Include all pages for illustrations, tables, appendices,
bibliography, etc. The numbering in the main body of the report should begin
with Page 1 and run consecutively to the last page. No punctuation, such as dash
or a period, should accompany the page number.
Page numbering restarts at the main body of the report: pages in the main body
and back matter, including appendices, are numbered using Arabic numerals,
with the first page of the Introduction as page one.
Page numbers are centered at the bottom of the page.
Specially Designated Expressions
(1) Specially designated expressions usually mean equations, formulas, etc.
(2) Specially designated expressions shall be centered on the page shall be set below
the preceding text and before the succeeding text by three line spaces.

22
Elements of Project
Development(3) The expressions shall be identified by an arabic number in parenthesis placed
opposite the expression and in line with the right margin of the text. They should
be numbered in each chapter in the order of their appearance together with the
chapter number, e.g., (6.14).
References
The numerical reference of the material shall be indicated in the text by an arabic
numeral in square brackets (e.g., [12]) placed in the text immediately following the
name, word, phrase, or sentence which the reference concerns (in most cases this will
be the author’s name). The number in parenthesis should indicate the order of
appearance of the reference in the text. The listing of references in the references shall
be in the order in which they are used in the text and shall bear the same number as
was used in the reference in the text.
It is very important that you acknowledge any of the work of others that you use or
adapt in your own work, or that provides the essential background or context to your
project. The use of references is the standard way to do this. Please follow the given
standard for the references of books, journals, and online materials.
The list of cited references is placed between the main text and the appendices. This
section should start on a new page, and should not have a chapter or section number,
just the heading “References”. Each reference should be as complete as possible.
However, some schemes for writing references are given below:
A Journal Paper
name(s) of author(s), year of publication, title of paper, name of journal, volume
number issue number (optional), page numbers.
A Conference Paper
name(s) of author(s), year of conference, title of paper, name(s) of editor(s),
name of conference, place of conference (optional), publisher of proceedings,
place of publication, page numbers.
A Book
name(s) of author(s), year of publication, chapters (if only part of the book is
relevant), title of book, name of publishers, place of publication (optional), page
numbers.
A Web Page
name(s) of author(s), year of publication, title of paper, url, date last accessed.
Appendices
These should contain detailed information not required on a first reading of the main
text, but necessary for closer study of the project and in particular its continuation or
replication. The Appendices should also include a program disk/cd when appropriate.
Coding style
In general during coding, most of your development time is spent in debugging,
troubleshooting, and practicing general maintenance, especially on larger projects.
Even when you work on small projects, a significant amount of time is usually spent

23
Guidelines and
Suggestions analysing and fixing code. The readability of your code is important for your benefit
and the benefit of your team members. When following conventions, you increase
readability, which increases workflow and helps find and fix any errors in your code,
and all programmers follow a standardised way of writing code, which improves the
project in many ways. For C, this involves things like brace placement, indentation,
and the way parentheses are used but the coding conventions and style varies from
language to language hence, you should follow the coding conventions of the
language, which you have used in your project implementation.
Style of English
The report should be written in an objective style, in the third person impersonal tense:
e.g., “The following software was developed....”not “I developed the following
software....”. An impersonal style keeps the technical factors and ideas to the forefront
of the discussion and you in the background. Try to be objective and quantitative in
your conclusions. For example, it is not enough to say vaguely “because the compiler
was unreliable the code produced was not adequate”. It would be much better to say
“because the A compiler produced code which ran 2-3 times slower than a fast enough
scheduler could not be written using this algorithm”. The second statement is more
precise, clear and informative and gives an impression that the student knows the
project and subject very well.
Submission of the Project Report
You have to submit your project report by the given date. One copy of the original
project report is to be submitted to the Study Centre concerned. A photocopy of the
same project report must be retained by the student, which should be produced before
the evaluation.
2.7 EVALUATION SCHEME
The project will be assessed by a written report and a combined presentation and viva
voce (viva voce). To help the students we have given some guidelines about
evaluation and assessment in the next section. If, the examiner finds that the project is
lacking in any key areas then, the student will be asked to re-submit the project. If the
student is re-submitting the project report then the students needs to repeat the entire
process beginning with the approval of the project proposal.
Project Synopsis/Proposal
Students can discuss their project topic and proposal with counsellors at study centres
during counselling, however, each student must send their complete project proposal to
the counsellor with the proforma of the project proposal given in appendix 2. Further,
counsellors will give suggestion on the project proposal/synopsis; students should
modify the project work according to the suggestions given in the proforma of the
project proposal.
Assignment/Continuous Evaluation
25% of total marks are allotted to continuous evaluation.
Final Evaluation
75% of total marks are evaluated in the final evaluation. These 75 marks will be given,
based on the evaluation of project report. The weightage will be given to analysis,
design, coding/implementation, testing and viva-voce.

24
Elements of Project
Development 2.8 ASSESSMENT GUIDELINES
In this section we have given a few general parameters as checkpoints for the
assessment of any software development project. You can note these points and
emphasise them during the project report preparation and examination. Basically,
assessment will be based on the quality of your report, the technical merit of the
project and the project execution. Technical merit attempts to assess the quality and
depth of the intellectual effort you have put into the project. Project execution is
concerned with assessing how much work you have put in.
Analysis
In Project planning include cost estimation and project scheduling. The Cost and
efforts estimation is to be done with the help of functional point analysis or other
similar methods. The project scheduling is identified with:
(i) Pert chart: Proper decomposition of stages, and
(ii) Gantt chart: Time, line structure and validity of chart.
You may know that the software requirement specification (SRS) document is one of
the important documents of your project. The indicators for SRS document is whether
you have used some standardisation like IEEE standards or any other international
standard, or whether your SRS has a proper structure based on sound software
engineering concepts as given in unit 3 or it is given in a running text. Project analysis
for DBMS/Application development projects should contain the ER diagram, Data
Flow Diagram and Data Dictionary, so you should include these with the following
requirements. However for other categories of project you should prepare class
diagrams, behavior model and /or state transition diagram and details of various
data structures used.
The Entity Relationship diagram (ER Diagram) should have:
o Proper symbol of attributes, entities and relationship, and
o Relationship of ER diagram to SRS with strong association
Data Flow Diagram (DFD) should have:
o All Data flow should be levelled and should have proper input and output.
o Relationship of data flow to data dictionary Context Diagram, Level 1 and
Level 2.
Data Dictionary: It should explain each entity and relationship in ER diagram
and data flow in DFD.
Design
Project design should include the desired features and operations in detail, including
user interface design, program structure, schema design and normalised tables and data
integrity and constraints. You should include them with the requirements given below:
Program Structure: It should have the proper modularisations of software and
specification of each module.
Schema Design and Normalised Tables: Normalise the table to minimum 3NF.
If any demand of Demoralisations clearly explain the reasons.
Data Integrity and Constraints: Explain the referential diagram. Define entity
integrity, which should include keys, alternate keys and other keys, value
constraints and ranges.

25
Guidelines and
Suggestions Procedural Design: Explain using Flowchart / Pseudo code / PDL.
User Interface Design: Coherence with dataflow and processor; Consistency of
interface and naming convention.
Architecture: Program architecture and explanation on suitability of data
structure used.
Coding
Coding phase of software development includes different activities like refining the
algorithms for individual components, transferring the algorithms into a programming
language (coding), translating the logical data model into a physical one and compiling
and checking the syntactical correctness of the algorithm with these activities. You
should include the comments and description in code, use the standardisation in
coding, use the methodology for error handling and security implementation. These
parameters ensure software quality and reliability. You should include them with the
requirements given below:
Comments and Description: Should have comments with functional
description which include the input, output, total function calls to/from other
functions, function parameters, description of main variables, Data type, logic
description, etc.
Standardisation of Coding: Use of naming convention of variable and
functions, nested depth, naming constant, use of data structure and style.
Error Handling: Explain exceptions handling and conditional checking.
Parameter passing and calling: Check the technique used for this purpose, how it
optimises the coding.
Security: Maintain confidentiality, integrity and authorisation according to the
requirement and needs of the system. Also maintain database level security, use
of Views, use of revoke and grant, user and access rights and ensure steps taken
against hacking of the system.
Testing
Testing is a process of devising a set of inputs to a given piece of software that will
cause the software to exercise some portion of its code. The developer of the software
can then check if the results produced by the software are in accordance with his or her
expectations. It includes, number of activities such as correcting syntactically and
semantically erroneous system components, detecting as many errors as possible in the
software system, and assuring that the system implementation fulfills system
specification.
It ensures the quality, efficiency and reliability of the software, which is measured by
the testing methodology and techniques used for unit, integrated and system testing.
You should give all the reports and results of test cases for unit, integrated and system
testing. How debugged your code is and what actions you have taken too improve the
code, must, be explained. Good testing can be measured by criteria such as
correctness, reliability, user friendliness, maintainability, efficiency and portability of
software.
Organisation of report
Report organisation improves the professional attitude of writing reports. You should
emphasise on the proper binding of the project report, the cover page, page numbering,
organisation of content, and proper printout of text and images.
26
Elements of Project
DevelopmentViva Voce
Student may be asked to write code for problem during viva to demonstrate his coding
capabilities and s/he may be asked to write any segment of coding given in project
report.
2.9 PITFALLS AND SOME TIPS
The main purpose of this course is to gain experience with the help of the concepts and
methods learned from the previous courses particularly, in knowing the practical
situation/problem in software development. We have explained most of the
components of the project in detail, however you may need some tips that may be
helpful and are generally required by students.
In recent years, we have noticed, that projects suffer from the lack of proper analysis
and later any review, failure to implement an engineering approach and lack of critical
element. A proper analysis and literary review is necessary for you to show that you
can place your work in the wider context of computing. An engineering approach is
one where you follow some appropriate process or methodology that leads from
requirements to design to implementation and testing. By adopting such a process, it is
much less likely that, you will fail to take some crucial factor into consideration, which
is an important aspect of software engineering.
The critical element involves showing what you independently believe to be good and
bad about what you’ve read, what you have been taught, what you have been asked to
do, what you have done, what you have not done and the consequences thereof. It does
not involve blindly accepting as fact everything that you have been told or read.
However, we have listed a few points that generally are found to be lacking in the
projects submitted by our students. These observations may be used by students as
valuable feedback.
Sometimes students opt for the wrong project problem/topic without, understanding
the depth of the requirements, and their own limitations in that area.
Few students are over enthusiastic and they don’t freeze the requirement or
expectations till, the coding and implementation leads to low quality and less
reliable software product.
Most of the students assume that the coding is the only work they have to do and
they neglect the importance of other software engineering processes that result in
improper knowledge gain of project development and poor results/grades.
Generally students lack critical work. They assume whatever is given in books
or taught to them in software development is correct.
Most of the students do not use the software engineering approach and
methodologies for software development.
Most of the students do not use standardisation in different phases of software
development.
Some students do not prepare documents such as the SRS, SDD, and Test Cases
etc. in different phases of software development.
Some students never consider the importance of notes and documentation, which
creates problems for them during report writing.
Generally students don’t give proper acknowledgement of material used in the
reference however, few are not aware of material which should be acknowledged
in the reference. You must include the following material in the reference.

27
Guidelines and
Suggestions Written, printed, or published (electronic or paper both) material.
The algorithms, models, hypotheses and paradigms that are used.
The software, which you used, including the development environment,
compilers, libraries, etc. you should given the web reference of the website
so that other student can collect information about it.
Most of the students are interested in developing website projects or some
system development project, but very few student are involved in research
oriented work.
A few students are too dependent on the counsellor. Remember you are
responsible for coding and documentation of your project.
A few students also copy the projects from some sources. This practice creates a
major problem, as it does not encourage the student’s own creativity/
knowledge/potential.
There is no need to write a detail history of Java or visual basic etc. On the other
hand, it is important to mention what you have used in the project and to explain
anything that might be unusual to the reader. For example, five years ago it was
important to introduce the reader to Java, but now it is not required.
Students may think, “So what if it’s wrong as long as the meaning is clear”. But
poor spellings leave a negative impression (of carelessness) and sometimes
cause confusion.
Report Format and Layout
In the previous sections, we have explained the specification of project report format
and layout however, it is also important to discuss additional tips for the preparation of
the report. That’s why we have given you a few tips and points as given below:
Use proper spelling and capitalisation of the programming languages, tools and
other proprietary software that you have used. For example, some students write
Unix and some writes UNIX, but which one of the two is correct?
Similarly, do not leave a space before a full stop or other punctuation mark.
Also, do not leave a space after an open bracket or before a closed bracket. You
should do it (like this).
Use round brackets only for parentheses. Keep square brackets for references.
Commas and full stops should be placed inside quotation marks. Even at the end
of sentences like “this.”
It is a good practice to leave two spaces after a full stop.
Spell out numbers (from one to nine) in text, i.e., write “two” not “2” except
where you are numbering bullet points. For number 10 and above, use numerals.
Remember numbers should be spelled out when they begin a sentence.
Spell out per cent; do not use %, and write per cent as two words without a
period.
Do not use the pronoun “I”, always use “We”, better use passive voice.

28
Elements of Project
Development 2.10 SCHEDULE OF PRACTICAL SESSIONS
Students can discuss their topic with the counsellors at study centres and the
counsellors will give suggestions on project specification at the study centre during the
practical sessions. There are total 10 practical sessions, as given below:
Name of the Topic No. of Practical Sessions
(3 hrs each)
Project specification 1
Coding / Implementation 5
Testing 2
Documentation 2
2.11 SUMMARY
In this unit, we have tried to cover most of the areas of concern in writing a project
report. We have tried to encourage you to put some effort into the project report and
laid down some guidelines to be followed for layout and format. The given guidelines
and suggestions are gradually becoming the ‘standard’ for project reports preparation
and will be amended and improved in the light of new/fresh experience.
2.12 FURTHER READINGS
1. IEEE 1063: Software user Documentation.
2. ISO/IEC 12207: Software Life Cycle Process
(http://www.software.org/quagmire/descriptions/iso-iec12207.asp).
3. ISO/IEC: 18019: Guidelines for the Design and Preparation of User
Documentation for Application Software.
4. http://en.tldp.org/HOWTO/Software-Release-Practice-
HOWTO/documentation.html.
5. http://www.sei.cmu.edu/cmm/

29
Software Engineering
Concepts and Standards UNIT 3 SOFTWARE ENGINEERING
CONCEPTS AND STANDARDS
Structure Page Nos.
3.0 Introduction 29
3.1 Objectives 30
3.2 Software Development Approaches 30 3.2.1 Waterfall Model
3.2.2 Spiral Model
3.2.3 Selection of Approach
3.3 Analysis 33
3.4 Design 42
3.5 Sample Design Document 48
3.6 Coding 50
3.7 Testing 51
3.8 Test Design Document 53
3.9 Summary 55
3.10 Further Readings 55
3.0 INTRODUCTION
Software Engineering deals with the development of software. Hence, understanding
the basic concepts of software is essential. Before beginning the development of the
project, it is essential to you to refresh your concepts about software development and
engineering. During your first and third semester (in courses MCS-021 and MCS-
034), you have already studied different approaches of software development. This,
will be a complete refresher for you, however, for details you can also refer to these
courses. As you know the field of software engineering is related to the development
of software. Large software needs systematic development unlike simple programs,
which can be developed in isolation, and there may not be any systematic approach
being followed. There is a difference between programming and Software
Engineering. Software Engineering includes activities like cost estimation, time
estimation, designing, coding, documentation, maintenance, quality assurance, testing
of software etc. whereas programming includes only the coding part.
The important task in software development is developing and maintaining
documentation. Documentation is a process that helps users of software and other
people to use and interact with the system. Effective and accurate documentation is
very necessary for the success of any system. Documentation becomes a part of each
step of system development throughout the process of system development even
before the documentation starts officially. During the process of system development,
study reports and other necessary information are documented to help people involved
in system development understand the process.
There are many kinds of documentation namely, analysis documentation, design
documentation, interface documentation, internal program documentation and user-
oriented documentation. We will learn how to develop these documents in this unit. In
most of your lab manuals and practical exercises you have developed different
programs/softwares according to the given problem, however in this course: Mini-
Project we will not only develop program but also learn the real time
challenges/problems in software development and engineering.

30
Elements of Project
Development 3.1 OBJECTIVES
After going through this unit, you should be able to:
5 learn about the various phases of software development life cycle;
6 understand software development models;
7 understand the importance and concept of documentation;
8 learn about various documents and process of documentation;
9 understand application of various standards of documentation processes;
10 differentiate between various documentation processes;
11 understand the relation between documentation and quality of software, and
12 understand the good practices for documentation process.
3.2 SOFTWARE DEVELOPMENT APPROACHES
The software industry considers software development as a process. According to
Booch and Rumbaugh, “A process defines who is doing what, when and how to reach
a certain goal”? Software engineering is a field, which combines process, methods and
tools for the development of software. The concept of process is the main step in
software engineering approach. Thus, a software process is a set of activities. The
various steps (called phases) which are adopted in the development of this process are
collectively termed as Software Development Life Cycle (SDLC). The various phases
of SDLC are discussed below. Normally, these phases are performed lineally or
circularly, but it can be changed according to the project as well. The software is also
considered as a product and its development as a process. Thus, these phases can be
termed as Software Process Technology. In general, different phases of SDLC are
defined as the following:
13 Analysis
14 Design
15 Coding
16 Testing.
As you have already learnt about different software development models (in the
course MCS-034), in details, here, briefly, we provide the description of linear and
spiral approach to software development which will be useful to you in your
Mini- project. The following are some of the models adopted to develop software:
3.2.1 Waterfall Model
It is the simplest, oldest and most widely used process model. In this model, each
phase of the life cycle is completed before the start of a new phase. It is actually the
first engineering approach of software development. Figure 1 depicts the Water Fall
Model.

31
Software Engineering
Concepts and Standards Requirements Analysis
Design
Coding
Testing
Maintenance
Figure 1: Waterfall model
The functions of various phases are discussed in software process technology.
The waterfall model provides a systematic and sequential approach to software
development and is better than the build and fix approach. But, in this model,
complete requirements should be available at the time of commencement of the
project, but in actual practice, the requirements keep on originating during different
phases. The waterfall model can accommodate new requirements only in the
maintenance phase. Moreover, it does not incorporate any kind of risk assessment. In
the waterfall model, a working model of software is not available. Thus, there is no
way of judging the problems of the software in-between different phases.
A slight modification of the waterfall model is a model with feedback. Once software
is developed and is operational, then the feedback to various phases may be provided.
3.2.2 Spiral Model
This model can be considered as the model, which combines the strengths of various
other models. Conventional software development processes do not take uncertainties
into account. Important software projects have failed because of unforeseen risks.
The other models view the software process as a linear activity whereas this model
considers it as a spiral process. This is made by representing the iterative development
cycle as an expanding spiral.
The following are the primary activities in this model:
Finalising Objective: The objectives are set for the particular phase of the project.
Risk Analysis: The risks are identified to the extent possible. They are analysed and
necessary steps are taken.
Development: Based on the risks that are identified, an SDLC model is selected and
followed.
Planning: At this point, the work done till this time is reviewed. Based on the review,
a decision regarding whether to go through the loop of spiral again or not will be
decided. If there is need to do so, then planning is done accordingly.
In the spiral model, these phases are followed iteratively. Figure 2 depicts the
Boehm’s Spiral Model (IEEE, 1988).
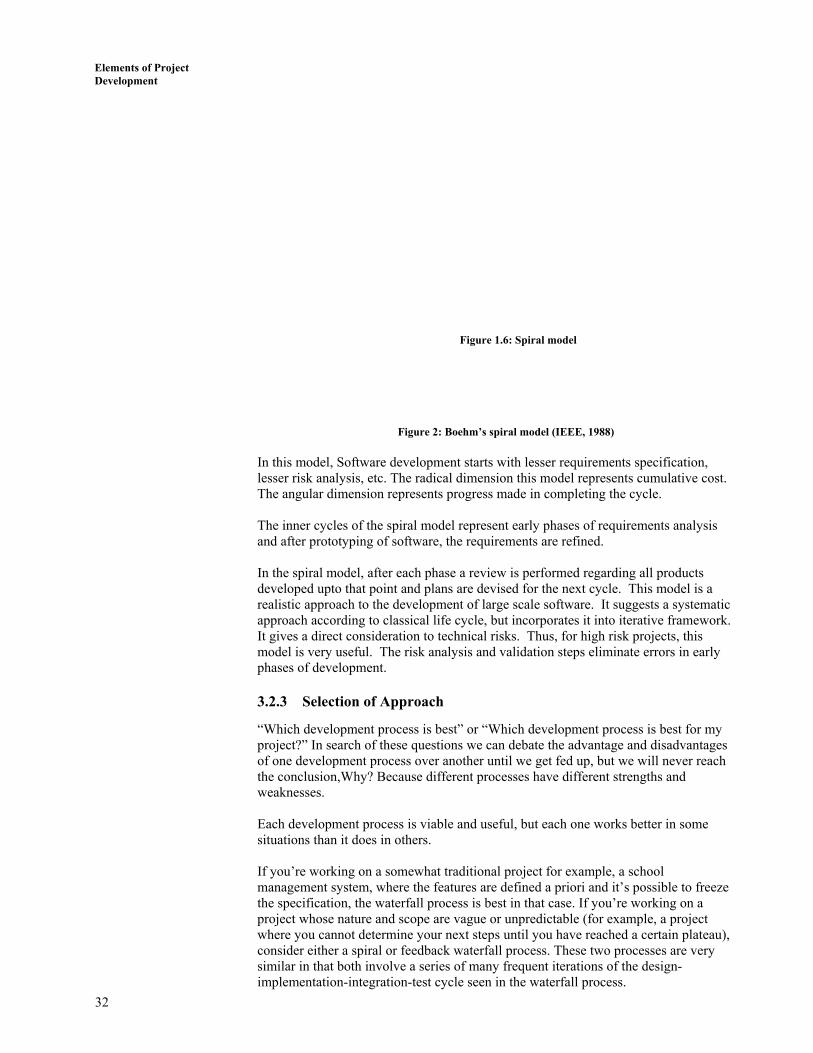
32
Elements of Project
Development
Figure 1.6: Spiral model
Figure 2: Boehm’s spiral model (IEEE, 1988)
In this model, Software development starts with lesser requirements specification,
lesser risk analysis, etc. The radical dimension this model represents cumulative cost.
The angular dimension represents progress made in completing the cycle.
The inner cycles of the spiral model represent early phases of requirements analysis
and after prototyping of software, the requirements are refined.
In the spiral model, after each phase a review is performed regarding all products
developed upto that point and plans are devised for the next cycle. This model is a
realistic approach to the development of large scale software. It suggests a systematic
approach according to classical life cycle, but incorporates it into iterative framework.
It gives a direct consideration to technical risks. Thus, for high risk projects, this
model is very useful. The risk analysis and validation steps eliminate errors in early
phases of development.
3.2.3 Selection of Approach
“Which development process is best” or “Which development process is best for my
project?” In search of these questions we can debate the advantage and disadvantages
of one development process over another until we get fed up, but we will never reach
the conclusion,Why? Because different processes have different strengths and
weaknesses.
Each development process is viable and useful, but each one works better in some
situations than it does in others.
If you’re working on a somewhat traditional project for example, a school
management system, where the features are defined a priori and it’s possible to freeze
the specification, the waterfall process is best in that case. If you’re working on a
project whose nature and scope are vague or unpredictable (for example, a project
where you cannot determine your next steps until you have reached a certain plateau),
consider either a spiral or feedback waterfall process. These two processes are very
similar in that both involve a series of many frequent iterations of the design-
implementation-integration-test cycle seen in the waterfall process.

33
Software Engineering
Concepts and Standards
3.3 ANALYSIS
Analysis describes the “What” of a system. The objectives that are to be achieved in
Software process development, are the requirements. In the requirements analysis
phase, the requirements are properly defined and noted down. The output of this phase
is SRS (Software Requirements Specification) document written in the natural
language. According to IEEE, requirements analysis may be defined as (1) the process
of studying user’s needs to arrive at a definition of system hardware and software
requirements (2) the process of studying and refining system hardware or software
requirements.
The main activities in the analysis phase are cost estimation, project planning and
scheduling, feasibility report preparation, and the development of SRS (software
requirement specifications) document of the project.
Feasibility Report
You may include the following contents in the feasibility report given in the Table
shown below:
Topic Some of the contents of the topic
Introduction Include the project background and report layout here.
Terms of Reference Define the expectations of the project, the Time Frame and
Available Resources
Existing System Define here the results of Fact Finding, working of the
Current System and the problems in the Current System
System Requirements Give the system requirements here, after discussion with the
System User
Proposed System Define the outline of the Proposed System, key Input and
Output to and from the system
Development Plan, Cost
Feasibility and other
feasibilities
You can include the Gantt Chart, Pert Chart, cost
estimation, etc.
Cost Estimation
Cost estimates are made to discover the cost to the developer, the cost of producing a
software system. It is an important activity in the real time project management,
however, this course may not require you to calculate cost estimation but it is
important for you to understand different methods of cost estimation for future use.
There are different cost estimation methods available like LOC, COCOMO, Putnams,
Statistical method and functional point methods, you can refer your MCS-034 course
material for further details.
Project Planning and Scheduling
Scheduling of a software project can be correlated to prioritising various tasks (jobs)
with respect to their cost, time and duration. Scheduling can be done with resource
constraint or time constraint in mind. Depending upon the project, scheduling methods
can be static or dynamic in implementation.
Scheduling Techniques

34
Elements of Project
DevelopmentThe following are the various types of scheduling techniques in software engineering:
Work Breakdown Structure: The project is scheduled in various phases following a
bottom-up or top-down approach. A tree-like structure is followed without any loops.
At each phase or step, milestone and deliverables are mentioned with respect to
requirements. The work breakdown structure shows the overall breakup flow of the
project and does not indicate any parallel flow. Figure 3 depicts an example of a work
breakdown structure.
Analysis
Software Project
Design Testing
Maintenance
Coding
Figure 3: An example WBS
The project is split into requirement and analysis, design, coding, testing and
maintenance phase. Further, requirement and analysis is divided into R1,R2, ..
Rn; design is divided into D1,D2..Dn; coding is divided into C1,C2..Cn; testing is
divided into T1,T2.. Tn; and maintenance is divided into M1, M2.. Mn. If the project
is complex, then further sub-division is done. Upon the completion of each stage,
integration is done.
Flow Graph: Various modules are represented as nodes with edges connecting nodes.
Dependency between nodes is shown by flow of data between nodes. Nodes indicate
milestones and deliverables with the corresponding module implemented. Cycles are
not allowed in the graph. Start and end nodes indicate the source and terminating
nodes of the flow. Figure 4 depicts a flow graph.
M2
M1
M3
M4 EndStart
Figure 4: Flow graph
M1 is the starting module and the data flows to M2 and M3. The combined data from
M2 and M3 flow to M4 and finally the project terminates. In certain projects, time
schedule is also associated with each module. The arrows indicate the flow of
information between modules.
Gantt Chart or Time Line Charts: A Gantt chart can be developed for the entire
project or a separate chart can be developed for each function. A tabular form is
maintained where rows indicate the tasks with milestones and columns indicate

35
Software Engineering
Concepts and Standards duration (weeks/months) . The horizontal bars that spans across columns indicate
duration of the task. Figure 5 depicts a Gantt Chart. The circles indicate the
milestones.
Program Evaluation Review Technique (PERT): Mainly used for high-risk projects
with various estimation parameters. For each module in a project, duration is
estimated as follows:
Figure 5: Gantt chart
Tasks Week1 Week2 Week3 Week4
i a1
ii a2
Milestone
i b1
ii b2
Milestone
i c1
Milestone
i d1
ii d2
Milestone
1) Time taken to complete a project or module under normal conditions, tnormal.
2) Time taken to complete a project or module with minimum time (all resources
available), tmin.
3) Time taken to complete a project or module with maximum time (resource
constraints), tmax.
4) Time taken to complete a project from previous related history,
Thistory.
An average of tnormal, tmin, tmax and thistory is taken depending upon the project.
Sometimes, various weights are added as 4*tnormal, 5*tmin, 0.9*tmax and 2*thistory
to estimate the time for a project or module. The Project manager fixes the
parameters.
The software project management tools support project planning and scheduling.
Some of the sample information that you can produce using these tools are:
A Sample Partial Project Plan
Overall Goal of the Project
The proposed software system should be able to:
read the structured data available in the Excel files and store it in a Database
system,
validate data of the database on the basis of predefined business rules,
prepare reports on data that is found to be in error during validation, and
prepare MIS reports from the validated data.
The Primary Data

36
Elements of Project
DevelopmentThe Primary data in the system is the employee data of the participant companies.
Delivery Deadlines
6 months from the date of Approval.
PROJECT PLAN
1. OBJECTIVES
The objective of the system can be defined here as:
The proposed system should be able to read the data from Excel files and store
validated data in the Database.
……………………………………….
2. SPECIFIC PRODUCTS TO BE DELIVERED
The products that will be delivered (You need not include all for an actual system):
The tested system and Network
Clint Workstations
A robust Database Management Server
Any other third party software.
3. ACTIVITIES AND MILESTONES
The activities in the system, after including the provisions for security, are:
Verification of the Users.
Migration of the Excel data.
Validation of the migrated data.
………………………………….
The milestones in the system are:
Start of the Project : 1st June, 2006
SRS Completion : 28th June, 2006
Requirements finalisation : 1st July, 2006
……………………………………………………
4. RESOURCE REQUIREMENT
The Hardware, Software, and Tools are required for the three different environments,
viz., Development environment, Quality Control environment, Deployment
environment. These resources may be documented accordingly.
5. SCHEDULING
GANTT Chart

37
Software Engineering
Concepts and Standards A very elementary Gantt or Timeline Chart for the development plan is given below.
The plan explains the tasks versus the time they will take to complete.
PERT Chart
A suitable PERT Chart for the development plan can be given here.
6. BUDGETARY ESTIMATES
The whole budgetary estimates may be divided into resource procurement and
software development costs. The software development efforts and cost may be
estimated with the help of COCOMO or any other model used by the organisation.
Software Requirement Specification
This document is generated as output of requirement analysis. The requirement
analysis involves obtaining a clear and thorough understanding of the product to be
developed. Thus, SRS should be a consistent, correct, unambiguous and complete,
document. The developer of the system can prepare SRS after detailed communication
with the customer. An SRS clearly defines the following:
External Interfaces of the system: They identify the information which is to
flow ‘from and to’ to the system.
Functional and non-functional requirements of the system. They stand for the
finding of run time requirements.
Design constraints:
Normally IEEE standard is followed. A typical format of SRS is as follows:
TABLE OF CONTENTS
Introduction
Purpose
Scope
Definition
Product and its function
Benefits and Goals
Overview.
Overall Description
Product Description

38
Elements of Project
DevelopmentProduct Functioning
Functions of Project
Users of Project
Assumptions made.
Specific Requirements
Interface Requirements
User Requirements
Hardware Requirements
Software Requirements
Logical Database Requirements.
Basic Processing Actions of the System
Appendices
Input/Output Formats
Instruction for Security
Results of Fact Finding
Data Model
Functional Model
Process Specification.
A sample portion of SRS is given below:
INTRODUCTION
Purpose
SRS contains details of the proposed software system, sufficient enough for the
designers to design the system. Thus, SRS is a means of communicating the findings
of the analysis stage to the design stage. The SRS includes:
17 Interface,
18 Logical Database,
19 Hardware, and
20 Performance and other constraints.
It also contains the assumptions made by the analyst and any systemic dependency.
Scope
The scope of SRS contains all the areas related to the project. The scope of SRS
includes:
Proposed software description,
Users of the proposed software,
Functional requirements of the software,
Assumptions and dependencies in the system, and
Constraints.
Definition
.……………………..
Product and its function
………………………..
Benefits and Goals

39
Software Engineering
Concepts and Standards ………………………..
Overview
..………………………
Overall Description
Product Description
The Client should be able to upload the raw data in Excel files into the Database. The
raw data is then validated using ………
Product Functioning
The Raw data from the Clients is put into the database.
…………………………………………………..
Functions in the Project
There are five functions of the system.
User Verification
The User is asked to enter the Username and Password. The system checks the
validity of Username and Password, otherwise the User is asked to do so again. A
maximum of three valid attempts are given to the user.
Upload Raw Data
……………………….
Validate Data
……………………….
Put the Validated Data
……………………….
Generating Reports
…………………………..
Users of the Product
………………………
Assumptions
……………………
SPECIFIC REQUIREMENTS
Interface Requirements
The Interface requirements include:
Easy to follow Interface,
Very few graphics,
No hidden buttons, and
Relevant error messages.
……………………………….
User Requirements
After a careful study of the requirements of the Client, analysts have come up with a
set of requirements.
…………………………………..
Hardware and Software Requirements
There are three environments that have been created for the project, viz.,
Development environment,

40
Elements of Project
DevelopmentQuality Control environment, and
Production environment.
The hardware requirements for all the platforms may be indicated here.
Logical Database Requirements
The following information is to be stored in the database.
The Clients Raw data,
The Clients Validated data, and
Username and Password.
BASIC PROCESSING ACTIONS OF THE SYSTEM
The basic processing actions of the system are.
Verification of the User
………………………………..
Upload Data
APPENDICES
APPENDIX A
INPUT / OUTPUT FORMATS
The input formats for the system contains the following screens.
The convention used while making the input formats are.
Square box is used for user input
Rounded Square box is used for system display
Login Screen
The following screen that inputs the Username and Password from the User for
authentication of the User to the system is:
Login Id
Password
LoginClose
APPENDIX B
Instructions For Security
Security is an integral part of any system. Clients send their confidential data with
trust and it is our foremost duty to protect the security and privacy of the data of the
Clients.
……………………… APPENDIX C
RESULTS OF FACT FINDING
Working of the Current System and its Problems
APPENDIX D

41
Software Engineering
Concepts and Standards DATA MODEL
Classes involved in the Project
Clients
Excel Data Files
Reports
Association between the classes
Clients fill data in the Excel Data Files (M .. M)
Clients generate Reports (M … M)
E-R/Object Diagram for the System
fills data creates CLIENT
Attributes of the Entities are:
Object Classes Attribute
Clients number
name
address
phone number
fax
Excel data Files excel file number
client number
Reports report number
report name
client number
APPENDIX E
FUNCTIONAL MODEL
One sample DFD at level 1 contains the following processes:
Verification of username and Password
Data Migration,
Validation of Migrated data, and
Generating Reports.
You can make various levels of DFDs
EXCEL DATA
FILES
REPORTS
Raw Data Storage
Username & password
Excel data file
Bad password & username
Password & Username OK
Data
Mi i
Username &
password
verification

42
Elements of Project
Development
Process Specification
Let us give one sample process verification.
Process: Username and Password Verification
Input: Username & Password
Output: Access granted or denied message
Processing
The Client enters the Username and Password and clicks the Login button.
The system connects with the DBMS and verifies them in the related database. If both
are valid: allow user to enter the system with the allowed access rights for that user.
Otherwise prompt wrong Username-Password message and take the user to the screen
where s/he can re-enter the Username-Password.
Interface Description
The interface contains the text boxes where the user can enter Username and
Password. It also contains a Login button for login and a Close button on closing the
application.
Internal Data Structure
The process uses the encrypted username and password table that also contains
information on access permission.
3.4 DESIGN
Software design is all about developing the blue print for designing workable
software. The goal of a software designer is to develop models that can be translated
into software. Unlike design in civil and mechanical engineering, software design is a
new and evolving discipline contrary to classical building design etc. In early days,
software development mostly concentrated on writing codes. Software design is
central to the software engineering process. Various design models are developed
during the design phase. The design models are further refined to develop detailed
design models, which are closely related to the program.
Software Design Process
Software design is the process of applying various software engineering techniques
for developing models in order to define a software system, which provides sufficient

43
Software Engineering
Concepts and Standards details for the actual realisation of the software. The goal of software design is to
translate user requirements into an implementable program.
Software design is the only way through which we can translate user requirements to
workable software. In contrary to designing, a building software design is not a fully
developed and mature process. Nevertheless the techniques available provides us with
tools for a systematic approach to the design of software. Figure 6 depicts the process
of software design.
Functional
model
User
Requirements System design Code
Information
model
Requirements
Data design
Procedural design
Figure 6: Process of software Design
During the process of software design, the information model is translated in to data
design. Functional model and behavioural model are translated to architectural design,
which defines major component of the software. Keeping in view the importance of
design, it should be given due weightage before rushing to the coding of software.
Software design forms the foundation for implementation of a software system and
helps in the maintenance of software in the future too. Software quality and software
design process are highly interrelated. Quality is built into the software during the
design phase.
High level design gives a holistic view of the software to be built, whereas low level
refinements of the design are very closely related to the final source code. A good
design can make the work of programmer easy and hardly allows the programmer to
forget required details. Sufficient time should be devoted to the design process to
ensure good quality software.
The following are some of the fundamentals of design:
21 The design should follow a hierarchical organisation,
22 Design should be modular or logically partitioned into modules, which are
relatively independent and perform independent task,
23 Design leading to interface that facilitates interaction with the external
environment,
24 Step-wise refinement to more detailed design, which provides necessary details
for the developer of the code, and
25 Modularity is encouraged to facilitate parallel development, but, at the same
time, too many modules lead to the increase of effort involved in integrating the
modules.
System Design Specification
The system design specification or software design specification as referred to, has a
primary audience, the system implementer or coder. It is also an important source of
information the system verification and testing. The system design specification gives
a complete understanding of the details of each component of the system, and its
associated algorithms, etc.
44
Elements of Project
DevelopmentThe system design specification documents the requirements of the system be
implemented. It consists of the final steps of describing the system in detail before
coding begins.
The system design specification is developed in a two stage process. In the first step,
design specification generally describes the overall architecture of the system at a
higher level. The second step provides the technical details of low-level design, which
will guide the implementer. It describes exactly what the software must perform to
meet the requirements of the system.
Tools for Describing Design
Various tools are used to describe the higher level and lower level aspects of system
design. The following are some of the tools that can be used in the System Design
Specification to describe various aspects of the design.
Data Dictionary
Definition of all the data and control elements used in the software product or
sub-system. Complete definition of each data item and its synonyms are
included in the data dictionary. A data dictionary may consist of description
of data elements and definitions of tables.
Description of Data Element:
26 Name and aliases of data item (its formal name).
27 Uses (which processes or modules use the data item; how and when the data
item is used).
28 Format (standard format for representing the data item).
29 Additional information such as default values, initial value(s), limitations and
constraints that are associated with the data elements.
Table Definitions
Table name and Aliases.
Table owner or database name.
Key order for all the tables, possible keys including primary key and foreign key.
Information about indexes that exist on the table.
Database Schema: Database schema is a graphical presentation of the whole
database. Data retrieval is made possible by connecting various tables through keys.
Schema can be viewed as a logical unit from the programmer’s point of view.
E-R Model: Entity-relationship model is database analysis and design tool. It lists
real-life application entities and defines the relationship between real life entities that
are to be mapped to the database. E-R model forms the basis for database design.
Security Model: The database security model associates users, groups of users or
applications with database access rights.
Trade-off Matrix

45
Software Engineering
Concepts and Standards A matrix that is used to describe decision criteria and relative importance of each
decision criterion. This allows comparison of each alternative in a quantifiable term.
Decision Table
A decision table shows the way the system handles input conditions and subsequent
actions on the event. A decision table is composed of rows and columns, separated
into four separate quadrants.
Input Conditions Condition Alternatives
Actions Subsequent Action Entries
Timing Diagram
Describes the timing relationships among various functions and behaviours of each
component. They are used to explore the behaviours of one or more objects
throughout a given period of time. This diagram is specifically useful to describe logic
circuits.
State Machine Diagram
State machine diagrams are good at exploring the detailed transitions between states
as the result of events. A state machine diagram is shown in Figure 7.
Figure 7: A state machine diagram
Object Interaction Diagram
It illustrates the interaction between various objects of an object-oriented
system. Please refer to Figure 8. This diagram consists of directed lines
between clients and servers. Each box contains the name of the object. This
diagram also shows conditions for messages to be sent to other objects. The
vertical distance is used to show the life of an object.
Message 1 ( ) Message 2 ( )
Return ( ) Return ( )
Object: class1 Object:class2 Object:class2
Figure 8: An object interaction diagram
Activate
module
Log in State 2 Start State 1
Log out

46
Elements of Project
DevelopmentA Flow chart shows the flow of processing control as the program executes. Please
refer to Figure 9.
Start
Input
Processing
Output
End
Figure 9: Flow chart
Inheritance Diagram
It is a design diagram work product that primarily documents the inheritance
relationships between classes and interfaces in object-oriented modeling. The
standard notation consists of one box for each class. The boxes are arranged in a
hierarchical tree according to their inheritance characteristics. Each class box
includes the class name, its attributes, and its operations. Figure 10 shows a
typical inheritance diagram.
Account Client
IndividualCorporateS/B account Current Account
Object
Figure 10: A typical inheritance diagram
Aggregation Diagram
The E-R model cannot express relationships among relationships. An
aggregation diagram shows relationships among objects. When a class is
formed as a collection of other classes, it is called an aggregation relationship
between these classes. Each module will be represented by its name. The
relationship will be indicated by a directed line from container to container.
The directed line is labelled with the cardinality of the relationship. It

47
describes “has a” relationship. Figure 11 shows an aggregation between two
classes (circle has a shape).
Software Engineering
Concepts and Standards
Circle Shape
Figure 11: Aggregation
Structure Chart
A structure chart is a tree of sub-routines in a program (Refer to Figure 12). It
indicates the interconnections between the sub-routines. The sub-routines
should be labelled with the same name used in the pseudo code.
Program B1 Program B2
Sub System B
Program A1 Program A2 Program A3
Sub System A
System
Figure 12: A structures chart
Pseudocode
Pseudocode is a kind of structured English for describing algorithms in an
easily readable and modular form. It allows the designer to focus on the logic
of the algorithm without being distracted by details of language syntax in
which the code is going to be written. The pseudocode needs to be complete.
It describes the entire logic of the algorithm so that implementation becomes a
routine mechanical task of translating line by line into the source code of the
target language. Thus, it must include flow of control.
This helps in describing how the system will solve the given problem.
“Pseudocode” does not refer to a precise form of expression. It refers to the
simple use of Standard English. Pseudocode must use a restricted subset of
English in such a way that it resembles a good high level programming
language. Figure 13 shows an example of pseudo code.
ELSE
Display regular time message
ENDIF
IF HoursWorked > MaxWorkHour THEN
Display overtime message
Figure 13: Example of a pseudocode

48
Elements of Project
DevelopmentContents of a Typical System Design Specification Document
1. Introduction
1.1 Purpose and scope of this document:
Full description of the main objectives and scope of the SDS
document is specified.
1.2 Definitions, acronyms, abbreviations and references
Definitions and abbreviations used are narrated in alphabetic
order. This section will include technical books and documents
related to design issues. It must refer to the SRS as one of the
reference book.
2. System architecture description
2.1 Overview of modules, components of the system and sub-systems
Structure and relationships. Interrelationships and dependencies among
various components are described. Here, the use of structure charts can be
useful.
3. Detailed description of components
29.2.1.1.1.1 3.1 Name of the component
29.2.1.1.1.2 3.2 Purpose and function
29.2.1.1.1.3 3.3 Sub-routine and constituents of the component
29.2.1.1.1.4 3.4 Dependencies, processing logic including pseudocode
29.2.1.1.1.5 3.5 Data elements used in the component.
4. Appendices.
3.5 SAMPLE DESIGN DOCUMENT
SCOPE
Define the System’s Objectives here
……………………
Architecture Design
Give the architecture of the system based on the analysis and flow models.
DATA DESIGN
Refine the E-R diagram if needed and make one table for each entry and data store
and table for all M.M relationships.
For example, the Client table may be:
COLUMN HEADING CONSTRAINTS
client_no Primary Key
client_number Not Null
client_addr Not Null
…….

49
Software Engineering
Concepts and Standards INTERFACE DESIGN
Human-Machine Interface Design Rules
Follow the basis rules for the interface design. These can be classified into three main
types:
External Interface design
Interface to the External Data
Interface to the external system or devices
External Interface Design
30 Easy to follow Interface
31 Zero or very less graphics (as not being used commercially)
32 No hidden buttons
33 Proper error messages
…………………………………….
Interface to the External Data
The system has to use proper external data. The system makes a connection with the
DBMS to do so. The rules that have to be followed while interfacing with the external
data are:
You must do the type checking.
Field overrun that is maximum size should be enough to accommodate the
largest data of that type
It is always better to encrypt the data and then store it in the database.
Interface to the External System or Device
…………………………………..
PROCEDURAL DESIGN
Verification of the User
Algorithm
Input: ………..
Output: …………….
STEPS
Ask the Client to enter Username-Password.
Check Username and Password combination in the encrypted database.
If the Username and Password is correct then give permission with allowed access
rights.
Else, access is denied and the enter Username and Password screen is shown again.
This cycle may be repeated for a maximum of three times.

50
Elements of Project
DevelopmentFlow Chart
START
Enter username
and Password
Maximum 3 chances
Verify from
database
Is Correct?Print bad Username and
Password
No
Yes
Interface Design
Login Screen
Output / Reports Design
Design your output reports
Data Security and Rights
Security is the integral part of any system. You can use encryption and authentication
or any other security mechanism as the need may be.
Allow permission as per
access
STOP

51
Software Engineering
Concepts and Standards 3.6 CODING
The input to the coding phase is the SDD document. In this phase, the design
document is coded according to the module specification. This phase transforms the
SDD document into a high-level language code. Currently, major software companies
adhere to some well-specified and standard style of coding called coding standards.
Good coding standards improve the understanding of the code. Once a module is
developed, a check is carried out to ensure that coding standards are followed. Coding
standards generally give guidelines on the following:
i) Name of the module
ii) Internal and External documentation of source code
iii) Modification history
iv) Uniform appearance of codes.
It must contain proper comments. The coding should be structured as per software
architecture.
VALIDATION CHECKS
Verification of the User
Both User Id and Password are mandatory
The size of User Id must be 10 characters long
ERROR AND EXCEPTION HANDLING
A proper mechanism of Error Handling is necessary in any system.
COMMENTS
Comments are an integral part of any system. Like any properly developed and
maintained system with high quality, this system too has sufficient comments and
description of the processes, functions, classes, and data structures.
CODING STANDARDS
The defined coding standards of software developers may be followed. A sample
clause in coding standard may be: “A consistent naming pattern is one of the most
important elements of predictability and discoverability in a managed code. For each
type, you must follow the defined capitalisation styles, case sensitivity and word
choice”.
3.7 TESTING
Testing
Testing is the process of running the software on manually created inputs with the
intention to detect errors. In the process of testing, an attempt is made to detect errors,
to correct the errors in order to develop error free software. Testing is performed
keeping the user’s requirements in mind and before the software is actually launched
on a real system, it is tested.
Normally, while developing the code, a software developer also carries out some
testing. This is known as debugging. This unearths the defects that must be removed
from the program. Testing and debugging are different processes. Testing is meant for
finding the existence of defects while debugging stands for locating the place of errors

52
Elements of Project
Developmentand correcting the errors during the process of testing. The following are some
guidelines for testing:
i) Test the modules thoroughly, cover all the access paths, generate enough data to
cover all the access paths arising from conditions.
ii) Test the modules by deliberately processing/entering wrong data.
iii) Specifically create data for conditional statements. Enter data in test file, which
will satisfy the conditions and test the script again.
iv) Test for locking by invoking multiple concurrent processes.
The following objectives are to be kept in mind while performing testing:
i) It should be done with the intention of finding errors.
ii) Good test cases should be designed with a probability of detecting undiscovered
errors.
iii) A successful test is one that uncovers yet undiscovered error(s).
The following are some of the principles of testing:
i) All tests should be performed according to user requirements.
ii) Planning of tests should be done long before testing.
iii) Starting with a small test, it should proceed towards large tests.
The following are different levels of testing:
Large systems are built out of subsystems, subsystems are made up of modules, of
procedures and functions. Thus, in large systems, testing is performed at various
levels, like unit level testing, module level testing, subsystem level, and system level
testing.
In all levels, testing is performed to check interface integrity, information content, and
performance.
The following are some of the strategies for testing: This involves design of test
cases. Test case is a set of designed data for which the system is tested. Two testing
strategies are present.
i) Code Testing: The code testing strategy examines the logic of the system. In
this, the analyst develops test cases for every instruction in the code. All the
paths in the program are tested. This test does not guarantee against software
failures. Also, it does not indicate whether the code is according to
requirements or not.
ii) Specification Testing: In this, testing with specific cases is performed. The
test cases are developed for each condition or combination of conditions and
submitted for processing.
The objective of testing is to design test cases that systematically uncover different
classes of errors and do so with the minimum amount of time and effort. Testing
cannot show the absence of errors. It can only find the presence of errors. The test
case design is as challenging as software development. Still, however effective the
design is, it cannot remove 100% errors. Even, the best quality software are not 100 %
error free. The reliability of software is closely dependent on testing.
Some testing techniques are the black box and the white box methods.
White Box Testing: This method, also known as glass box testing, is performed
early in the testing process. Using this, the software engineer can derive tests that
guarantees exercises of all independent paths within the module at least once. It has
the following features:

53
Software Engineering
Concepts and Standards i) Exercises all logical decisions on their true and false sides.
ii) Executes all loops at their boundaries and within their operational bounds.
iii) Exercises internal data structures to assure their validity.
Black Box Testing: This is applied during the later stage of testing. It enables the
software developer to derive a set of input conditions that will fully exercise the
functional requirements of a program. It enables him/her to detect errors like
incorrect or missing functions, interface errors, data structures or external data base
access errors and performance errors etc.
3.8 TEST DESIGN DOCUMENT
During system development, this document provides the information needed for
adequate testing. It also lists approaches, procedures and standards to ensure that a
quality product meets the requirement of the user. This document is generally
supplemented by documents like schedules, assignments and results. A record of the
final result of the testing should be kept externally.
This document provides valuable input for the maintenance phase.
The following IEEE standards describe the standard practices on software test and
documentation:
829-1998 IEEE Standard for Software Test Documentation
1008-1987 (R1993) IEEE Standard for Software Unit Testing
1012-1998 IEEE Standard for Software Verification and Validation
The following is the typical content of the Test Design Document:
1. Introduction
Purpose
The purpose of this document and its intended audience are clearly stated.
Scope
Give an overview of testing process and major phases of the testing process. Specify
what is not covered in the scope of the testing such as, supporting or not third party
software.
Glossary
It defines technical terms used in this document.
References
Any references to other external documents stated in this document including references
to related project documents. They usually refer to the System Requirement Specification
and the System Design Specification documents.
Overview of Document
Describe the contents and organisation of the document.
Test Plan
A test plan is a document that describes the scope, approach, resources and schedule
of intended testing activities. It identifies test items, the features to be tested, the

54
Elements of Project
Developmenttesting tasks, and the person who will do each task, and any risks that require
contingency planning.
Schedules and Resources
An overview of the testing schedule in phases along with resources required for
testing is specified.
Recording of Tests
Specify the format to be used to record test results. It should very specifically name
the item to be tested, the person who did the testing, reference of the test process/data
and the results expected by that test, the data tested. If a test fails, the person
responsible for correcting and re-testing is also documented. The filled out format
would be kept with the specific testing schedule. A database could be used to keep
track of testing.
Reporting Test Results
The summary of what has been tested successfully and the errors that still exist which
are to be rectified is specified.
Verification Testing
Unit Testing
For each unit/component, there must be a test, which will enable the tester to know the
accurate functioning of that unit.
Integration testing
Integration test is done on modules or sub-systems.
Validation Testing
System Testing
This is top level integration testing. At this level, requirements are validated as
described in the SRS.
Acceptance and Beta Testing
List test plans for acceptance testing or beta testing. During this test, real data is used
for testing by the development team (acceptance testing/alpha testing) or the customer
(beta testing). It describes how the results of such testing will be reported and handled
by the developers.
A sample test case may be:

55
Software Engineering
Concepts and Standards Login Screen
S.No. Test Case ID Do Expected Result
1. QT1-001 Enter user id in the text
box specified.
User id must not be more
than 510 characters and it
should not contain any
special characters and no
spaces including in the
start.
Enter password in the text
box specified. Password
must not be more than 10
characters.
Click on the Login button.
Successful login in to
the system if the values
are found in the
database.
…..
Test Log
Function Purpose of Set of
Test Cases per
Area
Test Case
ID(s)
No of Test
Cases run
Number of
Test Cases
Successful
Login The verification of
username and
password
QT1-001 8 100%
……
3.9 SUMMARY
Software engineering covers the entire range of activities used to develop software.
The activities include requirements analysis, program development using some
recognised approach like structured programming, testing techniques, quality
assurance, management and implementation and maintenance. Further, software
engineering expects to address problems, which are encountered during software
development.
3.10 FURTHER READINGS
1.
2.
3.
Software Engineering, Sixth Edition, 2001, Ian Sommerville; Pearson Education.,
New Delhi.
Software Engineering – A Practitioner’s Approach, Roger S. Pressman; McGraw-
Hill, New Delhi.
Jeffrey A. Hoffer, Joey F. George, Joseph S. Valacich; Modern Systems Analysis
and Design; Pearson Education; Third Edition; 2002.

56
Elements of Project
Development4.
5.
6.
7.
8.
9.
10.
11.
12.
ISO/IEC: 18019: Guide lines for the design and preparation of user
documentation for application software.
MCS-034 Course material of MCA (revised syllabus), IGNOU.
MCS-014 Course material of MCA (revised syllabus), IGNOU.
http://www.rspa.com
http://www.ieee.org
http://standards.ieee.org
http://www.sce.carleton.ca/squall
http://en.tldp.org/HOWTO/Software-Release-Practice-
HOWTO/documentation.html
http://www.sei.cmu.edu/cmm/

57
Category Wise Problem
DefinitionUNIT 4 CATEGORY WISE PROBLEM
DEFINITION
Structure Page Nos.
4.0 Introduction 57
4.1 Objectives 57
4.2 Project Selection 57
4.3 Project Categories 58
4.4 Application Development Projects 58
4.5 Networking Projects 59
4.6 System Software Development Projects 60
4.7 Web Development Projects 60
4.8 List of Application and Tools 61
4.9 Summary 62
4.10 Further Readings 62
4.0 INTRODUCTION
The project is dedicated to investigating the potentials of advanced technologies in
group learning, information exchange and network conferencing involving teachers
and students. Project development is the student’s opportunity to do a significant piece
of work in an area of personal interest and to expand his or her understanding of
computer science. The students are free to pursue any area of computer science that is
of their interest e.g., web application development or network applications etc. This
unit provides a description of project problems and ideas in different areas of
computer science. However, students can elaborate the project definitions further
after discussions with the counsellor. You should select project problems, that is
challenging, but manageable within the resources and time available.
4.1 OBJECTIVES
After going through this unit, you should be able to:
get an opportunity to investigate a chosen topic in considerable depth;
know how to start a project;
understand the given project problems;
develop or critical awareness of current problems and/or new insights, in their
field of study;
know the application and tools for project development, and
deal with project analysis issues both systematically and creatively.
4.2 PROJECT SELECTION
The selection of project area and problem is of crucial importance. The area needs to
integrate the interests of the student with the specialisation of the counsellor, and be of
a suitable level of difficulty. Students are encouraged to think about the subject areas
of their interest in which they would like to undertake a project, and after discussion
with the counsellor, or preliminary project problem can be selected. A counsellor is
formally allocated to students, and in consultation with the counsellor, a project
proposal is prepared. Selecting a project problem can be difficult from the given set of
projects. You could do so, by answering some of the following questions.

58
Elements of Project
DevelopmentAm I interested in this area or topic? This is a very important question. If your answer
is no, choose another area or topic. What do I know about this subject or topic?
This would determine the amount of work and research you have to put in. What are
some of the things that can be discussed about this subject or topic? This identifies the
amount of sub-topics (scope) that can be discussed. It also helps determine how easy
or difficult this subject would be. Who will benefit from this project? It will determine
the importance of your project. At who am I targeting this project? This will help you
in the presentation and your answer to this question should not be “only the
examiner”.
The projects offered in this unit may vary substantially in breadth, depth and degree of
difficulty. The most important thing is to shortlist a set of projects that are right for
you. A number of students are better suited to well-defined and relatively secure
projects that provide scope for representing expertise with a low risk of
disappointment. Other students are better advised to undertake relatively difficult,
insecure projects that require a high degree of innovative input and/or technical
problem solving.
You can elaborate on project definitions after discussing it with your counsellor; so
you may require different resources and references in order to understand and
elaborate on the definition of these project areas. You can get detail understanding of
these projects from your industrial placement employer or another similar software
organisation or University (e.g., different department’s, teaching, research or
administration) previous projects that need further work done similar to the project
description given. You should start the project with a commonly known project
problem, but with a novel solution, applying a well-known solution to a novel class of
problems and evaluating several possible solutions to find the best one for solving a
particular problem.
4.3 PROJECT CATEGORIES
We have divided different projects into four broad areas / categories of computer
science as given below, so that you can select any of these category for your
Mini project.
Application development
Networking project
System software
Website development.
An initial list of project definition will be given below in the following sections
however, a student can elaborate project definitions after discussing with the
counsellor.
Students should select projects from the given categories according to their interest,
experience and knowledge in that area, students should evaluated themselves
objectively and, then choose the project. Students may propose modification and
suggestions in the given project specification and finalise it with the approval of the
counsellor.
4.4 APPLICATION DEVELOPMENT PROJECTS
Here, we will focus on investigating new ideas in application development through
different projects. A set of names of possible projects and their details will be

59
Category Wise Problem
Definitionpresented. However, students are encouraged to be creative and develop their own
ideas in the given project descriptions.
1) Project Name: Cricket Training Management System
Description
Design and develop a Cricket Training Management System to improve the
quality of training. Assume there are many teams (according to their age and
experience) and each of them need different training, different set of exercises,
and different diet. With your system it should be possible to select a set of
exercises and create a programme for each team according to their age and
experience, and keep track of each team member and his/her performance.
Also, it should include the attendance system to record, who did not turn up for
a particular session. Your system should also prepare a diet chart for each and
every member considering his or her age, height, weight, role, level etc.
2) Project Name: Conference Room Booking
Description
Build a software for online conference room booking on date and time basis, in
order to better facilitate meetings and collaborative work for people connected
the by local area network. This software helps any authorised person book a
shared conference room from his/her desk itself and also shows the availability
of a particular conference room at the chosen time and date. This software also
handles various device booking such as an amplifier, video switch and projector
etc. Also, this software can be improvised to send a confirmation mail to the
user’s id alongwith the booked timings and date.
4.5 NETWORKING PROJECTS
We will focus on investigating new ideas in networking research through different
networking projects. A set of possible project topics, which will be presented.
However, students are encouraged to be creative and develop their own ideas in the
given project descriptions.
1) Project Name: Advance Search Utility for Network
Description
Develop a search utility for searching the different documents based on size (in
bytes), type (e.g., html, doc, pdf etc), date-of-modification and contents (text
written in document) from the different machines in a network. It will search the
documents and indicate the source machine, file and other relevant information.
2) Project Name: Simulator of Bus Network
Description
Buses have been widely used in LANs (e.g., Ethernet) to inter-connect a
moderate number of computers. This project develops a discrete-event simulator
for a bus-based network with the intend of analyse system performance under
different working conditions like:
Performance on cable breakdown
Performance on additional computers are added or
Performance on heavy traffic
Possibility of Data leakage

60
Elements of Project
DevelopmentPossibility of Virus infection
Performance with Carrier Sense Multiple Access
Performance with a bus master which controls access to the shared bus
resource.
4.6 SYSTEM SOFTWARE DEVELOPMENT
PROJECTS
Here we will focus on investigating new ideas in application development through
different projects. A set of possible project name and their details will be presented.
However, students are encouraged to be creative and develop their own ideas in the
given project descriptions.
1) Project Name: Advance Data Manager
Description
The way we organise our information and files, in the same way, develop an
application, which will classify and group the files according to the user
requirements like size, type, date of modification, contents and other logical
relationships. Your application should create the different folders automatically
and place files into them. For example: I have 36 files in my folder say ABC,
and I want them to put in 4 folders named as 2003, 2004, 2005, 2006, which
should contain the files, created in the years 2003, 2004, 2005 and 2006
respectively. For this task simply I will select the files and ask my application to
do this work for me.
2) Project Name: Voice Password
Description
Passwords are usually used to achieve secure authentication in a computer
system. This project will require the student to come up with an alternative way
of authenticating usage using a combination of voice words to authenticate
users. The software should recognise the voice of each user uniquely and
correctly.
4.7 WEB DEVELOPMENT PROJECTS
Here we will focus on investigating new ideas in application development through
different projects. A set of possible project name and their details will be presented.
However, students are encouraged to be creative and develop their own ideas in the
given project descriptions.
1) Project Name: On line election
Description
Develop a website for “On line election”. The programmer should understand
the constraints and real time issues faced during elections. For example: Let
students of a college prepare for the elections president and other posts. Design
a website which will show all the details of all the contesting candidates, their
agenda, commitments etc. During the specific day students will securely
contribute his/her vote. Voting should be secure; program should not disclose
the identity of voter (e.g., who gave vote to whom should not disclose and
should not be accessible any one). The voter should be able to vote only once.
Voter authentication should be done properly.

61
Category Wise Problem
Definition2) Project Name: On-line examination
Description
Online examination for objective and subjective questions. For subjective
questions avoid the copy and paste function on the web page, only the keyboard
should work in the Box’s for descriptive questions. Timer should inform the
student about the amount of time left. Questions should be generated one after
another randomly; select the question from the database. User name and
password for each student should be checked properly. Automatically checking
of objective answers, and for descriptive answer manually checking should be
done. Provide online declaration of results.
The idea is to set up an on-line cost effective Test Engine. The examination
department, the academy will maintain a question bank. The Controller of
examinations will have the authority to modify the criteria for examinations
according to the academy’s rules.
The system will facilitate off-line evaluation of examinations and declaration of
results. The system will allow experts to send in their questions to the question
bank through this system. In general this system has the following objectives:
To design an on-line cost effective examination and evaluation system.
Fetch the questions randomly according to specific criteria from a large
question database.
Provide on-line evaluation and result declaration system.
Use latest IT tools and Internet/Intranet technology to make a on-line
Examination and evaluation system.
To save the time of students engaged in learning advanced tools and
technologies.
To create a multi user application for conducting examinations and
evaluating results on-line for intranet.
Measure your skills.
Certify your abilities.
4.8 LIST OF APPLICATION AND TOOLS
FRONT END / GUI Tools Visual Basic, Power Builder, X-Windows (X/lib, X/motif,
X/Intrinsic), Oracle Developer 2000,VC++, Jbuilder
RDBMS/BACK END Oracle, Ingres, Sybase, Progress, SQL Plus, Versant, MY
SQL, SQL Server, DB2
LANGUAGES C, C++, Java, VC++, C#
NETWORK SIMULATORS NS2, MIT’S, NETSIM, NIST, CPSIM, INSANE, NEST,
REAL, OPNET, JAVA
SCRIPTING LANGUAGES PERL, SHELL Scripts (Unix), TcL/TK
RDBMS/BACK END Oracle, Ingres, Sybase, Progress, SQL Plus, Versant, MY
SQL, SQL Server, DB2
.NET Platform Dyalog APL, VB.Net, C#.Net, Visual C#.Net, Net,
ASP.Net, Delphi

62
Elements of Project
DevelopmentMIDDLE WARE
(COMPONENT)
TECHNOLOGIES
COM/DCOM, Active-X, EJB, WINCE, MSMQ, BEA,
MessageQ, MTS, CICS
UNIX INTERNALS Device Drivers, RPC, Threads, Socket programming
ARCHITECTURAL
CONCEPTS
INTERNET
TECHNOLOGIES
COBRA, TUXEDO, MQ SERIES
DHTML, Java script, VB Script, Perl & CGI script,
HTML, Java, Active X, RMI, CORBA, SWING, JSP,
ASP, XML, EJB, Java Beans, Servlets, Visual Age for
JAVA, UML, VRML, WML, Vignette, EDA,
Broadvision, Ariba, iPlanet, ATG, BigTalk, CSS, XSL,
Oracle ASP server, AWT, J2EE, LDAP, ColdFusion,
Haskell 98
WIRELESS
TECHNOLOGIES
Blue Tooth, 3G, ISDN, EDGE
REALTIME OPERATING
SYSTEM/ EMBEDDED
SKILLS
QNX, LINUX, OSEK, DSP, VRTX, RTXC, Nucleus
OPERATING SYSTEMS WINDOWS 2000/ME, WINDOWS NT, WINDOWS XP,
UNIX, LINUX, IRIX, SUN SOLARIS, HP/UX, PSOS,
VxWorks, AS400, AIX, DOS
APPLICATION AREAS Financial / Insurance / Manufacturing / Multimedia /
Computer Graphics / Instructional Design/ Database
Management System/ Internet / Intranet / Computer
Networking-Communication Software development/ E-
Commerce/ ERP/ MRP/ TCP-IP programming / Routing
protocols programming/ Socket programming.
4.9 SUMMARY
Projects also often form an important focus of discussion at interview with future
employers as they provide a detailed example of what you can achieve. Projects
typically involve adopting an engineering approach to the design and development of
a software system that fulfils a practical need (including, for example, filling a
perceived gap in the general software market). You can choose your project topic
from the lists supplied in this unit. We encourage industry-related suggestions in our
projects topics and novel applications within the sciences, education or government.
4.10 FURTHER READINGS
1. http://www.rspa.com
2. http://standards.ieee.org
3. http://www.sce.carleton.ca/squall
4. http://www.isi.edu/nsnam/ns/
5. http://www.inrialpes.fr/planete/People/ernst/Documents/Simulator.html.
