apeosware management suite 2 - opencds-fb.fujifilm.com
TRANSCRIPT

Important(1) This manual may not be edited, modified or copied in whole or part without the written consent of the
publisher.(2) Parts of this manual is subject to change without prior notice.(3) The screen shots and the illustrations in this manual are used as examples. They may differ from yours
depending on the model, the software, or the OS.
Product information is provided at our Internet homepage. Visit https://www.fujifilm.com/fbglobal/eng/product/aw_manage_suite
May 2021 - Edition 1 (GM1210E2-1)©FUJIFILM Business Innovation Corp. All rights reserved.
ApeosWare Management Suite 2Setup Guide

2
Adobe, the Adobe logo, Acrobat, PostScript, and Reader are trademarks or registered trademarks of Adobe in the United States and other countries.Apple, Mac, Mac OS and Safari are trademarks of Apple Inc., registered in the U.S. and other countries.Google, the Google logo, Android, and the Android logo are trademarks or registered trademarks of Google Inc.IOS is a trademark or registered trademark of Cisco in the U.S. and other countries and is used under license.Intel, Intel Core, and Xeon are trademarks of Intel Corporation in the United States and other countries.Linux is the registered trademark of Linus Torvalds in the United States and other countries.McAfee and VirusScan are registered trademarks or trademarks of McAfee, Inc., and/or its affiliates in the United States and/or other countries.Microsoft, Windows, Windows Server, Active Directory, ActiveX, Excel, PowerPoint, Internet Explorer, OneDrive, SharePoint, SQL Server, and Visual Basic are registered trademarks of US Microsoft Corporation in the U.S. and other countries.Kofax, the Kofax logo, and OmniPage are trademarks or registered trademarks of Kofax, Inc. and/or affiliated companies in the United States and/or other countries.Oracle and Java are registered trademarks of Oracle and/or its affiliates.© Panasonic Solution Technologies Co., Ltd.2020PaSoRi is a registered trademark of Sony Corporation.QR Code is a registered trademark of DENSO WAVE INCORPORATED.Red Hat is a trademark of Red Hat, Inc.Vine Linux is a registered trademark of Project Vine and Vine Caves, Ltd. in Japan and other countries.Wi-Fi is a registered trademark of Wi-Fi Alliance.Other company names or product names are registered trademarks or trademarks of each company.Microsoft product screen shots reprinted with permission from Microsoft Corporation.Microsoft Corporation. All rights reserved.
The manual of this product includes descriptions of ApeosWare Management Suite, which is also compatible with the following models sold in the past by Fuji Xerox Co., Ltd. For the compatible models, refer to our official website.https://www.fujifilm.com/fbglobal/eng/product/aw_manage_suite
The manual of this product includes Fuji Xerox products, licensed from Xerox Corporation.The distributor of the products is FUJIFILM Business Innovation Corp.Xerox, Xerox and Design, Fuji Xerox and Design, DocuCentre, DocuShare, DocuPrint, as well as PrintXchange are registered trademarks or trademarks of Xerox Corporation.
FUJIFILM and FUJIFILM logo are registered trademarks or trademarks of FUJIFILM Corporation.ApeosPort, ApeosWare, DocuWorks, and Working Folder are registered trademarks or trademarks of FUJIFILM Business Innovation Corp.

3
Table of Contents
Table of Contents .................................................................................................................................................... 3Conventions............................................................................................................................................................. 5About Manuals and Accessory Tools..................................................................................................................... 5
How to View Manuals .................................................................................................................5Accessory Tool List and How to Start .......................................................................................6
1 SetupRequired Environment .............................................................................................................................8
Server (For Entry Edition) ..........................................................................................................8Server (for Enterprise Edition) ................................................................................................12Web Client .................................................................................................................................15Print Client .................................................................................................................................15Mobile Client .............................................................................................................................17Accessory Tools .........................................................................................................................17
Server Configuration ..............................................................................................................................18All-in-One Configuration ..........................................................................................................18Multiplexing Configuration (Only Enterprise Edition) ...........................................................19Distributed Configuration ........................................................................................................19
Preparation .............................................................................................................................................22Checking the PC environment .................................................................................................22Setting Devices .........................................................................................................................23If ApeosWare Management Suite Server Is Changed to SSL ...............................................24Required Additional Software and Files for Use of the Flow Management Option ...........25About List File of Serial Numbers ............................................................................................26About Installation of IIS (Internet Information Services) ......................................................26SQL Server .................................................................................................................................28
All-in-One Configuration Setup ............................................................................................................31Flowchart of Setup ...................................................................................................................31Install Required Software .........................................................................................................32How to Install SQL Server 2019 Standard on Server ............................................................32Install ApeosWare Management Suite by Performing the Following Steps. ......................32Register the Program or Port to the Rule of the Reception of the Firewall ........................34Register the Port to the Router as an Exception ...................................................................37Installing Tools on the Client PC ..............................................................................................40
Multiplexing Server Configuration Setup ............................................................................................41
Distributed Configuration Setup ..........................................................................................................42Flowchart ...................................................................................................................................42Set up the Database Server .....................................................................................................44Set up the Report Server ..........................................................................................................44

4
Set up the Main Server .............................................................................................................46Setting Up a Print Application Server .....................................................................................48Update Setting File ...................................................................................................................49Setting Up a Print Input/Output Server or a Mobile Server ..................................................50Setting Up OCR Server .............................................................................................................50Setting Up the Flow Server ......................................................................................................52Register the Port to the Router as an Exception ...................................................................53Installing Tools on the Client PC ..............................................................................................58
License Activation ..................................................................................................................................59Activating the License via the Internet ...................................................................................59Activating the License with File ...............................................................................................60Delete serial number of software ............................................................................................62FUJIFILM Business Innovation Support Centre ......................................................................64
What to do after the setup ....................................................................................................................64Log in ApeosWare Management Suite. ..................................................................................64Settings of Single Sign-On Feature .........................................................................................64When Distributed Print Servers Are Not Displayed Correctly After Installation ................64
2 Repairing, Changing, and Uninstalling the SoftwareRepair a Program ...................................................................................................................................66
How to Change a Program (Adding options) ......................................................................................66
Uninstall a Program ...............................................................................................................................67Overview ....................................................................................................................................67Uninstall a Tool ..........................................................................................................................68Deactivate the License for the Software to Be Uninstalled ..................................................68Uninstall Software and Options ...............................................................................................70How to Delete the Database Manually ...................................................................................70
Allocation of Amount of Memory Used ................................................................................................73Overview ....................................................................................................................................73Option ........................................................................................................................................74Allocate Amount of Memory Used ..........................................................................................74Return Amount of Memory Used to Initial Status .................................................................75Operation Log ............................................................................................................................76

5
Conventions
The following icons are used in this guide, depending on the content described.
ImportantThis indicates information that you should know and information that you should confirm before operation.
NoteThis indicates additional information on operations.
ReferThis indicates a reference source.
The following conventions are used in this guide.
Microsoft Windows Operating System is referred to as “Windows” in this guide.A personal computer is referred to as “PC” in this guide.
About Manuals and Accessory Tools
How to View ManualsLog in to ApeosWare Management Suite and select [Help] > [User’s Manual (View PDF Document)] from the header menu. As the manual list on the network is displayed, click the manual you want to download.In the case of an accessory tool, click the [Help] button of the accessory tool. As the manual list on the network is displayed, click the manual you want to download.
“ ” Indicates messages, file names, folder names, entered values, entered examples, and emphasized contents. It also indicates cross-references within this guide.Example: “XXX” is displayed.
[ ] Indicates the name of a setting item displayed on the computer screen. Moreover, it indicates the name of a window, menu, dialog box, tab, or button displayed.Example: Click [OK].
{ } Indicates values such as a drive name or user name that change when the operation is executed.Example: “{Model name}:{Serial number}({IP address or host name}) of the target device is displayed.
> Indicates a path to proceed to a certain item within a procedure on a menu or a web page.Example: Select [Start] > [Programs].
Manual Name Overview
Setup Guide (this document) This section describes the setup method of ApeosWare Management Suite.
Installation and Operation Guide This section describes the outline of each feature of ApeosWare Management Suite.
Features Guide This section describes the setting and maintenance methods of ApeosWare Management Suite.
Features Guide Flow Management Option
Describes how to create the flow to deliver documents.Uses Flow Management Option.

6
Accessory Tool List and How to Start
Features GuideFlow Management Option Messages
Describes messages of Flow Management Option and how to handle them.
Features GuideOn Demand Print Terminal
Describes the feature of On Demand Print Terminal and its basic operation.This feature is available only in Japan.
Flow Management Option Help Describes items on the window of Flow Management Option.
Paper Form Help Describes items on the window of Paper Form Editor and Paper Form Management.
Accessory Tools Help Describes items on the window of Data Input Console, Diagnostics Utility, Popup Messenger, and Update Service.
Job Log Analyzer User Guide Describes the functions and usage of Job Log Analyzer, which creates a list report and a graph accounting job log files.
Supplement Guide Describes the features that are not part of the main guide.
NoteThis feature is available only in Australia.
Migration Guide This section describes the procedure to perform update installation from ApeosWare Management Suite 2.0 or later to ApeosWare Management Suite 2.2.
Tool Names Overview How to Start Tool
Data Input Console(Data Input Console)
Sets a large amount of information simultaneously.
Select [FUJIFILM ApeosWare Management Suite] > [Data Configuration Tool] on Startup menu in Windows program.
Diagnostics Utility(Diagnostics Utility)
Diagnoses the problem and retrieves the PC log when a network failure occurs.
Select [FUJIFILM ApeosWare Management Suite] > [Diagnosis Tool] on Startup menu in Windows program.
Paper Form Editor Creates a form template file for Paper Form Option.
Select [FUJIFILM ApeosWare Management Suite] > [Paper Form Editor] on Startup menu in Windows program.
Paper Form Management Manages the file (resources)which Paper Form Option needsto operate, and deletes theform.
Select [FUJIFILM ApeosWare Management Suite] > [Paper Form Management] on Startup menu in Windows program.
Popup Messenger(Popup Messenger)
Receives a notification about the print job and displays it on the client PC.
Starts automatically after activating the PC that Popup Messenger has been installed.When Popup Messenger does not start or is restarted after it is exited, select [FUJIFILM Popup Messenger] > [Popup Messenger] on Startup menu in Windows program.
Update Service(Update Service)
Updates ApeosWare Management Suite software.
Starts automatically after activating the PC that Update Service has been installed.When Update Service does not start or is restarted after it is finished, select [FUJIFILM ApeosWare Management Suite] > [Update Service - Update Now] on Startup menu in Windows program.
Manual Name Overview

7
Job Log Analyzer(Job Log Analyzer)
Creates a table report and a graph tallying the job log files.
Select [FUJIFILM] > [Job Log Analyzer] on Startup menu in Windows program.
Tool Names Overview How to Start Tool

8
1 Setup
Required EnvironmentDescribes the operating environment required to use ApeosWare Management Suite.
NoteFor the latest supported OS, refer to our official website. (Refer to the first page of this guide for URL.)
Server (For Entry Edition)Hardware
*1 You may experience a decrease in performance during processing a large amount of data.*2 It is required that the memory capacity be 8 GB when Flow Management Option is used together with one of
the following:Print ManagementScan SettingsCost Management
Items Descriptions
CPU
Windows 8.1/Windows 10 • Minimum: Intel® CoreTM2 Duo processors 2.0 GHz equivalent (2-Core or higher)*1
• Recommendation: Intel® CoreTM i3-10100 processors 3.60 GHz equivalent or higher (4-core or higher)
Windows Server 2012/Windows Server 2012 R2/Windows Server 2016/Windows Server 2019
• Minimum: Intel® Xeon®Processor 5506 2.13 GHz or equivalent (4 core or higher)*1
• Recommendation: Intel® Xeon® Processor E-2234 3.60GHz equivalent or higher (4 core or higher)
Storage
Flow Management Option Not Added System Drive 20 GB or higher Installation Destination Drive 10 GB or higher Data Storage Destination Drive 70 GB or higher
Flow Management Option Added System Drive 35 GB or higher Installation Destination Drive 15 GB or higherData Storage Destination Drive 100 GB or higher The capacity is calculated using data per month (8 hours per day x 20 days). Increase the capacity of the hard disk or back up any operation log to another storage media if necessary.
Memory It is required that the memory capacity be more than 4 GB*2 regardless of the combination of OS or software.
Graphics XGA (1024 x 768 pixels) or more
Network card Yes (corresponding to composition of up to two cards)
DVD Drive Yes

1 Setup
9
OSTarget OS are as follows.
Windows Server 2012 Standard (x64)Windows Server 2012 R2 Standard (x64)Windows Server 2012 R2 Datacenter (x64)Windows Server 2016 Standard (x64)Windows Server 2016 Datacenter (x64)Windows Server 2019 Standard (x64)Windows Server 2019 Datacenter (x64)Windows 8.1 Pro (x64)Windows 8.1 Pro Update1 (x64)Windows 10 Pro (x64)Windows 10 Education (x64)Windows 10 Enterprise (x64)
Note• To access ApeosWare Management Suite using Internet Explorer® on a server OS, disable [Internet
Explorer Enhanced Security Configuration]. The default of [Internet Explorer Enhanced Security Configuration] is still enabled.
• If you use SQL Server 2016 in Windows Server 2012 R2 (Standard or Datacenter) or Windows 8.1, apply KB2919442 and KB2919355 beforehand.
• You cannot install it in the OS which a domain controller runs.• You cannot install it in the OS supporting Intel Itanium processor.• Allocate resources equivalent to “Hardware” (P.8) when creating a PC in a virtualized environment. You
may experience a decrease in performance although you allocate resources equivalent to the “Hardware” (P.8) depending on the operating environment of the host PC.
• Supports the OS English ver. which supports Multilingual User Interface Language Packs and is applies for Japanese Language Pack.
• Not available for Server Core option. Don’t select Server Core option when installing OS.• Flow Management Option, Paper Form Editor, and Paper Form Management operate on the WOW64
(Windows 32-bit on Windows 64-bit) emulation layer subsystem. Additionally, it doesn’t support the multi-touch feature.
• A new PC is required for those who already use ApeosWare Management Suite2 on OS of 32-bit edition to migrate to ApeosWare Management Suite.
NetworkOperates on TCP/IP protocol. Below are requirements.
The static IP address of IPv4 or IPv6DNS
NoteSetting a dynamic IP address set by DHCP may cause ApeosWare Management Suite to work incorrectly.

10
Configuration of Two Network CardsThe main server of ApeosWare Management Suite can access logical networks called an operation network and a management network. In the routing environment, the operation network is connected to client PCs, Active Directory, a DNS server, and devices, and the management network is connected to Administrator PC and a backup server.
*1 There are restrictions as below in the environment in which routing is not performed between the operation network and the management network.Unable to log in to ApeosWare Management Suite from the management networkAddress architecture for each network should be separated. If address architecture for each network is not separated, SNMP trap of the device may not be received.
*2 Give priority to the DNS server on the operation network side if you implement a DNS server on both the operation network and the management network.
*3 In the routing environment, you may experience a decrease in performance although you can use all the features.
NoteWhen implementing the network, enable the management network after enabling the operation network. Set the access order as to access the operation network first, and next the management network.
Backup Server
Device
ApeosWare Management Suite ServerRouter*3
Administrator PC*1
Management network
Device*1 DNS Server*2
Administrator PC
Client PC Active Directory
DNS Server*2
Operation network

1 Setup
11
Prerequisite SoftwareThe following are the software required to perform ApeosWare Management Suite.
*1 Hereinafter referred to as “.NET Framework”. When the latest version of compatible .NET Framework is preinstalled on a supported OS, the preinstalled version is supported.
*2 Hereinafter referred to as “IIS”.*3 Hereinafter referred to as “SQL Server”. SQL Server is installed on “PowerShell 2.0”, “.NET 4 Japanese Pack
(only available for SQL Server Japanese version)”, as you install SQL Server.*4 To use the SQL Server, the SQL Server Browser must be installed.*5 Microsoft Edge is not supported. Use Microsoft Internet Explorer bundled in the OS.
○ : Stored in the DVD-ROM included in the product package of ApeosWare Management Suite or the file downloaded.
- : Not stored in the DVD-ROM or the downloaded file
Software Stored Descriptions
Microsoft .NET Framework3.5.1*1 ○ It is required on Windows 8.1 and Windows 10.Enable this with the [Windows Features] dialog box.
Microsoft .NET Framework 3.5[Service Pack 1]*1
- It is required on Windows Server 2012, Windows Server 2012 R2, and Windows Server 2016.Enable (add) by the [Add Role and Function] wizard in Server Manager.
Microsoft .NET Framework 4.5.2*1 - This is required when SQL Server prior to SQL Server 2016 (SQL Server 2012 or SQL Server 2012) is used. Enable this with the [Windows Features] dialog box.
Microsoft .NET Framework 4.6.X*1 ○ This is required when SQL Server 2016 or SQL Server 2019 is used. Enable (add) by the [Add Role and Function] wizard in Server Manager.
Internet Information Services*2 - If not installed, this is automatically installed when .NET Framework is installed.
Microsoft SQL Server® 2012 Express [Service Pack 4]*4
- Any of those shown on the left is required.
Note
• If any of the SQL Servers shown on the left is already installed, it can be used with no change.
• The SQL Server Browser must be installed.
Microsoft SQL Server® 2012 Standard [Service Pack 4]*4
-
Microsoft SQL Server® 2014 Express [Service Pack 3]*3*4
-
Microsoft SQL Server® 2016 Standard [Service Pack 2]*3*4
-
Microsoft SQL Server® 2016 Express [Service Pack 2]*3*4
-
Microsoft SQL Server® 2019 Standard ○
Microsoft SQL Server® 2019 Express ○
Any one of the following web browsers• Internet Explorer*5
• Mozilla Firefox®• Google ChromeTM
• Safari (MacOS)
- Enable JavaScriptTM and ActiveX® controls.When using Internet Explorer with the server of Windows Server 2012, Windows Server 2012 R2, disable [Internet Explorer Enhanced Security Configuration].Operation of Safari® is guaranteed only when it is used on Mac OS.

12
Server (for Enterprise Edition)Hardware
*1 4 core or more is required. You may experience a decrease in performance during processing a large amount of data.
*2 It is required that the memory capacity be 8 GB when Flow Management Option is used together with one of the following:Print ManagementScan SettingsCost Management
OSTo access ApeosWare Management Suite using Internet Explorer, disable [Internet Explorer Enhanced Security Configuration]. The default of [Internet Explorer Enhanced Security Configuration] is still enabled.
Windows Server 2012 Standard (x64)Windows Server 2012 R2 Standard (x64)Windows Server 2012 R2 Datacenter (x64)Windows Server 2016 Standard (x64)Windows Server 2016 Datacenter (x64)Windows Server 2019 Standard (x64)Windows Server 2019 Datacenter (x64)
Note• If you use SQL Server 2016 in Windows Server 2012 R2, apply KB2919442 and KB2919355 beforehand.• You cannot install it in the OS which a domain controller runs.• You cannot install it in the OS supporting Intel Itanium processor.• Allocate resources equivalent to “Hardware” (P.12) when creating a PC in a virtualized environment. You
may experience a decrease in performance although you allocate resources equivalent to the “Hardware” (P.12) depending on the operating environment of the host PC.
Items Descriptions
CPU • Minimum: Intel® Xeon®Processor 5506 2.13 GHz or equivalent (4-core or higher)*1
• Recommendation: Recommendation: Intel® Xeon® E-2234 Processor 3.60 GHz equivalent or higher (4-core or higher)
Storage • Flow Management Option Not AddedSystem Drive 20 G or higher Installation Destination Drive 10 G or higher
• Data Storage Destination Drive 70 G or higherFlow Management Option AddedSystem Drive 35 G or higher Installation Destination Drive 15 G or higher
• Data Storage Destination Drive 100 G or higher The capacity is calculated using data per month (8 hours per day x 20 days). Increase the capacity of the hard disk or back up any operation log to another storage media if necessary.
Memory It is required that the memory capacity be more than 4 GB*2 regardless of the combination of OS or software.
Graphics XGA (1024 x 768 pixels) or more
Network card Yes (corresponding to composition of up to two cards)
DVD Drive Yes

1 Setup
13
• Supports the OS English ver. which supports Multilingual User Interface Language Packs and is applies for Japanese Language Pack.
• Not available for Server Core option. Don’t select Server Core option when installing OS.• Flow Management Option, Paper Form Editor, and Paper Form Management operate on the WOW64
(Windows 32-bit on Windows 64-bit) emulation layer subsystem.• A new PC is required for those who already use ApeosWare Management Suite 2 on OS of 32-bit edition
to migrate to ApeosWare Management Suite.
NetworkOperates on TCP/IP protocol. Below are requirements.
The static IP address of IPv4 or IPv6DNS
NoteSetting a dynamic IP address set by DHCP may cause ApeosWare Management Suite to work incorrectly.
Configuration of Two Network CardsThe main server of ApeosWare Management Suite can access logical networks called an operation network and a management network. In the routing environment, the operation network is connected to client PCs, Active Directory, a DNS server, and devices, and the management network is connected to Administrator PC and a backup server.
*1 There are restrictions as below in the environment in which routing is not performed between the operation network and the management network.Unable to log in to ApeosWare Management Suite from the management networkAddress architecture for each network should be separated. If address architecture for each network is not separated, SNMP trap of the device may not be received.
*2 Give priority to the DNS server on the operation network side if you implement a DNS server on both the operation network and the management network.
*3 In the routing environment, you may experience a decrease in performance although you can use all the features.
*4 Only when the server configuration is Distributed Configuration. For details of each server, refer to “Distributed Configuration” (P.19).
Backup Server
Device
Main ServerRouter*3
Administrator PC*1
Management network
Device*1 DNS Server*2
Separate Server*4
Database Server*4
DNS Server*2
Operation network
Administrator PC
Client PC Active Directory

14
NoteEnable the management network after enabling the operation network at installation. Set the access order as to access the operation network first, and next the management network.
Prerequisite SoftwareThe following are the software required to perform ApeosWare Management Suite.
*1 Hereinafter referred to as “.NET Framework”. When the latest version of compatible .NET Framework is preinstalled on a supported OS, the preinstalled version is supported.
*2 Hereinafter referred to as “IIS”.*3 Hereinafter referred to as “SQL Server”. SQL Server is installed on “PowerShell 2.0”, “.NET 4 Japanese Pack
(only available for SQL Server Japanese version)”, as you install SQL Server.
○ : Stored in the DVD-ROM included in the product package of ApeosWare Management Suite or the file downloaded.
- : Not stored in the DVD-ROM or the downloaded file
Software Stored Descriptions
Microsoft .NET Framework 3.5[Service Pack 1]*1
- It is required on Windows Server 2012, Windows Server 2012 R2, and Windows Server 2016.Enable (add) by the [Add Role and Function] wizard in Server Manager.
Microsoft .NET Framework 4.5.2*1 - This is required when SQL Server prior to SQL Server 2016 is used.
Microsoft .NET Framework 4.6. or later*1 ○ This is required when SQL Server 2016 or SQL Server 2019 is used. Enable (add) by the [Add Role and Function] wizard in Server Manager.
Internet Information Services*2 - If not installed, this is automatically installed when .NET Framework is installed.
Microsoft SQL Server® 2012 Express [Service Pack 4]*4
- Any of those shown on the left is required.
Note
• If SQL Server is already installed, it can be used as a substitute.
• The SQL Server Browser must be installed.
Microsoft SQL Server® 2012 Standard [Service Pack 4]*4
-
Microsoft SQL Server® 2014 Express [Service Pack 3]*3*4
-
Microsoft SQL Server® 2016 Standard [Service Pack 2]*3*4
-
Microsoft SQL Server® 2016 Express [Service Pack 2]*3*4
-
Microsoft SQL Server® 2019 Standard ○
Microsoft SQL Server® 2019 Express ○
Any one of the following web browsers• Internet Explorer*5
• Mozilla Firefox®• Google ChromeTM
• Safari (MacOS)
- Enable JavaScriptTM and ActiveX® controls.When using Internet Explorer with the server of Windows Server 2012, Windows Server 2012 R2, disable [Internet Explorer Enhanced Security Configuration].Operation of Safari® is guaranteed only when it is used on Mac OS.

1 Setup
15
*4 To use the SQL Server, the SQL Server Browser must be installed.*5 Microsoft Edge is not supported. Use Microsoft Internet Explorer bundled in the OS.
Web ClientThe web client is a PC to set a server or use the features, connecting to the ApeosWare Management Suite server via a web browser.
*1 Setting dynamic IP address by DHCP may cause ApeosWare Management Suite to work incorrectly.
Print ClientThe Print Client is a PC to submit print jobs using a print server.
NoteThe following are the Page Description Languages (PDL) available on ApeosWare Management Suite.“ART-EX/PLW,” “PDF,” “XDW,” “PCL,” “ART IV,” “XPS (XML Paper Specification),” “TIFF,” “PostScript”For Print Job and Page Description Languages, refer to “Print Management and Operations” of Installation and Operation Guide.
Windows
Items Descriptions
Hardware Conform the system requirements of the OS.
OS In addition to “OS” (P.9) of “Server (For Entry Edition)”, the requirements are the same with the following OS.• Microsoft Windows 10 Enterprise (x64)• Windows 10 Pro (x86)• Windows 10 Enterprise (x86)• Windows 10 Education (x86)• Windows 8.1 Pro Update (x86)• Windows 8.1 Pro (x86)• macOS 10.13 High Sierra• macOS 10.14 Mojave• macOS 10.15 Catalina
Network Should be on the TCP/IP protocol.• The static IP address of IPv4 or IPv6*1
• DNS
Web Browser The same requirements as the “Prerequisite Software” (P.11)
Items Descriptions
Hardware Conform the system requirements of the OS.
OS In addition to “OS” (P.9) of “Hardware” (P.12), therequirements are the same with the following OS.• Microsoft Windows 10 Enterprise (x64)• Windows 10 Pro (x86)• Windows 10 Enterprise (x86)• Windows 10 Education (x86)• Windows 8.1 Pro Update (x86)• Windows 8.1 Pro (x86)
Network This is the same function as in “Web Client” (P.15).

16
Linux
MacOS
iOS
AndroidTM
Items Descriptions
Hardware Conforms the system requirements of the Distribution.
Distribution • CentOS 7.0• Red Hat Enterprise Linux 7.0• Ubuntu 14.04 LTS• Vine Linux® 6.2 CR
Network Should be on the TCP/IP protocol.• The IP address of either IPv4 or IPv6, or the IP addresses of both of them• DNS
Items Descriptions
Hardware Conform the system requirements of the OS.
OS • macOS 10.15 Catalina • macOS 10.14 Mojave• macOS 10.13 High Sierra• macOS 10.12 Sierra • OS X 10.11 El Capitan• OS X 10.10 Yosemite• OS X 10.9 Mavericks• OS X 10.8 Mountain Lion• Mac OS X 10.7 Lion
Network Should be on the TCP/IP protocol.• The IP address of either IPv4 or IPv6, or the IP addresses of both of them• DNS
Items Descriptions
Hardware Conforms the system requirements of the application.
OS
Applications Print Utility for iOSFor the target versions of Print Utility for Android, refer to “Print Utility for Android Operating Environment Page” in our official website. (Refer to the first page for URL.)
Items Descriptions
Hardware Conforms the system requirements of the application.
OS
Applications Print Utility for AndroidFor the target versions of Print Utility for Android, refer to “Print Utility for Android Operating Environment Page” in our official website. (Refer to the first page for URL.)

1 Setup
17
Mobile Client
Accessory ToolsDescribes the system requirements of the accessory tools for ApeosWare Management Suite.
Items Descriptions
Applications ApeosWare MS Mobile
OS • iOS• AndroidFor the supported versions, refer to our official website. (Refer to the first page of this guide for URL.)
Accessory Tool Names
PC Available to Install Descriptions
Data Input Console Server The same environment required for the serverRefer to “Server (For Entry Edition)” (P.8), “Server (for Enterprise Edition)” (P.12).
Diagnostics Utility Server The same environment required for the serverRefer to “Server (For Entry Edition)” (P.8), “Server (for Enterprise Edition)” (P.12).
Client Hardware, Network, OS• This is the same function as in “Server (For Entry Edition)” (P.8). Software• .NET Framework 3.5 (.NET 2.0 and 3.0 included)*2
Job Log Analyzer Server For the environments required for the server except Windows Server 2019 Standard (x64) and Windows Server 2019 Datacenter (x64):Refer to “Server (For Entry Edition)” (P.8), “Server (for Enterprise Edition)” (P.12).
Client For the hardware, network, and OS “Web Client” (P.15) except Windows Server 2019 Standard (x64) and Windows Server 2019 Datacenter (x64):• Software
Any of the followings is required:- Microsoft Office Excel 2013 (32-bit edition) - Microsoft Office
Excel 2016 (32-bit edition)- Microsoft Office Excel 2019 (32-/64-bit edition)
Paper Form Editor Server The same environment required for the serverRefer to “Server (For Entry Edition)” (P.8), “Server (for Enterprise Edition)” (P.12).
Client This is the same function as in “Server (For Entry Edition)” (P.8).
Paper Form Management
Server • Software- Windows authentication - .NET Framework 3.5 (.NET 2.0 and 3.0 included)*2
• Other than softwareThis is the same function as in “Server (For Entry Edition)” (P.8).
Popup Messenger Print Client*1 This is the same function as in “Print Client” (P.15).
Update Service Server The same environment required for the serverRefer to “Server (For Entry Edition)” (P.8), “Server (for Enterprise Edition)” (P.12).

18
*1 The clients of iOS and Android are excluded.*2 It is necessary for Windows 8.1. When you can connect to the Internet, enable the feature with the [Turn
Windows Features On or Off] menu. When you cannot connect to the Internet, run the following command after inserting the installation media for Windows 8.1.Dism/online/enable-feature/featurename:NetFx3 /All/Source:{Installation media drive}:\sources\sxs /LimitAccess
Server ConfigurationThis section describes the server configuration of ApeosWare Management Suite.
All-in-One ConfigurationIn this configuration, ApeosWare Management Suite software is installed in one PC.
*1 It is required to receive [FUJIFILM Business Innovation Notices].
Refer“ All-in-One Configuration Setup” (P.31)
Update Service Client • OSThis is the same function as in “Server (For Entry Edition)” (P.8).
• Software.NET Framework 3.5 (.NET 2.0 and 3.0 included)*2
On Demand Print Terminal
Client This feature is available only in Japan.For details, refer to “Features Guide On Demand Print Terminal”.
Accessory Tool Names
PC Available to Install Descriptions
ApeosWare Management Suite Server
Multifunction Device
Multifunction Device
Multifunction Device
PrinterPrinterPrinter
ApeosWare Management Suite
Option
Prerequisite Software
Update Service*1

1 Setup
19
Multiplexing Configuration (Only Enterprise Edition)In this configuration, ApeosWare Management Suite software is installed in two PCs. It is operated by registering a device to each PC.
*1 The contents installed on each server are the same as those of the server in “ All-in-One Configuration Setup” (P.31)
Refer“Multiplexing Server Configuration Setup”
Distributed ConfigurationThis configuration uses multiple PCs with ApeosWare Management Suite software installed individually. It is expected to increase the processing ability and distribute the network load.The specific servers that can be distributed vary between the Enterprise Edition and the Entry Edition.
Refer“Distributed Configuration Setup” (P.42)
ApeosWare Management Suite Server*1
Multifunction Device
Multifunction Device
PrinterPrinterPrinter
Server 1 Server 2
Multifunction Device

20
Enterprise Edition
*1 Either the print application server or the print input/output server.Different printer servers cannot coexist in the same system.
Server Required/Optional
Number of Deployable
DevicesDescriptions
Main Server Required 1 A PC to which ApeosWare Management Suite is installedThe Flow Management Option does not need to be installed to implement a flow server.
Database Server Optional 1 A database PC to which SQL Server is installed.Separating the database server from the main server allows to distribute the load.
Report Server Optional 1 A PC for report processing. The SSRS (SQL Server Reporting Services) option of SQL Server is required.Separating the dedicated server for report creation from the main server allows to reduce the load on the main server.
Report Server
ApeosWare Management Suite Server
Multifunction Device
Printer
Main Server
Database Server
Multifunction Device
Printer
Print Server*1
Mobile Device
OCR Server
Flow Server
Mobile ServerRouter
Printer
Multifunction Device

1 Setup
21
Print Application Server
Optional Up to 4 (including the main server)
PCs with [Print Management] installed Options for the print management can be added.Separating the server which provides all the feature of the print management allows to reduce the load on the main server.In addition, locating the print application server in an appropriate place on the network allows to reduce network traffic.Targets of print can be held by each server so that the independence of the servers increase.
Note• The print application server cannot coexist with the print
input/output server in the same system.• When the print application server is set up, the following
options are not available.• Cost Recovery Option• On Demand Print Terminal
Print Input/Output server
Optional Up to 25 (including the main server)
PCs that have installed only the feature of send/receive print data from [Print Management] Options for the print management can be added.Separating the receiving and analyzing print jobs and the forwarding process to the device allows to reduce the load on the main server.In addition, locating the print input/output server in an appropriate place on the network allows to reduce network traffic.Since the features other than input/output of print jobs are provided by the main server, the control can be easier.
NoteThe print input/output server cannot coexist with the print application server in the same system.
OCR Server Optional Up to 3 PCs for OCR processing and image processing (Skew Correction, Format Conversion, Document Split etc.) These servers are used when the features of Scan Settings and File Management Service are used.Separating the OCR server from the main server allows to reduce the load on the main server.
NoteThe servers cannot be used for the flow process of Flow Management Option.
Flow Server Optional 1 A PC with Flow Management Option and SQL Server installed The server imports, processes, and distribute documents.Separating the flow server which processes flow jobs from the main server allows to reduce the load on the main server.
Mobile Server Optional 1 A PC connected by ApeosWare MS Mobile application which transfers requests sent from the application to the main server.Set up when accessing ApeosWare Management Suite through the Internet (external network) using mobile devices.Set up a mobile server in a separate location from both an internal network and the Internet by firewall.
Server Required/Optional
Number of Deployable
DevicesDescriptions

22
Entry EditionThe separation of the database server, print application server and print input/output server is supported.
*1 Either the print application server or the print input/output server.Different printer servers cannot coexist in the same system.
PreparationThis section describes things to prepare before setting up.
Checking the PC environmentPreparing the number of PCs requiredPrepare a PC to install ApeosWare Management Suite software. The number of PCs required varies depending on the server configuration. All-in-One Configuration is required one PC, and Distributed Configuration is required two and more PCs.
Checking Hardware and OSMake sure that the hardware and PCs satisfy the requirements.
Refer• Entry Edition: “Server (For Entry Edition)” (P.8)• Enterprise Edition: “Server (for Enterprise Edition)” (P.12)
Checking NetworksMake sure that the network of the PC satisfies the requirements. Make sure that a static IP address is set.
Server Required/Optional
Number of Deployable
DevicesDescriptions
Main Server Required 1 A PC to which ApeosWare Management Suite is installed
Database Server Optional 1 A database PC to which SQL Server is installed.Separating the database server from the main server allows to distribute the load.
ApeosWare Management Suite Server
Multifunction Device
Main Server
Database Server
Printer
Multifunction Device
Print Server*1
1 Setup
23
Dynamic IP Address may not enable ApeosWare Management Suite to operate.
Refer• Entry Edition: “Network” (P.9)• Enterprise Edition: “Network” (P.13)
Synchronizing clocks in the environmentSynchronize the server, the client and the device clocks.
How to install the software with a remote desktopOne of the following is required to install the software with a remote desktop.
Make the DVD drive of the PC, the original location to be connected, available to share and allot it to the network drive on the PC, the destination connected.Make the DVD drive of the PC, the original location to be connected, available to share and allot it to the network drive on the PC, the destination connected. After that, copy all the contents of the DVD-ROM included in the product package of ApeosWare Management Suite set to the DVD drive, to the hard disc of the PC to be the destination.
When installing Flow Management OptionWhen installing Flow Management Option, note the following points.
Do not insert and remove USB memory and other removable media during installation or uninstallation. Operation may be completed with error.The Flow Management Option cannot be installed if the host name of the PC to be installed meets any of the following conditions:• When characters other than alphanumeric characters and hyphen (-) are used• When hyphen (-) is used at the top or end of a string• When a string contains more than 256 charactersFlow Management Option does not operate correctly unless the NETWORK SERVICE account has access permission to the installation folder of Flow Management Option, user data storage folder, folders specified by the [Folders] function of Inbound Channel and by the [Save to Folder] function of the distribution destination, and root directory of these folders.Give full control access permission to the NETWORK SERVICE account for these folders and their subfolders and do not change the setting.• {Installation folder}\FM • {Destination to save user data}\Data\FM • Folder specified by the [Folders] function of Inbound Channel• Folder specified by the [Save to Folder] function of the distribution destinationGive read and execute permission to the NETWORK SERVICE account or Users Group account for all the upstream folder hierarchies including the root directory of these folders.When a folder is shared, the [NETWORK SERVICE] account may be deleted unintendedly. When setting a shared folder, make sure to confirm that access of the NETWORK SERVICE account is permitted.
Setting DevicesConfirming Target DevicesConfirm whether the device to be used is supported by ApeosWare Management Suite or not.
Refer“Readme”

24
Settings required for the DeviceThe device to be used in ApeosWare Management Suite is required to be set as below.
NoteDepending on the model, menu construction and the name may vary. For details, refer to the manual of your device.
*1 For Fuji Xerox devices, deactivation of [Signature Verification] of the plugin/custom service settings is also required.
NoteApeosWare Management Suite may not work correctly if a dynamic IP address is set to the device.
ReferGuides for Devices
If ApeosWare Management Suite Server Is Changed to SSL
Note• If linking with OneDrive and Salesforce, the communication must be encrypted.
Items Notes
Activate SOAP Port
Activate SNMP Port
Activate WSD Port To search a device by WSD
NoteWSD stands for Web Services on Devices.
Activate WebDAV Port To use the box feature of Flow Management Option
Activate Salutation Port To use the box feature of Flow Management Option
Activate LPD Port To use the box feature of Flow Management OptionTo use the features of Print Management
• Activate “Embedded Plugin Feature” of expanded features
• Activate “Embedded Plugin Feature” of the plugin/custom service settings
To use custom authentication
Activation of [Custom Service] of the plugin/custom service settings*1
To use custom authentication or custom service
NoteIn the case of a model whose custom service is standard installation, there is limitation on the function requiring the external access kit.
Any of the followings is required depending on the model.• Activation of the external access kit• Activation of the customized extension kit
To use custom authentication or custom service
NoteDepending on the model, there is a model requiring the external access kit.
Filtering IP address Set the ApeosWare Management Suite server and the client so as not to be restricted.
Add LPD

1 Setup
25
• Depending on from where the server certificate is obtained, you may need to install the CA certificate to the web client or perform other actions. Inquire the server certificate provider for the necessary work steps.
1.Create a website using Internet Information Service.
2.Get the server certificate from CA (Certification Authority)
3. Import the server certificate retrieved on the server certificate screen in the Internet Information Service management tool.
4.Add the website with any name and any physical path.Select https in Bind settings, and select the server certificate retrieved on the field of the SSL certificate.
ReferIn installing ApeosWare Management Suite, select the website created on [Choose a Website], and then check [Enable SSL Configuration].• “Install ApeosWare Management Suite by Performing the Following Steps.” (P.32)• “Set up the Main Server” (P.46)• “Install ApeosWare Management Suite to the OCR server.” (P.51)• “Setting Up the Flow Server” (P.52)
Required Additional Software and Files for Use of the Flow Management Option
For the server to install Flow Management Option, the installation of the software or the preparation of the files are required as following.• To convert documents to DocuWorks format, or to process by OCR:
Install DocuWorks 8.0 or later.• To import documents from the folder of the device that does not support WebDAV:
Install Network Scanner Utility 2 Ver.5.9.4 or later.• When you use the flow that was created by Flow Management on another PC:
Copy the shared system ID file from the PC where the flow was created to the PC where to install the software. For the procedure of downloading Shared System ID with the PC that created the flow, refer to “Configuring the Flow Usage Environment” in the “Features Guide Flow Management Option”.
Flow Management Option uses features of DocuWorks. For this reason, when you install or update DocuWorks, you should note the following points:<When installing DocuWorks>When installing DocuWorks after installing Flow Management Option, it is necessary to restart the computer or manually restart the processing service. If the computer or processing service is not restarted, a flow including OCR processing cannot be executed.In this case, the log shown below is output.“The flow [<flow name>] cannot be used because it contains processing of a nonexistent function.”When a flow that specifies DocuWorks for format conversion is processed, no error is output, but the format is not converted into DocuWorks and the document is output in its format.For how to restart ApeosWare Management Suite Flow Management service manually, refer to “Features Guide Flow Management Option.”Flow Management Option needs Network Scanner Utility 2 to import data from folders of some multifunction devices.When you install or update Network Scanner Utility 2, you should note the following points:<When installing Network Scanner Utility 2>

26
When installing Network Scanner Utility 2 after installing Flow Management Option, it is necessary to restart the computer or manually restart the ApeosWare Management Suite Flow Management service.If the computer or ApeosWare Management Suite Flow Management service is not restarted, a flow that includes folders in Inbound Channel cannot be processed.For how to restart ApeosWare Management Suite Flow Management service manually, refer to “Flow Management Option.”Flow Management Option cannot be used with any of the following products that conflict with the Salutation protocol on a same computer.To use these products, the ApeosWare Management Suite Flow Management service needs to be stopped.• Confidential folder viewer• Network Scanner Utility 2
About List File of Serial NumbersSerial numbers of ApeosWare Management Suite can be set by importing them from the list file. Using the list file enables you to enter multiple serial numbers at a time.The list file is created as a text file on which multiple serial numbers are separated by line feed codes (CRLF). Each serial number has “-” (hyphen) as following.1111-2222-3333-4444-5555-66662222-3333-4444-5555-6666-77773333-4444-5555-6666-7777-8888
About Installation of IIS (Internet Information Services)IIS is automatically installed during the installation of .Net Framework, if it was not installed.If the auto installation of IIS failed and you install it manually, note the followings to operate.
Windows 8.1 or Windows 10
1.Click Control Panel > Programs and Features > Turn Windows features on or off to open the screen of the Windows.
2.Select “Internet Information Services” and check that check marks are attached to all of the following parent components and child components. Windows Process Activation Service
• NET Environment• Process Model• Configuration API
Internet Information ServicesWeb Administration Tool• IIS 6 Management Compatibility
- IIS 6 WMI Compatibility- IIS 6 Scripting Tools- IIS 6 Management Console- IIS Metabase and IIS 6 configuration compatibility
• IIS Management ConsoleThe World Wide Web service

1 Setup
27
Common HTTP Features• HTTP Error• Browse Directory• Default Document• Static ContentApplication Development• .NET Extensibility• ASP.NET• ISAPI Filters• ISAPI ExtensionsSecurity• Request FilteringPerformance Feature• Static Content CompressionStatus and Diagnosis• HTTP Logging• Request Monitor
3.If there is a function whose check mark is removed, install the function and install ApeosWare Management Suite again.
Some function names and operation procedures may vary depending on the OS.As for a valid component with IIS installed, do not remove the check mark. If the check mark is removed, a defect may occur.
NoteBy the setting of application pool for ApeosWare Management Suite, [Enable 32-Bit Applications] needs to be set to [False] (default value). When set to [True], ApeosWare Management Suite will not operate.
Windows Server 2012, Windows Server 2012 R2, Windows Server 2016, and Windows Server 2019
1.Open the server role select screen by the Add Role and Function wizard in Server Manager.
2.Select the “Web server (IIS)” and check that check marks are attached to all of the following parent components and child components.Web server
Common HTTP Features• HTTP Error• Browse Directory• Default Document• Static ContentSecurity• Request filter• Windows authentication
Note“Windows authentication” is required to install “Paper Form Management”.
Performance• Static Content CompressionStatus and Diagnosis

28
• HTTP Logging• Request MonitorApplication Development• .NET Extensibility• ASP.NET• ISAPI Filters• ISAPI Extensions
Administration Tool IIS 6 Management Compatibility• IIS Metabase Compatibility• IIS 6 WMI Compatibility• IIS 6 Scripting Tools• IIS 6 Management Console
3.Next, open the feature select screen.
4.Select the “Web process activation service” and check that check marks are attached to all of the following components.
• NET Environment• Process Model• Configuration API
5.If there is a function whose check mark is removed, install the function and install ApeosWare Management Suite again.
Some function names and operation procedures may vary depending on the OS.As for a valid component with IIS installed, do not remove the check mark. If the check mark is removed, a defect may occur.
NoteBy the setting of application pool for ApeosWare Management Suite, [Enable 32-Bit Applications] needs to be set to [False] (default value). When set to [True], ApeosWare Management Suite will not operate.
SQL ServerServers that require SQL Server
For the following servers, you need to install SQL Server.
For All-in-One Configuration/Multiplexing Server ConfigurationMain Server
For Distributed ConfigurationMain ServerReport ServerPrint Application ServerFlow Server
When separating the database, SQL Server is required to be installed on the database server.

1 Setup
29
Install SQL ServerSQL Server 2019 is included in the product package of ApeosWare Management Suite and installed automatically when ApeosWare Management Suite is installed. After the automatic installation, the instance named “FXAW” is created.When ApeosWare Management Suite 2 SQL Server Standard Media Set (E) is purchased, SQL Server can be installed from the media.If there is SQL Server already installed, it can be used with no change.
Note• If the SQL Server is not installed from the DVD-ROM, the change of the setting of the SQL Server Browser
service may be required.Set [Type of Startup] of the service to [Automatic] from the management tool of the Windows to start it.The display name and service name are as shown in the following.- Display name: SQL Server Browser- Service Name: SQLBrowse
• An installation of SQL Server 2019 by directly running Setup.exe contained in the media is not available.• Only the SQL Server 2019 installed from the media or the version installed with the demo version of
ApeosWare Management Suite is supported.
The procedure to install SQL Server in the media as shown below.
When installing SQL Server 2019 manuallyInstall by the following procedure.
1. Insert the DVD-ROM into the DVD drive.
2.When the window to select language appears, select the language to use and click [OK].When the window is not displayed, double-click “Launcher.exe” on the root of DVD-ROM.
3.Double-click [Microsoft SQL Server 2019] on the displayed window.
4.On and after, follow the instruction on the screen and the settings in the following table to install.
5.After the installation is complete, reboot the PC.
Note• When SQL Server 2019 Express is manually installed, make sure to reboot the PC. Otherwise
ApeosWare Management Suite cannot be installed.• The default installation drive is the C drive. You can change the installation drive from the default.
When you purchased ApeosWare Management Suite 2 SQL Server Standard Media SetInstall by the following procedure.
Items Setting Content
Feature Selection Select [Database Engine Services]
Instance Name Any name can be set. (“FXAW” is recommended.)
Authentication Mode Specify [Mixed Mode (SQL Server authentication and Windows authentication)].
SQL Server Administrator
Specify [Administrators].

30
1.Insert the DVD-ROM into the DVD drive.
2.When the window to select language appears, select the language to use and click [OK].When the window is not displayed, double-click "“Launcher.exe” on the root of DVD-ROM.
3.Double-click [Microsoft SQL Server 2019 Express] or [Microsoft SQL Server 2019 Standard] on the displayed window.
4.After that, follow the instruction on the screen and “When installing SQL Server 2019 manually” (P.29) to install.
5.After the installation is complete, reboot the PC.
Note• When ApeosWare Management Suite 2 SQL Server Standard Media Set is used for the installation,
make sure to reboot the PC. Otherwise ApeosWare Management Suite cannot be installed.• The default installation drive is the C drive. You can change the installation drive from the default.
Set Port Used by SQL ServerSet a port used by the SQL Server in the following operation.
NoteIt is an operation example in the case of Windows Server 2019. Operate it based on the versions of the OS and SQL Server used.
1. Select [Start] > [Microsoft SQL Server 2019] > [SQL Server 2019 Configuration Manager].
2.Perform the following steps.As an example, an operation is shown in a case where the SQL Server instance used in ApeosWare Management Suite is “FXAW” and the port number is “1433”.(1) Select the protocol of the SQL Server instance name used in ApeosWare Management Suite under
[SQL Server Network Configuration] in the left pane (tree pane).Example [Protocol of FXAW]
(2) Right-click [TCP/IP] in the right pane and select [Activated].(3) Double-click [TCP/IP].(4) Click the [IP Address] tab.(5) Enter “1433” into all [TCP ports] from [IP1] to [IP All] and set [Valid] to [Yes].(6) Click [OK].(7) Right-click the SQL Server used in ApeosWare Management Suite in [SQL Server Services] and
select [Reboot].Example SQL Server (FXAW)
3.If ApeosWare Management Suite has already been installed, refer to the specification procedure for the -DN option in “Change of Server Information” of Installation and Operation Guide to change the port number of the database.

1 Setup
31
All-in-One Configuration Setup
Flowchart of Setup
*1 If you already have the SQL Server in use, you can keep using it. Refer to “Prerequisite Software” (P.11) to check if the version is supported.
NoteDo not specify “c:\Program Files\” as the installation path when installing Flow Management Option, Paper Form Editor, and Paper Form Management. Flow Management Option, Paper Form Editor, and Paper Form Management operate on the WOW64 emulation layer subsystem, and thus an unexpected problem may occur.
Start
End
Install ApeosWare Management Suite by Performing the Following Steps. (P.32)
(When a firewall is set up on the PC)Register the Program or Port to the Rule of the Reception of the Firewall (P.34)
(When connecting through a router)Register the Port to the Router as an Exception (P.37)
(When necessary)Installing Tools on the Client PC (P.40)
(When installing Flow Management Option)Install Required Software (P.32)
(Check if the SQL Server is already installed and if its version is supported.)*1

32
Install Required SoftwareWhen installing Flow Management Option, install or copy necessary software (DocuWorks, Network Scanner Utility 2) and files on the PC in advance.For details, refer to “Required Additional Software and Files for Use of the Flow Management Option” (P.25).
How to Install SQL Server 2019 Standard on ServerWhen you use SQL Server 2019 Standard, install it on the PC.For information about the installation procedure and the required settings, refer to “Install SQL Server” (P.29).
Note
• If you already have the SQL Server in use, you can keep using it.• When using SQL Server 2019 Express, these steps are not necessary.
Install ApeosWare Management Suite by Performing the Following Steps.
Install ApeosWare Management Suite to the server. The following two methods are available.How to be installed from DVD-ROM (P.32)How to Install Software from File Downloaded (Only Entry Edition) (P.34)
How to be installed from DVD-ROM
1.Install ApeosWare Management Suite by performing the following steps.(1) Insert the DVD-ROM into the DVD drive.(2) When the window to select language appears, select the language to use and click [OK].
When the window is not displayed, double-click “Launcher.exe” on the root of DVD-ROM.(3) Double-click [ApeosWare Management Suite] on the displayed window.
(4) After that, follow the instruction on the screen and below descriptions to install.
Enter the serial number of ApeosWare Management Suite on the [Enter Serial Number] screen. The serial number is written in the “License Certificate” packed in the product package of

1 Setup
33
ApeosWare Management Suite.If you enter the serial number of trial edition, the trial edition will be installed.You can import the file of the serial number list. Refer to “About List File of Serial Numbers” (P.26). To use cost management functionality in the Enterprise Edition, display the [Setup Type] screen and then select the [Enable Cost Recovery Feature] check box.The [IIS Website Settings] screen is used to set the Internet Information Service website.When executing “If ApeosWare Management Suite Server Is Changed to SSL” (P.24) select [Select and use the existing website from IIS] and specify the previously created website. Attach a check mark to [Enable SSL Configuration] for [Binding Settings].Specify the database to use on the [SQL Server Information] screen.
When installing SQL Server 2019 included in the installerSelect [Newly Install SQL Server 2019].When SQL Server is already installedSelect [Use existing SQL Server], click [Browse], and then select the desired database instance.When [SQL Server Authentication] is selected as the authentication method, specify also the user name used to connect to SQL Server and its password.
On the [Confirm Installation Information] screen, specify the installation destination and data storage destination of the software.On the [Temporary Folder Settings] screen, specify a temporary folder used for data delivery with a device.If License Activator (a tool to activate license) starts during the installation, refer to “Activating the License via the Internet” (P.59).
2.When installing Flow Management Option, perform the following steps.(1) Double-click [Flow Management] on the [Features List] tab.(2) After that, follow the instruction on the screen and below descriptions to install.
On the [Enter Serial Number] screen, enter the serial number written on the “license certificate”.When installing as trial edition, click [Next] without entering anything.Select [General Configuration] on the [Specify Setup Type] screen.When [Specify Shared System ID] is displayed, perform the following steps.
When you do not use the flow that was created by Flow Management on another PC:(1) Select [Not Specify Shared System ID].When you use the flow that was created by Flow Management on another PC:(1) Select [Specify Shared System ID].(2) Click [Browse] and select Shared System ID File.The default name of the shared system ID file is “AWFMSystemIdDownload_{YearMonthDateHourMinuteSecond}}.ini”.
If License Activator (a tool to activate license) starts during the installation, refer to “Activating the License via the Internet” (P.59).
Note• The following options can be installed when an applicable language is selected with the DVD-ROM
included in the product package of ApeosWare Management Suite.• OCR for DocuWorks Multi Language Option (supported by languages other than English and
Japanese)• OCR for DocuWorks English License• OCR for DocuWorks Japanese Option• The following options can be installed when an applicable language is selected in the system locale
of Windows.• Attribute Processing Option• Database Query Option

34
• OmniPage Barcode Reader Option• Scan OCR Option
3.When the installation is complete, double-click Update Service on the [Features List] tab.As the installer starts, install Update Service following the instructions on the screen.
4. Install other software on the [Features List] tab as necessary.
NoteAfter that, if you install DocuWorks or Network Scanner Utility 2 after creating the flow, reboot the PC or Flow Management service after installation. Otherwise, the flow works incorrectly.
How to Install Software from File Downloaded (Only Entry Edition)
1.Unzip the zipped file of ApeosWare Management Suite downloaded.
2.Double click “AWMS.exe”.
3.After that, follow the instruction on the screen.
ReferStep 1 (4) in “How to be installed from DVD-ROM” (P.32)
Register the Program or Port to the Rule of the Reception of the Firewall
You may be required to change the settings if a firewall is set to the PC which ApeosWare Management Suite is installed to.Register the following programs and ports as programs for permitting the connection in the rule of the reception of the firewall. For detailed procedures, refer to the website of Microsoft.As for the rule of sending, do not change the predetermined operation and do not impose a limitation.
NoteDepending on the server configuration or optional settings, some programs are not installed on the server. Register the installed programs as programs for permitting the connection in the rule of the reception of the firewall.
1 Setup
35
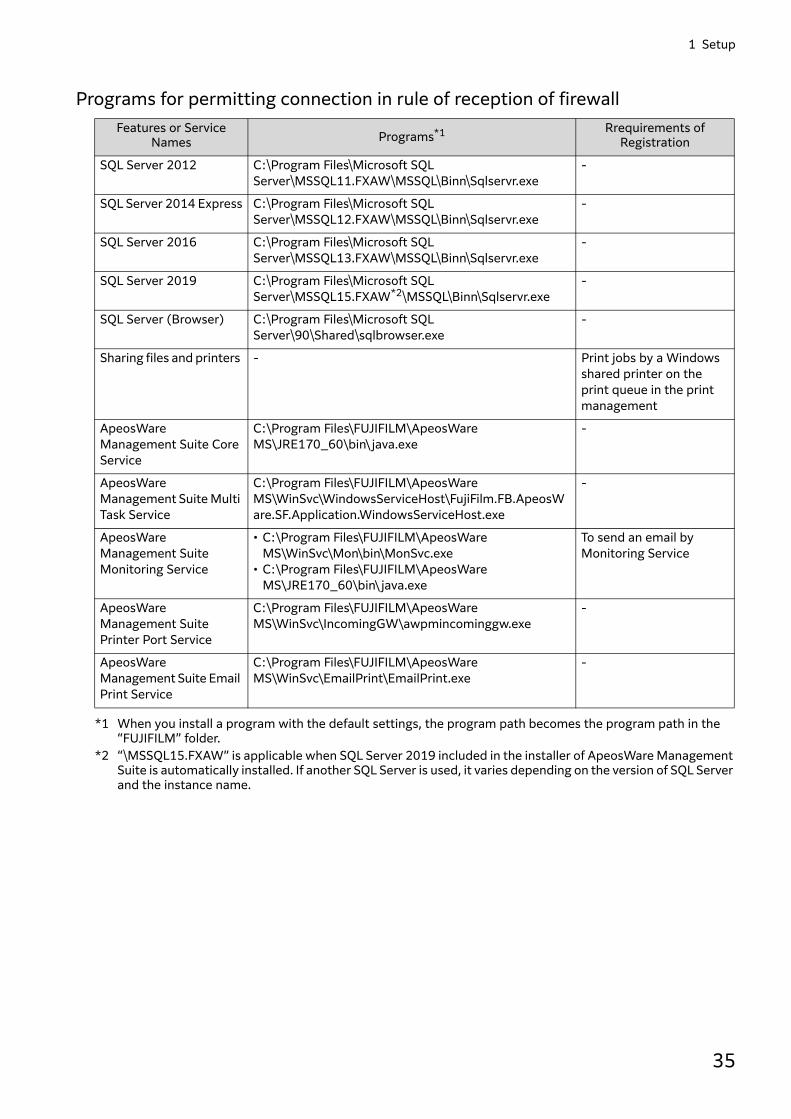
Programs for permitting connection in rule of reception of firewall
*1 When you install a program with the default settings, the program path becomes the program path in the “FUJIFILM” folder.
*2 “\MSSQL15.FXAW” is applicable when SQL Server 2019 included in the installer of ApeosWare Management Suite is automatically installed. If another SQL Server is used, it varies depending on the version of SQL Server and the instance name.
Features or Service Names Programs*1 Rrequirements of
Registration
SQL Server 2012 C:\Program Files\Microsoft SQL Server\MSSQL11.FXAW\MSSQL\Binn\Sqlservr.exe
-
SQL Server 2014 Express C:\Program Files\Microsoft SQL Server\MSSQL12.FXAW\MSSQL\Binn\Sqlservr.exe
-
SQL Server 2016 C:\Program Files\Microsoft SQL Server\MSSQL13.FXAW\MSSQL\Binn\Sqlservr.exe
-
SQL Server 2019 C:\Program Files\Microsoft SQL Server\MSSQL15.FXAW*2\MSSQL\Binn\Sqlservr.exe
-
SQL Server (Browser) C:\Program Files\Microsoft SQL Server\90\Shared\sqlbrowser.exe
-
Sharing files and printers - Print jobs by a Windows shared printer on the print queue in the print management
ApeosWare Management Suite Core Service
C:\Program Files\FUJIFILM\ApeosWare MS\JRE170_60\bin\ java.exe
-
ApeosWare Management Suite Multi Task Service
C:\Program Files\FUJIFILM\ApeosWare MS\WinSvc\WindowsServiceHost\FujiFilm.FB.ApeosWare.SF.Application.WindowsServiceHost.exe
-
ApeosWare Management Suite Monitoring Service
• C:\Program Files\FUJIFILM\ApeosWare MS\WinSvc\Mon\bin\MonSvc.exe
• C:\Program Files\FUJIFILM\ApeosWare MS\JRE170_60\bin\ java.exe
To send an email by Monitoring Service
ApeosWare Management Suite Printer Port Service
C:\Program Files\FUJIFILM\ApeosWare MS\WinSvc\IncomingGW\awpmincominggw.exe
-
ApeosWare Management Suite Email Print Service
C:\Program Files\FUJIFILM\ApeosWare MS\WinSvc\EmailPrint\EmailPrint.exe
-

36
Programs for permitting connection in rule of reception of firewall (if Flow Management Option installed)
*1 When you install a program with the default settings, the program path becomes the program path in the “FUJIFILM” folder.
*2 “\MSSQL15.FXAW” is applicable when SQL Server 2019 included in the installer of ApeosWare Management Suite is automatically installed. If another SQL Server is used, it varies depending on the version of SQL Server and the instance name.
Ports for permitting connection in rule of reception of firewall
Note“80” and “443” are the existing port numbers. Refer to the bind information on the website specified in installing.
Features or Service Names Programs*1 Requirements of Registration
AWFM FTP Output
C:\Program Files\FUJIFILM\ApeosWare MS\FM\axis2c\bin\axis2_pipe_server.exe
[Virtual Directory (FTP)] is selected as the storing folder not used FTP passive mode in the [Save to Folder] feature in Flow Management Option.
AWFM Print/Fax Output
C:\Program Files\FUJIFILM\ApeosWare MS\FM\jre\bin\ java.exe
If the print/fax output of Flow Management Option is used
SalutationDaemon
C:\WINDOWS\SysWOW64\fxsslm12.exe Network Scanner Utility 2 used to access the device’s box in the [Folder] function in Flow Management Option
SQL Server 2012 C:\Program Files\Microsoft SQL Server\MSSQL11.FXAW\MSSQL\Binn\Sqlservr.exe
-
SQL Server 2014 Express
C:\Program Files\Microsoft SQL Server\MSSQL12.FXAW\MSSQL\Binn\Sqlservr.exe
-
SQL Server 2016 StandardSQL Server 2016 Express
C:\Program Files\Microsoft SQL Server\MSSQL13.FXAW\MSSQL\Binn\Sqlservr.exe
-
SQL Server 2019 StandardSQL Server 2019 Express
C:\Program Files\Microsoft SQL Server\MSSQL15.FXAW*2\MSSQL\Binn\Sqlservr.exe
-
SQL Server (Browser)
C:\Program Files\Microsoft SQL Server\90\Shared\sqlbrowser.exe
-
Features or Service Names Communication Protocol Ports TCP/UDP
ApeosWare Management Suite Core Service HTTP 8181 TCP
ApeosWare Management Suite Core Service HTTPS 8183 TCP
World Wide Web Publishing Service HTTP 80 TCP
World Wide Web Publishing Service HTTPS 443 TCP
ApeosWare Management Suite Core Service ICMPv4 N/A -
World Wide Web Publishing Service ICMPv4 N/A -

1 Setup
37
Register Exceptions of Windows FirewallsIf the firewall is enabled, disable the Windows firewall or register exceptions referring to the Windows Help.
How to Set the other FirewallsIf a firewall other than Windows firewall or software such as an antivirus product having firewall functions is installed, you may be required to change those settings. “Programs for permitting connection in rule of reception of firewall” (P.35) and “Programs for permitting connection in rule of reception of firewall (if Flow Management Option installed)” (P.36) must be registered as exceptions of the firewall. Refer to the manual with the firewall or the antivirus product on how to operate.
Register the Port to the Router as an Exception This section describes the protocols and the port numbers allowed when you connect the ports with the devices via the router from ApeosWare Management Suite server. If the port number has been changed on the external server or the device, set them to the contents changed.

38
Popup Messenger
Print Client
SMB (TCP: 139)CIFS (TCP and UDP: 445)LPD (TCP: 515)
HTTP (TCP: 80)Internet
Active Directory Server
Web Client
SNMP (UDP: free dynamic port)
HTTP (TCP: 80)HTTPS (TCP: 443)
HTTP (TCP: 80)HTTPS (TCP: 443)
Device
Device Management
LDAP (TCP or UDP: 389)LDAP (TCP or UDP: 636)LDAP-GC (TCP: 3268)LDAPS-GC (TCP: 3269)Kerberos (TCP or UDP: 88)
HTTP (TCP: 80)HTTPS (TCP: 443)SNMP (UDP: 161)
ApeosWare Management Suite Server
Update Service*2
Monitoring Service
SMTP/POP3 Server
LPD (TCP: 515)SNMP (UDP: 161)
SMTP(TCP: 25)Pop Before SMTP(TCP: 110 and 25)
HTTP (TCP: 80)HTTPS (TCP: 443)
HTTP (TCP: 80)HTTPS (TCP: 443)SNMP (UDP: 161)WSD (UDP: 3702)*3SOCKET (TCP: 8050)*4ICMP (No)
Print application/Print input and output feature
Remote Authentication Agent
SOCKETTCP: 80, 443, 8181, 8088HTTP (TCP: 8183)
JMX(TCP: 1099)*1
Diagnostics Utility
ApeosWare Management Suite Core Service
SNMP (UDP: free dynamic port)
SNMP (UDP: free dynamic port)
IC Card Gate
HTTP (TCP: 80)HTTPS (TCP: 443)

1 Setup
39
*1 Use this when retrieving information of ApeosWare Management Suite using Diagnostics Utility.It is not necessary to register a port exception for the router since it will be used within the ApeosWare Management Suite server.
*2 Also applicable to installations on other servers or clients.
Device
FTP Server
FTP (TCP: 21)*10*11
NetBIOS (UDP: 137 and 138)SMB (TCP: 139)*5
CIFS (TCP: 445)*5
NetBIOS (UDP: 137 and 138)SMB (TCP: 139)*6
CIFS (TCP: 445)*6
HTTP (TCP: 80)HTTPS (TCP: 443)*7
SNMP (UDP: free dynamic port)
LPD (TCP: 515)SNMP (UDP: 161)*8
WebDAV (TCP: 80)*9Salutation (TCP: 1607 - 1636, TCP or UDP: 1605, UDP: 1606)*9SSL (TCP: 443)*9
Inbound Channel Folder
Destination folder
SMTP (TCP: 25)Pop Before SMTP(TCP: 110 and 25)
SMTP/POP3 Server
FTP (TCP: Any port)*10
Web Client
Flow Management Option
HTTP (TCP: 80)HTTPS (TCP: 443)
NetBIOS (UDP: 137 and 138)SMB (TCP: 139)CIFS (TCP: 445)
Shared Folder
DocuShare Server
FTP (TCP: Any port)
FTP (TCP: 21)
HTTP (TCP: 80)HTTPS (TCP: 443)
SharePoint Server
HTTP (TCP: 80)HTTPS (TCP: 443)
Link with File Management Service
Device
HTTP (TCP: 80)HTTPS (TCP: 443)NetBIOS (UDP: 137 and 138)SMB (TCP: 139)CIFS (TCP: 445)
HTTP (TCP: 80)HTTPS (TCP: 443)
InternetHTTPS (TCP: 443)*12
SMTP (TCP: 25)Pop Before SMTP(TCP: 110 and 25)

40
*3 To search a device by WSD. WSD stands for Web Services on Devices.*4 It is required when customizing an IC card reader for authentication and/or authentication device by using an
XCP plugin.*5 It is required when importing the document from the common folder by using the [Folder] function. *6 This is required to set when corresponding to either of the following.
- To store the document in the common folder by using [Save to Folder] function- To output the CSV file of the document to the shared folder by using [Document and Attributes Table Output] function- To use the [Form Analysis] feature- To use the [Save Form Analysis to File] feature
*7 It is required when importing the scan document by using [Link to Web Applications] function.*8 It is required when printing or faxing the documents by using [Printer Output] function.*9 It is required to import documents from the box via the [Device Folder] function. Set WebDAV or Salutation
depending on the device connection method. The setting differs as per the model. SSL (TCP: 443) must be set when using WebDAV with SSL encryption for device communication.
*10It is required when storing the document in the folder on the FTP server by using [Save to Folder] function.*11The ports except 21 can be also set.*12It is required when using Working Folder, Salesforce, or Google Drive.
Installing Tools on the Client PCInstall tools on the client PC as necessary. The following two methods are available.
How to be installed from DVD-ROM (P.40)How to Install Software from File Downloaded (Only Entry Edition) (P.41)
ReferFor details on the installation of Popup Messenger, refer to “Install Popup Messenger” in Features Guide.
How to be installed from DVD-ROM
1.Insert the Edition media of the DVD-ROM into the DVD drive.
2.When the window to select language appears, select the language to use and click [OK].
3.Click the [Tool List] tab.When installing Update Service and Paper Form Management, click the [Features List] tab.
4.Double-click the required tools.
WAfter that, follow the instruction on the screen.

1 Setup
41
How to Install Software from File Downloaded (Only Entry Edition)
1.Unzip the zipped file of the tool downloaded.
2.Double click “setup.exe”.After that, follow the instruction on the screen.
Multiplexing Server Configuration SetupThe multiplexing server configuration is the support only of the Enterprise Edition. Follow the steps below to set up.
Install on other serversYes
No
Start
End
Install ApeosWare Management Suite by Performing the Following Steps. (P.32)
(When a firewall is set up on the PC)Register the Program or Port to the Rule of the Reception of the Firewall (P.34)
(When connecting through a router)Register the Port to the Router as an Exception (P.37)
(When necessary)Installing Tools on the Client PC (P.40)
(When installing Flow Management Option)Install Required Software (P.32)

42
Distributed Configuration Setup
Flowchart
*1 The print application server and the print input/output server cannot coexist.In addition, when the print application server is installed, the following options are not available.Cost Recovery OptionOn Demand Print Terminal
Start
End
(When connecting through a router)Register the Port to the Router as an Exception (P.53)
(When necessary)Installing Tools on the Client PC (P.58)
Set up a separate server?
YesNo
Set up other separate servers?Yes
No
(When setting a report server)Set up the Report Server (P.44)
Set up the Main Server (P.46)
(When setting a database server)Set up the Database Server (P.44)
Setting Up a Print Application Server (P.48) *1
Setting Up the Flow Server (P.52)
Setting Up a Print Input/Output Server or a Mobile Server (P.50) *1
Setting Up OCR Server (P.50) *2

1 Setup
43
*2 After setting up an OCR server, OCR Config Utility is required to be run on the main server.
Note• Do not specify “c:\Program Files\” as the installation path when installing Flow Management Option,
Paper Form Editor, and Paper Form Management. Flow Management Option, Paper Form Editor, and Paper Form Management operate on the WOW64 emulation layer subsystem, and thus an unexpected problem may occur.
• If there is more than 60-second difference in the time setting between the main server, the print input/output server, the print application server and the flow server, Print Management, Flow Management Option, and Popup Messenger don’t work properly. Adjust the time on the main server and each server by using NTP (Network Time Protocol).
• Do not set up several distributed servers at the same time. If set up at the same time, the distributed servers may not be set up correctly.
ReferIf several distributed servers are set up at the same time, refer to “When Distributed Print Servers Are Not Displayed Correctly After Installation” (P.65).
Entry Edition
NoteDo not specify “c:\Program Files\” as the installation path when installing Flow Management Option and ApeosWare Management Suite on 64-bit edition of Windows. Using this path may cause unexpected problems because ApeosWare Management Suite runs on the WOW64 emulation layer subsystem.
(When installing Flow Management Option)Install Required Software (P.32)
Start
End
(When connecting through a router)Register the Port to the Router as an Exception (P.37)
(When necessary)Installing Tools on the Client PC (P.58)
Set up the Main Server (P.46)
(When setting a database server)Set up the Database Server (P.44)

44
Set up the Database ServerWhen installing a database server, set up the PC by performing the following steps.
1. If SQL Server is not installed on the PC, install it.For the required settings for SQL Server, refer to “Install SQL Server” (P.29).
2.When the firewall is set on the PC, register it as an exception.Refer to “Register the Program or Port to the Rule of the Reception of the Firewall” (P.34) and set target programs and ports as exceptions.
Set up the Report ServerWhen installing a report server, set up the PC by performing the following steps.
1. Install SQL Server and SSRS (SQL Server Reporting Services).
2. Install ApeosWare Management Suite.
Note• If a report server is installed, the database server is required to be separated from the main server.• It is recommended to set up the report server on the PC that the database server is set up on.• Report Server cannot be used in the SSL environment.
3. Install SQL Server and SSRS (SQL Server Reporting Services) on the report server.
NoteMake sure to install SQL Server and SSRS (SQL Server Reporting Services) on the report server.
ReferFor the required settings for SQL Server, refer to “Install SQL Server” (P.29).
4. Install ApeosWare Management Suite by performing the following steps.(1) Insert the Edition media of the DVD-ROM into the DVD drive.(2) When the window to select language appears, select the language to use and click [OK].
NoteWhen the window is not displayed, double-click “Launcher.exe” on the root of DVD-ROM.

1 Setup
45
(3) Double-click [Reports Server] on the displayed window.
(4) After that, follow the instruction on the screen and below descriptions to install.On the screen to select a database, specify the database the report feature uses.Specify “localhost\{Instance name}” from the drop-down listbox. Make sure to specify a local database.When [SQL Server Authentication] is selected as the authentication method, specify also the user name used to connect to SQL Server and its password.
5.When the firewall is set on the PC, register it as an exception.Refer to “Register the Program or Port to the Rule of the Reception of the Firewall” (P.34) and set target programs and ports as exceptions.
6.Log on to the report server with an administrator permission.
7.Start Internet Explorer and input the following address in the address bar.
Example: http://localhost/Reports_FXAW/
The report manager starts.
8.Perform the following steps in report manager.SQL Server 2012(1) Click [Folder Settings].(2) Click [New Role Assignment].(3) Input [Group or user name] as follows.
{Active Directory domain name}\{Main server name}$Example: Domain\Server$
(4) Select the check box in the browser.(5) Click [OK].SQL Server 2016(1) Click [Manage folder].(2) Click [Add group or user].
http://localhost/Reports_{Instance name}/

46
(3) Input [Group or user] as follows.{Active Directory domain name}\{Main server name}$Example: Domain\Server$
(4) Select the check box in the browser.(5) Click [OK].
Set up the Main ServerSet up the PC for the main server
1. Install SQL Server 2019 on the PC as necessary.For the required settings for SQL Server, refer to “Install SQL Server” (P.29).
Note
In the following cases, this procedure is not required.• When a separate database server is set up• When using SQL Server 2019 included in the installer• When SQL Server is already installed
2. Install ApeosWare Management Suite by performing the following steps.(1) Insert the Edition media of the DVD-ROM into the DVD drive.(2) When the window to select language appears, select the language to use and click [OK].
NoteWhen the window is not displayed, double-click “Launcher.exe” on the root of DVD-ROM.
(3) Double-click [ApeosWare Management Suite] on the displayed window.
(4) After that, follow the instruction on the screen and below descriptions to install.
Enter the serial number of ApeosWare Management Suite on the [Enter Serial Number] screen. The serial number is written in the “License Certificate” packed in the product package of ApeosWare Management Suite.If you enter the serial number of trial edition, the trial edition will be installed.You can import the file of the serial number list. Refer to “About List File of Serial Numbers” (P.26).
NoteWhen setting up an OCR server as a separate server, a license for Scan OCR Option is required.

1 Setup
47
To use cost management functionality in the Enterprise Edition, display the [Setup Type] screen and then select the [Enable Cost Recovery Feature] check box.
NoteWhen the print application server is set up as a separate server, make sure to uncheck the checkbox of [Enable Cost Recovery Feature]. Even when it is activated, the cost management is not available.
The [IIS Website Settings] screen is used to set the Internet Information Service website.When executing “If ApeosWare Management Suite Server Is Changed to SSL” (P.24) select [Select and use the existing website from IIS] and specify the previously created website. Attach a check mark to [Enable SSL Configuration] for [Binding Settings].On the [SQL Server Information] screen, specify the database to be used by ApeosWare Management Suite and the connecting method.
When automatically installing SQL Server 2019 Express included in the installerSelect [Newly Install SQL Server 2019 Express Edition].When SQL Server is already installed or a separate database server is set up Select [Use existing SQL Server], click [Browse], and then select the desired database instance.For a local database, specify “localhost\{Instance name}” and for a separate database specify “{Host name of the database}\{Instance name}”. Example: localhost\FXAW, DBSVR\FXAWWhen [SQL Server Authentication] is selected as the authentication method, specify also the user name used to connect to SQL Server and its password.
On the [Report Server Information] screen, specify the information of the report server.When setting a separation report serverSelect [Install Report Server in Another Server] and specify the URL of the report server as shown below. http://{Host name or IP address of the report server}/ReportServer_{Instance name}Example: http://192.0.2.1/ReportServer_FXAWWhen installing the report function in the main serverSelect [Install Report Server in the Same Server].
If License Activator (a tool to activate license) starts during the installation, refer to “Activating the License via the Internet” (P.59).
3.After the installation of ApeosWare Management Suite is complete, double-click [Update Service] on the [Features List] tab.As the installer starts, install Update Service following the instructions on the screen.
4.When the firewall is set on the PC, register it as an exception.Refer to “Register the Program or Port to the Rule of the Reception of the Firewall” (P.34) and set target programs and ports as exceptions.

48
Setting Up a Print Application ServerThis section describes the procedure of setting up PC in case of a print application server is set up.
Note• The print application server and the print input/output server cannot coexist in the same system.• Do not set up several distributed servers at the same time. If set up at the same time, the distributed
servers may not be set up correctly.
ReferIf several distributed servers are set up at the same time, refer to “When Distributed Print Servers Are Not Displayed Correctly After Installation” (P.65).
1. Install SQL Server 2019 on the PC as necessary.For the required settings for SQL Server, refer to “Install SQL Server” (P.29).
Note
In the following cases, this procedure is not required.• When a separate database server is set up• When using SQL Server 2019 included in the installer• When SQL Server is already installed
2. Install ApeosWare Management Suite by performing the following steps.(1) Insert the Edition media of the DVD-ROM into the DVD drive.(2) When the window to select language appears, select the language to use and click [OK].
When the window is not displayed, double-click “Launcher.exe” on the root of DVD-ROM.(3) Double-click [Print Application Server] on the displayed window.(4) After that, follow the instruction on the screen and below descriptions to install.
When the [Enter Serial Number] screen is displayed, enter the serial number of ApeosWare Management Suite. The serial number is written in the “License Certificate” packed in the product package of ApeosWare Management Suite.If you enter the serial number of trial edition, the trial edition will be installed.You can import the file of the serial number list. Refer to “About List File of Serial Numbers” (P.26). Specify the host name or IP address of the main server on the [Enter Connection Destination Main Server] screen.The [IIS Website Settings] screen is used to set the Internet Information Service website.When executing “If ApeosWare Management Suite Server Is Changed to SSL” (P.24) select [Select and use the existing website from IIS] and specify the previously created website. Attach a check mark to [nable SSL ConfigurationE] for [Binding Settings].Specify the database for the print management feature and its connection method on the [SQL Server Information] screen.
When automatically installing SQL Server 2019 Express included in the installerSelect [Newly Install SQL Server 2019 Express Edition].When SQL Server is already installedSelect [Use existing SQL Server], click [Browse], and then select the desired database instance.Use the following format to specify the local database: localhost\{Instance name}.Example: localhost\FXAWWhen [SQL Server Authentication] is selected as the authentication method, specify also the user name used to connect to SQL Server and its password.
If License Activator (a tool to activate license) starts during the installation, refer to “Activating the License via the Internet” (P.59).

1 Setup
49
3.After the installation of ApeosWare Management Suite is complete, double-click [Update Service] on the [Features List] tab.As the installer starts, install Update Service following the instructions on the screen.
4.When the firewall is set on the PC, register it as an exception.Refer to “Register the Program or Port to the Rule of the Reception of the Firewall” (P.34) and set target programs and ports as exceptions.
Update Setting FileIn the print application server configuration, jobs issued when the main server is down are listed and printed after the recovery of the main server, so Web.config, which is a setting file must be updated.
NoteWhen adding or changing the user of ApeosWare Management Suite, do not use user ID used in the past. If the job list of on demand prints is displayed with a new user, print jobs registered with the previous user may be listed.
For the update of a setting file, use the “ChangeJobListTarget.exe” tool. This tool is stored in “{Installation folder} ¥Utils¥ChangeJobListTarget”.A setting file is updated if an option is specified to the end of the tool and it is executed.Example:ChangeJobListTarget.exe -s enableChangeJobListTarget.exe -s disableIf “-s enable” is specified, the key of the setting file UseUserIDJobList is set to “true”. If “-s disable” is specified, it is set to “false”.
Note• When updating UseUserIDJobList, IIS is recycled after the execution of the tool, so stop IIS beforehand to
execute it. For details on how to stop IIS, refer to “How to stop IIS” (P.49).• Execute the update of UseUserIDJobList with the main server and print application server respectively.
How to stop IIS
1.Select [Start] > [Control Panel] > [AdminTools] > [Service].
2.On the [Service] screen, double-click [World Wide Web Publishing Service].The [Properties of World Wide Web Publishing Service] screen is displayed.
3.Click [Stop].The World Wide Web Publishing Service is stopped.
NoteIt may take 2 to 3 minutes for the stop of the World Wide Web Publishing Service.
Setting filesUpdated setting files are as shown in the following.
Main Server• {Installation folder} ¥WebApp¥Admin¥Web.config• {Installation folder} ¥WebApp¥MFD¥Web.config• {Installation folder} ¥WebApp¥PopupUI¥Web.config• {Installation folder} ¥WebApp¥User¥Web.config

50
Print Application Server• {Installation folder} ¥WebApp¥MFD¥Web.config• {Installation folder} ¥WebApp¥PopupUI¥Web.config
Setting Up a Print Input/Output Server or a Mobile ServerThis section describes the procedure of setting up PC in case of a print input/output server or a mobile server is set up.
Note• The print application server and the print input/output server cannot coexist in the same system.• Do not set up several distributed servers at the same time. If set up at the same time, the distributed
servers may not be set up correctly.
ReferIf several distributed servers are set up at the same time, refer to “When Distributed Print Servers Are Not Displayed Correctly After Installation” (P.65).
1. Install ApeosWare Management Suite by performing the following steps.(1) Insert the Edition media of the DVD-ROM into the DVD drive.(2) When the window to select language appears, select the language to use and click [OK].
When the window is not displayed, double-click “Launcher.exe” on the root of DVD-ROM.(3) Double-click the server to set up on the displayed window.
In case of print input/output server[Print Input/Output Server]
In case of mobile server[Remote Mobile Server]
(4) After that, follow the instruction on the screen and below descriptions to install.Specify the host name or IP address of the main server on the [Enter Connection Destination Main Server] screen.The [IIS Website Settings] screen is used to set the Internet Information Service website.When executing “If ApeosWare Management Suite Server Is Changed to SSL” (P.24) select [Select and use the existing website from IIS] and specify the previously created website. Attach a check mark to [Enable SSL Configuration] for [Binding Settings].
2.After the installation of ApeosWare Management Suite is complete, double-click [Update Service] on the [Features List] tab.As the installer starts, install Update Service following the instructions on the screen.
3.When the firewall is set on the PC, register it as an exception.Refer to “Register the Program or Port to the Rule of the Reception of the Firewall” (P.34) and set target programs and ports as exceptions.
Setting Up OCR ServerTo set up an OCR server, perform the following steps.(1) Install ApeosWare Management Suite to the OCR server.(2) Execute OCR Config Utility on the main server
Note• A license of the Scan OCR Option is required per an OCR server. Register the Scan OCR Option license on
the main server.

1 Setup
51
• Do not set up several distributed servers at the same time. If set up at the same time, the distributed servers may not be set up correctly.
ReferIf several distributed servers are set up at the same time, refer to “When Distributed Print Servers Are Not Displayed Correctly After Installation” (P.65).
Install ApeosWare Management Suite to the OCR server.
1. Install ApeosWare Management Suite by performing the following steps.(1) Insert the Edition media of the DVD-ROM into the DVD drive.(2) When the window to select language appears, select the language to use and click [OK].
When the window is not displayed, double-click “Launcher.exe” on the root of DVD-ROM.(3) Double-click [Remote OCR Server] on the displayed window.(4) After that, follow the instruction on the screen and below descriptions to install.
Specify the host name or IP address of the main server on the [Enter Connection Destination Main Server] screen.The [IIS Website Settings] screen is used to set the Internet Information Service website.When executing “If ApeosWare Management Suite Server Is Changed to SSL” (P.24) select [Select and use the existing website from IIS] and specify the previously created website. Attach a check mark to [Enable SSL Configuration] for [Binding Settings].
2.After the installation of ApeosWare Management Suite is complete, double-click [Update Service] on the [Features List] tab.As the installer starts, install Update Service following the instructions on the screen.
3.When the firewall is set on the PC, register it as an exception.Refer to “Register the Program or Port to the Rule of the Reception of the Firewall” (P.34) and set target programs and ports as exceptions.
Execute OCR Config Utility on the main server
1.Double-click the following executable file on the main server.File location:{Installation folder}\Utils\OCRConfigUtility{Installation folder} is as follows if no change is made on the initial settings.“C:\Program Files\FUJIFILM\ApeosWare MS”The installation folder for Flow Management Option, Paper Form Editor, and Paper Form Management is as shown below.“C:\Program Files (x86)\FUJIFILM\ApeosWare MS”File nameFujiFilm.FB.ApeosWare.OCRConfigUtility.exe
2.Delete the main server host name or IP address.When the OCR Config Utility is configured with main server information, OCR processing is performed in parallel on the main server and OCR server. Delete the main server configuration to perform OCR processing on the OCR server only.

52
3.Click [Add Server].
4.Enter the host name or IP address of the OCR server and the Port used, and click [Add].
5.Repeat the Step 2 and 3 for each OCR server set up.
Setting Up the Flow ServerWhen installing a flow server, set up the PC by performing the following steps.
Note• The main server must be set up on another PC before installing a flow server. When the main server is not
set up, refer to “Set up the Main Server” (P.46) and set it up.• Do not set up several distributed servers at the same time. If set up at the same time, the distributed
servers may not be set up correctly.
ReferIf several distributed servers are set up at the same time, refer to “When Distributed Print Servers Are Not Displayed Correctly After Installation” (P.65).
1. Install or copy the required software (DocuWorks, Network Scanner Utility 2) and files on the PC.
Refer“Required Additional Software and Files for Use of the Flow Management Option” (P.25)
2. Install the following programs that appear on the [Features List] tab.IIS (Internet Information Services) is automatically installed during the installation of .NET Framework if not already installed.
Microsoft® .NET Framework 4.6.XMicrosoft® .NET Framework 3.5.1Microsoft® SQL Server® 2019
3.Install Flow Management by performing the following steps.(1) Double-click [Flow Management] on the [Features List] tab.(2) After that, follow the instruction on the screen and below descriptions to install.
On the [Enter Serial Number] screen, enter the serial number written on the “license certificate”.When installing as trial edition, click [Next] without entering anything.Select [FM Isolated Configuration] on the [Specify Setup Type] screen.Specify the database that Flow Management uses and the connection method on the [Specify Database Server] screen.Click [Browse] of [Database Server Name] to select the instance of the database to use.For a local database, specify “localhost\{Instance name}” and for a separate database specify “{Host name of the database}\{Instance name}”. Example: localhost\FXAW, DBSVR\FXAWWhen [SQL Server Authentication] is selected as the authentication method, specify also the user name used to connect to SQL Server and its password.
NoteFor the database used for Flow Management, make sure to specify the same database as ApeosWare Management Suite.
When [Specify Shared System ID] is displayed, perform the following steps.When you do not use the flow that was created by Flow Management on another PC:(1) Select [Not Specify Shared System ID].When you use the flow that was created by Flow Management on another PC:
1 Setup
53
(1) Select [Specify Shared System ID].(2) Click [Browse] and select Shared System ID File.The default name is “AWFMSystemIdDownload_{YearMonthDateHourMinuteSecond}}.ini”.If License Activator (a tool to activate license) starts during the installation, refer to “Activating the License via the Internet” (P.59).
Note• The following options can be installed when an applicable language is selected with the DVD-ROM
included in the product package of ApeosWare Management Suite.- OCR for DocuWorks Multi Language Option (supported by languages other than English and
Japanese)- OCR for DocuWorks English License
• The following options can be installed when an applicable language is selected in the system locale of Windows.
- Attribute Processing Option- Database Query Option- OmniPage Barcode Reader Option- Scan OCR Option
4.When the installation of is Flow Management complete, double-click Update Service on the [Features List] tab.As the installer starts, install Update Service following the instructions on the screen.
5. Install other software on the [Features List] tab as necessary.
NoteFor the database used for Paper Form Management, make sure to specify the same database as ApeosWare Management Suite.
6.When the firewall is set on the PC, register it as an exception.Refer to “Register the Program or Port to the Rule of the Reception of the Firewall” (P.34) and set target programs and ports as exceptions.
NoteAfter that, if you install DocuWorks or Network Scanner Utility 2 after creating the flow, reboot the PC or Flow Management service after installation. Otherwise, the flow works incorrectly.
Register the Port to the Router as an Exception This section describes the protocols and the port numbers allowed when you connect the ports with the devices via the router from ApeosWare Management Suite server. If the port number has been changed on the external server or the device, set them to the contents changed.

54
Main Server
HTTP (TCP: 80)
Active Directory Server
Web Client
SMTP/POP3 Server
HTTP (TCP: 80)HTTPS (TCP: 443) Update
Service*1
SNMP (UDP: free dynamic port) Device
SMTP (TCP: 25)Pop Before SMTP (TCP: 110 and 25)
LDAP (TCP or UDP: 389)LDAP (TCP or UDP: 636)LDAP-GC (TCP: 3268)LDAPS-GC (TCP: 3269)Kerberos (TCP or UDP: 88)
Internet
Monitoring Service
HTTP (TCP: 80)HTTPS (TCP: 443)
DocuShare Server
HTTP (TCP: 80)HTTPS (TCP: 443)
SharePoint Server
HTTP (TCP: 80)HTTPS (TCP: 443) Device
HTTP (TCP: 80)HTTPS (TCP: 443)NetBIOS (UDP: 137 and 138)SMB (TCP: 139)CIFS (TCP: 445)
HTTP (TCP: 80)HTTPS (TCP: 443)
InternetHTTPS (TCP: 443)*4
NetBIOS (UDP: 137 and 138)SMB (TCP: 139)CIFS (TCP: 445)
Shared Folder
SMTP/POP3 Server
SMTP (TCP: 25)Pop Before SMTP(TCP: 110 and 25)
FTP Server
FTP (TCP: 21)
FTP(TCP: Any port)
Link with File Management Service
Remote Authentication Agent
HTTP (TCP: 80)HTTPS (TCP: 443)SNMP (UDP: 161) WSD (UDP: 3702)*2
SOCKET (TCP: 8050)*3ICMP (No)
Device Management
Print application/Print input and output feature
JMX(TCP: 1099)*5
Diagnostics Utility
ApeosWare Management Suite Core
A

1 Setup
55
SNMP(UDP: free dynamic port)
LPD (TCP: 515)SNMP (UDP: 161)
HTTP (TCP: 8181, 8800, 10480, and 18188)HTTPS (TCP: 443 and 8183)SMB (TCP: 445)
SMTP (TCP: 25)Pop Before SMTP(TCP: 110 and 25)
SMTP/POP3 Server
HTTP (TCP: 80)HTTPS (TCP: 443)
Device
Popup Messenger
Print ClientPrint Application Server
SMB (TCP: 139)CIFS (TCP and UDP: 445)LPD (TCP: 515)
Monitoring Service
A
SOCKET(TCP: 80, 443, 8181, 8088)HTTP (TCP: 8183)
Print application/Print input and output feature
HTTP (TCP: 8181 and 10480)HTTPS (TCP: 443)
SNMP(UDP: free dynamic port)
LPD (TCP: 515)SNMP (UDP: 161)
HTTP (TCP: 8181 and 8800)HTTPS (TCP: 443 and 8183)SMB (TCP: 445)
DevicePopup Messenger
Print ClientPrint Input/Output Server
SMB (TCP: 139)CIFS (TCP and UDP: 445)LPD (TCP: 515)
Monitoring Service
A
SOCKET(TCP: 80, 443, 8181, 8088)HTTP (TCP: 8183)
**Set [Inbound Rules] of Windows Firewall to allow the following two connections.Windows Management Instrumentation (WMI-IN)Windows Management Instrumentation (DCOM-IN)
Print Input/Output feature
HTTP (TCP: 8181 and 10480)SMB (TCP: 445)(Refer to the ** below)

56
A
Device
FTP Server
FTP (TCP: 21)*6*7
FTP (TCP: Any port)*6
NetBIOS (UDP: 137 and 138)SMB (TCP: 139)*9
CIFS (TCP: 445)*10
NetBIOS (UDP: 137 and 138)SMB (TCP: 139)*8
CIFS (TCP: 445)*9
HTTP (TCP: 80)HTTPS (TCP: 443)*10
SNMP (UDP: free dynamic port)
LPD (TCP: 515)SNMP (UDP: 161)*11
WebDAV (TCP: 80)*12
Salutation (TCP: 1607 - 1636, TCP or UDP: 1605, UDP: 1606)*12
SSL (TCP: 443)*12
Inbound Channel Folder
Destination folder
Web Client
HTTP (TCP: 80)HTTPS (TCP: 443)
SMTP/POP3 Server
SMTP (TCP: 25)Pop Before SMTP(TCP: 110 and 25)
Flow Management Option
Flow Server
Monitoring Service
HTTP (TCP: 80)HTTPS (TCP: 443)SQL (TCP: 1433)
SOCKET (TCP: 1433)SOCKET (UDP:1434)
Database Server
A

1 Setup
57
Mobile Device
HTTP (TCP: 80)HTTPS (TCP: 443)
Mobile Server
OCR Server
SMB (TCP: 139)NetBIOS (UDP: 137 and 138)CIFS (TCP: 445)HTTP (TCP: 8800)
HTTPS (TCP: 443)
HTTP (TCP: 80)
Update Service*2
HTTP (TCP: 80)
Update Service*2
Report Server
HTTP (TCP: 80)
Internet
A
A
A
Internet
HTTP (TCP: 80)HTTPS (TCP: 443)

58
*1 Also applicable to installations on other servers or clients.*2 To search a device by WSD. WSD stands for Web Services on Devices.*3 To send the settings to the XCP Plugin in authenticating the custom*4 Is required when using Working Folder, Salesforce, or Google Drive.*5 Use this when retrieving information of ApeosWare Management Suite using Diagnostics Utility.*6 It is not necessary to register a port exception for the router since it will be used within the ApeosWare
Management Suite server.It is required when storing the document in the folder on the FTP server by using [Save to Folder] function.
*7 The ports except 21 can be also set.*8 This is required to set when corresponding to either of the following.
- To store the document in the common folder by using [Save to Folder] function- To output the CSV file of the document to the shared folder by using [Document and Attributes Table
Output] function- To use the [Form Analysis] feature- To use the [Save Form Analysis to File] feature
*9 It is required when importing the document from the common folder by using the [Folder] function.*10It is required when importing the scan document by using [Link to Web Applications] function.*11It is required when printing or faxing the documents by using [Printer Output] function.*12Required to import documents from the box via the [Device Folder] function. Set WebDAV or Salutation
depending on the device connection method. The setting differs as per the model. SSL (TCP: 443) must be set when using WebDAV with SSL encryption for device communication.
Installing Tools on the Client PCInstall tools on the client PC as necessary.
ReferFor details on the installation of Popup Messenger, refer to “Install Popup Messenger” in Features Guide.
1. Insert the Edition media of the DVD-ROM into the DVD drive.
2.When the window to select language appears, select the language to use and click [OK].
3.Click the [Tool List] tab.When installing Update Service, click the [Features List] tab.
4.Double-click the required tools.
After that, follow the instruction on the screen.

1 Setup
59
License ActivationYou are required not only to install software and options but to activate the license. You can use them for only 30 days without activating license.License activation is required to keep using the software.
NoteWhen you use SQL Server Standard, license activation and deactivation are not required.
Activating the License via the InternetWhen your PC has Internet connection and is able to communicate with the license activation server via https protocol (SSL), you can activate your license via the Internet.
1.Select [FUJIFILM ApeosWare Management Suite] > [License Authentication] on Startup menu in Windows program.The license management screen is activated.
2.Click [License Registration].
3.Enter the serial number and click [Next].When entering the serial number manually(1) Select [Serial Number (Enter Text)].(2) Enter the serial number.(3) Click [Add].The serial number you entered is added to the list.When entering the serial number from a fileBy saving the serial number to a file in advance, you can load it into License Activator from the file.To describe multiple serial numbers in the file, make sure each of the four-digits is delimited by a hyphen (-), and each serial number is located on a separate line, delimited by a line break, as shown below.1111-2222-3333-4444-5555-66662222-3333-4444-5555-6666-7777(1) Select [Serial Number (Import File)].(2) Click [Browse] to select the file.
4.Select [Use the Internet to Activate License (Recommended)] and click [Next].
5.Enter [Email Address] and [Password] specified in user registration for “FUJIFILM BI Direct” and click[Next].License activation is performed via the Internet.
NoteIn order to receive up-to-date information via e-mail, select [E-mail delivery is required for information related to this product].
6.When the license activation is complete, click [Completed].
7.Check the registered license, and click [Exit].

60
Activating the License with FileCreating the license activation information file
1.Select [FUJIFILM ApeosWare Management Suite] > [License Authentication] on Startup menu in Windows program.The license management screen is activated.
2.Click [License Registration].A dialog box to enter the serial number is displayed.
3.Enter the serial number and click [Add].The entered serial number is displayed.
4.Select [Execute License Authentication Using File] and click [Next].A screen to enter the account information of “FUJIFILM BI Direct” is displayed.
5.Enter [Email Address] and [Password] specified in user registration for “FUJIFILM BI Direct” and click [Next].A screen to specify the output destination of the license activation file is displayed.
6.Click [Browse] and specify the output destination and file name of the license activation file and click [Next].The license activation file is output with the specified output destination and file name.The completion screen is displayed.
NoteThe file name is set to “activationinfor.dat”.
7.Click [Finish].
8.Click [Exit].The confirmation screen is displayed.
9.Click [Yes].The license management screen is ended.
10.Copy the output license activation file to a PC that can be connected to the Internet using USB memory, etc.
Uploading the license deactivation file
1.Start a web browser on a PC that can be connected to the Internet.
2.Enter the URL of the file upload page of “FUJIFILM BI Direct” in the [Address] field of the web browser.https://direct.fujifilmcom/bi/ap1/license/bulk_activation/upload?proc=activationThe login screen of “FUJIFILM BI Direct” is displayed.
3.Enter [User ID (Email Address)] and [Password] and click [Login]. The page to upload files is

1 Setup
61
displayed.
4.Confirm that the [Authentication] tab is selected and click [Browse].
5.Select the output license activation file and click [Open...].
NoteYou can upload the license activation file by directly dragging and dropping it.
6.Confirm that the selected file is displayed in the File field and click [Send].[Processing of the file is accepted] is displayed.
Downloading the license fileWhen you receive an e-mail that notifies completion of license activation processing, download the license file from “FUJIFILM BI Direct.”
1.Receive an e-mail that is sent by “FUJIFILM BI Direct” to notify completion of license activation processing.
2.Click the URL in the [Results List] screen in the email to display the [Results List] screen of FUJIFILM BI Direct on the web browser.
3.Confirm that the [Result] field of the receipt number shown in the email is “OK” and click [Download].The license file is downloaded.
4.Copy the output license activation file to a PC with Apeos Wiz Suite installed using USB memory, etc.
Activating the license using the license file
1.Select [FUJIFILM ApeosWare Management Suite] > [License Authentication] on Startup menu in Windows program.The license management screen is activated.
2.Click [High Function].The screen to select a function is displayed.
3.Select [License File Import] and click [Next].A screen to specify a license file is displayed.
4.Perform the steps as shown below.(1) Click [Browse] and specify the license file downloaded in “Downloading the license file” (P.61).(2) Click [Next].
License activation starts. When processing is finished, the completion screen of license activation is displayed.
5.Click [Finish].
6.Click [Exit].The confirmation screen is displayed.
7.Click [Yes].The license management screen is ended.

62
Delete serial number of softwareIf you have more than one serial number for one software application and have installed the software using the wrong serial number, you can delete the serial number.
1.Select [FUJIFILM ApeosWare Management Suite] > [License Authentication] on Startup menu in Windows program.The license management screen is activated.
2.Click [High Function].
3.Select [Delete Serial Number] and click [Next].
4.Select software or an option to delete the serial number. If deleting all, click [Select All/Deactivate All].
5.Click [Next].
6. If the check screen is displayed, check it and click [OK].The serial number is deleted.
7.Click [Exit].
Enter a serial numberWhen adding options after ApeosWare Management Suit is installed, or activating the license with another serial number, enter the serial number by performing the following steps.In case you enter the incorrect serial number, delete the number as“Delete serial number of software” (P.62), and then perform the following steps.
How to enter the serial numberFor the first time to activate licenseFor the first time to activate license, start the installer for modification and enter the serial number. For information on how to operate, refer to “Entering a serial number with the installer for modification” (P.63)As for the following options, even if license authentication is executed for the first time, activate the License Activator and enter the serial number.Refer to "Entering a serial number with “Entering a serial number with LicenceActivator (for the second time or after)” (P.63).Scan & Connect for OneDrive Device LicenseOCR for DocuWorks Japanese Option
For the second time or after to activate licenseWhen activating additional license to the option whose license was already activated, the operation methods vary depending on the option.If adding the following options, activate the License Activator and enter the serial number.Refer to “Entering a serial number with LicenceActivator (for the second time or after)” (P.63)
Device LicenseScan OCR Option(OmniPage OCR)Scan & Connect for DocuShare Device LicenseScan & Connect for Microsoft SharePoint Device LicenseScan & Connect for Salesforce Device LicenseScan & Connect for Intelledox Device LicenseScan & Connect for RightFax Device Licens

1 Setup
63
On Demand Print Terminal LicenseAdditional OS Parser OptionMobile User License
To add options other than the mentioned previously, use the installer for modification even it is second time or after.For example, if any Device License is not activated and you want to activate 100Device License, use the installer for modification. After that, if you want to add 500Device License, use License Activator.
Entering a serial number with the installer for modification
1.On the [Programs and Features] window of Windows, perform the following steps.(1) Click [ApeosWare Management Suite](2) Click [Change].
2.Click [Modify].After that, follow the instruction on the screen.
3.Enter the serial number.The serial number is written on the "license certificate" included in the product package of ApeosWare Management Suite.
NoteYou can import the file of the serial number list. Refer to “About List File of Serial Numbers” (P.26)
4.Click [Finish].The license management screen is activated and executes license authentication.After that, follow the instruction on the screen.
NoteIf the entry screen for a serial number is displayed, enter the serial number entered in procedure 3 and click [Next].
Entering a serial number with LicenceActivator (for the second time or after)
1.Select [FUJIFILM ApeosWare Management Suite] > [License Authentication] on Startup menu in Windows program.The license management screen is activated.
2.Select [Enter Serial Number].
3.Click [Next].Perform the following steps.
4.Enter the serial number.The serial number is written on the "license certificate" included in the product package of ApeosWare Management Suite.
NoteYou can import the file of the serial number list. Refer to “About List File of Serial Numbers” (P.26)

64
5.Click [Add].
6.Click [Next].
7.As the message of the completion of entering the serial number is displayed, click [Next].On and after, refer to “Activating the License via the Internet” (P.59) or “Activating the License with File” (P.60).
FUJIFILM Business Innovation Support CentreFor license activation assistance, contact your local FUJIFILM Business Innovation Customer Support Centre or select "make a support request" at Online Support website (https://support-fb.fujifilm.com/).
What to do after the setupDescribes what to do after the setup is complete.
Log in ApeosWare Management Suite.Confirm that you can log in to ApeosWare Management Suite from a web browser.For the information on how to log in, refer to “Logging in to ApeosWare Management Suite” in “Startup Guide”.
Settings of Single Sign-On FeatureThe Single Sign-On feature is disabled in the settings after installation. To use the Single Sign-On feature, enable it with the following procedures. When Single Sign-On is enabled, if the user logged in the client PC and the user registered in ApeosWare Management Suite are identical, the login screen is not displayed but the user can access the administrator screen or the user screen.
ReferWhat is Single Sign-On? “Single Sign-On” in Installation and Operation Guide
1.From [Server Manager] or [Turn Windows Features On or Off], add [Windows Authentication] of IIS security.
2.From the list of sites in the left pane of the Internet Information Services (IIS) Manager, select {Name of website you use} > [Login].
Note{Name of website used} is [ApeosWare Management Suite] if you selected [Create new website.] on the [IIS Website Settings] screen during the installation. If you selected an existing website, the name of the existing website is applied.
3.Double-click [Authentications] of [Features View].
4.Enable [Windows authentication], and disable [Anonymous authentication].

1 Setup
65
When Distributed Print Servers Are Not Displayed Correctly After Installation
If several distributed print servers are installed at the same time, they may not be set up correctly. If they are not set up correctly, re-install the print servers.
1.Remove the network cables of the print servers not displayed on the print server list screen.
NoteBy removing the network cables, set a status in which the main server cannot be communicated.
2.Uninstall the print servers.
NoteIn the “Save the files in the storage location for next use?” dialog, select the [No] option.
3.Connect the network cables to the print servers to set a status in which the main server can be communicated.
4.Reinstall the print servers.
5.After the installation completion of the print servers, reboot the main servers.

66
2 Repairing, Changing, and Uninstalling the Software
Repair a ProgramCorrupted files may be repairable by performing a repair installation.Performing repair installations does not change any settings or configured environments.
1.Perform the following steps on [Programs and features] on Windows.(1) Click [ApeosWare Management Suite].(2) Click [Change].
2.Click [Repair].After that, follow the instruction on the screen.
How to Change a Program (Adding options)If adding an option, execute an authentication operation from the License Activator. An option not in the License Activator is added by change installation. If adding an option by change installation, start it after preparing the serial number of the option.
1.Perform the following steps on [Programs and features] on Windows.(1) Click [ApeosWare Management Suite].(2) Click [Change].
2.Click [Change].After that, follow the instruction on the screen.
3.Enter the serial number.The serial number is written in the “License Certificate” packed in the product package of ApeosWare Management Suite.
4.Click [Finish].The license management screen is activated and executes license authentication.After that, follow the instruction on the screen.
Note• If the entry screen for a serial number is displayed, enter the serial number entered in procedure 3
and click [Next].• For operations on license authentication, refer to “What to do after the setup” (P.64).

2 Repairing, Changing, and Uninstalling the Software
67
Uninstall a Program
OverviewIn All-in-One Configuration SetupPerform steps of “Flowchart to Uninstall a Program” described below. If Flow Management is installed, uninstall Flow Management first.If any features are added to Flow Management, uninstall them from Flow Management first.For Distributed ConfigurationPerform the following “Flowchart to Uninstall a Program” in the following order in accordance with your server configuration.(1) Flow server or separate servers other than report and database servers(2) Main Server(3) Report Server(4) Database Server
Note• In case of print application server
1. Uninstall the print application.2. Delete the database.3. Reboot the main server.
• In case of print input/output server1. Delete the print input/output server uninstalled from the administrator screen of the main server.2. Uninstall the print input/output server.
Flowchart to Uninstall a Program
NoteCustom Authentication, FUJIFILM BI Direct Federation Settings, or other feature are used, plugins, custom services, and other software necessary to use these features will be installed in devices.Before uninstalling ApeosWare Management Suite, move devices to the device group for which [Authentication/Accounting Mode] is set to [No Authentication Required] and then update device configurations accordingly.Plugins and custom services are removed from devices once device configurations are successfully updated.
Start
End
Deactivate the License for the Software to Be Uninstalled (P.68)
Uninstall Software and Options (P.70)
Uninstall a Tool (P.68)

68
Uninstall a Tool
1.Perform the following steps on [Programs and features] on Windows.(1) Click the tool to be uninstalled.
See the table below about correspondence between tool names and names on the window.
(2) Click [Uninstall].After that, follow the instruction on the screen.
Deactivate the License for the Software to Be UninstalledDeactivate the license via internet
1.Select [FUJIFILM] > [License Administration Screen] on Startup menu in Windows program.The license management screen is activated.
2.Click [High Function].
3.Select [Deactivate the License] and click [Next].
4.Select software to deactivate license authentication. If deactivating all, click [Select All/Deactivate All].
5.Click [Next].
6.Select [Deactivate License Authentication Using E-Mail] and click [Next].
7. If the check screen is displayed, check it and click [OK].License authentication is deactivated.
8.Click [Exit].The confirmation screen is displayed.
9.Click [Yes].The license management screen is ended.
Deactivate the License with File
Creating the license deactivation file
1.Select [FUJIFILM] > [License Administration Screen] on Startup menu in Windows program.The license management screen is activated.
2.Click [High Function].The screen to select a function is displayed.
Tool Names Names on the Window
Job Log Analyzer FUJIFILM Job Log Analyzer {Version number}
Paper Form Editor FUJIFILM Paper Form Editor {Version number}
Paper Form Management FUJIFILM Paper Form Management {Version number}
Popup Messenger FUJIFILM Popup Messenger {Version number}
Update Service FUJIFILM Update Service {Version number}

2 Repairing, Changing, and Uninstalling the Software
69
3.Select [Deactivate License] and click [Next].
4.Confirm that the product name (serial number) to deactivate the license is selected and click [Next].
5. Perform the steps as shown below.(1) Select [Deactivate License Authentication Using File].(2) Click [Browse] and select the output destination and file name of the license deactivation file.
NoteAs for the default value, the file name is “LRT.dat”, and the output destination is the desktop.
(3) Click [Next].The license deactivation file is output with the specified folder and file name, and the completion screen is displayed.
6.Click [Finish].
7.Click [Exit].The confirmation screen is displayed.
8.Click [Yes].The license management screen is ended.
9.Copy the output license activation file to a PC that can be connected to the Internet using USB memory, etc.
Uploading the License Deactivation File
1.Start the web browser.
2.Enter the URL of the file upload page of “FUJIFILM BI Direct” in the [Address] field of the web browser.https://direct.fujifilmcom/bi/ap1/license/bulk_activation/upload?proc=activationThe login screen of “FUJIFILM BI Direct” is displayed.
3.Enter [User ID (Email Address)] and [Password] and click [Login].The page to upload files is displayed.
4.Select the [Deactivate] tab and click [Browse].
5. Select the output license activation file and click [Open...].You can directly drag and drop the license activation file.
6. Confirm that the selected file is displayed in the File field and click [Send].“Processing of the file is accepted” is displayed.
7.Receive an e-mail that is sent by “FUJIFILM BI Direct” to notify completion of license activation processing.
8.Click the URL in the [Results List] screen in the e-mail to display the [Results List] screen of FUJIFILM

70
BI Direct on the web browser.
9.Confirm that the [Result] field of the receipt number shown in the e-mail is “OK”.
Uninstall Software and Options
1.Perform the following steps on [Programs and features] on Windows.(1) If Flow Management is installed, click FUJIFILM Flow Management 2.2].(2) Click [Uninstall].(3) Click [ApeosWare Management Suite].(4) Click [Uninstall].
After that, follow the instruction on the screen.
Note• When “Database cannot be deleted” is displayed during uninstallation and uninstallation fails,
execute uninstallation again from [Add and Remove Programs]. Repeating uninstallation operation enables correct uninstallation.
• When uninstalling Flow Management Option updated by Update Service, the version displayed in an alert message may be different from the currently used version.In this case, check the currently used version in the Version column of “Programs and Features”, if no problem is found, keep uninstalling it.
How to Delete the Database ManuallyThis section describes how to manually delete the database used in ApeosWare Management Suite by using the components provided by SQL Server.
The case below requires to manually delete the database.For normal uninstallation, this procedure is not required.Execute this procedure when the database cannot be deleted for some reason upon uninstallation of ApeosWare Management Suite. Uninstall it if you reuse ApeosWare Management Suite no longer and don’t need the database. If the database is manually deleted while it is incomplete, for instance, part of the database does not exist, an error may be displayed. In this case, execute the procedure “How to delete a logical database and a SQL Server login” (P.70) and “How to delete a physical database” (P.72).
NoteDon’t delete the database during operating ApeosWare Management Suite.
How to delete a logical database and a SQL Server loginConfirm the following in advance.
The instance of SQL Server specified during the installation is activated.When SQL Server 2019 included in the installer of ApeosWare Management Suite is automatically installed, Instance Name becomes “FXAW.”ApeosWare Management Suite software is not in operation.

2 Repairing, Changing, and Uninstalling the Software
71
1.Log on as an Administrators group user to the PC with SQL Server installed.
2.Open the command prompt.
3.Enter the following command and log in to the instance.
The command prompt will be as follows if you log in to the instance correctly.
4.Execute the following command, and delete the database and the SQL Server login.
The command prompt is displayed if the database has been deleted successfully.
5.Execute the following command, and delete the database and the SQL Server login.
Database Name and SQL Server Login NameDatabase Name and SQL Server Login Name vary depending on the software as the list below.
Software Data Base Name SQL Server Login Name
ApeosWare Management Suite
AWMS2 • login_scn• login_pm• login_cst• login_jtr• login_dm• login_rms• login_fm• login_um• login_nim• login_sdm• login_mon• login_sf• login_rpt• login_mob• login_awms2• login_ext
Flow Management Option
• FM_DATA• FM_DATA_JP• FM_DATA_LOG• FM_DSH_RESOURCE*1
• FM_NPP• FM_PORTAL_DATA• FM_PRINT_DATA• FM_PROPERTY_MAPPER_DATA• FM_REPOSITORY• FM_REPOSITORY_CENTRAL*2
• FM_USERINTERACTION_DATA• FM_WEBUI_DATA
• AWFMDataDBUser• AWFMDataJpDBUser• AWFMDataLogDBUser• AWFMDshDBUser*1
• AWFMNPPDBUser• AWFMPortalDataDBUser• AWFMPrintDBUser• AWFMPropertyMapperDBUser• AWFMRepositoryCentralDBUser*2
• AWFMRepositoryDBUser• AWFMUserInteractionDBUser
c:\>sqlcmd.exe -E -S(local)\{Instance name specified on installation}
1>
1>drop database {Data base name}2>go1>sp_droplogin {SQL Server login name}2>go1>
1>exit

72
*1 Only when Paper Form Management installed.*2 Only Enterprise Edition
Run the following command repeatedly as many as the number of database names and SQL Server login names.For instance, to delete the database of ApeosWare Management Suite, run the command as shown below.
Delete the SQL Server login after deleting all the databases if there are some databases.
How to delete a physical databaseDelete the physical file in the database associated with ApeosWare Management Suite by Explorer. This procedure is not required if the physical file has been deleted. The physical file location varies depending on whether it is in Distributed Configuration or in All-in-One Configuration. In the event the file cannot be deleted by Explorer, the logical database may not have been deleted successfully.If you delete the instance of the SQL server before uninstalling ApeosWare Management Suite, only the physical file remains. In this case, delete the physical database before reinstalling ApeosWare Management Suite if you don’t need the database.
In All-in-One Configuration Setup
1.Delete the physical files in the database associated with ApeosWare Management Suite by Explorer
1>drop database AWMS22>go1>sp_droplogin login_scn2>go1>sp_droplogin login_pm2>go(Abbreviated)1>sp_droplogin login_rpt2>go1>sp_droplogin login_mob2>go1>

2 Repairing, Changing, and Uninstalling the Software
73
in the following folders.
*1 The default value is “C:\Program Files\FUJIFILM\ApeosWare MS”.*2 Only Enterprise Edition
For Distributed Configuration
1.Activate the Registry Editor, and confirm SQL Server data storage folder from the Registry key as shown below.HKLM\SOFTWARE\Wow6432Node\Microsoft\Microsoft SQL Server\MSSQL{SQL Server version}.{Instance name}\Setup\SQLDataRootExample:When SQL Server 2019 included in the installer of ApeosWare Management Suite is automatically installed, the following folder is used.HKLM\SOFTWARE\Wow6432Node\Microsoft\Microsoft SQL Server\MSSQL15.FXAW\Setup\SQLDataRoot
2.Delete the files shown in Step 1 of “In All-in-One Configuration Setup” (P.72) in the folder that was confirmed in Step 1 in Explorer.
Allocation of Amount of Memory Used
OverviewIn the following cases, the amount of memory used by ApeosWare Management Suite can be set.
Software Folders Files to be deleted
ApeosWare Management Suite
{ApeosWare Management Suite data storage location folder}\db
• AWMS2.mdf• AWMS2.ldf
Flow Management Option
{Flow Management Option install folder*1}\Flow Management\db
• FM_DATA.ldf• FM_DATA.mdf• FM_DATA_JP.ldf• FM_DATA_JP.mdf• FM_DATA_LOG.ldf• FM_DATA_LOG.mdf• FM_NPP.ldf• FM_NPP.mdf• FM_PORTAL_DATA.ldf• FM_PORTAL_DATA.mdf• FM_PRINT_DATA.ldf• FM_PRINT_DATA.mdf• FM_PROPERTY_MAPPER_DATA.ldf*2
• FM_PROPERTY_MAPPER_DATA.mdf*2
• FM_REPOSITORY.ldf• FM_REPOSITORY.mdf• FM_REPOSITORY_CENTRAL.ldf*2
• FM_REPOSITORY_CENTRAL.mdf*2
• FM_USERINTERACTION_DATA.ldf• FM_USERINTERACTION_DATA.mdf• FM_WEBUI_DATA.ldf• FM_WEBUI_DATA.mdf
Paper Form Management
• FM_DSH_RESOURCE.ldf• FM_DSH_RESOURCE.mdf

74
If you want to change the amount of memory allocated to the software of ApeosWare Management SuiteIf the software of ApeosWare Management Suite was added or deletedIf the amount of memory of PC in which ApeosWare Management Suite was installed was changed
The memory allocation is possible with following features installed on the PC on which the commands are run.
User ManagementDevice ManagementScan & ConnectorCost ManagementPrint ManagementFlow ManagementSQL Server
Specific memory amount is allocated automatically to each feature.
NoteIt cannot be set by remote.
OptionThe options of the command “AWMEMCONF.exe” are explained.
Allocate Amount of Memory UsedThe section below explains how to run the command allocating the memory usage amount.
Option Descriptions
-N{Amount of memory allocated to ApeosWare Management Suite}
To ApeosWare Management Suite, the amount of memory entered in {Amount of memory to be allocated to ApeosWare Management Suite} is allocated. Enter the amount of memory in MB. The recommended amounts are 2,048, 4,096, and 8,192.The value that is same as the memory capacity on the PC cannot be specified.If you want to allocate all the memory amount loaded on the PC, run the command without entering anything after “-N”.Also, you cannot specify any amount of memory that does not satisfy the memory capacity required by the ApeosWare Management Suite software.After the execution, PC must be rebooted.
Refer“OS” (P.9)
-S It returns to the amount of memory used when ApeosWare Management Suite was installed. After the execution, PC must be rebooted.
-C The amount of memory allocated to ApeosWare Management Suite is displayed.
-D If used with an option other than -F, a debug log is output. A debug log is used by our customer engineer or service engineer.
-H or none Help is displayed.
-F If executing a command without displaying a check message, use it with an option other than -D.
-V The version of “AWMEMCONF.exe” is displayed.

2 Repairing, Changing, and Uninstalling the Software
75
1.Log on to PC in which the amount of memory used is changed with the Administrator authority.
2.Open the command prompt.
3. Input the following command and push the <Enter> key.
{Path to MST folder} is the following if the initial value is not changed.ApeosWare Management Suite “C:\Program Files\FUJIFILM\ApeosWare MS\Utils\MST”Flow Management“C:\Program Files (x86)\FUJIFILM\ApeosWare MS\FM\tools\MST”
4.Enter the following command, and then press the <Enter> key.
The recommended amounts of memory are 2,048, 4,096, and 8,192 (MB).
NoteIf the following message is displayed when ApeosWare Management Suite or Flow Management is installed, select “Case where all memories installed in PC are allocated”.“The amount of memory allocated cannot be optimized. You can use the system without taking any measures, but it may not operate correctly. After installation is completed, optimize the amount of memory allocated in Memory Configuration. (For how to use Memory Configuration, refer to the manual.)”
5.The following message is displayed. If there is no problem, push <y>.
The amount of memory based on the command entered in procedure 4 is allocated to ApeosWare Management Suite.
6. If it is finished normally, the following message is displayed. Reboot the PC.
Return Amount of Memory Used to Initial StatusReturn to the amount of memory used when ApeosWare Management Suite was installed.
0
1.Log on to PC in which the amount of memory used is changed with the Administrator authority.
2.Open the command prompt.
3. Input the following command and push the <Enter> key.
cd {Path to MST folder}
AWMEMCONF.exe -N {Amount of memory allocated to ApeosWare Management Suite (MB)}
AWMEMCONF.exe -N
Currently, from the total amount of physical memory {Total amount of physical memory in PC} MB of this computer, {Amount of physical memory allocated currently} MB is allocated to ApeosWare Management Suite.Is it OK to start the setting of the amount of memory allocated? (y/n)
The setting of the amount of memory allocated has been completed normally.To reflect the setting, reboot the computer.

76
{Path to MST folder} is the following if the initial value is not changed.ApeosWare Management Suite “C:\Program Files\FUJIFILM\ApeosWare MS\Utils\MST”Flow Management“C:\Program Files (x86)\FUJIFILM\ApeosWare MS\FM\tools\MST”
4.Enter the following command, and then press the <Enter> key.
5.The following message is displayed. If there is no problem, push <y>.
It returns to the amount of memory used when it was installed.
6. If it is finished normally, the following message is displayed. Reboot the PC.
Operation LogThe execution description of “AWMEMCONF.exe” is output as an operation log once a day. The descriptions of operation logs are explained.
Output destination and file nameFolder to which operation log is output
The initial status of {User data storage destination} is “{Installation destination drive}\ FUJIFILM\ApeosWare MS”.File name
NoteThe operation log of “AWMEMCONF.exe” is not collected with Diagnostics Utility.
Output descriptionsThe descriptions shown in the following “Items” are output to operation logs being separated by commas.
Items Descriptions
Date and time Time of occurrence (Christian year, month, day, hour, minute, second, millisecond and time zone)
cd {Path to MST folder}
AWMEMCONF.exe -S
Currently, from the total amount of physical memory {Total amount of physical memory in PC} MB of this computer, {Amount of physical memory allocated currently} MB is allocated to ApeosWare Management Suite.
The setting of the amount of memory allocated has been completed normally.To reflect the setting, reboot the computer.
{User data storage destination} ¥Data¥Common Utility¥Memory Configuration¥logs
AWMCT-mct-system-{Output year}-{Output month}-{Output day}.log

2 Repairing, Changing, and Uninstalling the Software
77
Importance Any of the following• INFO• WARN• ERROR• FATAL
Blank -
Host name Name of host executed
Component ID String for identifying processed component
Blank -
Blank -
Operation target String for identifying classification of processing and operation
Message of component Log code, information showing cause and information required for handling event
Blank -
Stack trace Stack trace at time of error occurrence
Items Descriptions