anz transactive comparison
TRANSCRIPT

ANZ TrANsAcTive compArisoN05.2012

2
ANZ TrANsAcTive compArisoN
This comparison explains the new features you will see following the upgrade.
Content:
New Welcome screen 3
PaymentsNew Consolidated Payments Screen 4
Creating Payments 7
- Single Payments 10
- Domestic Payments 12
View or Modify Payments 13
Approve, Unapprove, Reject or Delete Payments 15
Release Payments 18
templatesNew Consolidated Templates Screen 20
Creating Template 23
Modify, View or Schedule Templates 25
Approve, Unapprove, Reject or Delete Templates 26
Administration 28
Reporting 30
Filtering 31
General 32

3
ANZ TrANsAcTive compArisoN
3
new welCome SCReen in DetAil
new FeAtURe BeFoRe UPGRADe
one Payments tab
From the Payments tab you will have access to all types of Single and Domestic payments for Australia and New Zealand.
You selected the Single or Domestic payment tab and then viewed Australia and New Zealand payments separately.
welcome message
You will see a welcome message with:
> Your User ID and
> The current time in your time zone .
Not Available.
AnZ transactive online Help
Online Help has been completely updated and will provide you with comprehensive help with all aspects of ANZ Transactive. Online Help is context-specific, which means that you are directed to helpful information related to the function you are currently performing.
You can access Online Help via the:
1. Help button on the top right corner of your screen
2. Ppop up windows, simply click the ‘?’ icon.
Alternatively
Basic online help was available in ANZ Transactive.
new welCome SCReen
AFteR yoUR UPGRADe BeFoRe
All Payments functions are under one tab which directs you to the new consolidated Payments screen. A new welcome message will also display your name and location.
Previously, there were separate Domestic and Single Payments tabs.
4
pAymeNTs
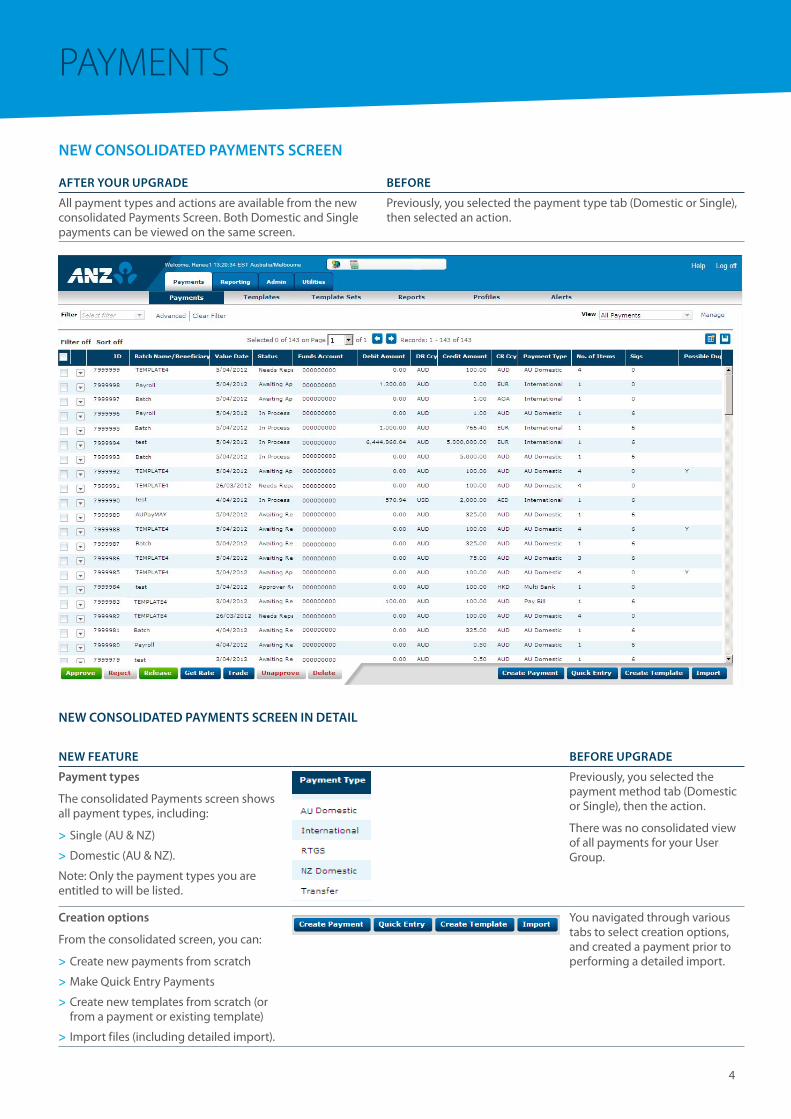
new ConSoliDAteD PAymentS SCReen in DetAil
new FeAtURe BeFoRe UPGRADe
Payment types
The consolidated Payments screen shows all payment types, including:
> Single (AU & NZ)
> Domestic (AU & NZ).
Note: Only the payment types you are entitled to will be listed.
Previously, you selected the payment method tab (Domestic or Single), then the action.
There was no consolidated view of all payments for your User Group.
Creation options
From the consolidated screen, you can:
> Create new payments from scratch
> Make Quick Entry Payments
> Create new templates from scratch (or from a payment or existing template)
> Import files (including detailed import).
You navigated through various tabs to select creation options, and created a payment prior to performing a detailed import.
new ConSoliDAteD PAymentS SCReen
AFteR yoUR UPGRADe BeFoRe
All payment types and actions are available from the new consolidated Payments Screen. Both Domestic and Single payments can be viewed on the same screen.
Previously, you selected the payment type tab (Domestic or Single), then selected an action.

5
pAymeNTs
new FeAtURe BeFoRe UPGRADe
Payment Actions
From the consolidated screen, you can perform these actions for one or more payments:
> Approve or reject payments
> Release payments
> initiate the Get Rate function for a payment (for cross currency payments only)
> Accept a rate using the Trade action
> Unapprove or Delete payments.
For example, you could approve five Single and Domestic payments at the same time.
You navigated through Single Payment and Domestic Payment tabs and their respective menus to perform the actions.
individual Payment drop down actions
Drop-down context menus allow you to complete payment actions.
Action options:
> Approve
> Reject
> Modify
> View
> Release
> Delete
> Other actions such as ‘Get Rate’ or ‘Copy as a Payment’ will appear when applicable.
Note: In the context menu you will see the actions which you are entitled to only.
You navigated through Single Payment and Domestic Payment tabs and their respective menus to perform the actions.
Column options
You can select and save customised views of the Payments screen.
New column option
Click to view column options and the click to save the new view. Your saved views will appear in the view drop down list.
Only default columns appeared and could not be modified.

6
pAymeNTs
new FeAtURe BeFoRe UPGRADe
Adjust column order and width
You can choose the order and width of each column.
Drag the column heading and drop in the order you want it to appear.
To change the width, click and drag the column border to the desired width.
The column order and width were fixed.
Quick filter
You can filter directly from the Payments screens.
Filtering was available by navigating to the Filter screen.

7
pAymeNTs
CReAtinG PAymentS
AFteR yoUR UPGRADe BeFoRe
You can create any payment method and type from the new consolidated Payments Screen. Once you select ‘Create Payment’ you will be navigated to choose a payment method and type.
Previously, you selected the payment method tab (Domestic or Single), then selected Create.
CReAtinG PAymentS in DetAil
new FeAtURe BeFoRe UPGRADe
Creating a payment
Navigate directly to the create payment screen.
Previously, you had to select the payment method tab (Domestic or Single), then select Create.
Createing payment from existing Payment or template
When creating a payment, there are radio buttons and a search function on the top right hand side of the Payments screen. These allow you to create a payment from an existing payment or template.
The search field has type predictive text, so as you type in the payment name you will see options suggested names appear.
If a template name is entered incorrectly, an error pop up will appear stating the payment does not exist on the list.
Search by magnify glass
Or alternatively start to type in ID
You navigated through various tabs to select creation options, and created a payment prior to performing a detailed import.

8
pAymeNTs
new FeAtURe BeFoRe UPGRADe
Select the Payment method and type
Select the method of payment, either Domestic or Single. Then choose the appropriate payment type.
Note: Domestic and Single Payments were referred to as Products previously, but now these options are referred to as Payment Methods.
You navigated through various tabs and menus to select the type method and type.
Heading
Once you have selected the payment method and type this information will appear above the fields which you need to complete.
Header information and individual payee information will all be editable directly from a Payment Detail screen.
Not available
Header information
Header information and individual payee information will all be editable directly from a Payment Detail screen. You no longer need to navigate away from this screen to complete the payment.
Only default columns appeared and could not be modified.
Value Date
Payment Date has been renamed Value Date. Value Date means the date the payment is submitted for processing.
Note: For some payments (e.g. International Payments) the value date may not always be the date that the payment will reach the beneficiary’s account.
Previously named Payment Date
expandable and collapsible sections
To avoid scrolling down the screen you can collapse the sections which you have completed or don’t need to fill in. Simply click on the ‘>’ to enter a particular section.
In this example Payee information is expanded, but Transactive Information is hidden, to view click the ‘>’ button.
Not available

9
pAymeNTs
new FeAtURe BeFoRe UPGRADe
Creation confirmation
When a payment is submitted, the confirmation message provides summary of the payment details. Includes:
> Payment ID
> To
> From
> Amount
> Value Date
> Payment Method.
The confirmation message also has two buttons the user can select.
> A Print Details button so you can print the Payment Detail Report for the selected payment
> A Create Payment option which allows you to to create another payment.
Pop up window only advised that the payment was successfully submitted.
Consistent Payment identifiers
The following payment identifiers are now referred to as “ID”:
> Payment ID
> Batch ID
> Tnum
> Tran Num.
Note: “ID” is now used in all ANZ Transactive screens and reports.
All the following referred to the same payment identifier:
> Payment ID
> Batch ID
> Tnum
> Tran Num.
existing Payment identifiers
Following the upgrade existing payment IDs will display as follows:
Single Payments - Payment Tnums (IDs) will appear as Tnum + 5000000 E.g. 5789143
or
- Payment Tnums (IDs) will appear as Tnum + 7000000 E.g. 7789143
Domestic Payments - Payment TNums (IDs) will remain
unchanged (E.g. 2479422)
Existing payment identifiers appeared as follows:
Single Payments - Payment Tnums appeared as
789143
Domestic Payments- Payment Tnums (IDs) were the
same.
10
pAymeNTs
CReAtinG PAymentS in DetAil – SinGle PAymentS
new FeAtURe BeFoRe UPGRADe
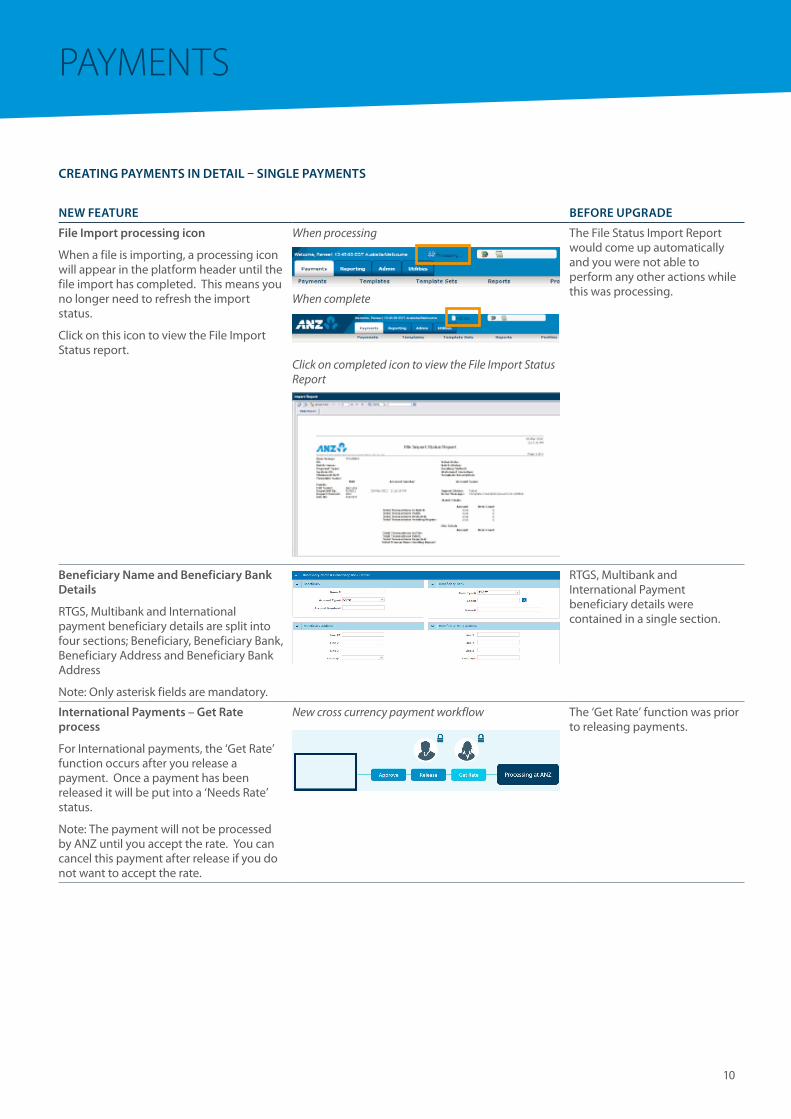
File import processing icon
When a file is importing, a processing icon will appear in the platform header until the file import has completed. This means you no longer need to refresh the import status.
Click on this icon to view the File Import Status report.
When processing
When complete
Click on completed icon to view the File Import Status Report
The File Status Import Report would come up automatically and you were not able to perform any other actions while this was processing.
Beneficiary name and Beneficiary Bank Details
RTGS, Multibank and International payment beneficiary details are split into four sections; Beneficiary, Beneficiary Bank, Beneficiary Address and Beneficiary Bank Address
Note: Only asterisk fields are mandatory.
RTGS, Multibank and International Payment beneficiary details were contained in a single section.
international Payments – Get Rate process
For International payments, the ‘Get Rate’ function occurs after you release a payment. Once a payment has been released it will be put into a ‘Needs Rate’ status.
Note: The payment will not be processed by ANZ until you accept the rate. You can cancel this payment after release if you do not want to accept the rate.
New cross currency payment workflow The ‘Get Rate’ function was prior to releasing payments.

11
pAymeNTs
new FeAtURe BeFoRe UPGRADe
Predictive text
Country, currency and some other fields are now free-form field with predictive text.
Drop down menu or search function were used to select a country.
multiBank - optional Regulatory Reporting and Bank to Bank instructions
Regulatory reporting and Bank to Bank instruction fields now available. The regulatory reporting information maybe used by authorities in the country of the Receiver or the Sender/Payment Originator.
These were not available.
Quick entry
Navigate directly to the Quick Entry screen.
You navigated through various tabs and menus to make a Quick Entry payment.

12
pAymeNTs
CReAtinG PAymentS in DetAil – DomeStiC PAymentS
new FeAtURe BeFoRe UPGRADe
File import specify payment type
There is one consolidated import screen where you can select the type of import you want to do.
You navigated through various tabs and menus to select the type of file import you wanted to do.
AU and nZ Detail import screens have been merged
The Detail Import screens for AU and NZ Domestic Payments have been merged. The file options applicable to the payment type will appear.
The Detail Import screen for AU and NZ Domestic Payments had two separate screens with different file types available for selection.
E.g. AU Domestic Payments file type:
> ABA
> CSV.
NZ Domestic Payments file type:
> With Control Record (ANZ)
> Without Control Record (NBNZ).
Cut off times now displayed
Cut off times will be displayed in the Payment Information section when submitting Domestic payments.
Cut off times were not displayed.

13
pAymeNTs
View oR moDiFy PAymentS
AFteR yoUR UPGRADe BeFoRe
You can view or modify any payment from the new consolidated Payments Screen using the context menu.
Previously, you had to select the payment type tab (Domestic or Single), then select view or modify.
moDiFyinG oR View PAymentS in DetAil
new FeAtURe BeFoRe UPGRADe
modify individual payments
There are two ways to modify payments from the Payments screen:
1) To modify a payment of any type, select modify via the context menu. To view the context menu, click on the downward arrow next to the ID field.
Note: In the context menu you will only see the actions which you are entitle to.
2) Click on the payment to view payment and then select the modify button at the bottom of the detail screen.
Alternatively,
To modify a Payment, you had to navigate through various tabs and menu to find the payment you wanted to modify.

14
pAymeNTs
new FeAtURe BeFoRe UPGRADe
View payments
To view payments click on the payment you wish to view or select view via the context menu on the consolidated Payments screen.
You had to navigate through various tabs and menus to find the payment you wanted to view.
View Audit information
To view audit information, click on the payment you want to view and then on the detail screen scroll down until you see the Audit header.
Expand details using the ‘>’ icon next to the Audit header.
Alternatively you can hover over the payment status on the payment screen to view basic audit information
Hover option
Audit information displayed on a separate page.
15
pAymeNTs
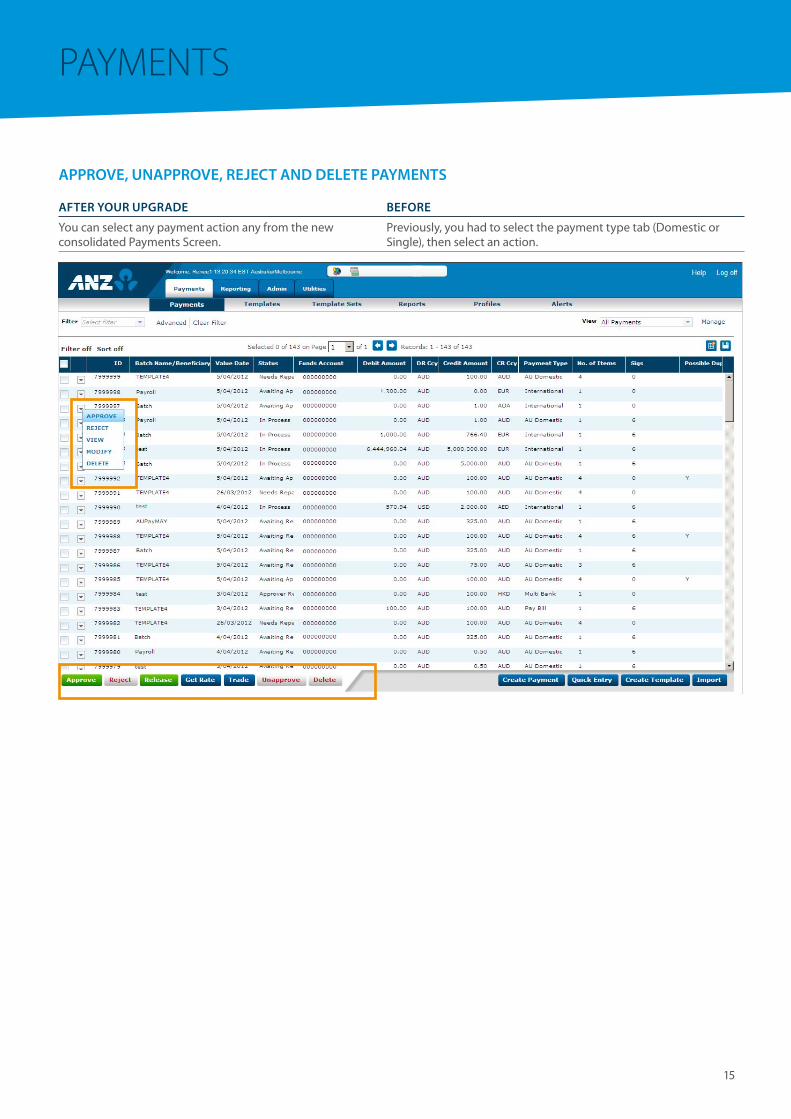
APPRoVe, UnAPPRoVe, RejeCt AnD Delete PAymentS
AFteR yoUR UPGRADe BeFoRe
You can select any payment action any from the new consolidated Payments Screen.
Previously, you had to select the payment type tab (Domestic or Single), then select an action.

16
pAymeNTs
APPRoVe, UnAPPRoVe, RejeCt oR Delete PAymentS in DetAil
new FeAtURe BeFoRe UPGRADe
Approve individual payments
There are three ways to approve payments from the Payments screen:
1) To approve a payment of any type, select approve via the context menu on the Payments screen. To view context menu options, click on the downward arrow next to the ID.
Note: In the context menu you will only see the actions which you are entitle to.
2) Check the box next to the ID field of the payment/s you wish to approve and then select the approve action at the bottom of the Payments screen.
3) Click on the payment to view the detail and click approve at the bottom of the detail screen.
Method 1
Method 2
Method 3
You had to navigate through various tabs and menu to approve a payment.
Approve multiple payments
Check the boxes of the payments awaiting approval that you want to approve and then click the approve button.
You could not approve multiple single and domestic payments.

17
pAymeNTs
new FeAtURe BeFoRe UPGRADe
Unapprove payments
There are three ways to unapprove payments from the Payments screen:
1) To unapprove a payment of any type, select unapprove via the context menu on the Payments screen. To view context menu options, click on the downward arrow next to the ID.
Note: In the context menu you will only see the actions which you are entitle to.
2) Check the box next to the ID field of the payment/s you wish to unapprove and then select the unapprove action at the bottom of the Payments screen.
3) Click on the payment to view the detail and click unapprove at the bottom of the detail screen.
Method 1
Method 2
Method 3
To unapprove a payment, you had to navigate through various tabs and menus.
Delete or Reject individual payments
There are three ways to delete or reject payments from the Payments screen:
1) To delete or reject a payment of any type, select Delete or Reject via the context menu on the Payments screen. To view context menu options, click on the downward arrow next to the ID.
Note: In the context menu you will only see the actions which you are entitled to.
2) Check the box next to the ID field of the payment/s you wish to delete or reject and then select the Delete or Reject action at the bottom of the Payments screen.
3) Click on the payment to view the detail and click Unapprove at the bottom of the detail screen.
Method 1
Method 2
Method 3
To delete or reject a payment, you had to navigate through various tabs and menus
Delete or Reject multiple payments
Check the boxes of the payments you wish to delete or reject and then click the applicable action button.
You could delete or reject multiple Single and Domestic Payments together.
18
pAymeNTs
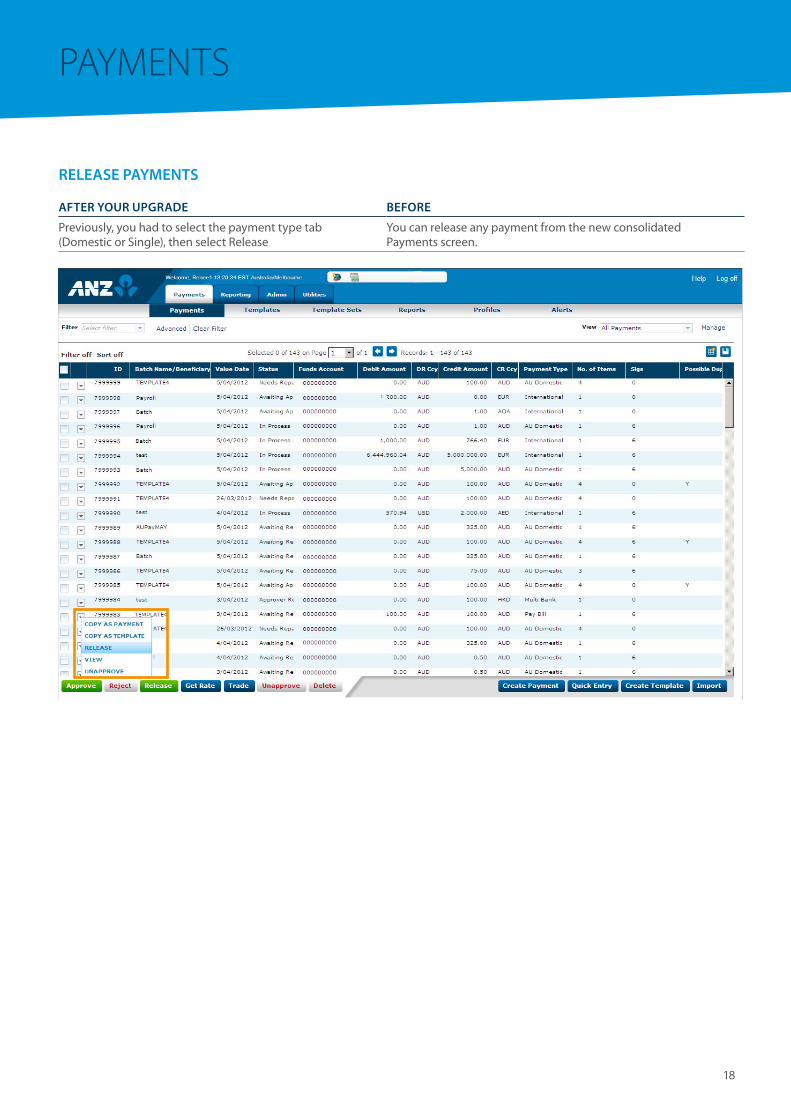
ReleASe PAymentS
AFteR yoUR UPGRADe BeFoRe
Previously, you had to select the payment type tab (Domestic or Single), then select Release
You can release any payment from the new consolidated Payments screen.

19
pAymeNTs
ReleASe PAymentS in DetAil
new FeAtURe BeFoRe UPGRADe
Release individual Payments
There are three ways to release payments from the Payments screen:
1) To release a payment of any type, select Release via the context menu on the Payments screen. To view context menu options, click on the downward arrow next to the ID.
Note: In the context menu you will only see the actions which you are entitled to.
2) Check the box next to the ID field of the payment/s you wish to release and then select the Approve action at the bottom of the Payments screen.
3) Click on the payment to view the detail and click Release at the bottom of the detail screen.
Method 1
Method 2
Method 3
You had to navigate through various tabs and menus to find the payment you wanted to release.
Release multiple payments
Check the boxes of the payments you wish to release and then click the applicable action button.
You could not release multiple Single and Domestic Payments together.
e-signer window displays
You can now release multiple payments of any type together. This means the e-signer window will display the same information for all payments.
e-signer window will display:
> ID
> Value Date/Time
> Funding Account
> Credit Amount/Currency
> Debit Amount/Currency
> Batch/Beneficiary name
> Number of Items
> Payment Type
> Transaction Details Checksum.
The e-signer window displayed either Single Payment or Domestic Payment information. It did not display both.
e-signer window displayed the applicable information below:
> Batch ID
> Pay Date Time
> Funds BSB Account
> Credit Amount
> Debit Amount
> Number of Items
> DEID/ DD Code
> Beneficiary Bank
> Beneficiary Account
> Payment Type
> Transaction Details Checksum.

20
TempLATes
new ConSoliDAteD temPlAteS SCReen
AFteR yoUR UPGRADe BeFoRe
Select the Payments tab and then select the Templates sub tab to view the new consolidated Templates Screen. You can select any template action from this screen.
Previously, you had to select the payment type tab (Domestic or Single), navigate to Templates and select the action you wish to perform.
ConSoliDAteD temPlAteS SCReen in DetAil
new FeAtURe BeFoRe UPGRADe
Payment types
The consolidated Templates screen shows all payment types, including:
> Single (AU & NZ)
> Domestic (AU & NZ).
There was no view that consolidated all payments for your User Group.
21
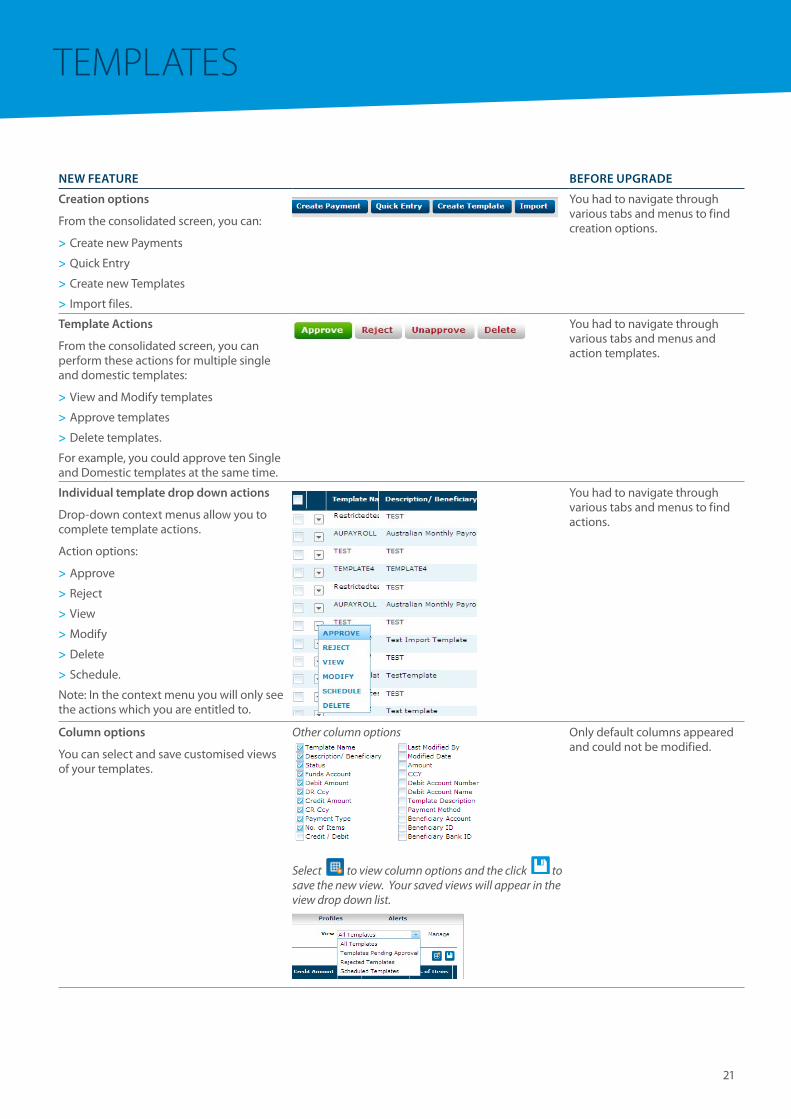
TempLATes
new FeAtURe BeFoRe UPGRADe
Creation options
From the consolidated screen, you can:
> Create new Payments
> Quick Entry
> Create new Templates
> Import files.
You had to navigate through various tabs and menus to find creation options.
template Actions
From the consolidated screen, you can perform these actions for multiple single and domestic templates:
> View and Modify templates
> Approve templates
> Delete templates.
For example, you could approve ten Single and Domestic templates at the same time.
You had to navigate through various tabs and menus and action templates.
individual template drop down actions
Drop-down context menus allow you to complete template actions.
Action options:
> Approve
> Reject
> View
> Modify
> Delete
> Schedule.
Note: In the context menu you will only see the actions which you are entitled to.
You had to navigate through various tabs and menus to find actions.
Column options
You can select and save customised views of your templates.
Other column options
Select to view column options and the click to save the new view. Your saved views will appear in the view drop down list.
Only default columns appeared and could not be modified.
22
TempLATes
new FeAtURe BeFoRe UPGRADe
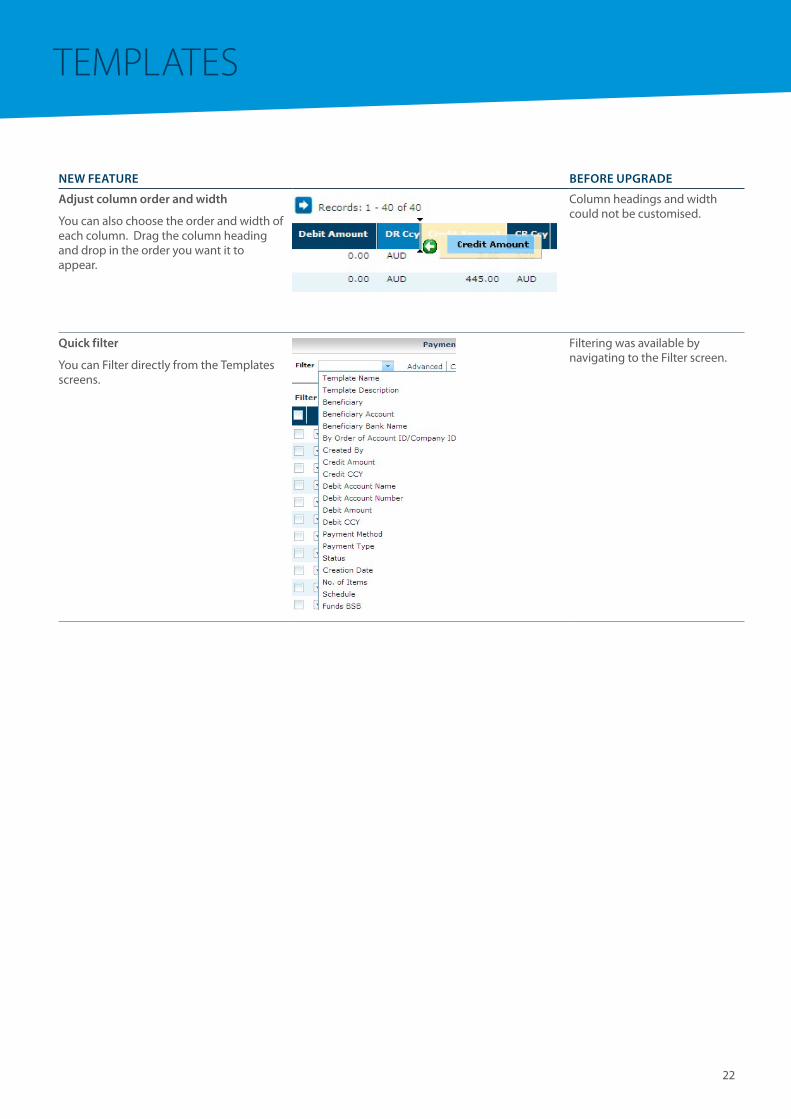
Adjust column order and width
You can also choose the order and width of each column. Drag the column heading and drop in the order you want it to appear.
Column headings and width could not be customised.
Quick filter
You can Filter directly from the Templates screens.
Filtering was available by navigating to the Filter screen.

23
TempLATes
CReAtinG temPlAteS
AFteR yoUR UPGRADe BeFoRe
Select the Payment tab and then select the Templates sub tab to view the new consolidated Templates screen. From this screen you can create templates.
Previously, you had to select the payment type tab (Domestic or Single), navigate to Templates sub tab and then select create template.
CReAtinG temPlAteS in DetAil
new FeAtURe BeFoRe UPGRADe
Create template from consolidated screen
You can create any type of template from the Templates screen.
You navigated to various tabs to select the type create a template.
Create from existing Payment or template
When creating a template, there are radio buttons and a search function on the top right hand side of the Templates screen. These allow you to create template from an existing payment or template.
The search field has type predictive text, so as you type in the payment name you will see options suggested names appear.
If a template name is entered incorrectly, an error pop up will appear stating the template does not exist on the list.
Search by magnify glass
Or alternatively start to type in ID
Went through various tabs and menu options to create a Domestic or Single payment from a template.

24
TempLATes
new FeAtURe BeFoRe UPGRADe
Select the Payment method and type
Choose whether you want to create either a Domestic or Single Payment and then the appropriate payment types will appear in the drop down
Note: Previously Domestic and Single Payments were referred to as Products. These are now referred to as Payment Methods.
You navigated to various tabs to select the payment method and type.

25
TempLATes
moDiFy, View oR SCHeDUle A temPlAte
AFteR yoUR UPGRADe BeFoRe
All templates are available from the new consolidated Templates Screen. From here, you can Modify, View and Schedule templates.
Previously, you had to select the payment type tab (Domestic or Single), navigate to templates and select the action you wanted to perform.
moDiFy, View oR SCHeDUle A temPlAte
new FeAtURe BeFoRe UPGRADe
modify individual template
There are two ways to modify templates from the Templates screen:
1) Select Modify via the context menu on the Templates screen. To view the context menu option click on the downward arrow next to the Template Name field
Note: In the context menu you will only see the actions which you are entitled to.
2) Click on the template to view the detail and then select the Modify button at the bottom of the detail screen.
Method 1:
Method 2:
You had to navigate through various tabs and menu to find the template you wanted to modify.
View template
You can click on the template to view the detail or select View via the context menu on consolidated Templates screen.
You had to navigate through various tabs and menu to find the template you wanted to view.
Create a recurring Payment using a template
The process of creating a recurring payment is unchanged, however this option is now available via the context menu on the consolidated Templates screen.
You navigated to various tabs to select the Schedule menu option.

26
TempLATes
APPRoVe, UnAPPRoVe, RejeCt AnD Delete A temPlAte
AFteR yoUR UPGRADe BeFoRe
All templates are available from the new consolidated Templates Screen. From here, you can Approve, Unapprove, Reject and Delete templates.
Previously, you had to select the payment type tab (Domestic or Single), navigate to Templates and select the action you wanted to perform.
APPRoVe, UnAPPRoVe, RejeCt AnD Delete A temPlAte in DetAil
new FeAtURe BeFoRe UPGRADe
Approve individual template
There are three ways to approve template from the Templates screen:
1) To approve a template, select Approve via the context menu on the Templates screen. To view context menu options, click on the downward arrow next to the Template Name.
Note: In the context menu you will only see the actions which you are entitled to.
2) Check the box next to the Template Name field of the template/s you wish to approve and then select the Approve action at the bottom of the Templates screen.
3) Click on the template to view the detail and click Approve at the bottom of the detail screen.
Method 1
Method 2
Method 3
You had to navigate through various tabs and menu to find the template you wanted to approve.
Approve multiple templates
Check the boxes of the templates awaiting approval that you want to approve and then click the Approve button.
You could not approve multiple Single and Domestic templates together.
27
TempLATes
new FeAtURe BeFoRe UPGRADe
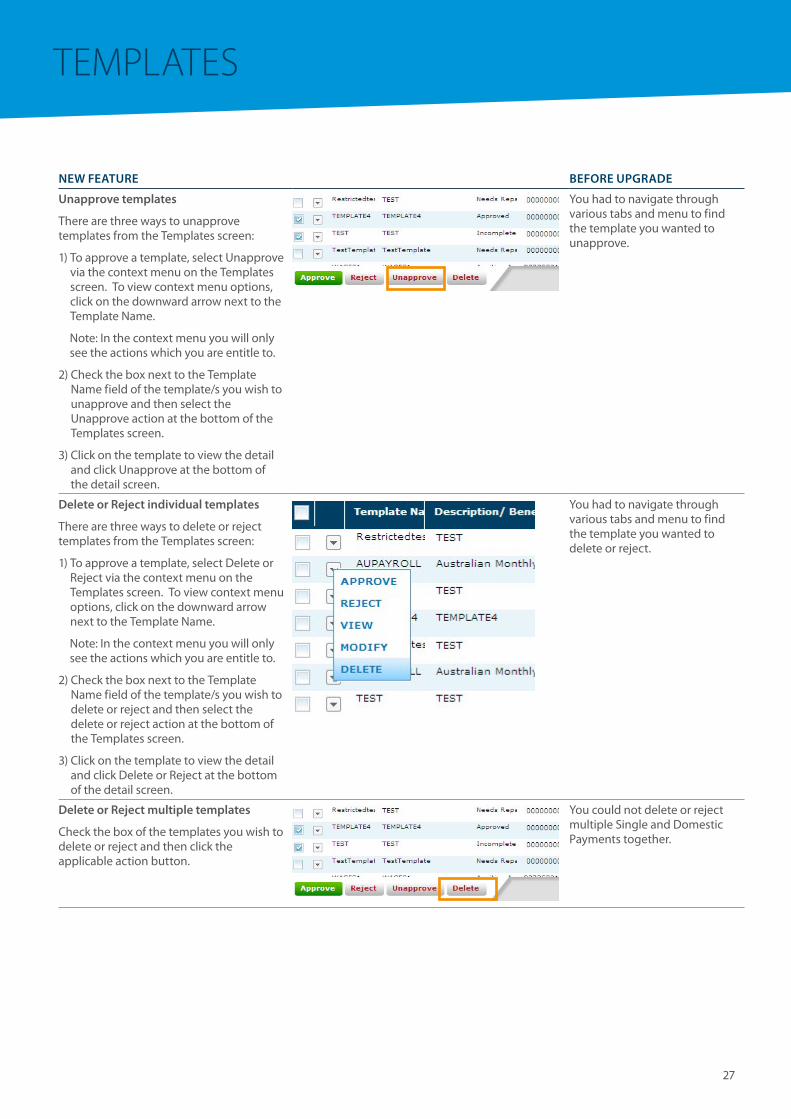
Unapprove templates
There are three ways to unapprove templates from the Templates screen:
1) To approve a template, select Unapprove via the context menu on the Templates screen. To view context menu options, click on the downward arrow next to the Template Name.
Note: In the context menu you will only see the actions which you are entitle to.
2) Check the box next to the Template Name field of the template/s you wish to unapprove and then select the Unapprove action at the bottom of the Templates screen.
3) Click on the template to view the detail and click Unapprove at the bottom of the detail screen.
You had to navigate through various tabs and menu to find the template you wanted to unapprove.
Delete or Reject individual templates
There are three ways to delete or reject templates from the Templates screen:
1) To approve a template, select Delete or Reject via the context menu on the Templates screen. To view context menu options, click on the downward arrow next to the Template Name.
Note: In the context menu you will only see the actions which you are entitle to.
2) Check the box next to the Template Name field of the template/s you wish to delete or reject and then select the delete or reject action at the bottom of the Templates screen.
3) Click on the template to view the detail and click Delete or Reject at the bottom of the detail screen.
You had to navigate through various tabs and menu to find the template you wanted to delete or reject.
Delete or Reject multiple templates
Check the box of the templates you wish to delete or reject and then click the applicable action button.
You could not delete or reject multiple Single and Domestic Payments together.
28
AdmiNisTrATioN
new FeAtURe BeFoRe UPGRADe
Data Roles assigned for all Users
All existing role entitlements will be preserved. However all Users now require a Data Role.
If Administrators have not assigned a Data Role, this will be automatically assigned and Users will continue to have access to all accounts and restricted templates.
When Administrators delete a Data Role, ANZ Transactive will check to confirm if the Data Role is assigned to a User. If it is, a notification will prompt you to unassign it before you can delete it.
Not all Users had a Data Role. Those Users without a Data Role had access to all accounts and restricted templates.
Administrators could delete a Data Role without second Administrator approval.
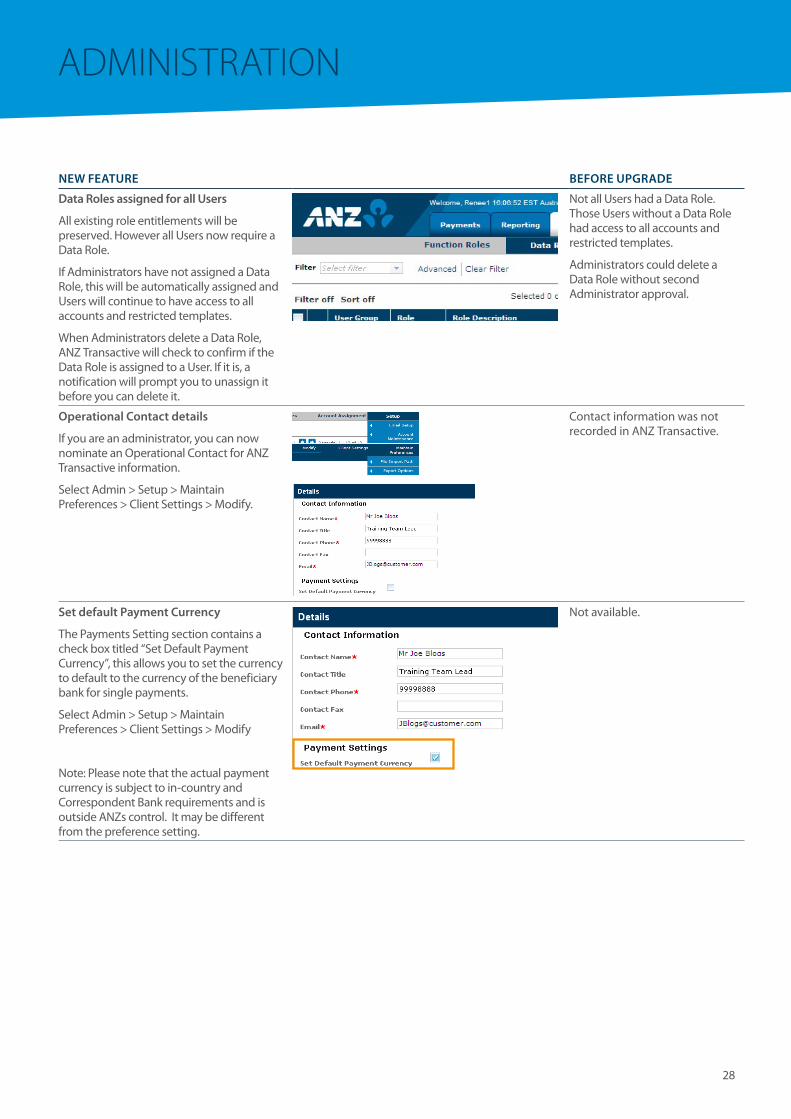
operational Contact details
If you are an administrator, you can now nominate an Operational Contact for ANZ Transactive information.
Select Admin > Setup > Maintain Preferences > Client Settings > Modify.
Contact information was not recorded in ANZ Transactive.
Set default Payment Currency
The Payments Setting section contains a check box titled “Set Default Payment Currency”, this allows you to set the currency to default to the currency of the beneficiary bank for single payments.
Select Admin > Setup > Maintain Preferences > Client Settings > Modify
Note: Please note that the actual payment currency is subject to in-country and Correspondent Bank requirements and is outside ANZs control. It may be different from the preference setting.
Not available.
29
AdmiNisTrATioN
new FeAtURe BeFoRe UPGRADe
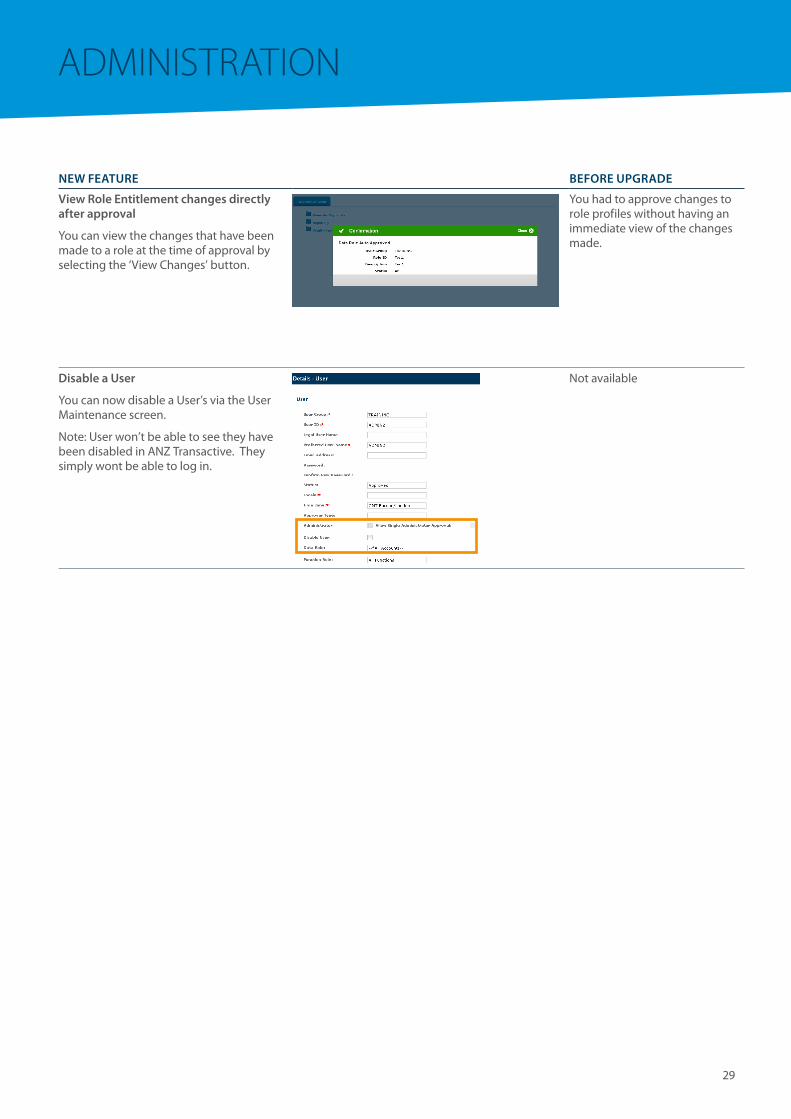
View Role entitlement changes directly after approval
You can view the changes that have been made to a role at the time of approval by selecting the ‘View Changes’ button.
You had to approve changes to role profiles without having an immediate view of the changes made.
Disable a User
You can now disable a User’s via the User Maintenance screen.
Note: User won’t be able to see they have been disabled in ANZ Transactive. They simply wont be able to log in.
Not available

30
reporTiNg
new FeAtURe – SinGle PAymentS BeFoRe UPGRADe
transaction Date and Bank name appear in Single Payment Reports
Transaction Date and Bank Name fields appear in all Single Payment reports expect discretion and Import reports.
Not available.

31
FiLTeriNg
new FeAtURe BeFoRe UPGRADe
Quick Filter
You can filter directly from the Payments and Templates screens.
Filtering was available by navigating to the Filter screen.
Advanced Filter
In the advance filter screen (available from the Payments or Templates screens) the filter criteria appears in expandable headers and there is more criteria for you to choose from.
You had to navigate through multiple screens and there was limited search criteria.
32
geNerAL
new FeAtURe BeFoRe UPGRADe
Colour coded pop up windows
Pop up messages change based on the context of the message. For example a pop up message with a red header signifies an error, an orange header signifies a decision and a green header is confirmation.
Pop up messages were in a standard format regardless of the message type.
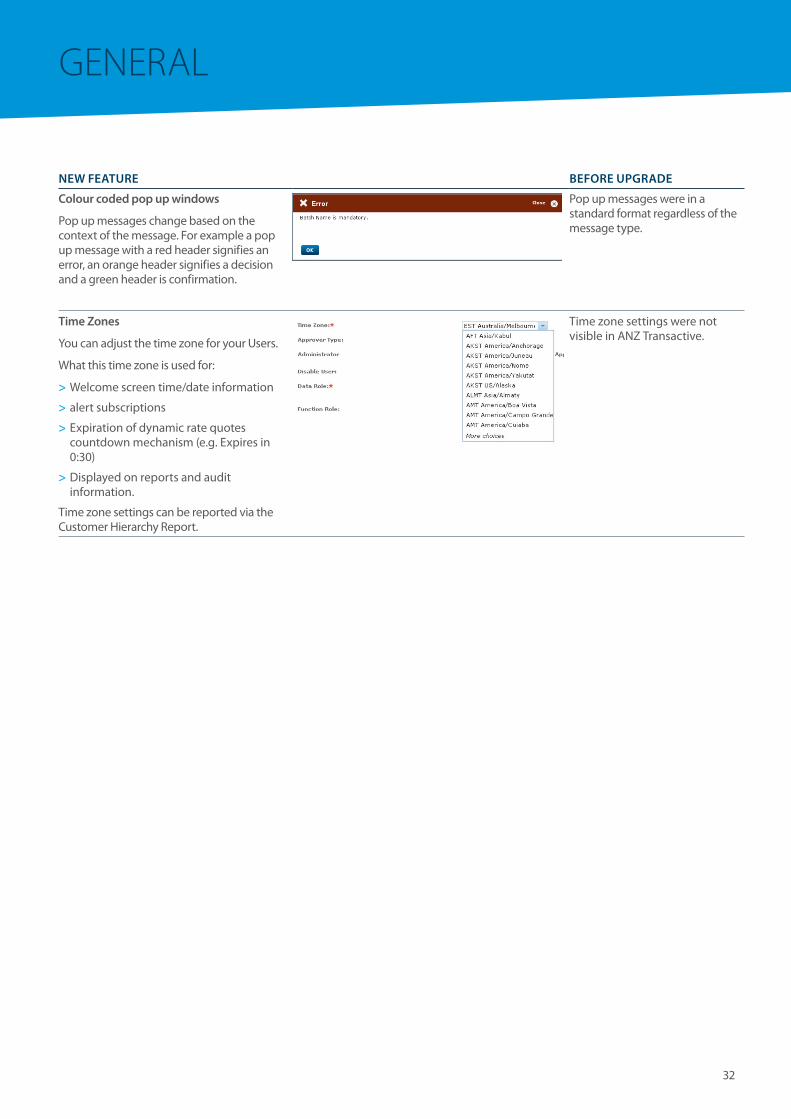
time Zones
You can adjust the time zone for your Users.
What this time zone is used for:
> Welcome screen time/date information
> alert subscriptions
> Expiration of dynamic rate quotes countdown mechanism (e.g. Expires in 0:30)
> Displayed on reports and audit information.
Time zone settings can be reported via the Customer Hierarchy Report.
Time zone settings were not visible in ANZ Transactive.

Australia and n
ew Zealand Banking G
roup limited (A
nZ) A
Bn 11 005 357 522. A
NZ’s colour blue is a trade m
ark of AN
Z. Item N
o. 88054 05.2012 W272088
anz.com