android_developer_guide
DESCRIPTION
Android powers millions of phones, tablets, and other devices in a wide variety of screen sizes and form factors. By taking advantage of Android's flexible layout system, you can create apps that gracefully scale from large tablets to smaller phones.TRANSCRIPT
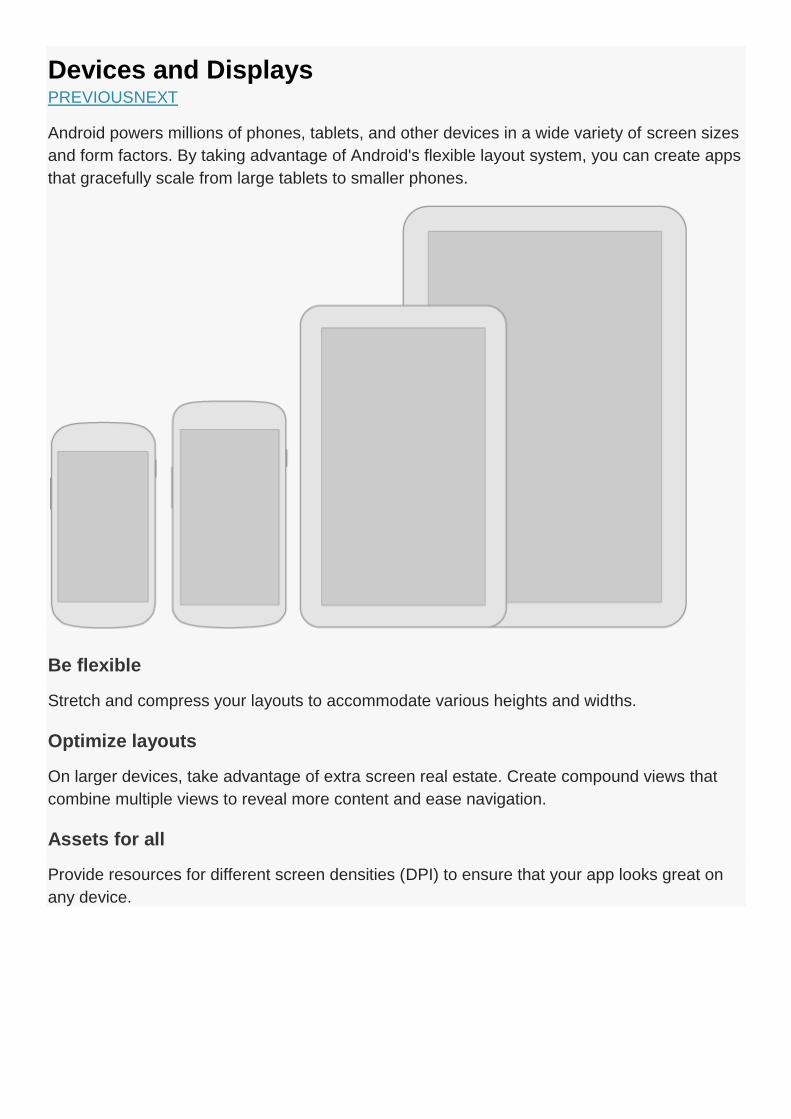
Devices and Displays PREVIOUSNEXT
Android powers millions of phones, tablets, and other devices in a wide variety of screen sizes
and form factors. By taking advantage of Android's flexible layout system, you can create apps
that gracefully scale from large tablets to smaller phones.
Be flexible
Stretch and compress your layouts to accommodate various heights and widths.
Optimize layouts
On larger devices, take advantage of extra screen real estate. Create compound views that
combine multiple views to reveal more content and ease navigation.
Assets for all
Provide resources for different screen densities (DPI) to ensure that your app looks great on
any device.
Strategies
So where do you begin when designing for multiple screens? One approach is to work in the
base standard (normal size and MDPI) and scale it up or down for the other buckets. Another
approach is to start with the device with the largest screen size, and then scale down and
figure out the UI compromises you'll need to make on smaller screens.
For details about designing layouts for larger screens, see the Multi-pane Layouts guide.
Developer Guide
For information about how to build flexible layouts for multiple screen sizes and densities,
read Designing for Multiple Screens and Building a Dynamic UI with Fragments.
Metrics and Grids PREVIOUSNEXT
Devices vary not only in physical size, but also in screen density (DPI). To simplify the way
you design for multiple screens, think of each device as falling into a particular size bucket and
density bucket:
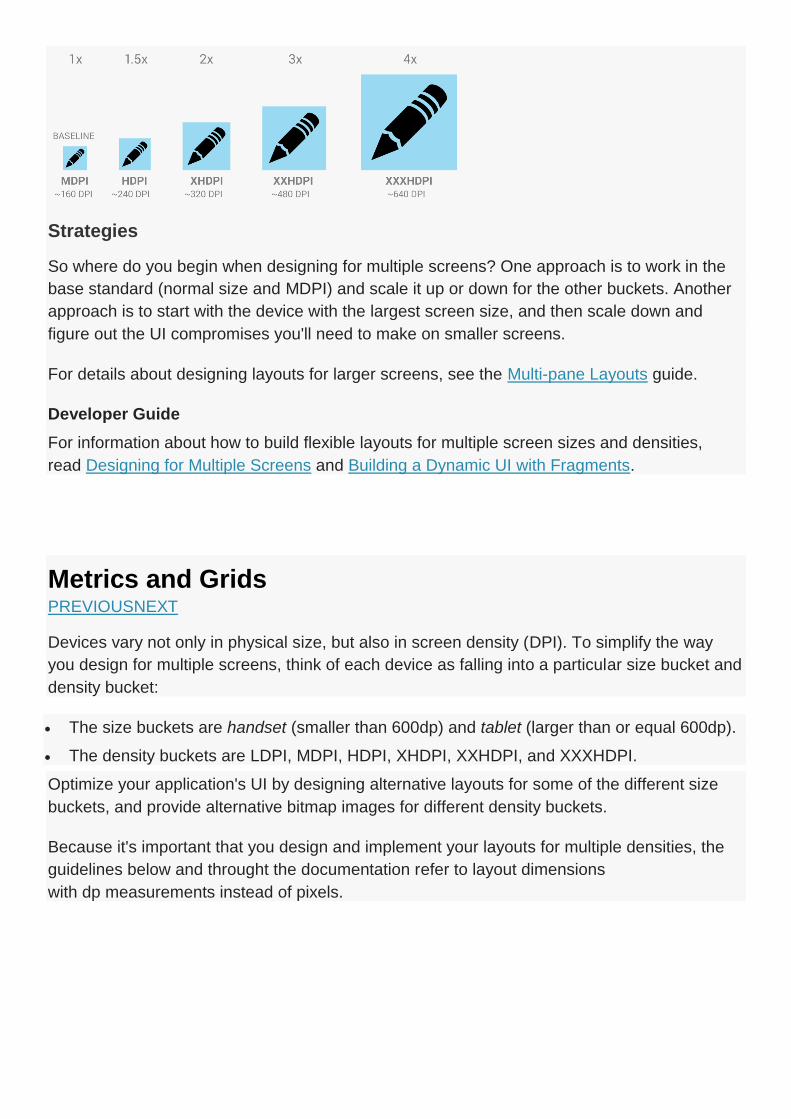
The size buckets are handset (smaller than 600dp) and tablet (larger than or equal 600dp).
The density buckets are LDPI, MDPI, HDPI, XHDPI, XXHDPI, and XXXHDPI.
Optimize your application's UI by designing alternative layouts for some of the different size
buckets, and provide alternative bitmap images for different density buckets.
Because it's important that you design and implement your layouts for multiple densities, the
guidelines below and throught the documentation refer to layout dimensions
with dp measurements instead of pixels.
Space considerations
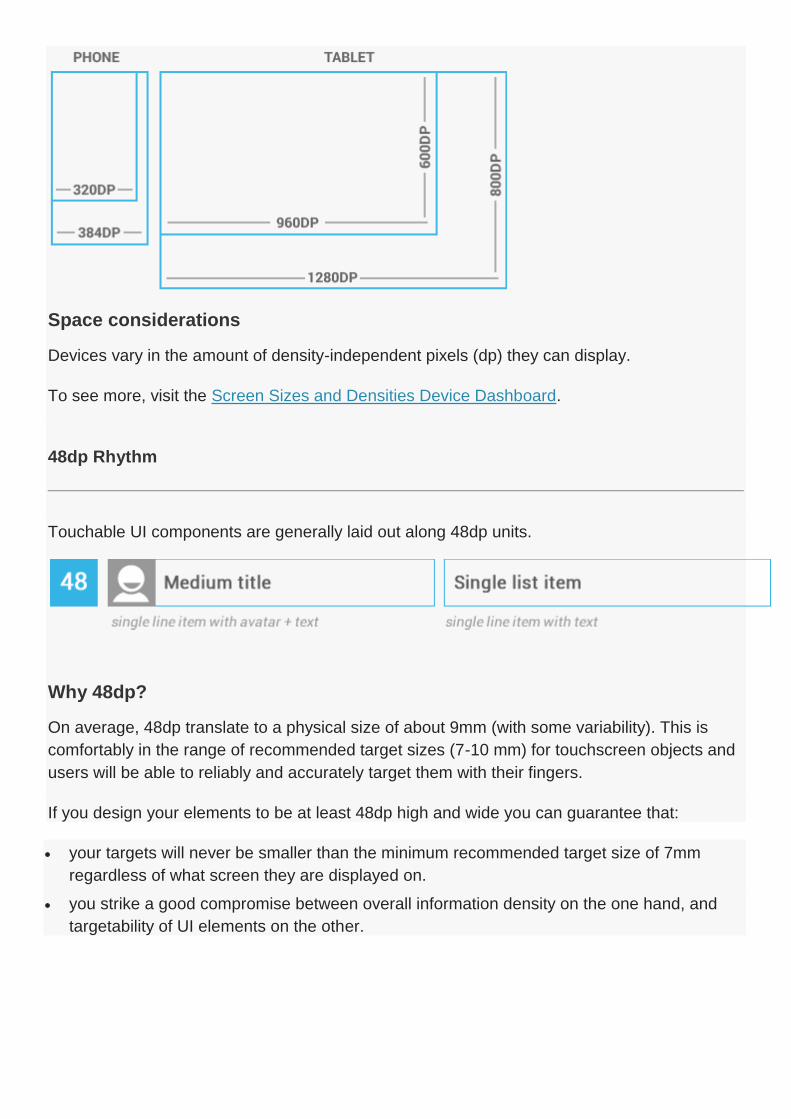
Devices vary in the amount of density-independent pixels (dp) they can display.
To see more, visit the Screen Sizes and Densities Device Dashboard.
48dp Rhythm
Touchable UI components are generally laid out along 48dp units.
Why 48dp?
On average, 48dp translate to a physical size of about 9mm (with some variability). This is
comfortably in the range of recommended target sizes (7-10 mm) for touchscreen objects and
users will be able to reliably and accurately target them with their fingers.
If you design your elements to be at least 48dp high and wide you can guarantee that:
your targets will never be smaller than the minimum recommended target size of 7mm
regardless of what screen they are displayed on.
you strike a good compromise between overall information density on the one hand, and
targetability of UI elements on the other.
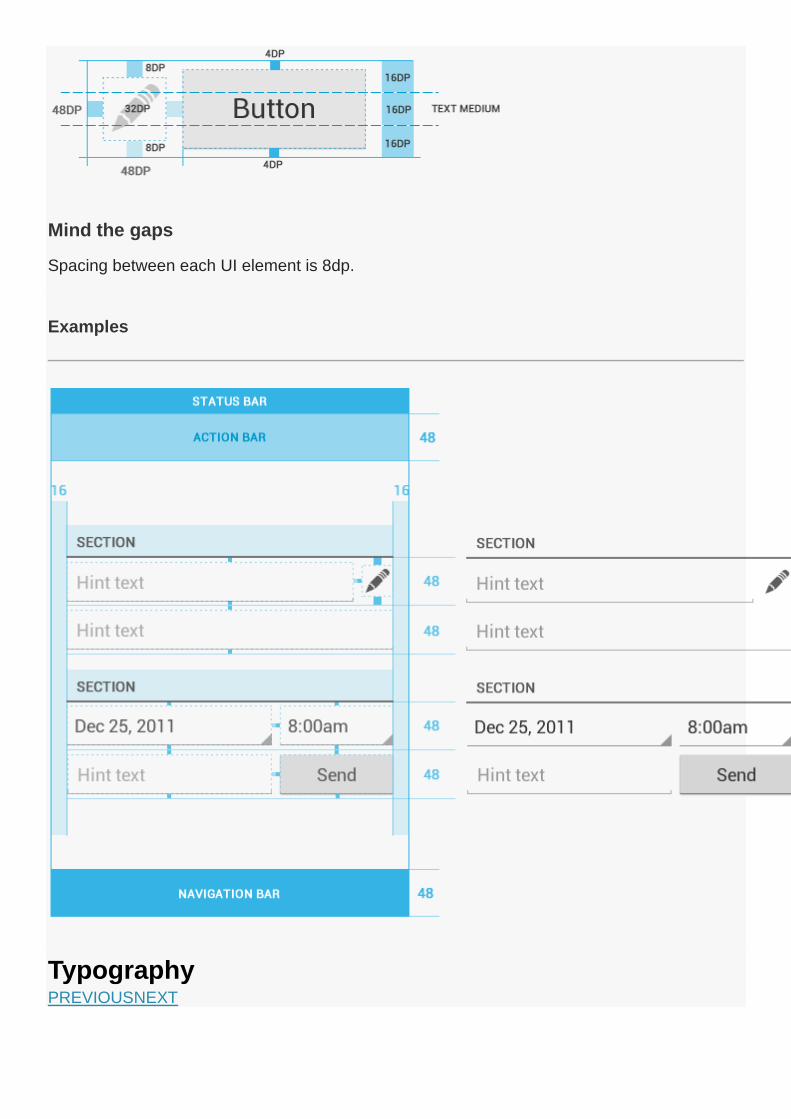
Mind the gaps
Spacing between each UI element is 8dp.
Examples
Typography PREVIOUSNEXT
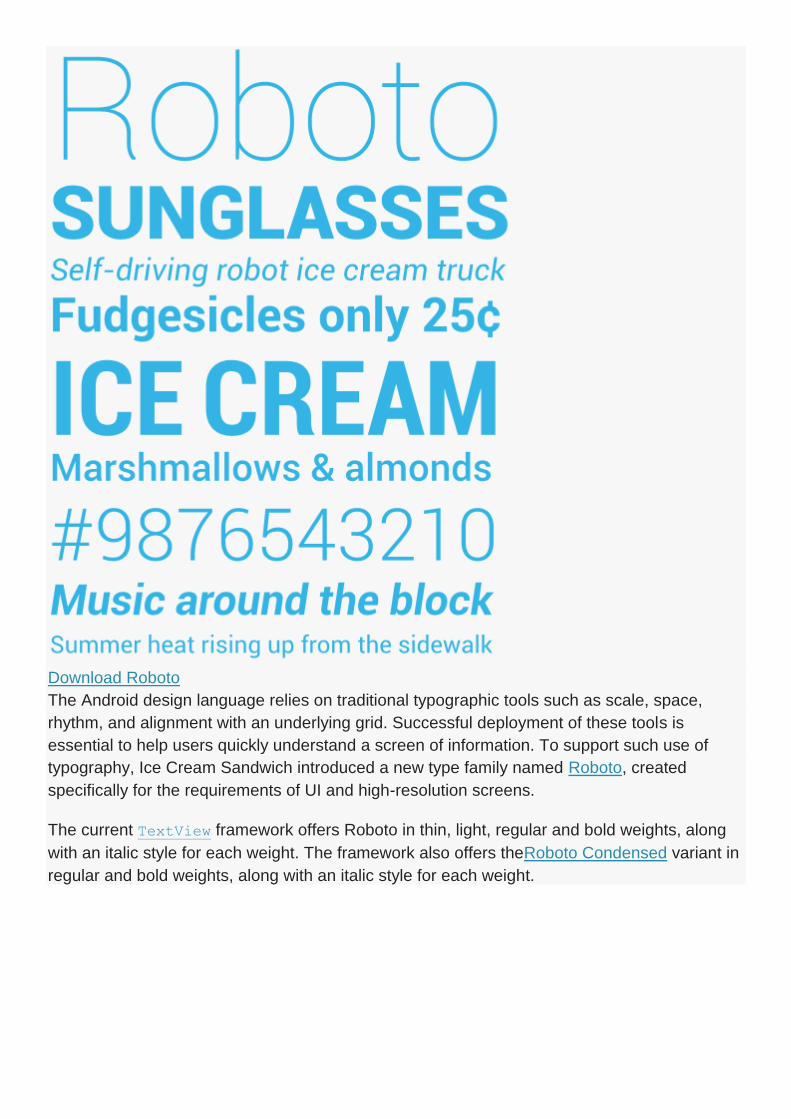
Download Roboto
The Android design language relies on traditional typographic tools such as scale, space,
rhythm, and alignment with an underlying grid. Successful deployment of these tools is
essential to help users quickly understand a screen of information. To support such use of
typography, Ice Cream Sandwich introduced a new type family named Roboto, created
specifically for the requirements of UI and high-resolution screens.
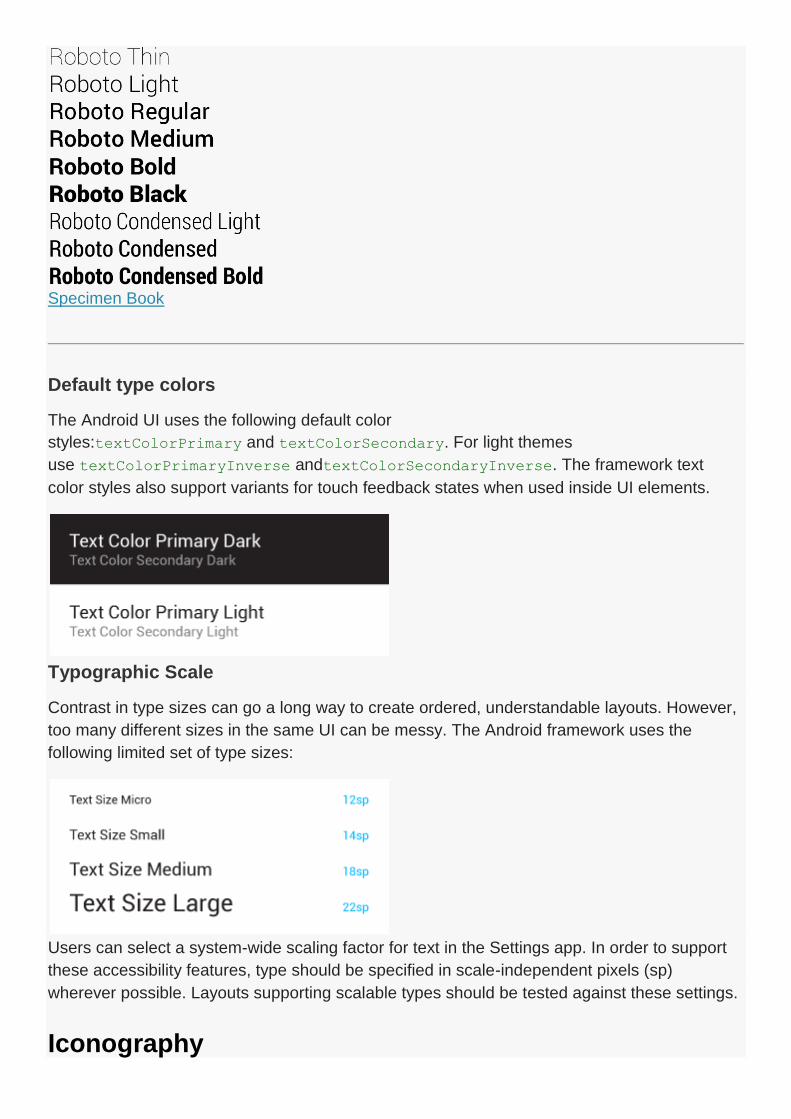
The current TextView framework offers Roboto in thin, light, regular and bold weights, along
with an italic style for each weight. The framework also offers theRoboto Condensed variant in
regular and bold weights, along with an italic style for each weight.
Specimen Book
Default type colors
The Android UI uses the following default color
styles:textColorPrimary and textColorSecondary. For light themes
use textColorPrimaryInverse andtextColorSecondaryInverse. The framework text
color styles also support variants for touch feedback states when used inside UI elements.
Typographic Scale
Contrast in type sizes can go a long way to create ordered, understandable layouts. However,
too many different sizes in the same UI can be messy. The Android framework uses the
following limited set of type sizes:
Users can select a system-wide scaling factor for text in the Settings app. In order to support
these accessibility features, type should be specified in scale-independent pixels (sp)
wherever possible. Layouts supporting scalable types should be tested against these settings.
Iconography
PREVIOUSNEXT
An icon is a graphic that takes up a small portion of screen real estate and provides a quick,
intuitive representation of an action, a status, or an app.
When you design icons for your app, it's important to keep in mind that your app may be
installed on a variety of devices that offer a range of pixel densities, as mentioned in Devices
and Displays. But you can make your icons look great on all devices by providing each icon in
multiple sizes. When your app runs, Android checks the characteristics of the device screen
and loads the appropriate density-specific assets for your app.
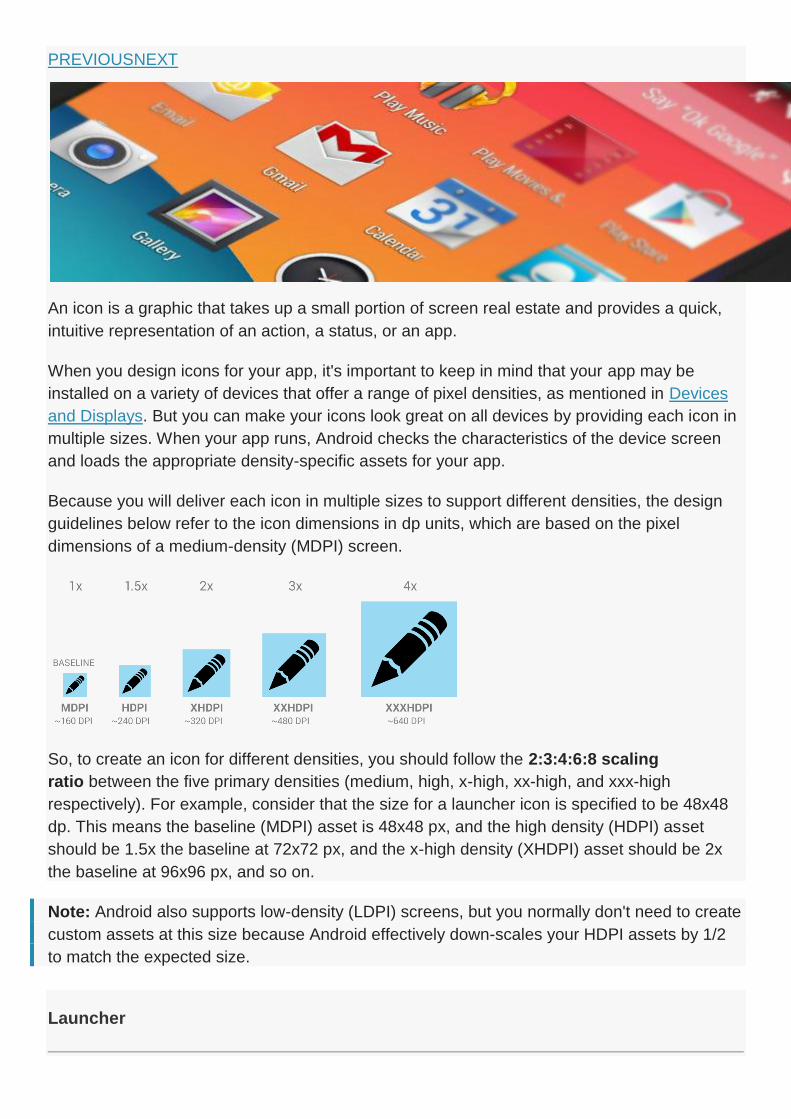
Because you will deliver each icon in multiple sizes to support different densities, the design
guidelines below refer to the icon dimensions in dp units, which are based on the pixel
dimensions of a medium-density (MDPI) screen.
So, to create an icon for different densities, you should follow the 2:3:4:6:8 scaling
ratio between the five primary densities (medium, high, x-high, xx-high, and xxx-high
respectively). For example, consider that the size for a launcher icon is specified to be 48x48
dp. This means the baseline (MDPI) asset is 48x48 px, and the high density (HDPI) asset
should be 1.5x the baseline at 72x72 px, and the x-high density (XHDPI) asset should be 2x
the baseline at 96x96 px, and so on.
Note: Android also supports low-density (LDPI) screens, but you normally don't need to create
custom assets at this size because Android effectively down-scales your HDPI assets by 1/2
to match the expected size.
Launcher

The launcher icon is the visual representation of your app on the Home or All Apps screen.
Since the user can change the Home screen's wallpaper, make sure that your launcher icon is
clearly visible on any type of background.
Sizes & scale
Launcher icons on a mobile device must be 48x48 dp.
Launcher icons for display on Google Play must be512x512 pixels.
Proportions
Full asset, 48x48 dp
Style
Use a distinct silhouette. Three-dimensional, front view, with a slight perspective as if viewed
from above, so that users perceive some depth.

Action Bar
Action bar icons are graphic buttons that represent the most important actions people can take
within your app. Each one should employ a simple metaphor representing a single concept
that most people can grasp at a glance.
Pre-defined glyphs should be used for certain common actions such as "refresh" and "share."
The download link below provides a package with icons that are scaled for various screen
densities and are suitable for use with the Holo Light and Holo Dark themes. The package also
includes unstyled icons that you can modify to match your theme, in addition to Adobe®
Illustrator® source files for further customization.
Download the Action Bar Icon Pack
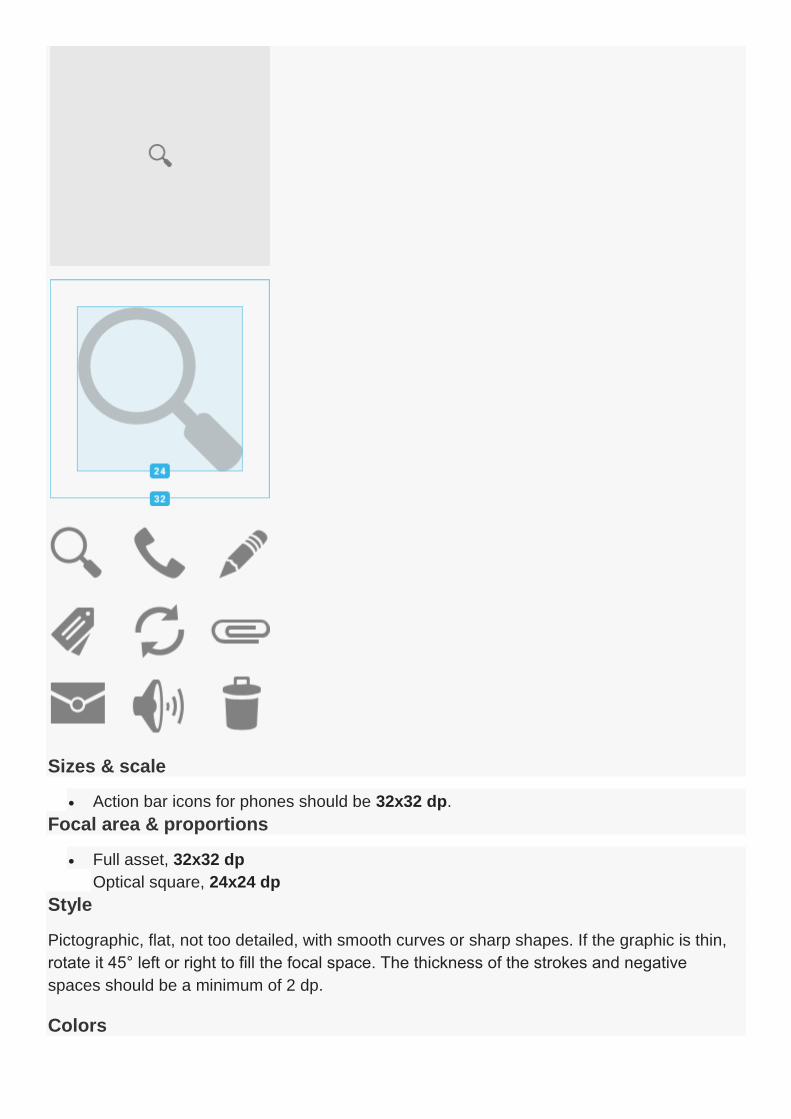
Sizes & scale
Action bar icons for phones should be 32x32 dp.
Focal area & proportions
Full asset, 32x32 dp
Optical square, 24x24 dp
Style
Pictographic, flat, not too detailed, with smooth curves or sharp shapes. If the graphic is thin,
rotate it 45° left or right to fill the focal space. The thickness of the strokes and negative
spaces should be a minimum of 2 dp.
Colors
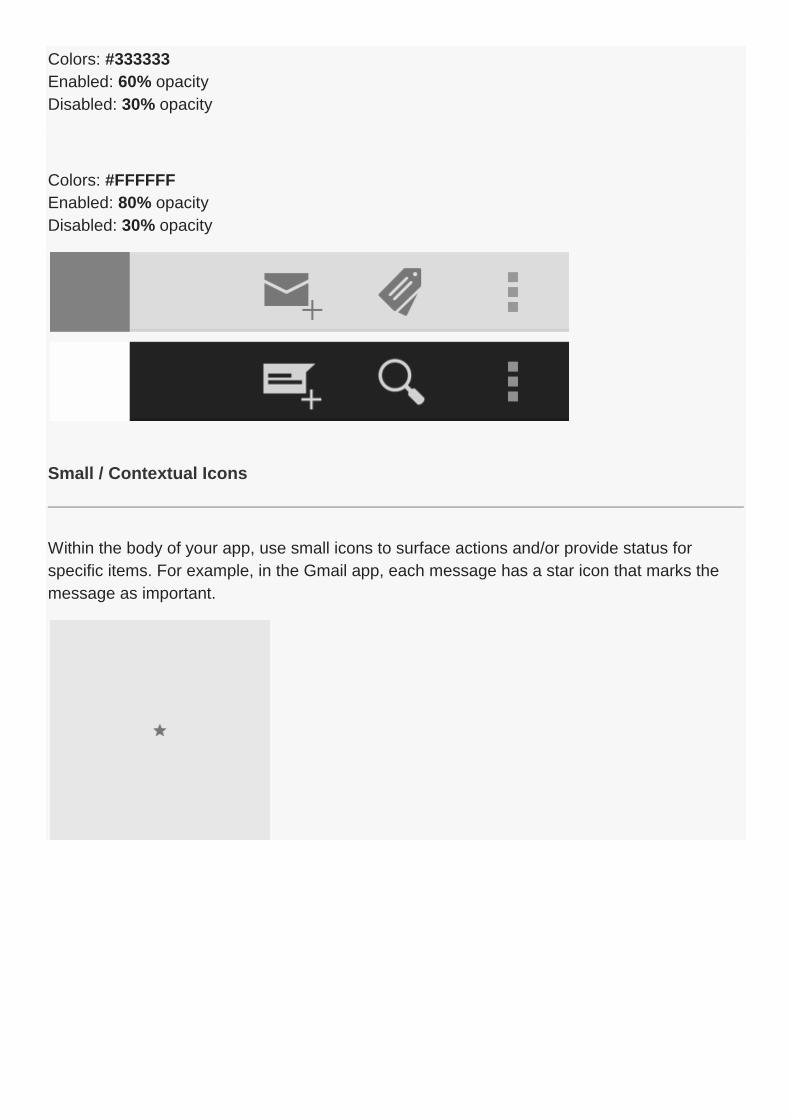
Colors: #333333
Enabled: 60% opacity
Disabled: 30% opacity
Colors: #FFFFFF
Enabled: 80% opacity
Disabled: 30% opacity
Small / Contextual Icons
Within the body of your app, use small icons to surface actions and/or provide status for
specific items. For example, in the Gmail app, each message has a star icon that marks the
message as important.

Sizes & scale
Small icons should be 16x16dp.
Focal area & proportions
Full asset, 16x16 dp
Optical square, 12x12 dp
Style
Neutral, flat, and simple. Filled shapes are easier to see than thin strokes. Use a single visual
metaphor so that a user can easily recognize and understand its purpose.
Colors
Use non-neutral colors sparingly and with purpose. For example, Gmail uses yellow in the star
icon to indicate a bookmarked message. If an icon is actionable, choose a color that contrasts
well with the background.
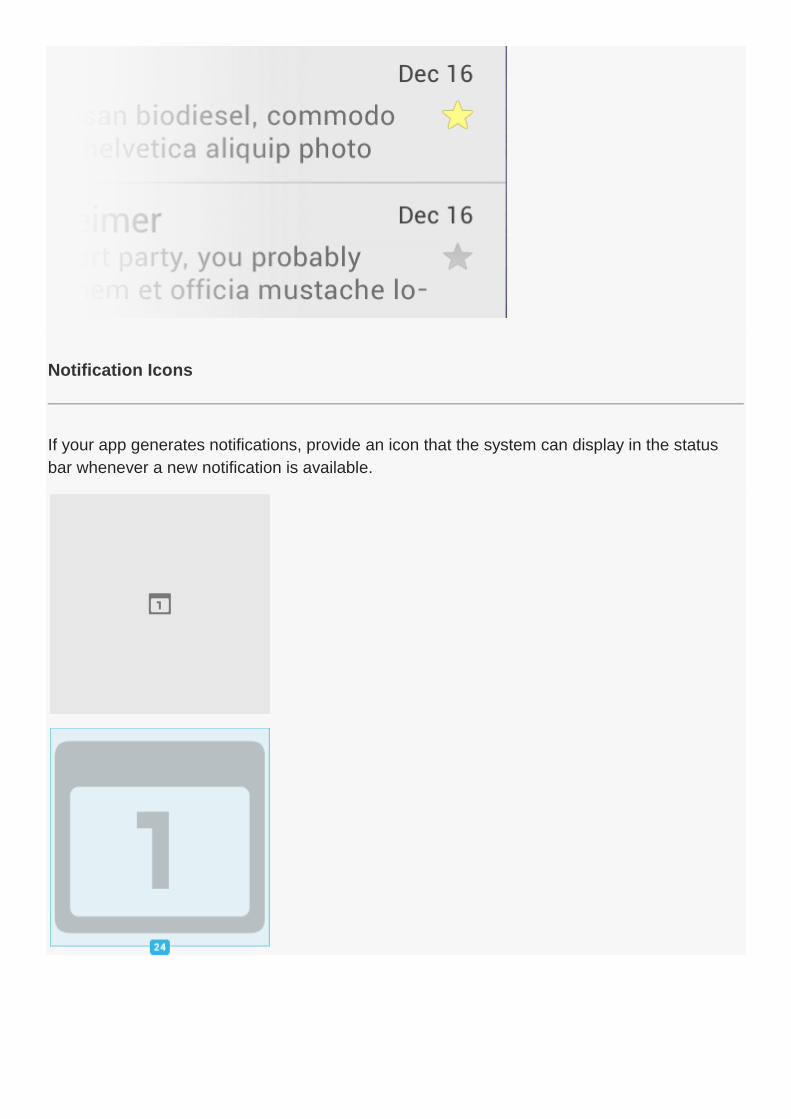
Notification Icons
If your app generates notifications, provide an icon that the system can display in the status
bar whenever a new notification is available.
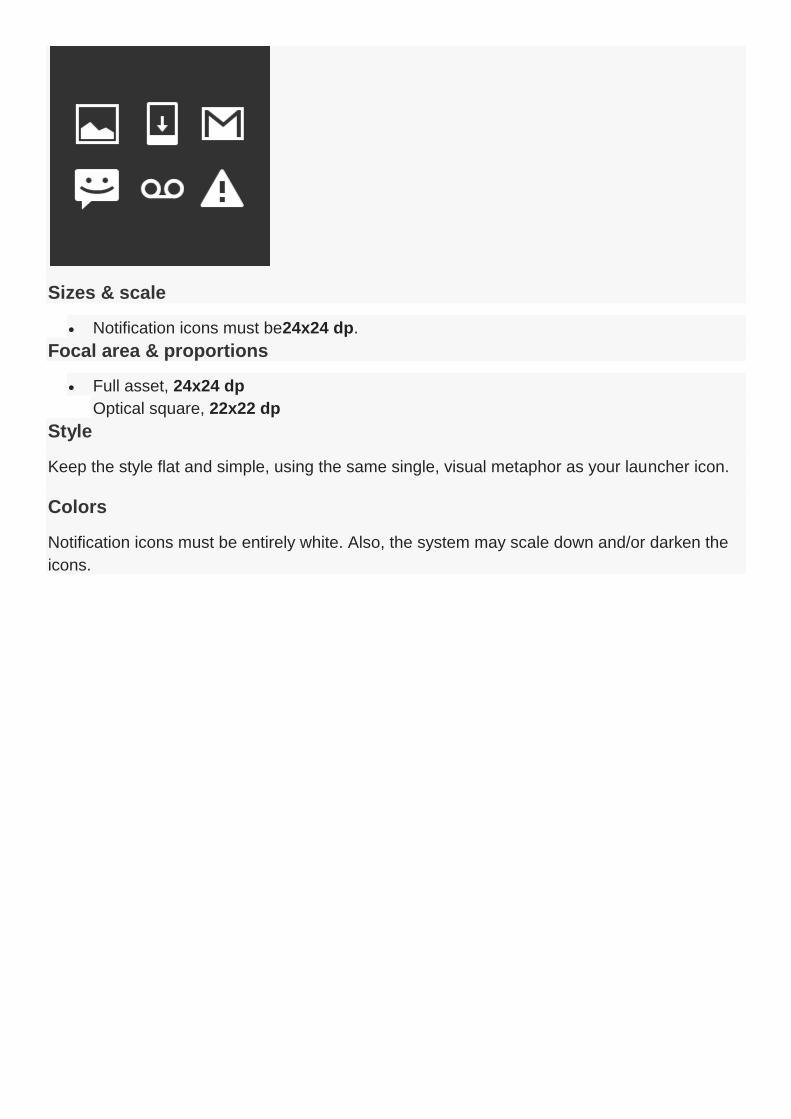
Sizes & scale
Notification icons must be24x24 dp.
Focal area & proportions
Full asset, 24x24 dp
Optical square, 22x22 dp
Style
Keep the style flat and simple, using the same single, visual metaphor as your launcher icon.
Colors
Notification icons must be entirely white. Also, the system may scale down and/or darken the
icons.
Design Tips
Here are some tips you might find useful as you create icons or other drawable assets for your
application. These tips assume you are using Adobe® Photoshop® or a similar raster and
vector image-editing program.
Use vector shapes where possible
Many image-editing programs such as Adobe® Photoshop® allow you to use a combination of
vector shapes and raster layers and effects. When possible, use vector shapes so that if the
need arises, assets can be scaled up without loss of detail and edge crispness.
Using vectors also makes it easy to align edges and corners to pixel boundaries at smaller
resolutions.
Start with large artboards
Because you will need to create assets for different screen densities, it is best to start your
icon designs on large artboards with dimensions that are multiples of the target icon sizes. For
example, launcher icons are 48, 72, 96, or 144 pixels wide, depending on screen density
(mdpi, hdpi, xhdpi, and xxhdpi, respectively). If you initially draw launcher icons on an 864x864
artboard, it will be easier and cleaner to adjust the icons when you scale the artboard down to
the target sizes for final asset creation.
When scaling, redraw bitmap layers as needed
If you scaled an image up from a bitmap layer, rather than from a vector layer, those layers will
need to be redrawn manually to appear crisp at higher densities. For example if a 60x60 circle
was painted as a bitmap for mdpi it will need to be repainted as a 90x90 circle for hdpi.
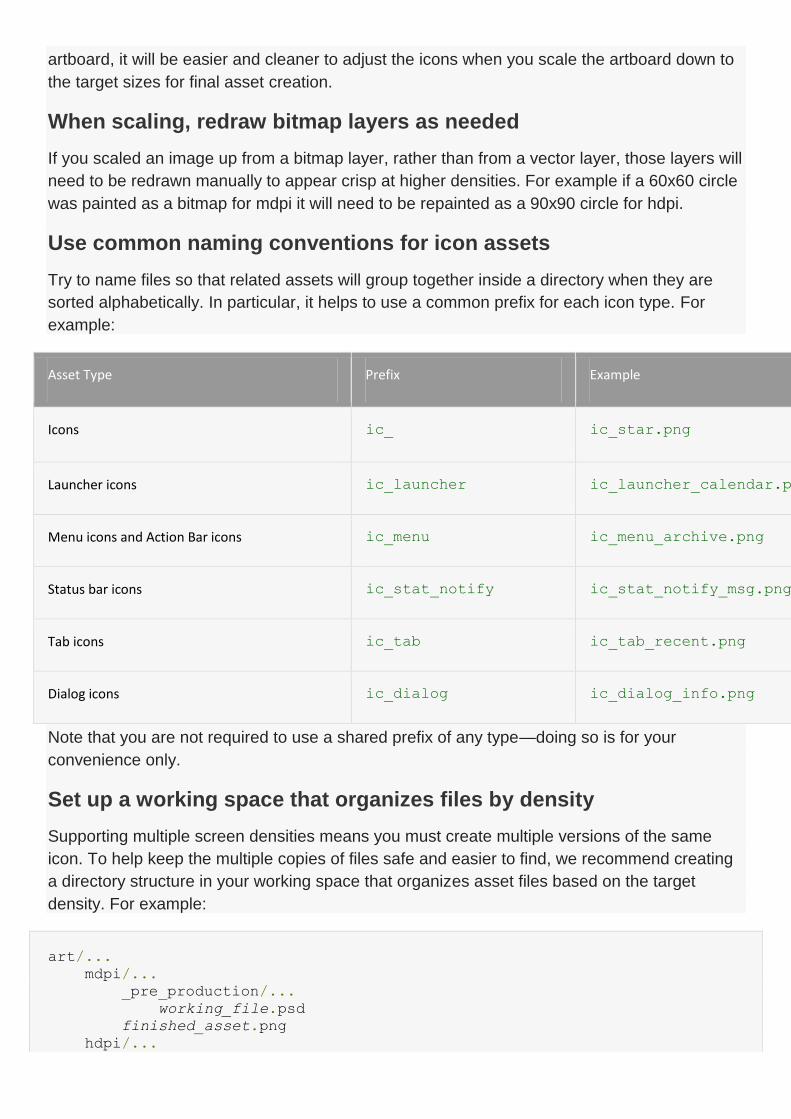
Use common naming conventions for icon assets
Try to name files so that related assets will group together inside a directory when they are
sorted alphabetically. In particular, it helps to use a common prefix for each icon type. For
example:
Asset Type Prefix Example
Icons ic_ ic_star.png
Launcher icons ic_launcher ic_launcher_calendar.png
Menu icons and Action Bar icons ic_menu ic_menu_archive.png
Status bar icons ic_stat_notify ic_stat_notify_msg.png
Tab icons ic_tab ic_tab_recent.png
Dialog icons ic_dialog ic_dialog_info.png
Note that you are not required to use a shared prefix of any type—doing so is for your
convenience only.
Set up a working space that organizes files by density
Supporting multiple screen densities means you must create multiple versions of the same
icon. To help keep the multiple copies of files safe and easier to find, we recommend creating
a directory structure in your working space that organizes asset files based on the target
density. For example:
art/...
mdpi/...
_pre_production/...
working_file.psd
finished_asset.png
hdpi/...
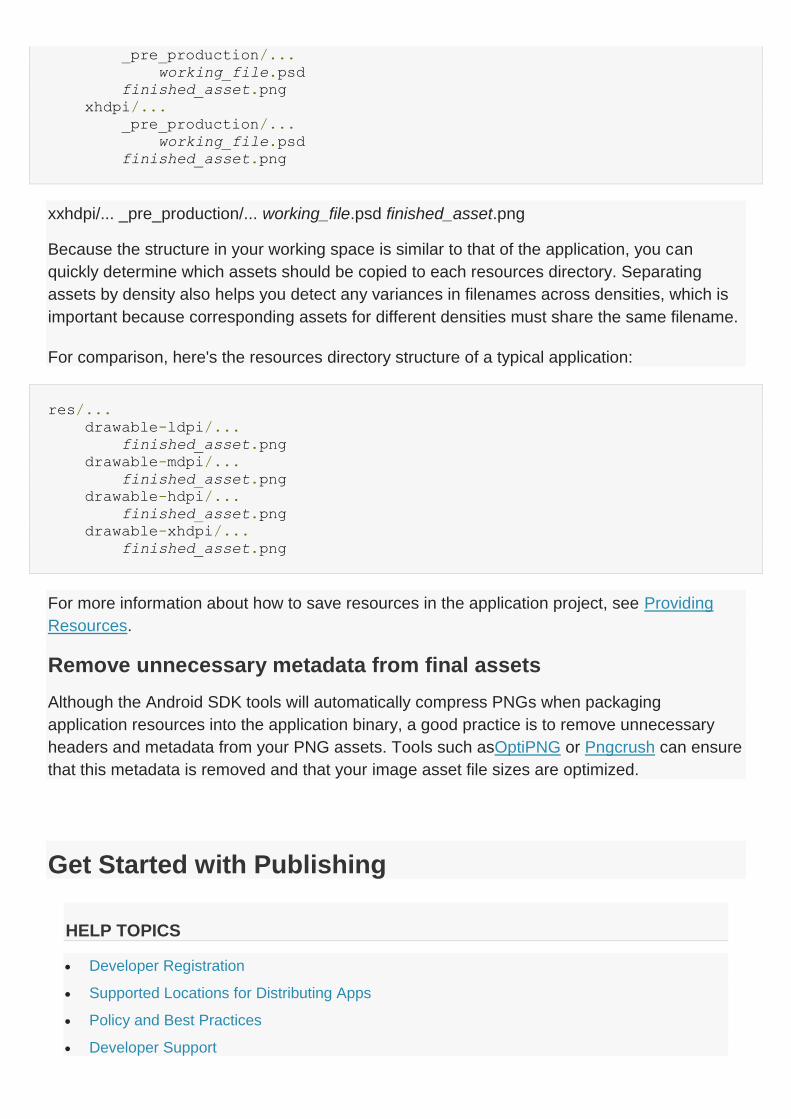
_pre_production/...
working_file.psd
finished_asset.png
xhdpi/...
_pre_production/...
working_file.psd
finished_asset.png
xxhdpi/... _pre_production/... working_file.psd finished_asset.png
Because the structure in your working space is similar to that of the application, you can
quickly determine which assets should be copied to each resources directory. Separating
assets by density also helps you detect any variances in filenames across densities, which is
important because corresponding assets for different densities must share the same filename.
For comparison, here's the resources directory structure of a typical application:
res/...
drawable-ldpi/...
finished_asset.png
drawable-mdpi/...
finished_asset.png
drawable-hdpi/...
finished_asset.png
drawable-xhdpi/...
finished_asset.png
For more information about how to save resources in the application project, see Providing
Resources.
Remove unnecessary metadata from final assets
Although the Android SDK tools will automatically compress PNGs when packaging
application resources into the application binary, a good practice is to remove unnecessary
headers and metadata from your PNG assets. Tools such asOptiPNG or Pngcrush can ensure
that this metadata is removed and that your image asset file sizes are optimized.
Get Started with Publishing
HELP TOPICS
Developer Registration
Supported Locations for Distributing Apps
Policy and Best Practices
Developer Support
GET STARTED
1. Google Play Developer Console
You can set up to start publishing on Google Play in only a few minutes. Here's how you do it:
Register for a Google Play publisher account
If you will sell apps, set up a Google Wallet Merchant Account
Explore the Google Play Developer Console and learn about the tools for publishing
Register for a publisher account
The first step is to visit the Google Play Developer Console and register for a publisher
account.
Here's what you will do during registration:
Tips
You need a Google account to register. You can create one during the process.
If you are an organization, consider registering a new Google account rather than using a personal
account.
Review the developer countries andmerchant countries where you can distribute and sell apps.
1. Visit the Google Play Developer Console athttps://play.google.com/apps/publish/.
2. Enter basic information about your developer identity — developer name, email address,
and so on. You can modify this information later.
3. Read and accept the Developer Distribution Agreement that applies to your country or
region. Note that apps and store listings that you publish on Google Play must comply with
the Developer Program Policies and US export law,
4. Pay a $25 USD registration fee using Google Wallet. If you don't have a Google Wallet
account, you can quickly set one up during the process.
When your registration is verified, you’ll be notified at the email address you specified during
registration.
Set up a Google Wallet Merchant account
If you want to sell products on Google Play — priced apps, in-app products, or subscriptions
— you will also need to set up a Google Wallet Merchant Account. You can do that at any
time, but make sure to first review the list of merchant countries.
To set up a Merchant account from the Developer Console:
1. Sign in to your Google Play Developer Console at https://play.google.com/apps/publish/
2. Open Financial reports on the side navigation.
3. Click Setup a Merchant Account now.

This takes you to the Google Wallet site to sign up as a Merchant; you'll need information
about your business available to complete this step.
Explore the Developer Console
When your registration is verified, you can sign in to your Developer Console, which will be the
home for your app publishing operations and tools on Google Play.
Once you've registered and received verification by email, you can sign in to your Google Play
Developer Console, which will be the home for your app publishing operations and tools on
Google Play. This sections below introduce a few of the key areas you'll find in the Developer
Console.
All applications page: Gives you a quick overview of your apps, lets you jump to stats, reviews, and
product details, or upload a new app.
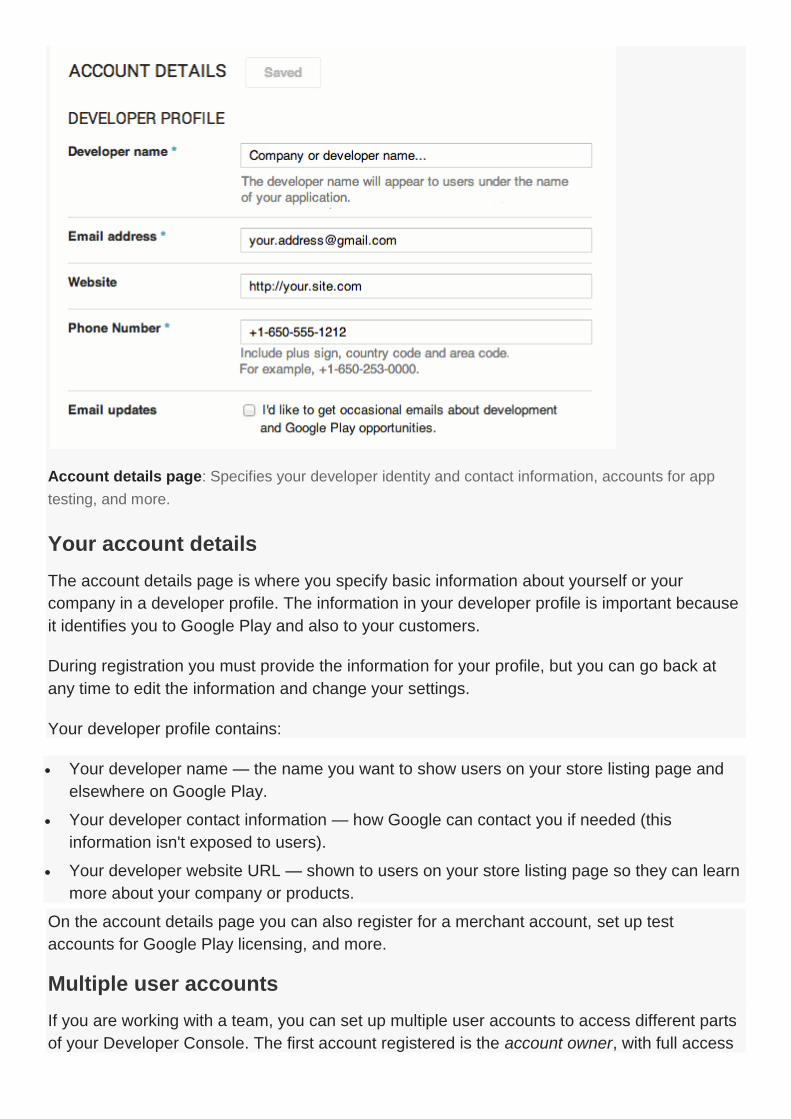
Account details page: Specifies your developer identity and contact information, accounts for app
testing, and more.
Your account details
The account details page is where you specify basic information about yourself or your
company in a developer profile. The information in your developer profile is important because
it identifies you to Google Play and also to your customers.
During registration you must provide the information for your profile, but you can go back at
any time to edit the information and change your settings.
Your developer profile contains:
Your developer name — the name you want to show users on your store listing page and
elsewhere on Google Play.
Your developer contact information — how Google can contact you if needed (this
information isn't exposed to users).
Your developer website URL — shown to users on your store listing page so they can learn
more about your company or products.
On the account details page you can also register for a merchant account, set up test
accounts for Google Play licensing, and more.
Multiple user accounts
If you are working with a team, you can set up multiple user accounts to access different parts
of your Developer Console. The first account registered is the account owner, with full access

to all parts of the Console. The owner can add user accounts and manage what parts of the
Console they have access to. For example, an owner can grant users access to publishing
and app configuration, but not access to financial reports.

Store listing page: Lets you upload your graphic assets, description, support information, and other
information to create the store listing page for a specific app.
Linking your Merchant Account
If you want to sell apps or in-app products, you can link your Google Wallet merchant account
to your developer profile. Google Play uses the linked merchant account for financial and tax
identification and monthly payouts of sales.
Your store listing details
The Developer Console lets you set up a colorful storefront page for your app called the Store
Listing page. Your Store Listing page is the home for your app in Google Play — it's the page
users see on their mobile phones or on the web when they want to learn about your app and
download it.
You can upload custom brand assets, screen shots, and videos to highlight what's great about
your app, and you can provide a localized description, add notes about the latest version, and
more. You can update your store listing at any time, even if you don’t have a new version of
your application.
Uploading and publishing
From the Developer Console you can quickly upload a release-ready APK and publish it when
you're ready. The app is a draft until you publish it, at which time Google Play makes your
store listing page and app available to users. You can unpublish the app at any time.
Distribution controls
In the Developer Console you can manage what countries and territories the app is distributed
to and, for some countries, you can choose what carriers you want to target.
You can also see the list of devices that your app is currently available to, based on any
distribution rules declared in its manifest file.
Selling and pricing your products
The Developer Console gives you tools to set prices for your apps and in-app products. Your
app can either be free to download or priced (charged before download).
See Supported locations for distributing applications for a list of countries where you can distribute or
sell your app,
If you publish your app as free, it must remain free. Free apps can be downloaded by any
users in Google Play.
If you publish it as priced, you can later change it to free. Priced apps can be purchased
and downloaded only by users who have registered a form of payment in Google Play.
In addition, you can sell in-app products and subscriptions in your app, whether the app is free
or priced. You can set prices separately for priced apps, in-app products, and subscriptions.
If you are selling a priced app or in-app products or subscriptions, the Developer Console lets
you set prices in a large number of different currencies. When users around the world visit
your store listing, they see the price of your app in their own currency. For most countries, the
price you set is the final price charged to users, inclusive of taxes.
To help you manage your prices, the Developer Console provides an autofill capability that
uses recent exchange rates to populate the prices in all supported currencies. You can change
prices for apps and in-app products at any time, just by saving changes in the Developer
Console.
In-app Billing
In-app Billing
For details on how to implement In-app Billing, see the In-app Billing developer documentation.
In-app Billing is a Google Play service that lets you monetize your apps in more ways by
selling in-app products and subscriptions. In-app products are one-time purchases, while
subscriptions are recurring charges on an monthly or annual basis.
From the Developer Console you can create product lists for in-app products and
subscriptions, set prices, and publish.
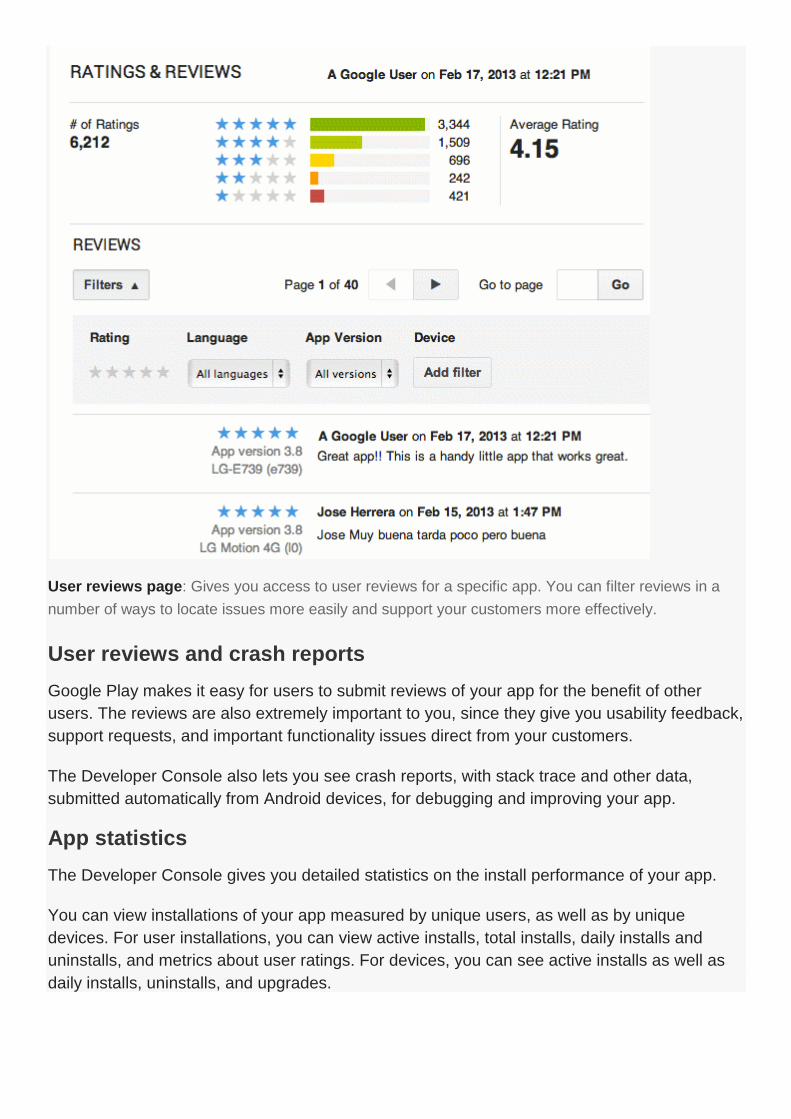
User reviews page: Gives you access to user reviews for a specific app. You can filter reviews in a
number of ways to locate issues more easily and support your customers more effectively.
User reviews and crash reports
Google Play makes it easy for users to submit reviews of your app for the benefit of other
users. The reviews are also extremely important to you, since they give you usability feedback,
support requests, and important functionality issues direct from your customers.
The Developer Console also lets you see crash reports, with stack trace and other data,
submitted automatically from Android devices, for debugging and improving your app.
App statistics
The Developer Console gives you detailed statistics on the install performance of your app.
You can view installations of your app measured by unique users, as well as by unique
devices. For user installations, you can view active installs, total installs, daily installs and
uninstalls, and metrics about user ratings. For devices, you can see active installs as well as
daily installs, uninstalls, and upgrades.
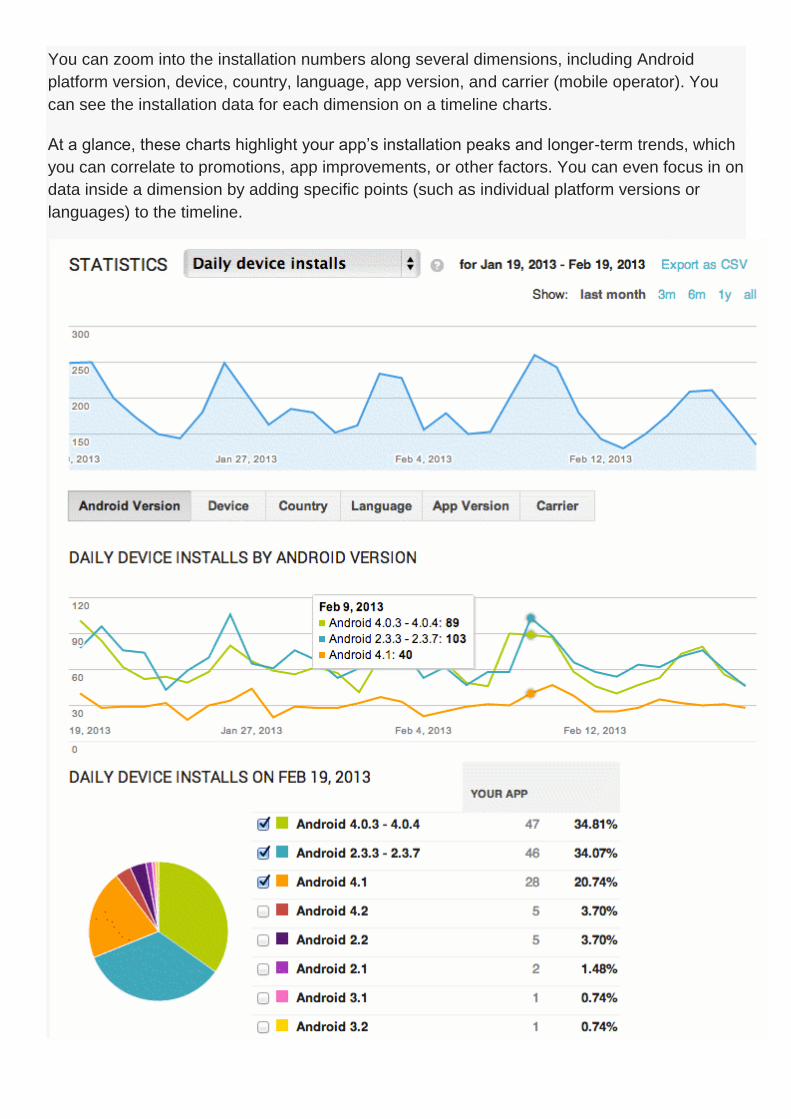
You can zoom into the installation numbers along several dimensions, including Android
platform version, device, country, language, app version, and carrier (mobile operator). You
can see the installation data for each dimension on a timeline charts.
At a glance, these charts highlight your app’s installation peaks and longer-term trends, which
you can correlate to promotions, app improvements, or other factors. You can even focus in on
data inside a dimension by adding specific points (such as individual platform versions or
languages) to the timeline.
App statistics page: Shows you a variety of statistics about a specific app's installation performance
over time.
Localization Checklist
CHECKLIST
1. 1. Identify target languages
2. 2. Design for localization
3. 3. Manage strings for localization
4. 4. Translate UI strings
5. 5. Test your localized app
6. 6. Prepare for international launch
7. 7. Support international users
SEE ALSO
1. Google Play Badge Builder
2. Device Art Generator
3. Translations in Google Play
4. ADT Translation Manager Plugin
Android and Google Play give you a worldwide audience for your app, with an addressable
user base that's growing very rapidly in countries such as Japan, Korea, India, Brazil, Russia,
and elsewhere.
To maximize your app's distribution potential and earn high ratings from users around the
world, we strongly encourage you to localize your app.
Localization involves a variety of tasks throughout your app's development cycle, and advance
planning is essential. Some of the tasks include translating your UI strings and localizing dates
and times, layouts, text direction, and finally your Google Play store listing.
This document helps you identify key aspects of localization to prepare for and the tasks you'll
need to perform, to get your app ready for a successful worldwide launch on Google Play.
1. Identify target languages and locales
A basic but important step in preparing for localization is identifying the countries where you
will distribute your app and the languages spoken there. Google Play lets you distribute your
app broadly to hundreds of countries, reaching users who speak a variety of languages.
For international users, you can manage your app on three main dimensions: country, locale,
and language. Of those, language is the key consideration for localization, although locale is
also significant because of differences in formats for dates, times, currencies, and similar
information. Users control both the language and locale used on their Android devices and in
turn those affect the display of your app, once installed.
Typically, you would decide which countries to target first, based on overall market size and
opportunity, app category, competitive landscape, local pricing and financial factors, and so
on. Then, based on your country targeting, you would determine the languages you need to
support in your app.
You will need to decide when to localize into some or all of the languages in your targeted
countries. In some countries it might make most sense to deliver an app in a major regional or
international language only, rather than in all locally spoken languages. Similarly, based on
overall market size, you might decide to deliver your app in only a small number of key
languages and offer English or another language for other countries. You can add more
languages in the future as your app's userbase grows.
Localizing your app is particularly important in countries where there is a large market
opportunity and English or another international language is not widely used. Once you have
identified your target languages, you can focus your development, translation, testing, and
marketing efforts to these markets.
Related resources:
Supported locations for distributing applications on Google Play. .
2. Design for localization
After you've determined your target languages for localization, assess what you'll need to do to
support them in your app and plan the work early. Consider the vocabulary expansion, script
requirements, character spacing and wrapping constraints, left-to-right and right-to-left
support, and other potential factors in each language.
Design a single set of flexible layouts
As you create your layouts, make sure that any UI elements that hold text are designed
generously. It’s good to allow more space than necessary for your language (up to 30% more
is normal) to accommodate other languages.
Also, elements should be able to expand horizontally or vertically to accommodate variations
in the width and height of UI strings or input text. Your text strings should not overlap borders
or the screen edge in any of your target languages.
If you design your UI carefully, you can typically use a single set of layouts for all of the
languages you support. SeeBuilding a Flexible UI for more information.
Use alternative layouts where needed
In cases where your UI can't accommodate text in one of your target languages, you can
create an alternative layout for that language only. Android makes it easy to declare sets of
layouts and other resources to load for specific languages, locales, screen sizes, and so on,
simply by tagging them with the appropriate resource qualifiers.
Although you can use alternative layouts to work around isolated issues, they can also make
your app harder to maintain over time. In general, using a single, more flexible layout is
preferred.
Support RTL layouts and text
If you are distributing to countries where right-to-left (RTL) scripts are used, should consider
implementing support for RTL layouts and text display and editing, to the extent possible.
Android 4.1 introduced limited support for bidirectional text, allowing apps to display and edit
text in both left-to-right (LTR) and right-to-left (RTL) scripts. Android 4.2 added full native
support for RTL layouts, including layout mirroring, so that you can deliver the same great app
experience to all of your users.
At a minimum, for Android 4.2 users, it's simple to add basic RTL layout mirroring, which goes
a long way toward meeting the needs of RTL users.
Use system-provided formats for dates, times, numbers, and currencies
Where your app specifies dates, times, numbers, currencies, and other entities that can vary
by locale, make sure to use the system-provided formats, rather than app-specific formats.
Keep in mind that not every locale uses the same thousands separator, decimal separator, or
percent sign.
Android provides a variety of utilities for formatting and converting patterns across locales,
such as DateUtils andDateFormat for dates; String.format() or DecimalFormat for
numbers and currency; PhoneNumberUtils for phone numbers; and others.
If you hard-code your formats based on assumptions about the user's locale, your app could
encounter problems when the user changes to another locale. The easiest and most reliable
approach is to always use system-provided formats and utilities.
Include a full set of default resources
Make sure that your app can run properly regardless of language or locale by providing a
complete set of default resources. The app's default resources are those that are not
marked with any language or locale qualifiers, for example those stored
in res/drawable/ and res/values/. If your app attempts to load a resource that isn't
available in the current language or in the default set, the app will crash.
Whatever the default language you are using in your app, make sure that you store the
associated layouts, drawables, and strings in default resource directories, without language or
locale qualifiers.
Related resources:
Native RTL Support in Android 4.2 — Blog post that explains how to support RTL in your UI. Quantity Strings (Plurals) — Developer guide describing how to work with string plurals according to rules of grammar in a given locale.
Locale — Reference information about how to use locale data determine exactly what CLDR data or version of the Unicode spec a particular Android platform version uses.
3. Manage strings for localization
It's important to manage your app's UI strings properly, so that you deliver a great experience
for users and make localization straightforward.
Move all strings into strings.xml
As you build your app, remember that it's a best practice to keep all of your UI strings in a
single file that's easy to update and localize. Declare all of your strings as resources in a
default strings.xml file. Do not hard-code any strings into your compiled code—hard-coded
strings are much more difficult to extract, translate, and load properly.
If you keep all of your default strings in a strings.xml file, you can quickly extract them for
translation, and once the translated strings are integrated back into your app with appropriate
qualifiers, your app can load them without any changes to your compiled code.
If you generate images with text, put those strings in strings.xml as well, and regenerate the
images after translation.
Follow Android guidelines for UI strings
As you design and develop your UI, make sure that you pay close attention to how you talk to
your user. In general, use asuccinct and compressed style that is friendly but brief, and use a
consistent style throughout your UI.
Make sure that you read and follow the Android Design recommendations for writing style and
word choice. Doing so will make your app appear more polished to the user and will help users
understand your UI more quickly.
Also, always use Android standard terminology wherever possible—such as for UI elements
such as "Action Bar," "Options Menu," "System Bar," "Notifications," and so on. Using Android
terms correctly and consistently makes translation easier and results in a better end-product
for users.
Provide sufficient context for declared strings
As you declare strings in your strings.xml file, make sure to describe the context in which
the string is used. Add comments before each string that may need clarification. This
information will be invaluable to translators and will help you manage your strings more
effectively over time.
For example, background information to provide might include:
What is this string for? When/where is it presented to the user?
Where is this in the layout? For example, if it’s a button, translations are less flexible than if
it were a text box.
Here's an example:
<!-- The action for submitting a form. This text is on a button that can
fit 30 chars -->
<string name="login_submit_button">Sign in</string>
Mark message parts that should not be translated
Often strings contain contain text that should not be translated to other languages. Common
examples might be a piece of code, a placeholder for a value, a special symbol, or a name. As
you prepare you strings for translation, look for and mark text that should remain as-is, without
translation, so that translators do not change it.
To mark text that should not be translated, use an <xliff:g> placeholder tag. Here's an
example tag that ensures the text “%1$s” will not be changed during translation (otherwise it
could break the message):
<string name="countdown">
<xliff:g id="time" example="5 days>%1$s</xliff:g>until holiday
</string>
When you declare a placeholder tag, always add an id attribute that explains what the
placeholder is for. If your app will later replace the placeholder value, be sure to provide an
example attribute to clarify the expected usage.
Here are some more examples of placeholder tag usage:
<resources xmlns:xliff="urn:oasis:names:tc:xliff:document:1.2">
<!-- Example placeholder for a special unicode symbol -->
<string name="star_rating">Check out our 5
<xliff:g id="star">\u2605</xliff:g>
</string>
<!-- Example placeholder for a for a URL -->
<string name="app_homeurl">
Visit us at <xliff:g
id="application_homepage">http://my/app/home.html</xliff:g>
</string>
<!-- Example placeholder for a name -->
<string name="prod_name">
Learn more at <xliff:g id="prod_gamegroup">Game Group</xliff:g>
</string>
<!-- Example placeholder for a literal -->
<string name="promo_message">
Please use the ”<xliff:g id="promotion_code">ABCDEFG</xliff:g>” to
get a discount.
</string>
...
</resources>
Related resources:
String Resources — Developer guide explaining how to use string resources in your UI. Writing Style — Android Design guidelines for voice and style in your UI. XML Localisation Interchange File Format (XLIFF) — Background information on XLIFF.
4. Translate UI strings and other resources
Translating your app's UI strings and resources to your target languages is the key phase of
localization, and it's the one that requires the most care and planning.
In general, it's recommended to work with a professional translator to ensure that the work
goes smoothly, stays on schedule, and results in a high-quality product that will enhance the
value of your app. If you are considering machine translations as an alternative, keep in mind
that automated translations are less reliable than high-quality professional translations and
may not produce as good an experience for your users.
Prepare for translation
Getting high-quality translation output depends in part on your input. To get ready for
translation, make sure that yourstrings.xml file is well organized, well commented, and
accurate.
Here are some ways to prepare your strings for translation:
Make sure your strings are formatted correctly and consistently.
Follow the strings recommendations listed in Manage strings for localization, above.
Clean up the strings.xml file and remove unused strings.
Place comments in the file to identify the owner, origin, and the version of the file, as well as
any special instructions for translators.
Identify existing translations, if any, and include those in an outgoing zip file or other
package that you will send to translators.
Identify drawables or other resources that require translation and include them in the
outgoing package for translators.
Additionally, consider translating your app's store listing details — app title and description,
release notes, and so on — as well as other international marketing materials.
Create a terminology list that explains the meaning and usage of key terms used in your
product, your market, or the underlying technology. Add the list to the outgoing package.
Send your strings for translation
Early in the development cycle, contact professional translation vendors for your target
languages to get an idea of cost, lead time required, turnaround time, and so on. Then select a
vendor and secure their services, making sure to include multiple iterations in the cost as a
safeguard. Google Play can help you do this — see Purchase professional translations, below.
As soon as your app's UI strings and design are stable, work with your development team to
extract all of the strings and other resources from the app and package them together for the
translator. If appropriate, you can version the outgoing package for later identification.
When the outgoing package is ready, send it to the translator or share it with them over a
cloud platform such as Google Drive. Keep a record of what you sent and when you sent it, to
cross-reference against returning translations and billing invoices from the translator.
When your translations are complete, take a preliminary look at the translations. Check that all
files were translated, check for potential encoding issues, and make sure that declaration
formats are intact.
If everything looks good, carefully move the localized directories and files back into your app's
resources. Make sure to tag the directories with the appropriate language and locale qualifiers
so that they'll later be loaded properly.
After the translations are merged back into your app, start testing the localized app.
Join the translation pilot
Google Play is offering translation services as part of a pilot program. If you're interested, sign up on
the APK page in your Developer Console.
If you join, also try the ADT Translation Manager Plugin, which makes it easy to upload your strings to
the Developer Console and download translations right into your project.
Purchase professional translations through the Developer Console
Google Play can help you quickly find and purchase translations of your app. In the Developer
Console, you can browse a list of third-party vendors who are pre-qualified by Google to offer
high-quality translation at competitive prices. You can upload the strings you want translated,
select the languages you want to translate into, and select your translation vendor based on
time and price.
Once you've purchased translations, you'll receive an email from your vendor. Your
translations are a direct business agreement between you and your vendor; you'll need to
work directly with the vendor to manage the translation process and deliverables and resolve
any support issues.
5. Test your localized app
Once you've received your translated strings and resources and moved them back into your
app, you need to test the app to make sure that it's ready for distribution to your international
users.
Manual testing can help you discover localization issues in your layouts and strings that can
affect user satisfaction and, ultimately, your app's user rating.
Set up a test environment
To test your localized app, you'll need to set up an environment consisting of multiple devices
(or virtual devices) and screen sizes, based on the markets and form factors you are targeting.
Note that the range of devices in specific regions might be different. If possible, match your
test devices to the actual devices likely to be available to users.
Look for common localization issues
On each test device, set the language or locale in Settings. Install and launch the app and
then navigate through all of the UI flows, dialogs, and user interactions. Enter text in inputs.
Some things to look for include:
Clipped text, or text that overlaps the edge of UI elements or the screen
Poor line wrapping
Incorrect word breaks or punctuation
Incorrect alphabetical sorting
Incorrect layout direction or text direction
Untranslated text — if your default strings are displayed instead of translated strings, then
you may have overlooked those strings for translation or marked the resources directory
with an incorrect language qualifier.
For cases where your strings have expanded in translation and no longer fit your layouts, it's
recommended to simplify your default text, simplify your translated text, or adjust your default
layouts. If none of those resolves the issue, you can create a custom layout for the language.
Test for default resources
After you've tested your app in all of your supported languages and locales, make sure to test
it again in an unsupported language and locale. This will help you make sure that your app

includes a full set of default strings and resources, so that your app is usable to all users,
regardless of their preferred language.
Review with native-language speakers
During or after testing, it's recommended that you let native speakers review your localized
app. One way to do that is through beta testing with regional users — Google Play can help
you do this. See Plan a beta release for more information.
Prepare for international launch
Getting your app translated is a key part of localization, but to help your product attract users
and gain visibility, you should prepare for launch in your target countries and create a broader
launch and marketing plan for international users.
Localize your Google Play listing
Localize your Google Play listing
Highlight what's great about your app to all of your users! Localize your listing in the Developer
Console:
App title and description
App screenshots on phones and tablets
Promotional graphics and videos.
If you want your app to be successful in international markets, it's essential to localize your
Google Play store listing. You can manage your localized listing in the Developer Console.
Well before launch, decide on your app title, description, promotional text, marketing names
and programs, and other text and images. Send your listing text and images for translation
early, so that you have them ready when beta testing begins. When your translated text is
available, you can add it through the Developer Console.
Also, since you've made the effort to create a great localized app, let users know about it!
Take screenshots of your UI in each language, for phones and 7- and 10- inch tablets. You
can upload screenshots to the Developer Console for each language you support. These will
be of great value to users browsing your app listing in other languages.
It's also essential to create localized versions of your promotional graphics and videos. For
example, your app's feature graphic might include text that should be translated, for maximum
effectiveness, or you might want to take a different visual approach in one country than you do
in another. You can create different versions of your promotional graphics for each language
and upload them to the Developer Console. If you offer a promotional video, you can create
localized versions of it and then add a link to the correct localized video for each language you
support.
Plan a beta release in key countries
Easy beta testing
Google Play now lets you set up groups of alpha and beta testers, anywhere around the world. Check
out this powerful feature next time you sign in to the Developer Console.
Before launching your app, it's always valuable to get real-world feedback from users — even
more so when you are launching an app in a new language, country, or region. In those cases,
it's highly recommended that you distribute a pre-release version of your app to users across
your key markets and provide an easy means for them to provide feedback and report bugs.
Google Play can help you set up a beta program for your app. After you sign in to the
Developer Console and upload your APK, you can set up groups of users for alpha testing and
beta testing the app. You can start with a small group of alpha testers, then move to a larger
group of beta testers. Once users are added, they access your app's store listing and install
the app. User feedback from alpha and beta testers goes directly to you and is not posted as
public reviews.
The feedback you receive will help you adjust your UI, translations, and store listing to ensure
a great experience for users.
Plan for international marketing
For highest visibility across countries, consider an international marketing or advertising
campaign. The scope of the campaign might vary based on the budget you can support, but in
general it's cost-effective and productive to do regional or country-specific marketing at launch
and after.
Create localized Google Play badges
If you are preparing international marketing, make sure to include a localized Google Play
badge to tell users you're on Google Play. You can use the badge generator to quickly build
localized badges that you can use on web sites or marketing materials. High-resolution assets
are also available.
Create Localized Device Art
If you feature product shots of your app running on Android devices, make sure that those
shots look great and reflect the latest in Android devices. To help you create high-quality
marketing materials, use the drag-and-drop Device Art Generatorto quickly frame your screen
shot on a Nexus device.
Check your Optimization Tips
As you prepare for launch, make sure to sign into the Developer Console and check your
app's Optimization Tips. The Optimization Tips let you know when you are missing parts of
your localized store listing and provide other helpful reminders for a successful localized
launch.
Support International Users after Launch
After you launch your app internationally, you should be prepared to support users in a variety
of languages and time zones. The extent of your international user support depends on your
budget, but at a minimum you should watch your ratings, reviews, and download stats
carefully after launch.
Here are some suggestions:
Use the app stats in the Developer Console to compare your downloads, installs, and
uninstalls, and ratings across languages and countries—If your downloads or ratings are
not keeping up in specific languages or countries, consider options for improving your
product or changing your marketing approach.
Check reviews regularly—Google Play translates all user reviews for you, so you can stay
in touch with how international users feel about your app, what features they like and what
issues are affecting them. By watching reviews, you can spot technical issues that may
affect many users in a particular country, then fix and update your app.
Respond to reviews if possible—It's good to engage with international users in their
language or a common language if possible. If not, you can try using translation tools,
although results may not be predictable. If your app gets very popular in a language,
consider getting support help from native-language speakers.
Make sure there's a link to any support resources on your web site. Consider setting up
language-specific user groups, Google+ communities, or other support forums.
By following these practices for localizing your app, promoting and marketing to international
users, and providing ongoing support, you can attract many new users to your app and
maintain their loyalty.
Make sure to read the Launch Checklist to learn more about how to plan, build, and launch
your app on Google Play.
Launch Checklist
CHECKLIST
1. 1. Understand the publishing process
2. 2. Understand Google Play policies
3. 3. Test for core app quality
4. 4. Determine your content rating
5. 5. Determine country distribution
6. 6. Confirm the app's overall size

7. 7. Confirm app compatibility ranges
8. 8. Decide on free or priced
9. 9. Consider In-app Billing
10. 10. Set prices for your apps
11. 11. Start localization early
12. 12. Prepare promotional graphics
13. 13. Build the release-ready APK
14. 14. Plan a beta release
15. 15. Complete the product details
16. 16. Use Google Play badges
17. 17. Final checks and publishing
18. 18. Support users after launch
Before you publish your app on Google Play and distribute it to users, you need to get the app
ready, test it, and prepare your promotional materials.
This document helps you understand the publishing process and get ready for a successful
product launch on Google Play. It summarizes some of the tasks you'll need to complete
before publishing your app on Google Play, such as creating a signed, release-ready APK,
understanding the requirements of the app, and creating the product page and graphic assets
for your app.
The preparation and publishing tasks are numbered to give you a rough idea of sequence.
However, you can handle the tasks in any sequence that works for you or you can skip steps
as appropriate.
As you move toward publishing, a variety of support resources are available to you. Relevant
links are provided in each step.
1. Understand the publishing process
Before you begin the steps in this checklist, you should take a moment to read and understand
the overall publishing workflow and become familiar with how the process works. In particular,
you or your development team will need to prepare your app for release using a process
common to all Android apps. ThePublishing Workflow documents provide the details on how
publishing works and how to get an APK ready for release.
Once you are familiar with publishing in general, read this document to understand the issues
that you should consider when publishing an app on Google Play.
Related resources:
General Publishing Overview — Start here for an overview of publishing options for Android apps.
Preparing for Release — Developer documentation on how to build the signed, release-ready APK. This process is the same for all Android apps.
2. Understand Google Play policies and agreements
Make sure that you understand and follow the Google Play program policies that you accepted
when registering. Google Play actively enforces the policies and any violations can lead to
suspension of your app or, for repeated violations, termination of your developer account.
Related resources:
Google Play Policies and Guidelines — An overview of Google Play policies for spam, intellectual property, and ads, with examples of common problems. — Help Center document describing various content policies and processes.
Policy and Best Practices — Help Center document describing various content policies and processes.
3. Test for Core App Quality
Before you publish an app on Google Play, it's important to make sure that it meets the basic
quality expectations for all Android apps, on all of the devices that you are targeting. You can
check your app's quality by setting up a test environment and testing the app against a short
set of core app quality criteria. For complete information, see the Core App Quality
Guidelines.
If your app is targeting tablet devices, make sure that it delivers a rich, compelling experience
to your tablet customers. See the Tablet App Quality Checklist for recommendations on ways
to optimize your app for tablets.
Related resources:
Core App Quality Guidelines — A set of core quality criteria that all Android apps should meet on all targeted devices. Tablet App Quality Checklist — A set recommendations for delivering the best possible experience to tablet users.
4. Determine your app's content rating
Google Play requires you to set a content rating for your app, which informs Google Play users
of its maturity level. Before you publish, you should confirm what rating level you want to use.
The available content rating levels are:
Everyone
Low maturity
Medium maturity
High maturity
On their Android devices, Android users can set the desired maturity level for browsing.
Google Play then filters apps based on the setting, so the content rating you select can affect
the app's distribution to users. You can assign (or change) the content rating for your app in
the Developer Console, so no changes are required in your app binary.
Related resources:
Rating your application content for Google Play — Help Center document describing content ratings levels and how to choose the appropriate one for your app.
5. Determine country distribution
Google Play lets you control what countries and territories your app is distributed to. For
widest reach and the largest potential customer base, you would normally want to distribute to
all available countries and territories. However, because of business needs, app requirements,
or launch dependencies, you might want to exclude one or more countries from your
distribution.
It's important to determine the exact country distribution early, because it can affect:
The need for localized resources in the app
The need for a localized app description in the Developer Console
Legal requirements for the app that may be specific to certain countries
Time zone support, local pricing, and so on.
With your country targeting in mind, you should assess what your localization needs are, both
in your app and in its Google Play listing details, and start the work of localization well in
advance of your launch target date.
See Localization Checklist for key steps and considerations in the localizing process.
Related resources:
Localization Checklist — Overview of key steps and considerations for localizing your Android app. Supported locations for distributing applications on Google Play. .
6. Confirm the app's overall size
The overall size of your app can affect its design and how you publish it on Google Play.
Currently, the maximum size for an APK published on Google Play is 50 MB. If your app
exceeds that size, or if you want to offer a secondary download, you can use APK Expansion
Files, which Google Play will host for free on its server infrastructure and automatically handle
the download to devices.
The maximum size for an APK published on Google Play is 50 MB.
You can use up to two (2) APK Expansion Files, each up to 2 GB in size, for each APK.
Using APK Expansion files is a convenient, cost-effective method of distributing large apps.
However, the use of APK Expansion Files requires some changes in your app binary, so you
will need to make those changes before creating your release-ready APK.
To minimize the size of your app binary, make sure that you run the Proguard tool on your
code when building your release-ready APK.
Related resources:
APK Expansion Files — Developer documentation describing APK Expansion Files and how to support them in your app. ProGuard — Developer documentation describing how to use ProGuard to shrink, optimize, and obfuscate your code prior to release.
7. Confirm the app's platform and screen compatibility ranges
Before publishing, it's important to make sure that your app is designed to run properly on the
Android platform versions and device screen sizes that you want to target.
From an app-compatibility perspective, Android platform versions are defined by API level.
You should confirm the minimum version that your app is compatible with (<minSdkVersion>),
as that will affect its distribution to Android devices once it is published.
For screen sizes, you should confirm that the app runs properly and looks good on the range
of screen sizes and densities that you want to support. You should confirm the minimum
screen-size and density support that your app declares (<supports-screens>), since that
can affect its distribution to Android devices once it is published.
To get a better understanding of the current device penetration of Android platform versions
and screen sizes across all Android devices, see the Device Dashboard charts.
Related resources:
Device Dashboard — A chart showing global percentages of devices by Android version, screen size, and level of OpenGL ES support. Android API Levels — A definition of API Levels and a list of which Android platform versions they are associated with.
8. Decide whether your app will be free or priced
On Google Play, you can publish apps as free to download or priced. Free apps can be
downloaded by any Android user in Google Play. Paid apps can be downloaded only by users
who have registered a form of payment in Google Play, such as a credit card or Direct Carrier
Billing.
Deciding whether you app will be free or paid is important because, on Google Play, free apps
must remain free.
Once you publish your app as a free app, you cannot ever change it to being a priced app.
However, you can still sell in-app products and subscriptions through Google Play's In-app
Billing service.
If you publish your app as a priced app, you can change it at any time to being a free app
(but cannot then change it back to priced). You can also sell in-app products and
subscriptions.
If your app is be priced, or if you'll be selling in-app products, you need set up a Google Wallet
merchant account before you can publish.
Related resources:
In-app Billing — Developer introduction to Google Play In-app Billing.
9. Consider using In-app Billing
Google Play In-app Billing lets you sell digital content in your applications. You can use the
service to sell a wide range of content, including downloadable content such as media files or
photos, and virtual content such as game levels or potions. In-app Billing service lets you sell
one-time purchases and subscriptions from inside your app. This can help you to monetize the
app over its installed lifetime.
If your are looking for more ways to monetize your app and build engagement, you should
consider In-app Billing. The service has become very popular with both users and developers.
To use In-app Billing, you need to make changes to your app binary, so you will need to
complete and test your implementation before creating your release-ready APK.
Related resources:
In-app Billing — Developer documentation describing In-app Billing and how to support it in your app.
10. Set prices for your products
If your app is priced or you will sell in-app products, Google Play lets you set prices for your
products in a variety of currencies, for users in markets around the world. You can set prices
individually in different currencies, so you have the flexibility to adjust your price according to
market conditions and exchange rates.
Before you publish, consider how you will price your products and what your prices will be in
various currencies. Later, you can set prices in all available currencies through the Developer
Console.
Related resources:
Selling Apps in Multiple Currencies — Help Center document describing how pricing works in Google Play. Prices and supported currencies — Help Center document listing supported currencies for pricing your apps. Transaction Fees — Help Center document describing transaction fees for priced apps and in-app products. Specifying tax rates — Help Center document describing how to set tax rates for different countries.
11. Start localization
With your country targeting in mind, it's a good idea to assess your localization needs and start
the work of localizing well in advance of your target launch date.
There are at least three aspects of localization to consider:
Localizing the strings, images, and other resources in your app
Localizing your app's store listing details on Google Play
Localizing the app's graphic assets, screenshots, and videos that accompany your store
listing.
See Localization Checklist for key steps and considerations in the localizing process.
To localize your store listing, first create and finalize your app title, description, and
promotional text. Collect and send all of these for localization. You can optionally translate the
"Recent Changes" text for app updates as well. Later you can add your localized listing details
in the Developer Console, or you can choose to let Google Play auto-translate your listing
details into the languages you support.
A key part of making your app listing attractive to a global customer base is creating localized
versions of your promotional graphics, screenshots and videos. For example, your app's
feature graphic might include text that should be translated, for maximum effectiveness. You
can create different versions of your promotional graphics for each language and upload them
to the Developer Console. If you offer a promotional video, you can create localized versions
of it and then add a link to the correct localized video for each language you support.
When your translations are complete, move them into your app resources as needed and test
that they are loaded properly. Save your app's translated listing details for later, when you
upload assets and configure your product details.
Related resources:
Localization Checklist — Overview of key steps and considerations for localizing your Android app. Localizing with Resources — Developer guide to localizing resources in your app.
12. Prepare promotional graphics, screenshots, and videos
When you publish on Google Play, you can supply a variety of high-quality graphic assets to
showcase your app or brand. After you publish, these appear on your product details page, in
store listings and search results, and elsewhere. These graphic assets are key parts of a
successful product details page that attracts and engages users, so you should consider
having a professional produce them for you. Screen shots and videos are also very important,
because they show what your app looks like, how it's used or played, and what makes it
different.
All of your graphic assets should be designed so that they are easy to see and highlight your
app or brand in a colorful, interesting way. The assets should reference the same logo and
icon as users will actually find in the All Apps launcher once they have downloaded the app.
Your graphic assets should also fit in well with the graphic assets of other apps published by
you, which will be also be displayed to users on your product details page.
To help you market your app more effectively to a global audience, Google Play lets you
create localized versions of your promotional graphics, screenshots, and videos and upload
them to the Developer Console. When a user visits your app's store listing, Google Play
displays the promotional graphic, screenshots and video that you've provided for the user's
language.
To localize your promotional graphics, you can translate any embedded text, use different
imagery or presentation, or change your marketing approach to best address the needs of
users in specific languages. For example, if your feature or promotional graphic includes and
embedded product name or tag line, you can translate that text and add it to a localized
version of the promotional graphic.
Because your localized graphic assets and videos are so important, you should get started on
creating them and localizing them well in advance of your target publishing date.
Note: Localized promotional graphics and videos are supported only in the new Developer
Console design.
Related resources:
Graphic Assets for your Application — Details about the graphic assets you need to upload before publishing. Google Play Featured Image Guidelines — Blog post that highlights key design considerations for your app's featured image.
13. Build and upload the release-ready APK
When you are satisfied that your app meets your UI, compatibility, and quality requirements,
you can build the release-ready version of the app. The release-ready APK is what you you
will upload to the Developer Console and distribute to users.
The process for preparing a release-ready APK is the same for all apps, regardless of how
they are distributed. Generally the process includes basic code cleanup and optimization,
building and signing with your release key, and final testing. When you are finished preparing
your application for release, you'll have a signed APK file that you can upload to the Developer
Console for distribution to users.
For complete details on how to create a release-ready version of your app, read Preparing for
Release.
Once you have the release-ready APK in hand, you can upload it to the Developer Console. If
necessary, you can replace the APK with a more recent version before publishing.
Related resources:
Preparing for Release — Essential information for preparing and packaging your app properly for distribution.
14. Plan a beta release
Easy beta testing
Google Play now lets you set up groups of alpha and beta testers, anywhere around the world. Check
out this powerful feature next time you sign in to the Developer Console.
Before launching your app, it's always valuable to get real-world feedback from users — even
more so when you are launching a new app. It's highly recommended that you distribute a pre-
release version of your app to users across your key markets and provide an easy means for
them to provide feedback and report bugs.
Google Play can help you set up a beta program for your app. After you sign in to the
Developer Console and upload your APK, you can set up groups of users for alpha testing and
beta testing the app. You can start with a small group of alpha testers, then move to a larger
group of beta testers. Once users are added, they access your app's store listing and install
the app. User feedback from alpha and beta testers goes directly to you and is not posted as
public reviews.
The feedback you receive will help you adjust your UI, translations, and store listing to ensure
a great experience for users.
15. Complete the app's product details
On Google Play, your app's product information is shown to users on its product details page,
the page that users visit to learn more about your app and the page from which they will
decide to purchase or download your app, on their Android devices or on the web.
Google Play gives you a variety of ways to promote your app and engage with users on your
product details page, from colorful graphics, screenshots, and videos to localized descriptions,
release details, and links to your other apps. As you prepare to publish your app, make sure
that you take advantage of all that your product details page can offer, making your app as
compelling as possible to users.
You should begin planning your product page in advance of your target launch date, arranging
for localized description, high-quality graphic assets, screenshots and video, and so on.
As you get near your target publishing date, you should become familiar with all the fields,
options, and assets associated with the product details configuration page in the Developer
Console. As you collect the information and assets for the page, make sure that you can enter
or upload it to the Developer Console, until the page is complete and ready for publishing.
After you've set your app's geographic targeting in the Developer Console, remember to add
your localized product details, promotional graphics, and so on, for all of the languages that
you support.
If your app is targeting tablet devices, make sure to include at least one screen shot of the app
running on a tablet, and highlight your app's support for tablets in the app description, release
notes, promotional campaigns, and elsewhere.
Related resources:
Category types — Help Center document listing available categories for apps. Graphic Assets for your Application — Help Center document describing the various graphics you can add to your product listing.
16. Use Google Play badges and links in your promotional campaigns
Google Play badges give you an officially branded way of promoting your app to Android
users. Use the Google Play Badge generator to quickly create badges to link users to your
products from web pages, ads, reviews, and more. You can also use special link formats to
link directly to your product details page, to a list of your products, or to search results.
To help your app get traction after launch, it's strongly recommended that you support launch
with a promotional campaign that announces your product through many channels as
possible, in as many countries as possible. For example, you can promote the launch using ad
placements, social network or blog posts, video and other media, interviews and reviews, or
any other channel available.
Related resources:
Google Play Badges — Generate a badge to bring users to your app in Google Play. Linking to Your Products — Link formats that you can use to bring users to your app in Google Play.
17. Final checks and publishing
When you think you are ready to publish, sign in to the Developer Console and take a few
moments for a few final checks.
Make sure that:
Your developer profile has the correct information and is linked to the proper Google Wallet
merchant account (if you are selling products).
You have the right version of the app uploaded.
All parts of your Product Details are ready, including all graphic assets, screenshots, video,
localized descriptions, and so on.
You have set your app's pricing to free or priced.
You have set country (and carrier) targeting and priced your products (if appropriate) in
buyer currencies
"Compatible devices" shows that your app is actually reaching the devices that you are
targeting. If not, you should check with your development team on the apps requirements
and filtering rules.
You have provided the correct link to your web site and the correct support email address.
Your app does not violate content policy guidelines.
You have acknowledged that your app meets the guidelines for Android content on Google
Play and also US export laws.
Your app is now ready to publish!
If you are releasing an update, make sure to read the requirements for publishing updates.
When you are ready, click the Publish button in the Developer Console. Within a few hours,
your app will become available to users and your product page will be appear in Google Play
for browsing, searching, or linking from your promotional campaigns.
Related resources:
Google Play Developer Program Policies — Guidelines for what is acceptable conent in Google Play. Please read and understand the policies before publishing.
Updates — Requirements for app updates in Google Play.
Developer Support — Support resources that you can use to find answers and report issues.
18. Support users after launch
After you publish an app or an app update, it's crucial for you to support your customers.
Prompt and courteous support can provide a better experience for users that results in better
ratings and more positive reviews for your products. Users are likely to be more engaged with
your app and recommend it if you are responsive to their needs and feedback. This is
especially true after publishing if you are using a coordinated promotional campaign.
There are a number of ways that you can keep in touch with users and offer them support. The
most fundamental is to provide your support email address on your product details page.
Beyond that, you can provide support in any way you choose, such as a forum, mailing list or a
Google+ page. The Google Play team does provide user support for downloading, installing
and payments issues, but issues that fall outside of these topics will fall under your domain.
Examples of issues you can support include: feature requests, questions about using the app
and questions about compatibility settings.
After publishing, plan to:
Check your ratings and reviews frequently on your app's product details page. Watch for
recurring issues that could signal bugs or other issues.
Be mindful of new Android platform version launches, as compatibility settings for your apps
might need to be updated.
Put a link to your support resources on your web site and set up any other support such as
forums.
Provide an appropriate support email address on your product details page and respond to
users when they take the time to email you.
Beyond the automatic refund window offered by Google Play, be generous with your own
refund policy, as satisfied users will be more likely to purchase in the future.
Acknowledge and fix issues in your app. It helps to be transparent and list known issues on
your product details page proactively.
Publish updates as frequently as you are able, without sacrificing quality or annoying users
with too-frequent updates.
With each update, make sure to provide a summary of what's changed. You can enter this
information in the Developer Console. Users will read it and appreciate that you are serious
about improving the quality of your app.
Related resources:
Supporting your users — Help Center document describing options for supporting users. In-app Billing — Help Center document describing how to correctly set up In-app Billing. Issuing Refunds — -- Help Center document describing how to issue refunds.
Linking to Your Products
For a link that includes the Google Play brand icon, check out the Badges page.
Google Play provides several link formats that let you bring users to your products in the way
you want, from Android apps, web pages, ads, reviews, articles, social media posts, and more.
The link formats let you:
Link to a specific app's product details page
Link to a list of all of your apps, or
Link to a search result of your choice
Link to a collection on Google Play
If you are linking from an Android app, you can also control whether the link launches the Play
Store application or the browser, which takes the user to the Google Play web site.
Linking to a Product Details Page
Use the format below to deep-link users directly to a specific app's product details page. At the
product details page, users can see the app description, screenshots, reviews and more, and
then install it.
To create the link, you need to know the app's fully qualified package name, which is declared
in the app's manifest file. The package name is also visible in the Developer Console.
From a web site:
http://play.google.com/store/apps/details?id=<package_name>
From an Android app:
market://details?id=<package_name>
Here's an example:
http://play.google.com/store/apps/details?id=com.google.android.ap
ps.maps
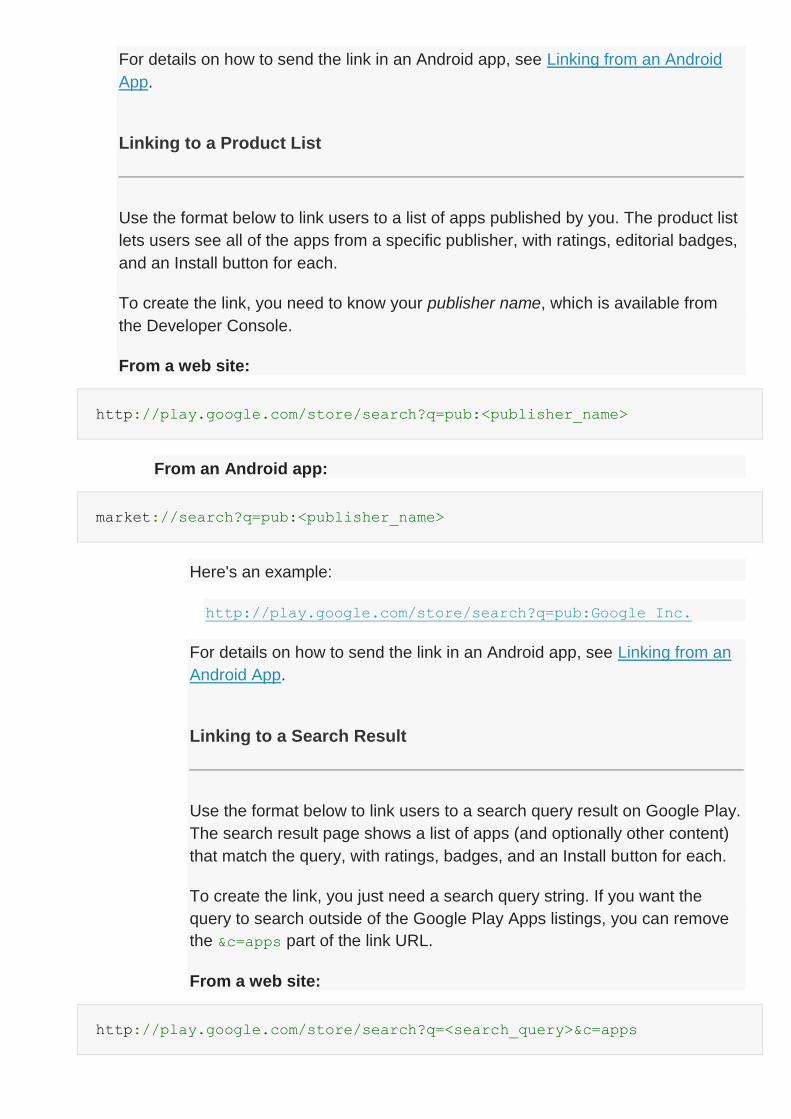
For details on how to send the link in an Android app, see Linking from an Android
App.
Linking to a Product List
Use the format below to link users to a list of apps published by you. The product list
lets users see all of the apps from a specific publisher, with ratings, editorial badges,
and an Install button for each.
To create the link, you need to know your publisher name, which is available from
the Developer Console.
From a web site:
http://play.google.com/store/search?q=pub:<publisher_name>
From an Android app:
market://search?q=pub:<publisher_name>
Here's an example:
http://play.google.com/store/search?q=pub:Google Inc.
For details on how to send the link in an Android app, see Linking from an
Android App.
Linking to a Search Result
Use the format below to link users to a search query result on Google Play.
The search result page shows a list of apps (and optionally other content)
that match the query, with ratings, badges, and an Install button for each.
To create the link, you just need a search query string. If you want the
query to search outside of the Google Play Apps listings, you can remove
the &c=apps part of the link URL.
From a web site:
http://play.google.com/store/search?q=<search_query>&c=apps
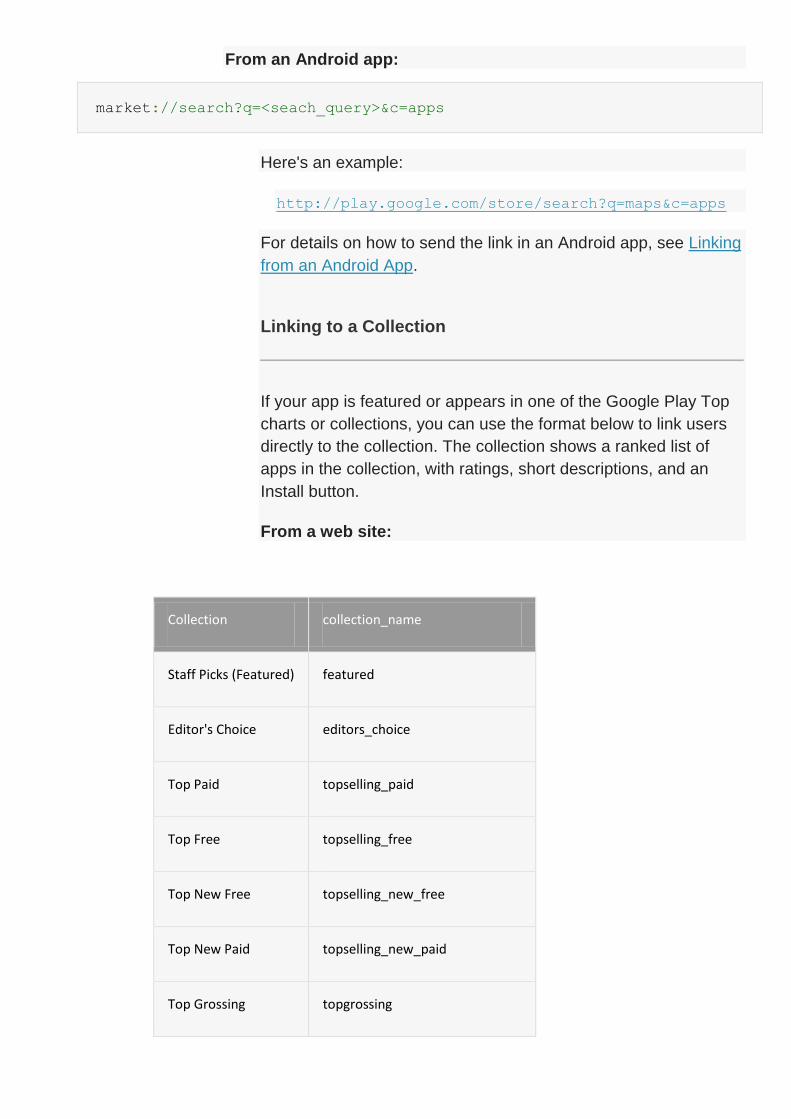
From an Android app:
market://search?q=<seach_query>&c=apps
Here's an example:
http://play.google.com/store/search?q=maps&c=apps
For details on how to send the link in an Android app, see Linking
from an Android App.
Linking to a Collection
If your app is featured or appears in one of the Google Play Top
charts or collections, you can use the format below to link users
directly to the collection. The collection shows a ranked list of
apps in the collection, with ratings, short descriptions, and an
Install button.
From a web site:
Collection collection_name
Staff Picks (Featured) featured
Editor's Choice editors_choice
Top Paid topselling_paid
Top Free topselling_free
Top New Free topselling_new_free
Top New Paid topselling_new_paid
Top Grossing topgrossing
http://play.google.com/store/apps/collection/<collection_name>
From an Android app:
market://apps/collection/<collection_name>
Here's an example:
http://play.google.com/store/apps/collectio
n/editors_choice
For details on how to send the link in an Android app,
see Linking from an Android App.
Table 1. Collections on Google Play.
Linking from an Android App
There are two general formats for links that are
accessible to users on Android devices, The two
formats trigger slightly different behaviors on the device:
market:// Launches the Play Store app to load
the target page.
http:// Lets the user choose whether to launch
the Play Store app or the browser to handle the
request. If the browser handles the request, it loads
the target page on the Google Play web site.
In general, you should use http:// format for links on
web pages and market:// for links in Android apps.
If you want to link to your products from an Android app,
create an Intent that opens an Google Play URL, as
shown in the example below.
Trending movers_shakers
Best Selling in Games topselling_paid_game
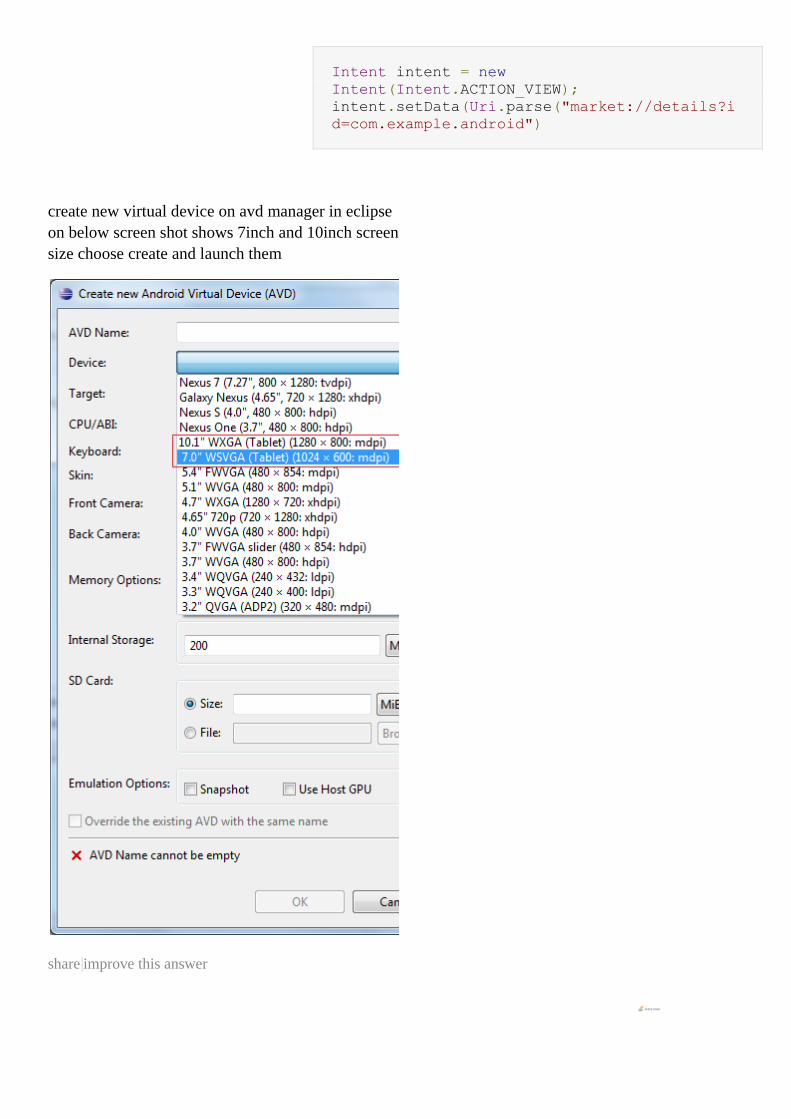
Intent intent = new
Intent(Intent.ACTION_VIEW);
intent.setData(Uri.parse("market://details?i
d=com.example.android")
create new virtual device on avd manager in eclipse
on below screen shot shows 7inch and 10inch screen
size choose create and launch them
share|improve this answer answered Jun 21 at 11:00
Stack Overflow User
1,150422
up vote1down vote The Android emulator images can be installed
through the SDK manager.
Beyond that, you can create an emulator for various
device configurations by using the Android Virtual
Device Manager which comes with the SDK to
create them. The prompt will allow you to specify
things like RAM, screen size, density and so on.
Documentation on using an AVD can be
found here.
share|improve this answer answered Jun 21 at 10:57
Raghav Sood
34k103868
up
vote1down
vote
If you have an Intel CPU, don't forget to download the Intel x86 Atom System Image and the
Emulator Accelerator (HAXM) from SDK Manager. You will also have to change the CPU
to Intel in AVDM.
There is also an AMD image, but only for Linux. And it's not in the SDK Manager, you have
to set it up manually.
Tablet App Quality Checklist
CHECKLIST
1. 1. Test for Basic Tablet App Quality
2. 2. Optimize your layouts
3. 3. Use the extra screen area
4. 4. Use assets designed for tablets
5. 5. Adjust fonts and touch targets
6. 6. Adjust homescreen widgets
7. 7. Offer the app's full feature set
8. 8. Target Android versions properly
9. 9. Declare dependencies properly
10. 10. Declare tablet screens support
11. 11. Showcase your tablet UI
12. 12. Follow publishing best practices
TESTING
1. Setting Up a Test Environment
Before you publish an app on Google Play, it's important to make sure that the app meets the
basic expectations of tablet users through compelling features and an intuitive, well-designed
UI.
Tablets are a growing part of the Android installed base that offers new opportunities for user
engagement and monetization. If your app is targeting tablet users, this document helps you
focus on key aspects of quality, feature set, and UI that can have a significant impact on the
app's success. Each focus area is given as checklist item, with each one comprising several
smaller tasks or best practices.
Although the checklist tasks below are numbered for convenience, you can handle them in any
order and address them to the extent that you feel is right for your app. In the interest of
delivering the best possible product to your customers, follow the checklist recommendations
to the greatest extent possible.
As you move through the checklist, you'll find links to support resources that can help you
address the topics raised in each task.
1. Test for basic tablet app quality
The first step in delivering a great tablet app experience is making sure that it meets the core
app quality criteria for all of the devices and form factors that the app is targeting. For
complete information, see the Core App Quality Guidelines.
Before publishing, also ensure that your app passes several basic technical checks and
launch criteria, such as:
Targets appropriate Android versions
Specifies any hardware dependencies properly
Declares support for appropriate screens
Uses all of the available screen space
Screenshots are uploaded to Google Play
If your app is already uploaded to the Google Play Developer Console, you can see how it is
doing against these checks by visiting the Optimization Tips page.
2. Optimize your layouts for larger screens

Android makes it easy to develop an app that runs well on a wide range of device screen sizes
and form factors. This broad compatibility works in your favor, since it helps you design a
single app that you can distribute widely to all of your targeted devices. However, to give your
users the best possible experience on each screen configuration — in particular on tablets —
you need to optimize your layouts and other UI components for each targeted screen
configuration. On tablets, optimizing your UI lets you take full advantage of the additional
screen available, such as to offer new features, present new content, or enhance the
experience in other ways to deepen user engagement.
If you developed your app for handsets and now want to distribute it to tablets, you can start
by making minor adjustments to your layouts, fonts, and spacing. In some cases — such as
for 7-inch tablets or for a game with large canvas — these adjustments may be all you need to
make your app look great. In other cases, such as for larger tablets, you can redesign parts of
your UI to replace "stretched UI" with an efficient multipane UI, easier navigation, and
additional content.
Here are some suggestions:
Get rid of "stretched" UI: On tablets, single-pane layouts lead to awkward whitespace and
excessive line lengths. Use padding to reduce the width of UI elements and consider using
multi-pane layouts.
Provide custom layouts as needed for large andxlarge screens. You can also provide
layouts that are loaded based on the screen's shortest dimension or the minimum available
width and height.
At a minimum, customize dimensions such as font sizes, margins, spacing for larger
screens, to improve use of space and content legibility.
Adjust positioning of UI controls so that they are easily accessible to users when holding a
tablet, such as toward the sides when in landscape orientation.
Padding of UI elements should normally be larger on tablets than on handsets. A 48dp
rhythm (and a 16dp grid) is recommended.
Adequately pad text content so that it is not aligned directly along screen edges. Use a
minimum 16dp padding around content near screen edges.
In particular, make sure that your layouts do not appear "stretched" across the screen:
Lines of text should not be excessively long — optimize for a maximum 100 characters per
line, with best results between 50 and 75.
ListViews and menus should not use the full screen width.
Use padding to manage the widths of onscreen elements or switch to a multi-pane UI for
tablets (see next section).
RELATED RESOURCES
Metrics and Grids—Android Design document that explains how to create layouts based on
density-independent grids.
Devices and Displays—Android Design document that explains how to design a UI that works well
on different devices and screen sizes.
Supporting Multiple Screens—Developer documentation that explains the details of managing UI
for best display on multiple screen sizes.
Configuration examples—Examples of how to declare layouts and other resources for specific
screen sizes.
3. Take advantage of extra screen area available on tablets
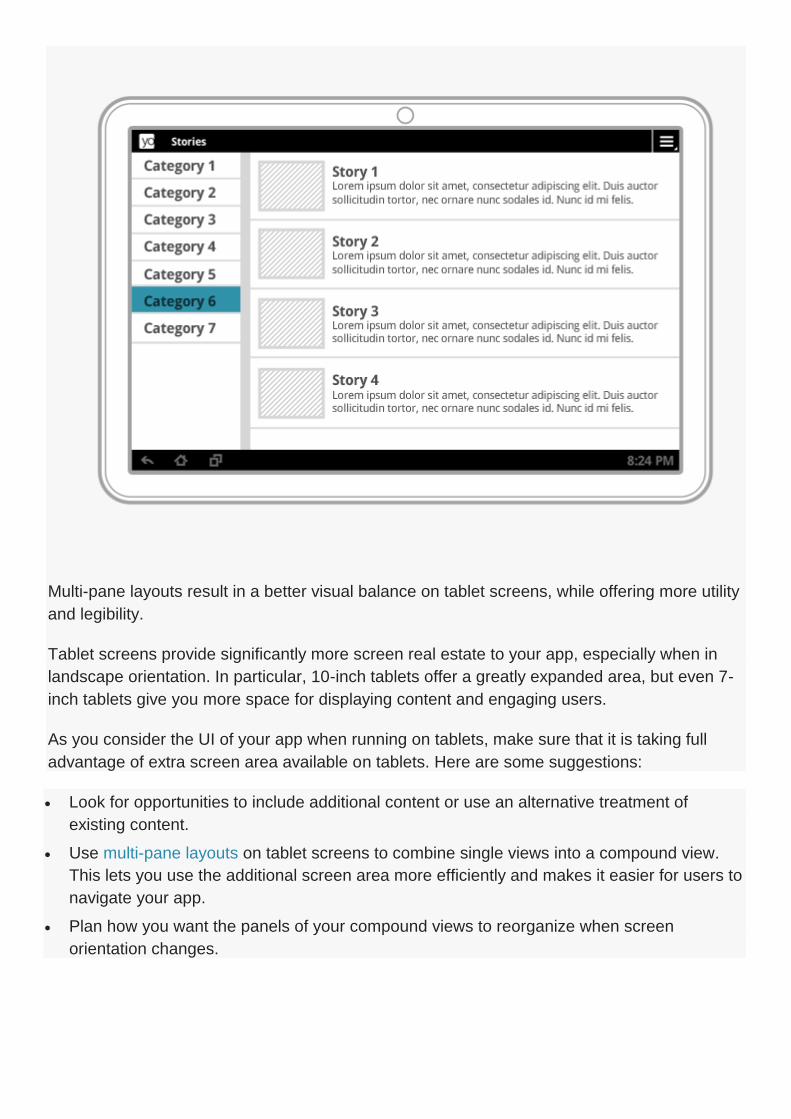
Multi-pane layouts result in a better visual balance on tablet screens, while offering more utility
and legibility.
Tablet screens provide significantly more screen real estate to your app, especially when in
landscape orientation. In particular, 10-inch tablets offer a greatly expanded area, but even 7-
inch tablets give you more space for displaying content and engaging users.
As you consider the UI of your app when running on tablets, make sure that it is taking full
advantage of extra screen area available on tablets. Here are some suggestions:
Look for opportunities to include additional content or use an alternative treatment of
existing content.
Use multi-pane layouts on tablet screens to combine single views into a compound view.
This lets you use the additional screen area more efficiently and makes it easier for users to
navigate your app.
Plan how you want the panels of your compound views to reorganize when screen
orientation changes.
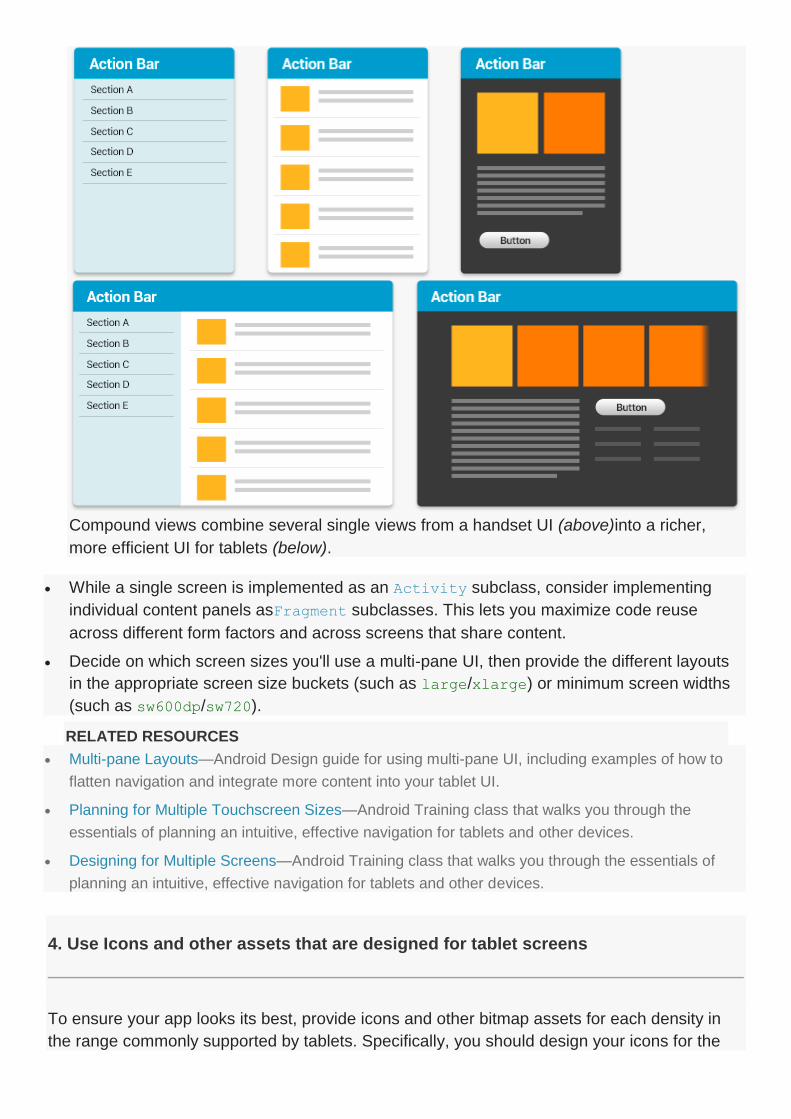
Compound views combine several single views from a handset UI (above)into a richer,
more efficient UI for tablets (below).
While a single screen is implemented as an Activity subclass, consider implementing
individual content panels asFragment subclasses. This lets you maximize code reuse
across different form factors and across screens that share content.
Decide on which screen sizes you'll use a multi-pane UI, then provide the different layouts
in the appropriate screen size buckets (such as large/xlarge) or minimum screen widths
(such as sw600dp/sw720).
RELATED RESOURCES
Multi-pane Layouts—Android Design guide for using multi-pane UI, including examples of how to
flatten navigation and integrate more content into your tablet UI.
Planning for Multiple Touchscreen Sizes—Android Training class that walks you through the
essentials of planning an intuitive, effective navigation for tablets and other devices.
Designing for Multiple Screens—Android Training class that walks you through the essentials of
planning an intuitive, effective navigation for tablets and other devices.
4. Use Icons and other assets that are designed for tablet screens
To ensure your app looks its best, provide icons and other bitmap assets for each density in
the range commonly supported by tablets. Specifically, you should design your icons for the
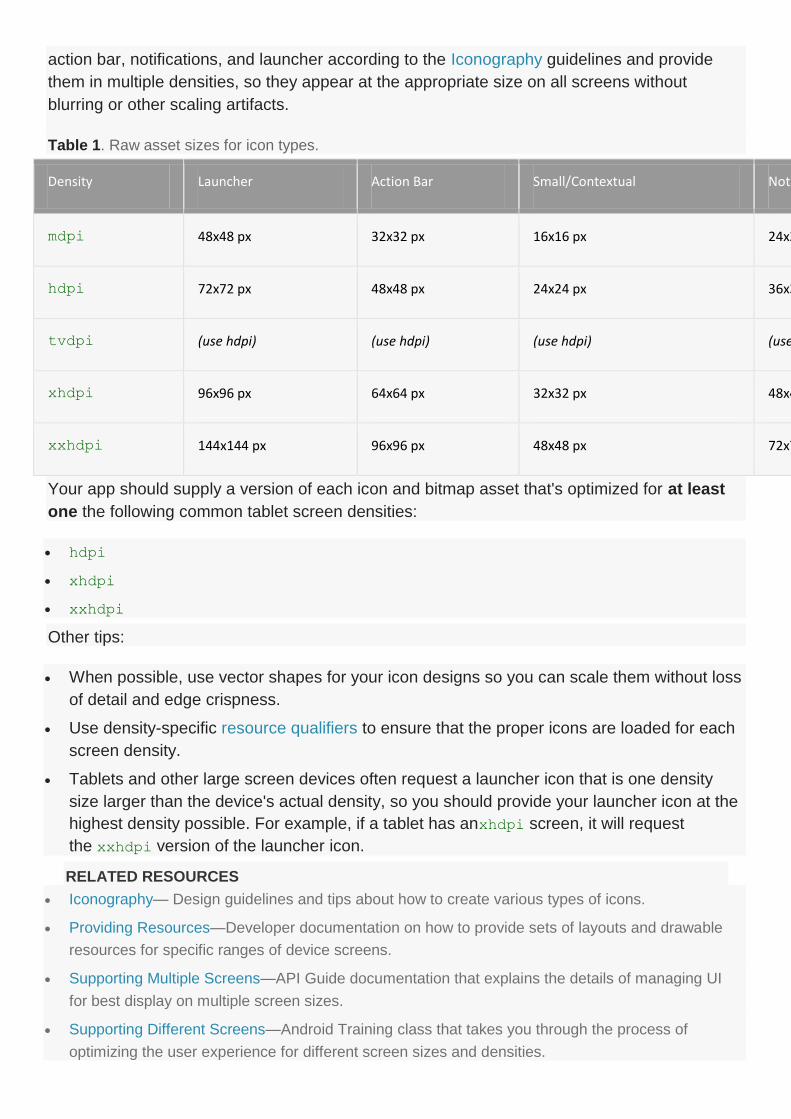
action bar, notifications, and launcher according to the Iconography guidelines and provide
them in multiple densities, so they appear at the appropriate size on all screens without
blurring or other scaling artifacts.
Table 1. Raw asset sizes for icon types.
Density Launcher Action Bar Small/Contextual Notification
mdpi 48x48 px 32x32 px 16x16 px 24x24 px
hdpi 72x72 px 48x48 px 24x24 px 36x36 px
tvdpi (use hdpi) (use hdpi) (use hdpi) (use hdpi)
xhdpi 96x96 px 64x64 px 32x32 px 48x48 px
xxhdpi 144x144 px 96x96 px 48x48 px 72x72 px
Your app should supply a version of each icon and bitmap asset that's optimized for at least
one the following common tablet screen densities:
hdpi
xhdpi
xxhdpi
Other tips:
When possible, use vector shapes for your icon designs so you can scale them without loss
of detail and edge crispness.
Use density-specific resource qualifiers to ensure that the proper icons are loaded for each
screen density.
Tablets and other large screen devices often request a launcher icon that is one density
size larger than the device's actual density, so you should provide your launcher icon at the
highest density possible. For example, if a tablet has anxhdpi screen, it will request
the xxhdpi version of the launcher icon.
RELATED RESOURCES
Iconography— Design guidelines and tips about how to create various types of icons.
Providing Resources—Developer documentation on how to provide sets of layouts and drawable
resources for specific ranges of device screens.
Supporting Multiple Screens—API Guide documentation that explains the details of managing UI
for best display on multiple screen sizes.
Supporting Different Screens—Android Training class that takes you through the process of
optimizing the user experience for different screen sizes and densities.
5. Adjust font sizes and touch targets for tablet screens
To make sure your app is easy to use on tablets, take some time to adjust the font sizes and
touch targets in your tablet UI, for all of the screen configurations you are targeting. You can
adjust font sizes through styleable attributes or dimension resources, and you can adjust touch
targets through layouts and bitmap drawables, as discussed above.
Here are some considerations:
Text should not be excessively large or small on tablet screen sizes and densities. Make
sure that labels are sized appropriately for the UI elements they correspond to, and ensure
that there are no improper line breaks in labels, titles, and other elements.
The recommended touch-target size for onscreen elements is 48dp (32dp minimum) —
some adjustments may be needed in your tablet UI. Read Metrics and Grids to learn about
implementation strategies to help most of your users. To meet the accessibility needs of
certain users, it may be appropriate to use larger touch targets.
When possible, for smaller icons, expand the touchable area to more than 48dp
using TouchDelegate or just centering the icon within the transparent button.
RELATED RESOURCES
Metrics and Grids —Android Design document that explains how to arrange and size touch targets
and other UI elements on the screen.
Typography—Android Design document that gives an overview of how to use typography in your
apps.
Supporting Multiple Screens—Developer documentation that explains the details of managing UI
for best display on multiple screen sizes.
Supporting Different Densities—Android Training class that shows you how to provide sets of
layouts and drawable resources for specific ranges of device screens.
6. Adjust sizes of home screen widgets for tablet screens
If your app includes a home screen widget, here are a few points to consider to ensure a great
user experience on tablet screens:
Make sure that the widget's default height and width are set appropriately for tablet
screens, as well as the minimum and maximum resize height and width.
The widget should be resizable to 420dp or more, to span 5 or more home screen rows (if
this is a vertical or square widget) or columns (if this is a horizontal or square widget).
Make sure that 9-patch images render correctly.
Use default system margins.

Set the app's targetSdkVersion to 14 or higher, if possible.
RELATED RESOURCES
Adding the AppWidgetProviderInfo Metadata —API Guide that explains how to set the height and
width dimensions of a widget.
App Widget Design Guidelines—API Guide that provides best practices and techniques for
designing and managing the size of widgets.
7. Offer the app's full feature set to tablet users
Let your tablet users experience the best features of your app. Here are some
recommendations:
Design your app to offer at least the same set of features on tablets as it does on handsets.
In exceptional cases, your app might omit or replace certain features on tablets if they are
not supported by the hardware or use-case of most tablets. For example:
o If the handset uses telephony features but telephony is not available on the current
tablet, you can omit or replace the related functionality.
o Many tablets have a GPS sensor, but most users would not normally carry their tablets
while running. If your phone app provides functionality to let the user record a GPS track
of their runs while carrying their phones, the app would not need to provide that
functionality on tablets because the use-case is not compelling.
If you will omit a feature or capability from your tablet UI, make sure that it is not accessible
to users or that it offers “graceful degradation” to a replacement feature (also see the
section below on hardware features).
8. Target Android versions properly
To ensure the broadest possible distribution to tablets, make sure that your app properly
targets the Android versions that support tablets. Initial support for tablets was added
in Android 3.0 (API level 11). Unified UI framework support for tablets, phones, and other
devices was introduced in Android 4.0 (API level 14) and is supported in later versions.
You can set the app's range of targeted Android versions in the manifest file, in the <uses-
sdk> element. In most cases, you can target Android versions properly by setting the
element's targetSdkVersion attribute to the highest API level available.
At a minimum, check the <uses-sdk> element to make sure that:
a. targetSdkVersion is declared with value 11 or higher (14 or higher is recommended), OR
b. minSdkVersion is declared with value 11 or higher.
c. If a maxSdkVersion attribute is declared, it must have a value of 11 or higher. Note that, in
general, the use ofmaxSdkVersion is not recommended.
RELATED RESOURCES
Android API Levels—Introduces API levels and how they relate to compatibility. A reference of
available API levels is included.
Supporting Different Platform Versions—Training class showing how to declare support for
minimum and target API levels in your app.
9. Declare hardware feature dependencies properly
Handsets and tablets typically offer slightly different hardware support for sensors, camera,
telephony, and other features. For example, many tablets are available in a "Wi-Fi"
configuration that does not include telephony support.
So that you can distribute a single APK broadly across your full customer base of phones and
tablets, make sure that your app doesn't declare requirements for hardware features that
aren't commonly available on tablets. Instead, properly declare the hardware features as not
required in the app manifest, as described below.
In your app manifest, locate any <uses-feature> elements. In particular, look for hardware
features that might not be available on some tablets, such as:
o android.hardware.telephony
o android.hardware.camera (refers to back camera), or
o android.hardware.camera.front
Declare the <uses-feature> elements as not required by including
the android:required=”false” attribute.
For example, here's the proper way to declare a dependency
on android.hardware.telephony, such that you can still distribute the app broadly, even
to devices that don't offer telephony:
<uses-feature android:name="android.hardware.telephony"
android:required="false" />
Similarly, check the manifest for <permission> elements that imply hardware feature
requirements that not be appropriate for tablets. If you find such permissions, make sure to
explicitly declare a corresponding <uses-feature>element for the features and includes
the android:required=”false” attribute.
After declaring hardware features as not required, make sure to test your app on a variety of
devices. The app should function normally when the hardware features it uses are not
available, and it should offer "graceful degradation" and alternative functionality where
appropriate.
For example, if an app normally uses GPS to set the location but GPS is not supported on the
device, the app could let the user set the location manually instead. The app can check for
device hardware capabilities at runtime and handle as needed.
RELATED RESOURCES
Permissions that Imply Feature Requirements—A list of permissions that may cause unwanted
filtering if declared in your app's manifest.
<uses-feature>—Description and reference documentation for the <uses-feature> manifest
element.
Testing the features required by your application—Description of how to determine the actual set of
hardware and software requirements (explicit or implied) that your app requires.
10. Declare support for tablet screens
To ensure that you can distribute your app to a broad range of tablets, your app should
declare support for tablet screen sizes in its manifest file, as follows:
A <supports-screens> element, if declared, must not
specify android:largeScreens="false" orandroid:xlargeScreens="false".
For apps targeting minSdkVersion value less than 13, a <supports-screens> element
must be declared with
bothandroid:largeScreens="true" and android:xlargeScreens="true".
If the app declares a <compatible-screens> element in the manifest, the element should
include attributes that specifyall of the size and density combinations for tablet screens that the
app supports. Note that, if possible, you should avoid using the <compatible-
screens> element in your app.
RELATED RESOURCES
Declaring Screen Size Support—Developer documentation that explains the details of managing UI
for best display on multiple screen sizes.
11. Showcase your tablet UI in Google Play
After you've done the work to create an rich, optimized UI for your tablet app, make sure that
you let your customers know about it! Here are some key ways to promote your tablet app to
users on Google Play.
Upload screenshots of your tablet UI

Tablet users want to know what your app is like on a tablet device, not on a phone. If you
developed a tablet app, make sure to upload screenshots of your tablet UI to the Google Play
Developer Console. Here are some guidelines:
Your screenshots should show the core functionality of your app, not a startup or sign-in
page. Wherever users will spend most of their time, that's what you should show in your
screenshots.
Add screenshots taken on both 7-inch and 10-inch tablets.
It's recommended that you add screenshots taken in both landscape and portrait
orientations, if possible.
Use screen captures if possible. Avoid showing actual device hardware in your
screenshots.
The recommended resolution of your tablet screenshots is 1280 x 720 or higher in each
orientation.
You can upload as many as 8 screenshots of your tablet UI for 7-inch tablets and an
additional 8 for 10-inch tablets.
Update your app description and release notes
In your app description, make sure to highlight that your app offers tablet-optimized UI and
great features for tablet users. Consider adding some detail about how your tablet UI works
and why users will like it.
Include information about tablet support in the app's release notes and update information.
Update your promotional video
Many users view an app's promotional video to get an idea of what the app is like and whether
they'll enjoy it. For tablet users, capitalize on this interest by highlighting your app's tablet UI in
your promotional video. Here are some tips and guidelines:
Add one or more shots of your app running on a tablet. To engage with tablet users most
effectively, it's recommended that you promote your tablet UI in approximately equal
proportion to your phone UI.
Show your tablet UI as early as possible in the video. Don't assume that tablet users will
wait patiently through a feature walkthrough on a phone UI. Ideally, you should engage
them immediately by showing the tablet UI within the first 10 seconds, or at the same point
that you introduce the phone UI.
To make it clear that you are showing a tablet UI, include shots of your app running on a
hand-held tablet device.
Highlight your app's tablet UI in the video's narrative or voiceover.
Feature your tablet UI in your promotional campaigns
Make sure to let tablet users know about your tablet UI in your promotional campaigns, web
site, social posts, advertisements, and elsewhere. Here are some suggestions:
Plan a marketing or advertising campaign that highlights the use of your app on tablets.
Show your tablet app at its best in your promotional campaigns—use the Device Art
Generator to quickly generate a high-quality promotional image of your app running on a 7-
inch or 10-inch tablet, in the orientation of your choice, with or without drop-shadow and
screen glare. It's as simple as capture, drag, and drop.
Include a Google Play badge in your online promotions to let users link directly to your
app's store listing. You can generate a badge in a variety of languages using the Badge
Generator.
RELATED RESOURCES
Publishing Checklist —Recommendations on how to prepare your app for publishing, test it, and
launch successfully on Google Play.
Google Play Developer Console—The tools console for publishing your app to Android users.
Google Play Badge Generator—Create "Get it on Google Play" badges for your app in a variety of
languages with a single click.
Device Art Generator—Drag and drop tool that lets you instantly create production- ready art
showing your app running on a tablet device.
12. Follow best practices for publishing in Google Play
Here are some best practices for delivering a successful tablet app on Google Play.
Check out your app's Optimization Tips
The Google Play Developer Console now offers an Optimization Tips page that lets you
quickly check how your app is doing against basic guidelines for tablet app distribution and
quality. To visit the page, sign into the Developer Console, load the app from All Applications,
and click Optimization Tips in the left navigation.
How to send feedback
Please use the link below to send feedback or request a manual review of your Optimization Tips.
Make sure to read the relevant sections of the Tablet App Quality Guidelines prior to sending
feedback.
Designed for Tablets Contact Form »
The Developer Console creates your app's Optimization Tips page by running a series of
checks to verify basic quality criteria. If it finds any issues, it alerts you to them as "To Do"
items in the Optimization Tips page.
If you've developed a tablet experience for your app, make sure to visit the Optimization Tips
page to see how your app is doing against the basic checks. If there are any issues listed, we
recommend addressing them in your app and uploading a new binary for distribution, if
needed.
If the Optimization Tips page lists "To Do" issues that you feel don't apply to your app or affect
its quality on tablets, please notify us using theDesigned for Tablets Contact Form ». We will
review your app and update your Optimization Tips page as appropriate.
Confirm the app's filtering
After you've uploaded the app to the Developer Console, check the APK's Supported Devices
list to make sure that the app is not filtered from tablet devices that you want to target.
Distribute as a single APK
It's recommended that you publish your app as a single APK for all screen sizes (phones and
tablets), with a single Google Play listing. This approach has several important advantages.
Easier for users to find your app from search, browsing, or promotions
Easier for users to restore your app automatically if they get a new device.
Your ratings and download stats are consolidated across all devices.
Publishing a tablet app in a second listing can dilute ratings for your brand.
If necessary, you can alternatively choose to deliver your app using Multiple APK Support,
although in most cases using a single APK to reach all devices is strongly recommended.
RELATED RESOURCES
Publishing Checklist— Recommendations on how to prepare your app for publishing, test it, and
launch successfully on Google Play.
Google Play Developer Console—The tools console for publishing your app to Android users.
Setting Up a Test Environment for Tablets
To assess the quality of your app on tablets — both for core app quality and tablet app quality
— you need to set up a suitable hardware or emulator environment for testing.
The ideal test environment would include a small number of actual hardware devices that
represent key form factors and hardware/software combinations currently available to
consumers. It's not necessary to test on every device that's on the market — rather, you
should focus on a small number of representative devices, even using one or two devices per
form factor. The table below provides an overview of devices you could use for testing.
If you are not able to obtain actual hardware devices for testing, you should set up emulated
devices (AVDs) to represent the most common form factors and hardware/software
combinations. See the table below for suggestions on the emulator configurations to use.
To go beyond basic testing, you can add more devices, more form factors, or new
hardware/software combinations to your test environment. For example, you could include
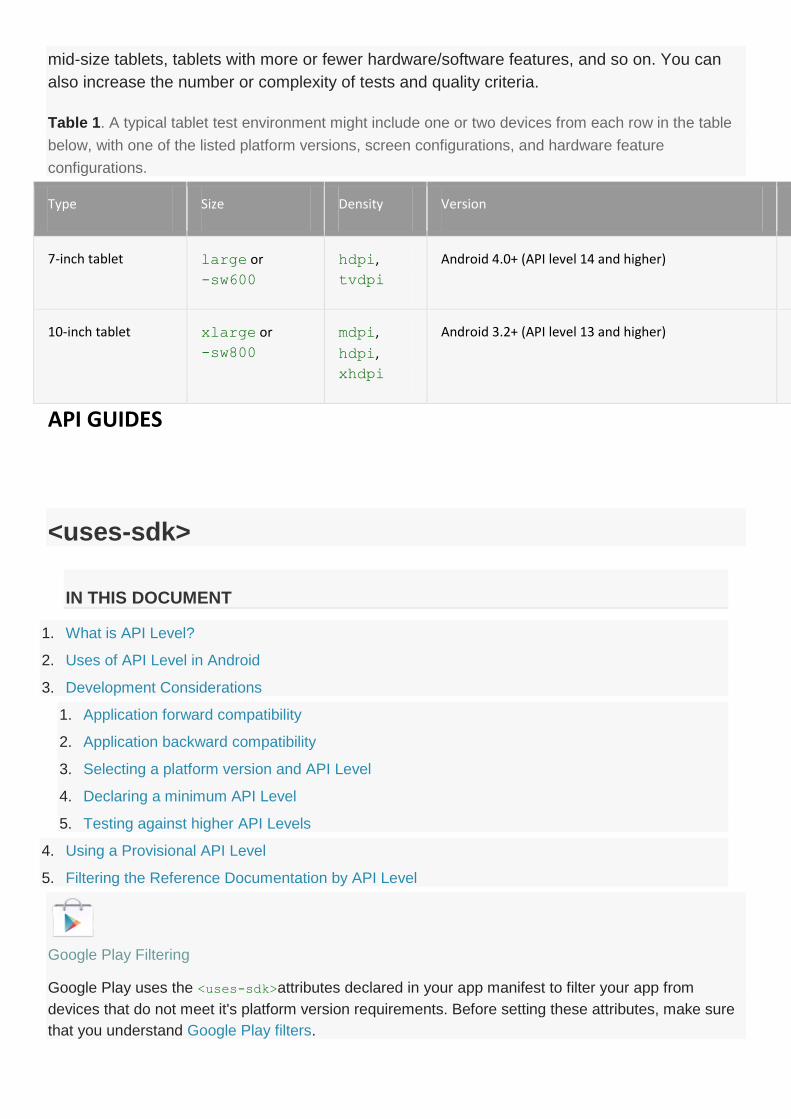
mid-size tablets, tablets with more or fewer hardware/software features, and so on. You can
also increase the number or complexity of tests and quality criteria.
Table 1. A typical tablet test environment might include one or two devices from each row in the table
below, with one of the listed platform versions, screen configurations, and hardware feature
configurations.
Type Size Density Version AVD Skin
7-inch tablet large or
-sw600
hdpi,
tvdpi
Android 4.0+ (API level 14 and higher) WXGA800-7in
10-inch tablet xlarge or
-sw800
mdpi,
hdpi,
xhdpi
Android 3.2+ (API level 13 and higher) WXGA800
API GUIDES
<uses-sdk>
IN THIS DOCUMENT
1. What is API Level?
2. Uses of API Level in Android
3. Development Considerations
1. Application forward compatibility
2. Application backward compatibility
3. Selecting a platform version and API Level
4. Declaring a minimum API Level
5. Testing against higher API Levels
4. Using a Provisional API Level
5. Filtering the Reference Documentation by API Level
Google Play Filtering
Google Play uses the <uses-sdk>attributes declared in your app manifest to filter your app from
devices that do not meet it's platform version requirements. Before setting these attributes, make sure
that you understand Google Play filters.
SYNTAX:
<uses-sdk android:minSdkVersion="integer"
android:targetSdkVersion="integer"
android:maxSdkVersion="integer" />
CONTAINED IN:
<manifest>
DESCRIPTION:
Lets you express an application's compatibility with one or more versions of the Android
platform, by means of an API Level integer. The API Level expressed by an application
will be compared to the API Level of a given Android system, which may vary among
different Android devices.
Despite its name, this element is used to specify the API Level, notthe version number
of the SDK (software development kit) or Android platform. The API Level is always a
single integer. You cannot derive the API Level from its associated Android version
number (for example, it is not the same as the major version or the sum of the major
and minor versions).
Also read the document about Versioning Your Applications.
ATTRIBUTES:
android:minSdkVersion
An integer designating the minimum API Level required for the application to run. The
Android system will prevent the user from installing the application if the system's API
Level is lower than the value specified in this attribute. You should always declare this
attribute.
Caution: If you do not declare this attribute, the system assumes a default value of "1",
which indicates that your application is compatible with all versions of Android. If your
application is notcompatible with all versions (for instance, it uses APIs introduced in
API Level 3) and you have not declared the proper minSdkVersion, then when installed
on a system with an API Level less than 3, the application will crash during runtime
when attempting to access the unavailable APIs. For this reason, be certain to declare
the appropriate API Level in the minSdkVersion attribute.
android:targetSdkVersion
An integer designating the API Level that the application targets. If not set, the default
value equals that given to minSdkVersion.
This attribute informs the system that you have tested against the target version and the
system should not enable any compatibility behaviors to maintain your app's forward-
compatibility with the target version. The application is still able to run on older versions
(down to minSdkVersion).
As Android evolves with each new version, some behaviors and even appearances
might change. However, if the API level of the platform is higher than the version
declared by your app'stargetSdkVersion, the system may enable compatibility
behaviors to ensure that your app continues to work the way you expect. You can
disable such compatibility behaviors by specifyingtargetSdkVersion to match the API
level of the platform on which it's running. For example, setting this value to "11" or
higher allows the system to apply a new default theme (Holo) to your app when running
on Android 3.0 or higher and also disables screen compatibility mode when running on
larger screens (because support for API level 11 implicitly supports larger screens).
There are many compatibility behaviors that the system may enable based on the value
you set for this attribute. Several of these behaviors are described by the corresponding
platform versions in theBuild.VERSION_CODES reference.
To maintain your application along with each Android release, you should increase the
value of this attribute to match the latest API level, then thoroughly test your application
on the corresponding platform version.
Introduced in: API Level 4
android:maxSdkVersion
An integer designating the maximum API Level on which the application is designed to
run.
In Android 1.5, 1.6, 2.0, and 2.0.1, the system checks the value of this attribute when
installing an application and when re-validating the application after a system update. In
either case, if the application's maxSdkVersion attribute is lower than the API Level
used by the system itself, then the system will not allow the application to be installed.
In the case of re-validation after system update, this effectively removes your
application from the device.
To illustrate how this attribute can affect your application after system updates, consider
the following example:
An application declaring maxSdkVersion="5" in its manifest is published on Google
Play. A user whose device is running Android 1.6 (API Level 4) downloads and installs
the app. After a few weeks, the user receives an over-the-air system update to Android
2.0 (API Level 5). After the update is installed, the system checks the
application's maxSdkVersion and successfully re-validates it. The application functions
as normal. However, some time later, the device receives another system update, this
time to Android 2.0.1 (API Level 6). After the update, the system can no longer re-
validate the application because the system's own API Level (6) is now higher than the
maximum supported by the application (5). The system prevents the application from
being visible to the user, in effect removing it from the device.
Warning: Declaring this attribute is not recommended. First, there is no need to set the
attribute as means of blocking deployment of your application onto new versions of the
Android platform as they are released. By design, new versions of the platform are fully
backward-compatible. Your application should work properly on new versions, provided
it uses only standard APIs and follows development best practices. Second, note that in
some cases, declaring the attribute can result in your application being removed
from users' devices after a system update to a higher API Level. Most devices on
which your application is likely to be installed will receive periodic system updates over
the air, so you should consider their effect on your application before setting this
attribute.
Introduced in: API Level 4
Future versions of Android (beyond Android 2.0.1) will no longer check or enforce
the maxSdkVersionattribute during installation or re-validation. Google Play will
continue to use the attribute as a filter, however, when presenting users with
applications available for download.
INTRODUCED IN:
API Level 1
What is API Level?
API Level is an integer value that uniquely identifies the framework
API revision offered by a version of the Android platform.
The Android platform provides a framework API that applications can
use to interact with the underlying Android system. The framework API
consists of:
A core set of packages and classes
A set of XML elements and attributes for declaring a manifest file
A set of XML elements and attributes for declaring and accessing
resources
A set of Intents
A set of permissions that applications can request, as well as
permission enforcements included in the system
Each successive version of the Android platform can include updates
to the Android application framework API that it delivers.
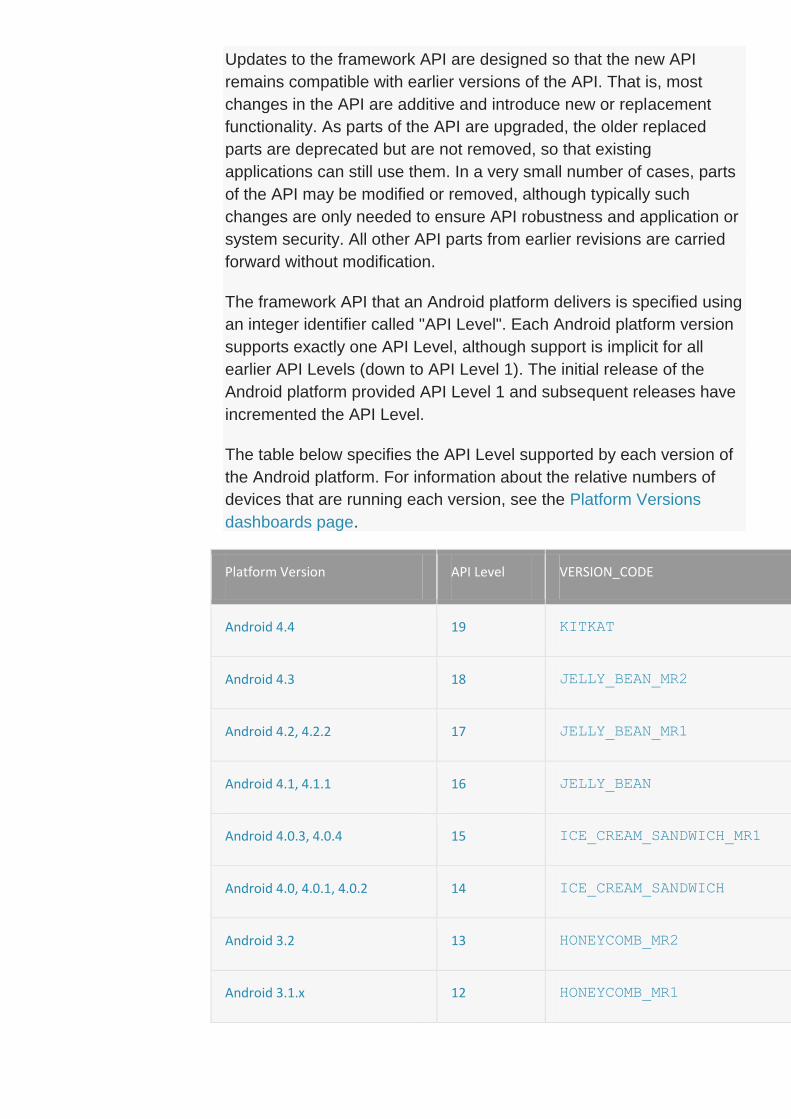
Updates to the framework API are designed so that the new API
remains compatible with earlier versions of the API. That is, most
changes in the API are additive and introduce new or replacement
functionality. As parts of the API are upgraded, the older replaced
parts are deprecated but are not removed, so that existing
applications can still use them. In a very small number of cases, parts
of the API may be modified or removed, although typically such
changes are only needed to ensure API robustness and application or
system security. All other API parts from earlier revisions are carried
forward without modification.
The framework API that an Android platform delivers is specified using
an integer identifier called "API Level". Each Android platform version
supports exactly one API Level, although support is implicit for all
earlier API Levels (down to API Level 1). The initial release of the
Android platform provided API Level 1 and subsequent releases have
incremented the API Level.
The table below specifies the API Level supported by each version of
the Android platform. For information about the relative numbers of
devices that are running each version, see the Platform Versions
dashboards page.
Platform Version API Level VERSION_CODE Notes
Android 4.4 19 KITKAT Platform Highlights
Android 4.3 18 JELLY_BEAN_MR2 Platform Highlights
Android 4.2, 4.2.2 17 JELLY_BEAN_MR1 Platform Highlights
Android 4.1, 4.1.1 16 JELLY_BEAN Platform Highlights
Android 4.0.3, 4.0.4 15 ICE_CREAM_SANDWICH_MR1 Platform Highlights
Android 4.0, 4.0.1, 4.0.2 14 ICE_CREAM_SANDWICH
Android 3.2 13 HONEYCOMB_MR2
Android 3.1.x 12 HONEYCOMB_MR1 Platform Highlights
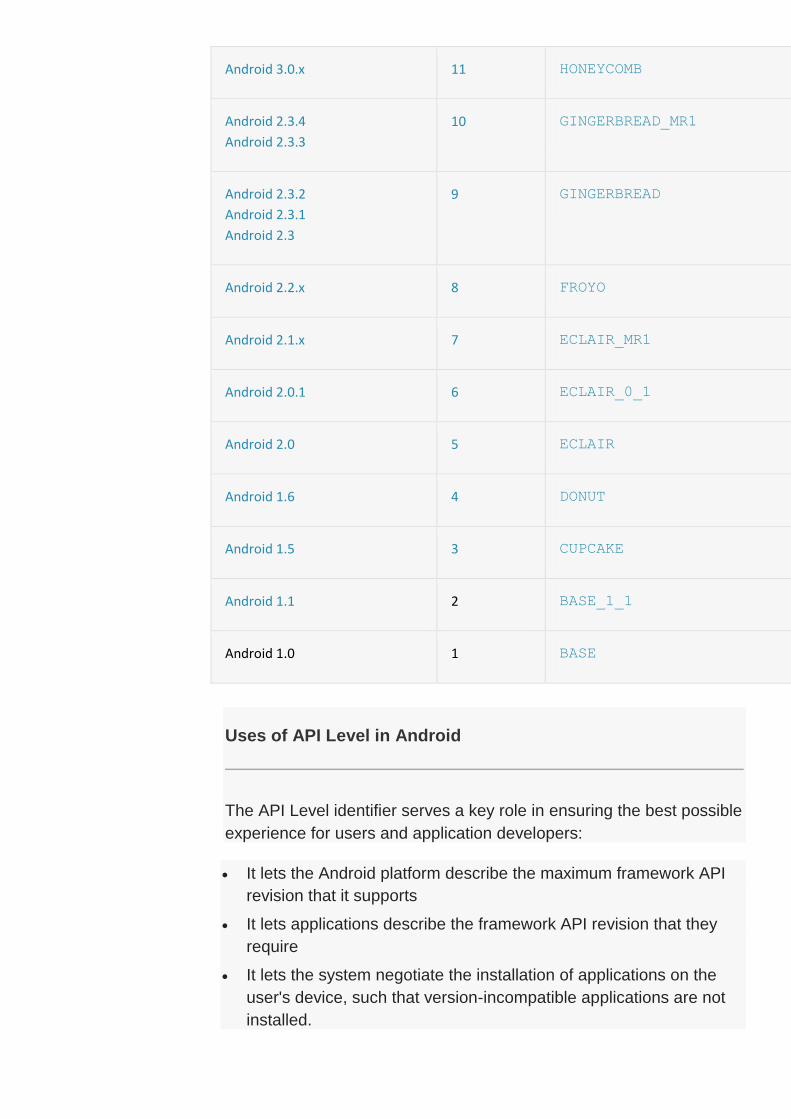
Android 3.0.x 11 HONEYCOMB Platform Highlights
Android 2.3.4
Android 2.3.3
10 GINGERBREAD_MR1 Platform Highlights
Android 2.3.2
Android 2.3.1
Android 2.3
9 GINGERBREAD
Android 2.2.x 8 FROYO Platform Highlights
Android 2.1.x 7 ECLAIR_MR1 Platform Highlights
Android 2.0.1 6 ECLAIR_0_1
Android 2.0 5 ECLAIR
Android 1.6 4 DONUT Platform Highlights
Android 1.5 3 CUPCAKE Platform Highlights
Android 1.1 2 BASE_1_1
Android 1.0 1 BASE
Uses of API Level in Android
The API Level identifier serves a key role in ensuring the best possible
experience for users and application developers:
It lets the Android platform describe the maximum framework API
revision that it supports
It lets applications describe the framework API revision that they
require
It lets the system negotiate the installation of applications on the
user's device, such that version-incompatible applications are not
installed.

Each Android platform version stores its API Level identifier internally,
in the Android system itself.
Applications can use a manifest element provided by the framework
API — <uses-sdk> — to describe the minimum and maximum API
Levels under which they are able to run, as well as the preferred API
Level that they are designed to support. The element offers three key
attributes:
android:minSdkVersion — Specifies the minimum API Level on
which the application is able to run. The default value is "1".
android:targetSdkVersion — Specifies the API Level on which
the application is designed to run. In some cases, this allows the
application to use manifest elements or behaviors defined in the
target API Level, rather than being restricted to using only those
defined for the minimum API Level.
android:maxSdkVersion — Specifies the maximum API Level on
which the application is able to run.Important: Please read
the <uses-sdk> documentation before using this attribute.
For example, to specify the minimum system API Level that an
application requires in order to run, the application would include in its
manifest a <uses-sdk> element with
a android:minSdkVersion attribute. The value
of android:minSdkVersion would be the integer corresponding to
the API Level of the earliest version of the Android platform under
which the application can run.
When the user attempts to install an application, or when revalidating
an appplication after a system update, the Android system first checks
the <uses-sdk> attributes in the application's manifest and compares
the values against its own internal API Level. The system allows the
installation to begin only if these conditions are met:
If a android:minSdkVersion attribute is declared, its value must
be less than or equal to the system's API Level integer. If not
declared, the system assumes that the application requires API
Level 1.
If a android:maxSdkVersion attribute is declared, its value must
be equal to or greater than the system's API Level integer. If not
declared, the system assumes that the application has no
maximum API Level. Please read the <uses-sdk> documentation
for more information about how the system handles this attribute.
When declared in an application's manifest, a <uses-sdk> element
might look like this:
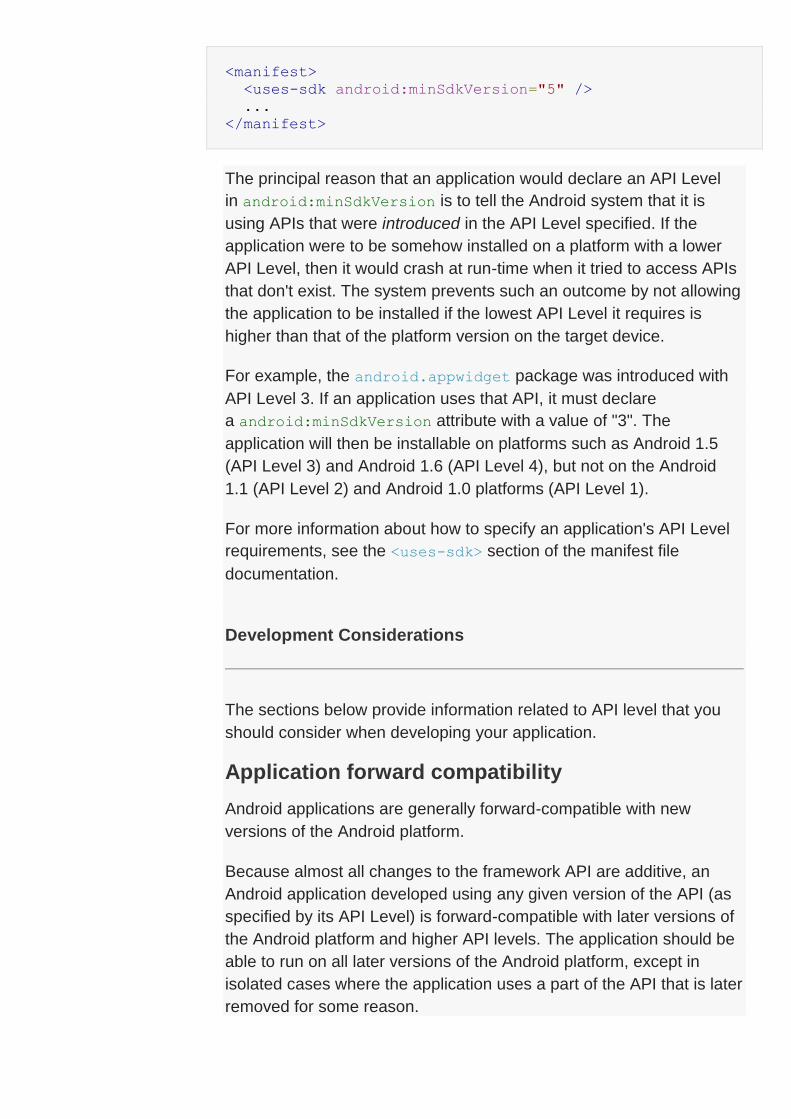
<manifest>
<uses-sdk android:minSdkVersion="5" />
...
</manifest>
The principal reason that an application would declare an API Level
in android:minSdkVersion is to tell the Android system that it is
using APIs that were introduced in the API Level specified. If the
application were to be somehow installed on a platform with a lower
API Level, then it would crash at run-time when it tried to access APIs
that don't exist. The system prevents such an outcome by not allowing
the application to be installed if the lowest API Level it requires is
higher than that of the platform version on the target device.
For example, the android.appwidget package was introduced with
API Level 3. If an application uses that API, it must declare
a android:minSdkVersion attribute with a value of "3". The
application will then be installable on platforms such as Android 1.5
(API Level 3) and Android 1.6 (API Level 4), but not on the Android
1.1 (API Level 2) and Android 1.0 platforms (API Level 1).
For more information about how to specify an application's API Level
requirements, see the <uses-sdk> section of the manifest file
documentation.
Development Considerations
The sections below provide information related to API level that you
should consider when developing your application.
Application forward compatibility
Android applications are generally forward-compatible with new
versions of the Android platform.
Because almost all changes to the framework API are additive, an
Android application developed using any given version of the API (as
specified by its API Level) is forward-compatible with later versions of
the Android platform and higher API levels. The application should be
able to run on all later versions of the Android platform, except in
isolated cases where the application uses a part of the API that is later
removed for some reason.

Forward compatibility is important because many Android-powered
devices receive over-the-air (OTA) system updates. The user may
install your application and use it successfully, then later receive an
OTA update to a new version of the Android platform. Once the
update is installed, your application will run in a new run-time version
of the environment, but one that has the API and system capabilities
that your application depends on.
In some cases, changes below the API, such those in the underlying
system itself, may affect your application when it is run in the new
environment. For that reason it's important for you, as the application
developer, to understand how the application will look and behave in
each system environment. To help you test your application on
various versions of the Android platform, the Android SDK includes
multiple platforms that you can download. Each platform includes a
compatible system image that you can run in an AVD, to test your
application.
Application backward compatibility
Android applications are not necessarily backward compatible with
versions of the Android platform older than the version against which
they were compiled.
Each new version of the Android platform can include new framework
APIs, such as those that give applications access to new platform
capabilities or replace existing API parts. The new APIs are accessible
to applications when running on the new platform and, as mentioned
above, also when running on later versions of the platform, as
specified by API Level. Conversely, because earlier versions of the
platform do not include the new APIs, applications that use the new
APIs are unable to run on those platforms.
Although it's unlikely that an Android-powered device would be
downgraded to a previous version of the platform, it's important to
realize that there are likely to be many devices in the field that run
earlier versions of the platform. Even among devices that receive OTA
updates, some might lag and might not receive an update for a
significant amount of time.
Selecting a platform version and API Level
When you are developing your application, you will need to choose
the platform version against which you will compile the application. In
general, you should compile your application against the lowest
possible version of the platform that your application can support.
You can determine the lowest possible platform version by compiling
the application against successively lower build targets. After you
determine the lowest version, you should create an AVD using the
corresponding platform version (and API Level) and fully test your
application. Make sure to declare aandroid:minSdkVersion attribute
in the application's manifest and set its value to the API Level of the
platform version.
Declaring a minimum API Level
If you build an application that uses APIs or system features
introduced in the latest platform version, you should set
the android:minSdkVersion attribute to the API Level of the latest
platform version. This ensures that users will only be able to install
your application if their devices are running a compatible version of
the Android platform. In turn, this ensures that your application can
function properly on their devices.
If your application uses APIs introduced in the latest platform version
but does not declare aandroid:minSdkVersion attribute, then it will
run properly on devices running the latest version of the platform,
but not on devices running earlier versions of the platform. In the latter
case, the application will crash at runtime when it tries to use APIs that
don't exist on the earlier versions.
Testing against higher API Levels
After compiling your application, you should make sure to test it on the
platform specified in the
application'sandroid:minSdkVersion attribute. To do so, create an
AVD that uses the platform version required by your application.
Additionally, to ensure forward-compatibility, you should run and test
the application on all platforms that use a higher API Level than that
used by your application.
The Android SDK includes multiple platform versions that you can
use, including the latest version, and provides an updater tool that you
can use to download other platform versions as necessary.
To access the updater, use the android command-line tool, located in
the <sdk>/tools directory. You can launch the SDK updater by
executing android sdk. You can also simply double-click the
android.bat (Windows) or android (OS X/Linux) file. In ADT, you can
also access the updater by selecting Window > Android SDK
Manager.
To run your application against different platform versions in the
emulator, create an AVD for each platform version that you want to
test. For more information about AVDs, see Creating and Managing
Virtual Devices. If you are using a physical device for testing, ensure
that you know the API Level of the Android platform it runs. See the
table at the top of this document for a list of platform versions and their
API Levels.
Using a Provisional API Level
In some cases, an "Early Look" Android SDK platform may be
available. To let you begin developing on the platform although the
APIs may not be final, the platform's API Level integer will not be
specified. You must instead use the platform's provisional API Level in
your application manifest, in order to build applications against the
platform. A provisional API Level is not an integer, but a string
matching the codename of the unreleased platform version. The
provisional API Level will be specified in the release notes for the
Early Look SDK release notes and is case-sensitive.
The use of a provisional API Level is designed to protect developers
and device users from inadvertently publishing or installing
applications based on the Early Look framework API, which may not
run properly on actual devices running the final system image.
The provisional API Level will only be valid while using the Early Look
SDK and can only be used to run applications in the emulator. An
application using the provisional API Level can never be installed on
an Android device. At the final release of the platform, you must
replace any instances of the provisional API Level in your application
manifest with the final platform's actual API Level integer.
Filtering the Reference Documentation by API Level
Reference documentation pages on the Android Developers site offer
a "Filter by API Level" control in the top-right area of each page. You
can use the control to show documentation only for parts of the API
that are actually accessible to your application, based on the API
Level that it specifies in the android:minSdkVersionattribute of its
manifest file.
To use filtering, select the checkbox to enable filtering, just below the
page search box. Then set the "Filter by API Level" control to the
same API Level as specified by your application. Notice that APIs
introduced in a later API Level are then grayed out and their content is
masked, since they would not be accessible to your application.
Filtering by API Level in the documentation does not provide a view of
what is new or introduced in each API Level — it simply provides a
way to view the entire API associated with a given API Level, while
excluding API elements introduced in later API Levels.
If you decide that you don't want to filter the API documentation, just
disable the feature using the checkbox. By default, API Level filtering
is disabled, so that you can view the full framework API, regardless of
API Level.
Also note that the reference documentation for individual API
elements specifies the API Level at which each element was
introduced. The API Level for packages and classes is specified as
"Since <api level>" at the top-right corner of the content area on each
documentation page. The API Level for class members is specified in
their detailed description headers, at the right margin.
Supporting Different Platform Versions
PREVIOUSNEXT
THIS LESSON TEACHES YOU TO
1. Specify Minimum and Target API Levels
2. Check System Version at Runtime
3. Use Platform Styles and Themes
YOU SHOULD ALSO READ
Android API Levels
Android Support Library
While the latest versions of Android often provide great APIs for your app, you should continue
to support older versions of Android until more devices get updated. This lesson shows you
how to take advantage of the latest APIs while continuing to support older versions as well.
The dashboard for Platform Versions is updated regularly to show the distribution of active
devices running each version of Android, based on the number of devices that visit the Google
Play Store. Generally, it’s a good practice to support about 90% of the active devices, while
targeting your app to the latest version.
Tip: In order to provide the best features and functionality across several Android versions,
you should use theAndroid Support Library in your app, which allows you to use several recent
platform APIs on older versions.
Specify Minimum and Target API Levels
The AndroidManifest.xml file describes details about your app and identifies which versions of
Android it supports. Specifically, the minSdkVersion and targetSdkVersion attributes for
the <uses-sdk element identify the lowest API level with which your app is compatible and the
highest API level against which you’ve designed and tested your app.
For example:
<manifest xmlns:android="http://schemas.android.com/apk/res/android" ... >
<uses-sdk android:minSdkVersion="4" android:targetSdkVersion="15" />
...
</manifest>
As new versions of Android are released, some style and behaviors may change. To allow
your app to take advantage of these changes and ensure that your app fits the style of each
user's device, you should set thetargetSdkVersion value to match the latest Android version
available.
Check System Version at Runtime
Android provides a unique code for each platform version in the Build constants class. Use
these codes within your app to build conditions that ensure the code that depends on higher
API levels is executed only when those APIs are available on the system.
private void setUpActionBar() {
// Make sure we're running on Honeycomb or higher to use ActionBar APIs
if (Build.VERSION.SDK_INT >= Build.VERSION_CODES.HONEYCOMB) {
ActionBar actionBar = getActionBar();
actionBar.setDisplayHomeAsUpEnabled(true);
}
}
Note: When parsing XML resources, Android ignores XML attributes that aren’t supported by
the current device. So you can safely use XML attributes that are only supported by newer
versions without worrying about older versions breaking when they encounter that code. For
example, if you set thetargetSdkVersion="11", your app includes the ActionBar by default
on Android 3.0 and higher. To then add menu items to the action bar, you need to
set android:showAsAction="ifRoom" in your menu resource XML. It's safe to do this in a
cross-version XML file, because the older versions of Android simply ignore
theshowAsAction attribute (that is, you do not need a separate version in res/menu-v11/).
Use Platform Styles and Themes
Android provides user experience themes that give apps the look and feel of the underlying
operating system. These themes can be applied to your app within the manifest file. By using
these built in styles and themes, your app will naturally follow the latest look and feel of
Android with each new release.
To make your activity look like a dialog box:
<activity android:theme="@android:style/Theme.Dialog">
To make your activity have a transparent background:
<activity android:theme="@android:style/Theme.Translucent">
To apply your own custom theme defined in /res/values/styles.xml:
<activity android:theme="@style/CustomTheme">
To apply a theme to your entire app (all activities), add the android:theme attribute to
the <application>element:
<application android:theme="@style/CustomTheme">
For more about creating and using themes, read the Styles and Themes guide.
What is API Level?
API Level is an integer value that uniquely identifies the framework API revision offered by a
version of the Android platform.
The Android platform provides a framework API that applications can use to interact with the
underlying Android system. The framework API consists of:
A core set of packages and classes
A set of XML elements and attributes for declaring a manifest file
A set of XML elements and attributes for declaring and accessing resources
A set of Intents
A set of permissions that applications can request, as well as permission enforcements
included in the system
Each successive version of the Android platform can include updates to the Android
application framework API that it delivers.
Updates to the framework API are designed so that the new API remains compatible with
earlier versions of the API. That is, most changes in the API are additive and introduce new or
replacement functionality. As parts of the API are upgraded, the older replaced parts are
deprecated but are not removed, so that existing applications can still use them. In a very
small number of cases, parts of the API may be modified or removed, although typically such
changes are only needed to ensure API robustness and application or system security. All
other API parts from earlier revisions are carried forward without modification.
The framework API that an Android platform delivers is specified using an integer identifier
called "API Level". Each Android platform version supports exactly one API Level, although
support is implicit for all earlier API Levels (down to API Level 1). The initial release of the
Android platform provided API Level 1 and subsequent releases have incremented the API
Level.
The table below specifies the API Level supported by each version of the Android platform.
For information about the relative numbers of devices that are running each version, see
the Platform Versions dashboards page.
Platform Version API Level VERSION_CODE Notes
Android 4.4 19 KITKAT Platform Highlights
Android 4.3 18 JELLY_BEAN_MR2 Platform Highlights
Android 4.2, 4.2.2 17 JELLY_BEAN_MR1 Platform Highlights
Android 4.1, 4.1.1 16 JELLY_BEAN Platform Highlights
Android 4.0.3, 4.0.4 15 ICE_CREAM_SANDWICH_MR1 Platform Highlights
Android 4.0, 4.0.1, 4.0.2 14 ICE_CREAM_SANDWICH
Android 3.2 13 HONEYCOMB_MR2
Android 3.1.x 12 HONEYCOMB_MR1 Platform Highlights
Android 3.0.x 11 HONEYCOMB Platform Highlights
Android 2.3.4
Android 2.3.3
10 GINGERBREAD_MR1 Platform Highlights
Android 2.3.2
Android 2.3.1
Android 2.3
9 GINGERBREAD
Android 2.2.x 8 FROYO Platform Highlights
Android 2.1.x 7 ECLAIR_MR1 Platform Highlights
Android 2.0.1 6 ECLAIR_0_1
Android 2.0 5 ECLAIR
Android 1.6 4 DONUT Platform Highlights
Android 1.5 3 CUPCAKE Platform Highlights
Android 1.1 2 BASE_1_1
Android 1.0 1 BASE
Uses of API Level in Android
The API Level identifier serves a key role in ensuring the best possible experience for users
and application developers:
It lets the Android platform describe the maximum framework API revision that it supports
It lets applications describe the framework API revision that they require
It lets the system negotiate the installation of applications on the user's device, such that
version-incompatible applications are not installed.
Each Android platform version stores its API Level identifier internally, in the Android system
itself.
Applications can use a manifest element provided by the framework API — <uses-sdk> — to
describe the minimum and maximum API Levels under which they are able to run, as well as
the preferred API Level that they are designed to support. The element offers three key
attributes:
android:minSdkVersion — Specifies the minimum API Level on which the application is
able to run. The default value is "1".
android:targetSdkVersion — Specifies the API Level on which the application is
designed to run. In some cases, this allows the application to use manifest elements or
behaviors defined in the target API Level, rather than being restricted to using only those
defined for the minimum API Level.
android:maxSdkVersion — Specifies the maximum API Level on which the application is
able to run.Important: Please read the <uses-sdk> documentation before using this
attribute.
For example, to specify the minimum system API Level that an application requires in order to
run, the application would include in its manifest a <uses-sdk> element with
a android:minSdkVersion attribute. The value of android:minSdkVersion would be the
integer corresponding to the API Level of the earliest version of the Android platform under
which the application can run.
When the user attempts to install an application, or when revalidating an appplication after a
system update, the Android system first checks the <uses-sdk> attributes in the application's
manifest and compares the values against its own internal API Level. The system allows the
installation to begin only if these conditions are met:
If a android:minSdkVersion attribute is declared, its value must be less than or equal to
the system's API Level integer. If not declared, the system assumes that the application
requires API Level 1.
If a android:maxSdkVersion attribute is declared, its value must be equal to or greater
than the system's API Level integer. If not declared, the system assumes that the
application has no maximum API Level. Please read the <uses-sdk> documentation for
more information about how the system handles this attribute.
When declared in an application's manifest, a <uses-sdk> element might look like this:
<manifest>
<uses-sdk android:minSdkVersion="5" />
...
</manifest>
The principal reason that an application would declare an API Level
in android:minSdkVersion is to tell the Android system that it is using APIs that
were introduced in the API Level specified. If the application were to be somehow installed on
a platform with a lower API Level, then it would crash at run-time when it tried to access APIs
that don't exist. The system prevents such an outcome by not allowing the application to be
installed if the lowest API Level it requires is higher than that of the platform version on the
target device.
For example, the android.appwidget package was introduced with API Level 3. If an
application uses that API, it must declare a android:minSdkVersion attribute with a value of
"3". The application will then be installable on platforms such as Android 1.5 (API Level 3) and
Android 1.6 (API Level 4), but not on the Android 1.1 (API Level 2) and Android 1.0 platforms
(API Level 1).
For more information about how to specify an application's API Level requirements, see
the <uses-sdk> section of the manifest file documentation.
Development Considerations
The sections below provide information related to API level that you should consider when
developing your application.
Application forward compatibility
Android applications are generally forward-compatible with new versions of the Android
platform.
Because almost all changes to the framework API are additive, an Android application
developed using any given version of the API (as specified by its API Level) is forward-
compatible with later versions of the Android platform and higher API levels. The application
should be able to run on all later versions of the Android platform, except in isolated cases
where the application uses a part of the API that is later removed for some reason.
Forward compatibility is important because many Android-powered devices receive over-the-
air (OTA) system updates. The user may install your application and use it successfully, then
later receive an OTA update to a new version of the Android platform. Once the update is
installed, your application will run in a new run-time version of the environment, but one that
has the API and system capabilities that your application depends on.
In some cases, changes below the API, such those in the underlying system itself, may affect
your application when it is run in the new environment. For that reason it's important for you,
as the application developer, to understand how the application will look and behave in each
system environment. To help you test your application on various versions of the Android
platform, the Android SDK includes multiple platforms that you can download. Each platform
includes a compatible system image that you can run in an AVD, to test your application.
Application backward compatibility
Android applications are not necessarily backward compatible with versions of the Android
platform older than the version against which they were compiled.
Each new version of the Android platform can include new framework APIs, such as those that
give applications access to new platform capabilities or replace existing API parts. The new
APIs are accessible to applications when running on the new platform and, as mentioned
above, also when running on later versions of the platform, as specified by API Level.
Conversely, because earlier versions of the platform do not include the new APIs, applications
that use the new APIs are unable to run on those platforms.
Although it's unlikely that an Android-powered device would be downgraded to a previous
version of the platform, it's important to realize that there are likely to be many devices in the
field that run earlier versions of the platform. Even among devices that receive OTA updates,
some might lag and might not receive an update for a significant amount of time.
Selecting a platform version and API Level
When you are developing your application, you will need to choose the platform version
against which you will compile the application. In general, you should compile your application
against the lowest possible version of the platform that your application can support.
You can determine the lowest possible platform version by compiling the application against
successively lower build targets. After you determine the lowest version, you should create an
AVD using the corresponding platform version (and API Level) and fully test your application.
Make sure to declare aandroid:minSdkVersion attribute in the application's manifest and set
its value to the API Level of the platform version.
Declaring a minimum API Level
If you build an application that uses APIs or system features introduced in the latest platform
version, you should set the android:minSdkVersion attribute to the API Level of the latest
platform version. This ensures that users will only be able to install your application if their
devices are running a compatible version of the Android platform. In turn, this ensures that
your application can function properly on their devices.
If your application uses APIs introduced in the latest platform version but does not declare
aandroid:minSdkVersion attribute, then it will run properly on devices running the latest
version of the platform, but not on devices running earlier versions of the platform. In the latter
case, the application will crash at runtime when it tries to use APIs that don't exist on the
earlier versions.
Testing against higher API Levels
After compiling your application, you should make sure to test it on the platform specified in
the application'sandroid:minSdkVersion attribute. To do so, create an AVD that uses the
platform version required by your application. Additionally, to ensure forward-compatibility, you

should run and test the application on all platforms that use a higher API Level than that used
by your application.
The Android SDK includes multiple platform versions that you can use, including the latest
version, and provides an updater tool that you can use to download other platform versions as
necessary.
To access the updater, use the android command-line tool, located in the <sdk>/tools
directory. You can launch the SDK updater by executing android sdk. You can also simply
double-click the android.bat (Windows) or android (OS X/Linux) file. In ADT, you can also
access the updater by selecting Window > Android SDK Manager.
To run your application against different platform versions in the emulator, create an AVD for
each platform version that you want to test. For more information about AVDs, see Creating
and Managing Virtual Devices. If you are using a physical device for testing, ensure that you
know the API Level of the Android platform it runs. See the table at the top of this document
for a list of platform versions and their API Levels.
Using a Provisional API Level
In some cases, an "Early Look" Android SDK platform may be available. To let you begin
developing on the platform although the APIs may not be final, the platform's API Level integer
will not be specified. You must instead use the platform's provisional API Level in your
application manifest, in order to build applications against the platform. A provisional API Level
is not an integer, but a string matching the codename of the unreleased platform version. The
provisional API Level will be specified in the release notes for the Early Look SDK release
notes and is case-sensitive.
The use of a provisional API Level is designed to protect developers and device users from
inadvertently publishing or installing applications based on the Early Look framework API,
which may not run properly on actual devices running the final system image.
The provisional API Level will only be valid while using the Early Look SDK and can only be
used to run applications in the emulator. An application using the provisional API Level can
never be installed on an Android device. At the final release of the platform, you must replace
any instances of the provisional API Level in your application manifest with the final platform's
actual API Level integer.
Filtering the Reference Documentation by API Level
Reference documentation pages on the Android Developers site offer a "Filter by API Level"
control in the top-right area of each page. You can use the control to show documentation only
for parts of the API that are actually accessible to your application, based on the API Level that
it specifies in the android:minSdkVersionattribute of its manifest file.
To use filtering, select the checkbox to enable filtering, just below the page search box. Then
set the "Filter by API Level" control to the same API Level as specified by your application.
Notice that APIs introduced in a later API Level are then grayed out and their content is
masked, since they would not be accessible to your application.
Filtering by API Level in the documentation does not provide a view of what is new or
introduced in each API Level — it simply provides a way to view the entire API associated with
a given API Level, while excluding API elements introduced in later API Levels.
If you decide that you don't want to filter the API documentation, just disable the feature using
the checkbox. By default, API Level filtering is disabled, so that you can view the full
framework API, regardless of API Level.
Also note that the reference documentation for individual API elements specifies the API Level
at which each element was introduced. The API Level for packages and classes is specified
as "Since <api level>" at the top-right corner of the content area on each documentation page.
The API Level for class members is specified in their detailed description headers, at the right
margin.
Except as noted, this content is licensed under Creative Commons Attribution 2.5. For details and restrictions, see
the Content License.
About Android | Legal | Support
http://developer.android.com/guide/topics/manifest/uses-sdk-element.html#ApiLevels
At a minimum, check the <uses-sdk> element to make sure that:
a. targetSdkVersion is declared with value 11 or higher (14 or higher is recommended), OR
b. minSdkVersion is declared with value 11 or higher.
c. If a maxSdkVersion attribute is declared, it must have a value of 11 or higher. Note that, in
general, the use ofmaxSdkVersion is not recommended.
RELATED RESOURCES
Android API Levels—Introduces API levels and how they relate to compatibility. A reference of
available API levels is included.
Supporting Different Platform Versions—Training class showing how to declare support for
minimum and target API levels in your app.