android internals, volume i - the power user's viewnewandroidbook.com/temp/ai-boot.pdf ·...
TRANSCRIPT

Android Images
Various Android devices each have their own specific images. These are the system images, provided by the vendor, which are meant to be flashed as the "factory default" distribution of Android onto the device. The images are comprised of several files, which are flashed into their respective partitions:
The Boot Loader: which provides the application processor bootstrap code. This code is normally responsible for finding and loading the boot image, but also handles firmware updates, and booting into recovery mode. Most bootloaders also implement a small USB stack, over which they can communicate with the host for purposes of controlling the boot or update process (normally over fastboot). The boot loader usually gets flashed into the aboot�partition, though on some devices (e.g. HTC) this may be called "hboot".The Boot Image: which normally consists of the kernel and a RAM disk, and is used to load the system. Assuming normal boot, the RAM disk will serve as the root filesystem for Android, and its /init.rc and related files will provide directives as to how to load the rest of the system partitions. The boot image is flashed into the boot partition.The Recovery image: similarly consisting of the kernel and a (different) RAM disk, and is used to load the system into "Recovery mode", in cases where normal boot has failed, or in case of an OTA update. This gets flashed into the recovery partition.The System Partition: which is the full Android system, including the Google supplied binaries and frameworks, as well as any provided by the vendor, and/or the carrier.The Data Partition: containing the "factory default" data files, which support the binaries in the system partition. This image also provides the "factory default" state to which the device is restored when effaced.
Google makes the system images for the Nexus devices available at their factory image repository2. You are encouraged to follow along with the hands-on experiments in this chapter with those images, or your own device, if rooted. Refer to the method in Chapter 2 for safely extracting the images from the raw partitions of a live device. To unpack a Google stock image, follow these steps:
Download the image from Google's factory images repository. This will be a gzipped tar file, with a name in the following convention:
piscine_devicename-build-factory-first_32_bits_of_SHA1_checksum.tgz
Unpack the file using tar: this will look something like the following Output:Output 3-1: Unpacking a factory image for a Nexus 5
Next, we discuss each of these components (with the exception of the radio/baseband) in turn.
��
$QGURLG�,QWHUQDOV��$�&RQIHFWLRQHUV�&RRNERRN��9ROXPH�,�
The Boot Loader
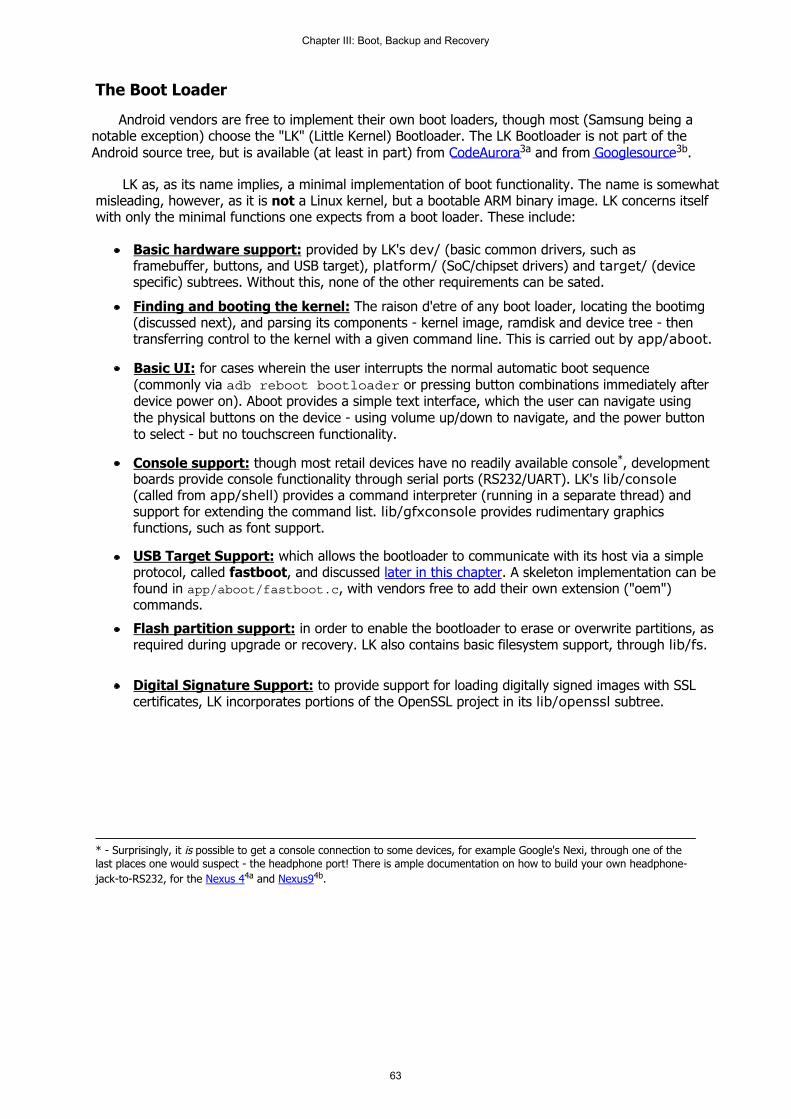
Android vendors are free to implement their own boot loaders, though most (Samsung being a notable exception) choose the "LK" (Little Kernel) Bootloader. The LK Bootloader is not part of the Android source tree, but is available (at least in part) from CodeAurora3a and from ooglesource3b.
LK as, as its name implies, a minimal implementation of boot functionality. The name is somewhat misleading, however, as it is not a Linux kernel, but a bootable ARM binary image. LK concerns itself with only the minimal functions one expects from a boot loader. These include:
Basic hardware support: provided by LK's dev/ (basic common drivers, such as framebuffer, buttons, and USB target), platform/ (SoC/chipset drivers) and target/ (device specific) subtrees. Without this, none of the other requirements can be sated.Finding and booting the kernel: The raison d'etre of any boot loader, locating the bootimg (discussed next), and parsing its components - kernel image, ramdisk and device tree - then transferring control to the kernel with a given command line. This is carried out by app/aboot.
Basic UI: for cases wherein the user interrupts the normal automatic boot sequence(commonly via or pressing button combinations immediately after device power on). Aboot provides a simple text interface, which the user can navigate using the physical buttons on the device - using volume up/down to navigate, and the power button to select - but no touchscreen functionality.
Console support: though most retail devices have no readily available console*, development boards provide console functionality through serial ports (RS232/UART). LK's lib/console (called from app/shell) provides a command interpreter (running in a separate thread) and support for extending the command list. lib/gfxconsole provides rudimentary graphics functions, such as font support.
USB Target Support: which allows the bootloader to communicate with its host via a simple protocol, called fastboot, and discussed later in this chapter. A skeleton implementation can be found in , with vendors free to add their own extension ("oem") commands.Flash partition support: in order to enable the bootloader to erase or overwrite partitions, as required during upgrade or recovery. LK also contains basic filesystem support, through lib/fs.
Digital Signature Support: to provide support for loading digitally signed images with SSL certificates, LK incorporates portions of the OpenSSL project in its lib/openssl subtree.
* - Surprisingly, it is possible to get a console connection to some devices, for example Google's Nexi, through one of thelast places one would suspect - the headphone port! There is ample documentation on how to build your own headphone-jack-to-RS232, for the Nexus 44a and Nexus94b.
��
&KDSWHU�,,,��%RRW��%DFNXS�DQG�5HFRYHU\

The Boot Loader Image
Boot Loaders can e updated and flashed, just like other System Images. Though the format is not officially documented, the releasetools.py script in some of the device-specific directories of the Android source tree provides the header format. This enables to parse and extract boot images, as shown in this output, examining Google's Nexus 5 boot loader:
Output 3-2: The Nexus 5 Boot Loader Image
As you can see in the output, the Boot Loader image is comprised of several sub-images, each of which is meant to be flashed to a specific partition. The boot loader itself is in "aboot", which is the Application Processor Boot loader. The image also contains the Resource Power Management bootstrap (rpm), ARM TrustZone image (tz), and secondary boot loader (sbl1) (discussed later in this chapter).
None of the file formats of the boot loader components are documented. These are all highly architecture dependent, and the ones in the example above pertain to Qualcomm's SnapDragon processor (the msm chipset). The focus of this discussion - aboot - is incorrectly recognized by
as an Hitachi SH big-endian COFF object, when in fact, it is formatted with a proprietary header, spanning 40 (or, in some cases more) bytes. The header format is shown in Table 3-1:
Table 3-1: The aboot proprietary header
Offset Field Contains0x00 Magic 0x00000005 (constant)0x04 Version Version # (2 or 3)0x08 ? NULL field0x0c Image Base Virtual memory address to load rest of image into0x10 Image Size Size of aboot image0x14 Code Size Size of aboot code size0x18 Last Code Addr Image Base + Code Size0x1C Signature Size Size of digital signature (usually 0x100 = 256 bytes)0x20 Last Mapped Addr Last Code Addr + Signature Size0x24 Certificate Chain Size of Certificate Chain, if any
Following the header is an ARM bootable image, which is mapped into memory at the address specified by the header. At its very base are the ARM exception vectors. These are a series of branch instructions, which define what addresses the processor will automatically jump to in certain cases (e.g. interrupts, exceptions, and aborts). The very first of those instructions - the reset handler - defines LK's entry point. The following experiment shows how you can remove the aboot header:
��
$QGURLG�,QWHUQDOV��$�&RQIHFWLRQHUV�&RRNERRN��9ROXPH�,�

Experiment: Removing the header from the aboot image
If you have a Nexus 5 ROM update, using on its bootloader.img (as shown in Output 3-2) will extract aboot. Otherwise, on a rooted device you can obtain a partition dump by the method shown in Chapter 2, substituting in that example with the partition of aboot (likely ). e a , you end up with aboot as a file.
Output 3-3: Making sense of aboot using
The ARM instructions can be recognized by the "eaXXXXXX" form: "ea" is the opcode for the ARM B(ranch) instruction. Exception vectors in ARMv7 contain seven 32-bit slots, so the reset handler is usually instruction is usually ea000006 (as above): 6 * 4 bytes away from next instruction.
If you cut off the first 40 bytes of the file (using ), the resulting file can be loaded into a disassembler fairly easily. Cut again after CodeSize bytes, to remove the signature and certificates, which should yield files that match the values of the header, namely:
Output 3-4: Getting the certificates from a bootloader image
You will need to rebase the image to 0x0f900000 (or whatever the field at offset 12 states).Reverse engineering of the boot loader is outside the scope of this chapter, but can be found in acompanion article on the book's web site5.
Boot loader locking
The boot loader on Android devices is usually locked, meaning it will refuse to flash or boot updates which are not digitially signed. The vendor provides its public key in ROM, and the key can be used to establish a chain of trust throughout the boot process. This way, all boot components -from the rpm through the sbl to the Android boot loader - can be verified. Reverse engineering of those components often reveals they contain an X.509v3 certificate, as well as the OpenSSL support needed to verify keys.
Boot loader locks are not to be confused with SIM Locks, which carriers often enforce to ensure that a phone purchased from them will only operate on their network. Rules in several countries already require carriers to unlock devices in certain cases, but no such rules force the sale of devices with unlocked boot loaders.
��
&KDSWHU�,,,��%RRW��%DFNXS�DQG�5HFRYHU\
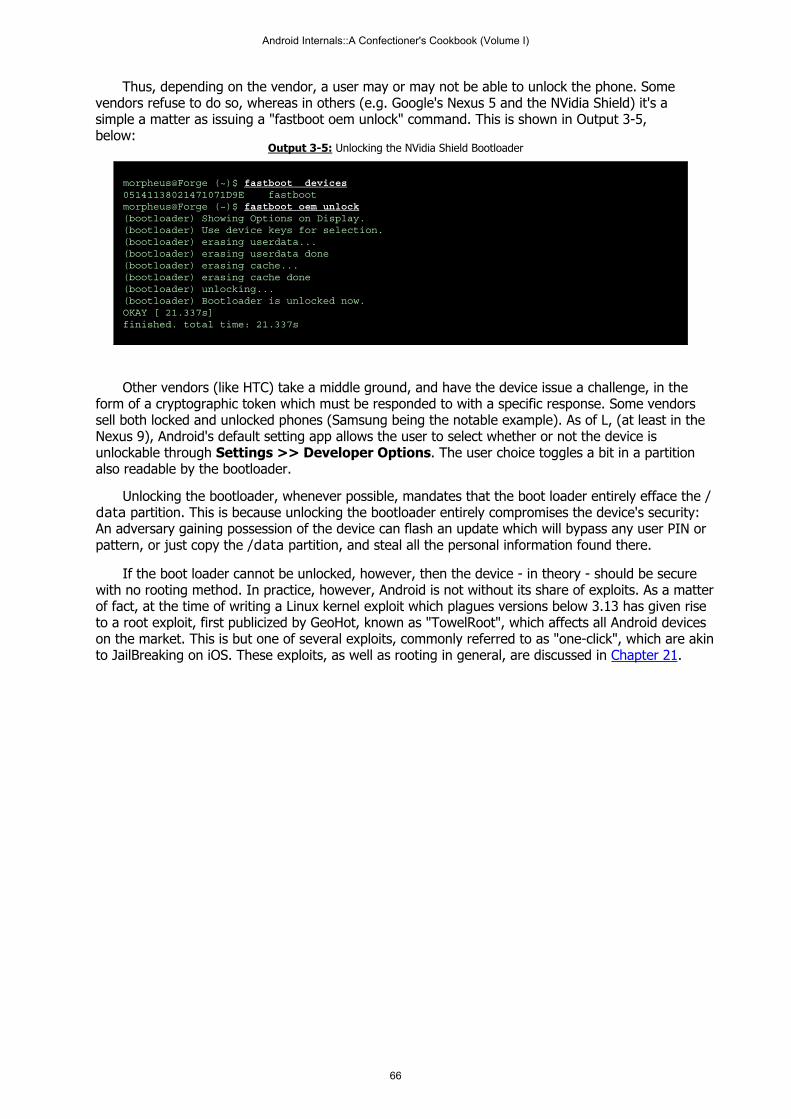
Thus, depending on the vendor, a user may or may not be able to unlock the phone. Some vendors refuse to do so, whereas in others (e.g. Google's Nexus 5 and the NVidia Shield) it's a simple a matter as issuing a "fastboot oem unlock" command. This is shown in Output 3-5, below:
Output 3-5: Unlocking the NVidia Shield Bootloader
Other vendors (like HTC) take a middle ground, and have the device issue a challenge, in the form of a cryptographic token which must be responded to with a specific response. Some vendors sell both locked and unlocked phones (Samsung being the notable example). As of L, (at least in the Nexus 9), Android's default setting app allows the user to select whether or not the device is unlockable through Settings >> Developer Options. The user choice toggles a bit in a partition also readable by the bootloader.
Unlocking the bootloader, whenever possible, mandates that the boot loader entirely efface the /data partition. This is because unlocking the bootloader entirely compromises the device's security: An adversary gaining possession of the device can flash an update which will bypass any user PIN or pattern, or just copy the /data partition, and steal all the personal information found there.
If the boot loader cannot be unlocked, however, then the device - in theory - should be secure with no rooting method. In practice, however, Android is not without its share of exploits. As a matter of fact, at the time of writing a Linux kernel exploit which plagues versions below 3.13 has given rise to a root exploit, first publicized by GeoHot, known as "TowelRoot", which affects all Android devices on the market. This is but one of several exploits, commonly referred to as "one-click", which are akin to JailBreaking on iOS. These exploits, as well as rooting in general, are discussed in Chapter 21.
��
$QGURLG�,QWHUQDOV��$�&RQIHFWLRQHUV�&RRNERRN��9ROXPH�,�

Boot Images
Android's boot images contain the core components of the operating system - the kernel and the RAM disk. The boot images (created with , in the Android source tree), bundle both with a minimal header, the kernel command line, a small hash, and an optional second stage boot loader (which in practice is unused) a a ne n e a a e n a a 2 . The images are recognizable by their magic ( ), similar to the bootloader magic ( ) discussed earlier.
Vendors are not strictly required to use this boot image format in their devices, and so results might vary with device. HTC, for example, prepends its own header, likely for use by their custom boot loader, HBOOT. You can usually spot the boot image header thanks to its magic value - , like so:
Output 3-6:The HTC boot image header
And then use dd to skip the custom header (in the example above, dd bs=0x100 skip=1)
The format of the boot image is well documented in bootimg.h, as shown in listing 3-1:Listing 3-1: The boot_img_hdr
��
&KDSWHU�,,,��%RRW��%DFNXS�DQG�5HFRYHU\

The Kernel
The Linux kernel, unlike most OS kernels, is mostly compressed: The kernel file format, known as a , consists of self-extracting code, which unpacks the rest of the kernel image in memory. As compression algorithms have greatly advanced, there are multiple options for compression, which can be decided during the build process (make config), as shown in Table 3-2:
Table 3-2: Kernel file formats
Magic Compression Notes
\x1f\x8b\x08\x00\x00\x00\x00\x00 GZip Most common compression format
\x89LZOx00\x0d\x0a\x1a\x0a LZO Faster, but 10-15% less efficient than GZip.Used by Samsung
The kernel always starts with the self-extracting code portion, which means one has to scan well into the file in order to find the compression magic. Most ARM kernels traditionally use zImage, though there is no strict requirement to do so. The utility will automatically uncompress both GZip and LZO kernel images (if requested) and provide you with a binary you can disassemble or search strings in. When loading into a disassembler, you'll need to rebase the image at
(assuming 32-bit).The kernel is the most architecture specific component of Android: Whereas other components
only care about the processor type (i.e. ARM, Intel, or MIPS), the kernel is also concerned with the board type and specific chipsets, because the processor is, in effect, a system-on-chip (SoC), which also contains additional components, for which specific drivers will be required. Those drivers are part of the source tree, and Google actually provides several kernel trees, for the chipsets shown in Table 3-3:
Table 3-3: Chipsets Devices, and board names for Google devices
Project Name Chipset vendor Devices (board names)
goldfish an N/A Android emulatormsm Qualcomm MSM Nexus One, Nexus 4, Nexus 5 (hammerhead)omap TI OMAP Pandaboard, Galaxy Nexus, Glass (notle)samsung Samsung Hummingbird Nexus Stegra NVidia Tegra Motorola Xoom, Nexus 7 & 9, NVidia Shieldexynos Samsung Exynos Nexus 10 (manta)
Google's devices are commonly known by their piscine board project name, and their kernel binaries are available via git at subtrees. The kernel sources (which naturally must remain open) can similarly be obtained via using
platform_project
as described further in Android Documentation6. Aside from Table 3-3, a good way of figuring out which branch a device's kernel is derived from is by looking at its strings and symbols.
��
$QGURLG�,QWHUQDOV��$�&RQIHFWLRQHUV�&RRNERRN��9ROXPH�,�

The Device Tree (ARM)
Most ARM kernels also rely on the presence of a device tree file to provide the kernel with the hardware device definitions. This file provides a hierarchical view of devices by connection, and enables the kernel to boot the approriate drivers for them. The device tree is commonly appended to the end of the kernel image, but may at times reside in a separate partition.
The device tree format is a binary blob, identified by the magic value . A complete discussion of the device tree is beyond the scope of this book (it is an ARM feature, and not specific to Android). The format is well documented in the ePAPR specification7, and a presentation by Thomas Pettazoni8. You can use the utility to extract the device tree from your kernel image. This is shown in the following experiment
Experiment: Retrieving the device tree from a boot.img
The , in addition to unpacking a boot.img and extracting its kernel and ramdisk, will also automatically extract the device tree component of the kernel image, if found. The extracted file, however, is in a binary format (.dtb, identifiable by its magic header of
). To decompile the device tree, you will need to use the utility, which is part of the package on Ubuntu, or package on Fedora. Once installed, it's a simple matter to decompile the file and obtain the textual .dts file:
Output 3-7: Extracting and decompiling a device tree from the Nexus 5 boot.img
��
&KDSWHU�,,,��%RRW��%DFNXS�DQG�5HFRYHU\

The RAM disk
The second component of the boot or recovery image is the initial RAM disk, often referred to as the initrd. The RAM disk provides an initial filesystem, used as the rootfs when booting up the OS. It's pre-loaded by the bootloader into RAM alongside the kernel (hence the name), and enables quick access, without any special drivers. This is not a Linux specific feature - other UN*X have also been known to use it, most notably iOS (wherein it is contained in the .ipsw system image, alongside the kernelcache).
Traditionally, the initramfs is often used to provide device-specific drivers, which the kernel requires for operation. This enables the Linux distributer to provide a generic, relatively compact kernel, and package the necessary drivers (which vary between hardware configurations) into a separate file, created during the initial install process. To get around the chicken-and-egg case wherein drivers are required for storage access, critical ones are packaged into the initramfs, which the kernel can then access directly in RAM. It also contains the startup program (/init), which the kernel loads as PID 1, enabling early startup operations which require user mode (for example, loading modules).
Once the RAM Disk operation is done, Linux normally discards it, in favor of the on-disk filesystem (a process often refers to as "pivoting root"). In Android, however, the initramfs is kept in memory, and provides the root filesystem. This is useful since the files are consulted often, and the memory footprint is fairly small. It also makes tampering with the rootfs harder, since the boot image is signed.
Linux supports two file formats for the RAMdisk - initrd (ext4 filesystem image) and initramfs (CPIO archive). The latter is commonly used, though it is commonly referred to as an initrd. The CPIO archive makes for a simple format with very little RAM requirements. To further save space, the archive is gzipped (The kernel already has zlib support, which it needs to decompress itself).
Every vendor is free to build the RAM disk as it sees fit, though most take the Android emulator image as a baseline - which is why it's not surprising to see init.goldfish.rc in some. Most RAM disks are therefore very similar. Further, for a given device, the boot and recovery RAM disks will be largely the same, with the execption of subtle modifications in the /init.rc file, which controls system startup. In a recovery RAM disk, the /init.rc omits the standard set of services, leaving adbd, and/sbin/recovery.
As specified, the kernel is packaged along with the ramdisk into a separate partition. This has a very important design rationale behind it: By packing the two together, a single digital signature may be applied on both, securing two for the price of one against tampering. That the kernel is a critical component of the system should be obvious, but the RAM disk, as well, is quite important: It controls system start up by providing /init and its corresponding /init...rc files. /init starts up as root, and is responsible for starting up all the other system components. Getting root access to a device is as simple as modifying the /init.rc file - but cannot be done without violating the digital signature.
��
$QGURLG�,QWHUQDOV��$�&RQIHFWLRQHUV�&RRNERRN��9ROXPH�,�

Experiment: Unpacking the RAM disk
Using the utility, you can obtain the RAM disk from either the boot or recovery images. Unpacking it is a simple matter with the standard utilities - gunzip and cpio, as shown here. If you don't possess a boot image, you can try this on the Android Emulator images.
Output 3-8: Unpacking a RAM disk from the recovery image using
For a description of initramfs contents (i.e. the Root filesystem), see Table 2-6 in the previous chapter. As a further experiment, you can compare the ramdisks of the boot and recovery images.
System and Data Partitions
The system and data partitions were discussed in the previous chapter. Vendors can provide these images in any format they see fit, since they can use proprietary binaries to flash, as well. Most vendors use fastboot, so their images are likely to follow the simg (sparse image) format used by Google's own images. Utilities for handling this file format can be found in the AOSP under system/core/libsparse.
Sparse images begin with a small (28-byte) header containing metadata about the image. The header format is shown in Table 3-4:
Table 3-4: The sparse image header
Offset Length Field0 4 Magic value ( )
4 4 Version (as Major + Minor). Currently .8 2 Header Size. Always (= 28)10 2 Chunk Size12 4 Block Size. Usually 0x1000 (4k) for Ext filesystems16 4 Number of Blocks in filesystem20 4 Number of Chunks in this file24 4 Optional Checksum (usually zero)
��
&KDSWHU�,,,��%RRW��%DFNXS�DQG�5HFRYHU\

Experiment: Mounting the Android system image on a host
Extracting a sparse image is a simple matter using the provided on the book's companion website. You can also compile the AOSP's from source. This is demonstrated on the system.img - the userdata and cache images are largely empty.
Output 3-9: Unpacking an Android system image
Android emulator images (found in $SDK_ROOT/system-images) are simply raw filesystem images, and so you can loop mount them directly. Later in this chapter we show how you can use this experiment in reverse, to modify the system images in preparation for flashing to the device.
��
$QGURLG�,QWHUQDOV��$�&RQIHFWLRQHUV�&RRNERRN��9ROXPH�,�

The Boot Process
With all the components of the system images dissected, we can now turn our attention to the actual boot process. Though device-dependent, the boot process can be generalized to the following stages:
Figure 3-1: The generalized Android Boot Process
Firmware Boot
The device's firmware is akin to BIOS (or, nowadays, EFI) on PCs. Its main component is a boot ROM, which is supplied by the hardware vendor. The boot ROM, being a component of read-only-memory, is quite often a very small component, and contains only the initial boot sequence, which initializes hardware components to the bare minimum required for usability. The boot ROM then proceeds to load a secondary boot loader (sbl), which - being software - can afford to be of a bigger size, and therefore perform more complicated initialization tasks (for example, displaying a startup graphic image).
Unlike a PC, a mobile device's processor is not a single CPU, as would be the case with an Intel or AMD processor, but a complete system-on-chip (SoC). In practice, this means that there are several processors working in tandem, of which the application processor is only one. The Qualcomm SnapDragon processors, for example, contain no less than four sub-processor: RPM(Resource/Power Management), Krait (the application processor), Adreno (The graphics processor -CPU) and Hexagon (the Digital Signal Processor - DSP). MSM chipsets, therefore, involve a particularly lengthy boot process, wherein the boot ROM provides the primary boot loader (PBL), to initialize the RPM processor. This, in turn, loads the secondary boot loader (sbl), which is itself broken into three parts (sbl1→sbl2→sbl3). The parts load and authenticate one another in an intricate choreography*, which also involves code from the rpm and tz (ARM TrustZone) partition. The latter sets up the "Trusted Execution Environment" operating system, which provides security services throughout the rest of the boot process, and when accessing cryptographic services during Android's lifecycle. The application processor then boots up the other components, and executes the application boot -which is where Android's boot loader comes into play.
* - Said choreography is actually quite complex, and entirely undocumented outside Qualcomm confidential documents,some of which have been leaked. For obvious reasons, this work cannot go into detail, but the information gleaned fromsaid documents, as well as a very detailed discussion, can be found at the XDA-Developers forum9a, with a plethora ofinformation in thread 241001419b
BootROM
SBL
rpm, sbl, modem..
(modem,DSP, etc)
Android
BootLoader
aboot partition
Linux Kernel
boot partition (bootimg)
InitRamFS:
/init + rc files
Frameworks
GUI, etc..
/system partition
��
&KDSWHU�,,,��%RRW��%DFNXS�DQG�5HFRYHU\

The FastBoot Protocol
Most Android bootloaders support the "FastBoot" protocol, which Google makes available as part of Android itself*. The FastBoot protocol is a simple, text-based protocol, which is meant to be used over a USB channel between the device and the host. It's not exceptionally fast in terms of performance (e.g. it is synchronous), so the name likely applies to it being very easy (and hence, fast) to implement. Figure 3-2 shows the message passing between host and device:
Figure 3-2: The fastboot choreography
The current protocol version at the time of writing (0.4) is fairly well detailed in system/core/fastboot/fastboot_protocol.txt. Table 3-5 lists the commands understood by the
host-side binary, and their corresponding protocol messages:
Table 3-5: Default fastboot commands
Command Line Protocol command Description
flash <partition> [ <filename> ]
download:%08x,flash:partition
write a file to a flash partitionflash:raw boot <kernel> [ <ramdisk> ] create bootimage and flash itflashall flash boot + recovery + systemupdate reflash device from update.ziperase <partition>
erase:partitionerase a flash partition
format <partition> format a flash partitiongetvar <variable> getvar:variable display a bootloader variableboot <kernel> [ <ramdisk> ] download:%08x,boot download and boot kerneldevices getvar:serialno list all connected devicescontinue continue continue with autobootreboot reboot reboot device normallyreboot-bootloader reboot-bootloader reboot device into bootloader
oem [command [args]] command[:args] send an OEM extensioncommand
* - Vendors are not required to support FastBoot, and may support their own boot-loader protocols instead of, or inaddition to FastBoot. An example of that can be found in Samsung's ODIN, and Amazon's bootloader.
��
$QGURLG�,QWHUQDOV��$�&RQIHFWLRQHUV�&RRNERRN��9ROXPH�,�

Experiment: Using Fastboot
The Android SDK provides the command, which is a simple but complete implementation of the protocol. To see if your device's bootloader supports fastboot, you first need to force it to halt at the bootloader stage. Rather than start up with the magic button combination (which is tricky on some devices), you can use . Your device will restart into the bootloader, and - if it supports fastboot, will be visible by "fastboot devices", by its serial number - similar to adb:
Output 3-10: Output from
At this point, the device should present the bootloader UI, and you should be able to independently navigate the boot loader menus using the physical buttons (usually VOLUMEUP/DOWN, and POWER to select). You can also use any one of the commands in Table 3-5, though because most are potentially dangerous (unless you know what you're doing), you can try "getvar all", to list all the bootloader variables. These will be different on every device, and the output from the HTC One M8 will show this:
Output 3-11: Output from an HTC-One M8
The really interesting part of fastboot, however, is in the oem extension: try to obtain a list of all commands (which will surely vary between devices).
The commands are extremely versatile and useful - HTC supports dmesg (to get bootloader log), get_temp (to read temperature sensors), read/writeusername (personalize the phone), read/writecid (carrier ID) and read/writeimei, which can be used by carriers to configure the phone for their networks. As noted previously, some devices - notably the Nexus 5 and NVidia's Shield - support "oem unlock" - which enables you to unlock the bootloader and free your phone, to load any custom firmware image.
��
&KDSWHU�,,,��%RRW��%DFNXS�DQG�5HFRYHU\

The roles and responsbilities of init
Like most UN*X kernels, the Linux kernel looks for a hard-coded binary to launch as the firstuser mode process. On desktop Linux systems, this has traditionally been /sbin/init, which read the/etc/inittab file for a description of supported "run-levels", or runtime configurations (single user,multi-user, network file systems, etc), start-up processes, and ctrl-alt-del behavior. Android alsouses an "init" binary, but most similarities end with the name. The following table shows thedifferences:
Table 4-1: Android's /init versus the traditional UN*X /sbin/init
Linux /sbin/init Android /init
Config file /etc/inittab/init.rc and any ed file (commonlyinit.hardware.rc and init.usb.rc (sometimesinit.hardware.usb.rc
Multipleconfigurations
Supported through the notion of "run-levels" (0: shutdown, 1, single user, 2-3multi-user, etc). Each "run level" loadsscripts from /etc/rcrunlevel.d
No run-levels, but offers configuration optionsthrough triggers and system properties
Watchdogfunctionality
Yes: Daemons defined with the keyword are restarted on exit,
unless they repeatedly crash, in whichcase they are suspended for a fewminutes.
Yes: Services are kept alive by default, unlessdefined as . Services may also furtherbe defined as , which will force thesystem to reboot if they cannot be restarted.
Adoptingorphanprocesses
Yes: will call toreap the return code, and avoidzombies.
Yes: registers a handler for which the kernel will automatically send on childprocess exit. Most processes are silently
ed for and their exit code discarded.
SystemProperties
No: Linux does not supportthe notion of system properties
provides read access to properties( ) to all processes on the system viashared memory, and a which allows write access ( ).
Socketassignment
No: Linux's init cannot get sockets forits child processes. This functionality isavailable for inetd.
Yes: can bind a UNIX domain (or, as ofL, seqpacket) socket for a child, which can thenget it through
Triggeredoperation
No: Linux allows only very specifictriggers, such as ctrl-alt-del and UPSpower events, but does not allowarbitrary triggers
Yes: can execute commands on anysystem property change, allowing it to run pre-defined commands on triggers that can be setby any (or some) users
Handlinguevents
No: Linux relies on the daemon (usually )
Sort of: also spawns itself as ,with separate config files
As a binary, /init is statically linked. This means that all of its dependencies are merged into thebinary during compilation, so as to mitigate the risk that a corrupt or missing library abort systemstartup. When it is first launched, the only filesystem mounted is the root filesystem (i.e / and /sbin),which is packaged in the Android boot partition along with the kernel.
In a sense, the Android take on init is closer to another's - iOS's launchd. Triggers and sockets inparticular are features offered by the latter, though Android shows novelty with the introduction ofsystem properties.
��
$QGURLG�,QWHUQDOV��$�&RQIHFWLRQHUV�&RRNERRN��9ROXPH�,�

System Properties
The Android System Properties provide a globally accessible repository of configuration settings.They are somehwat similar in form and function to MIBs, but are implemented in usermode by . The code in loads properties from several files, in theorder shown in table 4-2:
Table 4-2: Property Files in the Android file system
File Contains
/default.prop Initial settings. Note this file is part of the initramfs, and not present onthe device's flash partitions.
/system/build.prop Settings generated by the Android build process
/system/default.prop Settings usually added by vendor
/data/local.propLoaded if was compiled with , and the
property is set to 1. This enables developers to overrideprevious settings by dropping a file into /data.
/data/properW\/SHUVLVW�* Persistent properties. Prefixed by , these are saved across rebootindividually in files in this directory. can also re-load them at anytime using the directive in the /init.rc.
An additional property file, (/factory/factory.prop) is #defined but nolonger supported. Note the order of loading does matter, since setting the same property a secondtime will overwrite the previous value (unless the property is marked read-only).
Because is the ancestor of all processes in the system, it is only natural that it implementthe property store. Early in its initialization, the code calls to set upsystem properties. This function (eventually) calls , which opens the
( d as /dev/__properties__), and into memory with read/writepermissions, before closing it. Additionally, init re-opens the file, this time for , andthen unlinks it.
Figure 4-1: Handling the property workspace mapping
��
&KDSWHU�,9��,QLW

The read-only file descriptor of the property file is set to be inheritable by children. This allowsany process in the system easy access to system properties, albeit read-only, by ing thedescriptor early on. This clever approach effectively allows all users of the properties area to sharethe same physical memory backing the property area ( d as , 128k by default).The only write access to this area, however, remains in the hands (and memory) of .
You can see the shared memory area in all user mode processes on the system easily bylooking at the maps /proc entry:
Output 4-1: Viewing the mapping of the system property area, through the /proc filesystem
Most developers remain agnostic to the internal structure of the shared property area. The areais prefixed by a short header, which contains a serial number (reflecting internal versioning), amagic value ( or 'PROP'), and a version (0xfc6ed0ab for newer versions of Android, or
for compatibility). Then, following another 112 bytes (padding the header to 128bytes), are the properties themselves. Properties are stores in a data structure which hybridizes atrie (prefix tree) and a binary tree. This is rather nicely documented (if you appreciate ASCII art) inBionic's system_properties.c:
Listing 4-1: Internal structure of system properties, from system_properties.c:
The
In order to service write requests, opens up a dedicated UNIX domain socket -/dev/socket/property_service, which is world-writable (0666), so that any client may connect. It isthen up to to enforce permissions on the properties, which are hard-coded in an everincreasing list called . The permissions are based on simple UID and GID checks,(which obtains from the socket caller credentials), as shown in table 4-3. UID 0 is allowed fullaccess to the properties. When SELinux is enabled (as of KitKat and L) property namespaces arefurther protected by security contexts, as defined in /property_contexts, and shown in the followinglisting. (SELinux on Android is explained in Chapter 8).
���
$QGURLG�,QWHUQDOV��$�&RQIHFWLRQHUV�&RRNERRN��9ROXPH�,�
# In init: (note area is writable)root@generic:/ # grep __properties /proc/1/maps
/dev/__properties__b6f2f000-b6f4f000 rw-s 00000000 00:0b 1369# In any user mode process (in this case, the shell)root@generic:/ # grep __properties /proc/$$/maps
/dev/__properties__b6e5a000-b6e7a000 r--s 00000000 00:0b 1369

Table 4-3: Property namespaces and their permissions
Namespace OwningUID Contains
Network properties, used by rild
GSM related settingsPersistent radio settingsDNS resolver settings (in loco /etc/resolv.conf)USB mode (adb, mtp, mass storage, rndis, etc)
AID_SYSTEM
All network settings (including those owned byAID_RADIO)All device settingsUnusedhardware related settingssystem related settingsservice start/stop keyssecurity related settingsWireless LAN (WiFi) settingsSecurity Enhanced Linux settings
AID_SYSTEMAID_DHCP DHCP settings
AID_SYSTEMAID_SHELL Debug settings
AID_SHELL Logging settingsAID_SHELL Used by ADB if running as rootAID_SHELL Used by ADB if running over TCP/IPAID_SHELL Power Management Control
AID_BLUETOOTHBluetooth settingsBluetooth settings for BlueDroid stack
Special namespace prefixes
recognizes several special prefixes, which govern how it handles the properties:
The pseudo-prefix: designates the property as meant to survive reboot.Persistent properties are backed up by files in /data/property/, which must be owned byroot:root, with no links.The pseudo-prefix: is used for "read-only" properties. These, like C constants, may beset once and once-only, irrespective of owner UID. Normally these are set as early aspossible, i.e. in the vendor supplied build files.The prefix: is used to provide a convenient way to control init's services, by setting the
or properties (respectively) to the service name. e a an a e n n e an n e a e n e an ne A
separate ACL is maintained in the array, to restrict services by UID/GID. As of KitKat, this list defined ( ) and ( ). In L SELinux takes over ACL enforcement.
���
&KDSWHU�,9��,QLW
Accessing properties
The command provides command line property access through / ,and a property listener in the command. The native API for properties are defined insystem/core/include/cutils/properties.h:
key value
default_value - To retrieve a property, optionally specifying a default value if it doesnot exist. This simply accesses the shared memory area.
key value - To set the value of aproperty. This serializes the key and value, and sends them over the property service socket.
propfn key value
cookie cookie - To enumerate properties using a callback functionwhich will be invoked per property, with a pre-specified cookie
The file includes a few other undocumented (thoughaccessible) functions, the most useful of which is
serial , which blocks until any property is set. This is used by the command.
Framework level access to system properties is carried out through, which accesses the properties via JNI calls to the API calls.
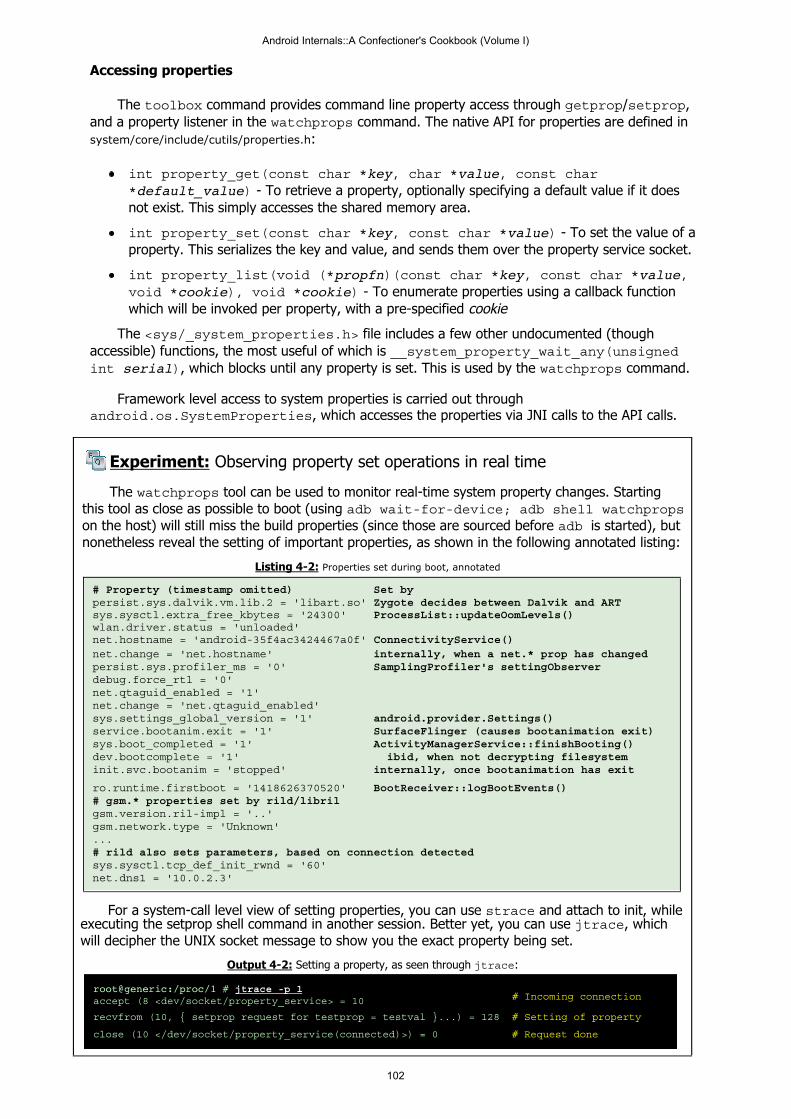
Experiment: e v n e e e a n n ea e
The tool can be used to monitor ea e system property changes Starting this tool as close as possible to boot (using on the host) will still miss the build properties (since those are sourced before is started), but n ne e e reveal the setting of important properties as shown in the following annotated listing:
���
$QGURLG�,QWHUQDOV��$�&RQIHFWLRQHUV�&RRNERRN��9ROXPH�,�
Listing 4- : 3URSHUWLHV�VHW�GXULQJ�ERRW��DQQRWDWHG
a e a eve v e e n e e an e an a a n e e e n e e e an n an e e n e e e an e
e e e e e a e e e a e e n e
root@generic:/proc/1 # #
# #
Output 4- : e n a e a een :

The .rc Files
's main operation involves loading its configuration file, and acting upon its directives.Traditionally, two files were used: The main /init.rc, and a device-specific /init.hardware.rc, wherehardware is obtained from the kernel argument, or /proc/cpuinfo. The default emulator hardware, for example, is "goldfish" an n an , and it is not uncommon to see /init.goldfish.rc�on actual devices as well, probably due to most implementors copying the default filesystem without really paying attention to detail. The original idea might have been to have all Android devices use the same /init.rc, leaving the device-specific file for vendor customizations. In practice one finds quite often that implementors simply add more directives into /init.rc.
As of JB, the only hard-coded rc file is /init.rc, and the directive is used to includeadditional rc files explicitly. JB's default /init.rc also includes /init.hardware.rc, (imported as/init.${ro.hardware}.rc, substituting the value of the property), and /init.usb.rc (or/init.${ro.hardware}.rc), which contains the USB related directives for - as discussed later inthis chapter. An additional is also present in the default build, to enable the
kernel facility to be used for debugging (Discussed in Volume III).
Triggers, actions, and services
The rc files are composed of trigger and service blocks. Trigger blocks contain commands, tobe executed when a trigger is satisfied. Service blocks define daemons, which can start bycommand and be responsible for, with optional modifiers (options) per such service. Service blocksstart with the service keyword, followed by a name and the command line. Triggers are defined bythe on keyword, followed by an argument, which is either a well-known name of a boot stage, orthe property keyword, followed by a property=value expression (in case the trigger is tied to aproperty value change). When executing a given action or command, sets the or properties, respectively. Well known boot stages are shown in table 4-4, butnote, that not all boot stages need be used, and vendors often deviate (e.g. mount filesystems inthe init stage)
Table 4-4: The boot stages
Init stage Contentsearly-init Very first stage of initialization. Used for SELinux and OOM settingsinit Creates file systems, mount points, and writes kernel variablesearly-fs Run just before filesystems are ready to be mountedfs Specifies which partitions to loadpost-fs Commands to run after filesystems (other than /data) are mountedpost-fs-data /data decrypted (if necessary) and mountedearly-boot Run after property service has been initialized, but before booting restboot Normal boot commandscharger Commands used when device is in charger mode
init.rc syntax and command set
The init.rc and its imported files are very well annotated - but also quite long. Instead ofcutting/pasting them and wasting bytes and pages, we next focus on their syntax and otherfeatures, which are relatively undocumented or little known. You may want to look at /init.rcalongside reading this section.
The recognizes two types of keywords when parsing the rc files: COMMANDs,naming actions to execute on a trigger/boot-stage (valid only in a trigger block) and OPTIONs,modifiers pertaining to a service declaration (valid only in a service block). Table 4-5 shows thecommands supported by ,from keywords.h. Colors correspond to different versions:
���
&KDSWHU�,9��,QLW

Table 4-5: Init commands
Command syntax Notes
directory as cd command (calls )octal_perms file Change octal_perms masks of fileuser group file Same as user group file
directory as Linux chroot command (calls )service_class Stop/Start all services associated with service_class
class Start
src_file dst_file Same as commanddomainname Writes domainname to /proc/sys/kernel/domainname
command No longer supportedservice Enable an otherwise disabled servicevariable value Export environment variable. Will be inherited by all children
hostname Writes hostnname to /proc/sys/kernel/hostname
interface Bring up an interface (same as ifconfig interface up)
module.ko Load a kernel moduleM: Install filesystem encryption key
(Re)-Load all properties from build, default and factory files (Re)-Load all persistent properties from /data/propert\
level Set kernel loglevel (printk)directory Create a directory (calls )fstype fs point Mount a file system of fs_htype from fs on mount point
Mount file systems in vold's /fstab.hardware. This causes init to fork and perform mounts using . init detects any encrypted file systems.
shutdown/reboot shutdown/reboot wrapperservice_name Start restart service specified in service block matching service_name
path Restore SELinux context for path (recursive added in L)filename Remove a file or directory (calls / , respectively)
SEcontext Set (change) SELinux context. Init uses [0|1] Toggle SELinux enforcement on/off
table index value Set key tablekey value Set a system property
value Set an SELinux boolean property. value can be 0/false/off or 1/true/oncategory min max use system call to enforce process (q.v. )service_name Stop service specified in service block matching service_name
.. Activate all swap partitions in fstab
target src Creates a symbolic link (as - calls )tzoffset Set system clock timezone (using
trigger_name Activate a trigger (causing init to re-run corresponding commands)
file timeout Wait up to timeout seconds for file to be created.file value Writes value to file. Same as value
���
$QGURLG�,QWHUQDOV��$�&RQIHFWLRQHUV�&RRNERRN��9ROXPH�,�
a e e a n en n a e n n
a ve a e
a a n n e a e a n na
filename.rc Include an additional rc file

If you look through your /init.rc files, you will likely see these commands used during thevarious boot stages to perform what one might expect during system startup: Setting up thedirectory structure, enforcing filesystem permissions, and setting up various kernel parameters via/proc or /sys. Once the boot stages are all defined, the rest of the file will deal with servicedefinitions. As stated, service blocks are modified by options. These provide the parameters bymeans of which determines how the services are to be run, and monitored. Table 4-6 lists theavailable options.
Table 4-6: Init options
OptionSyntax Notes
Supports Linux (removed in Android M)Defines the service to be part of a service group. Classes can then be manipulatedtogether by the commands.Defines the service as a console service. linked to /dev/console.Defines the service as a critical one. Critical services are automatically restarted. If theycrash more than (4) times in (240)seconds, the system will auto-reboot into recovery modeIndicates service will not be started. Service can still be started manuallySpecifies the gid to start the service as. will call for this.Specifies the I/O priority for the service. will call Specifies a key chord that can trigger this service. (discussed below)Tells init to start the service, but not worry about it (that is, ignore its ).Lists which commands to invoke if/when the service needs to be restarted. This iscommonly used to restart dependent servicesSpecifies the SELinux label to apply to this serviceSet an environment variable prior to ing and ing the service. Unlike ,this environment variable will only be seen by the serviceTells to open this UNIX Domain socket and let the process inherit the open socketdescriptor. This enables services to work with , and not worry about whichsockets to open or the permissions they may requireSpecifies the uid to start the service as. will call for this.
Starting services
Although the syntax is different, when starting services assumes the traditional functionof PID 1 (the traditional , or , to start up services: It s, sets up the service'spermissions (by calling ), sets up any input (UNIX domain) sockets andany environment variables, I/O priority (for services with ), and SELinux context. Forservices defined with , connects /dev/console to stdin/stdout/stderr, and for all othersit "zaps" stdio. Though presently unsupported, will also set the capability set for servicesdefined with (as discussed in Chapter 8). Only once all of these operations have beenperformed, will call to launch the service binary.
After the service is started, maintains a parental link to it - should the service terminate orcrash, will receive a signal, notifying it of the event - and allowing the service to berestarted. The option allows to form dependencies between services, and runadditional commands or restart dependent services when a particular service needs restarting. The
option defines the service as a "must-have", and if encounters a restart loop for aservice deemed critical (that is, it restarts the service, only to have it crash again), it will reboot theentire system into recovery mode. For every service, also maintains a corresponding
service property to reflect the service status (running/stopped/restarting).
���
&KDSWHU�,9��,QLW
e e e e e e e e e n

Keychords
An interesting, (though little known) function of is starting services in response tokeychords. The chords are defined as combinations of keys (on devices with a physical keyboard) orbuttons pressed by the user at any time (akin to key combinations one would press on a piano). Thekeys are specified by their IDs, which are taken from Linux's input mechanism.
Note the keychords follow codes specified in Android's key layout files (usually found in/system/usr/keylayout) and not the same codes as specified and used by the frameworks (i.e. thecodes at frameworks/native/include/android/keycodes.h). The only default service tied to a keychord is
, defined on some devices (like the Nexus 5) to be associated with the volume andpower buttons. You can find its definition in the Nexus' /init.hammerhead.rc:
Listing 4- : The BugReport service, demonstrating the use of keychords, from /init.hammerhead.rc
The dumpstate command is an AOSP provided binary which iterates over all subsystems andservices and dumps all diagnostics and statistics available for them. Note the service is disabled,meaning it has to be started manually, and its startup is tied to keycodes 114, 115 and 116. These,as you can verify by /system/usr/keylayout/Generic.kl are mapped to , and
, respectively.
For keychords to be supported, /dev/keychord must exist. This is a device node exported by thekeychord kernel driver, if the kernel was compiled with , or the driver wasinstalled as a module. The driver can be considered an "Androidism" of sorts, and is discussed inmore detail in Volume III.
On a rooted device (i.e one with a modified root filesystem) you can add all sorts offunctionality using keychords. In the default configuration you're somewhat limited(since only physical keys can be specified), but you can still override thecombinations to implement any functionality of your choice. In devices with physical
keyboard or additional buttons, using keychords opens up even more possibilities
Mounting File Systems
Though Android has a dedicated volume manager daemon ( ), init still has to perform somemount operations by itself: Recall, that when init is started only the root filesystem is mounted - no/system or /data and therefore it falls on it to at the very least mount /system, so that the variousdaemons - including can start. Naturally, this is a critical operation: If neither filesystem canbe mounted, /init will drop the device into recovery mode.
init recognizes the directive in the /init.rc (usually placed in the trigger) as arequest to perform a mount of all the default file systems. These are specified in the /fstab.hardwarefile, which is one of the files built by the AOSP. The code to handle the mount is in , which isused by both /init and . When /init performs the mount, it first forks, so as to mitigate thechance of a critical error impacting its own startup.
���
$QGURLG�,QWHUQDOV��$�&RQIHFWLRQHUV�&RRNERRN��9ROXPH�,�

The child process performs the mount operations, potentially running on the filesystems, if required. hardcodes the paths to the various checkers (presently, and, as of L, ), and those, too, are ()ed. The code bumps up its logging level, so you can see its messages in the kernel ring buffer (using ). If you do so early on enough (provided the buffer hasn't cycled to overwrite older messages), you will find flagged messages interspersed with those of , (both kernel modules providing respective filesystem support), and (which is enforced on filesystems if extended attributes are detected.
It i thus, that the child process handles the mounts, and returns a code to the parent (as all children do). It is according to this return value that /init sets the value of the property, which will be later picked up by to handle decryption of the filesystem, if necessary. If no filesystems are encrypted, /init fires the trigger.
Putting it all together: The flow of
As is the pattern with most daemons, /init's code follows a classic server setup: initialization, followed by a run-loop, which (hopefully) never exits.
Initialization
/init's initialization consists of the following steps:
Check if the binary was invoked as or (as of KitKat) . If so, the flow is diverted to the corresponding main loop for either of those daemons, discussed later in this chapter.Create directory entries for /dev, proc, and sys, and mount them. ne n e a e
Touch (open and then close) /dev/.booting a ne n e n a e This file is cleared once startup is complete (by (q.v. Figure 4-2).
to "daemonize" (link / / to /dev/null).
creates /dev/__kmsg__ (Major 1, Minor 11), and immediately deletes it.
creates the shared property area in memory, as discussed earlier in this chapter in "System Properties"
gets the hardware name by reading /proc/cpuinfo and extracting the "Hardware:" line. Rather crude, but it works (at least, on ARM architectures)
reads /proc/cmdline and imports as properties any argumentsbeginning with as .
SELinux is initialized In JB it is still conditionally #ifdef'ed HAVE_SELINUX. In KK SELinux is assumed to be available by default. The SELinux security contexts are restored for /dev and /sys.A special check is made to see if the device is in "charger mode" (as indicated by an kernel argument). This will divert the flow of init by skipping most of the initialization stages, and loading only the class of services (which presently contains only the daemon). If the device is not in charger mode, proceeds to load /default.prop, and boot n a
is called to parse /init.rc.
enqueues the actions supplied in the init.rc sections (using ) and the built-in actions ( ) on an . The resulting queue is shown in Figure 4-2.
���
&KDSWHU�,9��,QLW
n n a e e e en n n e n e ne n e an n en e a e n a e n a e
�LQLW a een e en n e a e n e n e n e e n n e e e en e e e e en e e e n
a e e a en e n n a e e e n e

Figure 4-2: The init boot stages (in white) and built-in commands (in yellow)
early-init Writes oom_adj, sets SELinux context, starts ueventd
wait_for_coldboot_done Blocks until ueventd creates /dev/.coldboot_done
mix_hwrng_into_linux_rngCopies entropy from /dev/hw_random (if present)to /dev/urandom. If not, skip
keychord_init Opens /dev/keychord for service keycodes
console_initLoads logo (/initlogo.rle) on graphics console (fb0)or displays "A N D R O I D" on 40x30 text console (tty0)
init
ro.bootmode != chargerro.bootmode == charger
early-fs
fs
post-fs
post-fs-data
mix_hwrng_into_linux_rng Remixes entropy, in case random devices weren't available
property_service_initLoads properties from files
Initializes /dev/socket/property_service
signal_init Create signal socketpair, registers SIGCHLD handler
check_startup Verify sockets exist, unlink /dev/.booting
ro.bootmode != chargerro.bootmode == charger
early-boot
charger
boot
queue_property_triggers Add all property triggers at end of action_queue
bootchart_init (#if BOOTCHART) collect boot statistics��RSWLRQDO�LQ�0�
Eventually, the main loop iterates through at all the init.rc commands, and spends most ofits days asleep, polling the file descriptors, optionally logging to bootchart, and waking up only whennecessary. You can see init's file descriptors by looking at the /proc file system:
���
$QGURLG�,QWHUQDOV��$�&RQIHFWLRQHUV�&RRNERRN��9ROXPH�,�