android basic xml layouts notes are based on: the busy coder's guide to android development by...
TRANSCRIPT

Android Basic XML Layouts
Notes are based on: The Busy Coder's Guide to Android Developmentby Mark L. MurphyCopyright © 2008-2009 CommonsWare, LLC.ISBN: 978-0-9816780-0-9&Android Developers http://developer.android.com/index.html
5

2
5. Android – UI – Basic XML Layouts
Basic XML Layouts - Containers
2
Designing Complex Uis
• Arguably, LinearLayout is the most common modeling tool. It offers a "box" model similar to the Java-Swing Box-Layout.
• Thông thường, một thiết kế UI là tổ hợp các hộp lồng nhau và các thành phần trong mỗi hộp được sắp xếp theo hàng ngang (horizontal) hoặc hàng dọc (vertical).

3
5. Android – UI – Basic XML Layouts
Basic XML Layouts - Containers
3
Summary of Commonly-used Android containers
1. LinearLayout (the box model),
2. RelativeLayout (a rule-based model), and
3. TableLayout (the grid model), along with
4. ScrollView, a container designed to assist with implementing scrolling containers.
5. Other (ListView, GridView, WebView, MapView,…) discussed later

4
5. Android – UI – Basic XML Layouts
Basic XML Layouts - Containers
4
Before we get started …
1. Android’s simplest layout manager is called: Frame Layout.
2. Một Frame Layout là một container hình chữ nhật mà mỗi thành phần của nó (child) được đính tại góc trên bên trái container.
3. Khi thêm một view mới vào một frame layout, nó được xếp chồng lên trên các view hiện có

5
5. Android – UI – Basic XML Layouts
Basic XML Layouts - Containers
5
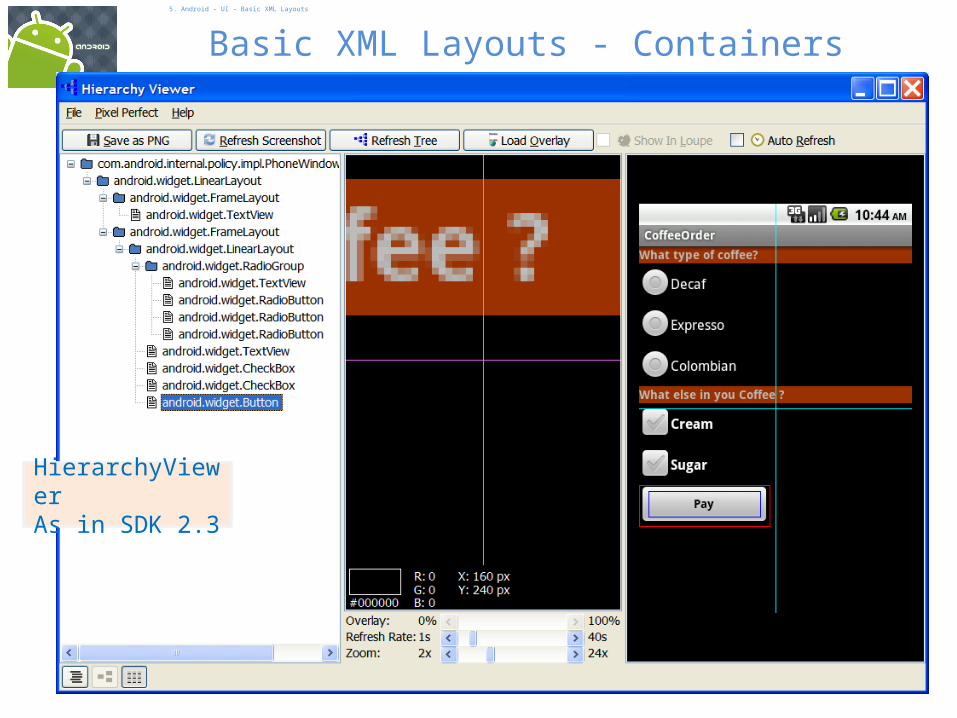
Before we get started …Hierarchy Viewer (\tools)
6
5. Android – UI – Basic XML Layouts
Basic XML Layouts - Containers
6
HierarchyViewerAs in SDK 2.3

7
5. Android – UI – Basic XML Layouts
Linear Layout
7
1. Linear Layout
LinearLayout is a box model – widgets or child containers are lined up in a column or row, one after the next.
To configure a LinearLayout, you have five main areas of control besides the container's contents: • orientation, • fill model, • weight, • gravity, • padding , • margin

8
5. Android – UI – Basic XML Layouts
Linear Layout
8
1. Linear Layout
Orientationquy định LinearLayout biểu diễn dạng hàng hay dạng cột.
Giá trị của thuộc tính android:orientation của phần tử LinearLayout tại XML layout: giá trị horizontal cho dạng hàng, vertical cho dạng cột.
Có thể sửa orientation trong khi chạy bằng mã chương trình với lệnh setOrientation()
horizontal
vertical

9
5. Android – UI – Basic XML Layouts
Linear Layout
9
1.1 Linear Layout: Orientation
<?xml version="1.0" encoding="utf-8"?><LinearLayoutandroid:id="@+id/myLinearLayout"android:layout_width="fill_parent"android:layout_height="fill_parent"android:background="#ff0033cc"android:padding="4dip"xmlns:android="http://schemas.android.com/apk/res/android"android:orientation="horizontal" ><TextViewandroid:id="@+id/labelUserName"android:layout_width="wrap_content"android:layout_height="wrap_content"android:background="#ffff0066"android:text="User Name"android:textSize="16sp"android:textStyle="bold"android:textColor="#ff000000"></TextView><EditTextandroid:id="@+id/ediName"android:layout_width="wrap_content"android:layout_height="wrap_content"android:textSize="18sp"></EditText><Buttonandroid:id="@+id/btnGo"android:layout_width="wrap_content"android:layout_height="wrap_content"android:text="Go"android:textStyle="bold"></Button></LinearLayout>
horizontal
vertical
10
5. Android – UI – Basic XML Layouts
Linear Layout
10
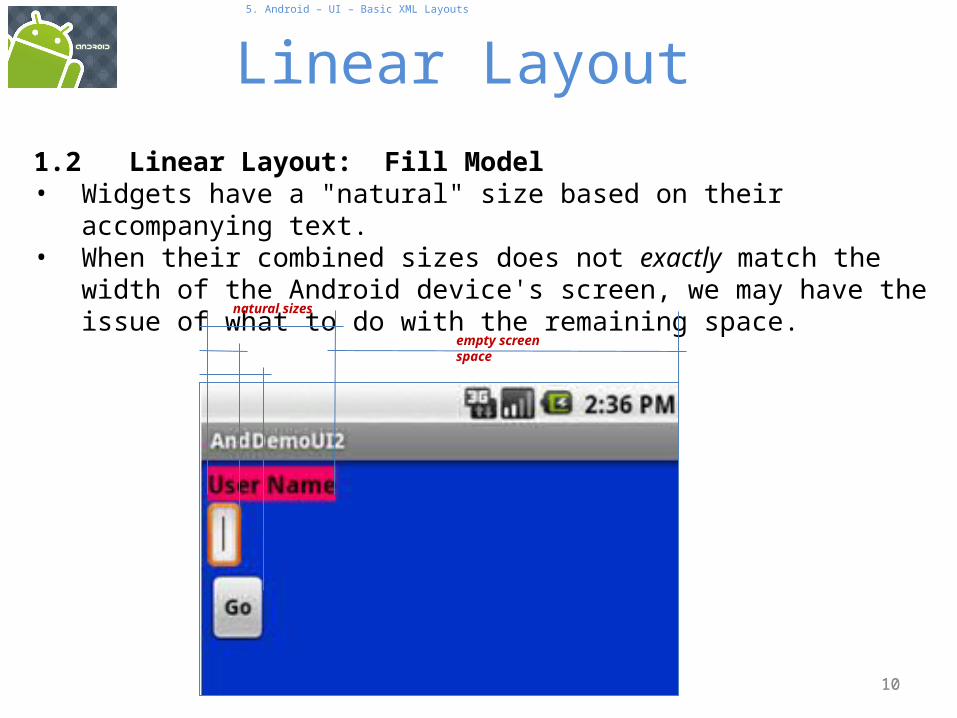
1.2 Linear Layout: Fill Model• Widgets have a "natural" size based on their accompanying text. • When their combined sizes does not exactly match the width of the Android
device's screen, we may have the issue of what to do with the remaining space.
empty screen space
natural sizes

11
5. Android – UI – Basic XML Layouts
Linear Layout
11
1.2 Linear Layout: Fill Model
Tất cả các widget trong một LinearLayout phải đặt giá trị các thuộc tính kích thướcandroid:layout_width and android:layout_height
để cung cấp thông tin giải quyết vấn đề empty space.
Các giá trị cho height và width:
1. Xác định một kích thước cụ thể, chẳng hạn 125dip (device independent pixels)
2. wrap_content, nghĩa là widget sẽ lấy đủ không gian nó cần (natural space), nếu nó quá lớn thì Android có thể dùng kiểu word-wrap để co nó lại cho vừa.
3. fill_parent, nghĩa là widget sẽ lấy hết không gian còn lại của container nếu còn thừa.

12
5. Android – UI – Basic XML Layouts
Linear Layout
12
1.2 Linear Layout: Fill Model
<?xml version="1.0" encoding="utf-8"?><LinearLayoutandroid:id="@+id/myLinearLayout"android:layout_width="fill_parent"android:layout_height="fill_parent"android:background="#ff0033cc"android:padding="4dip"android:orientation="vertical"xmlns:android="http://schemas.android.com/apk/res/android"><TextViewandroid:id="@+id/labelUserName"android:layout_width="fill_parent"android:layout_height="wrap_content"android:background="#ffff0066"android:text="User Name"android:textSize="16sp"android:textStyle="bold"android:textColor="#ff000000"></TextView><EditTextandroid:id="@+id/ediName"android:layout_width="fill_parent"android:layout_height="wrap_content"android:textSize="18sp"></EditText><Buttonandroid:id="@+id/btnGo"android:layout_width="125dip"android:layout_height="wrap_content"android:text="Go"android:textStyle="bold"></Button></LinearLayout>
Row-wise
Use all the row
Specific size: 125dip
125 dip
entire row (320 dip on G1)
G1 phone resolution is: 320 x 480 dip (3.2 in).

13
5. Android – UI – Basic XML Layouts
Linear Layout
13
1.2 Linear Layout: WeightCấp phát không gian theo tỷ lệ cho các widget trong một view.
Gán một giá trị (1, 2, 3,…) cho android:layout_weight để quy định tỷ lệ không gian dành cho widget đó.
ExampleBoth the TextView and the Button widgets have been set as in the previous example. Both have the additional property android:layout_weight="1" whereas the EditText control has android:layout_weight="2"
Default value is 0
Takes: 2 /(1+1+2)of the screen space

14
5. Android – UI – Basic XML Layouts
Linear Layout
14
1.3 Linear Layout: Gravity• It is used to indicate how a control will align on the screen.• By default, widgets are left- and top-aligned.• You may use the XML property
android:layout_gravity=“…”to set other possible arrangements:left, center, right, top, bottom, etc.
Button has right gravity

15
5. Android – UI – Basic XML Layouts
Linear Layout
15
1.3 CAUTION: gravity vs. layout_gravity
Phân biệt giữa:
android:gravity quy định nơi đặt nội dung của một đối tượng bên trong chính đối tượng đó theo trục x và trục y.
android:layout_gravity vị trí của view đối với container của nó.
android:gravity="center"
android:layout_gravity="center"

16
5. Android – UI – Basic XML Layouts
Linear Layout
16
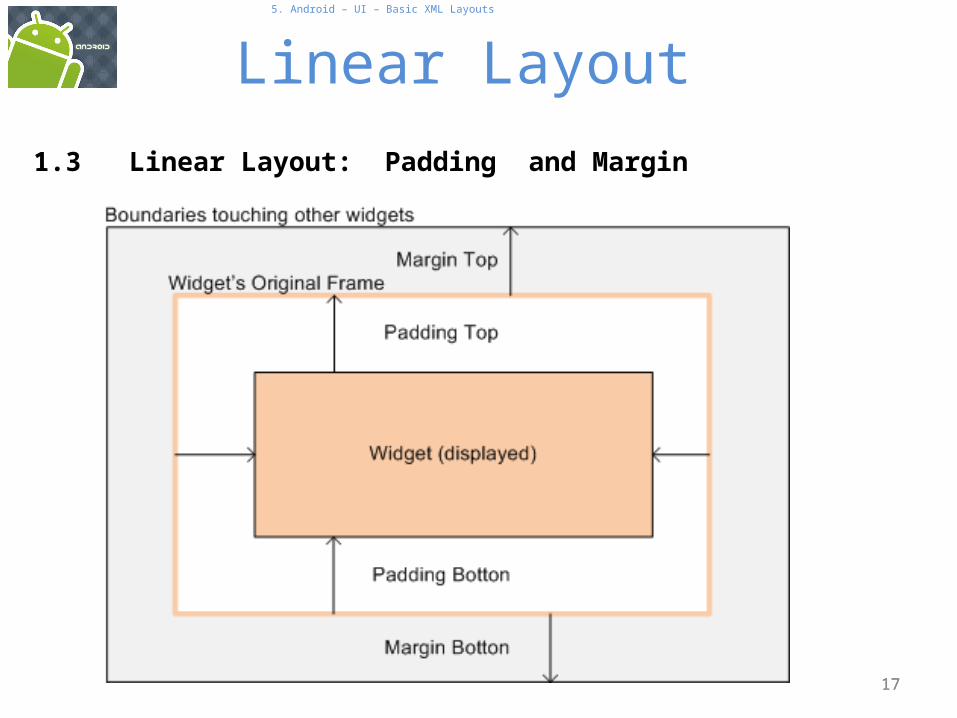
1.4 Linear Layout: Padding
• Quy định không gian giữa các biên của “ô” chứa widget và nội dung của chính widget đó.
• If you want to increase the internal whitespace between the edges of the and its contents, you will want to use the:• android:padding property • or by calling setPadding() at runtime on the widget's Java object.
Note: Padding is analogous to the margins on a word processing document.
17
5. Android – UI – Basic XML Layouts
Linear Layout
17
1.3 Linear Layout: Padding and Margin

18
5. Android – UI – Basic XML Layouts
Linear Layout
18
1.3 Linear Layout: Internal Margins Using PaddingExample:The EditText box has been changed to display 30dip of padding all around
<EditTextandroid:id="@+id/ediName"android:layout_width="fill_parent"android:layout_height="wrap_content"android:textSize="18sp"
android:padding="30dip“
></EditText>...

1919
5. Android – UI – Basic XML Layouts
Linear Layout
19
1.4 Linear Layout: (External) Marging• By default, widgets are tightly packed next to each other. • To increase space between them use the android:layout_margin attribute
<EditTextandroid:id="@+id/ediName"android:layout_width="fill_parent"android:layout_height="wrap_content"android:textSize="18sp"
android:layout_margin=“6dip“
></EditText>...
Increased inter-widget space

20
5. Android – UI – Basic XML Layouts
Relative Layout
20
2. Relative Layout
RelativeLayout sắp xếp các widget theo quan hệ giữa các widget trong cùng một container và với container.
A
CB
Example:A is by the parent’s topC is below A, to its rightB is below A, to the left of C
21
5. Android – UI – Basic XML Layouts
Relative Layout
21
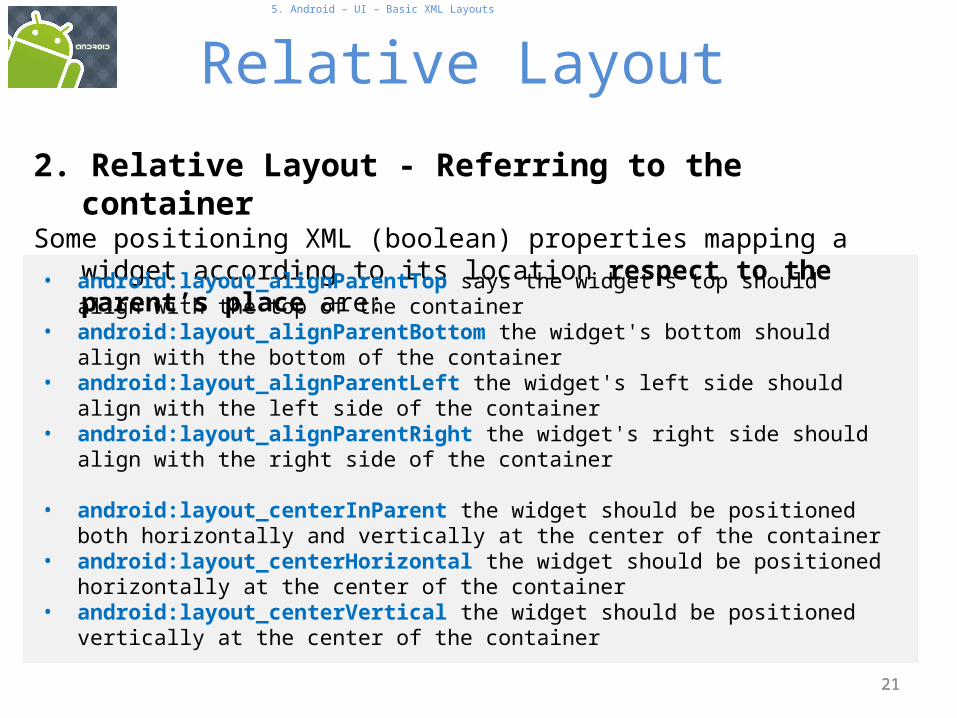
2. Relative Layout - Referring to the containerSome positioning XML (boolean) properties mapping a widget according to its
location respect to the parent’s place are:
• android:layout_alignParentTop says the widget's top should align with the top of the container
• android:layout_alignParentBottom the widget's bottom should align with the bottom of the container
• android:layout_alignParentLeft the widget's left side should align with the left side of the container
• android:layout_alignParentRight the widget's right side should align with the right side of the container
• android:layout_centerInParent the widget should be positioned both horizontally and vertically at the center of the container
• android:layout_centerHorizontal the widget should be positioned horizontally at the center of the container
• android:layout_centerVertical the widget should be positioned vertically at the center of the container

22
5. Android – UI – Basic XML Layouts
Relative Layout
22
2. Relative Layout – Referring to other widgets
The following properties manage positioning of a widget respect to other widgets:
• android:layout_above indicates that the widget should be placed above the widget referenced in the property
• android:layout_below indicates that the widget should be placed below the widget referenced in the property
• android:layout_toLeftOf indicates that the widget should be placed to the left of the widget referenced in the property
• android:layout_toRightOf indicates that the widget should be placed to the right of the widget referenced in the property

23
5. Android – UI – Basic XML Layouts
Relative Layout
23
2. Relative Layout – Referring to other widgets – cont.
• android:layout_alignTop indicates that the widget's top should be aligned with the top of the widget referenced in the property
• android:layout_alignBottom indicates that the widget's bottom should be aligned with the bottom of the widget referenced in the property
• android:layout_alignLeft indicates that the widget's left should be aligned with the left of the widget referenced in the property
• android:layout_alignRight indicates that the widget's right should be aligned with the right of the widget referenced in the property
• android:layout_alignBaseline indicates that the baselines of the two widgets should be aligned

24
5. Android – UI – Basic XML Layouts
Relative Layout
24
2. Relative Layout – Referring to other widgets
In order to use Relative Notation in Properties you need to consistently:
1. Put identifiers (android:id attributes) on all elements that you will need to address.
2. Syntax is: @+id/... (for instance an EditText box could be XML called: android:id="@+id/ediUserName")
3. Reference other widgets using the same identifier value (@+id/...) already given to a widget. For instance a control below the EditText box could say: android:layout_below="@+id/ediUserName"

25
5. Android – UI – Basic XML Layouts
Relative Layout
2. Relative Layout – Example<?xml version="1.0" encoding="utf-8"?><RelativeLayoutandroid:id="@+id/myRelativeLayout"android:layout_width="fill_parent"android:layout_height="fill_parent"android:background="#ff000099"xmlns:android="http://schemas.android.com/apk/res/android">
<TextViewandroid:id="@+id/lblUserName"android:layout_width="fill_parent"android:layout_height="wrap_content"android:background="#ffff0066"android:text="User Name"android:textStyle="bold"android:textColor="#ff000000"android:layout_alignParentTop="true"android:layout_alignParentLeft="true"></TextView>
<EditTextandroid:id="@+id/ediUserName"
android:layout_width="fill_parent"android:layout_height="wrap_content"android:layout_below="@+id/lblUserName"android:layout_alignParentLeft="true"android:layout_alignLeft="@+id/myRelativeLayout" android:padding="20dip"></EditText>
<Button android:id="@+id/btnGo"android:layout_width="wrap_content" android:layout_height="wrap_content" android:layout_below="@+id/ediUserName" android:layout_alignRight="@+id/ediUserName" android:text="Go" android:textStyle="bold"></Button>
<Button android:id="@+id/btnCancel" android:layout_width="wrap_content" android:layout_height="wrap_content" android:layout_toLeftOf="@+id/btnGo" android:layout_below="@+id/ediUserName" android:text="Cancel" android:textStyle="bold"></Button></RelativeLayout>
25

26
5. Android – UI – Basic XML Layouts
Relative Layout
2. Relative Layout – Comment (as of Aug. 2009)
Use the Eclipse ADT Layout Editor for laying out RelativeLayouts. DroidDraw is of very little help in this respect.
26

27
5. Android – UI – Basic XML Layouts
Table Layout
3. Table Layout
1. Android's TableLayout allows you to position your widgets in a grid made of identifiable rows and columns.
2. Columns might shrink or stretch to accommodate their contents. 3. TableLayout works in conjunction with TableRow. 4. TableLayout controls the overall behavior of the container, with
the widgets themselves positioned into one or more TableRow containers, one per row in the grid.
27

28
5. Android – UI – Basic XML Layouts
Table Layout
3. Table Layout
Rows are declared by you by putting widgets as children of a TableRow inside the overall TableLayout.
The number of columns is determined by Android ( you control the number of columns in an indirect way).
So if you have three rows, one with two widgets, one with three widgets, and one with four widgets, there will be at least four columns.
28
0 1
0 1 2
0 1 2 3

29
5. Android – UI – Basic XML Layouts
Table Layout
3. Table Layout
However, a single widget can take up more than one column by including the android:layout_span property, indicating the number of columns the widget spans (this is similar to the colspan attribute one finds in table cells in HTML)
29
<TableRow><TextView android:text="URL:" /><EditTextandroid:id="@+id/entry"android:layout_span="3" /></TableRow>

30
5. Android – UI – Basic XML Layouts
Table Layout
3. Table Layout
Ordinarily, widgets are put into the first available column of each row.
In the example below, the label (“URL”) would go in the first column (column 0, as columns are counted starting from 0), and the TextField would go into a spanned set of three columns (columns 1 through 3).
30
Label (URL)
EditText EditText-span EditText-span
Column 0 Column 1 Column 2ButtonCancel
Column 3ButtonOK
android:layout_span="3"
android:layout_columns="2"

31
5. Android – UI – Basic XML Layouts
Table Layout
3. Table Layout – Example
31
<?xml version="1.0" encoding="utf-8"?><TableLayoutandroid:id="@+id/myTableLayout"android:layout_width="fill_parent"android:layout_height="fill_parent"android:background="#ff0033cc"android:orientation="vertical"xmlns:android="http://schemas.android.com/apk/res/android"><TableRow><TextViewandroid:text="URL:" /><EditText android:id="@+id/ediUrl"android:layout_span="3"/> </TableRow><Viewandroid:layout_height="3dip"android:background="#0000FF" /><TableRow><Button android:id="@+id/cancel"android:layout_column="2"android:text="Cancel" /><Button android:id="@+id/ok"android:text="OK" /></TableRow><Viewandroid:layout_height="3dip"android:background="#0000FF" />
</TableLayout>
Skip columns: 0, 1
Strech up to column 3
Note to the reader:Experiment changing layout_span to 1, 2, 3

32
5. Android – UI – Basic XML Layouts
Table Layout
3. Table Layout
By default, each column will be sized according to the "natural" size of the widest widget in that column.
If your content is narrower than the available space, you can use the TableLayout property:
android:stretchColumns =“…”
Its value should be a single column number (0-based) or a comma-delimited list of column numbers. Those columns will be stretched to take up any available space yet on the row.
32

33
5. Android – UI – Basic XML Layouts
Table Layout
3. Table LayoutIn our running example we stretch columns 2, 3, and 4 to fill the rest of the row.
33
...<TableLayoutandroid:id="@+id/myTableLayout"android:layout_width="fill_parent"android:layout_height="fill_parent"android:background="#ff0033cc"android:orientation="vertical"android:stretchColumns ="2,3,4"xmlns:android="http://schemas.android.com/apk/res/android">
...
TODO: try to stretch one column at the time 1, then 2, and so on.

34
5. Android – UI – Basic XML Layouts
ScrollView Layout
4. ScrollView Layout
Dùng ScrollView khi dữ liệu cần hiển thị dài hơn 1 trang màn hình.
Cho phép kéo thanh cuốn để xem từng phần.
Tương tự 1 trang web.
34

35
5. Android – UI – Basic XML Layouts
ScrollView Layout
4. Example ScrollView Layout
35
<?xml version="1.0" encoding="utf-8"?><ScrollViewandroid:id="@+id/myScrollView1"android:layout_width="fill_parent"android:layout_height="fill_parent"android:background="#ff009999"xmlns:android="http://schemas.android.com/apk/res/android"><LinearLayoutandroid:id="@+id/myLinearLayoutVertical"android:layout_width="fill_parent"android:layout_height="fill_parent"android:orientation="vertical">
<LinearLayoutandroid:id="@+id/myLinearLayoutHorizontal1"android:layout_width="fill_parent"android:layout_height="fill_parent"android:orientation="horizontal"><ImageView
android:id="@+id/myPicture"android:layout_width="wrap_content"android:layout_height="wrap_content"android:src="@drawable/icon" /><TextViewandroid:id="@+id/textView1"android:layout_width="fill_parent"android:layout_height="wrap_content"android:text="Line1"android:textSize="70dip" /></LinearLayout>
<Viewandroid:layout_width="fill_parent"android:layout_height="6dip"android:background="#ffccffcc" />
<TextViewandroid:id="@+id/textView2"
android:layout_width="fill_parent"android:layout_height="wrap_content"android:text="Line2"android:textSize="70dip" /><Viewandroid:layout_width="fill_parent"android:layout_height="6dip"android:background="#ffccffcc" /><TextViewandroid:id="@+id/textView3"android:layout_width="fill_parent"android:layout_height="wrap_content"android:text="Line3"android:textSize="70dip" /><Viewandroid:layout_width="fill_parent"android:layout_height="6dip"android:background="#ffccffcc" /><TextViewandroid:id="@+id/textView4"android:layout_width="fill_parent"android:layout_height="wrap_content"android:text="Line4"android:textSize="70dip" /><Viewandroid:layout_width="fill_parent"android:layout_height="6dip"android:background="#ffccffcc" /><TextViewandroid:id="@+id/textView5"android:layout_width="fill_parent"android:layout_height="wrap_content"android:text="Line5"android:textSize="70dip" /></LinearLayout>
</ScrollView>

36
5. Android – UI – Basic XML Layouts
ScrollView Layout
4. Example ScrollView Layout
36
Scroller
Combining an ImageView & TextView in a horizontal Linear LayoutSimple
TextView

37
5. Android – UI – Basic XML Layouts
Absolute Layouts
5. Miscellaneous. Absolute Layout(đã lạc hậu, nên thay bằng
layout khác)
• layout cho phép quy định chính xác tọa độ (x,y) của các thành phần trong container.
• Absolute layouts are less flexible and harder to maintain than other types of layouts without absolute positioning.
37

38
5. Android – UI – Basic XML Layouts
Absolute Layouts
5. Miscellaneous Absolute Layout (cont.)
38
<?xml version="1.0" encoding="utf-8"?><AbsoluteLayoutandroid:id="@+id/myLinearLayout"android:layout_width="fill_parent"android:layout_height="fill_parent"android:background="#ff0033cc"android:padding="4dip"xmlns:android="http://schemas.android.com/apk/res/android">
<TextViewandroid:id="@+id/tvUserName"android:layout_width="fill_parent"android:layout_height="wrap_content"android:background="#ffff0066"android:text="User Name"android:textSize="16sp"android:textStyle="bold"android:textColor="#ff000000"android:layout_x="0dip"android:layout_y="10dip">
</TextView><EditTextandroid:id="@+id/etName"android:layout_width="fill_parent"android:layout_height="wrap_content"android:textSize="18sp"android:layout_x="0dip"android:layout_y="38dip"></EditText>
<Button android:layout_width="120dip" android:text="Go" android:layout_height="wrap_content" android:textStyle="bold" android:id="@+id/btnGo" android:layout_x="100dip" android:layout_y="170dip" /></AbsoluteLayout>
Button location

39
5. Android – UI – Basic XML Layouts
Basic XML Layouts - Containers
Questions?
39