android background concurrency services
DESCRIPTION
Android Background Concurrency ServicesTRANSCRIPT

THREADS
Runnable Represents a command that can be executed. Often used to run code in a different Thread.


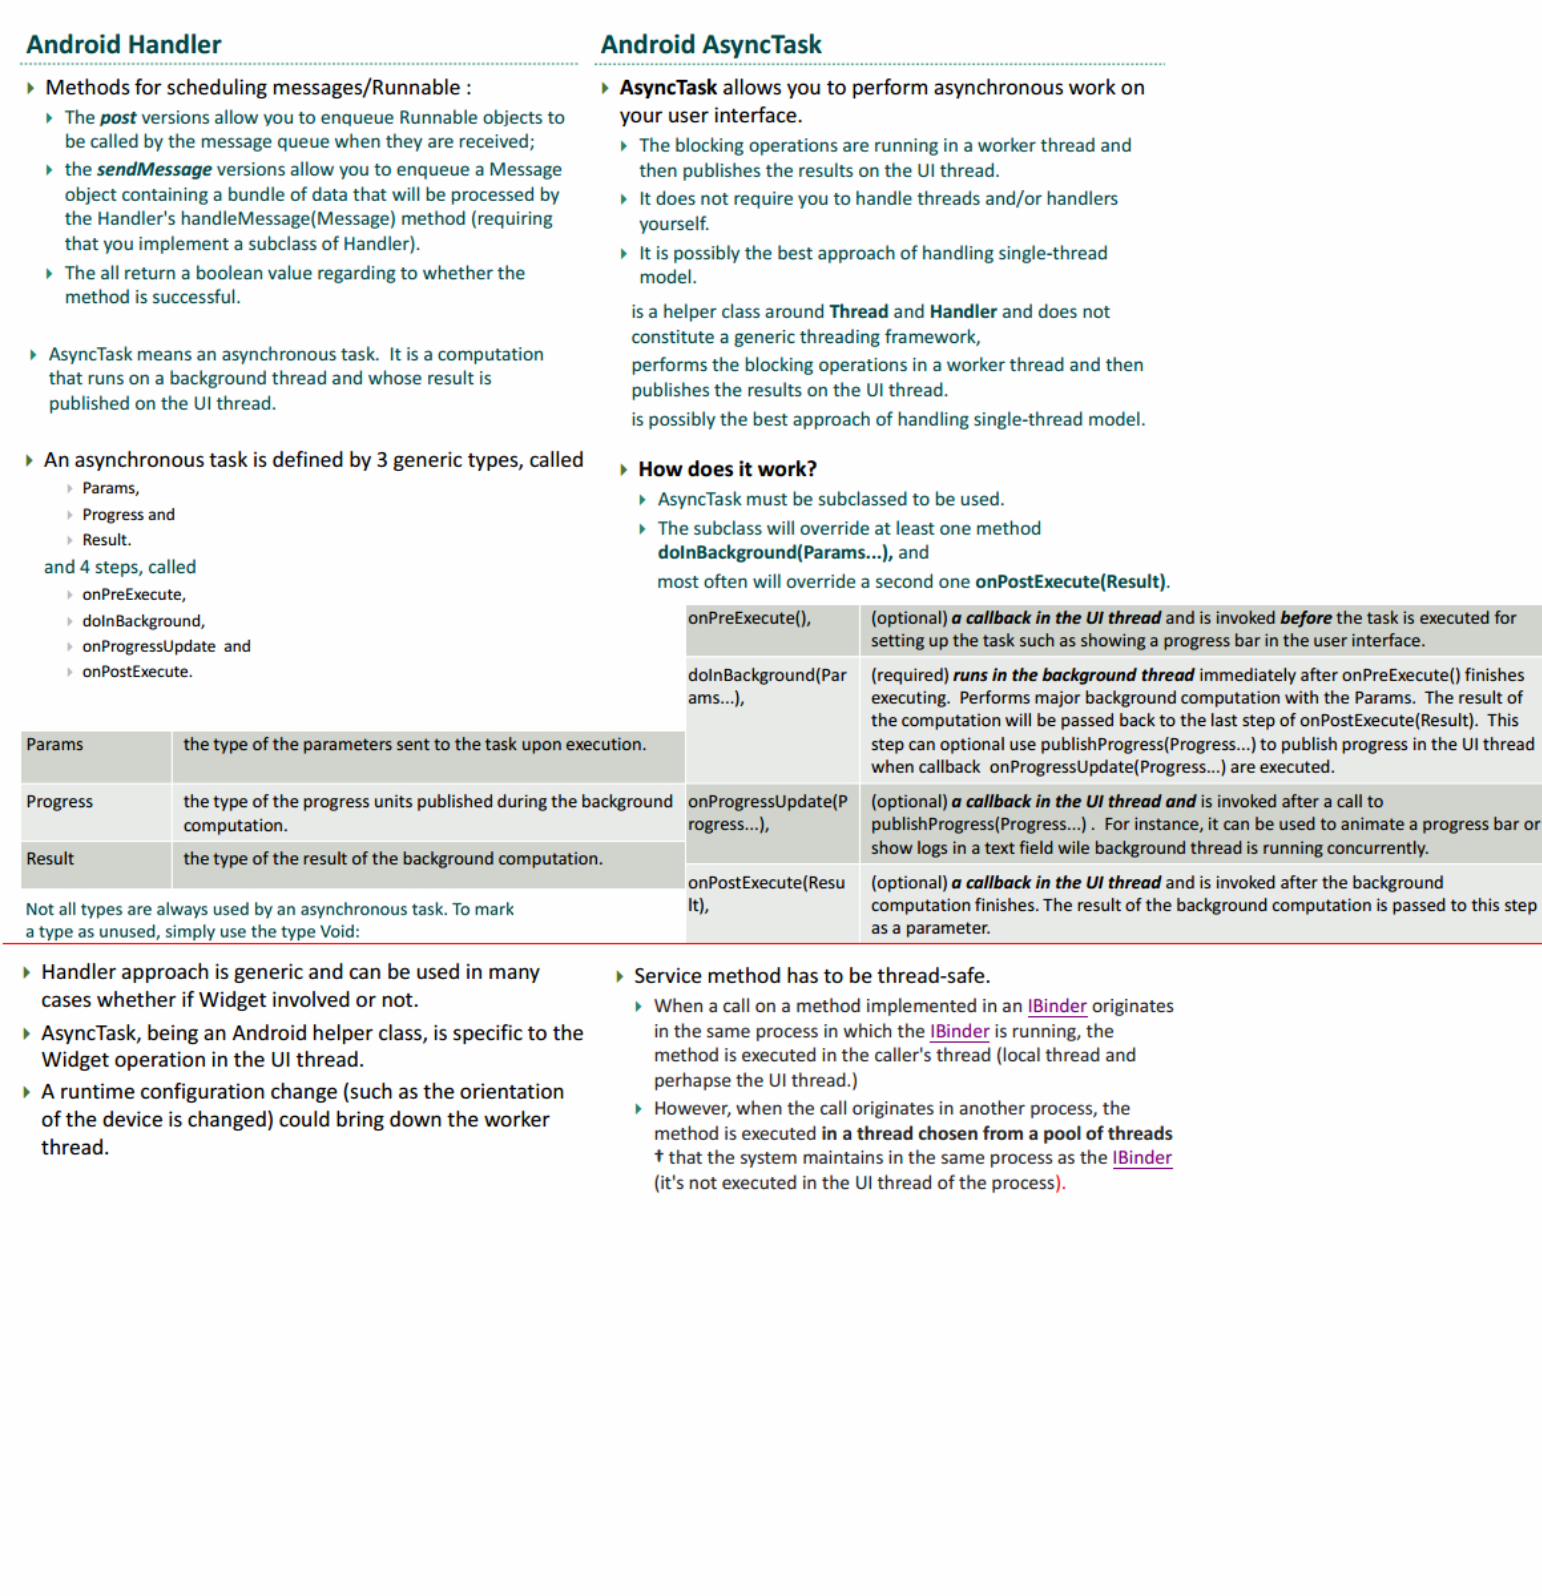
Threads: Android supports the usage of the Threads class to perform asynchronous processing. Android also supplies the java.util.concurrent package to perform something in the background, e.g. using the ThreadPools and Executor classes. If you need to update the user interface from a new Thread, you need to synchronize with the user interface thread.You can use the android.os.Handler class or the AsyncTasks class for this.Handler:The Handler class can update the user interface. A Handler provides methods for receiving instances of the Message or Runnable class.To use a handler you have to subclass it and override the handleMessage() to process messages. To process a Runnable you can use the post() method. You only need one instance of a Handler in your Activity. You thread can post messages via the sendMessage(Message msg) method or via the sendEmptyMessage() method.AsyncTask:The AsyncTask class encapsulates the creation of Threads and Handlers. An AsyncTask is started via the execute() method. The execute() method calls the doInBackground() and the onPostExecute() method. The doInBackground() method contains the coding instruction which should be performed in a background thread. This method runs automatically in a separate Thread. The onPostExecute() method synchronize itself again with the user interface thread and allows to update it. This method is called by the framework once the doInBackground() method finishes.To use AsyncTask you must subclass it. AsyncTask uses generics and varargs. The parameters are the following AsyncTask . TypeOfVarArgParams is passed into the doInBackground() method as input, ProgressValue is used for progress information and ResultValue must be returned from doInBackground() method and is passed to onPostExecute() as parameter.Feedback via ProgressBarFor providing feedback to the user you can use the ProgressBar dialog, which allow to display progress to the user. The Javadoc of ProgressBar gives a nice example of its usage.Alternatively you can provide progress feedback in the activities title bar. Concurrency and lifecyleOne challenge in using threads is to consider the lifecycle of the application. The Android system may kill your activity or trigger a configuration change which also will restart your activity. You also need to handle open dialogs, as dialogs are always connected to the activity which created them. In case the activity gets restarted and you access an existing dialog you receive an “View not attached to window manager” exception. To save an object your can use the method onRetainNonConfigurationInstance() method. This method allows to save one object if the activity will be soon restarted. To retrieve this object you can use the getLastNonConfigurationInstance() method. This way can you can save an object, e.g. a running thread, even if the activity is restarted.
Threads are the cornerstone of any multitasking operating system and can be thought of as mini-processes running within a main process, the purpose of which is to enable at least the appearance of parallel execution paths within applications. When an Android application is first started, the runtime system creates a single thread in which all application components will run by default. This thread is generally referred to as the main thread. The primary role of the main thread is to handle the user interface in terms of event handling and interaction with views in the user interface. Any additional components that are started within the application will, by default, also run on the main thread. When an Android application is first started, the runtime system creates a single thread in which all application components will run by default. This thread is generally referred to as the main thread. The primary role of the main thread is to handle the user interface in terms of event handling and interaction with views in the user interface. Any additional components that are started within the application will, by default, also run on the main thread. When an Android application is first started, the runtime system creates a single thread in which all application components will run by default. This thread is generally referred to as the main thread. The primary role of the main thread is to handle the user interface in terms of event handling and interaction with views in the user interface. Any additional components that are started within the application will, by default, also run on the main thread. In order to create a new thread, the code to be executed in that thread needs to be placed within the Run() method of a Runnable instance. A new Thread object then needs to be created, passing through a reference to the Runnable instance to the constructor. Finally, the start() method of the thread object needs to be called to start the thread running. To perform the task within the buttonClick() method, therefore, the following changes need to be made: When the application is now run, touching the button causes the delay to be performed in a new thread leaving the main thread to continue handling the user interface, including responding to additional button presses. In fact, each time the button is touched, a new thread will be created, allowing the task to be performed multiple times concurrently. As previously stated, updating a user interface element from within a thread other than the main thread violates a key rule of Android development. In order to update the user interface, therefore, it will be necessary to implement a Handler for the thread.
Im p le m e n t in g a T h re a d H a n d le r
Thread handlers are implemented in the main thread of an application and are primarily used to make updates to the user interface in response to messages sent by another thread running within the application’s process.
Note that the only change that has been made is to make a call to the sendEmptyMessage() method of the handler. Since the handler does not currently do anything with the content of any messages it receives it is not necessary to create and send a message object to the handler.

Passing a Message to the Handler
Whilst the previous example triggered a call to the handleMessage() handler callback, it did not take advantage of the message object to send data to the handler. In this phase of
the tutorial, the example will be further modified to pass data between the thread and the handler. Firstly, the updated thread in the buttonClick() method will obtain the date and
time from the system in string format and store that information in a Bundle object. A call will then be made to the obtainMessage() method of the handler object to get a message
object from the message pool. Finally, the bundle will be added to the message object before being sent via a call to the sendMessage() method of the handler object:
Next, update the handleMessage() method of the handler to extract the date and time
string from the bundle object in the message and display it on the TextView object: Handler handler = new Handler() {

THREADS & HANDLERS
We use Threads objects to start parallel execution lines. For this we need to “load” the Thread object with the behavior we want, meaning to provide a run() method for it, which contains that behavior. We can do this in three ways:
1. Providing a class implementing Runnable in the Threads constructor (and that class needs to implement the run() method) 2- Implementing (in fact overriding) the run() method of a Thread object we declare and initialize
3- Creating a class that inherits Thread and in that class overriding the run() method; in our code we just need to initialize an object of that class.
When we want to start the parallel execution we simply call the Thread’s start() method. Why using one method over another? When our Thread’s behavior is simple (thus the run() method short and simple) and there are little chances of change in future releases,
the second method tends to be used. When changes in the Thread behavior may occur, the first or last method is preferred.
They are some kind of special “doors” and background managers for the Threads. They are a way to communicate with/process within a Thread. Each Handler is associated with a single Thread and that Thread’s specific message queue. From the moment of its creation the Handler is linked with the parent Thread (the
one that created it). They deliver messages and runnable objects to that message queue and execute them as they come out of the message queue.
They have two main uses: - On the same Thread – schedule messages and runnables to be executed at specific times – used for implementing timeouts or ticks.
- On another Thread – send data/enqueue actions on another Thread.
Messages can contain data and are processed by handleMessage() method. Runnable objects can be enqueued in a Thread’s message queue to be executed. Methods using Message start with “send”, methods for Runnable objects start with “post”.
Methods for Messages/Runnables that are processed delayed – postAtTime(), postDelayed(), sendMessageAtTime(), sendMessageDelayed().
1. Delayed action on the same Thread – Send msg1 to the local Handler in Thread1 (by example with
sendMessageDelayed()) and the Handler will act on Thread1 with the specified delay. This can be used to create a tick or
time-out behavior
2. Action on another Thread (can also be delayed) – Send msg2 to Thread’s2 Handler to determine an action of the
Thread2

The Android Service class is designed specifically to allow applications to initiate and perform background tasks. Unlike broadcast receivers, which are intended to perform a task quickly and then exit, services are designed to perform tasks that take a long time to complete (such as downloading a file over an internet connection or streaming music to the user) but do not require a user interface. Started Services: Started services are launched by other application components (such as an activity or even a broadcast receiver) and potentially run indefinitely in the background until the service is stopped, or is destroyed by the Android runtime system in order to free up resources. A service will continue to run if the application that started it is no longer in the foreground, and even in the event that the component that originally started the service is destroyed. By default, a service will run within the same main thread as the application process from which it was launched (referred to as a local service). It is important, therefore, that any CPU intensive tasks be performed in a new thread within the service. Instructing a service to run within a separate process (and therefore known as a remote service) requires a configuration change within the manifest file. Unless a service is specifically configured to be private (once again via a setting in the manifest file), that service can be started by other components on the same Android device. This is achieved using the Intent mechanism in the same way that one activity can launch another as outlined in preceding chapters. Started services are launched via a call to the startService() method, passing through as an argument an Intent object identifying the service to be started. When a started service has completed its tasks, it should stop itself via a call to stopSelf(). Alternatively, a running service may be stopped by another component via a call to the stopService() method, passing through as an argument the matching Intent for the service to be stopped. Services are given a high priority by the Android system and are typically amongst the last to be terminated in order to free up resources. Intent Service The IntentService class is a convenience class (subclassed from the Service class) that sets up a worker thread for handling background tasks and handles each request in an asynchronous manner. Once the service has handled all queued requests, it simply exits. All that is required when using the IntentService class is that the onHandleIntent() method be implemented containing the code to be executed for each request. For services that do not require synchronous processing of requests, IntentService is the recommended option. Services requiring synchronous handling of requests will, however, need to subclass from the Service class and manually implement and manage threading to handle any CPU intensive tasks efficiently. Bound Service A bound service is similar to a started service with the exception that a started service does not generally return results or permit interaction with the component that launched it. A bound service, on the other hand, allows the launching component to interact with, and receive results from, the service. Through the implementation of interprocess communication (IPC), this interaction can also take place across process boundaries. An activity might, for example, start a service to handle audio playback. The activity will, in all probability, include a user interface providing controls to the user for the purpose of pausing playback or skipping to the next track. Similarly, the service will quite likely need to communicate information to the calling activity to indicate that the current audio track has completed and to provide details of the next track that is about to start playing. A component (also referred to in this context as a client) starts and binds to a bound service via a call to the bindService() method and multiple components may bind to a service simultaneously. When the service binding is no longer required by a client, a call should be made to the unbindService() method. When the last bound client unbinds from a service, the service will be terminated by the Android runtime system. It is important to keep in mind that a bound service may also be started via call to startService(). Once started, components may then bind to it via bindService() calls. When a bound service is launched via a call to startService() it will continue to run even after the last client unbinds from it. A bound service must include an implementation of the onBind() method which is called both when the service is initially created and when other clients subsequently bind to the running service. The purpose of this method is to return to binding clients an object of type IBinder containing the information needed by the client to communicate with the service. In terms of implementing the communication between a client and a bound service, the recommended technique depends on whether the client and service reside in the same or different processes and whether or not the service is private to the client. Local communication can be achieved by extending the Binder class and returning an instance from the onBind() method. Interprocess communication, on the other hand, requires Messenger and Handler implementation.
SERVICES

Implementing an Android Started Service – A Worked Example
Before writing any code, the first step is to add a new class to the project to contain the service. The first type of service to be demonstrated in this tutorial is to be based on the IntentService class. As outlined in the previous chapter (An Overview of Android Started and Bound Services), the purpose of the IntentService class is to provide the developer with a convenient mechanism for creating services that perform tasks asynchronously within a separate thread from the calling application. Starting the Service:
Creating the New Service
With the service implemented, modify the AndroidManifest.xml file to add a corresponding <service> element, which can be placed either before or after the service element for the previous service and should read:
Creating a New Thread for Service Tasks
Android Local Bound Services – A Worked Example
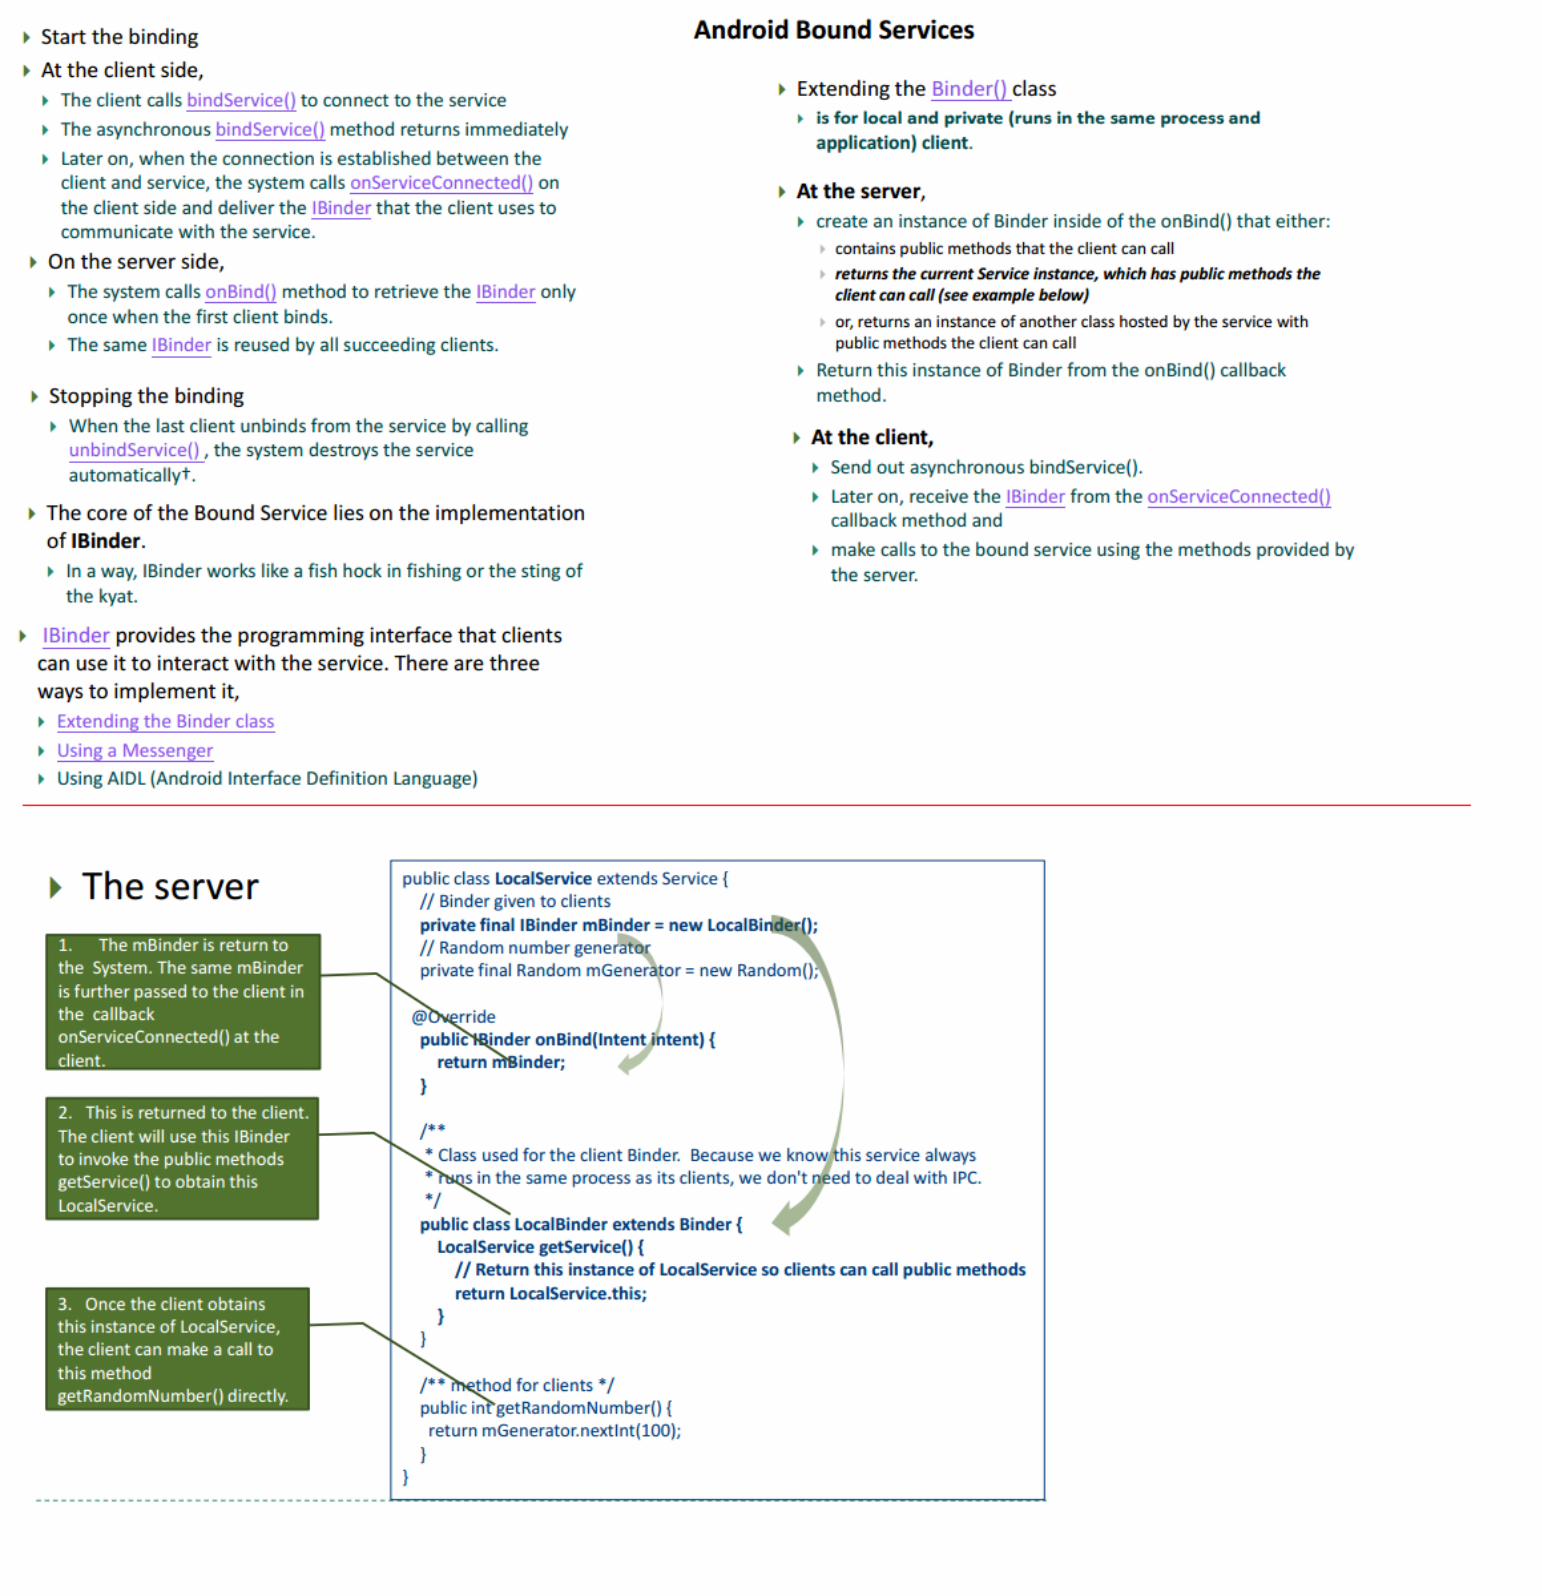
In common with started services, bound services are provided to allow applications to perform tasks in the background. Unlike started services, however, multiple client components may bind to a bound service and, once bound, interact with that service using a variety of different mechanisms. Bound services are created as sub-classes of the Android Service class and must, at a minimum, implement the onBind() method. Client components bind to a service via a call to the bindService() method. The first bind request to a bound service will result in a call to that service’s onBind() method (subsequent bind request do not trigger an onBind() call). In the case of the onServiceConnected() method, this will be passed an IBinder object containing the information needed by the client to interact with the service There are two recommended mechanisms for implementing interaction between client components and a bound service. In the event that the bound service is local and private to the same application as the client component (in other words it runs within the same process and is not available to components in other applications), the recommended mechanism is to create a subclass of the Binder class and extend it to provide an interface to the service. An instance of this Binder object is then returned by the onBind() method and subsequently used by the client component to directly access methods and data held within the service. In situations where the bound service is not local to the application (in other words, it is running in a different process from the client component), interaction is best achieved using a Messenger/Handler implementation. As previously outlined, local bound services can communicate with bound clients by passing an appropriately configured Binder object to the client. This is achieved by creating a Binder subclasss within the bound service class and extending it by adding one or more new methods that can be called by the client. In most cases, this simply involves implementing a method that returns a reference to the bound service instance. With a reference to this instance, the client can then access data and call methods within the bound service directly.
Implementing the Binder

A service is a component which runs in the background, without direct interaction with the user. The Android platform provides and runs predefined system services and every Android application can use them, given the right permissions. An Android application can, in addition to consuming the existing Android platform services, define and use new services. The Android platform provides pre-defined services, usually exposed via a specific Manager class. Access to them can be gained via the getSystemService() method. Services run with a higher priority than inactive or invisible activities and therefore it is less likely that the Android system terminates them. Defining your own services allows you to design very responsive applications. You can fetch the application via a service and once the application is started by the user, it can present fresh data to the user A service needs to be declared in the AndroidManifest.xml and the implementing class must extend the Service class or one of its subclasses
A service runs by default in the same process as the application. in its own thread. Therefore you need to use asynchronous processing in the service to to perform resource intensive tasks in the background. You can also specify that your Service runs in a separate process via the android:process=”:process_description” attribute. Running a service in its own process gives it its own memory address space and a garbage collector of the virtual machine in this process does not affect the application process. Running a services in its own process make the communication of the other Android components and the service harder to implement.
A Service is an application component that can perform long-running operations in the background and does not provide a user interface. Another application component can start a service and it will continue to run in the background even if the user switches to another application. Additionally, a component can bind to a service to interact with it and even
perform interprocess communication (IPC). For example, a service might handle network transactions, play music, perform file I/O, or interact with a content provider, all from the background.
A service can essentially take two forms: Started A service is “started” when an application component (such as an activity) starts it by calling startService(). Once started, a service can run in the background indefinitely,
even if the component that started it is destroyed. Usually, a started service performs a single operation and does not return a result to the caller. For example, it might download or upload a file over the network. When the operation is done, the service should stop itself.
Bound A service is “bound” when an application component binds to it by calling bindService(). A bound service offers a client-server interface that allows components to interact with the service, send requests, get results, and even do so across processes with interprocess communication (IPC). A bound service runs only as long as another application
component is bound to it. Multiple components can bind to the service at once, but when all of them unbind, the service is destroyed. To create a service, you must create a subclass of Service (or one of its existing subclasses). In your implementation, you need to override some callback methods that handle key
aspects of the service lifecycle and provide a mechanism for components to bind to the service, if appropriate. The most important callback methods you should override are:
onStartCommand() The system calls this method when another component, such as an activity, requests that the service be started, by calling startService(). Once this method executes, the service is started and can run in the background indefinitely. If you implement this, it is your responsibility to stop the service when its work is done, by calling
stopSelf() or stopService(). (If you only want to provide binding, you don’t need to implement this method.) onBind() The system calls this method when another component wants to bind with the service (such as to perform RPC), by calling bindService(). In your implementation of this
method, you must provide an interface that clients use to communicate with the service, by returning an IBinder. You must always implement this method, but if you don’t want to allow binding, then you should return null.
onCreate() The system calls this method when the service is first created, to perform one-time setup procedures (before it calls either onStartCommand() or onBind()). If the service is already running, this method is not called.
onDestroy() The system calls this method when the service is no longer used and is being destroyed. Your service should implement this to clean up any resources such as threads, registered listeners, receivers, etc. This is the last call the service receives.
If a component starts the service by calling startService() (which results in a call to onStartCommand()), then the service remains running until it stops itself with stopSelf() or
another component stops it by calling stopService(). If a component calls bindService() to create the service (and onStartCommand() is not called), then the service runs only as long as the component is bound to it. Once the service is
unbound from all clients, the system destroys it.

Broadcast Receivers
Stopping a service: You stop a service via the stopService() method. No matter how frequently you started the service with startService(intent) a call to stopService() stops it. A service can stop itself by calling the stopSelf() method. Binding between activities and local services: If the activity wants to interact with the service it can use the bindService() method to start the service. This method requires as parameter a ServiceConnection object which allows to connect to the service. In the service the onBind() method is called. This method returns a IBinder object to the ServiceConnection. This IBinder object can be used by the activity to communicate with the service. Afterwards the binding was done the onStartCommand() method is called with the Intent data provided by the activity. startService() also allows you to provide a flag which determines the restart behavior of the services. Service.START_STICKY is used for services which are explicit started or stopped. If these services are terminated by the Android system, they are restarted if sufficient resource are available again. Services started with Service.START_NOT_STICKY are not automatically restarted if terminated by the Android system. As with activities the Android system may terminate the process of a service at any time to save resources. For this reason you cannot simple use a TimerTask in the service to ensure that it is executed on a regular basis. For correct scheduling of the Service use the AlarmManager class.
There are several way for an activity to communicate with an service and vice versa. This section dicusses the different ways and gives recommendation which to use
Starting services
An Android component (service, receiver, activity) can start and trigger a service via the startService(intent) method. This method call starts the service if it is not running.
If the service started the onCreate() method is called. Once the service is started the method call to start the service triggers startService(intent) method in the service. It passes in the Intent for the startService(intent) call. If startService(intent) is called while the service is running, its onStartCommand() is also called. Therefore your service needs to be prepared that onStartCommand() can be called several times. This method is called in the main user interface thread therefore it cannot be called simultaneously from two different threads. Alternatively to startService(intent) you can also start a service via the bindService() method call. This allows you to communicate directly with the service.

Creating a Started Service A started service is one that another component starts by calling startService(), resulting in a call to the service’s onStartCommand() method. When a service is started, it has a lifecycle that’s independent of the component that started it and the service can run in the background indefinitely, even if the component that started it is destroyed. As such, the service should stop itself when its job is done by calling stopSelf(), or another component can stop it by calling stopService(). An application component such as an activity can start the service by calling startService() and passing an Intent that specifies the service and includes any data for the service to use. The service receives this Intent in the onStartCommand() method. Traditionally, there are two classes you can extend to create a started service: Service This is the base class for all services. When you extend this class, it’s important that you create a new thread in which to do all the service’s work, because the service uses your application’s main thread, by default, which could slow the performance of any activity your application is running. IntentService This is a subclass of Service that uses a worker thread to handle all start requests, one at a time. This is the best option if you don’t require that your service handle multiple requests simultaneously. All you need to do is implement onHandleIntent(), which receives the intent for each start request so you can do the background work. Extending the IntentService class Because most started services don’t need to handle multiple requests simultaneously (which can actually be a dangerous multi-threading scenario), it’s probably best if you implement your service using the IntentService class. The IntentService does the following: * Creates a default worker thread that executes all intents delivered to onStartCommand() separate from your application’s main thread. * Creates a work queue that passes one intent at a time to your onHandleIntent() implementation, so you never have to worry about multi-threading. * Stops the service after all start requests have been handled, so you never have to call stopSelf(). * Provides default implementation of onBind() that returns null. * Provides a default implementation of onStartCommand() that sends the intent to the work queue and then to your onHandleIntent() implementation.
That’s all you need: a constructor and an implementation of onHandleIntent(). If you decide to also override other callback methods, such as onCreate(), onStartCommand(), or onDestroy(), be sure to call the super implementation, so that the IntentService can properly handle the life of the worker thread. For example, onStartCommand() must return the default implementation (which is how the intent gets delivered to onHandleIntent()). Besides onHandleIntent(), the only method from which you don’t need to call the super class is onBind() (but you only need to implement that if your service allows binding).

Extending the Service ClassAs you saw in the previous section, using IntentService makes your implementation of a started service very simple. If, however, you require your service to perform multi-threading (instead of processing start requests through a work queue), then you can extend the Service class to handle each intent. For comparison, the following example code is an implementation of the Service class that performs the exact same work as the example above using IntentService. That is, for each start request, it uses a worker thread to perform the job and processes only one request at a time.
However, because you handle each call to onStartCommand() yourself, you can perform multiple requests simultaneously. That’s not what this example does, but if that’s what you want, then you can create a new thread for each request and run them right away (instead of waiting for the previous request to finish). Notice that the onStartCommand() method must return an integer. The integer is a value that describes how the system should continue the service in the event that the system kills it (as discussed above, the default implementation for IntentService handles this for you, though you are able to modify it). The return value from onStartCommand() must be one of the following constants: START_NOT_STICKY If the system kills the service after onStartCommand() returns, do not recreate the service, unless there are pending intents to deliver. This is the safest option to avoid running your service when not necessary and when your application can simply restart any unfinished jobs. START_STICKY If the system kills the service after onStartCommand() returns, recreate the service and call onStartCommand(), but do not redeliver the last intent. Instead, the system calls onStartCommand() with a null intent, unless there were pending intents to start the service, in which case, those intents are delivered. This is suitable for media players (or similar services) that are not executing commands, but running indefinitely and waiting for a job. START_REDELIVER_INTENT If the system kills the service after onStartCommand() returns, recreate the service and call onStartCommand() with the last intent that was delivered to the service. Any pending intents are delivered in turn. This is suitable for services that are actively performing a job that should be immediately resumed, such as downloading a file.

Starting a Service You can start a service from an activity or other application component by passing an Intent (specifying the service to start) to startService(). The Android system calls the service’s onStartCommand() method and passes it the Intent. (You should never call onStartCommand() directly.)The startService() method returns immediately and the Android system calls the service’s onStartCommand() method. If the service is not already running, the system first calls onCreate(), then calls onStartCommand().
Stopping a service A started service must manage its own lifecycle. That is, the system does not stop or destroy the service unless it must recover system memory and the service continues to run after onStartCommand() returns. So, the service must stop itself by calling stopSelf() or another component can stop it by calling stopService. You can use stopSelf(int) to ensure that your request to stop the service is always based on the most recent start request. That is, when you call stopSelf(int), you pass the ID of the start request (the startId delivered to onStartCommand()) to which your stop request corresponds.

Bound Services
A bound service is an implementation of the Service class that allows other applications to bind to it and interact with it. To provide binding for a service, you must implement the
onBind() callback method. This method returns an IBinder object that defines the programming interface that clients can use to interact with the service.
A client can bind to the service by calling bindService(). When it does, it must provide an implementation of ServiceConnection, which monitors the connection with the service. The
bindService() method returns immediately without a value, but when the Android system creates the connection between the client and service, it calls onServiceConnected() on
the ServiceConnection, to deliver the IBinder that the client can use to communicate with the service.
Multiple clients can connect to the service at once. However, the system calls your service’s onBind() method to retrieve the IBinder only when the first client binds. The system then
delivers the same IBinder to any additional clients that bind, without calling onBind() again.
When the last client unbinds from the service, the system destroys the service (unless the service was also started by startService()).
When you implement your bound service, the most important part is defining the interface that your onBind() callback method returns. There are a few different ways you can define
your service’s IBinder interface and the following section discusses each technique.
When creating a service that provides binding, you must provide an IBinder that provides the programming interface that clients can use to interact with the service. There are three
ways you can define the interface:
Extending the Binder class
If your service is private to your own application and runs in the same process as the client (which is common), you should create your interface by extending the Binder class and
returning an instance of it from onBind(). The client receives the Binder and can use it to directly access public methods available in either the Binder implementation or even the
Service. This is the preferred technique when your service is merely a background worker for your own application. The only reason you would not create your interface this way is
because your service is used by other applications or across separate processes.
Using a Messenger
If you need your interface to work across different processes, you can create an interface for the service with a Messenger. In this manner, the service defines a Handler that responds
to different types of Message objects. This Handler is the basis for a Messenger that can then share an IBinder with the client, allowing the client to send commands to the service
using Message objects. Additionally, the client can define a Messenger of its own so the service can send messages back.
This is the simplest way to perform interprocess communication (IPC), because the Messenger queues all requests into a single thread so that you don’t have to design your service
to be thread-safe.
Using AIDL
AIDL (Android Interface Definition Language) performs all the work to decompose objects into primitives that the operating system can understand and marshall them across
processes to perform IPC. The previous technique, using a Messenger, is actually based on AIDL as its underlying structure. As mentioned above, the Messenger creates a queue of all
the client requests in a single thread, so the service receives requests one at a time. If, however, you want your service to handle multiple requests simultaneously, then you can use
AIDL directly. In this case, your service must be capable of multi-threading and be built thread-safe.
To use AIDL directly, you must create an .aidl file that defines the programming interface. The Android SDK tools use this file to generate an abstract class that implements the
interface and handles IPC, which you can then extend within your service.
Note: Most applications should not use AIDL to create a bound service, because it may require multithreading capabilities and can result in a more complicated implementation. As
such, AIDL is not suitable for most applications and this document does not discuss how to use it for your service. If you’re certain that you need to use AIDL directly, see the AIDL
document.

Extending the Binder class
If your service is used only by the local application and does not need to work across processes, then you can implement your own Binder class that provides your client direct access to public methods in the service. Note: This works only if the client and service are in the same application and process, which is most common. For example, this would
work well for a music application that needs to bind an activity to its own service that’s playing music in the background.
Here’s how to set it up:
1. In your service, create an instance of Binder that either: contains public methods that the client can call returns the current Service
instance, which has public methods the client can call or, returns an instance of another class hosted by the service with public
methods the client can call 2. Return this instance of Binder from the onBind() callback method.
3. In the client, receive the Binder from the onServiceConnected() callback method and make calls to the bound service using the methods provided.
For example, here’s a service that provides clients access to methods
in the service through a Binder implementation:

All that a client needs to do is create a Messenger based on the IBinder returned by the service and send a message using send(). For example, here’s a simple activity that binds to the service and delivers the MSG_SAY_HELLO message to the service. Notice that this example does not show how the service can respond to the client. If you want the service to respond, then you need to also create a Messenger in the client. Then when the client receives the onServiceConnected() callback, it sends a Message to the service that includes the client’s Messenger in the replyTo parameter of the send() method. Binding to a Service Application components (clients) can bind to a service by calling bindService(). The Android system then calls the service’s onBind() method, which returns an IBinder for interacting with the service. The binding is asynchronous. bindService() returns immediately and does not return the IBinder to the client. To receive the IBinder, the client must create an instance of ServiceConnection and pass it to bindService(). The ServiceConnection includes a callback method that the system calls to deliver the IBinder. So, to bind to a service from your client, you must: 1. Implement ServiceConnection. 2. Your implementation must override two callback methods: onServiceConnected() The system calls this to deliver the IBinder returned by the service’s onBind() method. onServiceDisconnected() The Android system calls this when the connection to the service is unexpectedly lost, such as when the service has crashed or has been killed. This is not called when the client unbinds. 2. Call bindService(), passing the ServiceConnection implementation. When the system calls your onServiceConnected() callback method, you can begin making calls to the service, using the methods defined by the interface. 3. To disconnect from the service, call unbindService(). 4ç When your client is destroyed, it will unbind from the service, but you should always unbind when you’re done interacting with the service or when your activity pauses so that the service can shutdown while its not being used. (Appropriate times to bind and unbind is discussed more With this ServiceConnection, the client can bind to a service by passing it to bindService(). For example:

Started Service
Bound Service


We have a class that inherits Thread defined in a separate file. This is a good practice
when the Threads behavior is complex and expected to change over time. We’ll see a
way to interrupt the Thread and also sending messages with data between two
Threads.


There are two ways you can create threads in Java:
It’s always good to use synchronised/ volatile with methods/primitive variables if you
need to access them from multiple threads. It will make sure that block of code will
execute as atomic (together at once) because to enter that block of code one
need to have the lock, which can only be taken by one thread.
By default thread doesn’t have a message queue. To create a message queue and bind it to the current thread we can use Looper.prepare(). To start a loop which runs to read and process the messages or runnable objects, we use Looper.loop(). Handler Is bound to the looper(remember as message queue) of the current thread by default.
LOOPERS & HANDLERS JAVA
LOOPERS & HANDLERS ANDROID
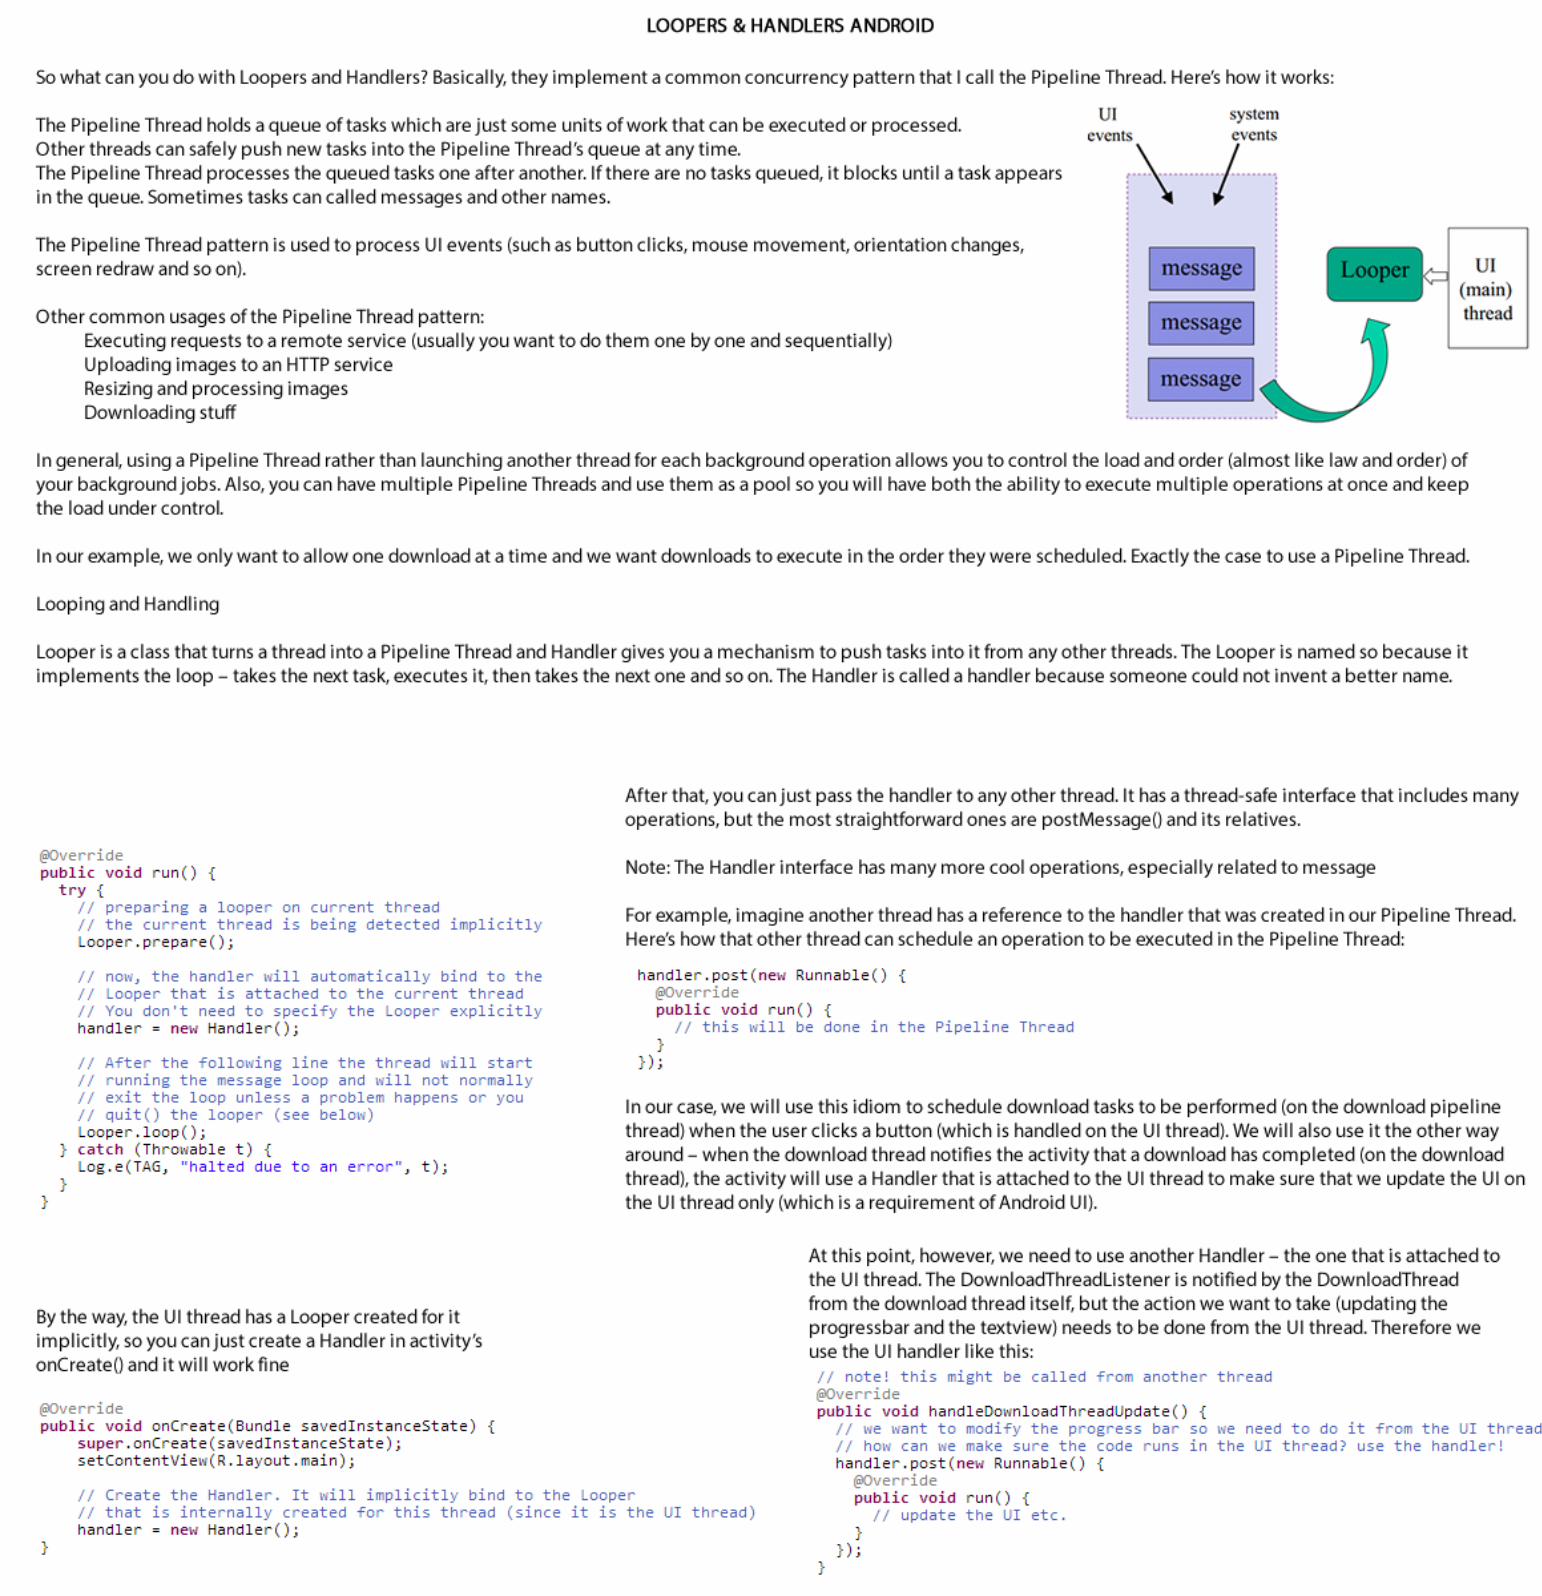
So what can you do with Loopers and Handlers? Basically, they implement a common concurrency pattern that I call the Pipeline Thread. Here’s how it works: The Pipeline Thread holds a queue of tasks which are just some units of work that can be executed or processed. Other threads can safely push new tasks into the Pipeline Thread’s queue at any time. The Pipeline Thread processes the queued tasks one after another. If there are no tasks queued, it blocks until a task appears in the queue. Sometimes tasks can called messages and other names. The Pipeline Thread pattern is used to process UI events (such as button clicks, mouse movement, orientation changes, screen redraw and so on). Other common usages of the Pipeline Thread pattern: Executing requests to a remote service (usually you want to do them one by one and sequentially) Uploading images to an HTTP service Resizing and processing images Downloading stuff In general, using a Pipeline Thread rather than launching another thread for each background operation allows you to control the load and order (almost like law and order) of your background jobs. Also, you can have multiple Pipeline Threads and use them as a pool so you will have both the ability to execute multiple operations at once and keep the load under control. In our example, we only want to allow one download at a time and we want downloads to execute in the order they were scheduled. Exactly the case to use a Pipeline Thread. Looping and Handling Looper is a class that turns a thread into a Pipeline Thread and Handler gives you a mechanism to push tasks into it from any other threads. The Looper is named so because it implements the loop – takes the next task, executes it, then takes the next one and so on. The Handler is called a handler because someone could not invent a better name.
By the way, the UI thread has a Looper created for it implicitly, so you can just create a Handler in activity’s onCreate() and it will work fine
After that, you can just pass the handler to any other thread. It has a thread-safe interface that includes many operations, but the most straightforward ones are postMessage() and its relatives. Note: The Handler interface has many more cool operations, especially related to message For example, imagine another thread has a reference to the handler that was created in our Pipeline Thread. Here’s how that other thread can schedule an operation to be executed in the Pipeline Thread: In our case, we will use this idiom to schedule download tasks to be performed (on the download pipeline thread) when the user clicks a button (which is handled on the UI thread). We will also use it the other way around – when the download thread notifies the activity that a download has completed (on the download thread), the activity will use a Handler that is attached to the UI thread to make sure that we update the UI on the UI thread only (which is a requirement of Android UI).
At this point, however, we need to use another Handler – the one that is attached to the UI thread. The DownloadThreadListener is notified by the DownloadThread from the download thread itself, but the action we want to take (updating the progressbar and the textview) needs to be done from the UI thread. Therefore we use the UI handler like this:


WHEN TO USE?


