an004: setup and usage of d3 timestamp sensors...
TRANSCRIPT
AN004:SETUPAND
USAGEOFD3
TIMESTAMPSENSORS
WITHMYSQL
DATABASE

1
CONTENT
PREPARING MYSQL DATABASE FOR USING IT TOGETHER WITH A SENSMAX EQUIPMENT ......................... 2
CONFIGURING SENSMAX HARDWARE FOR WORK WITH MYSQL DATABASE ............................................... 7
VIEWING D3 STATISTIC DATA WITH TIMESTAMPS IN MYSQL DATABASE .................................................. 11
2
PREPARING MYSQL DATABASE FOR USING IT TOGETHER WITH A
SENSMAX EQUIPMENT
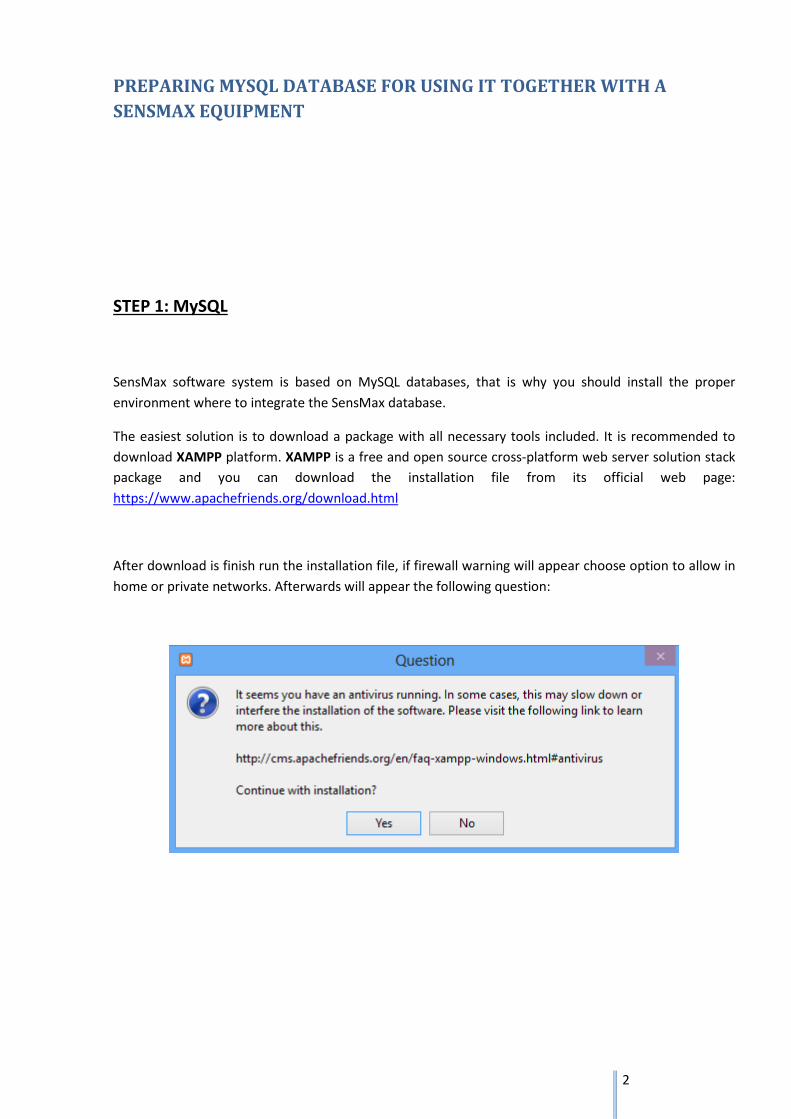
STEP 1: MySQL
SensMax software system is based on MySQL databases, that is why you should install the proper
environment where to integrate the SensMax database.
The easiest solution is to download a package with all necessary tools included. It is recommended to
download XAMPP platform. XAMPP is a free and open source cross-platform web server solution stack
package and you can download the installation file from its official web page:
https://www.apachefriends.org/download.html
After download is finish run the installation file, if firewall warning will appear choose option to allow in
home or private networks. Afterwards will appear the following question:
3
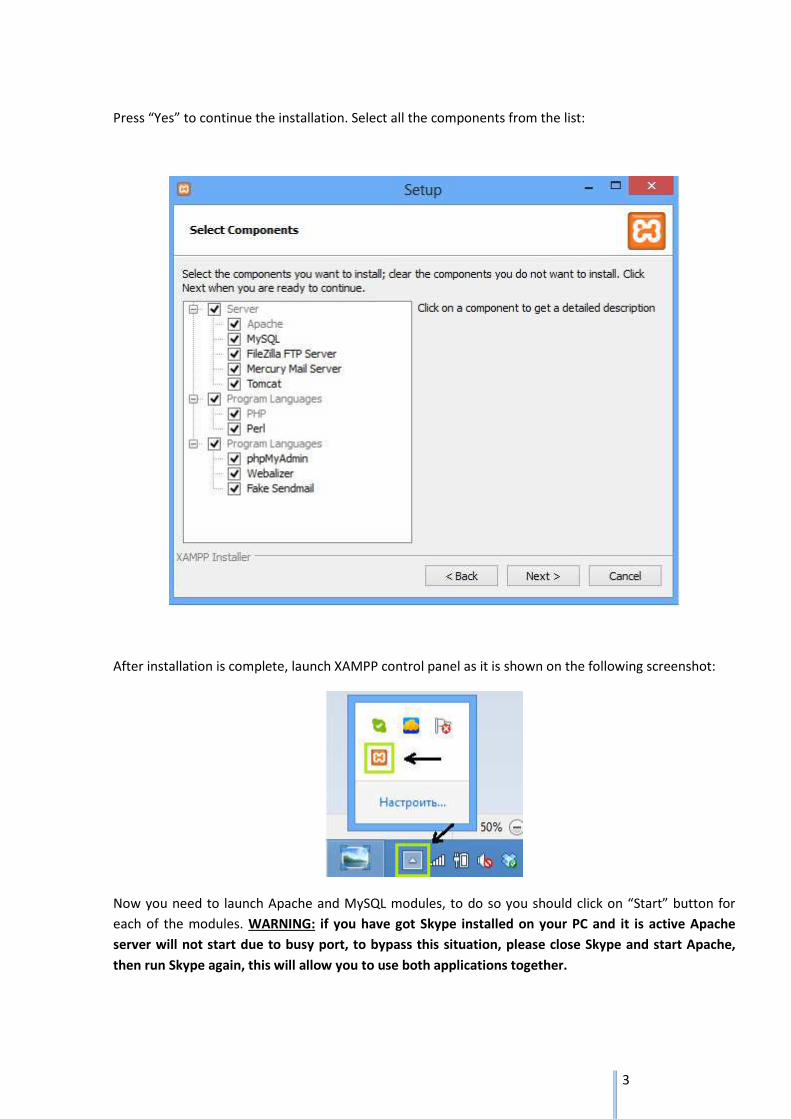
Press “Yes” to continue the installation. Select all the components from the list:
After installation is complete, launch XAMPP control panel as it is shown on the following screenshot:
Now you need to launch Apache and MySQL modules, to do so you should click on “Start” button for
each of the modules. WARNING: if you have got Skype installed on your PC and it is active Apache
server will not start due to busy port, to bypass this situation, please close Skype and start Apache,
then run Skype again, this will allow you to use both applications together.
4
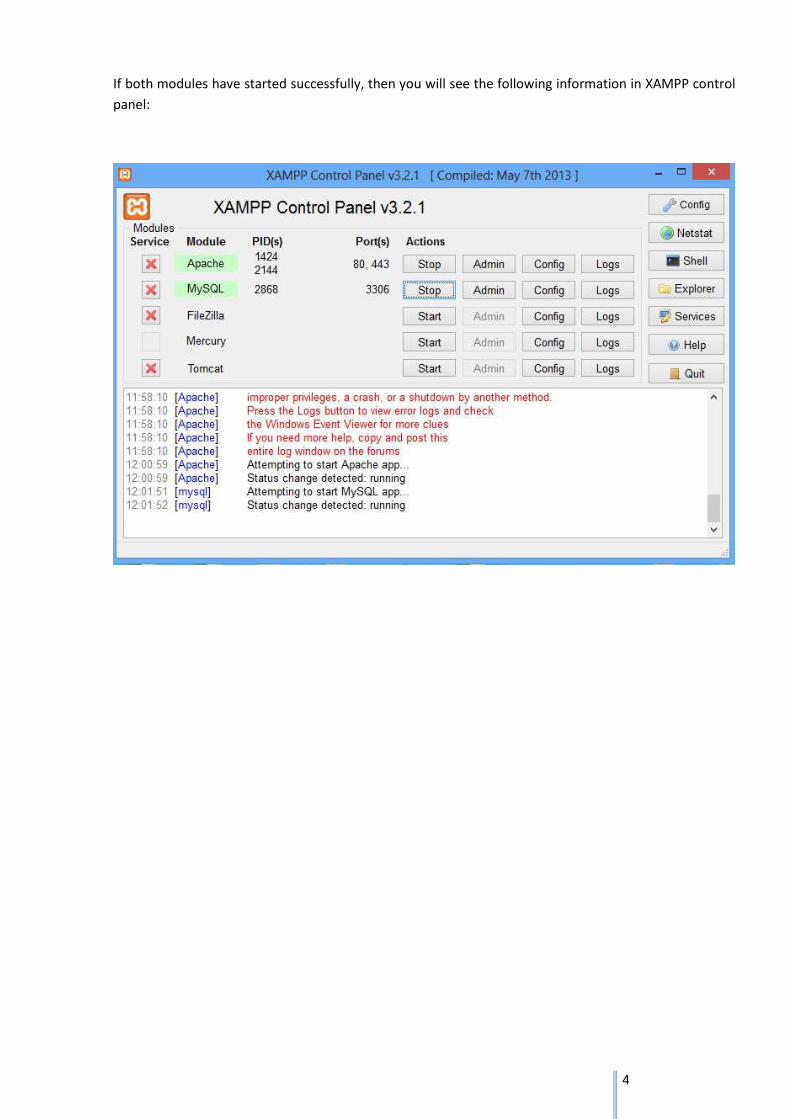
If both modules have started successfully, then you will see the following information in XAMPP control
panel:

5
STEP 2: Creating Database
Now we will create new database to implement a SensMax counting system structure in it. To proceed,
please, open your web browser and type in address bar localhost and press enter. If everything is fine
you will see the following starting window:
Select the communication language and you will proceed to XAMPP interface,
where you should select phpMyAdmin in a tools section in the lower left corner.
Click on Database section in the menu. To create new database enter its name (e.g. sensweb) and click
Create database as it is shown in a picture below:
6
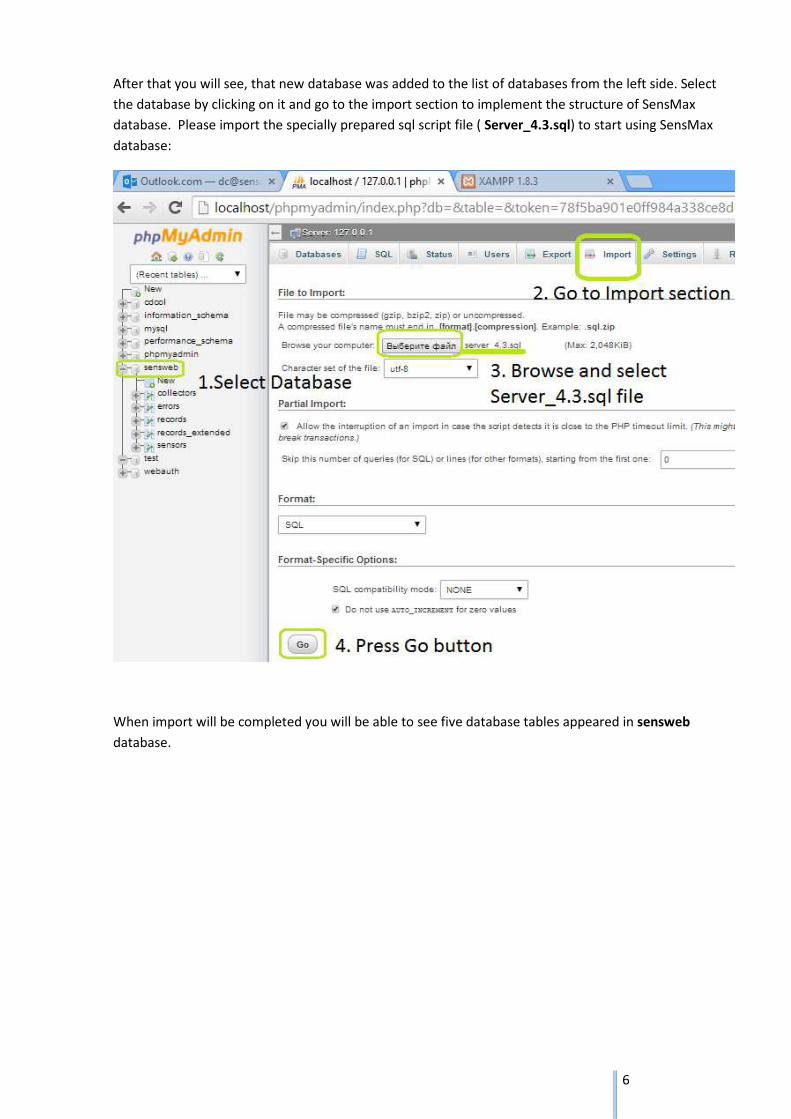
After that you will see, that new database was added to the list of databases from the left side. Select
the database by clicking on it and go to the import section to implement the structure of SensMax
database. Please import the specially prepared sql script file ( Server_4.3.sql) to start using SensMax
database:
When import will be completed you will be able to see five database tables appeared in sensweb
database.
7
CONFIGURING SENSMAX HARDWARE FOR WORK WITH MYSQL
DATABASE
STEP 1: Server
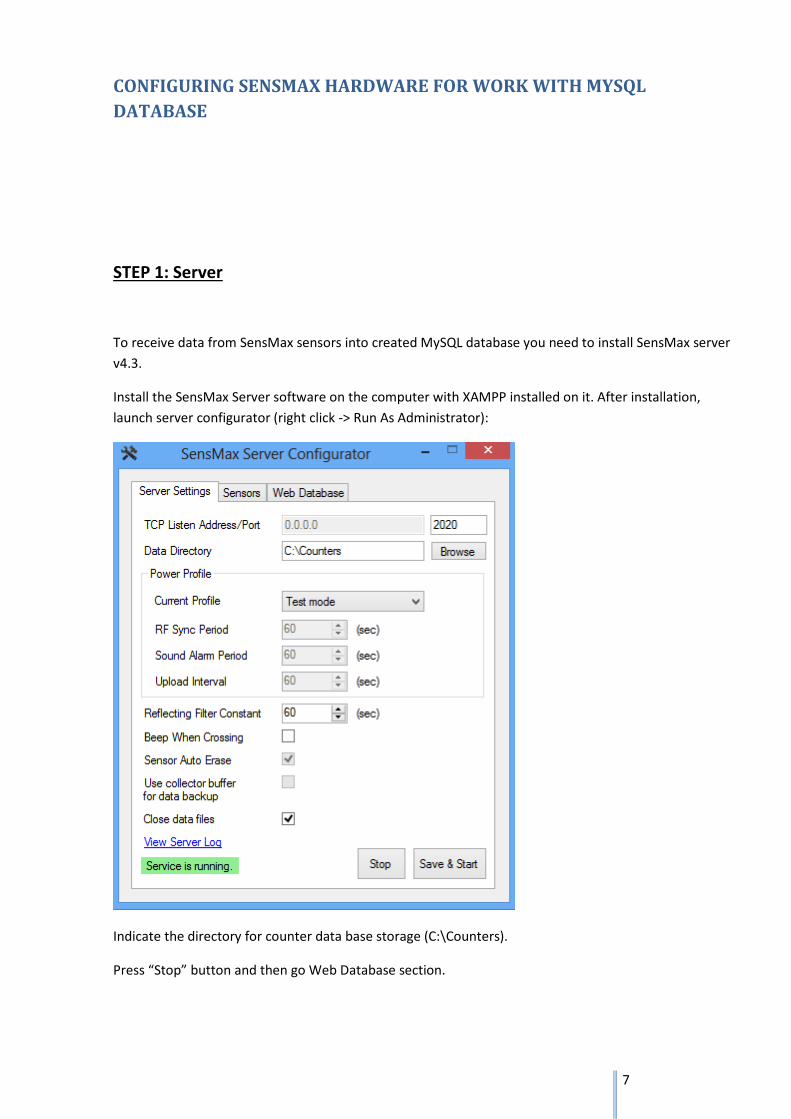
To receive data from SensMax sensors into created MySQL database you need to install SensMax server
v4.3.
Install the SensMax Server software on the computer with XAMPP installed on it. After installation,
launch server configurator (right click -> Run As Administrator):
Indicate the directory for counter data base storage (C:\Counters).
Press “Stop” button and then go Web Database section.
8
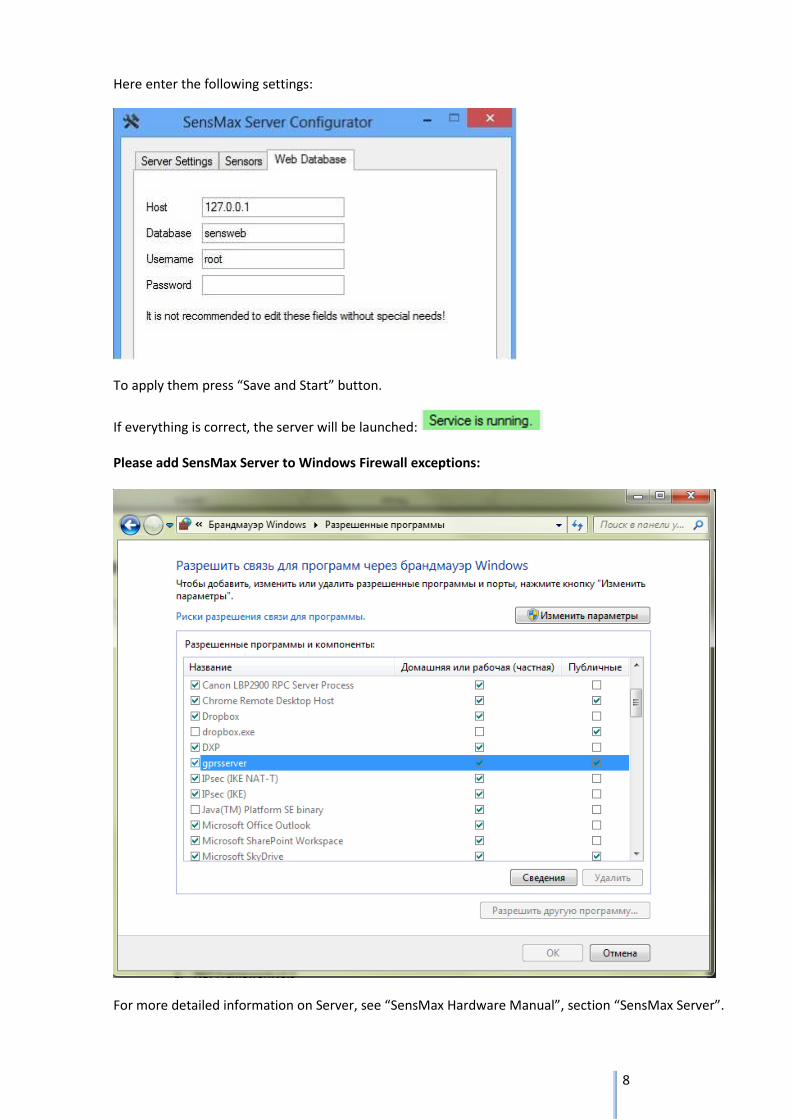
Here enter the following settings:
To apply them press “Save and Start” button.
If everything is correct, the server will be launched:
Please add SensMax Server to Windows Firewall exceptions:
For more detailed information on Server, see “SensMax Hardware Manual”, section “SensMax Server”.
9
STEP 2: Data collector
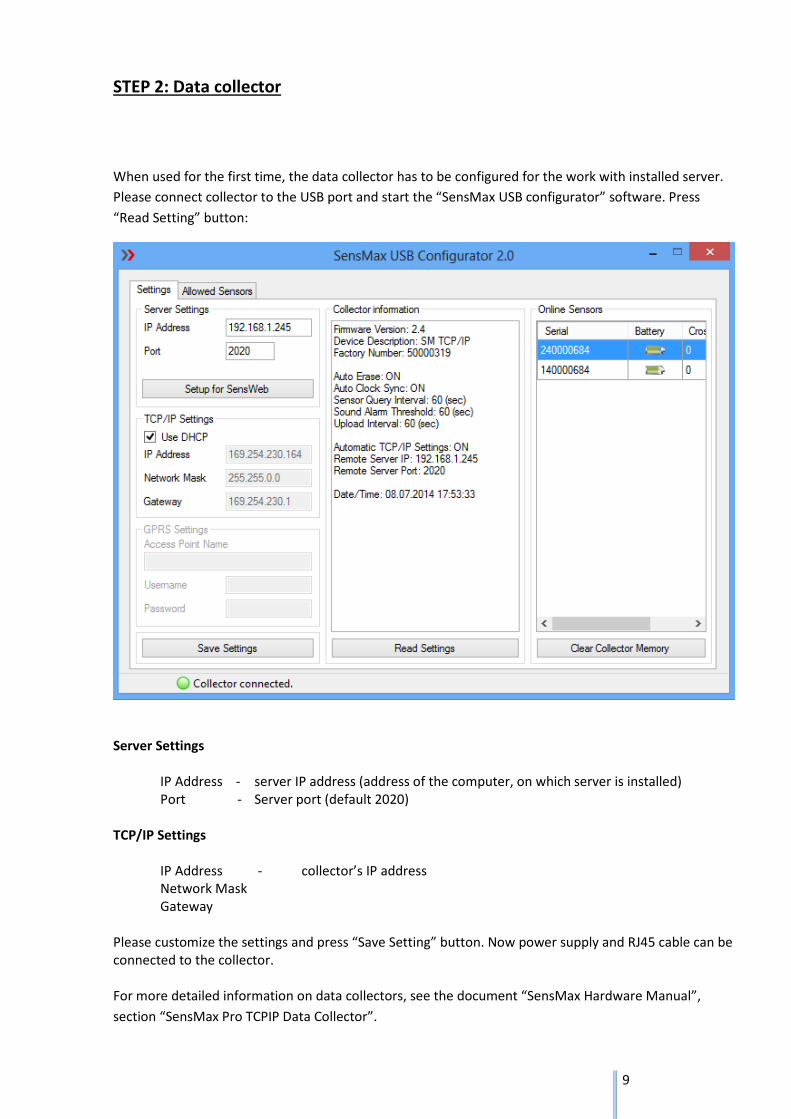
When used for the first time, the data collector has to be configured for the work with installed server.
Please connect collector to the USB port and start the “SensMax USB configurator” software. Press
“Read Setting” button:
Server Settings
IP Address - server IP address (address of the computer, on which server is installed)
Port - Server port (default 2020)
TCP/IP Settings
IP Address - collector’s IP address
Network Mask
Gateway
Please customize the settings and press “Save Setting” button. Now power supply and RJ45 cable can be
connected to the collector.
For more detailed information on data collectors, see the document “SensMax Hardware Manual”,
section “SensMax Pro TCPIP Data Collector”.
10
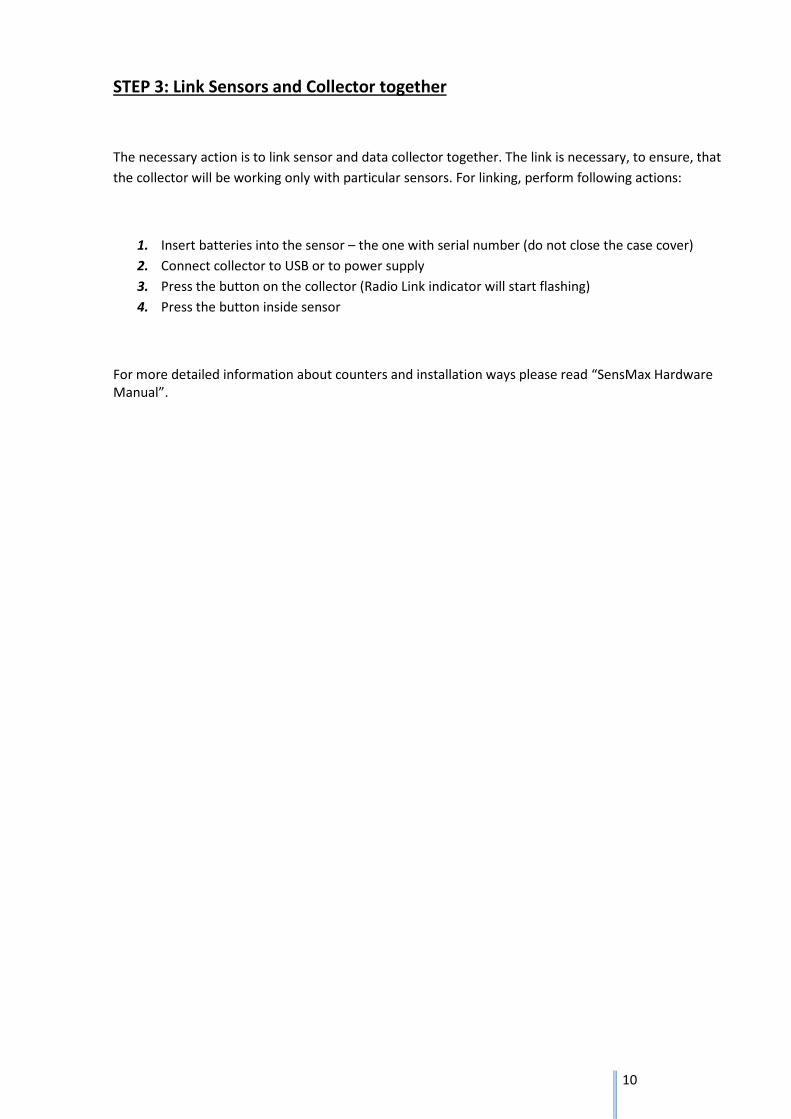
STEP 3: Link Sensors and Collector together
The necessary action is to link sensor and data collector together. The link is necessary, to ensure, that
the collector will be working only with particular sensors. For linking, perform following actions:
1. Insert batteries into the sensor – the one with serial number (do not close the case cover)
2. Connect collector to USB or to power supply
3. Press the button on the collector (Radio Link indicator will start flashing)
4. Press the button inside sensor
For more detailed information about counters and installation ways please read “SensMax Hardware
Manual”.
11
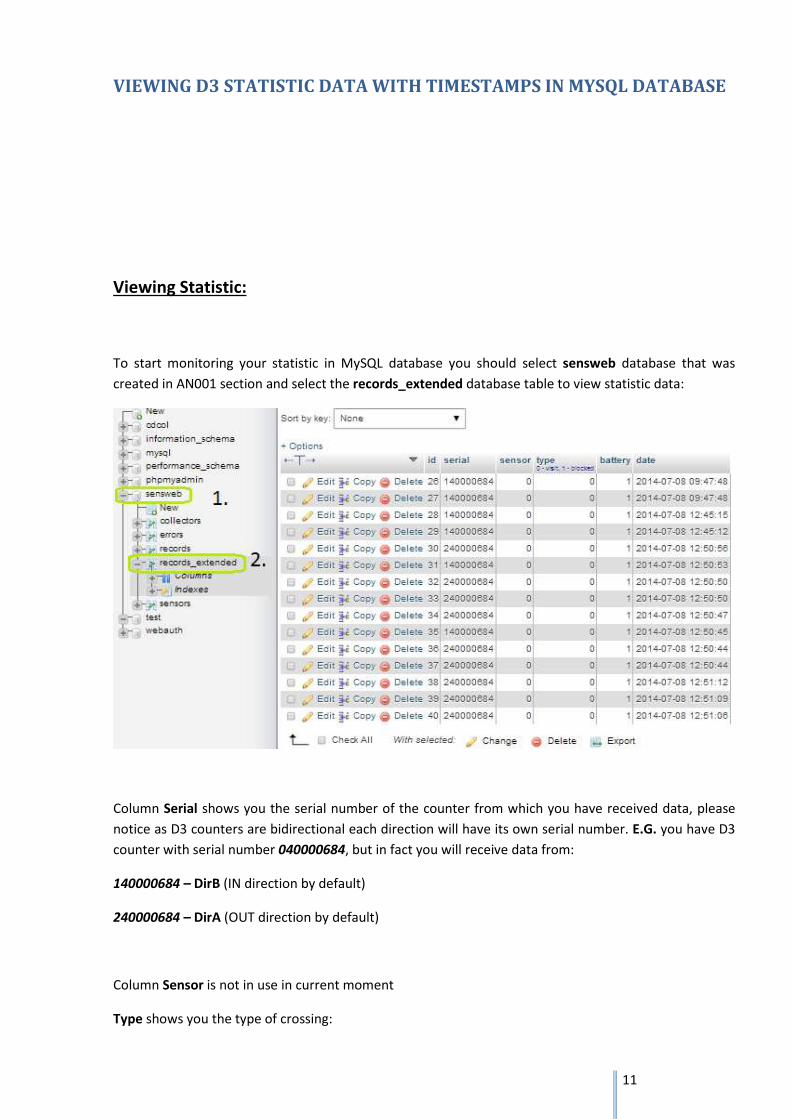
VIEWING D3 STATISTIC DATA WITH TIMESTAMPS IN MYSQL DATABASE
Viewing Statistic:
To start monitoring your statistic in MySQL database you should select sensweb database that was
created in AN001 section and select the records_extended database table to view statistic data:
Column Serial shows you the serial number of the counter from which you have received data, please
notice as D3 counters are bidirectional each direction will have its own serial number. E.G. you have D3
counter with serial number 040000684, but in fact you will receive data from:
140000684 – DirB (IN direction by default)
240000684 – DirA (OUT direction by default)
Column Sensor is not in use in current moment
Type shows you the type of crossing:

12
0 – Stands for a visitor period)
1 – Stands for a sensor blocking (when sensors do not see each other for a long period)
Battery shows you a level of charge, 1 is charged, 0 is discharged.
In Date column you will be able to find the precise date and time when crossing had been made.
3 0bearing parts d3 0l9 8 d3 0l11 8 d3 0l13 8 d3 0l15 8 d3 0l17 8 d3 0l19 8 d3 0l21 8 d3 0l23 8 d3 0
3 5rollering units d3 5l11 8 d3 5l13 8 d3 5l15 8 d3 5l17 8 d3 5l19 8 d3 5l21 8 d3 5l23 8 d3 5l25 8 d