an introduction to digital video creation: video capture ...lehman/edci663/dv guide...
TRANSCRIPT
An Introduction to Digital Video Creation: Video Capture, Editing, and More
James D. Lehman Educational Technology
Purdue University

Introduction to Digital Video Creation 2
Introduction
Digital video today can come in many forms. However, for multimedia production, only a few digital video formats are common. These include: MPEG, QuickTime, AVI (now obsolete), Windows Media, Real Media, and the new Flash Video. For CD-ROM and DVD-based multimedia, and to a lesser extent web-based multimedia, MPEG is a popular choice that offers high quality. However, MPEG requires extensive front-end processing for the best quality, and it is difficult or impossible to edit MPEG files, once produced, because of the way they are compressed. Real Media is the most popular streaming media format on the web, but it does not work well for the higher bandwidth of disc-delivered multimedia. Flash Video is a new entry that promises to be especially effective for web-based video, because Flash is already established as a tool for web-based multimedia. QuickTime and Windows Media and both span a range of applications from disc-based media to web-based streaming delivery. Because of their versatility, this guide focuses primarily on those formats.
Capturing Source Video To create a QuickTime or other digital movie, one first begins with video source material. In the past, all source material was in analog format and required digitization to be made into a digital movie. (See the section in the back of this guide about capturing analog video.) Today, digital camcorders can be used to capture video in digital format directly. Regardless of the source, basic principles for capturing good source video material are the same.
1. Plan your video shots Plan the video shots that you will want in advance. Keep in mind that you will put your video together from edited clips; it is preferable to make multiple short video shots rather than one long one.
2. Use the highest quality video format available Good source material goes a long way toward yielding good digital video files for multimedia. Among analog consumer formats, Hi8 and S-VHS are superior to standard VHS. MiniDV, the consumer quality digital video format, is superior to consumer level analog formats. Professional DV formats, such as DVCPro and DVCam, are even better. Three CCD digital camcorders generally offer superior results to single CCD cameras.
3. Always shoot extra video Start the camera rolling for at least 5 seconds before each video shot, and keep it rolling for 5 seconds after the end of the shot. This will ensure that you have enough good footage to edit. Also, shoot several times as much total footage as you think you will need.
4. Use good lighting Well-lit video tends to compress better than poorly lit video. Use outdoor shots or lighting indoors to achieve best results.
5. Use a tripod A tripod can dramatically improve video quality. A handheld camera almost always results in some jitters, even when you try your best to keep still. Not only does this result in poor quality original video, but these movements negatively impact the video compression process

Introduction to Digital Video Creation 3
when preparing a video file for CD/DVD or Web delivery. If a tripod is not available, brace the camera on something.
6. Frame people tightly When shooting a person, it is usually preferable frame the individual tightly using a face shot (closeup) or the upper body shot (medium shot) unless there is a reason for wider shot (e.g., to show a background, illustrate dance steps). This will yield a clearer final movie.
7. Allow for appropriate headroom and lead space Avoid too much headroom (the space between the top of a person's head and the top of the video frame) when shooting people. Lead space refers to the space in front of an object. Leave lead space in the direction a person is looking and in front of moving objects.
8. Avoid background detail and movement Detail in the background, especially movement (e.g., tree leaves swaying in the breeze), creates problems during compression and may result in pixellation or other artifacts. Use a plain, static background to avoid these problems.
9. Avoid backlight Watch out for situations where the background is brighter than the subject in the foreground. The subject will turn out too dark.
10. Track motion loosely When shooting moving objects, don't try to follow the action too closely. It will result in blurry and dizzying video. Go to a wider shot to capture the entire field of motion.
11. Minimize camera motion Panning, pivoting the camera from side to side from a fixed point, can be useful to track motion or reveal a large object such as a building or natural background. When panning, start with a fixed shot and then pan slowly to the left or right. Zooming in and out is a common error of novices; avoid it whenever possible. Instead, set the desired degree of zoom before beginning the shot.
12. Use a microphone To capture good audio, use a microphone or, at a minimum, isolate your subject from background noises.
Editing Video There are many products on the market that permit an individual to edit digital video files, whether digitized from analog source material or captured directly from a digital camcorder. These include high-end systems from Media100 and Avid, video editing mainstay Adobe Premiere, and simpler packages such as Apple’s iMovie and Windows Movie Maker. This guide introduces iMovie, which is available for Apple Macintosh computers and outputs QuickTime video files, and Movie Maker, which is available in Windows and outputs Windows Media files, because these are popular and widely available. The basic steps in video editing are similar regardless of the particular editing product that you use.
Introduction to Digital Video Creation 4
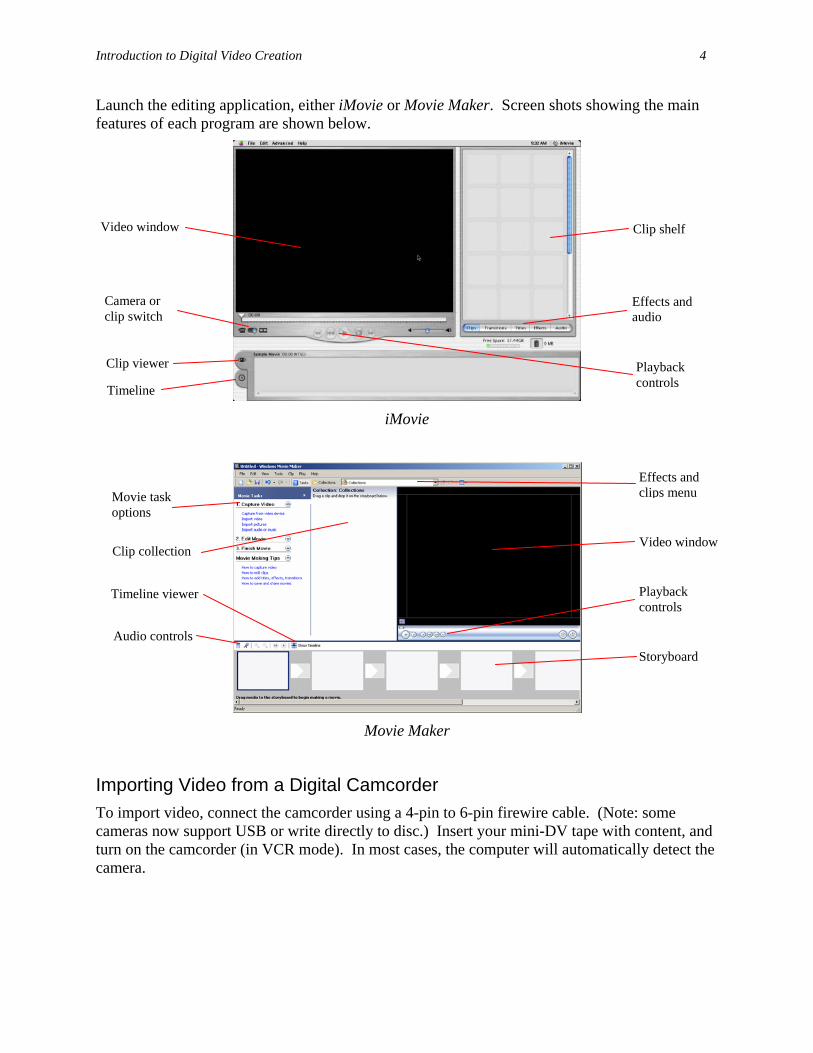
Launch the editing application, either iMovie or Movie Maker. Screen shots showing the main features of each program are shown below.
iMovie
Movie Maker
Importing Video from a Digital Camcorder To import video, connect the camcorder using a 4-pin to 6-pin firewire cable. (Note: some cameras now support USB or write directly to disc.) Insert your mini-DV tape with content, and turn on the camcorder (in VCR mode). In most cases, the computer will automatically detect the camera.
Clip collection
Effects and audio
Video window
Camera or clip switch
Clip viewer
Timeline
Playback controls
Video window
Playback controls
Clip shelf
Timeline viewer
Movie task options
Audio controls
Effects and clips menu
Storyboard
Introduction to Digital Video Creation 5
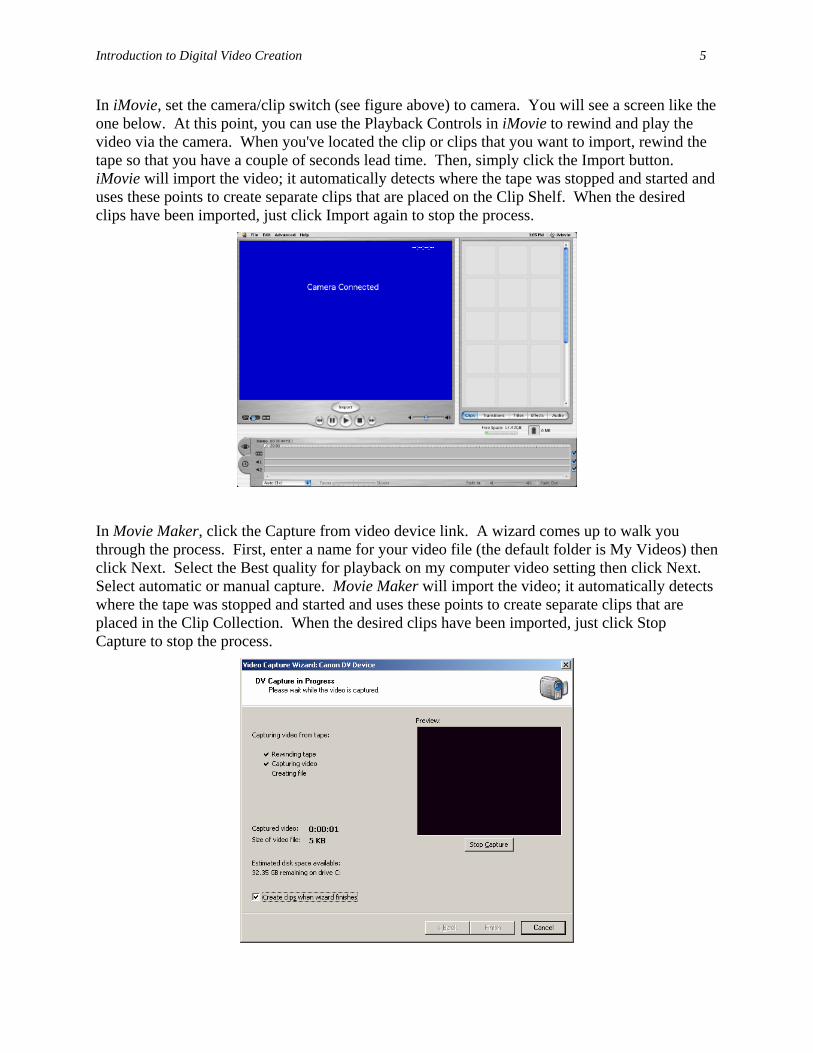
In iMovie, set the camera/clip switch (see figure above) to camera. You will see a screen like the one below. At this point, you can use the Playback Controls in iMovie to rewind and play the video via the camera. When you've located the clip or clips that you want to import, rewind the tape so that you have a couple of seconds lead time. Then, simply click the Import button. iMovie will import the video; it automatically detects where the tape was stopped and started and uses these points to create separate clips that are placed on the Clip Shelf. When the desired clips have been imported, just click Import again to stop the process.
In Movie Maker, click the Capture from video device link. A wizard comes up to walk you through the process. First, enter a name for your video file (the default folder is My Videos) then click Next. Select the Best quality for playback on my computer video setting then click Next. Select automatic or manual capture. Movie Maker will import the video; it automatically detects where the tape was stopped and started and uses these points to create separate clips that are placed in the Clip Collection. When the desired clips have been imported, just click Stop Capture to stop the process.
Introduction to Digital Video Creation 6
Working with Video Clips iMovie
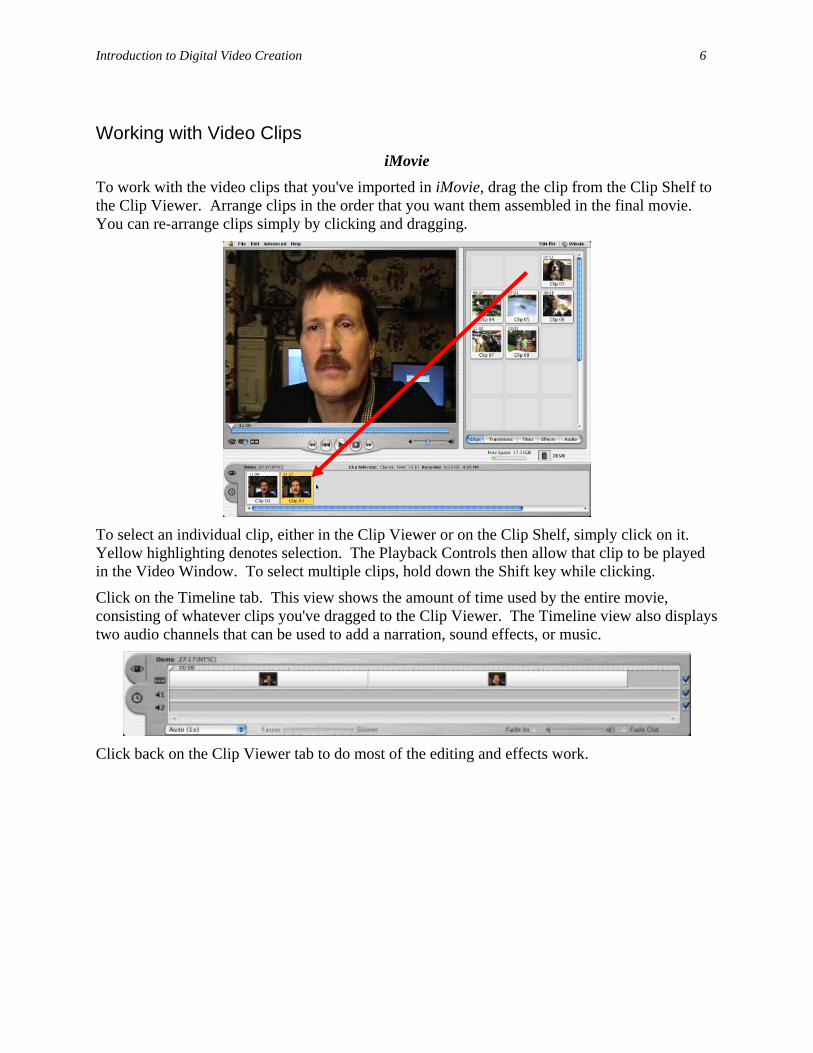
To work with the video clips that you've imported in iMovie, drag the clip from the Clip Shelf to the Clip Viewer. Arrange clips in the order that you want them assembled in the final movie. You can re-arrange clips simply by clicking and dragging.
To select an individual clip, either in the Clip Viewer or on the Clip Shelf, simply click on it. Yellow highlighting denotes selection. The Playback Controls then allow that clip to be played in the Video Window. To select multiple clips, hold down the Shift key while clicking.
Click on the Timeline tab. This view shows the amount of time used by the entire movie, consisting of whatever clips you've dragged to the Clip Viewer. The Timeline view also displays two audio channels that can be used to add a narration, sound effects, or music.
Click back on the Clip Viewer tab to do most of the editing and effects work.
Introduction to Digital Video Creation 7
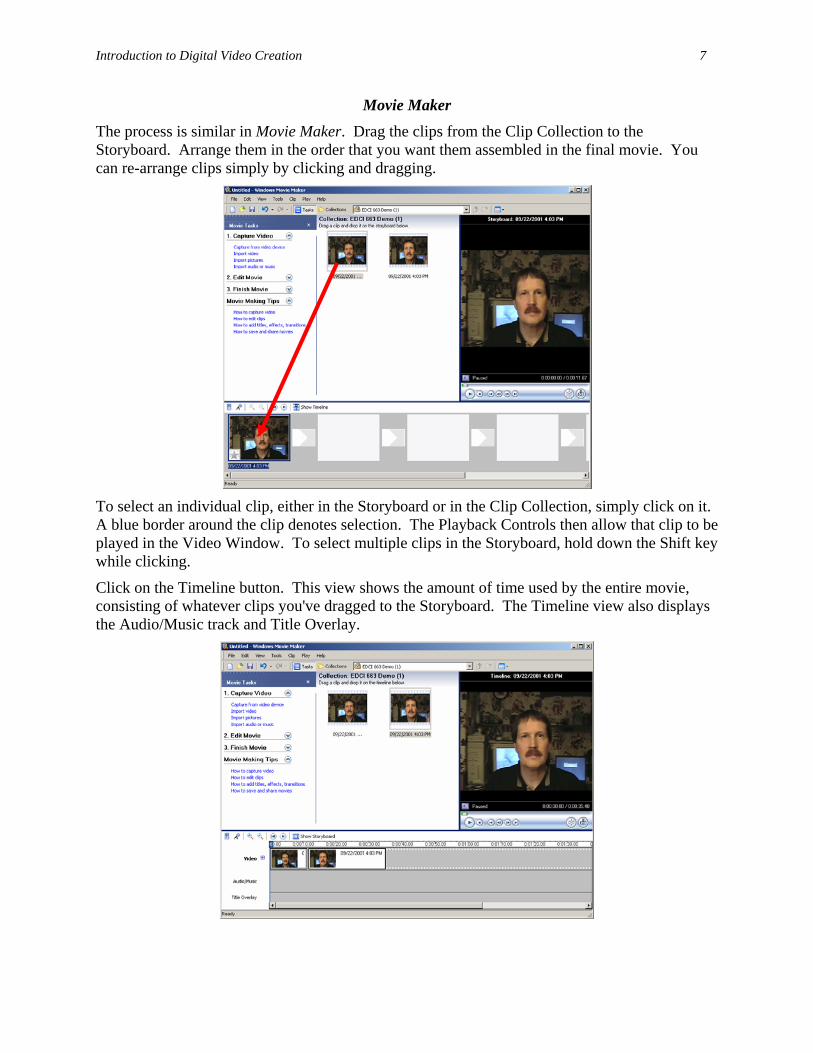
Movie Maker The process is similar in Movie Maker. Drag the clips from the Clip Collection to the Storyboard. Arrange them in the order that you want them assembled in the final movie. You can re-arrange clips simply by clicking and dragging.
To select an individual clip, either in the Storyboard or in the Clip Collection, simply click on it. A blue border around the clip denotes selection. The Playback Controls then allow that clip to be played in the Video Window. To select multiple clips in the Storyboard, hold down the Shift key while clicking.
Click on the Timeline button. This view shows the amount of time used by the entire movie, consisting of whatever clips you've dragged to the Storyboard. The Timeline view also displays the Audio/Music track and Title Overlay.
Introduction to Digital Video Creation 8
Editing a Clip iMovie
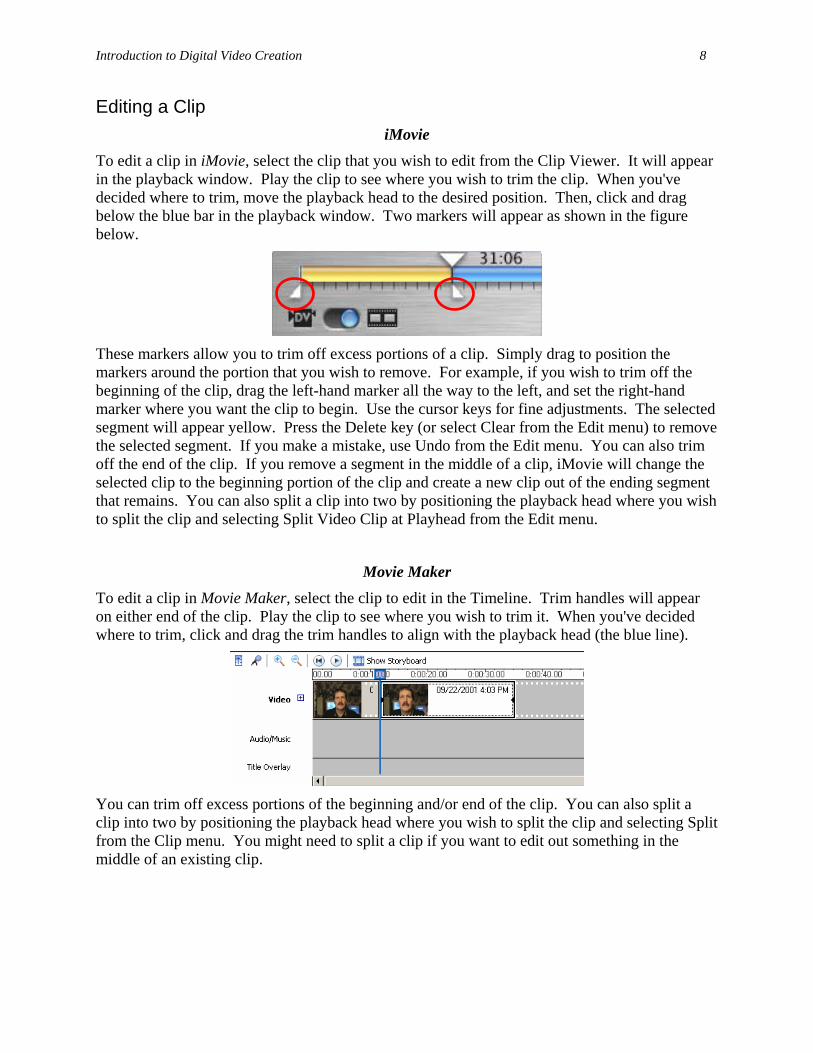
To edit a clip in iMovie, select the clip that you wish to edit from the Clip Viewer. It will appear in the playback window. Play the clip to see where you wish to trim the clip. When you've decided where to trim, move the playback head to the desired position. Then, click and drag below the blue bar in the playback window. Two markers will appear as shown in the figure below.
These markers allow you to trim off excess portions of a clip. Simply drag to position the markers around the portion that you wish to remove. For example, if you wish to trim off the beginning of the clip, drag the left-hand marker all the way to the left, and set the right-hand marker where you want the clip to begin. Use the cursor keys for fine adjustments. The selected segment will appear yellow. Press the Delete key (or select Clear from the Edit menu) to remove the selected segment. If you make a mistake, use Undo from the Edit menu. You can also trim off the end of the clip. If you remove a segment in the middle of a clip, iMovie will change the selected clip to the beginning portion of the clip and create a new clip out of the ending segment that remains. You can also split a clip into two by positioning the playback head where you wish to split the clip and selecting Split Video Clip at Playhead from the Edit menu.
Movie Maker To edit a clip in Movie Maker, select the clip to edit in the Timeline. Trim handles will appear on either end of the clip. Play the clip to see where you wish to trim it. When you've decided where to trim, click and drag the trim handles to align with the playback head (the blue line).
You can trim off excess portions of the beginning and/or end of the clip. You can also split a clip into two by positioning the playback head where you wish to split the clip and selecting Split from the Clip menu. You might need to split a clip if you want to edit out something in the middle of an existing clip.
Introduction to Digital Video Creation 9
Adding Titles iMovie
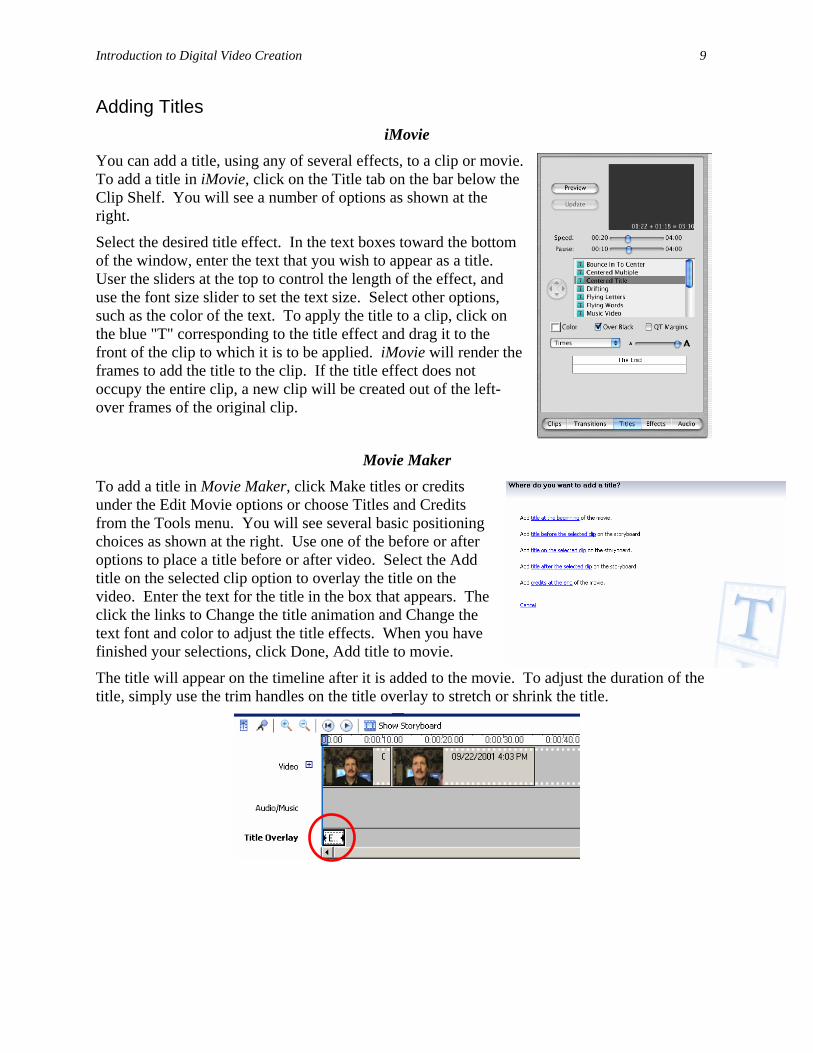
You can add a title, using any of several effects, to a clip or movie. To add a title in iMovie, click on the Title tab on the bar below the Clip Shelf. You will see a number of options as shown at the right.
Select the desired title effect. In the text boxes toward the bottom of the window, enter the text that you wish to appear as a title. User the sliders at the top to control the length of the effect, and use the font size slider to set the text size. Select other options, such as the color of the text. To apply the title to a clip, click on the blue "T" corresponding to the title effect and drag it to the front of the clip to which it is to be applied. iMovie will render the frames to add the title to the clip. If the title effect does not occupy the entire clip, a new clip will be created out of the left-over frames of the original clip.
Movie Maker To add a title in Movie Maker, click Make titles or credits under the Edit Movie options or choose Titles and Credits from the Tools menu. You will see several basic positioning choices as shown at the right. Use one of the before or after options to place a title before or after video. Select the Add title on the selected clip option to overlay the title on the video. Enter the text for the title in the box that appears. The click the links to Change the title animation and Change the text font and color to adjust the title effects. When you have finished your selections, click Done, Add title to movie.
The title will appear on the timeline after it is added to the movie. To adjust the duration of the title, simply use the trim handles on the title overlay to stretch or shrink the title.
Introduction to Digital Video Creation 10
Adding Transitions iMovie
You can add various transitions at the beginning or end of the movie or between two clips. To view the Transitions, click the Transitions tab. You will see the options shown at the right.
Select the desired transition and use the slider to set the length of the effect. For some transitions, you can also set the direction of the effect using the arrows shown. Drag the transition symbol (the blue-green icon next to the name) to the appropriate position, such as between two clips. iMovie will render the affected clips with the transition. The transition will appear on the Clip Viewer as a symbol. To remove a transition, simply select the symbol from the Clip Viewer and press Delete.
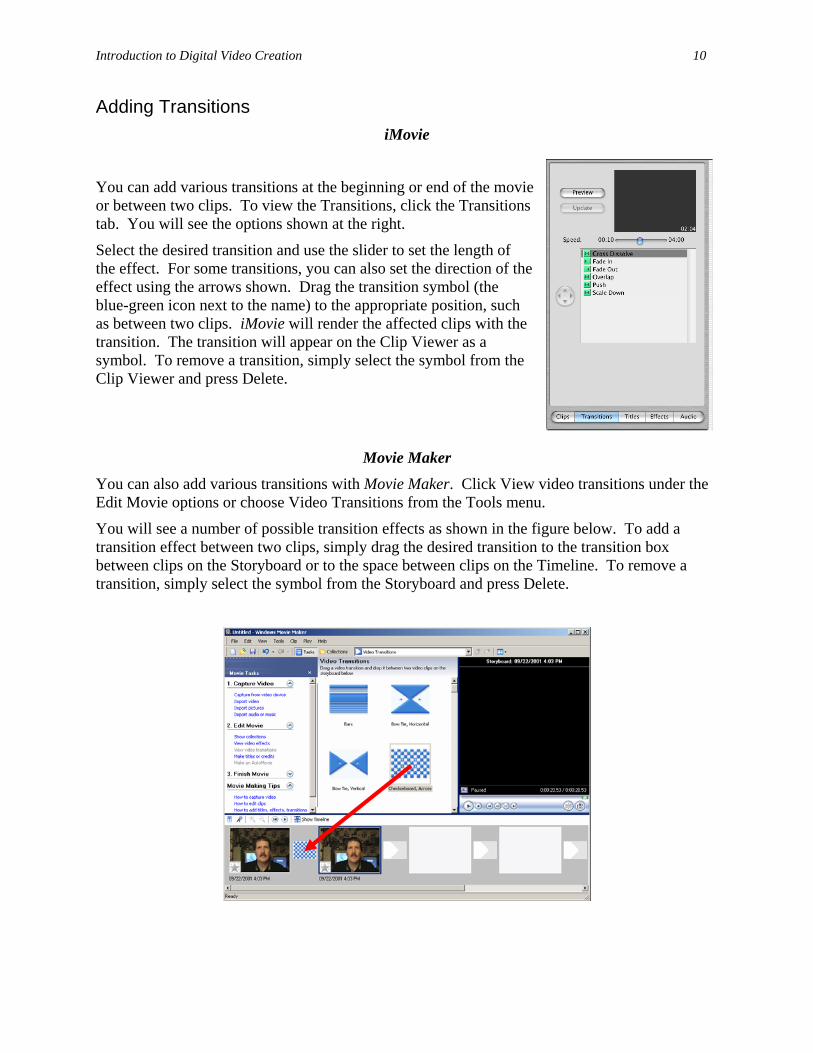
Movie Maker You can also add various transitions with Movie Maker. Click View video transitions under the Edit Movie options or choose Video Transitions from the Tools menu.
You will see a number of possible transition effects as shown in the figure below. To add a transition effect between two clips, simply drag the desired transition to the transition box between clips on the Storyboard or to the space between clips on the Timeline. To remove a transition, simply select the symbol from the Storyboard and press Delete.
Introduction to Digital Video Creation 11
Adding Effects iMovie
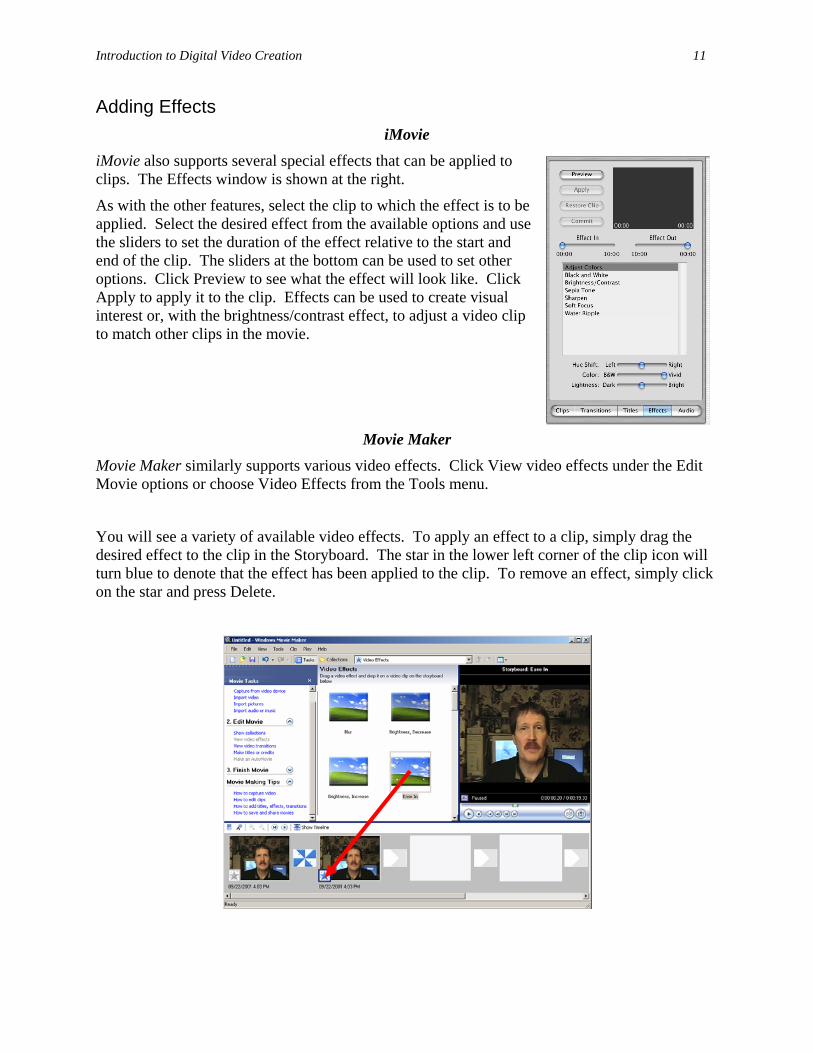
iMovie also supports several special effects that can be applied to clips. The Effects window is shown at the right.
As with the other features, select the clip to which the effect is to be applied. Select the desired effect from the available options and use the sliders to set the duration of the effect relative to the start and end of the clip. The sliders at the bottom can be used to set other options. Click Preview to see what the effect will look like. Click Apply to apply it to the clip. Effects can be used to create visual interest or, with the brightness/contrast effect, to adjust a video clip to match other clips in the movie.
Movie Maker Movie Maker similarly supports various video effects. Click View video effects under the Edit Movie options or choose Video Effects from the Tools menu.
You will see a variety of available video effects. To apply an effect to a clip, simply drag the desired effect to the clip in the Storyboard. The star in the lower left corner of the clip icon will turn blue to denote that the effect has been applied to the clip. To remove an effect, simply click on the star and press Delete.
Introduction to Digital Video Creation 12
Adding Audio iMovie
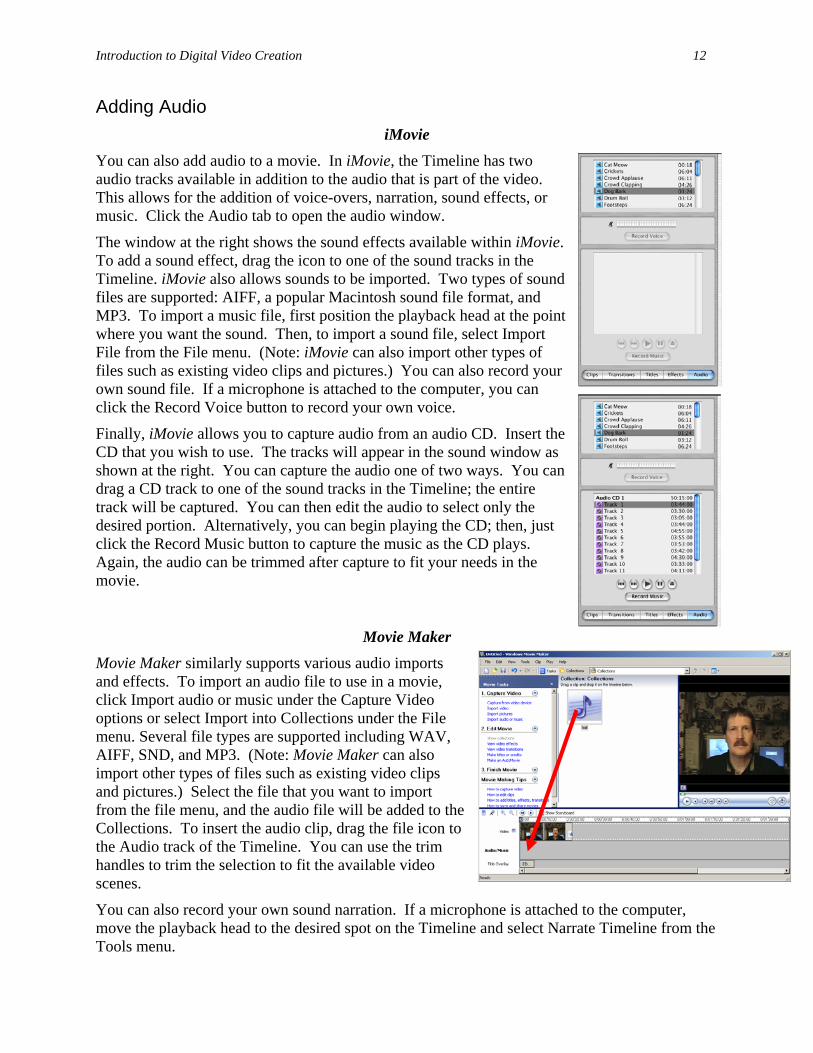
You can also add audio to a movie. In iMovie, the Timeline has two audio tracks available in addition to the audio that is part of the video. This allows for the addition of voice-overs, narration, sound effects, or music. Click the Audio tab to open the audio window.
The window at the right shows the sound effects available within iMovie. To add a sound effect, drag the icon to one of the sound tracks in the Timeline. iMovie also allows sounds to be imported. Two types of sound files are supported: AIFF, a popular Macintosh sound file format, and MP3. To import a music file, first position the playback head at the point where you want the sound. Then, to import a sound file, select Import File from the File menu. (Note: iMovie can also import other types of files such as existing video clips and pictures.) You can also record your own sound file. If a microphone is attached to the computer, you can click the Record Voice button to record your own voice.
Finally, iMovie allows you to capture audio from an audio CD. Insert the CD that you wish to use. The tracks will appear in the sound window as shown at the right. You can capture the audio one of two ways. You can drag a CD track to one of the sound tracks in the Timeline; the entire track will be captured. You can then edit the audio to select only the desired portion. Alternatively, you can begin playing the CD; then, just click the Record Music button to capture the music as the CD plays. Again, the audio can be trimmed after capture to fit your needs in the movie.
Movie Maker Movie Maker similarly supports various audio imports and effects. To import an audio file to use in a movie, click Import audio or music under the Capture Video options or select Import into Collections under the File menu. Several file types are supported including WAV, AIFF, SND, and MP3. (Note: Movie Maker can also import other types of files such as existing video clips and pictures.) Select the file that you want to import from the file menu, and the audio file will be added to the Collections. To insert the audio clip, drag the file icon to the Audio track of the Timeline. You can use the trim handles to trim the selection to fit the available video scenes.
You can also record your own sound narration. If a microphone is attached to the computer, move the playback head to the desired spot on the Timeline and select Narrate Timeline from the Tools menu.
Introduction to Digital Video Creation 13
Exporting Your Movie iMovie
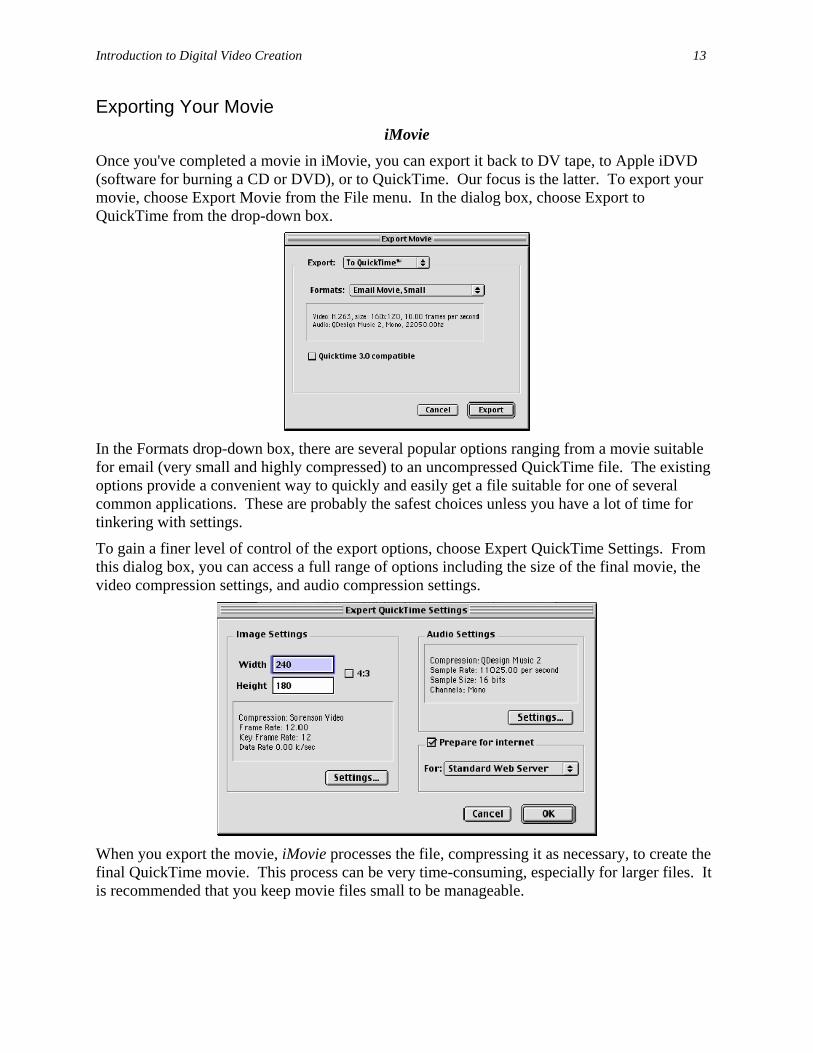
Once you've completed a movie in iMovie, you can export it back to DV tape, to Apple iDVD (software for burning a CD or DVD), or to QuickTime. Our focus is the latter. To export your movie, choose Export Movie from the File menu. In the dialog box, choose Export to QuickTime from the drop-down box.
In the Formats drop-down box, there are several popular options ranging from a movie suitable for email (very small and highly compressed) to an uncompressed QuickTime file. The existing options provide a convenient way to quickly and easily get a file suitable for one of several common applications. These are probably the safest choices unless you have a lot of time for tinkering with settings.
To gain a finer level of control of the export options, choose Expert QuickTime Settings. From this dialog box, you can access a full range of options including the size of the final movie, the video compression settings, and audio compression settings.
When you export the movie, iMovie processes the file, compressing it as necessary, to create the final QuickTime movie. This process can be very time-consuming, especially for larger files. It is recommended that you keep movie files small to be manageable.
Introduction to Digital Video Creation 14
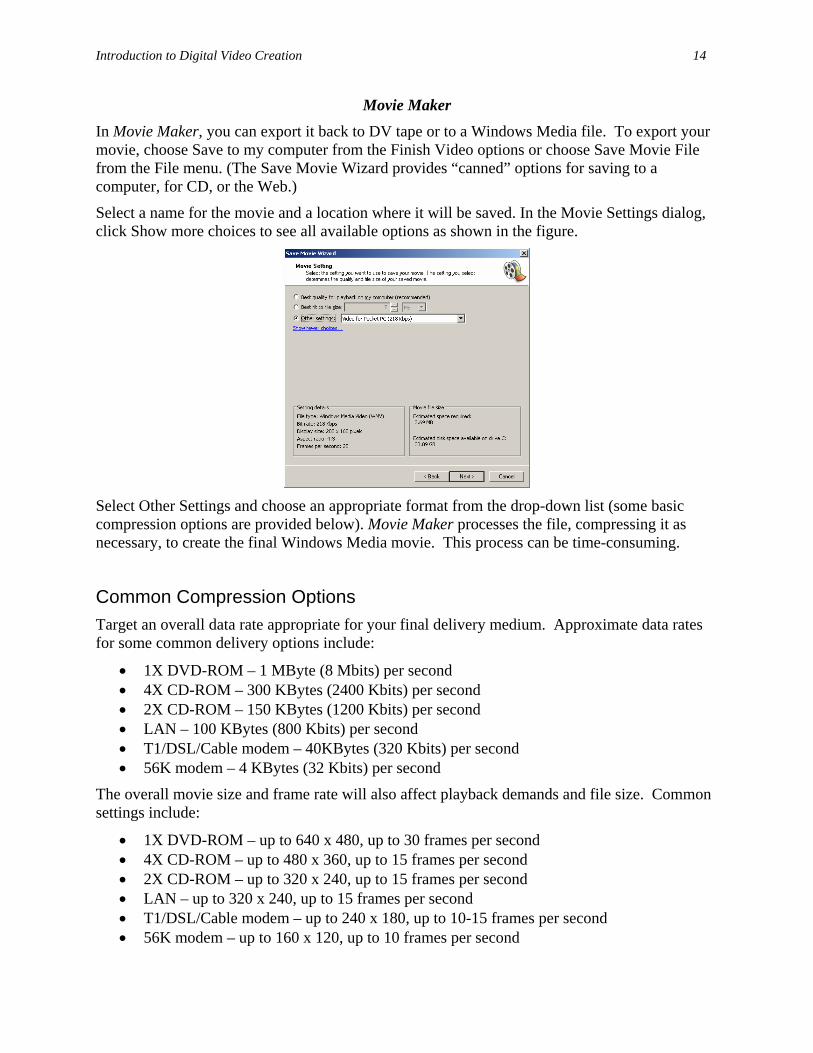
Movie Maker In Movie Maker, you can export it back to DV tape or to a Windows Media file. To export your movie, choose Save to my computer from the Finish Video options or choose Save Movie File from the File menu. (The Save Movie Wizard provides “canned” options for saving to a computer, for CD, or the Web.)
Select a name for the movie and a location where it will be saved. In the Movie Settings dialog, click Show more choices to see all available options as shown in the figure.
Select Other Settings and choose an appropriate format from the drop-down list (some basic compression options are provided below). Movie Maker processes the file, compressing it as necessary, to create the final Windows Media movie. This process can be time-consuming.
Common Compression Options Target an overall data rate appropriate for your final delivery medium. Approximate data rates for some common delivery options include:
• 1X DVD-ROM – 1 MByte (8 Mbits) per second • 4X CD-ROM – 300 KBytes (2400 Kbits) per second • 2X CD-ROM – 150 KBytes (1200 Kbits) per second • LAN – 100 KBytes (800 Kbits) per second • T1/DSL/Cable modem – 40KBytes (320 Kbits) per second • 56K modem – 4 KBytes (32 Kbits) per second
The overall movie size and frame rate will also affect playback demands and file size. Common settings include:
• 1X DVD-ROM – up to 640 x 480, up to 30 frames per second • 4X CD-ROM – up to 480 x 360, up to 15 frames per second • 2X CD-ROM – up to 320 x 240, up to 15 frames per second • LAN – up to 320 x 240, up to 15 frames per second • T1/DSL/Cable modem – up to 240 x 180, up to 10-15 frames per second • 56K modem – up to 160 x 120, up to 10 frames per second

Introduction to Digital Video Creation 15
The codec, short for compressor/decompressor, handles the compression and later playback of the digital video file. Video codecs generally achieve compression through at least two means: spatial or intraframe compression, which removes redundant data within a single video frame (like still image storage formats), and temporal or interframe compression, which maintains information that changes from frame to frame while discarding the data that stays the same. Because of the latter, setting the frequency of keyframes, the frames used to make temporal comparisons, are important. Some older codecs, such as Cinepak, work best with a keyframe every second. However, newer codecs may need a keyframe only every few seconds.
There are many codecs available to choose from. Finding the best option for a given video clip and application can take a lot of testing. For QuickTime movies, Cinepak was the old standard for CD-ROM delivered media, because it gave good quality without placing heavy processing demands on the computer for playback. However, as computer processing power improved, better codecs, such as Sorenson, were produced. Sorenson, like MPEG, is considered an asymmetric codec because it requires a lot of time to create the compressed file, but it plays back smoothly in real-time. Sorenson generally offers high quality for CD-ROM and DVD-ROM playback. H.263 is a symmetric codec (taking about as much effort to compress as decompress) originally designed for video conferencing applications. It has improved greatly in recent years and now offers good quality for web-based applications.
Windows Media Video (.wmv) format is a subset of the Advanced Streaming Format (.asf) formerly used by Microsoft. [Audio-Video Interleave (.avi) format is an even older Microsoft video file format that is now obsolete but still used.] Windows Media format supports streaming via Microsoft's Media Server or playback of downloaded files through Windows Media Player. Like RealSystem's SureStream technology, it supports variable network connectivity through support for up to five video streams and one audio stream. Windows Media Video format is a proprietary compression scheme, yielding good results, that is similar to MPEG-4.
Other compression schemes include RealSystem's Real Media (.rm), which is appropriate for network delivery of audio, video and other media types. RealSystem files cannot be edited or recompressed once they are encoded. The format supports SMIL, Synchronized Multimedia Integration Language, which permits synchronization of media and actions within a web page in addition to video and audio. SureStream files, when used in conjunction with a RealServer, supports variable playback depending on the user's network connection. MPEG, created by the Motion Pictures Experts Group, is a standard file format and associated compression algorithms to handle video and audio. MPEG-1 produces high-quality video and audio streams at approximately 2x CD-ROM data rates. MPEG-2 produces high-data rate, full broadcast-quality files for DVD, fast CD-ROM, or hard drive playback at 24–30 frames per second and full-screen resolution (720x480, NTSC). MPEG-2 is used for commercial DVDs (DVD-Video). MPEG-4 is the latest version of the standard, and the QuickTime file format was chosen as the foundation of the new standard. While it offers excellent video playback across a wide variety of devices, from satellite TV to cell phones, it has been reported that proprietary schemes, may offer superior results.
While iMovie and Movie Maker only output their respective formats, programs such as Discrete Cleaner and Sorenson Media Squeeze support all popular compressed video formats including QuickTime, Real Media, Windows Media, and MPEG. For best results, use one of these products to get high-quality compression in the smallest possible file size for your medium.
Introduction to Digital Video Creation 16
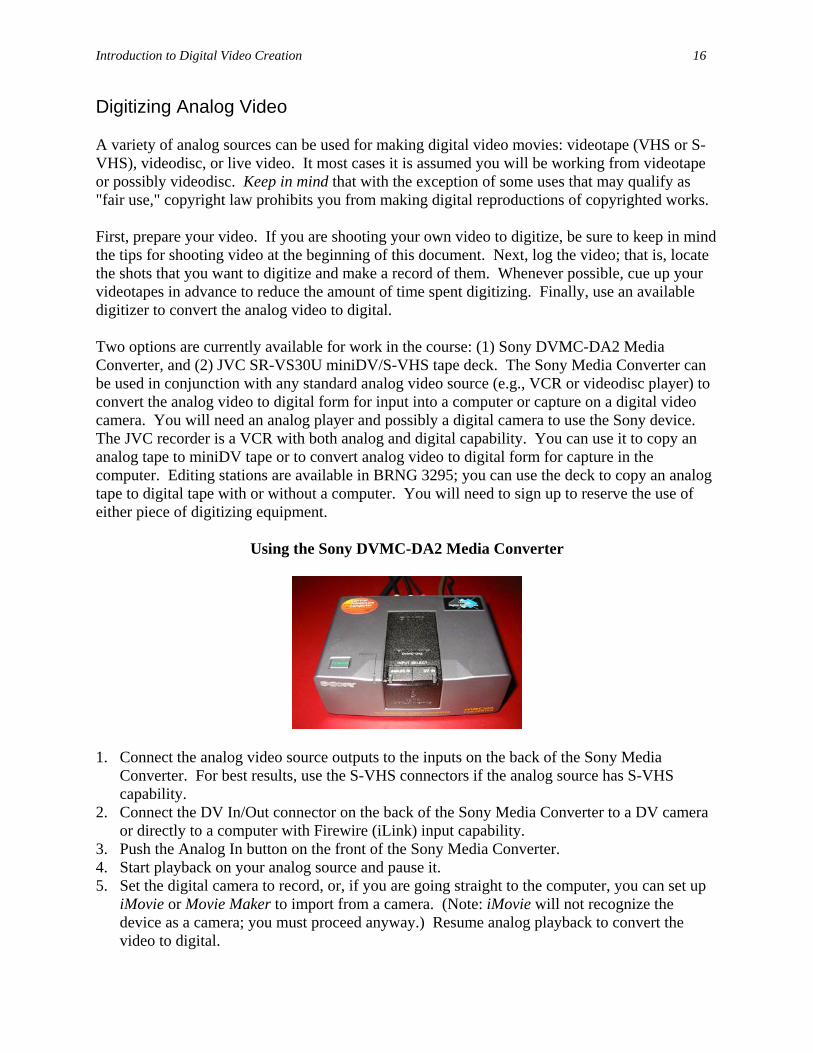
Digitizing Analog Video A variety of analog sources can be used for making digital video movies: videotape (VHS or S-VHS), videodisc, or live video. It most cases it is assumed you will be working from videotape or possibly videodisc. Keep in mind that with the exception of some uses that may qualify as "fair use," copyright law prohibits you from making digital reproductions of copyrighted works. First, prepare your video. If you are shooting your own video to digitize, be sure to keep in mind the tips for shooting video at the beginning of this document. Next, log the video; that is, locate the shots that you want to digitize and make a record of them. Whenever possible, cue up your videotapes in advance to reduce the amount of time spent digitizing. Finally, use an available digitizer to convert the analog video to digital. Two options are currently available for work in the course: (1) Sony DVMC-DA2 Media Converter, and (2) JVC SR-VS30U miniDV/S-VHS tape deck. The Sony Media Converter can be used in conjunction with any standard analog video source (e.g., VCR or videodisc player) to convert the analog video to digital form for input into a computer or capture on a digital video camera. You will need an analog player and possibly a digital camera to use the Sony device. The JVC recorder is a VCR with both analog and digital capability. You can use it to copy an analog tape to miniDV tape or to convert analog video to digital form for capture in the computer. Editing stations are available in BRNG 3295; you can use the deck to copy an analog tape to digital tape with or without a computer. You will need to sign up to reserve the use of either piece of digitizing equipment.
Using the Sony DVMC-DA2 Media Converter
1. Connect the analog video source outputs to the inputs on the back of the Sony Media
Converter. For best results, use the S-VHS connectors if the analog source has S-VHS capability.
2. Connect the DV In/Out connector on the back of the Sony Media Converter to a DV camera or directly to a computer with Firewire (iLink) input capability.
3. Push the Analog In button on the front of the Sony Media Converter. 4. Start playback on your analog source and pause it. 5. Set the digital camera to record, or, if you are going straight to the computer, you can set up
iMovie or Movie Maker to import from a camera. (Note: iMovie will not recognize the device as a camera; you must proceed anyway.) Resume analog playback to convert the video to digital.
Introduction to Digital Video Creation 17
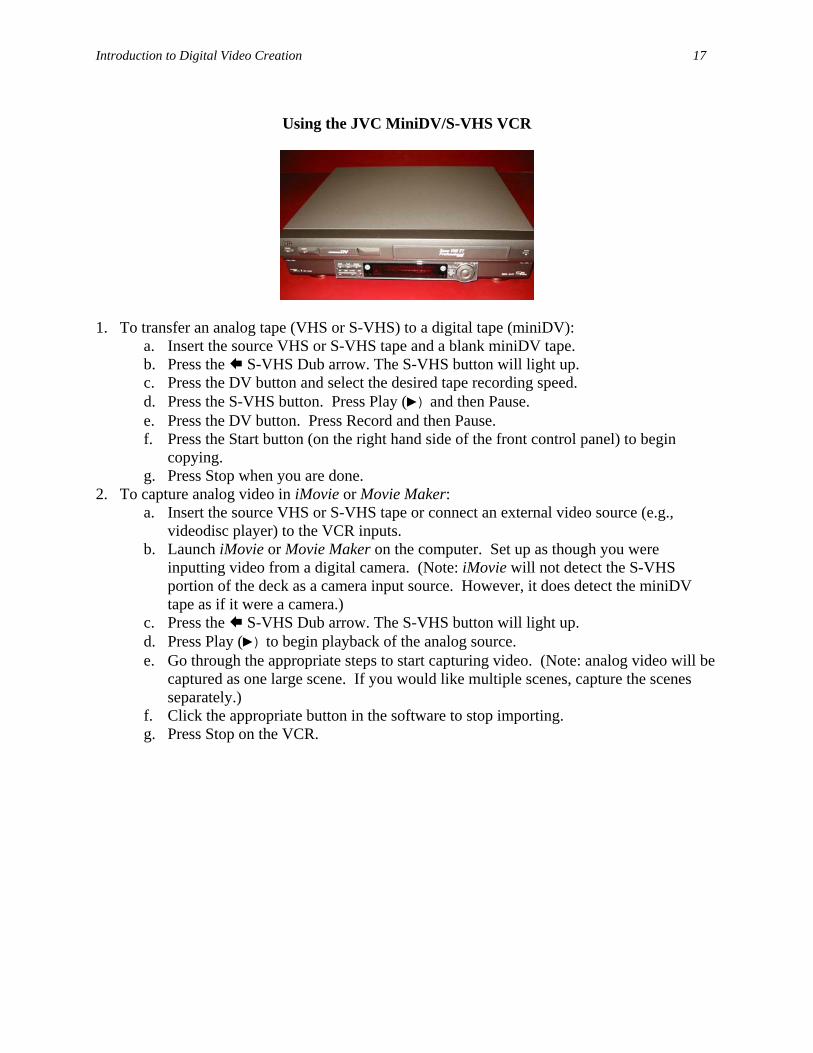
Using the JVC MiniDV/S-VHS VCR
1. To transfer an analog tape (VHS or S-VHS) to a digital tape (miniDV):
a. Insert the source VHS or S-VHS tape and a blank miniDV tape. b. Press the S-VHS Dub arrow. The S-VHS button will light up. c. Press the DV button and select the desired tape recording speed. d. Press the S-VHS button. Press Play (►) and then Pause. e. Press the DV button. Press Record and then Pause. f. Press the Start button (on the right hand side of the front control panel) to begin
copying. g. Press Stop when you are done.
2. To capture analog video in iMovie or Movie Maker: a. Insert the source VHS or S-VHS tape or connect an external video source (e.g.,
videodisc player) to the VCR inputs. b. Launch iMovie or Movie Maker on the computer. Set up as though you were
inputting video from a digital camera. (Note: iMovie will not detect the S-VHS portion of the deck as a camera input source. However, it does detect the miniDV tape as if it were a camera.)
c. Press the S-VHS Dub arrow. The S-VHS button will light up. d. Press Play (►) to begin playback of the analog source. e. Go through the appropriate steps to start capturing video. (Note: analog video will be
captured as one large scene. If you would like multiple scenes, capture the scenes separately.)
f. Click the appropriate button in the software to stop importing. g. Press Stop on the VCR.