an fta/irte best practice guide - soe.org.uk security guide... · an fta/irte best practice guide:...
TRANSCRIPT
Wheel Security
DELIVERING SAFE, EFFICIENT, SUSTAINABLE LOGISTICS
Edition 3 • September 2015
An FTA/IRTE best practice guide

2 An FTA/IRTE best practice guide:
ATS Euromaster offers a complete tyre management solution for commercial vehicle fleets of all sizes, backed up by the largest national network of truck centres and mobile service vans in the UK. The company’s skills lie in helping operators to maximise tyre performance, safety and longevity by carrying out routine tyre maintenance checks. This includes adjusting pressures, turning tyres on
the rim, regrooving, repairing damage and recommending vehicles for wheel alignment checks, where necessary. Backed up by the industry’s most highly trained technicians, ATS Euromaster can fit tyres to suit every budget, from premium to low-cost brands, with customers benefitting from 24/7 access to a dedicated rapid response fleet in the event of a tyre related breakdown. Call 0870 428 0871 or visit www.atseuromaster.co.uk for further information.
The IRTE (Institute of Road Transport Engineers) was founded in 1944 and is one of the most respected names in UK transport. IRTE is a professional sector of SOE (Society of Operations Engineers) a membership organisation representing some 16,500 individuals
and companies in engineering. It supports transport engineers throughout their careers and encourages high standards, with an emphasis on safety and best practice. Recognised as the independent and impartial voice of the industry, safety in operation is key and IRTE initiatives include research into tipper stability and safety, fuel efficiency, wheel loss prevention and tail lift safety.
IRTE publishes a monthly magazine Transport Engineer, renowned for its incisive features, news analysis and com-ment as well as a wide range of best practice guides including Tachograph Systems Compliance, Roadworthiness: Industry Best Practice, Coupling or Uncoupling & Parking of Large Goods Vehicle Trailers, Guide to Tipper Stability, Tail lifts – Simple guide for operators and Tail lifts – Specification guide for road vehicles.
For more information on joining SOE or IRTE, or to download a best practice guide, visit www.soe.org.uk, call 020 7630 1111 or email [email protected].
Sita UK is a recycling and resource management company. We deliver sustainable and increas-ingly innovative solutions for the public, local government, industry and commerce, enabling our customers to minimise the impact of their waste on the environment.
In the UK market since 1988, Sita UK has over 6,000 employees. Over 12 million residents and more than 40,000 business customers benefit from our knowledge and experience in managing waste.
Sita UK is a subsidiary of Suez Environnement. Natural resources are not infinite. Each day, Suez Environnement and its affiliates deal with the challenge to protect resources by providing innovative solutions to industries and to millions of people. Suez Environnement supplies drinking water to 76 million people, provides wastewater treatment services for 44 million people and collects the waste produced by 60 million people. Suez Environne-ment has 65,400 employees and, with its presence on all five continents, is a world leader exclusively dedicated to environmental services.
For more information please visit www.sita.co.uk

An FTA/IRTE best practice guide: 3
ForewordWheel security on commercial vehicles is a significant concern to Traffic Commissioners and the commercial vehicle industry.
While incidences of wheel loss are in the minority, the impact of failing to address wheel security can be devastating.
During the hundreds of public inquiries listed before us each year, we hear from operator licence holders, transport managers and drivers about the times when things have gone wrong. In the worst cases, there are serious consequences on other road users, drivers and operators.
Wheel security is a critical part of your responsibilities, whether as an operator licence holder, transport manager or driver. Vehicles should be well maintained and roadworthy before they are taken out on the public roads. Preventative maintenance regimes should be in place and functioning effectively, with a culture of compliance shared between those involved in, and responsible for, transport.
Traffic Commissioners welcome the publication of this best practice guide on how to prevent wheel loss, which should be used in addition to the Guide to Maintaining Roadworthiness.
Sarah BellKevin RooneyLead Traffic Commissioners – Enforcement
4 An FTA/IRTE best practice guide:
FTA members day-to-day operational management is supported by Shopfta in providing transport consumables, such as wheel nut indicators, tyre pres-sure gauges and tread depth gauges (www.shop.fta.co.uk), and FTA’s Member Advice Centre which deals with over 30,000 questions each year.
Acknowledgements
FTA and IRTE would like to acknowledge the contribution made by ATS Euromaster and Sita UK in providing expert technical knowledge, experience and material to assist in the production of this best practice guide.
FTA/IRTE best practice guide to Wheel Security
Edition 3 • September 2015
Editor : Andy Mair/IRTEProduction: Hilary KingdonDesign: Tim Holdstock
This guide focuses on wheel security to identify and share best practice. The best practices highlighted are based on real-life systems used by FTA and IRTE members and should stimulate ideas to improve your own systems and wheel fitment policies. It should be noted that any specific manufacturer’s instructions on wheel fitment and torquing pro-cedures should always be strictly adhered to.
© Freight Transport Association 2015
For details of how to join FTA contact the Member Service Centre on 03717 11 22 22
An FTA/IRTE best practice guide: 5
Introduction 6
Research finding 7
Responsibilities for wheel security 7
Drivers
Operators/maintenance staff Third party maintenance and service providers
Why do wheel fixings loosen? 8
Types of wheel fixings 11
Wheel fixing type
Spigot type wheel nuts for alloy and steel wheels
Driver checks and responsibilities 12
Maintenance of wheels and fixings 13
Inspection
Wheel and hub spigot wear
Preparation for wheel fitment
Wheel fitting/tightening procedure 16
Lubrication
Wheel re-torque procedure 17
Re-torque label
Recommended procedures for completing a re-torque label
Devices for preventing wheel loss 20
Annual test requirements for commercial vehicle wheels and components 20
Enforcement action – defective wheels and components 21
Operator Compliance Risk Score (OCRS)
Graduated fixed penalties
Co
ntents

6 An FTA/IRTE best practice guide:
IntroductionWheel detachment from vehicles, particularly heavy commercial vehicles, has been a cause for concern for operators for many years. When a wheel becomes detached from a heavy vehicle it may sim-ply come to rest without causing any further damage or harm. How-ever, in the wrong circumstances, when wheels become detached from a moving vehicle, they can accelerate up to around 150 km per hour, going out of control like a bouncing bomb, reaching a height of 50 metres before colliding with other vehicles or road users at an equivalent force of 10 tonnes.
In some cases this has resulted in fatalities, and according to research carried out by the Transport Research Laboratory (TRL) the typical annual frequency of fatalities resulting from wheel loss incidents is between three and seven cases per annum.
There has been a considerable amount of research and investiga-tive work on the subject of wheel loss over the years, and despite efforts to publicise the issue and published advice in various forms, wheel detachment from commercial vehicles remains an issue for the transport industry, although it occurs in a small proportion of overall road accidents.
Whilst it is recognised that the underlying problem of wheel loss is attributed to one of design (as it is fairly unforgiving), there is no doubt that a good maintenance regime together with an under-standing of the issues of wheel loss can significantly reduce the risk of a detachment occurring. Adopting a robust wheel checking and fitting policy together with an effective record system will help to:
■ maintain wheel security
■ reduce the likelihood of wheel detachment
■ reduce the likelihood of vehicles attracting prohibitions
The aim of this guide is to gain an understanding of why wheels become detached from vehicles and to provide best practice guide-lines for drivers and vehicle maintenance staff on preventing wheel loss. It includes guidance on adopting a policy of a clearly defined, structured and standardised method of wheel checking and fitment. The guide includes details of the most common causes of wheel looseness and what to look for when inspecting road wheels and component parts, and guidance on preparation and wheel fitment procedures to prevent wheel loss.
The guide will be of benefit to drivers, workshop technicians, tyre contractors, transport and workshop management staff.
An FTA/IRTE best practice guide: 7
This guide is based on BS AU50 Part 2 Section 7a 1995, and it is recommended that it should be used in conjunction with the British Standard and specific manufacturer recommendations.
Research findingsMuch research in recent years has been undertaken into determin-ing the cause of wheel loss on commercial vehicles. In 2006, the Transport Research Laboratory (TRL) published a Department for Transport commissioned report into Commercial Vehicle Wheel Security.
The report estimated that the typical annual frequency of wheel fixing problems is as follows.
■ Between 7,500 and 11,000 wheel fixing defects
■ Between 150 and 400 wheel detachments
■ Between 50 and 134 resulting in damage only accidents
■ Between 10 and 27 resulting in injury accidents
■ Between 3 and 7 fatal accidents
The report suggested that current designs of wheel fixings do pro-vide adequate clamp load when all components are in good condi-tion and properly tightened. However, it also shows that there can be substantial problems involving joint relaxation, torque to clamp ratio and component temperature that can affect the security of the fastening. The data suggests that the factor of safety inherent in the current design is not so high that it can tolerate large amounts of degradation of the components or imperfect maintenance pro-cedures. The report concludes that the current design is NOT a maintenance-free design and does, therefore, requires very careful handling.
Responsibilities for wheel security
DriversDrivers of commercial vehicles have a legal responsibility to ensure that the vehicle they use on the public highway is free from visible defects. Drivers are legally required to report any defects that they have identified in writing.
As part of their pre-use checks drivers should always carry out a visual inspection of the vehicle wheels for security.
Police officers and Driver and Vehicle Standards Agency (DVSA) examiners have the power to issue graduated fixed penalty notices.
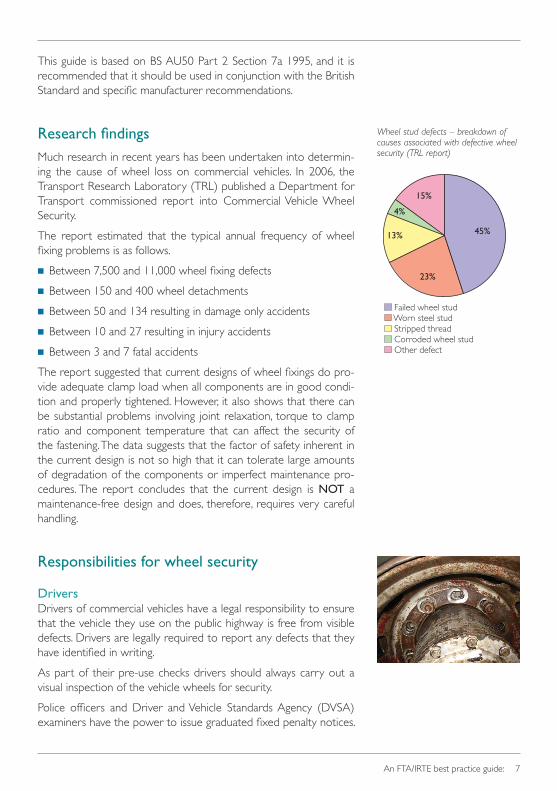
45%
23%
4%
13%
15%
� Failed wheel stud� Worn steel stud� Stripped thread� Corroded wheel stud� Other defect
Wheel stud defects – breakdown of causes associated with defective wheel security (TRL report)

8 An FTA/IRTE best practice guide:
When a fixed penalty notice is issued for a construction and use offence, such as defective wheels and fixings, the examiner may also prohibit the driving of the vehicle on a road. Consideration will be given to the culpability of the driver in respect of vehicle defects and in the main this will be the primary consideration in the issuing of a fixed penalty notice for roadworthiness offences such as defective wheels and fixings.
Operators/maintenance staffIt is a requirement of operator licensing for operators to maintain their vehicles in a safe and roadworthy condition at all times. Wheel security defects are considered serious by DVSA and Traffic Com-missioners, as they are deemed to be attributed to a poor mainte-nance regime. Operators should ensure that maintenance policies should be sufficiently robust to prevent wheel loss defects from occurring, and that staff are adequately trained in wheel mainte-nance procedures.
Third party maintenance and service providersOperators who use outside contractors for vehicle maintenance (including tyre companies) should check to ensure that these com-panies have sufficiently robust wheel inspection and fitment policies in place to prevent wheel loss defects from occurring. It would be prudent for operators to insist on written copies of wheel inspec-tion and fitment policies which may be required to be included in any contractual agreement with the third party agent and that spot checks are undertaken by the operator to check conformance with the policy.
It should be noted that regardless of any third party maintenance contract, including outside tyre contractors, the operator is ulti-mately responsible for maintaining vehicle roadworthiness.
Everyone involved in vehicle maintenance should have their duties and responsibilities clearly defined. Emphasis should be placed on the importance of maintaining roadworthiness and the role they play in ensuring compliance, and a firm understanding of the causes of wheel loss is vital.
Why do wheel fixings loosen?Road wheels on large commercial vehicles are subject to a wide variety of forces from the vehicle itself, vibration, cornering forces, heat effects, acceleration and braking.
If one wheel nut loosens then these forces are distributed over the remaining nuts. The majority of the forces are spread to the adjacent nuts causing them to loosen as well. As more nuts become loose the

An FTA/IRTE best practice guide: 9
process accelerates as the overall clamping force decreases (clamp-ing force being the loading that is created by the studs and wheel nuts compressing/pinching the wheel(s), hub and drum together). When the clamping force is less than the forces on the wheel, it will move relative to the hub. This results in side loading and a loosening of the remaining nuts which, if not spotted in time, leads to elon-gated stud holes, fatigue failure of studs, fretting fatigue cracks and wheel separation.
Relaxation of wheel clamping force can occur due to a loss of ten-sion in the stud. Laboratory test programmes have established that the sequence of events, which precede wheel loss due to relaxation, is as follows.
■ Settlement within the fixing leads to a reduction of clamping force
■ Clamping force reduction continues as further wear and settle-ment takes place
■ Some of the nuts may become so loose that they exert no effec-tive clamping force on the wheel
■ The nuts on the studs that have completely lost their clamping force may spin off over a period of time, or remain seized on the studs; in this eventuality the lack of clamping force will result in elongation of the stud holes, fatigue failure of studs, fretting fatigue cracks and wheel separation
■ Insufficient clamping force is recognised as the main reason for wheels becoming detached. Insufficient clamping force can lead to movement at the wheel and hub interfaces causing wear and subsequent loss of stud/bolt tension. Inadequate clamping force can occur if the initial tightening torque is too low, or the applied tightening torque did not result in the intended clamping force possibly due to over-tightening or because mating faces are dirty or damaged
Wheel fixings can loosen due to a variety of reasons ■ The fixing is insufficiently tightened and thus allows the wheel to fret and wear
■ The fixing is over-tightened, causing stretched/broken studs or causing studs to be pulled through the hub. It is often an uncon-scious act for drivers and maintenance staff to over-torque wheels, in the misguided belief that exerting extra pressure on a wheel fixing will prevent them from coming lose. Either way it will result in stud failure due to the fact the elastic limit of the material is exceeded
■ Failure to regularly check tightness of wheel fasteners
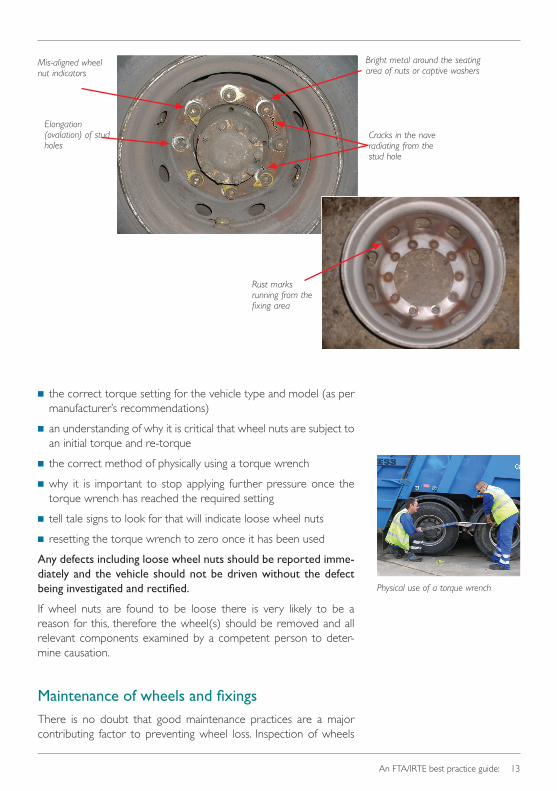
Examples of elongation of stud holes, wheel movement, wear to studs and a cracked wheel
10 An FTA/IRTE best practice guide:
■ Fitment of incompatible wheels
■ Fitment of unserviceable wheels and components
■ Incorrect lubrication of threads and interfaces. Lack of initial clamp-ing force can be due to high friction loss which can be resolved by the use of appropriate lubrication of the wheel nuts, studs and washers
■ Excessive lubrication or incorrect lubrication, eg applied to the mating surfaces of wheels
■ Severe corrosion and/or waisting of wheel studs
■ Studs not pressed fully into the hub or loose back nuts
■ Incorrectly assembled components
■ Incorrect assembly, eg not following the correct torque and re-torque procedure
■ Paint, rust/scale or dirt on mating surfaces
■ Worn wheel spigots
■ Fractured or seized wheel nuts washers
■ Brake drum securing screws/bolts loose, holding wheel off the hub face
■ Inaccurately calibrated torque wrench or calibration date expired
■ Incorrect use of air impact tools. This is a common cause of both under-torquing and over-torquing because the actual torque applied depends on a wide range of variables and is not measur-able. The power of air impact tools also often leads to problems such as cross-threading and cracked nuts and washers
■ Incorrect tightening sequence
■ Temperature effects. The clamp load can vary during service due to changes in temperature of the components
■ Settlement from any other factor eventually causing the clamping load to become inadequate
In summary, the assembly can only accommodate a very small amount of settlement. The wheel studs are very stiff and the amount of extension caused by the tightening torque is limited, particularly if the stud tension is lower than intended in the first place. Nut movement can be indicated whereas settlement is difficult to detect visually.

An FTA/IRTE best practice guide: 11
Types of wheel fixingsMost European truck and trailer manufacturers have standardised spigot type wheel fixings; although wheels designed for old type fix-ings are still in use. This can be an issue to fitters and technicians who may be confronted with a variety of non-compatible wheel fixings which, if not correctly matched, could result in damage to wheels, hubs and studs. Mismatching prevents correct mating and tightening of the wheel.
Different wheel fixing types are not interchangeable!
Wheel fixing typeConicalThis nut matches with a similarly shaped machining around the holes.
This means that when it is tightened the two faces ‘mate’ together to both locate and secure the wheel.
Din sphericalA plain nut is used with a washer that has a spherical facing. The washer matches a spherical shaped machining around the stud holes which, when tightened, locates and secures the wheel.
SpigotThis type of fixing is the most commonly used on heavy vehicles. The design of fixing relies on an accurate fit of the wheel centre on the hub spigot for location purposes and on clamping pressure generated by the large surface area of the fixed washer for securing purposes.
Spigot type wheel nuts for alloy and steel wheelsWith the increasing popularity of alloy wheels being fitted to trucks, the question of the correct wheel nut fitment is also important.
Early alloy wheels were generally manufactured with much lower hardness properties than conventional steel wheels, and the use of wheel nuts with washers designed with hardness properties suitable for steel wheels had a tendency to damage the softer alloy wheels. This resulted in the development of a standard which specified that the wheel nuts should be marked with ‘O’s to denote their hardness and compatibility with different wheel designs. However, alloy wheels became harder and a standardised hardness for the nut washer was adopted such that nuts were suitable for both steel and alloy wheels. The ‘O’ standard was never officially adopted, but many wheel nut manufacturers had already changed their tooling to accommodate the ‘O’ markings and therefore these markings may still be found on wheel nuts today. New wheel nuts bearing these ‘O’ markings will be suitable for both steel and alloy wheels, if there is any uncertainty regarding the markings and correct application, advice should be sought from the wheel nut manufacturer.
Conical
Din spherical
Spigot
12 An FTA/IRTE best practice guide:
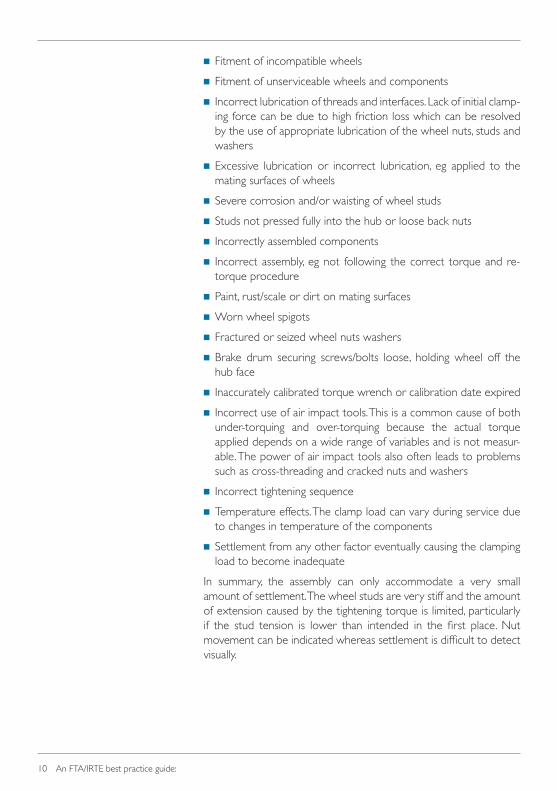
The following information relates to what the markings were intended to indicate and is for information only.
A spigot wheel nut with one ‘O’ on the captive washer denoted that the captive washer had been hardened to a degree where it was suitable for steel wheels only.
A spigot wheel nut with two ‘O’s on the captive washer denoted that the washer had undergone a controlled process which allowed it to be used with both steel and aluminium wheels.
A spigot wheel nut with three ‘O’s on the captive washer denoted that the captive washer was suitable for use on alloy wheels only.
Driver checks and responsibilitiesAs part of their pre-use checks, drivers must carry out a visual inspection of the vehicle wheels for security and are legally required to report any defects in writing.
Drivers should check wheels for :
■ signs of damage to nuts, studs etc
■ cracked wheels, nuts, washers etc
■ distorted rims
■ elongation of stud holes
■ missing, broken or loose fixings/components
■ signs of wheel looseness
■ bright metal in the area of nut and washer seating
■ rust that can be seen radiating out from the area of the nut and washer
■ the position of wheel nut indicator devices (if fitted), which can indicate if wheel nuts have moved
■ blocked ventilation holes
If looseness of wheels is suspected, the wheel nuts should be checked physically. This should ideally be undertaken by an individual that has received certificated training, using a calibrated torque wrench. Should the driver need to check wheel security with a socket and a bar, such as instances when away from the vehicle depot, then preferably a bar as supplied by the vehicle manufacturer should be utilised, alternatively a bar that is no longer than 500mm (20”) to avoid over-tightening (extensions to the bar beyond this length should not be used).
Driver training should include:
■ how to set a torque wrench correctly
An FTA/IRTE best practice guide: 13
■ the correct torque setting for the vehicle type and model (as per manufacturer’s recommendations)
■ an understanding of why it is critical that wheel nuts are subject to an initial torque and re-torque
■ the correct method of physically using a torque wrench
■ why it is important to stop applying further pressure once the torque wrench has reached the required setting
■ tell tale signs to look for that will indicate loose wheel nuts
■ resetting the torque wrench to zero once it has been used
Any defects including loose wheel nuts should be reported imme-diately and the vehicle should not be driven without the defect being investigated and rectified.
If wheel nuts are found to be loose there is very likely to be a reason for this, therefore the wheel(s) should be removed and all relevant components examined by a competent person to deter-mine causation.
Maintenance of wheels and fixingsThere is no doubt that good maintenance practices are a major contributing factor to preventing wheel loss. Inspection of wheels
Elongation (ovalation) of stud holes
Mis-aligned wheel nut indicators
Bright metal around the seating area of nuts or captive washers
Cracks in the nave radiating from the stud hole
Rust marks running from the fixing area
Physical use of a torque wrench
14 An FTA/IRTE best practice guide:
and associated components should be included in routine mainte-nance of commercial vehicles. Consideration should also be given to implementing a formal policy of checking wheel security on a more frequent basis, such as a weekly check using a torque wrench.
All components will be subject to wear in normal use, and vehicles used in more arduous conditions will be subject to increased wear rates to wheel rims, studs, nut and hubs – remember wheel studs and nuts are not a ‘fit and forget’ component. Many operators adopt a best practice policy of routinely removing wheels for inspection on an annual basis, usually around the time of MOT, to carry out a thorough examination of wheel and hub components as best practice. Opera-tors of vehicles used on arduous work and off road activity may need to consider removing wheels for inspection more regularly.
During routine maintenance, vehicles should be inspected for signs of wheel looseness, eg elongated wheel stud holes, bright metal or rust marks around the wheel nuts or washers. If a wheel nut is iden-tified as being loose at either inspection or as part of the driver’s checks, the wheel(s) must be removed to determine causation.
InspectionWhenever the need arises to remove a wheel(s) to allow for the repair of a part, eg replace road spring, before the wheels are fitted all relevant components, eg studs, nuts, spigot, wheel etc, must also be inspected for serviceability. The wheel(s) should be thoroughly inspected together with associated components for distortion, damage, dents, cracks, corrosion, worn stud holes and condition of the spigot mounting area. Inspect the condition of studs (and their security), wheel nuts, hub, spigot and, where applicable, the brake drum. When working on twin wheel assemblies, both wheels should always be removed for inspection.
It is vital that the cause of wear or damage to loose wheel nuts and associated components is established and rectified prior to re-fitting or re-tightening wheels.
Commercial vehicle wheels and associated components are sub-ject to inspection at annual test in accordance with criteria detailed in the Heavy Goods Vehicle Inspection Manual (see section Annual test requirements for commercial vehicle wheels and components on page 20).
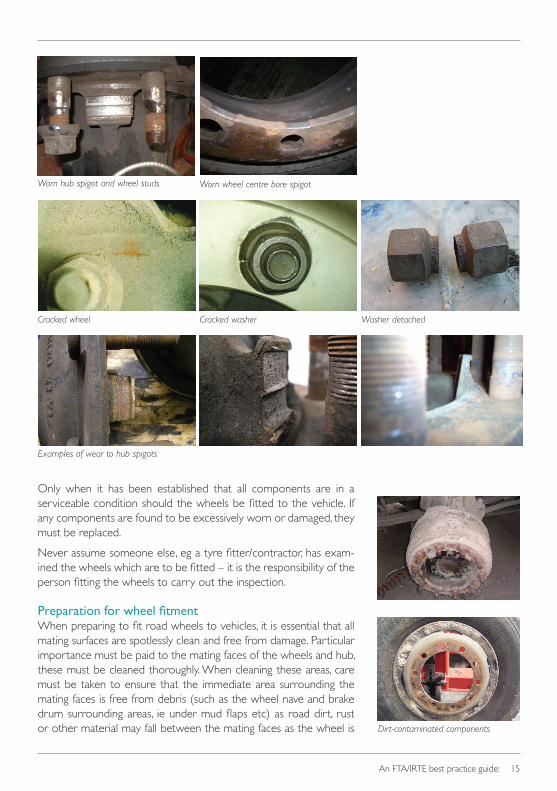
Wheel and hub spigot wearWheels should not be refitted to hubs with any signs of worn spig-ots as the wheel will not centralise correctly and will be located eccentrically which will cause imbalance of the wheel in motion and may lead to loosening of the wheels. This principle also applies to the centre bore of the wheel.
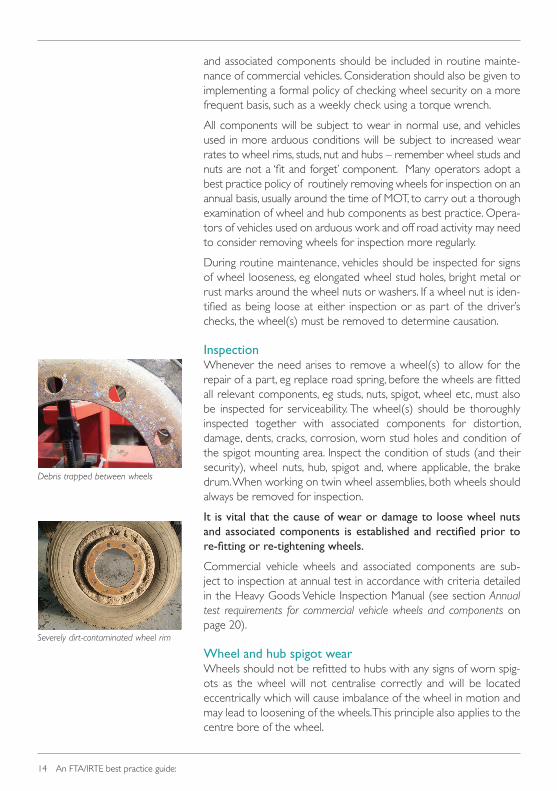
Debris trapped between wheels
Severely dirt-contaminated wheel rim
An FTA/IRTE best practice guide: 15
Only when it has been established that all components are in a serviceable condition should the wheels be fitted to the vehicle. If any components are found to be excessively worn or damaged, they must be replaced.
Never assume someone else, eg a tyre fitter/contractor, has exam-ined the wheels which are to be fitted – it is the responsibility of the person fitting the wheels to carry out the inspection.
Preparation for wheel fitmentWhen preparing to fit road wheels to vehicles, it is essential that all mating surfaces are spotlessly clean and free from damage. Particular importance must be paid to the mating faces of the wheels and hub, these must be cleaned thoroughly. When cleaning these areas, care must be taken to ensure that the immediate area surrounding the mating faces is free from debris (such as the wheel nave and brake drum surrounding areas, ie under mud flaps etc) as road dirt, rust or other material may fall between the mating faces as the wheel is
Worn hub spigot and wheel studs Worn wheel centre bore spigot
Cracked wheel Cracked washer Washer detached
Examples of wear to hub spigots
Dirt-contaminated components

16 An FTA/IRTE best practice guide:
refitted resulting in a reduction of the clamping load. (This reduction in clamping load will be exacerbated greatly once the debris breaks free.)
It is important to note that If debris falls between the mating faces of the wheel, the operation of tightening the wheels with a torque wrench may appear to be normal, however the correct clamping load for the wheel assembly will not have been achieved.
The hub spigot and the wheel centre bore must be cleaned to ensure the components are free from corrosion and debris, failure to do so may result in the wheel assembly not seating correctly and, due to resistance between the wheel and the hub, the required clamp load for the wheel will not be achieved.
Corrosion and debris on the threaded area of wheel studs and nuts will cause frictional resistance, and the wheel nuts should move freely on the thread by hand action only.
Any force that is required to turn the wheel nut will not be applied to the wheel mating face and the correct clamping load will not be achieved. In order to minimise any friction of the wheel stud and nut threads, which would reduce the clamping force achieved, the wheel studs and nuts should be cleaned down the entire length of the thread and lubricated using light engine oil (lubricant specifically designed for this purpose is available).
Note: Some vehicle manufacturer specify that no lubrication should be used on the threads. Always refer to specific manufac-turer instructions.
Wheel fitting/tightening procedureIdeally wheels should be fitted and torqued when cold to take into account any expansion and contraction of the components. Care should be taken where components such as brake drums have been removed and refitted that they are correctly and fully located prior to fitting the wheel.
LubricationLubricate the threads of the wheel studs using light engine oil (unless otherwise instructed by the vehicle manufacturer) and place a drop of oil between the captive washer and the nut.
■ Never be tempted to paint wheels before fitting or using tools such as a needle gun to clean any surfaces
■ Carefully fit the wheels squarely over hub/studs avoiding damage to stud threads. On twin wheel fitments, ensure the tyre valves are correctly aligned
Wheel nut tightening sequence
Corroded wheel stud
Wheels cleaned and in a serviceable condition for fitment

An FTA/IRTE best practice guide: 17
■ Fit and run up the wheel nuts by hand initially. If using power tools then only use for the initial phase of tightening. The last stages of tightening must be carried out with a torque wrench. The torque wrench must be in good working order and calibrated. Note: If an air wrench is used it is advisable to restrict the airflow to the minimum setting, and only run the nut down to the wheel nave and to avoid over-tightening
■ Ensure that the torque wrench is set according to the manufac-turers instructions, and that the socket used is of the correct size and depth
■ The final tightening of the wheel nuts should be done before fully lowering the wheel to the ground in order that the correct clamp-ing force can be achieved
■ Tighten the wheel nuts in the correct sequence illustrated (dia-metrically opposite in a rotational sequence to ensure mating faces are pulled together squarely and evenly) to the specified torque. Never be tempted to over-tighten as this will stretch the stud
Note: If the wheel nuts have been over-tightened during the run up procedure (this will be indicated by no movement of the nut during the torquing procedure) the wheel nuts must be slackened off, re-checked and re-tightened in the correct sequence.
Wheel re-torque procedureThe phenomenon of settlement in threaded fasteners has been known for a long time. Tension needs to be restored as relaxation in clamping force is likely to occur, as the numerous components that are ‘sandwiched’ re-settle. It is vital, therefore, that following a wheel fitting, the wheel nuts must be rechecked for tightness after the vehi-cle has stood for a period of 30 minutes, whether the vehicle has moved or not, or after 40-80 kilometres using a calibrated torque wrench set to the manufacturer’s specified torque value.
Note: Some vehicle manufacturers do not recognise the 30 minute re-torque procedure. Always refer to specific manufacturer instructions.
When carrying out the re-torque to the wheel nuts, under no cir-cumstances should the wheel nuts be slackened and retightened.Instead the wheel nuts should simply be checked to see if the cor-rect torque is still applied/tightened to the correct torque.
18 An FTA/IRTE best practice guide:
Where possible the re-torque procedure should be carried out to complete the wheel fitment procedure in one operation before the vehicle is put back into service. This may require a short road test of the vehicle to be carried out. If, however, this is impractical then the 30 minute procedure applies. If the vehicle is put into service without a re-torque, then there should be a robust system in place to inform the driver of the vehicle that the re-torque procedure is required and that the wheel nuts are required to be re-checked for tightness after either 30 minutes or after the vehicle has travelled 40 to 80kms (see re-torque label).
Note: Due to the operational difficulties associated with the 40-80km re-torque, if it is impractical for the driver to carry out this procedure with a torque wrench, in exceptional circumstance the use of a manufacturer’s wheel brace (less than 500mm in length) would suffice, but the distance based re-torque should be carried out at the earliest opportunity.
Re-torque labelIt is recommended that a documented means of ensuring that wheel nuts are always subject to an initial torque and re-torque is in place, and records are kept to form part of the vehicle’s maintenance his-tory. The completion of a re-torque label, which is completed each time a wheel is fitted to a vehicle, is common practice across the industry. If completed and used correctly, this label can provide a his-torical log of any wheels which have been removed from a vehicle, and the procedure followed for fitment.
A re-torque label can be can be used to document and monitor the entire wheel change procedure and should include instructions to tyre fitters/workshop technicians and drivers to ensure that the correct procedures have been carried out by all parties involved in wheel fitment.
Recommended procedure for completing a re-torque labelShould a wheel or wheels be fitted to a vehicle, a re-torque label should be completed in the following manner.
■ Enter vehicle details including vehicle/trailer identification number, and position of the wheel on the vehicle which has been removed
■ Upon fitting the wheel, the re-torque label should be completed to indicate that the initial torqueing procedure has been carried out. This includes details of the torque setting applied, date, time, vehicle mileage and who has carried out this procedure
■ The re-torque procedure should then be carried out and the re-torque section on the label should then be completed

An FTA/IRTE best practice guide: 19
Re-Torque LabelTo help prevent wheel loss, wheel nuts must be torqued immediately after fitting a wheel, then re-torqued according to the following.1 Commercial vehicles re-torquing must be done after either 30 minutes standing time or after 40-80Kms (25-50 miles) as laid down in BSAU 50:
part 2: section 7a:1995. (Specific manufacturer’s instructions may differ, in which case should always be followed).
2 Drivers: If using a torque wrench to carry out the above is impractical, the vehicle wheel brace can be used. You MUST, however, still re-check the wheel nuts with a torque wrench set to the appropriate torque at the earliest opportunity.
INSTRUCTIONS: Party carrying out wheel fitment, eg tyre contractor/workshop technician1 Fully complete the section overleaf marked ‘Wheel Removal Details’.
2 After torqueing the wheel nuts, fully complete the section ‘First Torque’.
3 If you carry out the first torque and re-torque of the wheel nuts in one operation, complete the “Torque and Re-Torque” sections (re-fit wheel nut indicators if fitted). 3a Tyre contractor/workshop technician/maintenance provider – following the completion of all sections of this label, attach the label to a job
or inspection card.
4 If the re-torque is NOT carried out as part of the completed operation, leave the ‘Re-Torque’ section blank and hand the label to the driver ; in his absence attach it to the vehicle’s steering wheel or to the driver’s wing mirror, or airline coupling if working on lone trailers.
INSTRUCTIONS: Driver1 If you find this fully completed label on your vehicle, or it is handed to you, you MUST return it to your manager or supervisor for filing.
2 If you find this label on your vehicle or it is handed to you and the re-torque section is blank, IT IS YOUR RESPONSIBILITY to ensure the wheel nuts are re-torqued.
3 If you have a wheel refitted to your vehicle, ensure that the person carrying out the fitment completes this label as instructed above.
4 Before using a torque wrench, ensure that you have had training.
5 Re-torque the wheel nuts to the correct torque – DO NOT apply further pressure once the correct torque has been reached.
6 After re-torqueing the wheel nuts, complete the ‘Re-Torque’ section of this label and return it to your manager or supervisor. Refit any wheel nut indicators where fitted.

20 An FTA/IRTE best practice guide:
■ Where it is impractical to carry out the re-torque procedure in a single process prior to the vehicle being used, the re-torque and completion of the re-torque section on the label should be car-ried out by the driver
■ If the driver is not available, the label should be placed in a promi-nent position (such as the steering wheel) so that the driver is made aware of the requirement to carry out the re-torque procedure
■ The fully completed re-torque label should be retained with the vehicle records to form part of the vehicle’s maintenance history, and provide an audit trail if necessary
It is important that all parties involved with the completion and processing of the re-torque label are fully aware of their responsibili-ties and have received instruction on what they are required to do to complete the process.
Devices for preventing wheel lossThere are a number of products on the market designed to make wheel nut movement more noticeable or to prevent nut movement altogether. Generally these devices are either wheel nut locking/retaining devices, or wheel nut movement indicators.
Whilst these devices can compliment a good maintenance sys-tem, they do not indicate or eradicate the problem of settlement. It is therefore important that each of these devices is carefully evaluated before being fitted and is only used to complement a full maintenance programme and never replace it.
Annual test requirements for commercial vehicle wheels and componentsCommercial vehicle wheels and associated components are subject to inspection at annual test in accordance with criteria detailed in the Heavy Goods Vehicle Inspection Manual. Vehicles will be subject to annual test failure for any of the reasons stated below.
A tyre retaining ring: ■ fractured
■ butting causing the flange to lift more than 1.5mm from the rim
A wheel: ■ stud or nut missing or loose or not obviously fulfilling the function of clamping the wheel to the hub
■ with any visible elongation of a stud hole

An FTA/IRTE best practice guide: 21
■ with a spigot wheel nut washer cracked
■ badly damaged or distorted or with a locating spigot or dowel missing
■ damaged by the corners of a wheel nut cutting into the material of the wheel
■ and its fixings not compatible
■ cracked (except at the bridge over the valve), weld breaking away or an inadequate repair
■ made of aluminium alloy repaired by welding
■ with a load rating less than that required to support the maximum permissible (GB) axle load
A hub: ■ cracked, badly damaged, or with a half shaft bolt, stud or nut loose or missing
■ with clearance between a spigot mounted wheel and the hub spigots that exceed 3mm across the diameter
Enforcement action – defective wheels and componentsAs previously mentioned, wheels and components are subject to inspection at annual test by DVSA examiners, and will fail the test for any of the reasons detailed above. DVSA will also check that an operator has a wheel security procedure in place as part of its auditing process. Furthermore the enforcement body also carry out thorough inspections of wheels and components as part of its roadside enforcement activity. DVSA considers wheel security as a serious issue and attributes defects in wheel security to poor main-tenance and inadequate driver checks. For this reason it is likely that any defects found with wheels and components at a roadside check would result in a prohibition being issued, which would be marked ‘S’. This ‘S’ marking indicates that the examiner attributes the defect to a significant failure in the operator’s maintenance arrangements, and would normally signal a full maintenance investigation by DVSA, possibly leading to a public inquiry.
The severity of the defect when found at a DVSA roadside check would be determined against criteria detailed in DVSA’s Catego-risation of Defects (see table below), and the appropriate action and prohibition level would be determined accordingly. Too many prohibitions or failure to get them removed, could ultimately lead to the curtailment, suspension or revocation of an operator’s licence.
22 An FTA/IRTE best practice guide:
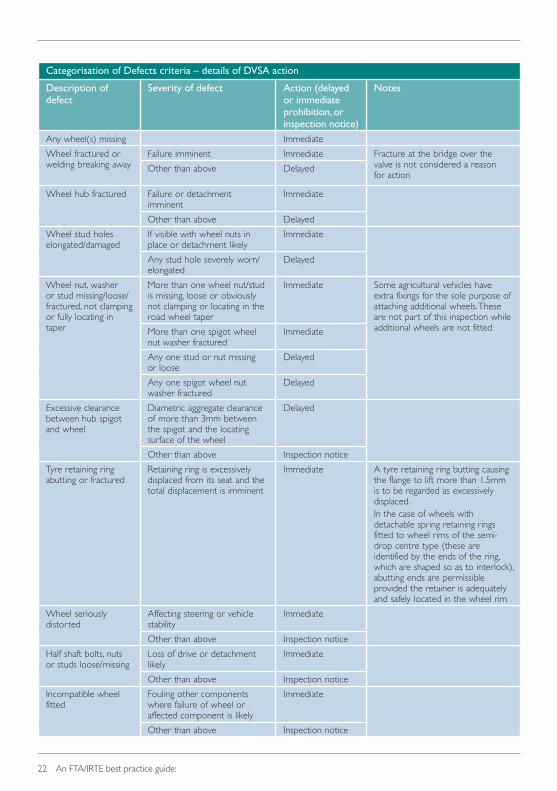
Categorisation of Defects criteria – details of DVSA action
Description of defect
Severity of defect Action (delayed or immediate prohibition, or inspection notice)
Notes
Any wheel(s) missing Immediate
Wheel fractured or welding breaking away
Failure imminent Immediate Fracture at the bridge over the valve is not considered a reason for action
Other than above Delayed
Wheel hub fractured Failure or detachment imminent
Immediate
Other than above Delayed
Wheel stud holes elongated/damaged
If visible with wheel nuts in place or detachment likely
Immediate
Any stud hole severely worn/elongated
Delayed
Wheel nut, washer or stud missing/loose/fractured, not clamping or fully locating in taper
More than one wheel nut/stud is missing, loose or obviously not clamping or locating in the road wheel taper
Immediate Some agricultural vehicles have extra fixings for the sole purpose of attaching additional wheels. These are not part of this inspection while additional wheels are not fittedMore than one spigot wheel
nut washer fracturedImmediate
Any one stud or nut missing or loose
Delayed
Any one spigot wheel nut washer fractured
Delayed
Excessive clearance between hub spigot and wheel
Diametric aggregate clearance of more than 3mm between the spigot and the locating surface of the wheel
Delayed
Other than above Inspection notice
Tyre retaining ring abutting or fractured
Retaining ring is excessively displaced from its seat and the total displacement is imminent
Immediate A tyre retaining ring butting causing the flange to lift more than 1.5mm is to be regarded as excessively displaced.In the case of wheels with detachable spring retaining rings fitted to wheel rims of the semi-drop centre type (these are identified by the ends of the ring, which are shaped so as to interlock), abutting ends are permissible provided the retainer is adequately and safely located in the wheel rim
Wheel seriously distorted
Affecting steering or vehicle stability
Immediate
Other than above Inspection notice
Half shaft bolts, nuts or studs loose/missing
Loss of drive or detachment likely
Immediate
Other than above Inspection notice
Incompatible wheel fitted
Fouling other components where failure of wheel or affected component is likely
Immediate
Other than above Inspection notice

An FTA/IRTE best practice guide: 23
Operator Compliance Risk Score (OCRS)As well as being issued with prohibitions, operators and drivers also risk additional enforcement action if wheels or components are found to be defective.
The Operator Compliance Risk Score (OCRS) system has been developed by DVSA as a way of assigning goods and passenger vehicle operators a rating that allows enforcement officers to identify which vehicles are most likely to be non-compliant. The roadworthiness OCRS score is based on the condition of vehicles, and points are accu-mulated if vehicles are found to be defective at annual test or roadside examinations. The points are weighted for safety significance. Defects found at annual test are set lower than those found on roadside checks as the emphasis is on the condition of the vehicle in the working envi-ronment rather than on the condition at the time of test.
Immediate prohibitions attract more points than those that are delayed. An inspector may decide that a defect indicates a significant failure in the operator’s maintenance arrangements and mark it with an ‘S’ (for ‘significant failure’). This is likely to be the case for wheel and hub defects and significantly increases the points value. The points value for defective road wheels and components are detailed in the table below.
Calculation of OCRS prohibition and testing points
Annual test failure points
Delayed prohibition points
Immediate prohibition points
‘S’ marked delayed prohibition points
‘S’ marked immediate prohibition points
Defective road wheels/components
50 50 200 100 400
Vehicle prohibitions and OCRS points are recorded on an opera-tor’s record and will increase the likelihood of other vehicles used by the operator being targeted for further enforcement action.
Graduated fixed penaltiesLegislation now permits DVSA examiners to issue fixed penalty notices for vehicle defects which affect roadworthiness, which include defective road wheels and components.
Fixed penalties can require the offender to pay a fine and, for cer-tain offences, accept penalty points on their driving licence. Careful consideration has always been given to the culpability of the driver in respect of vehicle defects and in the main this will be the primary consideration in the issuing of a fixed penalty notice for roadworthi-ness offences. A fixed penalty notice may be issued for the offence where the examiner determines the defect is serious and indicative of a significant breakdown of maintenance procedures (known as
Tel: 01892 526171 Fax: 01892 534985 Web: www.fta.co.uk
Freight Transport Association Limited
Delivering safe, efficient, sustainable logistics
Hermes House | St John’s Road | Tunbridge Wells | Kent TN4 9UZ
Registered in England Number 391957
©FTA 09.15/AM
Re-order code: 4087
an ‘S’ marked prohibition) if the examiner considers that the defect would have been apparent to the driver on conducting their daily walk around inspection. A fixed penalty may also be issued if the examiner considers that the defect would have been apparent dur-ing the driver’s use of the vehicle.