amt electronics pangaea cp-100fx user's guide (rev a) · edit: press to edit the preset or the...
TRANSCRIPT

AMTPANGAEAIR CONVOLUTION PLAYER
CP-100FX
User’s Guide
www.amtelectronics.comRev A (For use with firmware V1.5.7)
EVERYTHING JUST BEGINS©2017 AMT Electronics. Omsk, Russia

Important Safety Instructions
!This symbol, wherever it appears, means “electrical caution!” It indicates the presence of information about operating voltage and potential risks of electrical shock.
This symbol, wherever it appears, means “caution!” Please read the information next to all caution signs.
Before using this device, carefully read the applicable items of these operating instructions and safety suggestions:
1. Read these instructions.
2. Keep these instructions.
3. Pay attention to all warnings.
4. Follow all instructions.
5. Do not use this device near water.
6. Clean only with dry cloth.
7. Do not block any ventilation openings. Install in accordance with the manufacturer’s instructions.
8. Do not install near any heat sources such as radiators, heat registers, stoves, or other device (including amplifiers) that produce heat.
9. Connect only to AC power outlets rated 100-120V or 220-240V 50/60Hz.
10. Protect the power cord from being walked on or pinched particularly at plugs, convenience receptacles, and the point where they exit from the apparatus.
11. Use only attachments/accessories specified by the manufacturer.
12. Unplug this device during lightning storms or when unused for long periods of time.
13. Refer all servicing to qualified service personnel. Servicing is required when the apparatus has been damaged in any way, such as power-supply cord or plug is damaged, liquid has been spilled or objects have fallen into the apparatus, the apparatus has been exposed to rain or moisture, does not operate normally, or has been dropped.
14. To reduce the risk of fire or electrical shock, do not expose this equipment to dripping or splashing and ensure that no objects filled with liquids, such as vases, are placed on the equipment.
15. This equipment should be installed near the socket outlet and disconnection of the device should be easily accessible.
16. Do not install in a confined space.
17. Do not open the unit - risk of electric shock inside.
18. Prolonged listening at high volume levels may cause irreparable hearing loss and/or damage. Always be sure to practice “safe listening”.
!
Service: There are no user-servicable parts inside. All service must be performed by qualified personnel only. If you have questions unanswered by this manual contact our technical support at [email protected] The latest revision of this manual can be downloaded via www.amtelectronics.com
ALL PRODUCT, PRODUCT SPECIFICATIONS AND DATA ARE SUBJECT TO CHANGE WITHOUT NOTICE TO IMPROVE RELIABILITY, FUNCTION OR DESIGN OR OTHERWISE AND ACCURACY IS NOT GUARANTEED. ALL TRADEMARKS ARE THE PROPERTY OF THEIR RESPECTIVE OWNERS. AMT ELECTRONICS ACCEPTS NO LIABILITY FOR ANY LOSS WHICH MAY BE SUFFERED BY ANY PERSON WHO RELIES EITHER WHOLLY OR IN PART UPON ANY DESCRIPTION, PHOTOGRAPH OR STATEMENT CONTAINED HEREIN. COLORS AND SPECIFICATIONS MAY VARY FROM ACTUAL PRODUCT.
In order to reduce environmental damage, at the end of its useful life, this product must not be disposed of along with normal household waste to landfill sites. It must be taken to an approved recycling center according to the recommendations of the WEEE (Waste Electrical and Electronic Equipment) directive applicable in your country.

Table of Contents
Quick Start .................................................................................5OMG What Did I Just Buy? .................................................................................... 5What’s in the Box? .................................................................................................. 5Top Panel ................................................................................................................ 6Front Panel .............................................................................................................. 8Rear Panel ............................................................................................................... 8Setup A: Home/Studio .......................................................................................... 10Setup B: Live ......................................................................................................... 10Setup C: Live + FOH (Mono) .............................................................................. 11Setup D: Live + FOH (Stereo) ............................................................................. 11
Getting Around ........................................................................12Home Screen ......................................................................................................... 12Preset Screen ......................................................................................................... 12Setting Output Levels ........................................................................................... 13Tuner ..................................................................................................................... 14
Editing Presets ..........................................................................14Adjusting Preset Volume ...................................................................................... 14Selecting Effect Blocks/Adjusting Parameters ...................................................... 14Copying Effect Blocks ........................................................................................... 15Assigning Controllers ............................................................................................ 15Saving/Copying/Naming a Preset ......................................................................... 17Clearing a Preset ................................................................................................... 17
Effect Blocks .............................................................................18Resonance Filter .................................................................................................... 18Noise Gate ............................................................................................................. 20Compressor ............................................................................................................ 20Preamp Simulator .................................................................................................. 22Power Amp Simulator ........................................................................................... 23Cabinet Simulator (Impulse Response) ................................................................ 24EQ .......................................................................................................................... 25Delay ...................................................................................................................... 26

Phaser .................................................................................................................... 28Flanger ................................................................................................................... 29Chorus ................................................................................................................... 30Early Reflections .................................................................................................... 32Reverb ................................................................................................................... 32Tremolo ................................................................................................................. 33
Controllers ................................................................................35Footswitches .......................................................................................................... 35Expression Pedal .................................................................................................... 36External MIDI Controller ..................................................................................... 37
Global Settings .........................................................................38Attenuator ............................................................................................................. 38Master EQ .............................................................................................................. 38Bypassing The Cabinet Simulator ........................................................................ 39Dual Cabinet Mode ............................................................................................... 39MIDI Channel ....................................................................................................... 40MIDI Mapping ...................................................................................................... 40Global Tempo ....................................................................................................... 41
USB & Computer Operations ................................................41Internal Storage/Backup/Restore .......................................................................... 41Factory Reset ......................................................................................................... 42SD Card ................................................................................................................. 42Updating Pangaea’s Firmware ............................................................................... 42Using Digital Output (S/PDIF) ............................................................................. 43
Appendix A: Signal Flow .........................................................44
Appendix B: Technical Specifications ....................................45

Quick Start 5
Quick Start
OMG What Did I Just Buy?
Thank you for purchasing Pangaea CP-100FX Impulse Response convolution player. It is not just a cabinet simulator but a very powerful and flexible effects processor. Before designing Pangaea, we’ve set a challenge to give you as much freedom and control over all the settings as possible. As a result, you are able to tweak almost everything. There may be no limits for your tone as there may be no limits for your creativity and your music.
It may be overwhelming to find out what Pangaea is capable of. But don’t worry, this manual will carefully guide you through all the settings and show you Pangaea’s wide range of possibilities. Once you get all the basics it will be easy for you to make any changes on the fly. We’ve also preloaded some presets such as you can start right away!
We had a lot of fun designing it and we wish you a lot of fun using it!
Let’s get started!
What’s in the Box?
• Pangaea CP-100FX
• Power supply
• MicroSD memory card
• MicroSD to SD memory card adapter
• USB micro SD memory card reader
• USB cable
• Warranty card

Quick Start6
Top Panel
1. Display: The OLED (organic light-emitting diode) display with a very high contrast ratio and 180-degree viewing angle.
2. Navigation/Confirm Knob: When on the home screen turn to select presets and press to recall the selected preset. When on the preset screen turn to select the effect block. Press to turn the selected effect block on or off. When in the menu turn to navigate or to choose between values. Press to enter sub-level menu/edit the selected parameter or to confirm the selected value.
3. Footswitches: Press UP/DOWN to select presets. Press CONFIRM to recall the selected preset. Each footswitch may be assigned one of the following (check Chapter “Footswitches” for details):
• Default: to scroll up or down through the presets and recall them just as described above
• Controller: to access parameters of effect blocks. For example, to turn effects on or off. See full list of parameters in Chapter “Assigning Controllers”
• Tuner: to turn the tuner on or off. Enabling the tuner mutes the audio output
• Preset Map: to recall one of the predefined presets. You can predefine up to 4 presets and scroll through them by repeatedly pressing the footswitch
AMTPANGAEAIR CONVOLUTION PLAYER
CP100FX
INPUT THRU L BAL OUT R OUT LR
PHONES AUX IN USB SD CARD S/PDIFOUT
TAPFX
DOWN CONFIRM UP
1 2 3 4 5
ATT IN VOL EQ SYS TUNER
IN CLIP OUT CLIP
Esc EDIT
CONFIRM1
2
3
54
6
7 8
9 10

Quick Start 74. Esc/Cab’s Name: When on the home screen press to see currently chosen Impulse
Response’s filename. Otherwise press to return to the upper level menu or to the home screen.
5. Edit: Press to edit the preset or the effect block.
6. Multi-function Buttons: When on the home screen press:
• 1/ATT IN to adjust attenuator settings
• 2/VOL to adjust output levels
• 3/EQ to access the Master EQ
• 4/SYS to get to the system menu
• 5/TUNER to activate the tuner. You can also assign this function to a footswitch
When on the preset screen press:
• 1/ATT IN to reset the preset to factory default settings
• 2/VOL to adjust output level for the current preset
• 3/EQ to manage controllers for the current preset
• 4/SYS to rename the preset
• 5/TUNER to copy currently selected effect block to another preset
7. FX LED: This lights when the effects are activated.
8. Tap LED: Shows you the time and speed of delay and modulation effects.
9. In Clip: Turns green when the sound comes into Pangaea. Turns orange when input level is too high. Try reducing the output level of the device connected to Pangaea’s input. Otherwise some unpleasant distortion may occur.
10. Out Clip: Everything is fine when it is green. Which means Pangaea produces some sound. It is orange when clipping is detected. Try reducing preset or master volume to avoid distortion.

Quick Start8
Front Panel
11. Phones Out: Connect stereo headphones here. Press 2/VOL to adjust volume. Be careful, high volume level can seriously damage your ears.
12. Aux In: Connect any external audio device using a stereo cable with 1/8’’ (3.5mm) TRS connector. The signal coming from the external device is not processed by the effects of Pangaea and goes directly to the output.
13. USB: Use USB cable to connect Pangaea to the computer and access its internal storage.
14. SD Card: Insert microSD card here and access unlimited amount of Impulse Responses. Cards up to 32GB using FAT32 filesystem are supported.
15. Digital Out: Digitally connect Pangaea to your studio equipment via S/PDIF (75-ohm RCA) cable. This output sends out 24-bit digital version of Main Out at 48kHz.
Rear Panel
11 1213
1415
AMTPANGAEAIR CONVOLUTION PLAYER
CP100FXGND BAL R BAL OUT L
EXP MIDI OUT MIDI INOFF ON
DC 12V OUT LR THRU INPUT+ –
MADE IN RUSSIA OMSK
161718
20
19
21
22
23

Quick Start 9
16. Input: Plug your instrument or your amplifier’s output here. If you’re using a tube amplifier, make sure a speaker or a dummy load is connected to THRU output. Running a tube amp without load will lead to amplifier malfunction! Pangaea has no loadbox.
17. Thru/Bypass Out: This output sends out an unprocessed copy of whatever comes into Pangaea’s Input. Use a speaker cable to connect a speaker cabinet or a dummy load (such as AMT Power Eater PE-15/PE-120) here in case you’re feeding a signal from a tube amp or a power amp into Pangaea’s Input. Running a tube amp without load will lead to amplifier malfunction! Pangaea has no loadbox. If instead of an amplifier you connect your effect pedals or your guitar to Pangaea’s Input (no power amp before Pangaea), use this output as a bypass and send dry signal to another effects processor, cabinet simulator or studio equipment.
18. Balanced Out: Use balanced XLR cables to send out processed +4 dBu signal to the mixer, PA or your studio equipment. Pangaea is fully protected against phantom power, no need to worry about someone pressing that +48V button by accident.
19. Ground Lift Switch: Turn it off to eliminate hum and buzz caused by ground loops between your equipment.
20. Main Out: This output sends out processed –10 dBV line level stereo signal. It will also work with a mono cable and send out the Left channel.
21. Power: Pangaea will power up as soon as you connect the included 12V power adapter here.
22. MIDI: Connect to MIDI equipment to send and receive MIDI messages. You can control Pangaea using an external MIDI controller as well as control other devices using Pangaea’s footswitches. Pangaea also has a mapping function that allows incoming program changes to recall any preset on the device connected to MIDI Out.
23. Expression: Connect a standard expression pedal, such as AMT EX-50, and use your feet to control volume and effects.
!
!

Quick Start10
Setup A: Home/Studio
You don’t need an amp! Pangaea can emulate a Clean channel of an amp, therefore an overdrive pedal will do. You can even plug your guitar directly into Pangaea.
Setup B: Live
Turn off the CabSim (see Chapter “Bypassing The Cabinet Simulator”) and plug Pangaea into FX Loop of your amplifier.
AMTPANGAEAIR CONVOLUTION PLAYER
CP100FX
INPUT THRU L BAL OUT R OUT LR
PHONES AUX IN USB SD CARD S/PDIFOUT
TAPFX
DOWN CONFIRM UP
1 2 3 4 5
ATT IN VOL EQ SYS TUNER
IN CLIP OUT CLIP
Esc EDIT
CONFIRM
DRIVE
Main Out: FX+CabSim (Stereo)
Phones Out: FX+CabSim (Stereo)
Balanced Out: FX+CabSim (L+R)
Input
AMTPANGAEAIR CONVOLUTION PLAYER
CP100FX
INPUT THRU L BAL OUT R OUT LR
PHONES AUX IN USB SD CARD S/PDIFOUT
TAPFX
DOWN CONFIRM UP
1 2 3 4 5
ATT IN VOL EQ SYS TUNER
IN CLIP OUT CLIP
Esc EDIT
CONFIRM
Amp Input
Amp Speaker Out
Amp FX Loop ReturnAmp FX Loop Send
Input Main Out: FX (L/Mono)

Quick Start 11
Setup C: Live + FOH (Mono)
Switch to 1 R mode (see Chapter “Dual Cabinet Mode”). This will disable CabSim in the Left channel. Now you can monitor all effects through your amp on stage while providing studio-quality sound with Cabinet Simulation to Front of House.
Setup D: Live + FOH (Stereo)
Send studio-quality stereo signal with Cabinet Simulation to Front of House and use onstage monitor for your effects. You’ll hear dry unprocessed sound through the cabinet connected to Thru Out.
AMTPANGAEAIR CONVOLUTION PLAYER
CP100FX
INPUT THRU L BAL OUT R OUT LR
PHONES AUX IN USB SD CARD S/PDIFOUT
TAPFX
DOWN CONFIRM UP
1 2 3 4 5
ATT IN VOL EQ SYS TUNER
IN CLIP OUT CLIP
Esc EDIT
CONFIRM
Amp Input
Amp Speaker Out
Amp FX Loop ReturnAmp FX Loop Send
Input Main Out: FX (L/Mono)
Balanced Out: FX+CabSim (R/Mono)
Amp Input
Amp Speaker Out
Balanced Out: FX+CabSim (L+R)
AMTPANGAEAIR CONVOLUTION PLAYER
CP100FX
INPUT THRU L BAL OUT R OUT LR
PHONES AUX IN USB SD CARD S/PDIFOUT
TAPFX
DOWN CONFIRM UP
1 2 3 4 5
ATT IN VOL EQ SYS TUNER
IN CLIP OUT CLIP
Esc EDIT
CONFIRM
Input Main Out: FX+CabSim (L/Mono)
Thru Out: Unprocessed

Getting Around12
Getting Around
Home Screen
1. Preset Name: The name of the currently selected preset.
2. Preset Number: Currently selected preset number. Blank number means the preset is empty. All effect blocks of an empty preset are disabled. Filled number means the preset was modified and saved. Blinking number means the preset is selected but is not recalled. Press Navigation/Confirm knob to recall it.
3. Footswitch status: If any of three footswitches has been assigned the controller function, the corresponding square appears at the Home screen. Blank square means the footswitch is inactive/depressed. Filled square means the footswitch is active/pressed. Like if you assign a footswitch to turn an effect block on or off, this will show you whether or not the effect is enabled.
Turn Navigation/Confirm to scroll through presets and press it to recall the selected preset. If you’re lost and need to return to the Home screen, press Esc repeatedly until you get there.
Press Esc while on the Home screen to see currently chosen Impulse Response’s filename.
Preset Screen
Let’s say you’ve selected a preset and want to edit it. Press Edit to get to the Preset screen. You’ll see the following:
PresetName
1 2
3
RF GT CM PA IR EQPRDL PH FL ER RV TRCH

Getting Around 13The effect blocks are:
• RF: Resonance filter
• GT: Noise gate
• CM: Compressor
• PR: Preamp simulator
• PA: Power amp simulator
• IR: Impulse Response/Cabinet simulator
• EQ: Parametric EQ
• DL: Delay
• PH: Phaser
• FL: Flanger
• CH: Chorus
• ER: Early reflections
• RV: Reverb
• TR: Tremolo
Currently selected block is blinking. Disabled blocks are blank and enabled blocks are filled. Turn Navigation/Confirm to navigate between blocks and press it to enable or disable the selected block.
Setting Output Levels
To adjust global volume, go the Home screen and press 2/VOL button. Turn Navigation/Confirm to choose between Master and Phones Volume and press it to edit the value. Turn Navigation/Confirm to adjust the level. When you’re done press Esc to return to the Home screen. The adjustments will be stored.
Master Volume 120Phones Volume 15

Editing Presets14
Tuner
Out of tune? Go to the Home screen and press 5/TUNER button. Pangaea has a standard chromatic tuner with reference frequency 440Hz. Pick a string and you’ll see the closest note on the screen. The lower triangle shows you the actual pitch of the string relatively to that note. Raise or lower the pitch of the string to bring triangles together and you’re in tune.
Editing Presets
Adjusting Preset Volume
Each preset has its own individual volume that you can adjust and store together with the preset. To do that select a preset, press Edit to get to the Preset screen and press 2/VOL button. You’ll see the input meter at the bottom of the screen. Adjust the level by turning the Navigation/Confirm knob. When you’re done press Esc to get back to the Preset screen.
Selecting Effect Blocks/Adjusting Parameters
While on the Preset screen turn Navigation/Confirm to choose an effect block you want to edit and activate it. Now press Edit to access the effect’s parameters. Each effect block has its individual list of parameters you can adjust. Once you’re in, everything is generally done using the Navigation/Confirm knob. Turn it to scroll through the parameters, press it to enter the edit mode, turn it again to change the parameter’s value and finally press it to exit the edit mode. When you’re done adjusting effect’s parameters press Esc to return to the Preset screen.
G
Preset Level
Output

Editing Presets 15
Copying Effect Blocks
You can copy effect’s settings between presets. To do that select the effect block you want to copy at the Preset screen and press 5/TUNER. You’ll be prompted to choose the destination preset. Select it by turning and confirm by pressing the Navigation/Confirm knob. You’ll see the confirmation message.
Assigning Controllers
Each preset may be assigned up to 16 controllers. To manage preset controllers, press 3/EQ on the Preset screen. All edits are done using the Navigation/Confirm knob.
Here controllers are seen as connections between sources (like footswitches, expression pedal, etc.) and destinations which are various parameters inside of effect blocks. You can assign multiple controllers to control the same parameter. As well as you can control multiple parameters using the same Source.
Source may be set to one of the following:
• Off: None
• Expression: External expression pedal
• FSW DOWN: Pangaea’s left footswitch labeled DOWN
• FSW CONFIRM: Pangaea’s middle footswitch labeled CONFIRM
• FSW UP: Pangaea’s right footswitch labeled UP
• CC# 0-127: any MIDI controller from 0 to 127
Other than turning effect blocks on or off (use destination Effect_block_name On Off) and adjusting preset volume (use destination Effect_block_name Volume), additional following parameters of corresponding blocks are available as destinations:
PresetName Copy to ->
02
Contr 1Source OffDestin Preamp On Off
MinVal 0MaxVal 127PC OUT MIDI INSET 1
CC
Editing Presets16• RF: LFO Rate; Frequency
• CM: Volume; Threshold
• PA: Volume; Slave
• DL: Volume; Feedback; Tap
• PH, FL, CH: Volume; Rate
• RV: Volume; Time
• TR: Intensity; Rate; Tap
Using MinVal and MaxVal you can calibrate the controller by setting its boundaries. For example, if you’re using the expression pedal to control preset volume, the MinVal setting determines how much volume you’ll hear when the pedal is at its minimum (heel down) setting. Set MinVal to 0 to have silence in this position. Set MinVal higher than MaxVal to reverse the controller’s action.
You can choose how Pangaea reacts on incoming MIDI Program Change messages by setting PC Out to one of the following:
• MIDI IN: Works as MIDI Thru sending whatever comes to MIDI In directly to MIDI Out without changes. If you change presets using Navigation/Confirm knob or built-in Footswitches instead of external MIDI Controller, the preset number will be sent as Program Change message
• MAP: When the preset is activated the corresponding mapped preset number will be sent as Program Change message. See Chapter “MIDI Mapping” for details
• SET: The value set below will be sent as a Program Change when this preset is activated
PC Out is set for a preset rather than a controller.

Editing Presets 17
Saving/Copying/Naming a Preset
After you’re done editing a preset, return to the Preset screen and press Esc. You’ll be prompted to save the preset. Use Navigation/Confirm knob to choose between No, Return or Yes. You can also press Esc once again to quit without saving. Choose Return if you forgot something and don’t want to exit yet. If you choose Yes, you’ll be prompted to select the destination preset. At this point you can still cancel the operation by pressing Esc. Otherwise press Navigation/Confirm knob to save. Use the same procedure to copy presets.
To rename a preset press 4/SYS while on the Preset screen. Turn Navigation/Confirm knob to choose the letter you want to change and press it to edit the character. Now pick the right character. Press Edit to switch between upper and lower case. Press Navigation/Confirm to confirm. Use Edit button as a shortcut to delete a letter. At the end press Esc to return to the Preset screen and don’t forget to save!
Clearing a Preset
If you want to delete or clear a preset, press 1/ATT IN while on the Preset screen. Use Navigation/Confirm knob to move the cursor to Yes and confirm the action. All effect blocks will be reset to the default state. You don’t need to save the preset, simply press Esc to exit.
No Return Yes Save?
Preset . Name . abcdefghijklmnopqrst uvwxyz0123456789!@#$%
No Yes Preset Default Settings?

Effect Blocks18
Effect Blocks
Resonance Filter
This filter is the first one in the virtual chain of effects. It lets you cut some frequency ranges out of your guitar tone. For example, you can create an effect similar to wah-wah pedals. This effect block contains the following parameters:
• Mix: Controls the balance between Dry and Wet signal. The Dry signal is mixed out of phase. When Mix is set to 0 some frequencies will completely cancel each other, creating an interesting effect. Range: -63 (completely Dry) to 64 (completely Wet).
• F Type: Filter type. Can be set to LPF (Low-pass filter), HPF (High-pass filter) or BPF (Band-pass filter). LPF passes through frequencies below the cutoff frequency and attenuates everything above that point. Use this option to create effect similar to wah-wah. HPF does the opposite. BPF passes a range (band) of frequencies and attenuates everything outside the range.
• F Mod: Selects one of the following ways to control the cutoff frequency:
1. LFO: Automatically, by low-frequency oscillator
2. Dyn: Automatically, depending on the input signal level
3. Ext: Manually, by a controller, such as expression pedal. Choose Filt freq as destination when assigning a controller
• LFO r: When LFO is selected as F Mod, this parameter sets the LFO rate. You can assign a controller to this parameter. Use Filt LFOrate as destination. Range: 0 to 127.
low Frequency (Hz) high
Gain (dB)
LPF
low Frequency (Hz) high
Gain (dB)
BPF
low Frequency (Hz) high
Gain (dB)
HPF

Effect Blocks 19• Lo freq: Sets the lower limit for the cutoff frequency. The higher this limit is set, the
lower the width of the effect gets. The full width (cutoff frequency range) is from 26 Hz to 6545 Hz. Range: 0 (26 Hz) to 127 (560 Hz).
• Hi freq: Sets the upper limit for the cutoff frequency. The lower this limit is set, the lower the width of the effect gets. Range: 0 (560 Hz) to 127 (6545 Hz).
• Res: Sets the resonance, changing the saturation of the effect. Range: 0 to 127.
• Dyn th: When Dyn is selected as F Mod, this parameter sets the threshold/sensitivity of the effect to the input signal level. The lower it is, the louder you need to play to engage the effect. Range: 0 to 127.
• Dyn att: When Dyn is selected as F Mod, this parameter sets the attack time. The lower it is, the faster the effect opens up. Range: 0 to 127.
• Dyn rel: When Dyn is selected as F Mod, this parameter sets the release time. The higher it is, the longer it takes for the effect to get into the initial state. Range: 0 to 127.
• Volume: Sometimes high resonance values can boost the sound too much and cause some distortion. Use this parameter to reduce the volume of the effect. Range: 0 to 127.
low Frequency (Hz) high
Gain (dB)
Resonance 0
low Frequency (Hz) high
Gain (dB)
Resonance 127

Effect Blocks20
Noise Gate
Noise Gate is used to attenuate the signal in pauses when you don’t play guitar, helping you to hide some hiss, hum and other noise present in any guitar setup.
You can control its behavior using following parameters:
• Thresh: Sets the threshold. The Noise Gate allows the signal to pass through only when it is above the threshold. When the input signal is below the threshold, the gate is ‘closed’ and no signal is allowed to pass. Set it a little higher than the noise level in your system to achieve noise dampening. If the threshold is set too high, it may cut out your soft notes. Range: 0 to 127.
• Attack: Determines how fast the gate opens. Setting it to its maximum will result in swell effect. Range: 0 (0 ms) to 127 (127 ms).
• Decay: Determines how fast the gate closes. Low values won’t let any noise to pass but may cut your notes short. Range: 0 (about 0 ms) to 127 (about 1500 ms).
Compressor
Compressor reduces the volume of loud sounds and amplifies quiet sounds smoothening the dynamics. At the same time, it can be used as a sustainer making your single notes sound longer. It’s a great tool to letting some parts stand out. It is as easy to find settings that work against you. Too much compression may bring up some hum and noise when used together with overdrive or distortion.
Attack Decay Time
Gain (dB)
Threshold
Input level
Output level

Effect Blocks 21Compressor has the following parameters to tweak:
• Thresh: Everything above the set threshold level gets compressed and the overall signal is amplified. You can assign a controller to this parameter. Use Compr Thresh as destination. Range: 0 (0 dB) to 127 (-37 dB).
• Ratio: Lower values gently reduce the volume. Higher ratio turns the compressor into a limiter. For example, with a ratio 2:1 an Input signal at 6 dB above the threshold is reduced to 3 dB. Ratio 10:1 will result in 6 dB above the threshold being reduced to 0.6 dB. Range: 0 (2:1) to 127 (24:1).
• Volume: Sets the output volume. You can assign a controller to this parameter. Use Compr Volume as destination. Range: 0 to 127.
• Attack: Determines how fast the compressor will react after the signal gets louder than the threshold. Range: 0 (5 ms) to 127 (30 ms).
• Knee: Smoothes the compression gradually applying the ratio. Softer knee reduces the audible difference between uncompressed and compressed sound. Range: 0 (hard) to 127 (soft).
Input level (dB)O
utpu
t lev
el (
dB)
Threshold
Low ra
tioHigh ra
tio
Different ratios fixed threshold
Input level (dB)
Out
put l
evel
(dB
)
Threshold
Hard kn
ee
Soft kn
ee
Different ratio knees fixed threshold and ratio
Input level (dB)
Out
put l
evel
(dB
)
Low
thre
shol
d Different thresholds fixed ratio
High threshold
0 dB
0 dB
Attack Time
Gain (dB)
Threshold
Input level
Output level

Effect Blocks22
Preamp Simulator
To avoid any confusion, let’s draw the line between preamps and effect pedals.
Preamps are self-sufficient units with one or more channels. They have a strong output, so-called line level output, and are able to drive a power amp. These are:
• Rack devices, such as AMT SS-10 Tube Guitar Preamp
• Preamp sections of guitar head and combo amplifiers. For example, AMT StoneHead SH-50-4 with its dedicated Preamp Out
• Preamp pedals with line level output, such as AMT Electronics LA series, LA II series and SS series pedals
Effect pedals have a quieter output than preamps, so-called instrument level output, and are not able to drive a power amp. Connected directly to the power amp these pedals will sound dull. They are designed to work in conjunction with the clean channel of a guitar amp and are heavily dependent on it. Because the sound gets significantly colored by the amp, the same effect pedal may sound completely different when used with different amps. This group of devices includes:
• Boost pedals
• Overdrive pedals, such as AMT HR-1 ‘Heater’ pedal
• Distortion pedals, such as AMT Electronics FX Drive and FX Drive-mini series pedals. AMT LA II series preamps have dedicated Drive Out and can be used as effect pedals
Pangaea CP-100FX perfectly works with all the devices listed above. By default, Pangaea’s input is configured to work with a preamp. May you choose to use an effect pedal instead, enable Preamp Simulator effect block to simulate a clean channel of an amplifier. Just like a real amp, this block has a tone stack. Here is a list of the parameters you can adjust:
• Gain
• Volume
• Low
• Mid
• High

Effect Blocks 23
Power Amp Simulator
IR is a very good representation of a cabinet’s sonic characteristics. But since it’s dynamic behavior is linear, it can’t reproduce the compression, saturation and playing feel of a cranked up tube power amp. This is when the Power Amp Simulator may come in handy. The effect block provides the following parameters to tweak:
• Volume: Think of it as a Master volume of an amp. As you turn it up, you’ll notice how the sound gets more and more saturated and compressed. Just like with a real power amp, you can get some overdrive when Volume is set to maximum. You can assign a controller to this parameter. Use Amplif Volume as destination. Range: 0 to 127.
• Presence: Just like a real power amp this effect block has a Presence control. Use it to add some extra brightness to the tone. Range: 0 to 127.
• Slave: When you crank up the Volume, use this parameter to attenuate the level to avoid clipping. If Volume is low, turn Slave up to boost the output. You can assign a controller to this parameter. Use Amplif Slave as destination. Range: 0 to 127.
• Type: There are different types of power amps. Describing them all in details would require several pages and is not a goal of this handbook. Generally speaking, there are single-ended amps and push-pull amps. Single-ended amps have a single power tube, sometimes two connected in parallel. All single-ended amps are Class A by definition. Push-pull amps have two tubes or two pairs of tubes working together. These amps are Class AB but some of them may be biased to sound closer to Class A amps. Class AB amps are typically much more efficient in terms of power and volume than Class A amps. The vast majority of the amplifiers built today are push-pull amps. There are a few types of power tubes. Historically and due to availability 6L6 tubes were common in American amplifiers, while EL34 were a standard solution in European amps. Pangaea CP-100FX provides the following power amp types to choose from:
1. PP 6L6: Generic push-pull Class AB amp running 6L6 tubes
2. PP EL34: Generic push-pull Class AB amp running EL34 tubes

Effect Blocks243. SE 6L6: Generic single-ended Class A amp running 6L6 tubes
4. SE EL34: Generic single-ended Class A amp running EL34 tubes
5. AMT TC-3: Based on AMT Electronics TubeCake TC-3 power amplifier
6. California: Based on* Mesa/Boogie® Dual Rectifier® power amp section
7. British M: Based on* Marshall® JCM-800 power amp section
8. British L: Based on* Laney LC50 II 112 Combo power amp section
Cabinet Simulator (Impulse Response)
Impulse Response or IR is a sonic fingerprint of a certain speaker, cabinet, mic, mic preamp and room where the profile was captured. When used for cabinet simulation, it provides a great realism and depth. This effect block lets you load up to two Impulse Responses simultaneously and control the stereo image. Pangaea accepts IR files in 24-bit mono 48 kHz .wav format. You can tweak the following parameters:
• Pan: Gives you full control over the stereo image. Panning is only available in the “Dual Cabinet Mode”. You can pan each cabinet separately. Range: L63 to R63.
• Browser: This file browser lets you navigate through folders on the installed microSD card and load IR files. As you scroll through IRs you can monitor the difference in sound in real time. For every incompatible IR file the cabinet simulation will be bypassed and the volume dimmed to 50%. Use Navigation/Confirm knob to scroll, enter folders and pick the IR. Choose ‘..’ to return to a parent folder. Once you select an IR, it will be stored into Pangaea’s internal memory. Don’t forget to save the preset.
• Volume: Use this control with the integrated level meter to adjust the output volume.
IR.wavPan 0BrowserVolume
* All third party companies and products listed or otherwise mentioned in this document are trademarks of their respective owners and are in no way affiliated or associated with AMT Electronics. Product names are used solely to identify certain products whose tones and sounds were
studied during model development for this product. The use of these names does not imply any cooperation or endorsement.

Effect Blocks 25
EQ
This effect block provides 5-band parametric equalizer for fine-tuning your tone. Use Navigation/Confirm knob to pick a band and press the knob to adjust it. Each band has -15 to +15 dB range. If you scroll further to the right, you’ll get to the second settings screen with the following parameters:
• HPF: High-pass filter passes through frequencies above the cutoff frequency and attenuates everything below that point. Range: 20 Hz to 1000 Hz.
• LPF: Low-pass filter passes through frequencies below the cutoff frequency and attenuates everything above that point. Range: 1000 Hz to 20000 Hz.
• Presence: Adds some extra brightness to the tone. Range: 0 to 127.
You are able to reconfigure every band. To do that, select a band using Navigation/Confirm knob and press Edit. In the submenu you can adjust:
• F: Sets the operating frequency for the selected band. Each band has an individual range of values.
• Q: Sets the bandwidth - the area around the set frequency that the EQ will amplify or attenuate Range: 0.10 to 10.0.
Press 3/EQ button to reset a band to default settings.
F 894 Hz Q 0.70 Press EQ for Default F 800Hz Q 0.70
15
-150 dBEQ
Bandwidth Frequency (Hz)
Gain (dB)
0
-6
-6
-12
12
Frequency
F
Q

Effect Blocks26
Delay
Delay is the most used guitar effect. It memorizes the audio signal and plays it back once or several times after a period of time. Pangaea has two delay lines running at the same time and a modulation effect. And yes, you can tap the tempo! Here’s how you do that:
• Let’s say, you want to use the FSW CONFIRM to tap the tempo. Go to the system menu and change its type to Controller. Check Chapter “Footswitches” for instructions.
• Open preset controller settings (check Chapter “Assigning Controllers” for details). For the desired controller (for example Contr 1) set FSW CONFIRM as Source. Assign Delay Tap as destination. Now you can tap the delay tempo by pressing the footswitch.
This effect block contains the following parameters:
• Mix: Sets the relationship between dry signal and applied effect. You can assign a controller to this parameter. Use Delay Volume as destination. Range: Dry 63 to Wet 64.
• Time: There is a submenu where you can adjust:
1. Time: Sets the time between the repetitions. You can also press Edit button repeatedly at any time to tap the Time. A controller can be assigned to this parameter. Use Delay Tap as destination. Range: 0.01s to 2.73s.
2. TAP: Defines the multiplier for Time tapping. For example, when it is set to 1/4, pressing the Edit button or assigned footswitch every 2 seconds will set Time to 500ms. It can be set to:
• 1/1: The Time is set as you tap it• 1/1.5: Makes dotted 8th note delay when tapping quarters• 1/2: Makes 8th note delay when tapping quarters• 1/3: Makes dotted 16th note delay when tapping quarters or dotted 8th note
delay when tapping half notes• 1/4: Makes 16th note delay when tapping quarters or 8th note delay when
tapping half notes

Effect Blocks 27• F_Back: Determines how many repetitions there will be. Set it to maximum to get an
infinite delay. You can assign a controller to this parameter. Use Delay Fedback as destination. Range: 0 to 127.
• LPF: Low-pass filter passes through frequencies below the cutoff frequency and attenuates everything above that point. Use LPF to emulate analog delay. Range: 0 to 127.
• HPF: High-pass filter passes through frequencies above the cutoff frequency and attenuates everything below that point. Range: 0 to 127.
• D_Pan: Panning for the first delay line. Range: L63 to R63.
• D2 Vol: Volume level of the second delay line. When set to maximum its volume is equal to the first delay line. Range: 0 to 127.
• D2 Pan: Panning for the second delay line. Set D_Pan and D2 Pan to opposite extreme values for the Ping Pong effect. Range: L63 to R63.
• D–>D2: Defines the relative offset of the second delay line from the first one.
When its value is close to 0, both delays sound almost together and the second line comes a little earlier. When its value is close to 127, the second delay line is set back in time and comes almost together with the dry signal. Set it to 63 for the Ping Pong effect. Range: 0 to 127.
Time (ms)
Gain (dB)
Offset (D–>D2) Delay Line 1
100 200 300 400 500 600 8007000
DryDelay Line 2
Time: 0.300 s D–>D2: 95

Effect Blocks28• D_Mod: Controls the depth of the modulation. Modulation is only applied to processed
(wet) signal. Range: 0 to 127.
• M_Rate: Controls the rate of the modulation. Range: 0 to 127.
• Direct: Sets the type/direction of the delay. There are two options:
1. Forward: This is an ordinary delay effect. Pretty straight forward.
2. Reverse: This one is a reverse delay. Everything you play comes back backwards delayed by the Time you set.
Phaser
Phaser is a modulation effect based on splitting the signal into two paths and changing the phase of one of them using all-pass filters. When both signal paths are mixed together some frequencies appear to be out of phase and cancel each other. This process creates notches and peaks in a frequency response. These notches can be moved up and down the frequency range if filter’s phase shift is controlled by a low-frequency oscillator. This effect block contains the following parameters:
• Mix: Controls the balance between Dry and Wet signal. The most pronounced notches occur when the Mix ratio is 50% (D+W 0). You can assign a controller to this parameter. Use Phaser Volume as destination. Range: Dry 63 to Wet 64.
• Rate: Sets the Rate of the low-frequency oscillator (LFO), making the effect slower or faster. You can assign a controller to this parameter. Use Phaser Rate as destination. Range: 0 (0.048 Hz) to 127 (4.85 Hz).
• Center: Sets the frequency the notches will be moving around. Range: 0 (80 Hz) to 127 (12 kHz).
• Width: Controls the amplitude of the LFO, widening or narrowing the effect. Range: 0 to 127.

Effect Blocks 29• F_Back: Feeding some of the filter’s output back to its input increases the contrast
between the peaks and the notches, resulting in increased saturation of the effect. Range: 0 to 127.
• Stage: The number of filters called stages. Two stages create one notch. More notches create richer Phaser effect. You can choose between 4, 6 or 8 stages.
• HPF: High-pass filter passes through frequencies above the cutoff frequency and attenuates everything below that point. Range: 0 to 127.
Flanger
Flanger is a modulation effect in a way similar to Phaser. It is based on splitting the signal into two paths and applying delay to one of them. When mixed together some frequencies appear to be out of phase and cancel each other creating notches and peaks in a frequency response. Varying delay time using LFO makes notches sweep up and down the frequency spectrum. This effect block contains the following parameters:
low Frequency (Hz) high
Gain (dB)
Feedback 0low Frequency (Hz) high
Gain (dB)
Feedback 127
low Frequency (Hz) high
Gain (dB)
4 Stageslow Frequency (Hz) high
Gain (dB)
6 Stageslow Frequency (Hz) high
Gain (dB)
8 Stages
low Frequency (Hz) high
Gain (dB)
Flanger

Effect Blocks30• Mix: Controls the balance between Dry and Wet signal.
You can assign a controller to this parameter. Use Flang Volume as destination. Range: Dry 63 to Wet 64.
• LFO: Defines the shape of the LFO. This may be set to Triangle or Sinus.
• Rate: Sets the Rate of the low-frequency oscillator (LFO), making the effect slower or faster. You can assign a controller to this parameter. Use Flang Rate as destination. Range: 0 (0.024 Hz) to 127 (9.6 Hz).
• Width: Controls the amplitude of the LFO, widening or narrowing the effect. Range: 0 to 127.
• Delay: Specifies the delay of the second signal path changing the color of the effect. Longer delay produces more notches. Range: 0 (0 ms) to 127 (21 ms).
• F_Back: Feeding some of the filter’s output back to its input increases the contrast between the peaks and the notches, resulting in increased saturation of the effect. Range: 0 to 127.
• HPF: High-pass filter passes through frequencies above the cutoff frequency and attenuates everything below that point. Range: 0 to 127.
Chorus
Chorus is a modulation effect of the same nature as Flanger. The difference is that the Wet part of the sound is not only delayed, but shifts up and down in pitch. Delay time and pitch modulation are controlled by a LFO. When mixed together the sound gets thicker and wider. You can tweak the following parameters:
• Mix: Controls the balance between Dry and Wet signal. The widest Chorus occurs when the Mix ratio is 50% (D+W 0). Setting the Mix to 100% Wet (Wet 64) will result in Vibrato effect. You can assign a controller to this parameter. Use Chorus Volume as destination. Range: Dry 63 to Wet 64.

Effect Blocks 31• Rate: Sets the Rate of the low-frequency oscillator (LFO), making the effect slower or
faster. You can assign a controller to this parameter. Use Chorus Rate as destination. Range: 0 (0.024 Hz) to 127 (9.6 Hz).
• Width: Controls the amplitude of the LFO. Higher values mean wider pitch modulation and bigger Delay variation. Range: 0 (0 ms) to 127 (21 ms).
• Delay: Specifies the initial Delay of the second signal path changing the color of the effect. The total amount of Delay is a sum of the initial Delay and a variation based on the Width and the LFO. Range: 0 (0 ms) to 127 (21 ms).
• Type: There are 4 types of effect to choose from:
1. Chorus: Standard single voice Chorus based on a single Delay line with square modulation
2. Chorus S: Stereo Chorus with two Delay lines and square modulation. Delays share the same LFO and are modulated 180 degrees out of phase. This creates a richer chorus and a wider stereo image
3. Chorus x3: Multiple voice Chorus with 3 Delay lines and sine modulation. This chorus effect uses the same LFO to modulate all of the delays in sync, but at different points in the LFO’s cycle
4. Chorus x3 S: Stereo version of Chorus x3. The Dry signal in the left channel is added out of phase
• HPF: High-pass filter passes through frequencies above the cutoff frequency and attenuates everything below that point. Range: 0 to 127.

Effect Blocks32
Early Reflections
This effect block emulates room acoustics. Unlike Reverb, Early Reflections are sounds that you hear right after the direct sound before full reverberation takes over. It’s more like a series of discrete delays rather than a smooth tail associated with Reverb. The effect block provides the following parameters to tweak:
• Mix: Sets the amount of direct (Dry) and processed (Wet) signal. Range: Dry 63 to Wet 64.
• Type: There are 6 types of the effect to choose from:
1. Short M: Small room mono
2. Short S: Small room stereo
3. Medium M: Medium size room mono
4. Medium S: Medium size room stereo
5. Long M: Large room mono
6. Long S: Large room stereo
Reverb
Reverb simulates placing your amp in a big, reverberant space with a lot of echo, like a church, a huge concert hall or a parking garage. It wets your sound, smooths it out, and may help with the sustain. Pangaea has a powerful reverb unit capable of emulating different types of reverb. You can tweak the following parameters:
• Mix: Sets the amount of direct (Dry) and processed (Wet) signal. You can assign a controller to this parameter. Use Reverb Volume as destination. Range: Dry 63 to Wet 64.
• Time: Controls the decay Time. In other words, it lets you choose how long the reverb will sound. No matter how large or tiny the room is, you can set it to anything from very short to infinity. You can assign a controller to this parameter. Use Reverb Time as destination. Range: 0 to 127.

Effect Blocks 33• Size: Sets the Size of the room. The greater the room, the longer the reverb time. With
Size set to 0 and Time between 30 and 45 you can get a tone similar to a spring reverb. Range: 0 to 127.
• Damp: Damping shortens the reverb decay for the higher frequencies simulating warmer sounding rooms. Range: 0 to 127.
• LPF: Low-pass filter passes through frequencies below the cutoff frequency and attenuates everything above that point. Range: 0 to 127.
• HPF: High-pass filter passes through frequencies above the cutoff frequency and attenuates everything below that point. Range: 0 to 127.
• Detune: Sets the amount of pitch modulation for the processed signal. This one can add more life and motion to your sound or make really weird and totally ruin it. Handle with care! Range: 0 to 127.
Tremolo
Tremolo is an amplitude modulation effect controlled by a low-frequency oscillator (LFO). It’s like someone would turn the volume of the amplifier up and down creating pulsations.
• Intens: Sets the intensity of the effect. When set to maximum the sound completely fades out between the pulses. You can assign a controller to this parameter. Use Tremolo Inten as destination. Range: 0 to 127.
• Rate: Sets the Rate of the low-frequency oscillator (LFO), making the effect slower or faster. You can also press Edit button repeatedly at any time to tap the Rate or use a controller with destination set to Tremolo TAP. To gradually change the Rate with a controller use Tremolo Rate as destination. Range: 0 (0.048 Hz) to 127 (14.5 Hz).

Effect Blocks34• LFOdist: Lets you choose LFO curve from sine to square or anything in between.
Range: 0 (sine) to 127 (square).
• Type: Gives you two options to choose from: Mono and Stereo. The latter can be used to emulate Leslie rotating speaker effect.
• TAP: Defines the multiplier for Rate tapping. It can be set to:
• 1/1: The Rate is set as you tap it• 1/1.5: Sets the Rate to a dotted 8th note when tapping quarters• 1/2: Sets the Rate to an 8th note when tapping quarters• 1/3: Sets the Rate to a dotted 16th note when tapping quarters• 1/4: Sets the Rate to a 16th note when tapping quarters
Time
Gain (dB)
Sine Tremolo
Time
Gain (dB)
Square Tremolo

Controllers 35
ControllersPangaea CP-100FX was designed as a very flexible device for use in any environment. It provides a number of tools for performing musicians. By means of built-in Footswitches, optional Expression Pedal and External MIDI Controller you can get full control over its functions in real time.
More than that, you can control another external device via MIDI. Every time a new preset is recalled, no matter how it is done, Pangaea sends corresponding MIDI program change message to MIDI Out.
Footswitches
As it was mentioned before, each of three built-in Footswitches can be assigned different functions depending on your needs. In order to make this arrangements, press 4/SYS button while on the Home screen to enter the system menu. Then turn the Navigation/Confirm knob to move the cursor down to the second page where you’ll find the Foot Switch submenu and press the knob to enter. In the submenu choose the footswitch you want to configure. On the next screen you can choose the mode:
• Fast: Generates a single event as soon as the footswitch is pressed.
• Slow: This one generates two events: on footswitch release and on hold/long press. For example, you can turn an effect block on and off every time you press the footswitch shortly, and activate the tuner if you hold it a little longer. If you pick this option, use Early to set the event on release and Late to set the event on hold/long press.
As soon as you’ve chosen a mode, move the cursor to Fast, Early or Late and press the Navigation/Confirm knob to set the event type. This may be one of the following:
• Default: Footswitches UP and DOWN will scroll through the presets. If the CONFIRM footswitch is set to this type, you’ll need to press it to recall the selected preset. Otherwise presets will be recalled instantly as you scroll through them.
FSW-DOWN FSW-CONFIRM FSW-UP
Mode Slow Early Late

Controllers36• Controller: Lets you access parameters of effect blocks. For example, to turn effects on
or off. See full list of parameters in Chapter “Assigning Controllers”. At the same time, it is possible to choose the number of MIDI controller for messages sent to MIDI Out every time you press, release or hold the footswitch. In the Slow mode the Controller function may only be assigned to one event at a time either Early or Late.
• Tuner: Enables/disables the tuner. Enabling the tuner mutes the audio output.
• Preset Map: Used to recall one of the predefined presets. You can predefine up to 4 presets and scroll through them by pressing the footswitch repeatedly.
Expression Pedal
Connect your Expression Pedal using a stereo cable with 1/4’’ (6.35mm) TRS connectors. You will find Expression Pedal settings in the system menu (press 4/SYS button while on the Home screen) under the item Expression. Right here you can enable or disable it. If it is enabled, press Edit to enter the submenu.
Type may be set to one of the following:
• Standard V
• Alternat V
• Standard CC
• Alternat CC
Standard stands for a regular expression pedal. If for some reason your pedal doesn’t seem to work, try Alternat instead.
V is the Volume Pedal mode. In this mode the pedal will control the Master volume ignoring any controller assignments in presets. Set the Type to Standard CC or Alternat CC if you want it to work as a controller for preset parameters instead. In this mode you can also control preset volume by choosing Preset Level as destination for the Expression Pedal in the preset controllers list.
CC# option lets you choose the number of MIDI controller for messages sent to MIDI Out every time you use the Expression Pedal.
Type Standard CC Calibrate CC# Off

Controllers 37As opposite to digital MIDI foot controllers, regular expression pedals are analog devices and may need calibration to work properly. If you have a feeling that your pedal doesn’t cover the full range of values, follow this procedure to calibrate your pedal:
• Select Calibrate and enter calibration mode by pressing Navigation/Confirm knob.
• When prompted, set your pedal into the extreme minimum position (heel down) and press Confirm knob.
• Now set the pedal into extreme maximum position (heel up) and confirm again. You’re good to go!
External MIDI Controller
If you decide to use an External MIDI Controller, for example AMT FS-2MIDI, connect its output to Pangaea’s MIDI In. Make sure your external controller and Pangaea use the same MIDI channel, you may want to check Chapter “MIDI Channel” for details.
Pangaea will react on incoming Program Change and CC (continuous controller) messages. Program Change messages will recall Pangaea’s presets according to MIDI Map. You can change the default order, see Chapter “MIDI Mapping” to find out how. As it was described in Chapter “Assigning Controllers”, every preset has individual PC Out settings for outgoing Program Change messages. As for CC, all incoming messages will be forwarded to MIDI Out “as is”, at the same time triggering controllers you have assigned for effect blocks parameters in presets.
You can use an External MIDI Controller to enable/disable the Tuner. Press 4/SYS button while on the Home screen to enter the system menu. Then turn the Navigation/Confirm knob to move the cursor down and select Tuner contr item. Turn it on and press Edit to enter the submenu. Inside you can set the number of MIDI controller to control the Tuner.

Global Settings38
Global Settings
Attenuator
If you’re connecting Pangaea to the speaker output of an amplifier, chances are the sound level will be very high and will clipping will occur. Use built-in Attenuator to reduce input level and avoid clipping. By the way, don’t forget to connect an actual speaker or a loadbox to the Thru Out!
To adjust attenuator settings, go to the Home screen and press 1/ATT IN button. Check the level meter on the screen and turn the Navigation/Confirm knob to set the right level. Attenuator’s range is from -60dB to +4dB. Which means you can also amplify the input signal if it is too weak.
Press Esc when you’re done to store the settings. These settings are global. Once set they will influence all presets.
Master EQ
In some situations, you may need to fine-tune your tone to make it fit to acoustic properties of specific environment. Let’s say the room has some annoying resonant frequency or the PA system is too bassy. Use the Master EQ to eliminate these problems. Its settings are global and influence your overall sound. Press 3/EQ button on the Home screen and then Edit to enable or disable the Master EQ.
You can adjust Low, Mid and High frequencies from -12dB to +12dB. The Mid band’s frequency may be set to anything between 800 Hz and 5978 Hz.
Attenuator 0dBInput
Master EQ BypassEQ on/off press EDIT
Low dB 0.0Mid dB 0.0Mid Freq 3388 HzHigh dB 0.0

Global Settings 39
Bypassing The Cabinet Simulator
If you intend to connect Pangaea into the effect loop of an amplifier and don’t need the cabinet simulation, you can disable it for all presets at once. This will not affect any cabinet profiles stored in the presets but simply bypass the IR effect block. Press 4/SYS button while on the Home screen to enter the system menu. Set parameter Mode to CabSim Off to disable cabinet simulation. Set it back to CabSim On when you need cabinet simulation again.
Dual Cabinet Mode
Pangaea is able to run with two different cabinet profiles at the same time. Once the dual mode is enabled, two cabinets will be available in the IR effect block for each preset. Dual mode has slightly longer latency compared to the single cabinet mode. You can switch between modes by adjusting Cab num parameter in the system menu. It may be set to one of the following:
• 1 L+R: Single cabinet mode with cabinet simulation active for both Left and Right channels. This is the standard mode for all stereo applications with one cabinet.
• 1 R: Single cabinet mode with cabinet simulation active for the Right channel only. Effects are working for both channels. Use this mode when you need to send out a signal with cabinet simulation while monitoring sound with effects through a guitar amplifier. Connect Pangaea’s Main Out to Power Amp In or FX Loop Return of your amp using a mono cable with 1/4’’ (6.35mm) audio jacks. Use Pangaea’s Right Balanced Out and an XLR cable to connect to a mixer or other equipment.
• 2 L+R: Dual cabinet mode. Cabinet simulation is enabled for both channels. Each preset has individual panning and volume settings for cabinets. You can make these adjustments inside of the IR effect block.
Mode CabSim OnMidi Ch 1Cab num 1 L+RExpression On >
SY
Mode CabSim OnMidi Ch 1Cab num 2 L+RExpression On >
SY

Global Settings40
MIDI Channel
Pangaea uses one of 16 MIDI channels to communicate with other devices over MIDI. In order for this communication to be successful both devices shall use the same channel.
To change MIDI channel used to send and receive MIDI messages, go to the system menu and adjust Midi ch parameter.
MIDI Mapping
As it was mentioned before, you can use Pangaea to control external devices over MIDI. Mapping gives you more flexibility. It allows you to modify incoming MIDI Program Change (PC) message before recalling a preset or forwarding it to another device via MIDI Out.
To configure MIDI mapping scroll down to MIDI PC Map in the system menu. Inside you’ll find 128 pairs with the incoming PC on the left and the value assigned to it on the right.
To make it simple, let’s say all presets have PC Out parameter set to MAP. Then 1 -> 3 means that when PC=1 is received, preset 3 will be recalled and PC=3 will be sent to MIDI Out. If preset 1 is recalled by means of built-in footswitches or Navigation/Confirm knob, PC=3 will be sent to MIDI Out. As opposite to that, if all presets have PC Out parameter set to MIDI IN, any incoming PC message will be forwarded to MIDI Out unmodified (PC=1) while Pangaea’s presets will still be recalled according to the MIDI PC Map.
Mode CabSim OnMidi ch 1Cab num 2 L+RExpression On >
SY
Foot SwitchS/PDIF Main OutputMIDI PC MapTempo Preset
SY
1 -> 3

USB & Computer Operations 41
Global Tempo
In the system menu you can find parameter Tempo that may be set to either Preset or Global. If it is set to Preset, every time a new preset with Delay is recalled, Delay Time is set to the value stored in the preset. Otherwise if Tempo is set to Global, preset settings will be ignored and Time will stay unchanged. This allows changing presets during the song while keeping the same Delay Time, so you don’t need to tap it again. Once the song tempo has changed, use Delay Tap function to set the new Time.
USB & Computer Operations
Internal Storage/Backup/Restore
If you need to create backup copies of settings and presets, connect Pangaea to the computer using USB cable. Pangaea is automatically recognized by a computer as a standard Mass Storage Device and you can access its internal storage just like you normally access any USB drive. The folder structure looks like this:
You can make a full or a partial backup. Copy whatever you want to backup to your computer.
To restore settings or presets, copy corresponding files from your computer back to Pangaea’s internal storage.
Foot SwitchS/PDIF Main OutputMIDI PC MapTempo Global
SY
PRESETS
01_preset.pan Preset 1 02_preset.pan Preset 2 03_preset.pan Preset 3 ... 99_preset.pan Preset 99
system.pan System settings

USB & Computer Operations42
Factory Reset
If you need to reset Pangaea, connect it to the computer using USB cable and access its internal storage. You can reset system settings but keep all presets or vice versa. Simply delete corresponding files. Missing files will be recreated automatically using the default settings next time you turn on the device.
Once files are deleted, this operation cannot be canceled! Factory presets will not be recreated after full reset, all presets will be empty!
SD Card
Pangaea CP-100FX uses microSD card to load new Impulse Responses. You can find countless cabinet profiles online or create your own.
Use a card reader to transfer IR files to the microSD card from your computer. It is recommended to keep IR files in the IMPULSE folder even though Pangaea’s browser can access the entire memory card.
IR files must have 24-bit mono 48 kHz .wav format. Files in other formats will be ignored.
MicroSD cards up to 32GB using FAT32 filesystem are supported.
Updating Pangaea’s Firmware
We are constantly working on improvements to give you even more flexibility, more effects and options. Check www.amtelectronics.com for firmware updates.
To install firmware update, connect Pangaea to the computer using USB cable and power it up with the power supply. Unpack the downloaded zip archive and copy firmware file into the root folder of Pangaea’s internal storage. Safely remove Pangaea from the computer just like you normally do with USB Flash drives. The update process will start as soon as you disconnect the USB cable.
Important: Do not disconnect the power supply until the update process is completed. At the end of it Pangaea will reboot automatically. As soon as you see the Home screen, it is safe to turn the device off.
!
!

USB & Computer Operations 43Using Digital Output (S/PDIF)
Pangaea’s internal sample rate is 48 kHz. When using Digital Output to connect to another device, its sample rate must be set to 48 kHz as well.
In the system menu you’ll find S/PDIF parameter, which has two options:
• Main Output: S/PDIF will send out processed sound - a 24-bit digital version of Main Out.
• Dry Input: A digital version of unprocessed dry sound will be sent out.
The signal from Aux In is not sent to the Digital Output.
Foot SwitchS/PDIF Main OutputMIDI PC MapTempo Preset
SY

Appendix A: Signal Flow44
Appendix A: Signal Flow
Input
Main Out
Phones Out
Balanced Out
Thru/Bypass Out
Attenuator
A/D
AMT
AMTCOMPGATE
EQDELAYPHFL
TRRVERCH
D/A
S/PDIF Out
MasterVolume
PhonesVolume
RF
VOL
POWER AMP
IR
PREAMP
MASTER EQ
Aux In

Appendix B: Technical Specifications 45
Appendix B: Technical SpecificationsNumber of Presets 99
A/D & D/A converters 24 bit
Sampling Frequency 48 kHz
Latency Single cabinet mode: 1.5 ms Dual cabinet mode: 1.8 ms
IR Truncate 85.33 ms (4096 samples)
Analog Input Mono 1/4’’ (6.35mm) phone jack, unbalanced Impedance: 100 kOhm Nominal input level: -10 dBV (0.316V) Max input level: +8 dBV (2.6V)
Auxiliary Input Stereo 1/8’’ (3.5mm) phone jack Impedance: 22 kOhm Max input level: 0.5V
Main Output Stereo 1/4’’ (6.35mm) phone jack, unbalanced Impedance: 470 Ohm Nominal output level: -10 dBV (0.316V) Max output level: +10 dBv (3.5V)
Balanced Output 2 x XLR (Left and Right), balanced Impedance: 6 kOhm Nominal output level: +4 dBu (1.23V) Max output level: +17 dBu (5.6V)
Headphones Output Stereo 1/4’’ (6.35mm) phone jack Recommended headphones impedance 32 Ohm Impedance: 10 Ohm Max output level: 3V (no load)
Thru/Bypass Output Mono 1/4’’ (6.35mm) phone jack, unbalanced
Digital Output RCA Phono, S/PDIF, 24 bit, 48 kHz
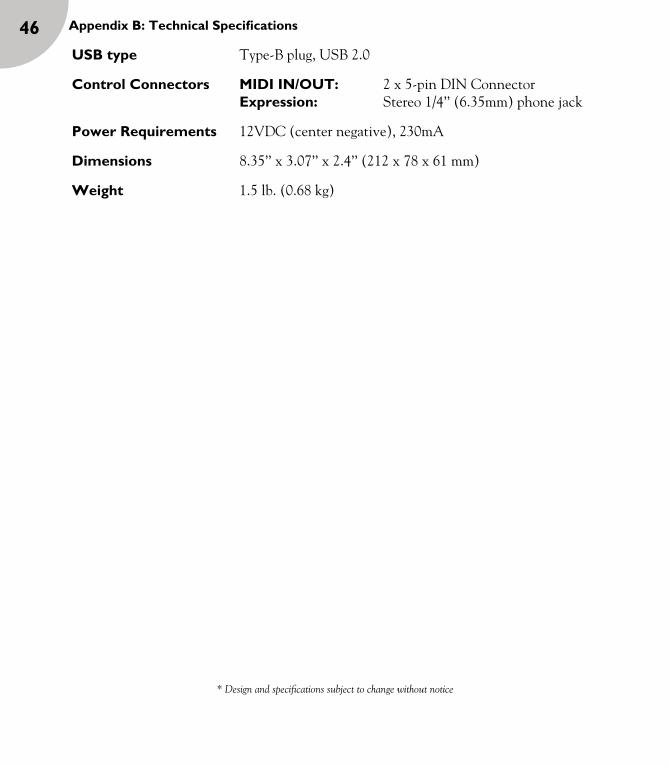
Appendix B: Technical Specifications46USB type Type-B plug, USB 2.0
Control Connectors MIDI IN/OUT: 2 x 5-pin DIN Connector Expression: Stereo 1/4’’ (6.35mm) phone jack
Power Requirements 12VDC (center negative), 230mA
Dimensions 8.35’’ x 3.07’’ x 2.4’’ (212 x 78 x 61 mm)
Weight 1.5 lb. (0.68 kg)
* Design and specifications subject to change without notice