amlogic engineering notes - gadgetfreakfreak-tab.de/neomode/amlogic platform usb burning... · ②...
TRANSCRIPT

Amlogic Application Notes
Amlogic Confidential 1/32
Application Notes
Amlogic Platform USB Burning Tool V2 User Guide
Revision 1.0
Amlogic, Inc. 2518 Mission College Blvd
Santa Clara, CA 95054 U.S.A.
www.amlogic.com
Legal Notices © 2014 Amlogic, Inc. All rights reserved. Amlogic ® is registered trademarks of Amlogic, Inc. All other registered trademarks, trademarks and service marks are property of their respective owners. This document is Amlogic Company confidential and is not intended for any external distribution.
Amlo
gic Confid
entia
l!

Amlogic Application Notes
Amlogic Confidential 2/32
Contents
1. Overview .................................................................................................................................................................................4
1.1 Introduction .................................................................................................................................................................4
1.2 Terminology ................................................................................................................................................................4
2. SDK and Fetch Tool ..............................................................................................................................................................5
2.1 Download code and pack firmware .........................................................................................................................5
2.2 Fetch PC Tool .............................................................................................................................................................6
3. Sdcard Burning User Guide .................................................................................................................................................9
3.1 Burn complete package ............................................................................................................................................9
3.2 Burn single partition (for developer) ..................................................................................................................... 13
4. USB Burning User Guide .................................................................................................................................................. 15
4.1 Tool and driver installation ..................................................................................................................................... 15
4.2 Burn the whole package ........................................................................................................................................ 15
4.3 Burn single partition (for developer) ..................................................................................................................... 17
5. Key Configuration and Burning ........................................................................................................................................ 21
5.1 Compilation and configuration support ................................................................................................................ 21
5.2 Use USB burning tool to burn key ........................................................................................................................ 25
5.3 Use usb command line tool to burn key .............................................................................................................. 27
6. Add CPU temperature check in the process of burning ............................................................................................... 29
6.1 Function overview ................................................................................................................................................... 29
6.2 Update code and burning tool to support this feature ....................................................................................... 29
6.3 How to use CPU temperature range checking function during producing ..................................................... 29
7. Burn and update from USB disk ....................................................................................................................................... 32
7.1 Function overview ................................................................................................................................................... 32
7.2 Burn aml_upgrade_package.img ............................................................................................................................... 32
7.3 Update the single partition(for developers) .............................................................................................................. 32
Amlo
gic Confid
entia
l!

Amlogic Application Notes
Amlogic Confidential 3/32
Revision History
Version Date Author Changes
0.1 Aug. 13, 2013 Sam Wu Initial version, only include command tool description,
0.5 Aug. 16, 2013 Sam Wu Add USB package burning tool description
0.6 Aug. 23, 2013 Sam Wu Support g18/g24/g33 in m6 kernel3.8 development
0.7 Oct. 09, 2013 Sam Wu Support k100/k101/k200 of m8 platform
0.8 Oct. 15, 2013 Sam Wu Sdcard burning support output dynamic progress bar on LCD, and enabled on k100/k101
0.9 Feb. 10, 2014 Sam Wu Add key burning description
1.0 Oct. 03, 2014 Chunyu.song, Sam.Wu
1, update the descriptions of relevant terminologies 2, usb burning tool support testing cpu temperature 3,support burning and update from USB disk
Amlo
gic Confid
entia
l!

Amlogic Application Notes
Amlogic Confidential 4/32
1. Overview
1.1 Introduction
This document provides an introduction of the image burning methods which are supported under Amlogic kernel3.10. It includes both USB(including U-disk burning) and sdcard burning.
This document applies to Amlogic kernel3.10 while Kernel 3.0 platform is not supported.
For the time being, this document does not introduce the OTA upgrade related topic.
1.2 Terminology
1) Version 2 Burning: it is a way of burning the image under uboot which based on Amlogic NFTL driver interface and worldcup USB protocol. For the time being, both USB and sdcard burning can be supported.
2) AmlUsbBurning 2.0.xx: version2 USB burning tool which is supported on win7/winxp windows OS.
3) update.exe: Command tool based on Amlogic libusb driver, i.e., usb terminal of uboot. The user can send commands to uboot by libusb driver. It is mainly for developers to burn or debug.
4) update: uboot Command to let the platform enter wordcup protocol mode. It is used to enter Amlogic USB burning mode.
5) sdc_update: uboot command. It is used to read a file from tf card and burn it to one of the platform partitions.
6) sdc_burn: uboot command. It is used to read the config file from tf card and also read the burning package in Amlogic format for burning.
7) usb_update:uboot command. It is used to read a file from U-disk and burn it to one of the platform partitions.
8) usb_burn: uboot command. It is used to read the config file from U-disk and also read the burning package in Amlogic format for burning.
Amlo
gic Confid
entia
l!
Amlogic Application Notes
Amlogic Confidential 5/32
2. SDK and Fetch Tool
2.1 Download code and pack firmware
2.1.1 Code download Here only kernel 3.10 + android 4.4 supported by M8 platforms are introduced.
a. android: + uboot repo init -u git://git.myamlogic.com/platform/manifest.git -b kk-amlogic --repo-
url=git://10.8.9.5/tools/repo.git
repo sync
Note: uboot code still needs to be compiled separately. However, code is already included under the SDK
root directory, i.e.,/uboot/ .
2.1.2 System build
a. uboot: i. uboot config
config command for k200 : "make m8_k200_v1_config" config command for k100 : "make m8_k100_v1_config" config command for k101 : "make m8_k101_v1_config"
ii. uboot make; iii. uboot output (uboot\build\) Copy uboot\build\u-boot.bin to directory device/amlogic/gxxxx/ Copy uboot\build\ddr_init.bin to directory device/amlogic/gxxx/ Copy uboot\build\u-boot-orig.bin to directory device/amlogic/gxxx/
b. Android:
i. source build/envsetup.sh ii. K100: lunch k100-userdebug K101: lunch k101-userdebug K200: lunch k200-userdebug
2.1.3 Make out burning package
Generate the complete burning package: After lunching to the corresponding configurations, use make (or make otapackage) directly under sdk root
folder to make out the complete burning package aml_upgrade_package.img in the related out path (e,g, out\target\product\k100).
Amlo
gic Confid
entia
l!
Amlogic Application Notes
Amlogic Confidential 6/32
aml_upgrade_package.img burning package can be used in both USB(including U-disk burning) and sdcard burning.
If make tool does not prompt that aml_upgrade rule is ready to generate or aml_upgrade_package.img is
not generated, it means enable TARGET_SUPPORT_USB_BURNING_V2 related compilation macro in makefile is not enabled in the current project source code. Please contact the corresponding project owner.
Generate the separate partition image for burning
1) Use make bootimage to boot.img under android root folder 2) Use make to generate u-boot.bin under uboot folder
2.2 Fetch PC Tool As there are two burning ways including USB and SDcard. The burning tools are also divided accordingly.
2.2.1 USB burning tool
USB burning tool consists of complete package and command line burning,
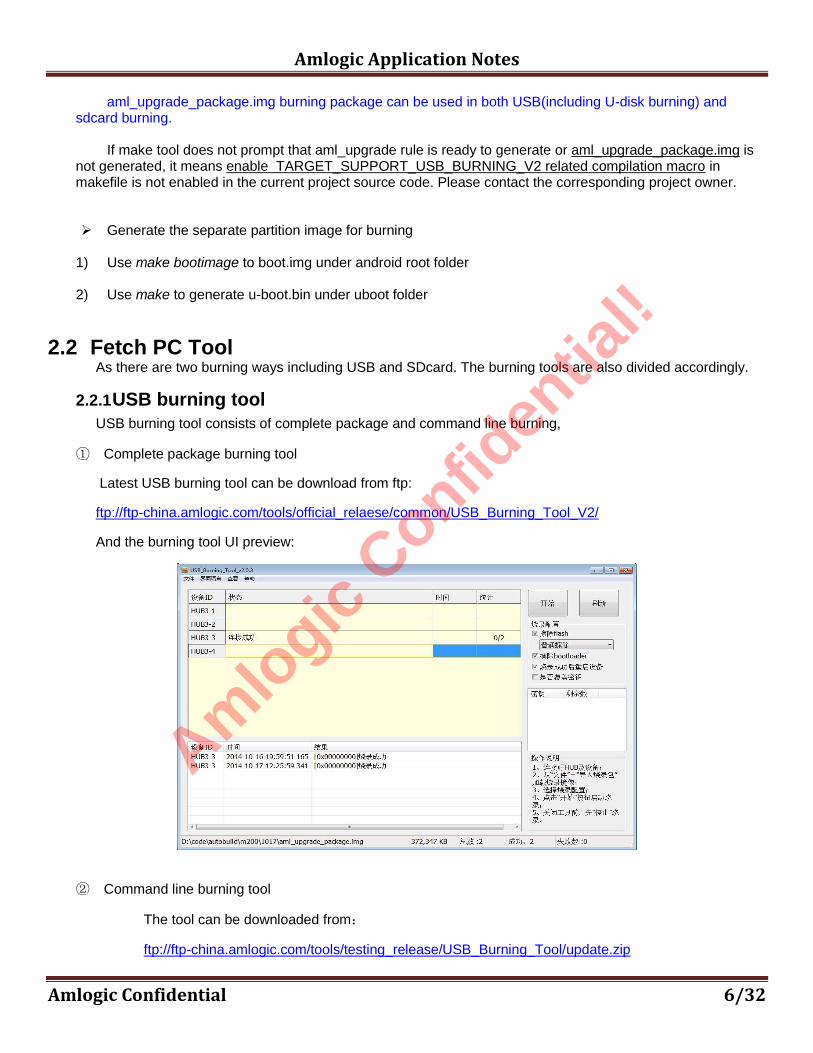
① Complete package burning tool
Latest USB burning tool can be download from ftp:
ftp://ftp-china.amlogic.com/tools/official_relaese/common/USB_Burning_Tool_V2/
And the burning tool UI preview:
② Command line burning tool
The tool can be downloaded from:
ftp://ftp-china.amlogic.com/tools/testing_release/USB_Burning_Tool/update.zip
Amlo
gic Confid
entia
l!

Amlogic Application Notes
Amlogic Confidential 7/32
The help UI of the command line tool update.exe is:
Please use the Update.exe with the help UI as shown in the figure above.
2.2.2 Sdcard Burning Tool
There are two tools for Sdcard burning. Please download them from the ftp address below:
2.2.2.1 Boot card maker: ftp://ftp-china.amlogic.com/tools/testing_release/Boot_Card_Maker/
For the time being, sdcard burning needs ‘boot card maker’. Use ‘boot card maker’ to burn u-boot.bin to the tf card.
Note:1. If your card has never used as boot or burning, it needs to be partitioned and formatted.
2. The boot card maker supports windows xp and Windows 7 (win7 supported).
The preview of boot card maker tools:
Amlo
gic Confid
entia
l!

Amlogic Application Notes
Amlogic Confidential 8/32
2.2.2.2 Burn Card Maker
The burn card maker can burn the complete burning package (default name: aml_upgrade_package.img) to the card. It can use simply one key to finish multiple steps of making a card.
Tool downloading address: ftp://ftp-china.amlogic.com/tools/official_relaese/common/Burn_Card_Maker/
Amlo
gic Confid
entia
l!

Amlogic Application Notes
Amlogic Confidential 9/32
3. Sdcard Burning User Guide
3.1 Burn complete package
For burning the entire package, also use “make otapackage” or “make” command to complete the burning package.
The user will need to prepare a TF card for burning.
If tf card is not properly partitioned, it will need to be formatted.
If the partitions are OK, the contents on this card will not be damaged.
3.1.1 Make burn card
Use the tool to make burn card (recommended):
Use the tool Burn_card_Maker, select the burning package aml_upgrade_package.img to start the one-key burning process.
3.1.2 Note on burn card maker tool options:
The tool option actually modifies aml_sdc_burn.ini. The ini script is similar to factory_update_param.aml for recovery burning. Currently there are four options that user needs to set:
Amlo
gic Confid
entia
l!

Amlogic Application Notes
Amlogic Confidential 10/32
1) To Partition and Format:
This option will re-format your tf card. If the card has been partitioned, it does not need to be selected. If not, this option needs to be selected. Otherwise, fat related commands of uboot fatload will not be recognized to the card (This option is not in aml_sdc_burn.ini script).
2) Erase_flash:
i. Value 1 corresponds to “erase in normal” in the tool. It means all the flash partition contents and uboot will be erased before burning, which is equivalent to erase manually first and then burn the image;
ii. Value 2 corresponds to “erase in force” in the tool. Similar to 1, it will also erase all the partition contets and uboot. However it uses scrub instead of erase.
iii. Value 3 corresponds to “erase in total” in the tool. It will erase all the content contents, uboot and flash key at the same time.
iv. Value 4 corresponds to “force erase in total” in the tool. It has the similar function as 3 however with non-protection mode.
3) Erase_bootloader:
If the value is 1, the platform will boot the bootloader in the external tf card during burning, which will ensure the latest Bootloader is used for card burning. (Default option. In order to always run the latest code during burning, please keep selecting this option).
4) Package:
It is allowed to have multiple burning package in the card. This option will choose which one to burn. (Same to --update_package in factory_update_param.aml)
Amlo
gic Confid
entia
l!

Amlogic Application Notes
Amlogic Confidential 11/32
Manually make burning card:
① Use “BootcardMaker.exe” to burn the compiled u-boot.bin to tf card.
② Copy the entire aml_upgrade_package.img to tf card.
③ Get aml_sdc_burn.in from device\amlogic\k100, rename the package name to your firmware name (Default aml_upgrade_package.img), and then copy aml_sdc_burn.ini to tf card.
3.1.3 Enter burning mode
If your platform is empty, i.e., never burnt, insert the tf card which is prepared and power on. It will enter burning mode automatically.
If your platform is not empty and the code to burn is new, you can enter tf card burning through combination keys.
If there is UART interface, use command ”run update” to start burning under uboot command line mode.
Note: the command ’run update’ under uboot supports multiple burning methods,
i. First it will try usb connection. If connected, it will enter usb burning mode;
ii. If no usb connection, it will first find aml_sdc_burn.ini in the card. If it is exists, card burning under uboot will be run;
iii. If card burning script is not found, it will search for auto erase script aml_autoscript. If it is exists, the script will be run;
iv. Finally it will jump to recovery burning. Therefore if burning by in the recovery way is always preferred, the user can run ’run recovery’ directly or rename ’aml_sdc_burn.ini’ in the card.
3.1.4 Burn Process
Under uboot, run command [sdc_burn $sdcburncfg] or “run update” to finish the complete package.
During burning, the progress bar will be updated at the bottom. In the case of K101, the progress UI is shown below. Am
logic
Confiden
tial!

Amlogic Application Notes
Amlogic Confidential 12/32
In the figure:
a. The number at top-left corner is the log of main steps.
b. The icon in the middle means burning status. Generally there are three kinds of icons: start burning, under burning (Upgrading as shown in the figure), finish burning and burning failed.
c. The speed of the bottom progress bar shows how much time burning will need. (The larger the firmware, the slower the progress bar updates)
3.1.4.1 Progress bar percentage:
3.1.4.1.1 0~2%:
During this stage:
1) If erase_bootloader is selected, then ease Bootloader and reboot.
2) Initialize burning environment and get the icon resources etc., from burning package.
! If burning fails and stay at 2%. It means flash initialization fails!
3.1.4.1.2 2%~5%:
This stage is for flash initialization. If erase_flash is selected, it will also erase flash.
3.1.4.1.3 6%~94%:
This stage is for burning the data partitions except for Bootloader. If the progress bar stops here, it means partition burning fails.
3.1.4.1.4 96%~98%: This stage is for burning bootloader.
Amlo
gic Confid
entia
l!

Amlogic Application Notes
Amlogic Confidential 13/32
3.1.4.1.5 100%:
Burn successfully.
3.1.4.2 Success or failure in burning:
1) After burning successfully, it will show the following logo:
After burning successfully, power key needs to be pressed to power off the platform.
2) If burning fails, it will show the following logo:
After burning is failed, power key needs to be long pressed to power off the platform or keep the status and let the related developer check.
3.2 Burn single partition (for developer)
3.2.1 Command use example: Use UBoot command [sdc_update] to burn a partition E.g.: Update partition boot: sdc_update boot boot.img Update partition bootloader:
Amlo
gic Confid
entia
l!

Amlogic Application Notes
Amlogic Confidential 14/32
sdc_update bootloader u-boot.bin ...apply this rule to other partitions. [system/recovery/boot and etc..]
Generally, after burning succussfully, please use UBoot command [reset] to reboot the platform.
Amlo
gic Confid
entia
l!

Amlogic Application Notes
Amlogic Confidential 15/32
4. USB Burning User Guide
4.1 Tool and driver installation
4.1.1 Tool installation
ftp://ftp-china.amlogic.com/tools/official_relaese/common/USB_Burning_Tool_V2/
Please get the latest tool to install from the above ftp address.
4.1.2 Driver Installation
If Amlogic usb burning tool is never used, please check the USB device driver installed correctly..
Installation steps:
1) Step 1: Enter USB burning mode
If the platform has code burnt, please enter command update under uboot mode. The terminal will show the following print out:
If command update is not recognized by uboot, please update your uboot code and re-burn uboot.
2) Step 2: install the driver
If the otg port of the platform is connected properly with the pc, please check the windows device manger. If we can see the following device, it means driver is installed successfully:
If the device is not recognized and there is unknown USB device, please manually installed the driver from local path: C:\Program Files (x86)\Amlogic\USB_Burning_Tool\libusb-win32-bin-1.2.6.0.
3) Step 3: After installation is finished, make the libusb-win32 device as shown in the above picture has been recognized. After device properly recognized, please manually plug out and in the usb cable.
4.2 Burn the whole package
It is more recommended to burn the whole package as all the code partitions can be updated.
Amlo
gic Confid
entia
l!

Amlogic Application Notes
Amlogic Confidential 16/32
4.2.1 Enter burning mode
To enter burning mode, please connect USB cable first!
If your platform is empty, connect USB and reboot to enter burning mode. (Note to distinguish different USB ports.)
If the platform has code burnt and the code is new, use combination keys to enter burning.
Use command”reboot usb_burner_reboot” or “reboot update” under android or use command update under uboot command line mode to enter burning mode.
4.2.2 PC operation
Take g33 as an example, for complete package burning, i.e., image compiled by using “ make otapackage“ or “make” , the image output path is AndroidRoot/out/target/product/g33refNew/aml_upgrade_package.img.
When the status shows connection is successful (after connecting to pc and enter burning mode successfully), import the burning package aml_upgrade_package.img .
4.2.3 Notes on UI options
There are three options in the UI:
1) Erase flash: If you have old code burnt, especially flash related driver has been updated or all partitions need to be formatted, please check this option.
Amlo
gic Confid
entia
l!

Amlogic Application Notes
Amlogic Confidential 17/32
After checking this option, manual erase is not required. It will use the latest code in the burning package to erase the whole falsh before burning. Flash erasing needs time and the length of time depends on the flash density used on your platform. The larger density, the longer time of erasing, approximately 1sec/GB in most of the cases.
To improve the pass yield, Amlogic flash team suggest to use this erase option by default.
2) Erase bootloader: If uboot or partition table configuration has update, please check this option. It is also default option and generally always checked.
3) Reset after success: Check this option will reset the platform after burning. You will see the boot logo after burning successfully.
4.2.4 Finish burning
After finishing burning, a green mark, which means burning successfully, will be shown in the tool UI.
4.3 Burn single partition (for developer)
Single partition burning means using command line tool update.exe. It uses command line to burn only partition image under the command line mode. As it saves the time of compiling the entire package and upgrade only one partition, it is faster and more efficient.
Note: The purpose of burning single partition is to debug the code. Therefore for single partition burning, you will need to use complete package burning method to burn the whole packages. Otherwise, it may cause not booting properly after burning.
4.3.1 Commonly used commands example: Use USB command line to update single partition on PC.
4.3.1.1 Enter usb burning mode There are two ways to enter usb burning mode:
1) Under android mode use “reboot usb_burner_reboot” or “reboot update” to reboot android to UBOOT burning mode.
2) Under uboot run command update or run update to enter USB burning mode.
Amlo
gic Confid
entia
l!

Amlogic Application Notes
Amlogic Confidential 18/32
3) If you needs to burn other partitions besides bootloader/boot/recovery, the flash command initialization, [update bulkcmd “disk_initial”], needs to be run before burning.
4.3.1.2 Command example Command:update.exe partition partition_name partition_image_path
E.g.:
Update partition boot with boot.img:
Update.exe partition boot boot.img Update partition bootloader with u-boot.bin: update.exe partition bootloader u-boot.bin ...apply this rule to other partitions For system: Update partition system system.img For recovery: update partition recovery recovery.img Note:
1) It is suggested to add the path of Update.exe into windows Environment path. Then you can call update.exe anywhere through cmd.exe..
2) When there are too many modifications, especially uboot switches different configs, it is needed to make distclean and re-compile!
4.3.1.3 After burn
Finish burning: Please update bulkcmd “reset” to reset platform.
4.3.2 Other command introduction
The user can enter update and view the simple guide of update.exe.
a. Commonly used commands and format:
Amlo
gic Confid
entia
l!

Amlogic Application Notes
Amlogic Confidential 19/32
Command name
Command format Command function Command parameters and example
Partition Update partition [dev0] part_name image_path
Burn a partition image to platform. This command is a mwirte simplified version and subset
Suggest to copy partition image to local storage to avoid network issues.
bulkcmd Update.exe bulkcmd [dev0] “cmd_str”
Run commands supported by USB burning or a general uboot string command without interactive
Note:The length of Cmd_str cannot be longer than 62 Bytes. .
[Update bulkcmd “disk_initial”] is for initialize flash.
[update bulkcmd “reset”] is for reset the platform.
mwrite Update.exe mwrite dev0 partition_img_file store part_name [file_format]
Burn a partition image
Command partition is an encapsulation of mwrite. mwrite can be also used to write memory and key while partition cannot.
Parttition_img_file: image file
Store: one kind of nand/emmc/spi, driver can automatically recognize according to the platform.
Part_name: partition name
File_format: sparse/normal
Mread Update.exe mread [dev0] part_name normal nBytes_to_dump dump_file
Dump the first nBytes_to_dump bytes contents of platform partition part_name to pc and save as dump_file
@Part_name: partition name, corresponding to partition table
@Normal: fixed parameter
@Nbytes_to_dump: number of bytes to dump
@Dump_file: saved file of the data dumped
Eg:
[ update mread store boot normal 0x100000 boot.dump] dumpt the first 1M contents of boot to pc and save as boot.dump
[update mread store mem 0x10100000 normal 0x200000 1.dump]
Dump the first 2M contents starting from the memory address 0x10100000 to pc and save as 1.dump.
Write Update.exe write dev0 file memory_addr
Download the file to platform memory and downloading address is memory_addr
File: file path to download
Memory_addr: platform related address
Run Update.exe run dev0 memory_addr Run the program at entry address memory_addr of platform side
Memory_addr: Entry address of program which has been loaded into memory.
Amlo
gic Confid
entia
l!

Amlogic Application Notes
Amlogic Confidential 20/32
b. Command example:
i. Enter worldcup mode to upgrade system.img under uboot
As shown in the picture,
1) First run bulkcmd “disk_initial 0” to initialize flash. Note the result should be success.
2) Use mwrite command to burn system.img to system partition in sparse format.
If there is no other partition to be burn, the user can call update bulkcmd dev0 “reset” to reset the platform or bootm to reboot.
ii. Enter optimus mode to upgrade boot.img under uboot
It is similar to system.img burning process. However note boot.img is not in compressed format, i.e., normal format.
iii. Enter optimus mode to upgrade u-boot.bin under uboot
Note, it only applies to the case that u-boot does not need to burn or flash related driver is not updated. If flash driver and burning related code need to be updated, please refer to the section “Empty platform case”
Use update.exe to update u-boot under uboot : update.exe mwrite dev0 u-boot.bin store bootlader
normal
4.3.3 Empty platform
For empty platform, please use complete burning method to burn once. It is complicated to use command line method and therefore not described here.
Amlo
gic Confid
entia
l!

Amlogic Application Notes
Amlogic Confidential 21/32
5. Key Configuration and Burning Under M8 platforms, keys are divided into three types: flash key (including nand key and emmc key), efuse
key and secure storage key. One key can only exist in one of the three types. Regarding which type, it is decided by dts configurations and user does not need to concern.
The burn of keys in the new tools is divided into three parts
DLL for secondary development. This DLL is to parse the key source and get the key contents, i.e., manage the KEY;
Burning tool. Burning tool will decide the APIs according to what is provided by DLL, get the key contents according to key configuration and run burning after fetching successfully(i.e., the tool process is to decide and generally does not modify).
Code that is actually burnt at uboot side: there are burning process code and key driver code at uboot side. In principle, key driver code is not modified. The user can expand the burning process code if necessary. If the user passes the encrypted KEY to the platform, then decryption code needs to be added to the burning process code at uboot side. It will call the key driver to burn after decryption. (As different projects may differ in uboot, the difference of the uboot side code is also maintained by the customers themselves similar to dll.)
The process to burn a new KEY is descripted below:
1)Configure DTD and add key driver required description in DTS, such as burning to efuse or nand,
write/read attributes etc, According to the configurations, the customization tool will generate new burning package and required configuration file for key burning.
2) Tool loads the key configuration file in the burning package to get the key names for keys to be burnt. And according to the key names, it will get the key contents from the user DLL. According to the key names and contents, the tool can use the burning protocol to run key burning.
3)After key contents received at uboot side, key will be processed accordingly for different key names.
After finish processing, it will call key driver interface to burn. (The type that key will burn to is decided by dtd and key driver.).
5.1 Compilation and configuration support There are three places to be config: uboot, kernel and dts.
5.1.1 Config in Uboot
In uboot, the user need to ensure whether the following 3 compilation macros in the related project head files are enabled. If not, please add them.
a) #define CONFIG_UNIFY_KEY_MANAGE
Enable this macro means unify_key driver is enabled. The key burning tool actually uses this driver interface.
In general, the user just need to ensure whether this macro is enabled in uboot.
b) #define CONFIG_SECURITYKEY
If the key is burnt to flash, the user needs to make sure whether this macro is enabled.
Amlo
gic Confid
entia
l!

Amlogic Application Notes
Amlogic Confidential 22/32
c) #define CONFIG_EFUSE 1
If the project needs to support efuse key, then make sure this macro is enabled.
5.1.2 Dts Config
Dts configuration is read together by the two drivers: keymanage in uboot and unify key management in kernel. In general, uboot will have both read and write operations to the keys while only read operation in kernel.
When visit keys in user layer, use meaning for names such as “mac、mac_bt, hdcp” to visit one key and
manage all kinds of keys in driver.
The path of Dts configuration file is: arch\arm\boot\dts\amlogic\
One example of dts configuration is shown below:
/// ***************************************************************************************
/// - Securitykey
//$$ MODULE="Securitykey"
//$$ DEVICE="securitykey"
//$$ L2 PROP_STR = "status"
securitykey{
compatible = "amlogic,aml_keys";
status = "ok";
};
/// ***************************************************************************************
/// - Unifykey
//$$ MODULE="Unifykey"
//$$ DEVICE="securitykey"
//$$ L2 PROP_STR = "status"
//$$ L3 PROP_U32 ="unifykey-num"
//$$ L2 PROP_CHOICE "Unifykey_0_match" = "unifykey-index-0"
//$$ L2 PROP_CHOICE "Unifykey_1_match" = "unifykey-index-1"
//$$ L2 PROP_CHOICE "Unifykey_2_match" = "unifykey-index-2"
//$$ L2 PROP_CHOICE "Unifykey_3_match" = "unifykey-index-3"
//$$ L2 PROP_CHOICE "Unifykey_4_match" = "unifykey-index-4"
unifykey{
compatible = "amlogic,unifykey";
Amlo
gic Confid
entia
l!

Amlogic Application Notes
Amlogic Confidential 23/32
status = "ok";
/*m8 efuse version 20, not config efuse version only you confirmed to program efuse*/
/*efuse-version = <20>;*/
unifykey-num = <3>;
unifykey-index-0 = <&keysn_0>;
unifykey-index-1 = <&keysn_1>;
unifykey-index-2 = <&keysn_2>;
//$$ MATCH "Unifykey_0_match" = <&keysn_0>
//$$ L2 PROP_STR = "key-name"
//$$ L2 PROP_STR = "key-device"
//$$ L2 PROP_STR = "key-dataformat"
//$$ L2 PROP_STR 3 = "key-permit"
keysn_0: key_0{
key-name = "usid";
key-device = "nandkey";
key-dataformat = "hexdata";
key-permit = "read","write","del";
};
//$$ MATCH "Unifykey_1_match" = <&keysn_1>
//$$ L2 PROP_STR = "key-name"
//$$ L2 PROP_STR = "key-device"
//$$ L2 PROP_STR = "key-dataformat"
//$$ L2 PROP_STR 3 = "key-permit"
keysn_1:key_1{
key-name = "mac_wifi";
key-device = "efusekey";
key-dataformat = "hexdata";
key-permit = "read","write","del";
};
Amlo
gic Confid
entia
l!

Amlogic Application Notes
Amlogic Confidential 24/32
//$$ MATCH "Unifykey_2_match" = <&keysn_2>
//$$ L2 PROP_STR = "key-name"
//$$ L2 PROP_STR = "key-device"
//$$ L2 PROP_STR = "key-dataformat"
//$$ L2 PROP_STR 3 = "key-permit"
keysn_2:key_2{
key-name = "mac";
key-device = "nandkey";
key-dataformat = "hexdata";
key-permit = "read","write","del";
};
Fields comments:
.Key-name: the name to read/write the key.
.Key-device: which kind of device the key stored. The valid value is one of [“nandkey”/”efusekey”/”secureskey”].
“nandkey” means the key will programmed to “nand reserved area” or “emmc reserved area”;
“efusekey” means the key will programmed to “efuse area in CPU”;
“secureskey” means the key will programmed to “secured flash area”, which can only be decrypted and access in secure os mode. (You should specify ‘secureskey’ only when secure os enabled)
.key-dataformat : usually should be “hexdata” for better compatibility.
.key-permit: specify how the key can be accessed, i.e., read/write/del.
Amlo
gic Confid
entia
l!

Amlogic Application Notes
Amlogic Confidential 25/32
5.2 Use USB burning tool to burn key
Usually key needs to be bought from 3rd parties. Before using USB burning tool to burn the keys, the user needs to get the key license file first.
USB burning tool only works as delivery channel. Regarding how to get the key contents can be through keyProvider.dll and how to parse is decided by key burning code in uboot.
5.2.1 Use customer tool to config burning package
In DTD, the keys to be supported on the platforms are configured while in customer tool, the keys to be burnt are configured.
i. Download and install customer tool;
ii. In the above tab, check the keys to be burnt and press “write key files”.
iii. After ”write key files”, the user can directly compress a new burning package. This package will burn both code image and keys;
iv. If keys need to be burn separately, the user need to select “make key burning image” in the “settings” sub menu. Then package for only key burning is generated. Am
logic
Confiden
tial!

Amlogic Application Notes
Amlogic Confidential 26/32
5.2.2 Burn of Common type keys
Common type keys are those keys that has been integrated in the release version keyProvider.dll and platform burning code, i.e., key types that is supported by default in the reference code. For such keys, it can be burnt simply by add the license file to the related place on PC.
Add license file and burn
i. Create license folder under installation folder, e.g., in win7
C:\Program Files (x86)\Amlogic\USB_Burning_Tool\license.
ii. Place the key license file to be burnt in the license folder.
iii. Example of common type keys template
Note: This template only applies to current keyProvider code. In the near future, keyProvider will be expanded and make the template more flexible to support more projects according to the requirements.
Key name Key license file comment
Usid [Group1]
usid = PRE<1>MIDLE<2>POST
param_1_format = %04x
param_1_start = 0001
param_1_end = 7fff
param_1_used = 0
param_2_format = %04x
param_2_start = 0000
PRE/MIDDLE/POST: constant value
Param_n_format: the nth param which can be translated to integers using sprint.
. param_n_start: the min value of
the nth param.
.param_n_end: the maximum value of the nth param.
.param_n_used: param_n_start + param_n_used is the value
Amlo
gic Confid
entia
l!

Amlogic Application Notes
Amlogic Confidential 27/32
param_2_end = ffff
param_2_used = 0
currently used.
Mac [Group1]
start = 0f:0f:a3:45:a0:12
end = 0f:0f:a3:45:a1:34
used = 18
Start is the starting ascii string
End is the max ascii string
Used is the number of mac address already used
iv. After configuring burning package and license file, use burning tool to load the burning package to start key burning.
Note: For key burning, there is an “overwrite key” option on the right side of burning tool. When checked, it will overwrite burning if the platform has already key burnt. Otherwise, keys will not be updated if the platforms that has keys.
5.2.3 Burn keys for special cases
For key burning in special cases, the reference design does not support. Therefore in order to support, keyProvider.dll and SDK code needs to be modified first for the related projects.
i. For KeyProvider.dll secondary development, please refer to <keyProvider design.doc> by jinkai.Li.
ii. If the key delivered to the platform needs to be parsed and verified before writing into flash, the key related codes needs to be modified in uboot.
5.3 Use usb command line tool to burn key Update.exe needs to be used for command line method.
5.3.1 Enter burning mode After connecting USB cable,
Amlo
gic Confid
entia
l!

Amlogic Application Notes
Amlogic Confidential 28/32
1) Run command run update or update in uboot
2) Run reboot update in android
Note: Make sure the connection is OK by checking whether there is Libusb-win32 device in the device manager.
5.3.2 Download dts configuration meson.dtb to the platform
update mwrite “Z:\mx-4.4-myamlogic_demo\out\target\product\k200\meson.dtb” mem dtb normal
Note: For MID platform, uboot boot will automatically load dtb and hence this step can be skipped. However, for mbox platform, it is necessary.
5.3.3 Initialize key driver under uboot
update bulkcmd "key init 0x12345
Note: key driver needs a value seed to initialize. If secure storage key will be burnt, then seed value is useful. Otherwise, the seed value can be any number.
5.3.4 Burn a key named as key0:
If the value of key0 is an ASCII string, the user can use command bulkcmd to burn.
update bulkcmd “key write key0 valueStr"
If key0 is any value (including ASCII string), the user can use command mwrite to burn.
First save the key0 value to the file keyFile.bin and run the command:
Update.exe mwrite keyFile.bin key key0 normal
5.3.5 Check whether key0 has been burnt
After downloading dtb and initialize key driver, command bulkcmd can be used to check whether key0 has been burnt.
Update bulkcmd "key is_burned key0
Note :If the key0 value is configured in dtd in ASCII format, you can read it back with [update
bulkcmd “key read key0”]
5.3.6 Quit burning mode and reset or power down the platform
update bulkcmd "reset/poweroff
Amlo
gic Confid
entia
l!

Amlogic Application Notes
Amlogic Confidential 29/32
6. Add CPU temperature check in the process of burning
6.1 Function overview
This function is used for: To detect whether the chip temperature is abnormal, or the chip temperature configuration parameters are wrong. After the Burn tool to turn this feature on, it will report burning failure if the platform device is outside normal temperature range.
6.2 Update code and burning tool to support this feature
Before enable this CPU temperature check function, you must check the uboot code and USB burning tool to
confirm whether it support this feature yet.
6.2.1 UBoot code update
Please cherry-pick or manually merge 3 commits:
http://scgit/uboot/commit/?h=next&id=98f3055395caff4ce51de07c06e2de9664173654 PD #97995: Add command 'cpu_temp' to get CPU temperature for uboot based on M8/M8baby
http://scgit/uboot/commit/?h=next&id=f0a1f3acfa05e6828a5d7359fa7498e34d2aa930 PD #97995: Remove compile warnnings and add error ENV for debug
http://scgit/uboot/commit/?h=next&id=435936bf13d9de9a63db185cf59ca085eab7db45 PD #97995: Remove compile warnnings and add error ENV for debug
After check there are already these commits, re-compile your uboot and update ddr_init.bin/u-boot-comp.bin/u-boot.bin in device/Amlogic/kxxx.
6.2.2 Update USB burning tool to version 2.0.3 or newer version
You can download the tool from this address:
ftp://ftp-china.amlogic.com/tools/official_relaese/common/USB_Burning_Tool_V2/
6.3 How to use CPU temperature range checking function during producing
6.3.1 Step 1: Setting the CPU temperature range
“Before” loading your burning package (aml_upgrade_package.img), the first step, configure the tools menu
"view" - > "temperature setting" to set the CPU temperature range.
Amlo
gic Confid
entia
l!

Amlogic Application Notes
Amlogic Confidential 30/32
Note: After enable this function, the producing tool will default this feature is needed. If your don’t
need this function or your aml_upgrade_package.img can’t support this feature, please check
to disable this function.
6.3.2 Step 2: Loading the aml_upgrade_package.img
Loading the burning package, which already contain the 3 commits descripted in chapter 6.2.
6.3.3 Step 3: Identify whether the burning failure is caused by CPU temperature checking
If the burning failure is caused by CPU temperature checking, there is tool tip like this:
“UBOOT/Temperature Test/Out of range”
Get the detail error message
You can click on the red error message on the tool, which will open the detail log for the burning flow.
Amlo
gic Confid
entia
l!

Amlogic Application Notes
Amlogic Confidential 31/32
If you use the error message time stamp [19:57:29:26 616] to search he detail message for [HUB6-2], you can get such log:
Amlo
gic Confid
entia
l!

Amlogic Application Notes
Amlogic Confidential 32/32
7. Burn and update from USB disk
7.1 Function overview This function is used to burn and update image package from U-disk. Just like burning from sdcard, you
need to put your packages into U-disk,and then burning by commands in uboot.
7.2 Burn aml_upgrade_package.img First you need to put the package and script into the U-disk.There are two ways to implement it.
7.2.1 Use Burn_card_maker
Use the Burn_card_maker tool to put the files into U-disk. If you do not familiar with the functions of this tool, please read back to 3.1.1.
After this, you can find aml_sdc_burn.ini and aml_upgrade_package.img in your U-disk. Then please modify the aml_sdc_burn.ini, set erase_bootloader = 0.
7.2.2 Manual
You just need to copy the aml_upgrade_package.img and aml_sdc_burn.ini into U-disk, modified the ini file:
set erase_bootloader = 0.
7.2.3 Burning
Use the following commands to burn:
usb_burn $sdcburncfg
The $sdcburncfg will link to the aml_sdc_burn.ini in the U-disk.
Friendly Reminder:Please be sure that the “erase_bootloader = 0” in aml_sdc_burn.ini before burning, or it will be failed.
7.3 Update the single partition(for developers) Before you update the single partition from U-disk, you need to put packages into it Just like update partition
from sdcard. Then you can use the following commands:
usb_update [partition name] [image path]
E.g.:
Update partition boot: usb_update boot boot.img Update partition bootloader: usb_update bootloader u-boot.bin ...apply this rule to other partitions. [system/recovery and etc..]
Generally, after burning succussfully, please use UBoot command [reset] to reboot the platform.
Amlo
gic Confid
entia
l!