ameb grade 5 theory teacher guide -...
TRANSCRIPT

BLITZBOOKS Teacher Guide AMEB Grade 5 Theory Page ii
Web version 2017
Grade 5 Theory
Teacher Guide
Samantha Coates
Published by BlitzBooks
PO Box 1510
MAROUBRA NSW 2035
AUSTRALIA
All rights reserved. No part of this book may be reproduced or transmitted in any form
or by any means, electronic or mechanical, including photocopying, recording or by
any information retrieval system without written permission from the publisher,
except for the inclusion of a brief quotation in a review.
Copyright © 2001-2002 Samantha Coates
Web edition 2017

BLITZBOOKS Teacher Guide AMEB Grade 5 Theory Page iii
Web version 2017
Introduction When I first started writing BlitzBooks at the end of 2000, I had been preparing
students for AMEB theory and musicianship exams for twelve years. Over this
time, I have tried several texts and workbooks, none of which my students found
particularly stimulating. I also found that the various texts did not address the
way in which the questions are asked in the actual exams. My inspiration to write
a series of books arose from this lack of appropriate materials.
At the time of publishing this web edition it is nearly 17 years on from there and
BlitzBooks is about to celebrate its – you guessed it – 17th birthday. I am
delighted to say that there are now some students who used BlitzBooks who
have grown up to become teachers who recommend BlitzBooks.
This teacher guide is designed to support and enlighten teachers who are
unfamiliar with the general expectations of AMEB examiners. Apologies if some
of the page numbers are slightly inaccurate; these can change with new edition
of workbooks. The content, however, is appropriate to any edition of the
workbook.
I hope that the workbooks together with engaged teachers will create confident
and well-prepared students. If students know their stuff and they know what to
expect when they walk into the exam room, they should come out feeling like
they “blitzed” it.

BLITZBOOKS Teacher Guide AMEB Grade 5 Theory Page iv
Web version 2017
About AMEB Grade Five Grade 5 Theory is not as difficult as one would expect it to be after the enormous
jump from Grade 2 to 3 and then Grade 3 to 4. There was so much involved in getting
four-part harmony well in hand for the fourth grade syllabus that the new
requirements for Grade 5 are not at all daunting.
The new concepts on the syllabus are musical forms, composing with modulation and
woodwind instruments. The rest of the exam concentrates on extending and refining
skills learned in Grade 4. For students ‘jumping in’ at Grade 5 level, it is highly
recommended to prepare by working through the Grade 4 workbook.
Note to Teachers of Instruments Other Than Piano Although the Grade 5 workbook will be easy to follow no matter what instrument is
being learned, there is no question that non-pianists are at a distinct disadvantage
when it comes to harmony. In order to hear their harmony examples students will rely
on either their instrumental teachers having piano skills (and indeed access to a piano
during the lesson) or a friend who can play for them.
As a piano teacher, it is easy for me to say that students must always hear what they
have written in order to develop an inner ear, however I understand that this is not
always possible. I have deliberately left out such instructions as ‘play this phrase’ in
favour of ‘see if you can get someone to play this phrase for you’. I believe that as
difficult as it may be to organise, students MUST hear their harmony examples played
at some stage if they are to develop an ‘inner ear’. It is true that simply following
rules and regulations can enable a student to complete a harmony example, but it
then becomes less about music and more about maths.
It would be helpful though to organise a couple of sessions during the year with a
piano (and pianist if necessary!) to play through all the harmony examples and
discuss why they may or may not sound good.
About the BlitzBooks Style These books are written specifically for those students preparing for AMEB written
examinations. For each grade there is a workbook, teacher guide and answer book.
This workbook is also suitable for students who wish to complete an online exam.
There is no need to purchase an online theory course.
Each new concept is introduced with a ‘step-by-step’ worksheet which shows the
student how to approach the question. Many teachers who use BlitzBooks prefer their
own methods of explanation for new concepts and leave the ‘step-by-step’ pages until
close to the exam, when the student can use them as a revision resource.
The conversational style of the worksheets makes revision easy, and the book sets out
the concepts in the same order as an AMEB exam. There is also a Test Paper at the
end for students to mark. This is a great way to help students understand how to
check their work.
This teacher guide outlines certain points for discussion and shows common mistakes
or variations of acceptable answers. Answer books are also available – these consist of
replicas of workbook pages with answers written in.

BLITZBOOKS Teacher Guide AMEB Grade 5 Theory Page v
Web version 2017
How Long Will It Take to Complete This Book? This depends on the type of music lesson. If theory is taught as a small part of a
practical lesson, each book will last approximately 12 months. If lessons are devoted
to theory, it will potentially take much less time. At this high level, it is impossible to
speculate as to how long each student will need to adequately cover and grasp all
syllabus requirements.
The important thing for teachers to remember is that apart from this book, there are
three important ways to practice for an exam:
Past papers, past papers and past papers!!
There is no better learning experience than seeing your mistakes. Completing past
papers, sometimes under ‘exam conditions’, is an important revision strategy.
If you have students enrolled for an online exam, they have the advantage of being
able to complete as many online practice papers as they wish, prior to the exam.
Exam Techniques We all know how hard it is to proof read our own work. This course aims to help the
students to get it right the first time, but the most important thing is for them to be
able to check their work properly. In the written exam, I suggest that they should go
about ‘marking their own paper’ two or three times. Many students allow time to write
out their answers on their spare manuscript paper before they leave the exam room,
with the intent of showing it to their teachers after the exam and discussing how they
went. This is a waste of good checking time as most supervisors are pretty strict
about keeping the spare manuscript!
Revision I feel that most of the art of teaching Grade 5 Theory lies in getting the students to
understand all of the concepts at the same time. There is a lot to master and it is
important not to leave any concepts for too long without drilling them in the lesson.
Although there are numerous revision sheets in the workbook, doing past papers is a
very important learning device for students and teachers. Attempting a past paper
two or three months before the exam will show up any weak spots and will perhaps
jolt the more laid-back student into doing some revision!

BLITZBOOKS Teacher Guide AMEB Grade 5 Theory Page vi
Web version 2017
Table of Contents Scales… ALL of Them! – p.3 ........................................................................... 2
Double Sharps in Scales – p.4......................................................................... 2
The Melodic Minor Scale – p.5 ......................................................................... 3
Intervals – p.8 ............................................................................................. 4
Naming Intervals – p.9 .................................................................................. 5
Drawing Intervals – p.11 ............................................................................... 5
Diminished and Augmented Intervals – p.12 ...................................................... 6
Intervals with Key Signatures – p.13 ................................................................ 6
Inversions/Compound Intervals – p.15 ............................................................. 7
Drawing Intervals BELOW the Note – p.16......................................................... 8
The Tonic Key Family Tree / More Modulations – pp.18-19.................................... 9
Harmony Revision: Tonality of Chords- p.21 .................................................... 10
Harmony Revision: 4-Part Writing – p.22 ........................................................ 11
The Cadential 46
(or Ic-V) – pp.24-29 ........................................................... 12
Puzzle – p.30 ............................................................................................ 14
Passing Notes /Auxiliary Notes – p.32 ............................................................ 14
Voice Exchange – p.33 ................................................................................ 15
Harmony Hints / Practise – p.34-37 ............................................................... 16
Harmonising Cadences/Modulating Cadences – p.40-44 ..................................... 16
Melody Writing – p.46 ................................................................................. 16
Continuing a Motif – p.48 ............................................................................. 18
Modulating is Easy – pp.50-52 ...................................................................... 18
The Woodwind Family – pp.54-56 .................................................................. 19
Woodwind Wordsearch – p.57 ....................................................................... 20
Handel, Mozart and their Stuff – p.60 ............................................................. 20
Musical Forms – pp.61-66 ............................................................................ 20
Crossword – p.67 ....................................................................................... 21
Test Paper – pp.71-76................................................................................. 21

BLITZBOOKS Teacher Guide AMEB Grade 5 Theory Page 2
Web version 2017
Guide to Workbook Sheets This guide does not contain answers to every workbook question, as most of them will
be immediately obvious to the teacher, as will most of the missing words.
Some worksheets are not featured in the guide as they are either straightforward
revision or self-explanatory.
Scales… ALL of Them! – p.3 Although 23 keys were studied in Grade 4, and that certainly seemed like a lot, now
that all diatonic scales are to be learned it opens up a whole can of worms because of
enharmonic equivalents, e.g. C sharp/D flat major and A sharp/B flat minor. However,
scale writing has been on the syllabus since grade 1, and by this level it is only a
matter of inserting or applying the correct key signature.
As I mentioned in the T4 teacher guide, I feel that a broader approach should be
taken which helps the students to understand the entire system of key signatures.
Students should know all about the cycle of fifths by this stage of their learning, but I
have not included a diagram of one in the workbook is because there are so many
different types of key signature tables that work more effectively than the good old
cycle of fifths!
The Blitz Key Signature Table is one such example – it is a booklet that teaches a
particularly foolproof way of writing out a cycle of fifths. As soon as they are told by
the examination supervisor to start writing, students write out the table in just a
couple of minutes and then refer to it throughout the exam. This eliminates the
difficulty of learning every existing key signature and ‘takes the pressure off’ in the
exam. Having said that, it is of course important for students to know their key
signatures off by heart, but I find that this will eventually happen through learning to
play the scales on their instrument; if we can make students’ lives easier during exam
time, why not?
Double Sharps in Scales – p.4
Objective
To learn how to write these accidentals and the application of them in scale writing.
Comments
This is usually quite a straightforward concept. The most common error is not
grasping the concept that a double sharp overrides the key signature. (In fact any
accidental overrides the key signature.) I have had students who, after thinking about
it very carefully, place a single sharp against the seventh note claiming that since it
was already a sharp in the key signature they are raising it again and it is therefore
now a double sharp! Conversely, I have occasionally had students who think that by
changing F sharp to F double sharp that it is raising the F sharp by a tone, hence the
“Hot Tip” about there being no sign to raise or lower a note more than a tone!
BLITZBOOKS Teacher Guide AMEB Grade 5 Theory Page 3
Web version 2017
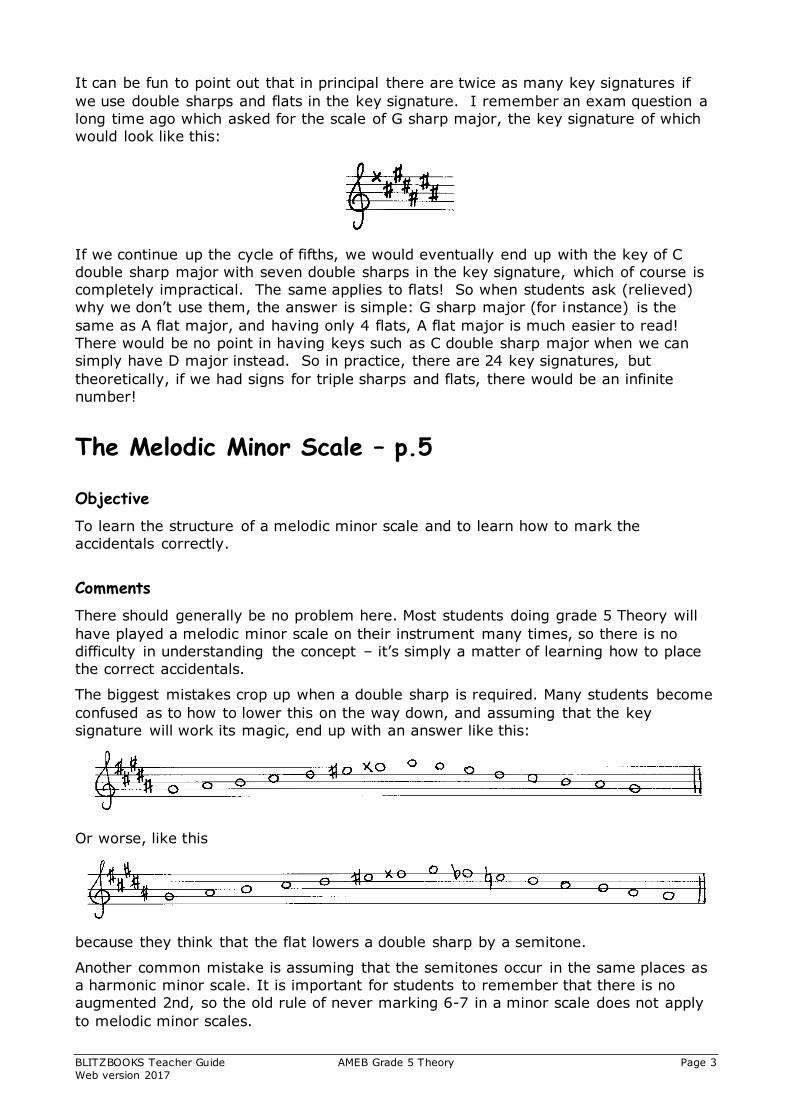
It can be fun to point out that in principal there are twice as many key signatures if
we use double sharps and flats in the key signature. I remember an exam question a
long time ago which asked for the scale of G sharp major, the key signature of which
would look like this:
If we continue up the cycle of fifths, we would eventually end up with the key of C
double sharp major with seven double sharps in the key signature, which of course is
completely impractical. The same applies to flats! So when students ask (relieved)
why we don’t use them, the answer is simple: G sharp major (for instance) is the
same as A flat major, and having only 4 flats, A flat major is much easier to read!
There would be no point in having keys such as C double sharp major when we can
simply have D major instead. So in practice, there are 24 key signatures, but
theoretically, if we had signs for triple sharps and flats, there would be an infinite
number!
The Melodic Minor Scale – p.5
Objective
To learn the structure of a melodic minor scale and to learn how to mark the
accidentals correctly.
Comments
There should generally be no problem here. Most students doing grade 5 Theory will
have played a melodic minor scale on their instrument many times, so there is no
difficulty in understanding the concept – it’s simply a matter of learning how to place
the correct accidentals.
The biggest mistakes crop up when a double sharp is required. Many students become
confused as to how to lower this on the way down, and assuming that the key
signature will work its magic, end up with an answer like this:
Or worse, like this
because they think that the flat lowers a double sharp by a semitone.
Another common mistake is assuming that the semitones occur in the same places as
a harmonic minor scale. It is important for students to remember that there is no
augmented 2nd, so the old rule of never marking 6-7 in a minor scale does not apply
to melodic minor scales.

BLITZBOOKS Teacher Guide AMEB Grade 5 Theory Page 4
Web version 2017
As the semitones fall in different places in the ascending and descending octaves, I
have generally found that rather than memorising any particular scale degree
numbers to mark, it is easier simply to work out the tones and semitones by
examining each interval up the scale. Many students discover for themselves that the
semitone between scale degrees 2-3 remains consistent in both octaves, and it only
the ‘other’ semitone that changes. By this level students are pretty good at imagining
playing the scale on their instruments (particularly advantageous for piano students).
It is worth pointing out that there are potentially four different ways a melodic minor
scale can be written:
1. Ascending/descending with key signature
2. Ascending/descending with accidentals
3. Descending/ascending with key signature
4. Descending/ascending with accidentals
A good activity is to get students to write out these four possibilities and keep track of
how many accidentals are required in each.
The use of the natural sign just before another accidental is completely optional.
Students will not be marked down either way. My personal preference is to leave out
the natural sign, as this helps to reinforce the concept that any accidental overrides
the previous accidental.
Intervals – p.8
Objective
To learn the effect accidentals have on major, minor and perfect intervals.
Comments
The diagram of the two ‘species’ is most effective in both capturing students’
imagination and ensuring their understanding of quality of intervals.
Many textbooks attempt to explain this concept using prose, for instance:
“Major 2nds, 3rds 6ths and 7ths when enlarged one semitone become augmented,
and when decreased one semitone become minor; Minor 2nds, 3rds, 6ths and 7ths
when enlarged one semitone become major, and when decreased one semitone
become diminished; Perfect intervals when enlarged one semitone become
augmented, and when decreased one semitone become diminished.”
What a nightmare!
It’s much better to use a table, and the table on this page of the workbook is simple
and easy-to-follow. It is very important that students discuss the effect accidentals
have on various intervals. I rarely encounter a child or adult who becomes confused
by this table!

BLITZBOOKS Teacher Guide AMEB Grade 5 Theory Page 5
Web version 2017
Naming Intervals – p.9
Objective
To improve on skills developed in Grades 3 and 4.
Comments
Since intervals are on the syllabus in every grade, I have assumed that by this stage
students know exactly how to determine the quality of an interval, and so I have not
included revision on this particular skill in the workbook. Students should consult their
Grade 3 or 4 workbooks if they are feeling a bit rusty. There is really nothing new in
Grade 5 – the skill now is learning how to factor in the accidentals.
Accidentals are the sole cause of the level of difficulty of intervals in this grade.
Students see double sharps and flats all over the place and pretty much panic. But if
the accidentals are removed, the interval is much simpler to work out, and then it is a
matter of discerning how the accidentals affect the interval once they have been
replaced.
The approach in the workbook is to strip (quite literally, making it ‘naked’) the interval
of its accidentals before attempting to name it. This ensures that the bottom note
belongs to a key that actually exists! (Something not possible if the bottom note is F
double flat.) The interval becomes very easy to name – in fact, as featured in the
‘Interesting Fact’ on the bottom of the page, there are only two intervals without
accidentals that do not turn out to be major, minor or perfect – the diminished 5th
above B and the augmented 4th above F.
The table on page 10 is designed to break down the elements involved in naming
complicated intervals, in the hope that it establishes a habit of doing so!
Drawing Intervals – p.11
Objective
To establish a habit of remembering to adjust accidentals where necessary when
drawing complicated intervals.
Comments
Once again, if the accidental in the question is removed, drawing the interval becomes
easy; the bottom accidental is then ‘applied’ to both notes. This means that the top
accidental may need to be adjusted.
Most Grade 5 students will feel quite confident adjusting accidentals, as this skill was
covered in Grade 3 Theory in regards to transposition. However, some students may
need some revision here. It’s a good idea to go over the ‘pecking order’ of accidentals,
namely:
When reapplying an accidental such as a double sharp to a flat sign, this will move the
flat up two ‘places’ in the pecking order … to a natural!

BLITZBOOKS Teacher Guide AMEB Grade 5 Theory Page 6
Web version 2017
Diminished and Augmented Intervals – p.12
Objective
To extend skills learned in previous pages to include diminished and augmented
intervals.
Comments
If the table on page 8 of the workbook is clearly understood, drawing diminished or
augmented intervals should technically not be much of a big deal. The approach in the
workbook is to draw a major, minor or perfect interval first, then adjust one of the
notes to make it diminished or augmented.
The main cause of mistakes is forgetting the order of the two ‘species’ of intervals on
page 8, and as a result lowering or raising intervals too much or too little!
The ‘Top Tip’ at the bottom of page 12 about keeping the right distance between the
notes is a very important one. Even though two intervals may sound exactly the
same, e.g.
the way they are notated indicates different names. It is the distance between the
actual notes that determines the number of the interval, whereas the accidentals
determine the quality.
A demonstration on a keyboard is very useful here. Ask a student to play a perfect 4th
and say the letter names, e.g. E to A, then ask them to raise the top note one
semitone and re-name the interval and the letter names. It is amazing how many
students will answer ‘Augmented 4th, E to B flat’, which of course is not correct. Doing
the same exercise lowering a perfect 5th should get the point across.
Students often ask what exactly is the difference between an augmented 4th and a
diminished 5th. Well, on a piano and in terms of sound, nothing! (For strings it’s a
whole different ball game.) But in terms of notation, it all comes down to musical
spelling – notes are spelled different ways depending on the context of the music they
occur in. All children have learned at school about the different uses of to vs too vs
two; they sound the same but you have to spell it the right way according to the
context. This is a handy analogy when explaining enharmonics!
Intervals with Key Signatures – p.13
Objective
To apply the previously learnt skills of naming and drawing intervals to questions
where a key signature is given.
and

BLITZBOOKS Teacher Guide AMEB Grade 5 Theory Page 7
Web version 2017
Comments
It is worth reminding students of a point made back in ‘Double Sharps in Scales’ –
that accidentals always override the key signature. Therefore, any accidentals present
in the original interval will remain the same when writing the interval without the key
signature.
Provided this is well understood, the problems only arise once the key signature goes
back in! The tricky thing is remembering to check which notes are affected by the key
signature – it could be neither, one or both of the notes.
From Grade 4 onwards the intervals tested are not necessarily above the tonic.
However, as there is often such a well-established habit of assuming the bottom note
is the tonic (since it is much easier to name an interval this way), some students will
accidentally misread the key signature. For instance:
In the above interval many students see the given note is F, assume it is the tonic and
misread the key signature as F sharp minor. In this case the interval would be
wrongly named a minor 6th. The best and most foolproof way to approach these
intervals is to regard the key signature as ‘just a bunch of accidentals’ and deal with
them accordingly!
Inversions/Compound Intervals – p.15
Objective
To revise the skill of inverting intervals, and to learn the meaning of ‘compound’
intervals.
Comments
In Grade 4 it was necessary to name the original interval before inverting and
renaming - this ensured the student was working with one of the required keys for the
grade. There is no need for this in Grade 5, however the original interval may just be
simpler to work out, in which case it is easier to do so and then derive the name of
the inversion from the ‘rules’ above. I think students should just go with the flow on
this one… however it is very useful to ‘double-check’ answers by naming both
intervals and making sure they complement each other.
Until now students have not had to deal with anything other than perfect octaves and
perfect unisons. For this reason it is important address the order in which to write
unisons involving accidentals. For instance, second example on this page asks for the
inversion of a diminished octave (A to A flat). The answer is an augmented unison,
which must be written as such:
It the notes are written the other way around, it becomes a diminished unison
instead:

BLITZBOOKS Teacher Guide AMEB Grade 5 Theory Page 8
Web version 2017
Even trickier, if the natural sign were not included, it would become a perfect unison:
Compound Intervals
I have noticed that many textbooks delve into explanations about simple and
compound intervals, concords and discords, and perfect or imperfect concords.
Nowhere on the syllabus does it state that students must be familiar with these
terms, nor in fact does it state that compound intervals will be examined. The syllabus
does not specify that intervals will always be within an octave, but neither does it for
grades 1-4!
I have included information on compound intervals as they are easy to grasp, but not
on any of the other abovementioned topics – I feel it only confuses students. I have
yet to come across an instance in past exam papers where a compound interval is
tested or where any such knowledge is required! Having said that, it is a great idea to
broaden the knowledge of those students who can handle it, but this should be done
on a case-by-case basis.
Drawing Intervals BELOW the Note – p.16
Objective
To learn that the quality of an interval must be determined from the bottom note.
Comments
Drawing perfect intervals below the note is usually no problem at all, but major and
minor intervals are much harder. This is because the quality of the interval must be
calculated from the bottom note, even though it is the top note that is given – very
confusing for some students!
This worksheet provides five examples of varying degrees of complexity, but more
practise may be needed. This type of question (i.e. drawing intervals below the note)
crops up only occasionally in exams and as a result is often not drilled enough in
lessons.
The ‘thing to notice’ about intervals 2 and 4 at the bottom the page is that they are
complementary, i.e. inversions of each other!
A note about diatonic and chromatic intervals
It can be very confusing trying to remember which intervals belong to diatonic and/or
chromatic scales. Although the definition of a diatonic interval is ‘an interval occurring
within a diatonic scale’, it cannot be said that a chromatic interval is one occurring
within a chromatic scale, as chromatic scales also contain diatonic intervals! It’s worth
pointing out to your students, just for the record, that chromatic intervals are those
NOT occurring in a diatonic scale. These are:

BLITZBOOKS Teacher Guide AMEB Grade 5 Theory Page 9
Web version 2017
• Augmented 3rds and 6ths
• Diminished 3rds and 6ths
• Augmented unisons and 8ves
• Diminished unisons and 8ves
And just for interests’ sake, here are some intervals that do not occur in either a
diatonic or a chromatic scale. They exist only in a mathematical sense…
• Diminished 2nds (really a perfect unison)
• Augmented 7ths (really a perfect 8ve)
• Diminished unisons (really a minor 2nd)
• Augmented 8ves (really a compound augmented unison, it’s larger than an
octave)
• Double diminished or double augmented intervals
And finally, a colleague of mine sparked an interesting debate amongst music nerds:
would an augmented 8ve be classified as simple or compound???
The Tonic Key Family Tree / More Modulations –
pp.18-19
Objective
To learn that any one key has five closely related keys, and to spot modulations to
those keys.
Comments
All the same techniques for spotting modulations learnt in Grade 4 apply to Grade 5,
there is simply a wider range of keys to which the melody might modulate. In fact,
the syllabus states that the short melodies given in the modulation question will only
modulate to the dominant, subdominant, or relative major or minor – not the relatives
of the dominant or subdominant! There are three good reasons however for learning
the entire ‘family tree’:
1. Later on in the ‘modulating cadences’ question, the syllabus states that the
given part will modulate to closely related keys
2. The ‘option’ of modulating in melody writing (discussed later) is easier to grasp
knowing five close relatives rather than three
3. Most pieces of music in general repertoire will show examples of modulations to
anywhere on the ‘tree’. It is very important for students to be able to identify
any modulations in pieces they are playing, and to understand the relationship
to the tonic key.
Many textbooks describe closely related keys as being those with one sharp or one flat
more, or one sharp or one flat less in the key signature. This is exactly the same as
saying the dominant and subdominant keys, and their relatives - much easier!
Knowing which accidentals to look for is a great aid in spotting modulations
successfully. When filling in and drawing the family trees, students should write in
brackets the new accidental for each close relative. For instance:

BLITZBOOKS Teacher Guide AMEB Grade 5 Theory Page 10
Web version 2017
F major (B) C major G major (F)
D minor (C) A minor (G) E minor (D)
The primary clues for deciding the tonic key are of course the key signature and the
last note. It’s also important to look for other clues such as the tonic triad in the first
bar or an anacrusis based on chord V leading to the tonic in bar I. A few other things
worth going over (particularly in relation to minor keys) are:
• There may be no raised 7th if the leading note either does not appear or only
appears in a descending passage
• If the leading note is not raised, the melody could modulate to the relative
major and this would result in there being no accidentals at all!
• There is a remote chance that the melody does not end on the tonic – it’s good
to double-check the original key.
Harmony Revision: Tonality of Chords- p.21
Objective
To understand the tonality of each chord, enabling good ‘decision-making’ later on
when deciphering doubling guidelines (see ‘The Doubling Dilemma’ below)
Comments
I find that students often have a lot of trouble remembering whether chords are major
or minor, particularly if they are not pianists.
Filling in the grid by listening is a very straightforward task, but it doesn’t actually
help them to remember. I have found it quite helpful to look at the grid in the
following way:
• Look at the options for major and natural minor scale first, leaving out chord
VII for now
• Primary chords (I, IV, V) are the same tonality as the key/scale; ‘secondary’
chords (for arguments’ sake being the others: II, III, VI) are the opposite
tonality
• Chord II is the only exception to this, being diminished in a minor key
• When discussing chord tonality for the harmonic minor scale, discuss which
chords are affected by the raised 7th, and adjust these accordingly. Chord III
becomes augmented (chord III is not on the syllabus for this grade), chord V
becomes major
• Chord VII can be discussed separately as always being diminished, except for in
the natural minor scale when the 7th is not raised

BLITZBOOKS Teacher Guide AMEB Grade 5 Theory Page 11
Web version 2017
In this way students start to look at the grid a little more analytically and see
patterns.
Harmony Revision: 4-Part Writing – p.22
Comments
Revising the difficult area of harmonisation is something that will be different for
every student, and of course also depends on the length of time between completing
Grade 4 and starting Grade 5. Some will carry on as if never having stopped after
Grade 4; others will stare at the page and have no idea what to do.
The example on page 20 is deliberately Grade 4 standard… in fact I felt as though the
rest of the book could easily be taken up with revision examples such as these! But in
the end it is really up to each individual student (and teacher) to ensure a good
grounding in harmony before attempting Grade 5. This sole page called ‘Harmony
Revision’ is designed to briefly and simply remind both student and teacher of what is
required ‘so far’. For students who are ‘jumping in’ at Grade 5 level, I strongly
recommend working through the Grade 4 BlitzBook first.
The harmony question in Grade 5 differs very little from Grade 4. It is 2 bars longer
and often provides opportunities for the use of the cadential 6/4 (discussed later), but
apart from expecting the use of a slightly larger harmonic vocabulary, the question is
essentially the same. It should therefore be approached in just the same way as was
taught in grade 4:
1) Do the cadences first
2) Choose a solid bass line for the rest.
Page 24 is devoted to exercises on choosing bass notes. This was covered in Grade 4
but often needs careful revision – that is, students must remember that the melody
note does not determine the harmony! Once the bass line is in, the next step is to add
the inner parts, and finally passing and auxiliary notes should be added.
Most students, particularly non-piano students, need some sort of written guide to
help them remember which notes are in which chords. Whilst in high school myself, I
remember visualising piano chords when doing my harmony, while my cellist friend
next to me would write out the following:
I CEG
II DFA
IV FAC
V GBD
VI ACE
Some examiners do not like to see this little table written on the paper. This is such a
shame – it’s like enforcing a rule that you can only harmonise properly if you can do it
in your head. However, since we don’t know who’ll be marking the papers, it’s
probably best if students write the ‘table’ on spare paper or at least rub it out when
finished.

BLITZBOOKS Teacher Guide AMEB Grade 5 Theory Page 12
Web version 2017
I always get my students to write down every chord possibility (in both root position
and first inversion) for each melody note eg.
(It would not be appropriate to harmonise the first chord of a piece with VI6, so there
is no point in considering this possibility.)
When choosing a bass line, it’s a matter of deciding which choice of chord would make
the smoothest progression. Students should try to remember that root position chords
rising or falling in 4ths or 5ths sound great, as do descending thirds (e.g. I-VI-IV).
Suggestions such as these and all harmony rules up to Grade 6 are summarised in “The BlitzBook of Harmony Rules”
The Cadential 46 (or Ic-V) – pp.24-29
Objective
To learn the function of chord I in second inversion.
Comments
Page 25 deals with the progression Ic-V, and once that is well in hand page 26
introduces the concept of following Ic-V with either I or VI.
There is much conjecture about chord Ic and whether is should actually be defined as
a ‘chord’ at all. To simply call it a second inversion chord implies that it can function
on its own as a piece of harmony. However, the sole purpose of this chord (as far as a
Grade 5 student is concerned) is to lead to chord V – it acts as a suspension, or an
appoggiatura, always resolving to the dominant chord by step… no exceptions!
There is a strong need for an aural demonstration here. Once students can hear
where the I 46 chord ‘wants to go’, they rarely forget that it cannot be used without
chord V, and it helps them to understand (from an aural perspective) the reason for
chord Ic being on a strong beat.
It is vitally important to get into the habit of doubling the fifth (which is the bass
note) in chord I 46. Once again, this ‘rule’ of doubling the fifth exists because there is
no other way of resolving this chord with good voice-leading and no consecutive 5ths
or 8ves.

BLITZBOOKS Teacher Guide AMEB Grade 5 Theory Page 13
Web version 2017
The most common mistake I come across is doubling the fifth in chord V as well as in
chord I 46! However, as long as the doubling is correct and the tonic is going to the
leading note, there is not a lot that can go wrong.
The skill lies in detecting opportunities for using Ic-V. Although there is no reason
why I-V-VI or I6-V-VI should not receive full marks if done correctly, for instance in a
cadence such as this:
it is a fact, however, that I 46-V would work will here instead of I6, and since it is the
new inversion on the syllabus and the idea is to show that it has been learned,
students are encouraged to use chord I in second inversion wherever appropriate, and
to choose this chord over root position or first inversion.
Once students have this drilled into them, they sometimes start using Ic-V at all the
cadence points without even checking to see if it works! The harmony examples on
pages 28-29 provide many opportunities for using I 46, however there are just one or
two instances when using it would mean putting it on a weak beat… a definite no-no…
hopefully students will pick this up themselves!
The comment on page 27 of the workbook that II6 - I 46- V - I is the ‘best chord
progression in the world’ is something my students have always found quite amusing
but have really responded to. I always encourage them to use II6 over chord IV when
approaching a cadential 46, in major or minor keys, as it just sounds so beautiful. Care
must be taken though to avoid consecutive 5ths; consecutives are created too easily
when there are so many neighbouring notes. There is of course nothing wrong with
using a different chord, particularly if the given melody won’t allow for II6, but the
idea is to approach a cadential 46 by step wherever possible, and the change in tonality
from minor to major is what makes it sound so special.
The Doubling Dilemma
There are so many different views on doubling that it is difficult to write about any
particular right or wrong things to do. Some teachers believe that one must never
double the third, some believe one should always double a major third and some
believe that there are no hard and fast doubling rules and that if it sounds good, do it!
I must say I was brought up with the latter philosophy. My music teacher would play
examples that broke all the ‘rules’ but which sounded great, and would therefore give
them full marks! On the other hand, I have never heard an example sound bad that
DID follow all the rules… and that is the crux of the matter. The rules or guidelines
exist because of what sounds good. I vividly remember studying Bach Chorales and
my teacher saying: “Bach didn’t follow the rules, he made the rules!”

BLITZBOOKS Teacher Guide AMEB Grade 5 Theory Page 14
Web version 2017
When teaching harmony to beginners, however, it is not good enough to say that
anything goes as long as it sounds good. Very few students can hear what they are
writing, and for non-pianists especially it is very difficult to find out how their harmony
compositions have turned out unless they have a teacher or relative who plays piano.
Students need a clear set of guidelines that will help them to develop good harmony
skills. I tend to teach the following:
• Doubling the third of a minor chord sounds better than doubling it in a major
chord (doubling a major third should be avoided – it sounds too strong)
• Doubling the fifth instead of the root is often a very good option
• Tripling the root is always an option
• Decisions on which note to double should mostly be based on voice-leading, i.e.
which notes will enable all parts to have a smooth line to sing.
• When in doubt, double a ‘primary’ note (i.e. scale degrees 1, 4 or 5)
The main problem I come across is trying to break my students’ habit of always
doubling the root! There is no easy way around this; to introduce different doubling
options as early as Grade 3 would be far too confusing.
As mentioned in regard to melody writing, some examiners will accept things that
others will not. It is important for teachers to keep an open mind and prepare their
students for this! The main aim is to help students develop an inner ear; no matter
how a student is marked in an exam, he/she has done brilliantly if able to hear the
harmony example while composing it.
‘Consecutives’
In my classes I usually refer to consecutive 5ths and 8ves as ‘consecutives’. It
occurred to me one day, when I was asked for the umpteenth time if consecutive 3rds
were OK, that my students had become a little confused by this generic use of the
word ‘consecutives’, and fair enough too! So even though I tend to use it in this
teacher guide, in class I have found it much better to always use the whole phrase
‘consecutive 5ths and 8ves’ all the time!
Puzzle – p.30
Comments
The thing that must be done to chord I in second inversion is “Always Double the
Fifth”! This is simply a fun way of revising a few key points.
Passing Notes /Auxiliary Notes – p.32
Objective
To understand the function and usage of these notes.
Comments
I find that students either forget to use passing and auxiliary notes, or they
completely saturate their harmony example until it is wildly complicated! A happy
medium is definitely something to strive for here. A good way to do this is to get

BLITZBOOKS Teacher Guide AMEB Grade 5 Theory Page 15
Web version 2017
students to take a visual approach - just sit back and look at the completed harmony
example. If it looks too crowded, it will sound too crowded. There should be no more
than two parts singing passing notes at the same time, and passing notes should
generally not coincide with auxiliary notes.
A passing note forming a V7 chord in a perfect cadence sounds great, e.g.
This automatically resolves correctly without students needing to understand the
function of a V7 chord, although this will be covered later on in melody writing. It is
important however NOT to use an auxiliary note here, as this would result in an
incorrect resolution of the V7 chord, e.g.
It is not really appropriate to have an auxiliary note in any perfect cadence! However,
if students remember the point made about raising their lower auxiliary notes by a
semitone, incorrect resolutions will be avoided most of the time.
Voice Exchange – p.33
Objective
To learn how to spot opportunities to use the chord progression I-VII6-I6 and vice
versa.
Comments
This chord progression is a precursor to the ‘Passing 6/4’ which is on the sixth grade
syllabus. Chord VII6 functions in the same way as a dominant chord and works very
well between two tonic chords in different inversions. The ‘formula’ is very easy to
follow; it’s just a matter of learning where to apply it.
Eight of the last ten exam papers have provided opportunities for voice exchange.
BLITZBOOKS Teacher Guide AMEB Grade 5 Theory Page 16
Web version 2017
Harmony Hints / Practise – p.34-37
Comments
There are so many things students need to remember when writing and checking
harmony examples. Voice leading is probably the most important of these, and can be
done in a visual way. The voices should always look evenly spaced, and they should
not look like they are all moving in the same direction. Some other useful tips are:
• Since there is no spacing rule between bass and tenor, the tenor voice should
always sing as high as possible. This allows much greater freedom in choosing
alto and soprano notes
• No more than two voices should move in similar motion at the same time.
There are very few instances in which consecutive 5ths and 8ves can be
successfully avoided.
• The example should not look too ‘empty’ or too ‘crowded’. Passing notes and
auxiliary notes should be added in keeping with the style of the given part.
Harmonising Cadences/Modulating Cadences – p.40-44
Objective
Preparation for the modulation questions to come.
Comments
This particular question has been presented this way for many years. Interestingly,
the syllabus says candidates will be required to ‘harmonise cadences’, but does not
specify that there will be four cadences, nor that each cadence must only be used
once. This is another example of the inadequacy of the syllabus details. As mentioned
in the introduction, it is extremely important for students and teachers to keep track
of the changing trends in AMEB papers. Although there is no evidence to suggest that
the format of this question will change, it might be a good idea for teachers to keep in
the back of their minds that it may well be a trend!
Page 40 should be very easy, as it is simply practise in cadence writing without
modulations. The only thing to get used to is only using each of the four principal
cadences only once.
From page 41, as long as the question is approached with care and patience, it should
be fairly straightforward. The most common error is the omission of relevant
accidentals, especially in the inner parts.
Melody Writing – p.46 Some of the following comments are from the Grade 4 Teacher Guide, but are still
highly relevant in grade 5:
When writing melodies in a minor key, students should take particular care when
using scale degrees 6-7, and AVOID an augmented 2nd. There is often confusion
surrounding this issue; many textbooks explain the use of the melodic form of the
BLITZBOOKS Teacher Guide AMEB Grade 5 Theory Page 17
Web version 2017
scale, however neglect to point out that it is not necessary, for instance, to raise the
6th degree of the scale if not followed by the leading note!
The reason the melodic minor scale raises the sixth and seventh notes on the way up
is because the leading note needs to be raised to give the feeling of wanting to rise to
the tonic; it is a very unsatisfying sound to hear a flattened leading note followed by
the tonic. In a descending passage, however, the sixth and seventh degrees could be
raised or flattened, it sounds fine either way. As a general rule, it’s best to raise the
6th and 7th in an ascending melodic passage, and for descending passages just see
what sounds best!
On the subject of sounding good, this is of course a very subjective thing. A melody
that is given full marks by one teacher may not be enjoyed by another.
One year, an adult student of mine sat for an exam, and upon finding that the poetry
example was the same as that of a recent past paper, had the opportunity to write
down the melody we had worked on together! We had a good laugh when the results
came back – “we” got 8 out of 10. The examiner thought it lacked shape – yet I
thought it was great!
Most students at this level of Theory or Musicianship have encountered subjective
marking at school. It is important to prepare them for the fact that from now on, in
terms of melody and harmony writing, there is no single ‘correct’ answer. I like to tell
my students that if Mozart himself sat the exam, he wouldn’t necessarily get full
marks!
The changes on the syllabus for Grade 5 are that the melody must be longer, and
there is the possibility of modulating to a related key, which is ‘optional’ according to
the instructions on the exam paper. (See below)
As mentioned in Grade 4, things that should be brought to a student’s attention are:
• The importance of adding interest to a rhythm at appropriate spots, a topic
covered in grades 3 and 4
• Credit will be given for sensitive treatment of the words
• It’s best to keep within a particular vocal range e.g. soprano or alto (or tenor or
bass if the student really wants to – often the boys do!)
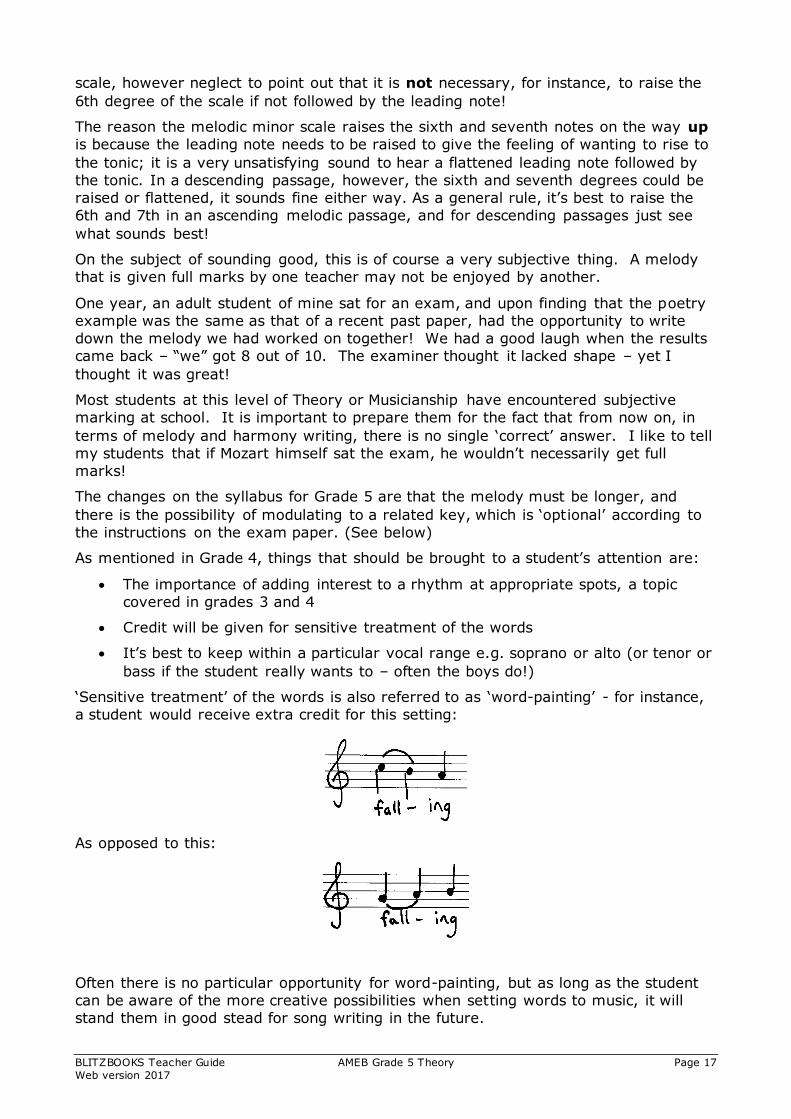
‘Sensitive treatment’ of the words is also referred to as ‘word-painting’ - for instance,
a student would receive extra credit for this setting:
As opposed to this:
Often there is no particular opportunity for word-painting, but as long as the student
can be aware of the more creative possibilities when setting words to music, it will
stand them in good stead for song writing in the future.

BLITZBOOKS Teacher Guide AMEB Grade 5 Theory Page 18
Web version 2017
Continuing a Motif – p.48
Objective
To learn how to write a melody based on a short given motif.
Comments
As discussed in grades 3 and 4, it is much easier for students to understand how to
compose a melody if they have analysed one that sounds good/bad and can
understand the different factors that contribute to it sounding good or bad! In this
way, students start out with a clear set of guidelines but end up with the ability to
write good melodies on the spot, without thinking about why a particular phrase
sounds good. For this reason they are asked to write down their comments on why
the three ‘solutions’ to the given motif are not so good. This can provide some
humour in the lesson as well as a great topic for discussion.
Most students seem to prefer the motif question to setting words to music. I admit
that I prefer this myself! This is because it is easier to extend and build upon an idea
than it is to start from scratch, particularly when one is pushed for time in an exam.
When a motif is given, the rhythmic AND melodic ideas are in place, and students are
not restricted to the meter or mood of a poem.
The approach in the workbook is to imagine that the motif is the ‘question’ (Q) and
that a contrasting ‘answer’ (A) must follow. I usually introduce this Q & A concept with
an analysis of familiar tunes such as ‘Mary Had a Little Lamb’ and ‘London Bridge’. I
then point out that although these songs contain exact repetitions of the Question, it’s
not so advisable to do this in an AMEB exam. They’ve only got 8 bars in which to show
their stuff – some examiners will view an exact repetition of the motif a bit of a cop-
out, no matter how musical!
Whether or not students are inspired to try out all the ‘Q’ and ‘A’ combinations at the
bottom of the page, the most important teaching point here is to re-use the given
material. I say to my students, ‘Imagine that someone went to the trouble of
composing the first phrase for you. Now imagine how offended they’d be if you didn’t
bother to re-use any of their ideas!’ Continuing in the same style is essential.
This exercise does not involve lyrics and is therefore not necessarily for voice. Some
students see this as an excuse to write instrumental melodies with enormous ranges!
It is still best to keep within a range of 1½ – 2 octaves.
Modulating is Easy – pp.50-52
Objective
To address the concept of modulation within a melody.
Comments
The question of whether or not to teach modulation to a student when the paper
states it is ‘optional’ drives me around the bend. Most students will back away from
anything new! As soon as they are aware they don’t have to do something, they
usually won’t do it or at least won’t try very hard. To say that modulation is ‘optional’
implies that a well-written, non-modulating melody could receive full marks, but all

BLITZBOOKS Teacher Guide AMEB Grade 5 Theory Page 19
Web version 2017
teachers know that the candidates who write modulating melodies (provided they do it
correctly) are likely to get higher marks than those who don’t.
It is much easier to hear and understand an effective modulation in a melody when it
is accompanied; therefore I always demonstrate modulations on the piano. I sing a
melody and play an accompaniment to it, showing how the accompaniment can easily
achieve a modulation from the tonic key to anywhere on the ‘family tree’. A
modulation is signalled by a perfect cadence in the new key. I have often presented
this as a simple formula (over two bars):
I V7 of new key I of new key
(In words: half a bar on chord I, half a bar on chord V7 of new key, then chord I of
new key)
This will work for any of the keys on the family tree – the beauty and function of
‘close’ relatives! The use of V7 is a foolproof way of making sure that the new
accidental will appear. For instance, take the example of a melody in C major
modulating to F major:
Chord V of F major = CEG
Chord V7 of F major = CEGB
If a student were to use the ‘formula’ with V instead of V7, the B flat may not appear
in the melody and this would not be a satisfactory modulation. I have had students
claim that the B flat was ‘in the accompaniment”! Even though it is great to imagine
an accompaniment to the melody, the fact is that only the melody line is written in the
exam and it must show the modulation through the use of accidentals.
Sequences
A sequence is a compositional tool. It is a way of emphasizing a particular musical
idea. Sequences can be used to profound effect in melody writing but it is not always
appropriate, especially when setting words to music. Most students seem to be
obsessed with putting a sequence in bars 5 and 6 of their 8-bar melody… one can only
imagine what an examiner might think about the ‘creativity’ of this after marking 200
sequences! Care should be taken when choosing to write a sequence and the chord
progression it follows must suit the flow of the rest of the melody.
The Woodwind Family – pp.54-56
Objective
To learn the instruments of the woodwind family and to research woodwinds enough
to be able to give a full description and fill in the grid.
Comments
This section is easy for woodwind players, and for anyone who has access to
demonstrations by woodwind players! Most of the time the exam questions require a
description of the instrument, rather than testing knowledge on terms relating to
woodwind playing such as tonguing, overblowing, etc. However, the workbook tests

BLITZBOOKS Teacher Guide AMEB Grade 5 Theory Page 20
Web version 2017
all sorts of things relating to woodwinds and a decent amount of research is expected.
If doing Grade 5 Theory is the only time non-woodwind students will cover information
on woodwinds, it’s best to feed them as much knowledge on the subject as possible!
Woodwind Wordsearch – p.57
Comments
The usual wordsearch format found in standard puzzle books lists all the words to
find, however in this wordsearch clues are provided instead. This encourages much
better learning and absorption of the information while still having fun.
There are three clues for words that are not exactly essential grade 5 information!
These are:
“All woodwind players need to do this to their instruments” – BLOW
“You do not want to do this in your exam” – FAIL
“Woodwind players are great at blowing out birthday candles on this” - CAKE
Handel, Mozart and their Stuff – p.60
Objective
To introduce the requirements for the form and history section of the exam.
Comments
Quite a lot of responsibility is put on the student here! This page is designed to whet
their appetites and inspire them to go out and do some research!
Of course, students tend not to use books anymore, only the internet. Wikipedia is
reasonably reliable; searching on specific names of musical forms is also good, but a
great source of well-summarised material can be found in How to Blitz! General
Knowledge. There is also extra information at www.blitzbooks.com.au
Musical Forms – pp.61-66
Comments
I have approached form and history in the same way as Grade 4… the ‘answers’ are
not in the book, only the questions. The syllabus states that there will be ‘general
questions’ on the topics of Minuet and Trio, Scherzo, Air with Variations and Recitative
and Aria – so how does one decide which information is the most essential?
Most other theory textbooks contain a reasonably concise explanation of the
abovementioned topics, however, as I said in Grade 4, my problem with this is that
students always think if they learn all the stuff in one particular book that they will be
well prepared for the exam. If the exam asks for a piece of information not contained
in their book, the student exclaims, ‘But it wasn’t in the book!’
These pages are set out in a way that stimulates thinking and encourages research.
Whilst all the most important questions are asked in the workbook, wider research will

BLITZBOOKS Teacher Guide AMEB Grade 5 Theory Page 21
Web version 2017
ensure the discovery of more facts and interesting perspectives. This is vital to the
development of good musicianship.
The best possible approach to this section is to listen to recordings of the examples
students intend to quote in the workbook, particularly operatic examples. If they don’t
listen to any examples, students are not really learning much about the music, they
are simply memorising stuff for the exam.
The Recitative and Aria is a fun, different and slightly irreverent way of getting the
information across. The Recitative is more akin to Mozart’s style than Haydn’s, so
students may find the rhythms in this a little difficult to follow at first. However, once
they’ve tried it a few times, ideally with teacher guidance (and accompaniment if
possible!), they will hopefully be singing it by heart and will therefore know the
information by heart.
Crossword – p.67
Objective
Like the puzzle, this is a fun way to do some revision, and also to test that the music
history research has actually been done! There is just one clue/word that I threw in
just for fun, which obviously has nothing to do with anything on the syllabus:
21 across: ‘Bart Simpson’s dad’ - HOMER
If your students have no idea of the answer to that clue, at least they can fill in all the
rest of the crossword and then have a good guess!
Test Paper – pp.71-76
Objective
To find all the mistakes and therefore practice ‘proofreading’ in preparation for
checking their own work in the exam.
Comments
In ‘completing’ this mock exam paper I have tried to include as many common mistakes
as I could think of.
This works best when marked in the lesson, stopping for discussion each time a
mistake is found. It is also a great idea for the student to rewrite the answer correctly
on spare manuscript.
Sometimes answers are wrong for more than one reason, some answers are actually
correct! This is sure to provide an amusing resource for revision and is invaluable in
helping students learn how to check their work.