amc anchors chapter 13 - arizona mountaineering...
TRANSCRIPT

1234567890123456789012345678901212345678901234567890123456789012123456789012345678901234567890121234567890123456789012345678901212345678901234567812345678901234567890123456789012123456789012345678901234567890121234567890123456789012345678901212345678901234567890123456789012123456789012345678123456789012345678901234567890121234567890123456789012345678901212345678901234567890123456789012123456789012345678901234567890121234567890123456781234567890123456789012345678901212345678901234567890123456789012123456789012345678901234567890121234567890123456789012345678901212345678901234567812345678901234567890123456789012123456789012345678901234567890121234567890123456789012345678901212345678901234567890123456789012123456789012345678Anchor Techniques • Page 13–1
Rev. 04/01/03, AMC Anchors Manual
13ANCHOR TECHNIQUES
INTRODUCTION.................................................................................................................................................. 1CONNECTIONS ................................................................................................................................................... 1KNOTS................................................................................................................................................................... 1
Cautions about knots ....................................................................................................................................... 3Slip Hitch ........................................................................................................................................................ 3Butterfly Knot ................................................................................................................................................. 3Clove Hitch ..................................................................................................................................................... 3Bowline Knot: Basic, High-Strength, Candy-Stripe ..................................................................................... 3Flat Overhand ................................................................................................................................................. 3Klemheist Hitch .............................................................................................................................................. 3Mule Knot ....................................................................................................................................................... 3Muenter Mule Knot ........................................................................................................................................ 3Mariner Hitch ................................................................................................................................................. 3
EQUALIZATION ................................................................................................................................................ 10
INTRODUCTIONAnchor systems should be Solid, Redundant, and Equalized, and allow No Extension (SRENE). We discussed solid
anchor points in the last chapter. In this chapter, we will discuss techniques for equalization and preventing extension.We will discuss redundancy to a certain extent, but will leave the full discussion to the Anchor Systems chapter.
Equalization is the technique of ensuring that the weight of the anchor system and any forces generated by falling,lowering or rappelling are distributed equally between each anchor point. In order to build a redundant anchor system,you must have at least two or three anchor points, depending on the anchor system. We will discuss how to equalizetwo points and three points.
CONNECTIONSWhen you apply these techniques, there are several ways to connect the biner, sling and rope components of an anchor
system: biner to sling, biner to rope, sling to sling, etc. Here are some guidelines on how to connect various pieces.Generally, don’t connect biner to biner (sometimes called “ganging biners”). Some biners can disconnect from
each other under certain conditions. Adding a sling between biners allows an “independent suspension” system thathelps prevent biners from getting cross-loaded, hung up on the nose, etc.
Do not bunch up too many slings in a biner. It may cause the biner to load in a strange way. There are also sharpedges on the inside of some biners: excess slingage does not settle well into the bottom of a biner and can come incontact with these sharp edges.
Never use slings or rope to hold moving nylon (the rope). Generally, the rope is the only component that will bemoving in the anchor system. Moving a rope through a sling can burn the sling and may cause it to fail. The rules are:1. Moving nylon on stationary nylon is unsafe (e.g., moving rope through a stationary sling).2. Moving nylon on moving nylon is somewhat okay, but avoid it; it can turn into moving nylon on stationary nylon
(for practical purposes, this should not occur in an anchor, but it is how a Muenter hitch works).3. Stationary nylon on stationary nylon is safe (e.g., two slings girth-hitched together).
If there is any doubt about the safety of a carabiner connection, reverse and oppose two biners in the connection.For practical purposes, it is almost impossible to fail this combination in climbing usage.
Never use slings to girth-hitch small diameter material, such as the wire cable on a wired nut. The small diametercan cut the sling under load.
KNOTSWe teach several different knots in the AMC Basic School. They are reviewed on the next page (fig 13-01a). The
new knots for the Anchors School are illustrated in the following pages.

12345678901234567890123456789012123456789012345678901234567890121234567890123456789012345678901212345678901234567890123456789012123456789012345671234567890123456789012345678901212345678901234567890123456789012123456789012345678901234567890121234567890123456789012345678901212345678901234567123456789012345678901234567890121234567890123456789012345678901212345678901234567890123456789012123456789012345678901234567890121234567890123456712345678901234567890123456789012123456789012345678901234567890121234567890123456789012345678901212345678901234567890123456789012123456789012345671234567890123456789012345678901212345678901234567890123456789012123456789012345678901234567890121234567890123456789012345678901212345678901234567Page 13–2 • Anchor Techniques
AMC Anchors Manual, Rev. 04/01/03
Pull onstrandoppositeknot
Overhand knot Water knot—tails should be at least 3 inches
Figure-eight-on-a-follow-through—tail should be at least 6 inches Figure-eight-on-a-bight
Grapevine knot—Tails should be as long as the whole knot
Girth hitch
Prusik hitch
Muenter hitch
Stopper knot for the endof rappel lines
Ropeend
Fig 13-01a—Areview of theknots we teachin the AMCBasic School

1234567890123456789012345678901212345678901234567890123456789012123456789012345678901234567890121234567890123456789012345678901212345678901234567812345678901234567890123456789012123456789012345678901234567890121234567890123456789012345678901212345678901234567890123456789012123456789012345678123456789012345678901234567890121234567890123456789012345678901212345678901234567890123456789012123456789012345678901234567890121234567890123456781234567890123456789012345678901212345678901234567890123456789012123456789012345678901234567890121234567890123456789012345678901212345678901234567812345678901234567890123456789012123456789012345678901234567890121234567890123456789012345678901212345678901234567890123456789012123456789012345678Anchor Techniques • Page 13–3
Rev. 04/01/03, AMC Anchors Manual
CAUTIONS ABOUT KNOTS••••• Tie knots correctly; don’t allow them to be sloppy. A properly tied knot is stronger, won’t shake loose as easily,
and will be easier to untie after holding falls.••••• Check all knots often, especially any that are left unattended like those in a slingshot anchor, or tied webbing
which may have loosened up while riding in your pack.••••• Make a habit of finishing any knots you start, including buckling your harness. Several well-known climbers
have fallen or nearly fallen to their death after interrupting the knot-tying process and using incomplete knots.
Slip HitchUse the slip hitch (fig 13-01b) for wrapping rock features, tying off rigid-stem cams or pitons, and as a releasable
knot under load.
Butterfly KnotUse the butterfly knot (fig 13-01c) to tie in to the middle of the rope, to shorten a sling or prusik, or to isolate a
damaged section of rope.
Clove HitchUse the clove hitch (fig 13-01d) to create an adjustable attachment, such as a tether between you and your anchor, a
connection between anchor pieces, or a quick way to temporarily anchor a rope. Strength tests on this hitch have shownthat it can start to slip at about 1000 pounds of force, or a heavy top-rope fall, so the clove hitch should not be used forthe main belay anchor unless it is backed up. Use a butterfly or figure-8 instead. The clove hitch is more useful in toprope belay stations where you must move around.
Bowline Knot: Basic, High-Strength, Candy-StripeThe bowline (fig 13-01e) is an end-of-rope knot like the figure-8, but can be undone more easily. Always tie off the
tail on a bowline; if you don’t, the tail can creep through the knot after repeated loading. Tie the high-strength versionby making two loops to start instead of one. Tie the candy-stripe bowline by wrapping the tail multiple times around theanchor point; it is useful on upward tapering anchor points and on trees, where it helps to prevent damage to tree barkif the load direction changes.
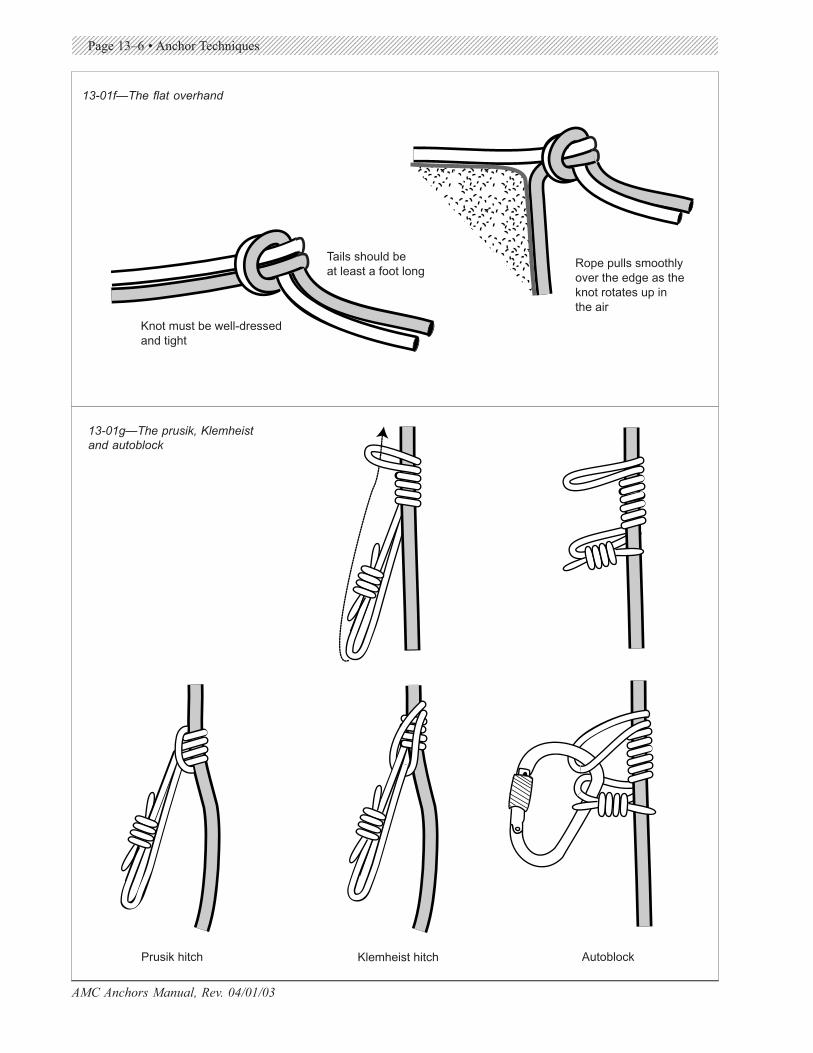
Flat OverhandThe flat overhand (fig 13-01f) is ideal for rappel situations where the rappel anchor is on flat ground above the
edge of the cliff. In these situations, trying to pull the rope down after rappelling can be tricky because the knot catcheson the edge of the cliff and hangs up. The flat overhand rotates up in the air and allows the rope to pull smoothly. Makesure the knot is well-dressed and the tails are about a foot long.
Klemheist hitchThis is an alternative to the prusik hitch. The Klemheist (fig 13-01g) unlocks as soon as it is unweighted, unlike the
prusik. The prusik, Klemheist and autoblock can be used to vary friction depending on your purpose. The prusik uses themost friction, the autoblock the least. All can be done with slings as well, with narrower slings being easier to use. Alwaystest the hitch before trusting your weight to it, especially if you are using a material you have not used before.
Mule KnotUse the mule knot (fig 3-01h) to tie off your belay (when using a device such as the ATC or Sherriff) or to free your
hands in emergencies. It is a slip hitch tied around the load side of a Muenter hitch with the rope passed through thebelay carabiner first. The knot can be used to tie off a rappel, but the autoblock is much better. If you don’t have anautoblock, keep in mind that the mule knot can come untied from the weight of the rope. Back it up with an overhandand a biner through the overhand before trusting it to hold.
Muenter Mule KnotUse the Muenter mule knot (fig 3-01i) to free your hands from a Muenter hitch belay or rappel. It is a slip hitch
tied around the load side of a Muenter hitch. This is one of the most useful knots for emergency applications. Alwaysback it up with an overhand and a biner through the overhand.
Mariner HitchUse the mariner hitch or Muenter mariner hitch (fig 3-01j) to tie off loads that need to be released while still under load.

12345678901234567890123456789012123456789012345678901234567890121234567890123456789012345678901212345678901234567890123456789012123456789012345671234567890123456789012345678901212345678901234567890123456789012123456789012345678901234567890121234567890123456789012345678901212345678901234567123456789012345678901234567890121234567890123456789012345678901212345678901234567890123456789012123456789012345678901234567890121234567890123456712345678901234567890123456789012123456789012345678901234567890121234567890123456789012345678901212345678901234567890123456789012123456789012345671234567890123456789012345678901212345678901234567890123456789012123456789012345678901234567890121234567890123456789012345678901212345678901234567Page 13–4 • Anchor Techniques
AMC Anchors Manual, Rev. 04/01/03
1
23
1
23
12
Make the wraps 2-3times larger than your hand;don't wrap the hand tightly
1
2
3
Pull the second strand from rightto left over all other strands
Now run the second strandunder everything else, left to right
2
Pull on ends A and B makingsure strand 2 stays separate
A
B A B
The butterfly can be loadedin either direction
13-01c —The butterfly knot
Fig 13-01b—Slip hitch
F F N F N
F N
. . . the far loop . . . and the near loop Place the near loopbehind the far loop
Make two loops . . .
Clip a biner into both loops Pull tight
13-01d—The clove hitch

1234567890123456789012345678901212345678901234567890123456789012123456789012345678901234567890121234567890123456789012345678901212345678901234567812345678901234567890123456789012123456789012345678901234567890121234567890123456789012345678901212345678901234567890123456789012123456789012345678123456789012345678901234567890121234567890123456789012345678901212345678901234567890123456789012123456789012345678901234567890121234567890123456781234567890123456789012345678901212345678901234567890123456789012123456789012345678901234567890121234567890123456789012345678901212345678901234567812345678901234567890123456789012123456789012345678901234567890121234567890123456789012345678901212345678901234567890123456789012123456789012345678Anchor Techniques • Page 13–5
Rev. 04/01/03, AMC Anchors Manual
Makeloop
Tail
Load
Tie offtail closeto bowlinewithgrapevine
Holdthese
Pullthis
Foldloop
1—Pull bightthrough loop
2—Feedtailthroughbight
Make suretail is oninside ofbowline loop
Insi
de
Out
side
U-shapedcharacteristicof bowline
Standard bowline
Candy-stripe is identicalto the regular bowlineexcept for the extrawraps around the anchor
Keep angleless than 90°
Maketwoloopsinsteadof one
Tail
Load
Twoloops
Fold loopover andmakeasanyotherbowline
High-strength bowline (about 6% stronger than the standard)
Still tie offtail with a grapevineclose to thebowline knot
Candy stripe bowline
13-01e—The bowline family of knots
12345678901234567890123456789012123456789012345678901234567890121234567890123456789012345678901212345678901234567890123456789012123456789012345671234567890123456789012345678901212345678901234567890123456789012123456789012345678901234567890121234567890123456789012345678901212345678901234567123456789012345678901234567890121234567890123456789012345678901212345678901234567890123456789012123456789012345678901234567890121234567890123456712345678901234567890123456789012123456789012345678901234567890121234567890123456789012345678901212345678901234567890123456789012123456789012345671234567890123456789012345678901212345678901234567890123456789012123456789012345678901234567890121234567890123456789012345678901212345678901234567Page 13–6 • Anchor Techniques
AMC Anchors Manual, Rev. 04/01/03
Prusik hitch Klemheist hitch Autoblock
Knot must be well-dressedand tight
Tails should beat least a foot long
Rope pulls smoothlyover the edge as theknot rotates up inthe air
13-01f—The flat overhand
13-01g—The prusik, Klemheistand autoblock

1234567890123456789012345678901212345678901234567890123456789012123456789012345678901234567890121234567890123456789012345678901212345678901234567812345678901234567890123456789012123456789012345678901234567890121234567890123456789012345678901212345678901234567890123456789012123456789012345678123456789012345678901234567890121234567890123456789012345678901212345678901234567890123456789012123456789012345678901234567890121234567890123456781234567890123456789012345678901212345678901234567890123456789012123456789012345678901234567890121234567890123456789012345678901212345678901234567812345678901234567890123456789012123456789012345678901234567890121234567890123456789012345678901212345678901234567890123456789012123456789012345678Anchor Techniques • Page 13–7
Rev. 04/01/03, AMC Anchors Manual
Hold rope very tightlyagainst belaydevice withfingers ofleft hand
Slip loop downthrough binerwithout lettinggo with lefthand fingers
Hold brakerope A andlet go withleft hand. Useleft hand to pullmore slack thrubiner and makeLoop B andBight C
Loop BBight C
Keep holdingbrake hand Awith right handand use left hand to passBight C thruLoop B
Loop B
Bight C
A
Moreslack
Snug down themule knot nextto the belaydevice
Secure withan overhandknot snuggeddown to themule knot
(For extrasecurity, suchas when leavingthe scene, securethe overhandknot with a bineror quickdrawattached toan anchor)
A
13-01h—The mule knot

12345678901234567890123456789012123456789012345678901234567890121234567890123456789012345678901212345678901234567890123456789012123456789012345671234567890123456789012345678901212345678901234567890123456789012123456789012345678901234567890121234567890123456789012345678901212345678901234567123456789012345678901234567890121234567890123456789012345678901212345678901234567890123456789012123456789012345678901234567890121234567890123456712345678901234567890123456789012123456789012345678901234567890121234567890123456789012345678901212345678901234567890123456789012123456789012345671234567890123456789012345678901212345678901234567890123456789012123456789012345678901234567890121234567890123456789012345678901212345678901234567Page 13–8 • Anchor Techniques
AMC Anchors Manual, Rev. 04/01/03
Snug downthe knotnext tothe Muenterhitch
Secure withan overhandknot snuggeddown to themule knot
(For extrasecurity, suchas when leavingthe scene, securethe overhandknot with a bineror quickdrawattached toan anchor)
This is anexcellent wayto tie off aredirect belayas well
Secure withan overhandknot snuggeddown to themule knot
(For extrasecurity, suchas when leavingthe scene, securethe overhandknot with a bineror quickdrawattached toan anchor)
13-01i—The Muenter mule knot

1234567890123456789012345678901212345678901234567890123456789012123456789012345678901234567890121234567890123456789012345678901212345678901234567812345678901234567890123456789012123456789012345678901234567890121234567890123456789012345678901212345678901234567890123456789012123456789012345678123456789012345678901234567890121234567890123456789012345678901212345678901234567890123456789012123456789012345678901234567890121234567890123456781234567890123456789012345678901212345678901234567890123456789012123456789012345678901234567890121234567890123456789012345678901212345678901234567812345678901234567890123456789012123456789012345678901234567890121234567890123456789012345678901212345678901234567890123456789012123456789012345678Anchor Techniques • Page 13–9
Rev. 04/01/03, AMC Anchors Manual
Bringlooparoundback toclip into thecarabiner
Snug upthe wraps
Pass thetail betweenthe two strands
Clip a binerthrough theloop andover thestrands
Clip a binerthrough theloop andover thestrands
Mariner hitch—can be done with a sling or long prusik
Muenter mariner hitch
13-01j—The mariner hitch

12345678901234567890123456789012123456789012345678901234567890121234567890123456789012345678901212345678901234567890123456789012123456789012345671234567890123456789012345678901212345678901234567890123456789012123456789012345678901234567890121234567890123456789012345678901212345678901234567123456789012345678901234567890121234567890123456789012345678901212345678901234567890123456789012123456789012345678901234567890121234567890123456712345678901234567890123456789012123456789012345678901234567890121234567890123456789012345678901212345678901234567890123456789012123456789012345671234567890123456789012345678901212345678901234567890123456789012123456789012345678901234567890121234567890123456789012345678901212345678901234567Page 13–10 • Anchor Techniques
AMC Anchors Manual, Rev. 04/01/03
EQUALIZATIONEqualization is the equal sharing of the climbing load by each individual anchor point. The techniques for
equalizing between two points (fig 13-02) and between three points (fig 13-03) are very similar. In considering how toequalize points of an anchor, it is helpful to think in terms of bolted and non-bolted anchors.
Bolted anchors are the easiest to set up because the anchor points are fixed. Place one quickdraw on each bolt andrun the rope through both lower quickdraw biners. Reverse and oppose the lower (rope-bearing) biners; the easiest wayto do this is to clip the top biners in the quickdraws with the gates facing each other. It is also easy to clip a biner oneach bolt, a runner in each biner, and a second biner in each runner, simulating the quickdraw setup; adjust the runnersto a length that weights each bolt equally. A short cordelette (fig 13-02) works well. Placing one biner on each bolt andrunning the rope through each biner is not a good idea. In cold shut and chain anchors, we prefer to use quickdraws orrunners with biners hung from the bolt hanger to save wear and tear on the anchor, then thread the rope through thecold shuts or chains for a rappel at the end of the day.
Non-bolted anchors allow numerous choices in technique, but they are generally variations of those listed above.First, determine how many anchor points there will be. This could be a single large tree, a tree and a boulder, two trees,a tree and two pieces of pro, three pieces of pro (minimum recommended for a pro-only anchor), four pieces of pro orsome other similar combination. Build a line of gear from each anchor point to the position where the rope-bearingbiners will be, then equalize between the lines using a cordelette or runners adjusted to the right length. A line of gearwill usually consist of runners girth-hitched together to reach from the anchor point to the edge; sometimes, one runnerworks, but on longer distances, more than one runner will be needed. Or, if the anchor is four pieces of pro, equalizebetween the first two pieces, equalize between the other two pieces, and then run a line of runners from eachequalization to the edge and equalize between the two lines, again with a cordelette or the proper length slings (fig 13-04). In all cases, the angle created by the two outermost equalizing strands should be less than 90 degrees.
The orientation of the biners in these setups can make a difference. The lower biners (the rope-bearing biners) inall cases should be reversed and opposed, and generally nose down. Sometimes, these biners rotate so the nose is up.Sometimes this can be corrected by the climber prior to being lowered and sometimes not. Since the biners are reversedand opposed, however, there is usually little risk involved.
In bolted anchors, the orientation of the upper biner doesn’t matter unless there is an irregularity in the rock thatmay interfere with the gate. Each biner will be rotated slightly toward the opposite bolt. If the gate pushes against theirregularity when the bottom biners are brought together, reverse the biner so the spine pushes against it instead. If itlooks like the irregularity will open the gate if the other bolt fails and the biner swings downward, then orient the spinein the direction of the swing.
In non-bolted anchors, it is generally better to orient the biner nose down and the gate away from the direction ofswing. Since the parts in a non-bolted anchor move around more, it is possible that the nose of the biner could get hungup on a projection of rock and break under a relatively small load. It is also more likely that the biners will move fromside to side as the anchor moves around, opening the possibility that the gates will run into something.
Recommendations:••••• The best overall technique is the cordelette. It is fast, redundant and prevents shock loading. The feature of
allowing side-to-side movement to handle zig-zags is not needed very often. The only caution about using thecordelette is that it may need a slight adjustment to ensure that it is truly equalized.
••••• A cordelette anchor can be created with cord or sling, but works best with cord (6mm or 7 mm).••••• Twenty feet is the most popular length for a cordelette. Too short a cordelette may limit available anchor placements
and too long a cordelette can become unwieldy to handle. Experiment with different lengths if you like.••••• The easiest technique for a bolted anchor is a pair of quickdraws, which are already equal lengths.••••• Do not use the single sling with a twist by itself for the rope-bearing biners, as it is not redundant.••••• Do use a single sling with a twist to equalize between pieces being used as a part of the anchor.••••• Do use short slings (less than 10') in a single sling with a twist to limit the extension of a failed anchor.••••• There is a dangerous technique sometimes used as an anchor itself or to back up another technique such as the
single sling with a twist. This is a triangular configuration sometimes referred to as an “American triangle” (fig.13-02). We recommend avoiding it.
••••• Make sure the outer strands of the setup are less than 90 degrees.

1234567890123456789012345678901212345678901234567890123456789012123456789012345678901234567890121234567890123456789012345678901212345678901234567812345678901234567890123456789012123456789012345678901234567890121234567890123456789012345678901212345678901234567890123456789012123456789012345678123456789012345678901234567890121234567890123456789012345678901212345678901234567890123456789012123456789012345678901234567890121234567890123456781234567890123456789012345678901212345678901234567890123456789012123456789012345678901234567890121234567890123456789012345678901212345678901234567812345678901234567890123456789012123456789012345678901234567890121234567890123456789012345678901212345678901234567890123456789012123456789012345678Anchor Techniques • Page 13–11
Rev. 04/01/03, AMC Anchors Manual
Makefigure-8-on-a-bighthere
Make surecordeletteweights
bothanchorsevenly
Dressfigure-8 Add
carabinersthroughbothloopsPull down in center on
both strands to even them out
Keepgrapevineclose toupper biner
Do not use a single slingwith a twist ("sliding X")for the rope-bearing biners
Two runners adjustedto the same length
The "American triangle"is considered unsafe
The cordelette is usually about 20 feet long and made of 6 mm or 7 mm cord
Two quickdraws withlower biners reversedand opposed
Rope-bearingbiners
Rope-bearingbiners
Non-rope-bearingbiner
Wrapping once arounda tree stabilizes thecordelette and helpsprotect the tree bark
A cordeletteequalizinguneven anchors
Never use just a bineron a bolt for aclimbing anchor
Use shortslings with
thistechnique
13-02—Two-point equalization techniques

12345678901234567890123456789012123456789012345678901234567890121234567890123456789012345678901212345678901234567890123456789012123456789012345671234567890123456789012345678901212345678901234567890123456789012123456789012345678901234567890121234567890123456789012345678901212345678901234567123456789012345678901234567890121234567890123456789012345678901212345678901234567890123456789012123456789012345678901234567890121234567890123456712345678901234567890123456789012123456789012345678901234567890121234567890123456789012345678901212345678901234567890123456789012123456789012345671234567890123456789012345678901212345678901234567890123456789012123456789012345678901234567890121234567890123456789012345678901212345678901234567Page 13–12 • Anchor Techniques
AMC Anchors Manual, Rev. 04/01/03
Addcarabinersthroughall threeloops
Pull downin center on allthree strands toeven them out
Keepgrapevineclose toupper biner
Makefigure-8-on-a-bighthere
Three slings adjusted to the properlength takes a little longer, but itis redundant
Do not use a single sling withtwo twists ("sliding X") for therope-bearing biners
The "American triangle" isconsidered unsafe
The cordelette can equalize between two or more points depending on its length
13-03—Three-point equalization techniques

1234567890123456789012345678901212345678901234567890123456789012123456789012345678901234567890121234567890123456789012345678901212345678901234567812345678901234567890123456789012123456789012345678901234567890121234567890123456789012345678901212345678901234567890123456789012123456789012345678123456789012345678901234567890121234567890123456789012345678901212345678901234567890123456789012123456789012345678901234567890121234567890123456781234567890123456789012345678901212345678901234567890123456789012123456789012345678901234567890121234567890123456789012345678901212345678901234567812345678901234567890123456789012123456789012345678901234567890121234567890123456789012345678901212345678901234567890123456789012123456789012345678Anchor Techniques • Page 13–13
Rev. 04/01/03, AMC Anchors Manual
Examples of how to equalize pieces of pro.Equalize smaller groups using any of thetechniques, then equalize those groups. Or,equalize the pieces directly. Biners areoriented nose down and with the spine inthe direction of swing should part of theanchor fail.
Single slingwith a twist(not to be usedfor the rope-bearing biners)Single sling
with a twist(not to be usedfor the rope-bearing biners)
Cordelette
Twoequalizedslings
Cordelette
Twoequalizedslings
Cordelette
Threeequalizedslings
Single slingwith 2 twists(not to be usedfor the rope-bearing biners)
13-04—Equalization examples