altiverb manual v3
TRANSCRIPT

7/30/2019 Altiverb Manual v3
http://slidepdf.com/reader/full/altiverb-manual-v3 1/32
Lagenoord 263513 GW UtrechtThe Netherlands
Phone: ++31-30-2433606
Fax: [email protected]
1

7/30/2019 Altiverb Manual v3
http://slidepdf.com/reader/full/altiverb-manual-v3 2/32
Altiverb™ Copyright © by Audio Ease. All rights reserved.
Altiverb™ IR Pre-Processor Copyright © by Audio Ease. All rights reserved.
No part of this documentation may be reproduced or transmitted in any form by any means,
electronic or mechanical, including photocopying, recording, or any information storage and
retrieval system, without permission in writing from Audio Ease.
All trademarks or registered trademarks are the property of their respective owners.
This software contains convolution know-how and algorithms
licensed from Lake Technology Limited, Australia, as described inpatents, including US Patent 5,502,747
The Impulse Responses that Audio Ease BV supplies with Altiverb™ are intended for use only
in Altiverb™ and may not be used for any other purpose. (Re-)Sampling of the Impulse
Responses that Audio Ease BV has supplied with Altiverb™ is expressly prohibited.
Copyrights may apply when you sell, lend, hire or give away sampled Impulse Responses
from hardware (reverb) units. Check the documentation of the unit that you want to sample
when you intend to do so.
Venue rights may apply when you sell, lend, hire or give away sampled Impulse Responses
from real acoustic spaces. Consult the owner of the venue when you intend to do so.
2

7/30/2019 Altiverb Manual v3
http://slidepdf.com/reader/full/altiverb-manual-v3 3/32
Contents
Altiverb™
1 Introduction 5
2 The Altiverb Documentation 7
3 Altiverb™ at a glance - a quick tour 9
4 About Altiverb's channel configurations 13
5 Using Altiverb™ for purposes other than reverb 17
6 Altiverb™ Reference 19
7 The Altiverb™ Impulse Responses folder 27
3

7/30/2019 Altiverb Manual v3
http://slidepdf.com/reader/full/altiverb-manual-v3 4/32
4

7/30/2019 Altiverb Manual v3
http://slidepdf.com/reader/full/altiverb-manual-v3 5/32
1 Introduction
1. Welcome.
Audio Ease is very proud to introduce to you the first sampled acoustics reverb that runsin real-time as a plug-in. Altiverb's underlying principals are not new, but only with the introduction of the AppleG4 has the processing power become available to create top quality sampled reverb, inreal-time, inside your computer.
Due to the massive amounts of calculations necessary to apply real acoustics to youraudio, be aware that Altiverb™ can use up a substantial amount of your RAM andprocessing power.
However, when you listen to the extraordinary quality and realism of the reverbsAltiverb™ is capable of creating, you’ll recognize that sampled acoustics is here to stay.
2. What does “Sampled Acoustics Processor” mean ?
When you clap your hands in a church, you are listening to the church’s response to theaudio impulse your palms made.
The shortest impulse in a digital sound environment is a single sample ‘spike’. That’swhat you get when you use your audio editor’s pencil tool and pull one single sample upto maximum level in an otherwise silent sound file. Playback of this spike in a churchwould create a response very similar to that of a hand clap.
Think of a sampled waveform as a stream of spikes. Replace every spike in the dry inputsound with the full church impulse response recording, and it will sound as if the dryaudio was played back in the church. The process of replacing samples with scaledimpulse responses (IR’s) is called convolution.
Altiverb™ is a convolution engine. It combines your dry input sound with an impulseresponse created in a real acoustic environment. The included Altiverb™ ImpulseResponse Pre-Processor software allows you to create your own impulse responses.
The two applications together allow you to sample any acoustic environment and apply
its sonic signature to the audio of your choice.
5

7/30/2019 Altiverb Manual v3
http://slidepdf.com/reader/full/altiverb-manual-v3 6/32
6

7/30/2019 Altiverb Manual v3
http://slidepdf.com/reader/full/altiverb-manual-v3 7/32
2The Altiverb documentation
This manual covers the functions and controls of Altiverb™. Wherever there is adifference between Mac OS 9 versions and Mac OS X versions of Altiverb it will beindicated.
Some topics concerning Altiverb™ outdate quicker than others, or are of interest to asmall subset of Altiverb users. These topics are not available in printed form and arecovered in several PDF files that can be found in the “Altiverb™” folder afterinstallation. There is little chance that you cannot open these files, but if you run intotrouble you can download your free copy of Acrobat Reader from www.adobe.com.
In the folder “Host specific descriptions” there are several PDF files that describe thepeculiarities of Altiverb for a given host application such as ProTools™ 5.2 for Mac OS
9, or Cubase SX for Mac OSX. They cover system requirements, functionality andoptimization of Altiverb™. Sometimes they describe exactly how to set up aquadraphonic Altiverb.
The file called Creating Impulse Responses.pdf describes step by step how to createyour own Impulse Responses in several given situations and it covers the use of theSweep Generator, and the Impulse Reopens Pre Processor applications.
7
7/30/2019 Altiverb Manual v3
http://slidepdf.com/reader/full/altiverb-manual-v3 8/32
8

7/30/2019 Altiverb Manual v3
http://slidepdf.com/reader/full/altiverb-manual-v3 9/32
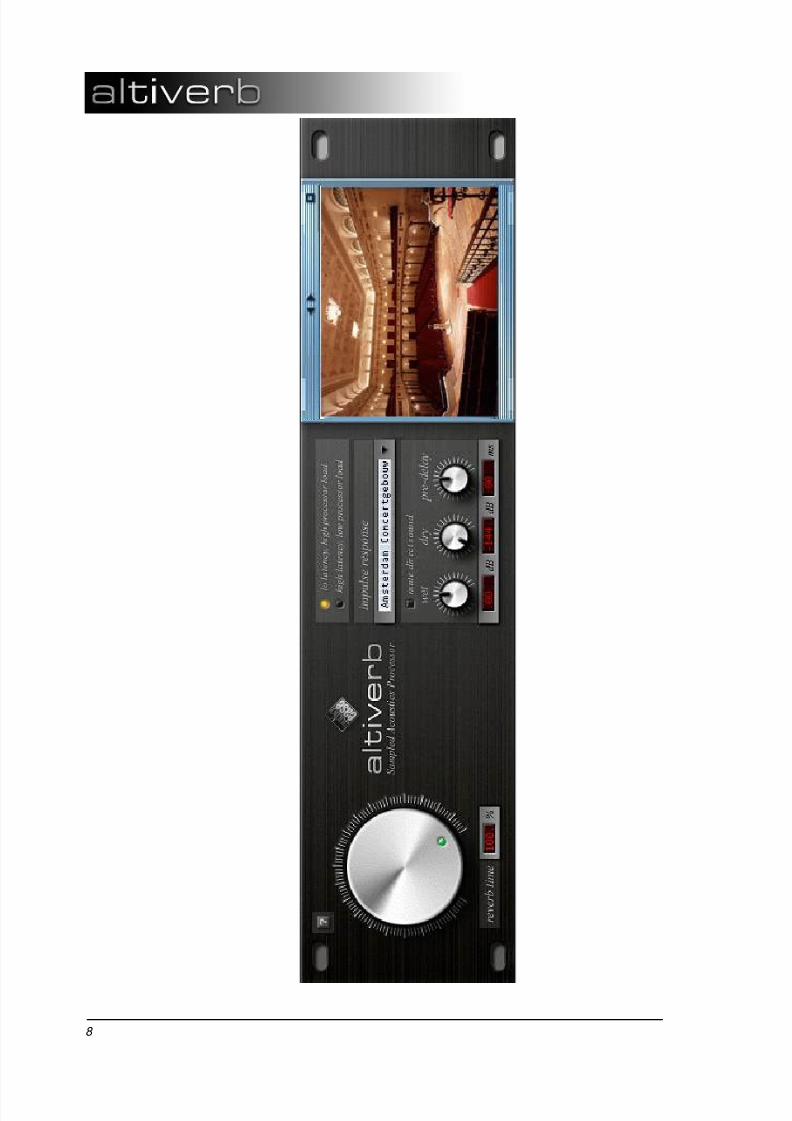
3 Altiverb™ at a glance A quick tour
Altiverb™ uses samples of real acoustic spaces to create reverb. These samples are
called impulse responses (or IRs for short). All the complexity of the real acoustic spaceis captured within the impulse responses, so very few controls are needed to build thereverb that you need. This makes Altiverb very easy to operate, as you’ll learn from thisbrief overview.
For installation instructions for Altiverb™, the Altiverb™ Impulse Responses and theAltiverb™ Impulse Pre-Processor please refer to the instructions text file on theCDROM or in the download.
Locate the folder containing the impulse responses.When you launch your sequencer or audio editor for the first time after Altiverb'sinstallation, you are asked to locate the impulse responses folder. At this stage
you should select the folder called “Altiverb™ Impulse Responses” that wasinstalled by the Altiverb™ Installer.
Insert Altiverb™Insert an Altiverb in the signal chain. In Cubase and Nuendo you have to click ‘edit’ to see the user interface. You can refer to your host application’s manualto find out how to insert a plug-in.
Select an impulse response
9

7/30/2019 Altiverb Manual v3
http://slidepdf.com/reader/full/altiverb-manual-v3 10/32
Now use this pop-up menu to select an impulse response. The contents of thispop-up depend on the contents of the folder “Altiverb™ Impulse Responses”,and on which channel configuration you have inserted. For example, there areprobably
more mono-to-stereo than stereo-to-four-channel (or quadraphonic) impulseresponses present.
Once you have selected an impulse response, a corresponding picture will appearin the Monitor , which is Altiverb’s information center. You can then hear thesampled acoustics when you play back some dry audio through the plug-in.
Step through the various pictures associated with the chosen impulse responsewith the forward and backward navigation buttons in the top middle of theMonitor. In addition to interior and exterior pictures of the recording venue thereare also layout pictures that show how the impulse response was recorded.
The layout pictures present a ‘bird’s eye’ view of the acoustic space. It shows adiagram of how the speakers and mics were set up when the acoustics weresampled.
Running audio through Altiverb will sound as if the source sound was played
back through the speakers and recorded with the microphones.In addition, there are pictures containing technical details regarding reverb decaylength, sample rate, and exact latency (if any).
Double click on a picture, or use the zoom box in the top right corner of theMonitor to view the picture at its original size.
After you have selected the impulse response, the remaining controls can be usedfor further refinements.
10

7/30/2019 Altiverb Manual v3
http://slidepdf.com/reader/full/altiverb-manual-v3 11/32
Adjust the wet/dry level of Altiverb’s output
Click and drag a knob to adjust a value, or type values directly in thecorresponding readouts (In Altiverb VST you cannot type in the readouts).
Balance front and rear outputs
If you have selected an Altiverb impulse response with a quadraphonic (4-channel) output, you can adjust the balance between the front and rear (orsurround) outputs with these controls.
Shorten the reverb tail if necessary
The large knob adjusts the length of the decay. It does this by applying anexponentially decaying envelope to the impulse response. It is not possible tolengthen the tail, you can only shorten it. When you turn the reverb time knob,Altiverb needs to calculate the new decay shape. While it does that it flashes a redlight in the knob’s indicator. Once the indicator has turned green again the reverbtime recalculation is completed.
11

7/30/2019 Altiverb Manual v3
http://slidepdf.com/reader/full/altiverb-manual-v3 12/32
Adjust the pre-delay if necessary
Pre-delay is a delay that you can add between the dry sound and the wet sound.When the knob points upward (12 o’clock), there is no delay between the two.When you turn it to the right, you will delay the wet sound so that the dry soundwill become less ‘attached’ to the reverb. When you turn the knob to the left, thedry sound will be delayed, possibly placing it in, or behind, the early reflectionpattern of the wet sound. This can create a better stereo image and more realisticpositioning of the dry sound in some cases.
Mute the direct sound if necessary
The direct sound, the sound that hits the microphones first, can be muted usingthis control. Doing this will make the sound of an impulse response wetter, it willcreate more contrast between dry and wet, and it will get rid of any ‘flamming’effects that may occur when a low latency Altiverb is used as a send effect. (Seethe notes on ‘mute direct sound’ in the reference section of this manual.)
Determine if you need “low processor load” or lowest possible latency
The “high latency” mode uses a minimum of processing power but can producea delay of up to a second between input and output. Click on the forward orbackward buttons in the top middle of the Monitor until the technical data pageappears to determine the precise delay.
In “no latency” mode (available in MAS and VST versions) , there is no delaybetween input and output of Altiverb™, but at the expense of increasedprocessing power demand.
HTDM and RTAS users will have a “low latency” mode instead of a “nolatencymode. Due to the nature of the HTDM and RTAS formats a short delay isinevitable. Click on the forward or backward buttons in the top middle of theMonitor until the technical data page appears to determine the precise delay. If,due to the delay you get ‘flamming’ effects, check ‘mute direct sound’ asdescribed above.
On screen help
Click this button to switch to the Monitor’s help channel. The help function
displays information as you move your mouse over a control.
12

7/30/2019 Altiverb Manual v3
http://slidepdf.com/reader/full/altiverb-manual-v3 13/32
4 Altiverb's channel configurations
This chapter describes Altiverb's internal signal routing with the help of diagrams. Pleaseread the appropriate PDF file in the folder “Host specific descriptions”to verify wethera specific configuration is available in your host application and when it is, if all outputswill actually be audible. The ‘plus’ signs at the bottom of the diagrams are the mixing points for the dry signal
(untreated audio,), and the wet signal (the reverbed signal). Note that in quadraphonicoutput configurations, the dry signal is only mixed to the front outputs.
No gain controls are depicted in the diagrams. There are however separate gains for thedry signal and the wet signal. In the case of a 4-channel quadraphonic output Altiverb,two more gains can be controlled. One for both front channels together, and one for bothsurround (rear) channels.
Mono Input to Four-channel Output This configuration (abbreviated as mono-to-quadraphonic) uses a single audiofeed and generates four channels of reverb. A typical use would be for mono
sources such as vocals. The dry signal is available in the front channels only.
mono-to-mono mono-to-stereo mono-to-quadraphonic
13

7/30/2019 Altiverb Manual v3
http://slidepdf.com/reader/full/altiverb-manual-v3 14/32
Stereo Input Summed to Mono with a Stereo Output A two-channel (stereo) input is summed before entering Altiverbs reverb
processor, similar to how many digital effects processors work. The signalcontrolled by the Dry control remains stereo. Use this in cases where you needlower processor load, for example. In many cases the sound of a true stereo inputreverb and a summed mono input reverb are very similar, especially when mutedirect sound is checked. This configuration appears abbreviated as stereo-mix tostereo in Altiverb.
Stereo Input Summed to Mono with a Four Channel Output Similar to the two-channel version described above, this configuration sums atwo-channel audio input to one channel prior to processing. The output is fourchannels of reverb (quadraphonic). The abbreviated stereo-mix to quadraphonic is used when selecting this configuration.
stereo-mix to stereo stereo-mix to quadraphonic
Stereo Input to Stereo Output This configuration (abbreviated as stereo-to-stereo) uses two independent inputchannels. Each input channel feeds a separate left/right Altiverb processor tocreate extremely realistic imaging.
Stereo Input with a Four Channel Output Two independent input channels are fed separately into four stereo channels of reverb to create a surround ambiance. The dry signal is available in the frontchannels only. This configuration is abbreviated as stereo-to-quadraphonic.
stereo-to-stereo stereo-to-quadraphonic
14

7/30/2019 Altiverb Manual v3
http://slidepdf.com/reader/full/altiverb-manual-v3 15/32
Automatic switching between stereo and stereo-mix input under Mac OSX
Only in Mac OSX, Altiverb™ will show both mono input and stereo input ImpulseResponses when it receives two channels at its input. In the Impulse Response Selectorpopup, a small icon in front of the name of the Impulse Response indicates whether theImpulse Response is mono or stereo input.
15

7/30/2019 Altiverb Manual v3
http://slidepdf.com/reader/full/altiverb-manual-v3 16/32
16

7/30/2019 Altiverb Manual v3
http://slidepdf.com/reader/full/altiverb-manual-v3 17/32
5Using Altiverb
for purposes other than reverb
Although Altiverb was designed as a convolution engine for reverb type impulseresponses, its applications are not limited to reverb. Every linear and time invariant system can be captured as an impulse response. And, Altiverb can convolve the inputaudio with any impulse response. Let’s define this terminology with an example:
If you play back a sound twice through a linear, time invariant system, the second timetwice as loud as the first time, you will get responses that are identical except for oneaspect – the second response is twice as loud as the first.
In real life, few systems are truly linear and time invariant, but many come close. Theobvious examples are acoustic spaces, but most transducers also meet theserequirements, provided they are not overloaded.
Below are more examples of systems that could be emulated with Altiverb, assuming animpulse response is available. In most cases you can sample these yourself using theAltiverb™ IR Pre-Processor.
Some examples to illustrate applications for (in some cases the mono-to-mono) Altiverb:
• loudspeakers and PA’s• microphones• hardware and software equalizers, and other frequency filters• tape-based delays• spring reverbs• plate reverbs• a large number of digital reverb presets (as long as they do not use LFO’s or chaotic
modulators that make them time variant)
17

7/30/2019 Altiverb Manual v3
http://slidepdf.com/reader/full/altiverb-manual-v3 18/32
• piano strings with the sustain pedal down• the body of a guitar• a telephone
• a wall or a ceiling• human vowel formant filters
Experimental Impulse Responses
Of course your experiments do not have to remain limited to sampling linear and timeinvariant systems. Altiverb can read any sound file (saved as a Sound Designer 2 formatfile) as an impulse response, so why not try a recording of overhead thunder as your IR.Unless you run a single sample spike through the system as your input sound, the resultwill be nothing like overhead thunder, but you might like the effect anyway.
Some other examples: A section of white noise as your impulse response smears yourinput sound without changing its frequency content. Try a crackling fire, a guitar strum, aspeech file, or an explosion recorded at a distance as an impulse response. Each willcreate a unique and interesting sound.
18

7/30/2019 Altiverb Manual v3
http://slidepdf.com/reader/full/altiverb-manual-v3 19/32
6 Altiverb reference
This chapter discusses each user interface control of Altiverb in detail, and expands uponthe inner workings of Altiverb in projects with sample rates of 88.2 kHz or higher.
19

7/30/2019 Altiverb Manual v3
http://slidepdf.com/reader/full/altiverb-manual-v3 20/32
The Impulse Response Selector Pop-up Menu
Altiverb uses recordings of the acoustics of real-life locations to create reverb. Theserecorded measurements are called impulse responses. You can select a reverb bychoosing from the impulse response selector pop-up menu.Altiverb comes with a variety of impulse responses. They are installed in the “Altiverb™Impulse Responses” folder. In addition, more impulse responses can be made with theaid of the included “Altiverb IR Pre-processor” application, or they may be downloadedvia http://www.audioease.com.
An impulse response can be created from a stereo recording of a starter pistol shot in achurch, for example. That recording will result in two mono sound files, a left and a rightfile. A mono input to stereo output impulse response can be generated from those with
some post processing in the Altiverb™ IR Pre-Processor.
The picture below shows the contents of an “Altiverb™ Impulse Responses” folder (inMac OS X), and how the folder’s contents relate to the impulse response selector pop-up. In this case we can see the actual Impulse Response files in a folder named “center-> quad cardioids”. The folder called ‘Cathedral Chartres - Notre Dame’ is a containerfor all folders that hold the impulse response variations of that specific hall venue.
The name ‘‘Cathedral Chartres - Notre Dame’ is displayed in the Altiverb pop-up menu,but you cannot select it directly. Exactly which of the sub-folders display depends on thechannel configuration of the Altiverb plug-in that you have inserted. For moreinformation regarding channel configurations, consult Chapter 4. Chapter 7 expands
upon the structure of the “Altiverb™ Impulse Responses” folder.
The way the contents of the “Altiverb™ Impulse Responses folder”relate to
the Impulse Responses selector pop-up (in Mac OS X).
20

7/30/2019 Altiverb Manual v3
http://slidepdf.com/reader/full/altiverb-manual-v3 21/32
The Monitor
The Monitor can display a variety of data. When an impulse response is
selected a number of pictures that are associated with it can be accessed via the forwardand backward navigation buttons shown above.
When the zoom box is pressed, or when you double click the picture in theMonitor, a separate window will appear, showing the picture at its original size.
Following is a description of the most common data that can be viewed using theMonitor.
1. Layout Picture
Many Audio Ease Impulse Responses are accompanied by a Layout Picture thatdisplays how the microphones were set up and where the speakers were at the time theimpulse response was recorded.The layout pictures also provide a simplified ‘bird’s eye view’ of the recording venue.The speakers are your inputs, the mics are your outputs. The wet signal will sound as if it was played through the speakers and recorded through the mics.
This is the speaker symbol:
This is the symbol for an omnidirectional microphone:
This symbol indicates a cardioid (directional) microphone:
2. Various photographs of the recording location
Any number of photographs of the recording venue may be accessed through theMonitor. You can include your own pictures of acoustic spaces you sample by placing
21

7/30/2019 Altiverb Manual v3
http://slidepdf.com/reader/full/altiverb-manual-v3 22/32
them in the folders you create for your own impulse responses.
3. Recording statistics
Most of the Audio Ease Impulse Responses are accompanied by a recording statisticspicture. To display it at its original size in a separate window you should double-click this picture or use the blow-up rectangle, as the information may be illegible in theMonitor. This picture provides information about recording date, the recording andplayback gear that was used etc.
4. Impulse Response statistics
This screen shows, amongst other data, the length of the impulse response, and the
sample rate of the impulse response file. When you use a different sample rate than theone displayed, Altiverb will convert the sample rate of the Impulse Response uponreading it from disk.
The impulse response stats are created on the fly by Altiverb. The recording stats,photographs of the recording location and layout picture are all .jpg, gif, TIFF, or pictfiles that have been placed in the Altiverb™ Impulse responses folder. (See Chapter 7for details.)
5. On-screen help
The question mark in the top left of Altiverb will switch the Monitor to the on-line helpchannel. The Monitor will then display information about any control you roll the mousepointer over. You can use the forward and backward buttons in the top middle of theMonitor to get out of the on-line help channel. You can also switch to the help channel
via the forward and backward button in the top middle of the Monitor.
22

7/30/2019 Altiverb Manual v3
http://slidepdf.com/reader/full/altiverb-manual-v3 23/32
The Reverb Time Knob
This knob can shorten the reverb time by applying an exponential decay to the selectedimpulse response. When set to 100 %, you will hear the reverb generated by the entireimpulse response. You can type values in the display below the knob (except in AltiverbVST). Because of its size, the decay knob behaves like a physical knob – you need torun your mouse along the circumference to operate it.When you turn the reverb time knob, Altiverb needs to calculate the new decay shape.While it does that it flashes a red light in the knob’s indicator. Once the indicator hasturned green again the reverb time recalculation is completed.
The Wet and Dry Knobs
The wet signal is the signal generated by the reverb. The wet signal is derived solely
from the recorded impulse response and is therefore likely to generate the most lifelikeauditory image. The wet signal’s strength is controlled by the Wet knob. It can be turneddown to-144 dB, which is silence in the 24 bit audio domain.
The dry signal is the signal as it is input to Altiverb. You can add dry signal if you needmore clarity, more definition, or a wider stereo image. However, if you overdo it, you runthe risk of losing the character of the original impulse response. You can mitigate thisrisk by using negative pre-delay as discussed in the following paragraph.When the Wet and Dry knobs point upward (at the 12 o’clock position) they are at 0dB, no attenuation or amplification occurs.
Mute Direct Sound
The direct sound, the sound that hits the microphones first, can be muted usingthis control. It will make the sound of an impulse response wetter, it will createmore contrast between dry and wet, and it will get rid of any ‘flamming’.
If you run Altiverb RTAS or HTDM in low latency mode there is a delay of about 25 msec. between input and output of Altiverb. (Check the appropriatePDF files in the folder “Host Specific Descriptions” for more info)This delay can become a problem if you insert Altiverb in an aux, and send itaudio from a track. If you hear both the track and Altiverb, the amount of direct
sound in the impulse response may be heard as an early reflection (echo) of thetrack’s audio. This is called ‘flamming’. If you check ‘mute direct sound’ the
23

7/30/2019 Altiverb Manual v3
http://slidepdf.com/reader/full/altiverb-manual-v3 24/32
flam will disappear.
The Front and Rear Knobs
If you have inserted a quadraphonic output Altiverb, the above two knobs will appear,allowing you to adjust the front and rear channel gains separately.Not all host applications will allow you to use quadraphonic output (Check theappropriate PDF files in the folder “Host Specific Descriptions” for more info)
Pre-delay
Pre-delay is a delay that you can add between the dry sound and the wet sound. Whenthe knob points upward (12 o’clock position), there is no delay between the two. Whenyou turn it clockwise, the wet signal is delayed so that the dry signal will become less‘attached’ to the reverb. When you turn the knob counterclockwise the dry sound isdelayed, possibly placing it in or behind the early reflection pattern of the wet sound.This can create a better stereo image and more realistic positioning of the dry sound.
The Latency Selector
The “high latency” mode uses a minimum of processing power but can produce a delayof up to1.5 seconds between input and output. Click on the forward or backwardbuttons in the top middle of the Monitor until the technical data page appears todetermine the precise delay. In “no latency” mode (available in MAS and VSTversions), there is no delay between input and output of Altiverb™, but at the expense of increased processing power demand.HTDM and RTAS users will have a “low latency” mode instead of a “no latency”.mode. Due to the nature of these formats a short delay is inevitable. Click on the forwardor backward buttons in the top middle of the Monitor until the technical data pageappears to determine the precise delay. If, due to the delay you get ‘flamming’ effects,check ‘mute direct sound’ to eliminate the flam.
More about host dependent latency can be found in chapter 5.
On-screen Help
Click this button to switch directly to the Monitor’s help channel. The help functiondisplays information about a control when you roll your mouse pointer over it.
About
Click the Audio Ease logo to switch to the Monitor’s ‘about’ channel. This page shows
24

7/30/2019 Altiverb Manual v3
http://slidepdf.com/reader/full/altiverb-manual-v3 25/32
product information, and support contact info.
Altiverb and Sample Rates of 88.2 kHz and Higher
Altiverb has been tested in projects running at the following ‘high’ sample rates: 88.2kHz, 96 kHz, 176.4 kHz and 192 kHz. Running the reverb engine at these sample rateswould place an extremely heavy load on the processor. At the time of the writing of thismanual, there were no impulse responses available for Altiverb that were recorded at asample rate higher than 48 kHz. There is no quality advantage of running the reverbengine at 96 kHz when a 48 kHz Impulse Response is selected. In such a case it makessense to keep the reverb engine running at 48 kHz, so processor load stays at areasonable level.
An Example
When a 48 kHz impulse response is used in a 96 kHz project, the reverb engine
will run at 48 kHz, while the dry sound will stay at 96 kHz. This is shown in thediagram below for a mono-to-stereo Altiverb. The sample rate conversionsperformed are of very high quality and are extremely accurate. They introduce aslight delay (typically 64 samples) into the signal path. The exact amount of delayis displayed in the Monitor window (see page 28).
The dry sound stays at 96 kHz, while the reverb engine runs at 48 kHz
It is possible that 96 kHz impulse responses will eventually become available. With a 96kHz impulse response being used in a 96 kHz project, none of the sample rateconversions described above would need to be performed. The reverb engine will run at96 kHz, resulting in very heavy processor load.
The sample rate converters can only function when your hardware buffer size is set to512, 1024, 2048, 4096, 8192, or 16384 samples. (Check the appropriate PDF files in thefolder “Host Specific Descriptions” for more info) If such a buffer size is not available,Altiverb will warn you that it will run its reverb engine at a high sample rate, resulting in
very heavy processor load.
25

7/30/2019 Altiverb Manual v3
http://slidepdf.com/reader/full/altiverb-manual-v3 26/32
26

7/30/2019 Altiverb Manual v3
http://slidepdf.com/reader/full/altiverb-manual-v3 27/32
7 The
Altiverb™ Impulse Responses folder
This chapter expands on the information about the structure and contents of the Altiverb™ Impulse Responses folder.
27

7/30/2019 Altiverb Manual v3
http://slidepdf.com/reader/full/altiverb-manual-v3 28/32
When your sequencer launches, Altiverb scans the Altiverb™ Impulse Responses folder for files that it can use to make reverb with, and adds items to the
Impulse Responses selector pop-up accordingly. It will only add suitable combinationsof files for the selected channel configuration.
For instance, if you choose stereo input to stereo output, only the stereo-to-stereoImpulse responses that where found during the scan of Altiverb™ Impulse Responsesfolder will be displayed.
The folder structure is as follows:
Altiverb™ Impulse Responses
Recording venue 1 folder
Picture 1 associated with the recording venue
Picture 2 associated with the recording venue
.
.
Impulse response 1 folder
Picture 1 associated with this impulse response
Picture 2 associated with this impulse response
.
.
actual mono impulse response sound file 1
actual mono impulse response sound file 2
.
.
Impulse response 2 folder
Picture 1 associated with this impulse response
Picture 2 associated with this impulse response
.
.
actual mono impulse response sound file 1
actual mono impulse response sound file 2
.
.Recording venue 2 folder
.
.
figure 8.1 - The Altiverb™ Impulse Responses folder structure
28

7/30/2019 Altiverb Manual v3
http://slidepdf.com/reader/full/altiverb-manual-v3 29/32
Figure 8.2 shows a simplified example of a very small impulse response folder in MacOS 9.
This picture can only be accessed when the impulseresponse ‘Hall mono to stereo cardioids’ is selected
These pictures can be accessed when any of theimpulse responses in the folder ‘Hall’ is selected
The Impulse Response Selector pop-upwill look like the picture above when a stereo-to-stereo Altiverb is selected. Note that the mono tostereo impulse response is not visible
These four files together form a single stereo-to-stereoimpulse response. The files are named in the following way:filename.speakerposition.micnumber
figure 8.2 - Example of a small Altiverb Impulse Responses folder
figure 8.3 - The actual impulse response sound files are distributedover an Altiverb ™ stereo-to-stereo structure as shown.
29

7/30/2019 Altiverb Manual v3
http://slidepdf.com/reader/full/altiverb-manual-v3 30/32
Format of the Actual Sound Files
The sound files in figure 8.2 are Sound Designer 2 files which can be opened in most
sound file editors. They can have any sample rate, and they can be 16 or 24 bits. All filesthat are output from the Altiverb IR Pre-Processor are Altiverb Proprietary files.
The Audio Ease impulse responses distributed with Altiverb are all in this proprietaryformat that cannot be opened in a sound file editor. The Altiverb License Agreementexplicitly prohibits copying or resampling Altiverb’s proprietary Impulse Responses.
Format of the Graphics Files
Altiverb can display Graphics in the following formats:
• JPEG (.jpg)
• GIF (.gif)• Pict
• TIFF
Figure 8.2 shows which graphics will be displayed when an impulse response isselected.
Selecting Another Impulse Responses Folder
It may be advantageous to maintain more than one impulse response folder. You canselect another impulse responses folder by activating ‘caps lock’ with the caps lock keybefore your sequencer launches. When you do this, your sequencer application will ask
you to locate the Altiverb Impulse Responses folder, just like it did when you firstinstalled Altiverb. Navigate to the desired alternate IR directory, select it, and continuelaunching your sequencer. You can change your active impulse responses folder as oftenas needed.
Changing the Location of the Impulse Responses Folder
You can move the folder containing your impulse responses from its original location.The next time your sequencer launches, you will be asked to locate the impulseresponses folder, unless you have moved it around on the same disk. When asked to,simply navigate to the new IR directory and select it to make it active.
About the Use of Aliases Inside the Impulse Responses Folder
You can make aliases of both impulse response sound files and picture files within theImpulse Responses folder. This can be helpful when you want to make two mono-to-stereo impulse responses from a set forming a single stereo-to-stereo impulse response.
30
7/30/2019 Altiverb Manual v3
http://slidepdf.com/reader/full/altiverb-manual-v3 31/32
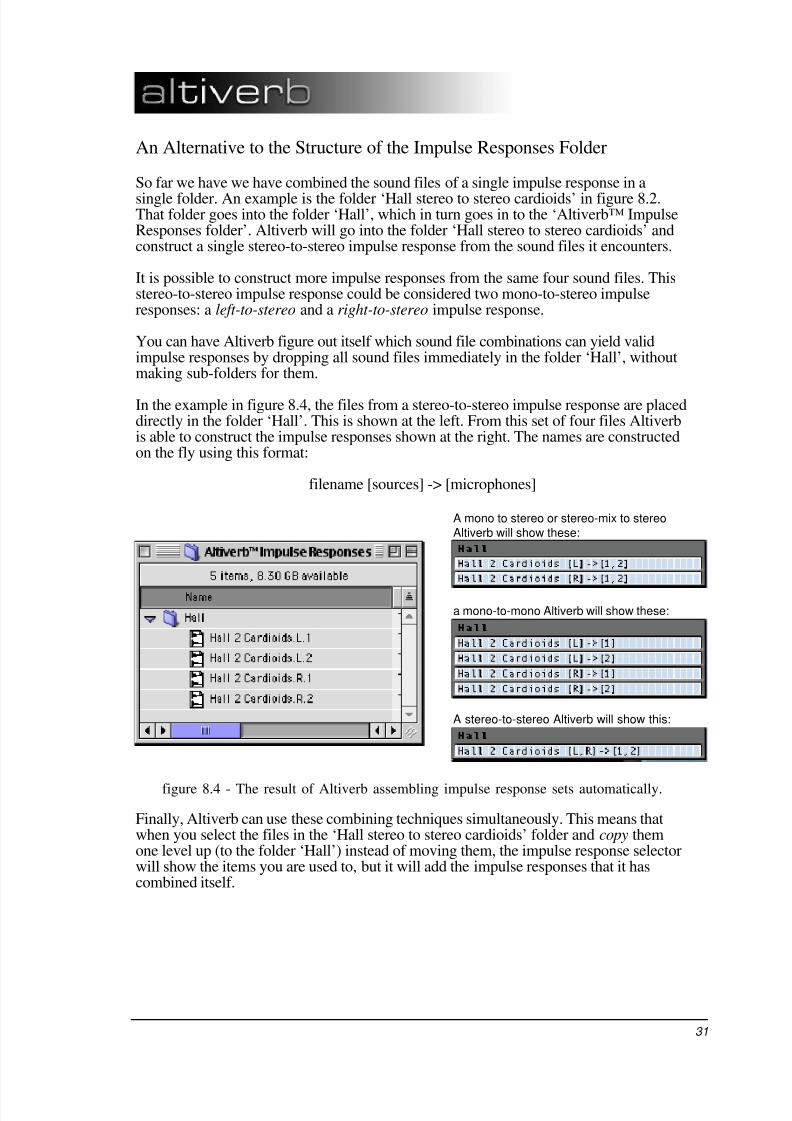
An Alternative to the Structure of the Impulse Responses Folder
So far we have we have combined the sound files of a single impulse response in a
single folder. An example is the folder ‘Hall stereo to stereo cardioids’ in figure 8.2.That folder goes into the folder ‘Hall’, which in turn goes in to the ‘Altiverb™ ImpulseResponses folder’. Altiverb will go into the folder ‘Hall stereo to stereo cardioids’ andconstruct a single stereo-to-stereo impulse response from the sound files it encounters.
It is possible to construct more impulse responses from the same four sound files. Thisstereo-to-stereo impulse response could be considered two mono-to-stereo impulseresponses: a left-to-stereo and a right-to-stereo impulse response.
You can have Altiverb figure out itself which sound file combinations can yield validimpulse responses by dropping all sound files immediately in the folder ‘Hall’, withoutmaking sub-folders for them.
In the example in figure 8.4, the files from a stereo-to-stereo impulse response are placeddirectly in the folder ‘Hall’. This is shown at the left. From this set of four files Altiverbis able to construct the impulse responses shown at the right. The names are constructedon the fly using this format:
filename [sources] -> [microphones]
A mono to stereo or stereo-mix to stereo
Altiverb will show these:
a mono-to-mono Altiverb will show these:
A stereo-to-stereo Altiverb will show this:
figure 8.4 - The result of Altiverb assembling impulse response sets automatically.
Finally, Altiverb can use these combining techniques simultaneously. This means thatwhen you select the files in the ‘Hall stereo to stereo cardioids’ folder and copy themone level up (to the folder ‘Hall’) instead of moving them, the impulse response selectorwill show the items you are used to, but it will add the impulse responses that it hascombined itself.
31

7/30/2019 Altiverb Manual v3
http://slidepdf.com/reader/full/altiverb-manual-v3 32/32
Index
Topic Page
Aliases 30
Altiverb™ Impulse responses folder 27
Convolution 5
Decay 11, 23
Delay (latency) 24
Dry-wet balance 11, 23
Format of graphics 30
Format of Impulse response files 30
Front knob 24
Graphic files 30
Help function 24
Impulse response folder 27
Impulse response selector 20
Latency 24
Location of Impulse responses folder 30
Monitor 21
Mono to mono Altiverb 13
Mono to quad Altiverb 14
Mono to stereo Altiverb 13
Mute Direct sound 23
Pre-delay 24
Rear knob 24
Reverb Time knob 23
Stereo to quad Altiverb 14Stereo to stereo Altiverb 14
Stereo-mix to quad Altiverb 14
Stereo-mix to stereo Altiverb 14
Surround reverb (Front & Rear knobs) 24
Wet-dry balance 23