all-in-one, cloud-managed networking solution · all-in-one, cloud-managed networking solution...
TRANSCRIPT
AER 2100
All-in-One, Cloud-Managed Networking Solution
Quick Start Guide

2CradlePoint AER 2100
Accessories• Additional MC400 integrated 4G LTE modem*• Rack mounting bracket• Power adapters and international power cords• External modem antennas and cabling
* A CradlePoint MC400 integrated 4G LTE modem comes standard with the AER 2100. Add
a second integrated MC400 modem for a complete “cut-the-wire” 4G LTE solution, fusing
enterprise reliability with unparalleled agility.
Enterprise SupportFor enhanced services including enterprise-level support, extended warranties, site surveys, and expert installation, check out CradlePoint’s CradleCare suite of services. Visit cradlepoint.com/cradlecare to learn more.
What’s In The Box
CradlePoint AER 2100 Dual-Band 2.4/5 GHz WiFi Antennas
12V 3A AC/DC Power Supply
Ethernet Cable Quick Start GuideMultipurpose Retaining Toolwith screws for securing
Integrated MC400 3G/4G Modem with Antennas

3Cloud-Enabled Management and Application Platform
CradlePoint Enterprise Cloud ManagerDeploy and Manage the Intelligent Network
Rapidly deploy and dynamically manage networks at geographically distributed stores and branch locations with Enterprise Cloud Manager, CradlePoint’s next generation management and application platform. Enterprise Cloud Manager integrates cloud manage-ment with your CradlePoint devices to improve productivity, increase reliability, reduce costs, and enhance the intelligence of your network and business operations.
To learn more about CradlePoint Enterprise Cloud Manager and to begin a free 30-day trial, contact [email protected] or visit cradlepoint.com/ecm.

4Hardware
USB 2.0 Port
LEDs(see pages 6–7 for descriptions)
Lock Slot
10/100/1000 Ethernet Port(Configurable: LAN or WAN
Default: WAN)
Reset
USB 2.0 Port
PowerSwitch and Port
LEDs(see pages 6–7 for descriptions)
Ground Screw
Front Panel
Back Panel10/100/1000 Ethernet Ports
(Configurable: LAN or WANDefault: LAN)

5Hardware
Left Side Right Side
Modem Port 1 (USB 2.0)
Reserved for future use
Modem Port 2(USB 2.0)
With Cover
Cover Removed
With Two MC400 Integrated Modems (one included)
3G/4G Antenna Connectors
(SMA)
WiFi Antenna Connectors (Reverse SMA)
WiFi Modem
When connecting the provided antennas, review the connection points.
• WiFi antennas have flat circular bases (RSMA).• Modem antennas have protruding pins (SMA).
3G/4G Antenna Connectors
(SMA)
GPS Connector
(SMA)
GPS Connector
(SMA)

6LED Information
SIGNAL STRENGTH Blue LED bars indicate the active modem’s signal strength. • 4 Solid Bars = Strongest signal. • 1 Blinking Bar = Weakest signal. (A blinking bar indicates half of a bar.)
POWER The CradlePoint AER 2100 must be powered using an approved 12V DC power source. • Green = Powered ON. • No Light = Not receiving power. Check the power switch and the power source connection.• Flashing Amber = Attention. Open the administration pages (see page 12) and check the router status.
EC
ETHERNET WAN Indicates information about a data source connected to the Ethernet WAN port. • Blue = Connected to an active Ethernet WAN interface.
WiFi BROADCAST These two LEDs indicate activity on the WiFi broadcast for both the 2.4 GHz and 5 GHz bands.
• 2.4G (green) = 2.4 GHz WiFi is on and operating normally.• 5G (blue) = 5 GHz WiFi is on and operating normally.
21
2.4G 5G
32
1
4
RESET
LED_word.Icon color: White color
logo color: cool-gray 8C logo color: cool-gray 8C
(塑膠前蓋印刷)
(鐵件下蓋印刷)
(Cap1 logo 印刷) (Cap2 logo 印刷)
USB_icon color: White color
IO port_word.icon color: White color
+
metal-Thames Graphics Design
WRT-C8BRev:1.0 color& Graphics
Date:Jun.24.2013Designer:ME Department
Front-cover: BlackMaterial: ABSTexture:MT11015
Bottm-metal: BlackMaterial: SPCCTexture:MT11015
Cradlepoint: White
Wipipe: White+Red(PMS 186C)
2121
260.00 mm

7LED Information
INTEGRATED MODEM Indicates the status of integrated modems.
EXTERNAL USB MODEM Indicates the status of external USB modems.
Both integrated and external USB modems have the following LED indicators:• Green = Modem has established an active connection.• Blinking Green = Modem is connecting.• Amber = Modem is not active. • Blinking Amber = Data connection error. No modem connection possible.• Blinking Red = Modem is in the process of resetting.
EC
21
2.4G 5G
32
1
4
RESET
LED_word.Icon color: White color
logo color: cool-gray 8C logo color: cool-gray 8C
(塑膠前蓋印刷)
(鐵件下蓋印刷)
(Cap1 logo 印刷) (Cap2 logo 印刷)
USB_icon color: White color
IO port_word.icon color: White color
+
metal-Thames Graphics Design
WRT-C8BRev:1.0 color& Graphics
Date:Jun.24.2013Designer:ME Department
Front-cover: BlackMaterial: ABSTexture:MT11015
Bottm-metal: BlackMaterial: SPCCTexture:MT11015
Cradlepoint: White
Wipipe: White+Red(PMS 186C)
2121
260.00 mm
ADDITIONAL LED INDICATIONS • Several different LEDs flash when the factory reset button is detected.• Two of the modem LEDs blink red in unison for 10 seconds when there is an error during firmware
upgrade.

8Getting Started
1. Insert an activated SIM.A wireless broadband data plan must be added to your CradlePoint AER 2100. Wireless broadband data plans are available from wireless carriers such as Verizon, AT&T, Sprint, EE, and Vodafone. The SIM must be provisioned with the carrier. Contact your carrier for details about selecting a data plan and about the process for provisioning your SIM.
Once you have an activated SIM, insert it into the integrated modem. Insert the SIM card into the slot marked SIM 1 (use the other slot, SIM 2, for a secondary/backup SIM). Be sure to insert the card with the notch-end first and the gold contacts facing down – it will click into place.
Gold contacts must face down
Notch-end goes in first
Sample SIM card

9Getting Started (continued)
2. Attach the integrated modem.Follow these steps to attach the integrated modem:
1. Remove the left side panel cover from the router. Use a Phillips screwdriver to remove the screws, and use the Multipurpose Retaining Tool (included in the router package) to remove the cover.
2. Slide the modem into the side of the router (left slot first). The protruding section of the modem fits into the groove.
3. Reattach the panel cover and screw it back on. (When necessary, remove the cover and modem using the Multipurpose Retaining Tool.)

10Getting Started (continued)
3. Attach the WiFi and modem antennas.Attach the three included WiFi antennas and two included modem antennas to the connectors. Antennas are jointed, which enables you to position them for optimal signal. To attach, hold the antenna straight and twist the base of the antenna to connect, folding the joint if needed.
Examples of suggested antenna orientations:
Care should be taken to ensure that the router antennas are not near metal or other RF reflective surfaces.
Wall MountDesk Mount

11Getting Started (continued)
4. Connect the power source.Plug the provided power supply (12V DC wall adapter) into an electrical outlet. Then connect the power supply to the router.
Ensure power is switched on:
• O = OFF• I = ON
When you set the power switch to the ON ( I ) position, watch for the power LED to illuminate.
If you would like to secure the power supply cord, attach the Multipurpose Retaining Tool as shown. Secure with included screws.
Power Switch PowerSupply Port

5. Connect to a computer or other network equipment.Connect wirelessly to the WiFi broadcast or with an Ethernet cable connected to your computer and then plugged into one of the Ethernet LAN ports (numbered 1–4). The default WiFi network name is “2100-xxx”, where “xxx” is the last three characters of your router’s MAC address (this is the SSID on the product label). To connect to the WiFi, you will need to input the DE-FAULT PASSWORD when prompted. The DEFAULT PASSWORD is provided on the product label found on the bottom of your router.
Accessing the Administration Pages (local GUI)Once you are connected, open the CradlePoint AER 2100’s GUI-based local administration pages to make configuration changes to your router.
1. Open a browser window and type “cp/” or “192.168.0.1” in the address bar. Press ENTER/RETURN.
2. When prompted for your password, type the eight character DEFAULT PASSWORD found on the product label.
NOTE: All configuration changes can be made remotely through CradlePoint Enterprise Cloud Manager. See page 14 for information about connecting to Enterprise Cloud Manager.
12Getting Started (continued)
Made in Taiwan
RoHS
Part No.: 2100
www.cradlepoint.com
H/W ver.1.0
12V 3A (max 4A)
FCC ID:UXX-S4A340A
IC:6921A-S4A340A
Model No.:S4A340A
Default Password:440c1fc1
MAC Address: 0030440c1fc1
Serial No.:MM130167900418
SSID: 2100-fc1

13First Time Setup Wizard
When you log in to the local administration pages for the first time, you will be automatically directed to the FIRST TIME SETUP WIZ-ARD, which will walk you through basic steps to customize your CradlePoint AER 2100. You have the ability to configure any of the following:
Administrator Password Time Zone WiFi Network Name Security Mode Access Point Name (APN) Modem Authentication Failure Check If you are currently using the router’s WiFi network, you will need to reconnect your devices to the network using the newly established wireless network name and password.
NOTE: To return to the First Time Setup Wizard after your initial login, select GETTING STARTED on the top navigation bar and FIRST TIME SETUP in the dropdown menu.

14Connecting to CradlePoint Enterprise Cloud Manager
Depending on your ordering process, your devices may have already been bulk-loaded into Enterprise Cloud Manager (ECM). Simply log in at cradlepointecm.com using your ECM credentials and begin managing your devices seamlessly from the cloud.
If your device has not yet been loaded into your ECM account, you need to register. Log into the local administration pages (see page 12) and go to GETTING STARTED ➡ ENTERPRISE CLOUD MANAGER REGISTRATION. Enter your ECM username and password, and click on “Register”.
Once you are logged into cradlepointecm.com, begin managing your devices individually or by group. For example…
• View the Dashboard for a visual analytics overview of your devices, including a data usage chart.• Make a configuration change and apply it to all the devices a Group.• Set up emailed Alerts for when a modem reaches its Data Cap Threshold, for a Configuration Change, etc.
For more information about how to use CradlePoint Enterprise Cloud Manager, see the following Knowledge Base articles:
• knowledgebase.cradlepoint.com/articles/Support/CradlePoint-Enterprise-Cloud Manager• knowledgebase.cradlepoint.com/articles/Support/Getting-Started-with-Enterprise-Cloud-Manager
To learn more about CradlePoint Enterprise Cloud Manager and to begin a free 30-day trial, contact [email protected] or visit cradlepoint.com/ecm.
15Firmware Updates
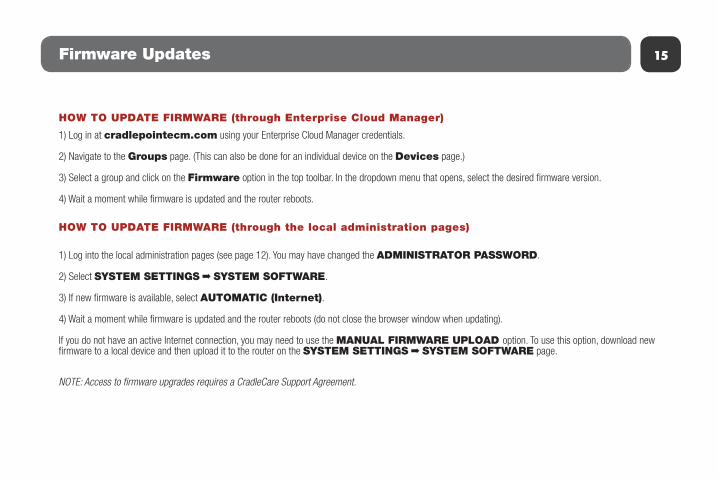
HOW TO UPDATE FIRMWARE (through Enterprise Cloud Manager)
1) Log in at cradlepointecm.com using your Enterprise Cloud Manager credentials.
2) Navigate to the Groups page. (This can also be done for an individual device on the Devices page.)
3) Select a group and click on the Firmware option in the top toolbar. In the dropdown menu that opens, select the desired firmware version.
4) Wait a moment while firmware is updated and the router reboots.
HOW TO UPDATE FIRMWARE (through the local administration pages)
1) Log into the local administration pages (see page 12). You may have changed the ADMINISTRATOR PASSWORD.
2) Select SYSTEM SETTINGS ➡ SYSTEM SOFTWARE.
3) If new firmware is available, select AUTOMATIC (Internet).
4) Wait a moment while firmware is updated and the router reboots (do not close the browser window when updating).
If you do not have an active Internet connection, you may need to use the MANUAL FIRMWARE UPLOAD option. To use this option, download new firmware to a local device and then upload it to the router on the SYSTEM SETTINGS ➡ SYSTEM SOFTWARE page.
NOTE: Access to firmware upgrades requires a CradleCare Support Agreement.

16Setting the APN
Depending on your modem, you may need to specify the APN (Access Point Name).
SELECT THE APN
1) Log into the administration pages (see page 12).
2) Select INTERNET ➡ CONNECTION MANAGER.
3) Select the modem you would like to manage. Click EDIT to open the WAN Configuration editor.
4) Select the SIM/APN/AUTH SETTINGS tab. In the ACCESS POINT CONFIGURATION field, either select the desired APN from the options displayed or enter it manually.
5) Input the username and password for authentication if required by your carrier.
6) Click SUBMIT.
17Features
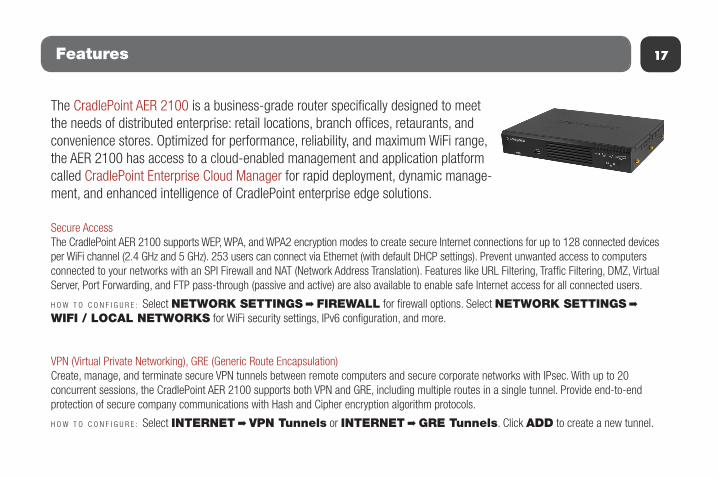
The CradlePoint AER 2100 is a business-grade router specifically designed to meet the needs of distributed enterprise: retail locations, branch offices, retaurants, and convenience stores. Optimized for performance, reliability, and maximum WiFi range, the AER 2100 has access to a cloud-enabled management and application platform called CradlePoint Enterprise Cloud Manager for rapid deployment, dynamic manage-ment, and enhanced intelligence of CradlePoint enterprise edge solutions.
Secure AccessThe CradlePoint AER 2100 supports WEP, WPA, and WPA2 encryption modes to create secure Internet connections for up to 128 connected devices per WiFi channel (2.4 GHz and 5 GHz). 253 users can connect via Ethernet (with default DHCP settings). Prevent unwanted access to computers connected to your networks with an SPI Firewall and NAT (Network Address Translation). Features like URL Filtering, Traffic Filtering, DMZ, Virtual Server, Port Forwarding, and FTP pass-through (passive and active) are also available to enable safe Internet access for all connected users.
H O W T O C O N F I G U R E : Select NETWORK SETTINGS ➡ FIREWALL for firewall options. Select NETWORK SETTINGS ➡ WIFI / LOCAL NETWORKS for WiFi security settings, IPv6 configuration, and more.
VPN (Virtual Private Networking), GRE (Generic Route Encapsulation)Create, manage, and terminate secure VPN tunnels between remote computers and secure corporate networks with IPsec. With up to 20 concurrent sessions, the CradlePoint AER 2100 supports both VPN and GRE, including multiple routes in a single tunnel. Provide end-to-end protection of secure company communications with Hash and Cipher encryption algorithm protocols.
H O W T O C O N F I G U R E : Select INTERNET ➡ VPN Tunnels or INTERNET ➡ GRE Tunnels. Click ADD to create a new tunnel.

18Features
Load BalancingWhen multiple data sources are connected to the router (4G, Ethernet, WiFi), it can be configured to distribute all connected users or device traffic across active data connections. This feature distributes each connected user to the best data source available, relieving congestion and pressure on any single data source. If you are using more than two LTE modems, a special 12V 4A (48W) power supply is required.
H O W T O C O N F I G U R E : Select INTERNET ➡ CONNECTION MANAGER. In the WAN Interfaces table, select LOAD BALANCE for the WAN devices you want configured for load balancing.
FailoverWhen multiple Internet sources (4G, Ethernet, WiFi) are connected to the CradlePoint AER 2100, the router can automatically detect an Internet outage and “fail over” to a secondary connection and “fail back” when the primary data service returns. Redundant connection keeps your busi-ness going.
H O W T O C O N F I G U R E : Select INTERNET ➡ CONNECTION MANAGER. Order your connections by failover priority.
Dual-Band Concurrent WiFi NetworksThe CradlePoint AER 2100 can broadcast up to four WiFi networks on both the 2.4 GHz and 5 GHz bands. Secured SSIDs are used for your trusted workgroup members. Guest (public) SSIDs can provide full, secure access to the Internet, but users are restricted from accessing the router administration console or any connected devices on the private network. Each network can be configured with its own security, QoS, and VLAN Settings. You also have the ability to “Hide” network names (SSIDs) from broadcast.
H O W T O C O N F I G U R E : Initial WiFi settings are available in the First Time Setup Wizard. For more WiFi configuration options, go to NETWORK SETTINGS ➡ WIFI / LOCAL NETWORKS.

19Features
VLAN SupportCreate and manage virtual LANs to segregate and secure your network.
H O W T O C O N F I G U R E : Select NETWORK SETTINGS ➡ WIFI / LOCAL NETWORKS. Select the “VLAN Interfaces” tab under LOCAL NETWORK INTERFACES.
WiFi as WANThe CradlePoint AER 2100 can receive an existing WiFi signal and use it to create secure Internet access, allowing you to connect devices using the CradePoint AER 2100’s security features. The WiFi as WAN feature can be used as a WiFi repeater or as a WiFi-to-Ethernet adapter for non-WiFi devices.
H O W T O C O N F I G U R E : Select INTERNET ➡ WIFI AS WAN. In the “WiFi Client Mode” field, select WIRELESS AS WAN. The router automatically detects nearby WiFi networks: import the desired network.
VRRP (Virtual Router Redundancy Protocol)VRRP provides hardware redundancy for increased reliability. Configure master and backup routers for you network.
H O W T O C O N F I G U R E : Select NETWORK SETTINGS ➡ WIFI / LOCAL NETWORKS. Select the desired network and click EDIT. Select the VRRP tab for configuration options. Requires a feature license.
Advanced Routing Protocols (BGP/OSPF/RIP)Border Gateway Protocol (BGP), Open Shortest Path First (OSPF), and Routing Information Protocol (RIP) are enterprise routing protocols that improve router communication and understanding of the network topology.
H O W T O C O N F I G U R E : Select NETWORK SETTINGS ➡ ROUTING PROTOCOLS. Select the desired routing protocol to view configuration options. Requires a feature license.

20Regulatory, Warranty, Safety, and Privacy Information
Federal Communication Commission StatementThis device complies with Part 15 of the FCC Rules. Operation is subject to the following two conditions: (1) This device may not cause harmful interference, and (2) this device must accept any interference received, including interference that may cause undesired operation.
If this equipment does cause harmful interference to radio or television reception, which can be determined by turning the equipment off and on, the user is encouraged to try to correct the interference by using one or more of the following measures:• Reorient or relocate the receiving antenna.• Increase the separation between the equipment and receiver.• Connect the equipment into an outlet on a circuit different from that to which the receiver is connected.• Consult the dealer or an experienced radio or television technician for help.
Changes or modifications not expressly approved by CradlePoint, Inc. could void the user’s authority to operate the product. RF Exposure Safety NoticeTo comply with FCC/IC RF Exposure Limits set forth for an uncontrolled environment, the product must be installed and operated with aminimum separation distance (between nearby person(s) and radiating antenna) according to the following scenarios:
1. 20 cm minimum when the product is operated alone without co-transmitting from a 3G/4G modem.2. 37 cm minimum when the product is operated with a 3G/4G modem which has maximum of 7 W ERP output power.3. For co-transmission scenarios not covered above, please consult the RF technician or device supplier.
Avertissement De Securite Concernant Les Expositions Aux Frequences RadioPour etre conforme aux limites d’exposition aux frequences radio FCC/IC etablies pour un environnement non controle (utilisation par le grandpublic), l’equipement doit etre installe et utilise en laissant une distance de separation de securite (entre la ou les personnes presentes dans leperimetre et l’antenne d’emission) selon les cas suivants:

21Regulatory, Warranty, Safety, and Privacy Information (continued)
1. 20 cm au minimum quand le produit est utilisé seul sans co-transmettre a l’aide d’un modem 3G/4G.2. 37 cm au minimum quand le produit est utilisé avec un modem 3G/4G ayant une puissance de sortie maximale de 7W ERP.3. Dans des cas de co-transmission non mentionnes ci-dessus, merci de bien vouloir consulter un technicien radio qualifie ou directement lefabricant de l’appareil.
Industry Canada StatementThis device complies with RSS-210, RSS-102, and RSS-Gen of the Industry Canada Rules. Operation is subject to the following two conditions: (1) This device may not cause harmful interference, and (2) this device must accept any interference received, including interference that may cause undesired operation.
Caution:1) The device for the band 5150-5250 MHz is only for indoor usage to reduce potential for harmful interference to co-channel mobile satellite systems. 2) The maximum antenna gain permitted (for devices in the band 5725-5825 MHz) to comply with the e.i.r.p. limits specified for point-to-point and non point-to-point operations as appropriate, as stated in section A9.2(3).
This device has been designed to operate with an antenna having a maximum gain of 5 dBi. Antenna having a higher gain is strictly prohibited per regulations of Industry Canada. The required antenna impedance is 50 ohms. Déclaration d’Industrie CanadaCe dispositif est conforme à la norme CNR-210, CNR-102, et CNR-Gen d’Industrie Canada applicable aux appareils radio exempts de licence. Son fonctionnement est sujet aux deux conditions suivantes: (1) le dispositif ne doit pas produire de brouillage préjudiciable, et (2) ce dispositif doit accepter tout brouillage reçu, y compris un brouillage susceptible de provoquer un fonctionnement indésirable.
Précaution1) Le dispositif fonctionnant dans la bande 5150-5250 MHz est réservé uniquement pour une utilisation à l’intérieur afin de réduire les risques de brouillage préjudiciable aux systèmes de satellites mobiles utilisant les mêmes canaux.

22Regulatory, Warranty, Safety, and Privacy Information (continued)
2) Le gain d’antenne maximal autorisé (pour les appareils dans la bande 5725-5825 MHz) pour se conformer à la pire limites fixées pour les opérations de point à point et non point à point et non le cas échéant, comme indiqué dans la section A9.2 (3).
Ce dispositif a été conçu pour fonctionner avec une antenne ayant un gain maximal de 5 dBi. Une antenne à gain plus élevé est strictement interdite par les règlements d’Industrie Canada. L’impédance d’antenne requise est de 50 ohms.
Open Source SoftwareThis product contains software distributed under one or more of the following open source licenses: GNU General Public License Version 2, BSD License, Net-SNMP License, and PSF License Agreement for Python 3.3. For more information on this software, including licensing terms and your rights to access source code, contact CradlePoint at cradlepoint.com.
Warranty InformationCradlePoint, Inc. warrants this product against defects in materials and workmanship to the original purchaser (or the first purchaser in the case of resale by an authorized distributor) for a period of one (1) year from the date of shipment. This warranty is limited to a repair or replacement of the product, at CradlePoint’s discretion. CradlePoint does not warrant that the operation of the device will meet your requirements or be error free. Within thirty (30) days of receipt should the product fail for any reason other than damage due to customer negligence, purchaser may return the product to the point of purchase for a full refund of the purchase price. If the purchaser wishes to upgrade or convert to another CradlePoint, Inc. product within the thirty (30) day period, purchaser may return the product and apply the full purchase price toward the purchase of another CradlePoint product. Any other return will be subject to CradlePoint, Inc.’s existing return policy.
Limitation of CradlePoint LiabilityThe information contained in this Quick Start Guide is subject to change without notice and does not represent any commitment on the part of CradlePoint or its affiliates. CRADLEPOINT AND ITS AFFILIATES HEREBY SPECIFICALLY DISCLAIM LIABILITY FOR ANY AND ALL: (A) DIRECT, INDIRECT, SPECIAL, GENERAL, INCIDENTAL, CONSEQUENTIAL, PUNITIVE OR EXEMPLARY DAMAGES, INCLUDING WITHOUT LIMITATION FOR

23Regulatory, Warranty, Safety, and Privacy Information (continued)
LOSS OF PROFITS OR REVENUE OR OF ANTICIPATED PROFITS OR REVENUE ARISING OUT OF THE USE OR INABILITY TO USE THE DEVICE, EVEN IF CRADLEPOINT AND/OR ITS AFFILIATES HAVE BEEN ADVISED OF THE POSSIBILITY OF SUCH DAMAGES, AND EVEN IF SUCH DAMAGES ARE FORESEEABLE; OR (B) CLAIMS BY ANY THIRD PARTY.
Notwithstanding the foregoing, in no event shall the aggregate liability of CradlePoint and/or its affiliates arising under or in connection with the device or integrated modems, regardless of the number of events, occurrences, or claims giving rise to liability, exceed the price paid by the original purchaser of the device or integrated modems.
PrivacyCradlePoint collects general data pertaining to the use of CradlePoint products via the Internet including, by way of example, IP address, device ID, operating system, browser type and version number, etc. To review CradlePoint’s privacy policy, please visit: cradlepoint.com/privacy.
Other Binding Documents; Trademarks; CopyrightBy using your CradlePoint device, you agree to be bound by CradlePoint’s Terms of Use, User License and other Legal Policies, all as posted at cradlepoint.com/legal. Please read these documents carefully. CradlePoint and the CradlePoint logo are trademarks of CradlePoint, Inc. © 2014 CradlePoint, Inc. All rights reserved.

P/N 170626-004
The best in wireless WAN … meets the best in wireless LAN.
Integrated 4G LTE Dual-Band Dual-Concurrent WiFiwith 802.11ac
• Combines Integrated 4G LTE and Dual-Band Dual-Concurrent WiFi with 802.11ac• Ultimate WAN Diversity™: Use 4G LTE with dual-modem, dual-SIM, and multi-carrier functionality; Ethernet; and/or WiFi as WAN• Failover/failback and load balancing: 4G LTE + Ethernet + WiFi as WAN• Enterprise-level security and features, including VPN, VLAN, VRRP, BGP, OSPF, RIP, and more (some features require license)• Dynamic management with CradlePoint Enterprise Cloud Manager