alfresco workdesk 4.1.1.0 installation guide · alfresco and other cmis-compliant ecm systems ......
TRANSCRIPT

Installation Guide
Alfresco Workdesk 4.1.1.0

ii
Copyright 2013 by Alfresco and others.
Information in this document is subject to change without notice. No part of this document may be reproduced or transmitted in any form or by any means, electronic or mechanical, for any purpose, without the express written permission of Alfresco. The trademarks, service marks, logos, or other intellectual property rights of Alfresco and others used in this documentation ("Trademarks") are the property of Alfresco and their respective owners. The furnishing of this document does not give you license to these patents, trademarks, copyrights, or other intellectual property except as expressly provided in any written agreement from Alfresco.
The United States export control laws and regulations, including the Export Administration Regulations of the U.S. Department of Commerce, and other applicable laws and regulations apply to this documentation which prohibit the export or re-export of content, products, services, and technology to certain countries and persons. You agree to comply with all export laws, regulations, and restrictions of the United States and any foreign agency or authority and assume sole responsibility for any such unauthorized exportation.
You may not use this documentation if you are a competitor of Alfresco, except with Alfresco's prior written consent. In addition, you may not use the documentation for purposes of evaluating its functionality or for any other competitive purposes.
This copyright applies to the current version of the licensed program.

iii
Table of Contents
Introduction .......................................................................................................................... 1 About this document .....................................................................................................................1 Intended audience .........................................................................................................................2 Typographical conventions used in this guide .................................................................................1 Abbreviations ................................................................................................................................2 Checklist ........................................................................................................................................3
Prerequisites ......................................................................................................................... 4 Server-side prerequisites ................................................................................................................4
Application server ................................................................................................................................ 4 Databases and JDBC drivers ................................................................................................................. 4 ECM systems ........................................................................................................................................ 4
Client-side prerequisites.................................................................................................................5
Recommendations ................................................................................................................ 6 Ports ..............................................................................................................................................6 URL structure .................................................................................................................................6
Resource Files ....................................................................................................................... 7 Resource folders setup ...................................................................................................................7
Alfresco and other CMIS-compliant ECM systems ............................................................................... 7 IBM FileNet P8 ...................................................................................................................................... 7
Exemplary resource files .............................................................................................................. 10
Deploying Alfresco Workdesk .............................................................................................. 11 Initial deployment........................................................................................................................ 11
Create an Alfresco Workdesk Web Archive ....................................................................................... 11 Application servers ............................................................................................................................. 12 Verification ......................................................................................................................................... 13
Changing the ECM adapter ........................................................................................................... 15 Provide required libraries ................................................................................................................... 15 Update Alfresco Workdesk configuration .......................................................................................... 17 Redeploy and verify ............................................................................................................................ 23
Viewer integration ....................................................................................................................... 23 Provide IBM FileNet P8 Daeja viewer libraries ................................................................................... 23 Redeploy and verify ............................................................................................................................ 23
Database connection ................................................................................................................... 23 Configure database ............................................................................................................................ 24 Configure Application Server ............................................................................................................. 27 Redeploy and Verify ........................................................................................................................... 30
Access control and security .......................................................................................................... 30 Authentication.................................................................................................................................... 30 Authorization ...................................................................................................................................... 33 Auditing .............................................................................................................................................. 33
Basic configuration .............................................................................................................. 35 Design ......................................................................................................................................... 35

iv
Role Manager .............................................................................................................................. 35 Simple Role Manager ......................................................................................................................... 35 DB Role Manager ................................................................................................................................ 36
History Manager .......................................................................................................................... 38 DB History Manager ........................................................................................................................... 38 Case History (only for IBM FileNet P8 BPM) ...................................................................................... 39
MIME Types ................................................................................................................................. 39 Drag and Drop applet (DND) ......................................................................................................... 39
Drag and Drop activation ................................................................................................................... 40 Drag and Drop configuration .............................................................................................................. 40
Temporary files ............................................................................................................................ 41 Language support ........................................................................................................................ 41
Hints and troubleshooting ................................................................................................... 43 Log files ....................................................................................................................................... 43
Log4j configuration file ....................................................................................................................... 43 Log4j and JBoss ................................................................................................................................... 44
Reload configuration files ............................................................................................................. 45 Servlets ....................................................................................................................................... 45 Deploying on Unix/Linux systems ................................................................................................. 46
Installing the AWD Configurator .......................................................................................... 47 Create new project ...................................................................................................................... 47 Import deployment folder structure ............................................................................................. 49 How to use the AWD Configurator ................................................................................................ 51
owplugins.xml .................................................................................................................................... 52 owmimetables.xml ............................................................................................................................. 54
How to handle your configuration files ......................................................................................... 55
Updating Alfresco Workdesk ............................................................................................... 57
Upgrading the ECM back end system ................................................................................... 59
Appendix ............................................................................................................................. 60 A1: Daeja Viewer configuration in web.xml .................................................................................. 60 A2: Example for Log4J configuration ............................................................................................. 61 A3: Background about Log4J......................................................................................................... 62 A4: Example for changing Java user in DB2 ................................................................................... 64

Alfresco Workdesk 4.1.1.0 1
Introduction Besides collaboration centric document challenges there are a lot of process centric business challenges. The goals of automating these processes are increased process efficiency, cost savings, increased customer or employee satisfaction, and achievement of compliance. Many of the analysts also call this Transactional Content Management. Alfresco Workdesk is a purpose-built solution for process centric or transactional content processes.
Alfresco Workdesk helps you streamline document centric business processes and cases. With its business role management feature it provides every user group with the right documents in the right business context and in the right application, that can be created by simple configuration rather than coding. Since documents, processes and cases can be accessed via any standard web browser, from within most Office applications and from mobile devices, processes do not stop at the boundary of an enterprise and users are optimally supported in their way of working. Thus processes are accelerated dramatically and compliance is assured.
Alfresco Workdesk provides faster time-to-value because it offers state of the art ECM functionality out of the box and makes the creation of customer specific business applications as easy as possible. Productivity enhancing features like dynamic folders, views and actions, which are determined by the user´s role in the process allow that the very same document can live in many different views. Hence, Alfresco Workdesk helps your organization to process cases, deals, loans, claims faster and more efficiently.
There are 3 modules of Workdesk offering the same functionality on different devices:
• Alfresco Workdesk - Robust features and flexibility on any web browser
• Alfresco Office Workdesk - Bypass the browser with seamless desktop integration
• Alfresco Mobile Workdesk - Mobilize your business processes on iPads and iPhones
Alfresco Workdesk leverages the proven Alfresco enterprise content platform and at the same time can connect to other ECM systems via the open standard CMIS.
About this document This guide explains how to deploy Alfresco Workdesk and how to configure the supported ECM infrastructure. It also contains information about how to install the AWD Configurator. Here is the brief overview of the different sections in this installation manual.
The Prerequisites section describes the prerequisites for installing Alfresco Workdesk.
The Recommendations section recommends the ports and URL structure for Alfresco Workdesk deployments.
The section Resource Files describes how and where to setup resource files like search templates and virtual folder templates.
The Deploying Alfresco Workdesk section describes Alfresco Workdesk deployment, starting from deploying a dummy ECM adapter, and then followed by the deployment of the real ECM adapter. It lists the corresponding library files required for each ECM system, and describes the source and destination locations of these libraries during the deployment.
When you have finished installing Alfresco Workdesk with a real ECM adapter, you can configure different advanced Alfresco Workdesk components, for example, Role Manager, History Manager, MIME Type Manager, drag and drop, and so on, by following the instructions in Basic configuration.

2 Alfresco Workdesk 4.1.1.0
The section Hints and troubleshooting provides possible solutions for the most common problems that can occur during Alfresco Workdesk deployments.
To facilitate the configuration of plugins and MIME types, Alfresco Workdesk is delivered with a helper tool called AWD Configurator. The Installing the AWD Configurator section describes how you can install and use this tool and then be able to configure the Alfresco Workdesk plugins and MIME types.
The Updating Alfresco Workdesk section describes how to update an existing Alfresco Workdesk deployment with a newer updated version, or fix pack, for the existing version.
Intended audience This document is intended for software professionals who are installing Alfresco Workdesk. Depending on the ECM system and the Alfresco Workdesk edition you are using, you need basic skills to manage the underlying ECM systems.
Alfresco Workdesk can be used with one of the following ECM systems:
Alfresco Community/Enterprise (using CMIS adapter)
Any other CMIS-compliant ECM systems (using CMIS adapter)
IBM FileNet P8 Content Manager 5.x (using the native FNCM5 adapter)
Note: Alfresco Workdesk Community is delivered with the CMIS adapter only and only CMIS-compliant ECM systems (e.g. Alfresco Community/Enterprise) can be connected.
It is recommended that you are a system administrator and have experience with:
Application servers:
o Deploying web applications (on Apache Tomcat, IBM WebSphere, JBoss, Oracle WebLogic)
o Classpath configurations
o Configuration of the libraries used by your web application
o log4j configuration, reading of log files
o xml
JDBC connections
Database knowledge (running SQL scripts)
Web applications in general
You must have the authorization to modify and create resources.

Alfresco Workdesk 4.1.1.0 1
Typographical conventions used in this guide
Convention Example
Important terms Alfresco
Classes OwAppContext
Methods getName()
Source Code public void myMethod(){}
Comments in Source Code // simple source code comment
Java Package com.wewebu.server.app
Plugins com.wewebu.ow.server.plug.owdemo.owmain
Path com/wewebu/ow/server/…
XML Attribute <node>
XML value value
Product-specific terms Add Document
Formatting legend for brackets in Source Code, Paths, File Names, and so on:
Ellipsis (...): Parameter the user must supply
Between brackets […]: Optional items
Between braces {…}, choices separated by pipe |, example: {even|odd}: Set of choices from which the user must choose only one
The following placeholders are used in this document:
(workdesk) - root directory of AWD deployment
(Tomcat) - installation root of Tomcat application server
(WebSphere) - installation root of WebSphere application server
(JBoss) - installation root of JBoss application server
(Workplace) - root directory of IBM FileNet P8 Workplace deployment

2 Alfresco Workdesk 4.1.1.0
Abbreviations AMP Alfresco Module Package
AWD Alfresco Workdesk
AOWD Alfresco Office Workdesk
AMWD Alfresco Mobile Workdesk
BPM Business Process Management
CMIS Content Management Interoperability Services
ECM Enterprise Content Management
FNCM IBM FileNet P8 Content Manager
IE Internet Explorer
MS Microsoft
MS Word Microsoft Word
Office Microsoft Office
P8 IBM FileNet P8
SSO Single Sign-On
WAR Web Archive
All trademarks, trade names, registered trademarks, or registered trade names are property of their respective holders.

Alfresco Workdesk 4.1.1.0 3
Checklist 1. Before starting
[Prerequisites] Prerequisites?
[Recommendations] Checked recommendations?
[Fehler! Verweisquelle konnte nicht gefunden werden.] Checked settings for pplication server?
[Fehler! Verweisquelle konnte nicht gefunden werden.] Checked settings for CM system?
2. Deployment
[Initial deployment] Dummy ECM adapter deployment up and running?
[
Changing the ECM adapter] Client libraries installed?
[Update Alfresco Workdesk configuration] Alfresco Workdesk configured?
[Viewer integration] Viewer configured? *
[Database connection] Database configured?
3. Basic configuration
[DB Role Manager] DB Role Manager configured? *
[DB History Manager] DB History Manager configured? *
[MIME Types] MIME types configured?
[Drag and Drop applet (DND)] Drag and Drop applet configured? *
4. Installing AWD Configurator
[Installing the AWD Configurator] New project created and deployment structure imported?
* Feature not available in Alfresco Workdesk Community.

4 Alfresco Workdesk 4.1.1.0
Prerequisites Before deploying the Alfresco Workdesk application, your infrastructure should meet the following prerequisites on both the server-side and the client-side.
Server-side prerequisites Before starting the Alfresco Workdesk installation, check the server-side prerequisites.
Application server
Alfresco Workdesk runs within a web application server. You can test the Alfresco Workdesk deployment on the application server without an underlying back end ECM system by using the dummy ECM adapter (see chapter Initial deployment for more information).
Alfresco Workdesk has been successfully tested on several application servers. The following list shows the recommended application servers:
Apache Tomcat
IBM WebSphere
JBoss
Oracle WebLogic
Note: Only Apache Tomcat is available in Alfresco Workdesk Community.
Databases and JDBC drivers
Alfresco Workdesk is able to store persistent information in a database. Communication with that database is done using JDBC and datasources handled by the application server. In case there is no eligible JDBC driver installed on the Alfresco Workdesk application server, you need the corresponding JDBC libraries from your database vendor. For further details, see Database connection.
Alfresco Workdesk has been successfully tested with several databases. The following list shows the recommended databases:
IBM DB2
Microsoft SQL
MySQL
Oracle Database
PostgreSQL
Note: Only MySQL and PostgreSQL are available in Alfresco Workdesk Community.
ECM systems
The underlying ECM system must meet the prerequisites described in the following sections.
Note: Only CMIS-compliant ECM systems are available with Alfresco Workdesk Community.
See also the Alfresco Workdesk Release Notes for supported ECM system versions.

Alfresco Workdesk 4.1.1.0 5
Alfresco and other CMIS-compliant ECM systems
No additional prerequisites are required to connect Alfresco Workdesk to a CMIS-compliant ECM system (e.g. Alfresco Community/Enterprise) using the CMIS adapter.
IBM FileNet P8
Make sure that your Alfresco Workplace deployment is running and you have made a backup. When using IBM FileNet P8, we recommend deploying Alfresco Workdesk on the same application server that hosts the IBM FileNet Application Engine. In some cases, this is mandatory.
Client-side prerequisites To access the Alfresco Workdesk application on the client-side, use any of the popular web browsers.
See also the Alfresco Workdesk Release Notes to find a list of supported browsers.
In addition to an installed web browser, the following criteria must be met:
The web browser must be connected to the network for accessing the application server
JavaScript must be enabled in the web browser
To use some features of Alfresco Workdesk (for example, drag and drop functionality, viewers) Java applets must be allowed in the web browser
To use Alfresco Workdesk features/plugins, like “Send as email link” or “Send as email attachment”, install an email client, for example, Microsoft Office Outlook or Lotus Notes, on the client-side. Select one of these email clients as the default email client for both the client-side operating system and the client-side web browser.
Even if you are using any other browser than Internet Explorer, make sure that you
set the default email program in the Internet Explorer settings. This is because the
“email plugins” of Alfresco Workdesk might use the Internet Explorer API and the
Windows Registry to specify the default email program.

6 Alfresco Workdesk 4.1.1.0
Recommendations The following sections outline the recommendations for deploying Alfresco Workdesk.
Ports Alfresco Workdesk does not require any special port or port settings. It can also use Secure Sockets Layer (SSL) to provide secure communication. By default, no additional communication channel mechanism is needed by the Java applets used in Alfresco Workdesk (for example the drag and drop applet).
To be able to use the secure SSL communication you must install a security
certificate on your application server.
URL structure In this document, the base URL of the installed Alfresco Workdesk application is referred as
(workdesk).
It is composed of (Protocol)://(ServerName)[:(Port)]/(ContextPath)
The (Port) in the URL is required only for non-standard ports and even forbidden
for the default ports 80 (HTTP) and 443 (HTTPS).

Alfresco Workdesk 4.1.1.0 7
Resource Files For some features in Alfresco Workdesk, additional resource files (e.g. search templates, virtual folder templates, user preferences) are required, that have to be stored in corresponding folders either on a file system accessible by the application server (for Alfresco and CMIS-compliant repositories) or the underlying ECM system itself (for IBM FileNet P8 Content Manager).
Note: Search templates and (semi-)virtual folder templates are special XML documents and their syntax and format are described in detail in the Alfresco Workdesk Configuration and Planning Guide.
Resource folders setup Depending on the underlying ECM system, the Alfresco Workdesk resource files must be stored either on a file system accessible by the Alfresco Workdesk deployment or in the underlying ECM repository itself. To store those files, folders for each resource file category have to be
created such as other, owsearchtemplates and owpreferences 1. In the following
sections, the folder structures and their location are described for the different supported ECM systems.
Alfresco and other CMIS-compliant ECM systems
For Alfresco and other CMIS-compliant ECM systems, the Alfresco Workdesk resource files are stored on a file system accessible by the the application server. By default, the required folder
structure is stored within the Alfresco Workdesk deployment itself at (workdesk)\WEB-
INF\(Adapter), e.g. (workdesk)\WEB-INF\opencmis.
This location can be changed using the <OwApplicationObjectBaseDir> node inside
owbootstrap.xml (located in the corresponding adapter´s configuration directory in (workdesk)\WEB-INF\conf\(Adapter) , e.g. (workdesk)\WEB-
INF\conf\opencmis.
If you change the <OwApplicationObjectBaseDir> node, you should copy the whole default
folder structure from (workdesk)\WEB-INF\(Adapter) to the new defined location and you
should ensure that the folders have read/write access. By default there are the directories
other, owpreferences and owsearchtemplates, which are holding (semi-)virtual folder
templates, user preferences and search templates.
IBM FileNet P8
Note: The required FNCM adapter is not available in Alfresco Workdesk Community.
To operate correctly, Alfresco Workdesk needs a predefined folder structure in the IBM FileNet P8 repository respectively Object Store, where for example persistent user preferences are stored. You may either use an existing Object Store, that also holds business information, or you may create a new Object Store solely for the Alfresco Workdesk resource folders.
1 Often, an Alfresco Workdesk deployment and an Alfresco Office Workdesk deployment share the same resource folder
structure. This way both have access to the same resources, like search templates. However, each deployment must have its own location for storing persistent user preferences, therefore a different folder name than owpreferences can be defined in owboostrap.xml using the <UserDefinedPreferencesFolder> configuration node.
8 Alfresco Workdesk 4.1.1.0
Note: You must tell Alfresco Workdesk in which Object Store the folder structure can be found,
by setting the parameter <DefaultObjectStore> in owbootstap.xml under
(workdesk)\WEB-INF\conf\fncm5\ (see also section Configure ECM adapter).
To create the required folder structure, you may either use a provided script (see section Create required folder structure via script) or add the required folders manually (see Create required folder structure manually).
Create required folder structure via script
In the default Alfresco Workdesk installation, you can find a directory \db\fncm. In this
directory, you will find a P8 import script with the file name P8ObjectStoreInitial.xml.
Import this XML file into the root directory of your desired Object Store and use the FileNet Enterprise Manager (FEM) to create the required resource folder structure.
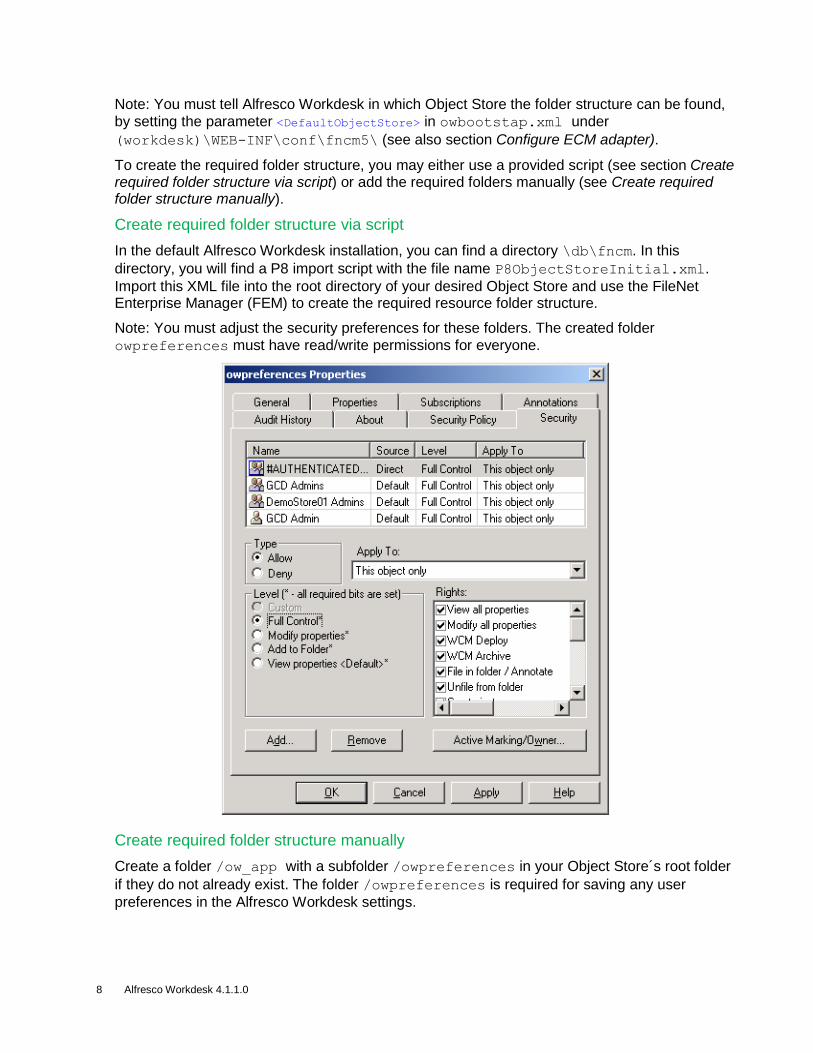
Note: You must adjust the security preferences for these folders. The created folder
owpreferences must have read/write permissions for everyone.
Create required folder structure manually
Create a folder /ow_app with a subfolder /owpreferences in your Object Store´s root folder
if they do not already exist. The folder /owpreferences is required for saving any user
preferences in the Alfresco Workdesk settings.

Alfresco Workdesk 4.1.1.0 9
Note: Make sure that everyone has read/write access rights to the /owpreferences
folder.
Additionally, further folders should be created depending on whether you require further
resources or not. Your subfolder structure under the folder /ow_app may have the following
subfolders:
/other contains templates defining hierarchies of (semi-)virtual
folders and eFiles
/owpreferences *) all users must have "write access" for this folder
/owsearchtemplates contains search templates
/recordtemplates contains templates for physical eFiles
/owbpmviewtemplates contains definitions for virtual queues/inboxes
*) This subfolder is required!

10 Alfresco Workdesk 4.1.1.0
Exemplary resource files For Alfresco and other CMIS-compliant ECM systems there should be exemplary search templates and (semi-)virtual folder templates contained in every delivered Alfresco Workdesk in
the corresponding owsearchtemplates and other folder under (workdesk)\WEB-
INF\(Adapter), e.g. (workdesk)\WEB-INF\opencmis.
To test virtual folders with IBM FileNet P8 Content Manager, you may import the
\db\fncm\testvirtualfolder.xml file from the Alfresco Workdesk delivery into the
/ow_app/other folder of your Object Store. In this virtual folder template, you must ensure
that the IBM FileNet P8 Object Store is set correctly in your configuration:
<objectstores mergeoption="union">
<objectstore name="DemoStore1" />
</objectstores>
An examplary virtual view for BPM (only available with IBM FileNet P8 Content Manager) can
be found in \db\fncm\bpmtestcrossview.xml in the Alfresco Workdesk delivery. Import it
to /ow_app/owbpmviewtemplates in your Object Store.

Alfresco Workdesk 4.1.1.0 11
Deploying Alfresco Workdesk The following sections describe how to deploy Alfresco Workdesk.
The first section describes how to deploy Alfresco Workdesk with its out-of-the-box configuration (that is, using an Alfresco system in the cloud with a customer management demo scenario). This configuration enables you to test your Alfresco Workdesk deployment without connecting to your own ECM system yet.
Note: Do not use the preconfigured demo system for any production use cases, as the state of the Alfresco cloud deployment is reset every now and you might lose data then!
For the deployment procedure, several supported application servers are covered and a short verification mechanism is provided after each step to ensure that your first deployment step will be successful.
Later sections cover the deployment procedures, when it comes to redeploy Alfresco Workdesk in advanced configurations, for example, switching the Alfresco Workdesk ECM adapter from the Alfresco cloud system to an own Alfresco or IBM FileNet P8 Content Manager instance. This step also includes a verification mechanism.
A third section is about creating a datasource at the application server side. Alfresco Workdesk comes with a preconfigured datasource used for the preconfigured demo scenario, which must be changed to store persistent information in a database when connecting to your own ECM system instance. This step also includes the redeploying and verification procedure.
Initial deployment This section describes how to create a valid Alfresco Workdesk web archive (WAR) file and how to deploy this file in its initial configuration on different application servers.
Note: We strongly recommend deploying Alfresco Workdesk initially without any modifications to the initial delivered state.
Later sections then refer to modifying Alfresco Workdesk´s configuration and redeploying Alfresco Workdesk with this changed configuration.
Create an Alfresco Workdesk Web Archive
Extract the downloaded Alfresco Workdesk delivered zip file to a temporary location. Depending on the deployment procedure of your application server, the web archive is needed in one of the following modes:
Packed Mode: To create a packed web archive file, a Java Development Kit (JDK) has to be installed on your system. For Microsoft Windows operating systems, we provide the
scripts create_workdesk_war.bat (for Windows) and create_workdesk_war.sh
(for Unix) in the \bin directory of the Alfresco Workdesk delivery. Read
create_war_readme.txt in the same directory for further information. You can also
create the web archive file manually by executing a command similar to
jar –cf workdesk.war *
Exploded Mode: The \bin\workdesk folder in the extracted zip file is already an
exploded web archive.

12 Alfresco Workdesk 4.1.1.0
For deploying Alfresco Workdesk, proceed with the corresponding section for your application server.
Application servers
This section describes the steps of the Alfresco Workdesk deployment procedure on different supported application servers.
Apache Tomcat
Note: This server is not supported with IBM FileNet P8 Content Manager.
On Apache Tomcat, Alfresco Workdesk has to be deployed as exploded web archive. Therefore
you can either copy the \bin\workdesk folder from the Alfresco Workdesk delivery to
(Tomcat)\webapps or you might deploy a created Alfresco Workdesk web archive (see
previous chapter).
IBM WebSphere
Note: This server is not available in Alfresco Workdesk Community.
On IBM WebSphere, Alfresco Workdesk has to be deployed as packed web archive (*.war
file). Use the WebSphere server administration console to deploy this file. You do not need to change the default settings during the deployment process of WebSphere.
After having deployed Alfresco Workdesk, check that all classes are loaded with the application
class loader. Normally you can find this option in the menu Shared library references >
JSP reload options for web modules by navigating in WebSphere´s server
administration console through step 1 to 3 as shown in the following screenshot:
Select Classes loaded with application class loader first.

Alfresco Workdesk 4.1.1.0 13
Oracle WebLogic
Note: This feature is not available in Alfresco Workdesk Community.
On Oracle WebLogic, Alfresco Workdesk has to be deployed as packed web archive (*.war
file). Use the WebLogic server administration console to deploy this file.
WebLogic only supports absolute file paths in the Alfresco Workdesk configuration
files like web.xml. Placeholders like deploy# are not supported.
For Oracle WebLogic version 10 and higher: Alfresco Workdesk uses the
getRealPath() method to read some configuration from the Alfresco Workdesk
deployment file structure. Therefore set the WebLogic parameter <show-archived-
real-path-enabled> in WebLogic´s config.xml to true:
<web-app-container>
<show-archived-real-path-enabled>true
</show-archived-real-path-enabled>
</web-app-container>
JBoss
Note: This feature is not available in Alfresco Workdesk Community.
On JBoss, Alfresco Workdesk has to be deployed as exploded web archive. After copying the
\bin\workdesk folder from the Alfresco Workdesk delivery to
(JBoss)\server\default\deploy, you may rename the folder to your application context.
Do not forget to append the .war extension to the folder name. An example would be
(JBoss)\server\default\deploy\workdesk.war.
JBoss and log4j*.jar: Do not deploy log4j*.jar when using JBoss. See Log4j
and JBoss for further information.
Verification
To check if your initial Alfresco Workdesk deployment is up and running, open any popular web
browser and navigate to http://(servername)[:(port)]/(context path). The default
value for (context path) is workdesk. If your initial deployment was successful, the following
login page should be displayed:

14 Alfresco Workdesk 4.1.1.0
Log in with name “csu” and password “abs” and you should see the following screen:
If you see an error message similar to “Error 500: com.wewebu.ow.server.log.
OwLogCoreBase (initialization failure)” when calling the Alfresco Workdesk URL,
log4j-x.x.x.jar is missing on your application server. Follow the instructions in
section Log files to install the missing library.
Verification of different Alfresco Workdesk deployments will produce different welcome screens (for example, configuring another ECM adapter in later sections). We strongly recommend that you verify the Alfresco Workdesk deployment again after each new deployment by checking whether you can reach the Alfresco Workdesk login page.

Alfresco Workdesk 4.1.1.0 15
Changing the ECM adapter The Alfresco Workdesk deployment is by default connected to an Alfresco system in the cloud but can be switched to an own/local ECM system in just two steps. First, Alfresco Workdesk needs to know where to find the Java API libraries of the respective ECM system (only for IBM FileNet P8 Content Manager as for Alfresco and other CMIS-compliant repositories the required CMIS libraries are already included in the Alfresco Workdesk delivery/deployment). Afterwards,
the ECM adapter must be switched in the Alfresco Workdesk web application web.xml
configuration file.
Provide required libraries
Copy the required ECM adapter depending libraries into the Alfresco Workdesk web
application deployment, that is, (workdesk)\WEB-INF\lib and make them available to the
Alfresco Workdesk web application.
Whenever the original libraries change (new patch/fix pack version), you must update
the copies here also.
CMIS API libraries (required for Alfresco and any other CMIS-compliant ECM system)
Alfresco Workdesk needs some Java libraries to connect to Alfresco or any other CMIS-compliant ECM repository via the CMIS adapter, which is based on Apache Chemistry
OpenCMIS. The required libs are already located in (workdesk)\WEB-INF\lib and there is
no further action required. Following is a list of the default delivered Alfresco Workdesk CMIS (Apache Chemistry OpenCMIS) libraries:
Activation*.jar
alfresco-opencmis-extension*.jar
apache-mime*.jar
aspectjrt*.jar
chemistry-opencmis-client-api*.jar
chemistry-opencmis-client-bindings*.jar
chemistry-opencmis-client-impl*.jar
chemistry-opencmis-commons-api*.jar
chemistry-opencmis-commons-impl*.jar
commons-httpclient*.jar
httpclient*.jar
httpcore*.jar
httpmime*.jar
mimepull*.jar
org.restlet.ext.httpcllient*.jar
org.restlet.ext.jackson*.jar

16 Alfresco Workdesk 4.1.1.0
org.restlet.ext.json*.jar
org.restlet.lib.org.json*.jar
org.restlet*.jar
jackson-core-asl*.jar
jackson-mapper-asl*.jar
jaxb-api*.jar
jaxb-impl*.jar
jaxws-api*.jar
jaxws-rt*.jar
jcip-annotations*.jar
json-simple*.jar
resolver*.jar
saaj-api*.jar
saaj-impl*.jar
slf4j-api*.jar
stax-api*.jar
stax-ex*.jar
streambuffer*.jar
wstx-asl*.jar
IBM FileNet P8 5.x API libraries
Note: This feature is not available in Alfresco Workdesk Community.
Alfresco Workdesk needs the IBM FileNet P8 5.x Client API to connect to the IBM FileNet P8 5.x Content Engine. The structure and archive names of the IBM FileNet P8 Client API might change from version to version. For IBM FileNet P8 5.x, the Client APIs are contained in the following libraries:
jace.jar
pe.jar *)
pe3pt.jar *)
peResources.jar *)
xlxpScanner.jar
xlxpScannerUtil.jar
*) Only required when using IBM FileNet P8 BPM / Process Engine
The IBM FileNet P8 5.x Client API itself additionally requires the log4j-1.2.10.jar
library. This library might already be provided by the application server.
All required IBM FileNet P8 Client API libraries can be found in an IBM FileNet P8
deployment directory in ../FileNetEngine.ear/APP-INF/lib.

Alfresco Workdesk 4.1.1.0 17
Either copy the required libraries into the WEB-INF\lib folder of the Alfresco Workdesk
deployment or use the referencing mechanisms provided by the application server to make them available for the web application.
1. Configure the connection to the IBM FileNet Content/Process Engine:
Next, you need to tell Workdesk how to connect to the IBM FileNet P8 Content/Process
Engine. Modify the corresponding configuration nodes in (workdesk)\WEB-
INF\conf\fncm5\owbootstrap.xml. This file contains, among other configuration
parameters, the server name or IP address of your IBM FileNet P8 Content Engine and the connection point for your IBM FileNet P8 Process Engine located under the main adapter
configuration node <EcmAdapter>:
<ConnectionUrl> sets the URL for the IBM FileNet P8 Content Engine
<jaasContext> sets the authentication mechanism
<BPM>/<ConnectionPointName> sets the P8 Process Engine Connection Point
Update Alfresco Workdesk configuration
Before Alfresco Workdesk is able to access the underlying ECM system(s), its configuration has to be adapted in several locations. The necessary switches are described in the following sections.
Switch ECM adapter
Alfresco Workdesk is able to maintain and switch between multiple configuration sets. Each configuration set corresponds to a different ECM system and consists of a different set of xml files. Each set of xml files is stored in its own descriptive folder. Switching between different ECM systems means switching to a different configuration set. You can do so by changing the
path to the currently active configuration set in the (workdesk)/WEB-INF/web.xml file.
Alfresco Workdesk provides exemplary configuration sets for all supported ECM systems:
Alfresco (local deployment using the CMIS adapter):
(workdesk)\WEB-INF\conf\opencmis
Alfresco (local deployment with Human Resources scenario using the CMIS adapter):
(workdesk)\WEB-INF\conf\opencmis_hr
Alfresco (cloud deployment with Customer Management scenario using the CMIS adapter):
(workdesk)\WEB-INF\conf\opencmis_trial
IBM FileNet P8 5.x (using the native FNCM5 adapter):
(workdesk)\WEB-INF\conf\fncm5
Switch between the ECM system configurations by removing and adding XML comment tags.
Example:
Switch from CMIS adapter to the IBM FileNet P8 5.x adapter.

18 Alfresco Workdesk 4.1.1.0
Before switching (opencmis_trial configuration option is set):
<context-param id=”OwResourceFilePath”>
<param-value>deploy#WEB-INF/conf/opencmis_trial</param-value>
…
<!-- param-value>deploy#WEB-INF/conf/fncm5</param-value -->
</context-param>
After switching (fncm5 configuration option is set):
<context-param id=”OwResourceFilePath”>
<!-- param-value>deploy#WEB-INF/conf/opencmis_trial</param-value -->
…
<param-value>deploy#WEB-INF/conf/fncm5</param-value>
</context-param>
Configure ECM adapter
The owbootstrap.xml file is one of the XML files in each configuration set folder. The
<EcmAdapter> element must be edited with a text editor to connect to your ECM system.
Alfresco and other CMIS-compliant repositories
For Alfresco and other CMIS-compliant repositories you must configure the CMIS connection to the underlying CMIS-compliant ECM system using either SOAP or REST binding in
owbootstrap.xml.
Examplary REST binding:
<EcmAdapter>
<ClassName>com.wewebu.ow.server.ecmimpl.opencmis.OwCMISNetwork</ClassName>
<Version>4.1.1</Version>
<AtomPub>http://server:port/alfresco/cmisatom</AtomPub>
. . .
Examplary SOAP binding:
<EcmAdapter>
<ClassName>com.wewebu.ow.server.ecmimpl.opencmis.OwCMISNetwork</ClassName>
<Version>4.1.1</Version>
<WSDLRepository>http://server:port/cmis/RepositoryService?wsdl</WSDLReposito
<WSDLNavigation>http://server:port/cmis/NavigationService?wsdl</WSDLNavigation>

Alfresco Workdesk 4.1.1.0 19
<WSDLObject>http://server:port/cmis/ObjectService?wsdl</WSDLObject>
<WSDLMultifiling>http://server:port/cmis/MultiFilingService?wsdl</WSDLMultifiling>
<WSDLDiscovery>http://server:port/cmis/DiscoveryService?wsdl</WSDLDiscovery>
<WSDLVersioning>http://server:port/cmis/VersioningService?wsdl</WSDLVersion>
<WSDLRelationship>http://server:port/cmis/RelationshipService?wsdl</WSDLRelationship>
<WSDLPolicy>http://server:port/cmis/PolicyService?wsdl</WSDLPolicy>
<WSDLACL>http://server:port/cmis/ACLService?wsdl</WSDLACL>
. . .
General settings
To change the default table name (OW_ATTRIBUTE_BAG) of the database table where the attribute bags are stored (see aallssoo Configure database), you can use the <DbAttributeBagTableName> configuration element:
<DbAttributeBagTableName>OW_ATTRIBUTE_BAG</DbAttributeBagTableName>
Alfresco Aspects
If you are using Alfresco Aspects, please refer to the following configuration option:
Since Alfresco Aspects are not part of the CMIS standard and are not completely covered by CMIS, the existing CMIS adaptor was extended to provide the information of mandatory aspects during the creation process.
Configuration node: <bootstrap>/<EcmAdapter>/
<AspectRetrieverClass>….</AspectRetrieverClass>
→ A class that is responsible for information retrieval and that provides the list of mandatory Aspects IDs to adaptor. You do not have to activate this line.
<AspectRetrieveUrl>http://cmis.alfresco.com/service/api/classes/</AspectRetrieveUrl>
→ An URL that defines the service-location for information retrieval → the standard setting is configured to use Alfresco in the cloud. If you connect to your local repository (and not the cloud) disable the complete line (for example, set a comment or remove it) → the correct URL will be dynamically built by Alfresco Workdesk.
IBM FileNet P8 5.x
For IBM FileNet P8, the value of the <DefaultObjectStore> element must be set to the symbolic
name of the Object Store that holds the ow_app folder structure (see the two sections Create
required folder structure via script and Create required folder structure manually).

20 Alfresco Workdesk 4.1.1.0
Example:
<EcmAdapter>
<ClassName>com.wewebu.ow.server.ecmimpl.fncm5.OwFNCM5Network</ClassName>
<Version>4.1.1</Version>
<DefaultObjectStore>P8ConfigObjectStore</DefaultObjectStore>
. . .
It is also possible to connect Alfresco Workdesk to the IBM FileNet P8 Process Engine.
Following parameters must be set in the owbootstrap.xml file:
<ConnectionPointName>: Define the connection point name
<DefaultObjectStoreLookup>: Define the object store
<WorkplaceRedirectURL>: Define the URL to the Workplace installation
Example:
<BPM optionid=””>
<ConnectionPointName>P8ConnPt1</ConnectionPointName>
<DefaultObjectStoreLookup>P8ConfigObjectStore</DefaultObjectStoreLookup>
<ProxyRouting>false</ProxyRouting>
<DefaultResource></DefaultResource>
<WorkplaceRedirectURL>http://192.168.1.254:9080/Workplace</WorkplaceRedirectURL>
<ExternalAttachmentProperties>
<property></property>
</ExternalAttachmentProperties>
</BPM>
Configure ECM cross adapter
Note: This feature is not available in Alfresco Workdesk Community.
A cross adapter configuration can be set up using the configuration subnode
<ExternalCrossAdapter> in the <EcmAdapter> element, which contains information about the following items:
classname configuration
user mappings (map the users/groups of the crossed ECM system to the users/groups of the leading ECM system)
If usermap is missing completely, the same user credentials for the user of the leading ECM system are also used as credentials for the crossed ECM system.
If usermap exists, but no user name or group is defined, all users of the leading ECM system are
mapped to the user defined in this usermap.
If several usermap configurations exist with several group configurations and a user of the
leading ECM system is member of more than one group, it depends on the first role delivered by LDAP, which user is used for the crossed ECM system. This case is avoided by using only one group for a user and by correctly configuring this option.

Alfresco Workdesk 4.1.1.0 21
Property mappings (map the properties of the crossed ECM system to the properties of the leading ECM system).
Parameters that are required for the communication with the respective ECM system (For example, IP address / server name / object store depending on the crossed ECM system).

22 Alfresco Workdesk 4.1.1.0
Example for a cross Adapter configuration (IBM FileNet P8 5.x crossed with an Alfresco ECM repository using a crossed CMIS adapter):
<ExternalCrossAdapter>
<Xmapping>
<usermappings>
<usermap name=”admin” group=””>
<user>P8Admin</user>
<password>Pasword</password>
</usermap>
</usermappings>
<propertymappings>
<!—- cmis:document.cmis:name is the corresponding field for the P8 property
DocumentTitle -->
<propertymap name=”cmis:document.cmis:name”>
DocumentTitle
</propertymap>
</propertymappings>
<classmappings>
<classmap name="D:owd:hrdocument">HrDocument</classmap>
</classmappings>
</Xmapping>
<XecmAdapter>
<ClassName>com.wewebu.ow.server.ecmimpl.opencmis.OwCMISNetwork</ClassName>
<Version>4.1.1</Version>
<IDDMSIDConverterClass>
com.wewebu.ow.server.ecmimpl.opencmis.p8.OwP8CMISIDDMSIDConverter
</IDDMSIDConverterClass>
<!-- CMIS FNCM5 -->
<AtomPub>http://server:port/fncmis/resources/Service</AtomPub>
<Authentication mode="NONE"/>
</XecmAdapter>
</ExternalCrossAdapter>
…
Configure the logging mechanism
Configure log4j to make Alfresco Workdesk write logs into a separate log file. See Log files for details about configuring log4j.

Alfresco Workdesk 4.1.1.0 23
Redeploy and verify
To finalize the ECM adapter switch, Alfresco Workdesk has to be redeployed. See Initial deployment.
Before deploying Alfresco Workdesk in its new configuration you must undeploy the
old Alfresco Workdesk deployment first.
Viewer integration Note: This feature is currently only available for IBM FileNet P8 Content Manager.
The next section describes how to configure and deploy the native Daeja viewer for IBM FileNet P8 Content Manager.
Provide IBM FileNet P8 Daeja viewer libraries
You can choose between two options if you want to install the Daeja viewer:
First option is to install it as a separate application with its own WAR-file.
The second option is to copy the entire FnJavaV1Files directory, that is, including its
contents, from (Workplace) to (workdesk). Also, you must copy Annot.xsl from
(Workplace)\WEB-INF\xsl to (workdesk)\viewer\fncm5.
You must also configure the CODEBASE parameter in (workdesk)\
viewer\fncm5\FNCM5ImageViewer.jsp to point to a valid Daeja viewer installation (For
example: codebase="<%=strBaseURL%>/FnJavaV1Files").
Make sure that the Daeja viewer related servlets and servlet-mappings in
(workdesk)\WEB-INF\web.xml are active. For details on how web.xml must be
adapted, refer to A1: Daeja Viewer configuration in web.xml.
Redeploy and verify
To finish the viewer integration, Alfresco Workdesk has to be redeployed. See Initial deployment. Verify the correct native viewer integration by opening some image files from Alfresco Workdesk afterwards.
Database connection Alfresco Workdesk uses database connections to store persistent data for:
DB Role Manager
DB History Manager
Other Alfresco Workdesk related data (user settings, attribute bag, bookmarks/favorites, search queries…)
This section explains how to create the required database tables, how to create the corresponding datasources in your application server and how to make the created datasources available to the Alfresco Workdesk web application.

24 Alfresco Workdesk 4.1.1.0
Configure database
By default, Alfresco Workdesk writes persistent data into the database tables OW_ATTRIBUTE_BAG, OW_HISTORY and OW_ROLE. If you want to use custom database tables with custom table names, you can configure these table names in the owbootstrap.xml file (see Configure ECM adapter and Role Manager for configuration examples). We recommend creating a new database for Alfresco Workdesk with the scripts (adapt the scripts if you want to change database table names) delivered with Alfresco Workdesk and configure the database with read/write privileges.
Note: As soon as a database is configured for Alfresco Workdesk, at least the ow_attribute_bag table must exist in this database.
IBM DB2
Note: This feature is not available in Alfresco Workdesk Community.
Create a new database for Alfresco Workdesk using the delivered script (Delivery)\db\scripts\create_db2_databases\win\workdesk\create_OWDDB.b
at from the DB2 Command Window:
Use the following delivered scripts to create the default database tables:
(Delivery)\db\scripts\OwDB2_CreateAttributeBagTable.sql
Note: The Attribute Bag table script provided with an Alfresco Workdesk delivery
contains a default column length of 1024 bytes for the attribute value. We recommend
to set this column length to an upper limit as per own needs.
(Delivery)\db\scripts\OwDB2_CreateDBHistoryManagerTable.sql
(Delivery)\db\scripts\OwDB2_CreateDBRoleManagerTable_Scheme2.sql
You can run the scripts by using the DB2 Control Center. Note that the schema user of the tables will be the same user that established a database connection while creating the tables. This user has to be configured in the datasource at the application server later on.
The following screenshot gives an example of this connection in case of IBM WebSphere 6.1 and IBM DB2 9.1:
Note: In case of Windows 2003 Server, the currently logged in user will be the owner
of the new database. The user you specify in the fourth argument will be granted the
rights “Connect to” and “Create Table” and is called the “Schema user”.
Note: When creating the database manually, make sure to use a page size of at least 8
KB. The provided script create_OWDDB.bat automatically takes care of this issue.

Alfresco Workdesk 4.1.1.0 25
Changing the Java Connector user: It is not enough only to change the database
owner to the Java Connector user, because the schema user would not be changed.
To achieve this, connect as the appropriate user to the database. See A4: Example for
changing Java user in DB2 for examples.
Microsoft SQL Server
Note: This feature is not available in Alfresco Workdesk Community.
Create a new database and then use the scripts provided with the Alfresco Workdesk delivery to create the database tables.
(Delivery)\db\scripts\OwMSSQL_CreateAttributeBagTable.sql

26 Alfresco Workdesk 4.1.1.0
(Delivery)\db\scripts\OwMSSQL_CreateDBHistoryManagerTable.sql
(Delivery)\db\scripts\OwMSSQL_CreateDBRoleManagerTable_Scheme2.sql
Create a new user account for the Alfresco Workdesk web application with read and write privileges to the created tables.
Oracle 9i
Note: This feature is not available in Alfresco Workdesk Community.
Create a new database and then use the scripts provided with the Alfresco Workdesk delivery
(Delivery)\db\scripts\OwOracle_CreateAttributeBagTable.sql
(Delivery)\db\scripts\OwOracle_CreateDBHistoryManagerTable.sql
(Delivery)\db\scripts\OwOracle_CreateDBRoleManagerTable_Scheme2.sql
Create a new user account for Alfresco Workdesk with read/write privileges to these tables.
Note: When using a command line tool like Sql-Plus to import the SQL statements,
every file has to end with a “/ “, otherwise the last SQL statement will not be
executed.
Example:
CREATE TABLE OW_ATTRIBUTE_BAG (
UserName varchar2(128) NOT NULL,
BagName varchar2(128) NOT NULL,
AttributeName varchar2(128) NOT NULL,
AttributeValue varchar2(1024) NOT NULL,
CONSTRAINT OW_ATTRIBUTE_BAG_PK PRIMARY KEY (UserName, BagName, AttributeName)
);/
MySQL
Use the supplied batch file to create the Alfresco Workdesk database and all database tables:
(Delivery)\db\scripts\create_mysql_databases\create_OWDDB.bat
Alternatively, use the following script to create the Alfresco Workdesk database:
(Delivery)\db\scripts\create_mysql_databases\Create_MySQL_Database.sql
Use the following scripts to create every Alfresco Workdesk table manually:
(Delivery)\db\scripts\OwMySQL_CreateAttributeBagTable.sql
(Delivery)\db\scripts\OwMySQL_CreateDBHistoryManagerTable.sql *
(Delivery)\db\scripts\OwMySQL_CreateDBRoleManagerTable.sql *
* Not needed/used by Alfresco Workdesk Community
PostgreSQL
Use the supplied batch file to create the Alfresco Workdesk database and all database tables:
(Delivery)\db\scripts\create_postgres_databases\create_OWDDB.bat

Alfresco Workdesk 4.1.1.0 27
Alternatively, use the following script to create the Alfresco Workdesk database:
(Delivery)\db\scripts\create_postgres_databases\Create_PostgreSQL_Data
base.sql
Use the following scripts to create every Alfresco Workdesk table manually:
(Delivery)\db\scripts\OwPostgreSQL_CreateAttributeBagTable.sql
(Delivery)\db\scripts\OwPostgreSQL_CreateDBHistoryManagerTable.sql *
(Delivery)\db\scripts\OwPostgreSQL_CreateDBRoleManagerTable.sql *
* Not needed/used by Alfresco Workdesk Community
Configure Application Server
You must configure a new datasource at the application server, which makes the created database tables available to the Alfresco Workdesk web application. The following section briefly describes how to establish a JDBC connection between the application server and the DBMS. The first part explains how to create a JDBC provider at the application server. The latter part covers the configuration of a related datasource for that JDBC provider.
JDBC Libraries: Make sure you have the correct versions of the required JDBC driver
libraries for connecting to your database. You can download the libraries from the
corresponding database vendor.
Here are some JDBC libraries that you might need; their names may be different from database version to database version.
MSSQL:
sqljdbc-3.0.1301.101.jar
Oracle:
ojdbc14-10.2.0.5.jar
IBM DB2:
db2jcc.jar (JDBC driver type 4)
db2jcc_license_cu.jar (JDBC driver type 4)
db2jcc_license_cisuz.jar (JDBC driver type 4 for z/OS)
db2java.zip (db2java.jar) (JDBC driver type 2)
MySQL:
mysql-connector-java-5.1.14-bin.jar
PostgreSQL:
postgresql-9.1-902.jdbc4.jar (JDBC driver type 4)
The following list provides the JDBC driver library destination folder for the corresponding application server, from where the JDBC driver is made available to a web application running on that application server:

28 Alfresco Workdesk 4.1.1.0
Apache Tomcat 6.x onwards: (Tomcat)\lib
JBoss: (JBoss)\server\default\lib
Oracle WebLogic: Contact your Oracle WebLogic and/or database administrator for further Information
IBM WebSphere: Contact your WebSphere and/or database administrator for further information
Apache Tomcat
Configure the Resource Adapter for Tomcat:
1. Edit the configuration template \db\tomcat\META-INF\context.xml according to your
database installation by uncommenting the correct XML example block for your database (DB2, Oracle, MSSQL, Access, MySQL, PostgreSQL) .
2. Adopt the path value in the <Context> element to the value of the web application context
root of your Alfresco Workdesk deployment, that is, (workdesk).
3. Adopt the values for the parameters username, password and url in the configuration file to the values of your database server.
4. Replace the file context.xml in the folder META-INF in your Alfresco Workdesk
deployment, that is, (workdesk)\META-INF.
Create the required database tables if they don’t exist already. The corresponding SQL scripts
can be found in db/scripts (see Configure database). Depending on your type of Alfresco
Workdesk configuration, all three tables may be required (ow_attribute_bag, ow_history, ow_role).
Note: As soon as a data source was configured, at least the ow_attribute_bag table must exist in the database.
Make sure you entered the correct value for <JNDIName> in owbootstrap.xml, section
<DefaultDataSource>. It has to be exactly the value of the name parameter from the
<Resource name=”java:/JNDIName”…> tag of the copied context.xml configuration file.
The following shows an example of the owbootstrap.xml entry:
<DefaultDataSource>
<JNDIName>java:/JNDI_Name</JNDIName>
</DefaultDataSource>
IBM WebSphere
Note: This feature is not available in Alfresco Workdesk Community.
In IBM WebSphere you must configure a new datasource. For IBM WebSphere 6.1 the steps are:
Configure a JDBC Provider:
o For Alfresco Workdesk, a non-XA JDBC Provider is sufficient. If appropriate, you may use an already existing provider. Otherwise, create a new one at Resources -> JDBC -> JDBC Providers -> New
Configure a J2C Authentication Alias:
Alfresco Workdesk 4.1.1.0 29
o Make sure that there is an authentication alias configured defining appropriate database access credentials. To create a new one, go to Secure administration, applications, and infrastructure -> Authentication -> Java Authentication and Authorization Service -> J2C authentication data -> New.
Create a new datasource
o This is done at Resources -> JDBC -> Data sources -> New
o Choose an appropriate Datasource name and JNDI name.
Important: make sure you enter the same value for <JNDIName> of
<DefaultDataSource> section in the owbootstrap.xml as defined in the
WebSphere datasource. It may not start with a java:/ prefix. Here is an example of
how it is supposed to look, both in WAS as well as in owbootstrap.xml:
<DefaultDataSource>
<JNDIName>WorkdeskDefaultDS</JNDIName>
</DefaultDataSource>
For other IBM WebSphere versions, the setup should be similar, but some menu entry
names might have changed. Contact your IBM WebSphere administrator for details.
JBoss
Note: This feature is not available in Alfresco Workdesk Community.
Copy the file from the Alfresco Workdesk delivery:
(Delivery)\db\jboss\mssql-ds.xml for MS-SQL
(Delivery)\db\jboss\db2-ds.xml for DB2
(Delivery)\db\jboss\oracle-ds.xml for Oracle
(Delivery)\db\jboss\mysql-ds.xml for MySQL or
(Delivery)\db\jboss\postgresql-ds.xml for PostgreSQL
Copy the file to the directory (JBoss)\server\default\deploy and adapt all settings
(server-name, database-name, user-name and password) to your environment.
You could change the JNDI name “MSSQLDS”, ”OracleDS”, ”DB2DS”, „MySQLDS” or “PostgreSQL” to a name of your choice, but you must remember that the name must
correspond to the default name (<JNDIName> of <DefaultDataSource> section) specified in
owbootstrap.xml.
Oracle WebLogic with Connection Pooling
Note: This feature is not available in Alfresco Workdesk Community.
In the Server Console, create a new connection pool. When selecting the type of the pool, select "other". Input values in the same way as when creating the datasource in Tomcat. The major problem should be to make the JDBC driver libs (for example, the sqljdbc.jar file)
available to WebLogic. Modify the CLASSPATH variable in the "startWebLogic.cmd" by adding

30 Alfresco Workdesk 4.1.1.0
the JDBC driver path, for example, "…;(path to sqljdbc.jar)" or copy the JDBC driver libraries
(jar files) to the ...\server\lib folder. Restart the application server.
Create a new datasource using the Server Console. Then select the connection pool that was created using the previous instructions.
Important: The JNDI name has to be "MSSQLDS" for Microsoft for example. No java:/
or anything on both sides - neither the datasource configuration side on WebLogic
nor the owbootstrap.xml side on Alfresco Workdesk. Then, restart the application
server.
When the datasource has been created correctly, it should be visible in the JNDI tree view at Server Console -> Server -> Logging -> JDBC -> View JNDI tree.
Redeploy and Verify
To finish the setup of the database connection, Alfresco Workdesk has to be redeployed. Follow Initial deployment to do so.
A correct database connection can be verified by starting up the Alfresco Workdesk deployment and checking the corresponding LOG file. If you see some lines similar to the following in the LOG file, whereas the entry with the <DefaultDataSource> element is the most important line, everything seems to work fine and a database connection should be established by Alfresco Workdesk:
[main] DEBUG owd.core [] - OwConfiguration.applicationInitalize: start reading the bootstrap
configuration data...
[main] DEBUG owd.core [] - OwConfiguration.createJdbcDataSource: Initializing datasource
successfully.
[main] DEBUG owd.core [] - OwConfiguration.createJdbcDataSource: Initializing Spring Jdbc template
successfully done.
[main] DEBUG owd.core [] - OwConfiguration.applicationInitalize: DB <DefaultDataSource> of
owbootstrap.xml, JNDIName = java:/MSSQLDS
[main] DEBUG owd.core [] - OwConfiguration.applicationInitalize: ...reading the bootstrap
configuration data finished.
Access control and security For access control, the following three levels are differentiated:
Authentication – Identification and verification of users
Authorization – Controlling access to resources
Auditing – Monitoring and logging access to the system
Authentication
To understand authentication with Alfresco Workdesk, note the following:
Alfresco Workdesk never authenticates a user or verifies user credentials.

Alfresco Workdesk 4.1.1.0 31
Authentication is usually performed by the ECM repository (as it contains the objects for which access control is required). For CMIS-compliant repositories (other than Alfresco) connected using the Alfresco Workdesk CMIS adapter, you must authenticate users against an ECM system connected to a LDAP system.
Alfresco Workdesk can only support what the back end provides, so you must set up the back end and authentication infrastructure as a prerequisite.
Only a user who is authenticated by the ECM repository can access content using Alfresco Workdesk.
Alfresco Workdesk passes user credentials to the ECM back end system in one of two possible ways:
o Username and password from a user login form are passed to the ECM back end.
o Alfresco Workdesk delegates authentication to the JEE (formerly J2EE) application server container. This is commonly called Single Sign-On (SSO), since it does not require username and password to be provided to Alfresco Workdesk. This is always specific to the content repository and the provided API for authenticating users. The JEE container uses the Java Authentication and Authorization Service (JAAS) to verify the user's credentials by making the necessary LDAP calls to whatever directory service is configured on the application server level.
Once a user is successfully authenticated against the back end, Alfresco Workdesk uses this identity for authorization.
Authentication is always specific to the content repository. SSO has to be configured for the ECM repository and on the application server. This is a task of the system administrator and/or service provider, which is out of the Alfresco Workdesk scope. Alfresco Workdesk can be configured to support SSO for IBM FileNet P8. Technically, Alfresco Workdesk is calling a logon() or connect() method with or without username and password. Setting up the prerequisites and performing integration tests typically requires far more effort and planning.
Enabling of SSO for Alfresco Workdesk
To enable Single Sign-On for Alfresco Workdesk, enable security in the application server and the Alfresco Workdesk deployed module.
Activate container-managed security for Alfresco Workdesk by adding these lines to the
web.xml file of Alfresco Workdesk:
<security-constraint>
<web-resource-collection>
<web-resource-name>AWD</web-resource-name>
<description>Alfresco Workdesk</description>
<url-pattern>/</url-pattern>
<url-pattern>/default41.jsp</url-pattern>
</web-resource-collection>
<auth-constraint>
<role-name>All Authenticated</role-name>
</auth-constraint>
<user-data-constraint>
<description>User data constraints</description>
<transport-guarantee>NONE</transport-guarantee>

32 Alfresco Workdesk 4.1.1.0
</user-data-constraint>
</security-constraint>
<login-config>
<auth-method>BASIC</auth-method>
<realm-name>Workdesk</realm-name>
</login-config>
<security-role>
<description>All Authenticated</description>
<role-name>All Authenticated</role-name>
</security-role>
Configure security roles in the application.xml deployment descriptor:
<application>
<display-name>AWD</display-name>
<module>
<web>
<web-uri>workdesk.war</web-uri>
<context-root>/workdesk</context-root>
</web>
</module>
<security-role>
<role-name>All Authenticated</role-name>
</security-role>
</application>
Users or groups must be assigned in the application server role configuration (for example, when using IBM WebSphere, go to the Integrated Solutions Console > Enterprise Applications > Alfresco workdesk > Security role to user/group mapping).
SSO configuration for IBM FileNet P8 5.x
As a prerequisite for using SSO with Alfresco Workdesk and IBM FileNet P8 5.x, IBM FileNet P8 WorkplaceXT has to be configured for SSO. If SSO is working correctly with IBM FileNet P8
WorkplaceXT, you must configure owbootstrap.xml located in (workdesk)/WEB-
INF/conf/fncm5 as shown in the following example to use SSO also for your Alfresco
Workdesk deployment:
<EcmAdapter>
<ClassName>com.wewebu.ow.server.ecmimpl.fncm5.OwFNCM5Network</ClassName>
<Version>4.1.1</Version>
<ConnectionURL>iiop://localhost:2809/FileNet/Engine</ConnectionURL>

Alfresco Workdesk 4.1.1.0 33
<jaasContext>FileNetP8Server</jaasContext>
To get more information about SSO for IBM FileNet P8 5.x, visit the IBM Information Center:
IBM FileNet P8 Version 5.0 Information Center:
http://publib.boulder.ibm.com/infocenter/p8docs/v5r0m0/index.jsp?topic=%2Fcom.ibm.p8.ce.dev.ce.doc%2Fgs_concepts.htm
SSO for other ECM systems
Contact Alfresco Support if you want to use SSO for Alfresco Workdesk in combination with other ECM systems than the ones mentioned above.
Authorization
Authorization is handled at two different levels, at object and document level (see Object and document-level security) as well as at business roles and UI level (see Business roles and UI level security).
Object and document-level security
Alfresco Workdesk strictly complies with the security of the underlying repository. This security can never be bypassed. The back end repository provides security on an object-level, typically documents and folders but also choicelists, workitems and other custom objects or item types depending on the back end System.
Business roles and UI level security
Alfresco Workdesk extends the above basic object level security by a functional, role-based security at front end level. This is incorporated by the DB Role Manager. The DB Role Manager
assigns a set of functionality to a group by calling getGroupMemberships() against an LDAP
Directory for the current user, retrieved during authentication process.
Permissions can be assigned to a group or role for the following items:
UI Design Definitions (corporate or departmental design)
Master Plugins
Document Plugins
eFile Plugins
Document classes
User-defined items
Auditing
There are three levels of auditing and logging:
Back end history maintained by the ECM repository: Logging is completely transparent to Alfresco Workdesk. It has to be decided if back end logging or front-end logging (by Alfresco Workdesk) is used (or both). Alfresco Workdesk uses a History Manager (see History Manager) to display whatever history is used in a table, back end history can only be displayed.
Application history by incorporating the Alfresco Workdesk DB History Manager: If front-end logging has to be used, any major DB (Oracle, DB2, MS SQL, MySQL,

34 Alfresco Workdesk 4.1.1.0
PostgreSQL) can be used to log whichever action was executed in the front end. Therefore the DB History Manager (see DB History Manager) is required. Any event can be logged which is triggered in the fronted, so typically a click on a component, plugin, button. For example a click on the checkout menu item, which is an Alfresco Workdesk plugin. Often front-end history is used if back end events are not meaningful and/or must be combined to be meaningful from a business perspective. So front-end history is used as a kind of “storytelling” from the business perspective.
Technical logging for Alfresco Workdesk is done using log4j (see Log files)

Alfresco Workdesk 4.1.1.0 35
Basic configuration After Alfresco Workdesk is configured to run with your ECM system, you can start modifying some basic configurations.
Design The design definition, which should be invoked by Alfresco Workdesk, can be specified with the
element <DesignName> (within the <RoleManager> element in owbootstrap.xml). In a standard
Alfresco Workdesk delivery the design default41 is available. When left empty, the default
design default41 will be chosen. Additional designs can be created by customization. For
additional information refer to Developer Guide: Customizing Layout and Designs section.
Role Manager Alfresco Workdesk offers two variants of its Role Manager: the Simple Role Manager
(<ClassName> element ends with OwSimpleRoleManager) and the DB Role Manager (ends
with OwDBRoleManager). The Role Manager is configured in the file owbootstrap.xml and
the corresponding configuration element is called <RoleManager>.
Since only one instance of the <RoleManager> is allowed to be present, use XML comments (<!-
—and -->) to hide the instance which should not be taken into account:
<!-- RoleManager>
<ClassName>com.wewebu.ow.server.roleimpl.simplerole.OwSimpleRoleManager
</ClassName>
…
</RoleManager -->
<RoleManager>
<ClassName>com.wewebu.ow.server.roleimpl.dbrole.OwDBRoleManager</ClassName>
…
</RoleManager>
Simple Role Manager
When enabling the Simple Role Manager, you may only restrict access to the Site Settings by
defining the tag <SiteAdmins> and to specify which design (element <DesignName>) should be used. In the following example, the user “Administrator” is set as the site administrator.

36 Alfresco Workdesk 4.1.1.0
<RoleManager>
<ClassName>com.wewebu.ow.server.roleimpl.simplerole.OwSimpleRoleManager</ClassName>
…
<SiteAdmins>
<user>Administrator</user>
</SiteAdmins>
<DesignName>default41</DesignName>
</RoleManager>
DB Role Manager
Note: This feature is not available in Alfresco Workdesk Community.
By using the DB Role Manager, persistent user/role data is saved to a database table (see Configure database). The table name (default: OW_ROLE) can be configured in the
<DbTableName/> element:
<RoleManager>
<ClassName>com.wewebu.ow.server.roleimpl.dbrole.OwDBRoleManager</ClassName>
…
<DbTableName>OW_ROLE</DbTableName>
</RoleManager>
When using the DB Role Manager, you can define role profiles with the Administration master
plugin. The element <SecurityAdmin> allows specifying the name(s) of the user(s) and group(s) who may act as role administrator(s):
<SecurityAdmin pluginid="[id of plugin to enable for Security Admin]">
<User>[user1]</User>
<User>[user2]</User>
...
<Group>[group1]</Group>
<Group>[group2]</Group>
...
</SecurityAdmin>

Alfresco Workdesk 4.1.1.0 37
As it is not possible to request group information via CMIS, it is necessary to have a LDAP connection configured for Alfresco Workdesk to be able to use the DB Role Manager in combination with CMIS compliant repositories (other than Alfresco). In those cases, the CMIS compliant repository (other than Alfresco) itself also needs to be connected to the same LDAP system and needs to share the same users and groups.LDAP authentication for Alfresco
Workdesk is configured in the configuration node <authentication> in owbootstrap.xml.
By configuring mode="LDAP", Alfresco Workdesk users respectively groups are no longer
retreived from the pure ECM system, but from an ECM system connected to the same LDAP system as configured in this node. Example LDAP authentication configurations can be found
as commented parts of every default owbootstrap.xml file. The available LDAP configuration
nodes are standard LDAP configuration nodes.
By configuring mode="ALFRESCO", Alfresco groups are used for configuring the DB Role Manager
and can be directly retrieved from the Alfresco repository.
By default the definition of Alfresco Groups in the DB Role Manager is in a similar
format to GROUP_GROUPNAME.
Beware of case sensitivity: The user names must be spelled exactly as defined in the
user and group directory (for example, in LDAP).
As it is not possible to request user or group information with CMIS directly, it is
required to have LDAP authentication configured to be able to use the DB Role
Manager in combination with CMIS compliant repositories other than Alfresco.
In addition to the default design, you can set up a list of additional designs available for the role configuration with the element <AvailableDesigns>. Remember that the default design defined
in element <DesignName> is only used as long as you are not logged in. Once logged in, the
design corresponding to an assigned role is applied. The element <SchemeVersion> defines the version of the database scheme, which must be set to 3. This option is used for backwards compatibility.
The element <MasterRoles> is explained in the Configuration and Planning Guide: Master Roles
section. With the <ConfigCategories/> element, a list of categories is specified that appear in the Administration master plugin, separated by comma. For categories that are not specified in the list, the access is allowed to all resources. The following XML code fragment from
owbootstrap.xml shows a sample configuration for the DB Role Manager:
<RoleManager>
<ClassName>com.wewebu.ow.server.roleimpl.dbrole.OwDBRoleManager</ClassName>
...
<SecurityAdmin pluginid="com.wewebu.ow.Admin">
<User>Administrator</User>
</SecurityAdmin>
<DesignName></DesignName>

38 Alfresco Workdesk 4.1.1.0
<AvailableDesigns>
<Design displayName="Alfresco Workdesk 4.1 Design">default41</Design>
</AvailableDesigns>
<SchemeVersion>3</SchemeVersion>
<MasterRoles enable="true">
<MasterRoleGroup name="Manager" memberOfAll="true">
<Role>HR Manager</Role>
<Role>Office Manager</Role>
</MasterRoleGroup>
</MasterRoles>
<ConfigCategories>ROLE_CATEGORY_PLUGIN,ROLE_CATEGORY_SEARCH_TEMPLATE</ConfigCategories>
</RoleManager>
Indexfields are different to other categories. An implicit “Allow“ is set for all groups. For indexfields, there are three types of contexts:
CREATE.Document/FolderClass.PropertyName for example, AddDocument Plugin
CHECKIN.Document/FolderClass.PropertyName for example, Checkin-Plugin
VIEW.Document/FolderClass.PropertyName for example, EditProperties-Plugin
The following values can be set:
Allow/Deny: Implicitly all values for all roles are set to “Allow“. Whenever a user is member of more than one group and the access rights for one of these groups is denied then the user won’t see the properties in this certain context.
Modify/View: You can define whether the property is displayed as readonly or editable for a user. The values of all groups where the user is a member are interpreted with an “OR“ operator. This means that if one property for a certain user (group) is displayed as “readonly“, each of the groups must have the access right set to “readonly“. If only one group has the value “modify”, then it is displayed as “editable” in the application.
It is not recommended in Alfresco Workdesk to set properties as readonly with the
DB Role Manager indexfields category. Configure a second instance of an
EditPropertiesSimple-Plugin to display certain properties readonly.
History Manager In owbootstrap.xml, you can configure which History Manager is invoked. Use XML
comments to enable or disable the corresponding <HistoryManager> elements.
DB History Manager
Note: This feature is not available in Alfresco Workdesk Community.
By using the DB History Manager, configurable audit data is saved to a database table (see Configure database). The table name (default: OW_HISTORY) can be configured in the
<DbTableName/> element:

Alfresco Workdesk 4.1.1.0 39
<HistoryManager>
<ClassName>com.wewebu.ow.server.historyimpl.dbhistory.OwDBHistoryManager</ClassName>
…
<DbTableName>OW_HISTORY</DbTableName>
…
</HistoryManager>
Case History (only for IBM FileNet P8 BPM)
When dealing with situations where documents appear as workflow attachments, it is often preferable to be able to not only access the audit information directly related to the document but also to retrieve the audit information related to the workflow instance(s) the document was involved in. To provide this functionality, your system must be configured in the following way:
Create a property in the IBM FileNet P8 Content Engine. This property will contain the reference to the Workflow instance
o Create a property of type String, add it to the document classes for which this functionality should be available; this property can be either single or multivalue, depending on whether you plan to establish relationships to just one or multiple workflow instances.
o Set its symbolic name as value for element <CaseObjectRefPropertyName> (within
<EcmAdapter>) in owbootstrap.xml.
Set the value for referencing in the workflow. In the workflow, the property defined above is set for the attached document.
o Add a component step to your workflow design(s) with a call of setStringProperty.
o Parameters are:
destDocument: name of attachment field
symbolicPropName: name of property in Content Engine
value: F_WobNum+","+F_Subject
MIME Types Most ECM systems determine the file type due to MIME type definitions, whereas Microsoft Office or Microsoft Windows ignore MIME types and use a filename extension like “.doc” or “.xls” instead. Alfresco Workdesk performs the MIME type and filename extension mapping in both directions. Existing documents in the repository always keep their filename and MIME type while being edited with Alfresco Workdesk. For detailed information about configuring MIME types for usage in Alfresco Workdesk, follow the instructions given in owmimetables.xml.
Drag and Drop applet (DND) Note: This feature is not available in Alfresco Workdesk Community.
The drag and drop applet can rapidly import multiple documents into your ECM repository. By default, this functionality is activated for the default Alfresco Workdesk configuration. In this default configuration, it is part of the eFile plugin named Add documents and is included in the class:

40 Alfresco Workdesk 4.1.1.0
com.wewebu.ow.server.plug.owaddmultidocuments.OwAddMultipleDocumentsRecordFun
ction
Drag and Drop activation
The drag and drop applet can be enabled/disabled in the configuration for the Add documents
eFile function by changing the following tag in owplugins.xml:
<DragDropTarget multifile="true│false">true│false</DragDropTarget>
Setting multifile=true will enable multifile upload and setting false inside the
<DragDropTarget> tag will disable the drag and drop applet for the Add documents eFile plugin.
If you are using the AWD Configurator helper tool, then you can enable/disable the function DragDropTarget in all plugins from the plugin class
com.wewebu.ow.server.plug.owaddmultidocuments.OwAddMultipleDocumentsRecordFuncti
on.
The servlet that is actually responsible for drag and drop functionality can be
activated/deactivated in the following sections in the web.xml file:
<servlet id="Servlet_5">
<servlet-name>dragdropcontent</servlet-name>
<servlet-class>com.wewebu.ow.server.servlets.OwDragDropContent</servlet-class>
</servlet>
<servlet-mapping id="ServletMapping_5">
<servlet-name>dragdropcontent</servlet-name>
<url-pattern>/dragdropcontent/*</url-pattern>
</servlet-mapping>
If you have set the value to "true" inside the <DragDropTarget> tag and the
corresponding drag and drop servlet in the web.xml is commented out, then upon
drag and drop you will see the “Add New Document” dialog without any file content.
Drag and Drop configuration
You can configure various parameters of the drag and drop applet by editing the appropriate
cfg.properties file located at (workdesk)\applets\dndupload. The properties file lets

Alfresco Workdesk 4.1.1.0 41
you customize the upload behavior of the drag and drop applet. You can define the maximum upload size, allowed file extensions or the maximum number of uploaded files. The properties file has the following important parameters that can be changed according to your needs:
max_batch_upload_size Maximum upload size limit of file(s) in Kilobytes
max_upload_count Maximum number of uploaded files
file_ext_filter File extensions allowed for upload
accept_insecure_certificates Allow self-signed or expired certificates
Temporary files When using document upload, you must define a folder for temporary files in the <TempDir>
configuration node of owbootstrap.xml. You can define the path of this temporary folder as
absolute path or as a path relative to the Alfresco Workdesk deployment. Make sure that the value is set to a directory/path, on which the Alfresco Workdesk application has reading and writing access. If the temporary folder does not exist in the defined location, the Alfresco Workdesk application will try to create and use it.
Example for an absolute path definition:
Windows server operating system: <TempDir>C:/Temp/</TempDir>
Unix server operating system: <TempDir>/usr/tmp</TempDir>
Example for a path definition relative to the Alfresco Workdesk deployment:
Windows/Unix server operating system: <TempDir>../../Temp/</TempDir>
If no value is set, the Alfresco Workdesk application uses the environment information/properties (java.io.tmpdir) to get the location of the application server or the temporary folder of the server operating system. If this variable is not available to the process, the deployment location will be used as temporary folder.
Language support The Alfresco Workdesk user interface is available in different languages. In a default Alfresco Workdesk delivery, English (en), French (fr), German (de), Italian (it), Japanese (ja) and
Spanish (es) are supported. You can setup your customized preferred language support in
owbootstrap.xml.
Set a specific language as default:
<defaultlocal>en</defaultlocal>
Make a series of languages available for selection by Alfresco Workdesk users:
<availablelocals>
<lang displayname="Deutsch">de</lang>
<lang displayname="English">en</lang>
<lang displayname="Français">fr</lang>
</availablelocals>
All configured languages must be part of the deployment.

42 Alfresco Workdesk 4.1.1.0
Instead of selecting the language from the language dropdown menu on the Alfresco
Workdesk login page, a user can also save the link to a preferred language as a
personal browser favorite and therefore always start with the preferred language.

Alfresco Workdesk 4.1.1.0 43
Hints and troubleshooting This section lists the most frequently asked questions (FAQ) and answers about installing Alfresco Workdesk.
Log files Alfresco Workdesk uses log4j for error reporting. By default, only errors are logged to the console. You can modify the reporting/logging level from “error” to “debug” and/or send the log
to a file by changing the log4j.properties file.
If you want to log during the startup/initialization phase of Alfresco Workdesk, you must copy
the log4j.properties file, for example, from (workdesk)/WEB-INF/conf/fncm5 to the
(workdesk)/WEB-INF/classes/ directory. This is very important, because of errors caused
by incorrect configuration of Alfresco Workdesk (for example, syntax errors in
owplugins.xml), misconfigured datasource, missing libraries and so on.
Multiple log4j.jar libraries: Make sure that you do not have multiple log4j-
x.y.z.jar files installed on your application server and in the Alfresco Workdesk
deployment. Sometimes the ECM back end API libraries also provide some log4j
libraries that can be in conflict with the log4j libraries provided by Alfresco Workdesk.
Log4j configuration file
A configuration file for log4j (log4j.properties) is shown in the following example:
# Set root logger level to DEBUG and its only appender to A1.
log4j.rootLogger=DEBUG,A1
# A1 is set to be a ConsoleAppender.
log4j.appender.A1=org.apache.log4j.ConsoleAppender
# A1 uses PatternLayout.
log4j.appender.A1.layout=org.apache.log4j.PatternLayout
# %x inserts the user id to the log file
log4j.appender.A1.layout.ConversionPattern=%d{ISO8601} [%t] %-5p %c [%x] - %m%n
# log4j.appender.A1.layout.ConversionPattern=%-4r [%t] %-5p %c - %m%n
# FileNet P8
log4j.category.com.filenet=WARN
log4j.category.com.filenet.wcm.api.impl.RemoteCommand=ERROR
# FileNet P8 5.0
log4j.category.filenet_tracing=WARN
# Apache
log4j.category.org.apache=WARN
# Spring

44 Alfresco Workdesk 4.1.1.0
log4j.category.org.springframework=WARN
You can log into a separate log file with the following example of a log4j configuration. In this
case, an appender called workdesk_file was defined, which logs into a file workdesk.log in
the root directory of drive c:
# file appender for workdesk
#log4j.appender.workdesk_file=org.apache.log4j.DailyRollingFileAppender
#log4j.appender.workdesk_file.DatePattern='.'yyyy-MM-dd
log4j.appender.workdesk_file=org.apache.log4j.FileAppender
log4j.appender.workdesk_file.file=${catalina.home}/logs/workdesk.log
log4j.appender.workdesk_file.layout=org.apache.log4j.PatternLayout
#log4j.appender.workdesk_file.layout.ConversionPattern=%-4r [%t] %-5p %c %x - %m%n
log4j.appender.workdesk_file.layout.ConversionPattern=%d{ISO8601} [%t] %-5p %c [%x]
- %m%n
log4j.appender.workdesk_file.append=true
You can use this appender with the following command line:
log4j.rootLogger=DEBUG, workdesk_file
Suppress ECM system logs: If you want to suppress logs that have not been written
by Alfresco Workdesk (for example, from IBM FileNet P8 or Apache Tomcat), your
log4j.properties must be similar to the following example:
# FileNet P8
log4j.category.com.filenet=WARN
log4j.category.com.filenet.wcm.api.impl.RemoteCommand=ERROR
For further technical background information about log4j see A3: Background about Log4J.
Log4j and JBoss
JBoss assigns a separate classloader for each deployed application, so that different versions of common libraries do not interfere with each other. But JBoss also uses log4j and has its own
version of a log4j library. Therefore, do not deploy an additional log4j-xxx.jar and do not
create an additional appender in the log4j configuration file. It is highly recommended to use only the appender that is already present in the global JBoss log4j configuration.

Alfresco Workdesk 4.1.1.0 45
Reload configuration files Alfresco Workdesk offers the possibility of reloading configuration files after changing them. Therefore, you can activate changes during runtime. You can reload the configuration for plugins, MIME types and boot settings separately. Only an Alfresco Workdesk administrator
can reload configuration files – see owbootstrap.xml node for Role Manager configuration–
SiteAdmins.
Also, it is possible to reload the class descriptions of your DMS, so that the Alfresco Workdesk application must not be restarted after adding class descriptions to the DMS. Reloading the configuration files effects the visibility of new data after a user is logging in again. The following screen shows the configuration reloading section in the Alfresco Workdesk settings:
Servlets The Alfresco Workdesk application is using several servlets, such as the standard application servlets and specific servlets for different ECM back end systems. Ensure that, at minimum, you
enable the standard application servlets by activating (uncommenting) them in the web.xml
file.
Standard application servlets are the following:
getContent (/getContent/*)
Gets the application content stream
dragdropcontent (/dragdropcontent/*)
Receives the content from the client
multifileDownload (/multifileDownload/*)
Enables downloading multiple files as one single zip file.
The encoding of the file names in the zip file (default set to UTF-8) can be set with the
<init-param> parameter file_name_encoding.
getPropertyContent (/getPropertyContent/*)
Get a stream request from a property
ECM back end specific servlets are the following:
setFNCMDaejaViewerAnnotation (/setFNCMDaejaViewerAnnotation/*)
Saves an annotation in the IBM FileNet P8 using Daeja Viewer or ADV
getFNCMDaejaAnnotationSecurity (/getFNCMDaejaAnnotationSecurity /*)
Opens an annotation in the IBM FileNet P8 using Daeja Viewer

46 Alfresco Workdesk 4.1.1.0
A1: Daeja Viewer configuration in web.xml describes how to integrate the DaejaViewer for IBM
FileNet P8 by enabling the corresponding servlets in the web.xml file.
Deploying on Unix/Linux systems When using a Unix/Linux system for the Alfresco Workdesk deployment, make sure that the access rights (owner) of the deployment files are the same as the access rights of the application engine. This is especially important for an IBM WebSphere application server. When the access rights (owner) for the application engine is set to root, there should not be any problems.

Alfresco Workdesk 4.1.1.0 47
Installing the AWD Configurator The configuration helper tool AWD Configurator is located in the directory
(Delivery)\bin\configurator.
There is one directory alfresco-workdesk-configurator_x.y.z_linux.gtk that
includes the launchable version for the Linux operating systems and one directory alfresco-
workdesk-configurator_x.y.z_win32 including the launchable version for Microsoft
Windows operating systems.
Depending on your operating system, copy the corresponding directory to an appropriate
location, for example, /etc/opt/Alfresco for Linux or C:\Program Files\Alfresco\
for Microsoft Windows and start the AWD Configurator by launching launcher for Linux (you
must launch AWD Configurator as administrator and with the execution flag set) or
eclipse.exe for Microsoft Windows.
When first starting the AWD Configurator, you must create a new project for your Alfresco Workdesk deployment. In this project, you can read in all required configuration files by linking the corresponding configuration directories. This procedure is described in the following sections.
Create new project Create a project for your Alfresco Workdesk deployment configuration (for example, myConfiguration). Create a subfolder in this project, which is linked to the Alfresco Workdesk deployment directory, which you wish to configure. To create projects use the context menu: New Project type project. Now, choose a name for your new configuration. In this example, we have chosen Workdesk Configuration.

48 Alfresco Workdesk 4.1.1.0
Note: do not use the _xsd project for referencing to the configuration files. This
project is for XML schema files, which are used to validate the created *.xml
configuration files.

Alfresco Workdesk 4.1.1.0 49
Import deployment folder structure Use the context menu on the recently created project to link to your configuration source files: New Others New Dialog: type Folder.

50 Alfresco Workdesk 4.1.1.0
After selecting the sub item Other, select File System and then activate the <<Advanced option. You must select the option Link to alternate location (Linked Folder) and browse to the root
directory of your Alfresco Workdesk deployment containing all its configuration files.
You can either use a temporary directory for configuration or link directly to the
directory of the Alfresco Workdesk deployment if your application server supports
this behavior.
After linking configuration files, the AWD Configurator will be similar to the following example:

Alfresco Workdesk 4.1.1.0 51
How to use the AWD Configurator After you have installed Alfresco Workdesk, and after basic configuration, you can start
customizing by editing the owplugins.xml file of your ECM adapter (for example, fncm5)
configuration. The default owplugins.xml of your ECM adapter shows a basic configuration
of most common functions and is a good starting point for your project.
By editing owplugins.xml, you define menus and functions implemented as Alfresco
Workdesk plugins. There are four types of Alfresco Workdesk plugins:
ow_app: The application itself. Configure this plugin for a base setup of your Alfresco Workdesk deployment.
ow_master: By defining master plugins, you create the main menu navigation. Create a new master plugin to add a new menu item. You can change the order of these menu items by ordering the corresponding master plugins.
ow_recordfunction: Folder plugins offer a range of functions for physical and (semi-)virtual folders.
ow_docfunction: Document plugins are used when working with documents. They appear as options of actions to perform on a document, for example appearing in the context menu of an item in a result list. You can change the order of these document functions by ordering the corresponding plugins.
The following sections describe the AWD Configurator features.

52 Alfresco Workdesk 4.1.1.0
owplugins.xml
Navigate to an ECM adapter configuration set (for example, (workdesk)\WEB-
INF\conf\fncm5\) and double-click on one of the configuration files (owplugins.xml or
owmimetable.xml) to open the plugins editor.
You can now edit the various plugin instances, add new ones ( ) or modify the order in which
they are listed (sort plugins ; change grouping of plugins ). By using the arrows ( ), you can define in which order they appear in the deployed application.
Note: The move plugin up and move plugin down buttons ( ) only work if
grouping is disabled.
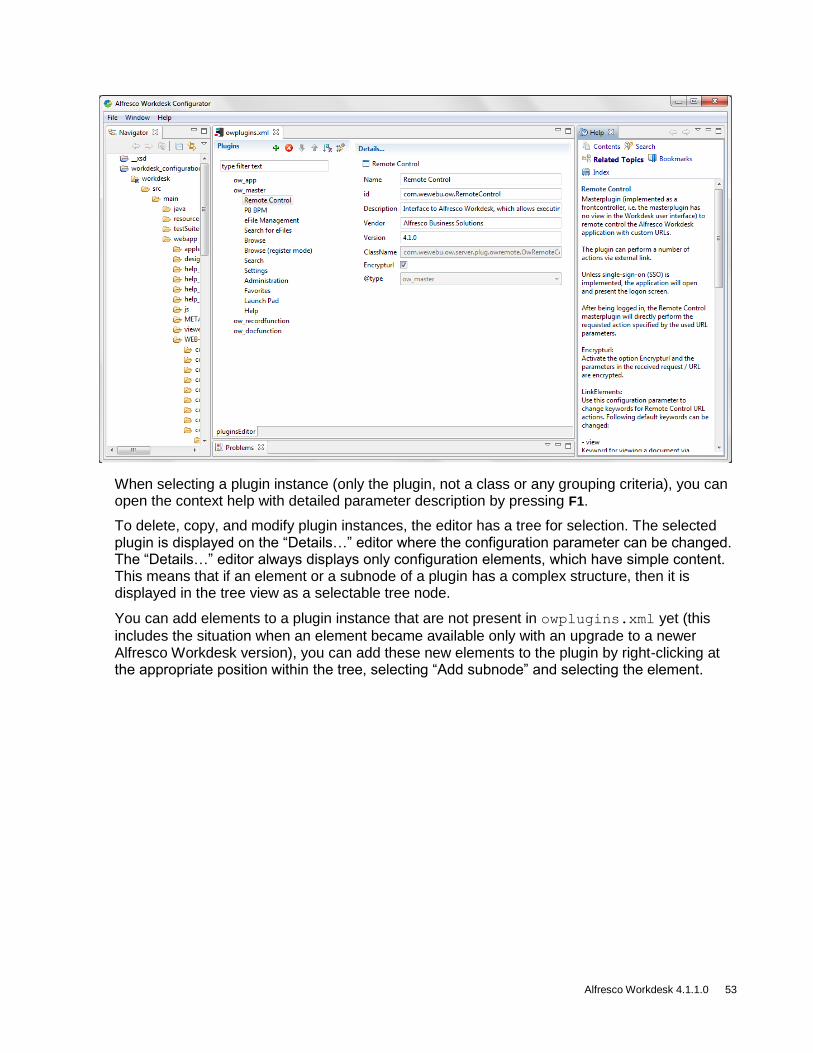
Alfresco Workdesk 4.1.1.0 53
When selecting a plugin instance (only the plugin, not a class or any grouping criteria), you can open the context help with detailed parameter description by pressing F1.
To delete, copy, and modify plugin instances, the editor has a tree for selection. The selected plugin is displayed on the “Details…” editor where the configuration parameter can be changed. The “Details…” editor always displays only configuration elements, which have simple content. This means that if an element or a subnode of a plugin has a complex structure, then it is displayed in the tree view as a selectable tree node.
You can add elements to a plugin instance that are not present in owplugins.xml yet (this
includes the situation when an element became available only with an upgrade to a newer Alfresco Workdesk version), you can add these new elements to the plugin by right-clicking at the appropriate position within the tree, selecting “Add subnode” and selecting the element.
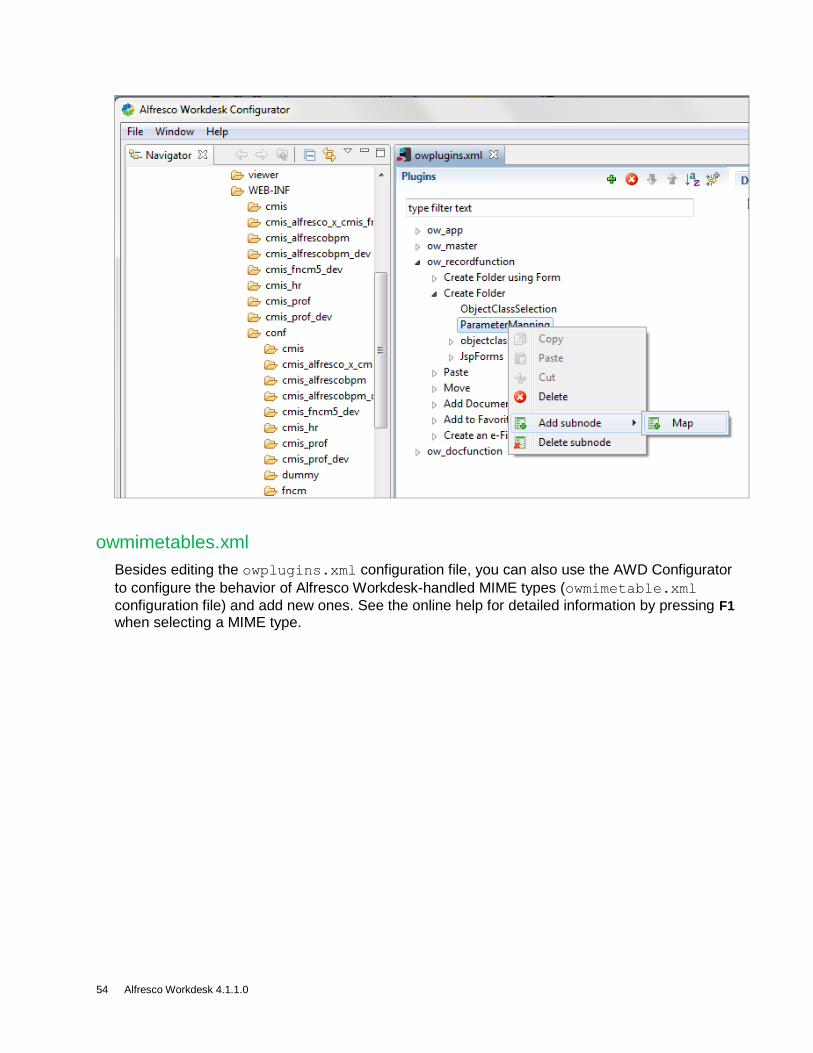
54 Alfresco Workdesk 4.1.1.0
owmimetables.xml
Besides editing the owplugins.xml configuration file, you can also use the AWD Configurator
to configure the behavior of Alfresco Workdesk-handled MIME types (owmimetable.xml
configuration file) and add new ones. See the online help for detailed information by pressing F1 when selecting a MIME type.

Alfresco Workdesk 4.1.1.0 55
How to handle your configuration files The AWD Configurator does not support any versioning or automatically created backups of your configuration files. This offers you the possibility to edit the deployed Alfresco Workdesk application directly instead of having to redeploy the entire directory. The proceeding of linking to this directory is described in the previous sections. Depending on your application server, you must restart the application or the entire server when making changes to the configuration files.
We recommend making a backup of at least your owplugins.xml file when starting to make
changes to your configuration. You can save the configuration files directly in your deployment. This does not have an effect on your application. Your deployment directory in
(workdesk)\WEB-INF\conf\(Adapter) may contain the following structure:
log4j.properties
owbootstrap.xml
owmimetable.xml
owplugins.xml
owplugins.backup09-01-03.xml
owplugins.backup09-01-02.xml
owplugins.backup09-01-01.xml
WcmApiConfig.properties

56 Alfresco Workdesk 4.1.1.0
Backup: When making a backup, we recommend not only backing up the
configuration files, but the entire deployment. Keep in mind that there might be
various changes to different files (for example, JSP files) in the deployment that need
to be backed up.
You can also use the AWD Configurator functions Copy and Paste to make backups of your existing configuration files.

Alfresco Workdesk 4.1.1.0 57
Updating Alfresco Workdesk The following guide gives a brief overview of the tasks to be done when updating to a newer version of Alfresco Workdesk:
See the Release Notes for the new Alfresco Workdesk version to see what’s changed with the new release.
Analyze your existing JSP files. If there are any changes, backup those changed files separately and migrate them separately so that you do not lose any client-specific customizations.
Analyze your existing CSS files. If there are any changes, backup those changed files separately and migrate them separately so that you do not lose any client-specific customizations.
Back up your current Alfresco Workdesk deployment.
Copy the new JAR files to (workdesk)\WEB-INF\lib. Afterwards, delete the
corresponding old JAR files, so that only the new library versions will be deployed.
Alfresco Workdesk libraries are located in the (Delivery)/lib folder of the
delivery, additional libraries (third party libraries like Spring, log4j, Apache
Commons…) used by Alfresco Workdesk are placed in the (Delivery)/lib.ext/
folder.
Copy/Upgrade customer-specific Java classes.
Copy your web resource (everything except the folder WEB-INF) into your deployment.
Upgrade every saved JSP file separately.
Upgrade every saved CSS file separately.
Update your configuration:
o Take the old owbootstrap.xml and transfer the configuration to the new one. You can do this quite easy by comparing the old file with the new file and by checking for new parameters or nodes.
o Take the old owplugins.xml and transfer the configuration to the new one. You can do this quite easy by comparing the old file with the new file and by checking for new parameters or nodes.
o Take the old owmimetable.xml and transfer the configuration to the new one. You can do this quite easy by comparing the old file with the new file and by checking for new parameters or nodes.
Alfresco Workdesk is downwards compatible. You can use your old configuration to
run a newer version of Alfresco Workdesk. If you are using your old configuration
files, you may miss new features introduced with a new Alfresco Workdesk release
(see Release Notes for more information).

58 Alfresco Workdesk 4.1.1.0
Alfresco Workdesk 4.1.1.0 59
Upgrading the ECM back end system When upgrading the ECM back end system, you must do the following tasks on an existing Alfresco Workdesk installation:
Back up your actual deployment so that you can revert the following steps every time.
Replace the API libraries/configuration files of the ECM back end system in the existing Alfresco Workdesk installation with the API libraries/configuration files from the upgraded ECM back end system. You can achieve this by following the steps in Provide required libraries.
If the upgraded ECM back end system comes with an upgraded viewer, which you might want to integrate in Alfresco Workdesk, you must upgrade the files for the viewer in the Alfresco Workdesk deployment. Follow the steps in Viewer integration.

60 Alfresco Workdesk 4.1.1.0
Appendix
A1: Daeja Viewer configuration in web.xml Note: This feature is not available in Alfresco Workdesk Community.
The following extract shows the corresponding entries in web.xml for the servlets used in
combination with Daeja Viewer and IBM FileNet P8 5.x:
<!--
..............................................................................
Servlets
............................................................................... -->
<!-- IBM FileNet P8 5.x only, uncomment otherwise -->
<servlet id="Servlet_2">
<servlet-name>setFNCMDaejaViewerAnnotation</servlet-name>
<servlet-class>
com.wewebu.ow.server.ecmimpl.fncm5.viewer.OwFNCM5DaejaAnnotServlet
</servlet-class>
</servlet>
<!-- IBM FileNet P8 5.x only, uncomment otherwise -->
<servlet id="Servlet_3">
<servlet-name>getFNCMDaejaAnnotationSecurity</servlet-name>
<servlet-class>
com.wewebu.ow.server.ecmimpl.fncm5.viewer.OwFNCM5AnnotSecurityServlet
</servlet-class>
</servlet>
<!-- IBM FileNet P8 5.x only, uncomment otherwise -->
<servlet-mapping id="ServletMapping_2">
<servlet-name>setFNCMDaejaViewerAnnotation</servlet-name>
<url-pattern>/setFNCMDaejaViewerAnnotation/*</url-pattern>
</servlet-mapping>
<!-- IBM FileNet P8 5.x only, uncomment otherwise -->
<servlet-mapping id="ServletMapping_3">
<servlet-name>getFNCMDaejaAnnotationSecurity</servlet-name>
<url-pattern>/getFNCMDaejaAnnotationSecurity/*</url-pattern>
</servlet-mapping>

Alfresco Workdesk 4.1.1.0 61
A2: Example for Log4J configuration The following text shows a typical log4j configuration file, which has to be put in the root directory of the directory where your classes are located. The value “../YourLogFileFolder/YourLogFile.log” represents the location for saving your logs.
<?xml version="1.0" encoding="UTF-8"?>
<!DOCTYPE log4j:configuration SYSTEM "log4j.dtd">
<!-- ===================================================================== -->
<!-- Log4j Configuration -->
<!-- -->
<!-- On WebSphere this file must be placed in the "web-inf/classes" folder of the
deployed application -->
<!-- On JBOSS, the .xml-file should be in the following folder: "jboss-
3.2.7\server\default\conf" -->
<!-- ===================================================================== -->
<!-- $Id: log4j.xml,v 1.13.2.13 2004/05/11 16:33:46 belaban Exp $ -->
<!--
| For more configuration information and examples see the Jakarta Log4j
| website: http://jakarta.apache.org/log4j
-->
<log4j:configuration xmlns:log4j="http://jakarta.apache.org/log4j/">
<appender name="FILE" class="org.apache.log4j.DailyRollingFileAppender">
<param name="File" value="../YourLogFileFolder/YourLogFile.log"/>
<!—- True adds entries to an existing log file when starting -->
<!—- False deletes the existing log file when starting -->
<param name="Append" value="false"/>
<!-- Rollover at midnight each week -->
<param name="DatePattern" value="'.'yyyy-ww"/>
<layout class="org.apache.log4j.PatternLayout">
<!-- The default pattern: Date Priority [Category] Message\n -->
<param name="ConversionPattern" value="%d %-5p [%c] %m%n"/
<!-- The full pattern: Date MS Priority [Category] (Thread:NDC) Message\n
<param name="ConversionPattern" value="%d %-5r %-5p [%c] (%t:%x) %m%n"/>
-->
</layout>
</appender>
<!-- Limit the org.apache category to INFO as its DEBUG is verbose -->
<category name="org.apache">
<priority value="error"/>
</category>

62 Alfresco Workdesk 4.1.1.0
<!-- Limit FileNet categories to WARN -->
<category name="com.filenet">
<priority value="WARN"/>
</category>
<category name="com.filenet.wcm.api.impl.RemoteCommand">
<priority value="ERROR"/>
</category>
<category name="com.wewebu.ow">
<priority value="WARN"/>
</category>
<root>
<appender-ref ref="FILE"/>
</root>
</log4j:configuration>
A3: Background about Log4J There are three main aspects that cause massive problems with log4j on an application server:
A java ClassLoader is responsible for loading Classes from their corresponding .class or .jar file. For security reasons, classes with the same name but loaded by different ClassLoaders are treated as different classes.
Example:
class Foo
{
private static Bar x;
public setX(newX : Bar);
{
x = newX;
}
}
class Bar {}
class BarChild extends Bar {}
Imagine some code loaded by ClassLoader1 creates an object of class Foo. So, this class Foo is loaded by ClassLoader1. This ClassLoader will also load the class Bar since it is used by Foo. Then some other code loaded by ClassLoader2 creates an object of class BarChild. So, BarChild and Bar will be loaded by ClassLoader2. When this other code tries to call setX(), a ClassMismatchException is thrown. Why? BarChild extends Bar and so you can call setX() with an object of class BarChild, but Bar@ClassLoader1 is different from Bar@ClassLoader2.

Alfresco Workdesk 4.1.1.0 63
An application server uses a couple of different ClassLoaders. There is the default Java System Loader, responsible for loading all Classes of the JRE. Next, an application server has some root ClassLoader responsible for loading all classes in the shared libraries folders of the application server (tomcat: common/lib). And there is an extra ClassLoader for each application. This is also done for security reasons. With this design, no class of ApplicationA can be loaded or used by code from ApplicationB.
Log4j creates a static logging object used by all applications. Due to 1 and 2, you can get lots of problems depending on where your log4j archives are located.
Due to the third point, problems are depending on your application server. If you are only using one log4j instance, you can get into conflict with log4j of your application server. If you have problems with log4j, contact Alfresco Support for assistance.
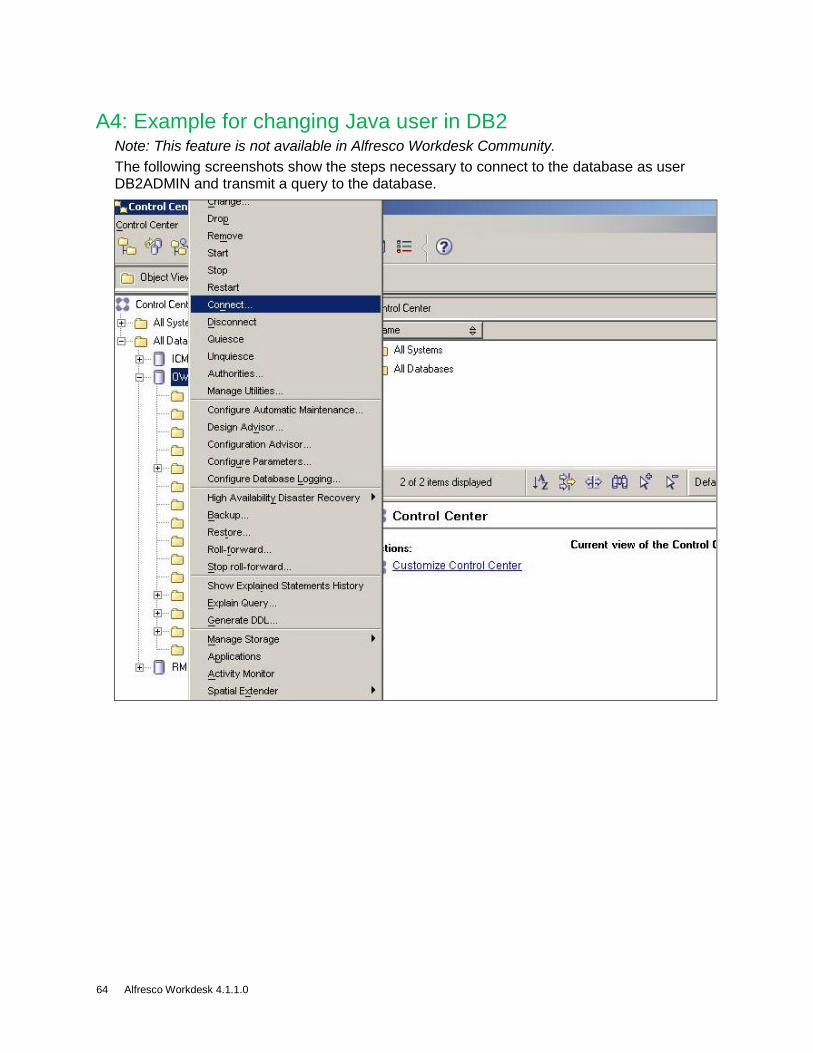
64 Alfresco Workdesk 4.1.1.0
A4: Example for changing Java user in DB2 Note: This feature is not available in Alfresco Workdesk Community.
The following screenshots show the steps necessary to connect to the database as user DB2ADMIN and transmit a query to the database.

Alfresco Workdesk 4.1.1.0 65